ZKTeco Antarvis VMS User Guide, AntarVis2.0 is the professional software for the central management of the front end network monitoring devices, including NVR, DVR, IPC, MDI, SDI and etc. It is to mainly fulfill the functions as real-time preview, video playback, E-map, alarm linkage, decoding on the wall, support the WEB access and mobile phone client access.
AntarVis2.0 program adopts independent setup package, which is easy for setup and contains the various basic functions for demand. It can be generally used for the small-sized project. Since VMS access data directly from device, the connection of one device with several clients has not been recommended for it intensifies tolerance capacity of device.
AntarVis2.0, our Video Management System, is a professional software for central management of the front-end network monitoring devices, including NVR, DVR, IPC, MDI, SDI, etc. It is to mainly fulfill functions such as real-time preview, video playback, E-map, alarm linkage, decoding on the wall, supporting WEB access and mobile phone client access.
The installation package of AntarVis2.0 is an independent executable file, which is easy to set up and contains various fundamental functions you may need. It can be generally used for small-sized projects.
AntarVis2.0 currently supports four protocols including active ZKTeco, ONVIF ,ZKTeco-P and P2P.
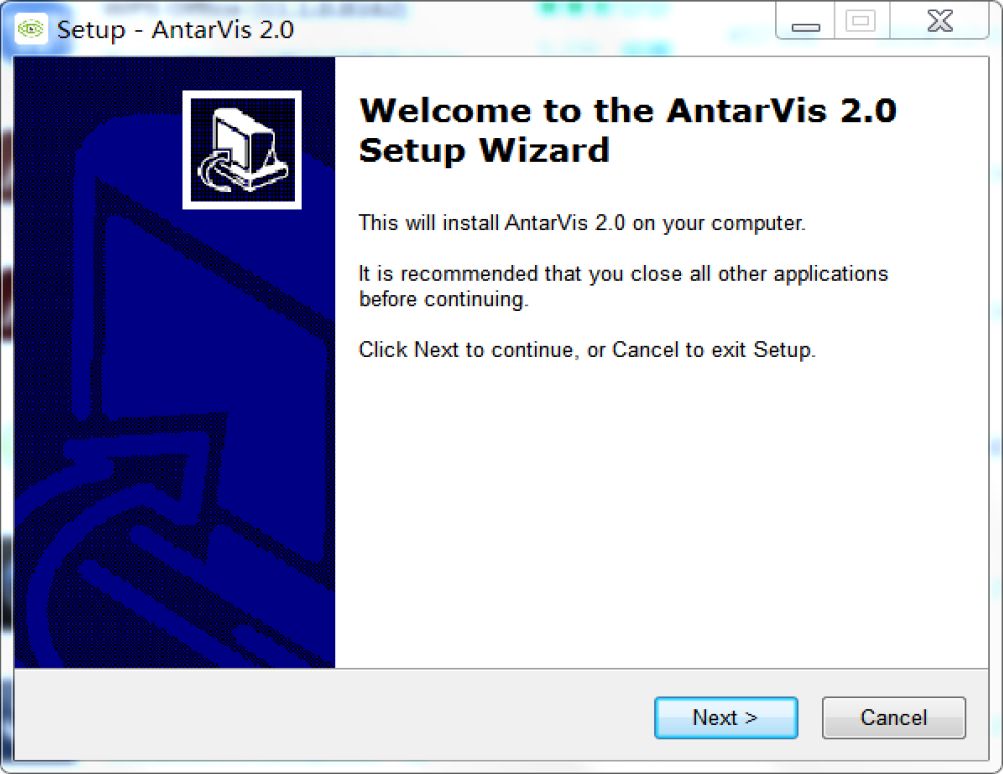
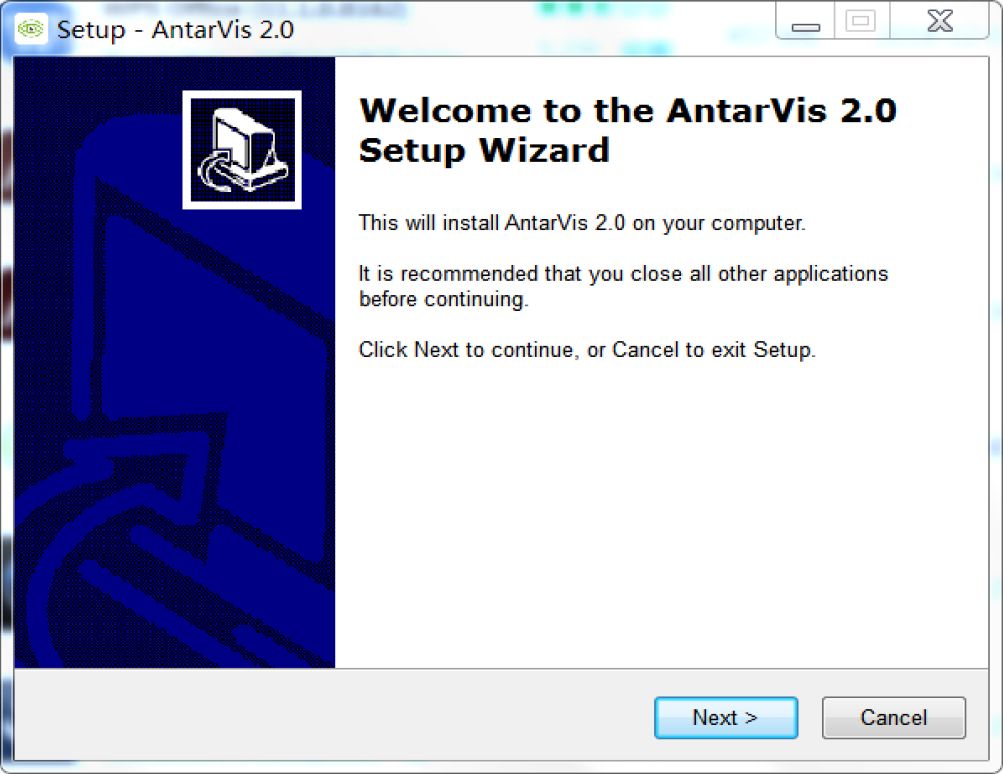
Setup overview, double click to run setup program to open setup wizard:
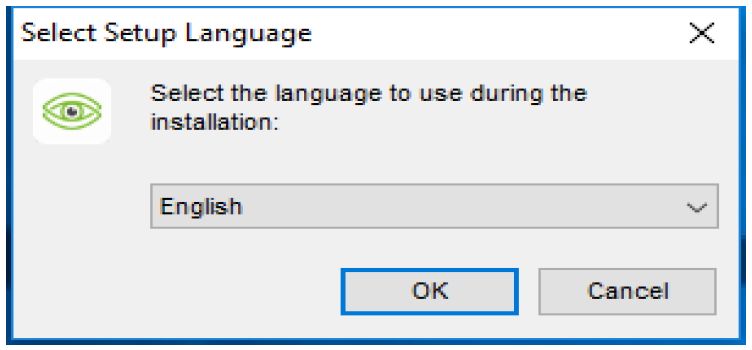
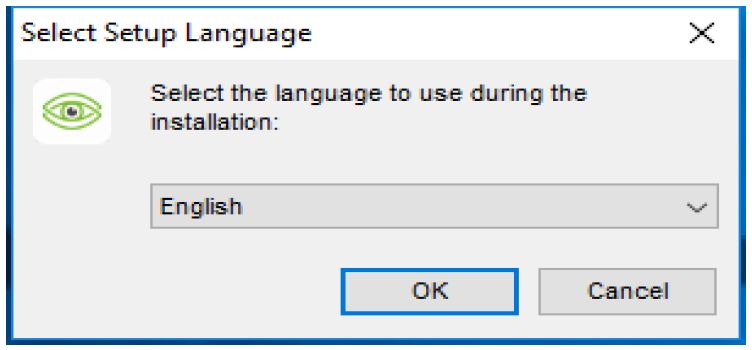
Select setup language, then the program automatically recognizes the system language as default option; if other languages required setup, please select from the drop-down list. The initial program supports simplified Chinese and English. If you need other languages, please contact the distributor for translation; click on “OK” to confirm the setup language selected. Take simplified English as an
example:
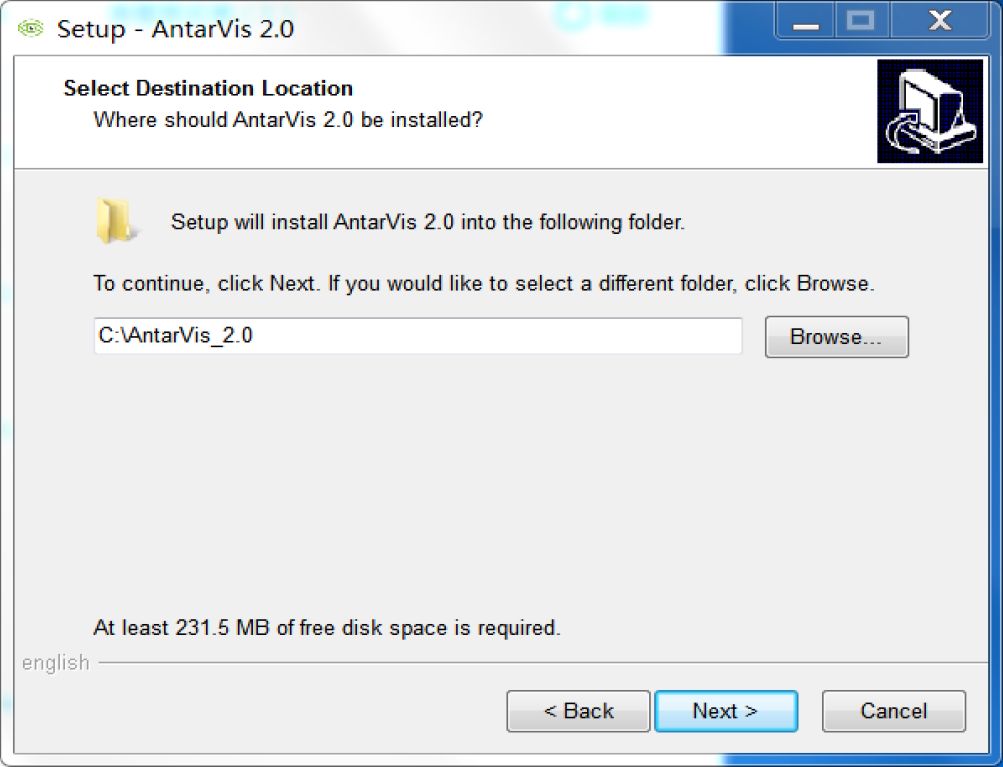
Click on “Next”, then select the setup path:
2 Antarvis2.0 User Manual
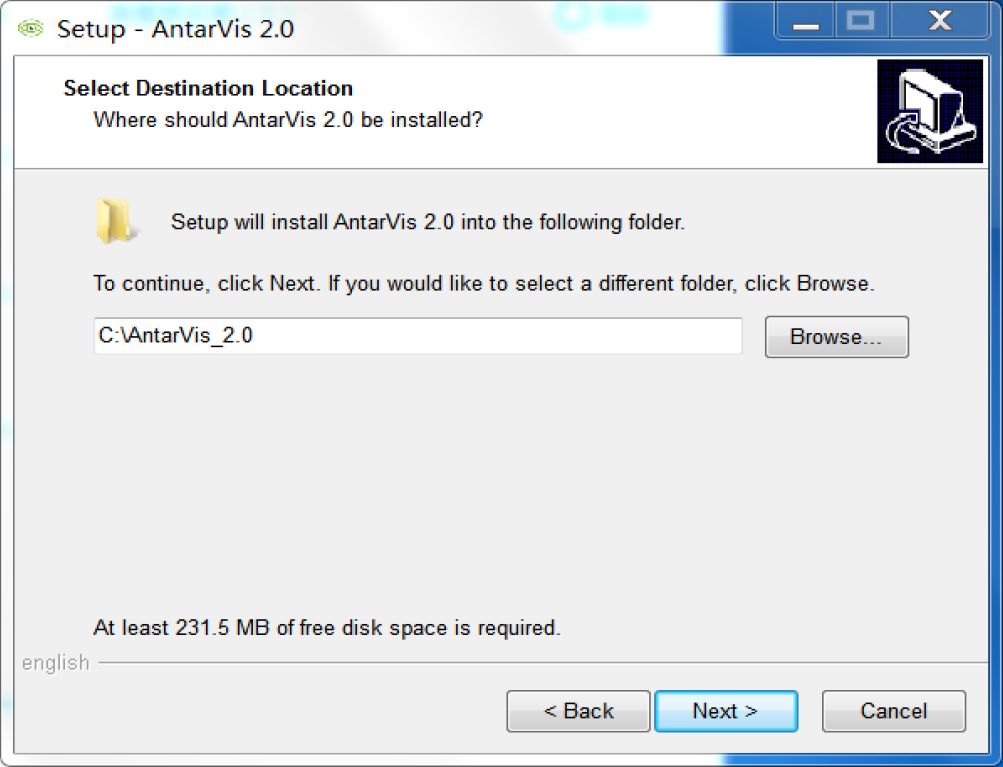
System’s default path is C:\AntarVis_2.0. Users may modify the path as needed. Click on “Next” to continue:
ZKTeco Antarvis VMS User Guide
Read More :
- NVMS 2 Installation Guide
- LILIN Client Installation and User Guide
- FLIR Cloud Client installation and user guideAntarVis2.0, our Video Management System, is a professional software for central management of the front-end network monitoring devices, including NVR, DVR, IPC, MDI, SDI, etc. It is to mainly fulfill functions such as real-time preview, video playback, E-map, alarm linkage, decoding on the wall, supporting WEB access and mobile phone client access.The installation package of AntarVis2.0 is an independent executable file, which is easy to set up and contains various fundamental functions you may need. It can be generally used for small-sized projects.
AntarVis2.0 currently supports four protocols including active ZKTeco, ONVIF ,ZKTeco-P and P2P.
Setup overview, double click to run setup program to open setup wizard:
Select setup language, then the program automatically recognizes the system language as default option; if other languages required setup, please select from the drop-down list. The initial program supports simplified Chinese and English. If you need other languages, please contact the distributor for translation; click on “OK” to confirm the setup language selected. Take simplified English as an
example:
Click on “Next”, then select the setup path:
2 Antarvis2.0 User Manual
System’s default path is C:\AntarVis_2.0. Users may modify the path as needed. Click on “Next” to continue:
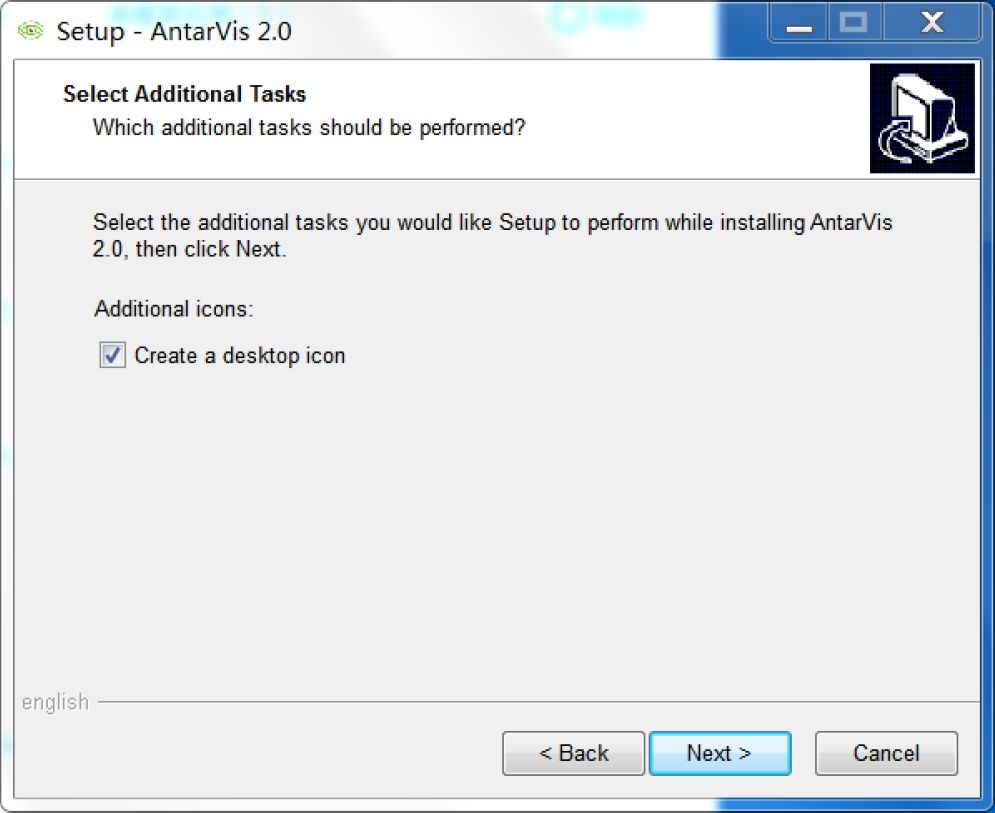
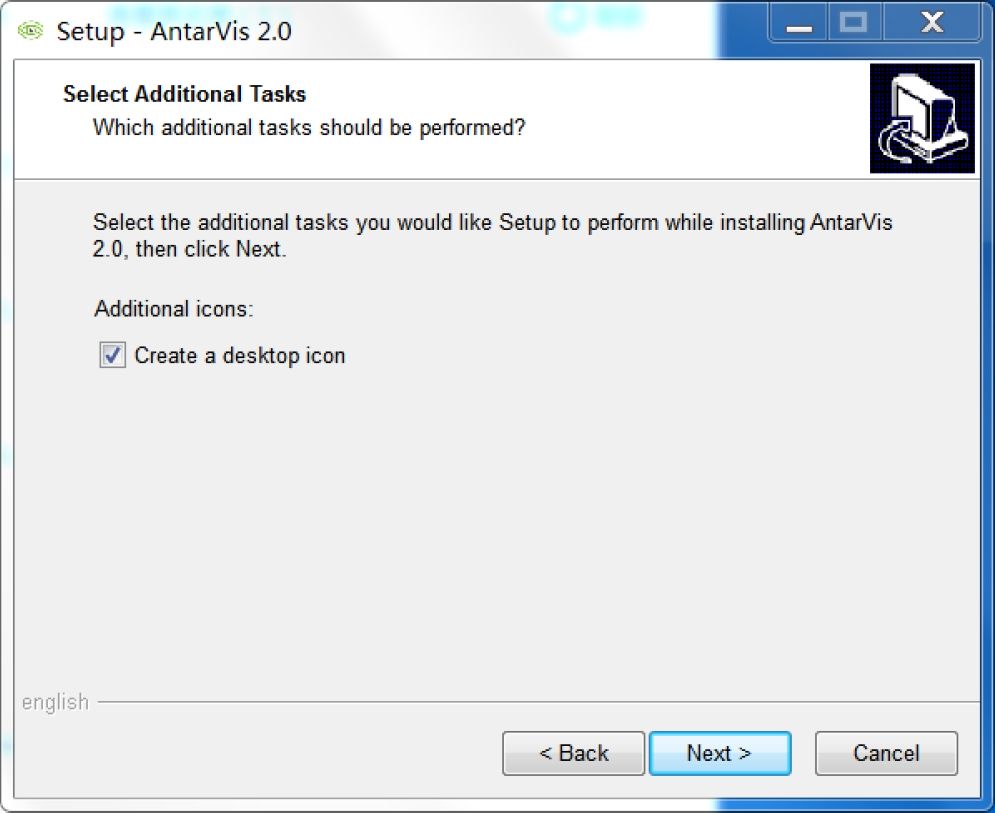
Click “Next” to confirm to create desktop shortcut, continue to complete setup (©note: computer already setup antivirus program may pop-up prompt; please select “allow” with no exception for the normal setup start of the program), the program runs as the setup completed, as shown in figure:
AntarVis 2.0
Login
Forgot password
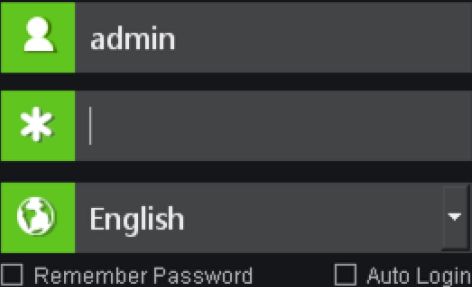
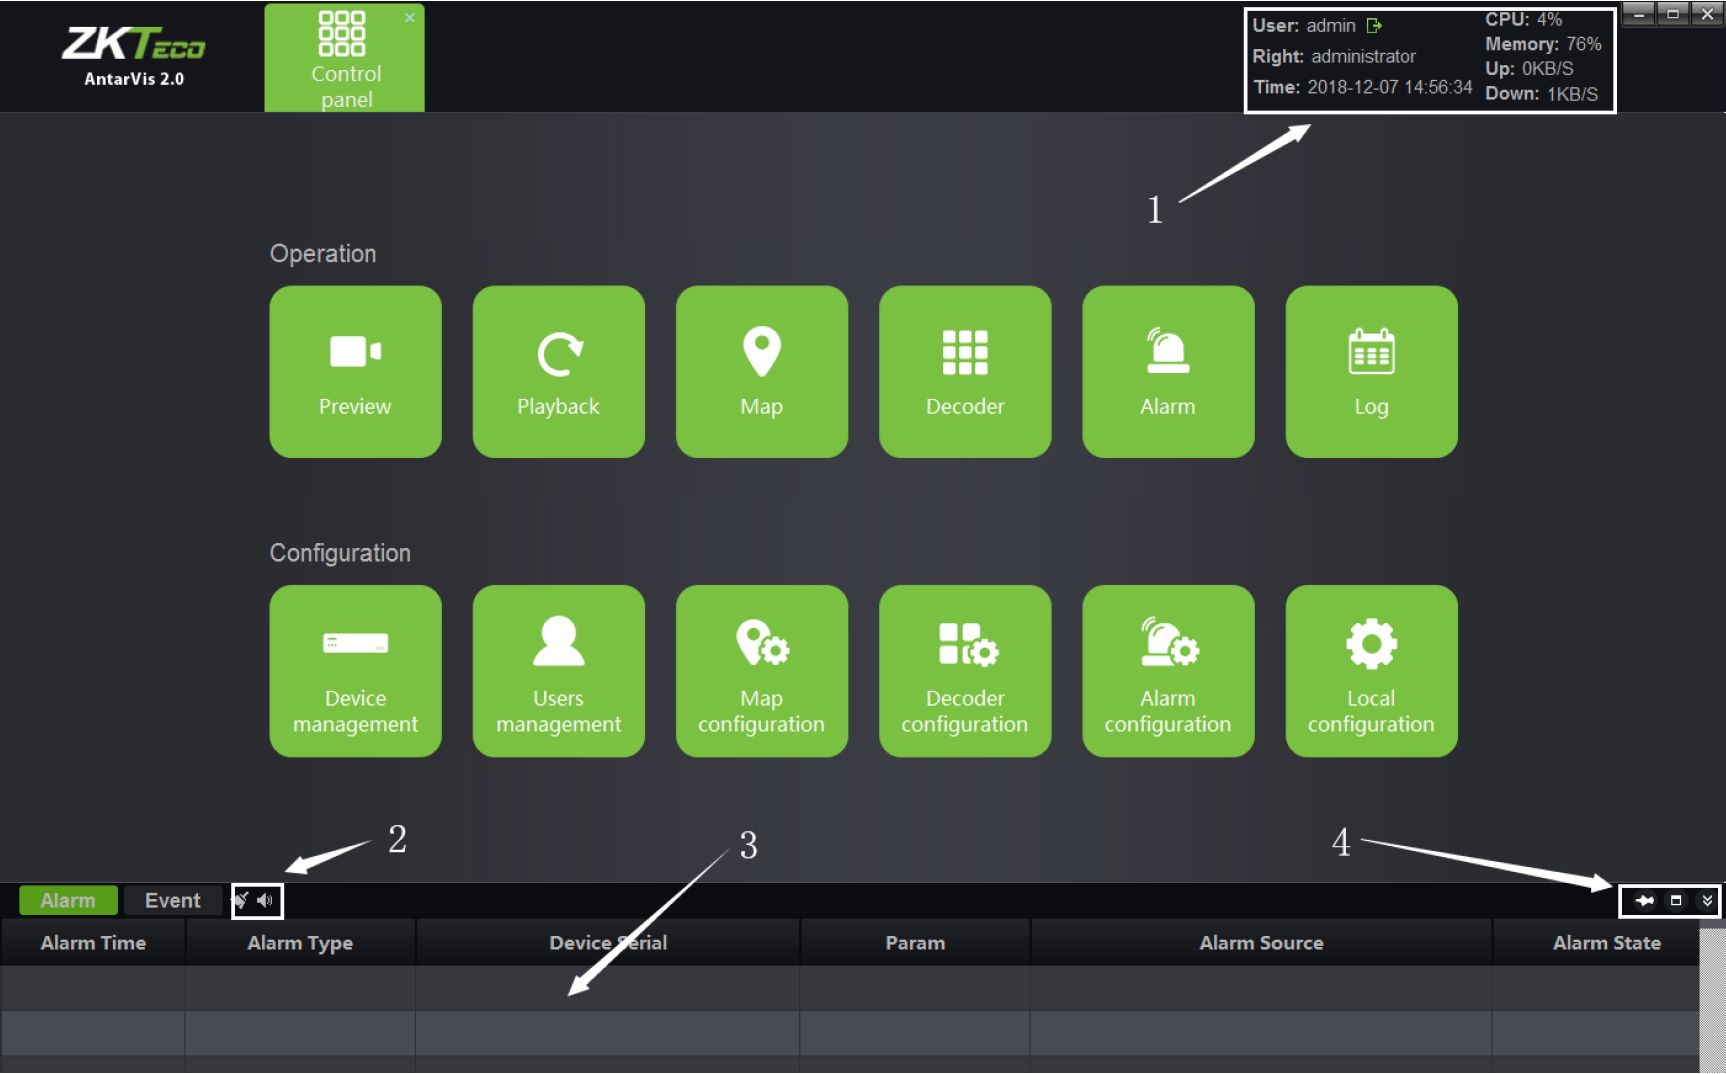
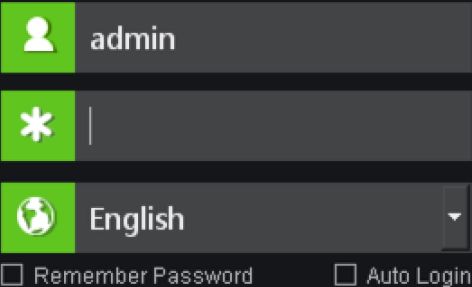
Users may manually switch between languages. The initial user name is admin, and the initial password is 123456. Enter the password, click on “Login”; if you have selected “Remember password”, you do not have to enter the password and the program automatically logs in as “Auto login”. The function of automatic login can be canceled in local configuration. When you forget the password, click on “Forgot password” to get a temporary key for the supplier to help you get a temporary password. Below is the main interface of the program:
Antarvis2.0 User Manual 3
1) Display current user, user rights, current time, consumption of CPU memory and real-time
network data flow; click on
to log out.
2) Display real-time alarm messages and event messages; double-click on the alarm message to
open the preview of the current alarm channel for users to view alarm in real-time manner.
3)
The functions in the toolbar
, from left to right, are: clear alarm/event message, close
sound/open sound.
4)
The functions in the toolbar
, from left to right, are: stay window, window max,
hide window.
Click on “Device management” on the main interface.
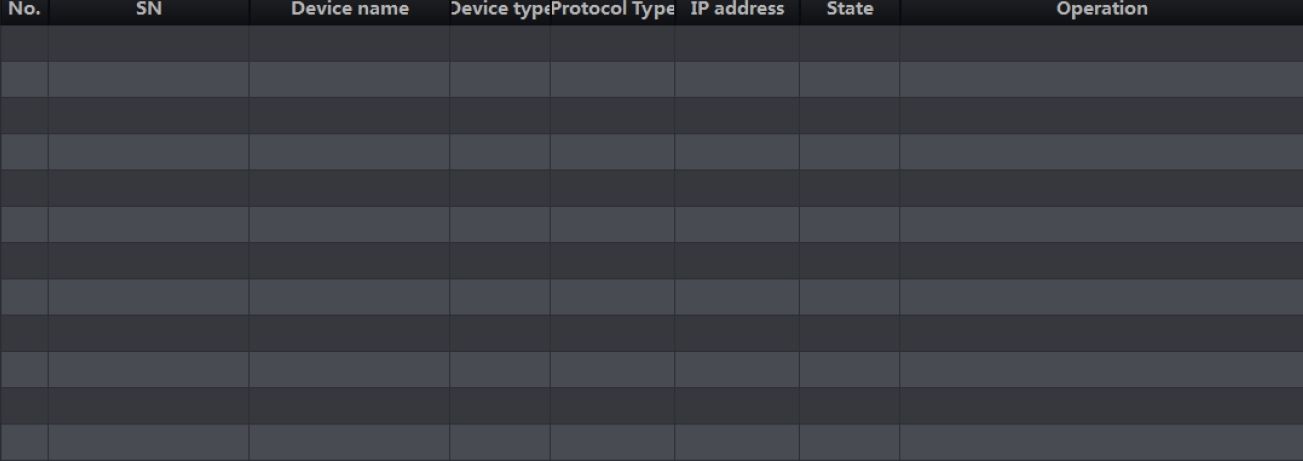
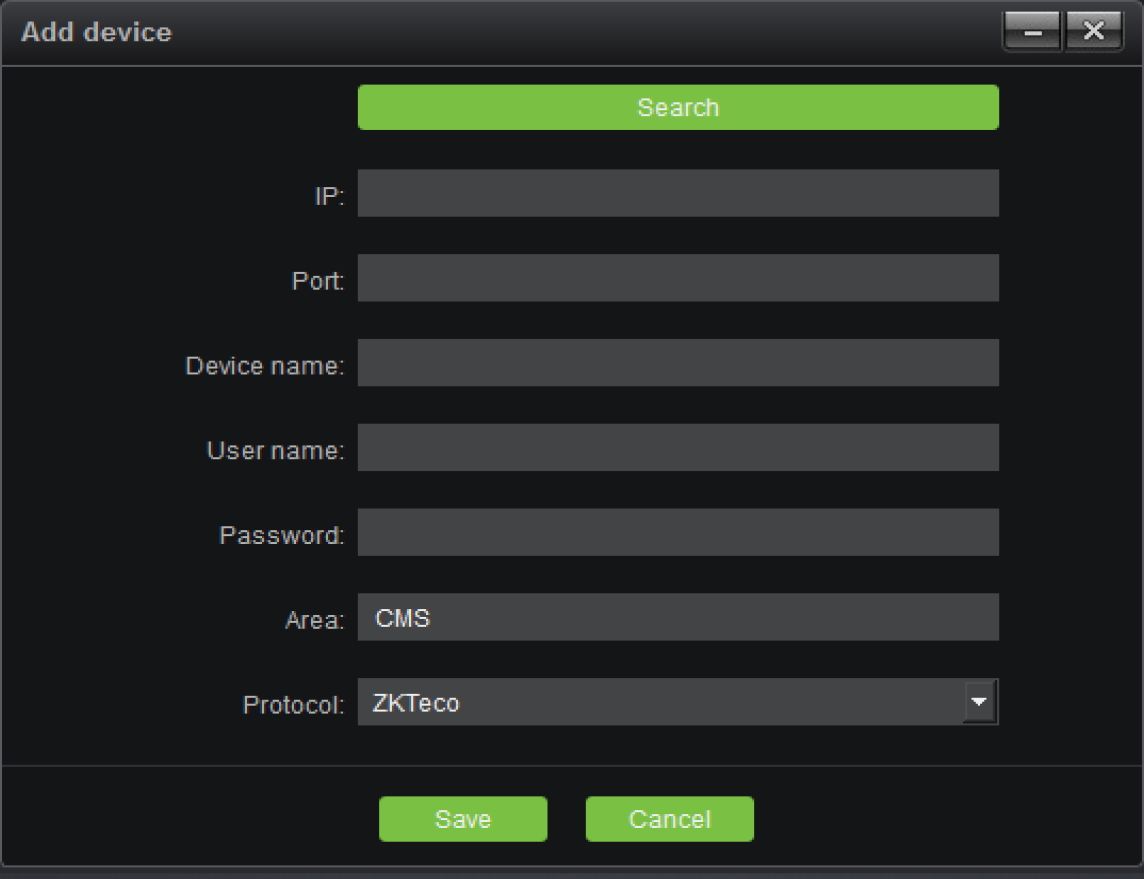
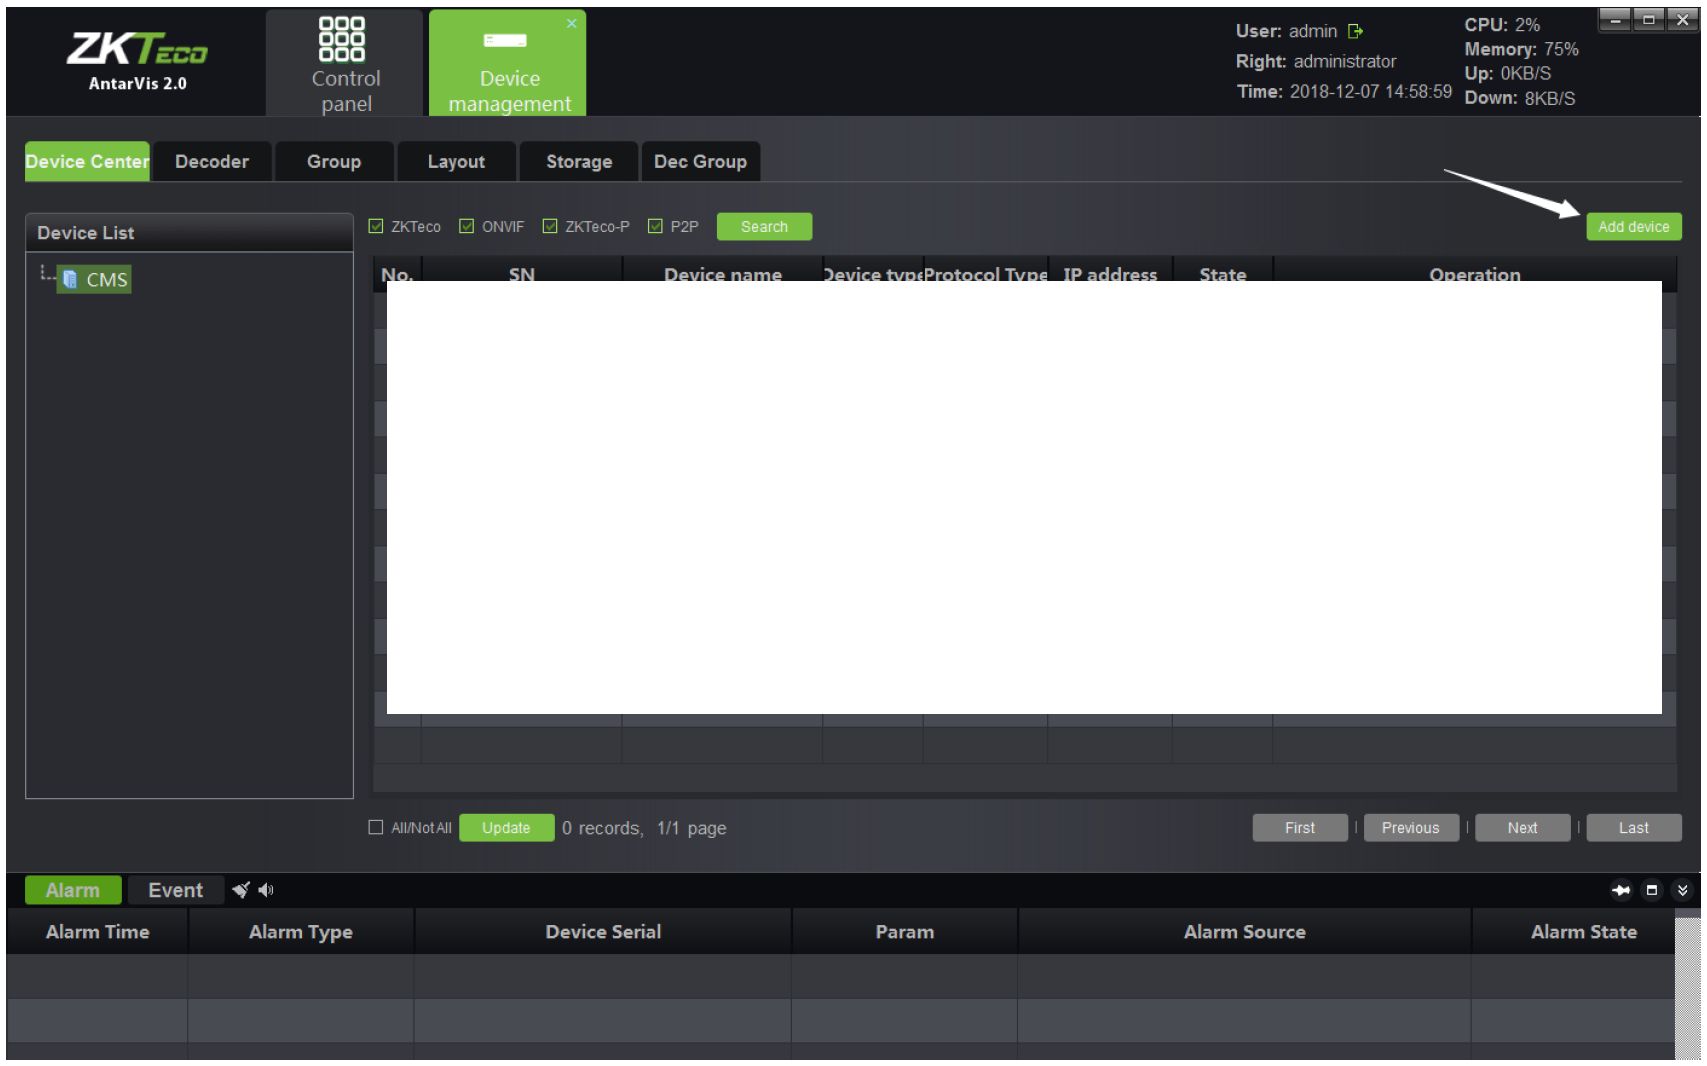
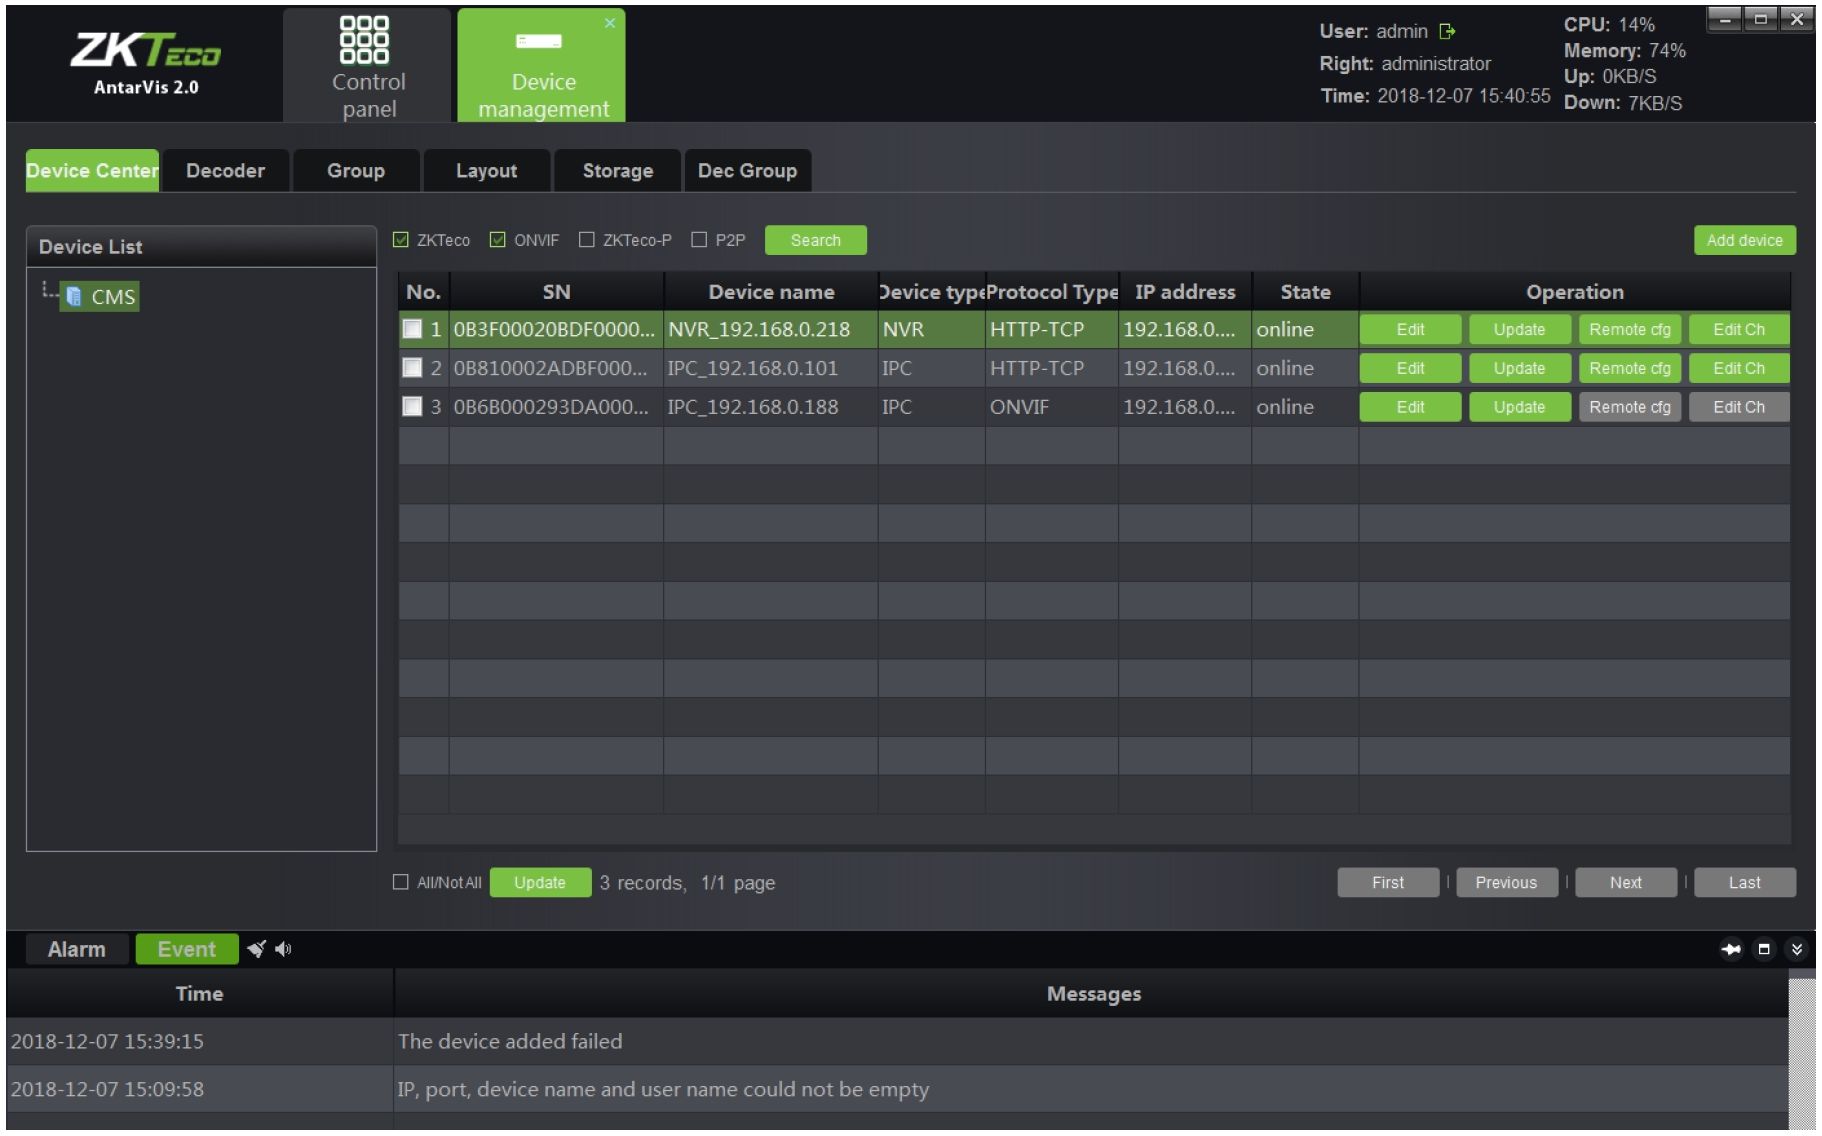
This interface displays relevant information of all devices added to VMS, including device type, protocol type and online and offline status; click on “Add device” at the top right corner, the “add device” interface will then pop up:
4 Antarvis2.0 User Manual
Select a protocol. ZKTeco protocol is an independently developed protocol of our company. Front-end devices should support ZKTeco protocol. ZKTeco’s front-end devices currently used for shipping basically supports this protocol. The ZKTeco-P protocol is the protocol used by PTZ domes.ONVIF protocol is the joint ownership protocol for access to third-party devices that support this protocol.
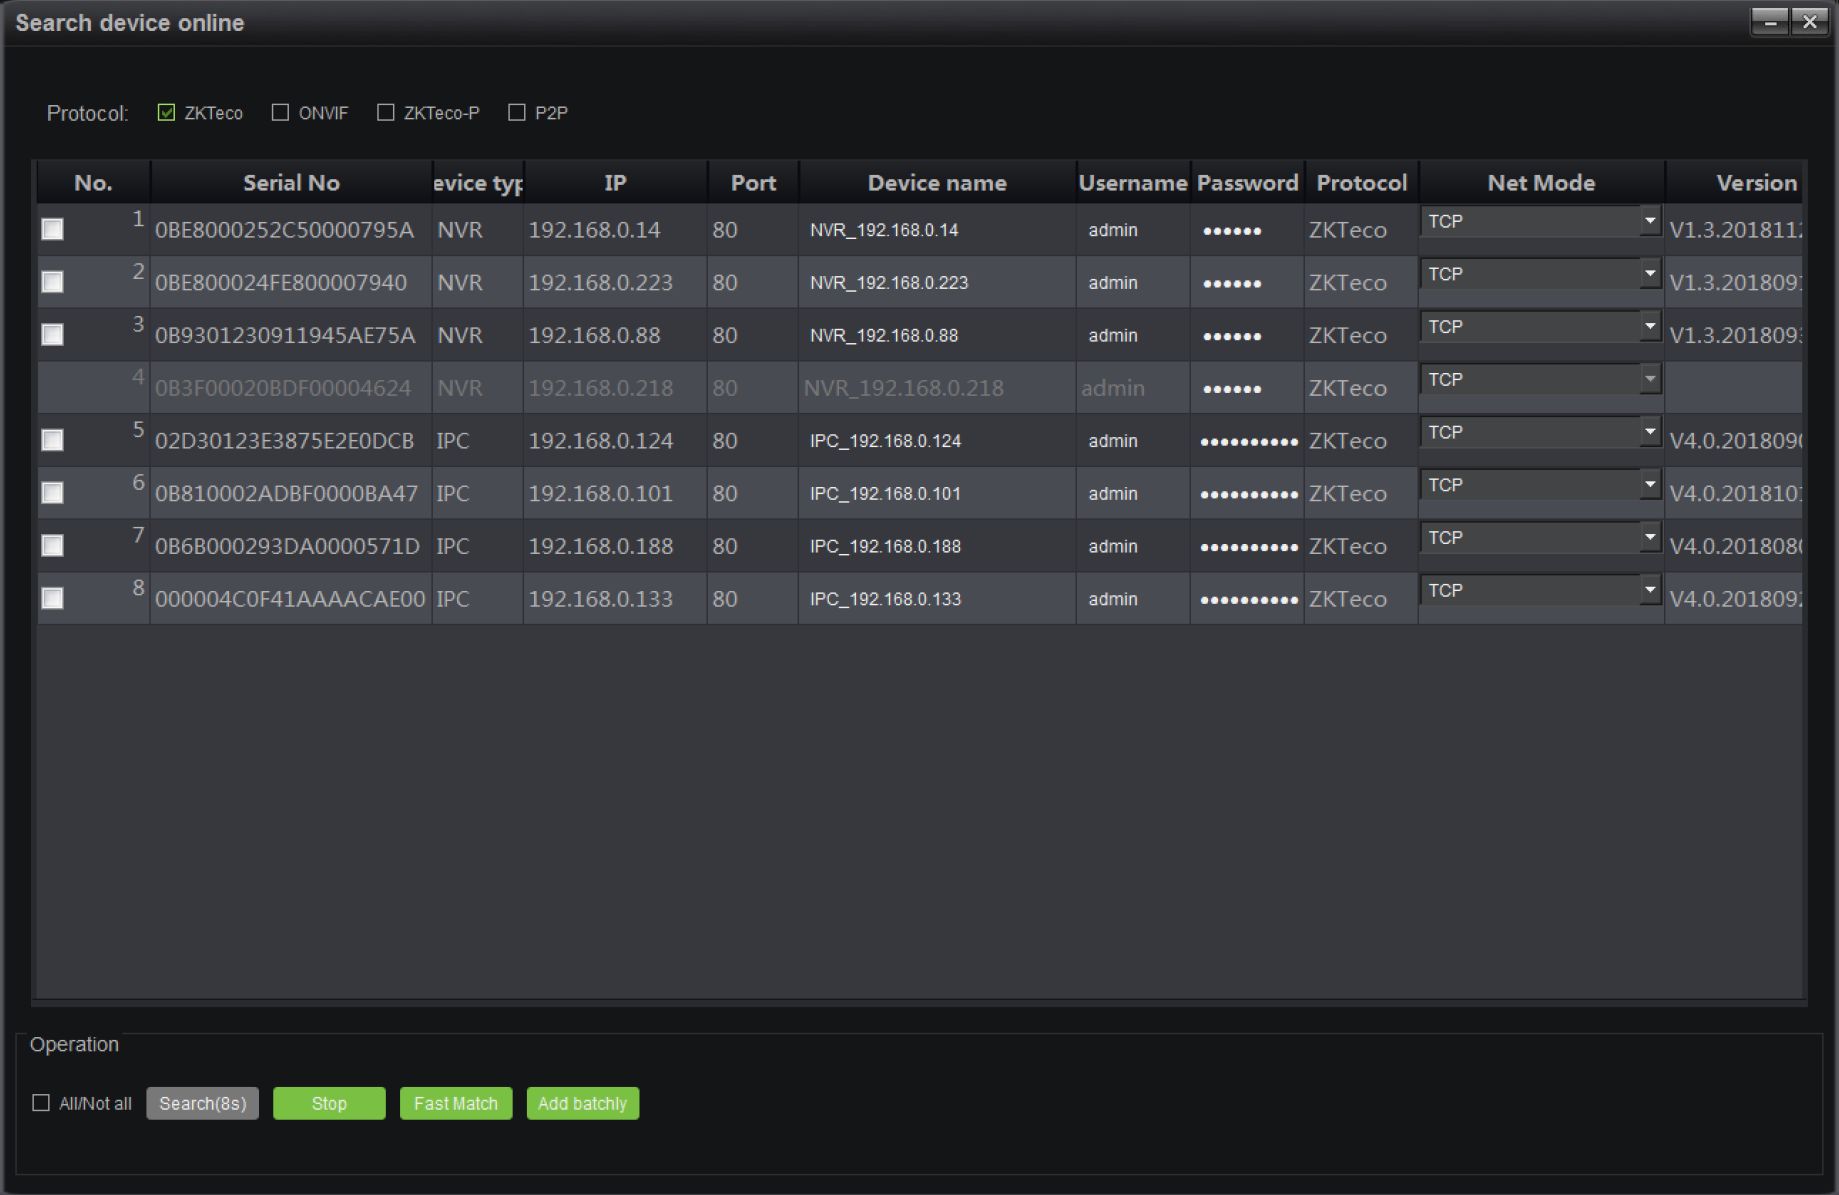
Select the protocols as needed, it is to click on “Search” to search for online devices in the LAN. Take ZKTeco protocol as an example:
Antarvis2.0 User Manual 5
©Note: devices displayed in gray are those devices that have been added to the device list; click on “IP address” to sort them according to the IP address of the devices.
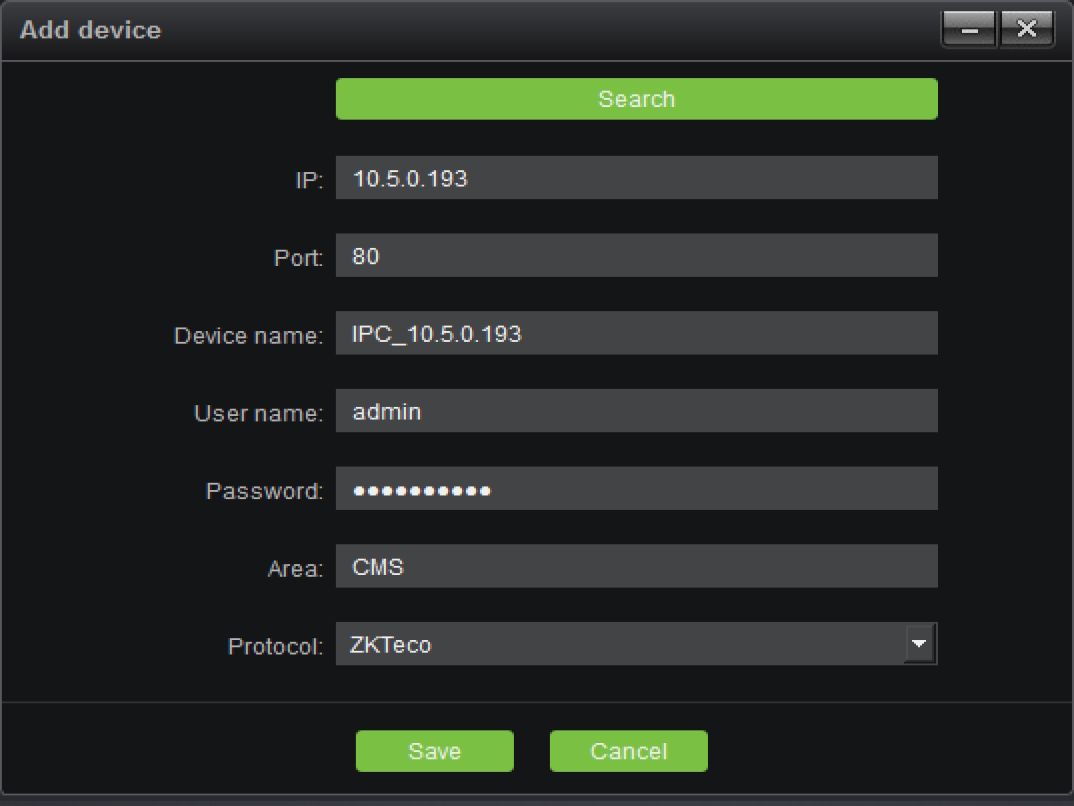
Select the device to be added, click on the “Select” button, as shown below:
Device Name: define by the user as needed.
User Name: user name of the device.
Password: password of the device.
Enter correct user name and password to add the corresponding device into the device list. Also, the front end using the ZKTeco protocol does not require a password. (©Note: for safety consideration,
6 Antarvis2.0 User Manual
Devices using the ONVIF protocol,the password can’t be retrieved and the password of the device needs to be manually filled in; no password filled in or wrong password will lead to add log-in failure.) Fast match function means when there are multiple devices with the same username and password, choose fast match, then you just need to input the username and password for one time.
After adding the equipment, the interface is as shown below:
We can edit and delete devices, call remote configuration and modify channel names here. The remote configuration is only supported by ZKTeco protocol; calling the remote configuration can view or modify related parameters of the front-end device. Modifying the channel name is only supported by ZKTeco protocol; It is quick and convenient to modify channel name of the front-end device .
Antarvis2.0 User Manual 7
□□□
□□o
□□a
Control
panel
Device CenterB Decoder Group
_ »
Device
managementLayout Storage Dec Group
Decoder name Decoder type
User: admin B CPU: 10% “■
. . … Memory: 72%
Right: administrator ..
Up. UKd/o
Time: 2018-12-07 15:42:25 Down’ *|KB/S
IP address
0 records, 1/1 page
First Previous Next Last
Alarm Event < 4» -*• B Time Messages 2018-12-07 15:39:15 The device added failed 2018-12-07 15:09:58 IP, port, device name and user name could not be empty Switch to decoder interface. This interface, which is similar to that to add a device, displays all
decoders added to the server at present and the online and offline status of the decoders. The added
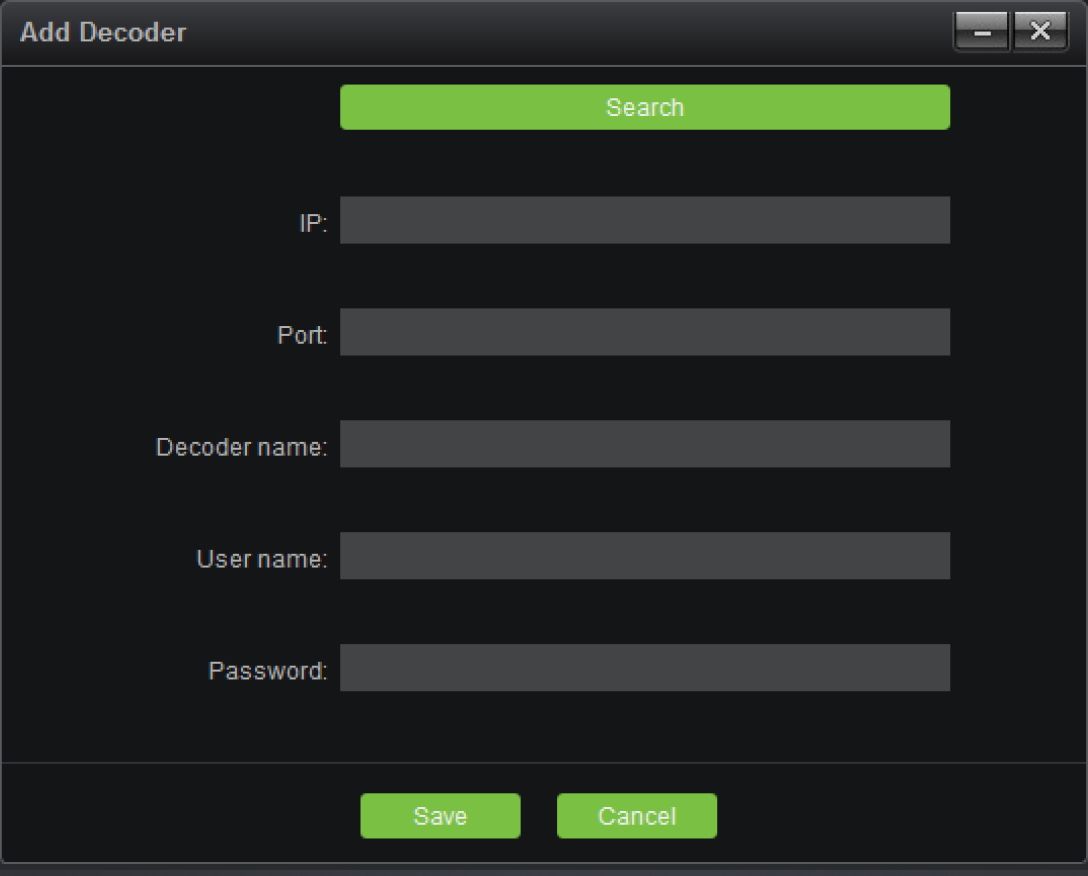
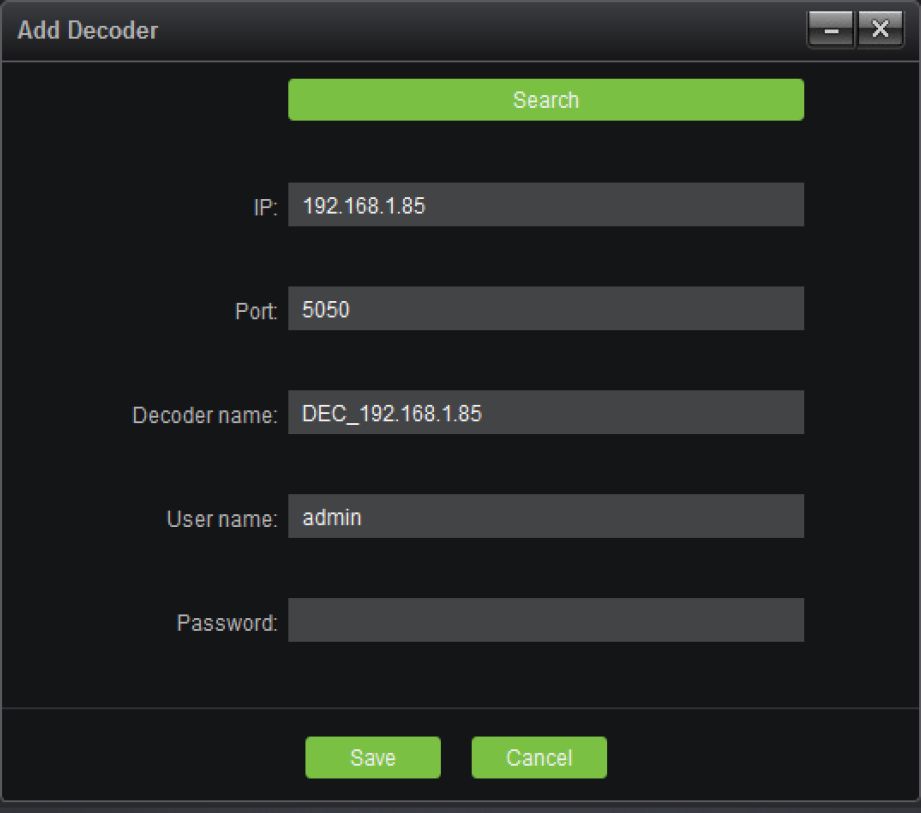
decoders can be edited and deleted; in case of adding a new decode, click on the
Add Decoder
button in the top right corner:
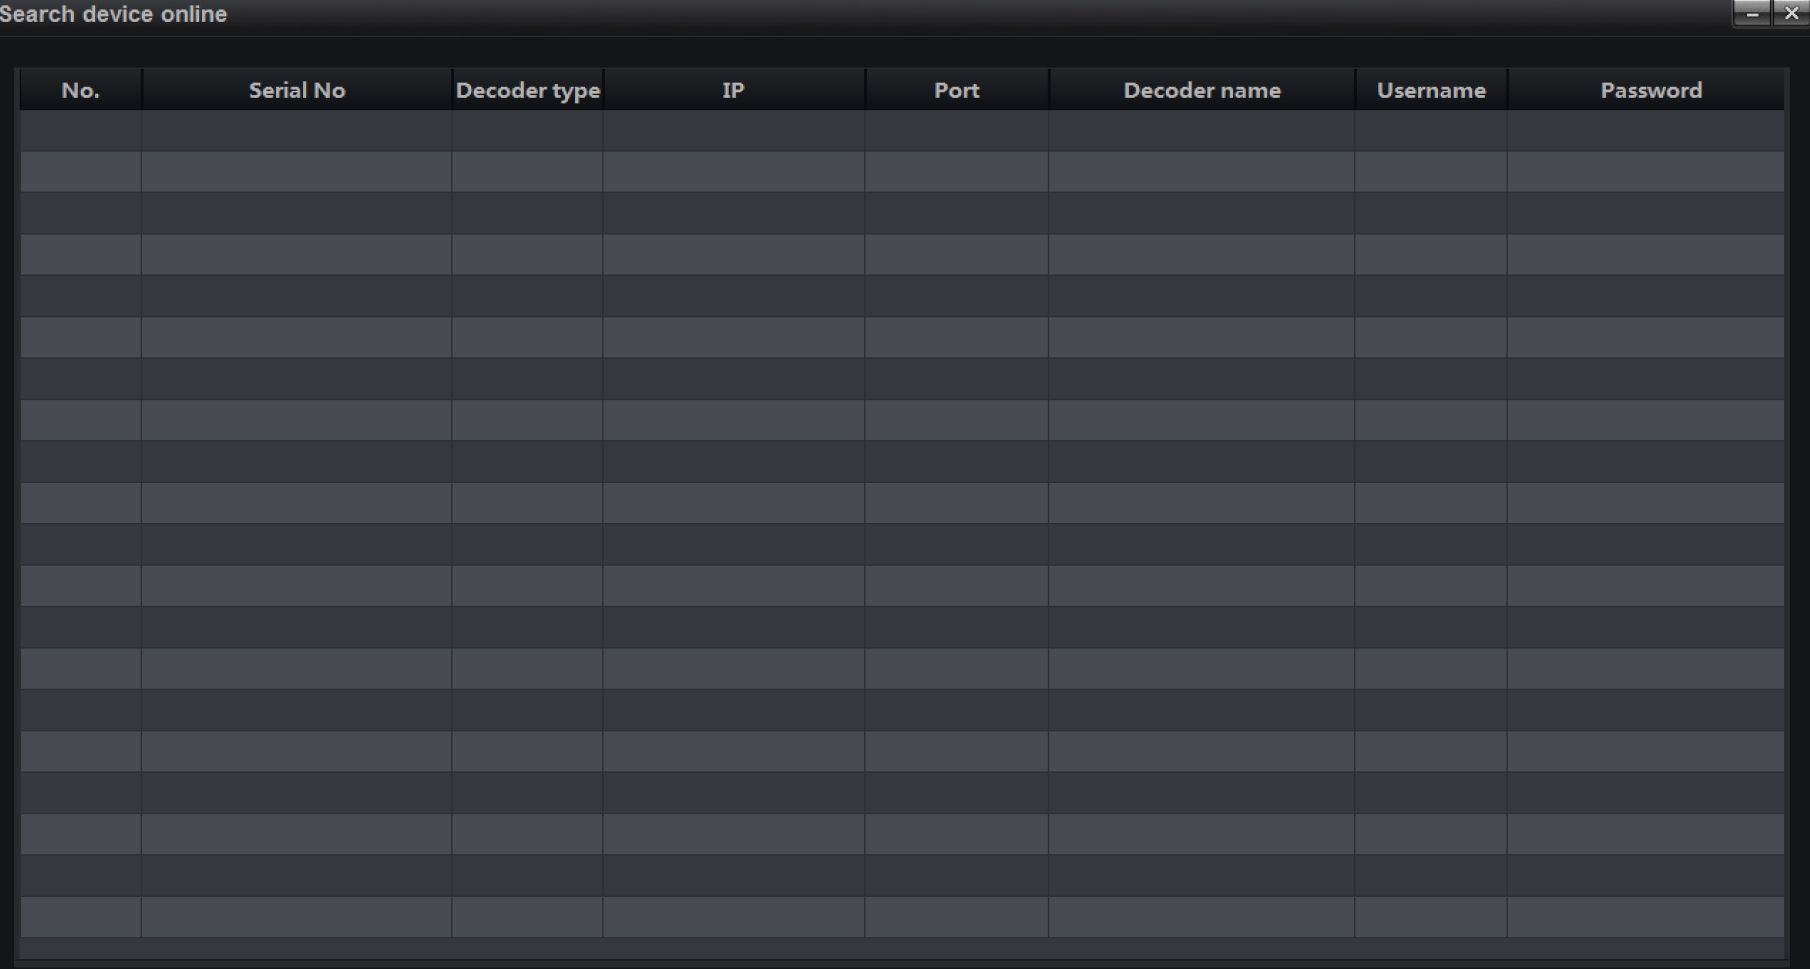
Click on “Search” to search for all online decoders in the LAN; similarly, the decoder added to the
8 Antarvis2.0 User Manual
decoder list will display in gray and can not be added again:
Operation
□ All/Not all | Search Stop Fast Match Add batchly
Select a decoder to be added, click on “Select”:
Decoder Name: users may define and modify the name as needed.
User Name: the default setting is admin.
Password: the default setting is null.
When it is completed, click on “Save” to add the decoder to the server; in case you want to add a group of decoders, select multiple decoders on the search interface, fill in the right password, click on “Add batchly” to add multiple devices with one key.
Antarvis2.0 User Manual 9
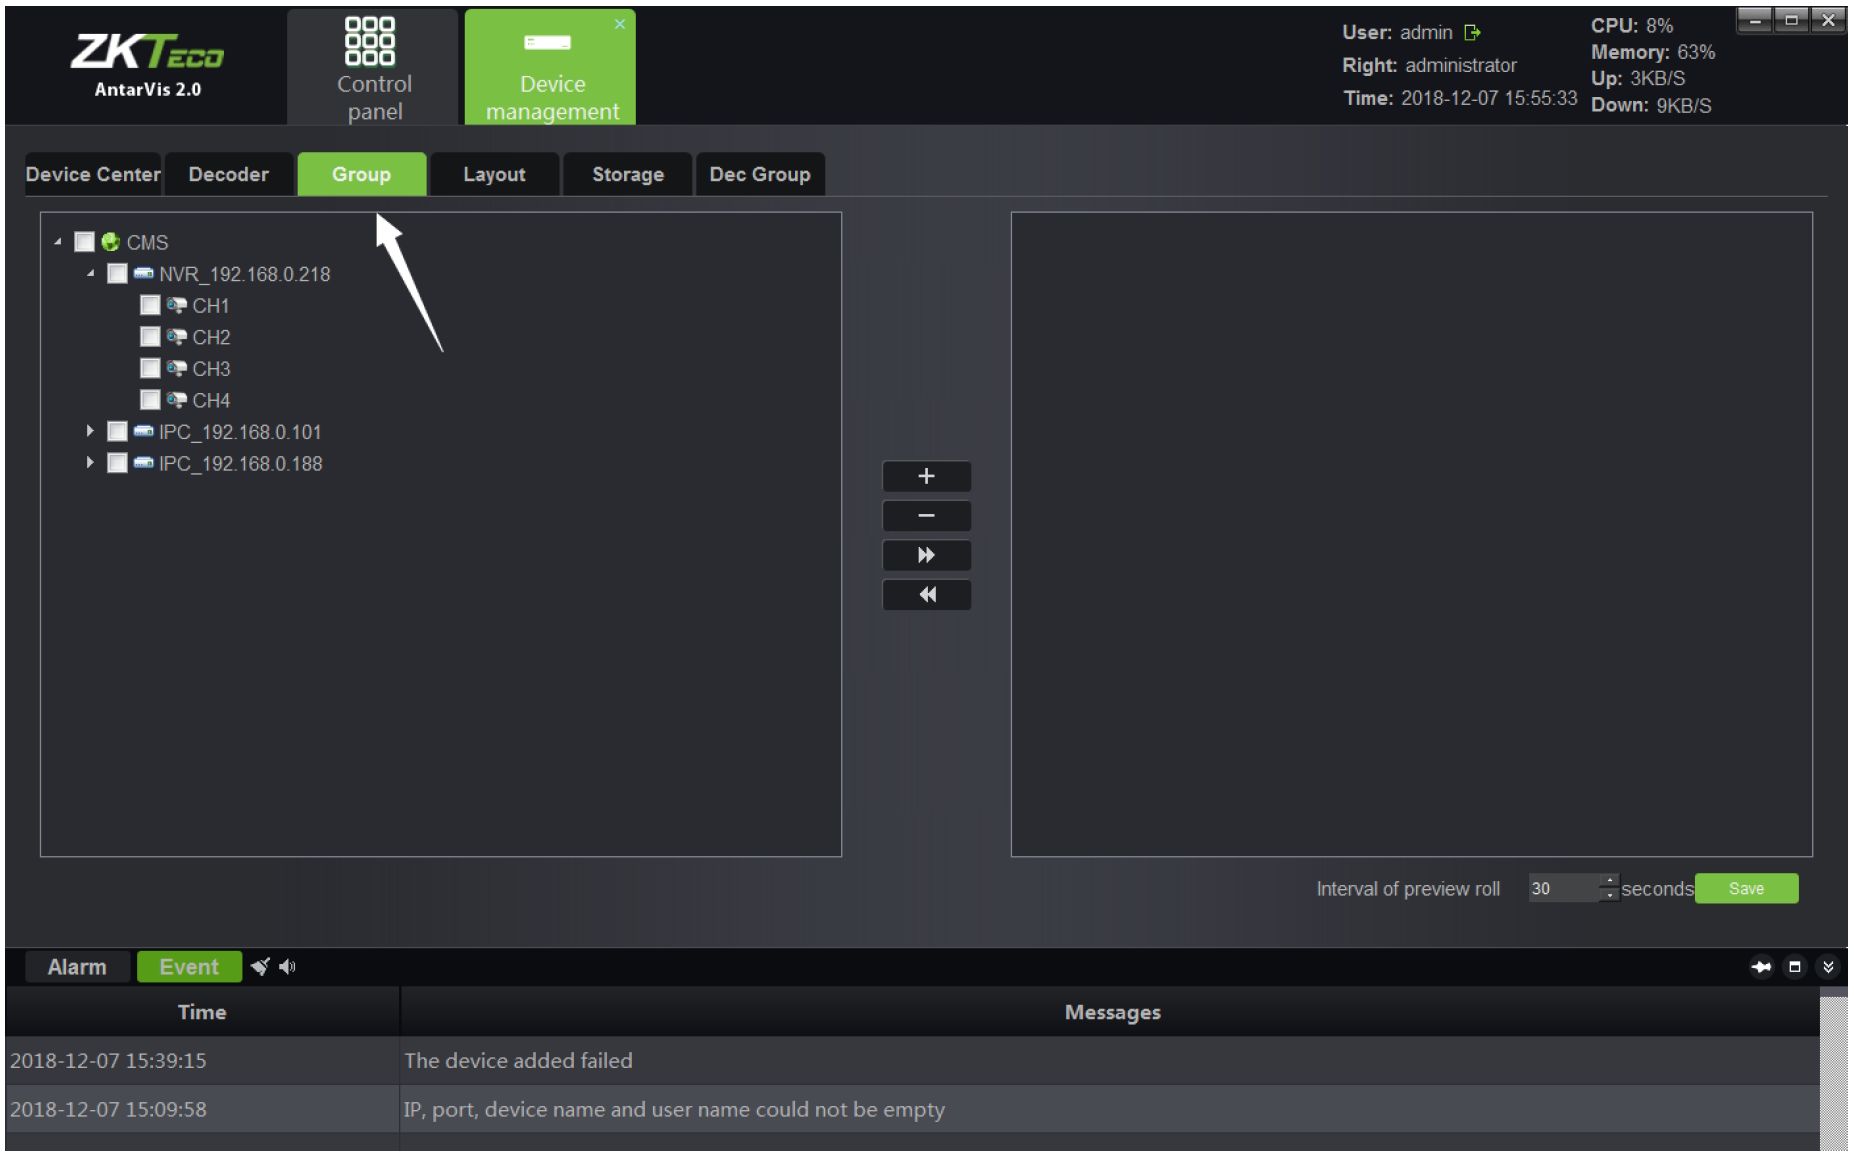
Switch to the page of “Group” in the device management module, as shown in the figure below:
Click on “+” button to add group.
Fill in the group name, click on “Save” to create the group; when it is succeeded, select the device
channel on the left, then select a group on the right, click on the
button to add the
relevant channels to the corresponding group; the actual application of grouping will be described
in the preview module. When adding is completed, the interface will look like below:
10 Antarvis2.0 User Manual
ZKT^ AntarVis 2.0
□□□ □□□ □□□ Control panel
_ * Device management
User: admin & CPU: 2% — —’ _. . . . . . . . Memory: 63%
Right: administrator Up;
Time: 2018-12-07 15:58:14 Down: 2KB/S
X Device Center Decoder Group Layout Storage Dec Group ‘ ■ ft CMS ■< ■ ®NVR_192.168.0.218
- ¥ CH1
- df CH2
- >CH3
- ? CH4
* ■•IPC_192.168.0.101
» ■ *»IPC_192.168.0.188
+ *
*
- s»NVR_192.168.0.218-CH1
- «»NVR_192.168.0.218-CH2
‘ BM2
- e»NVR_192.168.0.218-CH3
- ®»NVR_192.168.0.218-CH4
- e?IPC_192.168.0.188-CH01
- «WPC_192.168.0.101-CH01
Interval of preview roll 30 ‘ seconds] save Alarm Event ■< 4» Time
-H n Messages
IB 2018-12-0715:57:45 Add channel success!|IPC_192.168.0.188-CH01] 2018-12-07 15:57:45 Add channel success![IPC_192.168.0.101-CH01] Similarly, check the channel in the group and click on
to remove the channel from the
group.
Switch to the page of “Layout” in the device management module, as shown below:
ZKT^
AntarVis 2.0
□□□ □ □□ OOÛ
Control
panelDevice
managementUser: admin & CPU: 4%
„ . . .. Memory: 70%
Right: administrator Up. H8|<B;S
Time: 2018-12-07 15:59:20 Down* 31^3/5
Device Center Decoder Group I Layout Storage Dec Group
Add Layout
No.
Layout Name
Dwell Times(s)
Window Count
Division Type
Operation
0 records, 1/1 page
First Previous Next Last
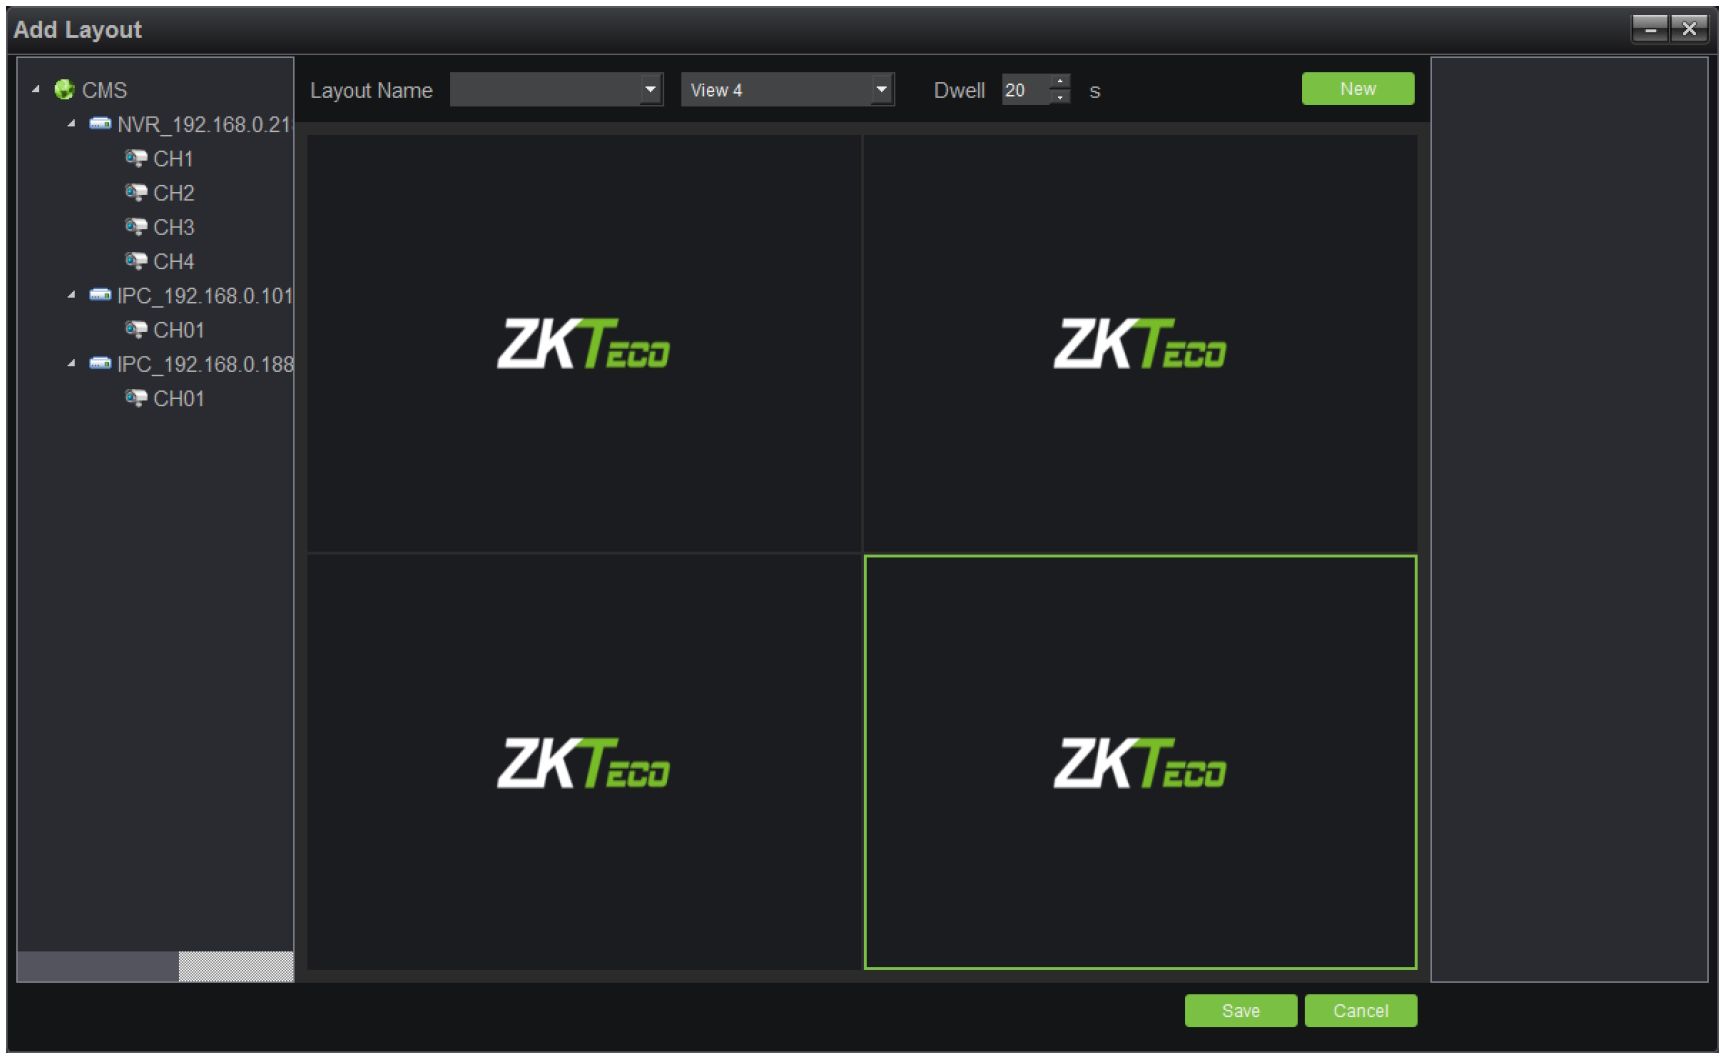
Alarm Event < 4» n « Time Messages 2018-12-07 15:57:45 Add channel success! [IPC_192.168.0.188-CH01] 2018-12-0715:57:45 Add channel success![IPC_192.168.0.101-CH01] Click on the button “Add layout”, then the system will pop up this window:
Antarvis2.0 User Manual 11
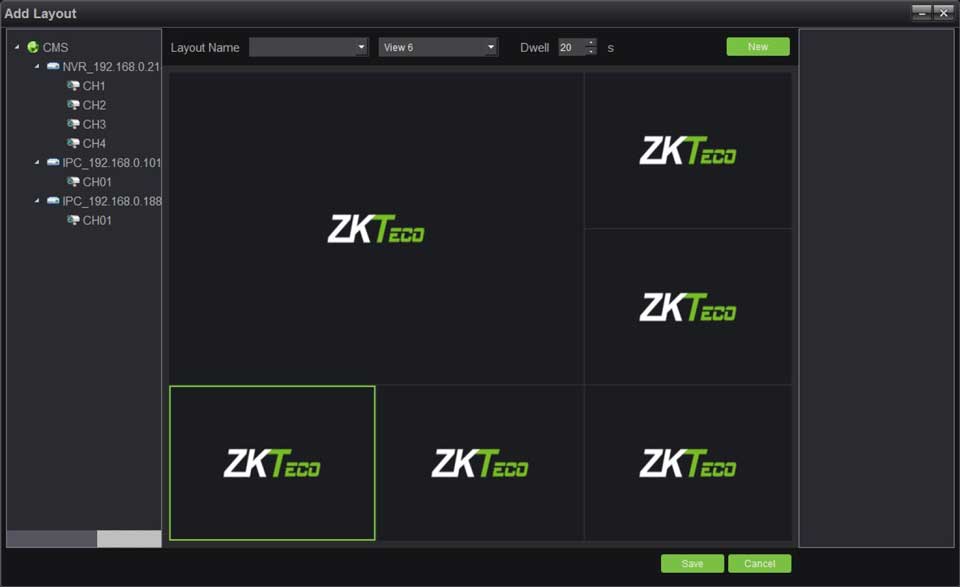
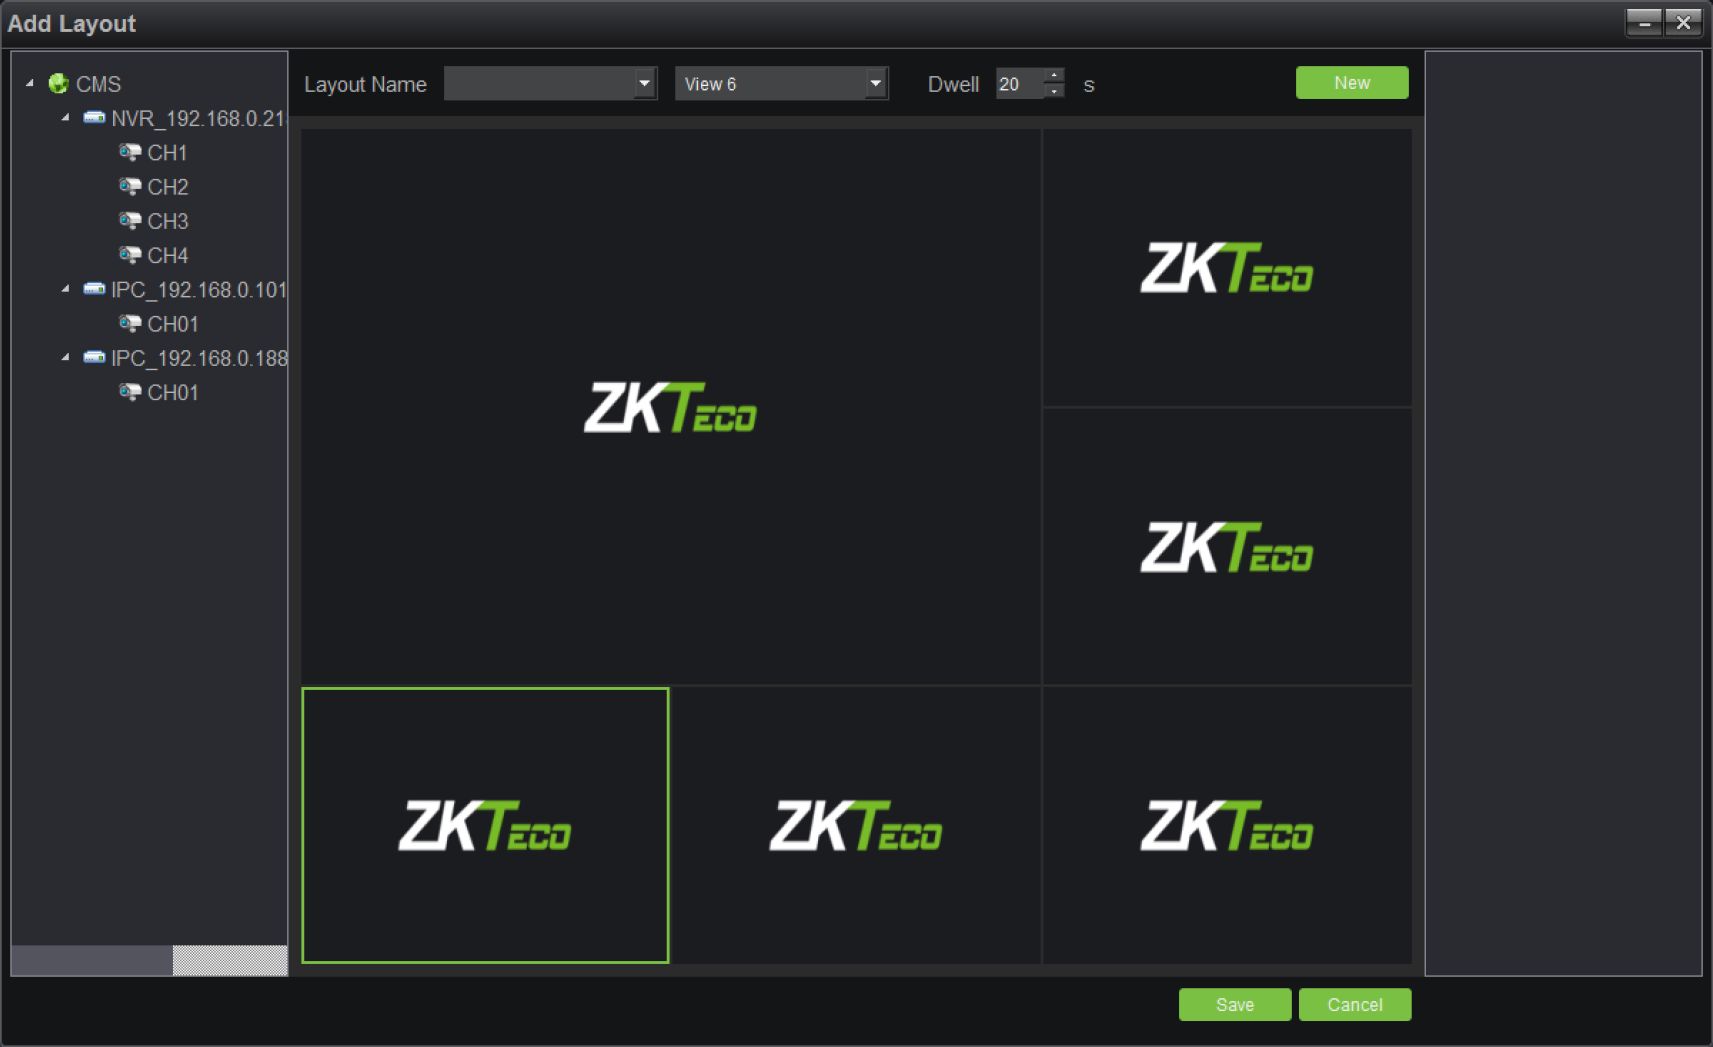
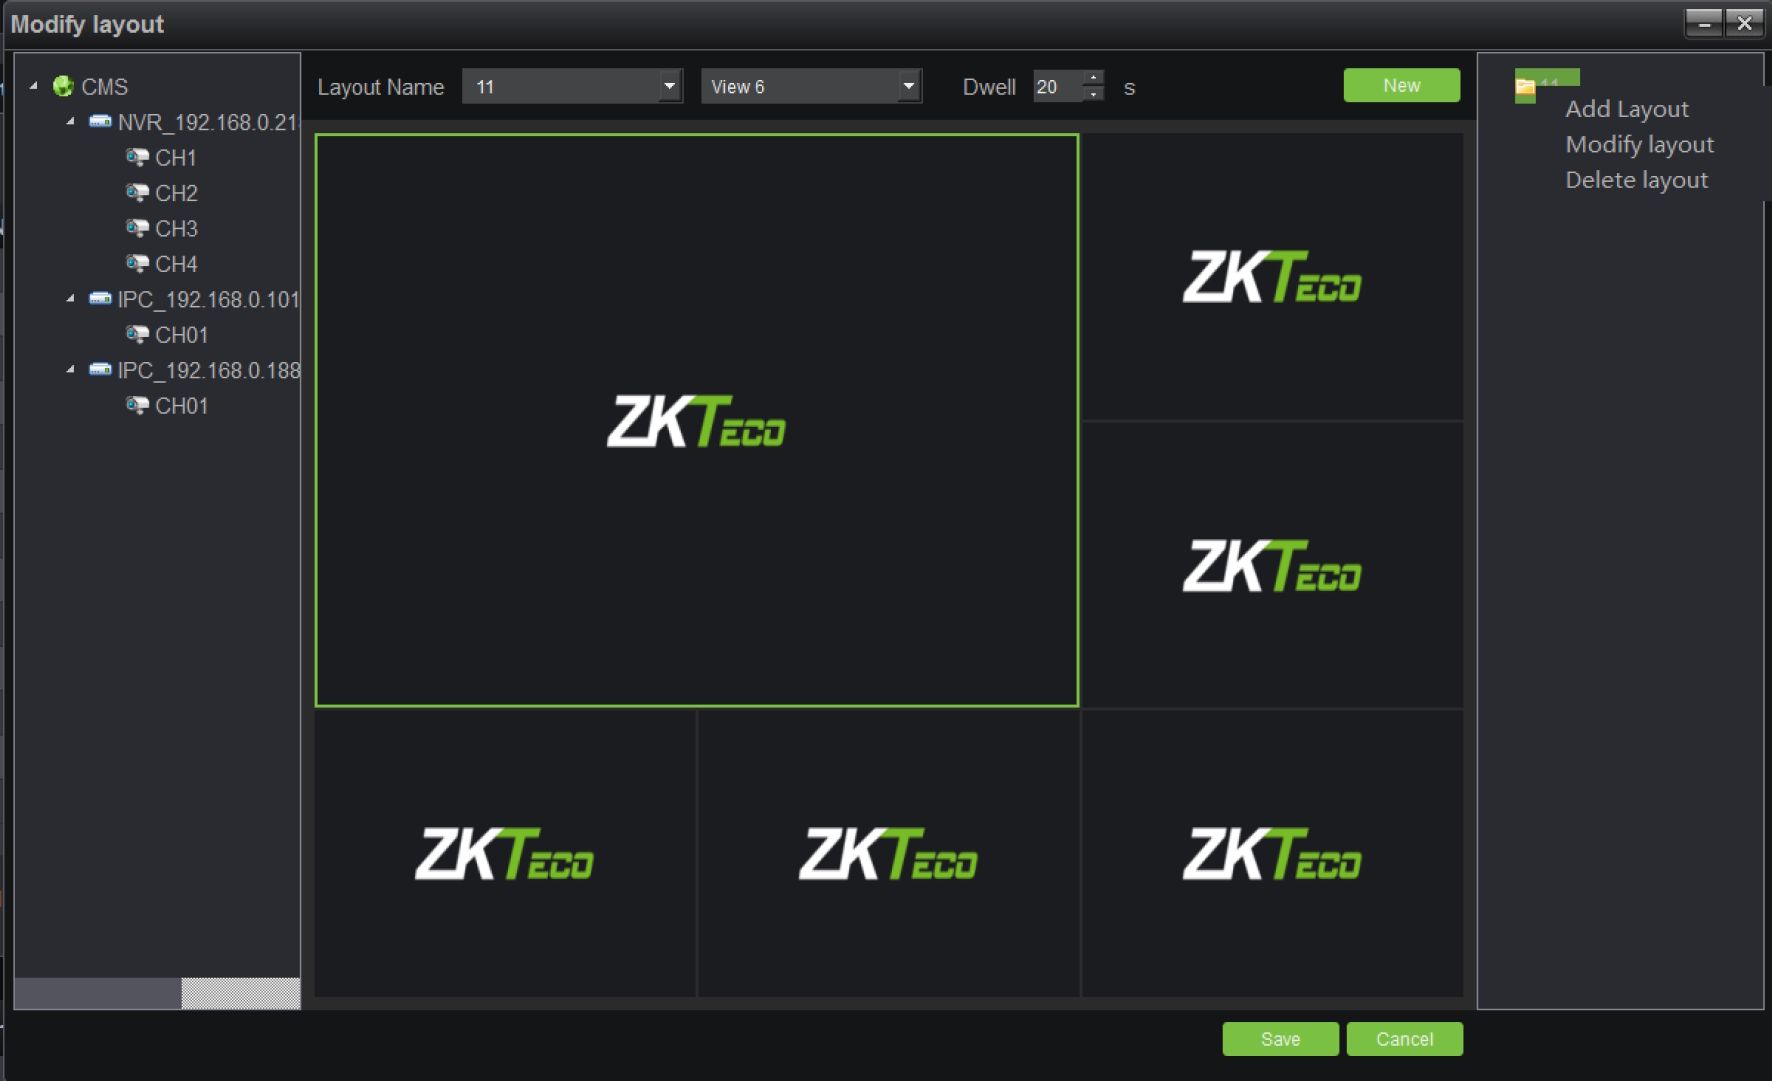
Fill in the name of a layout, select the number of split screens as needed. Types of split screen include standard split and wide-screen split, among which, pictures under ordinary split screen and wide-screen are displayed in 16:9 and 1:1, respectively; select the duration of stay from Dwell option. and then drag the channel for layout. Take 6 split screens as an example:
Click on “New” or “Save” to complete layout settings. Then, the saved layout information shall be
displayed on the right side:
12 Antarvis2.0 User Manual
Right-click on the existing layout to edit the layout. Applications of the layout function are further elaborated in the preview module.
Switch to the page of “Storage” in the device management module, as shown below:
ZKTecü
AntarVis 2.0
□□□
□□O □□□
Control
panel
— *
Device
managementUser: admin G» CPU: 8%
_. . . . ■ ■ . Memory: 71%
Right admlnlstratar Up;
Time: 2018-12-07 16:15:30 Down* 3KB/S
Device Center Decoder Group
Layout I Storage Dec Group
Alarm Event < 4) Alarm Time Alarm Type Device Serial Param Alarm Source Alarm State H 2018-12-07 16:14… Motion detection 0B3F00020BDF00004624 4 NVR_192.168.0.218-CH4 Stop Alarm H 2018-12-0716:14… Motion detection 0B810002ADBF0000BA47 1 IPC_192.168.0.101-CH01 Stop Alarm SB This page displays relevant information of the storage server, including the server name, server
Antarvis2.0 User Manual 13
address and used space of the hard disk drive. Click on
to set a storage server, as
shown in the figure below:
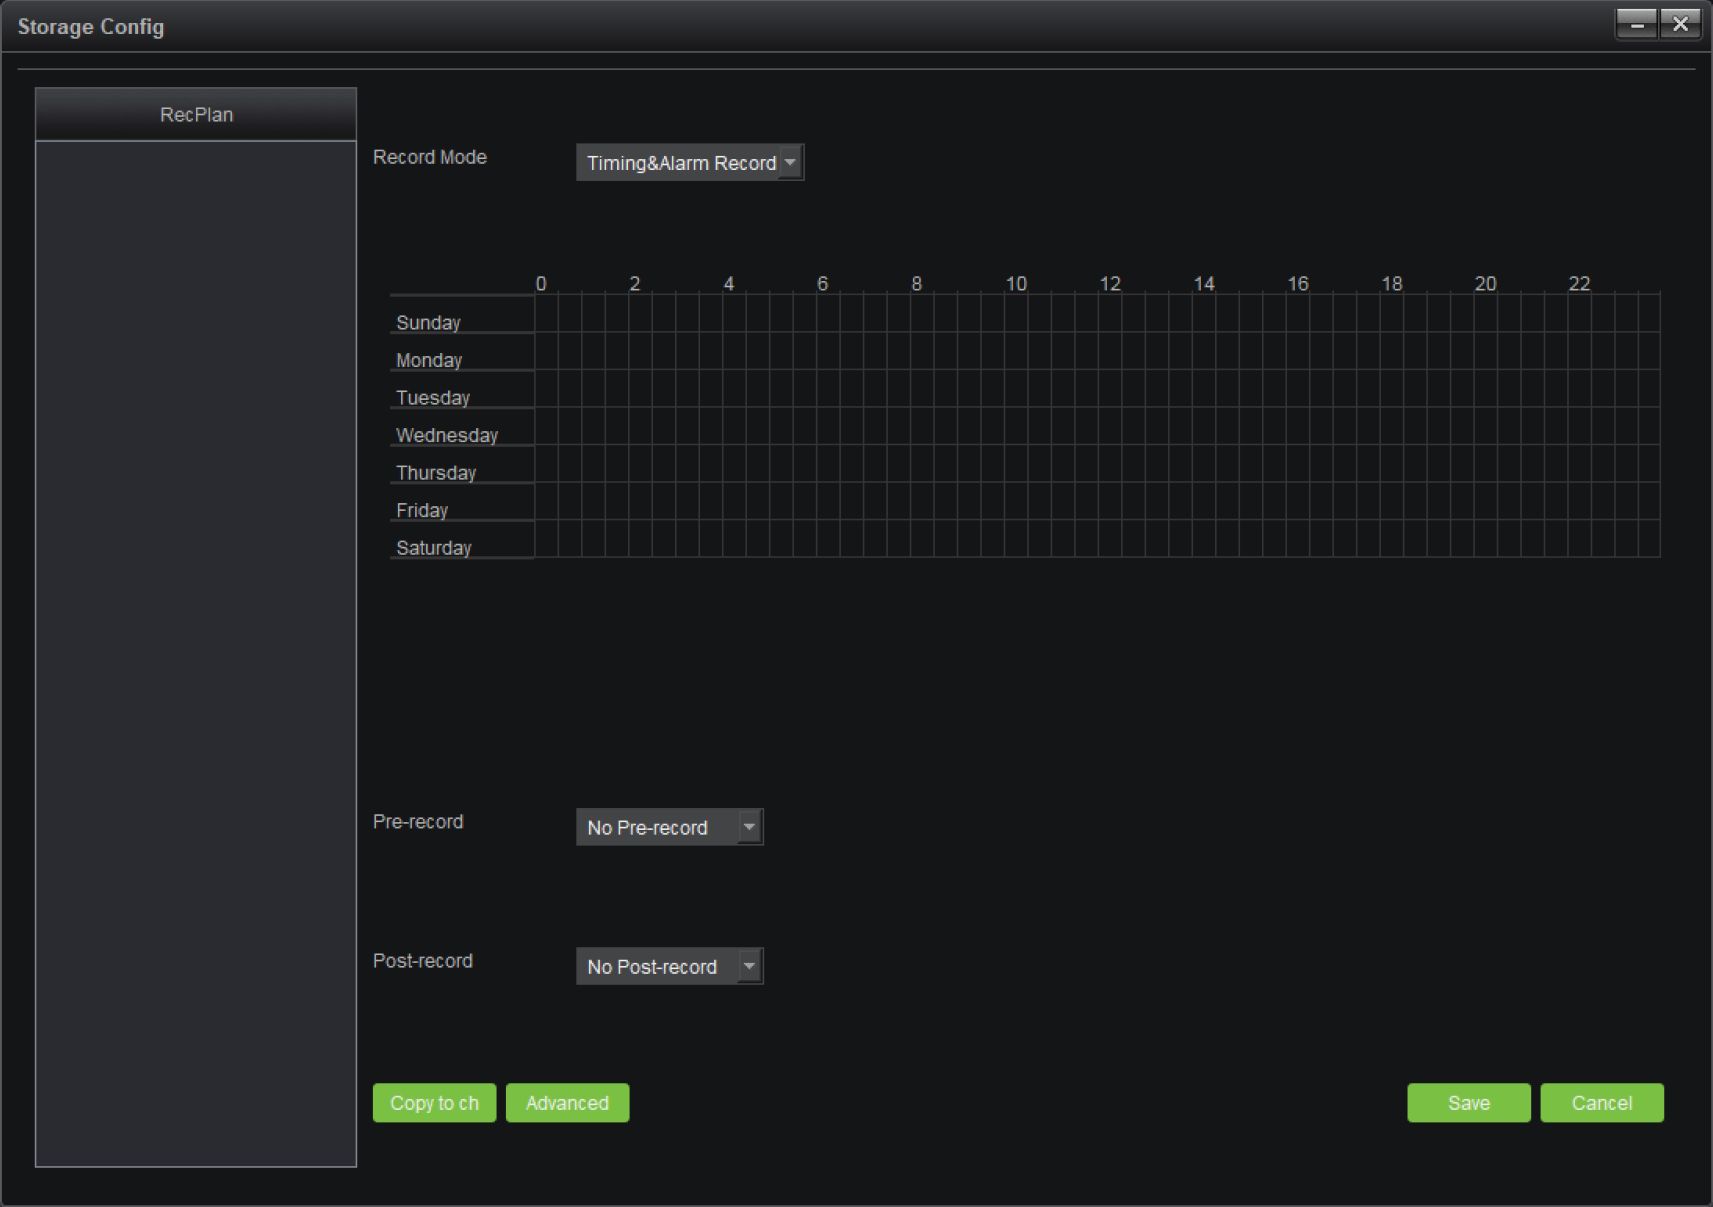
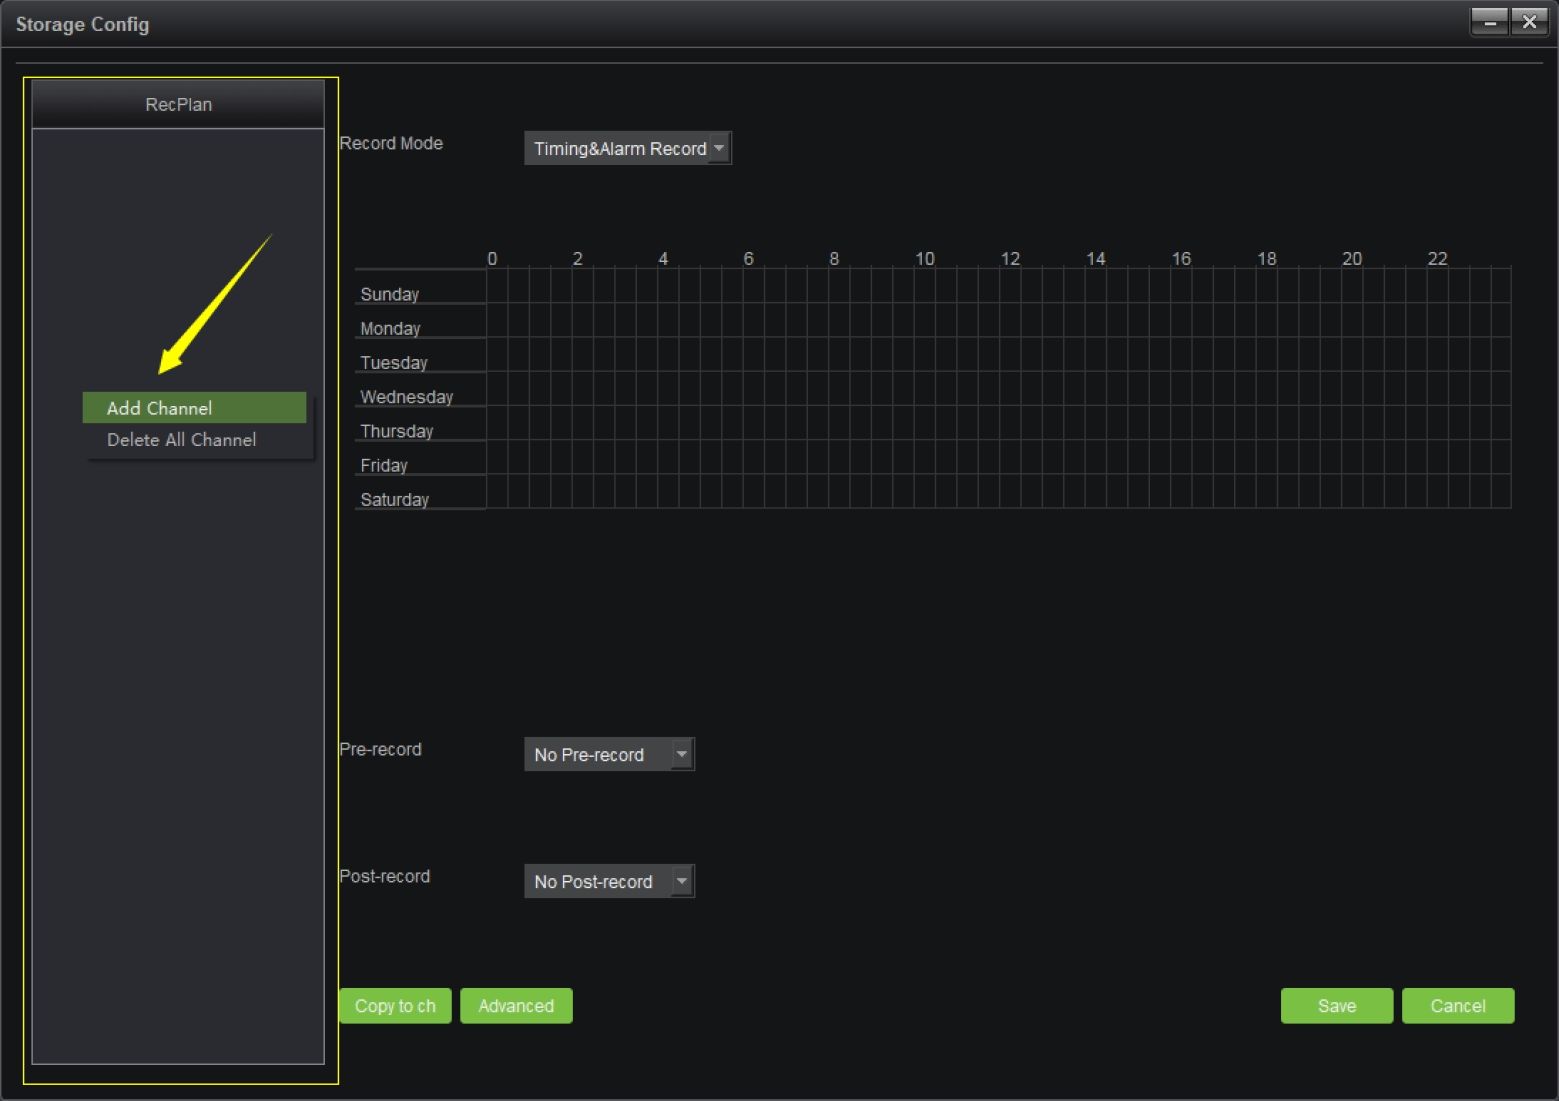
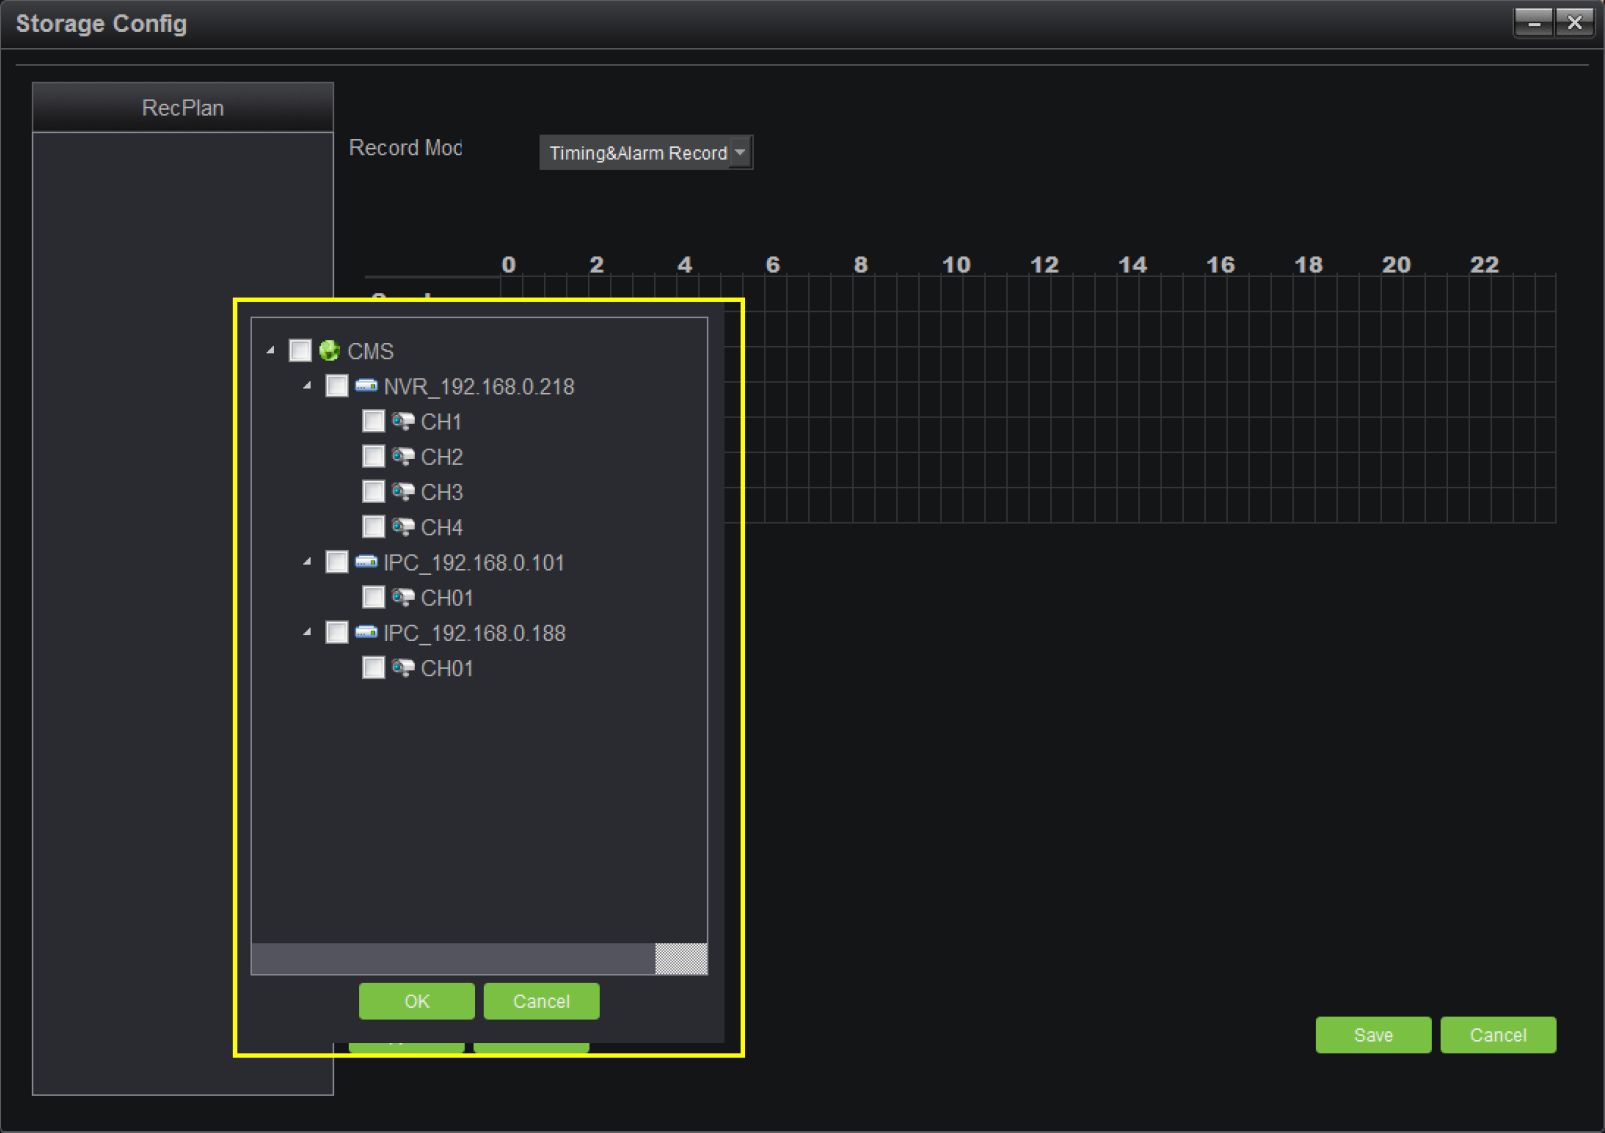
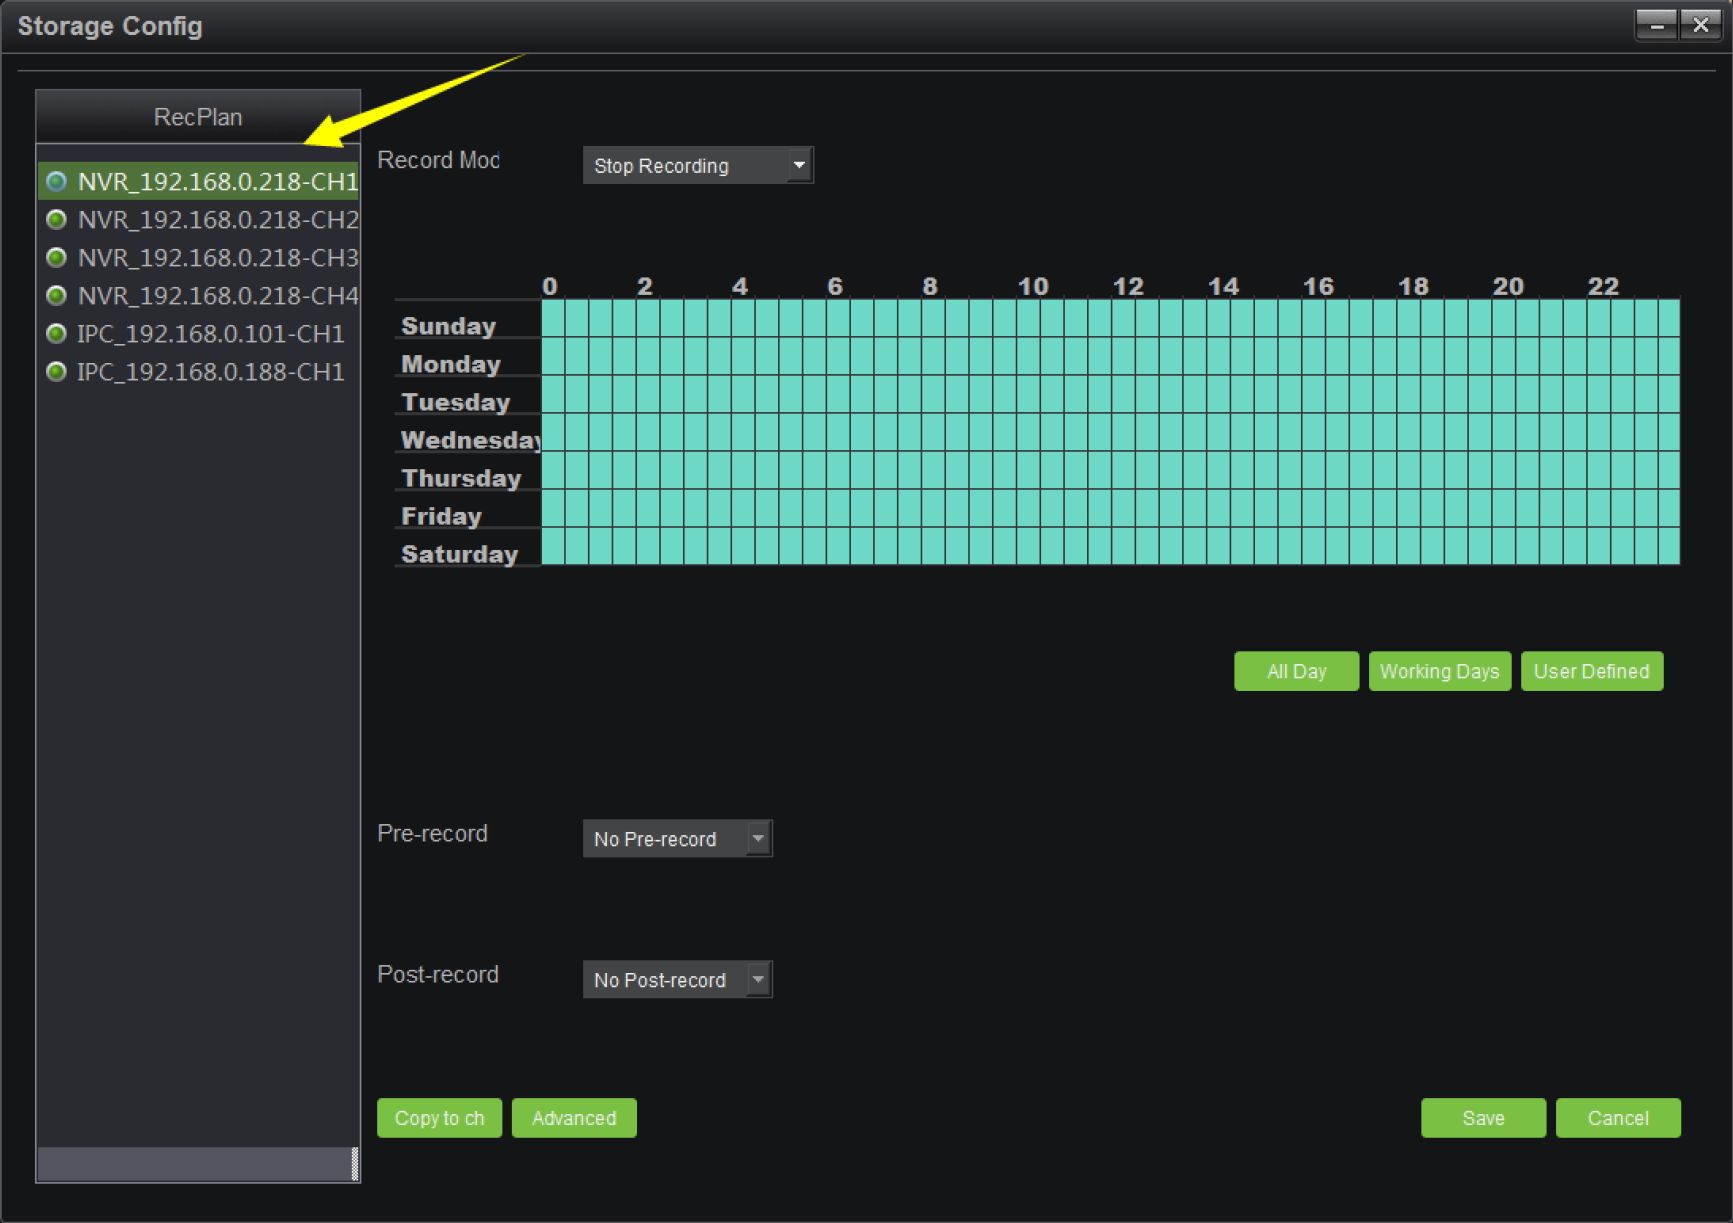
Right-click on the blank area of the RecPlan on the left side, then add a channel to the storage server;
when it is done, select the channel to set the RecPlan.
14 Antarvis2.0 User Manual
RecPlan has a default whole-day template and a working day template. In case of the need of other RecPlan templates, click on “User Template” to add those you need; start to record as the RecPlan set. Yellow arrow in the figure shows the recording status of the channel. Red means the channel is working; blue means the otherwise.
Antarvis2.0 User Manual 15
There are four kinds of recording modes, including timing & alarm recording, timing recording, alarm recording and stop recording, among which, timing & alarm recording refers to the timing plus alarm recording, i.e. timing recording runs if no alarm recording has been triggered, while alarm recording runs as an alarm has been triggered; timing recording refers to only time stamps you set; alarm recording means record starts when an alarm is triggered; and stop recording means do not record at all.
- Pre-record and time delay function are only available in two modes: timing & alarm recording and alarm recording, particularly the alarm recording; copy to channel refers to copy the RecPlan of certain channel to other channel that already added to the storage server; advanced setting can set up different partitions of disk for recording while some others do not; the default setting is that other disks can be used for recording besides the system disk. Click on “Save” to make the settings effective as the configuration completed.
In case the channel added to the storage server shall be modified, right-click on the channel added to add a channel, delete single channel and delete all channels; click on “Save” when the configuration completed and recording starts.
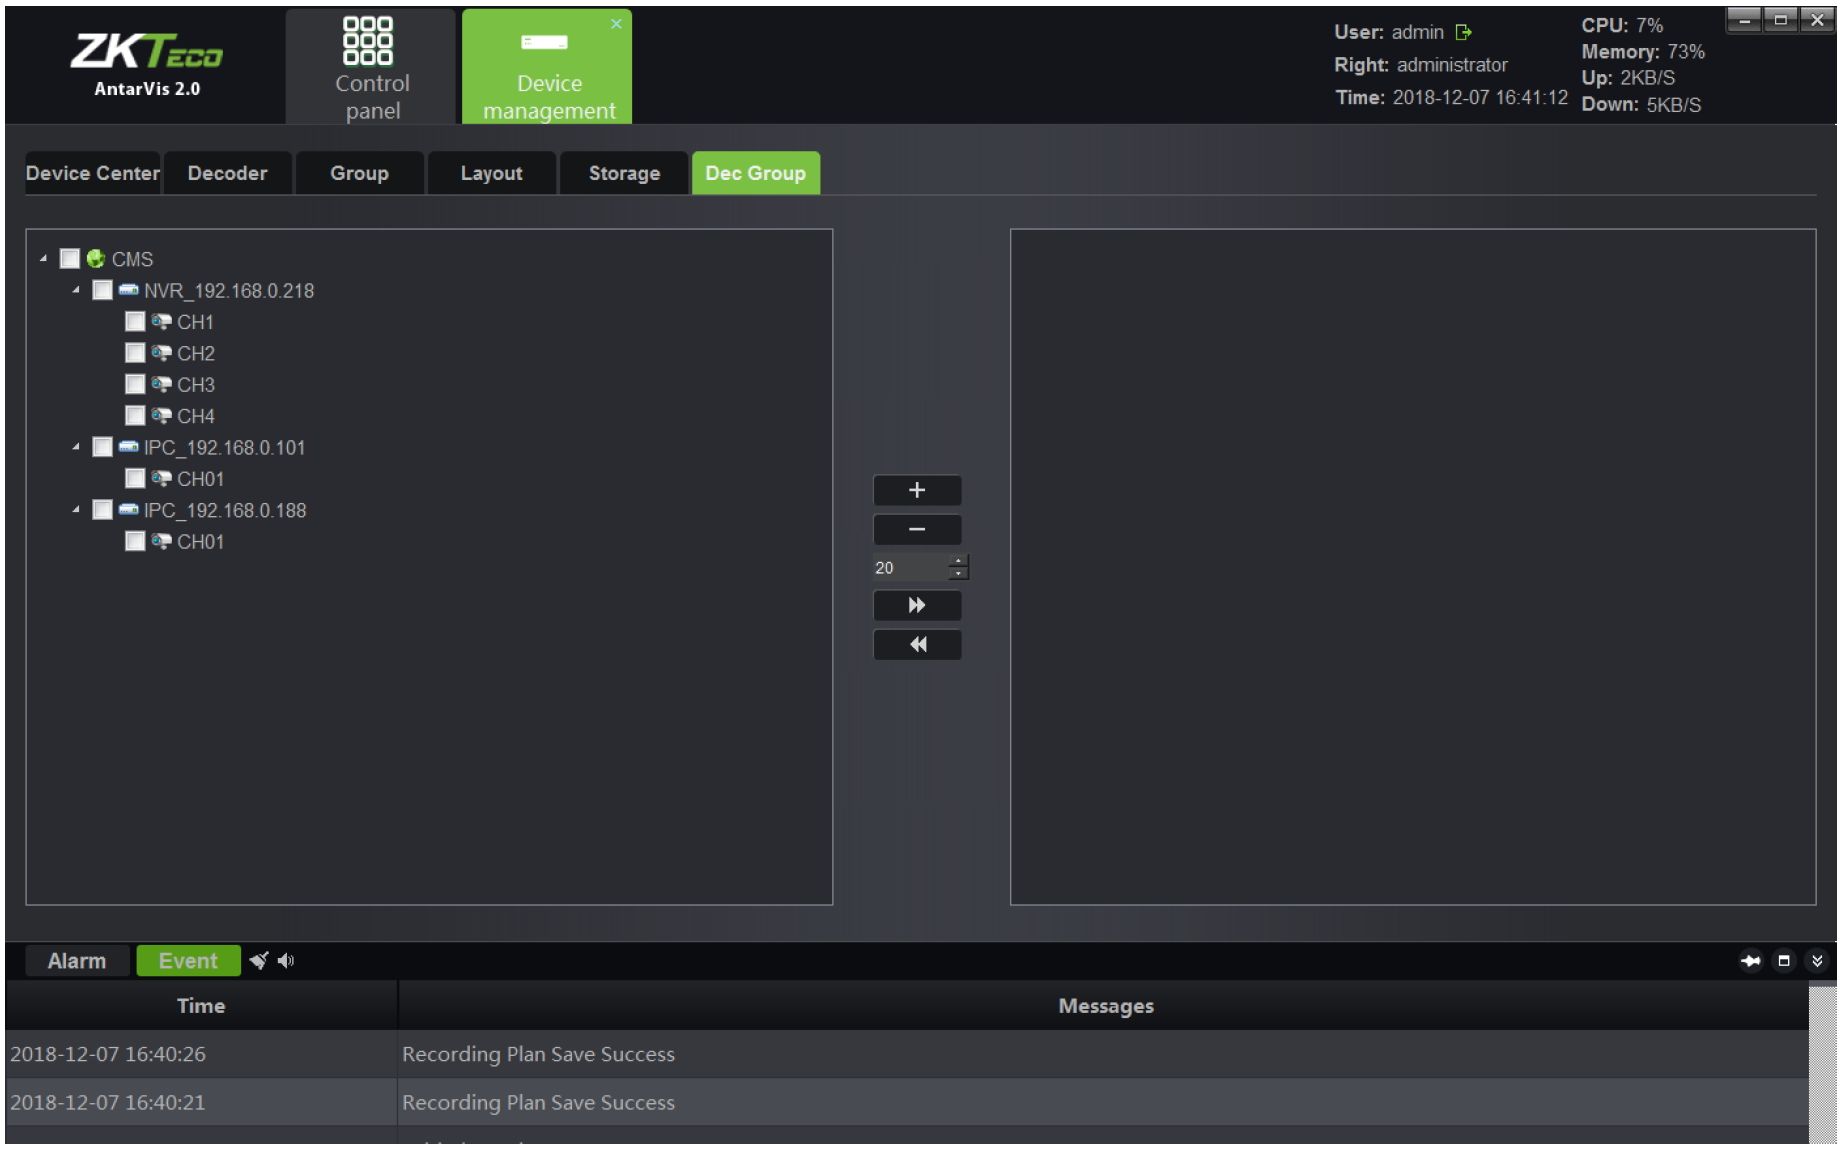
Switch to the “Dec Group” interface in the device management module, as shown below:
16 Antarvis2.0 User Manual
The operation configuration method of this group is similar to the preview group mentioned above, except that this group is used for intra-group patrol on the decoder. For details, please refer to the introduction of the decoding management module in the following section.
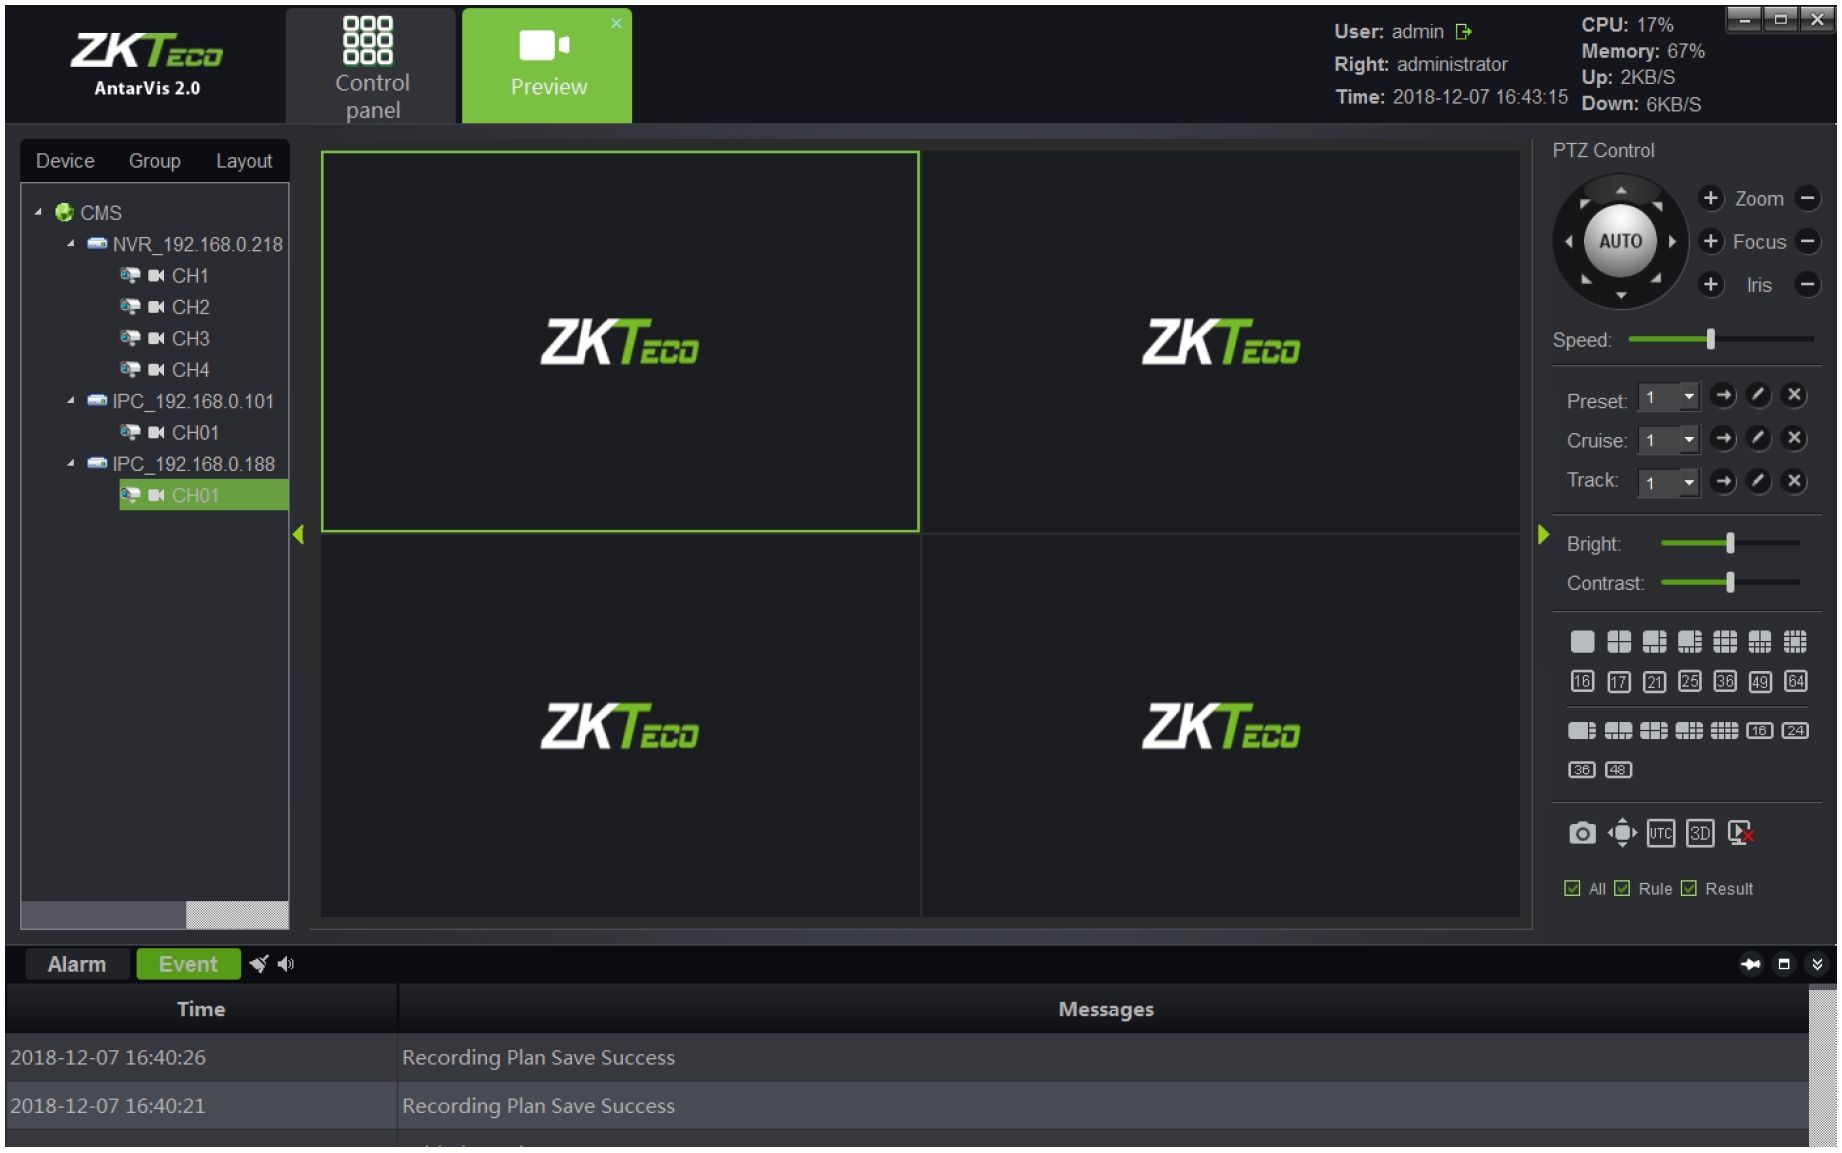
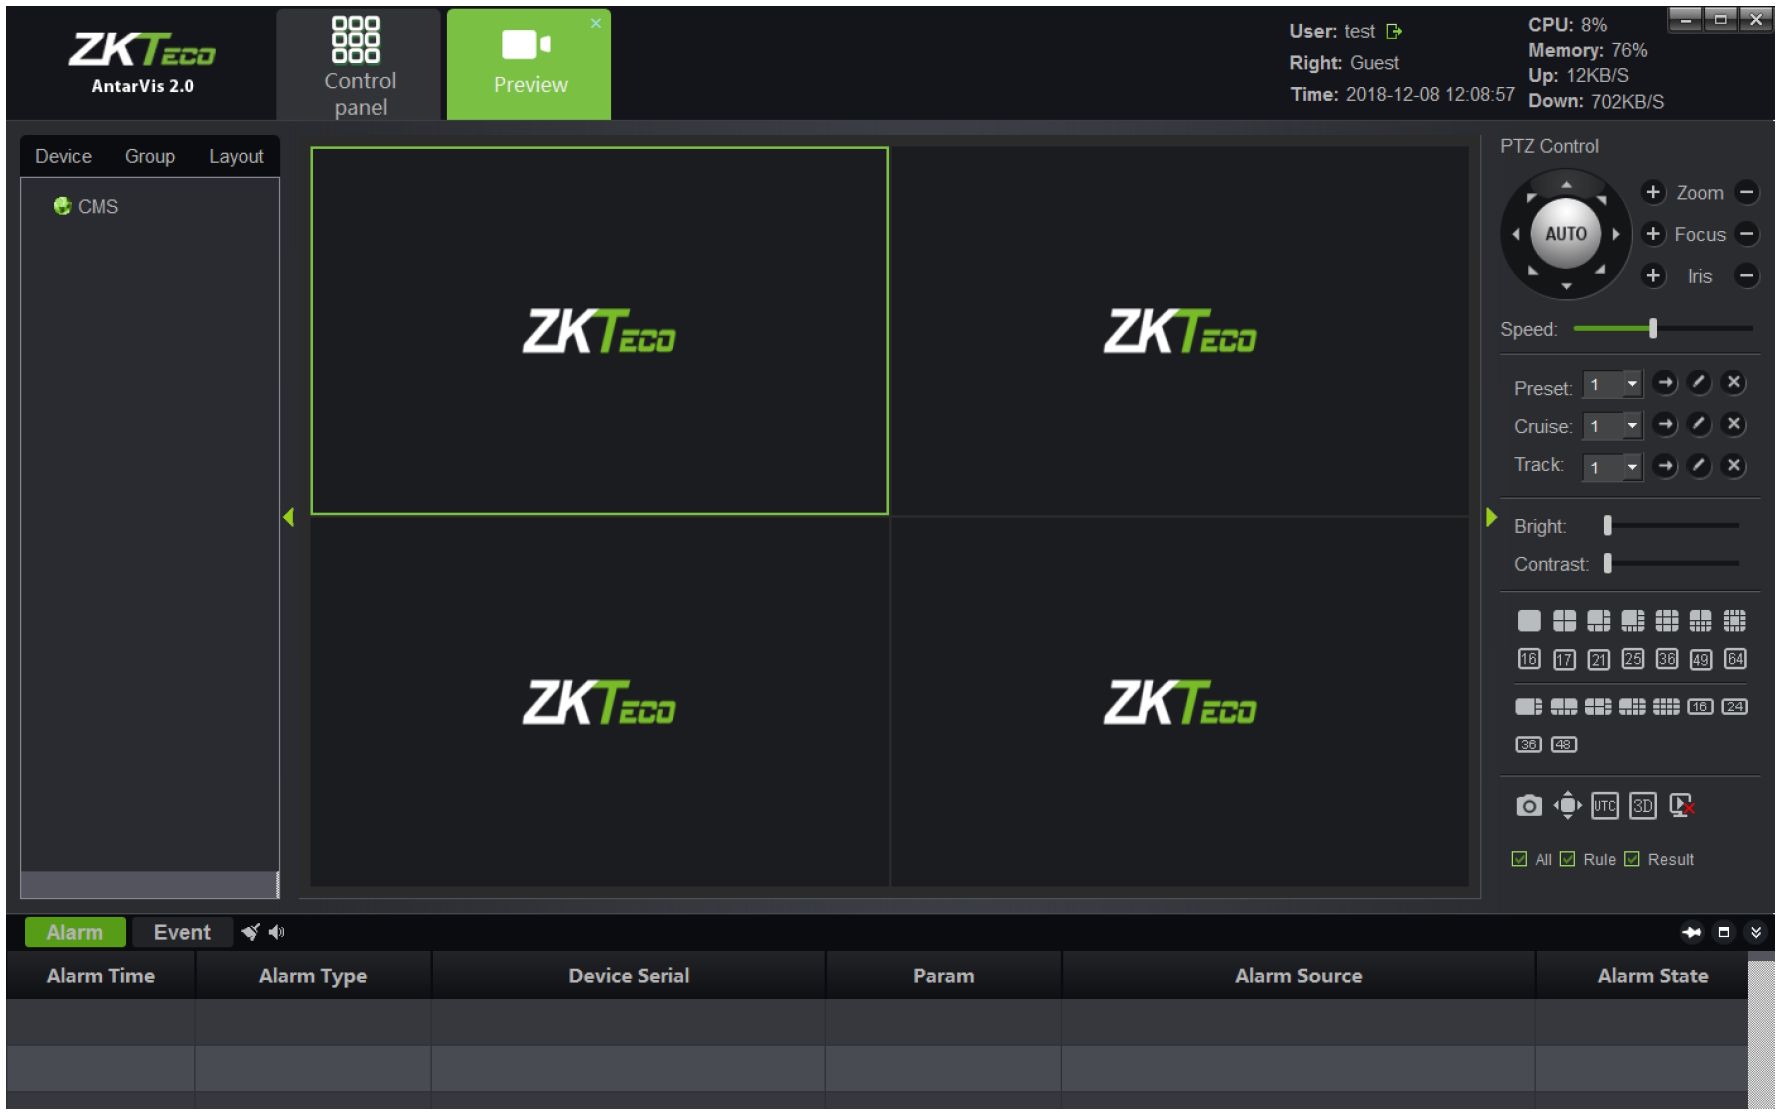
Click “Preview” on the main interface to enter the preview module:
As shown in the figure, the device list is on the left side, displaying all devices added currently and the online and offline status of device. PTZ control interface and video parameter control interface are on the right side. Below the video parameter control interface is the split screen switch button, with which, user may manually switch the number of split screens according to the actual demand.
- Split screen modes include standard split and wide-screen split, corresponding to different window scales. The differences between them have been elaborated in the layout module, thus no further introduction now. Besides the regular kinds of split screens, there are several special-shaped splits for customers to select corresponding numbers as needed.
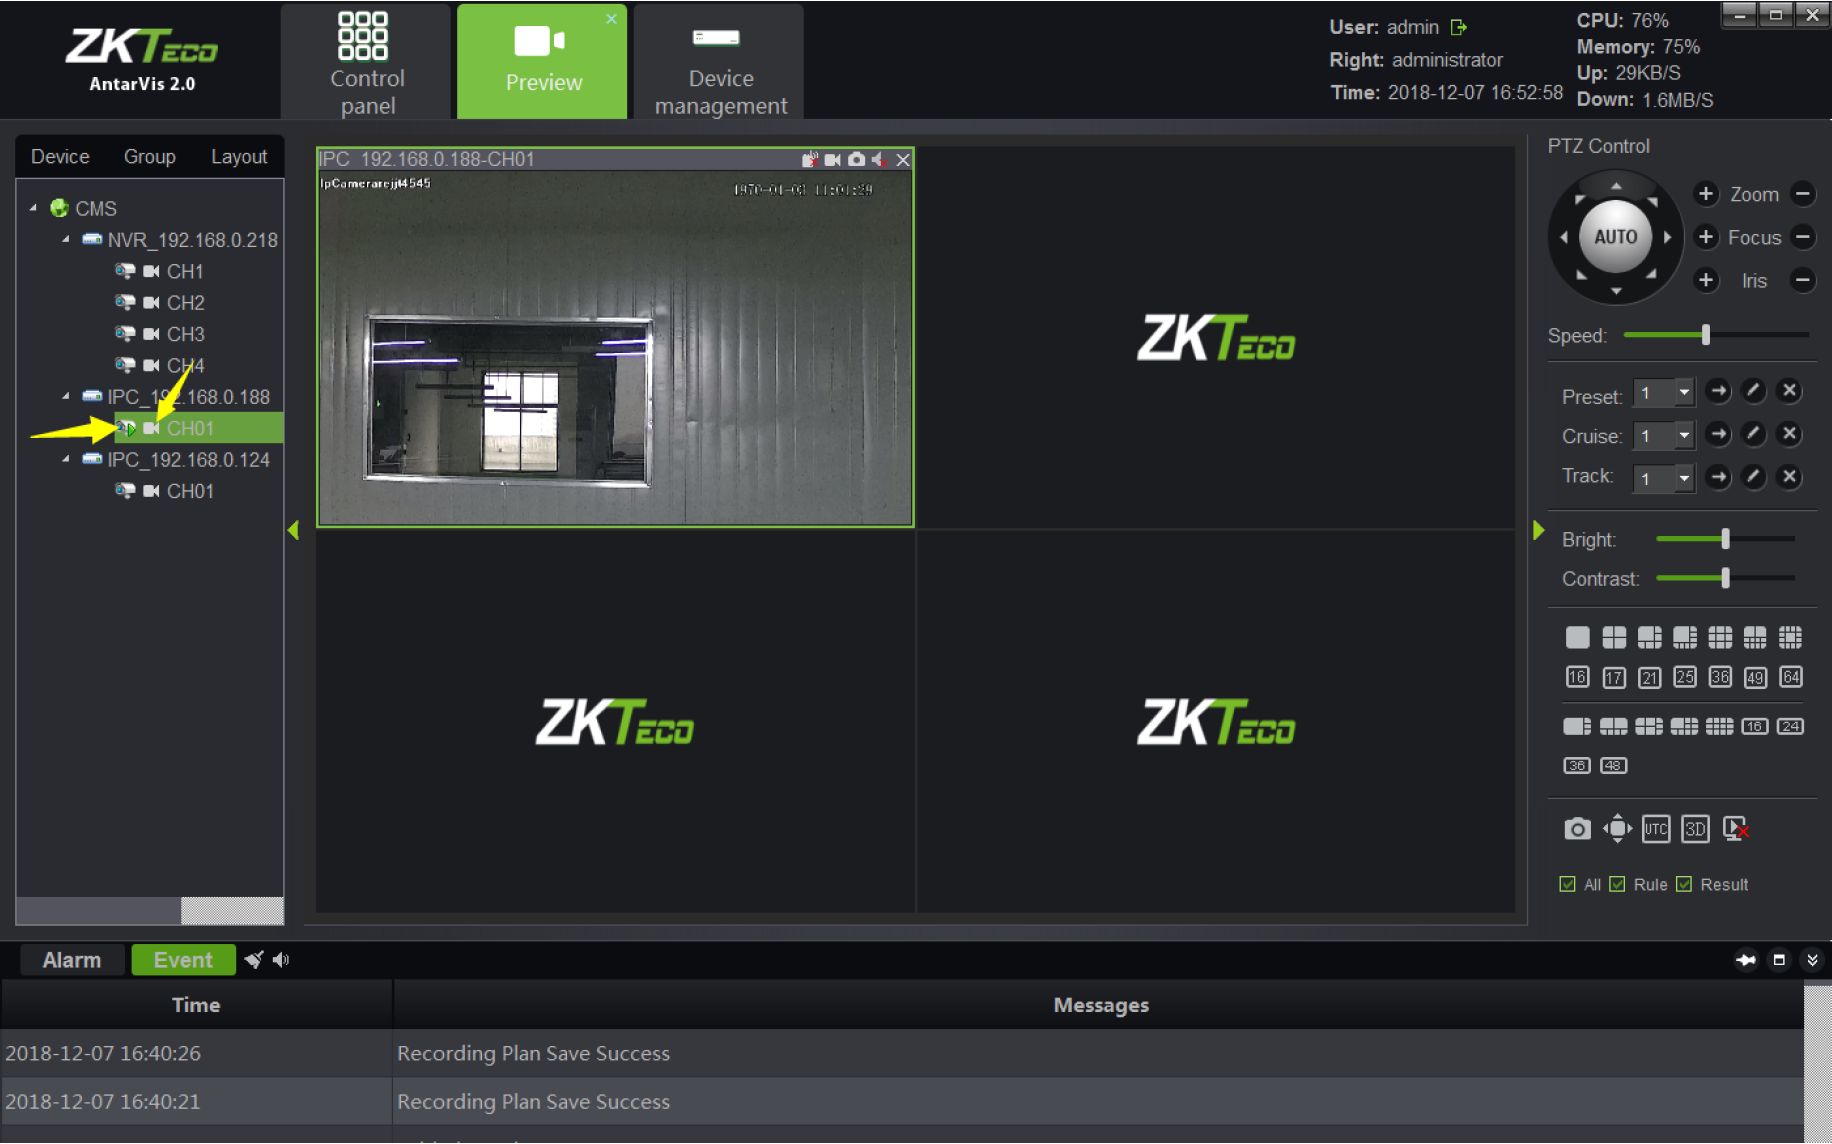
Double-click on the device list on the left side or drag the channel to the window opens the preview window of the device channel. Opened channels video will play on the corresponding panels.
Antarvis2.0 User Manual 17
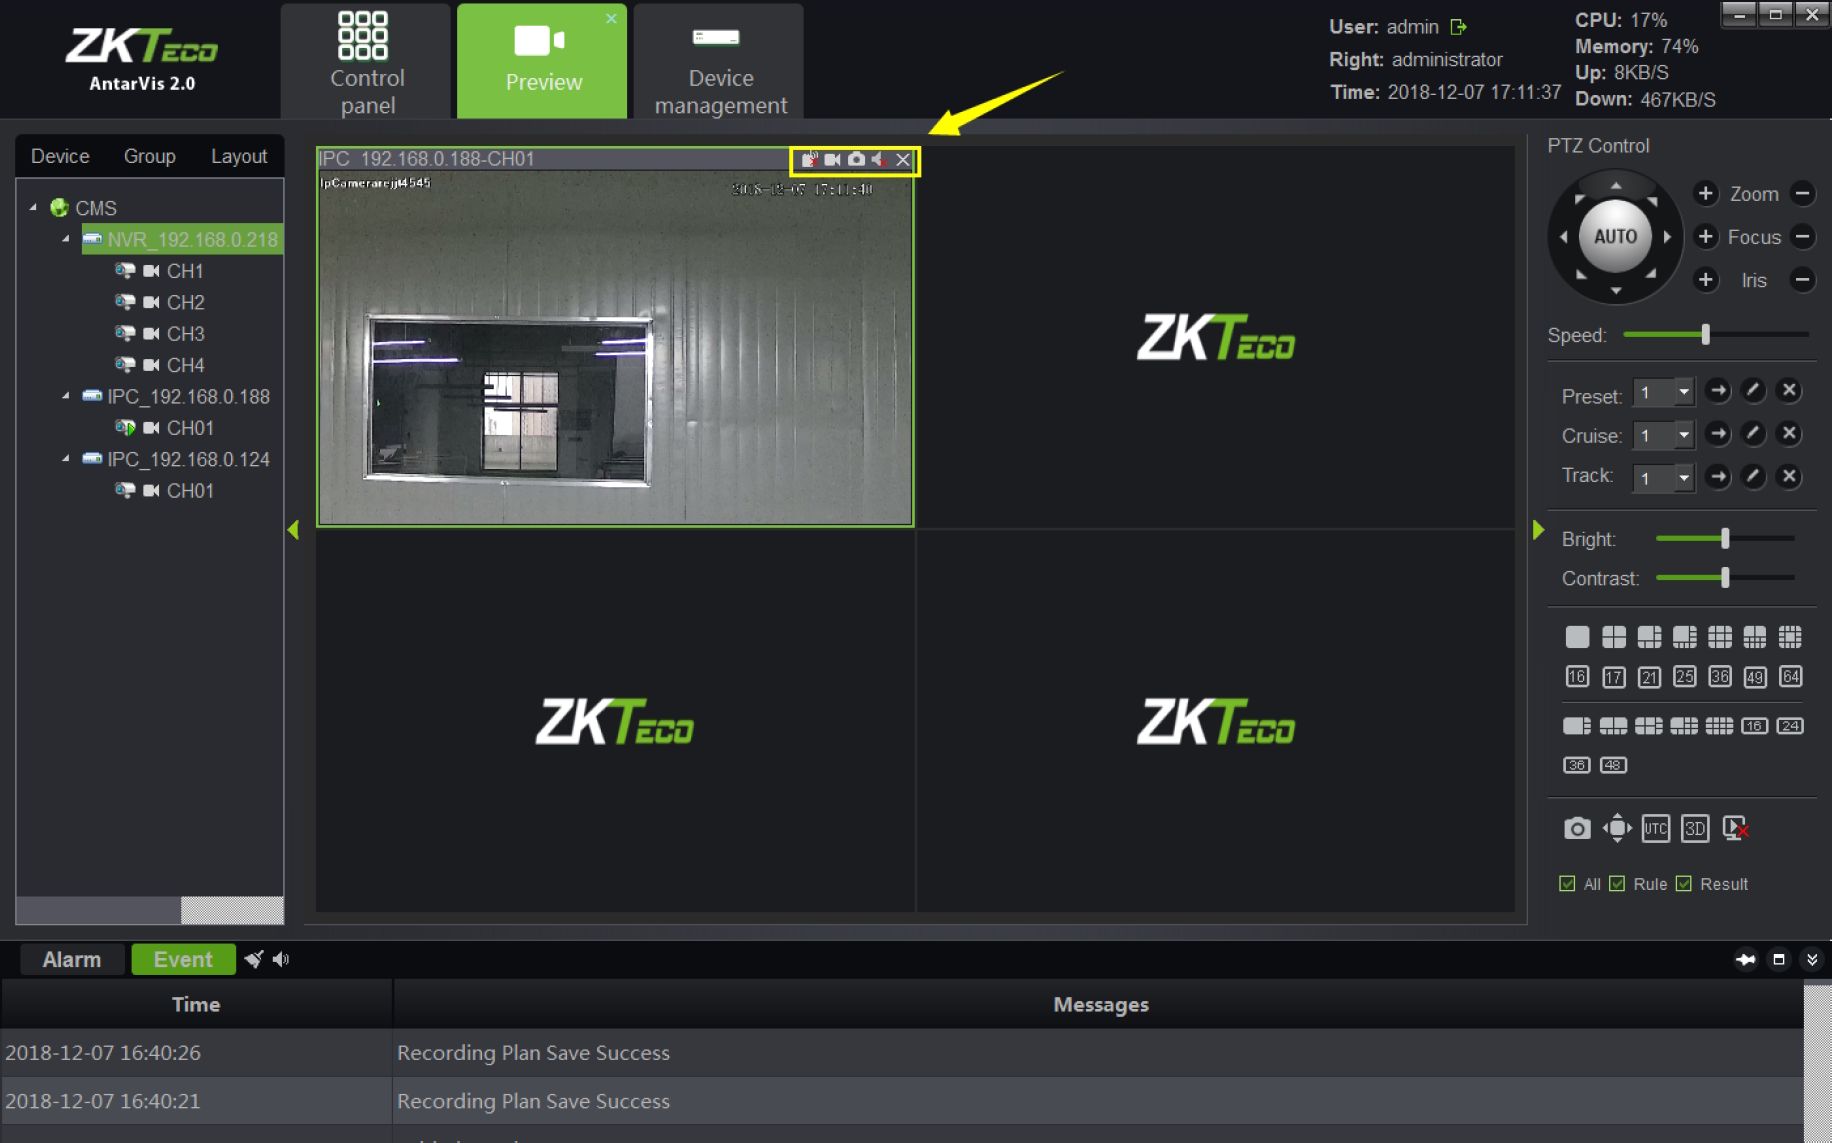
©Note: the green triangle on the left-top of the picture above shows that this channel is in preview; the buttons yellow arrows point to shows the local recording status of channels. White □ shows that this channel is turned off.
As for local recording, blue
indicates that local recording is turned on in this channel and
is working. Right-click on the channel to turn local recording on or off.
Open devices’ stream with one key. You may open stream of a maximum of 64 channels each time.
Close all previews that the current device has activated with one key.
Open local recording of this channel.
Open intercom of PC and the device.
18 Antarvis2.0 User Manual
On Preview panels, there is a row of shortcuts above the preview window as indicated in the figure:
1)
represents the channel intercom switch; click on it to enable or disable intercom of PC and
thischannel.
- □ represents the device recording switch; click on it to enable or disable local recording of this channel; blue icon □ indicates that the feature is activated, while white icon □ indicates
that the feature is not activated.
channel.
- represents the audio preview switch; click on it to turn the audio on or off. indicates it is off; indicates it is on.
- 0 represents the button to quit preview; click on it to close the current preview of this channel.
Antarvis2.0 User Manual 19
There is a toolbar
on the lower right side of the preview interface, among which:
represents the capture button; select a preview window, then click on this button to take a
snapshot of the display;
represents the full-screen button, click on it to switch between the selected window and the
full-screen mode;
represents the on/off button for UTC function; click to enable the UTC function. Please note
that this feature requires a front-end equipment to operate;
4)
3D
represents the on/off button for 3D positioning; click to enable the 3D positioning function.
Please note that this feature requires a front-end equipment and 18H protocol to operate;
to close all preview windows opened at present.
□ All □ Rule □ Result
B^^B^^^B^^^^Hcheck boxes are for Intelligent detection, intelligent detection supported
by front-end devices includes NVR and IPC. When it is used, the setup intelligent rule will bedisplayed in the preview screen. If a target triggers the intelligent alarm, the target triggering the
alarm will be displayed in the preview screen.
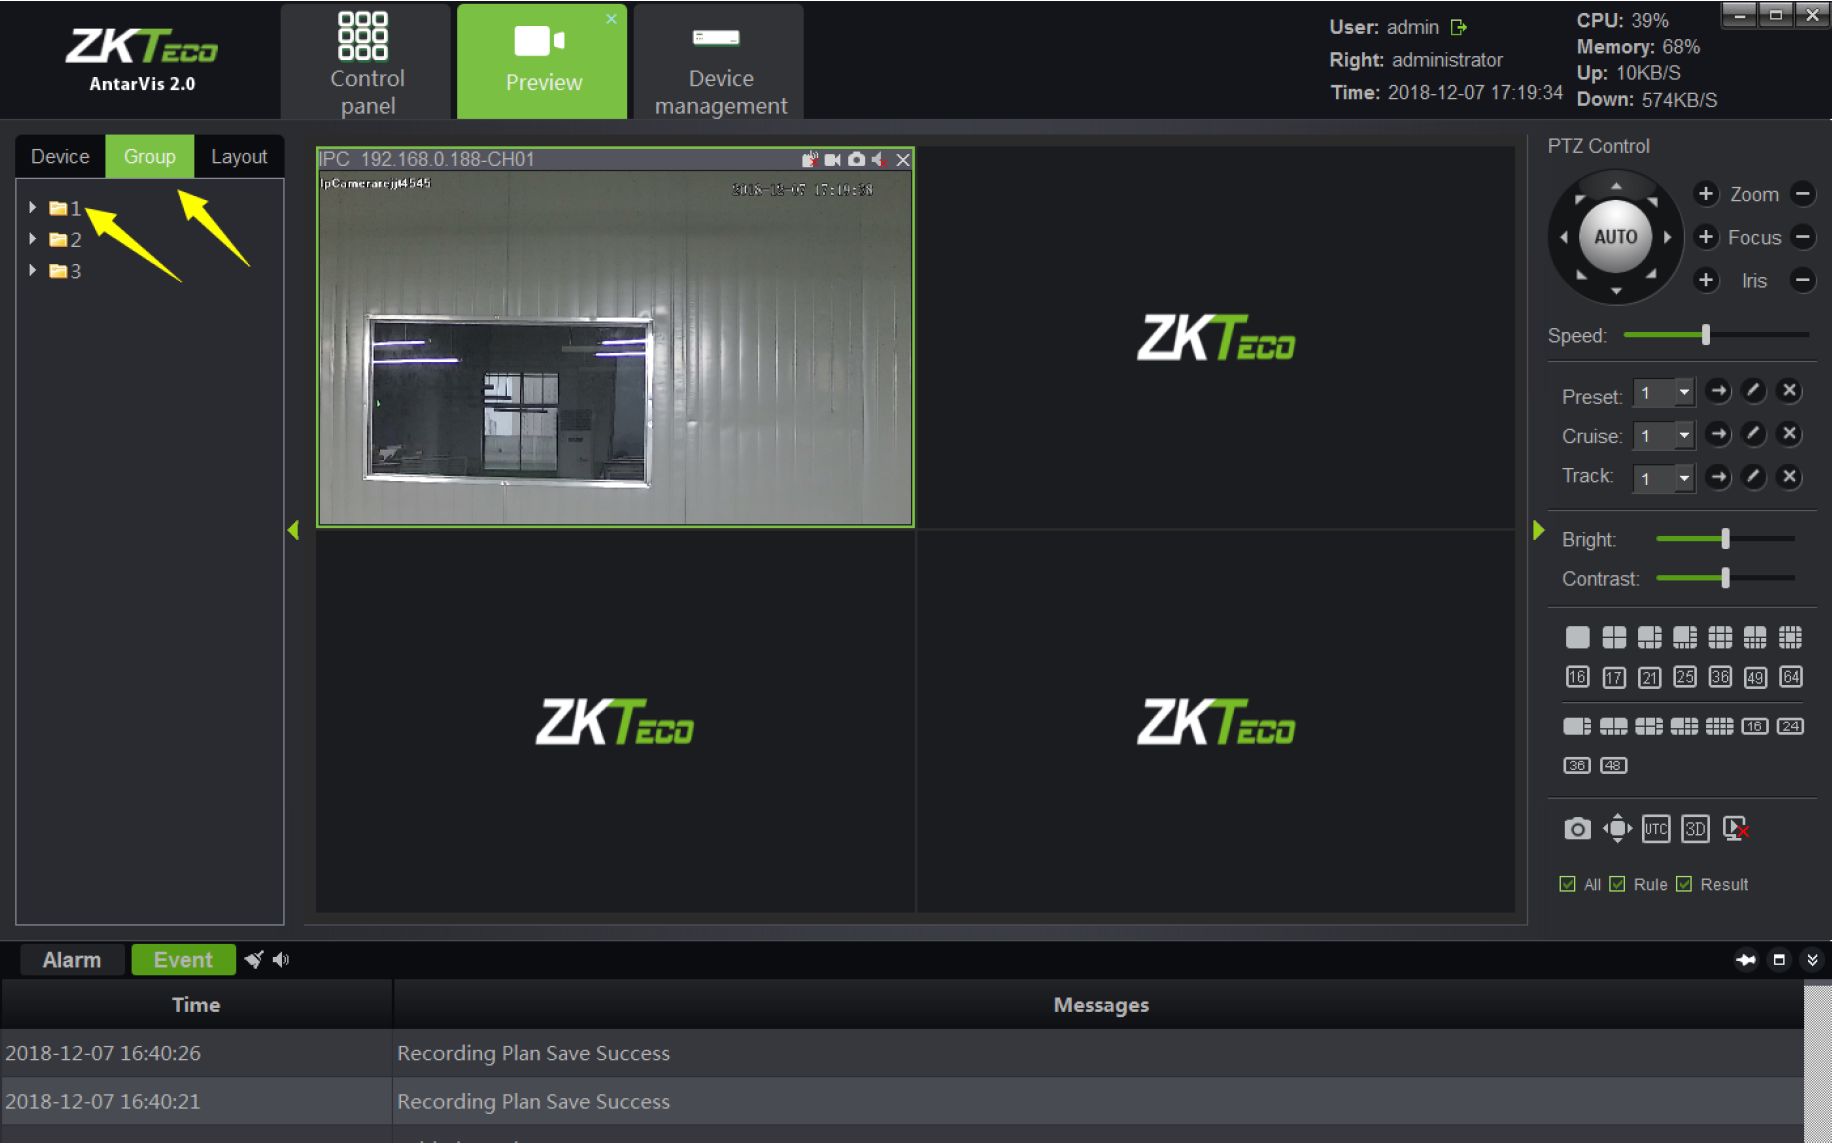
To add two or more groups. For details, please see ”Group“ for specific operation under the section
Device Management”. When a group is created, you may switch to the group page on the preview
interface, as shown in the figure below:
20 Antarvis2.0 User Manual
Right-click on the selected group to operate “Start Patrol” and “Stop Patrol” functions. Time intervals between patrols can be set up in the local configuration module, which will be illustrated below. The default interval is 30 seconds.
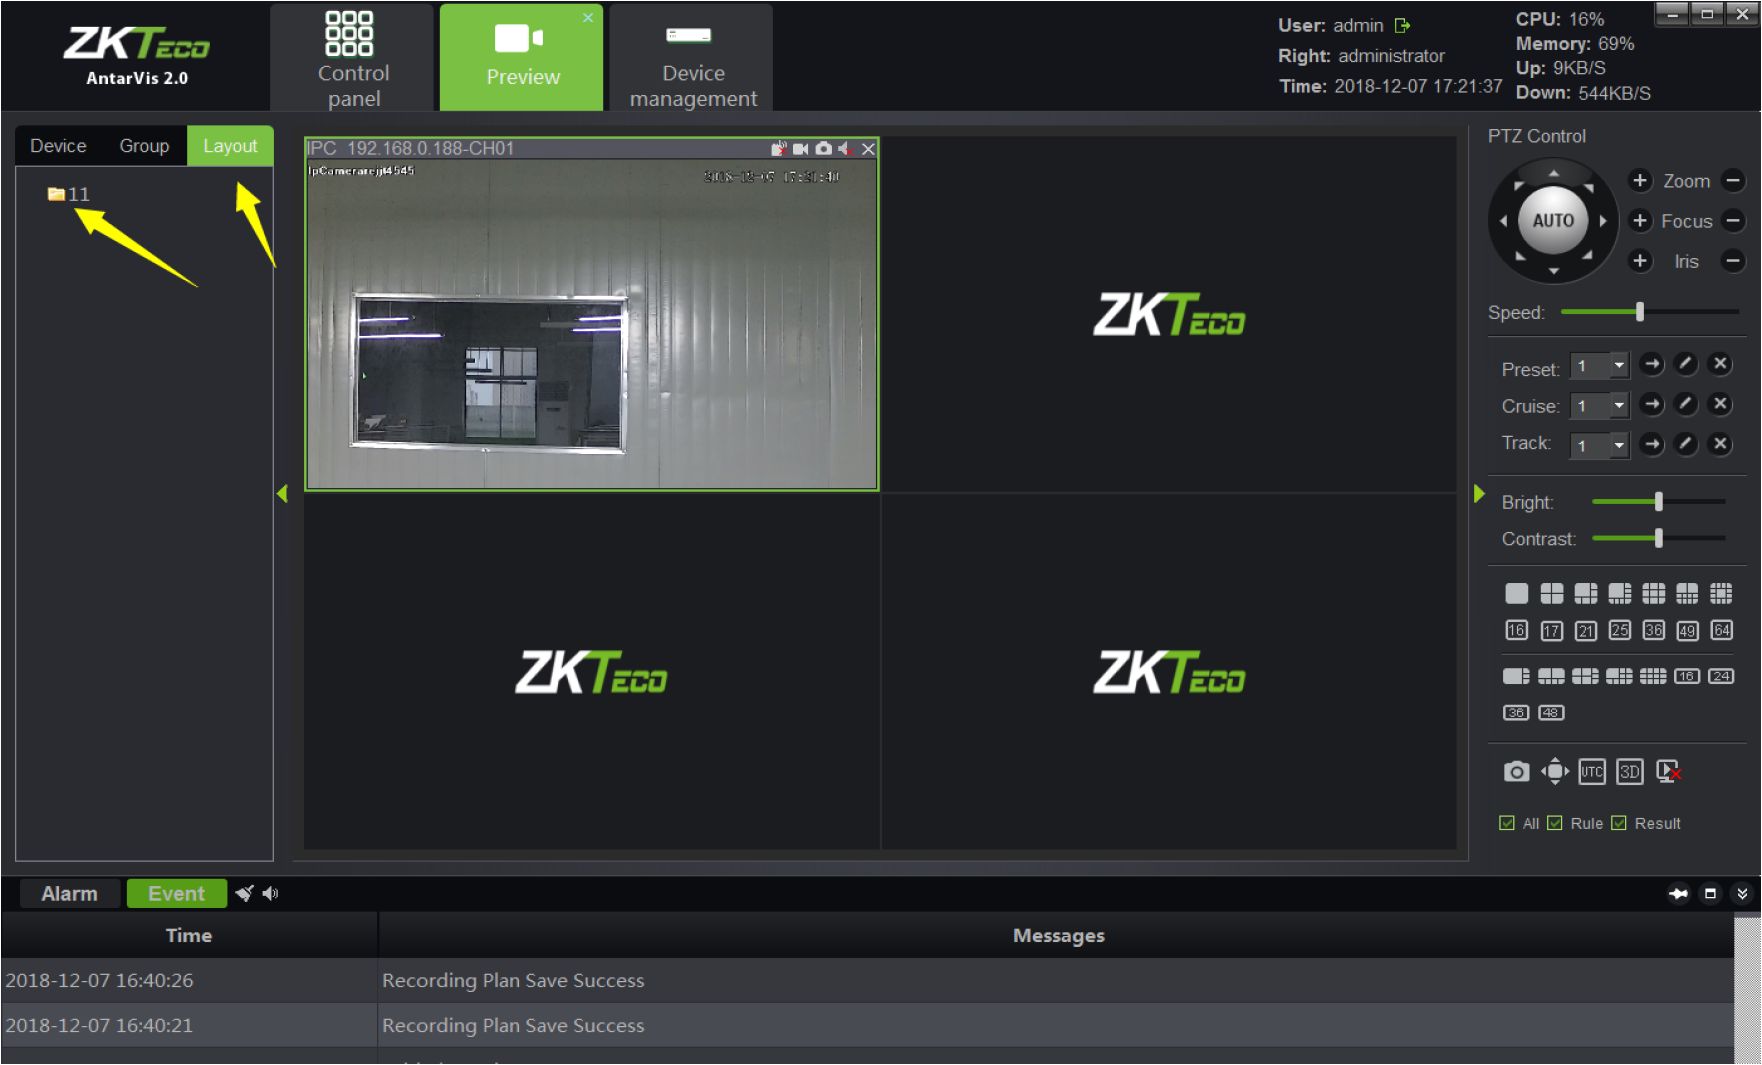
To add two or more layouts. For details, please refer to the paragraph “Layout” under the section “Device Management”. When a layout is created, you may switch to the layout page on the preview interface, as shown in the figure below:
Antarvis2.0 User Manual 21
Right-click on the selected layout to open the preview of this layout with one key. Select “Start Patrol” to start the patrol function among several layouts. The interval between patrols can be set up when the layout is set up. Click on “Stop all” to stops the patrol function or close the current preview.
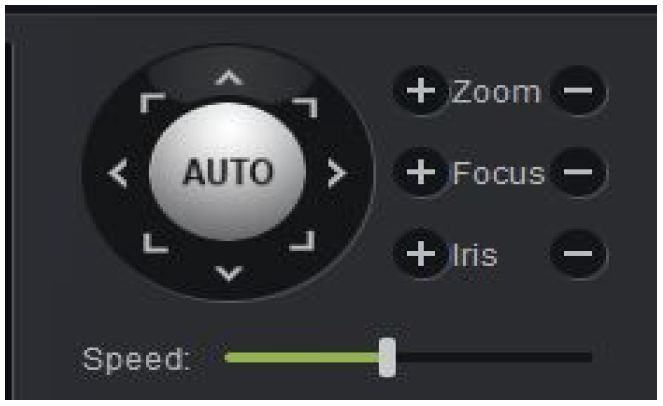
Users may adjust rotation of the camera in 8 directions, including up, down, left, right, upper left,
lower left, upper right and lower right. “Zoom” means that users may zoom in or out and adjust the
visual angle; “Focus” helps adjust the focal length of the camera to ensure the clearness of the
picture; the enlargement and narrowing of the aperture ensures the brightness and depth of field of
the picture; the setting of the PTZ control speed can adjust the rotation speed of the speed dome
camera. Click on “AUTO”, the speed dome camera automatically starts scanning. Please see the
following figure:
22 Antarvis2.0 User Manual
Preset: 2 0 Z X|
Cruise: 5 T ✓ X|
Trade 3 ▼ -») ✓ XI
1) Preset: the rotation of the PTZ camera requires the setting of the direction of the preset. Click
on
to set up the preset. A maximum of 255 presets can be set up. To adjust the presets,
2)
select the preset to be adjusted, click on
to call or click on
Cruise: as the preset settings are done, click on
maximum of 255 cruise paths can be set; click on
to call or click on
to delete the preset.
to edit and set the cruise path. A
to delete the
selected cruise path.
3)
Track: click on
to edit and set the track; click on
to call or click on
to delete
the track set.
As the preview opened, parameters of the pictures can be adjusted; the adjustment here will not affect the front-end parameters of IPC but the display effect of the picture in the client-end. Please
see the following figure:
Users may adjust the relevant parameters, namely brightness and contrast, as needed.
As the preview interface opened, select a corresponding window and then scroll the mouse wheel to adjust digital zoom-in and zoom-out of the current picture.
Antarvis2.0 User Manual 23
You may access multiple modules in the preview module. Each of them is independent. If the user’s monitor supports multi-screen mode output, you may use the multi-screen display feature. Considering the actual situation, the maximum preview module to be opened can be restricted to 5. For instance, when you have opened two preview modules, you may drag one of them out with the same operations as dragging the module to another monitoring screen, as shown below:
The monitoring screen on the left is the primary screen; while that on the right is the complementary screen. The operations of preview between two screens doesn’t influence each other; closing the complementary screen will not affect the primary screen, however, the complementary screen will be closed if the primary screen is closed.
- Users may select the number of preview screens to be opened as needed. For instance, one screen can be selected to open Cruise and display independently in one monitor, meanwhile, another screen can carry out the operations of temporary preview, monitoring and intercom.
24 Antarvis2.0 User Manual
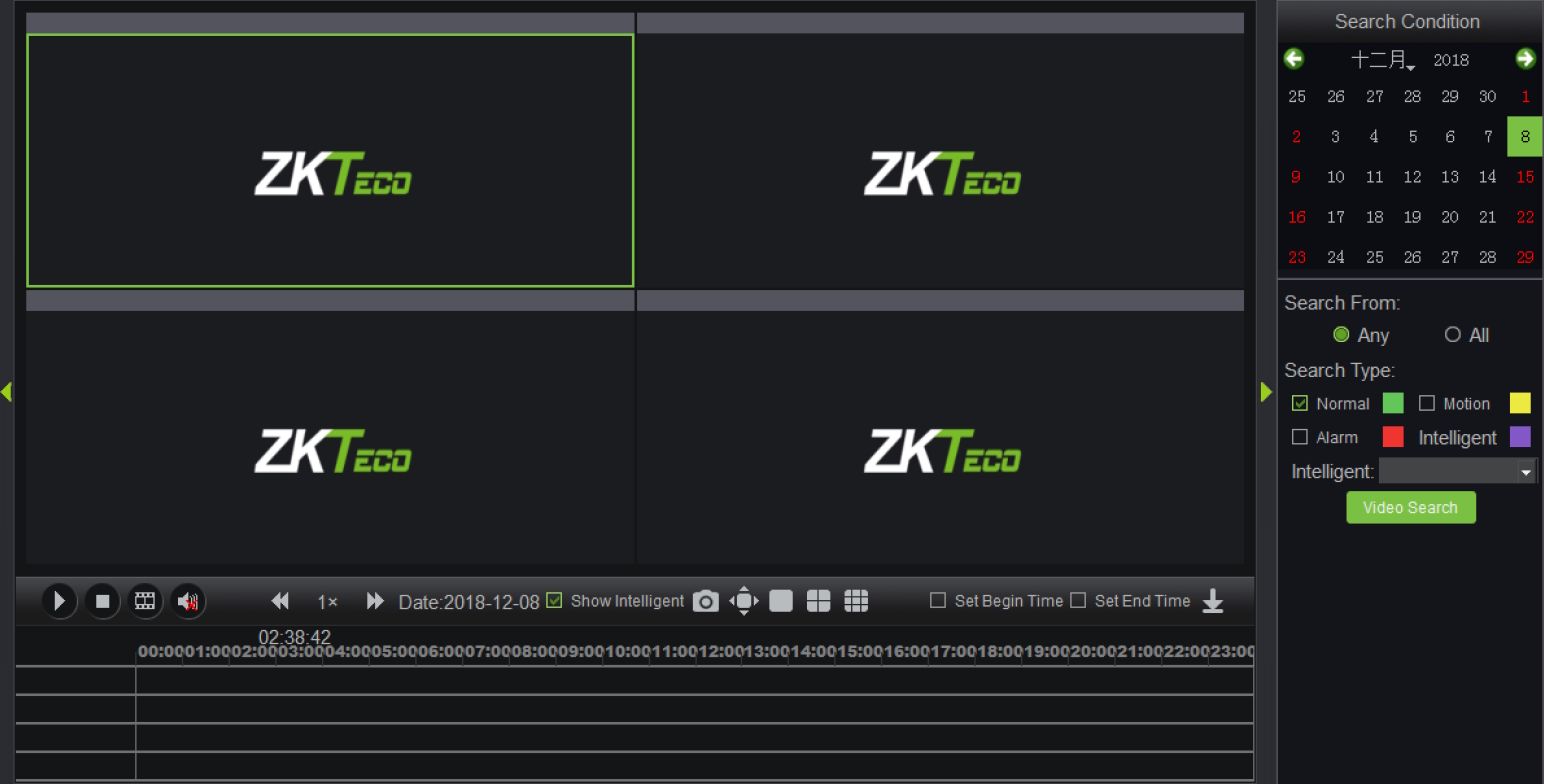
Click on the “Playback” button on the main interface to enter the video playback module:
AntarVis 2.0
Preview
□□□ □□□ ooo
Control
panelUser: admin B
Right: administrator
Time: 2018-12-08 10:40:15
CPU: 19%
Memory: 69%
Up: 11 KB/S
Down: 794KB/S
Device Localhost ^Storage
J ■ ■ Local_Storager
- <¥NVR_192.168.0.2
- <>NVR_192.168.0.2
- ^NVR_192.168.0.2
- <TNVR_192.168.0.2
- e»IPC_192.168.0.1S
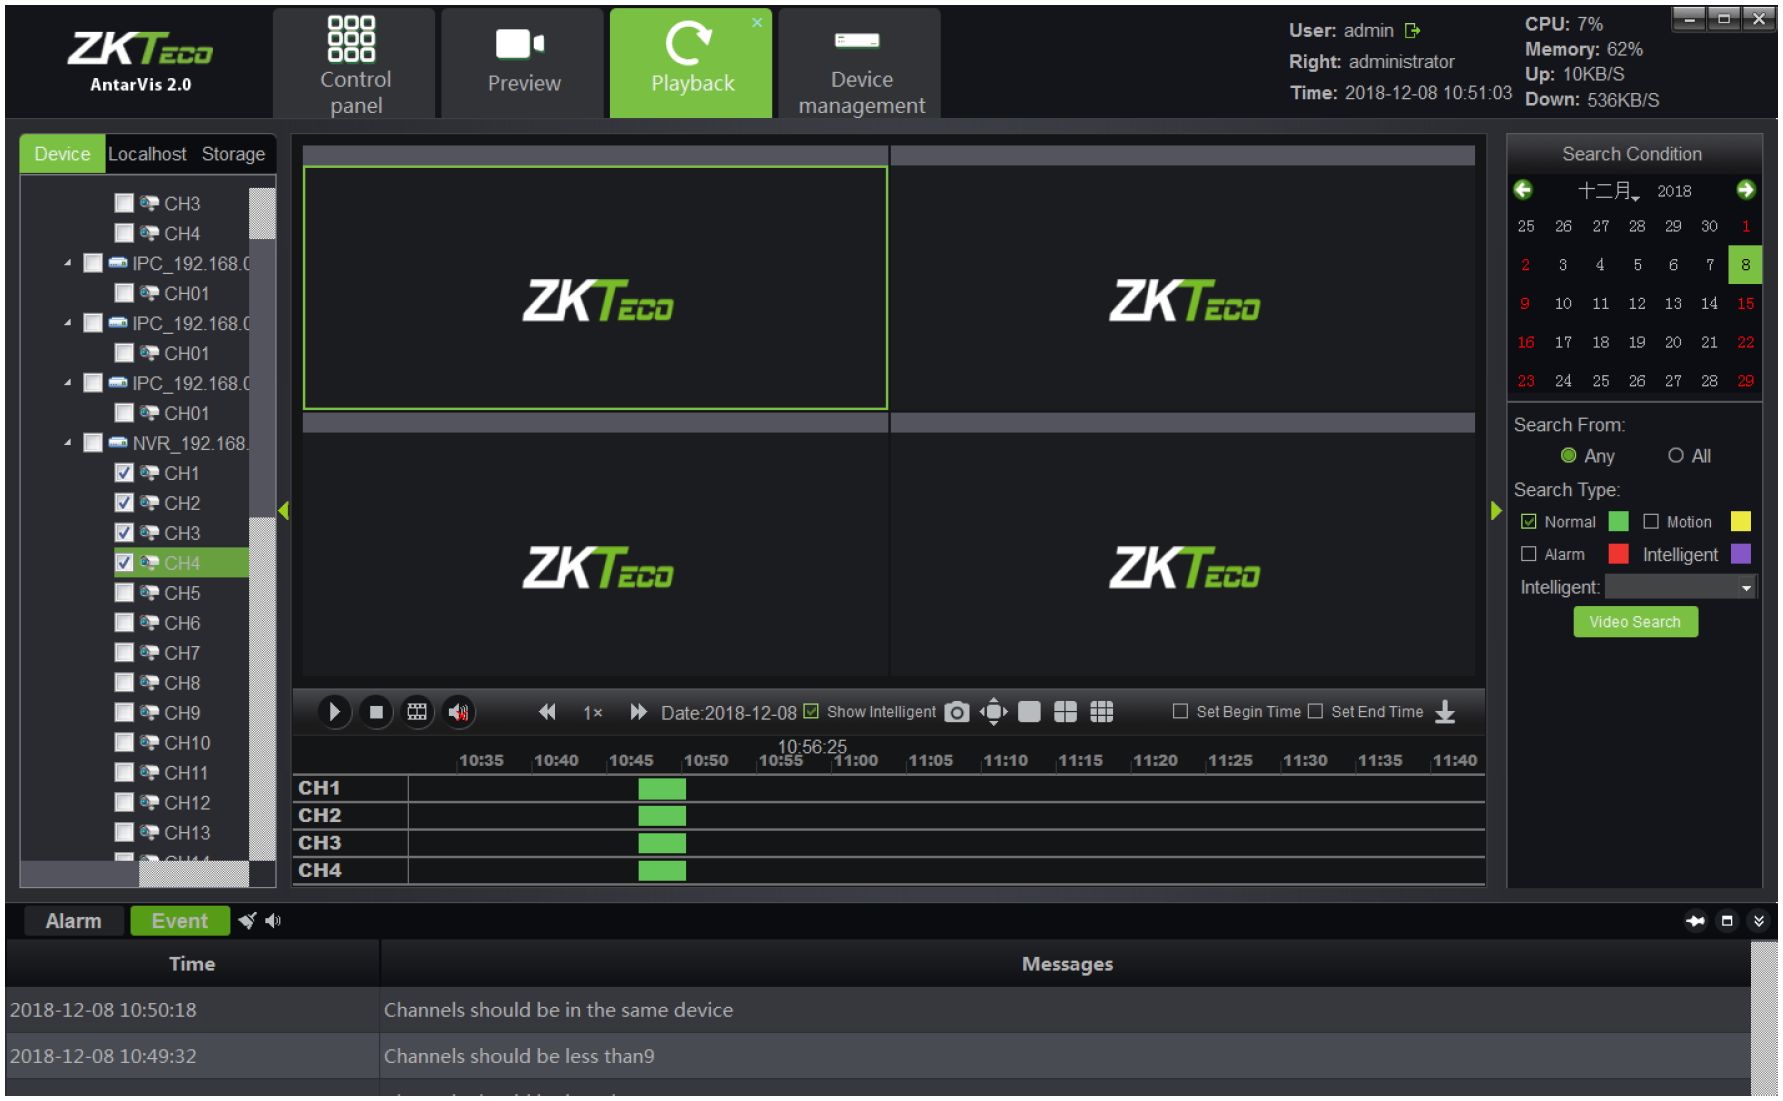
Alarm Event | < 4» B W Time Messages 2018-12-08 10:13:26 Recording Plan Save Success 2018-12-08 10:13:19 Recording Plan Save Success Select a device channel where the video to be played from the device tree on the left. Please note that only videos in the same device or same storage server can be played simultaneously, and at most 9 channels can be selected each time.
- Select the storage path of the video on the left, select the stream type of the video to be played in the column of “stream type”, and select the date on the calendar, click on “video search”, then the system will starts to search for the relevant video(s) and display the search results on the search result panel.
- Video path includes “device”, “local” and “storage”, among which, the device video refers to the video stored in the hard disk or the SD card of the front-end device, local video refers to the video stored in the PC of the client server and the storage video refers to the video stores in the storage server.
- The stream type includes main stream and sub stream. When a customer opens dual stream in the course of recording, relevant videos can be searched for as needed. The search result will be shown as below:
Antarvis2.0 User Manual 25
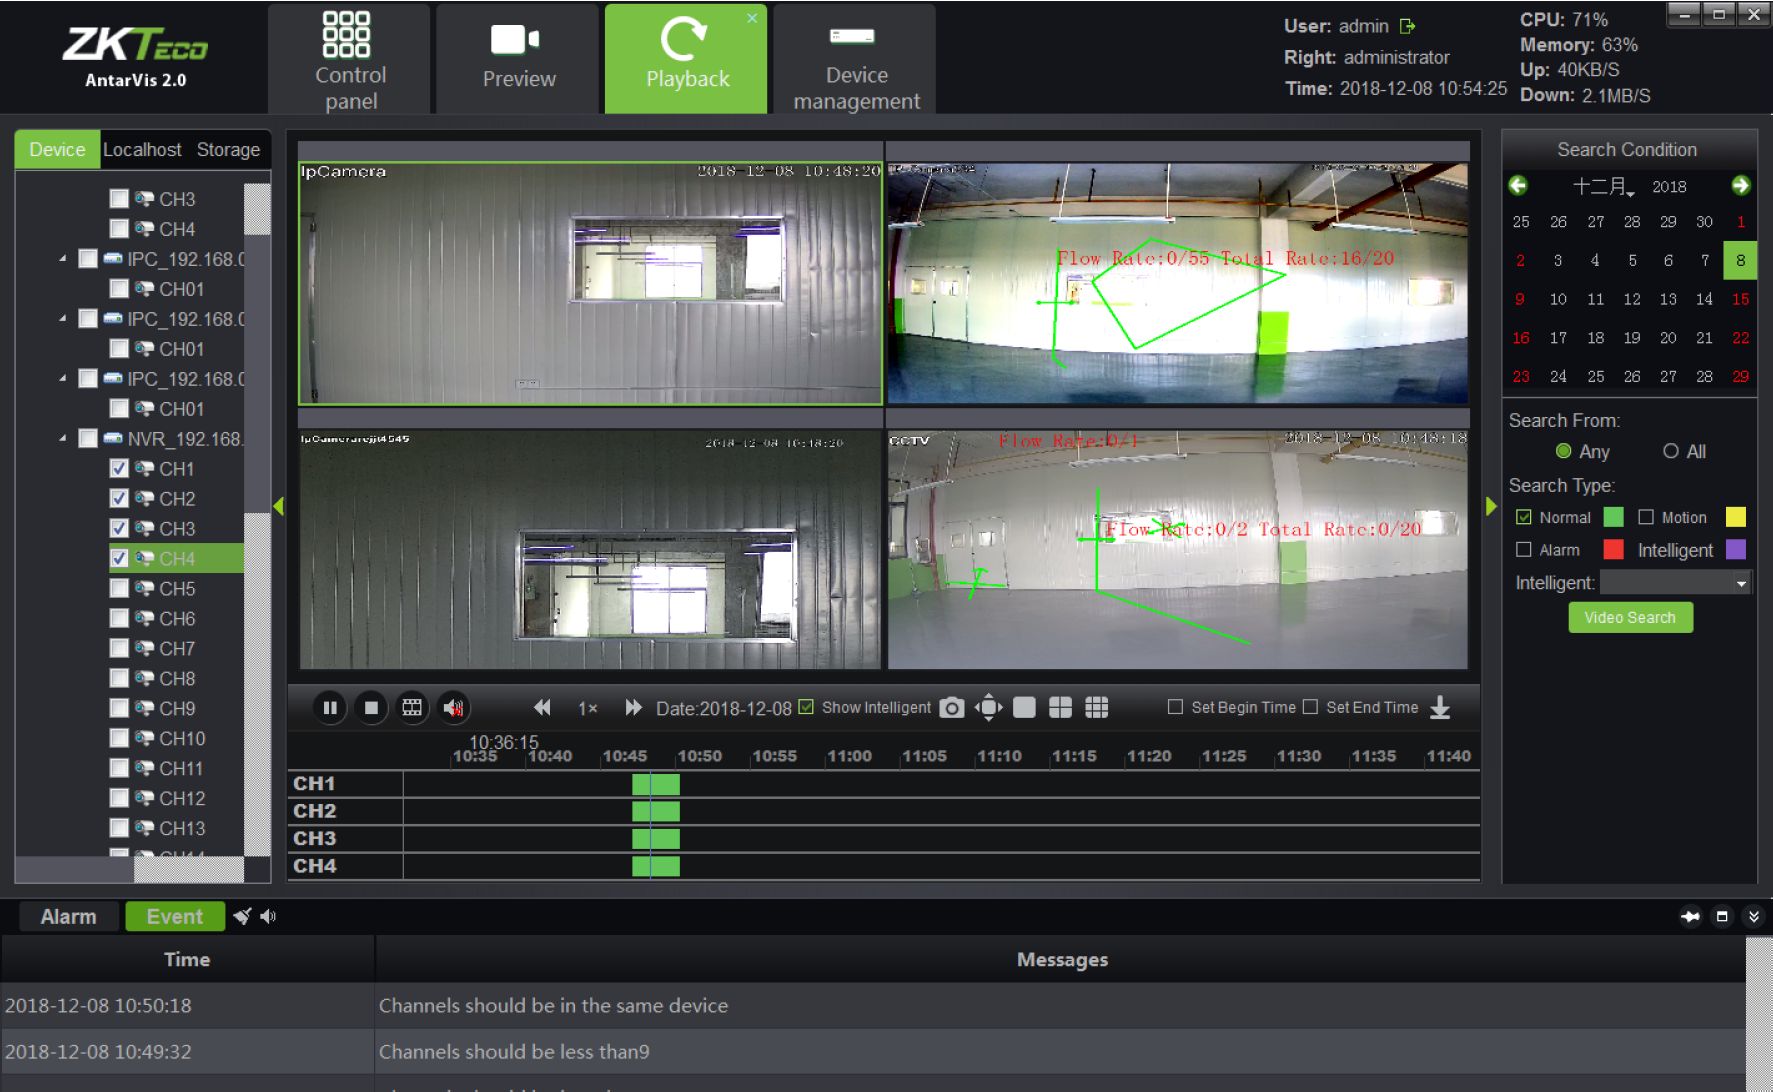
Click on
on the interface to start playing or pause; click on
to stop playing. Place the
cursor on the video bar and scroll the mouse wheel to enlarge or reduce the scale of the video
bar. Double-click on the video bar to play, and double-click in the timeline of playback to switch the
time stamps for playback, as shown in the figure below:
26 Antarvis2.0 User Manual
During playback in several channels, select certain windows, double left-click to switch the window into full screen; place the mouse on certain window, scroll the mouse wheel to operate digital enlargement of this window.
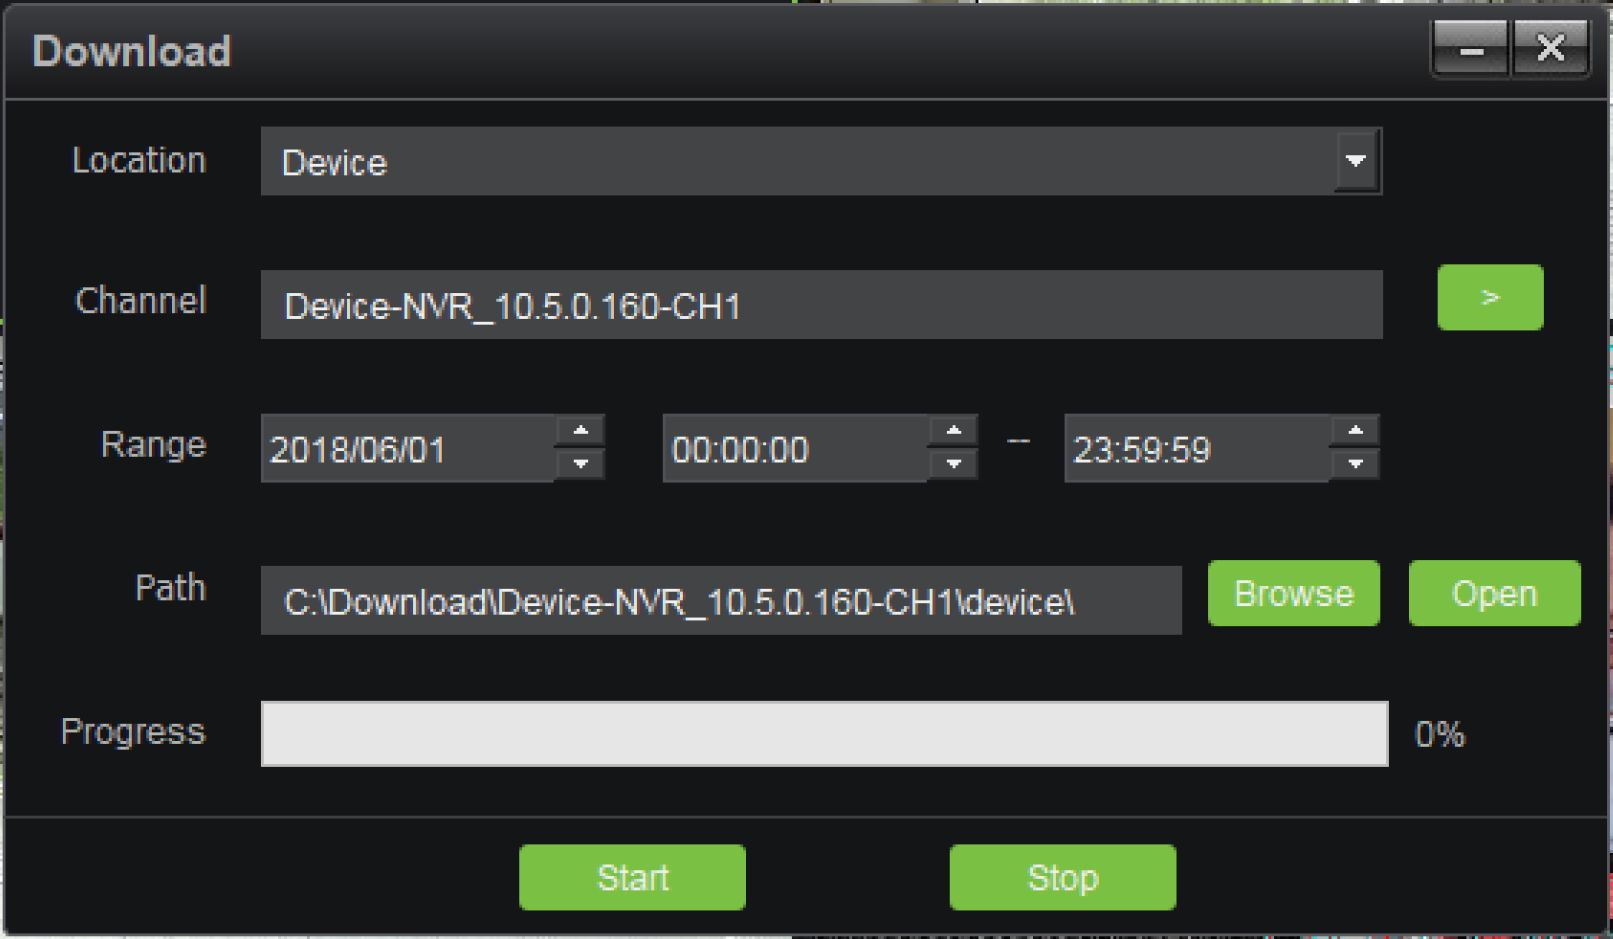
Click on the
button on the interface to enter the download interface of the video file, as shown
below:
Select the video location(including device videos and storage server videos), channel, range of recording time file save path in proper order, click on the “Start” button to start downloading. When the progress reaches 100%, download is completed.
Among the functional buttons
on the interface,
represents frame play; click on the button to play the selected video frame by frame, and one
frame will be played for each click.
represents audio switch, which can turn on/ off the audio
of playback.
represents play speed adjustment buttons, with which, users may
Antarvis2.0 User Manual 27
n
adjust the play speed between 1/16X and 16X.
represents the capture button; click on this
button to take a snapshot during playback.
represents the full-screen button; click to switch to
full-screen (right-click to exit the full-screen mode).
represents window-split buttons;
users may manually switch the display to single screen, 4 screens and 9 screens as needed.
represents the starting time and ending time; As for certain play
point, select the starting or ending time to add a sign on the video bar. When the starting or ending time is selected, click on “Download” to rapidly download the video between the two tags to facilitate further operations.
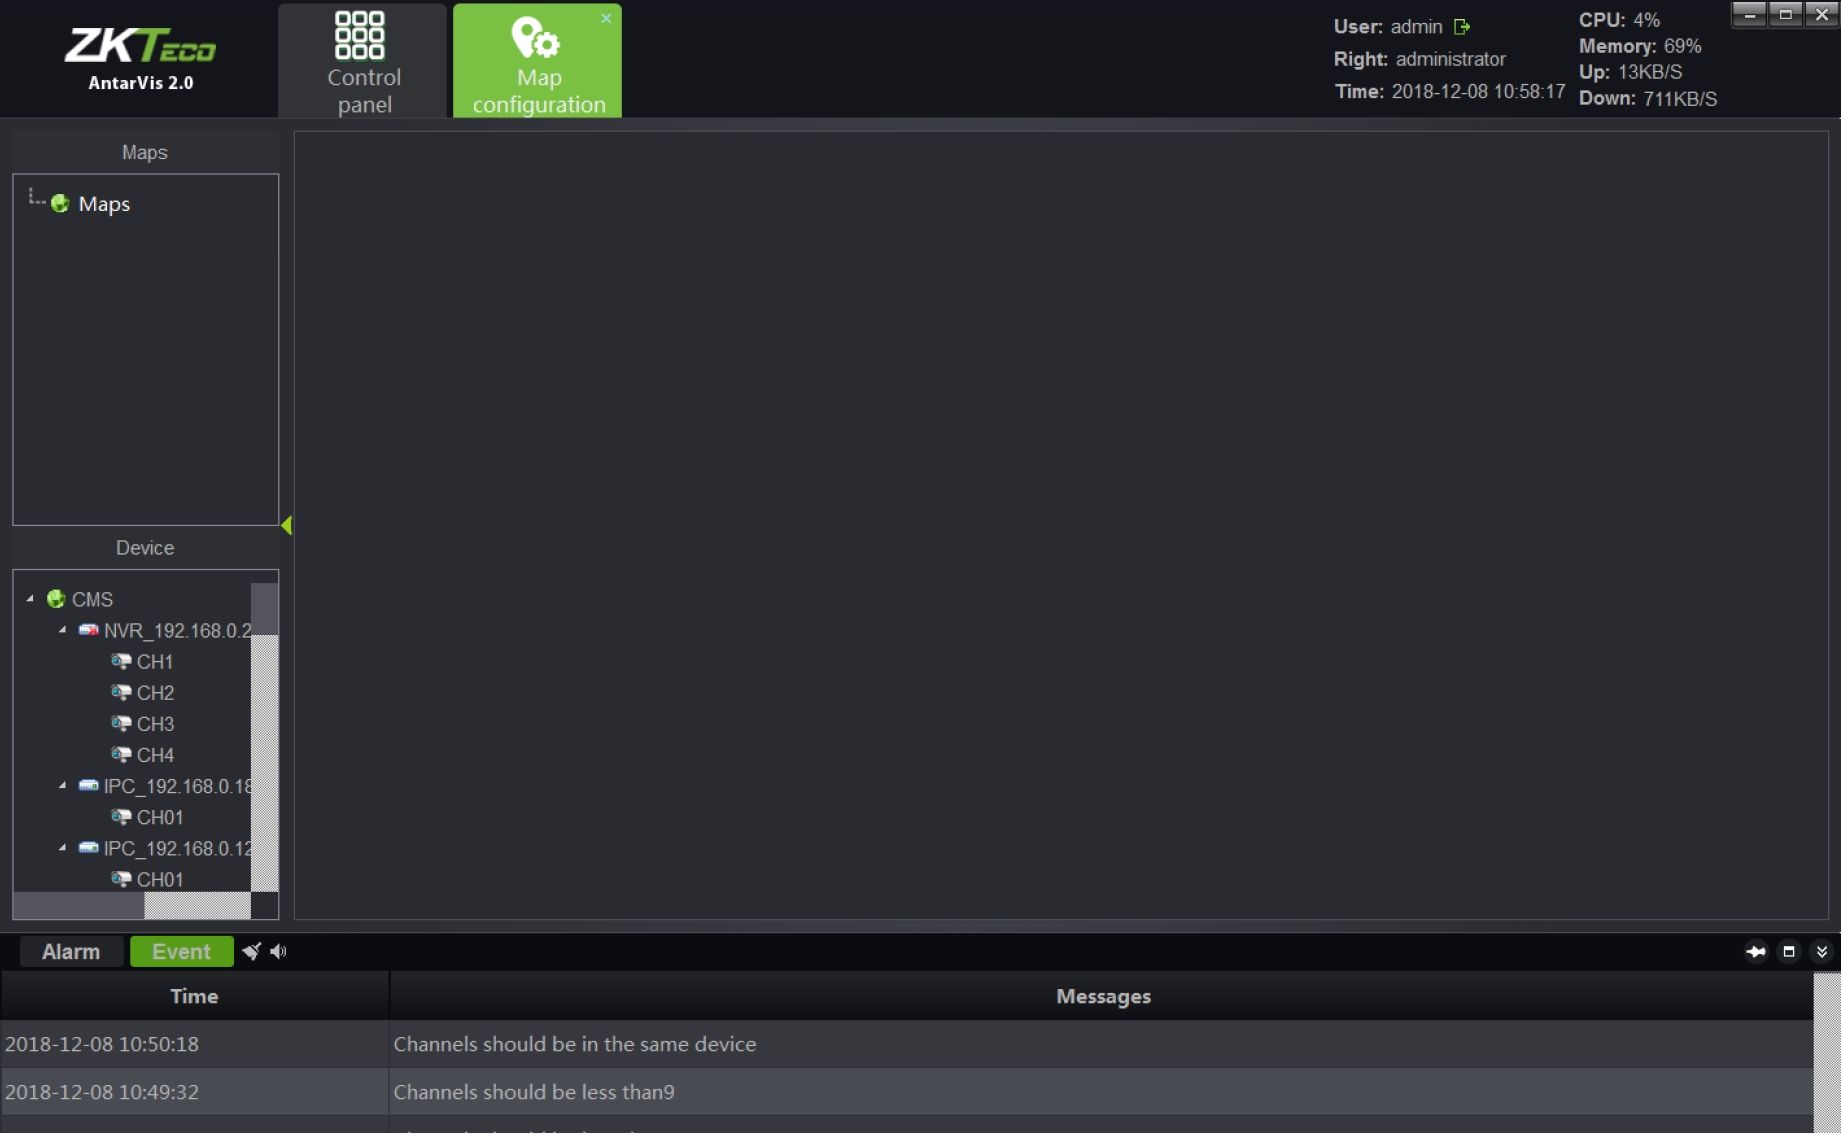
Click on “Map configuration” on the main interface to enter the map configuration module, as shown below:
Right-click on the signed place in the figure, select “Add map”, pop up the window:
28 Antarvis2.0 User Manual
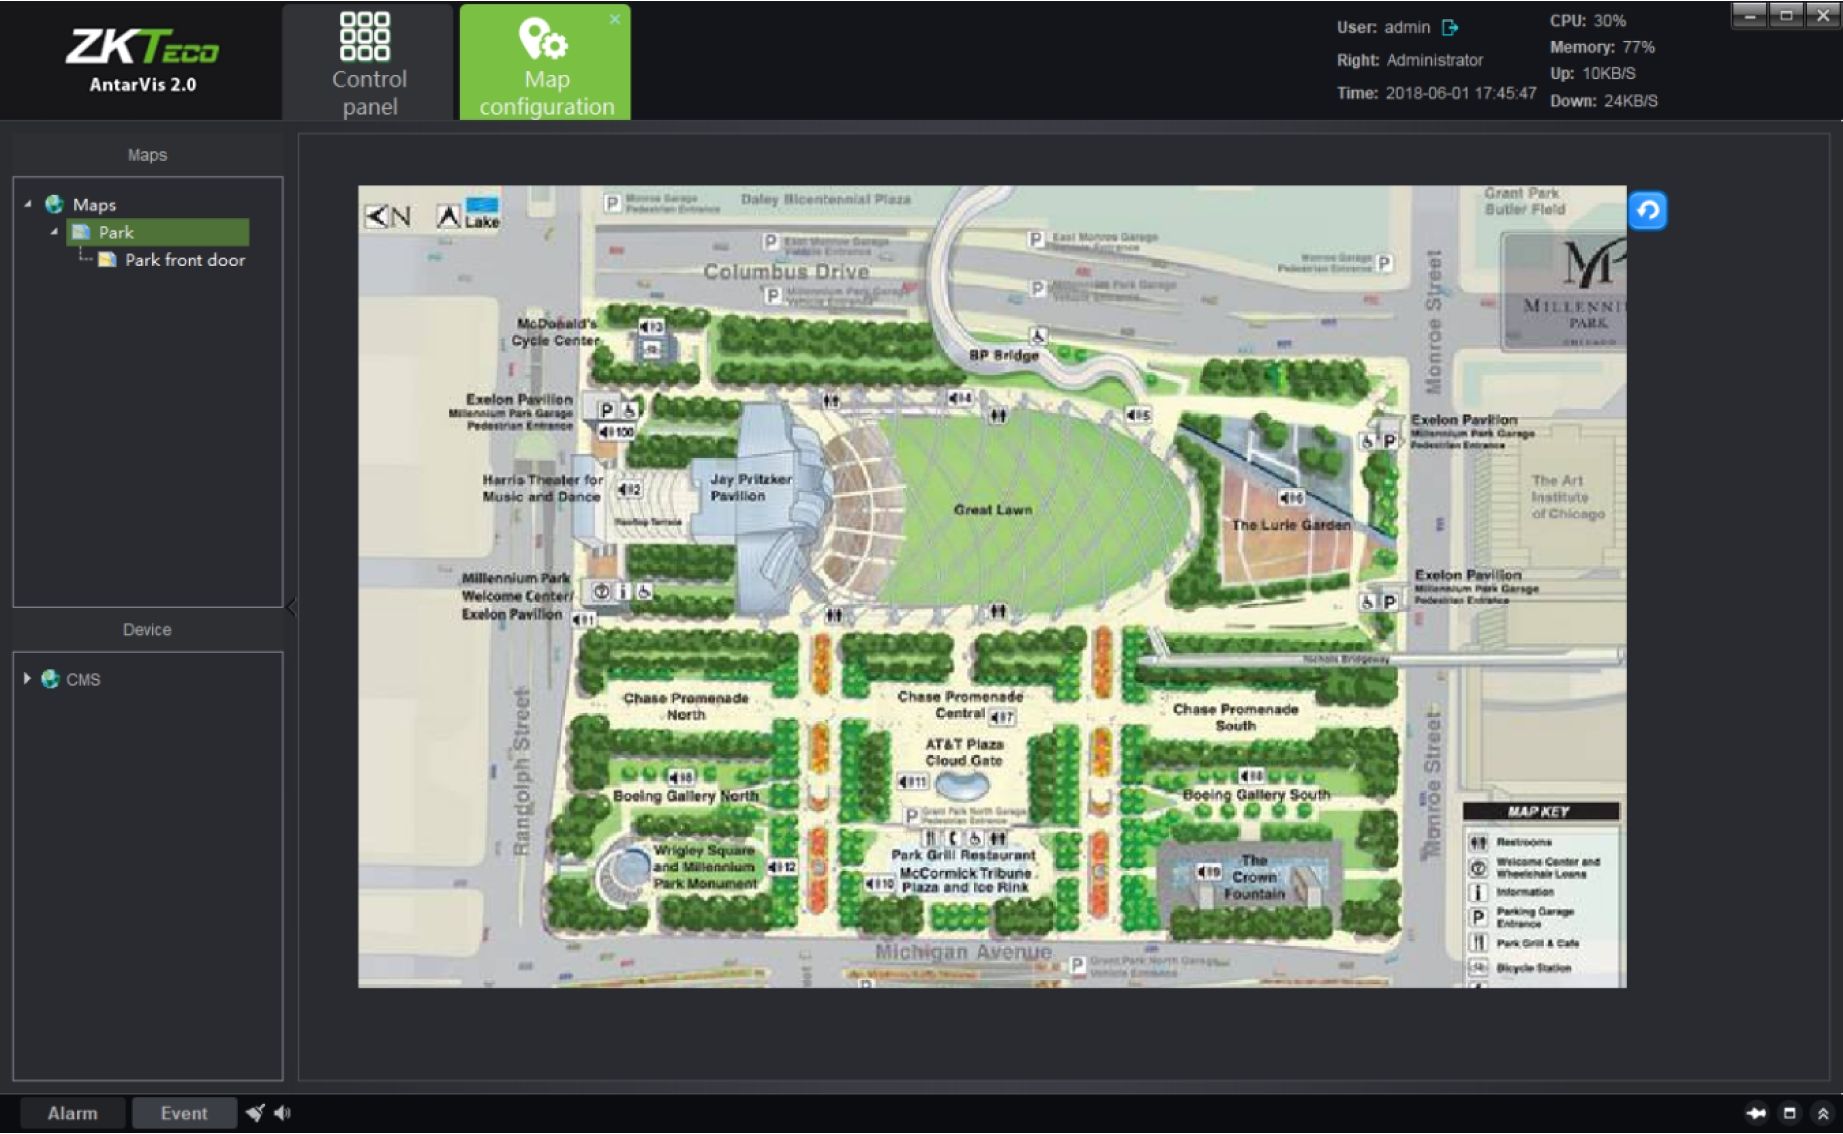
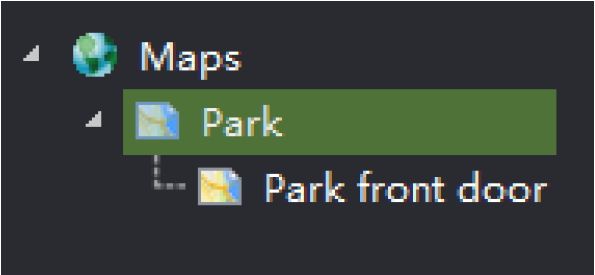
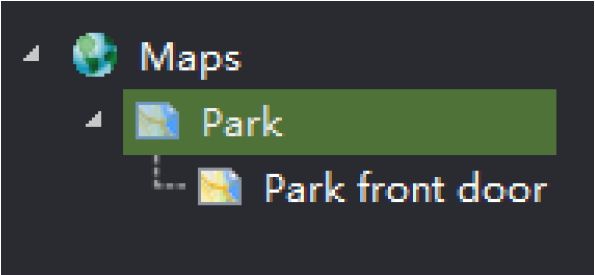
Fill in the name, select a picture, click on “OK” to add a map, then several maps is added; meanwhile, sub-map can be added under the map has been added, as shown in figure:
The map opened will be indicated in yellow for differentiation:
- Add map: add a new map.
- Delete map: delete the selected map.
- Add child map: add a child map under the current map list. You may add several or multi-level
Antarvis2.0 User Manual 29
sub-maps for each map. When a sub-map is added, drag the sub-map to the main map to
complete association and the sub-map shall be displayed in the main map as the icon
Double-click on the icon in the main map to switch to the corresponding sub-map; and click on
the
button in the sub-map to return to the main map.
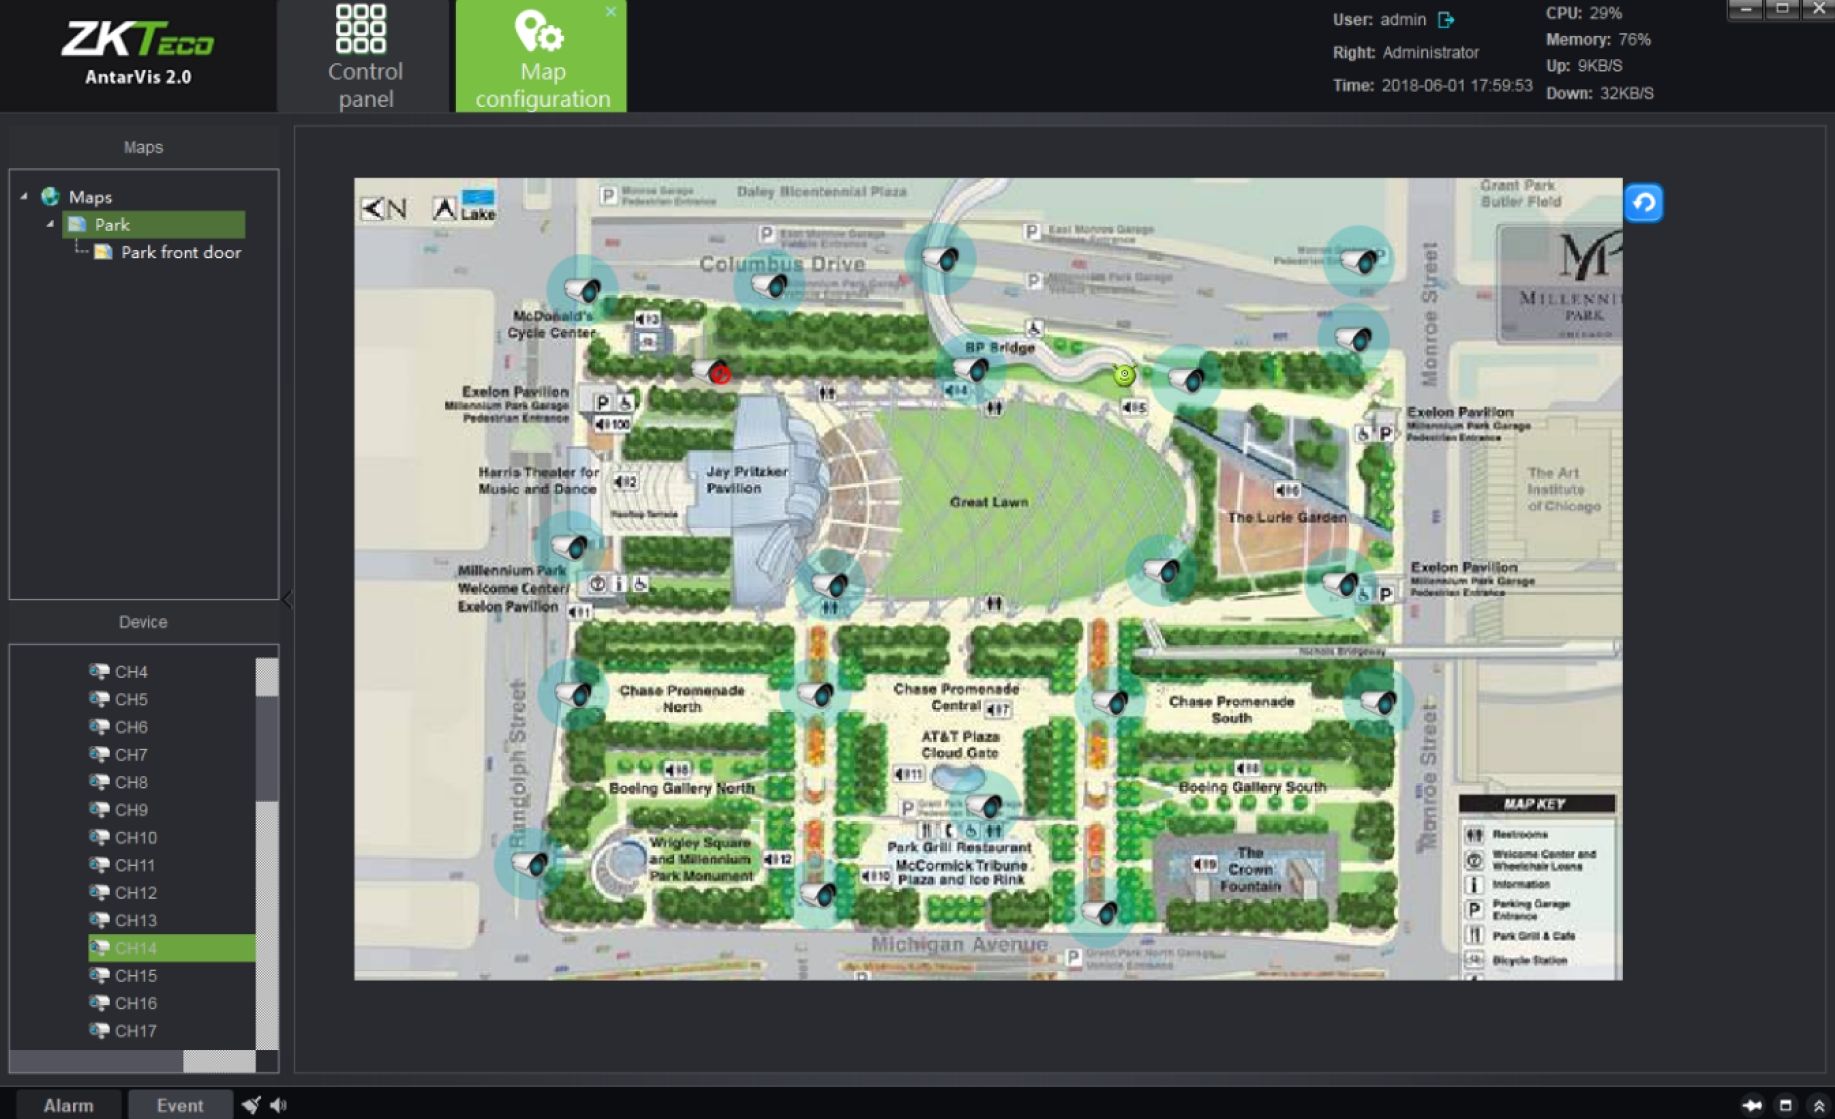
Drag the device channel or alarm input from the lower-left to the map, then the deployment will be completed:
©Note: as the channel has been dragged to the map, the position shall be adjusted by dragging it again; right-click on the deployed channel to select or delete an icon (bullet/ dome/ PTZ). Place the cursor on the map, scroll the mouse wheel to zoom in/out the map. The channel deployed to the map shall not be dragged repeatedly. Place the mouse on the deployed channel to view the channel information.
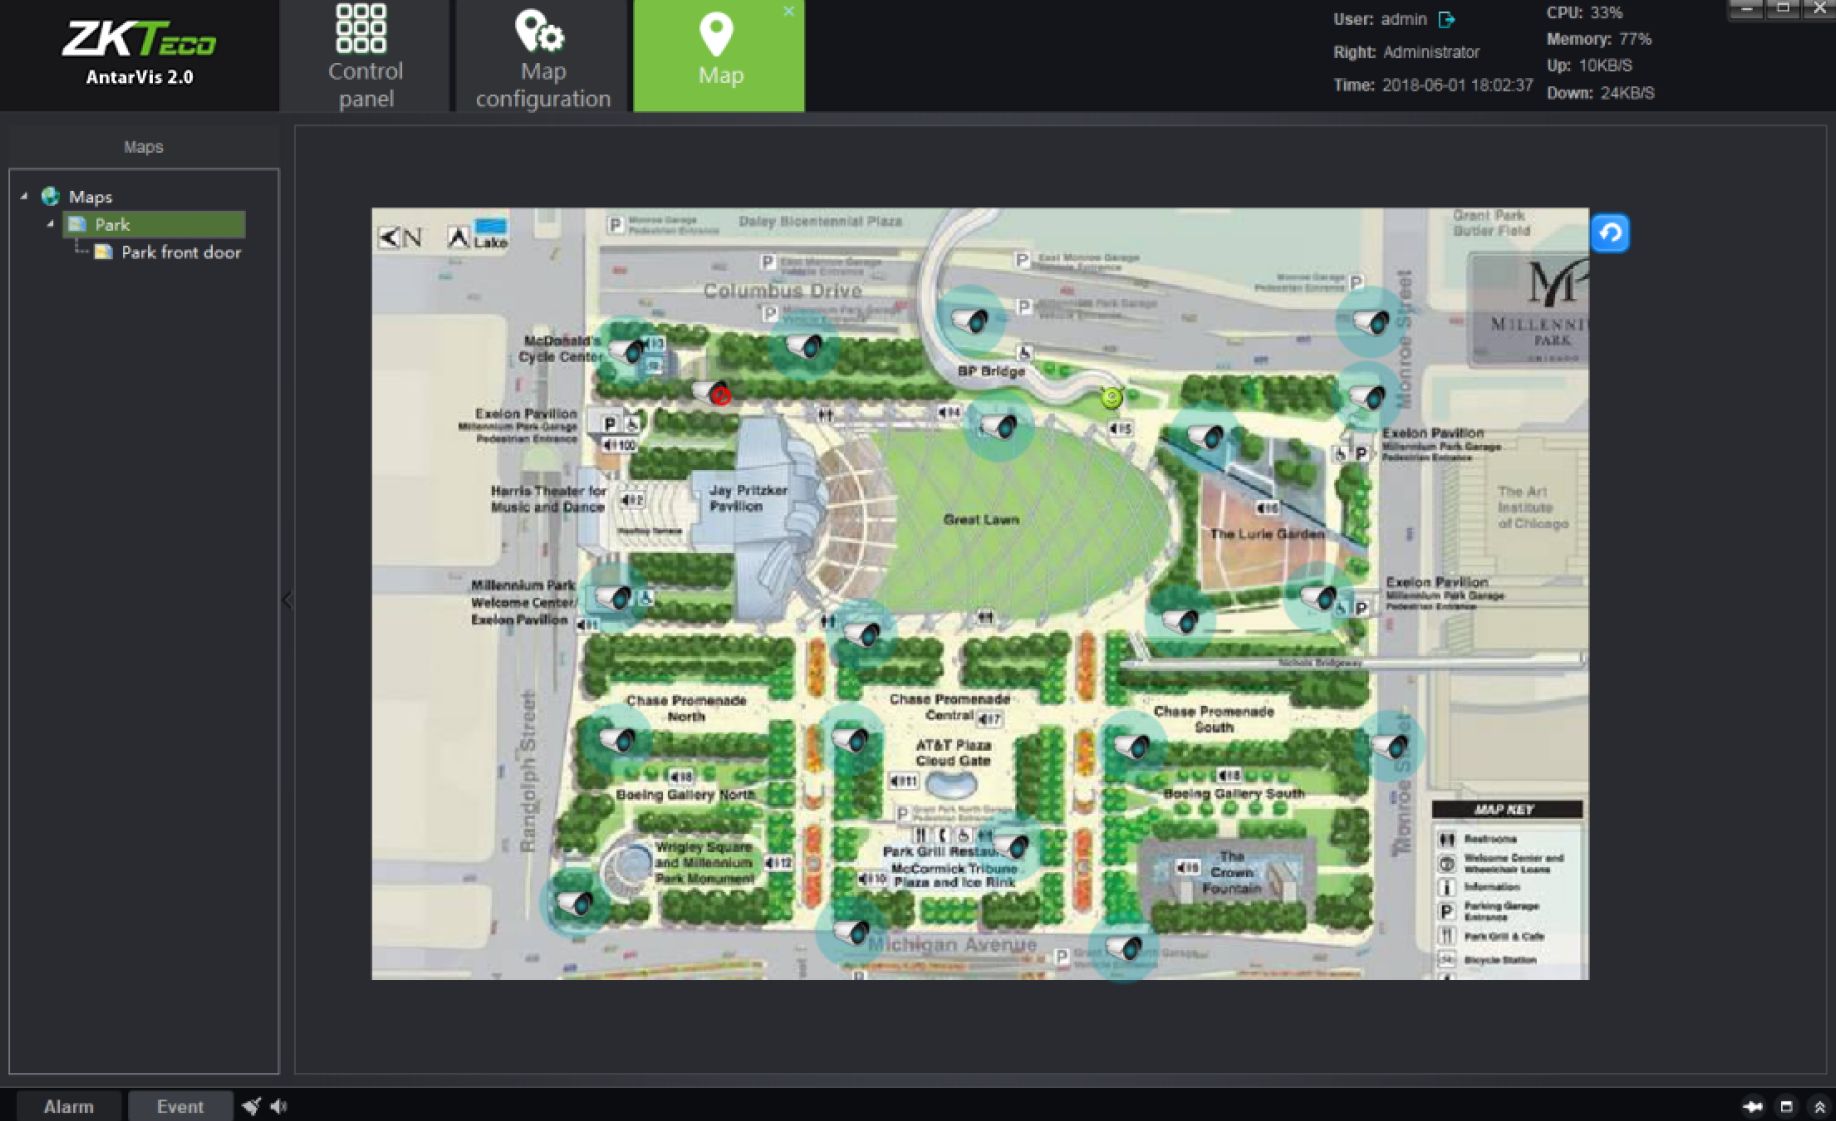
Click on the “Map” button on the main interface to enter the map management module as shown
30 Antarvis2.0 User Manual
below:
Double-click on the map to view the map configured and deployed channel. The relevant configuration and modification cannot be executed on the map. Right-click on the channel deployed on the map to allow preview and playback of the corresponding channel. Users, in the actual applications, may swiftly call the preview and playback of the corresponding channel according to the map, which makes the operation clearer and easier. When an alarm is triggered and the associated channel is deployed on the map, the channel icon on the map will turn into red.
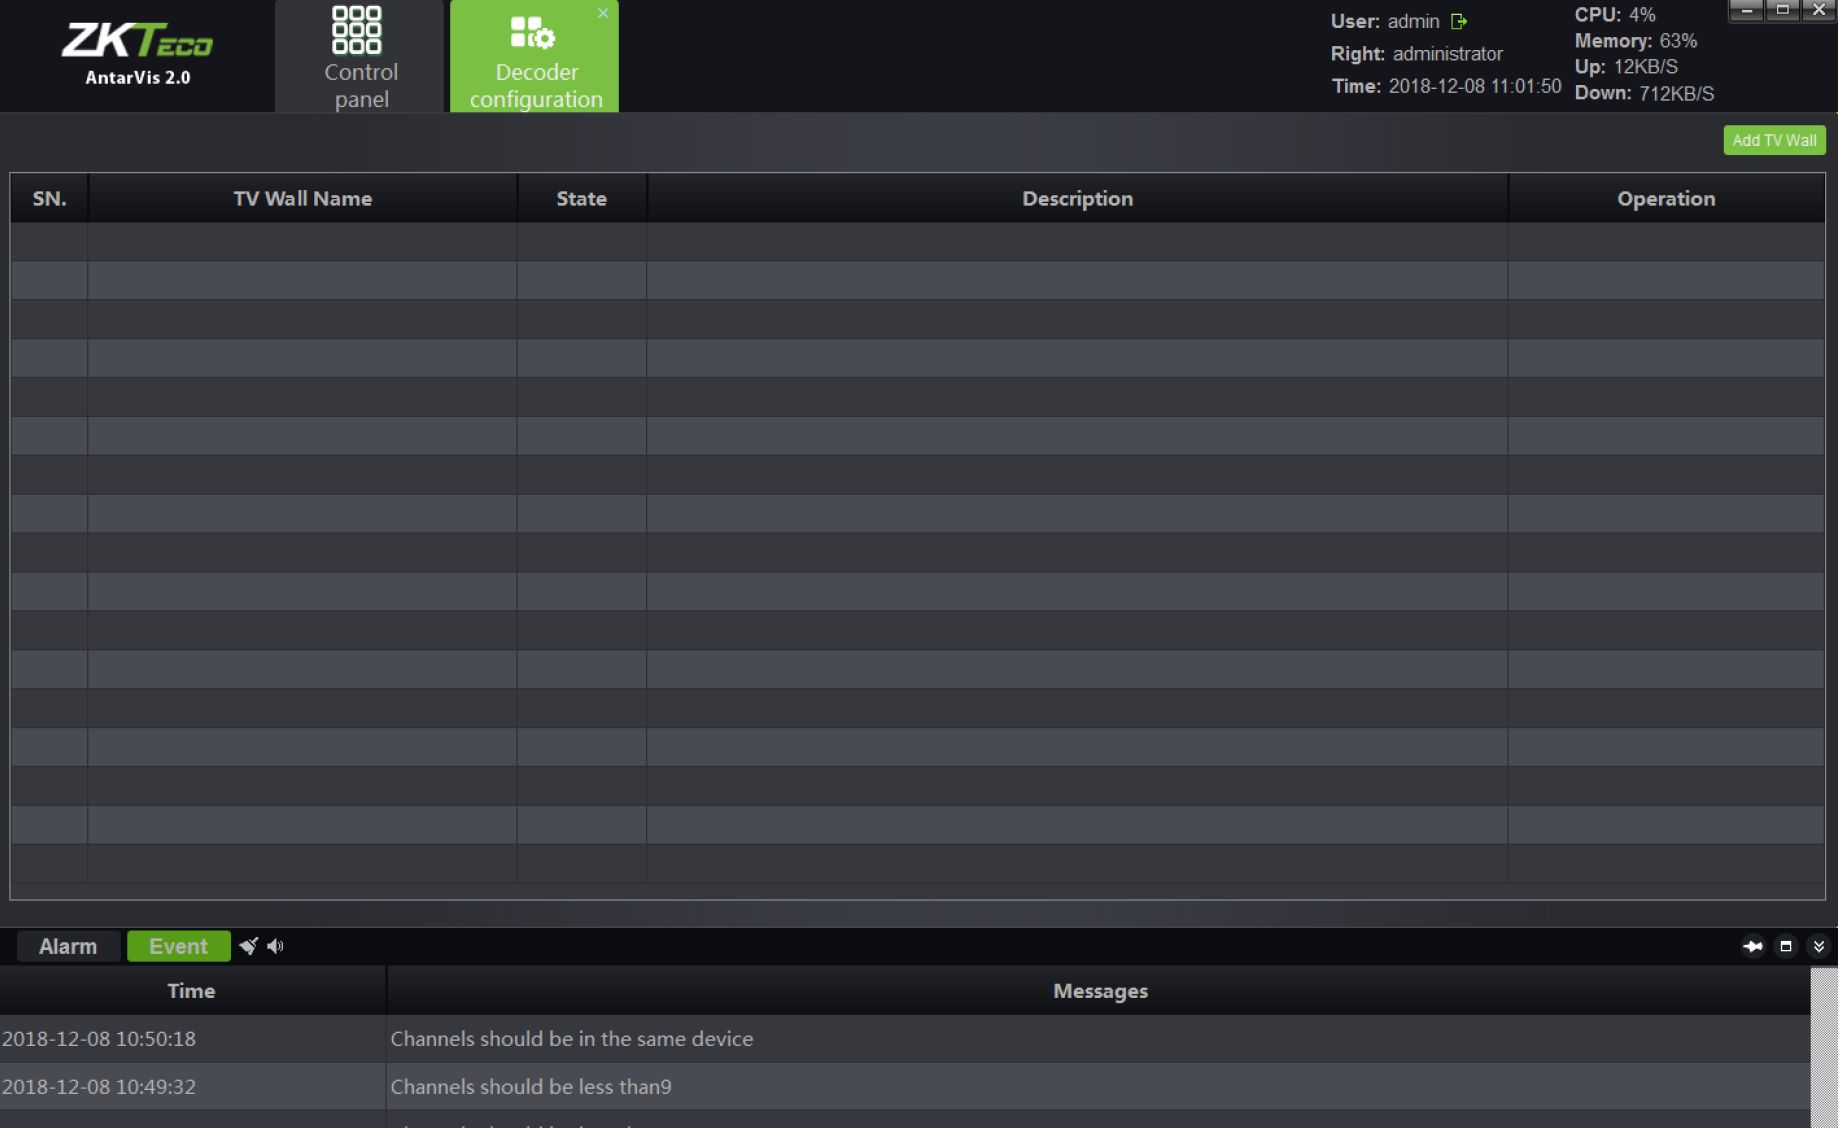
Click on the “Decoder configuration” button on the main interface to enter the decoder configuration module:
Antarvis2.0 User Manual 31
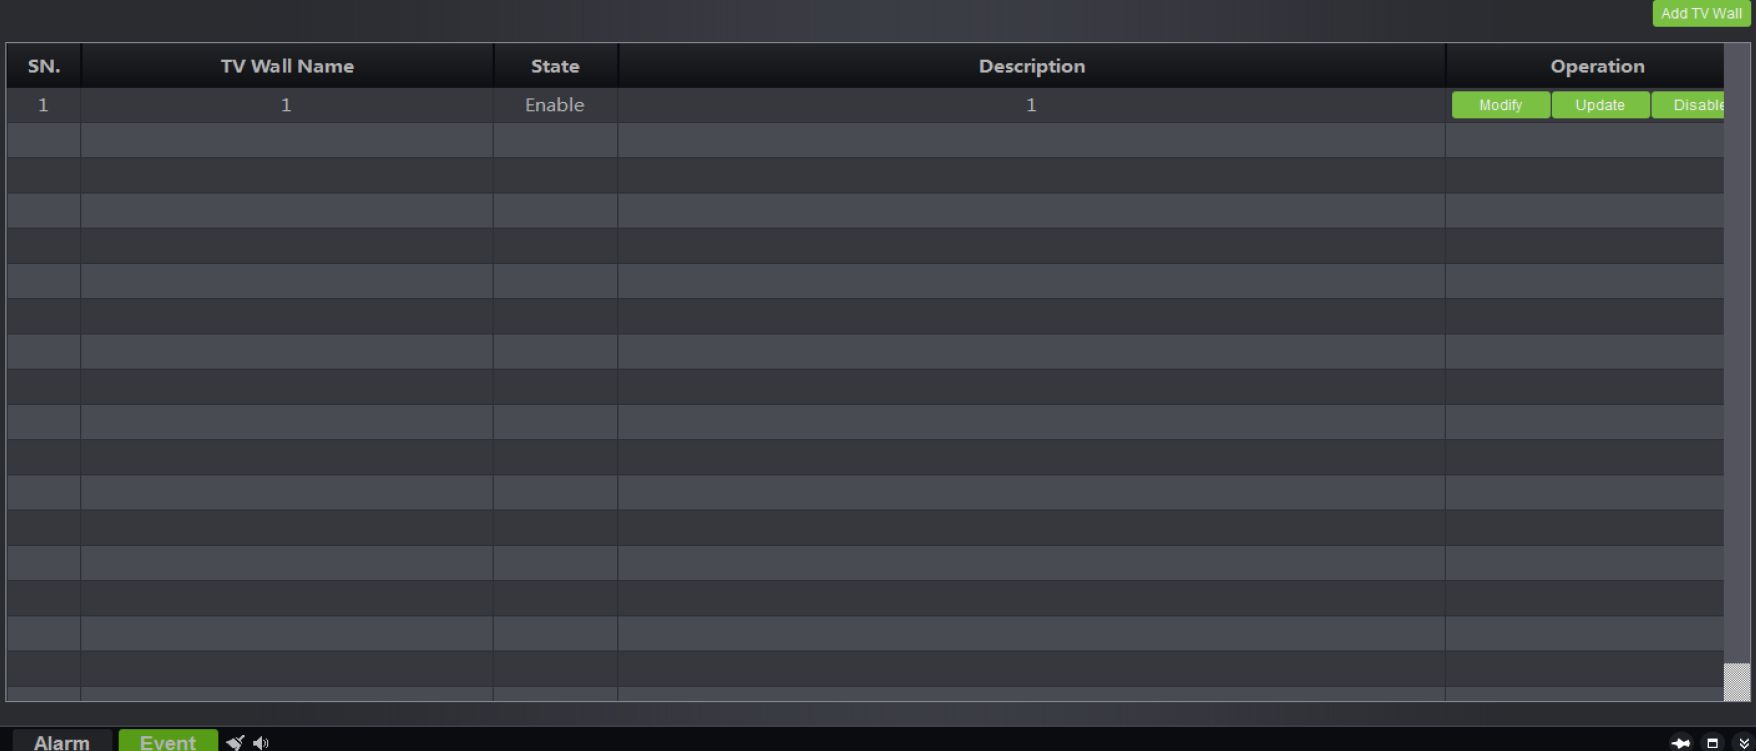
The module shows the TV wall scheme currently set and the enabled status of the scheme. In terms of the existing TV wall scheme, you may operate “modify”, “delete” and “disable/enable”. Click on “Add TV wall” button in the top right corner to add new TV wall schemes, as shown in the figure below:
32 Antarvis2.0 User Manual
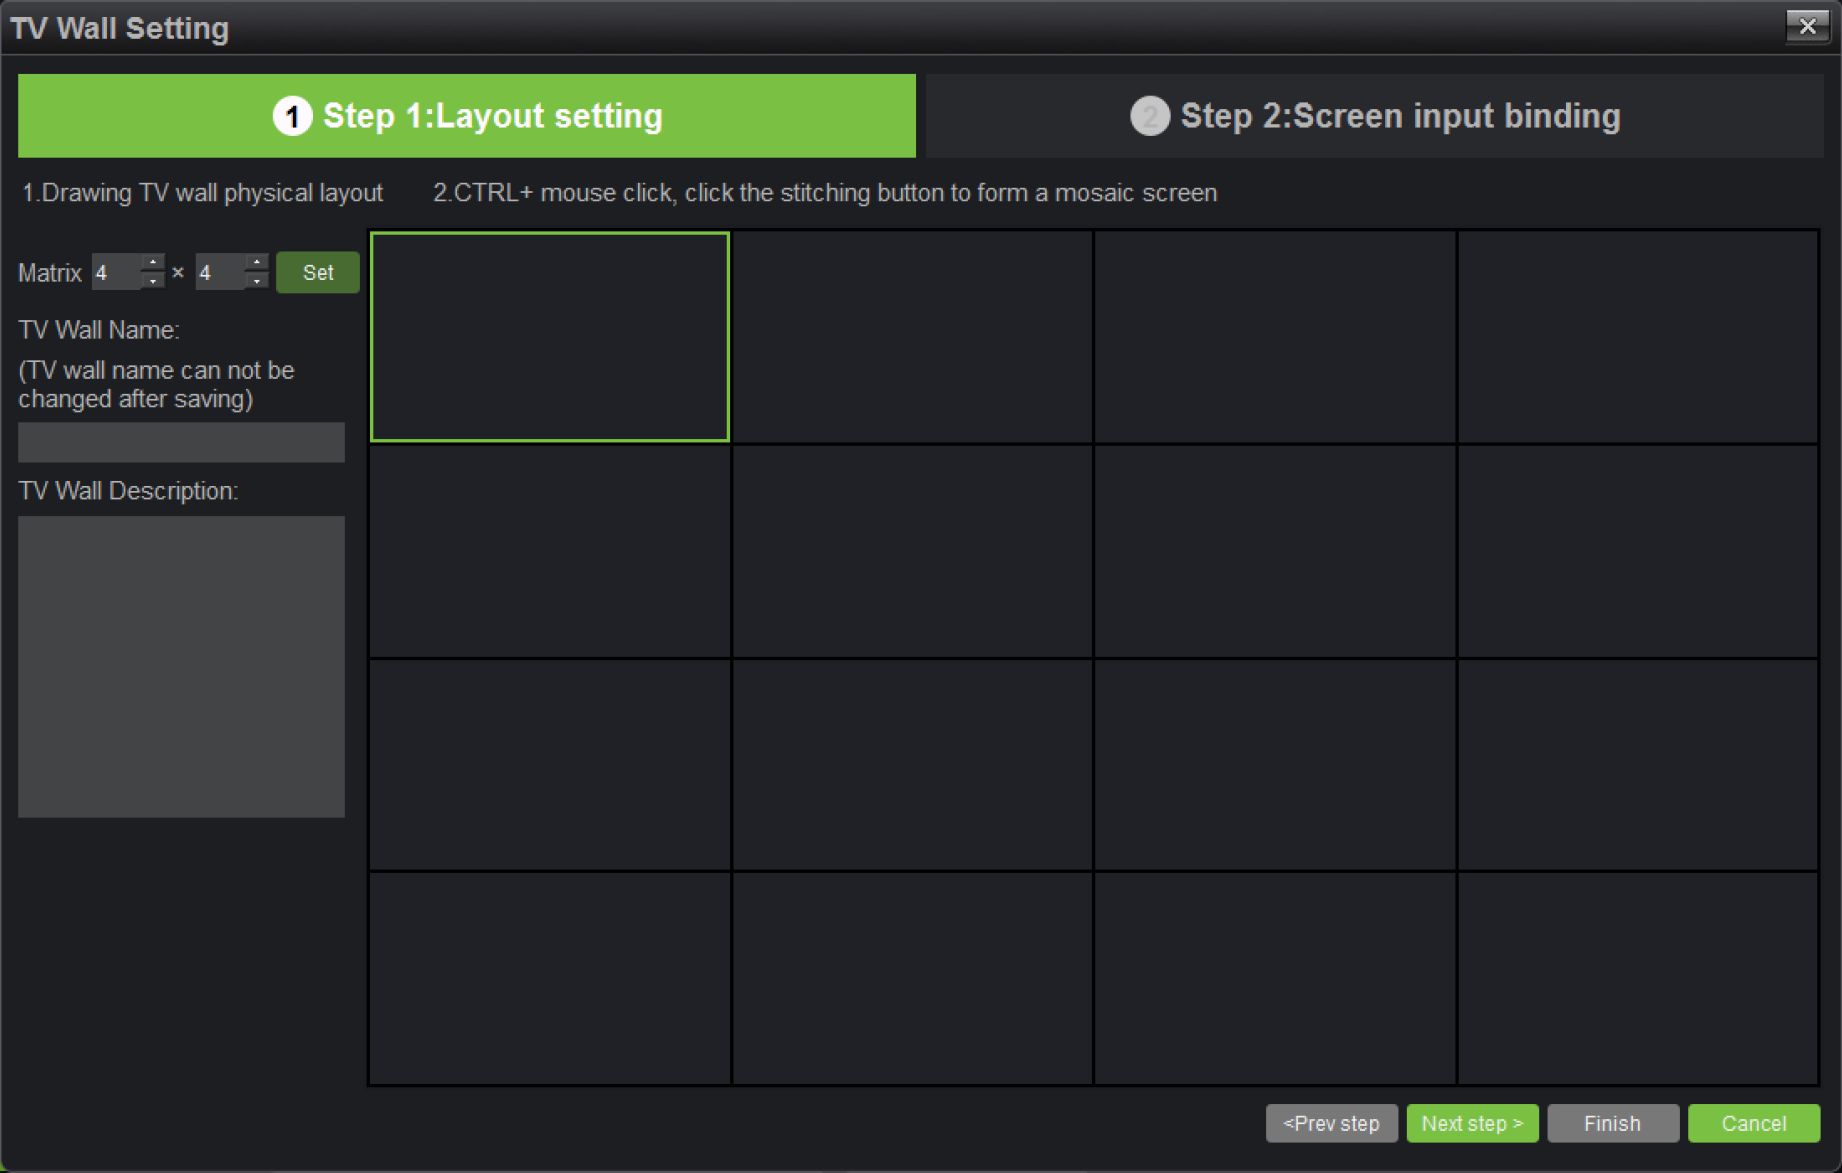
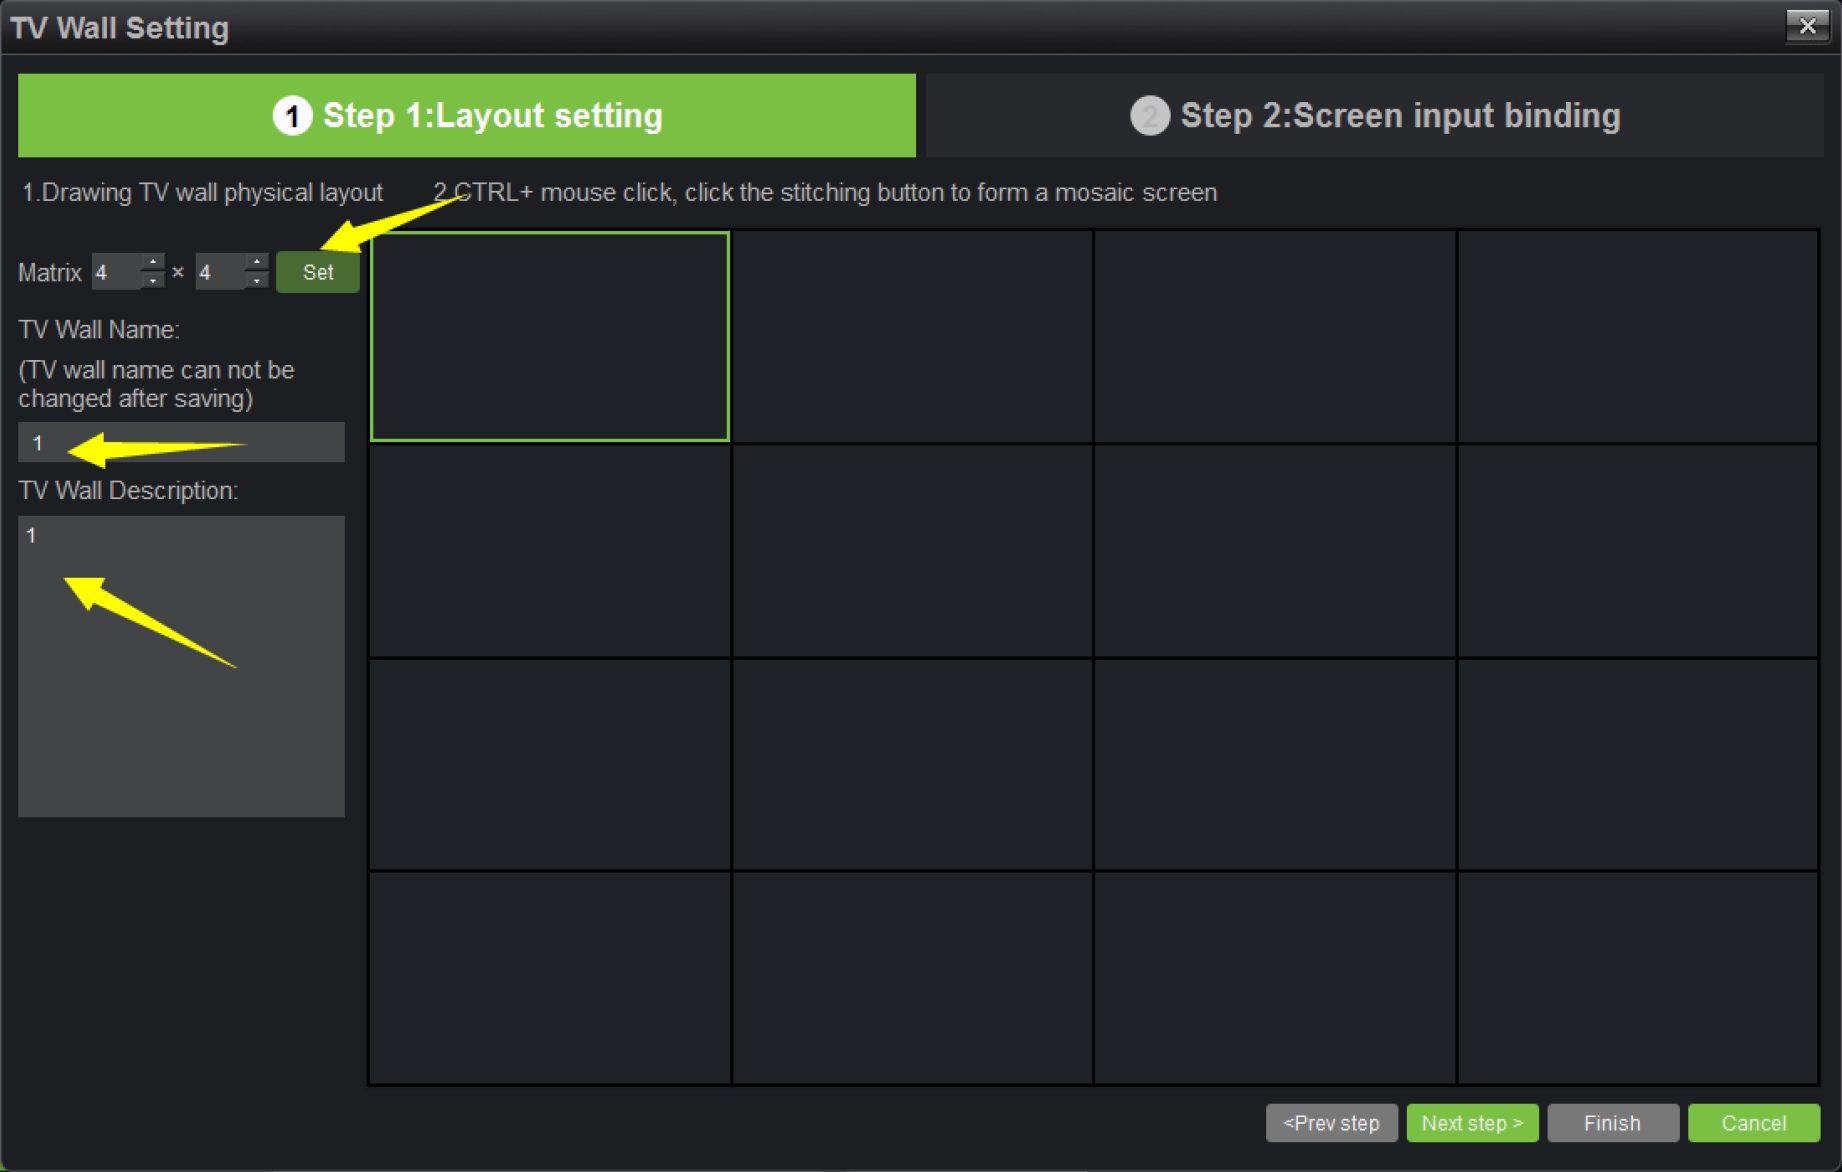
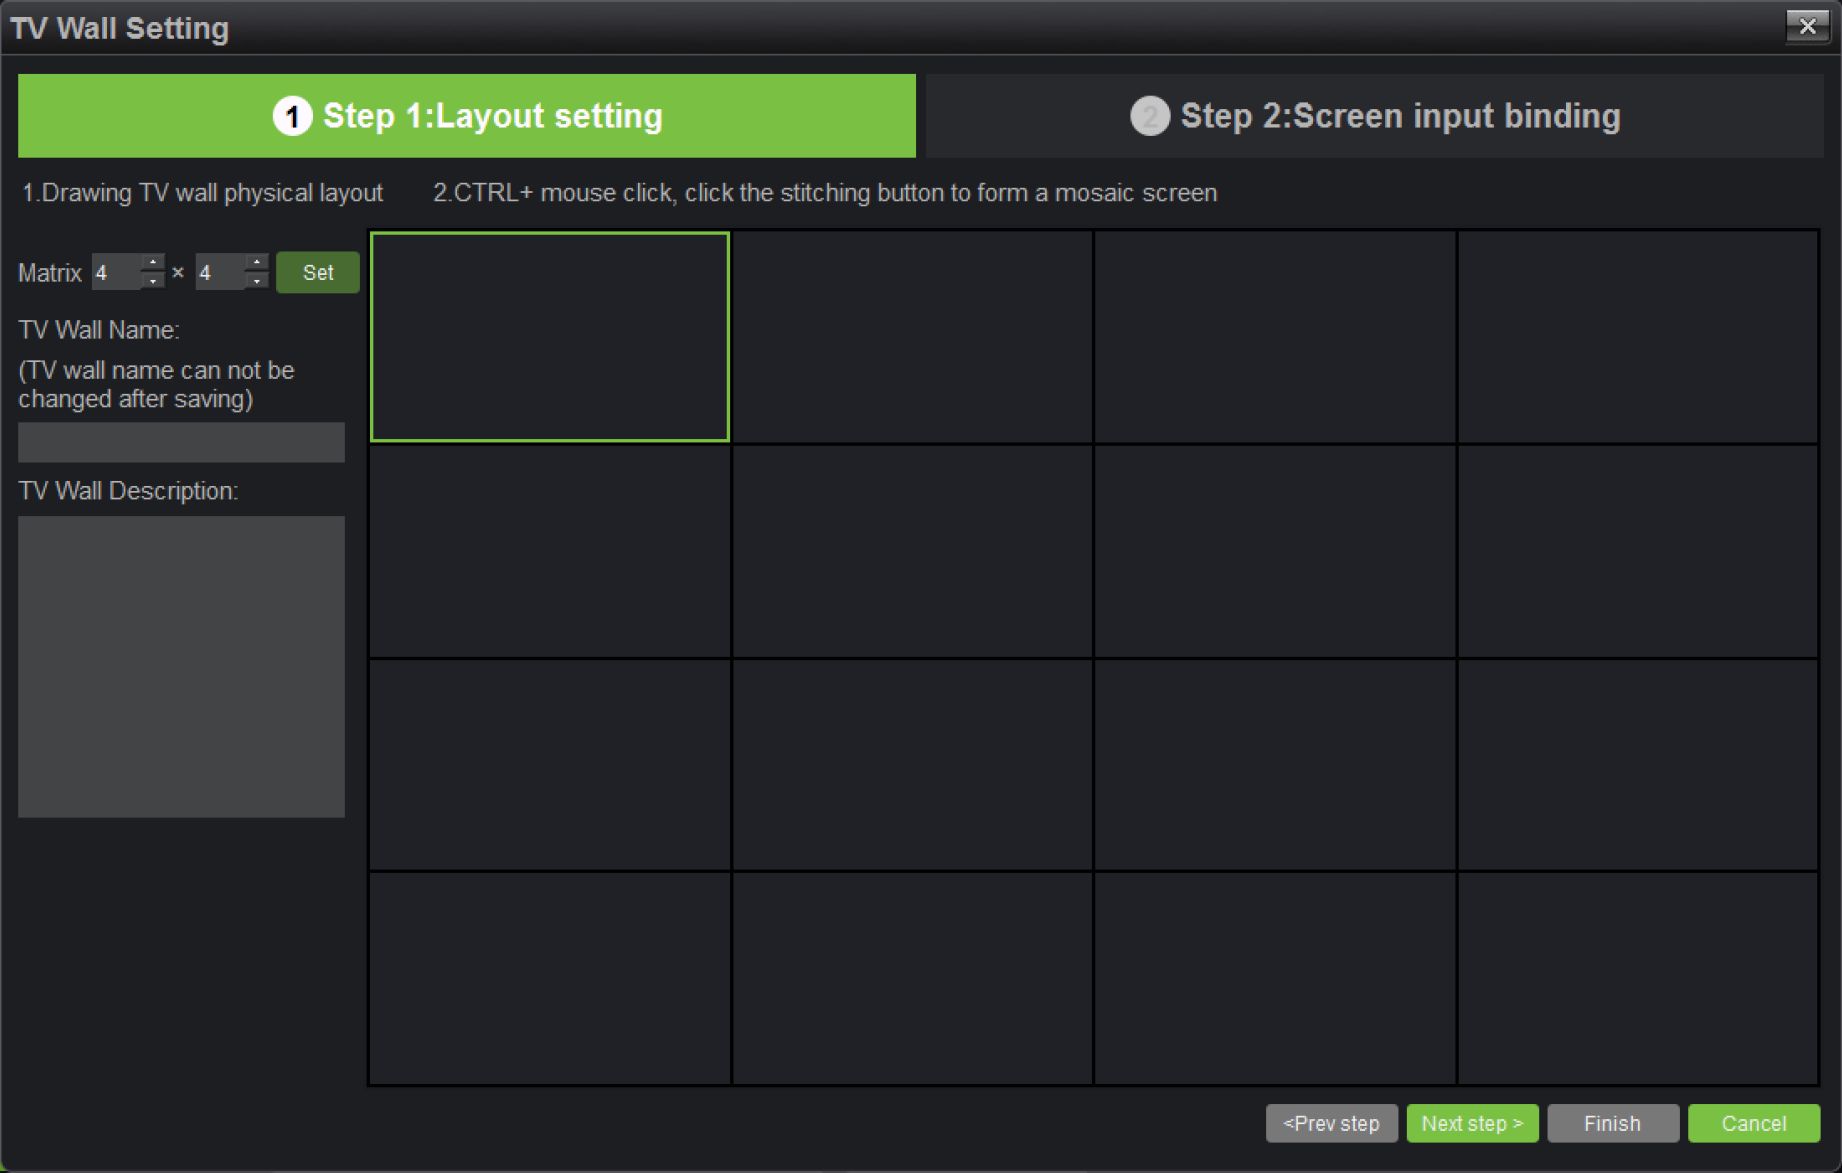
Set a TV wall layout, fill in the relevant information here:
- Matrix layout setting: user cab set the matrix layout as actually needed, maximally support 8×8 layout; when a layout is selected, click on “Set” to make the changes effective.
- Fill in the name of TV wall scheme; users may customize the name of the TV wall scheme as needed (©Note: the name will not be modified as defined).
- TV wall scheme description: users may describe the scheme for differentiation, optional.
- TV wall splice: users may set the TV wall as splice mode or non-splice mode.
As completed, click on “Next step”.
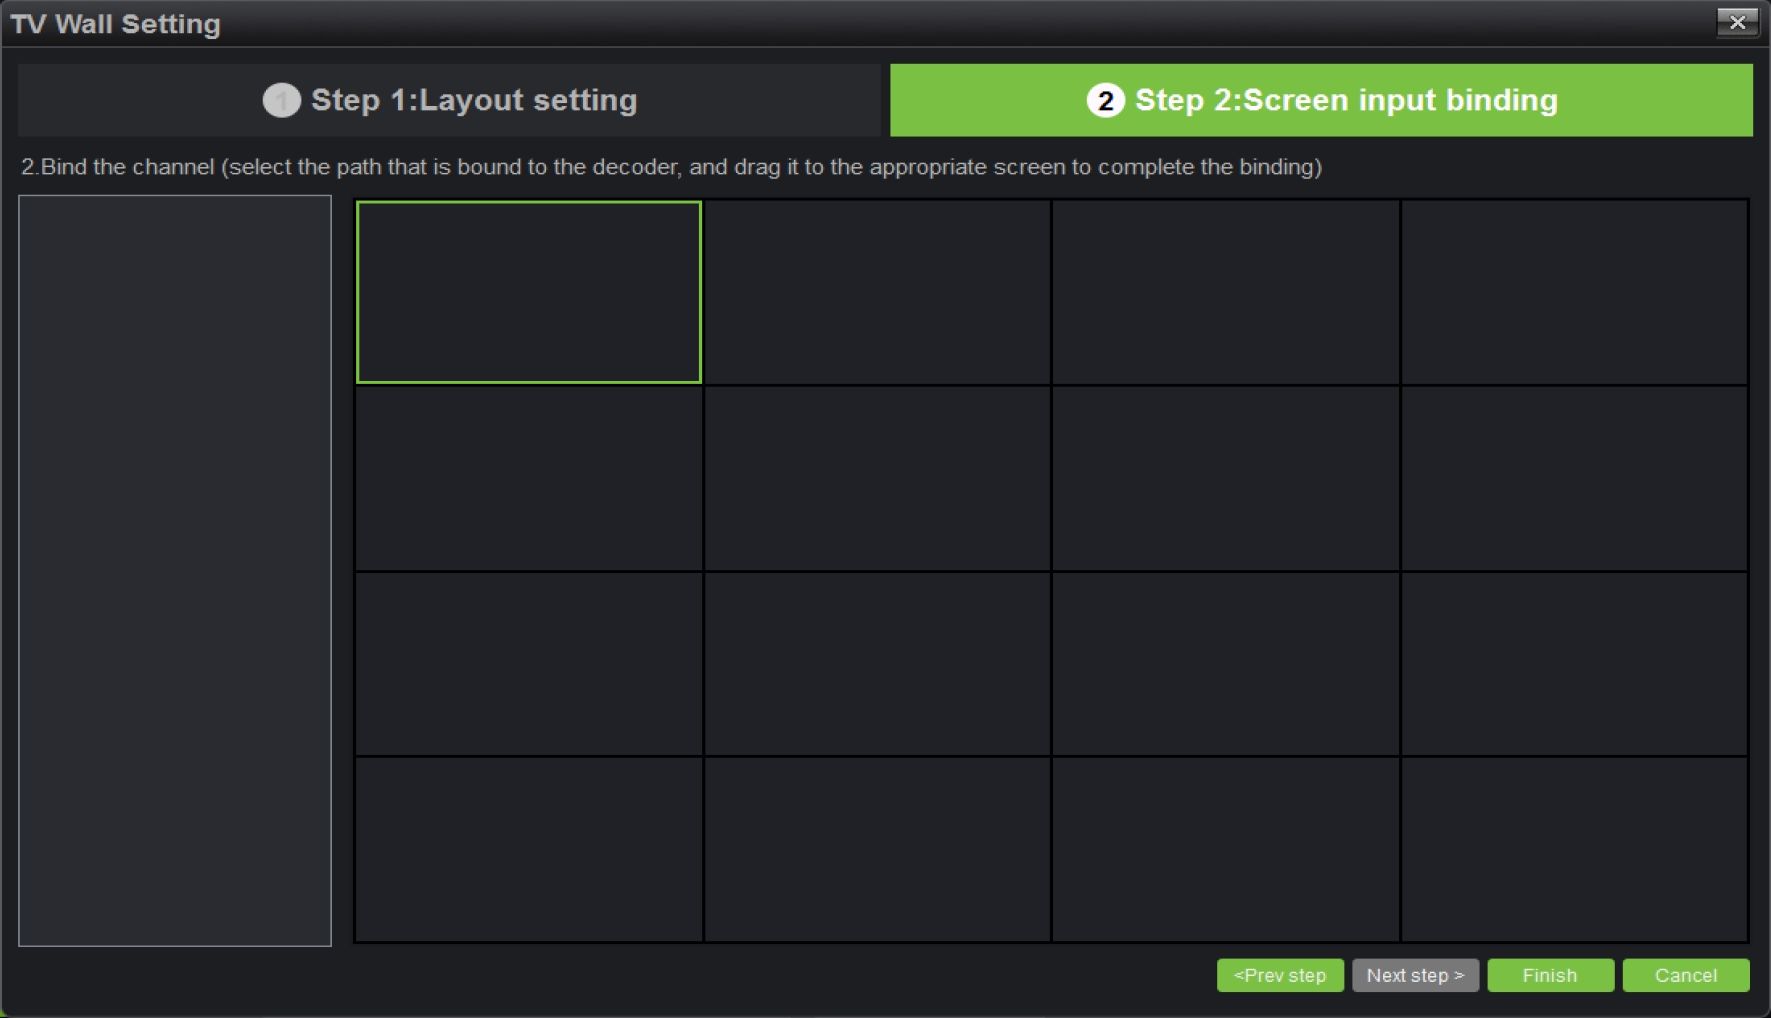
Drag the decoder added to the layout set, as shown below:
Antarvis2.0 User Manual 33
On this interface, users may set the layout and associate the decoder to the TV wall matrix layout according to different situations. To complete settings, click on “Finish”.
□□□ □□□ DOO
Control
panelDecoder
configurationUser: admin G»
Right: administrator
Time: 2018-12-08 11:10:10
CPU: 11% İJ.E3.
Memory: 65%
Up: 13KB/S
Down: 522KB/S
2018-12-08 10:50:18
Channels should be in the same device
Messages
Channels should be less than9
After finishing the settings, the saved TV wall will be seen on the decoder configuration interface and can be edited, deleted and disabled/enabled.
If the configuration shall be enabled as the setting completed, select “Enable this configuration immediately”, then click on the “Finish” button below. If you do not want to enable the setting, directly click on “Finish” to exit. As the setting is completed, this configuration scheme will be displayed in the decoder configuration list.
34 Antarvis2.0 User Manual
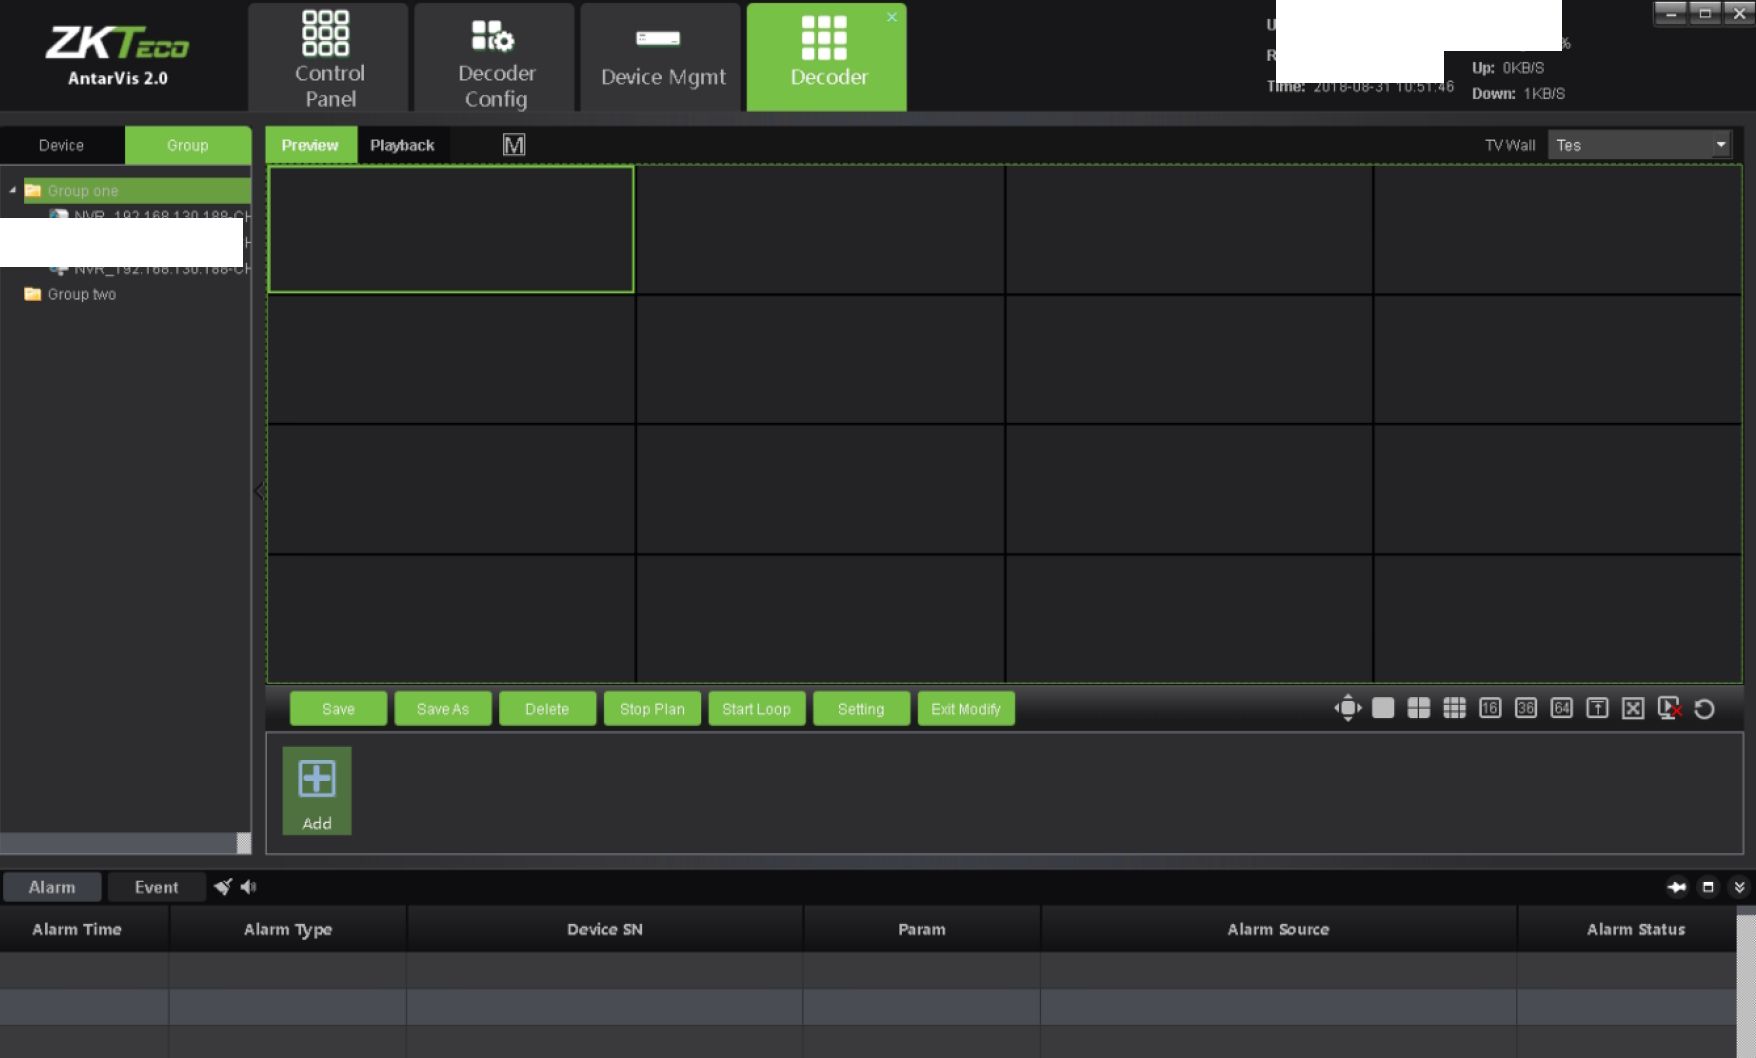
Click on the “Decoder” button on the main interface to enter the decoder management module, as shown below:
User: admin G»
Hııjlıt Admin
CPU: 53%
Memory: 40%
rime: 2018-08-31 10:51:46
^NVR_192.168.130.188-CH
«T NVR_192.168.130.188-Ch
e»NVR 192,188.130,188-CHFirstly, drop-down the check box in the signed place of the figure to select TV wall. All rules set and enabled will be shown in this box. Select a scheme.
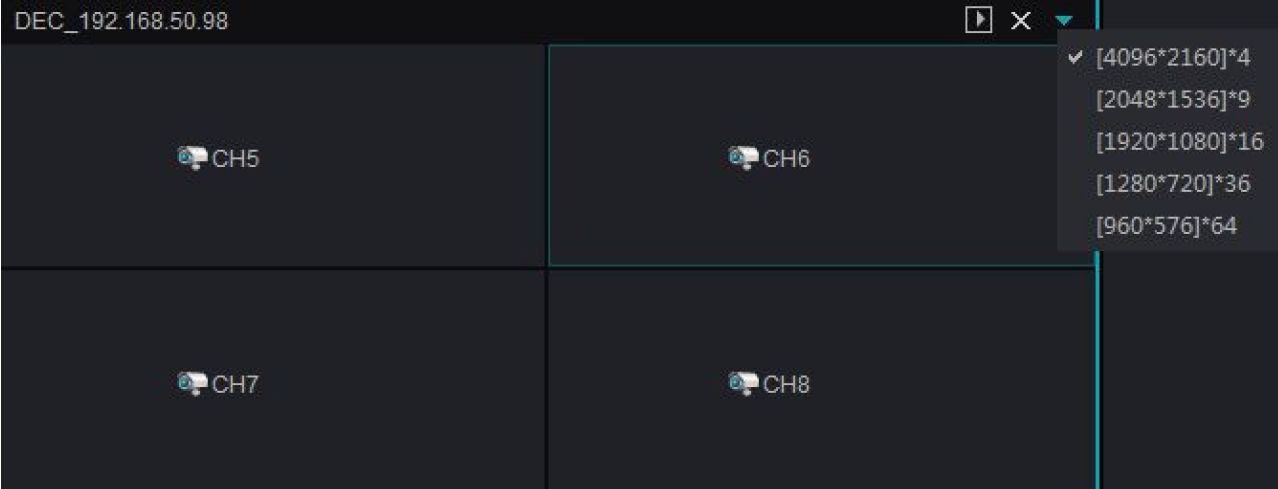
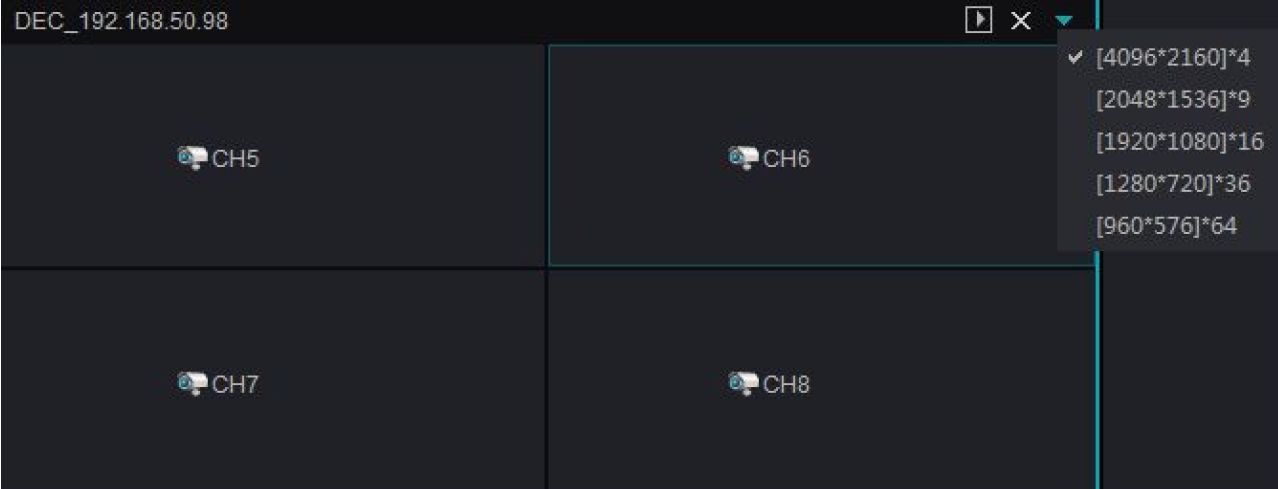
When you have selected a scheme, please set the decoding mode of the decoder to ensure normal decoding. The decoding mode is relevant to the decoder and varies according to different decoders, and the decoding mode is the expression of the decoding capability of the decoder. Click on
the button in the figure, as shown below:
Antarvis2.0 User Manual 35
Decoding mode represents the current decoding capability of the decoder, which is listed in the figure and supports 3 decoding modes, i.e. 16 channels 720 x576, 9 channels 1280 x960 and 4 channels 2048 x1536.
- Please note that the subsequent number represents the maximum resolution of decoding, for example, under the 9-channel mode, the maximum resolution of decoding is 1280×960; the decoding mode of different decoders varies as well. It shall be normally decoded and displayed as the resolution of the front-end IPC has been guaranteed not to exceed the resolution restriction of the current decoder mode.
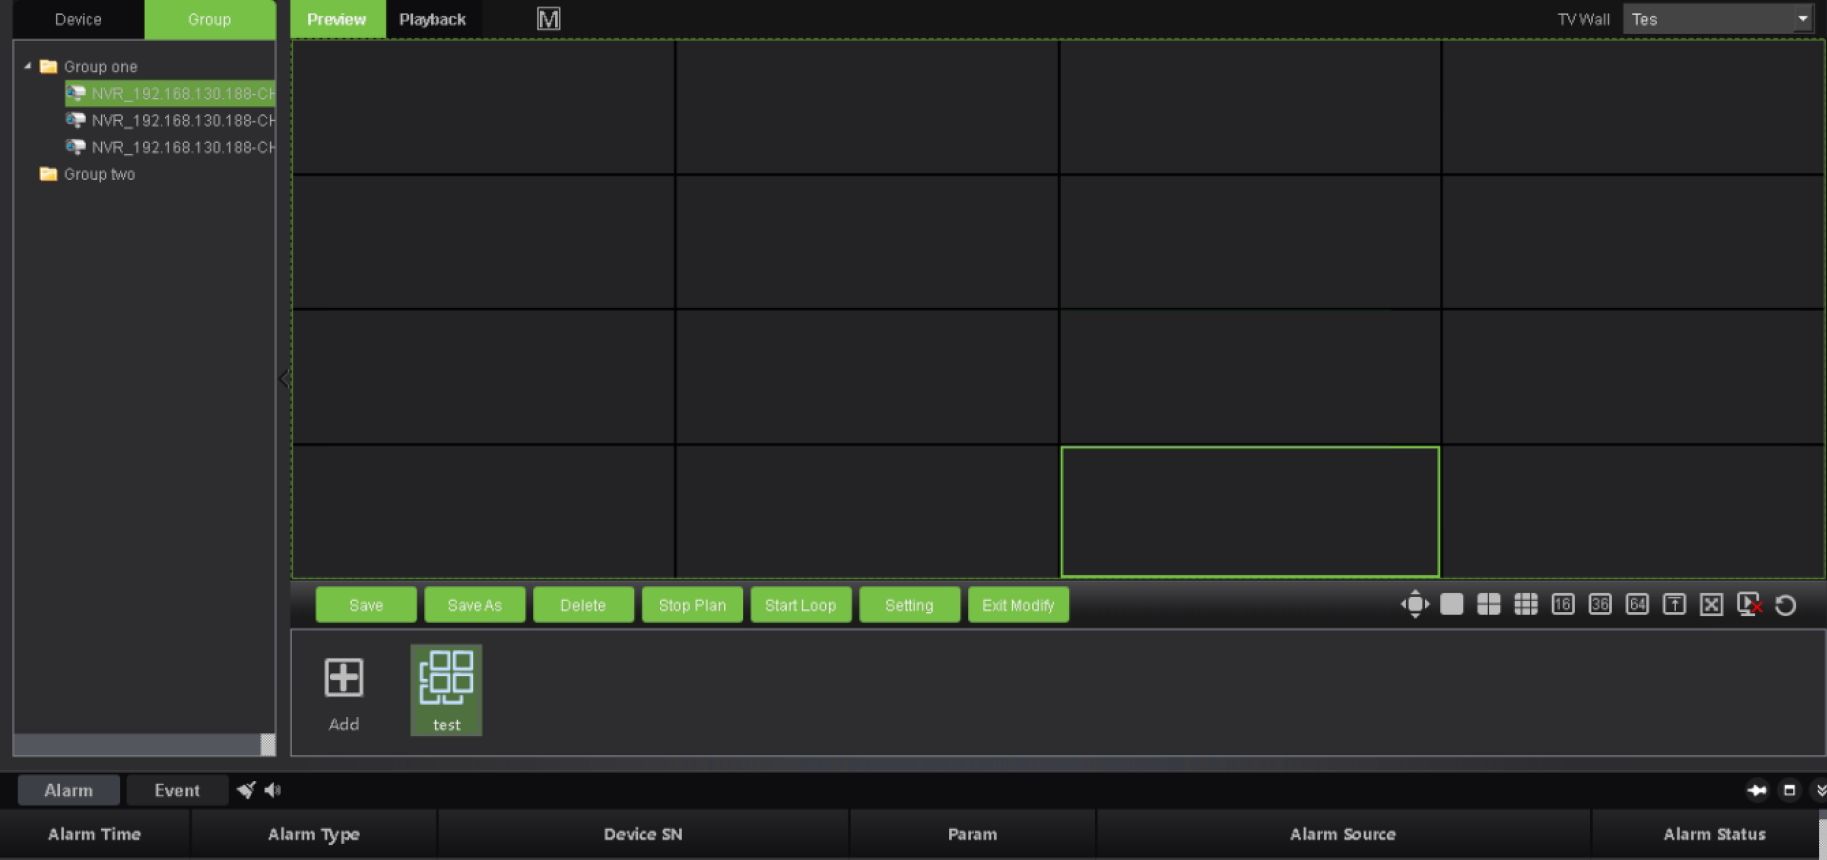
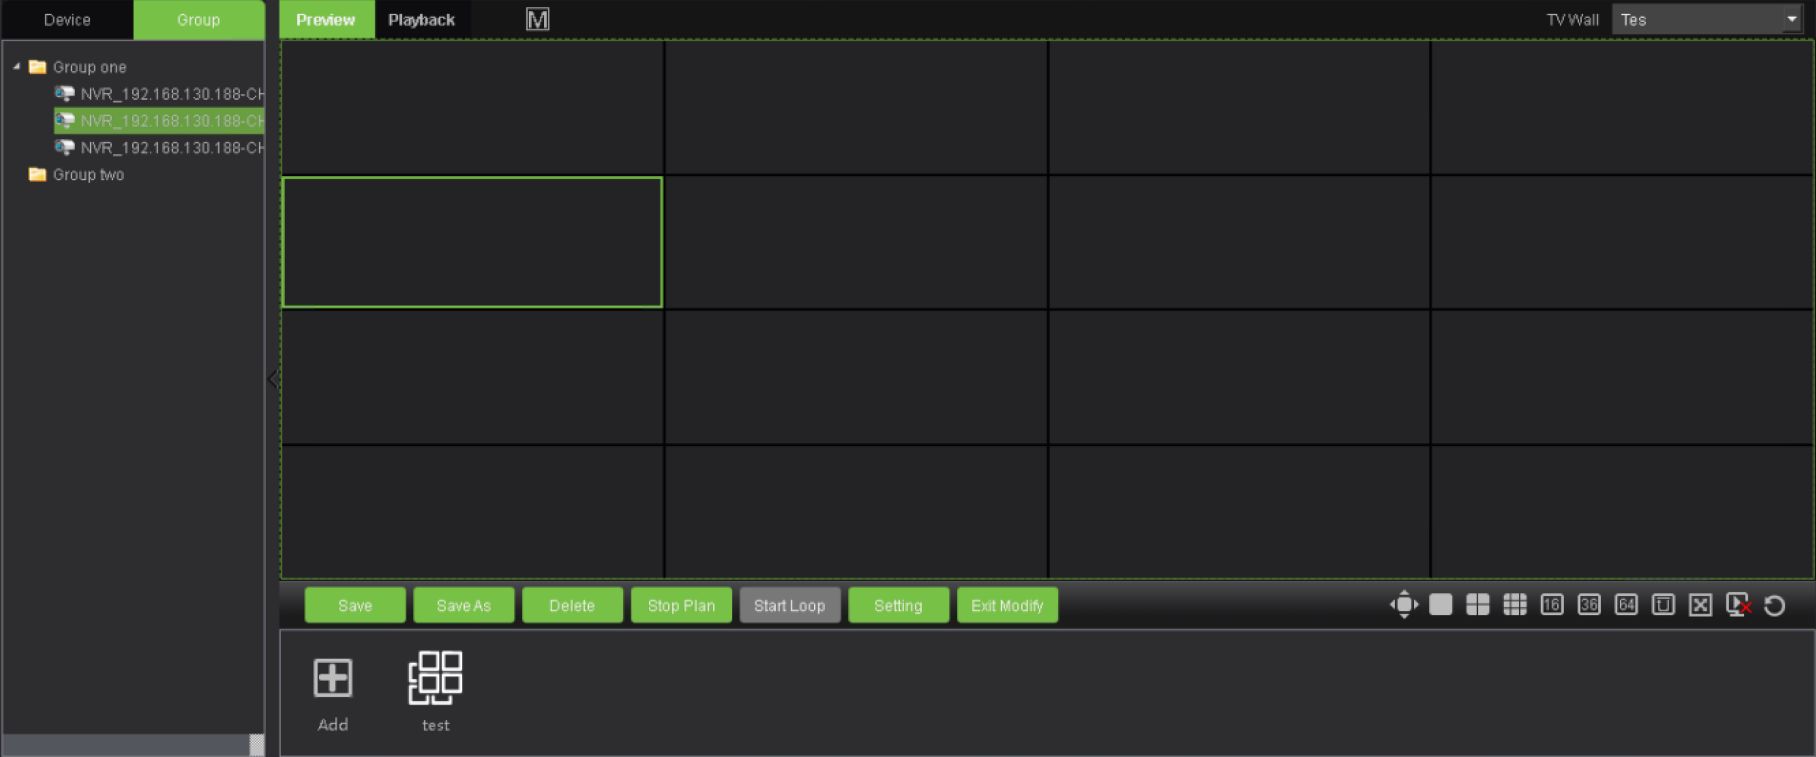
When you have selected a scheme, select the channel for decoding on the wall in the device list on
the left, then drag the relevant decoder to the corresponding decoding screen to complete decoding
on the wall. Use the
button to change the stream type of decoding on the wall before
dragging. Select main stream or sub-stream on the wall.
ZKTm is — :::
AntarVis 2.0 Control Decoder Device Mgmt I Decoder
Panel Config
If the channel dragged to the channel of the decoding screen shall be changed to other channels, the other channels shall be directly dragged to the corresponding window.
36 Antarvis2.0 User Manual
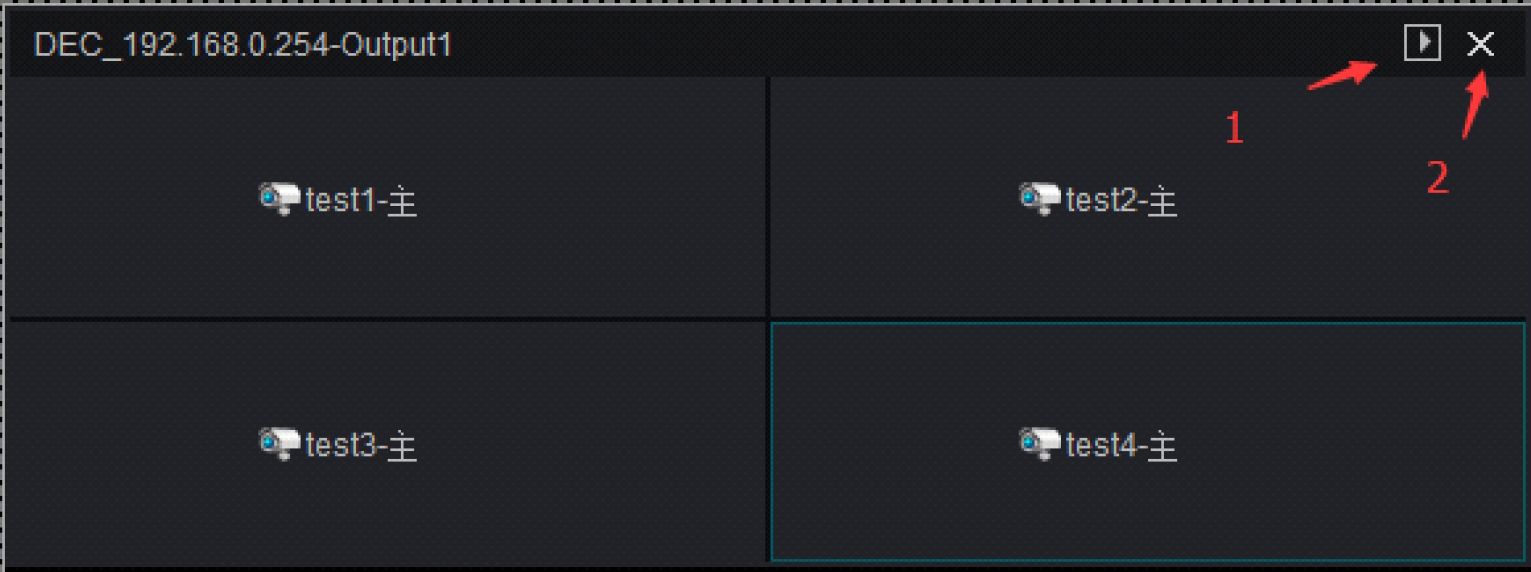
1) İDİ is used to open the decoding module preview window. Click on it to access a preview
window on the current page, which is convenient for customers to view pictures on the wall.
2) H is used to delete the current channel. Click on it to delete the decoding channel of the
current split screen.
The decoding management group has been mentioned in the device management module discussed above. After setting up the decoding group, users may drag the group to the TV wall in the
decoding group module, as follows:
The group dragged to the TV wall output can automatically open the patrol within group. The patrol interval can be set at the time of configuring the decoding group. The default value is 2 seconds.
Antarvis2.0 User Manual 37
Click on the “ADD” button to add a pre-plan:
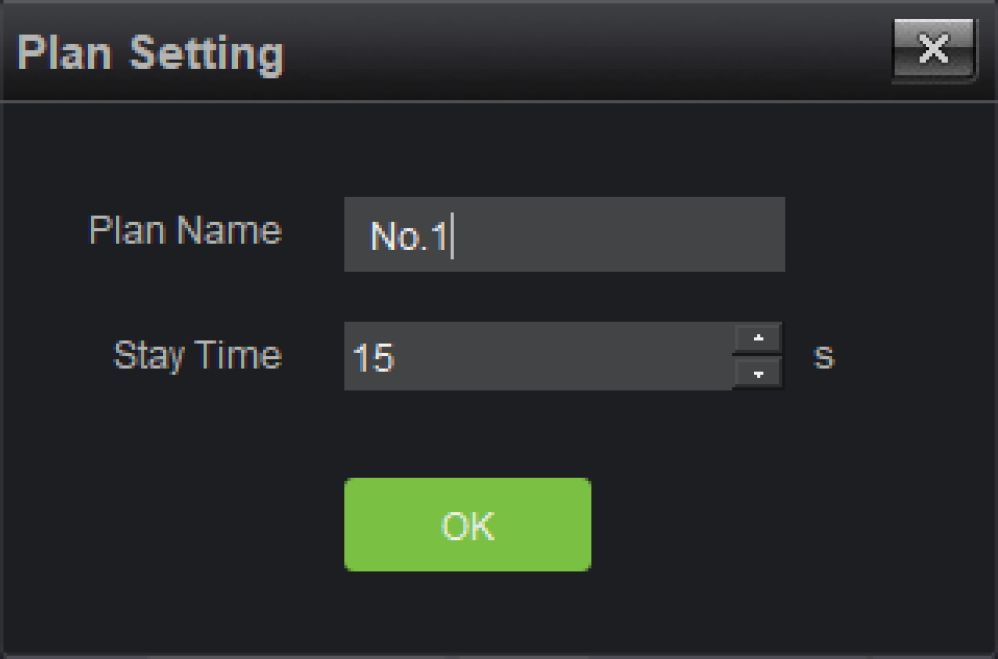
Set a “Plan Name” and “Stay Time” for the pre-plan patrol. The default value of “Stay Time” is 15 seconds; the minimum value is 10 seconds. After completion of settings, please click on “OK” to enter the pre-plan edit mode:
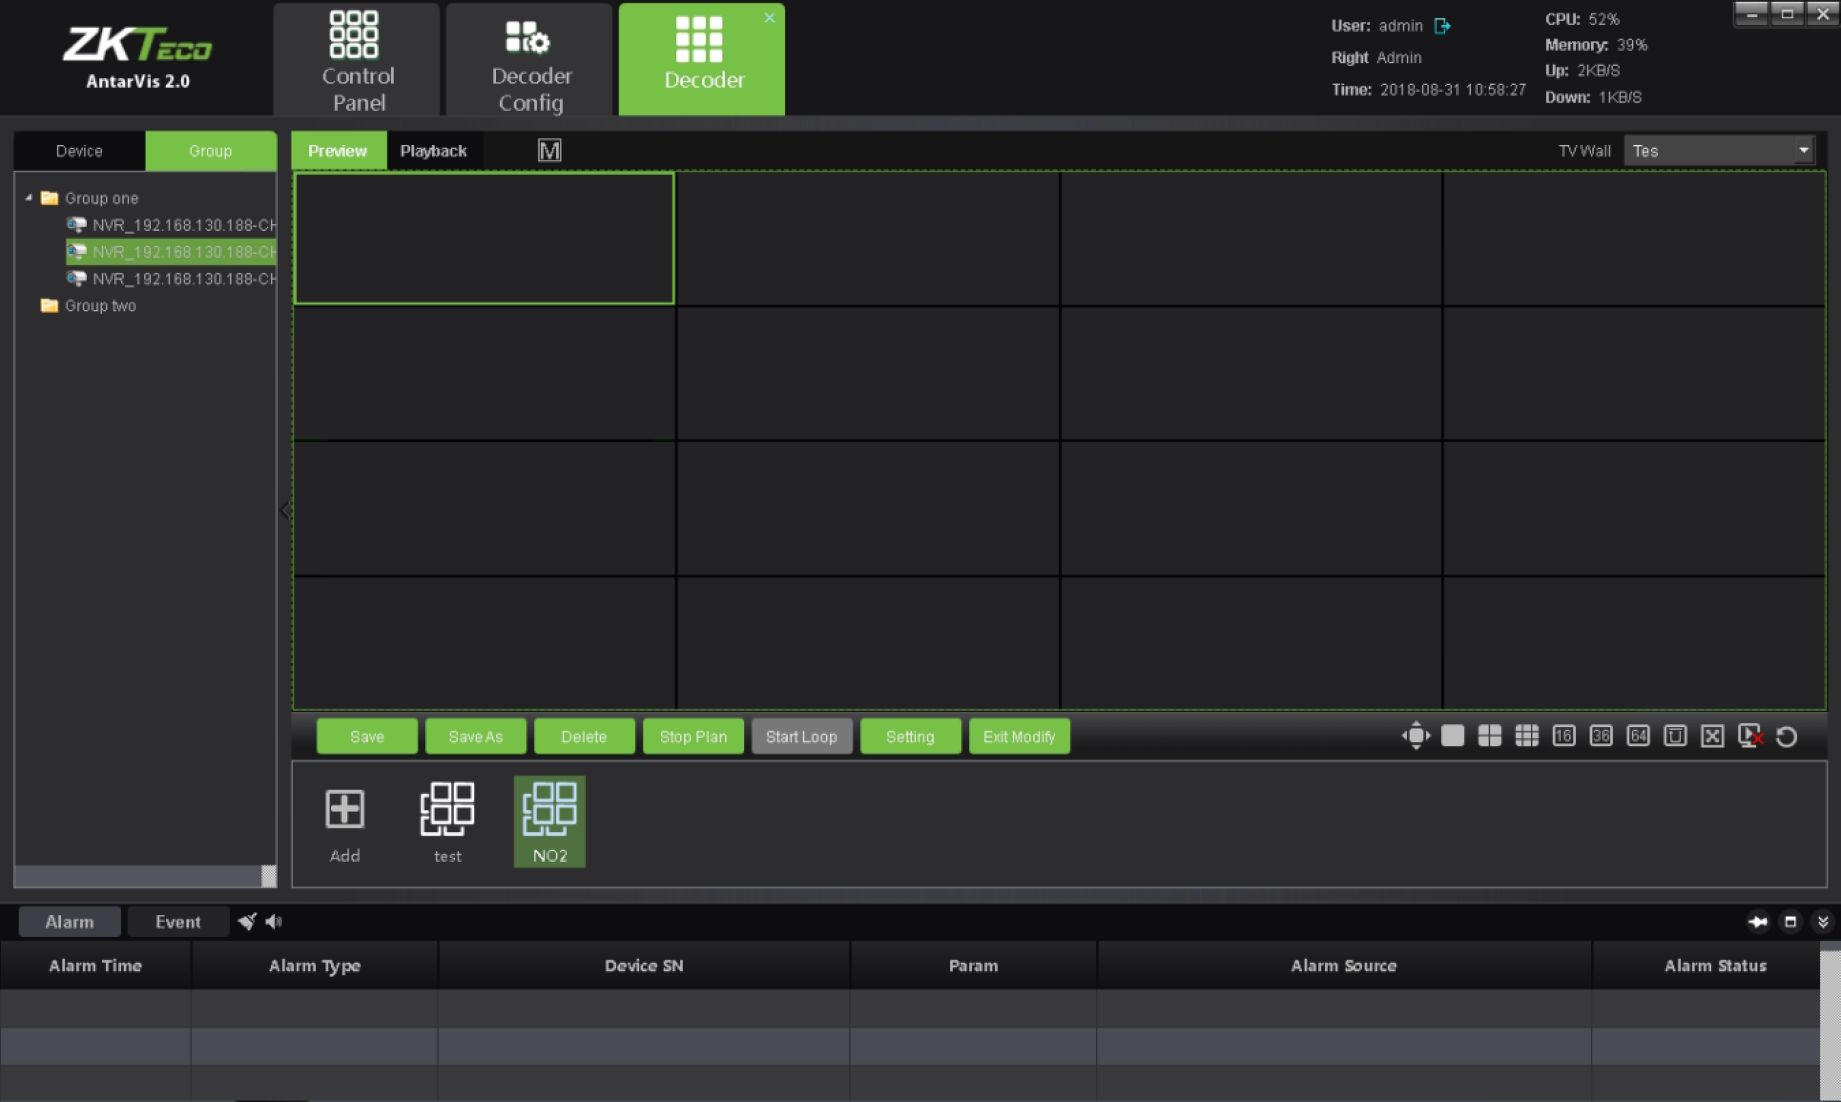
Configure the Pre-plan. Select the decoder split screen, decoding stream type and channel to edit the pre-plan settings. When you have completed settings, please click on “Save Pre-plan” to complete the editing.
Click on “Pre-plan” to make this group of Pre-plan to TV Wall directly with no necessary manual
38 Antarvis2.0 User Manual
operation, which is much convenient for users. Users may delete the saved pre-plans and perform other operations. If you have set several pre-plans, click “Start Pre-plan Patrol” to allow the decoder to start cruise according to the configured pre-plan.
In case of Decoding rolling to be fulfilled in certain decoder, the decoder must be selected for Cruise during TV wall scheme setting (please see section 6.2), and the roll group has been determined in the course of scheme setting.
As the roll group and roll screen has been assured to be set in the scheme, on the button below in the interface to start/pause the Cruise , click the o button in the process of roll to stop roll (note: roll control button is only effective to roll decoder but general decoder).
On the preview operation interface, there is a row of function buttons
are split-screen switch control buttons. When a user selects the decoding screen, he/she may use the
buttons here to switch the number of split screens between different modes, such as 1,4, 9, 16, 36,
64. is a full screen control; users may click on it to activate full screen mode, right-click to exit.
is a split control; users may open/close the decoder split.
is a channel-clear-control; iib
is used to clear all decoding channels in certain decoders with one key, while
is used to clear all
decoding channels in all decoders with one key.
Access the playback operation interface as shown below:
Antarvis2.0 User Manual 39
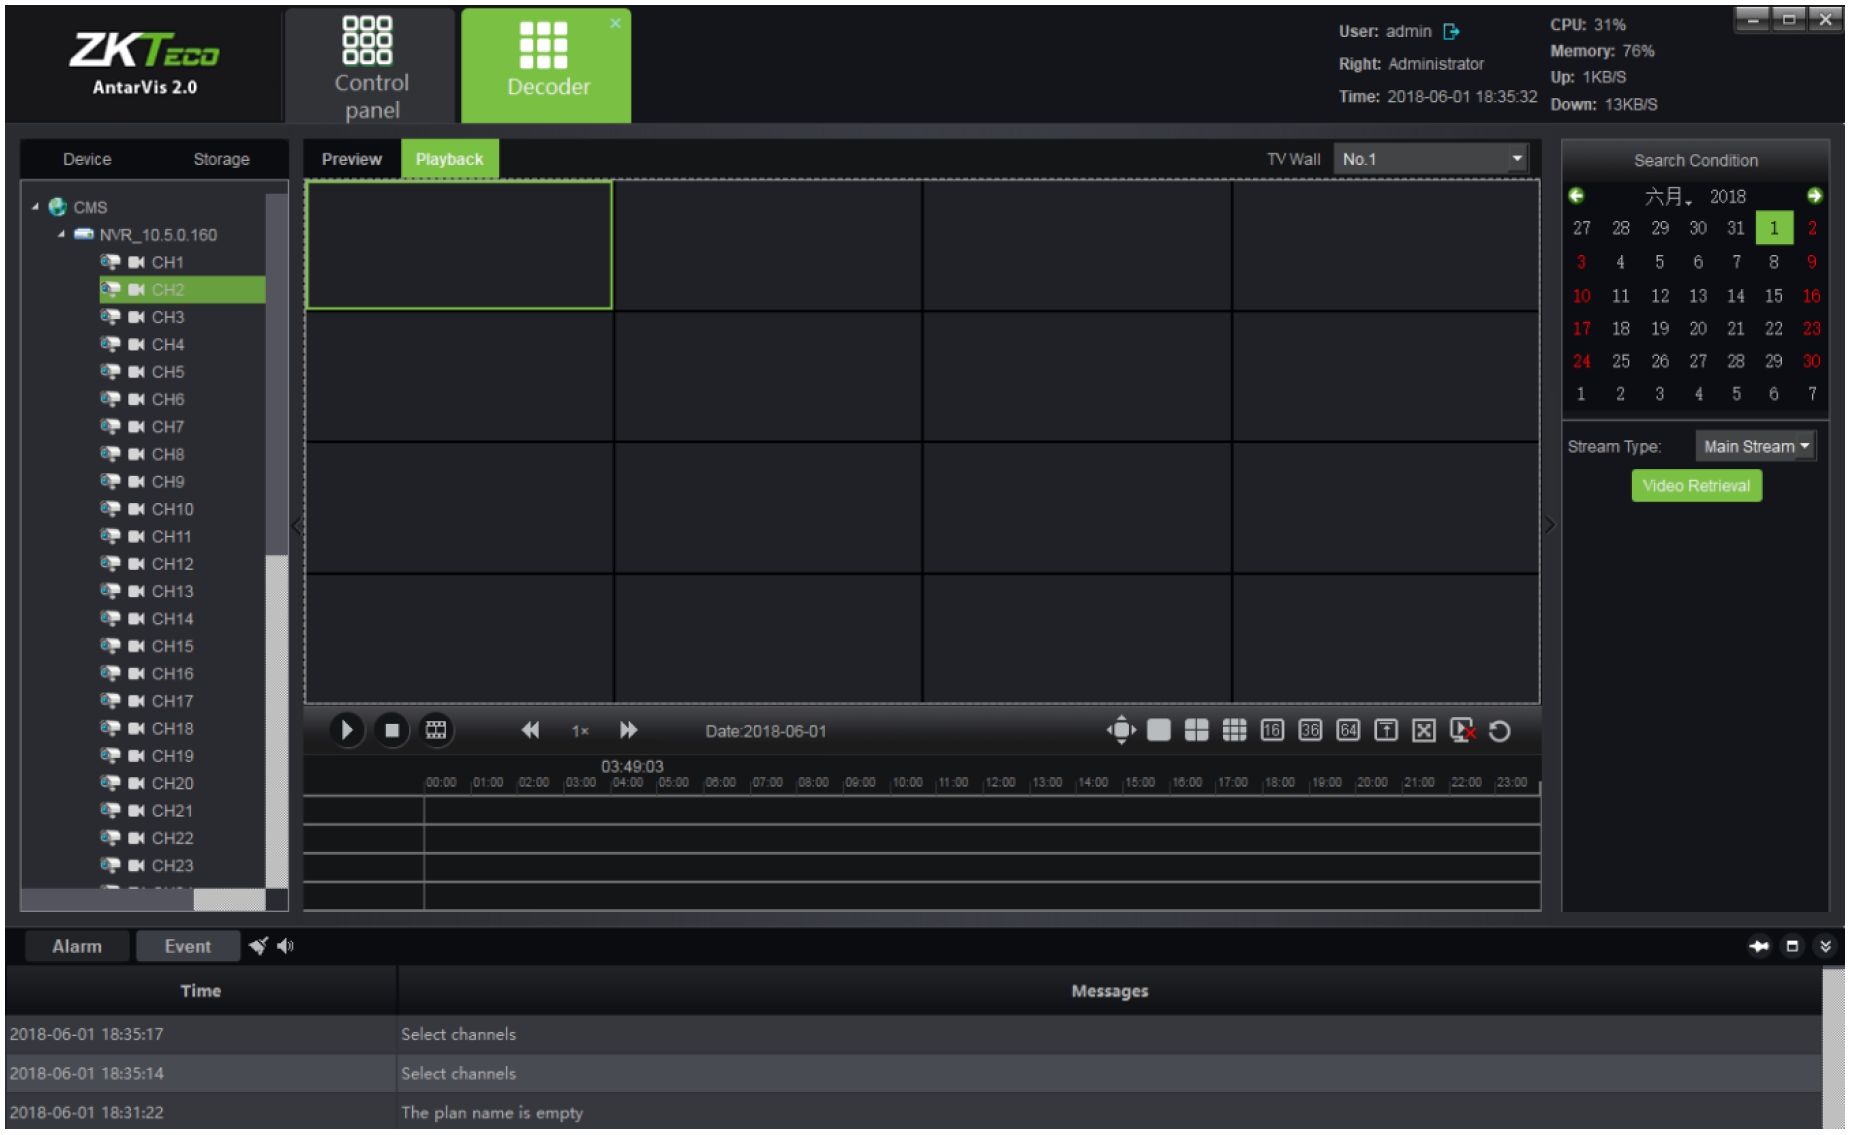
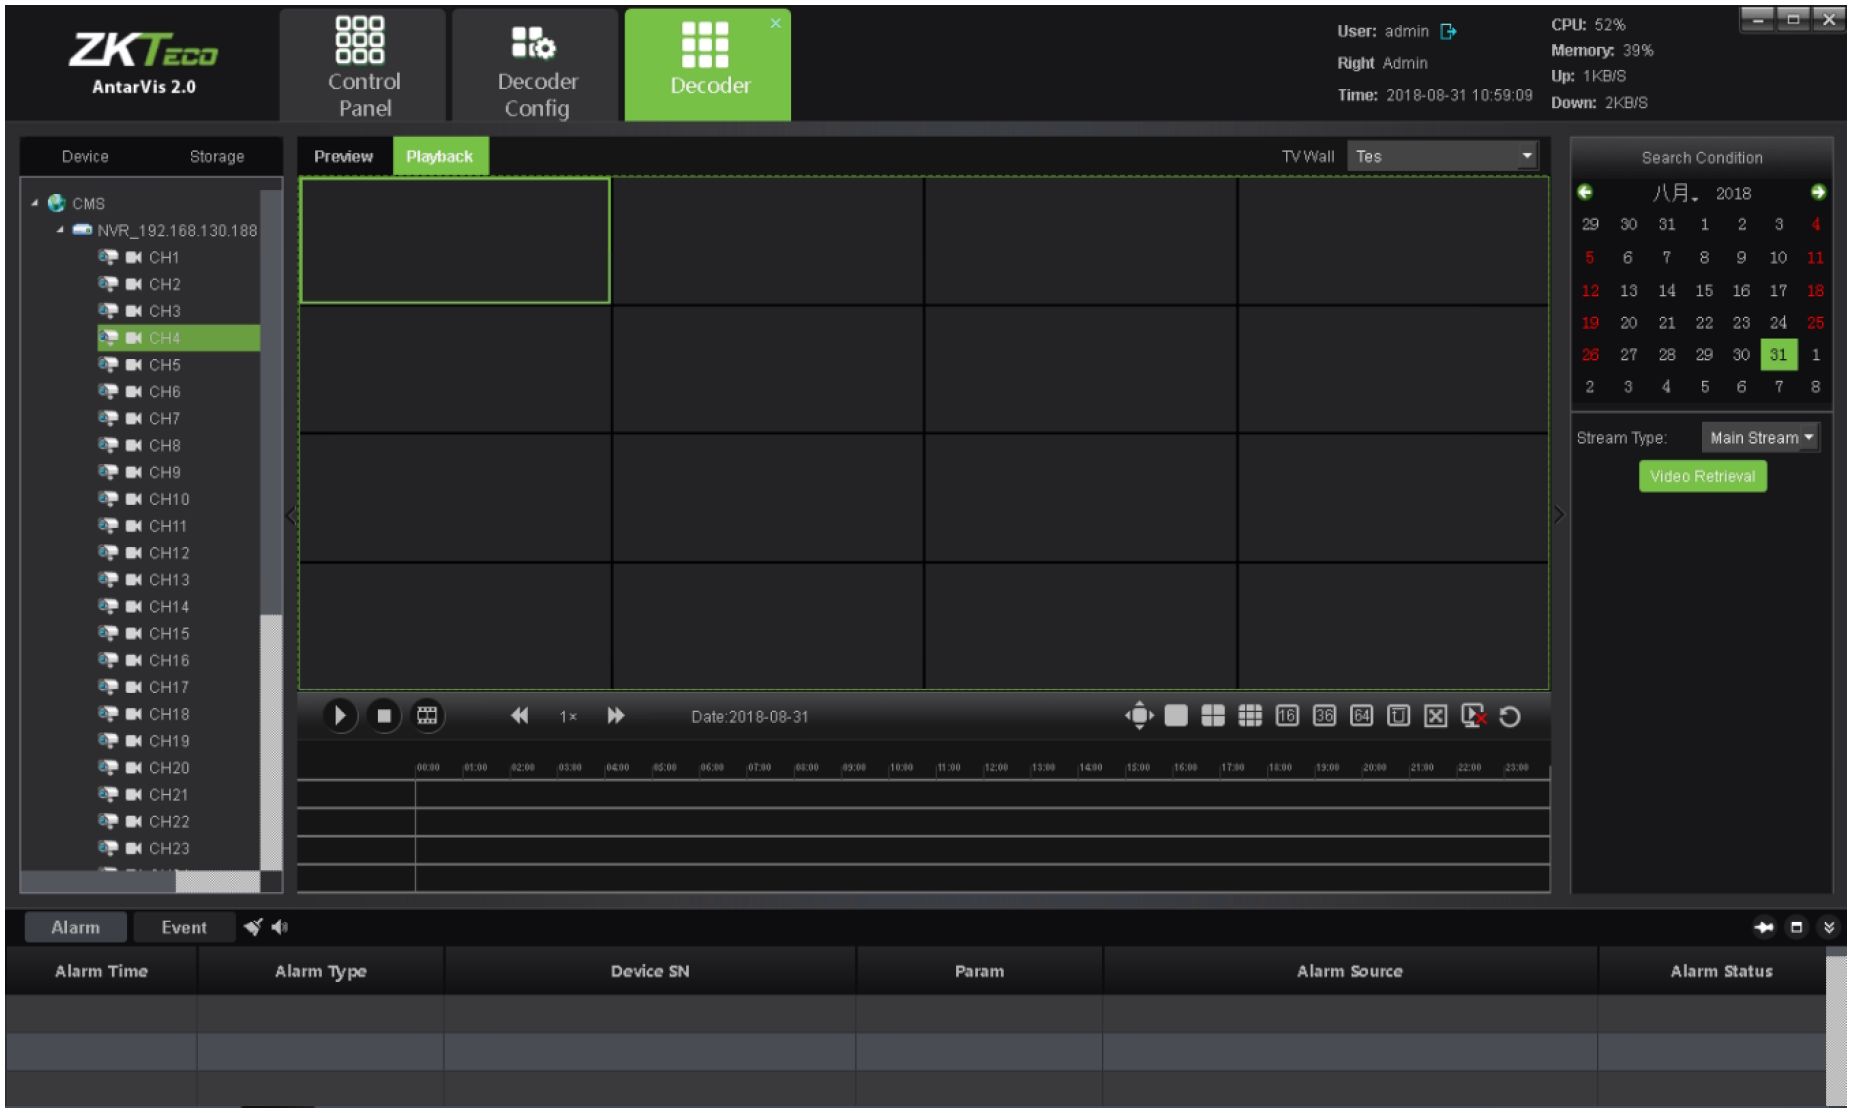
Drag the channel to be played to the decoder, then select the criteria for searching, such as date and video path. Click on the “video retrieval” button to search for video files in the corresponding
channel. Operation here is similar to that of video playback. All playback channels must be in the
same device, and a maximum of 9 channels of playbacks simultaneously. When the video search is
completed, click on the
button or double-click on timeline to start playing. Double-click to
relocate time stamp during playing, as shown in the figure:
40 Antarvis2.0 User Manual
The function buttons in the lower part of playback operation interface are
For details about the
functions of the buttons, please see the section above. Its functions includes: play/pause, stop, frame
play, playback speed adjustment, full screen, split -screen number button, decoder CLS, splict offset settings, open/close the split, TV wall CLS.
Click on the “Alarm configuration” button on the main interface to access the alarm configuration interface. “Alarm configuration” is an alarm rule setting module. If a user wants to fulfill alarm linkage in the client-end, the alarm linkage rule must be set in advance.
Antarvis2.0 User Manual 41
ZKTebo AntarVis 2.0
□□□ □□□ OOO Control panel
Alarm configuration User: admin & Right: administrator
Time: 2018-12-08 11:30:29
CPU: 13% – Memory: 69%
Up: 13KB/S
Down: 586KB/S
Add Device Refresh Rule Name Alarm Type Alarm Source Remarks Enable Description Alarm | Event I < 4> ■** a «
Time Messages 2018-12-08 11:29:25 Select channels 2018-12-08 11:28:54 Select channels Alarm configuration interface shows the currently set linkage rules and the state of the rule.
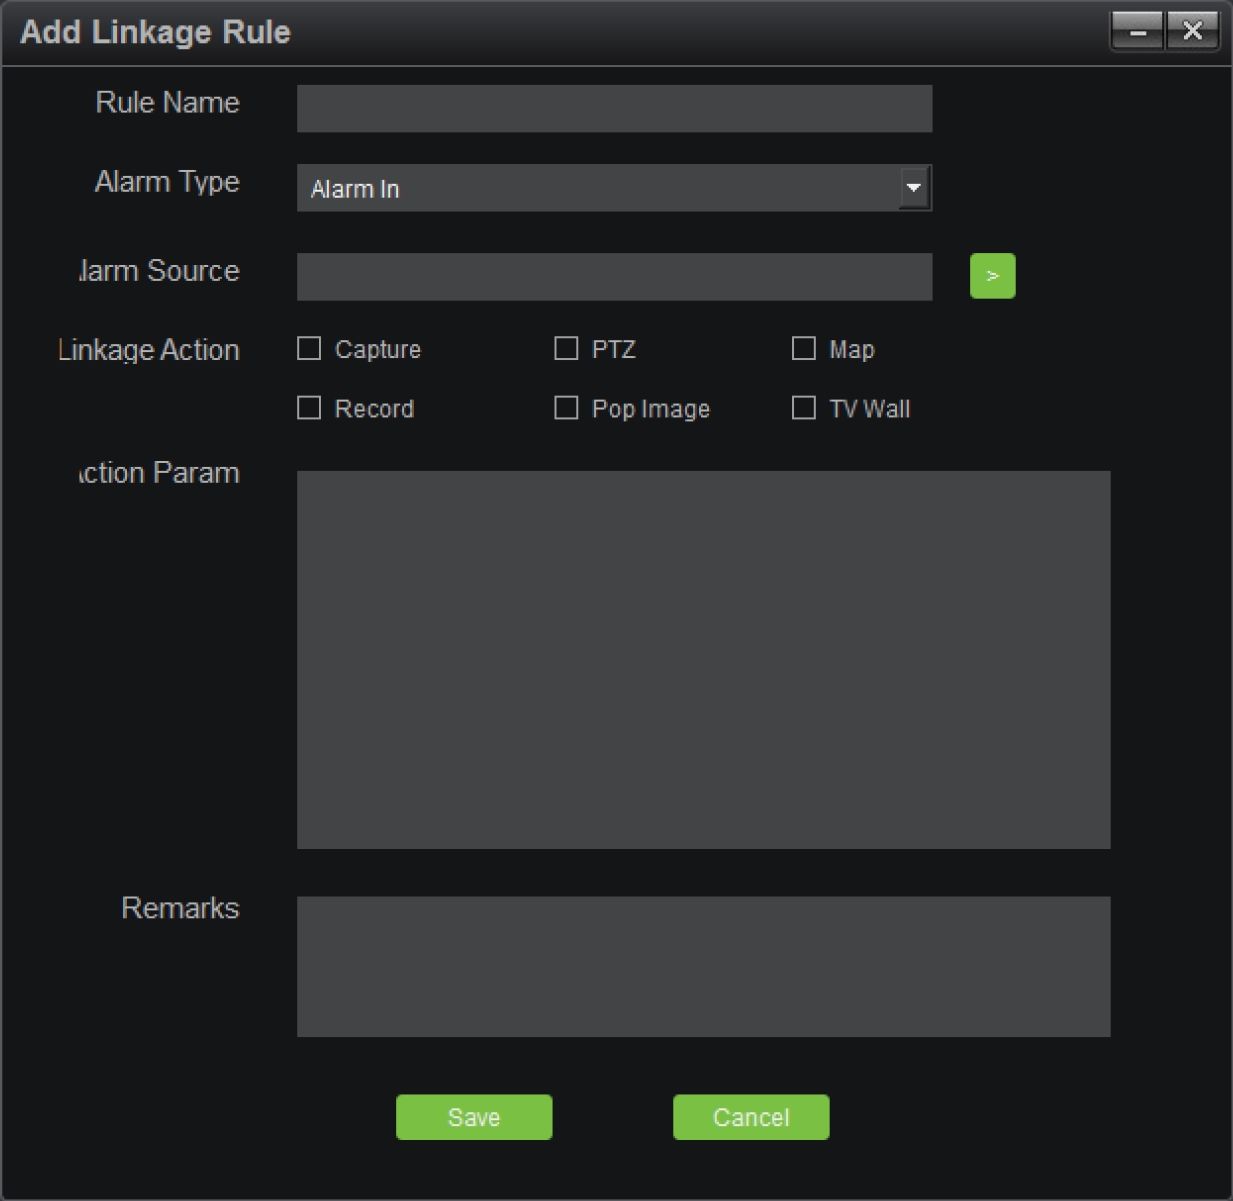
To add an alarm linkage rule, please click on “Add” at the upper left corner, as shown below:
42 Antarvis2.0 User Manual
- Rule name: alarm linkage rule name is user-defined.
- Alarm type: currently support 8 types of alarm, including Alarm in, Motion detection, Tampering, Video Loss, Area alarm, Object alarm, Cross line alarm and Counting alarm. Among which, the last four kinds are specialized to the device about intelligent detection. Regarding the definitions of the 8 types of alarm, please see NVR’s specifications.
- Alarm source: Click on the check box to add all channels of all devices to VMS which can currently be selected.
- Linkage action: includes capture, PTZ, Map, Record, pop Image and TV wall, which are defined respectively as below.
Capture: captures the picture of the linkage channel.
PTZ: controls the linkage channel. You may choose to call certain presets, call certain cruises or certain tracks. Only front devices which support PTZ control can be linked to PTZ.
Map: displays an alarm on map interface. For the linkage of map alarm, the channel to be linked shall be deployed on the map. When an alarm is triggered, the icon of the channel will be indicated in red on the map.
Record: when an alarm is triggered, the channel linked starts recording at local storage server, where you shall configure the RecPlan in advance. Records can be viewed by searching in the playback module.
Pop image: when an alarm is triggered, the preview window will pop up from the main interface displaying the real-time preview of the linked channel.
TV Wall: select a channel and TV Wall for wall-run. When an alarm is triggered, the real-time preview picture of this channel will be uploaded to the TV Wall.
Note: If the linkage action has been set as map, video, popup image and TV Wall, the front-end devices shall be selected. It shall be “auto-end” or “Schedule end”; “auto end” means that there is no linkage action upon the completion of alarm, while “timing end” means that the linkage action will end at the set time, which ranges from 1 second to 36,000 seconds.
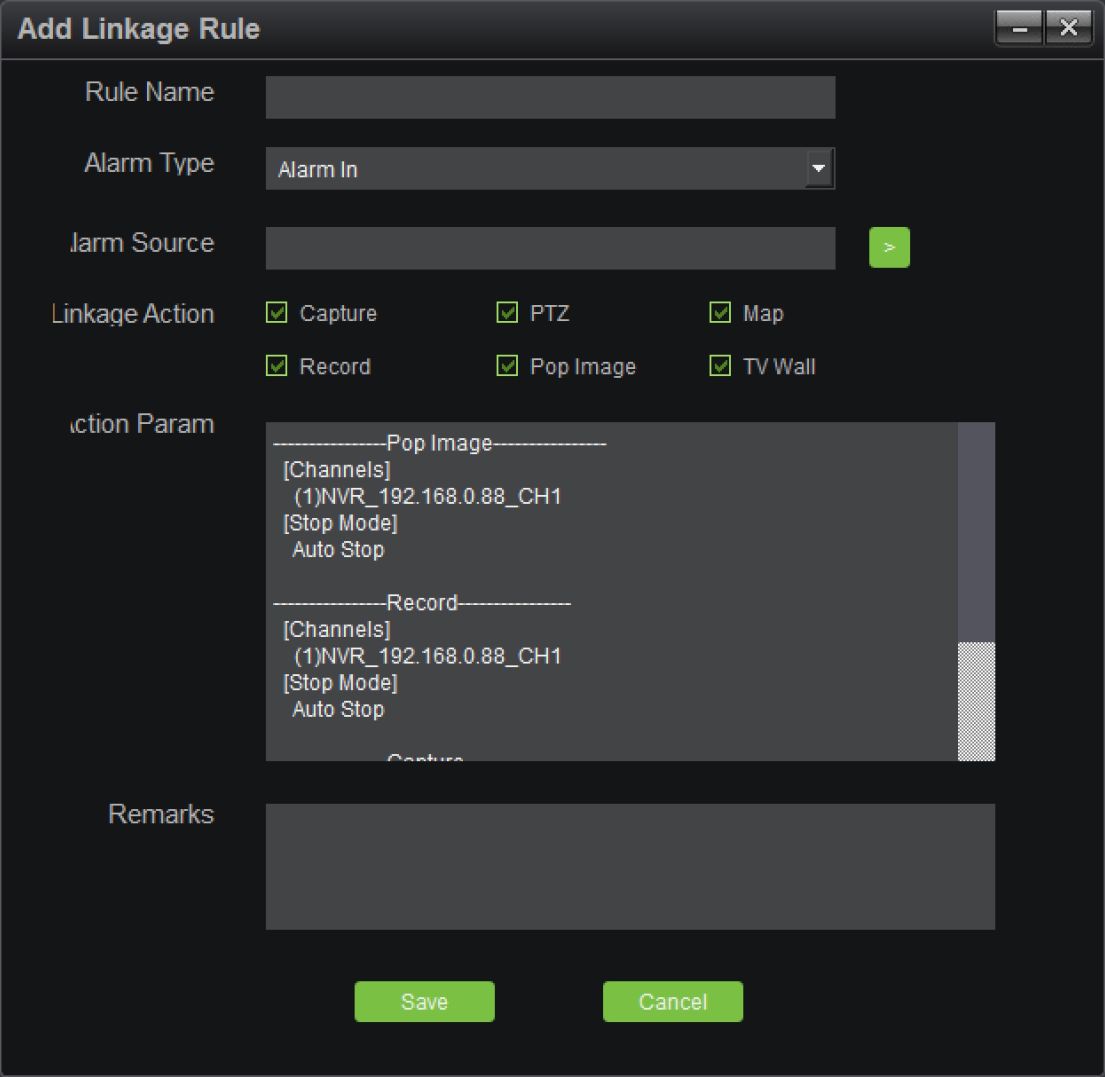
- Action param: the linkage action set can be displayed in this column.
- Remarks: indicates relevant information of this linkage rule. It can be customized and omitted.
Upon completion, the window is as shown below:
Antarvis2.0 User Manual 43
Click on the “Save” button at the bottom to save and complete the settings.
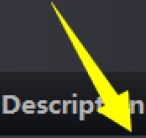
Upon completion of alarm rule adding, users may click on “Modify” indicated in the figure to edit the existing rule.
Add Device Refresh
Rule Name Alarm Type Alarm Source
1 Alarm In DEVICES-NVR_192.168.0.88-NetAI…
Remarks
Enable
□
Modify Update
To delete the existing rule, click on the “Delete” button in the figure; in case of disable of the feature at the moment, select the “check” button in the figure.
44 Antarvis2.0 User Manual
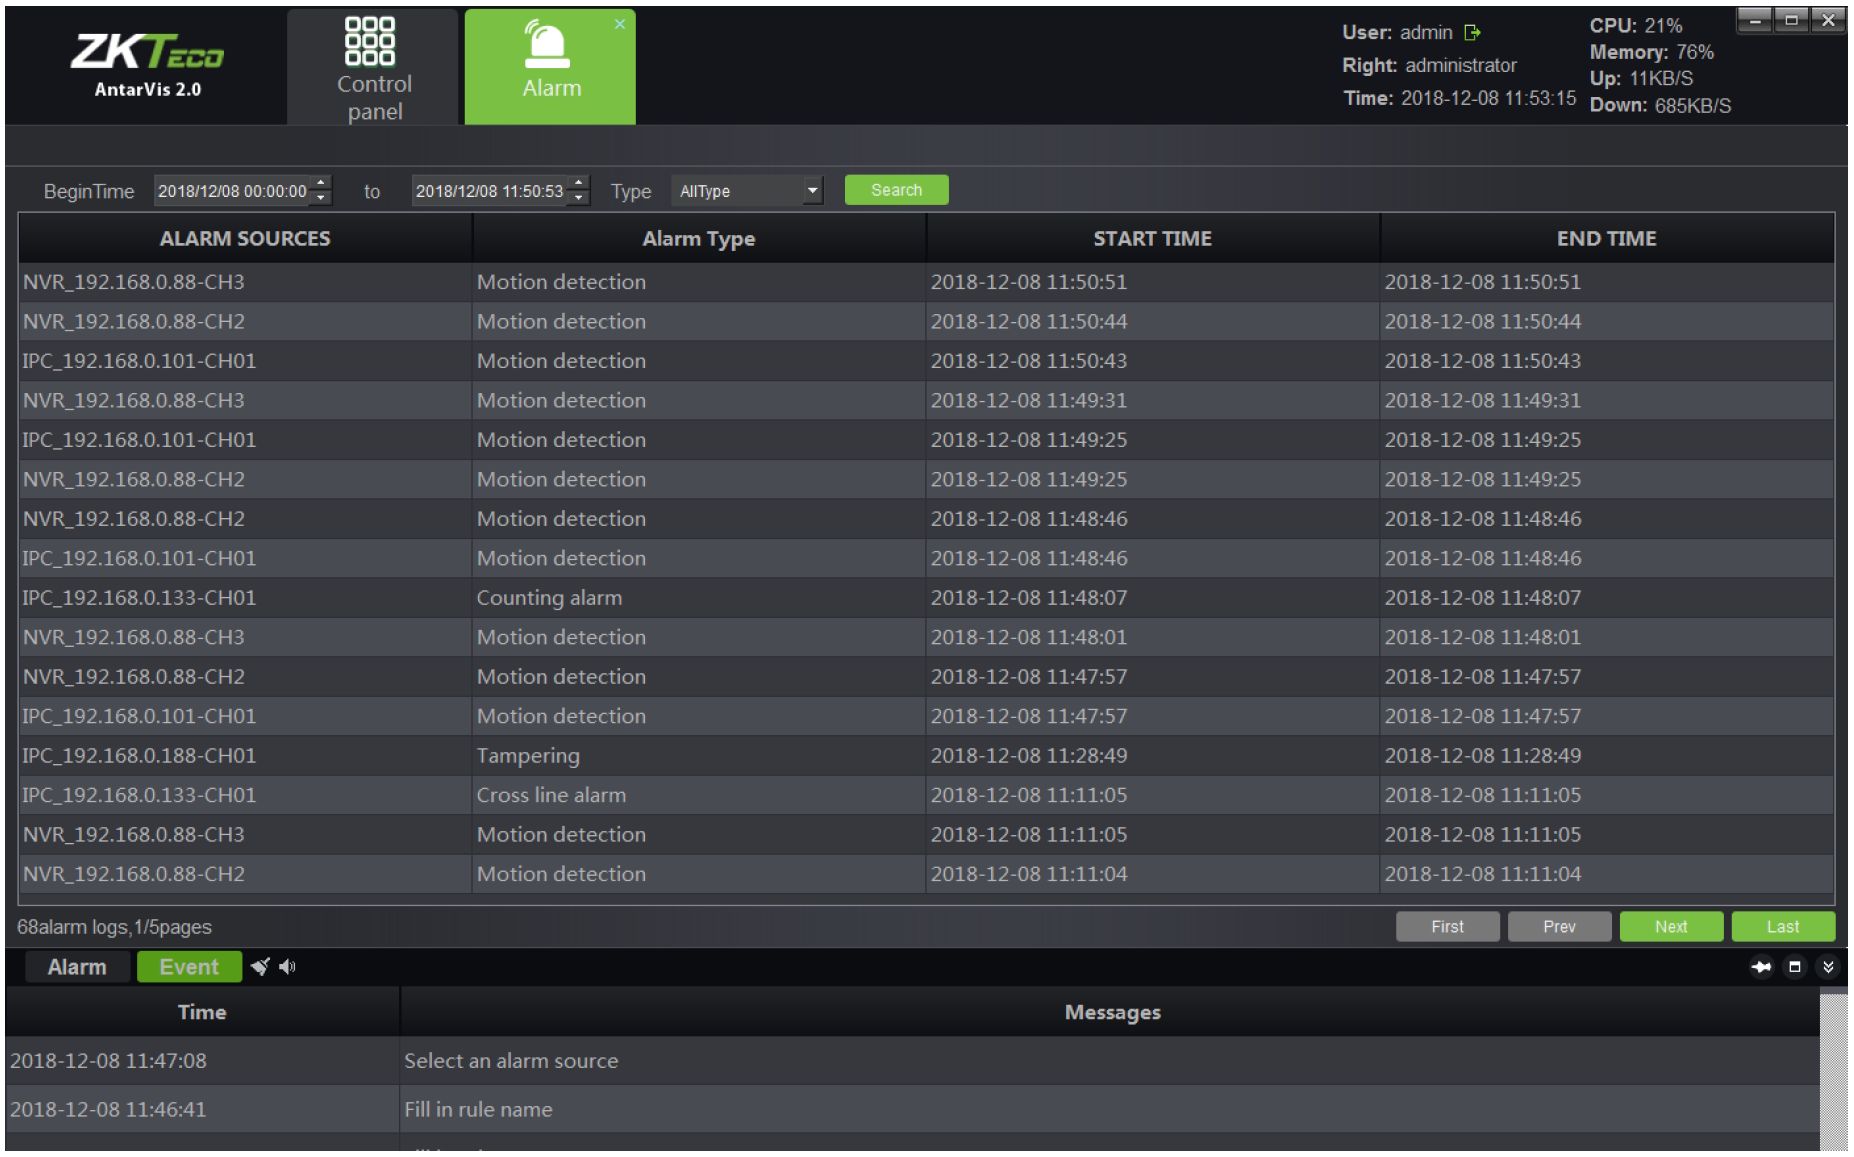
Click on the “Alarm” button on the main interface to enter the alarm management interface:
Alarm management interface displays all alarm information upload to VMS. Select time range to search and an alarm type, click on the “Search” button, then the system will search for relevant alarm information. There are 8 types of alarms, including alarm input, motion detection, video tampering alarm, video loss, target count detection, area detection, object detection and line crossing detection.
Click on the “Log” button on the main interface to enter the log management interface:
Antarvis2.0 User Manual 45
User: admin G» CPU: 5%
x Memory: 77%
Right: administrator Up: 1IKBS
Time: 2018-12-08 11:53:43 Doyun* 682KR/<S
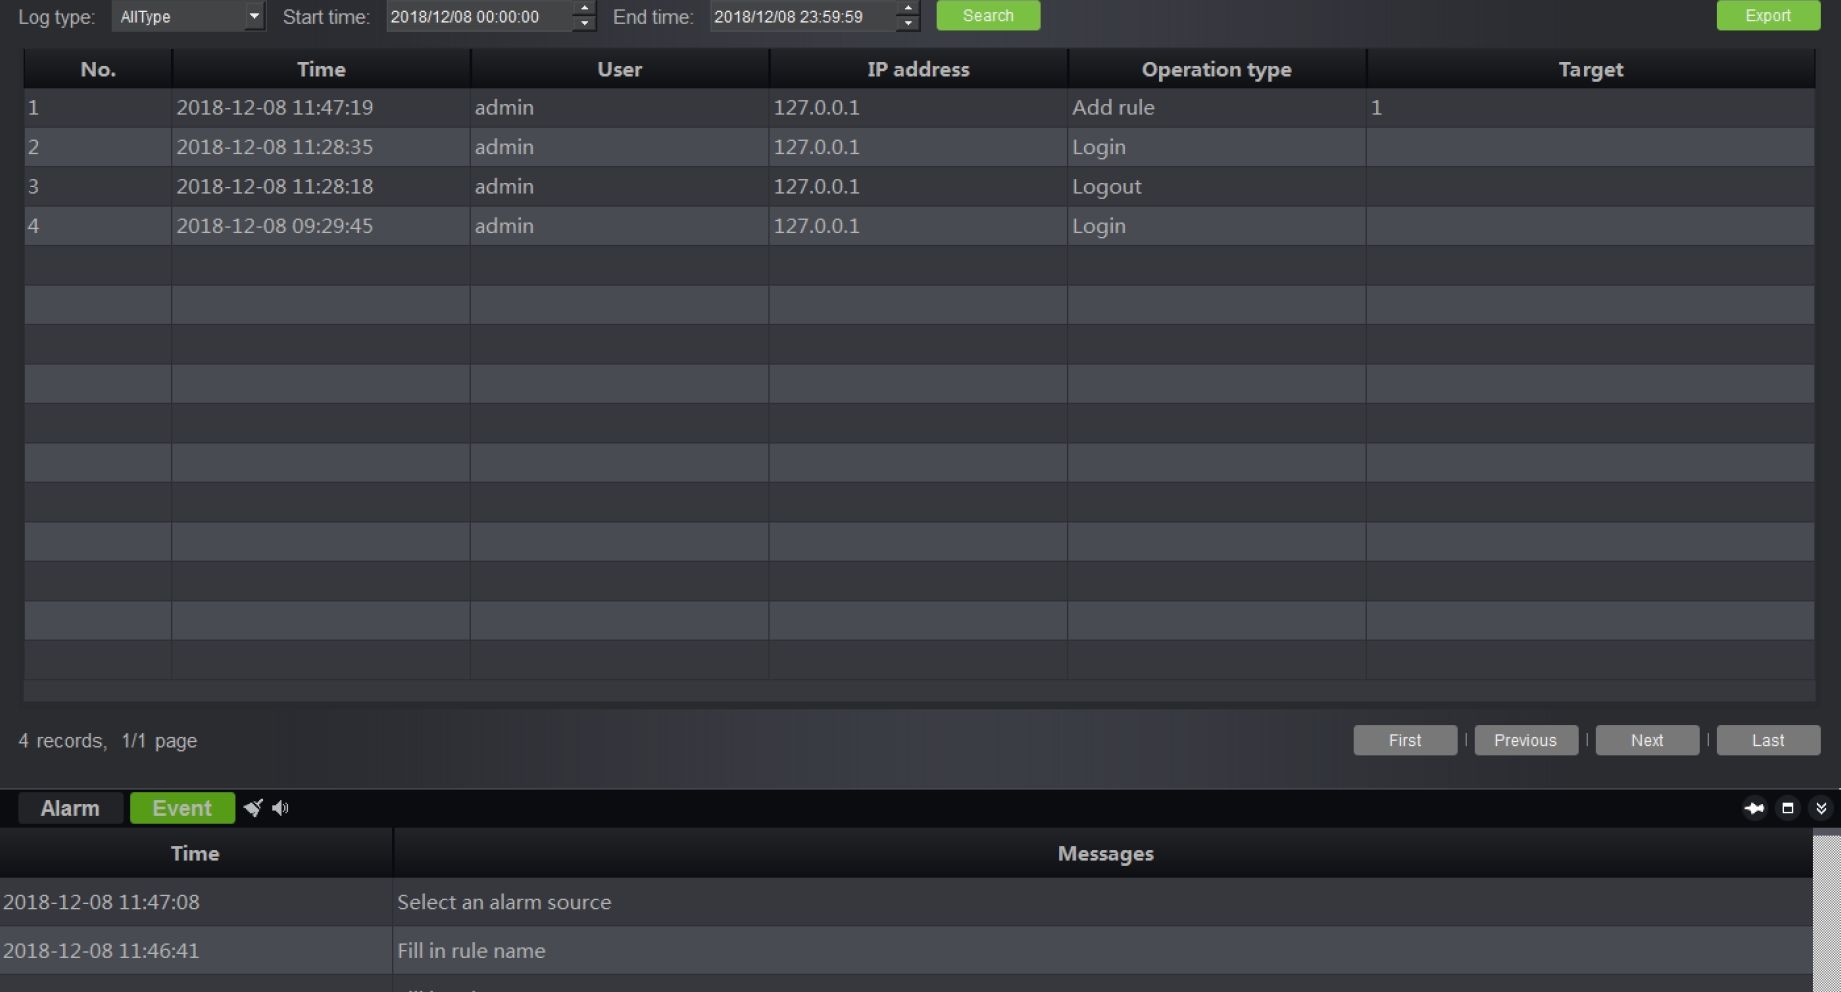
Log management interface displays all important operation records of a user. Select a log type and time range to search, click on “Retrieve” to start searching. Log types include login/logout, device management, start/stop rec, linkage management and remote configuration.
- login/logout: users log in/out records.
- Device management: management of records about user registration, modification and deletion of devices.
- Start/stop recording: start/stop local video record.
- Linkage management: management about recordsfromf user operations, such as addition, modification and deletion of a linkage rule.
- Remote configuration: records of user operations in terms of remote configuration, and modification of parameters for front-end devices.
The log will record the operation time, the user performed such operations, IP address where the operation is conducted, types of operations and target address of relevant important operations in details, which help the administrator to find out any issues.
46 Antarvis2.0 User Manual
Click on the “User management” button on the main interface to enter the user management interface:
ZKTe^ AntarVis 2.0
□□□ □□□ □□a Control panel
X * Users management
User: admin G» Right: administrator
Time: 2018-12-0811:58:40
CPU: 4% SI! Memory: 75%
Up: 14KB/S
Down: 615KB/S
Add user Username User type Operation admin administrator Modify Update Right
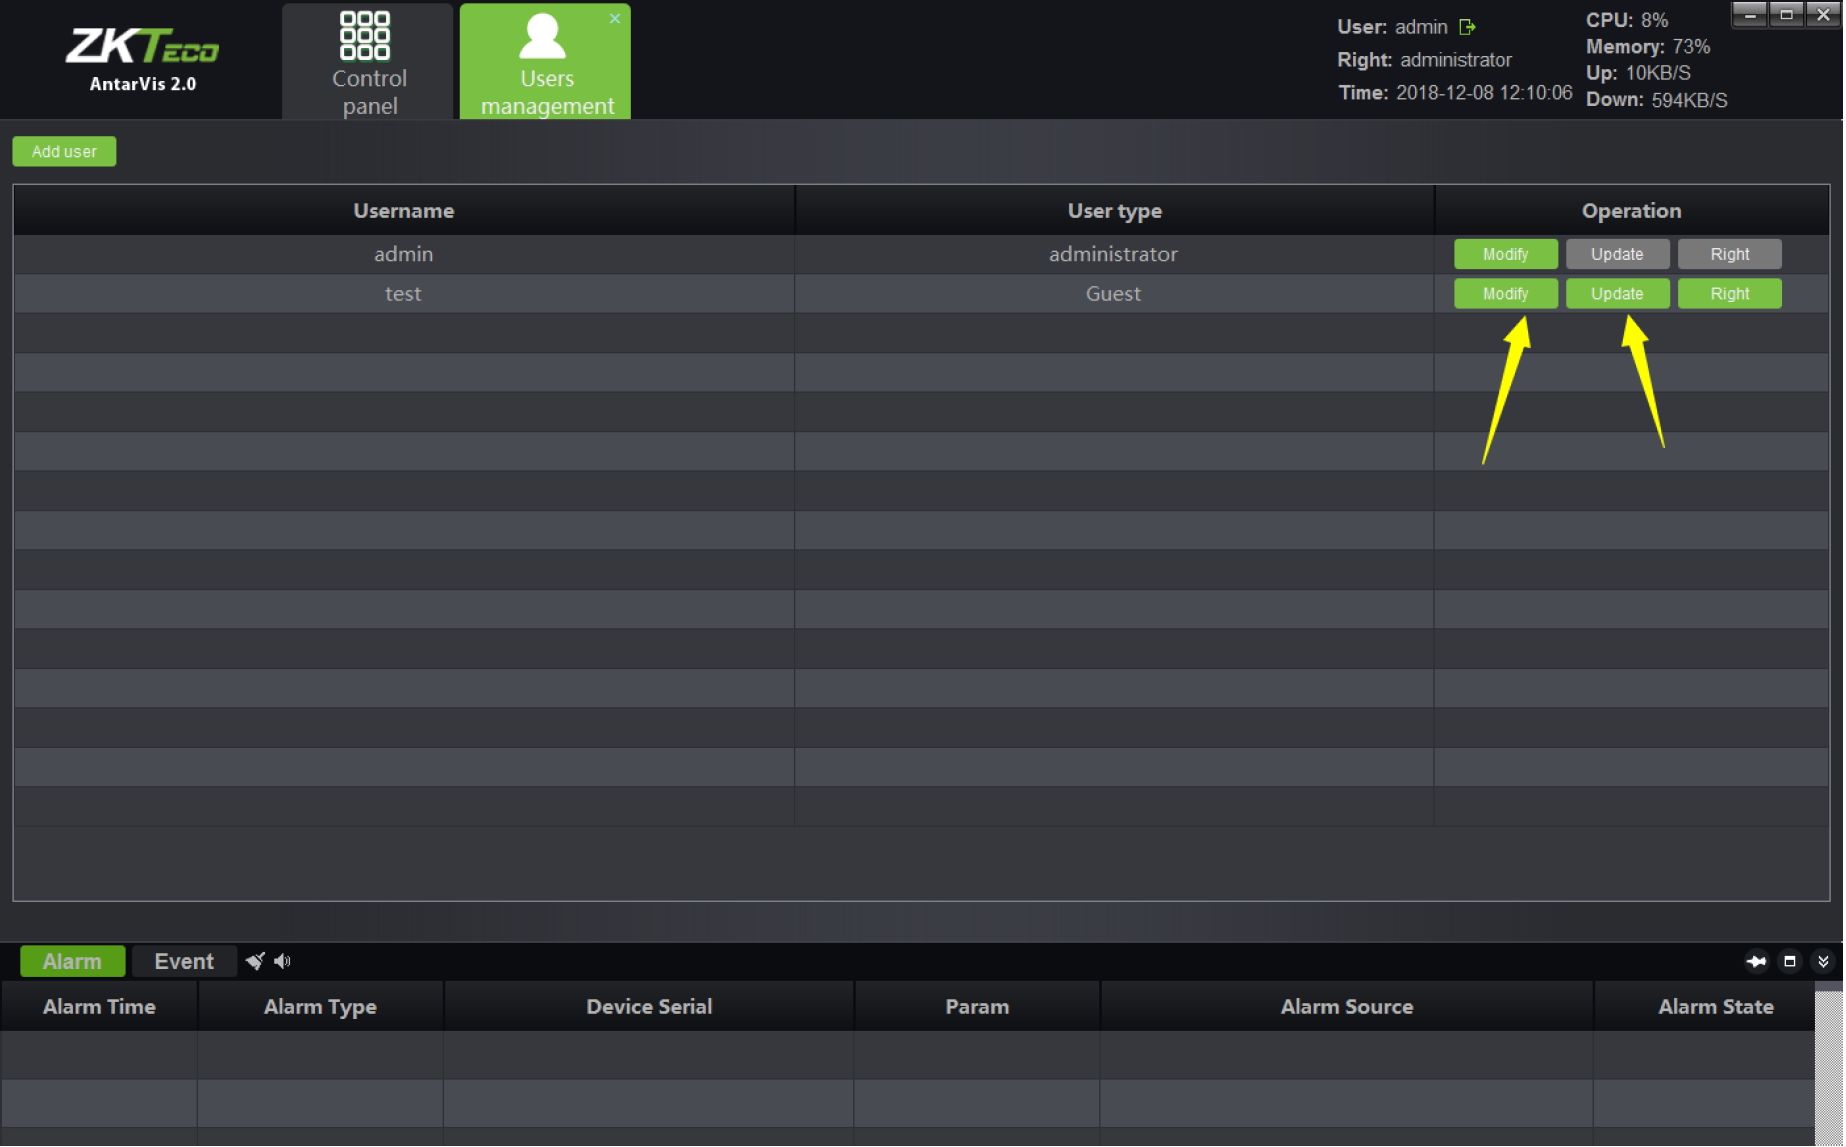
Alarm Event < 4» -•* B Time Messages 2018-12-08 11:47:08 Select an alarm source 2018-12-08 11:46:41 Fill in rule name User admin listed in the user management interface has the rights to set privilege for sub-users and users. There is a default super user whose name is “admin”, which can not be deleted and has all privileges. Click on “Modify” to change the password of the super user.
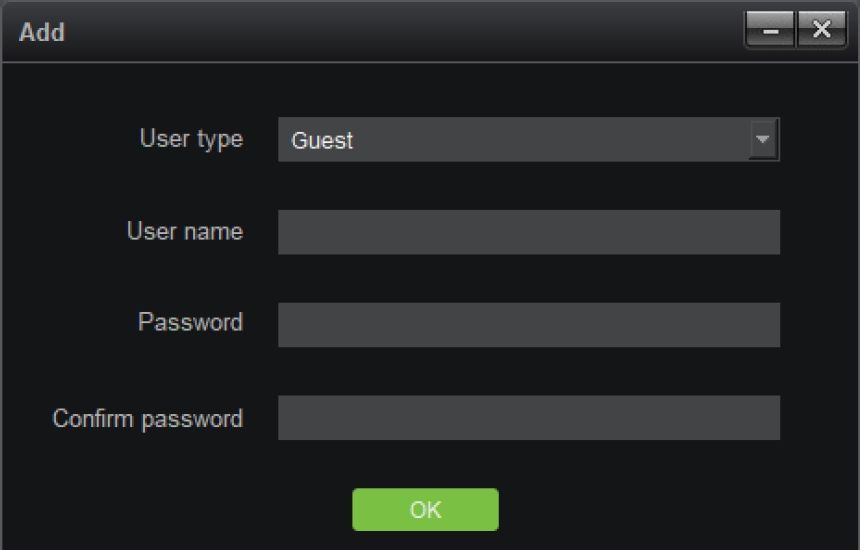
Click on “Add user” at the left-upper corner to add a new user:
The default user type is “Guest”, which means an ordinary user, not an administrative user. The user
Antarvis2.0 User Manual 47
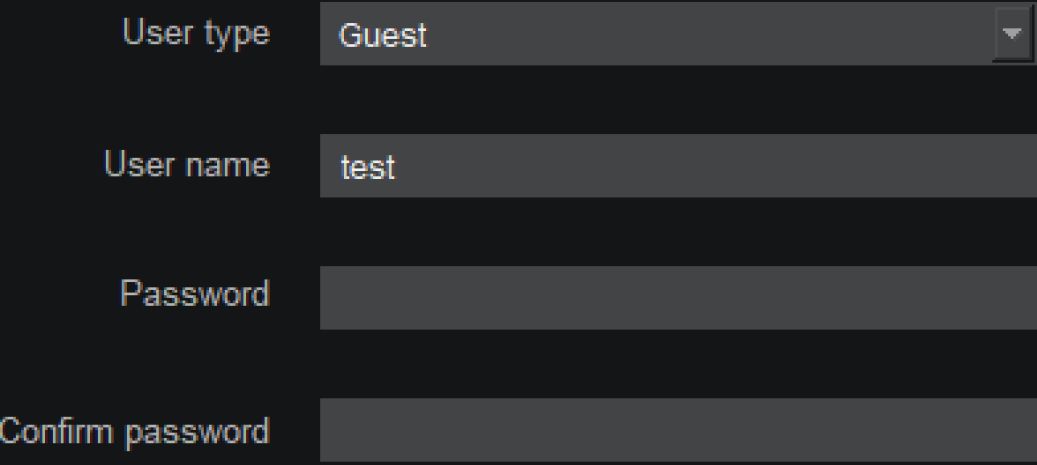
type cannot be modified. Fill in the user name, password, type the password again, then click on “OK’ to add a new user. The password and that to input at the field “Confirm password” shall be the same.
Add user
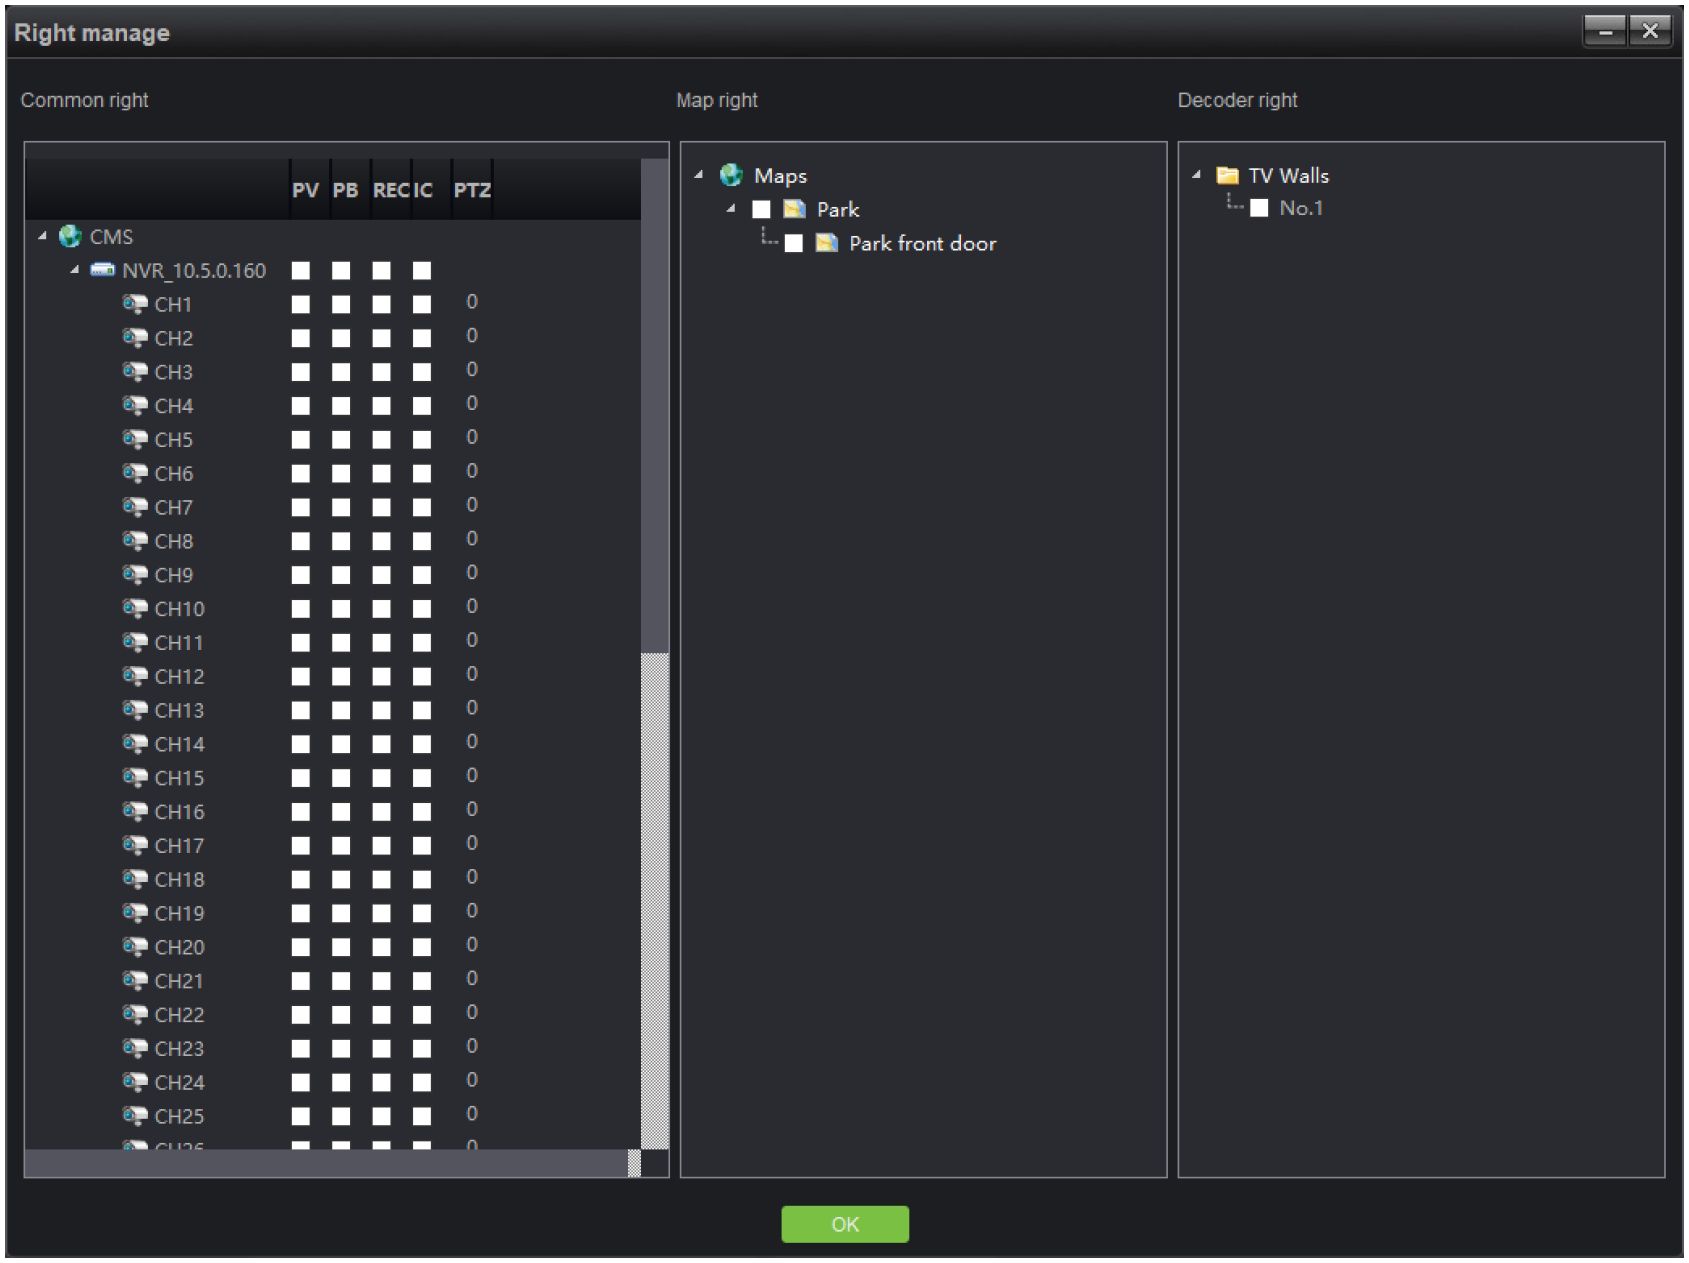
User name User type Operation Righ^ admin Administrator Modify II Delete test Guest Modify II Delete Right To assign sub-users access rights, click on the “Right” button indicated in the figure to grant the users relevant access privileges:
Types of access include common access, map access and decoder access.
Common access: includes preview, playback, video, intercom and PTZ control; depends on channels. The administrator may distribute relevant channels to the corresponding sub-users. The number corresponding to PTZ represents the control priority of PTZ. You may double-click to edit, and select a value from 0 to 10, among which, 0 indicates that there will be no PTZ control access, and 1-10 indicates the priority of PTZ control access. The larger the number, the higher the authority, i.e. 10
48 Antarvis2.0 User Manual
represents the top priority of PTZ control while 1 represents the lowest priority.
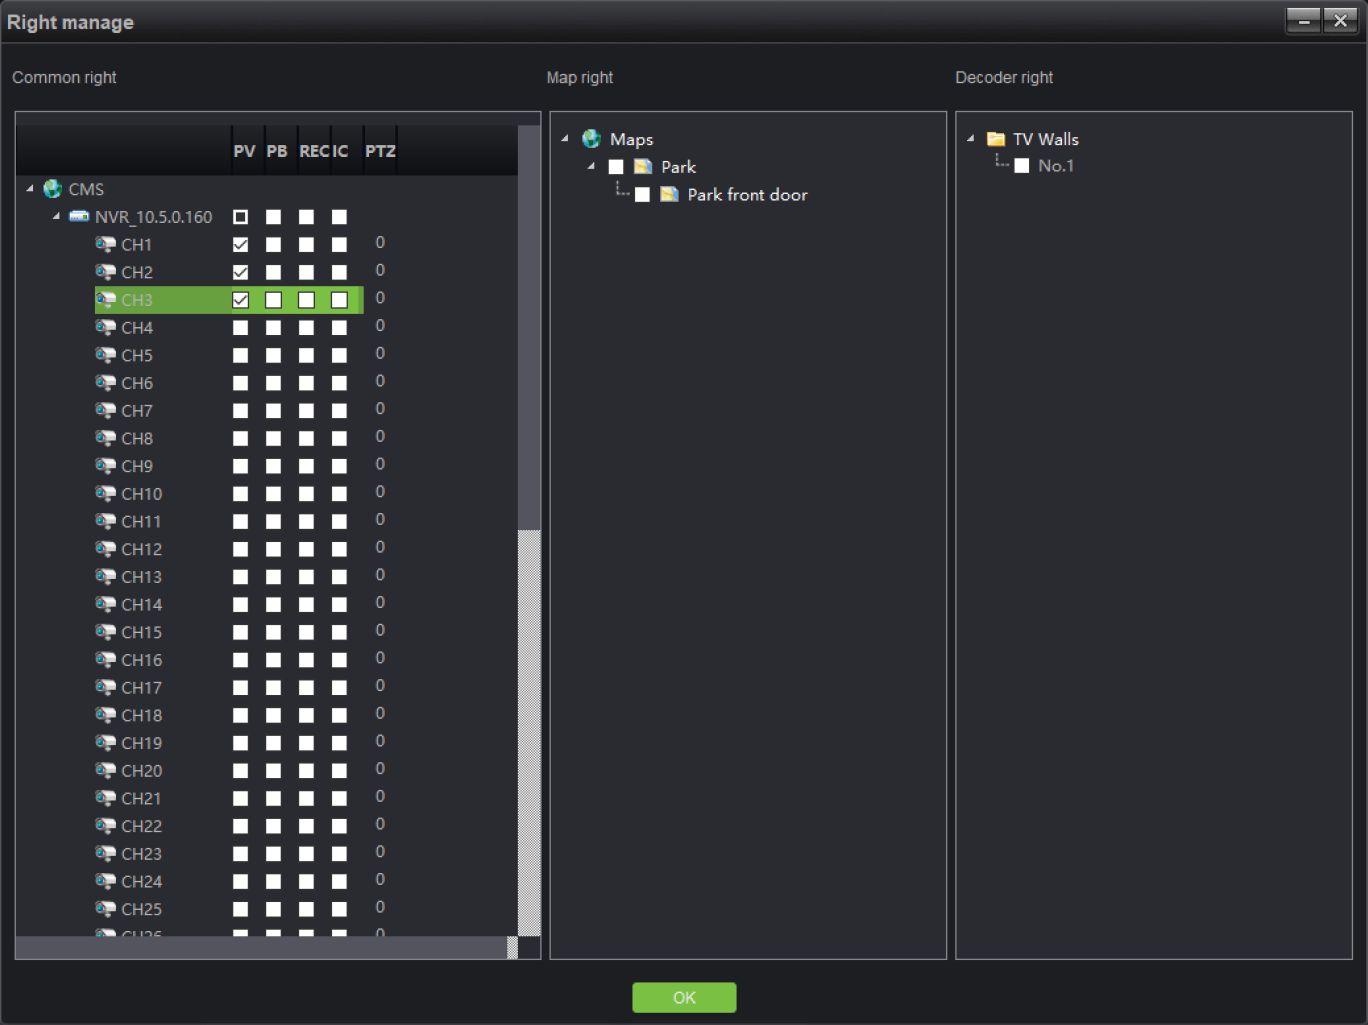
Channels without preview access distributed will be hidden if a sub-user logs in. Similarly, channels without relevant access rights cannot offer users access to playback, video and intercom. users can’t apply the corresponding functions. For instance, there are only 3 channels have been distributed to test sub-user, as shown in the figure:
Login with sub-user can only view three channels, as shown in the figure below:
©Note: the super user has top access priority which cannot be modified.
Antarvis2.0 User Manual 49
1) Modify a sub-user
Click on the “Modify” button indicated in the figure to pop up the editing interface.
Edit – X
OK
Users may modify their passwords as needed. Upon completion of input, click on the “OK” button to confirm and save.
Click on the “Delete” button on the user management interface to delete corresponding users, among which, you may not delete the super user account.
50 Antarvis2.0 User Manual
Click on the “Local configuration” button on the main interface to enter the local configuration
interface:
ZKTeco □□a □□a OOO
o AntarVis 2.0 Control Local panel configuration User admin & CPU: 13%
. … * Memory: 74%
Right: administrator ..
Up: 11 KB/S
Time: 2018-12-08 12:11:49 Down: 625KB/S
□ Autologin □ Bootfrom the start
0 Auto stream O Speed mode ® Save mode 4 ■» sub screen open the main stream
Window scale
Capture path
Download path
Export log path
FullScreen
C:\Capture
C:\Download
C:\Logs
Browse Open
Browse Open
Browse Open
Sync device time I Set Time □ Auto time Sync time 00:00 * Interval 1 ‘ Day
Alarm sounds f Set
Rec storage path settings | Set
Data backup and restore Backup Restore
Channel count
ZKTeco: unlimited Channel
ONVIF: unlimited Channel; P2P: unlimited Channel; ZKTeco-P:unlimited Chai
Record colors ScheduleMotion detect
Smart
Version V2.0[20181123]
Save
Alarm Event < -♦* n s
Alarm Time Alarm Type Device Serial Param Alarm Source Alarm State 2018-12-08 12:10… Motion detection 0B9301230911945AE75A 2 NVR._192.168.0.88-CH2 Stop Alarm 2018-12-08 12:10… Motion detection 0B810002ADBF0000BA47 1 IPC_192.168.0.101-CH01 Stop Alarm
- Auto login: when VMS software opens, it will automatically log in.
- Boot from the start: when you select this feature, the client-end program will run automatically when the server which runs VMS boot up.
- Auto stream: when speed mode and save mode are selected, as shown in the figure,
□ Auto stream 0 Speed mode 0 Save mode 4 ‘ sub screen open the main stream
among which,
open of preview will open main stream and sub stream under the speed mode, however, only one of them will be displayed, therefor, it will be faster for switching and also saves the bandwidth. “Save” mode means that only one stream shall be opened at the same time; the current stream shall be closed to open another. It is slower and saves the bandwidth as well.
- Users may select the mode as needed. In addition, it can be selected under certain number of split screens to automatically switch to main stream under the circumstance of auto stream, 1,4 and 9 channels are optional.
Antarvis2.0 User Manual 51
- Window scale: for preview or playback. You may choose from full screen, 4:3 and 16:9.
- Capture path: the directory to save captured pictures, including preview captures, playback captures and alarm linkage captures.
- Download path: the directory to down documents.
- Export log path: the directory to export log documents.
- Sync device time: manual or automatic synchronization of time of access devices.
- Alarm sounds: selection of sound, which is used as alarm linkage sound. You may customize the sound.
- Rec storage path setting: setting local directory to save recorded documents.
- Data backup and restore: backing up and restoring database to prevent data loss.
- Channel count: displaying the authorized total number of channels. ZKTeco: unlimited Channel;
ONVIF: unlimited Channel; P2P: unlimited Channel; ZKTeco-P: unlimited Channel
- Record colors: defining the color of indication of different types of videos.
- Version: the version number of the current program (non-modifiable).
Upon completion of settings, click on “Save” to quit.
52 Antarvis2.0 User Manual
Click “Next” to confirm to create desktop shortcut, continue to complete setup (©note: computer already setup antivirus program may pop-up prompt; please select “allow” with no exception for the normal setup start of the program), the program runs as the setup completed, as shown in figure:

AntarVis 2.0
Login
Forgot password
Users may manually switch between languages. The initial user name is admin, and the initial password is 123456. Enter the password, click on “Login”; if you have selected “Remember password”, you do not have to enter the password and the program automatically logs in as “Auto login”.
The function of automatic login can be canceled in local configuration. When you forget the password, click on “Forgot password” to get a temporary key for the supplier to help you get a temporary password. Below is the main interface of the program:
Antarvis2.0 User Manual 3
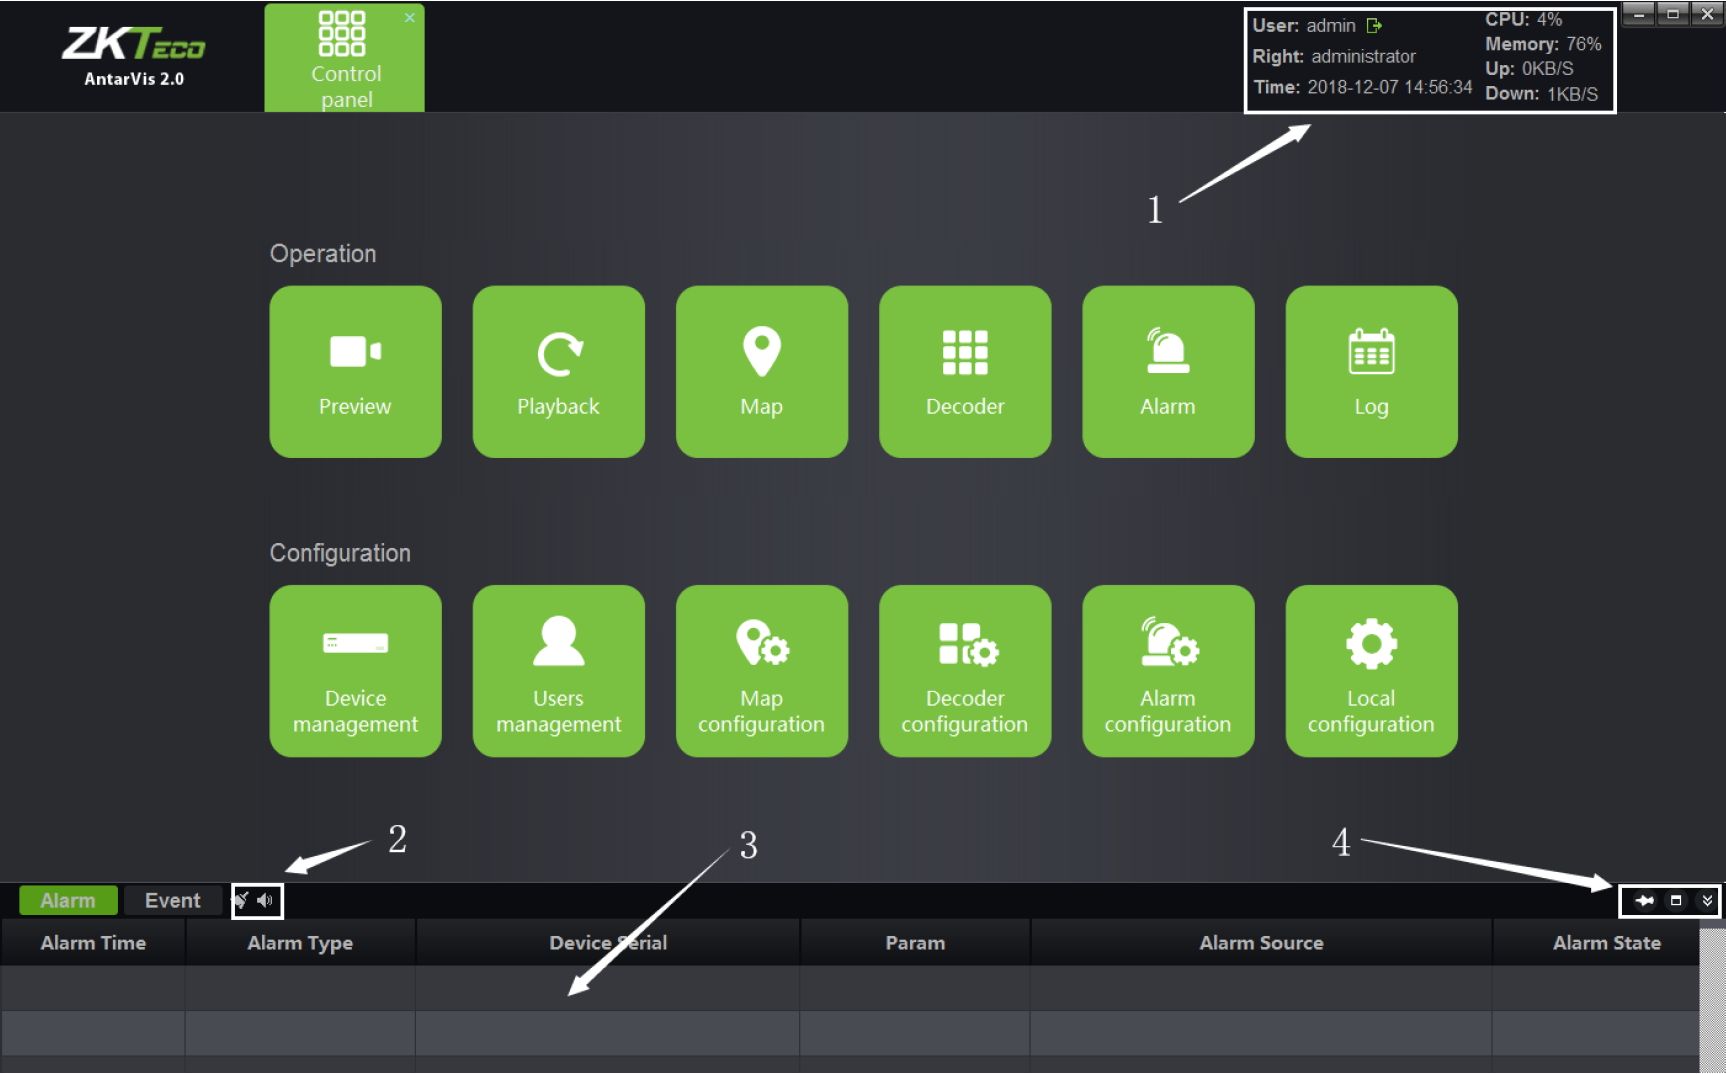
1) Display current user, user rights, current time, consumption of CPU memory and real-time
network data flow; click on

to log out.
2) Display real-time alarm messages and event messages; double-click on the alarm message to
open the preview of the current alarm channel for users to view alarm in real-time manner.
3)
The functions in the toolbar

, from left to right, are: clear alarm/event message, close
sound/open sound.
4)
The functions in the toolbar

, from left to right, are: stay window, window max,
hide window.
Click on “Device management” on the main interface.
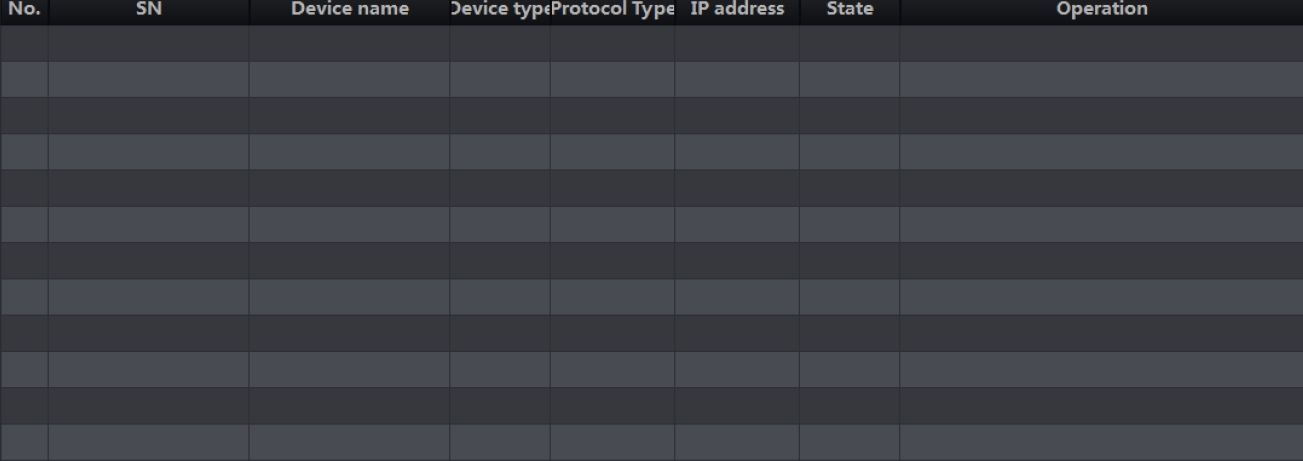
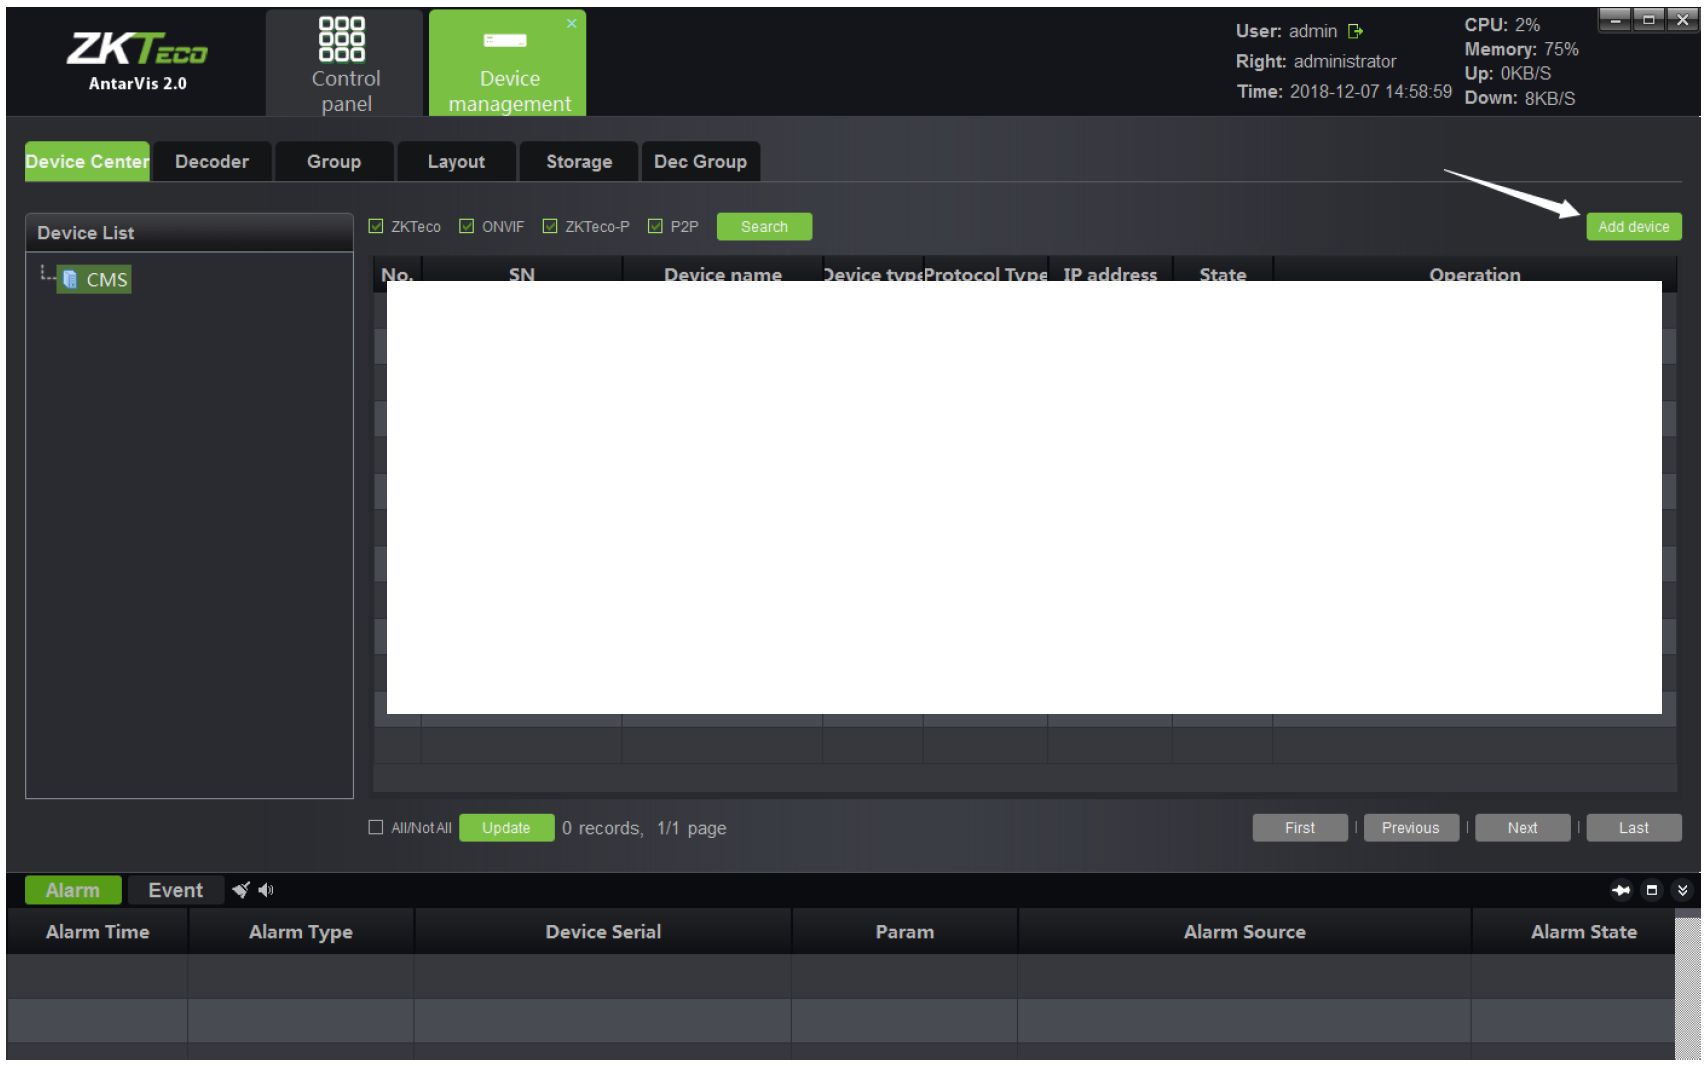
This interface displays relevant information of all devices added to VMS, including device type, protocol type and online and offline status; click on “Add device” at the top right corner, the “add device” interface will then pop up:
4 Antarvis2.0 User Manual
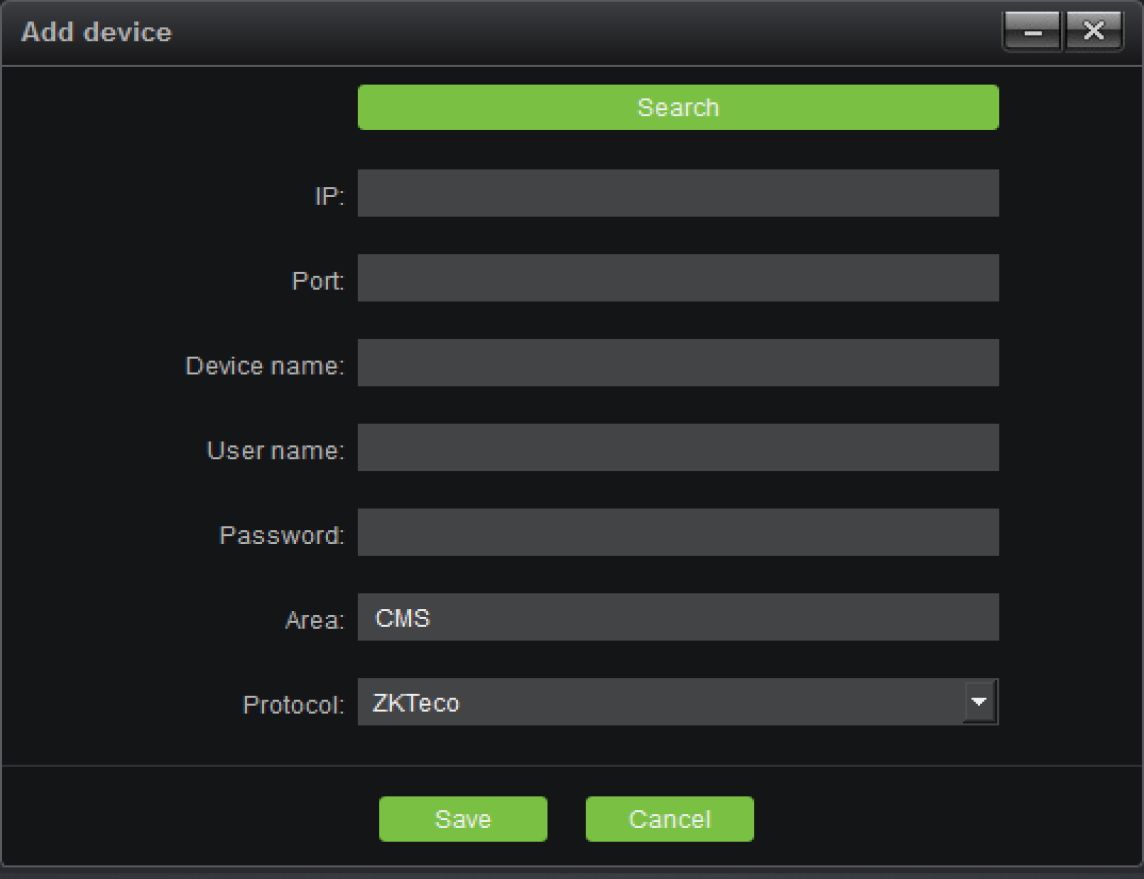
Select a protocol. ZKTeco protocol is an independently developed protocol of our company. Front-end devices should support ZKTeco protocol. ZKTeco’s front-end devices currently used for shipping basically supports this protocol. The ZKTeco-P protocol is the protocol used by PTZ domes.ONVIF protocol is the joint ownership protocol for access to third-party devices that support this protocol.
Select the protocols as needed, it is to click on “Search” to search for online devices in the LAN. Take ZKTeco protocol as an example:
Antarvis2.0 User Manual 5
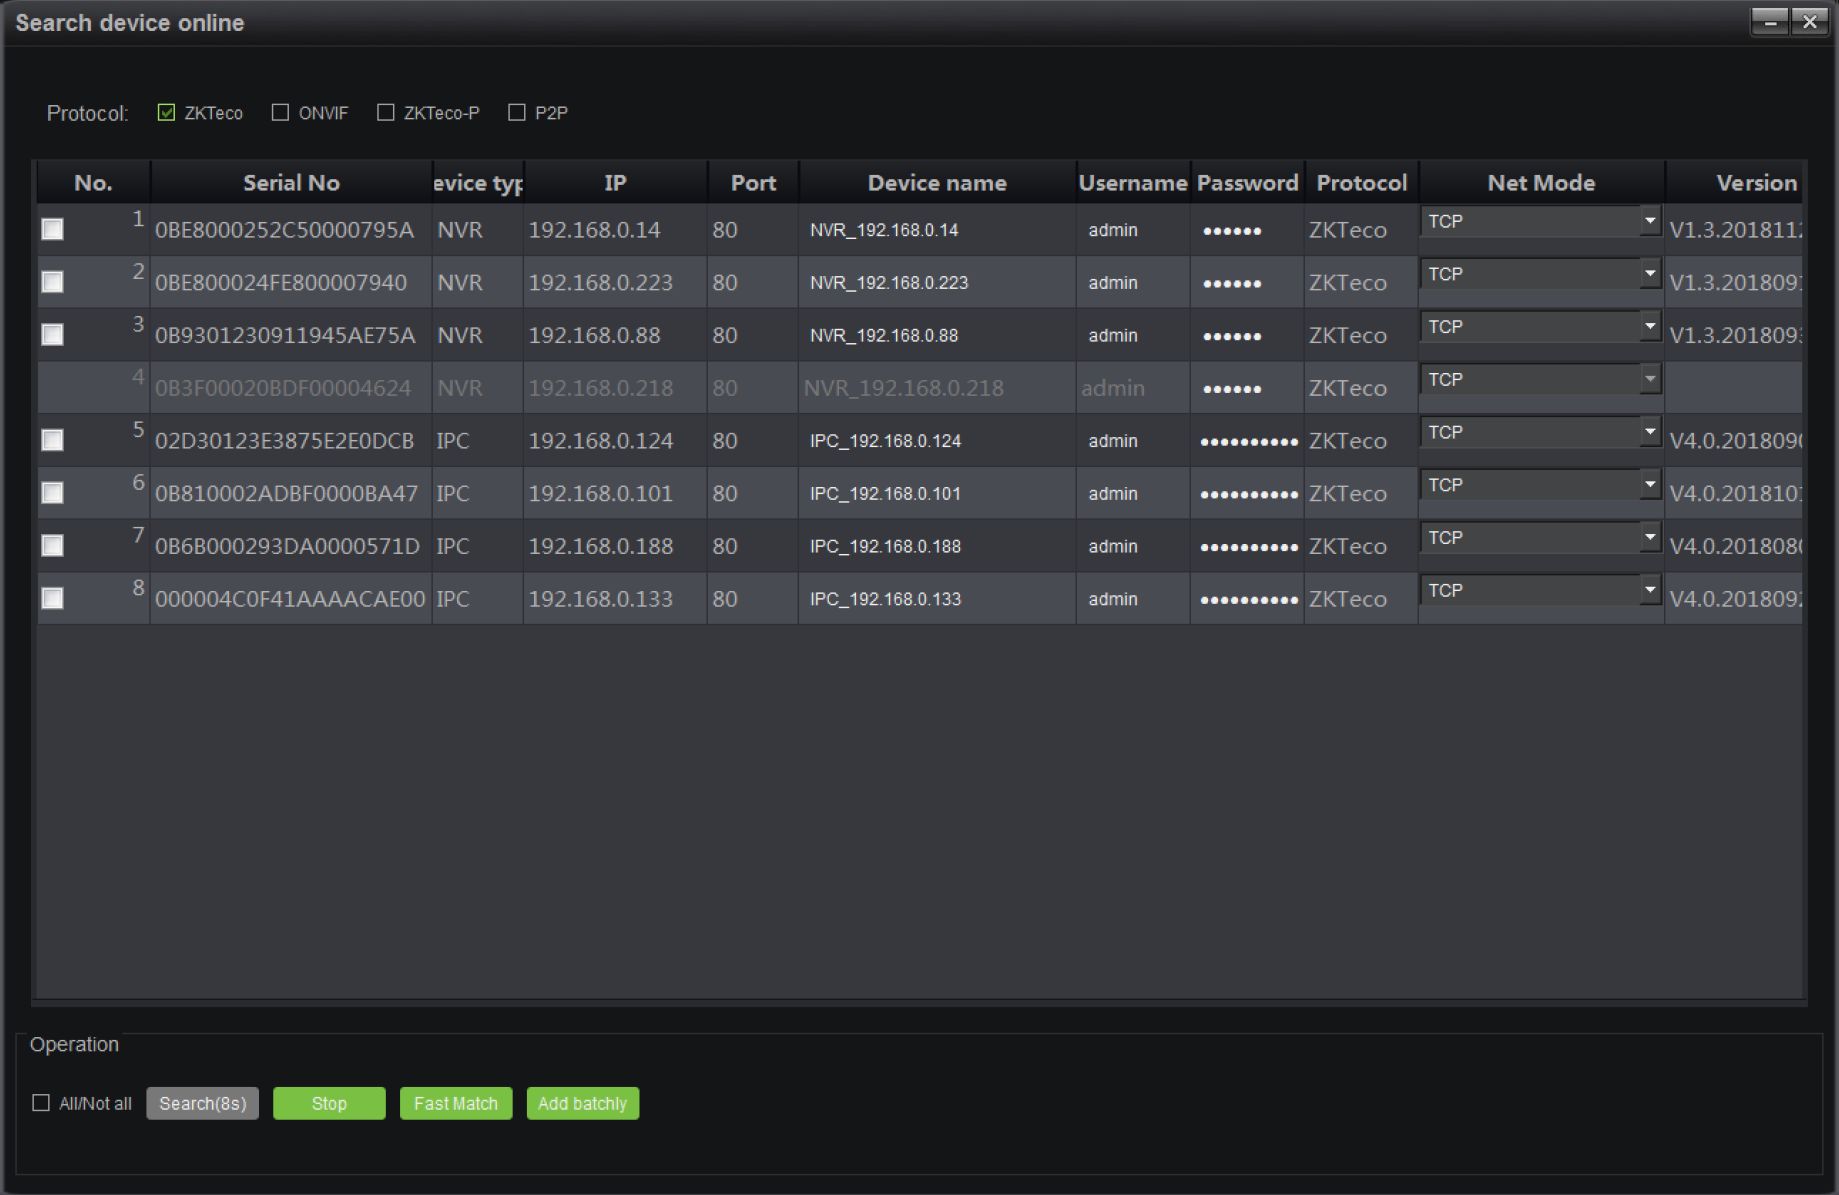
©Note: devices displayed in gray are those devices that have been added to the device list; click on “IP address” to sort them according to the IP address of the devices.
Select the device to be added, click on the “Select” button, as shown below:
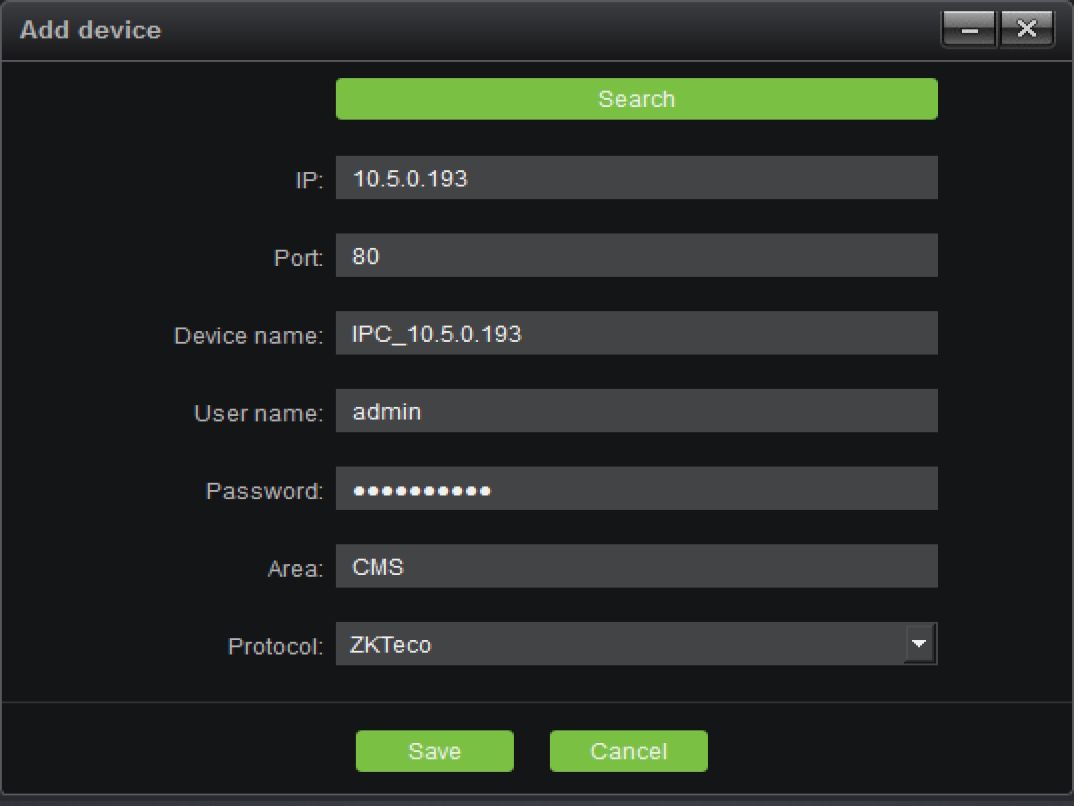
Device Name: define by the user as needed.
User Name: user name of the device.
Password: password of the device.
Enter correct user name and password to add the corresponding device into the device list. Also, the front end using the ZKTeco protocol does not require a password. (©Note: for safety consideration,
6 Antarvis2.0 User Manual
Devices using the ONVIF protocol,the password can’t be retrieved and the password of the device needs to be manually filled in; no password filled in or wrong password will lead to add log-in failure.) Fast match function means when there are multiple devices with the same username and password, choose fast match, then you just need to input the username and password for one time.
After adding the equipment, the interface is as shown below:
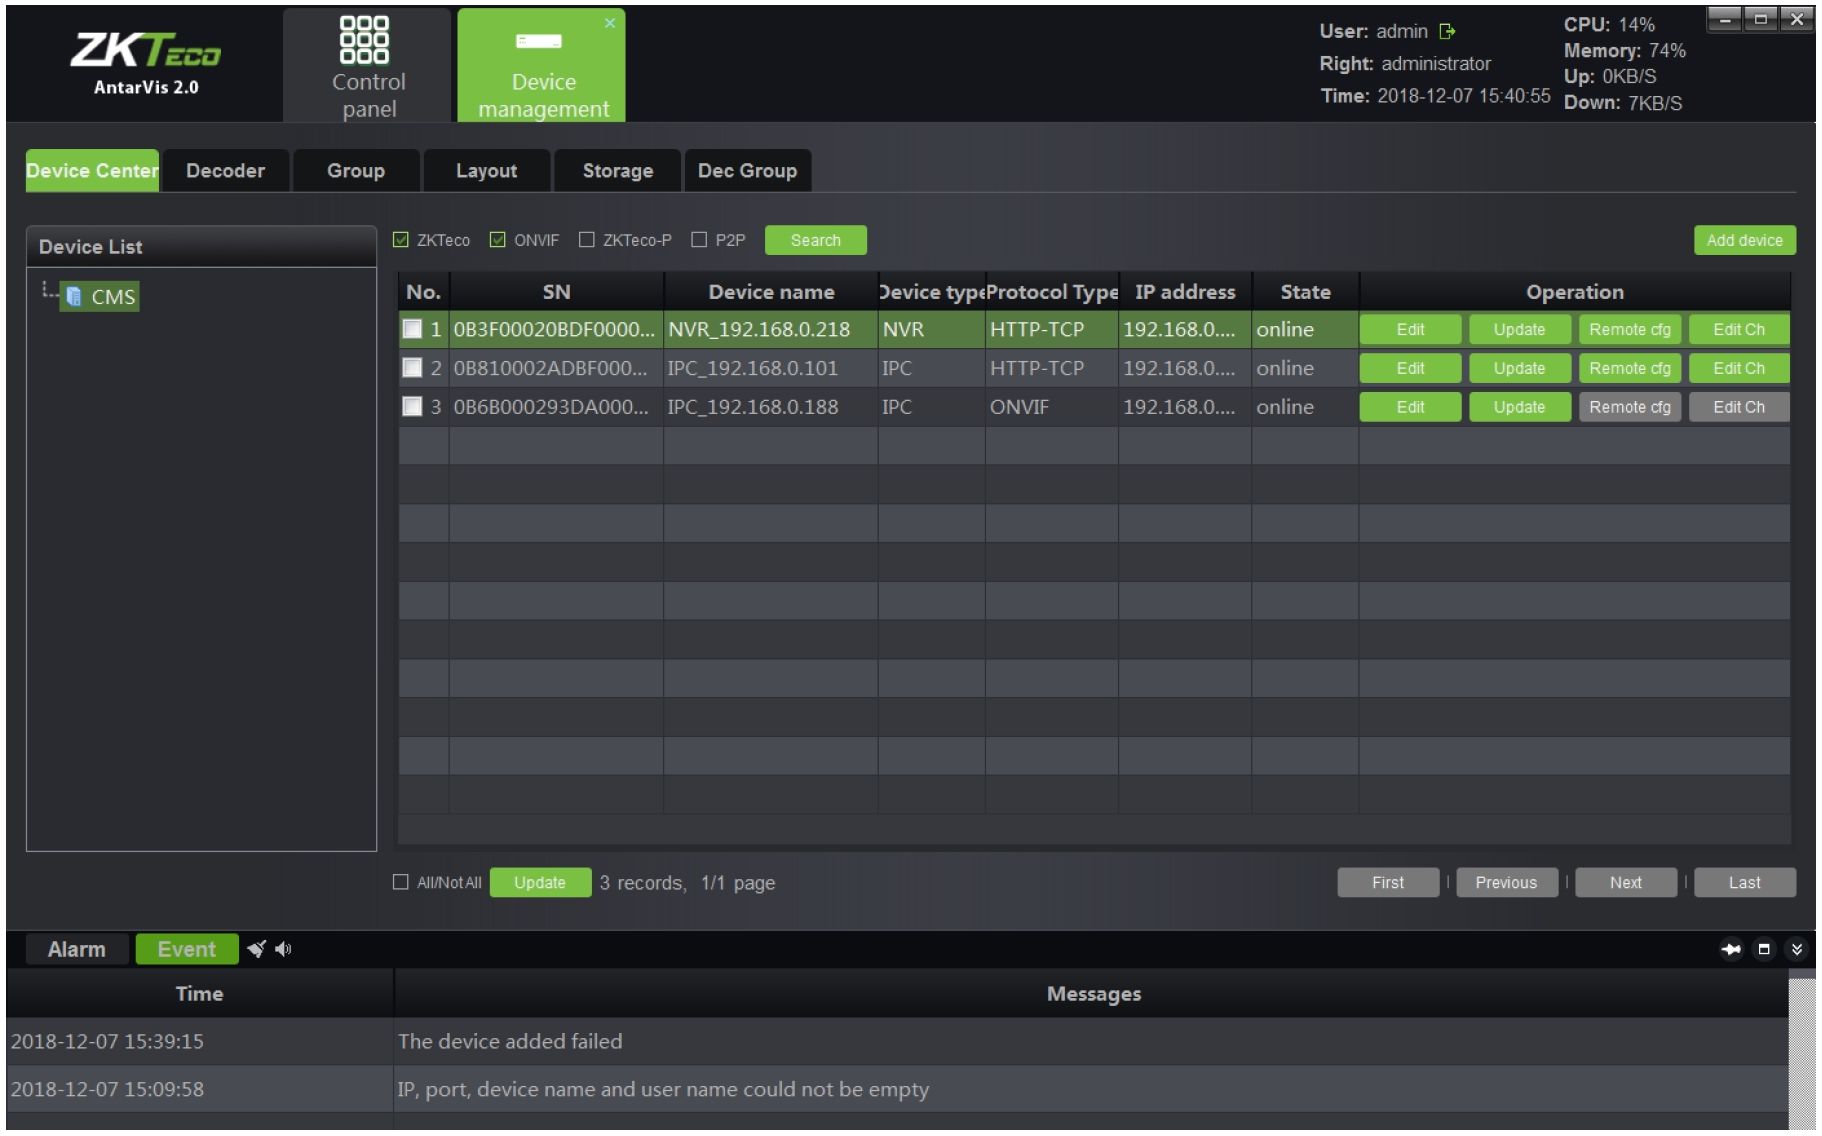
We can edit and delete devices, call remote configuration and modify channel names here. The remote configuration is only supported by ZKTeco protocol; calling the remote configuration can view or modify related parameters of the front-end device. Modifying the channel name is only supported by ZKTeco protocol; It is quick and convenient to modify channel name of the front-end device .
Antarvis2.0 User Manual 7

□□□
□□o
□□a
Control
panel
Device CenterB Decoder Group
_ »
Device
management
Layout Storage Dec Group
Decoder name Decoder type
User: admin B CPU: 10% “■
. . … Memory: 72%
Right: administrator ..
Up. UKd/o
Time: 2018-12-07 15:42:25 Down’ *|KB/S
IP address

0 records, 1/1 page
First Previous Next Last
| Alarm Event | < 4» | -*• B | |||
| Time | Messages | ||||
| 2018-12-07 15:39:15 | The device added failed | ||||
| 2018-12-07 15:09:58 | IP, port, device name and user name could not be empty |
Switch to decoder interface. This interface, which is similar to that to add a device, displays all
decoders added to the server at present and the online and offline status of the decoders. The added
decoders can be edited and deleted; in case of adding a new decode, click on the
Add Decoder
button in the top right corner:
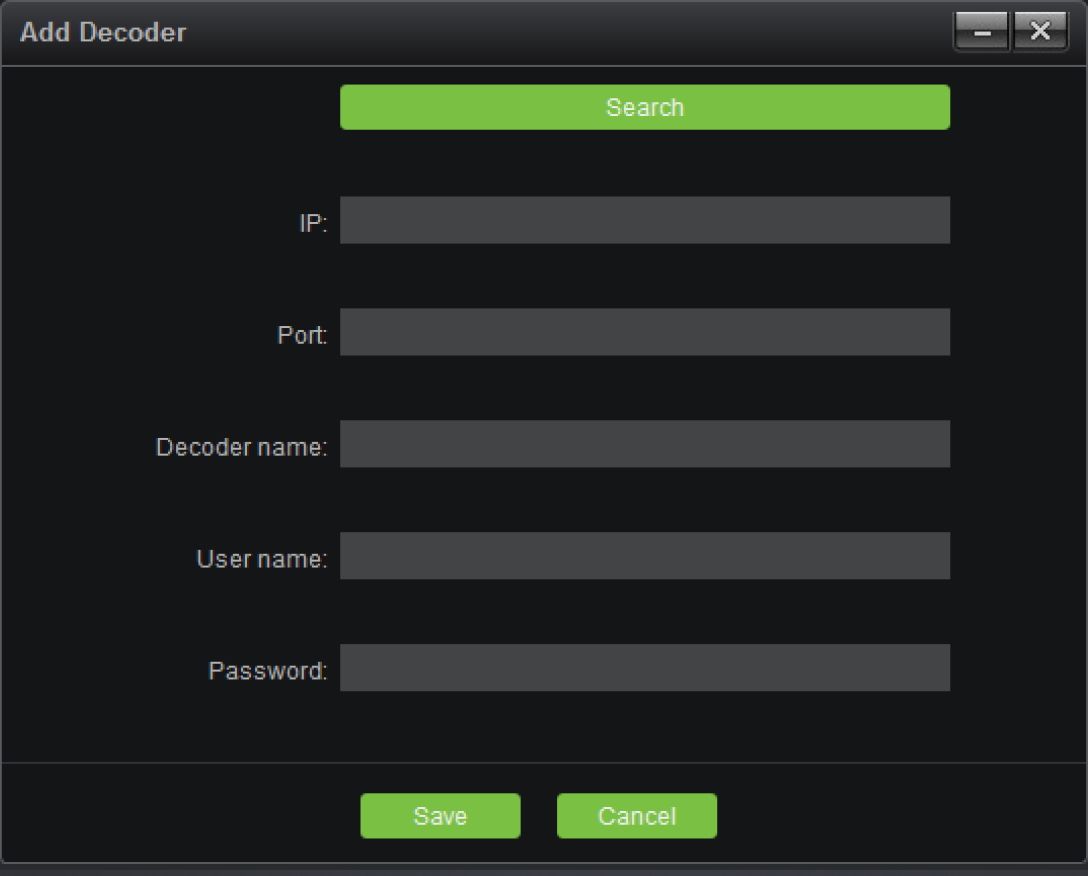
Click on “Search” to search for all online decoders in the LAN; similarly, the decoder added to the
8 Antarvis2.0 User Manual
decoder list will display in gray and can not be added again:
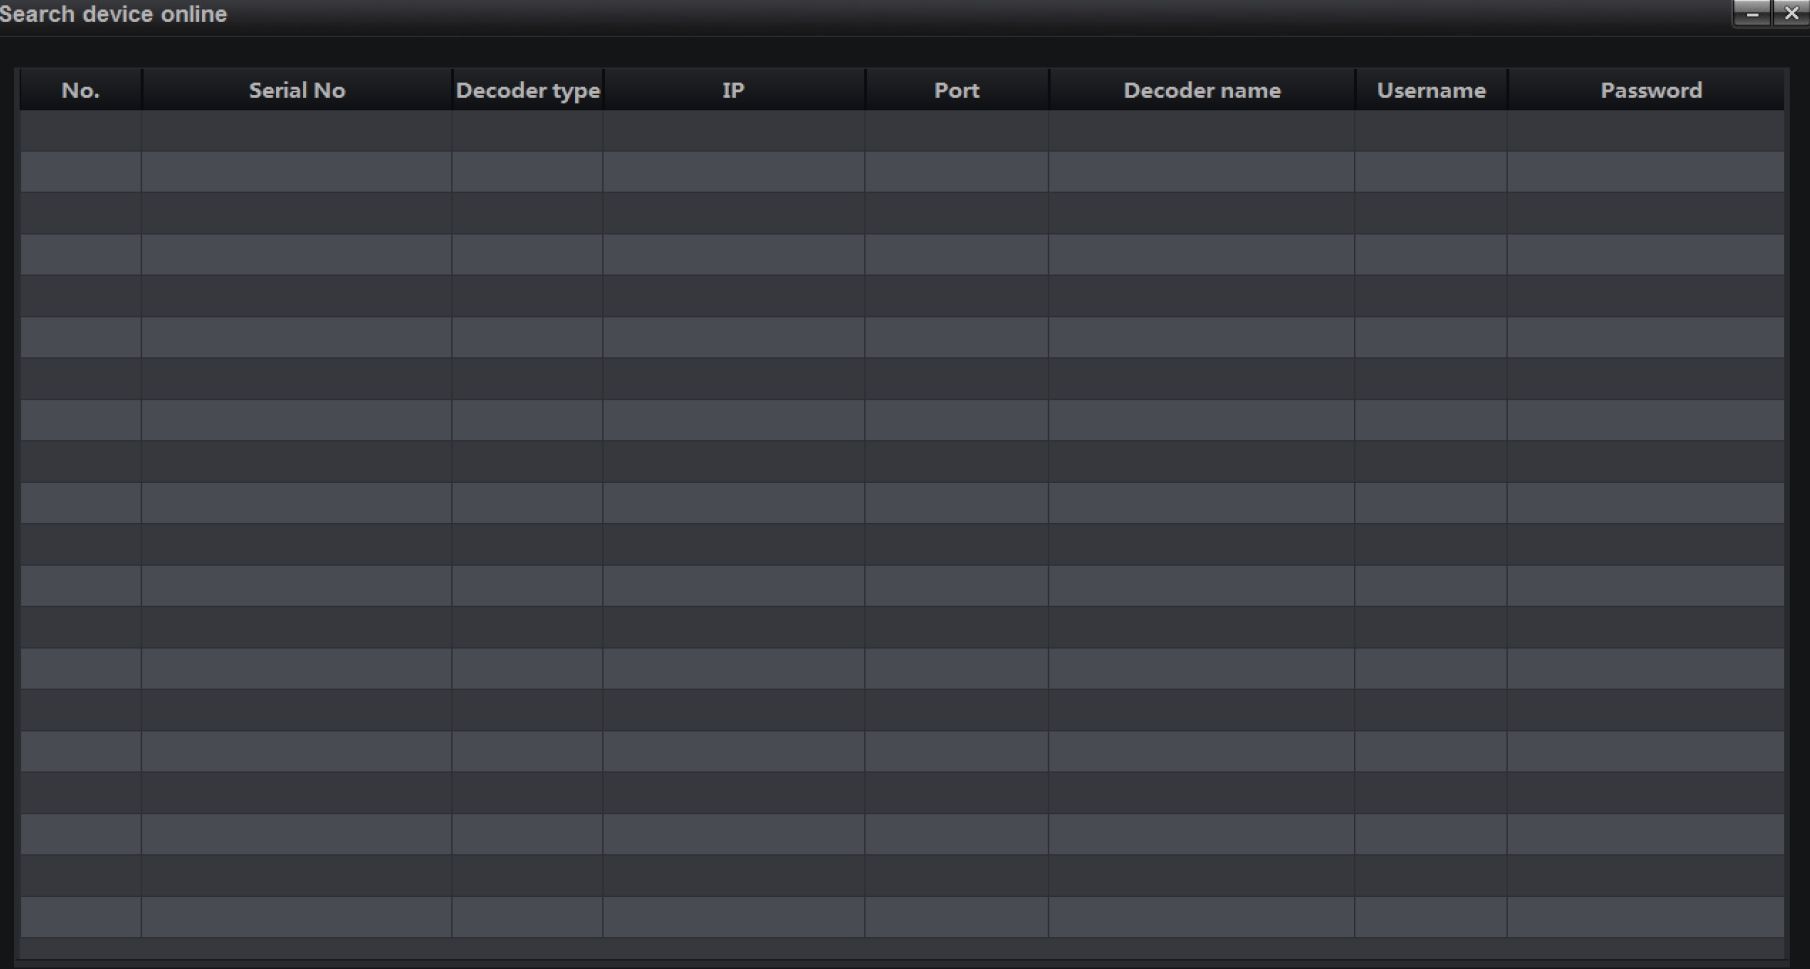
Operation
□ All/Not all | Search Stop Fast Match Add batchly
Select a decoder to be added, click on “Select”:
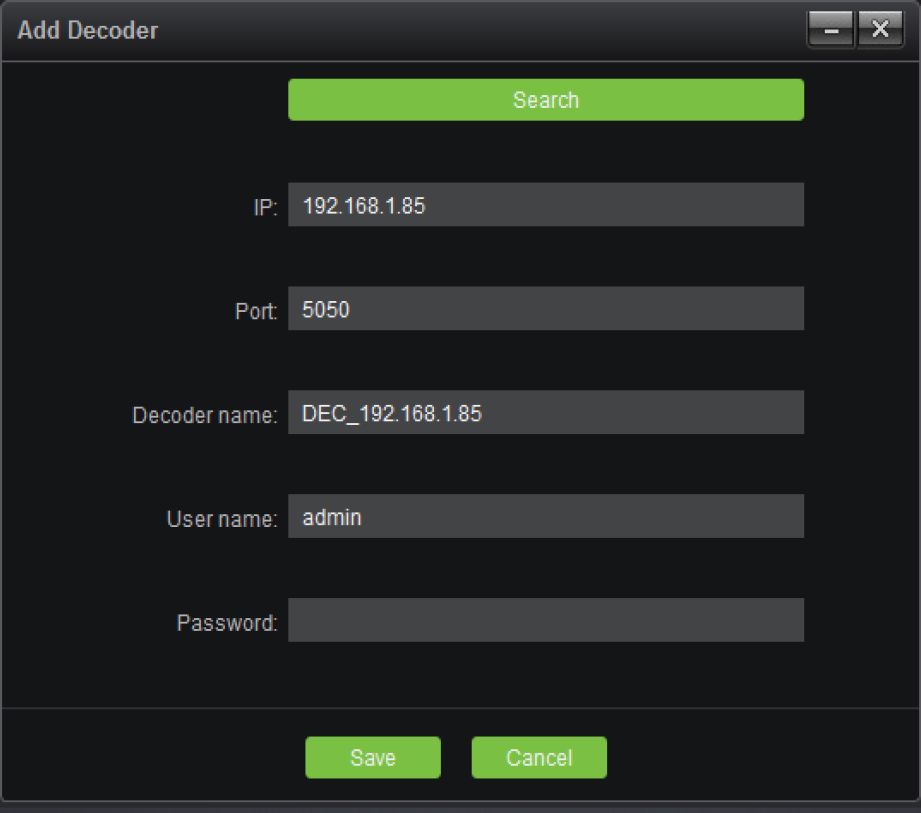
Decoder Name: users may define and modify the name as needed.
User Name: the default setting is admin.
Password: the default setting is null.
When it is completed, click on “Save” to add the decoder to the server; in case you want to add a group of decoders, select multiple decoders on the search interface, fill in the right password, click on “Add batchly” to add multiple devices with one key.
Antarvis2.0 User Manual 9
Switch to the page of “Group” in the device management module, as shown in the figure below:
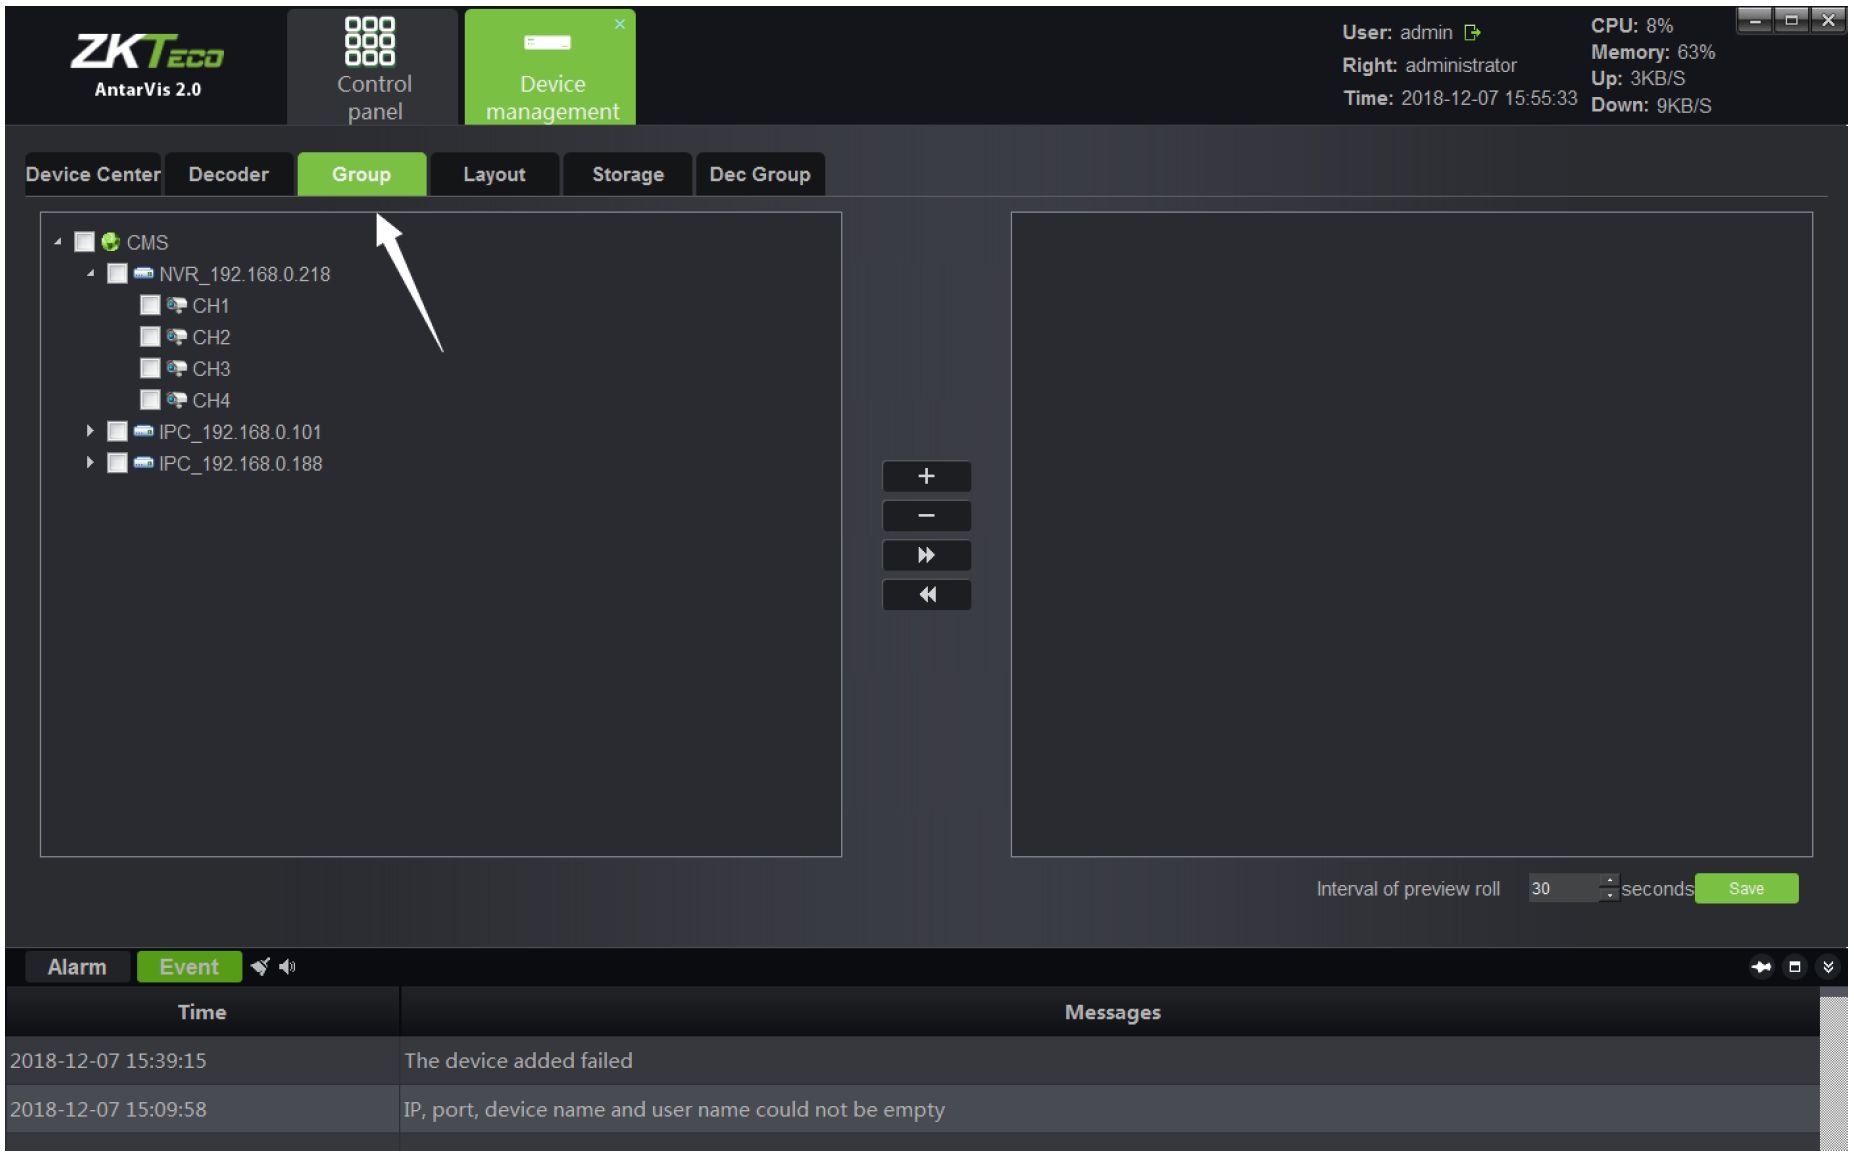
Click on “+” button to add group.

Fill in the group name, click on “Save” to create the group; when it is succeeded, select the device
channel on the left, then select a group on the right, click on the

button to add the
relevant channels to the corresponding group; the actual application of grouping will be described
in the preview module. When adding is completed, the interface will look like below:
10 Antarvis2.0 User Manual
| ZKT^
AntarVis 2.0 |
□□□ □□□ □□□
Control panel |
_ *
Device management |
User: admin & CPU: 2% — —’
_. . . . . . . . Memory: 63% Right: administrator Up; Time: 2018-12-07 15:58:14 Down: 2KB/S |
X | |||
| Device Center Decoder | Group | Layout Storage Dec Group | |||||
| ‘ ■ ft CMS
■< ■ ®NVR_192.168.0.218
* ■•IPC_192.168.0.101 » ■ *»IPC_192.168.0.188 |
+
* * |
‘ BM2
|
|||||
| Interval of preview roll 30 ‘ seconds] save | |||||||
| Alarm Event ■< 4»
Time |
-H n
Messages |
IB | |||||
| 2018-12-0715:57:45 | Add channel success!|IPC_192.168.0.188-CH01] | ||||||
| 2018-12-07 15:57:45 | Add channel success![IPC_192.168.0.101-CH01] | ||||||
Similarly, check the channel in the group and click on

to remove the channel from the
group.
Switch to the page of “Layout” in the device management module, as shown below:
ZKT^
AntarVis 2.0
□□□ □ □□ OOÛ
Control
panel
Device
management
User: admin & CPU: 4%
„ . . .. Memory: 70%
Right: administrator Up. H8|<B;S
Time: 2018-12-07 15:59:20 Down* 31^3/5
![]()
Device Center Decoder Group I Layout Storage Dec Group
Add Layout
No.
Layout Name
Dwell Times(s)
Window Count
Division Type
Operation
0 records, 1/1 page
First Previous Next Last
| Alarm Event | < 4» | n « | ||
| Time | Messages | |||
| 2018-12-07 15:57:45 | Add channel success! [IPC_192.168.0.188-CH01] | |||
| 2018-12-0715:57:45 | Add channel success![IPC_192.168.0.101-CH01] |
Click on the button “Add layout”, then the system will pop up this window:
Antarvis2.0 User Manual 11
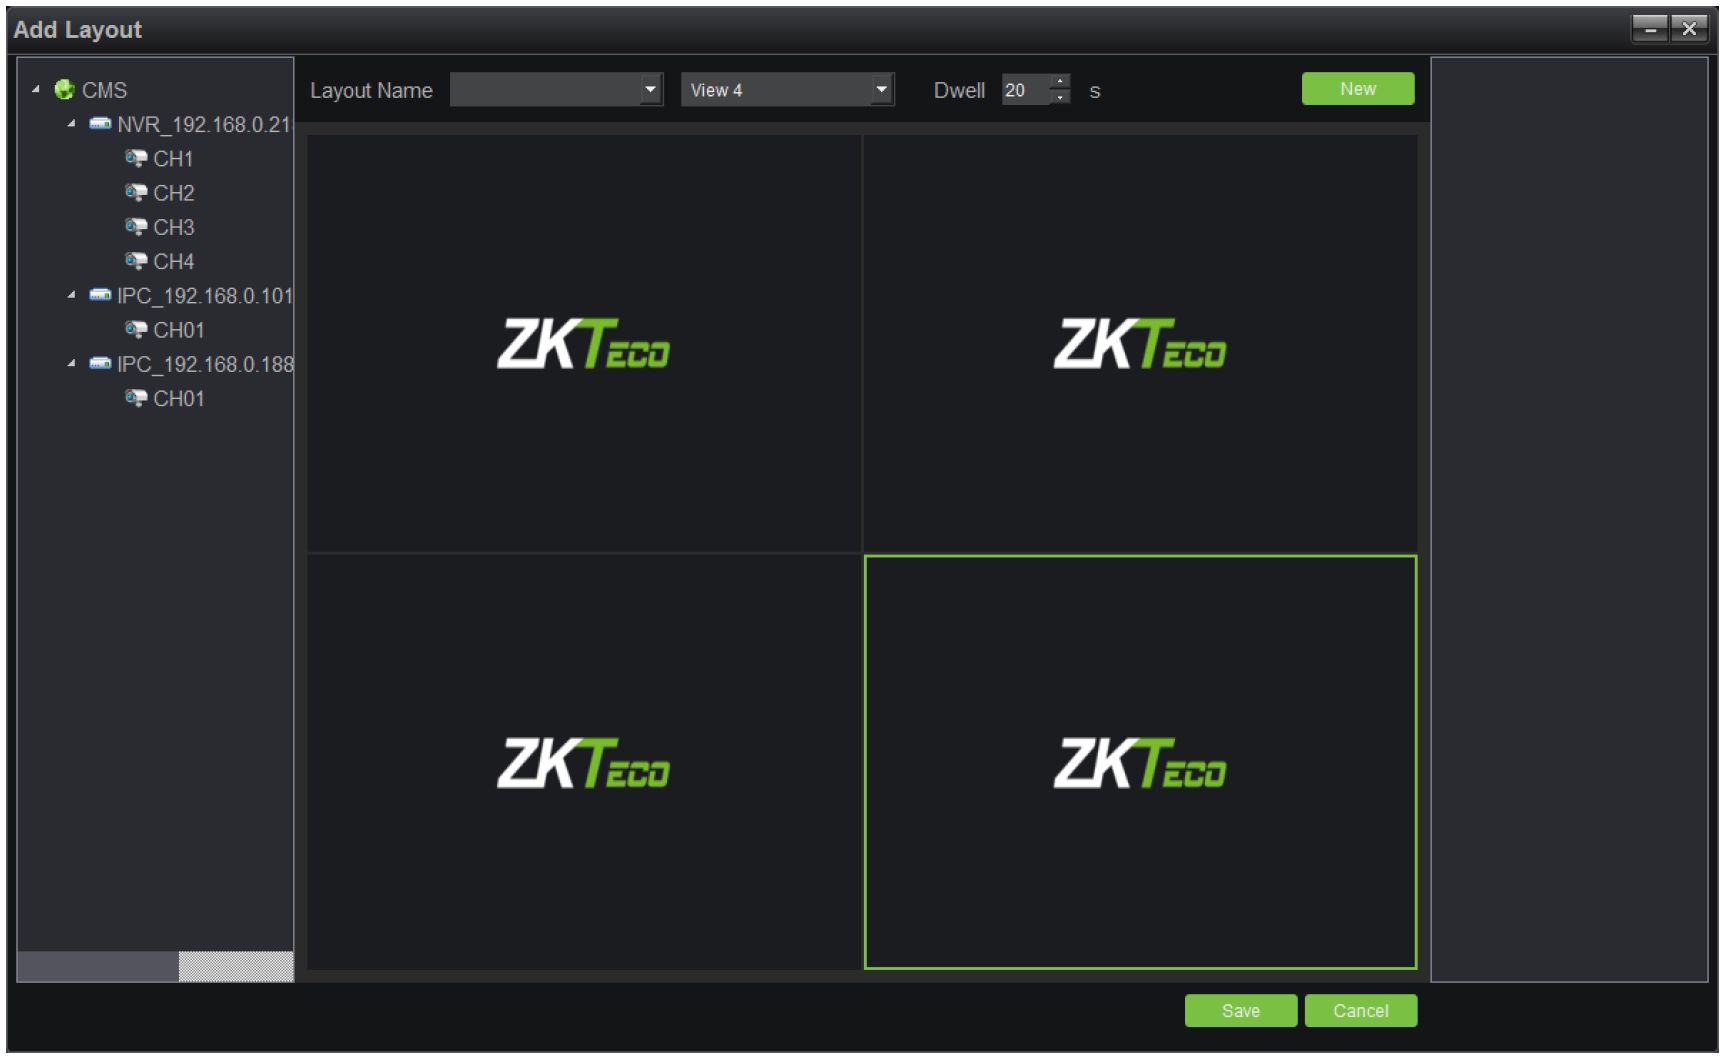
Fill in the name of a layout, select the number of split screens as needed. Types of split screen include standard split and wide-screen split, among which, pictures under ordinary split screen and wide-screen are displayed in 16:9 and 1:1, respectively; select the duration of stay from Dwell option. and then drag the channel for layout. Take 6 split screens as an example:
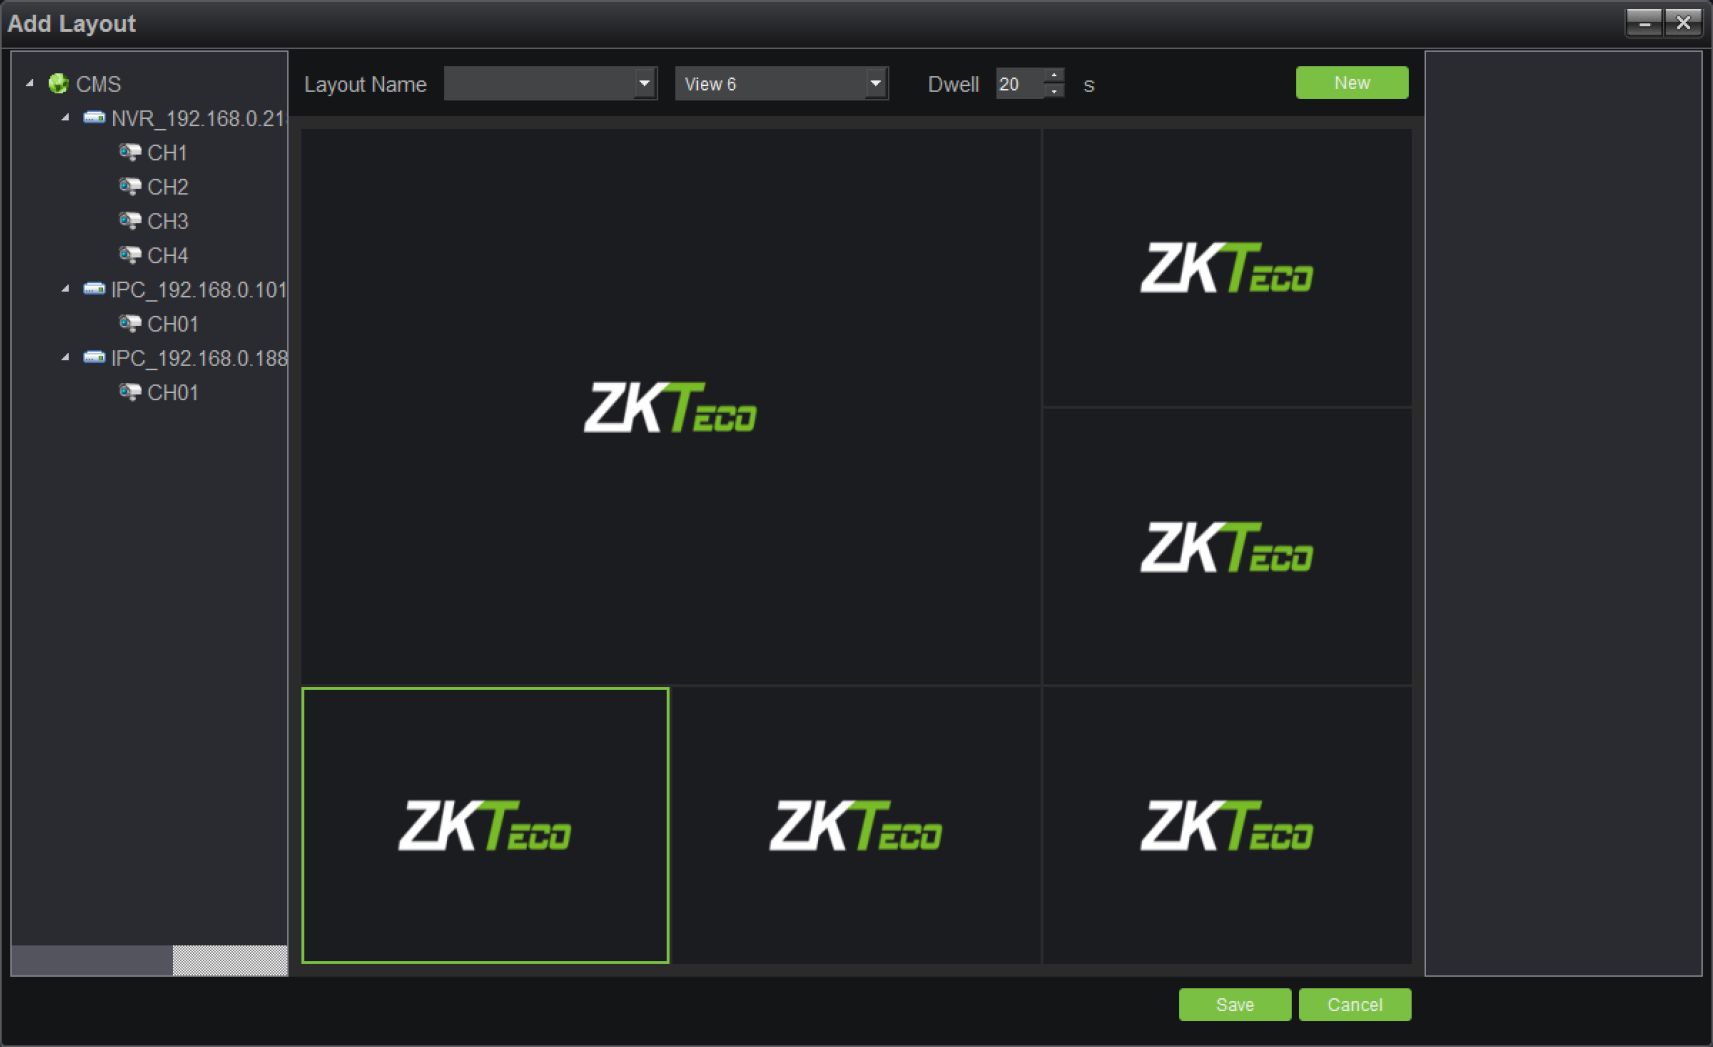
Click on “New” or “Save” to complete layout settings. Then, the saved layout information shall be
displayed on the right side:
12 Antarvis2.0 User Manual
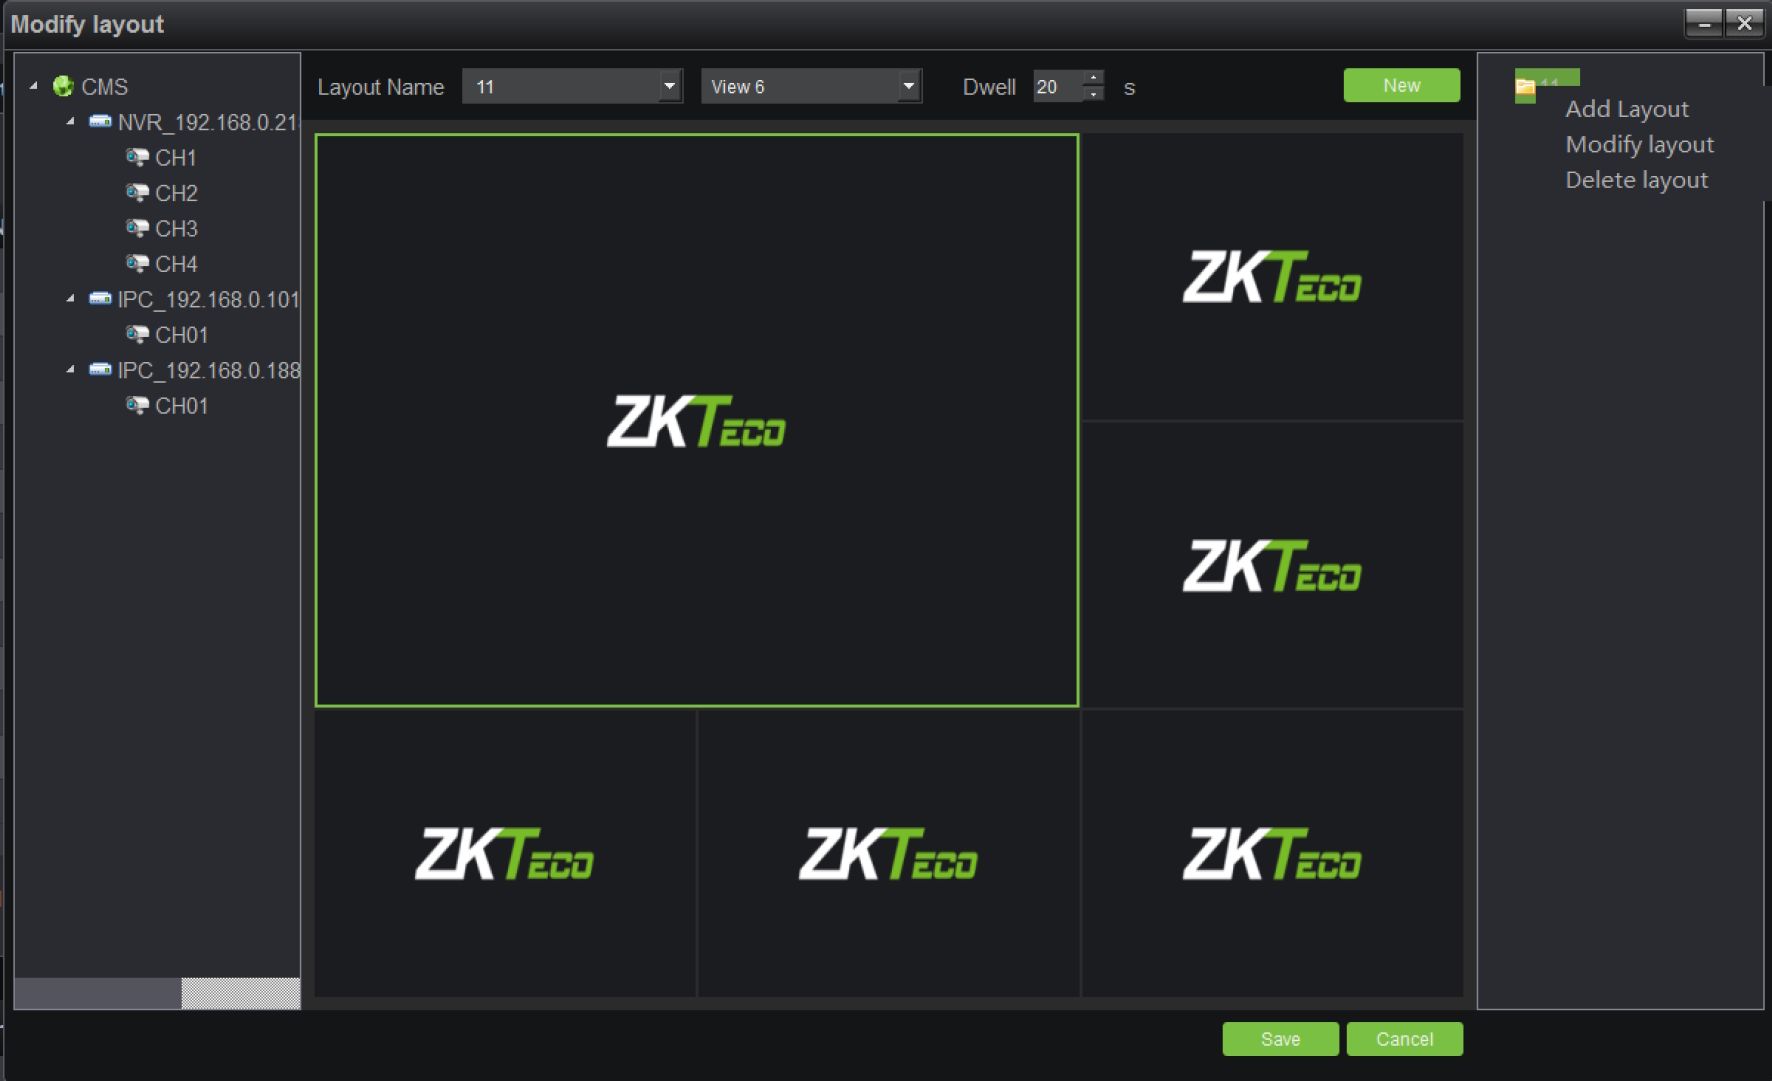
Right-click on the existing layout to edit the layout. Applications of the layout function are further elaborated in the preview module.
Switch to the page of “Storage” in the device management module, as shown below:
ZKTecü
AntarVis 2.0
□□□
□□O □□□
Control
panel
— *
Device
management
User: admin G» CPU: 8%
_. . . . ■ ■ . Memory: 71%
Right admlnlstratar Up;
Time: 2018-12-07 16:15:30 Down* 3KB/S
Device Center Decoder Group
Layout I Storage Dec Group
| Alarm Event < 4) | ||||||
| Alarm Time | Alarm Type | Device Serial | Param | Alarm Source | Alarm State H | |
| 2018-12-07 16:14… | Motion detection | 0B3F00020BDF00004624 | 4 | NVR_192.168.0.218-CH4 | Stop Alarm H | |
| 2018-12-0716:14… | Motion detection | 0B810002ADBF0000BA47 | 1 | IPC_192.168.0.101-CH01 | Stop Alarm SB | |
This page displays relevant information of the storage server, including the server name, server
Antarvis2.0 User Manual 13
address and used space of the hard disk drive. Click on

to set a storage server, as
shown in the figure below:
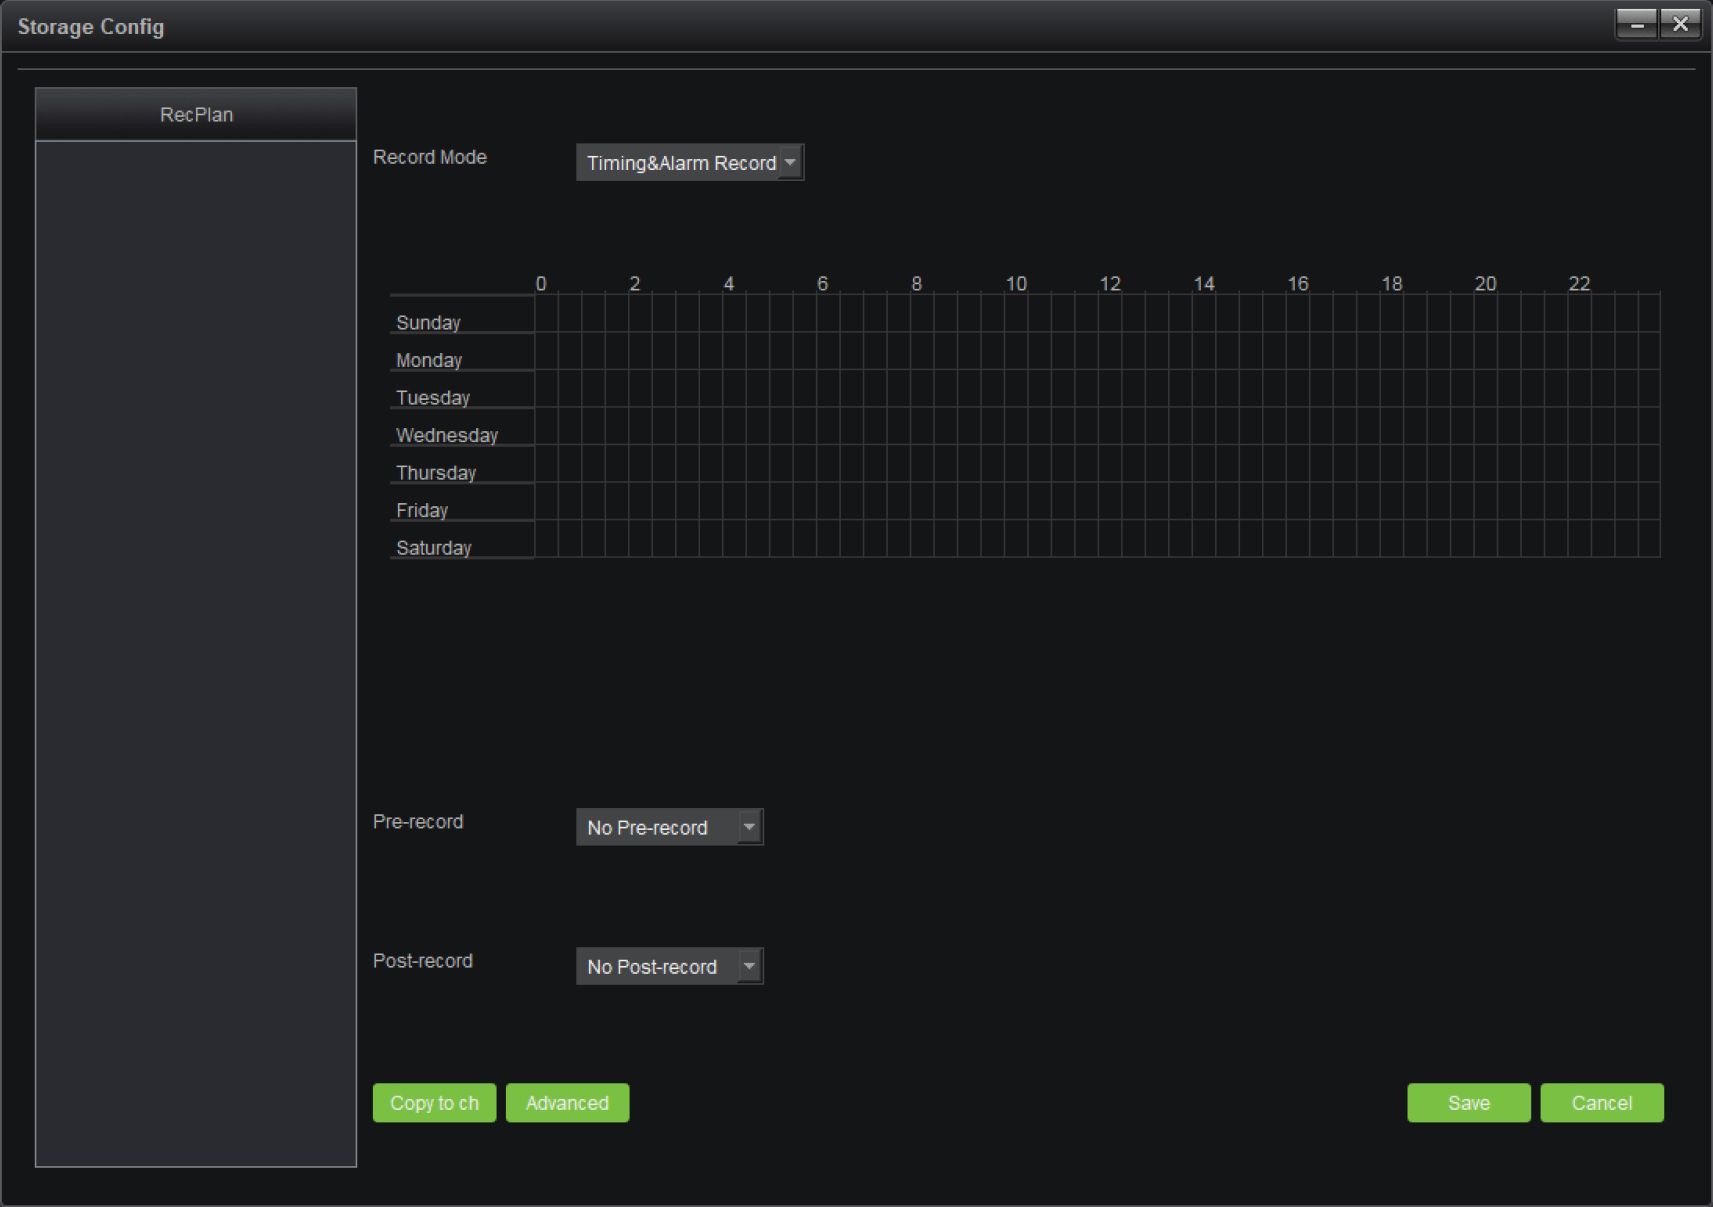
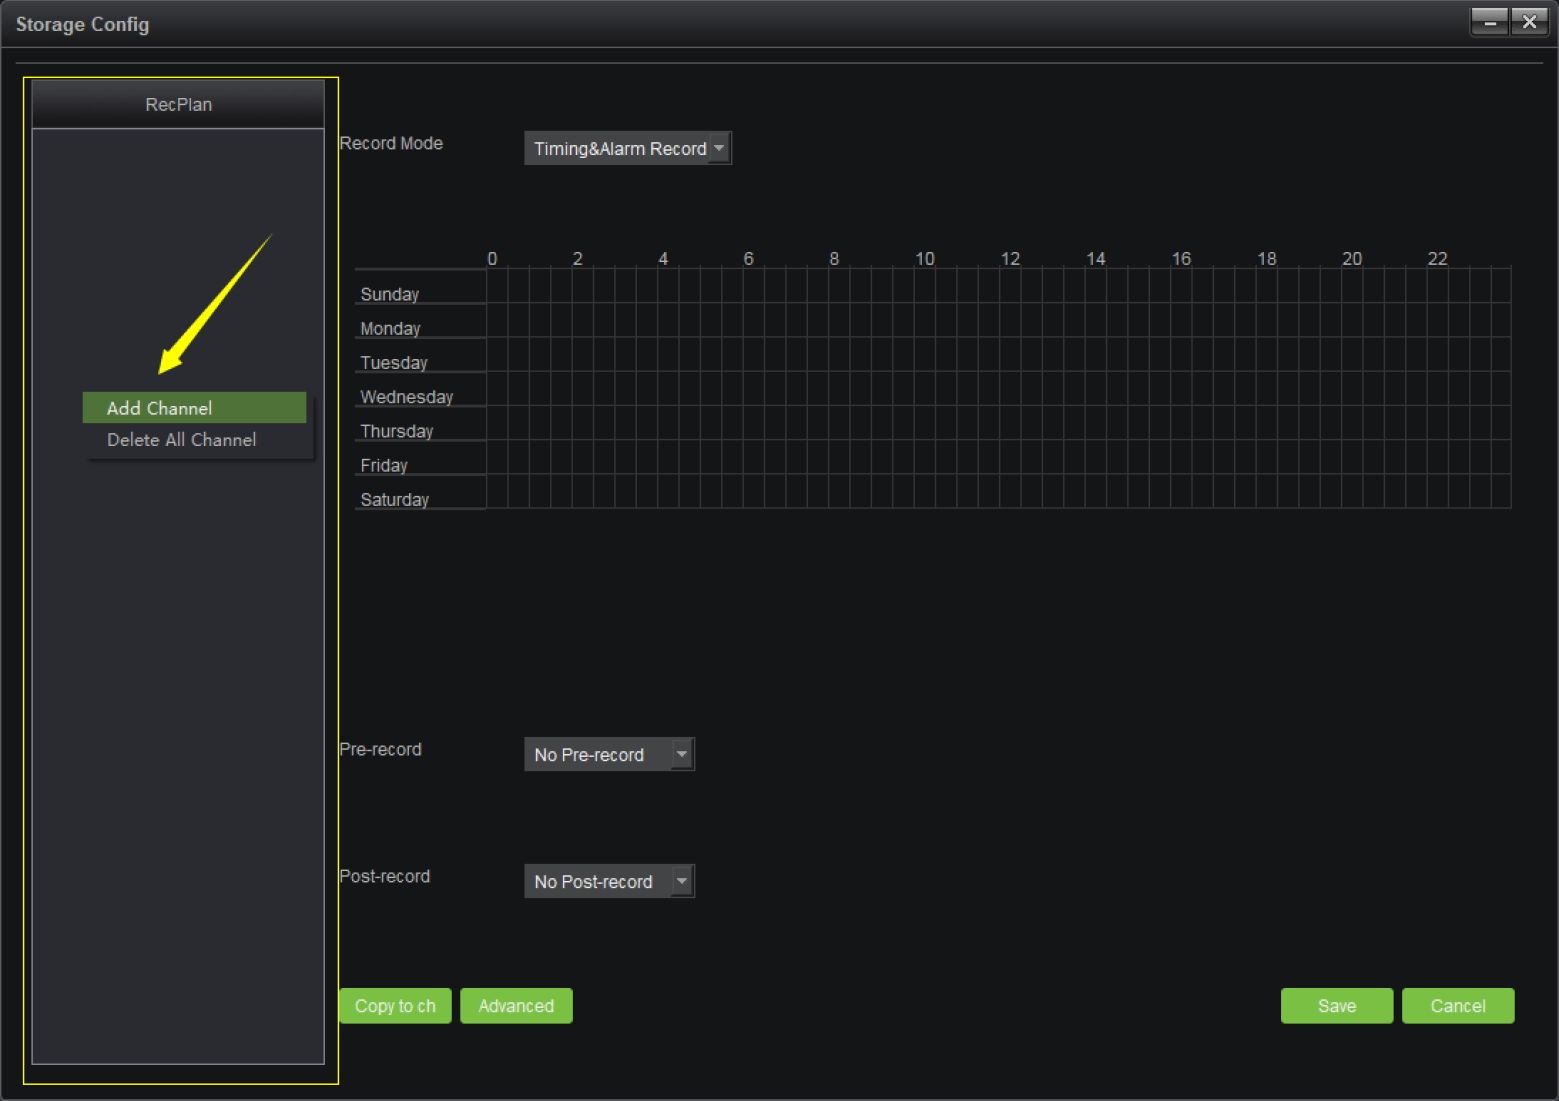
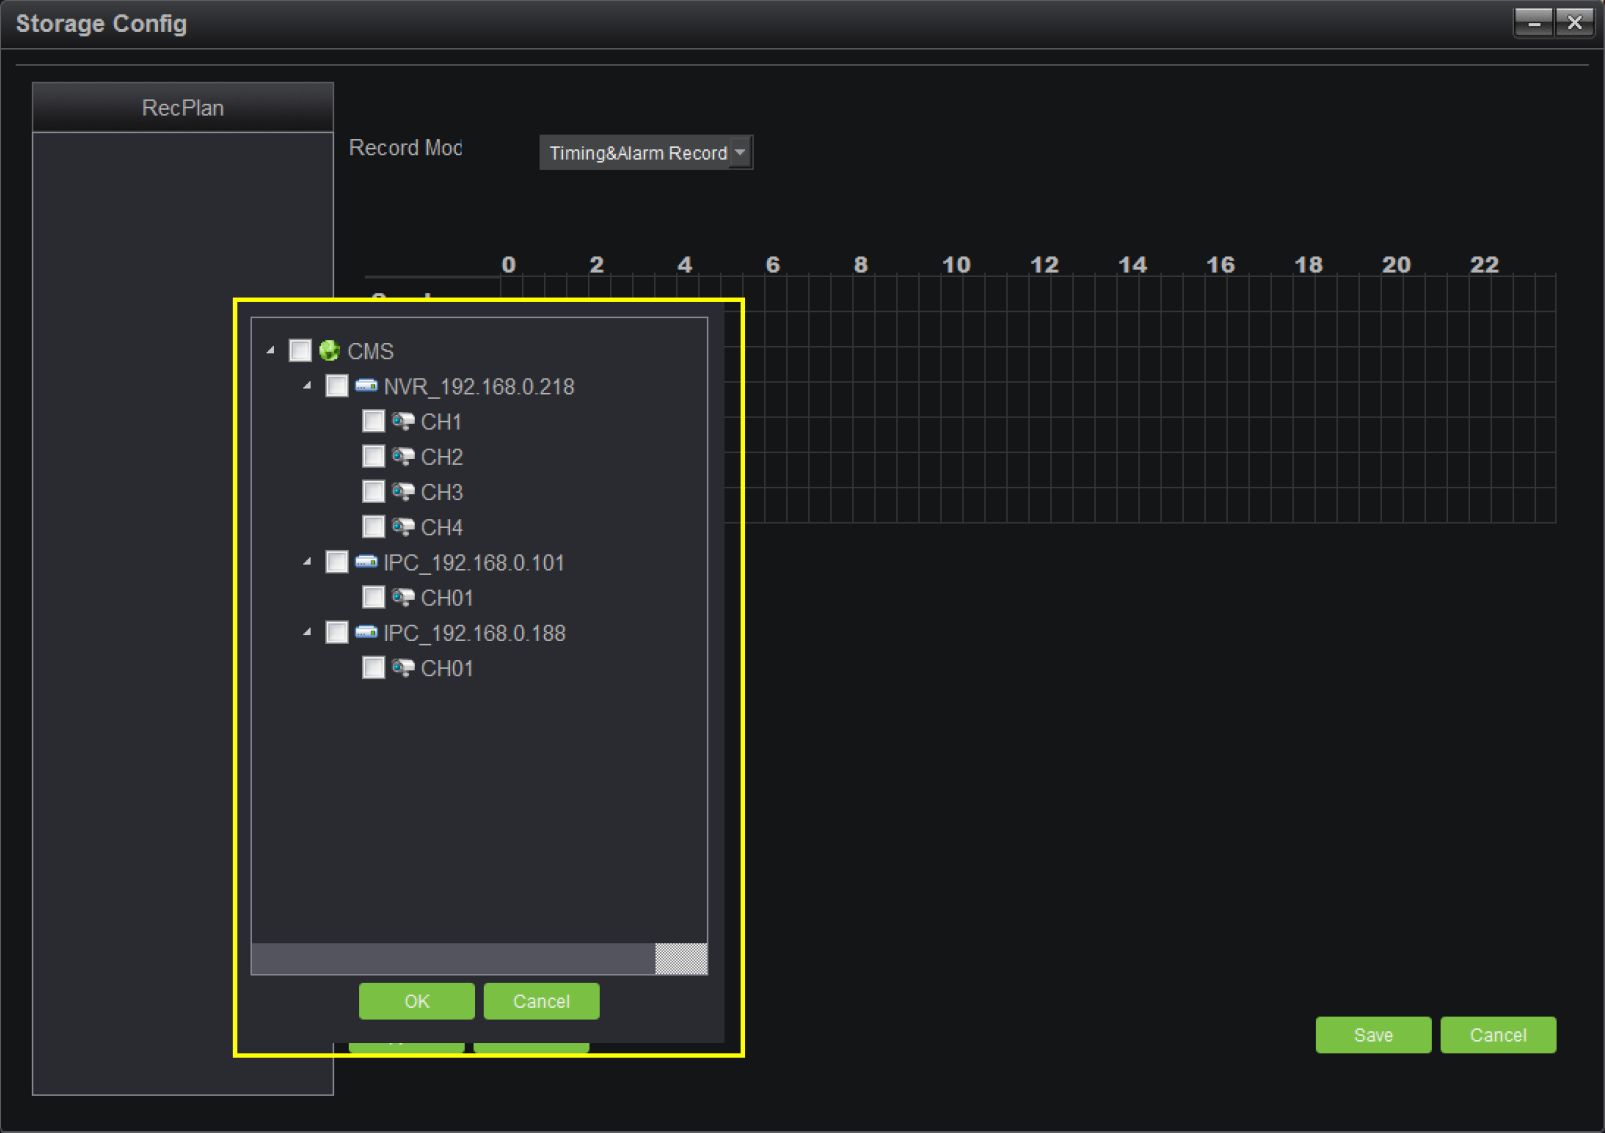
Right-click on the blank area of the RecPlan on the left side, then add a channel to the storage server;
when it is done, select the channel to set the RecPlan.
14 Antarvis2.0 User Manual
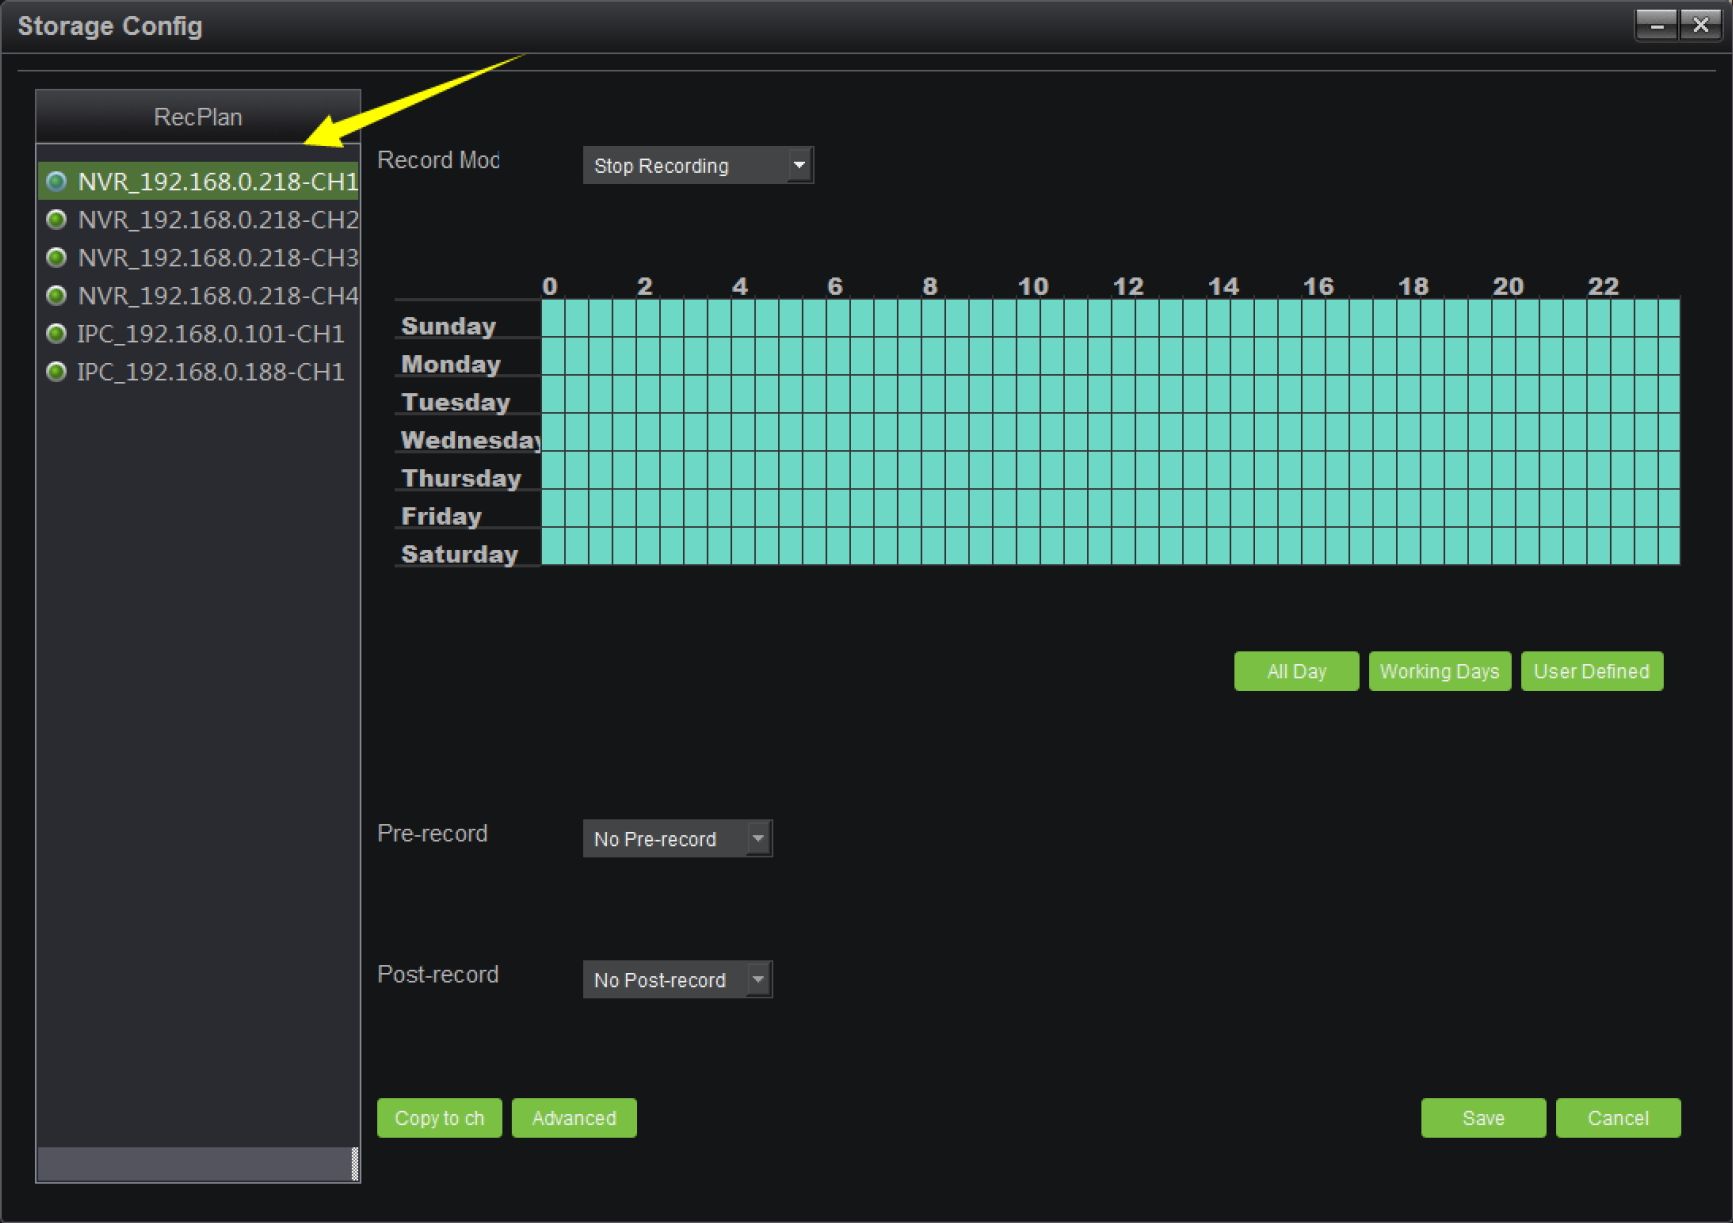
RecPlan has a default whole-day template and a working day template. In case of the need of other RecPlan templates, click on “User Template” to add those you need; start to record as the RecPlan set. Yellow arrow in the figure shows the recording status of the channel. Red means the channel is working; blue means the otherwise.
Antarvis2.0 User Manual 15
There are four kinds of recording modes, including timing & alarm recording, timing recording, alarm recording and stop recording, among which, timing & alarm recording refers to the timing plus alarm recording, i.e. timing recording runs if no alarm recording has been triggered, while alarm recording runs as an alarm has been triggered; timing recording refers to only time stamps you set; alarm recording means record starts when an alarm is triggered; and stop recording means do not record at all.
Pre-record and time delay function are only available in two modes: timing & alarm recording and alarm recording, particularly the alarm recording; copy to channel refers to copy the RecPlan of certain channel to other channel that already added to the storage server; advanced setting can set up different partitions of disk for recording while some others do not; the default setting is that other disks can be used for recording besides the system disk. Click on “Save” to make the settings effective as the configuration completed.
In case the channel added to the storage server shall be modified, right-click on the channel added to add a channel, delete single channel and delete all channels; click on “Save” when the configuration completed and recording starts.
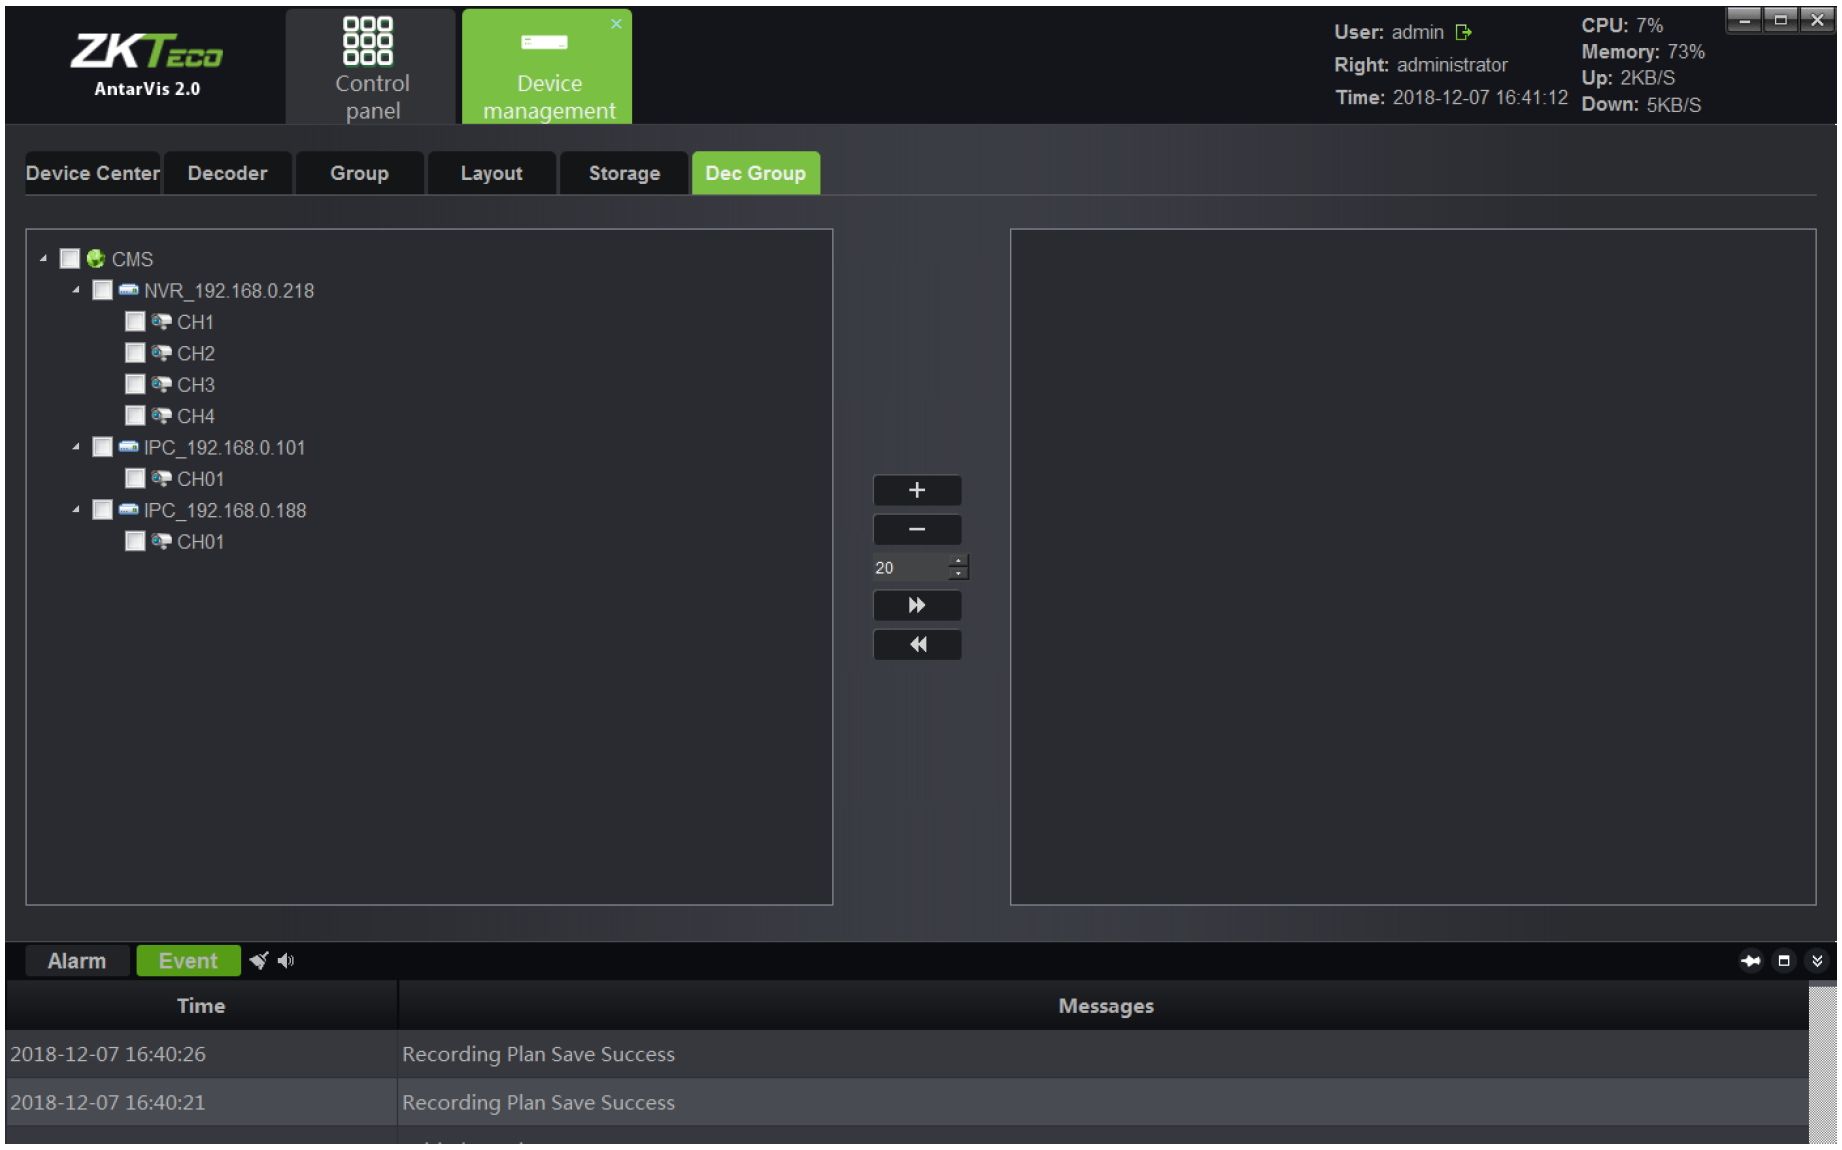
Switch to the “Dec Group” interface in the device management module, as shown below:
16 Antarvis2.0 User Manual
The operation configuration method of this group is similar to the preview group mentioned above, except that this group is used for intra-group patrol on the decoder. For details, please refer to the introduction of the decoding management module in the following section.
Click “Preview” on the main interface to enter the preview module:
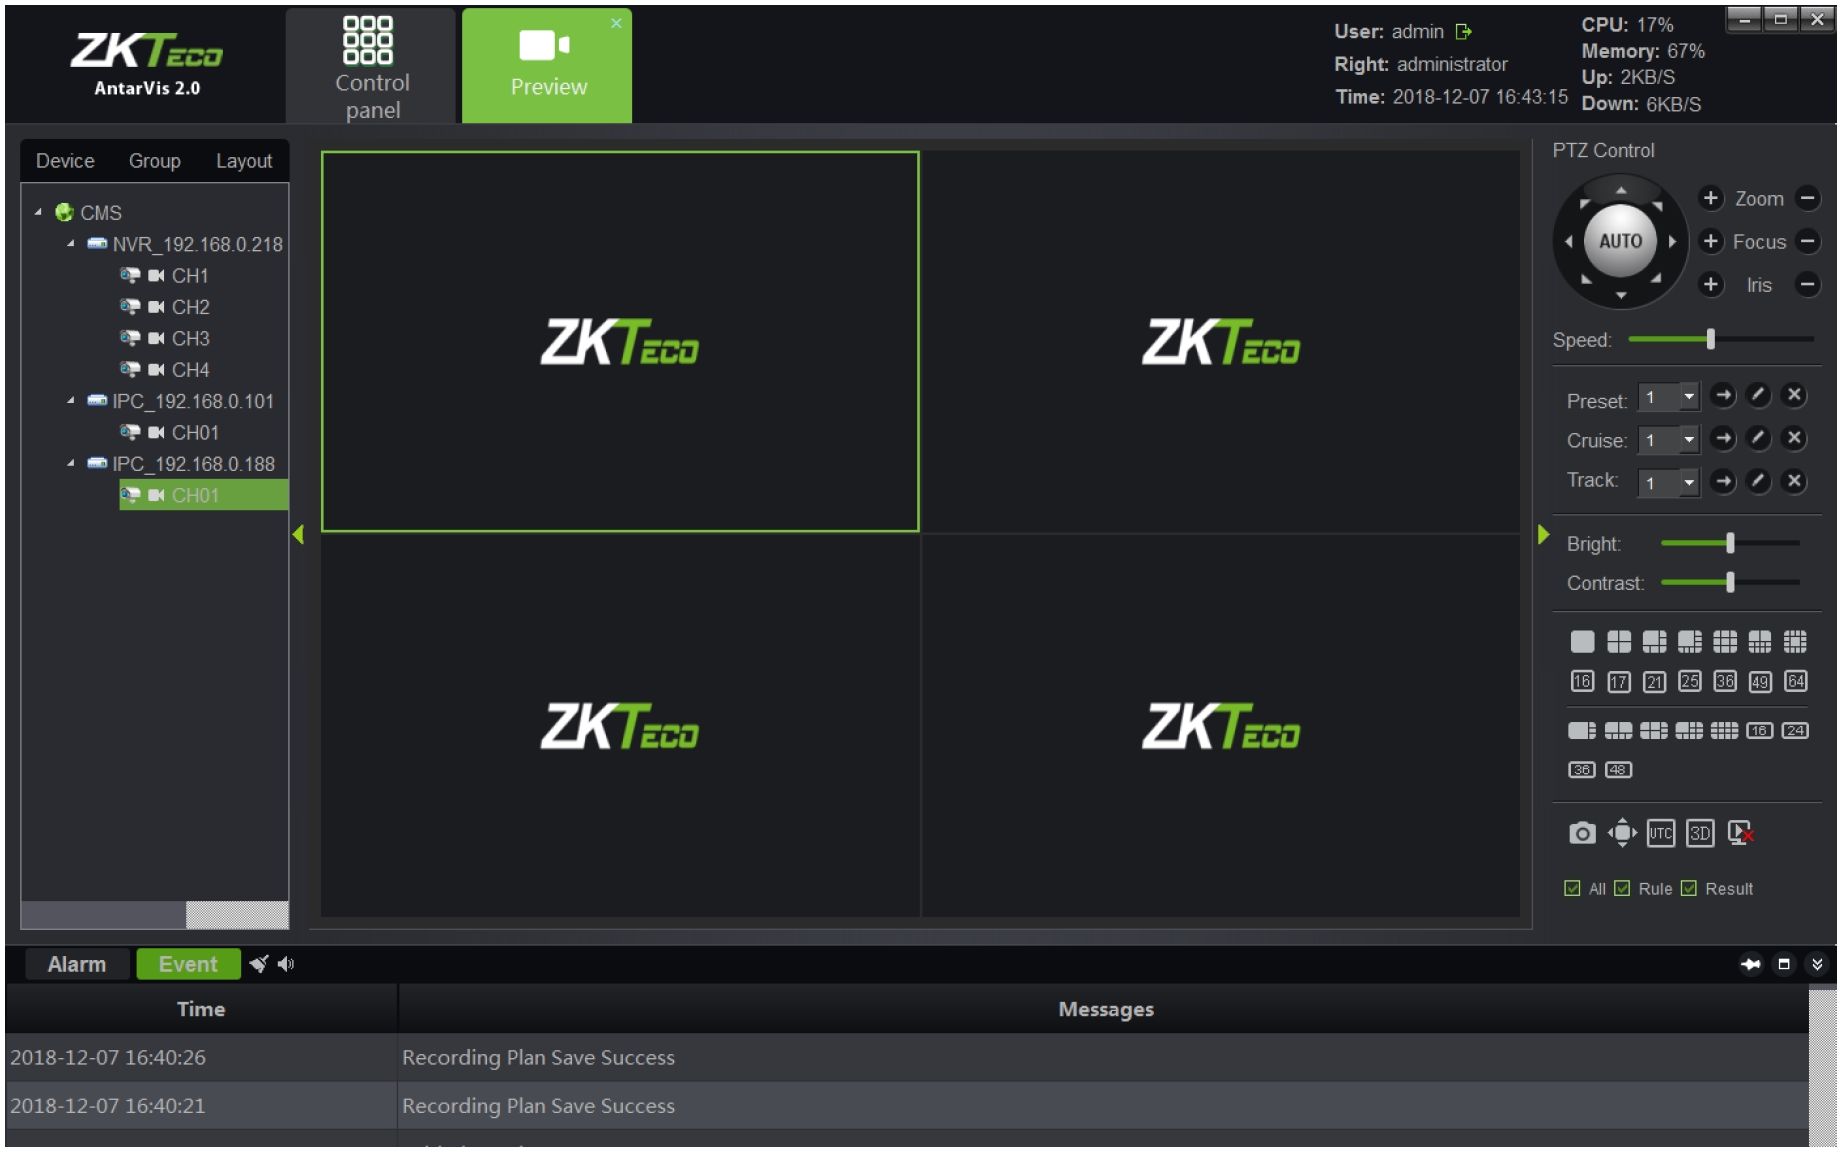
As shown in the figure, the device list is on the left side, displaying all devices added currently and the online and offline status of device. PTZ control interface and video parameter control interface are on the right side. Below the video parameter control interface is the split screen switch button, with which, user may manually switch the number of split screens according to the actual demand. Split screen modes include standard split and wide-screen split, corresponding to different window scales.
The differences between them have been elaborated in the layout module, thus no further introduction now. Besides the regular kinds of split screens, there are several special-shaped splits for customers to select corresponding numbers as needed.
Double-click on the device list on the left side or drag the channel to the window opens the preview window of the device channel. Opened channels video will play on the corresponding panels.
Antarvis2.0 User Manual 17
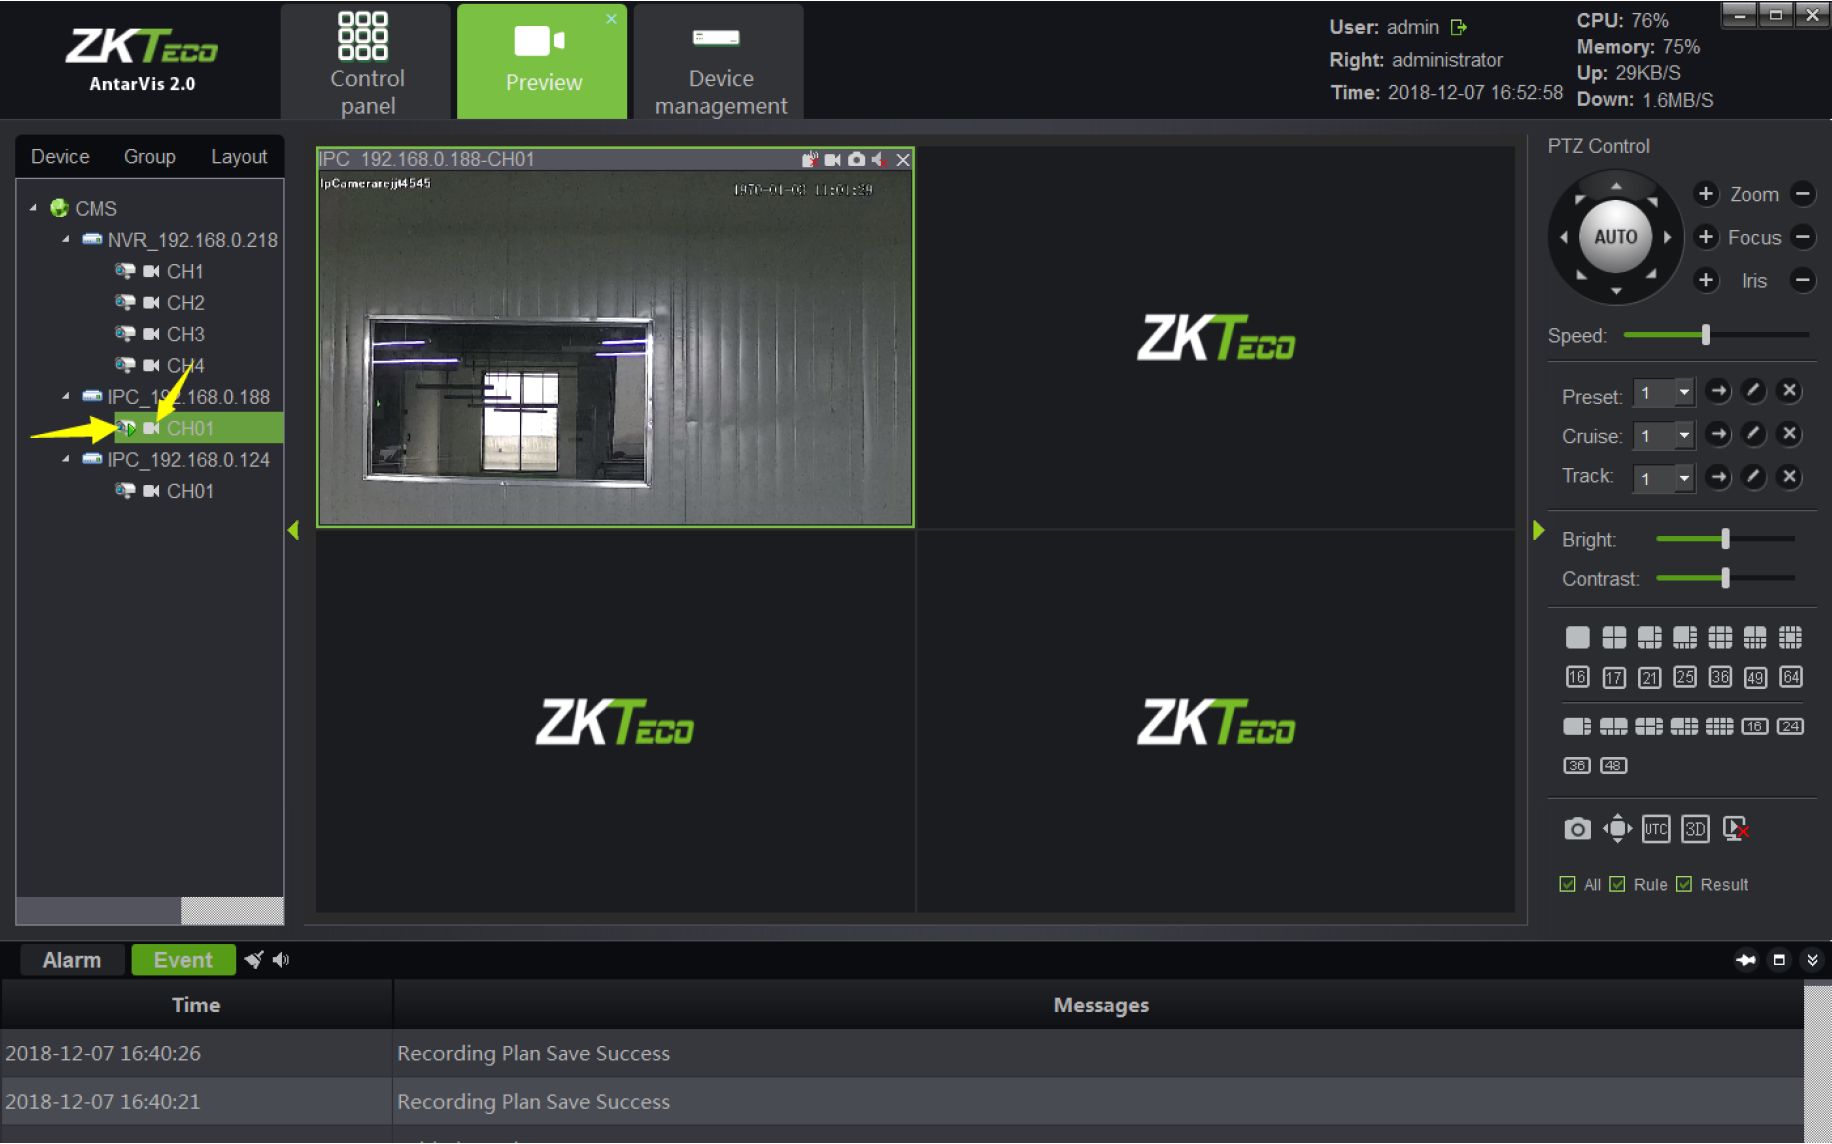
©Note: the green triangle on the left-top of the picture above shows that this channel is in preview; the buttons yellow arrows point to shows the local recording status of channels. White □ shows that this channel is turned off.
As for local recording, blue

indicates that local recording is turned on in this channel and
is working. Right-click on the channel to turn local recording on or off.
Open devices’ stream with one key. You may open stream of a maximum of 64 channels each time.
Close all previews that the current device has activated with one key.
Open local recording of this channel.
Open intercom of PC and the device.
18 Antarvis2.0 User Manual
On Preview panels, there is a row of shortcuts above the preview window as indicated in the figure:
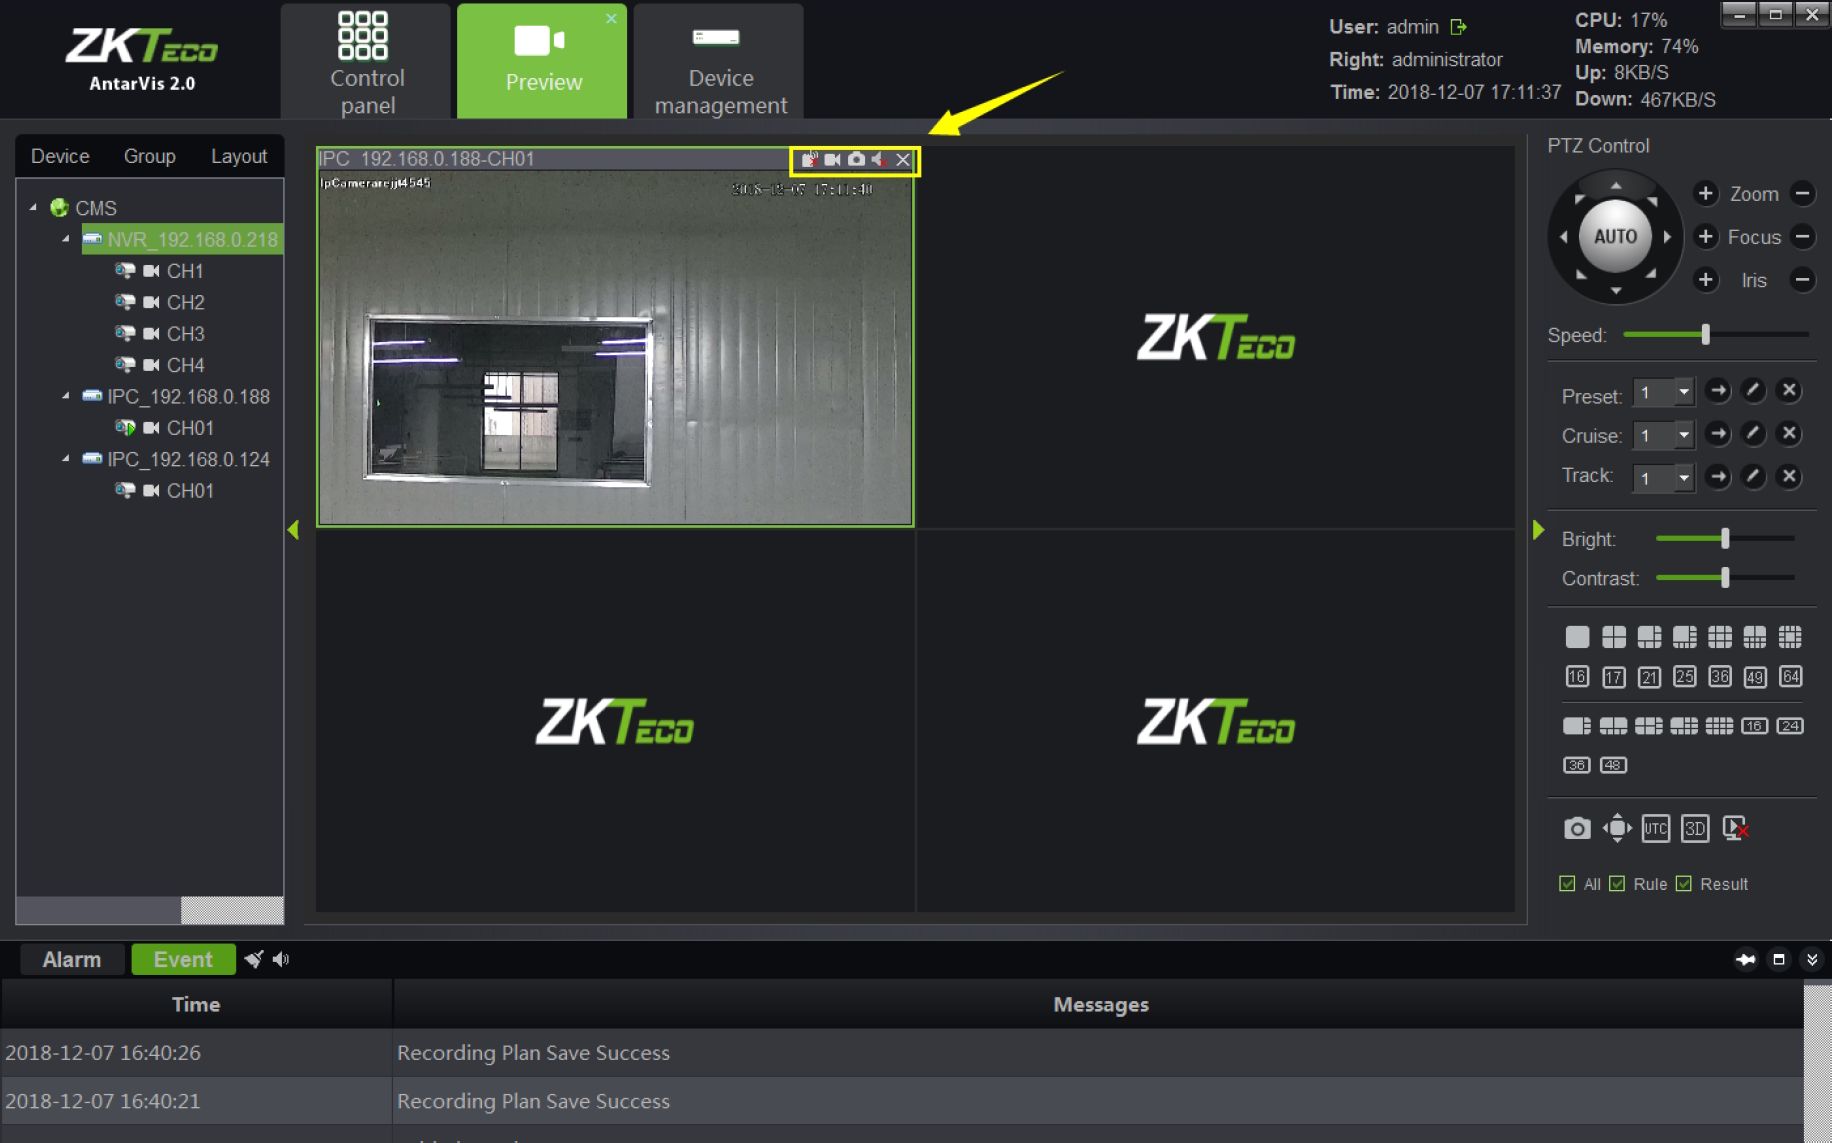
1)

represents the channel intercom switch; click on it to enable or disable intercom of PC and
thischannel.
- □ represents the device recording switch; click on it to enable or disable local recording of this channel; blue icon □ indicates that the feature is activated, while white icon □ indicates
that the feature is not activated.
channel.
- represents the audio preview switch; click on it to turn the audio on or off. indicates it is off; indicates it is on.
- 0 represents the button to quit preview; click on it to close the current preview of this channel.
Antarvis2.0 User Manual 19
There is a toolbar

on the lower right side of the preview interface, among which:
represents the capture button; select a preview window, then click on this button to take a
snapshot of the display;
represents the full-screen button, click on it to switch between the selected window and the
full-screen mode;
represents the on/off button for UTC function; click to enable the UTC function. Please note
that this feature requires a front-end equipment to operate;
4)
3D
represents the on/off button for 3D positioning; click to enable the 3D positioning function.
Please note that this feature requires a front-end equipment and 18H protocol to operate;
to close all preview windows opened at present.
□ All □ Rule □ Result
B^^B^^^B^^^^Hcheck boxes are for Intelligent detection, intelligent detection supported
by front-end devices includes NVR and IPC. When it is used, the setup intelligent rule will be
displayed in the preview screen. If a target triggers the intelligent alarm, the target triggering the
alarm will be displayed in the preview screen.
To add two or more groups. For details, please see ”Group“ for specific operation under the section
Device Management”. When a group is created, you may switch to the group page on the preview
interface, as shown in the figure below:
20 Antarvis2.0 User Manual
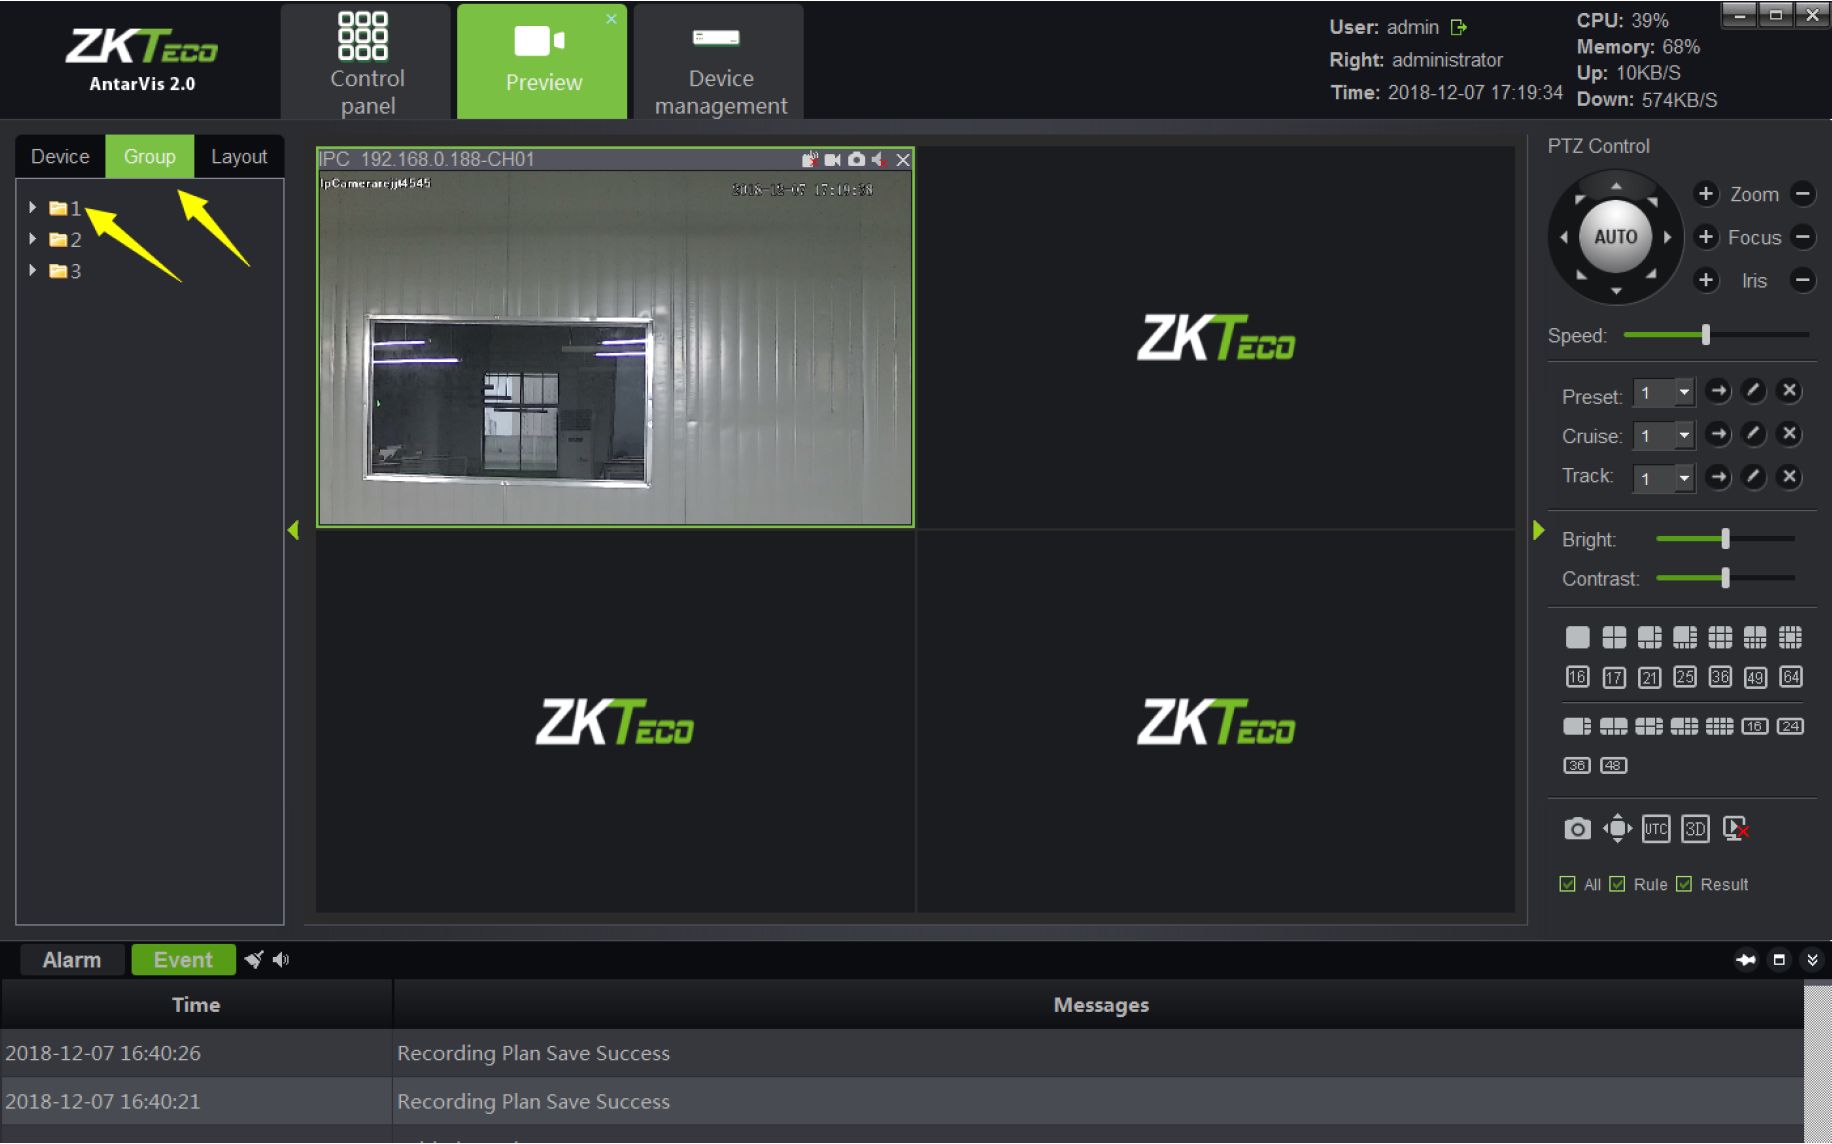
Right-click on the selected group to operate “Start Patrol” and “Stop Patrol” functions. Time intervals between patrols can be set up in the local configuration module, which will be illustrated below. The default interval is 30 seconds.
To add two or more layouts. For details, please refer to the paragraph “Layout” under the section “Device Management”. When a layout is created, you may switch to the layout page on the preview interface, as shown in the figure below:
Antarvis2.0 User Manual 21
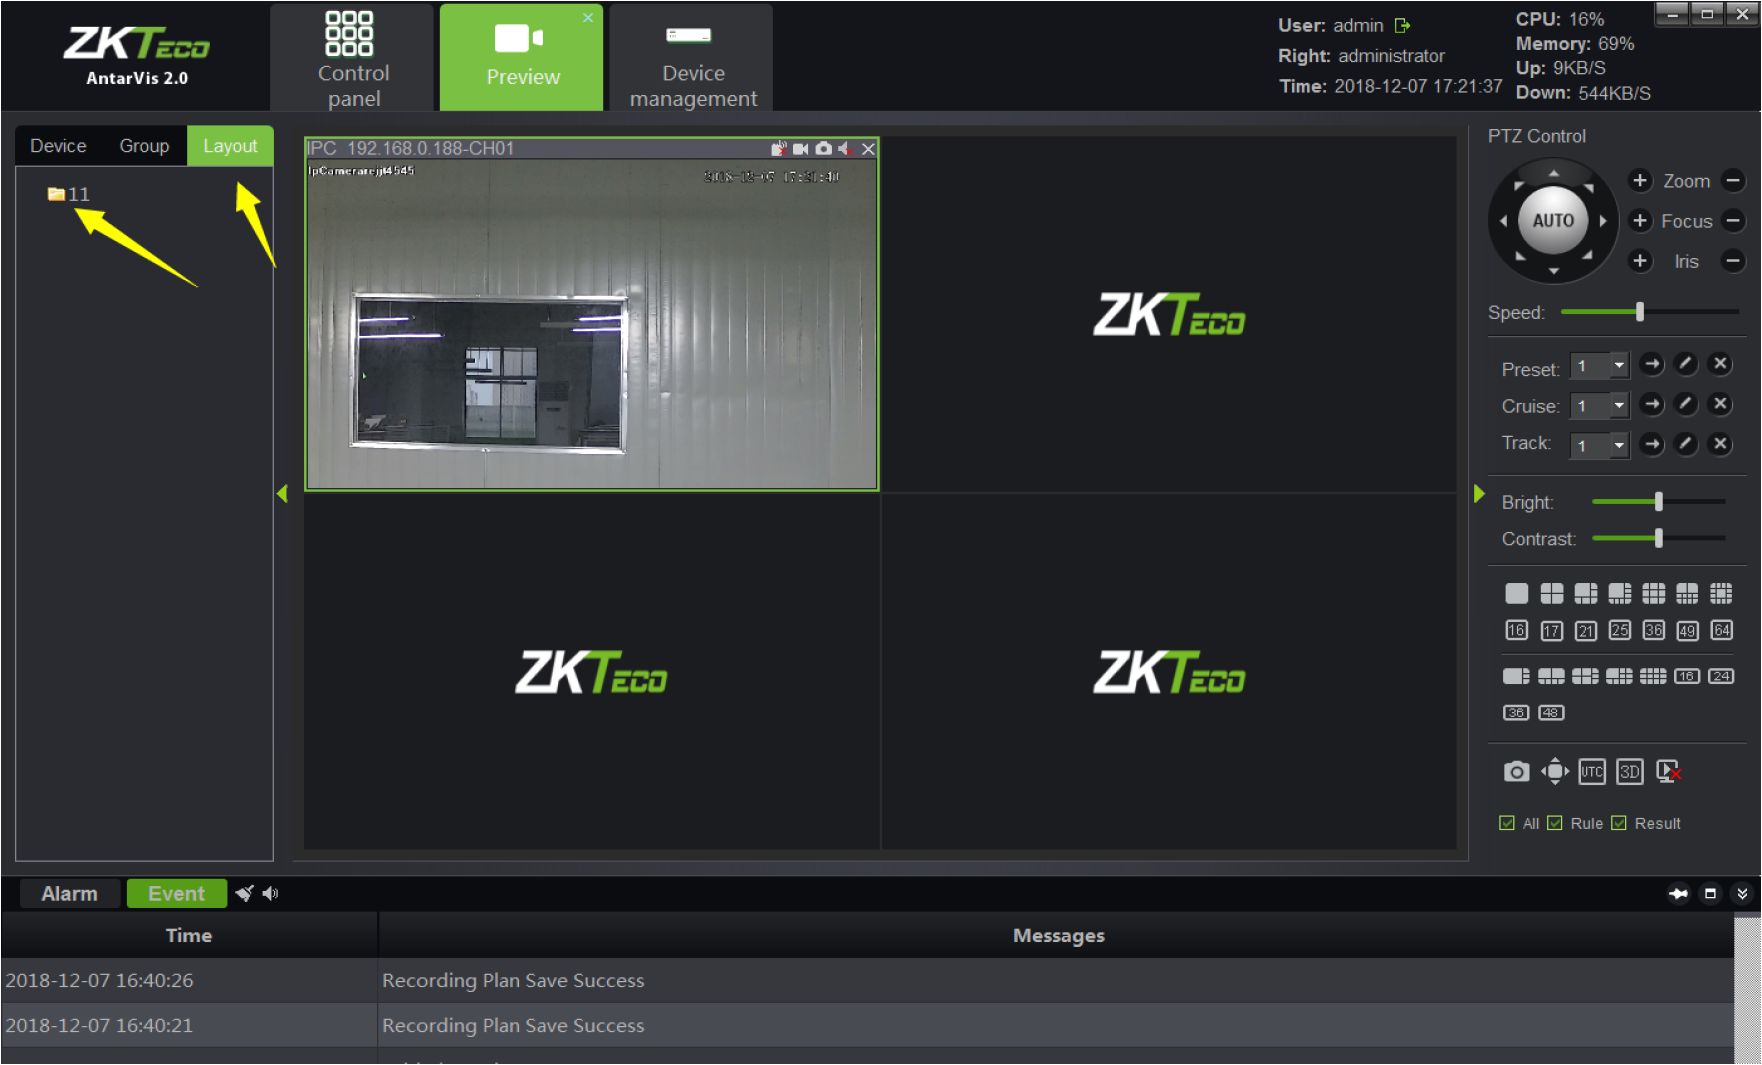
Right-click on the selected layout to open the preview of this layout with one key. Select “Start Patrol” to start the patrol function among several layouts. The interval between patrols can be set up when the layout is set up. Click on “Stop all” to stops the patrol function or close the current preview.
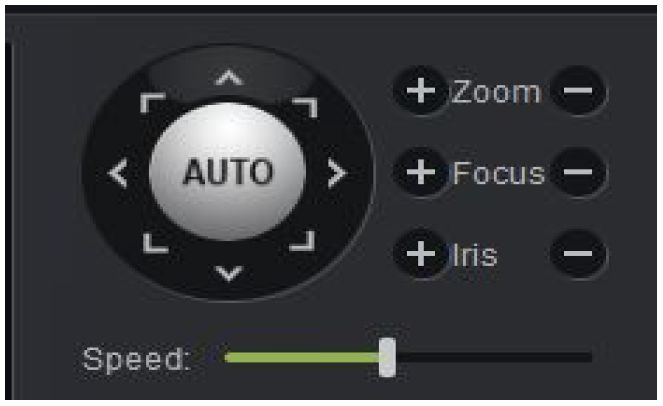
Users may adjust rotation of the camera in 8 directions, including up, down, left, right, upper left,
lower left, upper right and lower right. “Zoom” means that users may zoom in or out and adjust the
visual angle; “Focus” helps adjust the focal length of the camera to ensure the clearness of the
picture; the enlargement and narrowing of the aperture ensures the brightness and depth of field of
the picture; the setting of the PTZ control speed can adjust the rotation speed of the speed dome
camera. Click on “AUTO”, the speed dome camera automatically starts scanning. Please see the
following figure:
22 Antarvis2.0 User Manual
Preset: 2 0 Z X|
Cruise: 5 T ✓ X|
Trade 3 ▼ -») ✓ XI
1) Preset: the rotation of the PTZ camera requires the setting of the direction of the preset. Click
on

to set up the preset. A maximum of 255 presets can be set up. To adjust the presets,
2)
select the preset to be adjusted, click on

to call or click on
Cruise: as the preset settings are done, click on

maximum of 255 cruise paths can be set; click on

to call or click on

to delete the preset.
to edit and set the cruise path. A

to delete the
selected cruise path.
3)
Track: click on

to edit and set the track; click on

to call or click on

to delete
the track set.
As the preview opened, parameters of the pictures can be adjusted; the adjustment here will not affect the front-end parameters of IPC but the display effect of the picture in the client-end. Please
see the following figure:

Users may adjust the relevant parameters, namely brightness and contrast, as needed.
As the preview interface opened, select a corresponding window and then scroll the mouse wheel to adjust digital zoom-in and zoom-out of the current picture.
Antarvis2.0 User Manual 23
You may access multiple modules in the preview module. Each of them is independent. If the user’s monitor supports multi-screen mode output, you may use the multi-screen display feature. Considering the actual situation, the maximum preview module to be opened can be restricted to 5. For instance, when you have opened two preview modules, you may drag one of them out with the same operations as dragging the module to another monitoring screen, as shown below:

The monitoring screen on the left is the primary screen; while that on the right is the complementary screen. The operations of preview between two screens doesn’t influence each other; closing the complementary screen will not affect the primary screen, however, the complementary screen will be closed if the primary screen is closed.
Users may select the number of preview screens to be opened as needed. For instance, one screen can be selected to open Cruise and display independently in one monitor, meanwhile, another screen can carry out the operations of temporary preview, monitoring and intercom.
24 Antarvis2.0 User Manual
Click on the “Playback” button on the main interface to enter the video playback module:
![]()
AntarVis 2.0
![]()
Preview

□□□ □□□ ooo
Control
panel
User: admin B
Right: administrator
Time: 2018-12-08 10:40:15
CPU: 19%
Memory: 69%
Up: 11 KB/S
Down: 794KB/S
Device Localhost ^Storage
J ■ ■ Local_Storager
- <¥NVR_192.168.0.2
- <>NVR_192.168.0.2
- ^NVR_192.168.0.2
- <TNVR_192.168.0.2
- e»IPC_192.168.0.1S
| Alarm Event | < 4» | B W | ||
| Time | Messages | ||
| 2018-12-08 10:13:26 | Recording Plan Save Success | ||
| 2018-12-08 10:13:19 | Recording Plan Save Success |
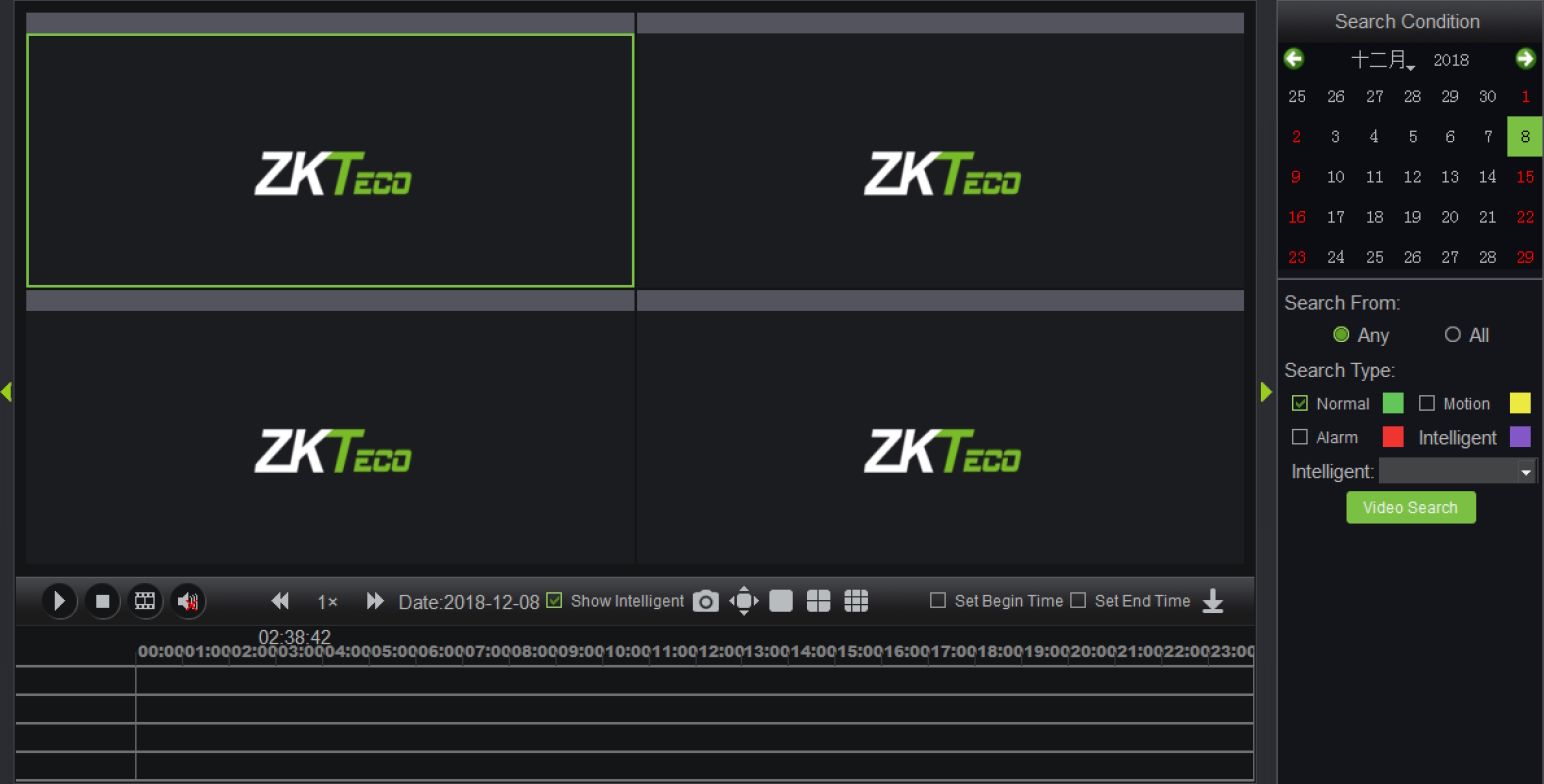
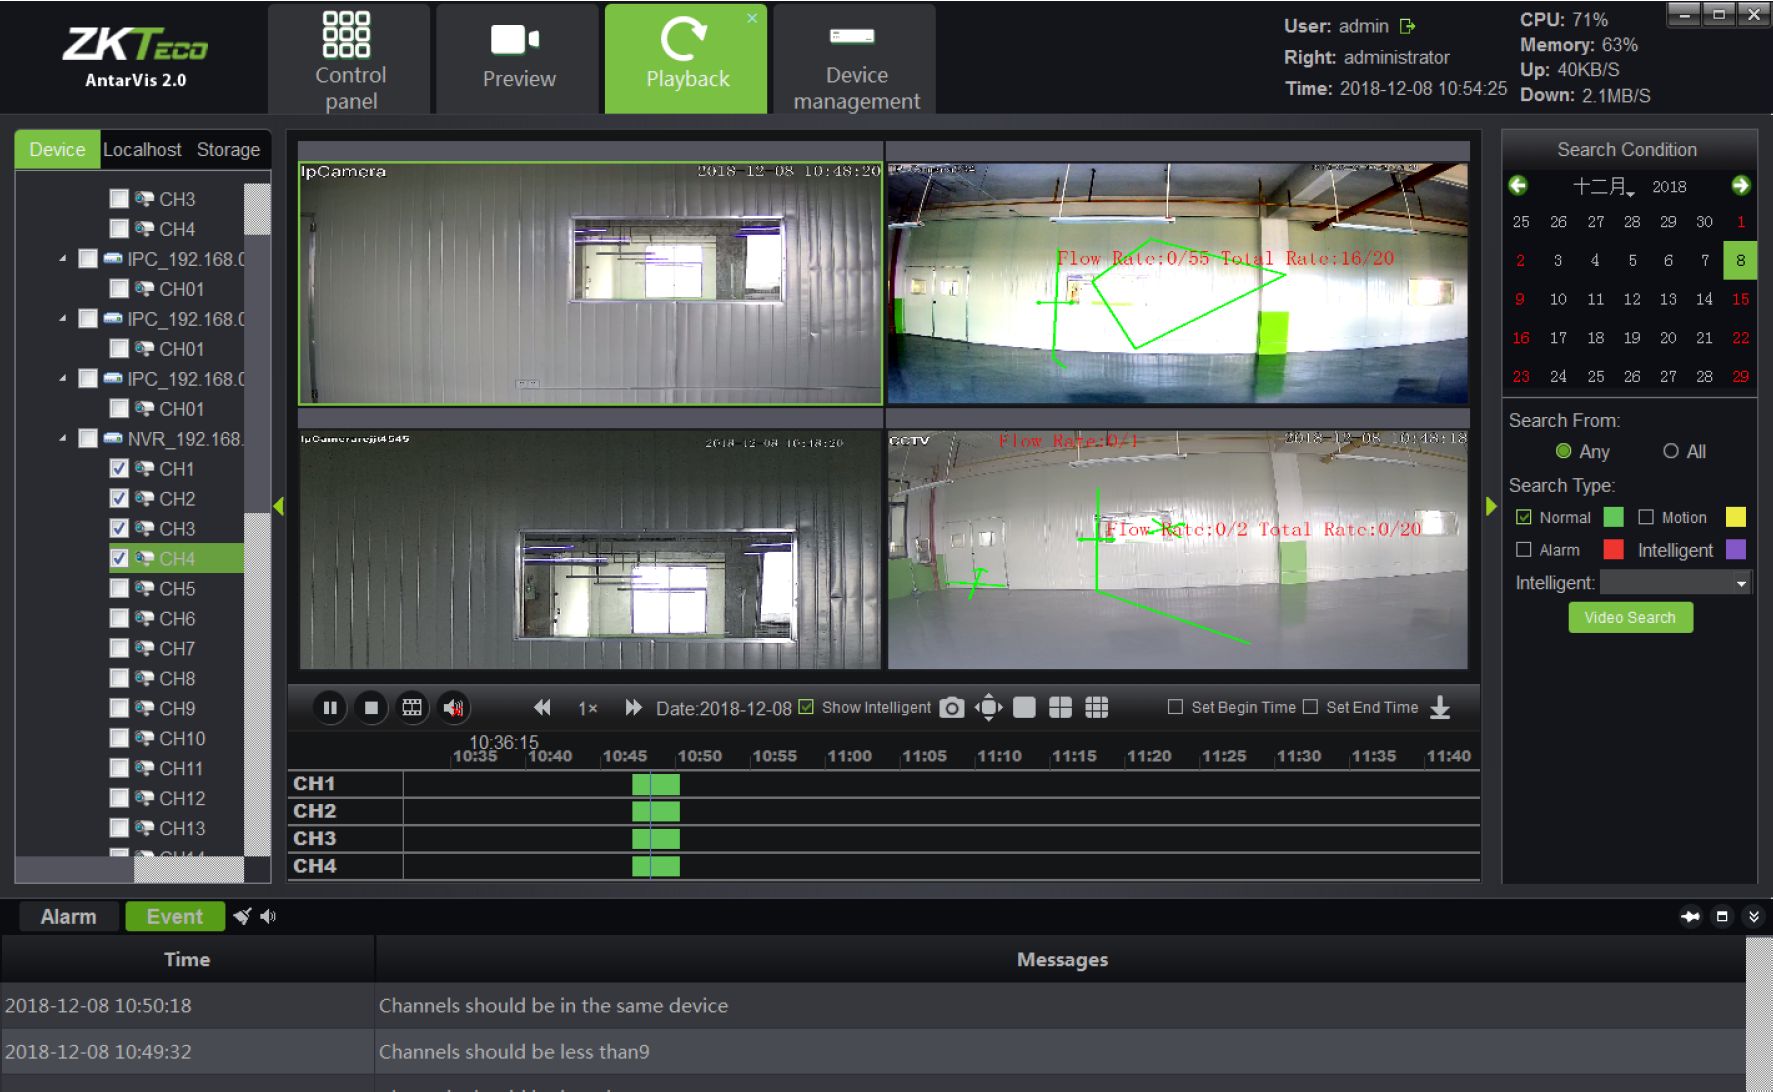
Select a device channel where the video to be played from the device tree on the left. Please note that only videos in the same device or same storage server can be played simultaneously, and at most 9 channels can be selected each time. Select the storage path of the video on the left, select the stream type of the video to be played in the column of “stream type”, and select the date on the calendar, click on “video search”, then the system will starts to search for the relevant video(s) and display the search results on the search result panel.
Video path includes “device”, “local” and “storage”, among which, the device video refers to the video stored in the hard disk or the SD card of the front-end device, local video refers to the video stored in the PC of the client server and the storage video refers to the video stores in the storage server. The stream type includes main stream and sub stream. When a customer opens dual stream in the course of recording, relevant videos can be searched for as needed. The search result will be shown as below:
Antarvis2.0 User Manual 25
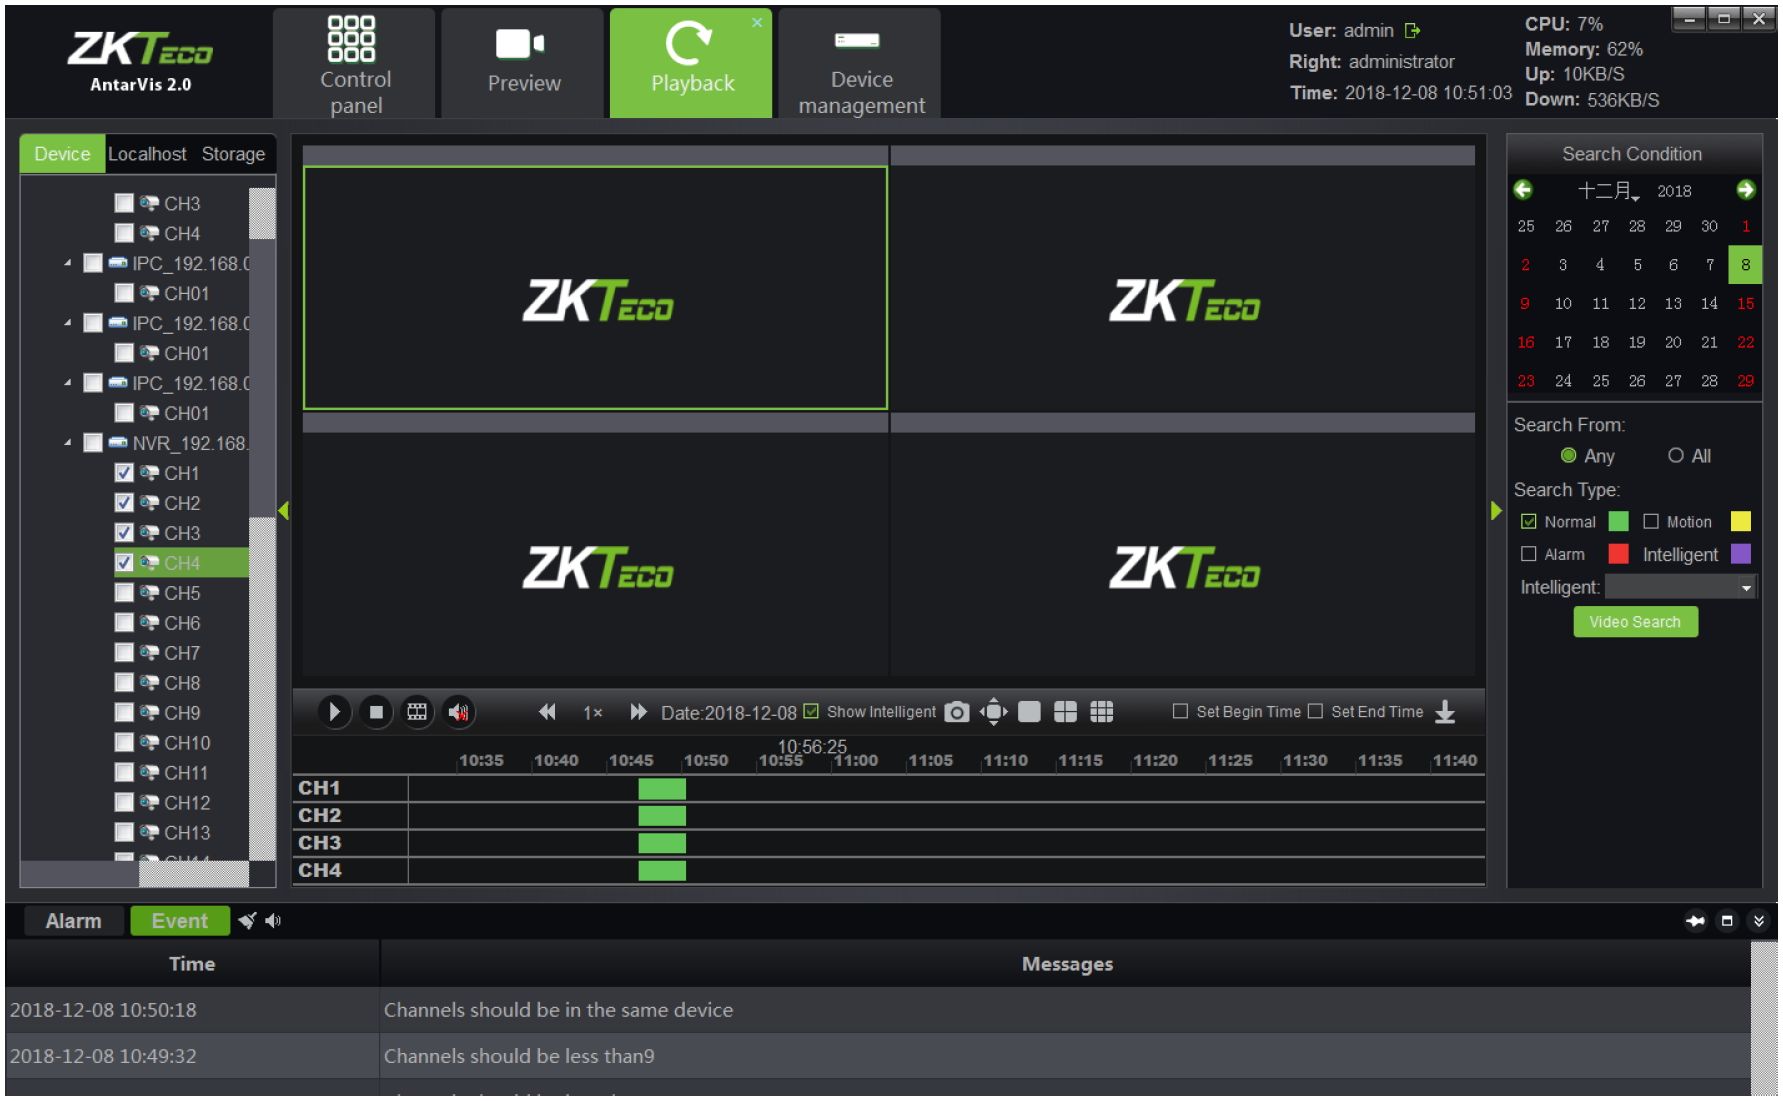
Click on

on the interface to start playing or pause; click on

to stop playing. Place the
cursor on the video bar and scroll the mouse wheel to enlarge or reduce the scale of the video
bar. Double-click on the video bar to play, and double-click in the timeline of playback to switch the
time stamps for playback, as shown in the figure below:
26 Antarvis2.0 User Manual
During playback in several channels, select certain windows, double left-click to switch the window into full screen; place the mouse on certain window, scroll the mouse wheel to operate digital enlargement of this window.
Click on the

button on the interface to enter the download interface of the video file, as shown
below:
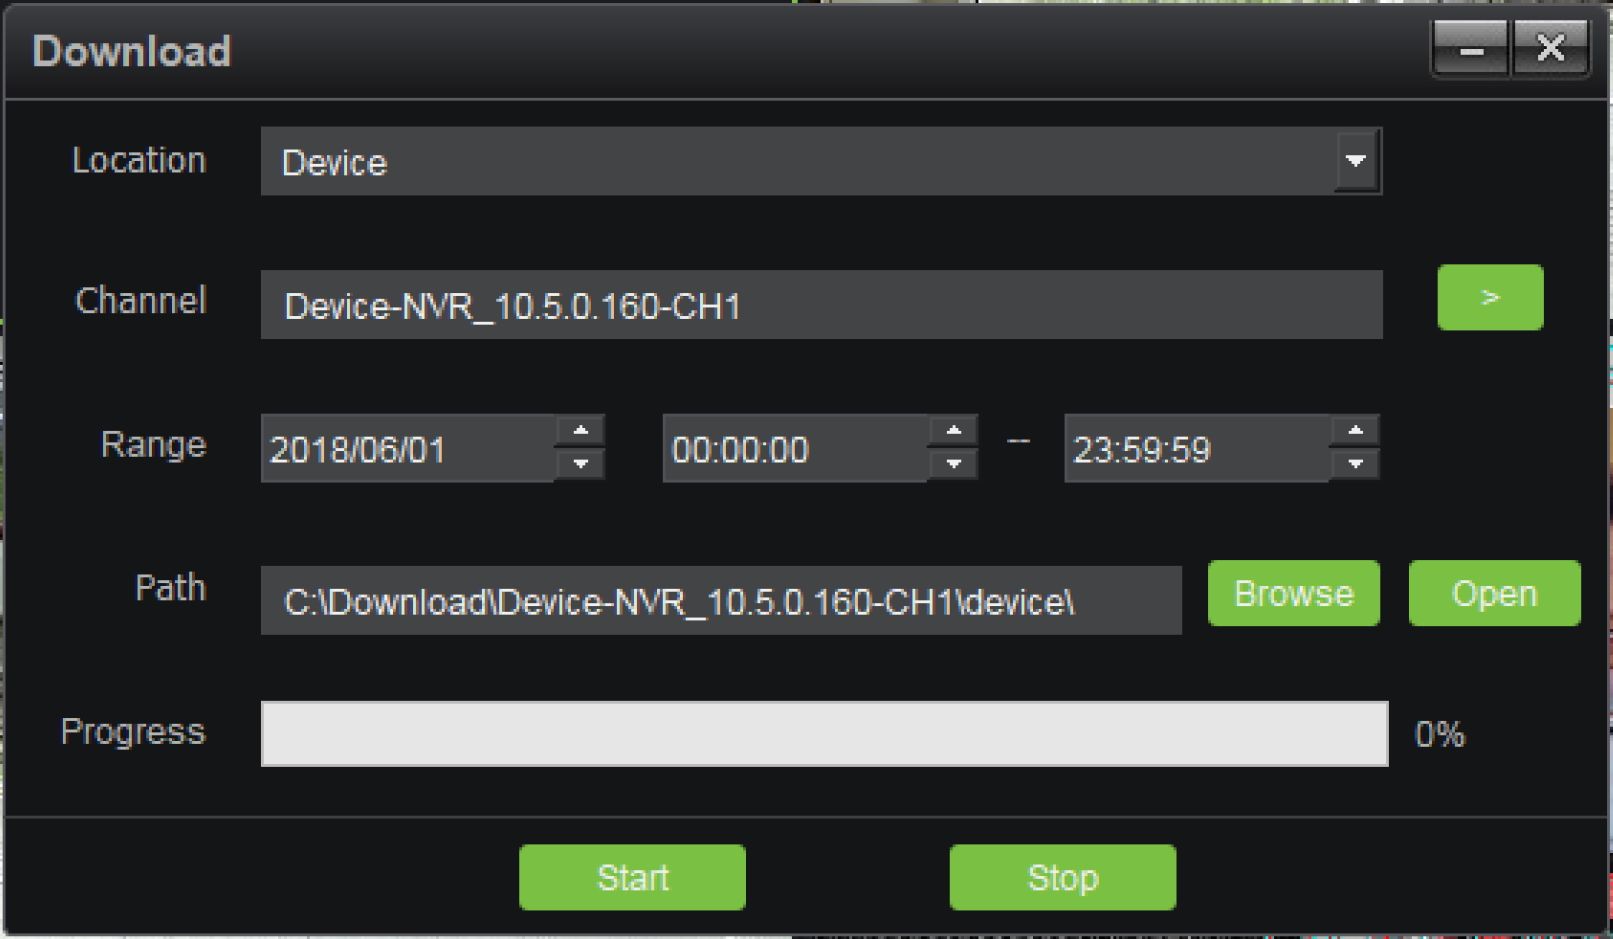
Select the video location(including device videos and storage server videos), channel, range of recording time file save path in proper order, click on the “Start” button to start downloading. When the progress reaches 100%, download is completed.
Among the functional buttons

on the interface,

represents frame play; click on the button to play the selected video frame by frame, and one
frame will be played for each click.

represents audio switch, which can turn on/ off the audio
of playback.

represents play speed adjustment buttons, with which, users may
Antarvis2.0 User Manual 27
n
adjust the play speed between 1/16X and 16X.
represents the capture button; click on this
button to take a snapshot during playback.

represents the full-screen button; click to switch to
full-screen (right-click to exit the full-screen mode).

represents window-split buttons;
users may manually switch the display to single screen, 4 screens and 9 screens as needed.

represents the starting time and ending time; As for certain play
point, select the starting or ending time to add a sign on the video bar. When the starting or ending time is selected, click on “Download” to rapidly download the video between the two tags to facilitate further operations.
Click on “Map configuration” on the main interface to enter the map configuration module, as shown below:
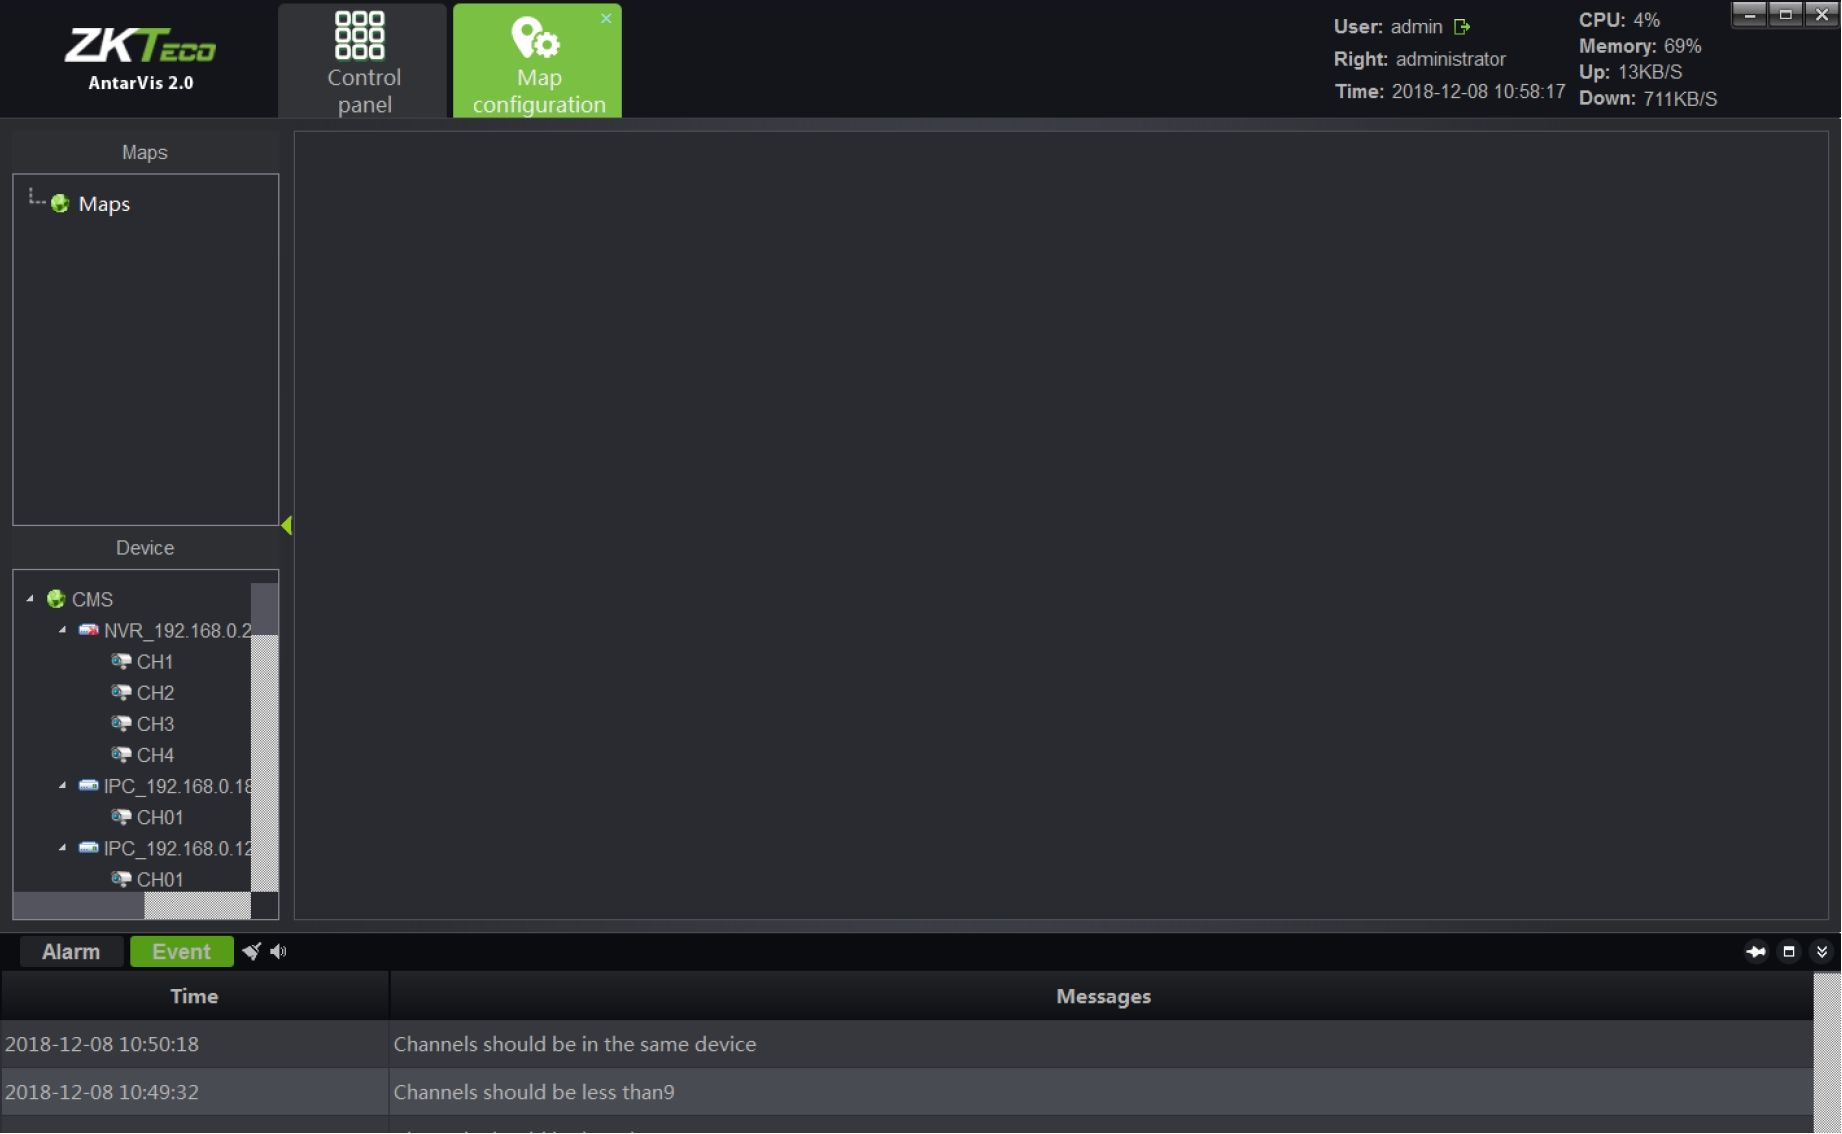
Right-click on the signed place in the figure, select “Add map”, pop up the window:
28 Antarvis2.0 User Manual

Fill in the name, select a picture, click on “OK” to add a map, then several maps is added; meanwhile, sub-map can be added under the map has been added, as shown in figure:
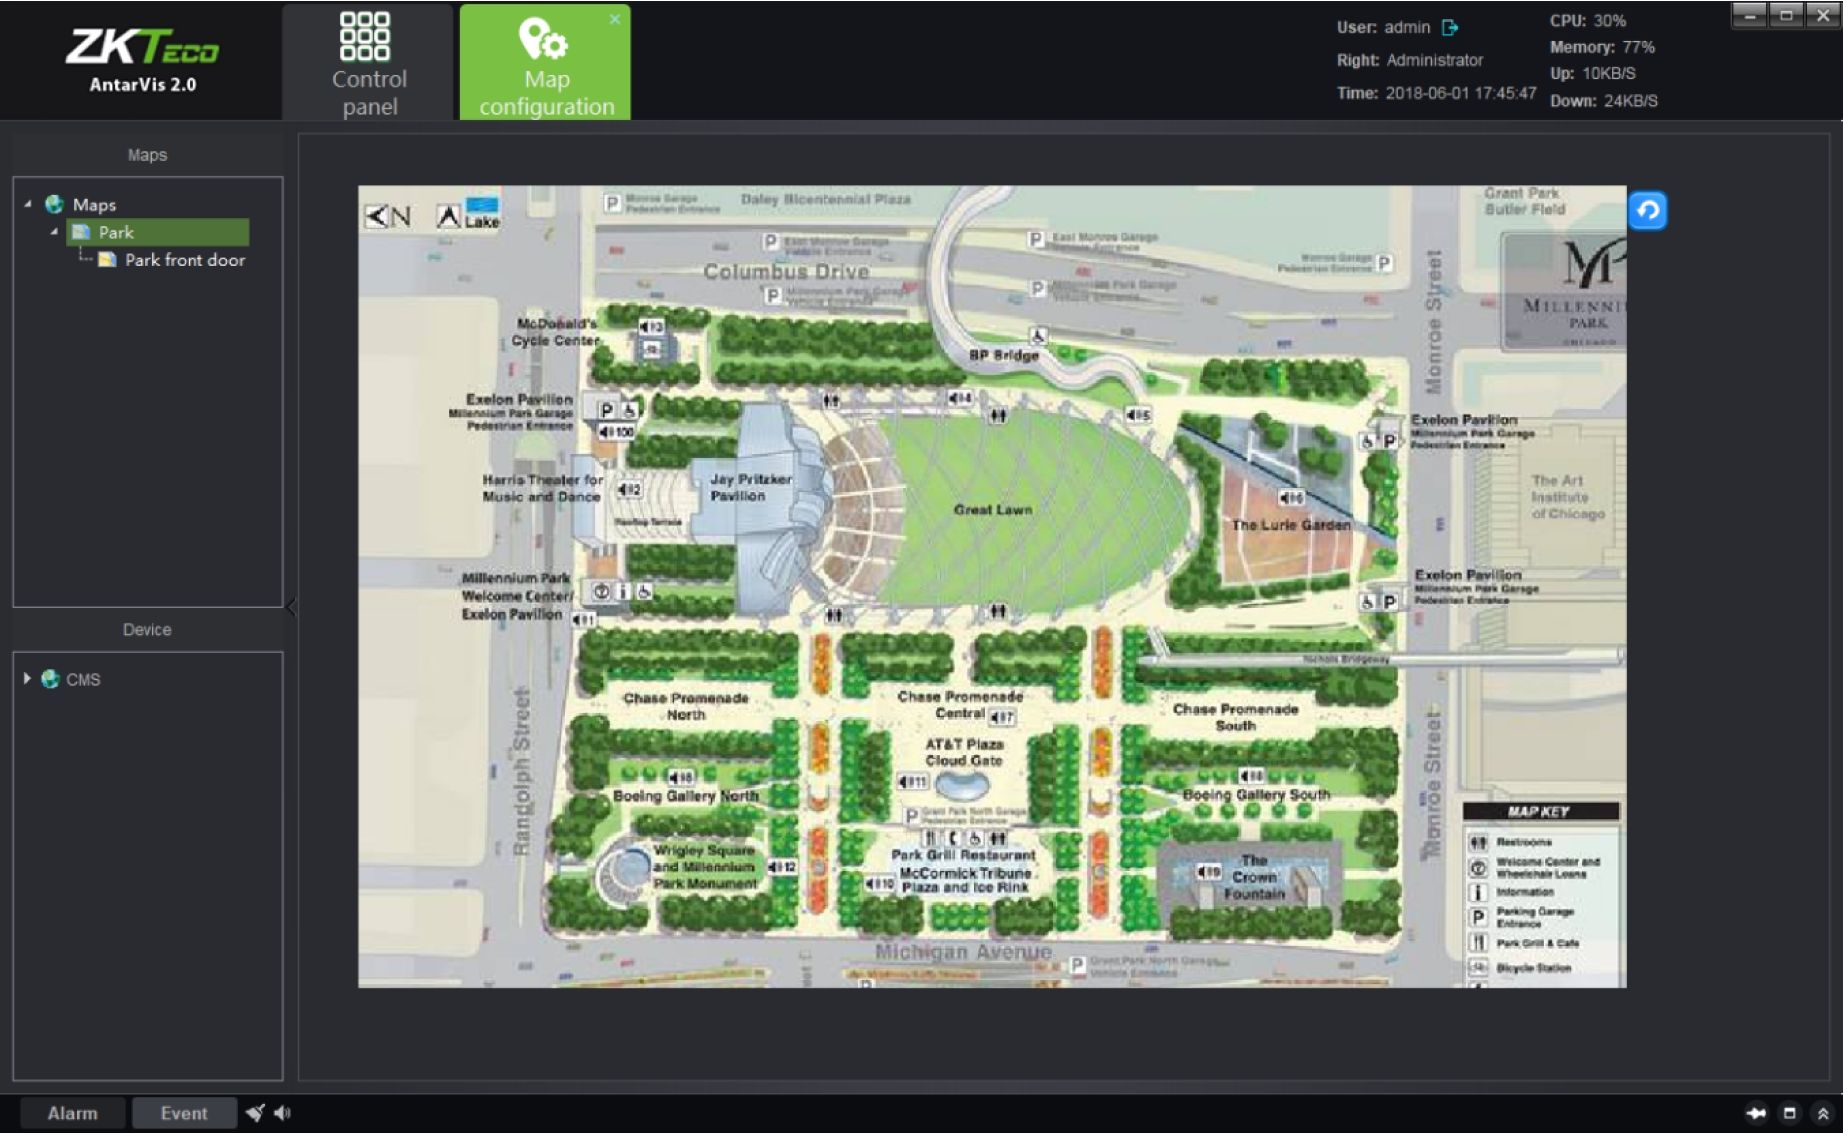
The map opened will be indicated in yellow for differentiation:
- Add map: add a new map.
- Delete map: delete the selected map.
- Add child map: add a child map under the current map list. You may add several or multi-level
Antarvis2.0 User Manual 29
sub-maps for each map. When a sub-map is added, drag the sub-map to the main map to
complete association and the sub-map shall be displayed in the main map as the icon
Double-click on the icon in the main map to switch to the corresponding sub-map; and click on
the

button in the sub-map to return to the main map.
Drag the device channel or alarm input from the lower-left to the map, then the deployment will be completed:
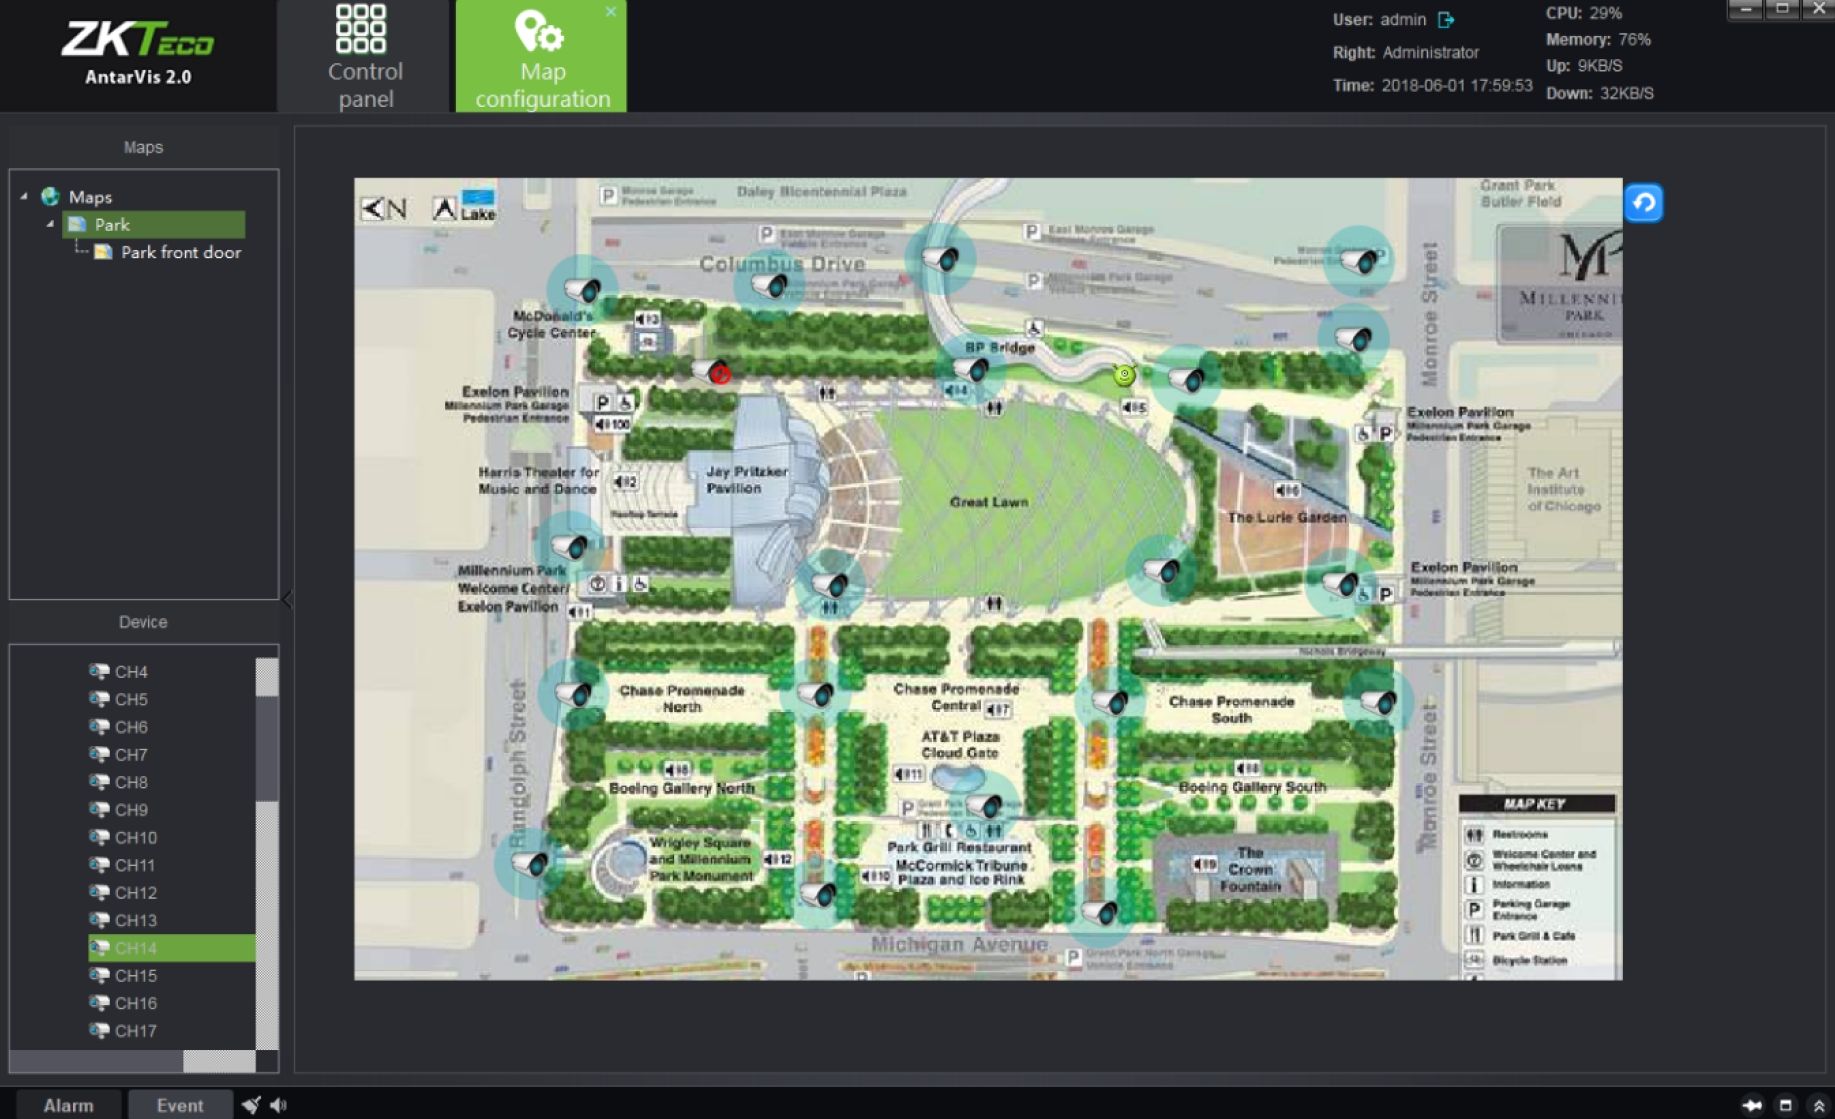
©Note: as the channel has been dragged to the map, the position shall be adjusted by dragging it again; right-click on the deployed channel to select or delete an icon (bullet/ dome/ PTZ). Place the cursor on the map, scroll the mouse wheel to zoom in/out the map. The channel deployed to the map shall not be dragged repeatedly. Place the mouse on the deployed channel to view the channel information.
Click on the “Map” button on the main interface to enter the map management module as shown
30 Antarvis2.0 User Manual
below:
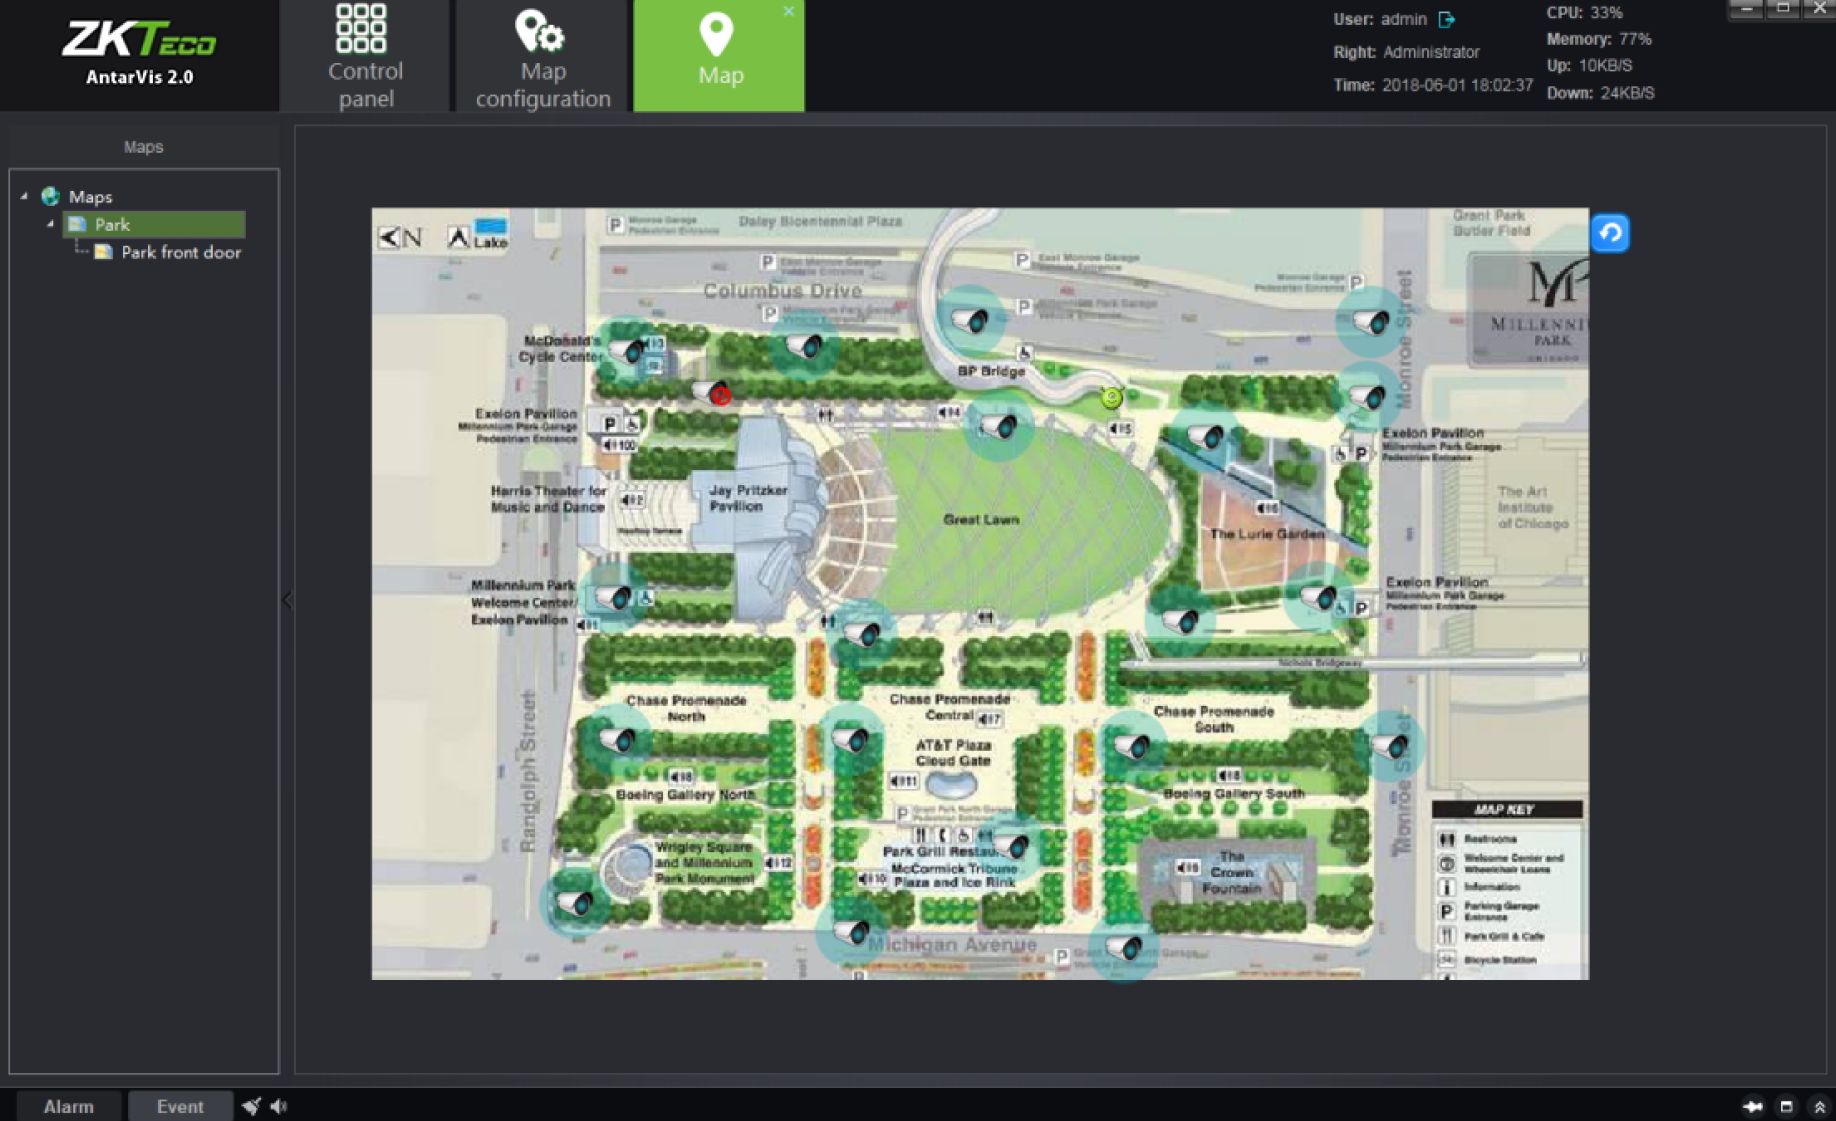
Double-click on the map to view the map configured and deployed channel. The relevant configuration and modification cannot be executed on the map. Right-click on the channel deployed on the map to allow preview and playback of the corresponding channel. Users, in the actual applications, may swiftly call the preview and playback of the corresponding channel according to the map, which makes the operation clearer and easier. When an alarm is triggered and the associated channel is deployed on the map, the channel icon on the map will turn into red.
Click on the “Decoder configuration” button on the main interface to enter the decoder configuration module:
Antarvis2.0 User Manual 31
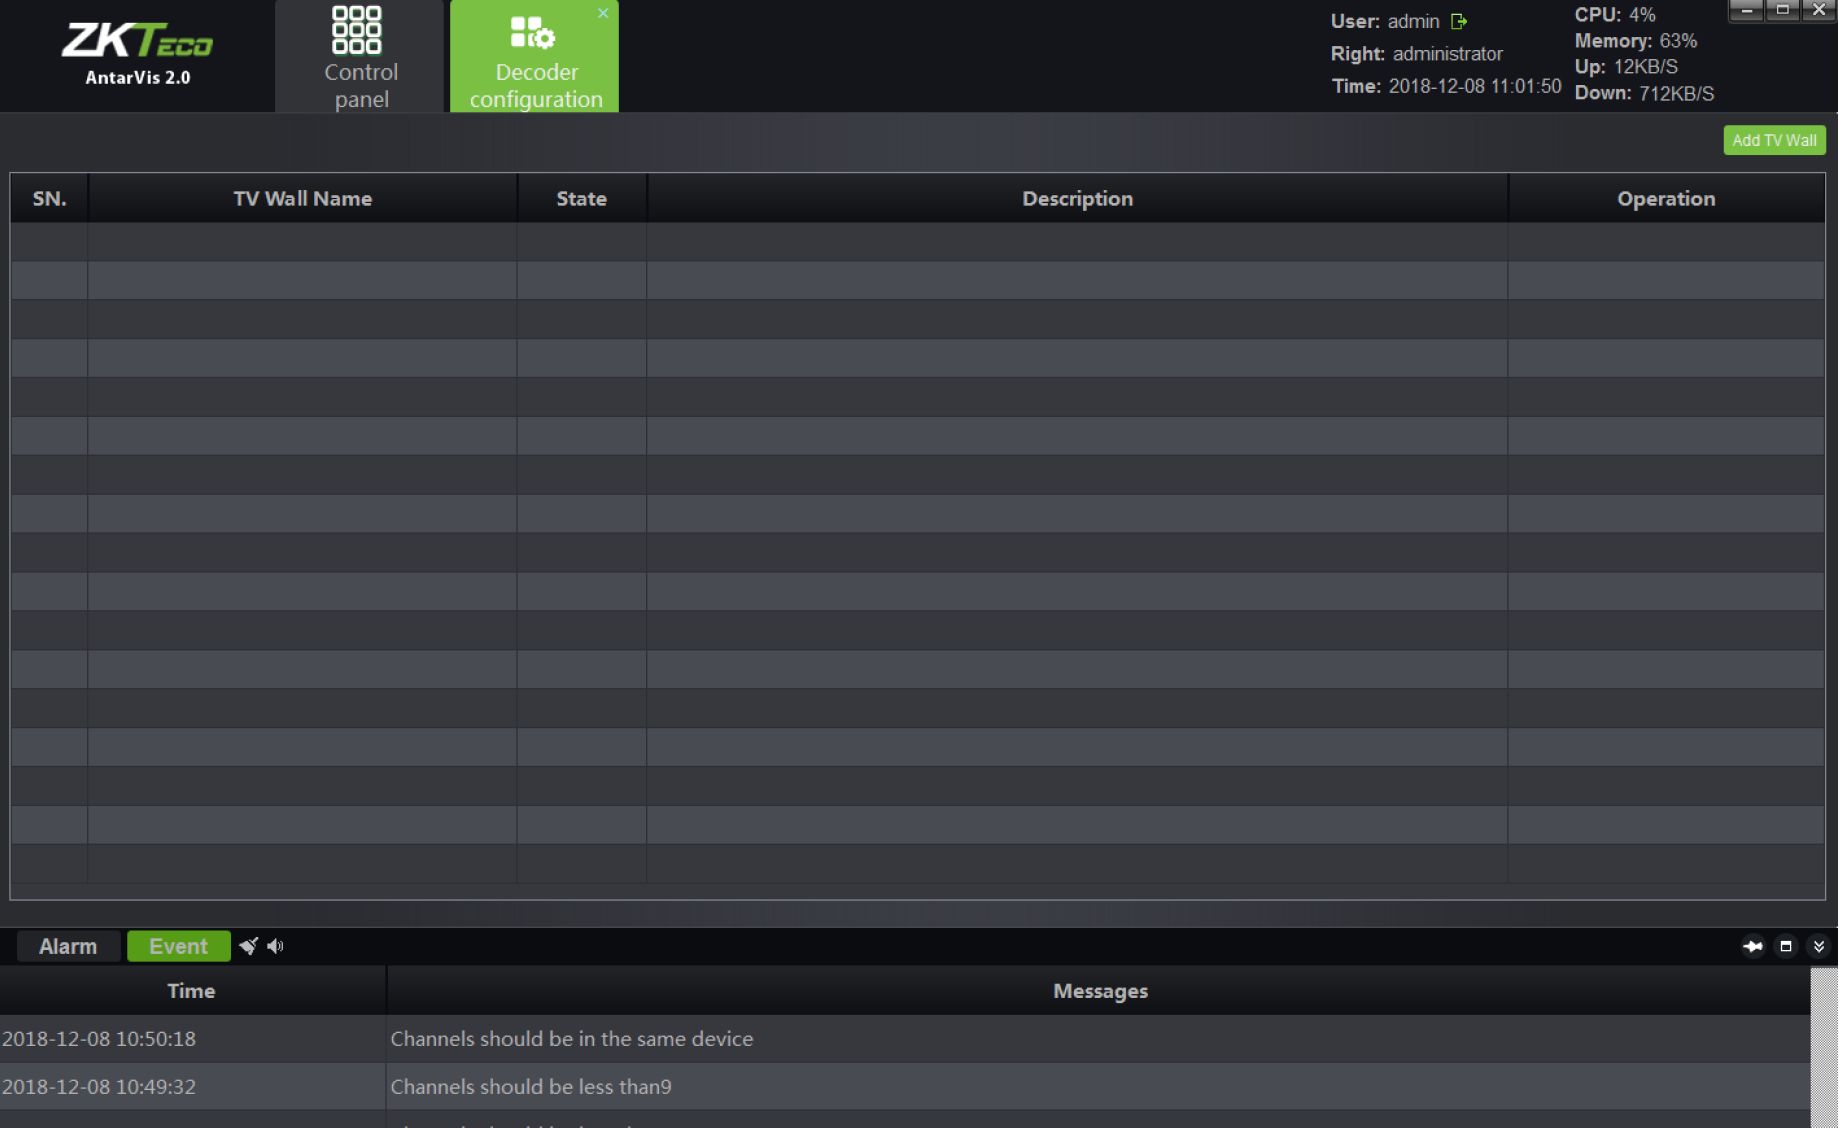
The module shows the TV wall scheme currently set and the enabled status of the scheme. In terms of the existing TV wall scheme, you may operate “modify”, “delete” and “disable/enable”. Click on “Add TV wall” button in the top right corner to add new TV wall schemes, as shown in the figure below:
32 Antarvis2.0 User Manual
Set a TV wall layout, fill in the relevant information here:
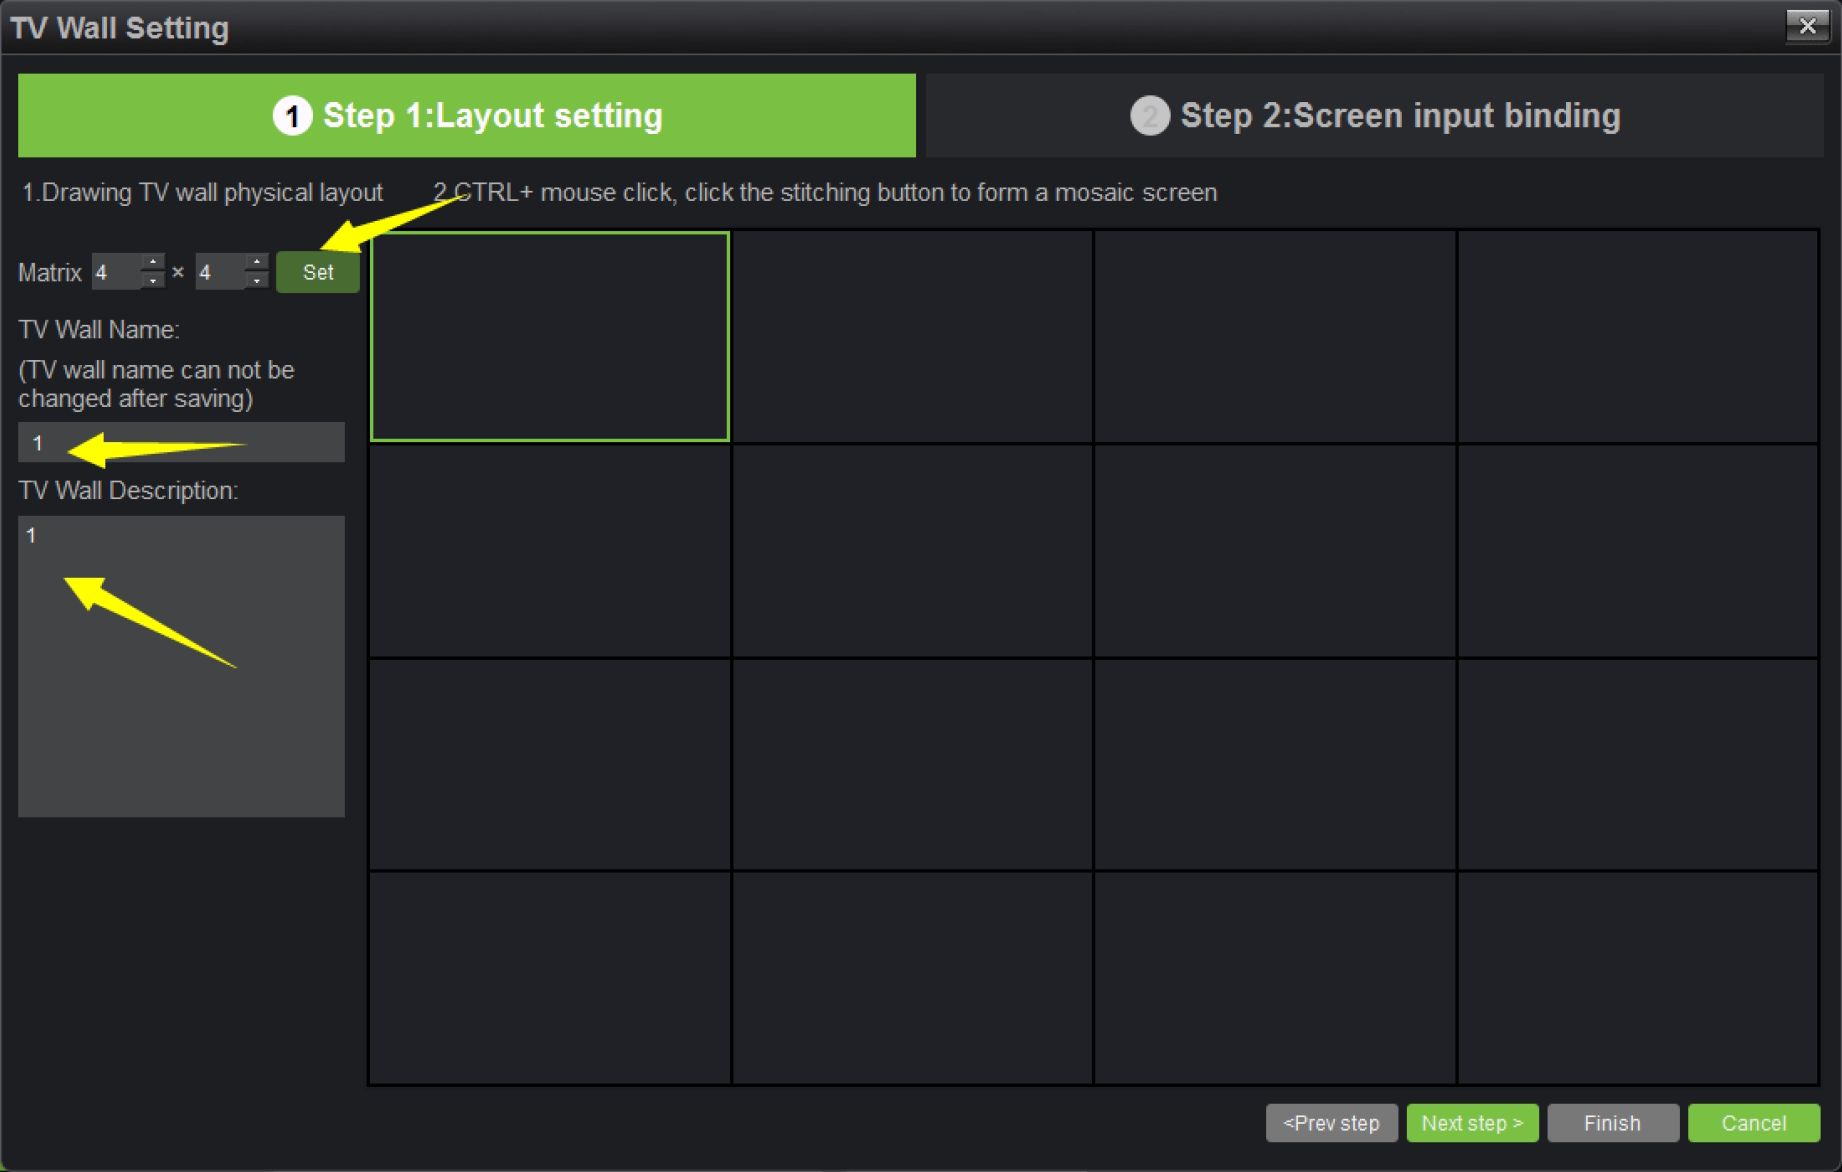
- Matrix layout setting: user cab set the matrix layout as actually needed, maximally support 8×8 layout; when a layout is selected, click on “Set” to make the changes effective.
- Fill in the name of TV wall scheme; users may customize the name of the TV wall scheme as needed (©Note: the name will not be modified as defined).
- TV wall scheme description: users may describe the scheme for differentiation, optional.
- TV wall splice: users may set the TV wall as splice mode or non-splice mode.
As completed, click on “Next step”.
Drag the decoder added to the layout set, as shown below:
Antarvis2.0 User Manual 33
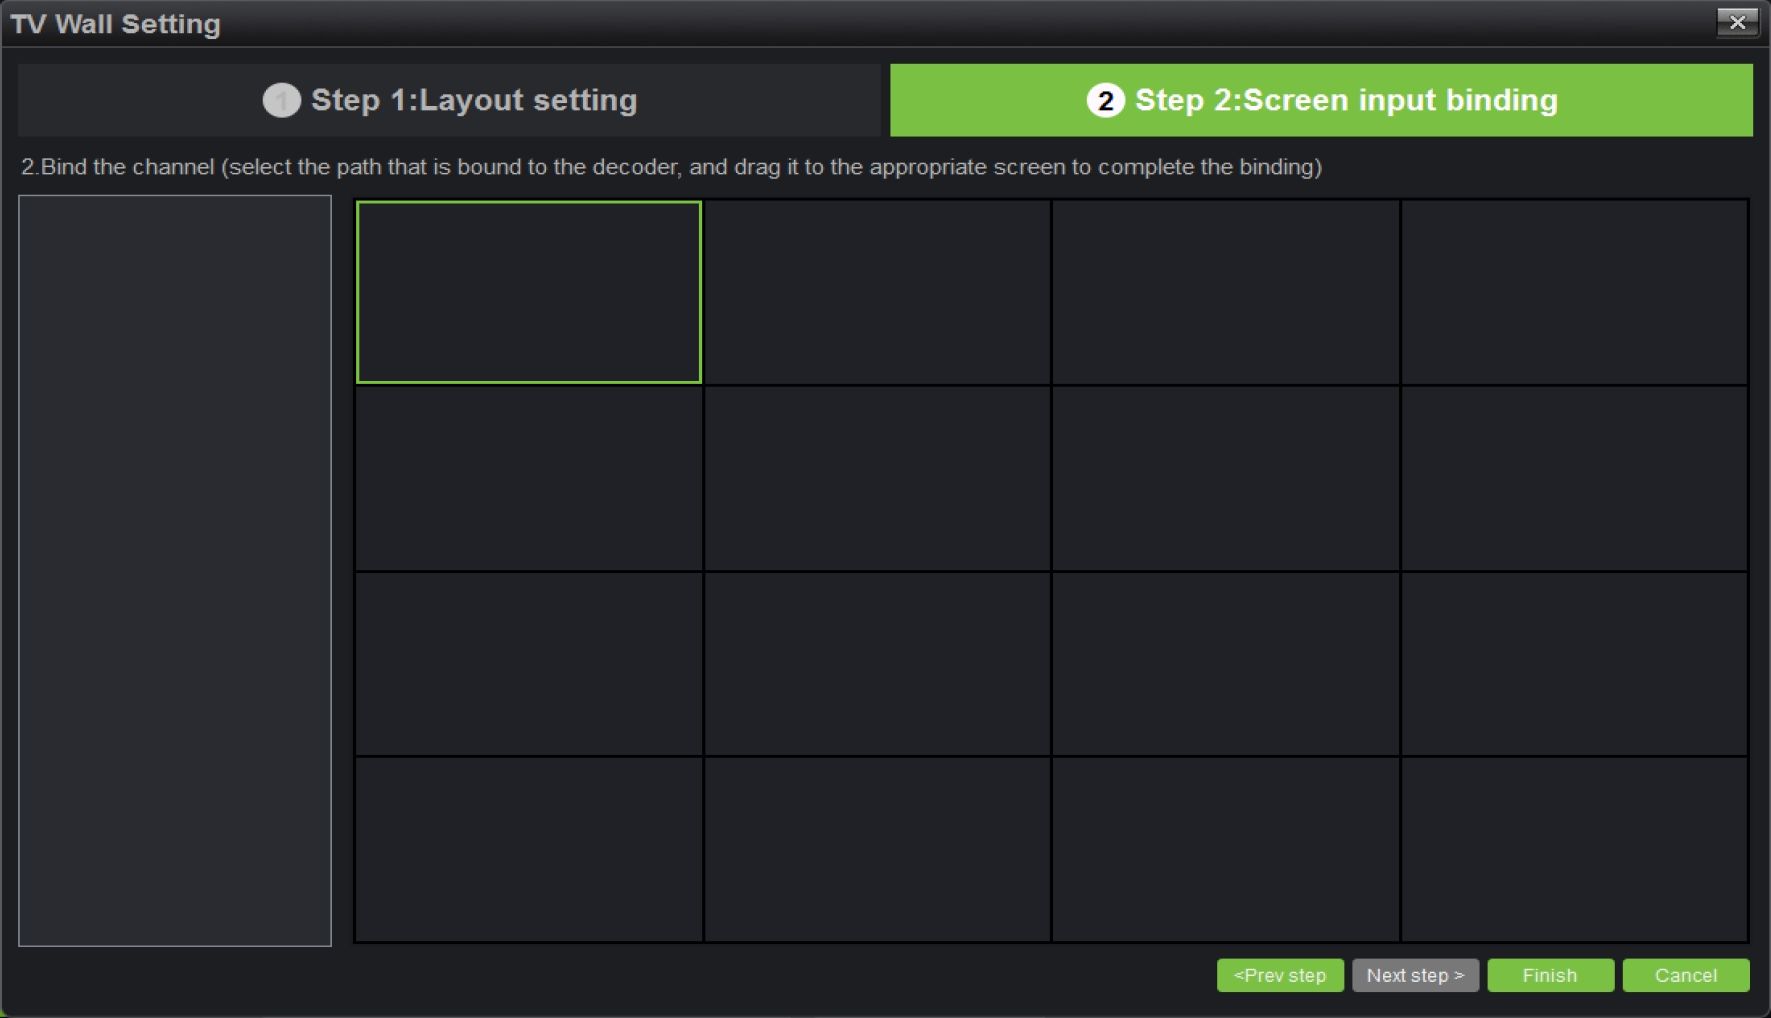
On this interface, users may set the layout and associate the decoder to the TV wall matrix layout according to different situations. To complete settings, click on “Finish”.

![]()
□□□ □□□ DOO
Control
panel
Decoder
configuration
User: admin G»
Right: administrator
Time: 2018-12-08 11:10:10
CPU: 11% İJ.E3.
Memory: 65%
Up: 13KB/S
Down: 522KB/S
2018-12-08 10:50:18
Channels should be in the same device
Messages
Channels should be less than9
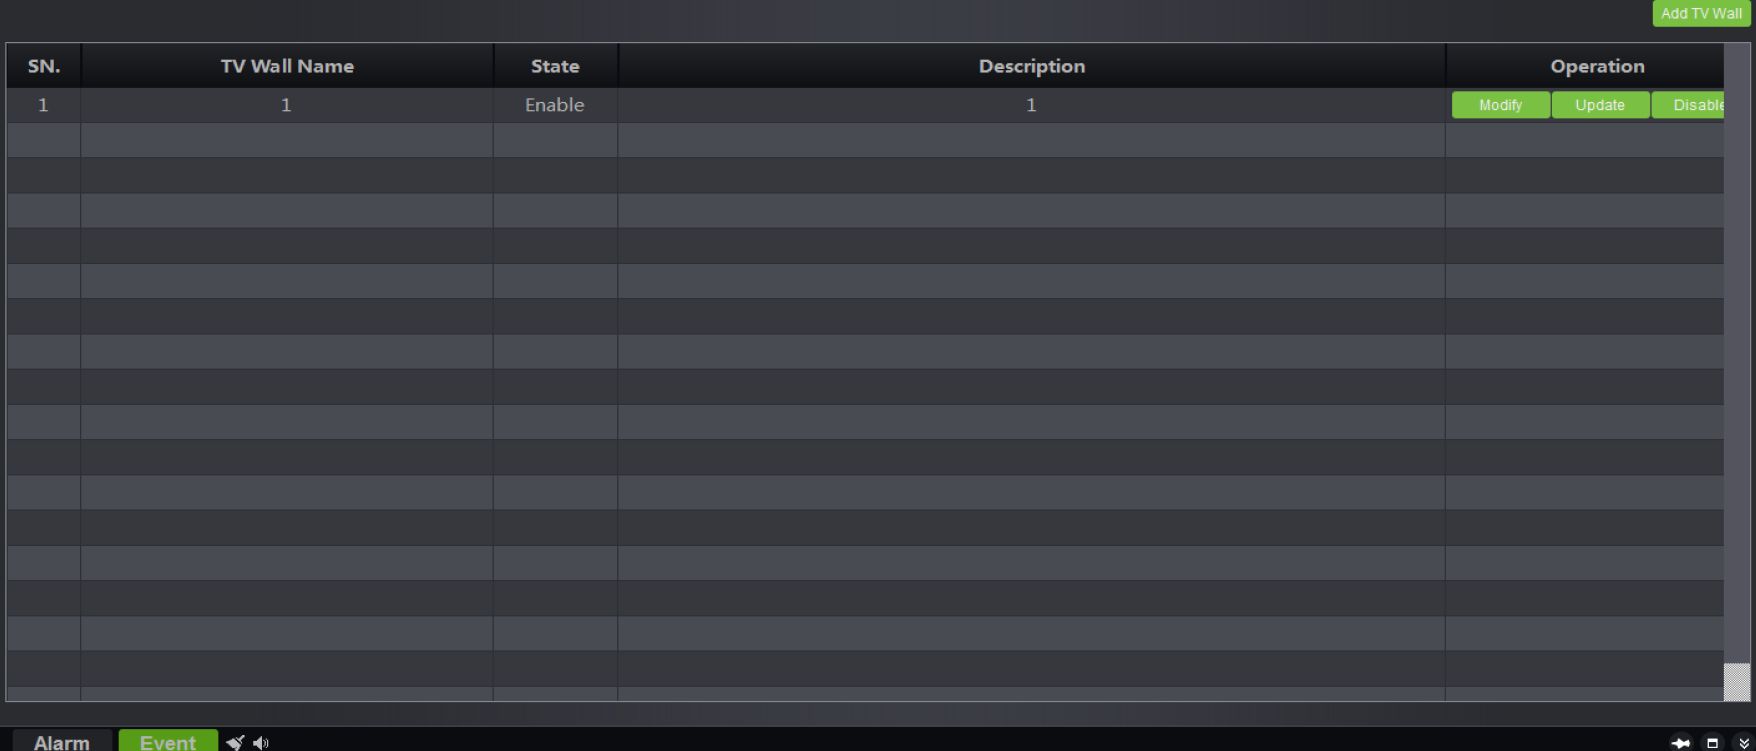
After finishing the settings, the saved TV wall will be seen on the decoder configuration interface and can be edited, deleted and disabled/enabled.
If the configuration shall be enabled as the setting completed, select “Enable this configuration immediately”, then click on the “Finish” button below. If you do not want to enable the setting, directly click on “Finish” to exit. As the setting is completed, this configuration scheme will be displayed in the decoder configuration list.
34 Antarvis2.0 User Manual
Click on the “Decoder” button on the main interface to enter the decoder management module, as shown below:
User: admin G»
Hııjlıt Admin
CPU: 53%
Memory: 40%
rime: 2018-08-31 10:51:46
^NVR_192.168.130.188-CH
«T NVR_192.168.130.188-Ch
e»NVR 192,188.130,188-CH
Firstly, drop-down the check box in the signed place of the figure to select TV wall. All rules set and enabled will be shown in this box. Select a scheme.
When you have selected a scheme, please set the decoding mode of the decoder to ensure normal decoding. The decoding mode is relevant to the decoder and varies according to different decoders, and the decoding mode is the expression of the decoding capability of the decoder. Click on
the button in the figure, as shown below:
Antarvis2.0 User Manual 35
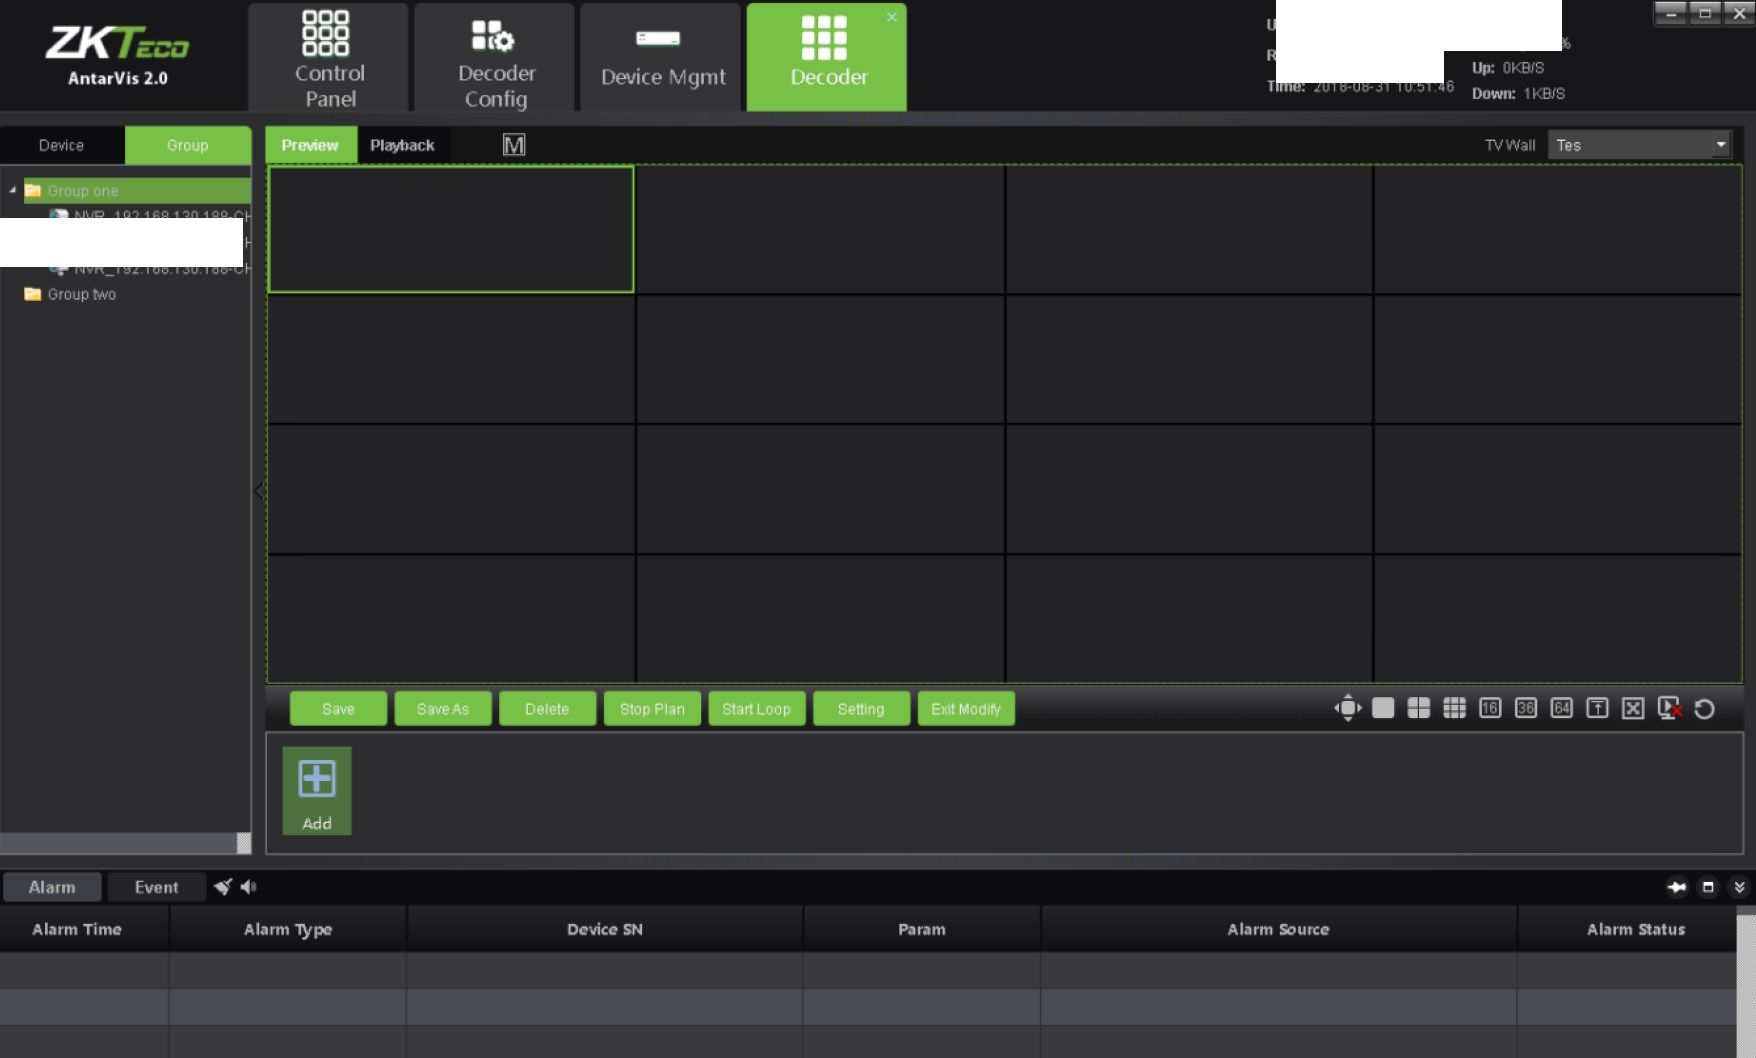
Decoding mode represents the current decoding capability of the decoder, which is listed in the figure and supports 3 decoding modes, i.e. 16 channels 720 x576, 9 channels 1280 x960 and 4 channels 2048 x1536. Please note that the subsequent number represents the maximum resolution of decoding, for example, under the 9-channel mode, the maximum resolution of decoding is 1280×960; the decoding mode of different decoders varies as well. It shall be normally decoded and displayed as the resolution of the front-end IPC has been guaranteed not to exceed the resolution restriction of the current decoder mode.
When you have selected a scheme, select the channel for decoding on the wall in the device list on
the left, then drag the relevant decoder to the corresponding decoding screen to complete decoding
on the wall. Use the

button to change the stream type of decoding on the wall before
dragging. Select main stream or sub-stream on the wall.
ZKTm is — :::
AntarVis 2.0 Control Decoder Device Mgmt I Decoder
Panel Config
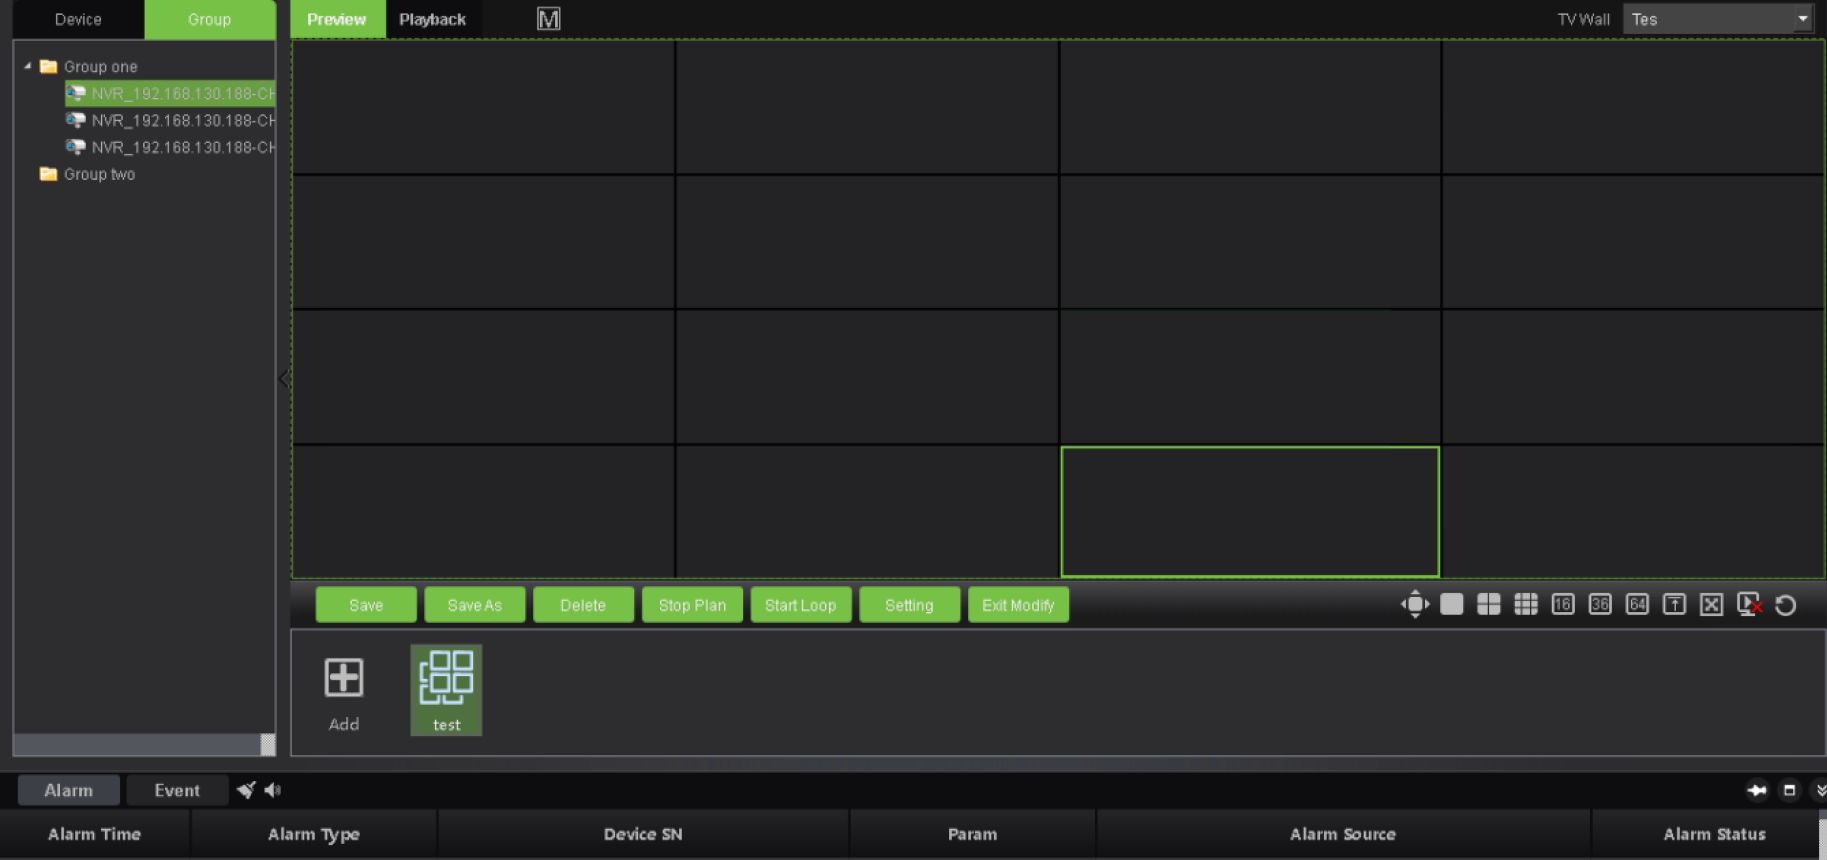
If the channel dragged to the channel of the decoding screen shall be changed to other channels, the other channels shall be directly dragged to the corresponding window.
36 Antarvis2.0 User Manual
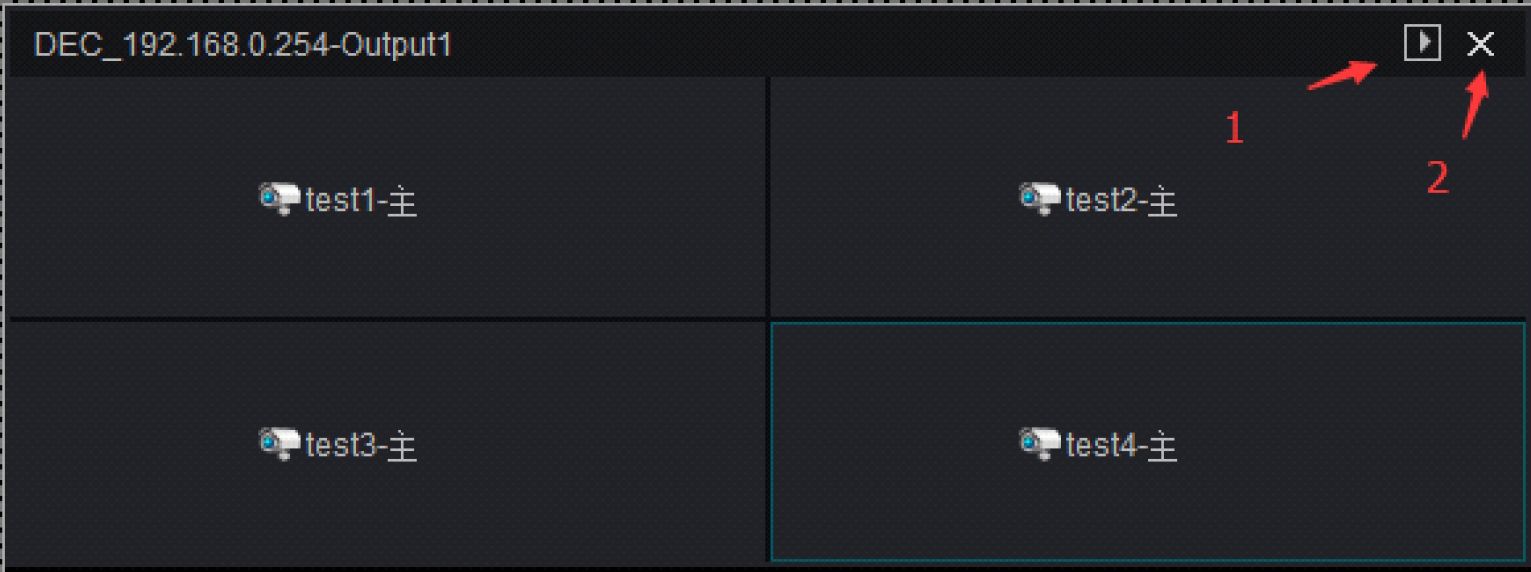
1) İDİ is used to open the decoding module preview window. Click on it to access a preview
window on the current page, which is convenient for customers to view pictures on the wall.
2) H is used to delete the current channel. Click on it to delete the decoding channel of the
current split screen.
The decoding management group has been mentioned in the device management module discussed above. After setting up the decoding group, users may drag the group to the TV wall in the
decoding group module, as follows:
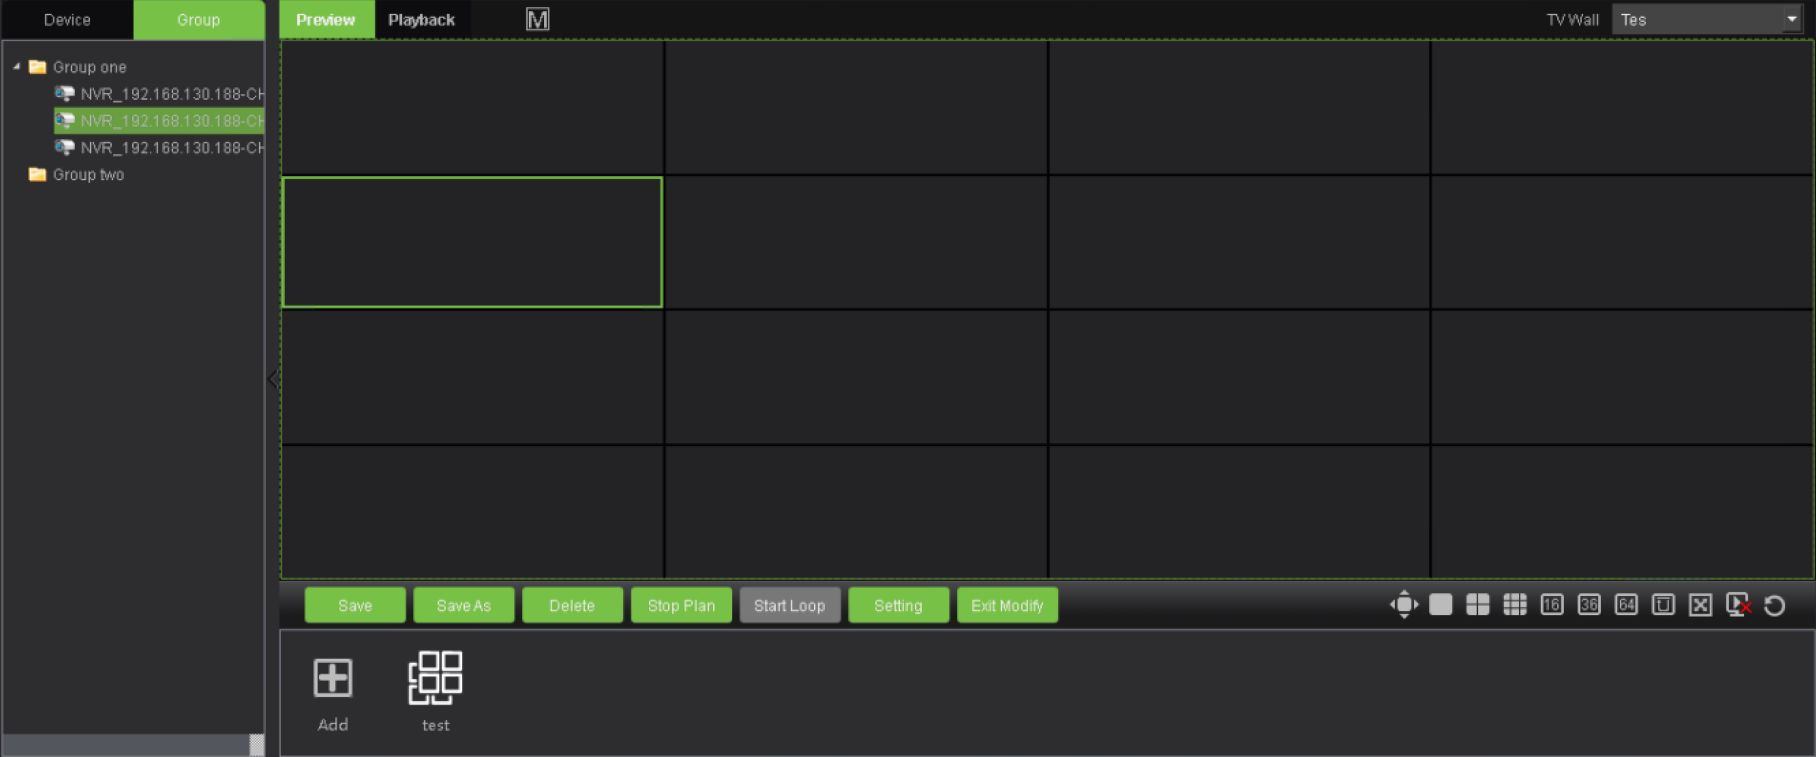
The group dragged to the TV wall output can automatically open the patrol within group. The patrol interval can be set at the time of configuring the decoding group. The default value is 2 seconds.
Antarvis2.0 User Manual 37
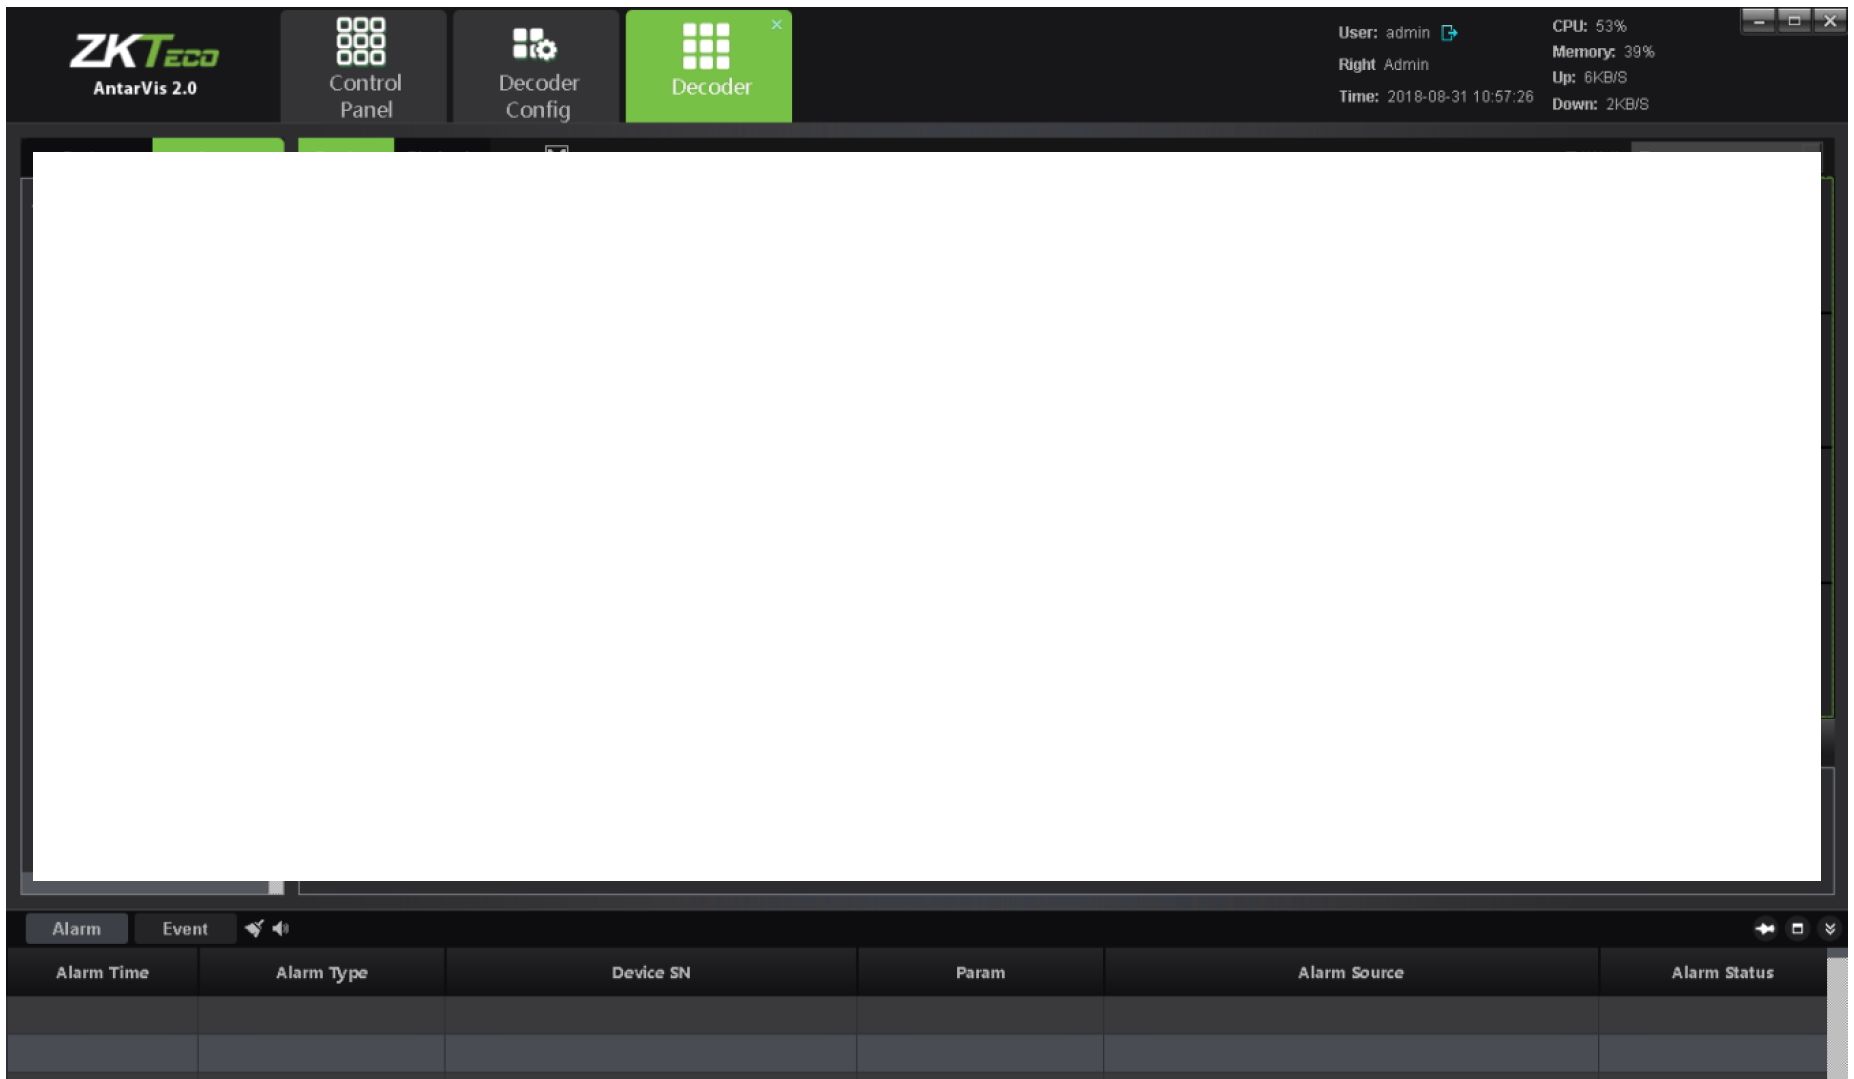
Click on the “ADD” button to add a pre-plan:
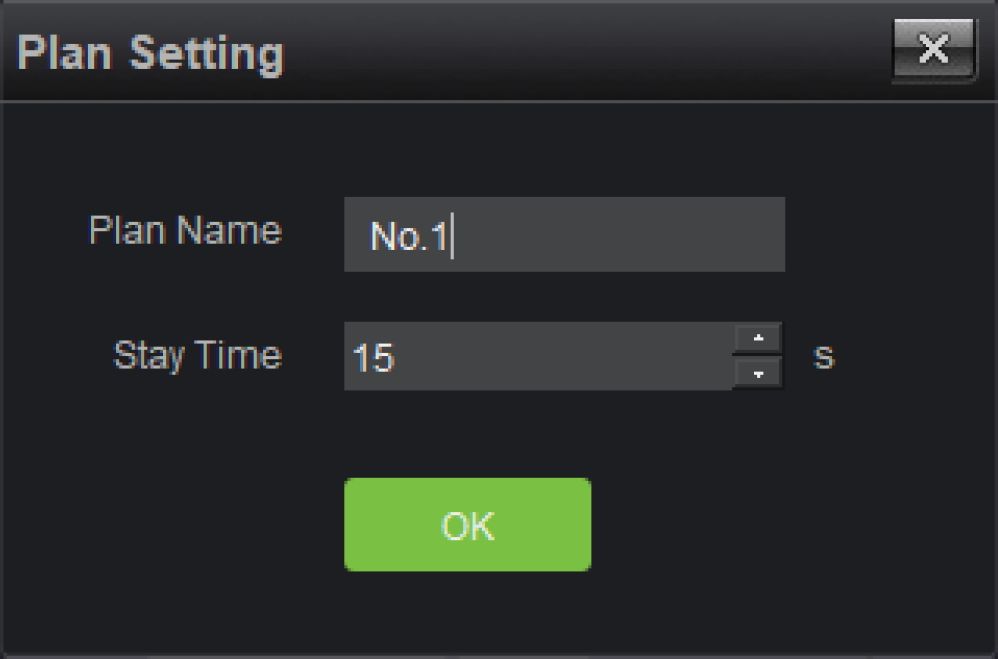
Set a “Plan Name” and “Stay Time” for the pre-plan patrol. The default value of “Stay Time” is 15 seconds; the minimum value is 10 seconds. After completion of settings, please click on “OK” to enter the pre-plan edit mode:
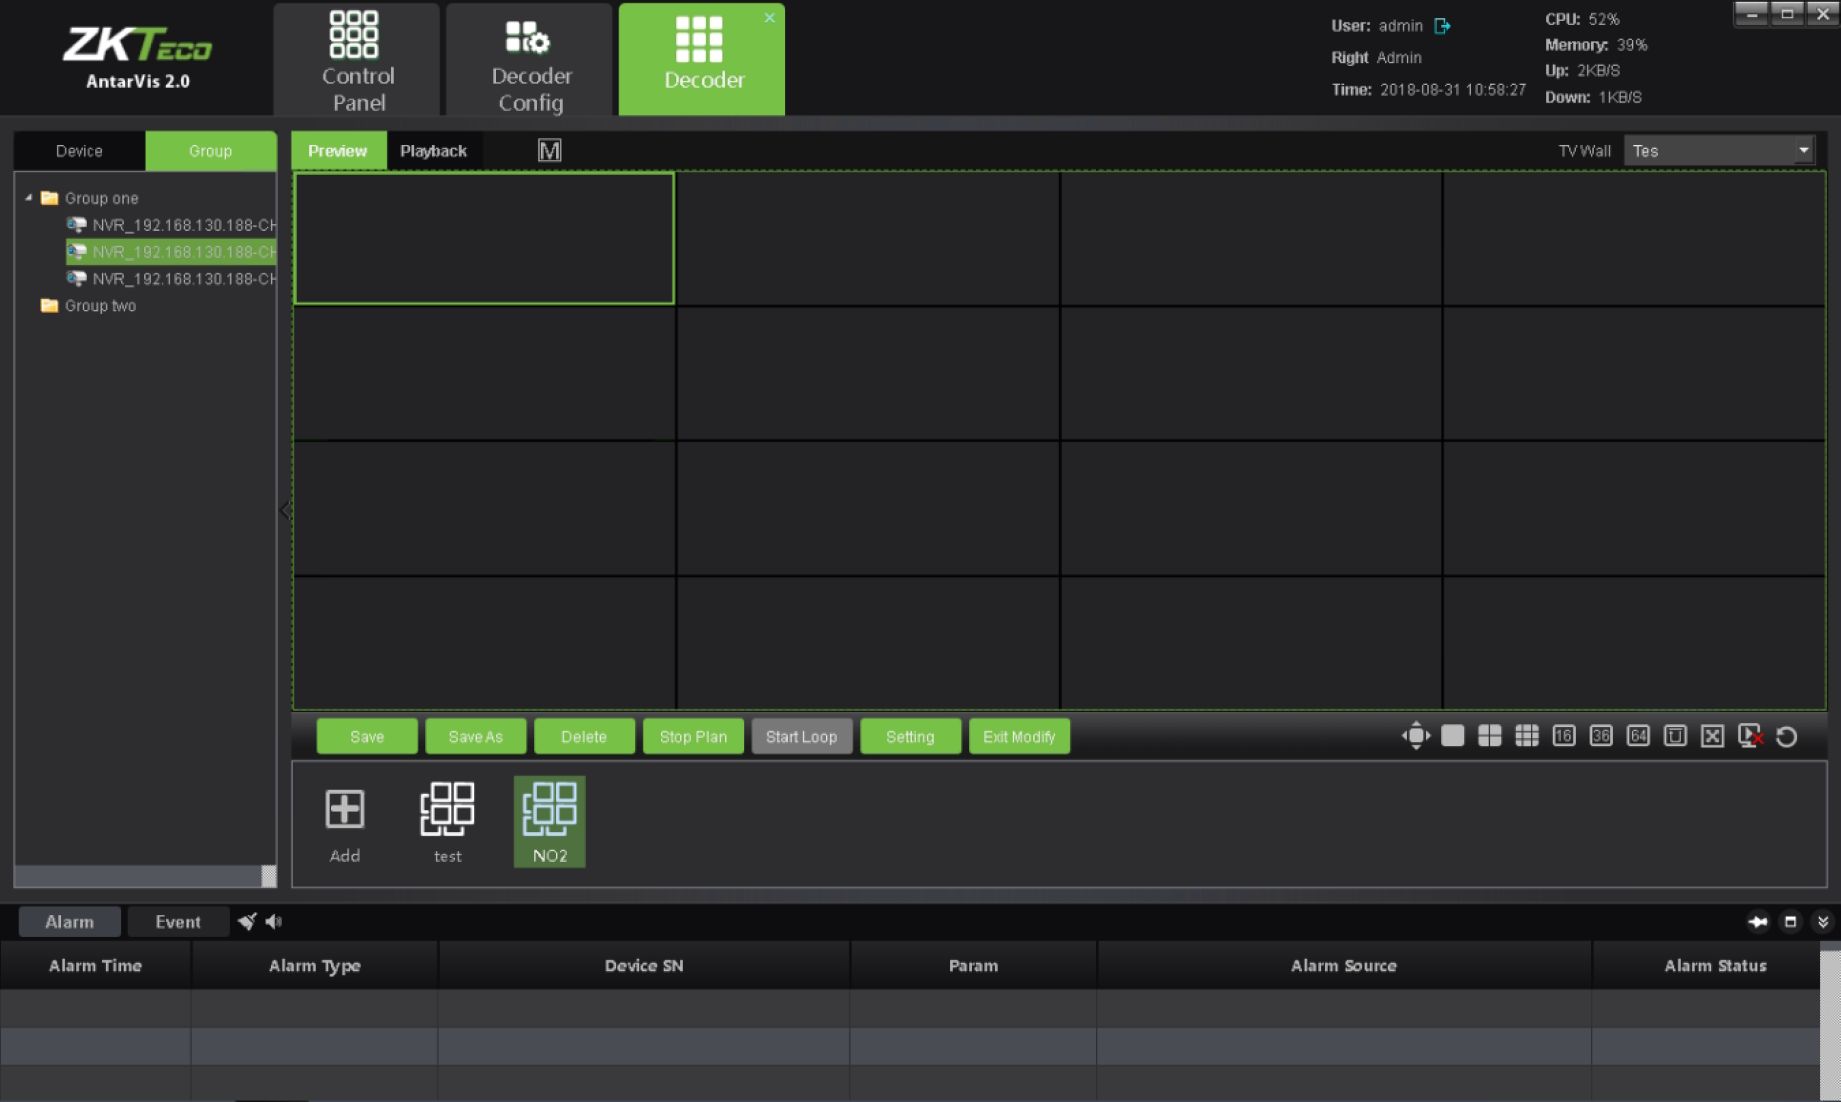
Configure the Pre-plan. Select the decoder split screen, decoding stream type and channel to edit the pre-plan settings. When you have completed settings, please click on “Save Pre-plan” to complete the editing.
Click on “Pre-plan” to make this group of Pre-plan to TV Wall directly with no necessary manual
38 Antarvis2.0 User Manual
operation, which is much convenient for users. Users may delete the saved pre-plans and perform other operations. If you have set several pre-plans, click “Start Pre-plan Patrol” to allow the decoder to start cruise according to the configured pre-plan.
In case of Decoding rolling to be fulfilled in certain decoder, the decoder must be selected for Cruise during TV wall scheme setting (please see section 6.2), and the roll group has been determined in the course of scheme setting.
As the roll group and roll screen has been assured to be set in the scheme, on the button below in the interface to start/pause the Cruise , click the o button in the process of roll to stop roll (note: roll control button is only effective to roll decoder but general decoder).
On the preview operation interface, there is a row of function buttons


are split-screen switch control buttons. When a user selects the decoding screen, he/she may use the
buttons here to switch the number of split screens between different modes, such as 1,4, 9, 16, 36,
64. is a full screen control; users may click on it to activate full screen mode, right-click to exit.

is a split control; users may open/close the decoder split.

is a channel-clear-control; iib
is used to clear all decoding channels in certain decoders with one key, while

is used to clear all
decoding channels in all decoders with one key.
Access the playback operation interface as shown below:
Antarvis2.0 User Manual 39
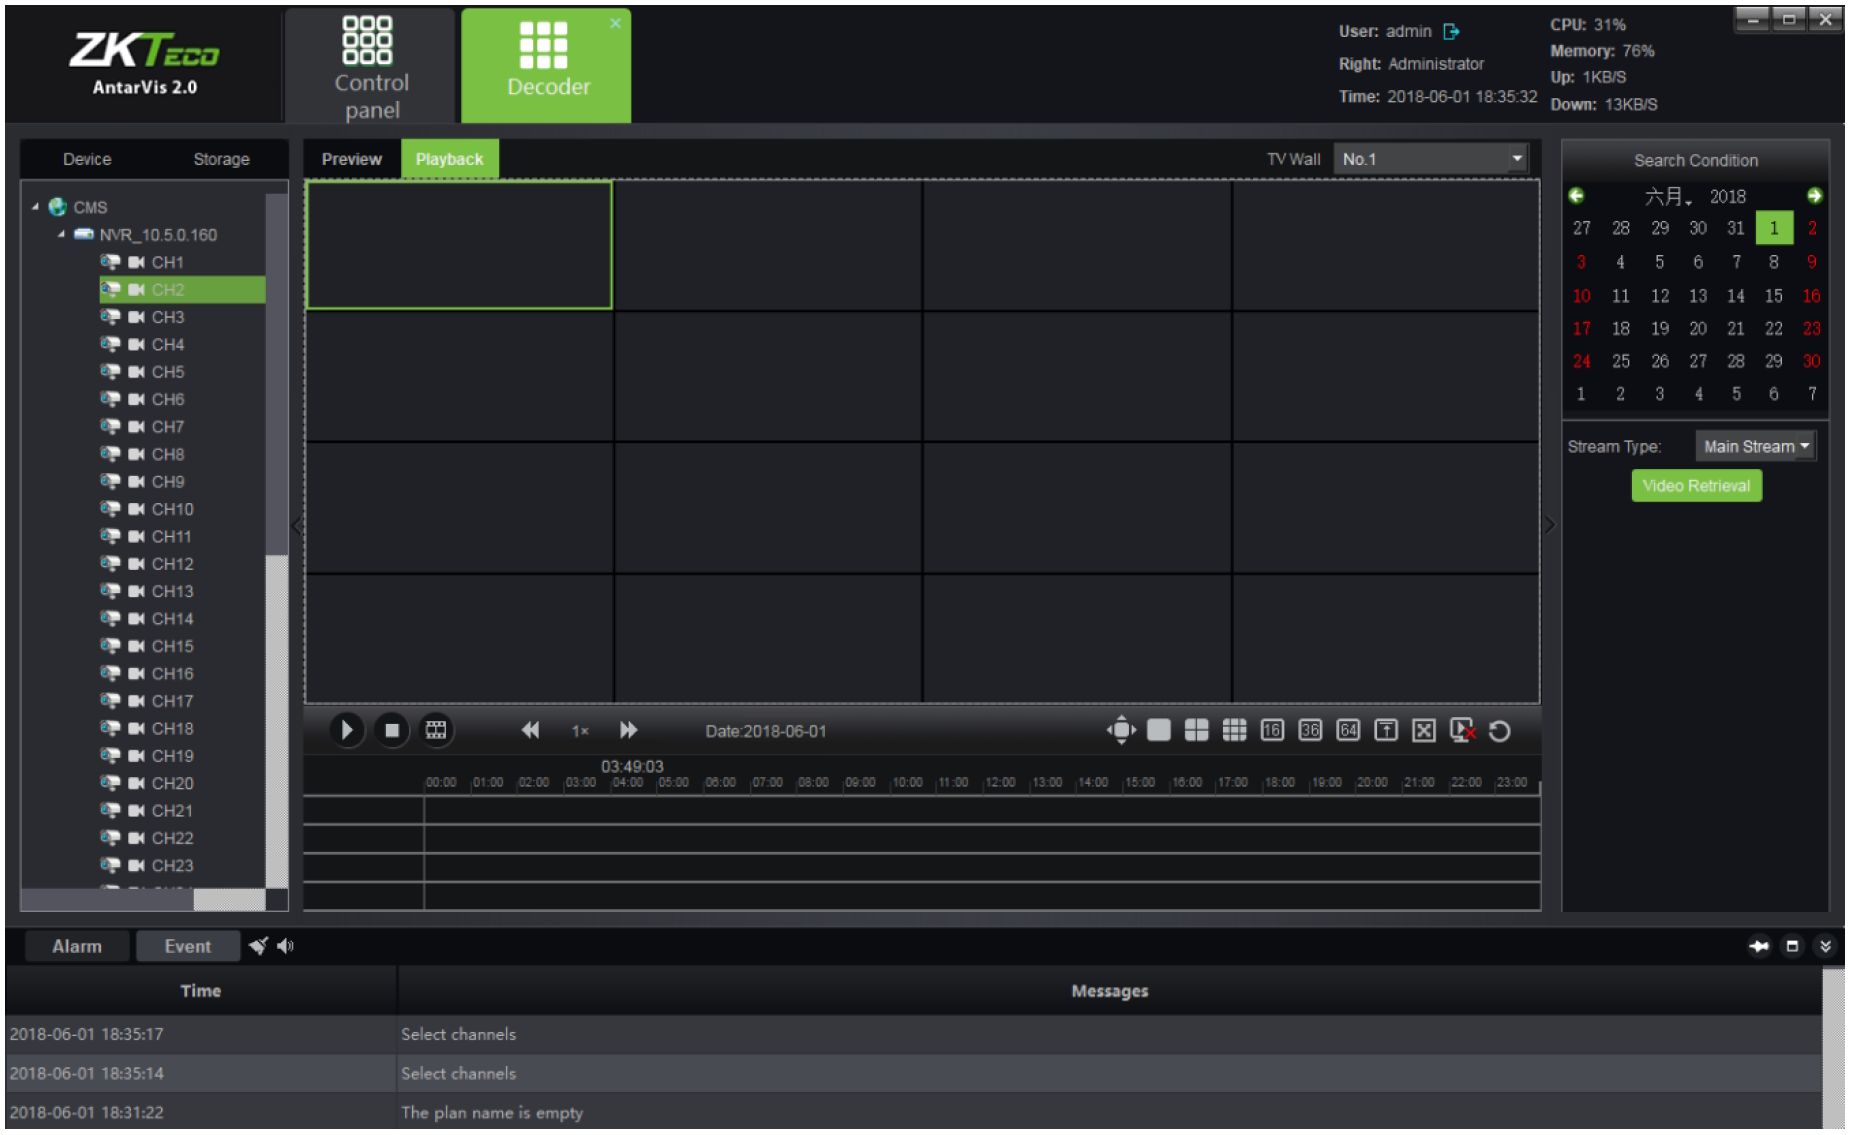
Drag the channel to be played to the decoder, then select the criteria for searching, such as date and video path. Click on the “video retrieval” button to search for video files in the corresponding
channel. Operation here is similar to that of video playback. All playback channels must be in the
same device, and a maximum of 9 channels of playbacks simultaneously. When the video search is
completed, click on the

button or double-click on timeline to start playing. Double-click to
relocate time stamp during playing, as shown in the figure:
40 Antarvis2.0 User Manual
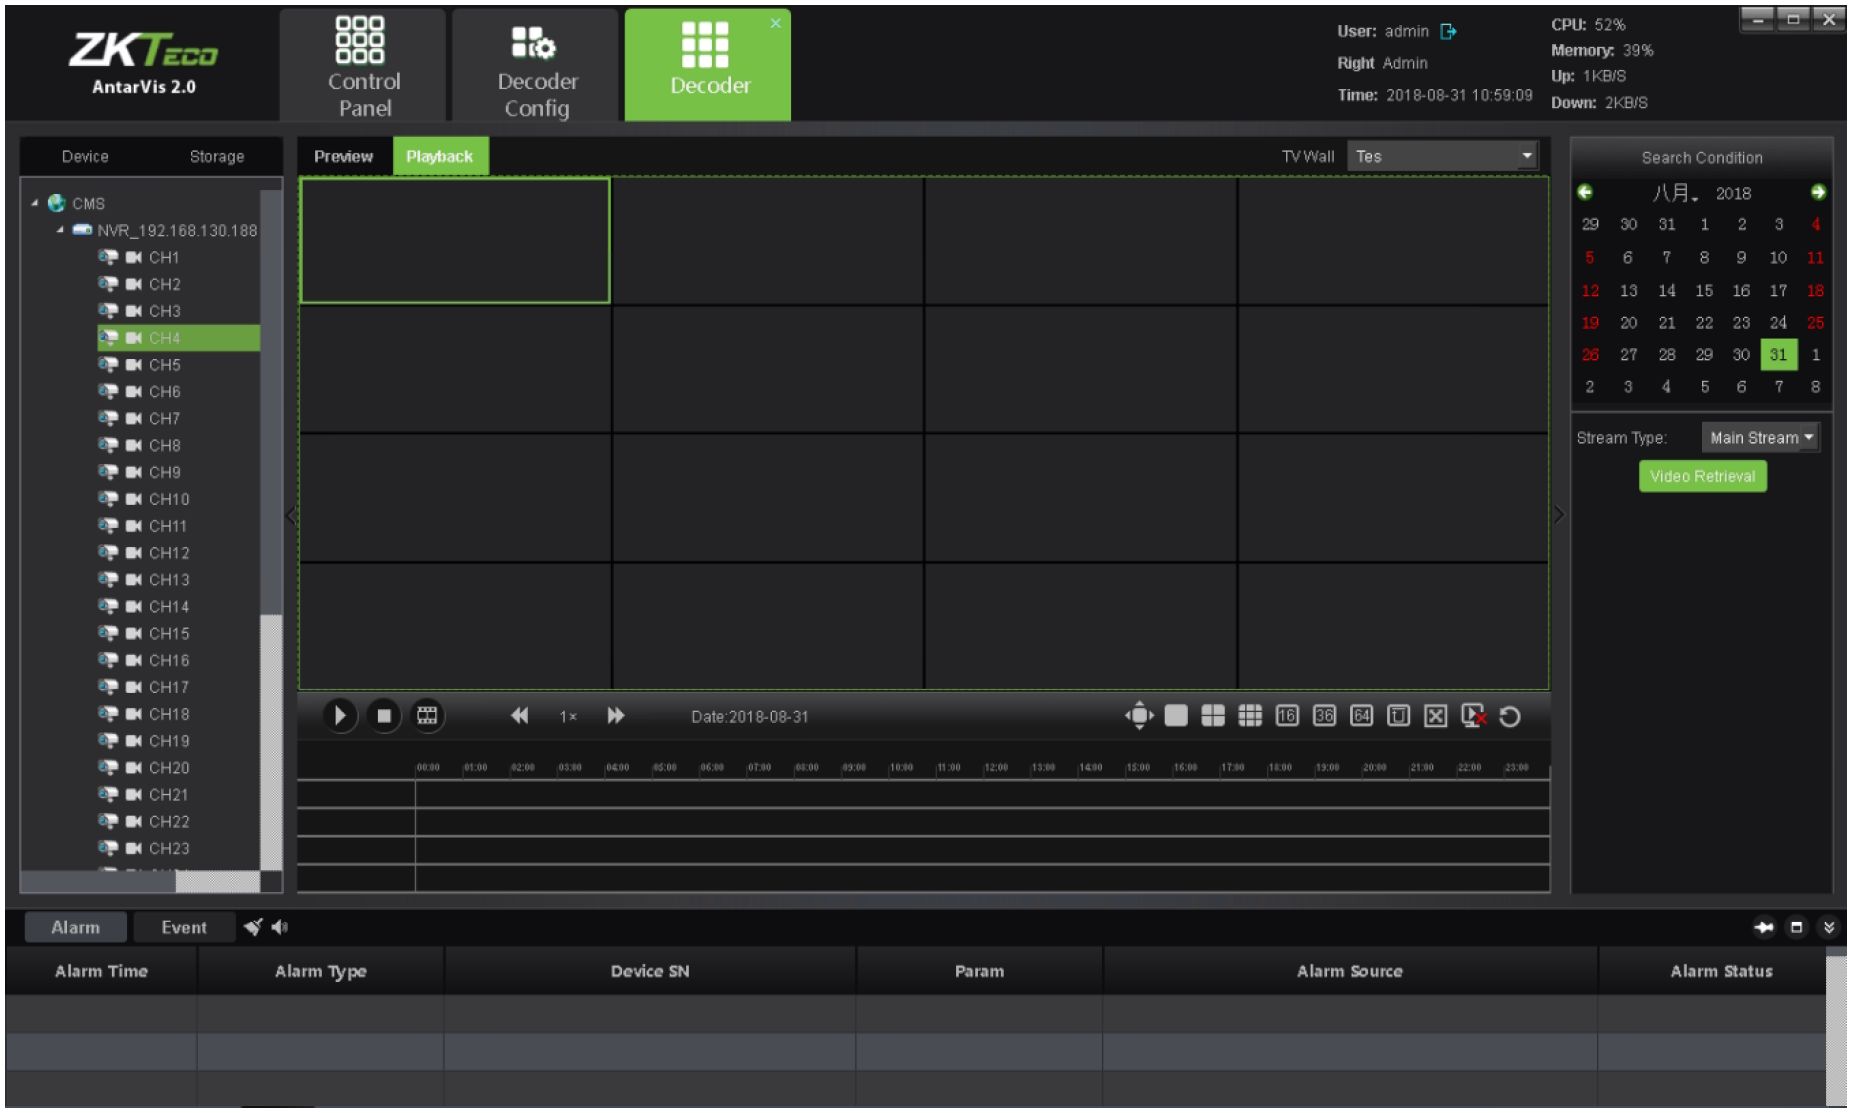
The function buttons in the lower part of playback operation interface are

For details about the
functions of the buttons, please see the section above. Its functions includes: play/pause, stop, frame
play, playback speed adjustment, full screen, split -screen number button, decoder CLS, splict offset settings, open/close the split, TV wall CLS.
Click on the “Alarm configuration” button on the main interface to access the alarm configuration interface. “Alarm configuration” is an alarm rule setting module. If a user wants to fulfill alarm linkage in the client-end, the alarm linkage rule must be set in advance.
Antarvis2.0 User Manual 41
| ZKTebo
AntarVis 2.0 |
□□□ □□□ OOO
Control panel |
Alarm configuration | User: admin &
Right: administrator Time: 2018-12-08 11:30:29 |
CPU: 13% –
Memory: 69% Up: 13KB/S Down: 586KB/S |
||
| Add Device Refresh | ||||||
| Rule Name | Alarm Type | Alarm Source | Remarks | Enable | Description |
Alarm | Event I < 4> ■** a «
| Time | Messages | |
| 2018-12-08 11:29:25 | Select channels | |
| 2018-12-08 11:28:54 | Select channels |
Alarm configuration interface shows the currently set linkage rules and the state of the rule.
To add an alarm linkage rule, please click on “Add” at the upper left corner, as shown below:
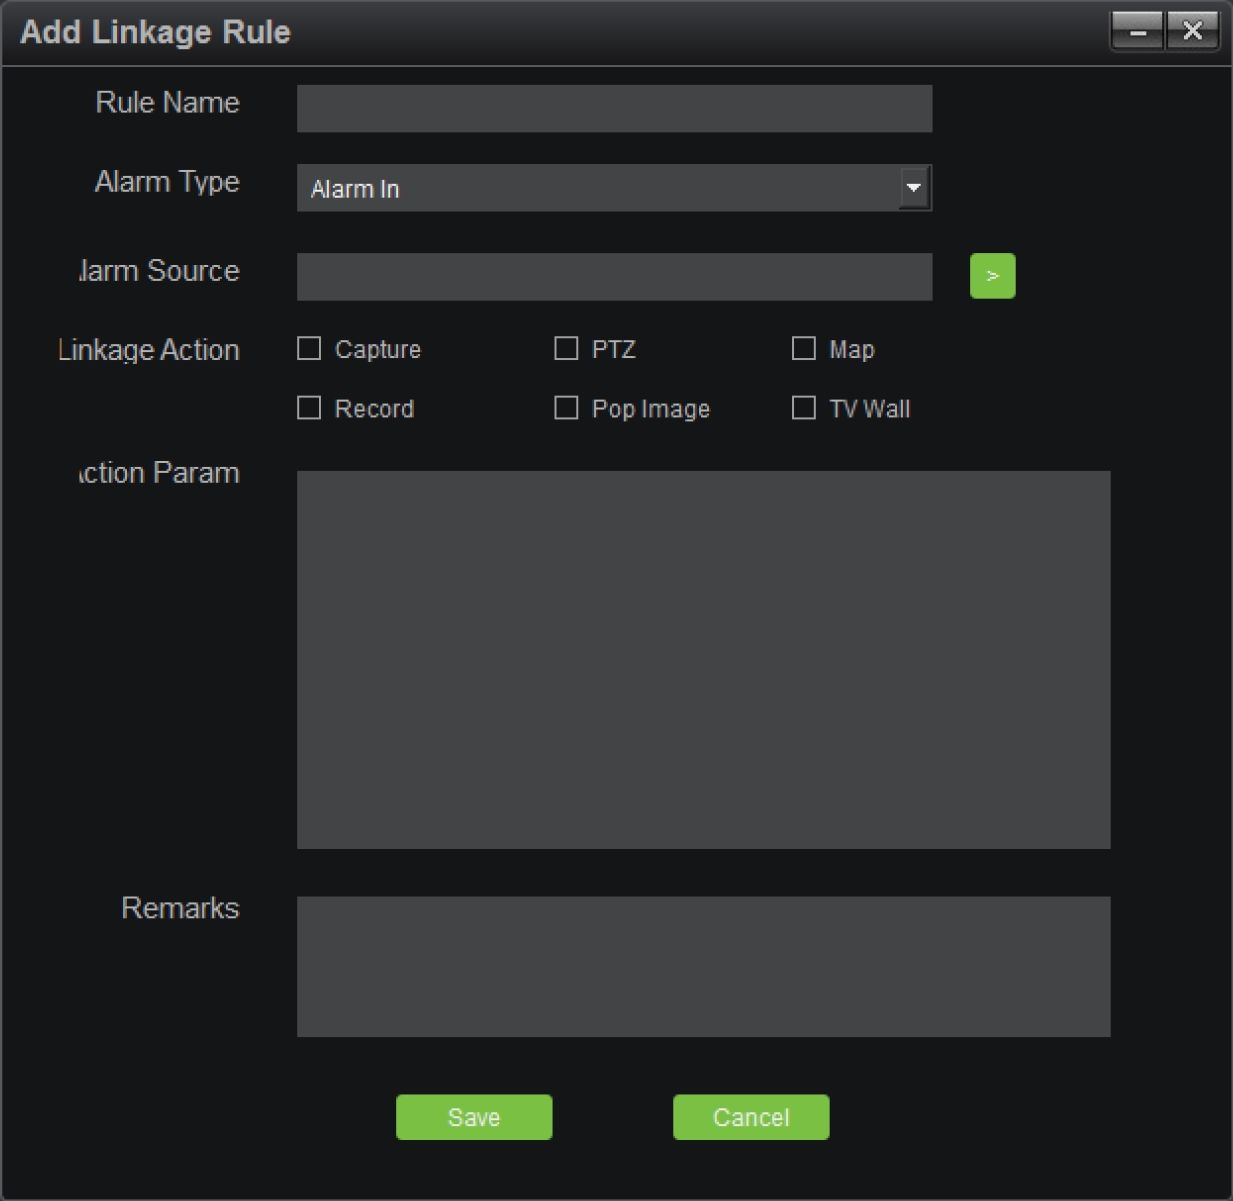
42 Antarvis2.0 User Manual
- Rule name: alarm linkage rule name is user-defined.
- Alarm type: currently support 8 types of alarm, including Alarm in, Motion detection, Tampering, Video Loss, Area alarm, Object alarm, Cross line alarm and Counting alarm. Among which, the last four kinds are specialized to the device about intelligent detection. Regarding the definitions of the 8 types of alarm, please see NVR’s specifications.
- Alarm source: Click on the check box to add all channels of all devices to VMS which can currently be selected.
- Linkage action: includes capture, PTZ, Map, Record, pop Image and TV wall, which are defined respectively as below.
Capture: captures the picture of the linkage channel.
PTZ: controls the linkage channel. You may choose to call certain presets, call certain cruises or certain tracks. Only front devices which support PTZ control can be linked to PTZ.
Map: displays an alarm on map interface. For the linkage of map alarm, the channel to be linked shall be deployed on the map. When an alarm is triggered, the icon of the channel will be indicated in red on the map.
Record: when an alarm is triggered, the channel linked starts recording at local storage server, where you shall configure the RecPlan in advance. Records can be viewed by searching in the playback module.
Pop image: when an alarm is triggered, the preview window will pop up from the main interface displaying the real-time preview of the linked channel.
TV Wall: select a channel and TV Wall for wall-run. When an alarm is triggered, the real-time preview picture of this channel will be uploaded to the TV Wall.
Note: If the linkage action has been set as map, video, popup image and TV Wall, the front-end devices shall be selected. It shall be “auto-end” or “Schedule end”; “auto end” means that there is no linkage action upon the completion of alarm, while “timing end” means that the linkage action will end at the set time, which ranges from 1 second to 36,000 seconds.
- Action param: the linkage action set can be displayed in this column.
- Remarks: indicates relevant information of this linkage rule. It can be customized and omitted.
Upon completion, the window is as shown below:
Antarvis2.0 User Manual 43
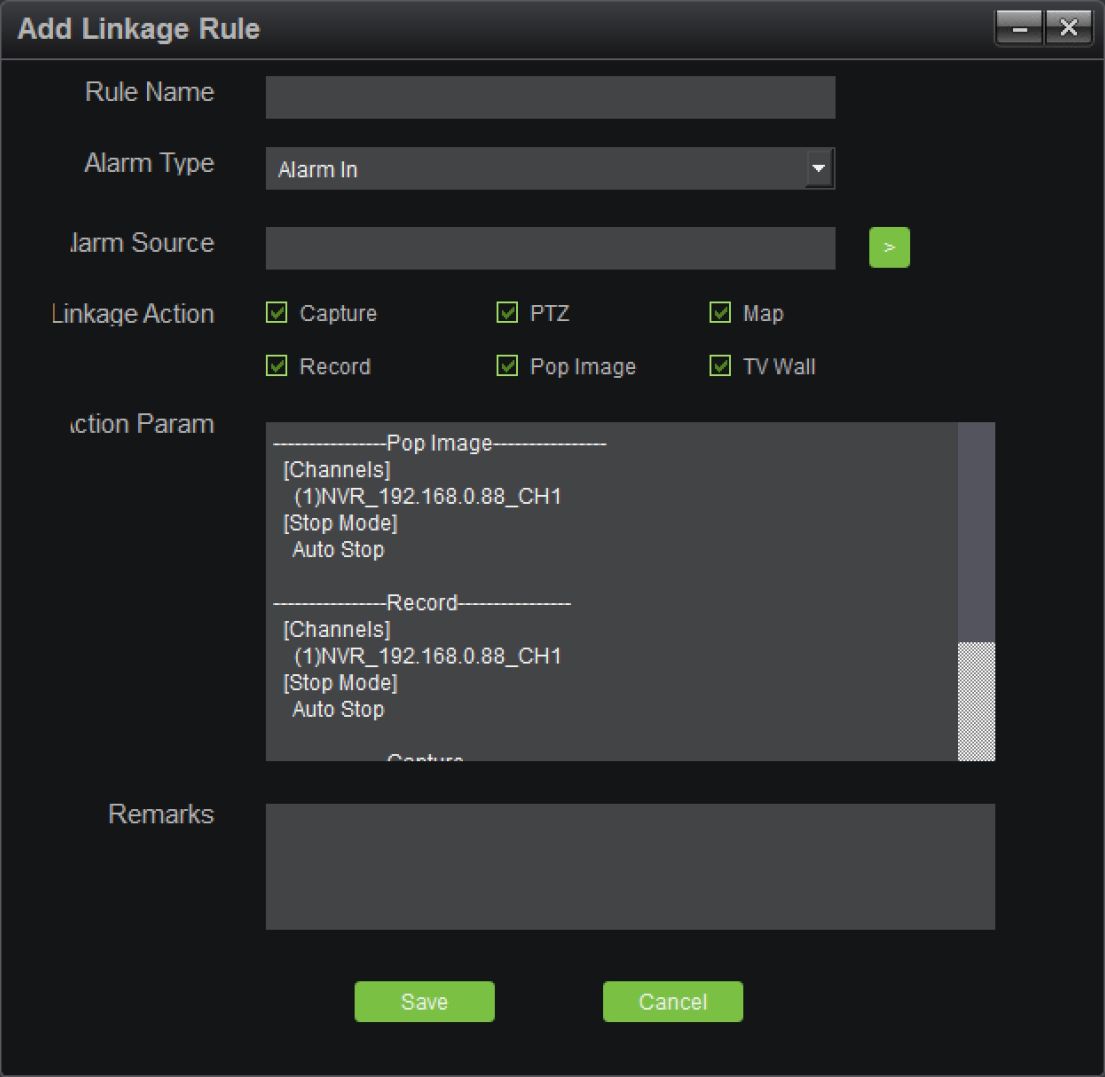
Click on the “Save” button at the bottom to save and complete the settings.

Upon completion of alarm rule adding, users may click on “Modify” indicated in the figure to edit the existing rule.
Add Device Refresh
Rule Name Alarm Type Alarm Source
1 Alarm In DEVICES-NVR_192.168.0.88-NetAI…
Remarks
Enable
□
Modify Update
To delete the existing rule, click on the “Delete” button in the figure; in case of disable of the feature at the moment, select the “check” button in the figure.
44 Antarvis2.0 User Manual
Click on the “Alarm” button on the main interface to enter the alarm management interface:
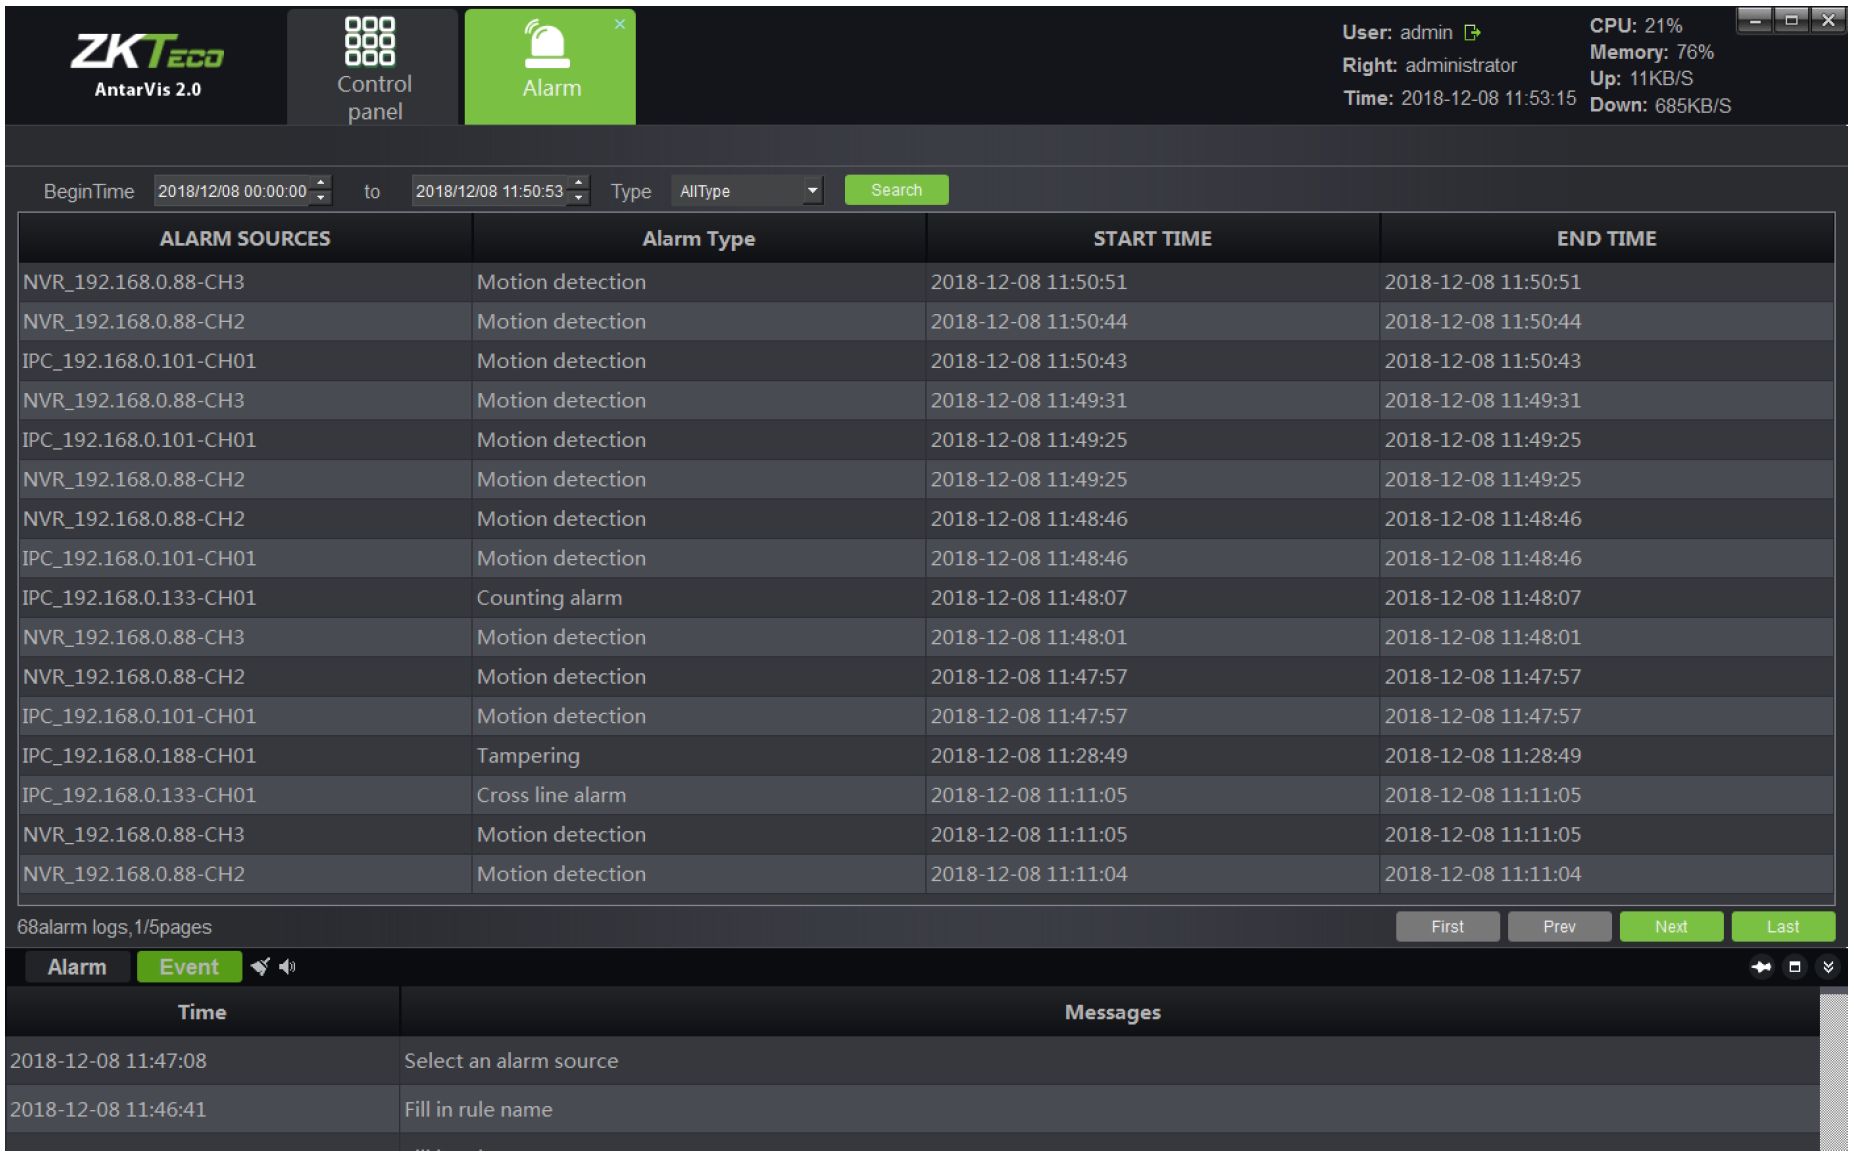
Alarm management interface displays all alarm information upload to VMS. Select time range to search and an alarm type, click on the “Search” button, then the system will search for relevant alarm information. There are 8 types of alarms, including alarm input, motion detection, video tampering alarm, video loss, target count detection, area detection, object detection and line crossing detection.
Click on the “Log” button on the main interface to enter the log management interface:
Antarvis2.0 User Manual 45
User: admin G» CPU: 5%
x Memory: 77%
Right: administrator Up: 1IKBS
Time: 2018-12-08 11:53:43 Doyun* 682KR/<S
![]()
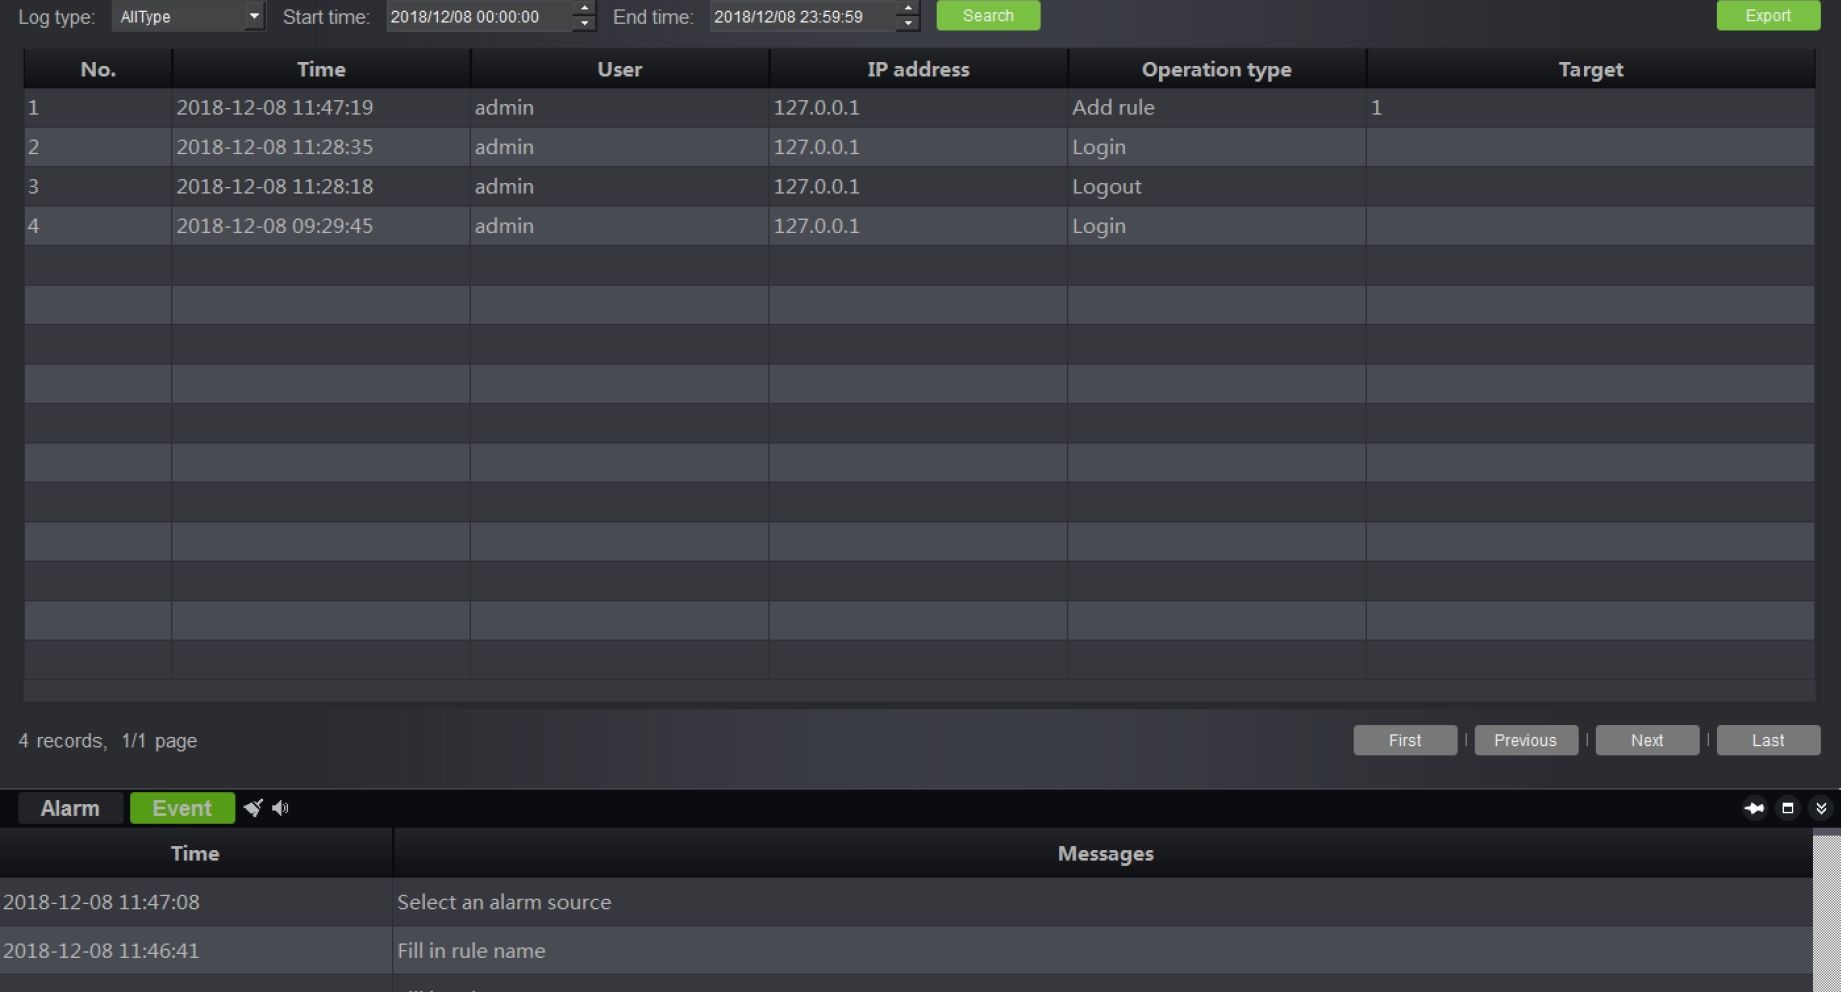
Log management interface displays all important operation records of a user. Select a log type and time range to search, click on “Retrieve” to start searching. Log types include login/logout, device management, start/stop rec, linkage management and remote configuration.
- login/logout: users log in/out records.
- Device management: management of records about user registration, modification and deletion of devices.
- Start/stop recording: start/stop local video record.
- Linkage management: management about recordsfromf user operations, such as addition, modification and deletion of a linkage rule.
- Remote configuration: records of user operations in terms of remote configuration, and modification of parameters for front-end devices.
The log will record the operation time, the user performed such operations, IP address where the operation is conducted, types of operations and target address of relevant important operations in details, which help the administrator to find out any issues.
46 Antarvis2.0 User Manual

Click on the “User management” button on the main interface to enter the user management interface:
| ZKTe^
AntarVis 2.0 |
□□□ □□□ □□a
Control panel |
X *
Users management |
User: admin G»
Right: administrator Time: 2018-12-0811:58:40 |
CPU: 4% SI!
Memory: 75% Up: 14KB/S Down: 615KB/S |
|
| Add user | |||||
| Username | User type | Operation | |||
| admin | administrator | Modify | Update Right |
| Alarm Event | < 4» | -•* B | |||
| Time | Messages | ||||
| 2018-12-08 11:47:08 | Select an alarm source | ||||
| 2018-12-08 11:46:41 | Fill in rule name |
User admin listed in the user management interface has the rights to set privilege for sub-users and users. There is a default super user whose name is “admin”, which can not be deleted and has all privileges. Click on “Modify” to change the password of the super user.
Click on “Add user” at the left-upper corner to add a new user:
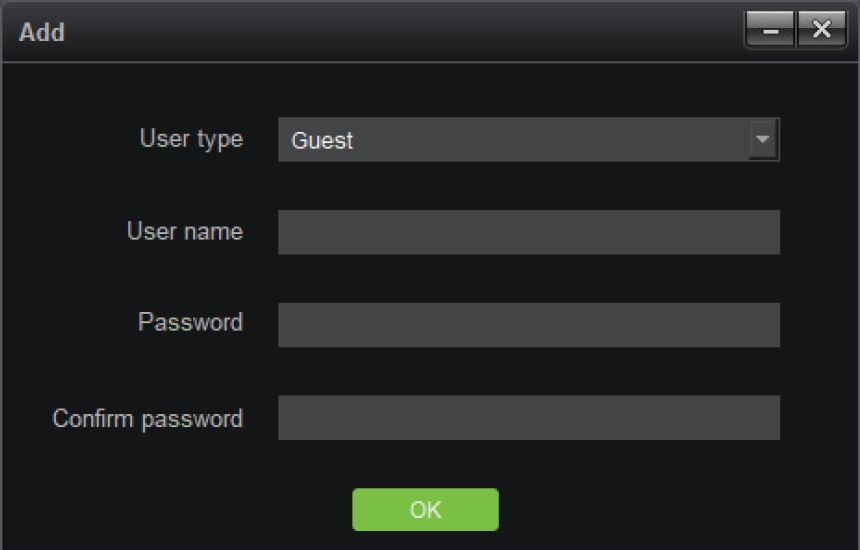
The default user type is “Guest”, which means an ordinary user, not an administrative user. The user
Antarvis2.0 User Manual 47
type cannot be modified. Fill in the user name, password, type the password again, then click on “OK’ to add a new user. The password and that to input at the field “Confirm password” shall be the same.
Add user
| User name | User type | Operation | Righ^ | ||
| admin | Administrator | Modify | II | Delete | |
| test | Guest | Modify | II | Delete | Right |
To assign sub-users access rights, click on the “Right” button indicated in the figure to grant the users relevant access privileges:
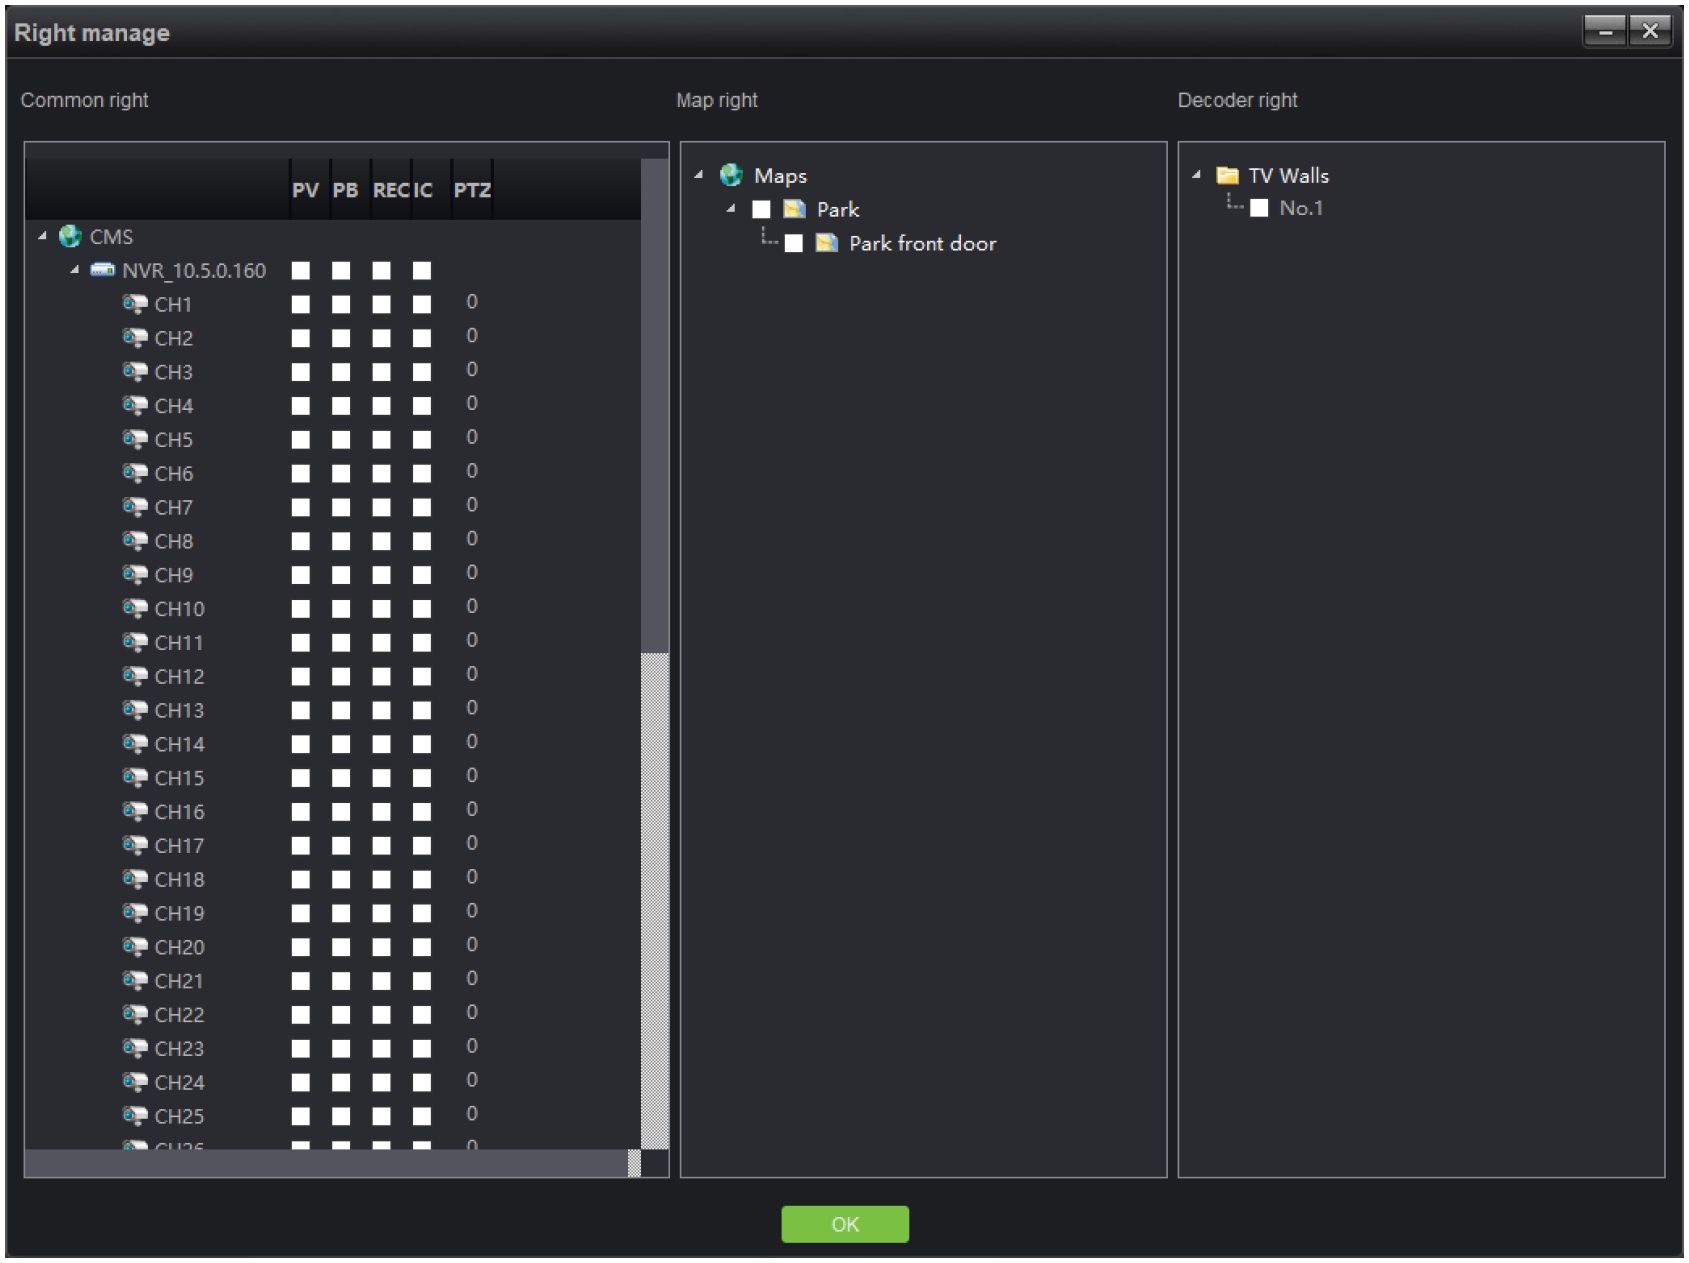
Types of access include common access, map access and decoder access.
Common access: includes preview, playback, video, intercom and PTZ control; depends on channels. The administrator may distribute relevant channels to the corresponding sub-users. The number corresponding to PTZ represents the control priority of PTZ. You may double-click to edit, and select a value from 0 to 10, among which, 0 indicates that there will be no PTZ control access, and 1-10 indicates the priority of PTZ control access. The larger the number, the higher the authority, i.e. 10
48 Antarvis2.0 User Manual
represents the top priority of PTZ control while 1 represents the lowest priority.
Channels without preview access distributed will be hidden if a sub-user logs in. Similarly, channels without relevant access rights cannot offer users access to playback, video and intercom. users can’t apply the corresponding functions. For instance, there are only 3 channels have been distributed to test sub-user, as shown in the figure:
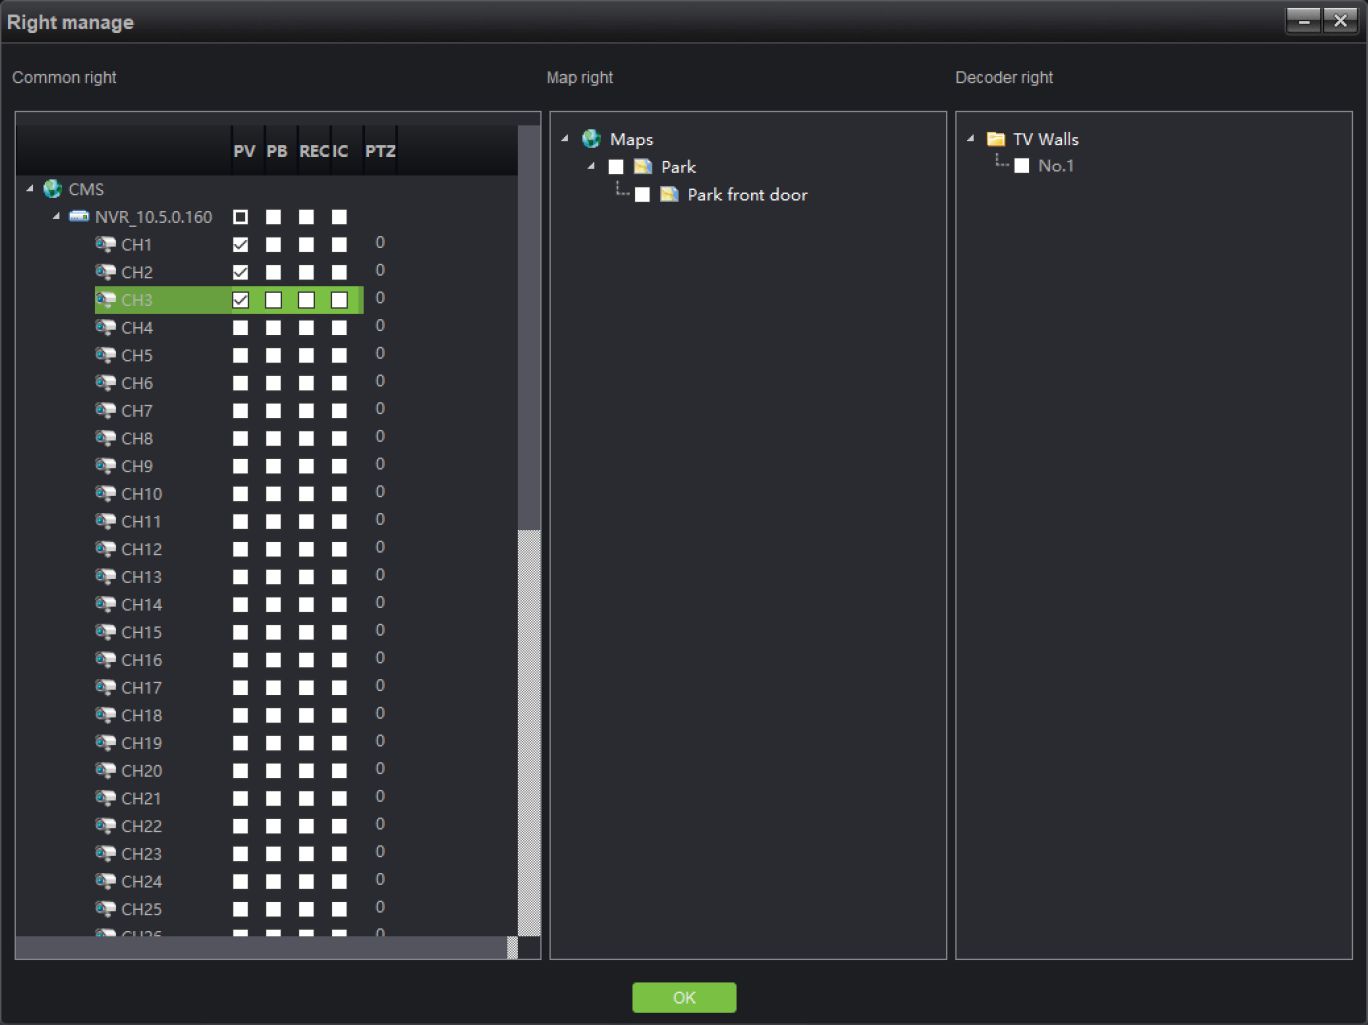
Login with sub-user can only view three channels, as shown in the figure below:
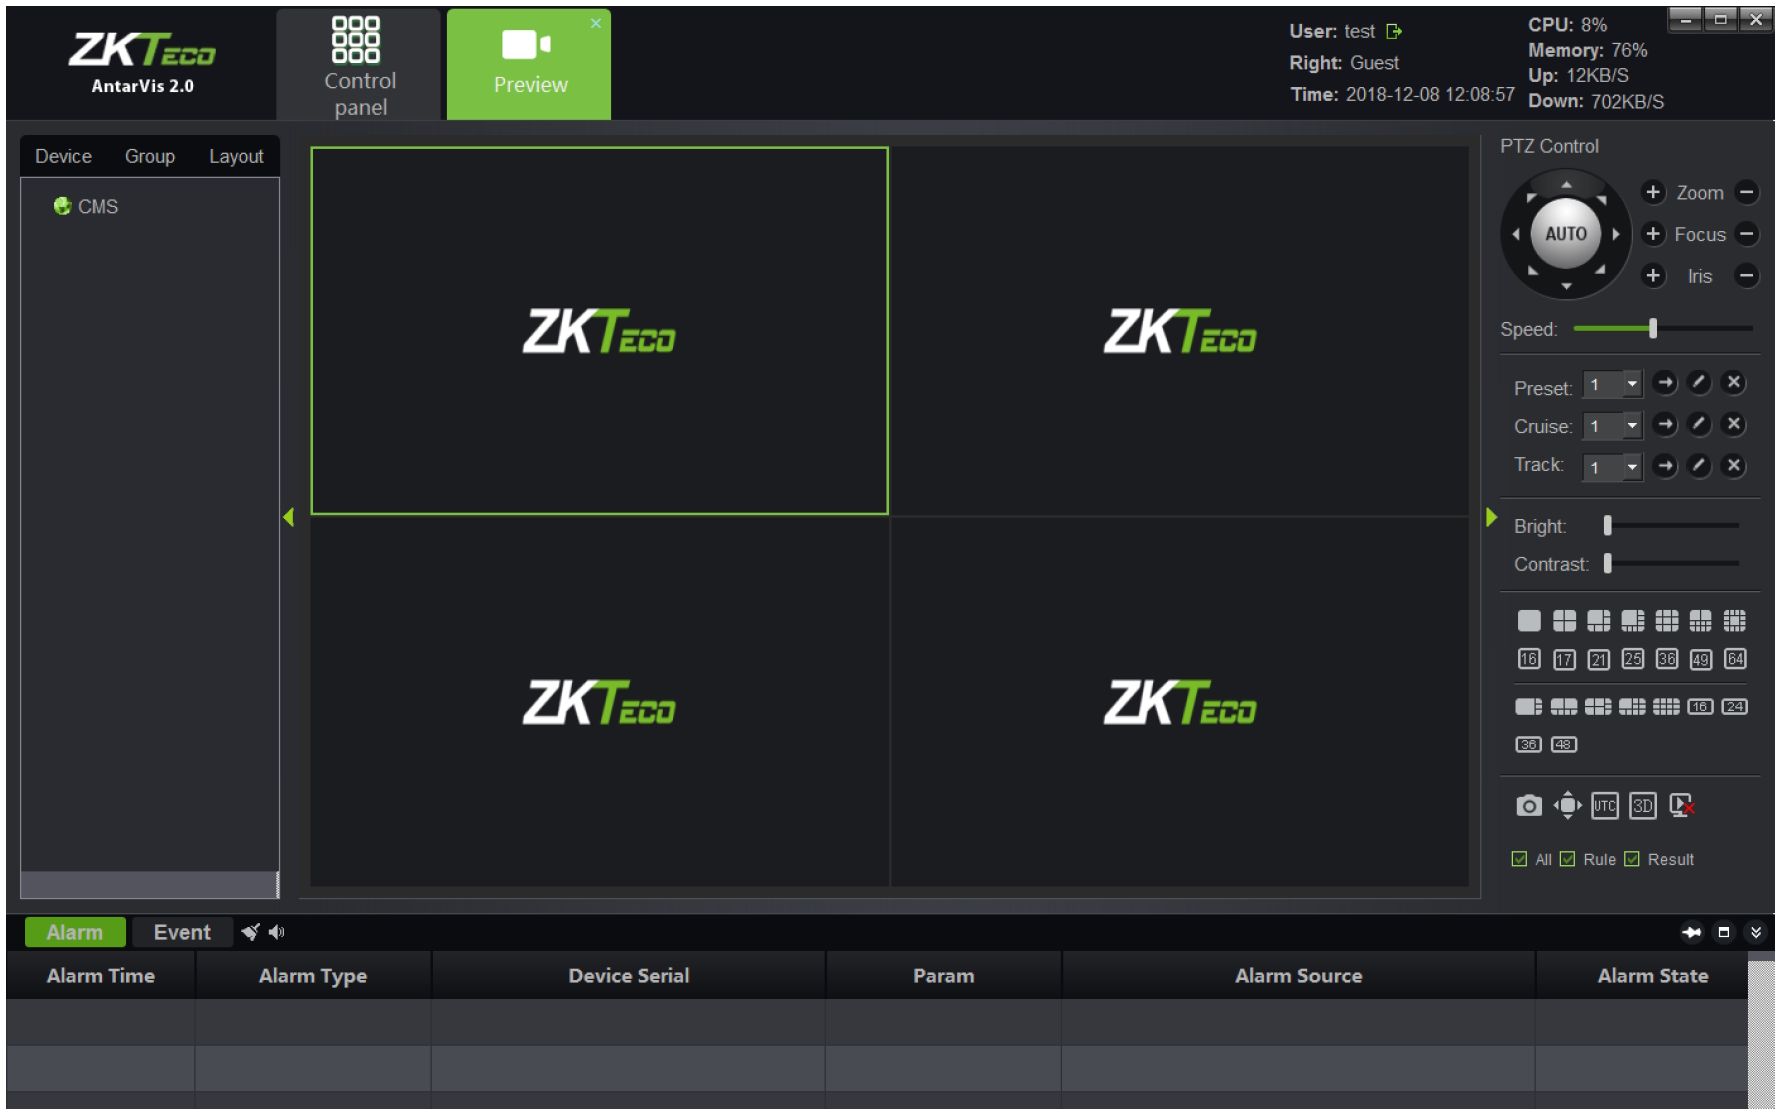
©Note: the super user has top access priority which cannot be modified.
Antarvis2.0 User Manual 49
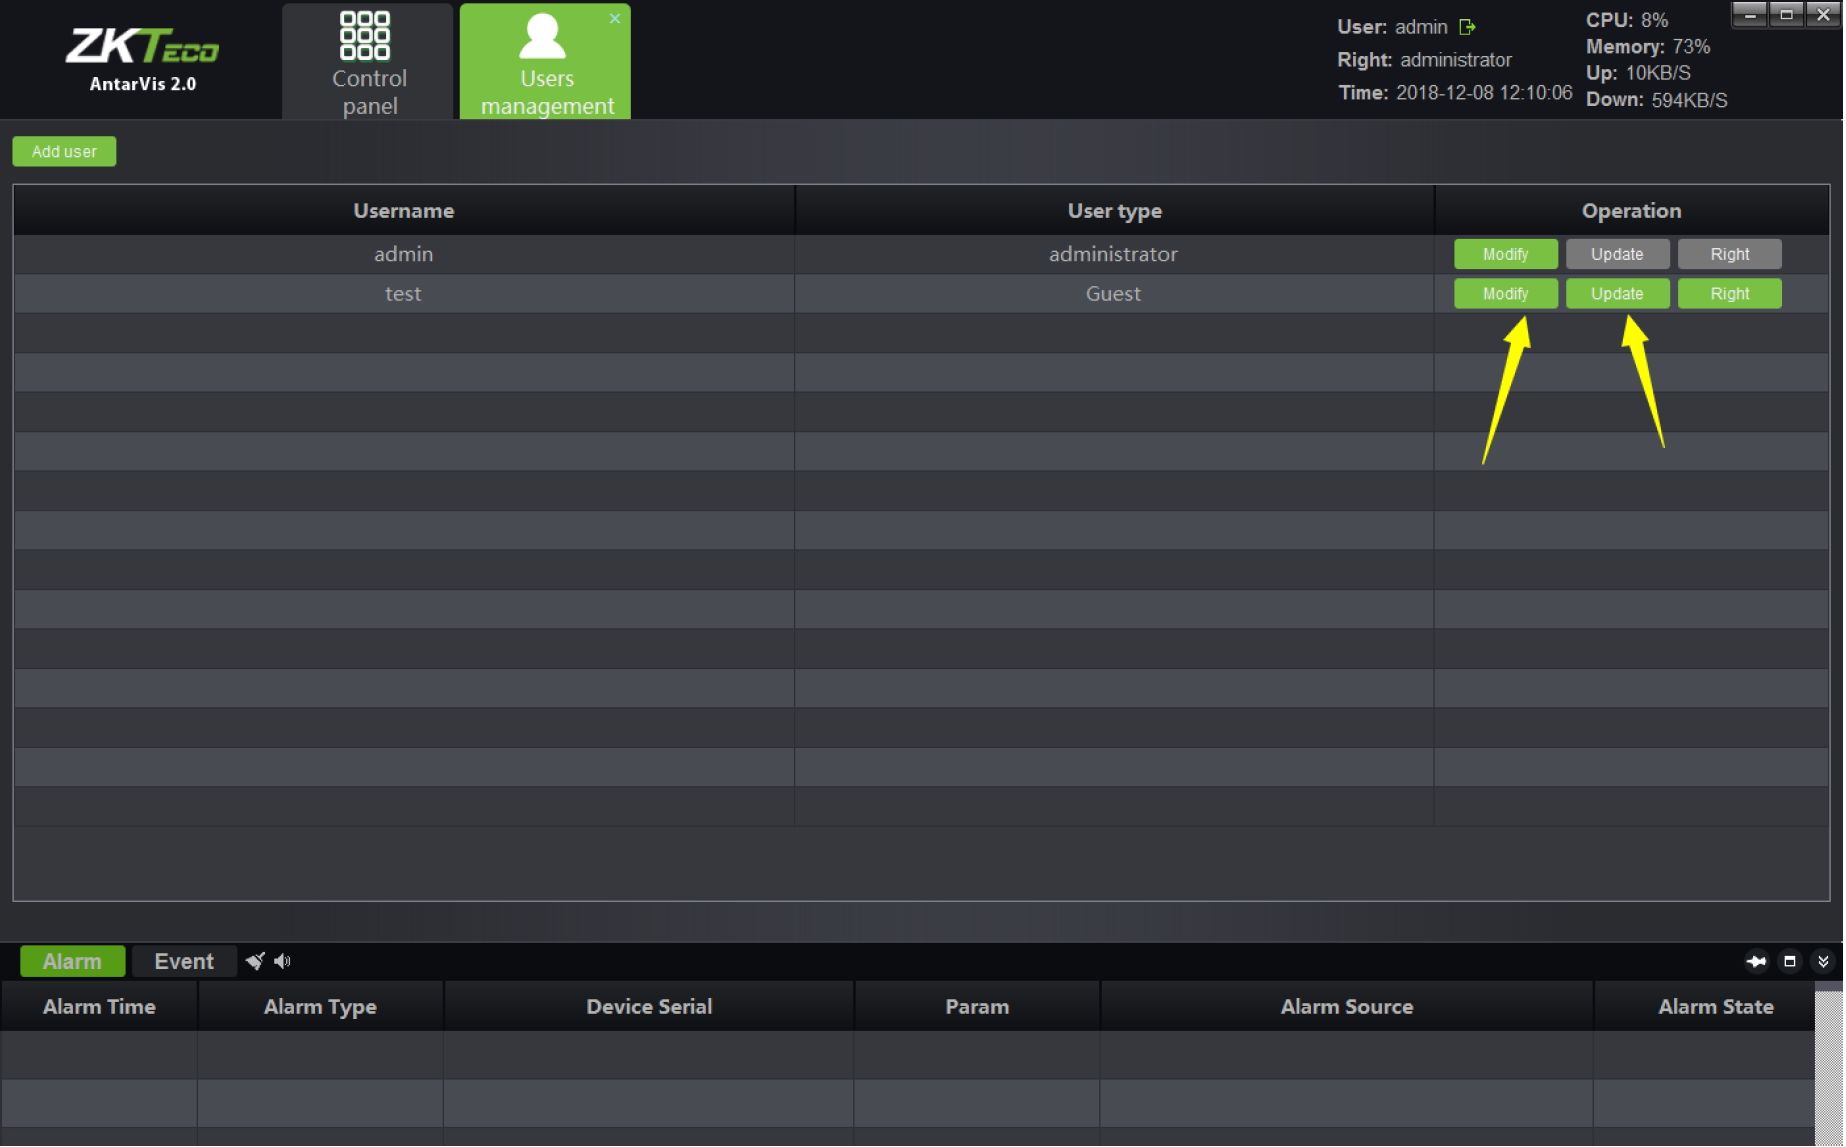
1) Modify a sub-user
Click on the “Modify” button indicated in the figure to pop up the editing interface.
Edit – X
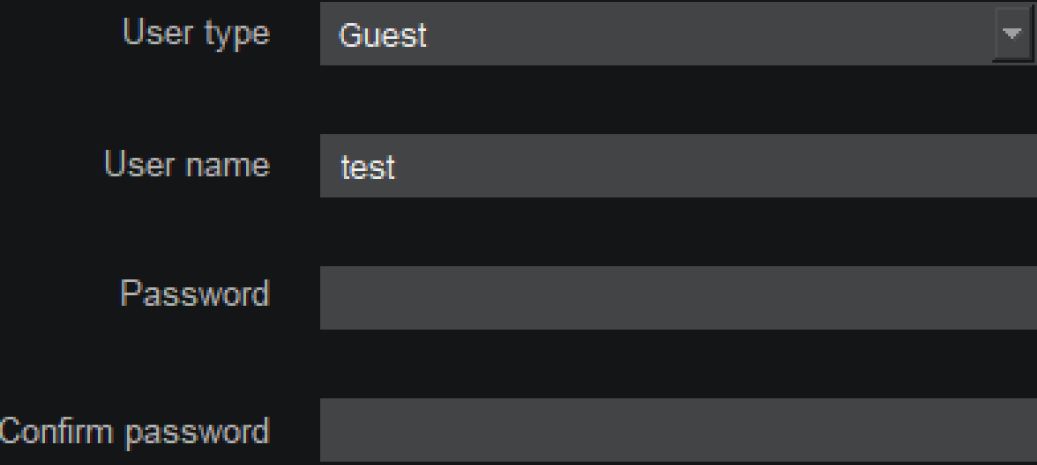
OK
Users may modify their passwords as needed. Upon completion of input, click on the “OK” button to confirm and save.
Click on the “Delete” button on the user management interface to delete corresponding users, among which, you may not delete the super user account.
50 Antarvis2.0 User Manual
Click on the “Local configuration” button on the main interface to enter the local configuration
interface:
| ZKTeco | □□a
□□a OOO |
o |
| AntarVis 2.0 | Control | Local |
| panel | configuration |
User admin & CPU: 13%
. … * Memory: 74%
Right: administrator ..
Up: 11 KB/S
Time: 2018-12-08 12:11:49 Down: 625KB/S
□ Autologin □ Bootfrom the start
0 Auto stream O Speed mode ® Save mode 4 ■» sub screen open the main stream
Window scale
Capture path
Download path
Export log path
FullScreen
C:\Capture
C:\Download
C:\Logs
Browse Open
Browse Open
Browse Open
Sync device time I Set Time □ Auto time Sync time 00:00 * Interval 1 ‘ Day
Alarm sounds f Set
Rec storage path settings | Set
Data backup and restore Backup Restore
Channel count
ZKTeco: unlimited Channel
ONVIF: unlimited Channel; P2P: unlimited Channel; ZKTeco-P:unlimited Chai
Record colors ScheduleMotion detect
Smart
Version V2.0[20181123]
Save
Alarm Event < -♦* n s
| Alarm Time | Alarm Type | Device Serial | Param | Alarm Source | Alarm State | |
| 2018-12-08 12:10… | Motion detection | 0B9301230911945AE75A | 2 | NVR._192.168.0.88-CH2 | Stop Alarm | |
| 2018-12-08 12:10… | Motion detection | 0B810002ADBF0000BA47 | 1 | IPC_192.168.0.101-CH01 | Stop Alarm |
- Auto login: when VMS software opens, it will automatically log in.
- Boot from the start: when you select this feature, the client-end program will run automatically when the server which runs VMS boot up.
- Auto stream: when speed mode and save mode are selected, as shown in the figure,
□ Auto stream 0 Speed mode 0 Save mode 4 ‘ sub screen open the main stream
among which,
open of preview will open main stream and sub stream under the speed mode, however, only one of them will be displayed, therefor, it will be faster for switching and also saves the bandwidth. “Save” mode means that only one stream shall be opened at the same time; the current stream shall be closed to open another. It is slower and saves the bandwidth as well. Users may select the mode as needed. In addition, it can be selected under certain number of split screens to automatically switch to main stream under the circumstance of auto stream, 1,4 and 9 channels are optional.
Antarvis2.0 User Manual 51
- Window scale: for preview or playback. You may choose from full screen, 4:3 and 16:9.
- Capture path: the directory to save captured pictures, including preview captures, playback captures and alarm linkage captures.
- Download path: the directory to down documents.
- Export log path: the directory to export log documents.
- Sync device time: manual or automatic synchronization of time of access devices.
- Alarm sounds: selection of sound, which is used as alarm linkage sound. You may customize the sound.
- Rec storage path setting: setting local directory to save recorded documents.
- Data backup and restore: backing up and restoring database to prevent data loss.
- Channel count: displaying the authorized total number of channels. ZKTeco: unlimited Channel;
ONVIF: unlimited Channel; P2P: unlimited Channel; ZKTeco-P: unlimited Channel
- Record colors: defining the color of indication of different types of videos.
- Version: the version number of the current program (non-modifiable).
Upon completion of settings, click on “Save” to quit.
52 Antarvis2.0 User Manual
