54 | Wisenet Viewer User Manual
Managing Devices
You can change and search device information registered on Wisenet Viewer.
Managing Devices
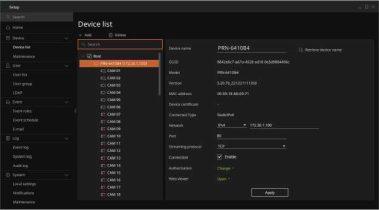
You can check the detailed information of devices registered on Wisenet Viewer and change the settings.
![]()
NOTE
You can only change certain device settings in Wisenet Viewer. To change the detailed settings of a device,
change them on the device or the web viewer.
Check settings information when device information is displayed.
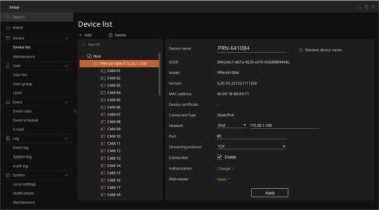
• Device name: Displays the name of the selected Device. You can customize the name.
– Retrieve device name: Change the device/channel names in Wisenet Viewer to those set in the device.
Managing Devices | 55
![]()
NOTE
If several devices are selected, only the streaming protocol, the connection, and the authorization item will
be displayed.
■ Changing Device Information
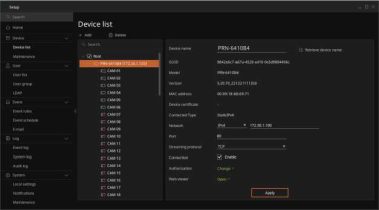
• The detailed information on devices can be changed on recorders, and the items that can’t be changed only show the settings values.
Managing Devices
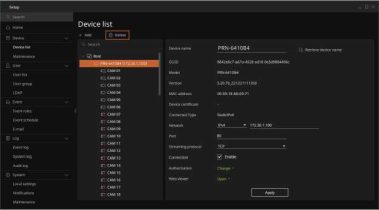
the device.
However, when you restart the Wisenet Viewer, the delete confirmation window will be
displayed again.
58 I Wisenet Viewer User Manual
You can update the firmware of devices and cameras registered on Wisenet Viewer. Once connected with the network, you can check the latest version of the firmware by linking it with the update server, and proceed with the update.
![]()
NOTE
Managing Devices
The sublist camera item is displayed on the bottom of the said device only when the device supports the
camera firmware update.
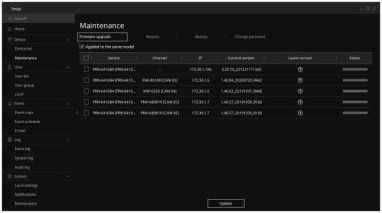
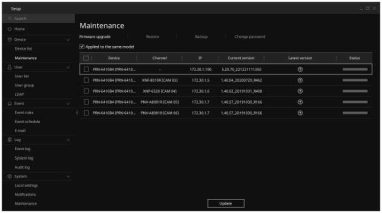
• If you check Applied to the same model, this firmware will be applied so that multiple devices
Managing Devices | 59
of the same model can be updated simultaneously. Even if the same firmware is applied, it does not apply when the device model is different.
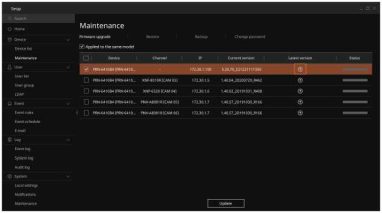
NOTE
The items displayed in the Status column are as follows:
Managing Devices

Maintenance
Firmware upgrade Restore | Backup | Change password
@ Applied to the same model
Device | Channel | IP | Current version |
© © © © ©
![]()
![]()
S Log
Event log
System log
Audit log
0 System
Local settings
Notifications
Maintenance
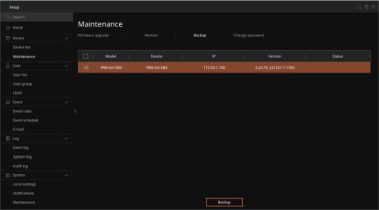
4. Select a device to back up.
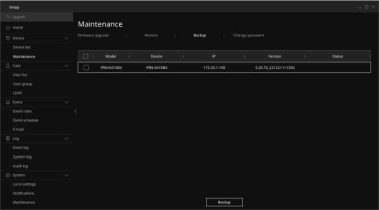
Managing Devices | 61
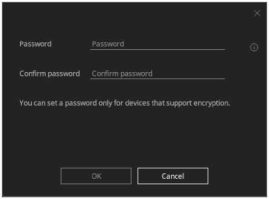
![]()
NOTE
The items displayed in the Status column are as follows:
Managing Devices
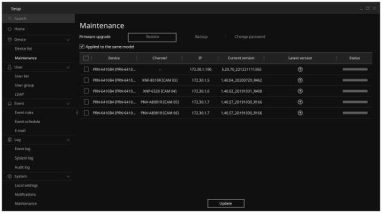
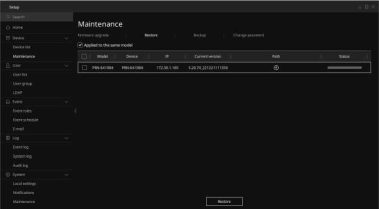
• If you check Applied to the same model, you can restore multiple devices of the same model
with the backup file applied simultaneously.
Managing Devices | 63
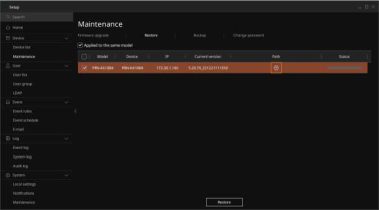
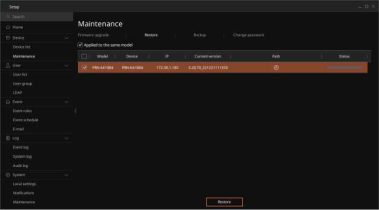
• When restoring a device, you can apply the .bin or .dat format for the backup file.
64 I Wisenet Viewer User Manual
Managing Devices
Password Password
Cancel
![]()
NOTE
The items displayed in the Status column are as follows:
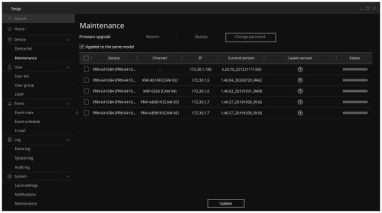
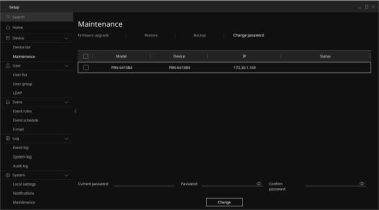
• If you select several devices and change their passwords all at once, it will apply to all selected
devices.
66 I Wisenet Viewer User Manual
Enter the same password in the Confirm password field again.
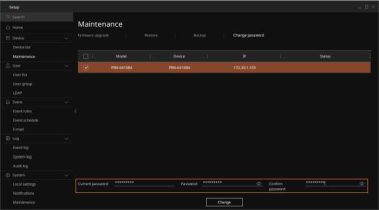
Managing Devices
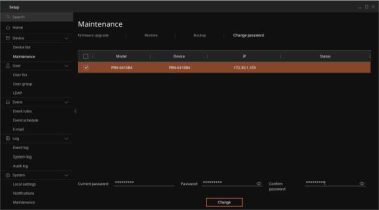
Managing Devices | 67
You can use a dynamic layout to freely customize the size of a video tile and move it. With it, you can configure a device, web page, video, or image registered on Wisenet Viewer with the desired layout. You can also operate an efficient monitoring system with a map layout in which the device is placed on a floor plan of a specific place.
When monitoring real-time video or playing recorded video, a user can use various control menus to change the settings.
With Wisenet Viewer, you can use dynamic layouts that allow smooth video tile size change and movement. You can use your mouse wheel on a grid to change the size and number of a tile quickly. You can also use the Autofit function to automatically adjust the tile size. This explains how to use dynamic layouts.
You can add one or several devices to a grid simultaneously. A video tile is automatically added to the grid that functions as a starting point. Video tiles will be added from left to right and from top to bottom.


16channelsassignment
1 2
3
3 channels assignment
64channelsassignment

4 channels assignment
Dragging a device over a grid will make video be automatically added to an empty tile. When added to an empty tile, it will be added from the right and bottom.
68 | Wisenet Viewer User Manual
![]()
NOTE
A grid is created, depending on video ratio that the user sets via a Layout tab. For more information on the
Layout tab Shortcut menu, refer to Using the Grid Shortcut Menu (page 84).
Using Layouts
You can freely move channels added to a grid and place it. You can drag a video to an empty tile to move it. If you drag it to a tile with a video added, the locations of the two tiles will change.


You can also zoom in on the tile size to move it. If you drag it to a tile with a video added, the existing tile will move to a different location, and the enlarged tile will take its place.

Using Layouts | 69
You can zoom in and out of a tile size of video added to a grid. If you move your mouse to video tile, the size change arrow will be displayed. You can freely change the tile size by dragging the arrow up and down, left and right, and diagonally.

You can maximize the tile to fit the Layout screen by double-clicking it.
You can scroll your mouse wheel to zoom in or out on the grid. The Autofit button is displayed on top-right of the layout during this time. Select the Autofit button, and the current layout’s entire video will be automatically adjusted to be viewed at a glance.

ZoomOut
RunAutofit
![]()
NOTE
To move to a different location on the grid, drag while right-clicking.
70 I Wisenet Viewer User Manual
You can arrange several devices, web pages, videos, or images categorized according to the purpose or the convenience of the monitoring person into one layout to monitor it easily and quickly.
Using Layouts
|
1 |
2 |
3 |
4 |
5 |
6 |
|
8 |
|
g |
10 |
11 |
12 |
|
14 |
13 |
16 |
|
|
18 |
19 |
20 |
.’1 |
22 |
23 |
24 |
|
25 |
26 |
27 |
28 |
29 |
30 |
|
32 |
|
33 |
34 |
35 |
36 |
|
38 |
39 |
40 |
|
41 |
42 |
43 |
44 |
43 |
46 |
4/ |
48 |
|
49 |
SO |
51 |
32 |
53 |
54 |
S3 |
56 |
|
37 |
38 |
59 |
60 |
61 |
62 |
63 |
64 |
|
|
|
|
|
|
1 |
2 |
|
3 |
4 |
|
|
|
|
|
|
1 |
2 |
|
3 |
4 |
Resource
Q Search
5) Root
h NVRGroupt
Pl NVRGroup2
C NVRweb
v □ PRN-6410B4
tO CAM 01
tO CAM 02
tO CAM 03
tO CAM 04
Layout
□ Layout
03 7th FL
□ Gate#!
ED Lobby
□¡I Sequence
![]()
New layout
Expand all
Collapse all
Using Layouts | 71
An arrow will be displayed under the cursor.
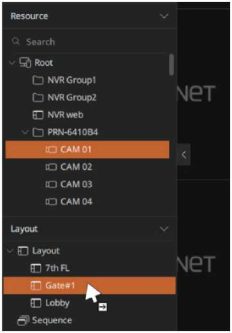
• You can also drag channels registered on the grid of the current layout to add them.
For more information on channel allocation, refer to Adding Channels (page 73).
NOTE
You can also create a layout by saving it on the Layout tab.
72 I Wisenet Viewer User Manual
If a layout is created, you can add web pages, videos, images, or Channel registered in the Resource tree to the layout.
■ Adding Channels to Layout
You can drag the desired channel from the Resource tree to add it to a created layout item or a grid. You can also drag one or several channel simultaneously to add them to a layout.
Assigning Layout Tree’s Layout
Select one or several channels from the Resource tree and drag them on the Layout item of the Layout tree. If an arrow is displayed on the cursor, drag it to the desired layout.
If you add the channel by dragging it to the layout, the change history will be automatically saved.
Using Layouts
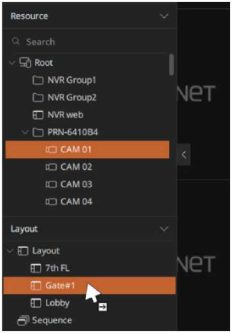
Using Layouts | 73
Assigning to Grids
Select one or several channels from the Resource tree and drag them to an empty tile in the grid.
To select several separated individual items, press Ctrl while selecting them.
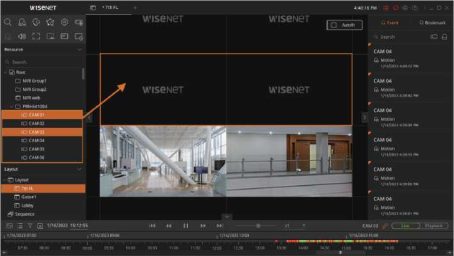
■
Adding Web Pages to Layouts
Select a web page registered in the Resource tree. Then, drag it to an empty tile or a saved
Layout item.
■
Adding Video Files to Layouts
Select a video file of Media file from the Resource tree. Then, drag it to an empty tile or a saved Layout item.
■
Adding Image Files to Layouts
To add an image file to the tile, you must select or drag a file from the folder it’s saved in.
74 | Wisenet Viewer User Manual
Arranging Map Layouts
You can set image files, such as maps or floor plans, as wallpapers and place other channels included in the layout in any location.
Using Layouts
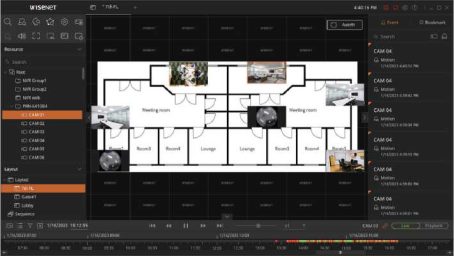
• Layout changes are not automatically saved. Save changes before exiting the program.
Using Layouts | 75
You can arrange channels with the desired layout to monitor a real-time video or play a recorded video. You can use various functions, such as setting video resolution by using the Screen control menu and Shortcut menu or controlling the PTZ mode.
If a video is displayed on a layout, you can control the screen by each tile. You can use the PTZ mode and zoom in and out on the video. You can also save or capture a video of the channel on your PC.
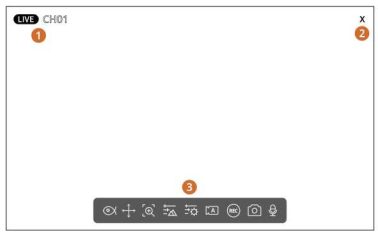
76 I Wisenet Viewer User Manual
|
No. |
Screen |
Detailed Description on Functions |
|
1 |
Channel information |
The channel name and live status are displayed. |
|
2 |
Remove video |
Remove the current video. |
|
3 |
Video control function |
•: You can monitor in various modes by correcting fisheye warping.
•: You can control the PTZ mode and set up a preset.
•: With digital zoom, you can zoom in on video and see new tiles.
•: You can adjust the video’s focus.
•: You can adjust the brightness and contrast of a video or set it to the
initial value. •: You can display and change the video profile settings of the current
channel. •: You can save a real-time video on your PC.
•: You can capture a video as a png file and save it.
•: You can output the audio to the channel selected as the camera’s
microphone. |
When a fisheye-enabled camera is connected, you can use dewarping correction for monitoring in various modes. By assigning the corrected screens to multiple tiles and saving them as layouts, you can monitor the entire site at the same time.
Using Layouts
You can view all the fisheye videos.
Selecting the Crop function will display the enlarged, warping-corrected screens in an unoccupied tile. You can select the crop areas and angles you desire for monitoring.
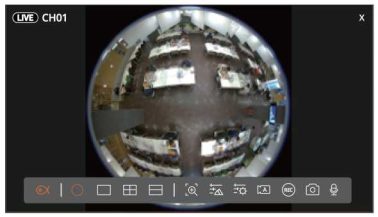
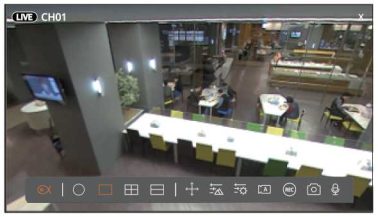
• Single view
You can view fisheye images on a single screen.
PTZ mode allows you to move between and zoom in on images by dragging on them or scrolling with the mouse.
Using Layouts | 77
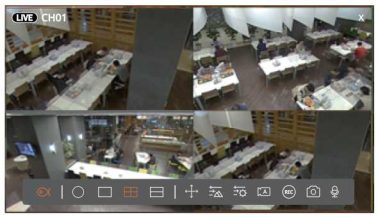
You can view the fisheye images on quadrant screens.
PTZ mode allows you to move between and zoom in on images by dragging on them or scrolling with the mouse.
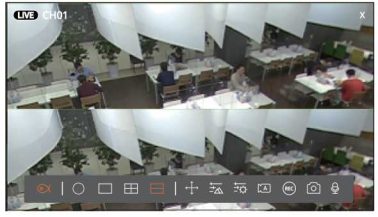
You can view fisheye images on a panoramic screen.
PTZ mode allows you to move between images you’re monitoring by dragging with the mouse.
![]()
NOTE
and mount type.
78 I Wisenet Viewer User Manual
![]()
NOTE
Using Layouts
<E3 choi

![]()
|
|
Preset |
Swing |
Group |
Tour |
Tracking |
If you select and move the cursor on the screen, the direction keys will be displayed. You can click the direction keys to control the video’s direction. You can also select and drag it to the desired direction to move quickly.
You can use your mouse wheel on the PTZ screen to zoom in and out on the video. You can use the / buttons on the right to zoom in and out on images.
After selecting , click Preset. You can select a preset from the PTZ list to apply.
• Deleting PTZ presets
Using Layouts I 79
• Controlling PTZ Swing
• Controlling PTZ Group
• Controlling PTZ Tour
• Controlling PTZ Tracking
Set the focus closer.
Set the focus farther away.
Set the focus automatically.
![]()
NOTE
The auto focus function may not be supported depending on the camera specs.
80 | Wisenet Viewer User Manual
■ Setting up Video Brightness/Contrast
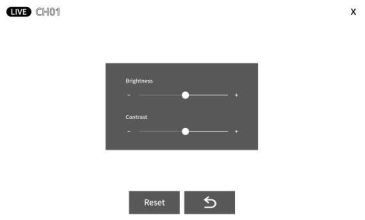
Using Layouts
Adjust the video brightness by selecting -/+.
Adjust the video contrast by selecting -/+.
Set the brightness and contrast of a video to their initial values.
Using Layouts | 81
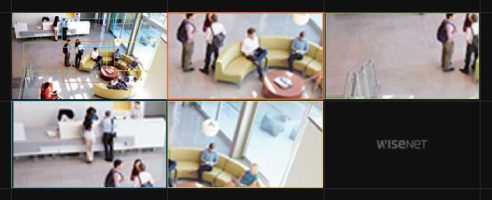
If you select , it will zoom in on the video in the empty tile.
Every time you select in a video, the enlarged videos will be constantly created in other tiles. If there are several cropped videos, they can be distinguished by their colors, and the last cropped video created is located at the top of the screen. You can also adjust the size of the crop area and check it on the zoomed-in screen.
If you select , the real-time video will be saved in the designated folder on your PC.
If you select one more time, Video file saved will be displayed at the top of the screen when the recording ends.
NOTE
The location of the folder in which the recorded video is saved can be checked at Setup > System > Local settings.
Video will be automatically saved in the My Documents folder path of a PC: <C:/User/user/Documents> For more information on changing the video save folder, refer to Setting up the Local Save File Location (page 175).
■ Saving Captured Screens
If you select , you can capture a video as a png file and save it.
When capturing is complete, Image file saved will be displayed at the top of the screen.
![]()
NOTE
You can check the location of the folder in which a captured image is saved at Setup > System > Local
settings.
82 I Wisenet Viewer User Manual
■ Using the Microphone
You can select to output audio with the channel’s microphone.
NOTE
k • To use a microphone, select the audio item and set it as On in the Setup > Camera > Channel Setup of the registered recorder.
Using Layouts
Using Layouts | 83
When monitoring or playing videos from the Layout tab, it explains the Shortcut menu that can be used in a grid or tile.
If you set the Shortcut menu on a grid, it will be applied to every tile.
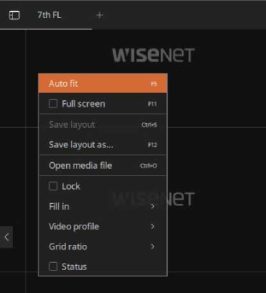
84 | Wisenet Viewer User Manual
■
Using Layouts
Using the Tile Shortcut Menu
You can use Shortcut menu in each tile.
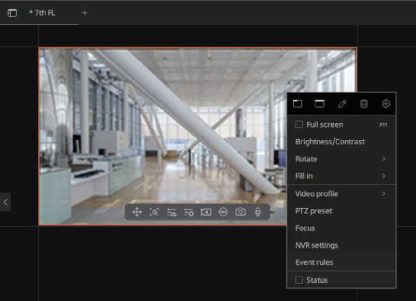
Using Layouts | 85
86 | Wisenet Viewer User Manual
You can select a channel from the Resource tree or choose a saved layout to monitor the real-time video of the channel registered at Wisenet Viewer and play the recorded video. You can also add image or video files saved in your PC to the layout and check them.
Using Layouts
You can drag the desired channel from the Resource tree to add to the tile and check the video.
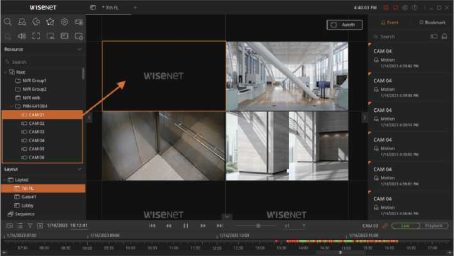
• For more information on channel allocation, refer to Adding Channels (page 73).
Using Layouts | 87
|
Autofit |
It automatically adjusts and displays the tile size to put the current layout’s entire video at a glance. If you use the mouse wheel on a grid to zoom in and out on a video, the Autofit button will be displayed on the top-right. If you use your mouse wheel to zoom in and out on the video with the Autofit function on, the Autofit function will automatically be canceled. To use the Autofit function, press the F5 key. |
|
Full screen |
You can see the current layout in full screen. You can also display a video in full screen by selecting from the Function button panel. Press F11 to exit full screen. |
|
Save layout |
You can save the current layout. Press Ctrl + S keys on the keyboard to save the layout. |
|
Save layout as… |
You can save the current layout with a different name. Press F12 to save the layout with a different name. |
|
Open media file |
You can bring files from the folder the image or video is saved in to a tile. To open a media file, press Ctrl + O and select the desired file. |
|
Lock |
You can lock the current layout settings to prevent them from being changed. |
|
Fill in |
You can select a tile’s video display mode. •Stretch: Displays the video received from a device according to tile ratio.
•Keep aspect ratio: Displays on tile according to the ratio of the video received from a device.
|
|
Video profile |
You can select a video profile. •Auto: Automatically changes and displays a profile based on the size of the video tile.
•Primary profile: Displays according to the primary profile settings of the video.
•Secondary profile: Displays according to the secondary profile settings of the video.
|
|
Grid ratio |
You can select a tile’s video ratio. |
|
Status |
You can display a tile’s video information. |
|
Full screen |
You can see the current layout in full screen. You can also display a video in full screen by selecting from the Function button panel. Press F11 to exit full screen. |
|
Brightness/Contrast |
You can adjust the brightness and contrast of a video or set them to their initial values. |
|
Rotate |
You can rotate a video. • If the channel assigned in the tile has fisheye dewarping enabled, the Rotate menu will not be displayed. |
|
Fill in |
You can select a tile’s video display mode. |
|
Video profile |
You can select a video profile. |
|
PTZ preset |
You can set up a PTZ preset. For more information on PTZ preset registration, refer to Controlling PTZ mode (page 79). • If the channel assigned in the tile has fisheye dewarping enabled, the PTZ preset menu will not be displayed. |
|
Focus |
You can set the video’s focus. For more information on the video focus settings, refer to Setting up the Focus (page 80). |
|
NVR settings |
You can set it in detail by channel, such as channel activation and profile settings. For more information on channel settings, refer to Changing Channel Information (page 47). |
|
Event rules |
You can check the currently applied event rules and add or delete them. For more information on event rule settings, refer to Adding Event Rules (page 110) or Managing Event Rules (page 116). |
|
Status |
You can display a tile’s video information. |
|
WISeNRT |
This is displayed when a video is not assigned to the tile. |
|
o |
This is displayed when a video is being loaded on the tile. |
|
Q |
This is displayed when the device is not receiving a real-time video. |
|
Q |
This is displayed when a video saved on a device or PC is not playing. |
|
|
This is displayed when the user does not have playback permissions. |
|
|
This is displayed when the number of concurrent users is exceeded. |
|
|
This is displayed when a connection to the device is lost. |
|
| Q Input password | |
This is displayed when assigning a media file with a password set. A video will not be displayed when an incorrect password is entered. |
If you double-click a layout saved in the Layout tree, the Layout tab will open. You can check the video of several Channel in a layout from a grid at a glance.
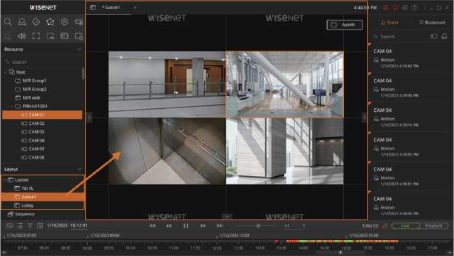
If you select among the function buttons, you can see the selected layout in full screen.
• To end full screen, press F11 or cancel Full Screen from the grid or tile Shortcut menu. For more information on using the shortcut keys, refer to Shortcut Keys (page 30).
88 | Wisenet Viewer User Manual
Watcher can set the desired video for its intended use and convenience as a layout and monitor it.
Watcher can also change and save layout settings and manage them by using the lock function so that settings cannot be changed.
Using Layouts
Using the Layout Lock Function
You can use the lock function so that the settings, such as moving the video tile location of the layout, deleting the tile, or allocating the video, cannot be changed.
■ Locking Layouts
![]()
NOTE
■ Unlocking Layouts
• You can also change the name by selecting a layout and pressing the F2 key.
For more information on using the shortcut keys, refer to Shortcut Keys (page 30).
Using Layouts | 89
If you have changed the tile composition of a layout or an individual tile’s size, save the changed layout before closing the Layout tab or Wisenet Viewer. If layout settings are changed, will be displayed next to a layout.
NOTE
90 | Wisenet Viewer User Manual
You can set up a sequence by grouping the points that need periodic monitoring in a layout. When operating the set sequence, the layout will automatically switch according to the regular time intervals, resulting in more efficient monitoring.
Using Layouts
You can select a registered layout and set a sequence.
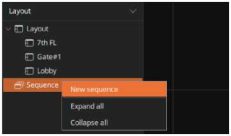
Using Layouts | 91
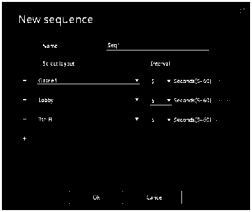
•
![]()
Edit sequence: Edit the layout or interval of the selected sequence.
NOTE
Shortcut to grid and tile functions, are not available.
Using Layouts | 93
You can change the layout list or interval of the set sequence.
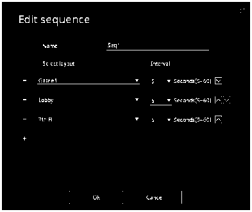
• You can change the name by selecting a sequence and pressing the F2 key.
For more information on using the shortcut keys, refer to Shortcut Keys (page 30).
94 | Wisenet Viewer User Manual
Setting up Users
You can add user groups to Wisenet Viewer or set the authority for a user group. You can also edit or delete the information of a registered user or group and connect to the LDAP (Lightweight Directory Access Protocol) server to add users.
Setting up Users
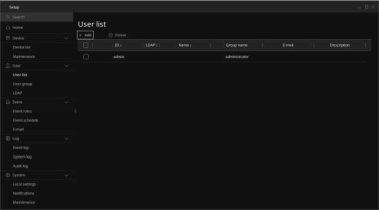
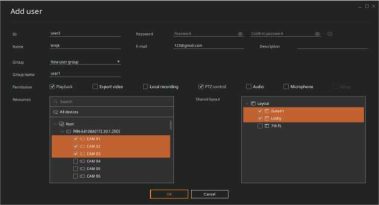
You can enter user information to add an account.
• Select Add user at the bottom of the main Setup page to open the Add user window directly.
Setting up Users | 95
– If you select New user group, you can add a new group to set up a group name and register users. When a new group is added, you can select their permissions, resources, or Shared layouts.
![]()
NOTE
When a user is added to a group that is already registered, the added user is set with the same permission,
resources, and shared layouts of that group.
5. Select the OK button.
![]()
NOTE
The admin account is a basic administrator right and its ID, group, and permission cannot be changed.
96 | Wisenet Viewer User Manual
You can add user groups.
Setting up Users
• Select Add user group at the bottom of the main Setup page to open the Add user group
window directly.
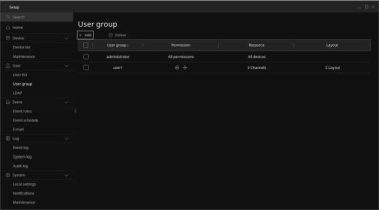
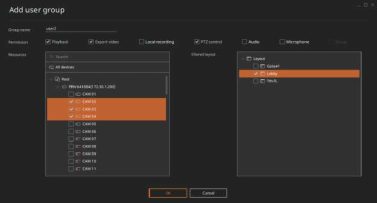
Setting up Users | 97
• Resources: Displays the resource list that users of group can access.
– If you select All devices, you can access all the devices registered on Wisenet Viewer.
• Shared layout: Displays the Layout list that users of group can access.
5. Select the OK button.
NOTE
To use an authorized microphone function, select the audio item as On in Setup > Camera > Channel Setup on the registered recorder. If the microphone function is activated, will be displayed on the video tile.
98 | Wisenet Viewer User Manual
You can change or delete registered user/group information.
You can check registered users or user groups.
Setting up Users
■ Checking User Lists
3. The registered user list is displayed.
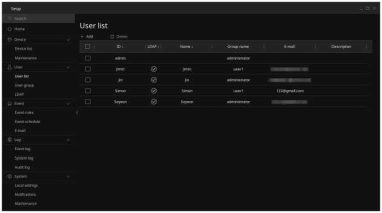
Setting up Users | 99
■ Checking User Group List
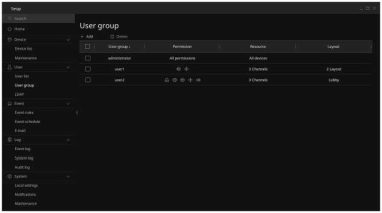
– When you select all the devices registered in the Root, All devices will be displayed. When specific channels are selected, the number of selected channels will be displayed.
– When you select a layout, the name of the selected layout will be displayed. When multiple layouts are selected, the number of selected layouts will be displayed.
100 I Wisenet Viewer User Manual
Changing User/Group Information
You can change the information of a registered user or user group.
■ Changing User Information
Setting up Users
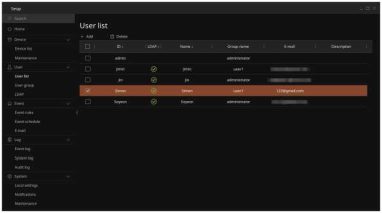
4. When the Edit user window is displayed, change the information.
Edit user
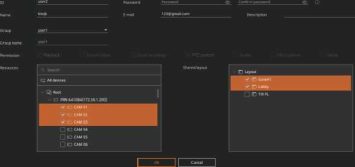
Setting up Users | 101
If you select New user group, you can add a new group to set up a group name and register users. When a new group is added, you can select their permissions, resources, or layouts.
![]()
NOTE
The admin account is an administrator account that can use all the functions. You cannot set its Group,
Resource, and Shared layout items, but only the password, name, and description items.
■ Changing User Group Information
Q Search
O Home
0 Device
Device list
Maintenance
£ User
User list
User group
User group
+ Add 0 Delete
User group i | Permission
administrator All permissions
Resource
All devices
Layout
![]()
3 Channels 2 Layout
3 Channels Lobby
Q Event
Event rules
Event schedule
@ Log
Event log
System log
Audit log
0 System
Local settings
Notifications
Maintenance
102 | Wisenet Viewer User Manual
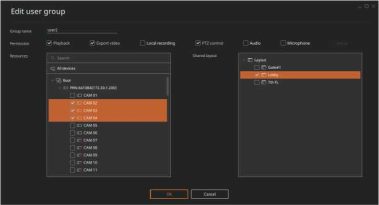
Setting up Users
• For more information on adding a user group, refer to Adding User Groups (page 97).
NOTE
The group administrator can use all the functions, so its group permissions cannot be changed.
Setting up Users | 103
You can delete registered a user or user group.
![]()
NOTE
The admin accounts and administrator groups cannot be deleted.
■ Deleting Users
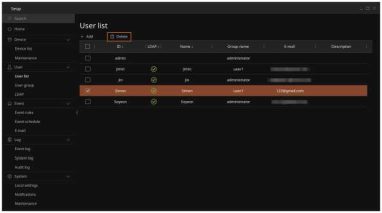
• The results will be displayed in the top-right part of the screen.
104 | Wisenet Viewer User Manual
■ Deleting Users Groups
Setting up Users
Q Search
O Home
0 Device
Device list
Maintenance
â User
User list
User group
User group
![]()
User group i
administrator
Resource
All devices
Layout
Permission
All permissions
![]()
3 Channels 2 Layout
3 Channels Lobby
Event rules
Event schedule
® Log
Event log
System log
Audit log
0 System
Local settings
Notifications
Maintenance
![]()
NOTE
If a user group is deleted, the user information included in the group will also be deleted.
Setting up Users | 105
LDAP (Lightweight Directory Access Protocol) is a directory service that can save users, files, or device information into a tree structure to search on the network and it is used when managing certain data in the datacenter simultaneously.
In Wisenet Viewer, you can assign user roles and access permission by bringing user information that already exists in the LDAP server.
![]()
NOTE
The LDAP servers that can be connected to Wisenet Viewer are as follows:
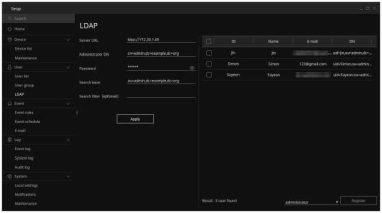
106 I Wisenet Viewer User Manual
![]()
Setting up Users
NOTE
All registered LDAP user ID information is deleted if the LDAP server information is changed.
Setting up Users | 107
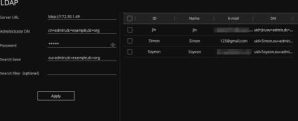
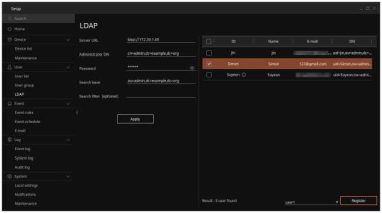
You can add users registered on the LDAP server as Wisenet Viewer users. Users can log in to Wisenet Viewer with the LDAP ID and password.
User information is displayed on the right table if the server is connected.
Q Search
O Home
0 Device
Device list
Maintenance
£ User
User list
User group
Q Event
Event rules
Event schedule
® Log
Event log
System log
Audit log
0 System
Local settings
Notifications
Maintenance
Result : 3 user found
administrator ; | Register”
108 | Wisenet Viewer User Manual
Setting up Users
![]()
NOTE
is displayed next to the user name if the same ID is already registered in Wisenet Viewer or you want to
register the same user again.
• The user information overwrite confirmation window appears if you want to register the same user
again.
Setting up Users | 109
If a change in a video or device is detected and a preset event happens, it will alert the watcher about the event status with various event actions, such as alarm sounds. You can check events in real time and search recorded videos by condition. If you set rules in advance, you can effectively monitor videos for events like this.
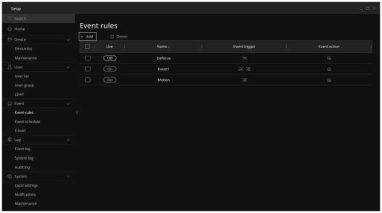
You can add event rules to use on Wisenet Viewer. If an event trigger registered on a device is detected, you can check the event via event actions.
• Select Add event rule at the bottom of the main Setup page to open the Add event rule window directly.
110 | Wisenet Viewer User Manual
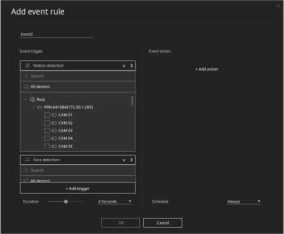
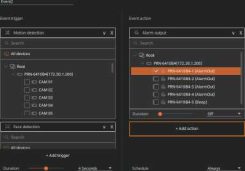
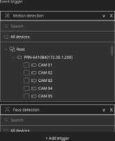
4. If the Add event rule window is displayed, select Add trigger.
Monitoring events
Monitoring events | 111
Add event rule
OK ~| | Cancel |
• If selected event trigger is detected, select an action to carry out. You can select up to 2 event actions.
6. Select the OK button.
![]()
NOTE
To use event rules in Wisenet Viewer, event rules usage of recorders must be set.
112 | Wisenet Viewer User Manual
You can check event triggers that can be registered for each device.
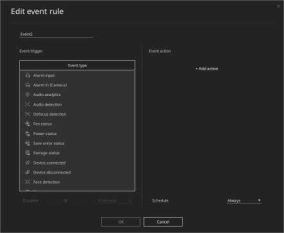
Monitoring events
Monitoring events | 113
NOTE
The dynamic event item may be changed depending on the specs ofthe camera connected to the recorder.
114 | Wisenet Viewer User Manual
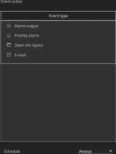
You can check event actions that can be registered for each device.
Edit event rule
Monitoring events
OK ~| | Cancel |
Monitoring events | 115
You can delete or set whether to use registered event rules.
|
Item |
Description |
|
Alarm input |
An event will occur if an alarm is inputted into the connected recorder. |
|
Alarm Input (Camera) |
An event will occur if an alarm is inputted into the connected camera. |
|
Audio analytics |
When audio analytics are detected, an event occurs. |
|
Audio detection |
When audio above the level set on the camera connected to the recorder is detected, an event occurs. |
|
Defocus detection |
When the lens of the camera connected to the recorder gets blurry, an event occurs. |
|
Fan status |
If the fan of a recorder is not working properly, an event occurs. |
|
Power status |
If the power of a recorder is restored, an event occurs. |
|
Save error status |
If the recording on a recorder is not working properly, an event occurs. |
|
Storage status |
If there is a problem with the hard disk of the recorder, an event occurs. |
|
Device connected |
An event is triggered when a recorder is connected. |
|
Device disconnected |
An event is triggered when a recorder is disconnected. |
|
Face detection |
If a person’s face is detected by a video of the camera connected to the recorder, an event occurs. |
|
Firmware |
An event is triggered when software that can update the system is detected. |
|
Item |
Description |
|
Fog detection |
If fog or cloudy weather is detected by a video of the camera connected to the recorder, an event occurs. |
|
Motion detection |
If a motion is detected within an area of interest set on the camera connected to the recorder, an event occurs. |
|
Overload |
If the network connection is unstable or disconnected, an event occurs. |
|
Tampering detection |
If the video of the camera connected to the recorder is covered or the camera location is changed, an event occurs. |
|
Auto tracking |
If a moving object is traced, an event occurs. |
|
Video analytics |
If video analytics is detected, an event occurs. |
|
Video loss |
If a camera’s video is not received from a device, an event occurs. |
|
Queue |
If a queue is detected by a video of the camera connected to the recorder, an event occurs. |
|
Queue.Level.Medium |
If a queue with medium occupancy is detected by a camera connected to the recorder, an event will occur. |
|
Queue.Level.High |
If a queue with a high level of occupancy is detected by a camera connected to the recorder, an event will occur. |
|
Object Detection.Person |
If a person is detected by the camera connected to the recorder, an event occurs. |
|
Object Detection.Vehicle |
If a vehicle is detected by the camera connected to the recorder, an event occurs. |
|
Object Detection.Face |
If a face is detected by the camera connected to the recorder, an event occurs. |
|
Object Detection. LicensePlate |
If a license plate is detected by the camera connected to the recorder, an event occurs. |
|
Digital Auto Tracking |
If a specific moving object is automatically detected on video of the camera connected to the recorder, an event occurs. |
|
Shock Detection |
If a shock, vibration, or change of physical location is detected by the camera connected to the recorder, an event occurs. |
|
Item |
Description |
|
Alarm output |
If an event trigger is detected, an alarm sounds for a set duration from the device. If you select the alarm out, you can check the event alarm history from Wisenet Viewer. If an event trigger is detected from the device that supports Beep (alarm sound), an alarm will sound. When setting the alarm out, you can set the duration item. There will be no alarm when you set it to Off , and you can configure it as either 5-30 Seconds or Continuous. |
|
Priority alarm |
If an event trigger is detected, the priority alarm event occurs in the selected channel. If the event that a Priority alarm is designated occurs, a priority alarm event will be displayed at the top of the Event tab. For more information on the alert alarm event operation, refer to the Priority Alarm Events (page 127). |
|
Open the layout |
If any event trigger is detected, the selected layout will appear on the Live screen. |
|
|
If an event trigger is detected, the event history will be sent out to the selected user email. |
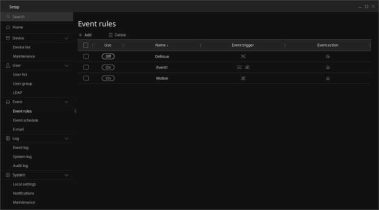
116 | Wisenet Viewer User Manual
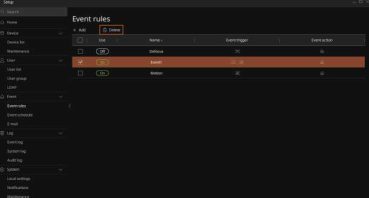
However, when you restart the Wisenet Viewer, the delete confirmation window will be displayed again.
118 | Wisenet Viewer User Manual
Monitoring events
Monitoring events | 119
You can set the operation time of an event action when setting the event rules.
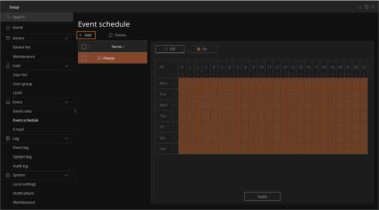
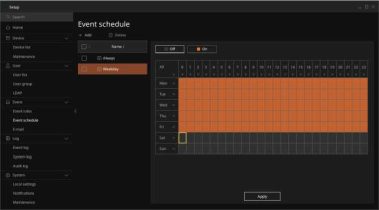
120 | Wisenet Viewer User Manual
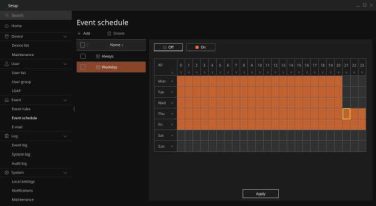
• You cannot change or delete the Always item as it is a basic setting of Wisenet Viewer.
![]()
NOTE
The currently used event schedule cannot be deleted. If you want to delete the event schedule, remove
the schedule from the event rule that is in use first.
122 I Wisenet Viewer User Manual
When an event occurs, the alarm history can be sent to users registered on Wisenet Viewer via e-mail.
You can set an SMTP to send e-mails.
■ Setting up a Gmail Account
• The app password for the device is the same as the password used to log in to the SMTP on Wisenet Viewer.
Make sure to keep a record of your password.
Monitoring events
You can send a test e-mail to the set mail account.
Monitoring events | 123
Q Search
O Home
0 Device
Device list
Maintenance
£ User
User list
User group
Q Event
Event rules
Event schedule
® Log
Event log
System log
Audit log
0 System
Local settings
Notifications
Maintenance
Server address
Authentication
![]()
![]()
Apply
After sending an e-mail, the test result will be displayed on the right side of the Send button.
4. Click the Apply button.
124 | Wisenet Viewer User Manual
You can check real-time events for devices registered in Wisenet Viewer from the Event tab.
Monitoring events
If a real-time event occurs on a connected device, you can check the event information from the
Event tab and play it.
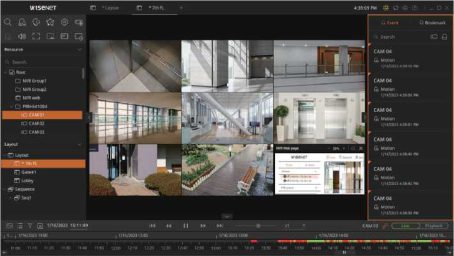
You can check the information of real-time events based on the preset event rules. The channel name, event type, and emergence time are displayed on the Event tab.
If you double-click an event, you can immediately play the event video from the channel being
monitored.
Monitoring events | 125
Ö Event G Bookmark
Q Search CO Q
CH03
£û Motion! 1/16/2023 4:39:10 PM
CH03
£û Motion!
1/16/2023 4:39:06 PM
CH03
^ Motion detection 1/16/2023 4:39:01 PM
CH03
£û Motion!
1/16/2023 4:36:46 PM
126 | Wisenet Viewer User Manual
If an event occurs for which you have set a Priority alarm, the event will be indicated at the top of the event tab.
In the Event tab, the channel name, priority alarm event, and the time of emergence are always displayed, regardless of the set event filter.
If you double-click an event, you can immediately play the event video from the channel being monitored. The priority alarm event checked by playing video is automatically arranged in chronological order with regular events.
Q Event
Q Search
□ Bookmark
to Q
Monitoring events
CH03
¿6 Motionl
1/16/2023 4:39:10 PM
CH03
¿6 Motionl
1/16/2023 4:39:06 PM
CH03
^ Motion detection
1/16/2023 4:39:01 PM
CH03
¿6 Motionl
1/16/2023 4:38:4€ PM
![]()
NOTE
– Event search: You can search events within the selected channel.
– Clear: You can delete all event lists displayed on the event tab.
Monitoring events | 127
You can search real-time events displayed on the Event tab by the device.
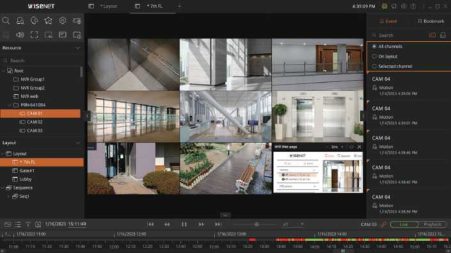
• The event of the channel that is included in the current layout will play in the tile.
The event of the channel that is not included in the current layout will play on an empty tile.
128 | Wisenet Viewer User Manual
You can search real-time events displayed on the Event tab by event type.
• You can search real-time events by entering the event types in the search window of the event
tab.
Monitoring events
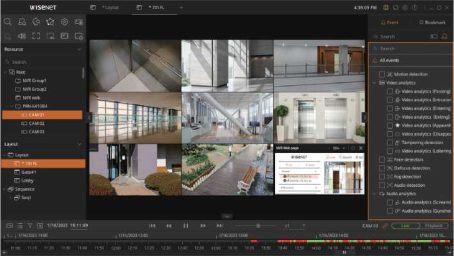
Monitoring events | 129
Depending on the device registered on Wisenet Viewer, the Dynamic Event display list can be different.
3. Double-click searched event, and the video will play.
• The event of the channel that is included in the current layout will play in the tile.
The event of the channel that is not included in the current layout will play on an empty tile.
130 | Wisenet Viewer User Manual
Searching Event Videos
You can search videos through various filters, such as devices, events, objects, etc. You can play the queried videos with dynamic layouts and save them locally to your PC.
Searching Event Videos
Searching Event Recorded Videos
You can select and search saved event recorded videos by selecting a device, date, and event type.
• If you select Event search from the shortcut menu of the timeline, the event search bar will be displayed.
Select the desired camera from the device list.
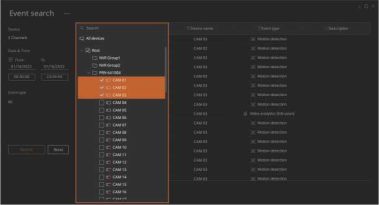
Searching Event Videos | 131
You can directly enter the time item after selecting a date.
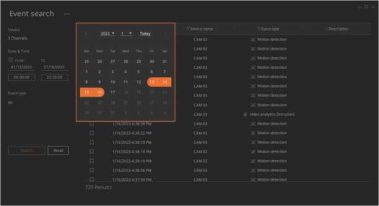
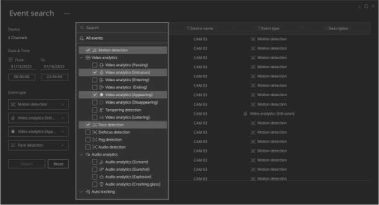
132 I Wisenet Viewer User Manual
6. If you double-click a search result, the video will play on the right pane.
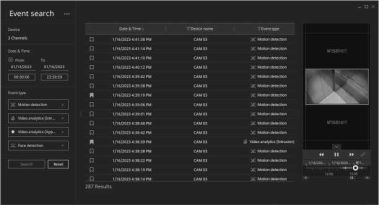
Searching Event Videos
If you select another video while a video is playing, the new video will be added in accordance with the dynamic layout.
You can view all bookmarks you saved in the Bookmark tab.
– Select the bookmark icon and select OK if the Confirm bookmark deletion window appears.
• When the column item of a search result is selected, it will be automatically arranged in ascending/descending order.
NOTE
For more information on recorded video playback, refer to Using the Timeline (page 143).
Searching Event Videos | 133
You can search videos recorded with AI-enabled cameras connected to the storage by persons, faces, vehicles, etc. Also, you can filter the search results by the details based on the selected object.
![]()
NOTE
AI Search is only available for AI-enabled recorders connected to Wisenet Viewer.
• Click ••• at the top of the Event search window and select AI search to open the AI search
page.
Select the desired camera from the device list.
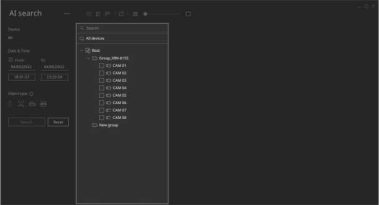
134 I Wisenet Viewer User Manual
You can directly enter the time item after selecting a date.
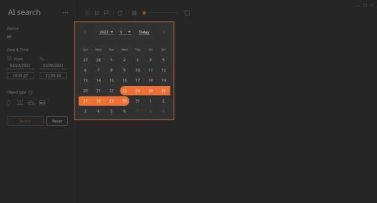
Searching Event Videos
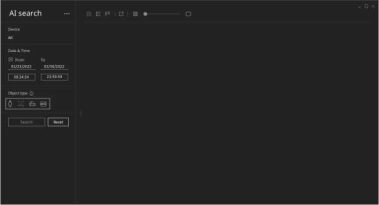
• Searchable object types may differ by device model.
Searching Event Videos | 135
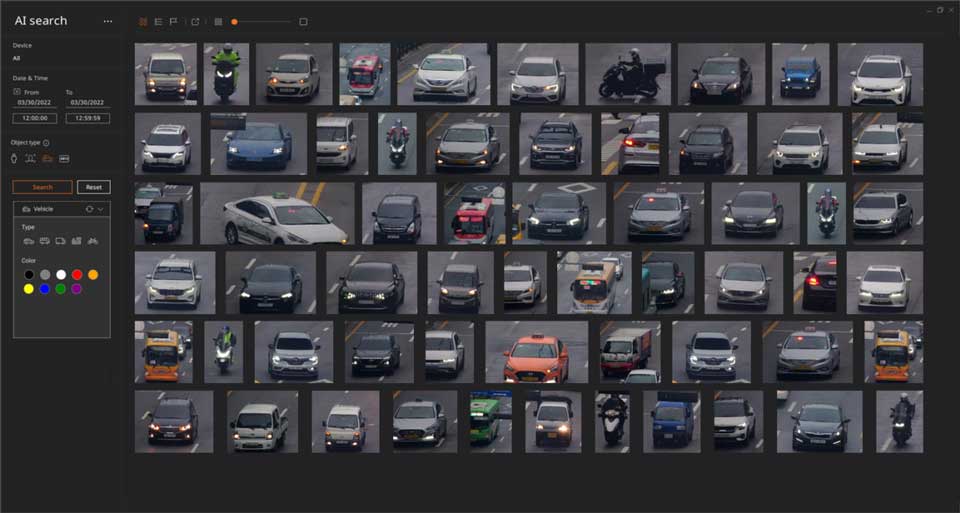
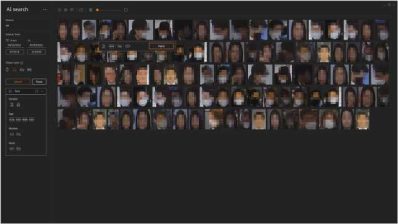
The search results are presented in thumbnails.
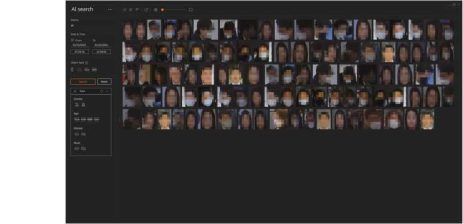
If you select any filter, the search results will be limited to that filter.
^ ^JTL iLLWiiWWH» b« ‘i* ■ / vOlbll’F .* Si I ;. liMr*ii***3*r^^^ lb ^itW • b • i it4 * ■ ^ – > ■ *1
• The filter items that can be applied according to the object are as follows.
– Person: Gender, Clothing(Top/Bottom) colors, Bags
– Face: Gender, Age, Glasses, Masks
– Vehicle: Vehicle type and color
– LPR: Enter the vehicle license plate number.
• p : You can flag the search results. Flags are only available when the search results are 136 | Wisenet Viewer User Manual
presented as thumbnails.
• B : You can export the search results as .jpg files.
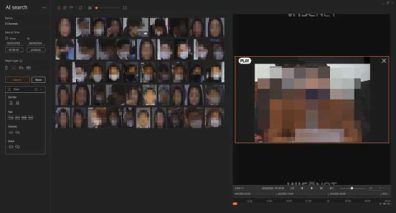
Searching Event Videos
NOTE
Searching Event Videos | 137
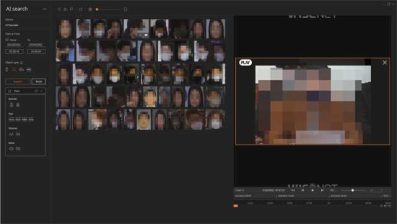
Filtering with the specific BestShot properties
• You can filter objects by selecting the properties that BestShot has.
NOTE
138 I Wisenet Viewer User Manual
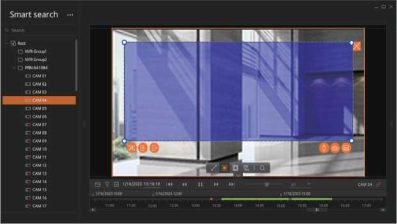
You can search for events by Include area, Exclude area, and Virtual line from among recorded videos
of a specific time period.
• Click ••• at the top of the Event search window and select Smart search to open the Smart
Searching Event Videos
search page.
from.
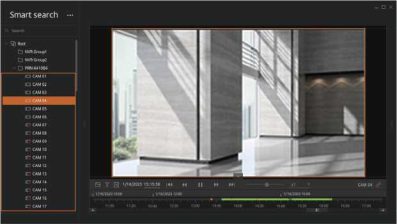
desired area with the mouse.
Searching Event Videos | 139
NOTE
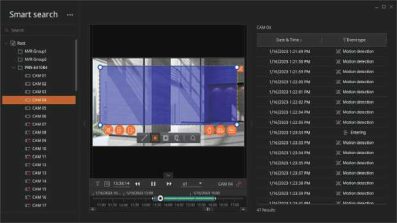
The event search results are displayed on the list on the right, and the event video is played when selecting a search result.
140 | Wisenet Viewer User Manual
dynamic layout standard.
Searching Event Videos
