Wisenet Viewer User Manual, About the User Manual ,This document contains the instructions for the operator of the Wisenet Viewer program. Please read
this User Manual before using the product to ensure correct usage. This manual explains how to use the product based on the default values and the default screens.
The information in this manual may vary, depending on the product’s software update and our policies, and is subject to change without notice to the user.
Wisenet Viewer Introduction
Wisenet Viewer is a viewer program that can monitor and control the video of a device connected to a network through a PC in real time. You can search and play real-time events and recorded videos and save the videos as files on your PC.
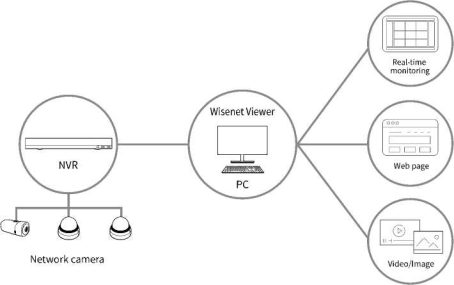
You can group devices connected to your network and place each tile in the desired space to save it as a layout. Moreover, you can register a web page and monitor it along with your devices.
If you enable the dynamic layout function to control and place tiles with a mouse, you can monitor the real-time video received on devices with any desired location or size.
You can search and play videos by selecting saved regular/event videos by a specific date, event type, or object type.
You can save real-time videos or recorded videos as files on your PC.
10 | Wisenet Viewer User Manual
You can search log data, such as event or program usage history, and save it as a file.
You can check the events detected in a device by applying the preset event rules.
If you set permissions by user group, the users that belong to the group can use only the menus they have permissions for.
Wisenet Viewer Introduction
It describes the terms needed for using Wisenet Viewer.
Wisenet Viewer Introduction | 11
To install Wisenet Viewer, you must download the installation program from the Hanwha Vision homepage.
Please run the program after checking the hardware specs and OS version of the PC you will install Wisenet Viewer on.
Before installing Wisenet Viewer, check system requirements.
If the minimum requirements are not met, the program may not function Properly.
NOTE
• The supported OS will be displayed when installing on Windows OS.
The supported OS will not be displayed on macOS because it does not have an installer.
• You can install the program on an unsupported OS version of Windows and macOS, but the program may not function properly.
• Be aware of the following when using an Apple M1 CPU:
– Rosetta 2 is required to run the program.
– If you run Wisenet Viewer after rebooting your PC or installing Rosetta 2, it may run slowly.
![]()
Download the Wisenet Viewer installer and install Wisenet Viewer on your PC.
https://www.hanwhavision.com/en/products/surveillance-software/viewer/
12 I Wisenet Viewer User Manual
Starting Wisenet Viewer
When the Wisenet Viewer installation finishes, you must run the program to set up the login information.
Look through standard screen composition before enabling the program.
Running Wisenet Viewer
When the Wisenet Viewer installation finishes, you can run the program.
Launching via the Shortcut Icon
Double-click Wisenet Viewer program on your home screen.
Starting Wisenet Viewer
Select □ > Wisenet Viewer.
![]()
NOTE
When running Wisenet Viewer on any Mac OS for the first time, the License Agreement
window will appear. Select I accept the license. and click OK.
• Users that do not agree to the license agreement are not allowed to access Wisenet Viewer.
Starting Wisenet Viewer | 13
Setting up a Wisenet Viewer Administrator Password
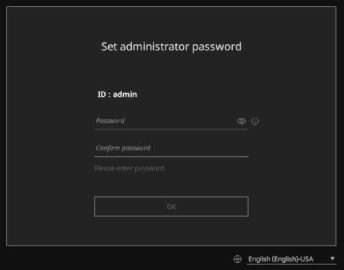
After launching Wisenet Viewer, you must set an admin password.
|
Item |
Description |
|
Layout |
This is a function that can place several devices on each tile and monitor them all at once. |
|
Bookmark |
This is a function that marks specific parts of recorded videos saved on your device. |
|
Tile |
This is the area where a single video is displayed. It can display real-time videos, recorded videos, web pages, or images from a device. |
|
Event |
This means a function that sets rules and alerts when specific changes occur on the videos and the device. |
|
Device |
This means network video surveillance devices, such as NVR, network camera, etc. |
|
Item |
Minimum requirements |
Recommended requirements |
|
CPU |
Intel i3 or faster, Apple M1 |
Intel i7-11700 2.5GHz or faster |
|
RAM |
4 GB higher |
16 GB higher |
|
HDD |
200 GB higher |
200 GB higher |
|
VGA |
512 MB higher (OpenGL 2.1 support is required) |
NVIDIA T600 (OpenGL 2.1 support is required) |
|
LAN |
1 GB NIC recommended |
1 GB NIC recommended |
|
Monitor |
1366×768 |
FHD, 4K supported(High DPI Display), Multi monitors support |
|
OS |
Windows 8.1/10/11 64 bit macOS 11.0 / 12.0 / 13.0 Ubuntu 22.04 LTS/ 20.04 LTS |
|
![]()
NOTE
14 | Wisenet Viewer User Manual
Read More : Wyze App Setup Guide
When the Wisenet Viewer login screen appears, log in by entering ID and password.
Starting Wisenet Viewer
U ISeNeT Viewer
1 03.ÛÛK
admin
0 Save ID
M Auto login
Log in
![]()
NOTE
Starting Wisenet Viewer | 15
After logging in to Wisenet Viewer, you will see the standard screen. The Wisenet Viewer screen consists
of the following:
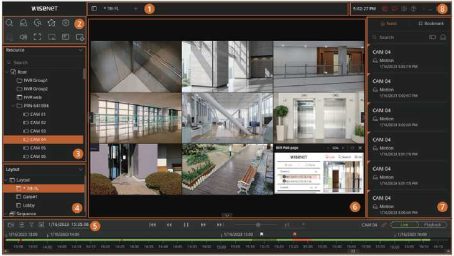
16 | Wisenet Viewer User Manual
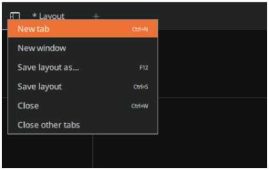
If you right-click the mouse button on the Layout tab to use viewed its detailed menu.
After clicking and dragging the Open layout tab, you can change the tab order.
Starting Wisenet Viewer
|
Screen No. Configuration |
Detailed Description on Functions |
|
1 Layout Tab |
You can check the currently open Layout tab. |
|
Function Button 2 Panel |
You can adjust video, audio, and search events of a recorded video. Moreover, you can use various functions provided by Wisenet Viewer, such as registering the device or setting up the user environment. • appears if you hover the mouse over the function button panel. If you click , you can edit the items that display on the panel. |
|
3 Resource Tree |
You can check the device, web viewer, and media file registered on Wisenet Viewer. You can also search for a device or set it as a group. |
|
4 Layout Tree |
You can create a layout to register, change the name, or enable the lock function. You can also save the registered layout as a sequence. |
|
5 Timeline Panel |
You can see the timeline of a saved video by selecting Play mode. You can also select and save the desired part of a video during playback. |
|
6 Layout Panel |
You can monitor video shot by a camera connected to a recorder in real time and control the video by tile. |
|
7 Event Panel |
•Event Tab: You can check and search an event happening on a device in real time.
•Bookmark Tab: You can check and open the bookmarks on the list.
|
|
Information/alarm 8 display |
You can use the system alarm provided by Wisenet Viewer or the control function of Wisenet Viewer. |
Starting Wisenet Viewer | 17
You can enable the following functions by clicking the function buttons.

18 | Wisenet Viewer User Manual
![]()
NOTE
appears on the right of the panel if you hover the mouse over the function button panel.
If you click , you can select or unselect the items that display on the panel.
Starting Wisenet Viewer
Starting Wisenet Viewer | 19
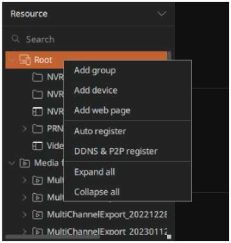
In the Resource tree, you can register devices and web pages, and browse saved video files. You can also search the registered devices or create groups to manage.
For more information on creating and managing groups, refer to Managing Groups (page 40).
■ Device Icons
NOTE
![]()
For more information on checking the media file folder, refer to Changing the Media File
Folder Path (page 52).
20 I Wisenet Viewer User Manual
On the Layout tree, you can configure and register a layout, and change or delete a registered layout.
For more information on how to add and manage a layout, refer to Using Layouts (page 68).
You can also save the registered layout as a sequence. For more information on sequence settings, refer to Setting up Sequences (page 91).
Starting Wisenet Viewer
Layout
— Layout
New layout
• (5 Sequence
> gPSeql
Starting Wisenet Viewer | 21
On the Timeline panel, you can search and play saved videos. You can also save videos as files.
S :: Y 0 1/16/2023 16:20:51 |<4 « || ►► H| * x1 * CAM 04 ¡f ( Uve ) Playback )
I 1/16/202313:00 । 1/16/2023 14:00 । 1/16/2023 15:00 R R । 1/16/202316:00
—“ ^^—^^——^—^— ^c« —
13:35 13:40 13:45 13:50 13:55 14:00 14:05 14:10 14:15 14:20 14:25 14:30 14:35 14:40 14:45 14:50 14:55 15:00 15:05 15:10 15:15 15:20 15:25 1530 15:35 15:40 15:45 15:50 15:55 16:00 16:05 16:10 16:15 16:20
|
New tab |
Open a new Layout tab. Press Ctrl + N on the keyboard to open a new Layout tab. |
|
New window |
Open a Layout tab in a new window. |
|
Save layout as… |
Save the current layout with a different name. Press F12 to save the layout with a different name. |
|
Save layout |
Save changes to the current layout. Press Ctrl+S to save changes to the current layout. |
|
Close |
Close the current Layout tab. Press Ctrl+W to close the current Layout tab. |
|
Close other tabs |
Close every tab except the currently selected Layout tab. |
|
Search |
You can select a search menu. |
|
Event search |
You can search events in videos by date or event type. |
|
AI search |
You can search AI event videos by date or object type. |
|
Smart search |
You can search event videos by Include area, Exclude area, and Virtual line. |
|
Masking video |
You can set privacy masking areas on a recorded video to protect privacy or to hide areas that you don’t want to display. To use privacy masking, activate a video masking license. In case of activation, the Video masking button appears. |
|
Settings |
You can set up program usage environment, such as device registration, user registration, event rules, etc. You can search for a specific menu option or function to open directly through the search box on the Settings page. |
|
Register |
•Auto register: Search and register devices connected to the network automatically.
•DDNS/P2P register: Register by entering the product ID and login information of devices connected to the network.
|
|
Priority alarm |
If an priority alarm event occurs while the event tab is closed, the icon will be activated. If you click the icon, you can check real-time events on the Event Tab. |
|
Volume |
You can adjust the volume of a video. |
|
Full screen |
It displays videos on the layout in full screen mode. Press F11 to exit full screen mode. |
|
Remove all video |
Remove all videos from the selected layout. |
|
Channel name |
Displays channel names on every video tile. |
|
Status |
On the video tile, display video information, such as the Codec, resolution, and fps. |
|
Channel |
•: This is displayed when a camera of a recorder is connected.
•: This is displayed when a camera of a recorder is disconnected.
|
|
Web page |
When a web page is registered, it is displayed at the bottom of the Root item. |
|
Media file |
If image or video files are stored in the storage folder, it is displayed at the bottom of the Media Files item. •: Displays video files saved in the save folder.
•: Displays Image files saved in the save folder.
|
timeline.
You can search videos saved in devices by date or event type and play them. For more information on video playback, refer to Controlling Playback (page 146).
After right-clicking the top of the timeline while playing a video, you can use the Shortcut menu. For more information on the timeline shortcut menu, refer to Timeline (page 143).

22 I Wisenet Viewer User Manual
You can monitor the video coming from device and control the video via tiles. If a tile is selected, it will be marked with an orange line.
You can monitor the items of the resource tree or layout tree after adding them to the layout tree by dragging or double-clicking them. You can also add video or image files saved on your PC by dragging them with a mouse.
For more information on video control and shortcut menu, refer to Checking Layout Videos (page 76).
Starting Wisenet Viewer
Layout
Brightness/Contrast
Rotate
Video profile
Focus
NVR settings
Event rules
wiseNeT
Starting Wisenet Viewer | 23
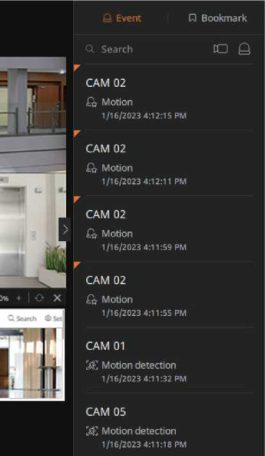
On the Event panel, you can check real-time events and the bookmark list.
When a new event occurs, it will be added to the Event list in real time. You can search event by channel or event type. For more information on using the Event tab, refer to Monitoring RealTime Events (page 125).
24 | Wisenet Viewer User Manual
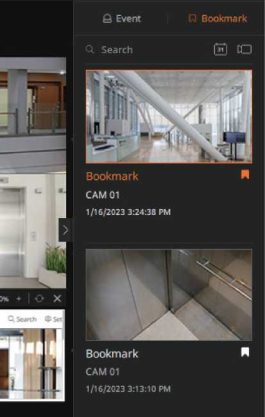
You can check the bookmark list. You can search bookmarks by date or channel. For more
information on using the Bookmark tab, refer to Using Bookmarks (page 165).
Starting Wisenet Viewer
Starting Wisenet Viewer | 25
You can use the information/alarm display function provided by the program to control the window.
![]()
26 I Wisenet Viewer User Manual
If a device or system error occurs while using Wisenet Viewer, the notification icon will be displayed in red.
When the notification icon is displayed, please check the error details and take the necessary action.
6:09:26 PM
® I
Starting Wisenet Viewer
[PRN-6410B4] Allowed bitrate exceeded
The amount of data storable by each channel exceeded, and only I-frame will be stored. Check the save settings.
1/16/2023 4:39:15 PM
[PRN-6410B4] RAID error
RAID array not available due to a disc error or RAID configuration error. Check the RAID status.
1/16/2023 4:39:4 5 PM
[PRN-6410B4] Retransmission overload
The amount of data has exceeded the transfer bandwidth of the device during remote transfer, some of the channels will be played in I-frame. Reduce the number of users or channels that are monitored.
1/16/2023 4:40:08 PM
□ Bookmark
11:01:47 AM
11:01:46 AM
11:01:43 am
ta e
• Power error
• Fan error
Starting Wisenet Viewer | 27
• Record error
• Overload
28 I Wisenet Viewer User Manual
• Connection related
Starting Wisenet Viewer
• Firmware related
• Alarm input related
Starting Wisenet Viewer | 29
This describes the keyboard shortcut available in Wisenet Viewer.
30 I Wisenet Viewer User Manual
Managing Devices
You can assign the devices registered on Wisenet Viewer to a group and manage them. You can also update or back up the firmware of the registered device.
You can enable the following three methods to register devices on Wisenet Viewer.
|
(fit |
CPU/RAM Usage |
You can check the performance of your PC. •CPU: Displays the current CPU usage of your PC.
•RAM: Displays the current memory usage of your PC.
•The icon color changes depending on the CPU/RAM usage of your PC.
– 0-60%: Gray, 60-90%: Yellow, Over 90%: Red |
|
a:- |
Notification |
If a system notification occurs, the icon will activate. If a notification occurs, the alarm history will be displayed below the information/alarm display icon. You can check the details by pressing the activated icon. • Right-click on the notification history and select Clear to clear all notifications. Select Settings to go back to the Notification settings page. |
|
|
User information |
You can check the ID of the user who logged in. Clicking Logout will log out the current user. |
|
|
Help |
You can find help for Wisenet Viewer. Clicking the icon will open the help screen. |
|
— |
Screen minimization |
You can minimize the Wisenet Viewer screen. |
|
|
Screen maximization |
You can maximize the Wisenet Viewer screen. |
|
|
Exit |
You can exit Wisenet Viewer. If you click Exit program on the exit confirmation window, it will be closed. |
|
Item |
Description |
|
Dual power system failure |
There is problem with the power. Check the power LED. |
|
Item |
Description |
|
Fan error |
The fan is not working properly. Check the fan connection status. |
|
CPU fan error |
The CPU fan is not working properly. Check the CPU fan connection status. |
|
Frame fan error |
The frame fan is not working properly. Check the frame fan connection status. |
|
Left fan error |
The left fan is not working properly. Check the left fan connection status. |
|
Right fan error |
The right fan is not working properly. Check the right fan connection status. |
|
Item |
Description |
|
Disk full |
Cannot save video because the disk is full. Check the disc status. |
|
SD card is full |
Cannot save because the SD card is full. Check the SD card status. |
|
NAS full |
Cannot save because the NAS is full. Check the disc status. |
|
No disk |
There is no HDD connected. Check the device. |
|
Disc failed |
There is a problem with the HDD. Check the HDD status. |
|
SD card failed |
There is a problem with the SD card. Check the SD card status. |
|
NAS failed |
There is a problem with NAS. Check the NAS status. |
|
Disk error |
There is a problem with the HDD. Check the HDD status. |
|
RAID degraded |
There is a problem with an HDD installed on the RAID. Check the HDD status. |
|
RAID rebuilding |
Recovering the Degrade status array in RAID. |
|
RAID error |
Due to disk error or RAID configuration problem, the RAID arrangement cannot be enabled anymore. Check the RAID status. |
|
iSCSI disconnected |
Check the iSCSI connection status. |
|
NAS disconnected |
Check the NAS connection status. |
|
Allowed bitrate exceeded |
Since the amount of data that can be saved per channel has been exceeded, only I-frame will be saved. Check the save setting. |
|
Record error |
Due to a camera issue, there was a problem saving the video. Check the camera status. |
|
Item |
Description |
|
Retransmission overload Network traffic overload |
During remote transmission, the amount of data exceeded the device’s transmission bandwidth. Some channels are played on I-frame. Please reduce the number of users or channels to monitor. |
|
CPU overload VPU error Memory error |
There has been a system overload. Please limit the number of users to monitor through remote control at the web viewers or VMS or adjust the number of channels played remotely or on a recorder. |
|
Item |
Description |
|
Connected |
Connected to device. |
|
Disconnected |
Playback ended due to network quality decline. |
|
User canceled connection. |
|
|
There is a problem with the device connection. Please check the network or device status. |
|
|
There is a problem with the device authentication information. Check the device authentication information. |
|
Item |
Description |
|
Latest firmware available |
There is a software update on the update server. Upgrade to the latest version. |
|
Firmware upgrade |
Firmware is being upgraded. You cannot play video during the upgrade. |
|
Item |
Description |
|
Alarm input |
An alarm input error has occurred. |
|
Item |
Windows |
MAC |
|
Display the name change window of the resource tree and layout tree item |
F2 * Enter: Close after applying changes ESC: Close |
F2 * Enter: Close after applying changes ESC: Close |
|
Run Autofit |
F5 |
Command + R |
|
Switch to full screen/window mode |
F11 |
Control + Command + F |
|
Opening media files |
Ctrl + O |
Command + O |
|
Opening a new Layout tab |
Ctrl + N |
Command + N |
|
Saving a layout |
Ctrl + S |
Command + S |
|
Saving a layout with a different name |
F12 |
Ctrl + Shift + S |
|
Closing a Layout tab |
Ctrl + W |
Command + W |
|
Delete selection |
Delete or Backspace |
Del |
|
Play/pause |
Space Bar |
Space Bar |
|
Reverse |
Ctrl + M |
Command + [m] |
|
Forward |
Ctrl + [m] |
Command + [^] |
|
Zoom in on the timeline |
Ctrl + [ f ] or [+] |
Command + [ t ] or Command + [+] |
|
Zoom out on the timeline |
Ctrl + [ i ] or [-] |
Command + [ I ] or Command + [-] |
|
Previous event |
z |
z |
|
Next event |
x |
x |
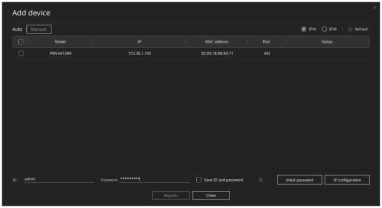
Search and register the devices connected to the network automatically.
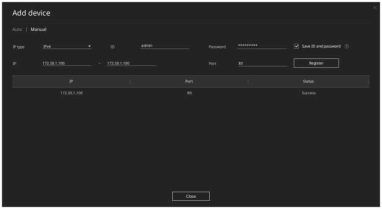
Register by directly entering the network information of the device.
Managing Devices
ID
Password ®>
| | Save ID and password @
OK | [ Cancel |
If ID/password information is registered, the device automatically registered in the Root item will be displayed.
Managing Devices | 31
■ Registering via the Resource Tree
Resource
Q Search
3 Root
![]()
NOTE
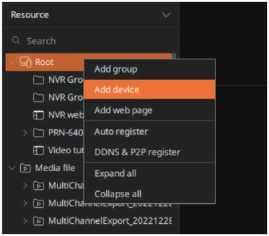
If you select Add device in the Shortcut menu, you can register the device from the Add
device window.
32 I Wisenet Viewer User Manual
|
□ NVR □ NVR ~ NVR |
Add group Add device Add web page |
|
□ PRN |
Auto register |
|
□ Vide |
DDNS & P2P register |
|
o Media f > È Mult > e Muit |
Expand all Collapse all |
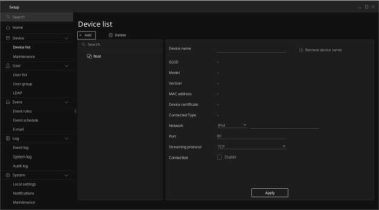
• Select Add device at the bottom of the main Setup page to open the Add device
window directly.
Managing Devices
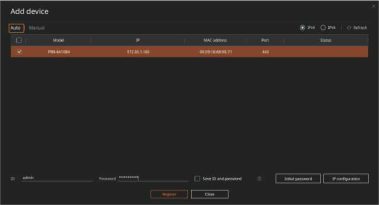
If Save ID and password is checked, the ID and password will be saved on Wisenet Viewer.
Managing Devices | 33
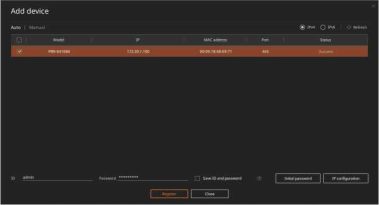
34 | Wisenet Viewer User Manual
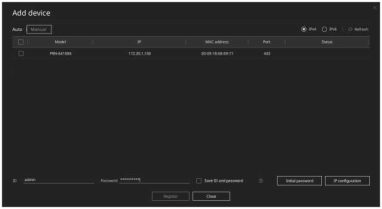
Managing Devices
■
Registering via the Setup Menu
• Select Add device at the bottom of the main Setup page to open the Add device window directly.
Managing Devices | 35

• IP type: Select the IP type of the device.
36 I Wisenet Viewer User Manual
Within the IP range you specified, you can register several devices at once.
![]()
NOTE
IPv6 is supported only on Windows OS.
Managing Devices
Add device
Auto | Manual
IP type IPv4 ▼ ID admin
IP 17230.1.100 – 17230.1.100
![]()
Managing Devices | 37
You can enter a product ID to register a device on Wisenet Viewer.
■ Checking the Product ID
If you set up a DDNS address on a connected recorder, the product ID information that can be remotely connected will be displayed.
![]()
NOTE
To use the Quick connect function, connect the recorder to the UPnP router and set the Quick
connect(UPnP) item to Enable.
■ Registering via the Function Button
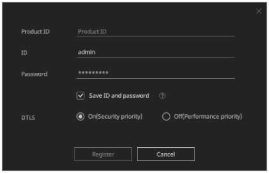
38 I Wisenet Viewer User Manual
■ Registering via the Resource Tree
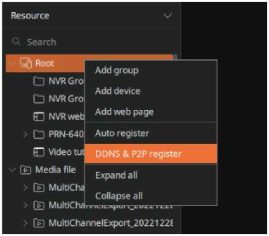
Managing Devices
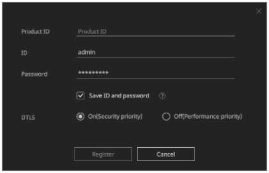
■ Registering via the Setup Menu
When adding a device manually, you can select DDNS/P2P for the IP type and register it.
For more detail, please refer to Registering Manually (page 34).
Managing Devices | 39
You can arrange registered channels or web pages as groups via the Resource tree. You can change channels in a group, move them to a different group, or delete a group.
If several devices are in a group, the channels included in the group can be moved or deleted simultaneously.
![]()
NOTE
Only users with administrator rights can create and manage groups.
Once a group is created, you can use the following menu.
Resource
Q Search
X ç^ Root
(□ NVRweb
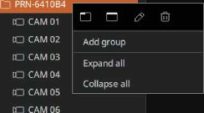
40 | Wisenet Viewer User Manual
You can allocate registered devices and web pages to create groups.
![]()
NOTE
Media file videos cannot be added to a group.
Managing Devices
■ Forming Groups
|
|
Open |
You can open the selected group on the current Layout tab. |
|
|
Open in new window |
You can open the selected group in a new window. |
|
|
Edit |
You can change the name of the selected group. |
|
0 |
Remove |
You can delete the selected group. |
|
Add group |
You can add a low rank group within the current group. |
|
|
Expand all |
You can expand all the details of groups and media files contained in the root item. |
|
|
Collapse all |
You can hide all the details of groups and media files contained in the root item. |
|
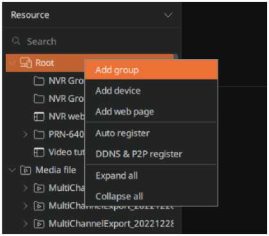
An arrow will be displayed under the cursor.
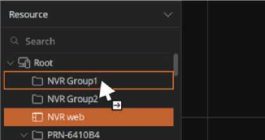
tO CAM 01
tO CAM 02
tO CAM 03
tO CAM 04
Managing Devices | 41
![]()
NOTE
you can separate and manage channels assigned to devices.
be displayed.
■ Changing Group Names
• You can change the name by selecting a group and pressing the F2 key.
For more information on using the shortcut keys, refer to Shortcut Keys (page 30).
• If a group is deleted, the included channels move below the Root.
Low-rank groups included in the deleted groups are deleted together, and the channels move below the Root.
42 | Wisenet Viewer User Manual
You can move channels assigned to a group or release them from a group. You can also change the settings information of the selected channel or search for an event.
Managing Devices
Using the Channel Shortcut Menu
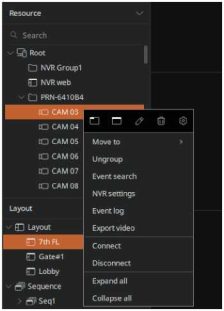
Managing Devices | 43
You can move a channel assigned to a group to another group or release it from the group.
■ Moving Channels to Another Group
|
|
Open |
You can open the selected channel in the current Layout tab. |
|
|
Open in new window |
You can open the selected channel in a new window. |
|
|
Edit |
You can change the name of the selected channel. |
|
0 |
Remove |
You can delete the selected channel. |
|
|
Settings |
You can check and change the channel settings information. |
|
Move to |
You can move the selected channel to a different group. |
|
|
Ungroup |
You can release the selected channel from the current group. |
|
|
Event search |
You can search events that happened in the selected channel. |
|
|
NVR settings |
You can check and change the settings of the recorder that includes the selected channel. |
|
|
Event log |
You can search the event log of the selected channel. |
|
|
Export video |
You can save the recorded videos of the selected channel. |
|
Connect |
You can connect a recorder to the selected channel. |
|
Disconnect |
You can disconnect the recorder from the selected channel. |
|
Expand all |
You can expand all the details of groups and media files contained in the root item. |
|
Collapse all |
You can hide all the details of groups and media files contained in the root item. |
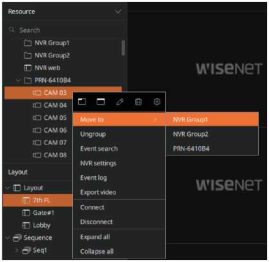
• The channel moves to the selected group. Channels that are moved are automatically arranged by name.
44 | Wisenet Viewer User Manual
■ Releasing Channels from Groups
• You can also change the name by selecting a channel and pressing the F2 key.
For more information on using the shortcut keys, refer to Shortcut Keys (page 30).
![]()
NOTE
If the channel is deleted from the Resource tree, the saved layout will also be deleted. To register a deleted
channel again, check Enable of Activate in the Setup > Device > Device list.
Managing Devices | 45
You can check the detailed information of the channel registered on Wisenet Viewer and change the desired information.
![]()
NOTE
On Wisenet Viewer, you can only change certain settings of the registered channels. You can change the
detailed settings of a recorder from the web viewer of a connected device.
■ Checking Channel Information
Check settings information when device information is displayed.
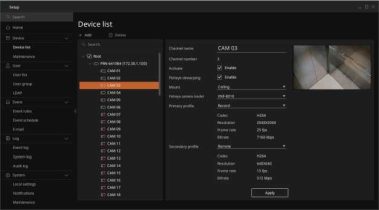
This capability is only available with cameras that support fisheye view.
46 I Wisenet Viewer User Manual
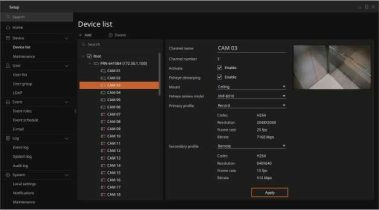
• The detailed information on devices can be changed on recorders, and the items that can’t be changed only show the settings values.
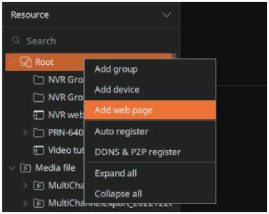
register.
New Web page
Name
URL
Digest authentication
NVR web
ID
Password
admin
OK ~| | Cancel
• You can also change the name by selecting a web page and pressing the F2 key.
For more information on using the shortcut keys, refer to Shortcut Keys (page 30).
The registered web page will be displayed on the assigned tile. When a web page is displayed on a video tile, you can zoom in and out on the web page within the tile and use the refresh function. You can also change and save registered web page information.
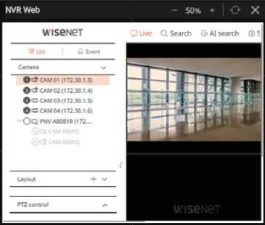
50 I Wisenet Viewer User Manual
NOTE
When a video tile is assigned a webpage, right-click on it to access the shortcut menu options.
Managing Devices
■ Changing Web Page Information
Edit Web page
Name
URL
Digest authentication
NVR web
0 Enable
ID admin
Password *********
OK ~| | Cancel
Managing Devices | 51
You can bring the image or the video file saved on your PC and check it on Wisenet Viewer.
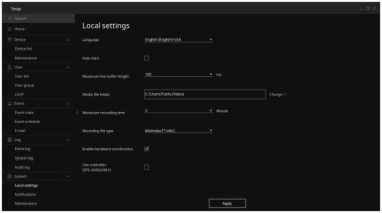
Changing the Media File Folder Path
You can change the folder the media file is saved in. Images captured or videos recorded at Wisenet Viewer are saved in the media file folder, and the images or videos that will be used in Wisenet Viewer can be saved here as well.
![]()
NOTE
•
•
In Media File in the Resource tree, only video files with formats supported by Wisenet Viewer will be
displayed.
Videos or images added by directly dragging the saved files from PC are not displayed on the Media
File of the resource tree.
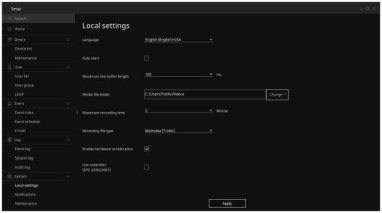
52 I Wisenet Viewer User Manual
5. Select the Apply button.
Managing Devices
6. Select the Close button on the confirmation window.
![]()
NOTE
image files in the changed folder at the bottom of the Root item.
You can drag video or image files to directly allocate them to a tile. You can also arrange and save layouts.
![]()
NOTE
Here are the media file types that you can check on Wisenet Viewer: Files that are not supported may not
work properly.
• Video: mkv, avi, mp4, wisenet media file(wnm), SEC
– Video codec: H264, H265, MJPEG
– Audio codec: AAC, G.711, G.726
• Image: png, jpeg, jpg, bmp
Drag a video file displayed on the Media File item of the Resource tree to add to a tile.
Managing Devices | 53
Drag video or image files saved on your PC to add them to a tile.
NOTE
k • If you select the Open Media File from the shortcut menu, which appears when right-clicking on an empty tile in the grid, you can add media files to the tile.
Or, you can press Ctrl + O on the empty tile to add media files.
■ Verifying the digital signature of the WNM video file
When saving a WNM video by adding a digital signature, the digital signature of the video can be verified.
![]()
NOTE
To save a WNM file with a digital signature, select Enable on the digital signature menu when exporting
the video. For more information on exporting videos, refer to Exporting Recorded Videos (page 152).
