Shenzhen VStarcam Technology Co., Ltd, is a national High-Tech enterprise, integrates development, production, and sales, products mainly covering video surveillance, smart home, and intelligent security, has become the leading supplier of the rapid growing network intelligent hardware and system.
VStarcam was founded in 2011, headquartered in Shenzhen. Products and solutions have been widely applied in more than 190 countries, has built a strong R&D, marketing and service network both domestically and worldwide. VStarcam aims to become the guardian of human security core strength. Yesterday, VStarcam create excellence! Today, VStarcam beyond dreams!
1.How to report your problem to VStarcam support team?
If you are having problems with VStarcam device, please try the following ways to reach us:
If you have downloaded VStarcam APP Eye4, please login the APP, click ‘Me’ at the bottom right corner, go to ‘Online support’. The support engineers are available during Monday to Friday, 8:00~12:00 am, 1:20~5:50 pm(UTC+8).
You can also send our technical support engineers an email with your problems and key information to include are:
1. Username of the VStarcam APP Eye4 account;
2. Product UID numbers;
3. App version and mobile phone model;
4. Issue description;
5. If possible screenshots or short video to explain the problem.
VStarcam Devices FAQ
Read More : Ubox 4G LTE Cellular Security Camera Guide
Please follow the steps below:
1.Download the mobile APP Eye4 to your smart phone. Eye4 APP is available in Google Play and APP store.
2. Register an account, take down the account name and password, for future login.
3. Login the Eye4 APP account which you have registered.
4) Indoor cameras:
Outdoor cameras:
3.What should i do if the camera shown offline?
Generally speaking, the issue “offline” mainly caused by unstable wireless connection, change of router, change of wireless password etc, there are some advices for solving this issue.
1. It is recommended to connect the camera to the LAN port of the router with a network cable.
2. Please restore the camera to factory default and reconfigure it (please refer to video tutorial for factory reset)
3. If the above advices don’t work, please enter the mobile APP — “me” — “online customer service” for more help.
4.How does the cloud storage service work?
1.How does cloud storage work
After the cloud storage function is enabled, it will record videos when the camera detects movement and upload videos to the cloud server through internet connection. Note: It will not record video all the time after the cloud storage service is opened, only when the motion is detected. Besides, it does not capture images.
The cloud storage service is purchased for a single camera, if there are multiple cameras and all need to open the cloud storage service, then each camera needs to buy the cloud storage service separately.
If the camera is lost or stolen, and it is offline, if you want to see the video recorded in the cloud storage, do not delete the camera from the APP account, open the “cloud storage” in the APP and you can still watch it.
2. How to open cloud storage?
To open the cloud storage service for the camera, please launch the mobile phone APP, find the camera→click the three dots in the upper right corner of the camera→enter the cloud storage option→click “activate”. If it’s the first time for the device to open cloud storage service, you can get a cheap three-month trial of the service.
If you have enjoyed the cheap trial of cloud storage for three months, you need to purchase a package to continue using the cloud storage service. Please refer to the pricing on the APP for relevant packages and prices.
3. How to view video in cloud storage?
To view the cloud storage video, please enter the mobile APP, find the camera, click on the three dots in the top right corner of the camera, tap “cloud storage” option, you will get the cloud storage video page. Please click the date logo on the lower left side of the page, select a date, and then look at the time axis at the bottom of the screen, blue parts means there are videos, gray parts means there are no videos, click on the blue part to watch the video, drag the timeline to watch the video of other time period.
4. Why there is no video being recorded after you opened cloud storage service?
The causes of this problem may include:
1) No motion event is detected by the camera. If no movement is detected within the scope of camera monitoring, video will not be recorded or uploaded to the cloud server, so there is no cloud storage for video.
2) Poor Internet connection. The cloud storage video relies on the internet connection to upload to the cloud server. Poor internet connection may lead to the failure or loss of videos.
3)Movement is not obvious enough to be detected by the camera. If the motion movement detected by the camera is too short or the recorded video is too small, the camera will not record cloud video or can’t be displayed even if the video is successfully uploaded to the server.
4)The device is offline. If the device is restarting or power is being cut off, the device will be offline during this period, and there will be no cloud storage video being recorded.
5) Cloud server problem. If all the above causes are excluded, the issue may be caused by the cloud server. Please contact support for help. To contact support, please refer to the FAQ How to report your problem to VStarcam Support Team?
5.How to purchase cloud service?
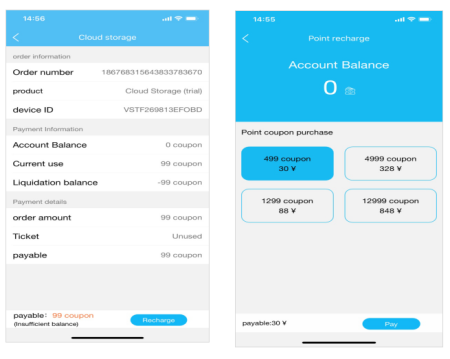
After the mobile APP is upgraded to 5.3.0 and above, the purchase mechanism of cloud storage service will be changed into ticket format, then how to purchase cloud storage service? Please follow the steps below:
Step 1: Top up the ticket
After the camera is added to the APP, open the phone APP, click on the three points in the top right corner of the camera → “Cloud Storage”, click the renewal icon in the upper right corner of the page→”Renewal”, select the relevant packages(tickets needed for each package will be displayed on the right side of the package), click “Buy now” , choose the ticket package you prefer, click ‘top-up ticket ‘ on the lower right corner of the page, choose the ticket package and purchase.

Step 2: Purchase cloud storage service package
After successful top up the tickets, the APP will jump back to the renewal page. Click the “Renewal” button and choose a package you prefer and pay for it. After successfully paid for it, the cloud service will be activated and the camera will record video when it detect motion and upload the videos to the server.
1. Enter Eye4 — me — coupon — exchange coupon, scan the QR code on the coupon card.
2, Enter the camera, go to Cloud storage — renewal — choose the package on your coupon and click to buy — select the coupon — confirm the payment (Be sure to choose the right package on your coupon).
7.How to download cloud storage video clips?
To download video clips in cloud storage, please upgrade the mobile APP to the latest version first, and then follow the steps below:
On the home page of the mobile APP, click on the three dots in the upper right corner of the camera and select the “Cloud storage” option.
Vertical cloud storage interface
Click the video file you want to download and click the download arrow in the upper right corner of the screen to download. After downloading, video file will be stored in the phone album or the DCIM folder in the local files of the phone.
Horizontal cloud storage interface
Click the “Cloud storage” option and the page will automatically jump to the vertical cloud storage page. Click the blue switching icon in the upper right corner of the page and the page will switch to the horizontal cloud storage page. Click the download arrow in the upper right corner of the page, drag the download box in the timeline according to the prompt on the page, select the videos to download, click the √ in the upper right corner of the page to confirm the downloading.
After downloading, video file will be stored in the phone album or the DCIM folder in the local files of the phone.
Note: To play the downloaded cloud storage videos on the computer, we need to transfer videos from the phone to the computer.
8.What should user do if can’t receive motion alarm notification in app?
1) Ensure the phone signal is good and internet connection is ok.
2) Ensure that this feature has been enabled in the Eye4 app.
3) Ensure the Eye4 app is running in front or background of the phone.
4) Ensure the Eye4 app is not blocked from sending notifications by any anti-virus installed on your mobile phone.
5) Ensure notification for Eye4 app has been enabled in phone setting.
Forget the camera password
Please reset the camera to factory default settings, the default password of the camera is 888888.
How to reset:
Power on camera, then find out the camera “ reset “ hole, use a pin or pencil to keep pressing the button for about 15 seconds until camera reboot, then the camera will be reset successfully.
Notes:
1.Indoor camera’s “ reset” button: at the back of the camera or in the lower section of the head of the camera ;
2.Outdoor camera’s “reset” button (without Pan &tilt): on the power cable.
Forget App Account and Password
1.Currently, there is no way to retrieve account name of PC and mobile APP, it required to register a new one if you forgot it.
2.If you forgot the password, click “ Forget Password “ in Eye4 APP in PC or Phone, enter the email account bound the account, then you will get a verification mail, please follow the system prompts to change the password.
Note: If you can not get the verification mail, please contact us.
10.How to reset/restore the camera to factory default?
Please enter the FAQ system to find the corresponding video tutorial for how to reset the camera to factory default: https://www.vstarcam.com/support/.
11.How to upgrade the camera firmware?
Please enter Eye4 APP Settings — Firmware and click upgrade. If there is no problem with the camera, it is not recommended to upgrade firmware.
12.How long can a 32G TF card hold videos?
The storage space of video is affected by the actual scene. If the picture is more dynamic, the storage space generated will be larger; if it is more static, the space will be smaller. There’s no exact answer. It’s about 7 days.
13.How to record sound to SD card?
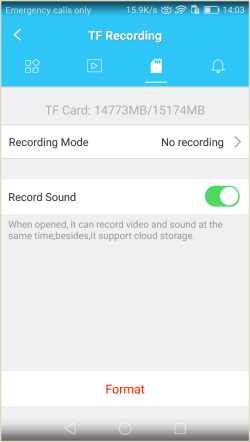
The function of recording sound to SD card is turned off by default.
You can enable it on phone APP:
Open the APP on your smart phone, go to the home page and find the camera, click the three dots on the right corner of the camera, go to ‘Settings-TF Recording’, to enable the ‘Record Sound’.
14.SD card is not being recognized
The solutions are as follows:
1.Check whether it is inserted in the opposite direction.
2.After inserted, click “format SD card” (format it even if you cannot check SD card’s memory size), reboot camera and refresh it.
3.Please plug the SD card to a card reader, then plug the card reader to a computer and format it to FAT32 format.
4.Make sure the card is working, you can test it on other camera or devices.
5.If the above steps do not work, please change a SD card,(please use genuine SD card), For example, Kingston SD Card, Class 4 and 10 is preferred.
Notes:
1.If the above methods does not work, you can check the SD card slot on the camera and the SD card. If it proved to be hardware problems, please contact the dealer for replacement.
2.Besides, please make sure the camera’s firmware and the APP is in the latest version. If not, please update to the latest one.
15. How to playback SD card videos on PC client?
To playback the video recorded to SD card on PC client, please open the client, move cursor to the window of the camera, right click on it, choose ‘view SD card files’, in the pop-up window, click on ‘Refresh’, the video files will be listed on the right panel, click the videos to playback them.
16.How to download video clips from SD card?
We can download video clips from SD card on mobile APP Eye4.
To do that, we can open the app Eye4, click the setting icon on the top right corner of the camera, choose ‘TF Card Records’, tap the video clip you want to download, and click the arrow on the right side of the video file, to download it. After being downloaded, on ios phone, the video will be stored to your phone’s album, on android phone, the video will be stored to your phone’s File-DCIM-Eye4 directory.
17.How to remove video files from SD card?
SD card video can be deleted by the following 2 methods:
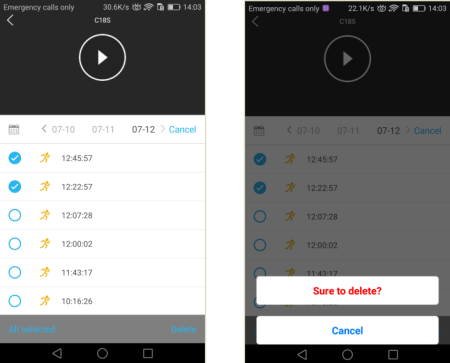
1. Delete the recording files in “TF card Records”
Open the APP home page, click the three dots on the upper right corner of the camera, and select “TF Card Records” to view the recording files in the SD card. Click the calendar icon to select the date; Click the “Edit” button on the right to select the video files you want to delete, tap the “delete” option on the lower right corner, after confirming, the video files can be deleted.

2. To format the SD card
After format the SD card, you can delete all video files in the SD card at one time. To format the SD card, go to the “Settings – TF Recording” of the camera and click “format”. You can also remove the SD card from the camera, insert it into the card reader, then insert the card reader into the computer, and format it on the computer.

18.IP camera screen blurred , color cast?
If your camera’s screen blurred or it’s color cast, please follow the guide below:
1.Please reboot camera a few times, or restore cameras to factory default settings, after that, it will be back to normal.
2.If the problem occur again and again, then it probably cause by camera’s sensor problem, please contact dealer or salesman for maintenance or replacement.
19.How to flip the inverted picture?
Click the three dots on the right upper side, click settings, select “Video”,enable “Vertical mirror”.
Right click mouse in main menu→fast networking→Choose auto config→click OK.
If you want to manual config, input IP address, click diagnose. If it shows healthy network, it indicates the internet connection is good.
If it shows network anomaly, plz process according to the clew(Ensure your device has accessed network).
1.Auto add.
Power on Recorder and camera , and let them in the same LAN. After automatic set up function is enabled, the recorder will auto add the searched cameras to the channel .
2.Manually add.
If don’t want to use “auto add” function , right click mouse in Preview interface→ click “Video Manage”, → Click the drop-down frame in the selected box at the right side of video management, double left click mouse or click the “add “ button to add IPC to the channel. Or Click Auto add(Auto add can add all the IPC Searched to channel list)
Delete channel : Delete Specified IPC Channels Edit channel: Manually Revise channel parameters (such as IPC password and username ), Click OK to finish the operation.
3.How to playback video on NVR?
A: 1. Right click mouse in main menu→ Video playback → choose data , channel, record mode→ click Search → then can view playback file.
Warm prompt:
3.Illustration for playback button: Play, Pause, Fast forward x2,x4,x8.
4.Play file: Choose the recording file in file list, as number “1” shown in picture, Choose one of the recording, click “play” to recording file;
5.Video backup: Choose the recording file in file list, as number “1” shown in picture. Insert the U flash disk, click “video backup”to backup the file;
6.Timeline: click “date” and “time” at left bottom to check the timeline of recording, show number”2” shown in picture;
7.On the timeline with recording file, left click the mouse, then can playback the file.
4.How to access the NVR in LAN?
Step 1: Fast Networking→check the IP address of the device.
Step 2:Access the computer in same LAN, input video recorder’s IP address and port(if port is 80, no need to input) in IE browser or any other browser. Then it will access in LAN log in web page, input username and password, click log in.
Step 3: Once access successfully, you can get the video.
Tips: Please make sure video recorder and computer are in the same network segment.
1.Right click mouse in main menu → Fast Networking → Check the ID of the device.
2.Open the IE browser , enter the www.e-seenet.com in the address bar. Then it will access log in web page, input ID, user name and password, click log in.
3.Once access successfully , you can get the video.
Tips: Video quality and fluency depend on the upload speed of video recorder and download speed of computer, each channel need above 30KB.
6.How to backup the video on NVR?
A: 1.Right click mouse in main menu→Video backup→Choose channel No.→ Choose Record mode→In search time, input beginning time and end time→ Click search ,recording will come out → Choose the video which need to backup → click video backup.
Tips: Support 32G U disk backup maximum, recording file will be packed every one hour.
Step 1: Right click main interface→Adjust channel, click it and enter into setup interface.
Step 2: On channel setup interface, click one channel image, press tight the left button of mouse and drag the image to other channel position.
Step 3 : After setup, right click interface, and it will remind to save the settings, click “Yes” and save.
Tips: After setup, please remember to click “save”, otherwise it won’t work.
Step 4: After channel setup, right click main interface→video management→added device, if the position of newly setup channel has changed, that means the setup works.
8.What kind of video recordings does the NVR support?
The NVR support three kinds of video recording, which are timing recording, alarm recording and motion recording.
9.How to setup motion recording?
Step 1: Setup recording time range. Right click mouse→System setup→Recording setup→Recording plan. Click Reset button. After come into Reset interface-click Motion button, and put mouse icon on the upper left comer, press and drag the mouse to the right to choose the time, then list will turn to green color. Press “Apply” button, then setup successfully.
Step 2: Choose Channel Setup→Video detection→choose Sensitivity as you want→Detection type change to ‘Motion’→check Buzzer, Alarm, Email notification, APP alarm notification etc→setup the protection time→click Copy to→click OK.
10.How to download and install Mobile application(IP PRO3)?
A: 1. Go to http://www.dvr163.com/download/indexm.php?p=ippro3 in mobile browser, enter download page, click install to download and install APP.
1.Please scan the QR code in manual to download APP.
Note: For iOS system , it requires iOS 8.0 version or above. For Android, Android 4.4 or above.
11.How to add cameras into mobile application?
A: 1. Register account on APP. And login account .
2.Enter device interface.
3.Add device.
4.Added successfully . Click channel No.to get video .
5.Remote playback.
Note: Each cellphone number / email address can be used for registration one time.
12.How to reset the password of the NVR?
The NVR has no password by default, so there is no need to enter any password when first login. However, if you had changed the password but forgot it,please follow the steps below to reset the password.
After input wrong password, it says ‘Username or password is incorrect’.To recover the password, please don’t click ‘OK’ in the window, and directly click the left button of the mouse and then right button,namely left click, right click→left click,right click→left click,right click→left click,right click→left click, right click→left click, right click.
The window of restore default user will pop up, click ‘yes’ to enter password modification window.
In the new window, please don’t enter anything, click ‘OK’ directly, the password will be restore to the default,done.
After login with default password, if you want to setup new password, please go to the main screen of the monitor, right click the mouse, choose ‘System setup→System Admin→User’, highlight the user and click ‘Set password’, setup new password and click ‘OK’, done.


