Vivotek Shepherd setup and user guide, Shepherd, embedded with powerful device management functions, can easily set up multiple cameras simultaneously. The software automatically brings up a list of all VIVOTEK devices that are connected on the network. The user can then manually group the cameras to apply pre-configured settings.
Shepherd supports various powerful functions, including: IP-address assignment, remote reboot/restore, and firmware and VADP package upload. Shepherd greatly benefits system integrators and installers who often have projects that require the simultaneous set up of multiple cameras with the same settings.
Shepherd supports batch uploading of firmware and exporting device lists for VIVOTEK NVRs, updating virus signatures for cameras equipped with the Trend Micro IoT Security package, and importing / exporting Stereo Tracker, Deep Learning VCA and VCA package configurations.
How install Shepherd tool into your PC
The Shepherd is a VIVOTEK tool that allows you to find the cameras in your network, perform basic configuration, manage firmware upgrades and collect basic information (firmware version, model name, ports, etc.). To install this software in your PC please follow the next steps.
Step 1. Go to the official webpage of the Shepherd application: https://www.vivotek.com/Shepherd
Step 2. Select the “Download” tab and click on the latest version available to download the application.
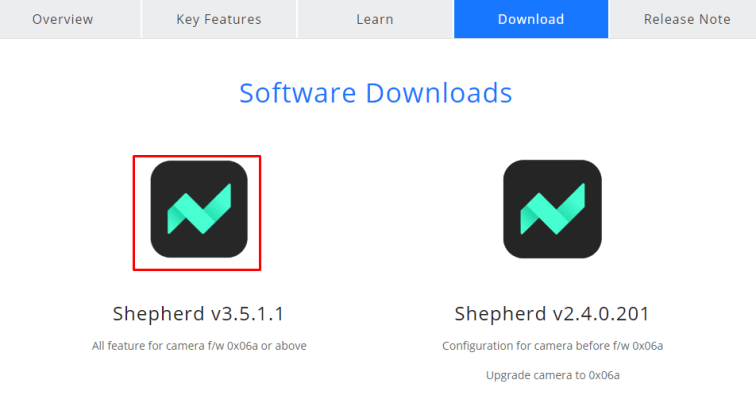
Be sure to use the newer version unless you have really old cameras.
Step 3. Once the download is complete run the installer, then select a location in where you want to extract the application. For this example, we will extract the application in the “Desktop” folder.

Note: This is a portable application so it wont be directly installed in your system.
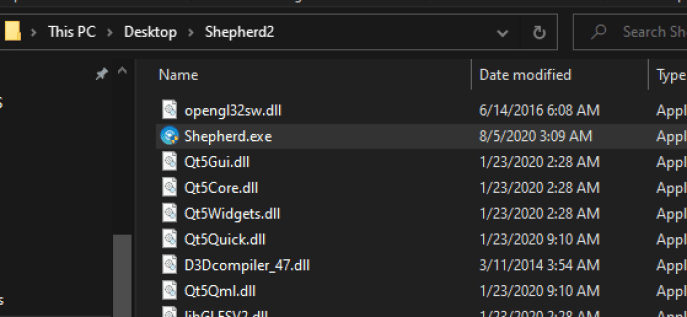
Step 4. Go to the extracted location (in this case “Desktop”) and find a folder called “Shepherd2”. This folder will contain the files necessary to run the application.
Step 5. Run the “Shepherd.exe” file, be sure to use administrator rights to open it. o
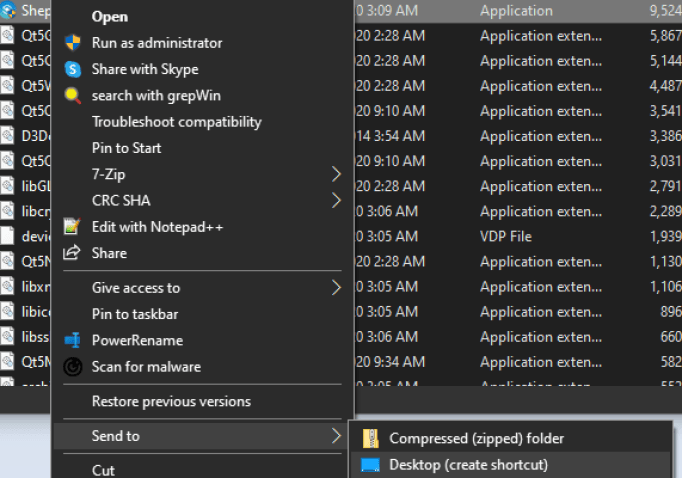
For easier access, you can also make a shortcut by right clicking and choosing Send to > Desktop.
Step 5. Once the interface is running, you can start searching your cameras and accessing by just double-clicking them.
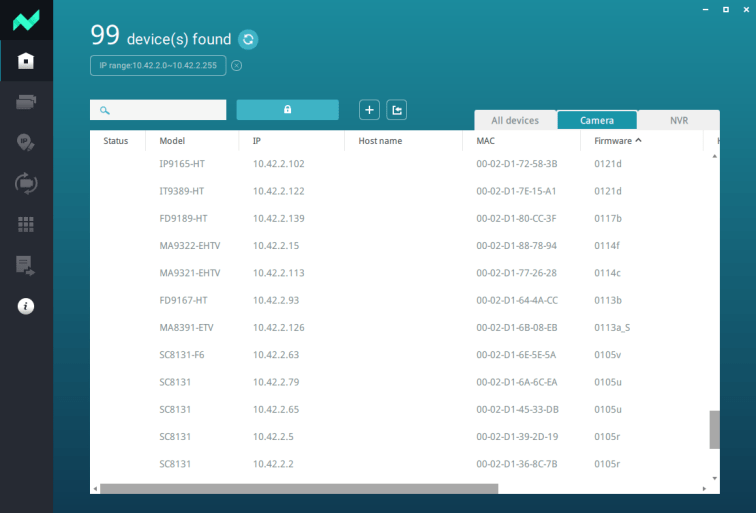
Vivotek Shepherd setup and user guide
Read Also : VAST Security Station complete guide
Where can I find the software version information for the Shepherd application?
Question
Where can I find the software version information for the Shepherd application?
Answer
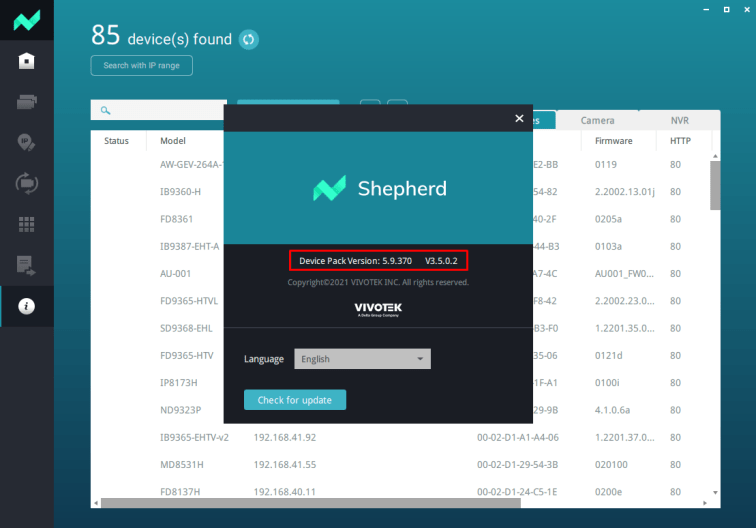
To find the software version information for the VIVOTEK Shepherd application, you can follow these steps:
Step 1. Open the Shepherd application on your PC.
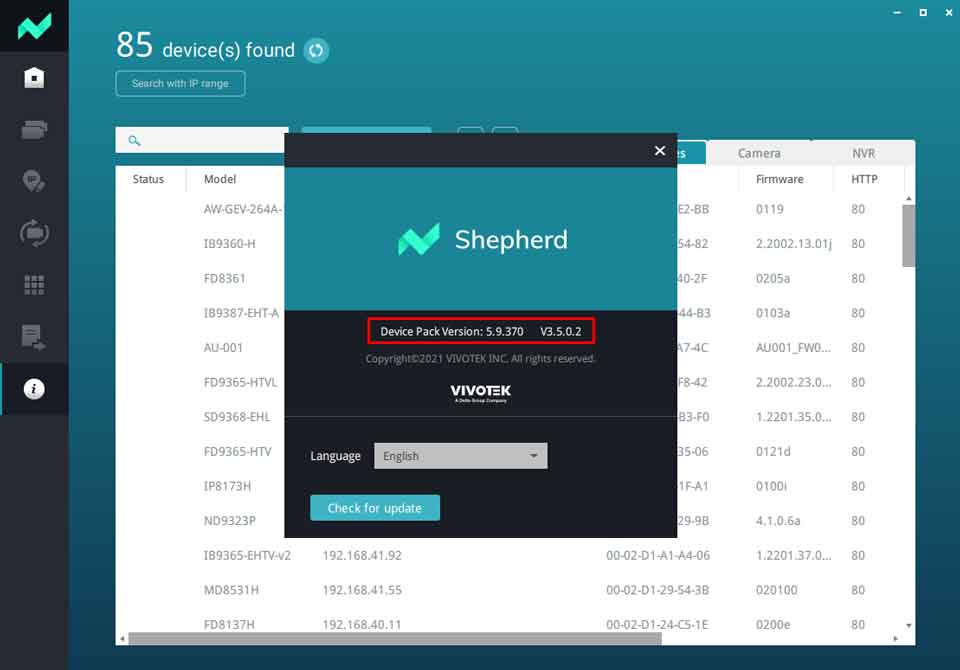
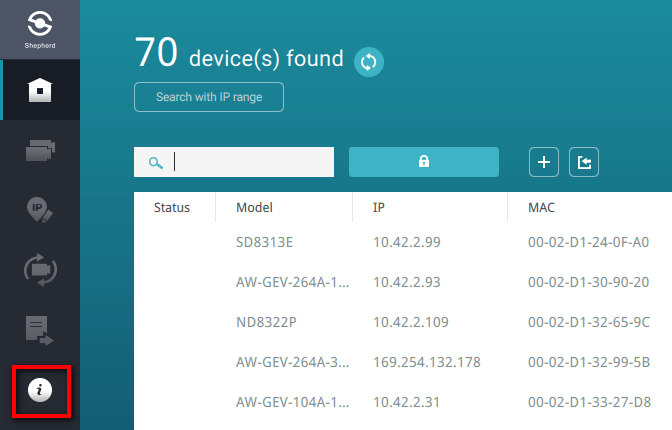
Step 2. Once the Shepherd interface finish loading, click on the “Information” icon.
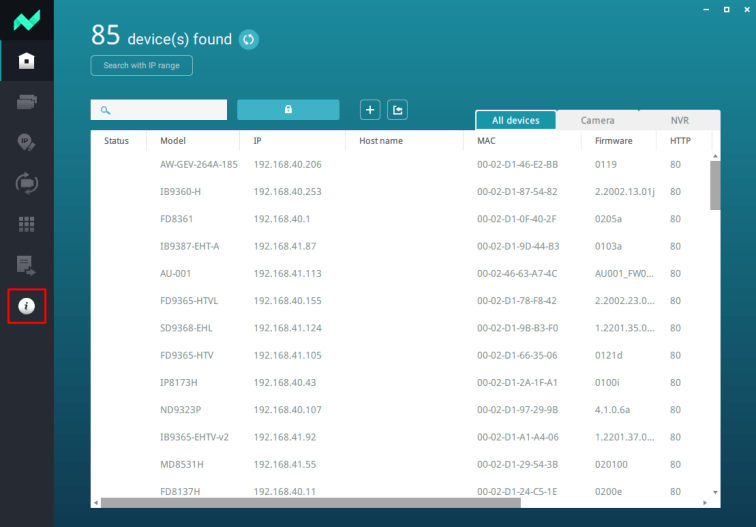
Step 3. The “Information” window will appear, displaying the software version information, including the version number and device package version.
Can you find ONVIF cameras when using the Shepherd application?
Question
Can you find ONVIF cameras when using the Shepherd application
Answer
The VIVOTEK Shepherd application was designed to search and manage VIVOTEK devices using VIVOTEK communication protocols, unfortunately the application cannot search or configure ONVIF cameras in the network.
[Shepherd] Does the Shepherd application supports MAC OS?
Question
Does the Shepherd application supports MAC OS?
Answer
The VIVOTEK Shepherd only supports Windows 7, Windows 8, Windows 10, the recent Windows 11 and several Windows servers (2012, 2016 and 2019).

Unfortunately, it does not support MAC OS. This means that if you’re using a MAC computer, you won’t be able to run the application on your device.
[Shepherd] What ports are being mainly used by the Shepherd application for communication?
The Shepherd application mainly uses (as default) port 5678 to send UDP broadcast packets to the network in order to find VIVOTEK devices.

When the devices receive the broadcast, it will reply the application with basic information such as model name, IP, mac and ports used for communication.
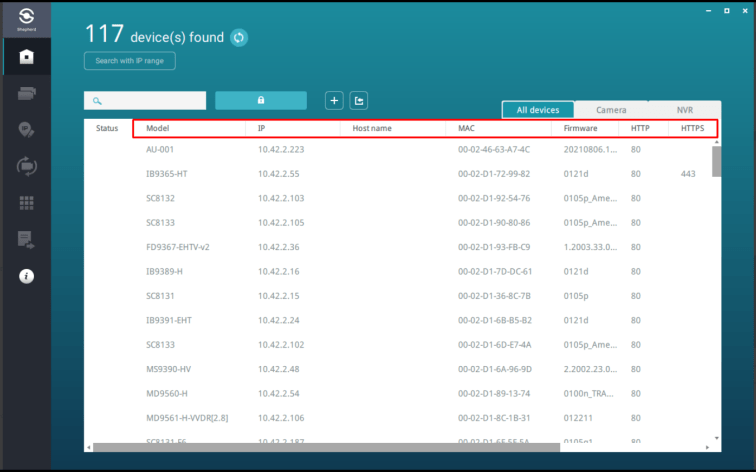
Then, the Shepherd application it will use those ports configured in the device to perform configurations, data upload and firmware upgrade.

Why I cannot update the Trend Micro license via Shepherd ?
Question
Why I cannot update the Trend Micro license via Shepherd ?
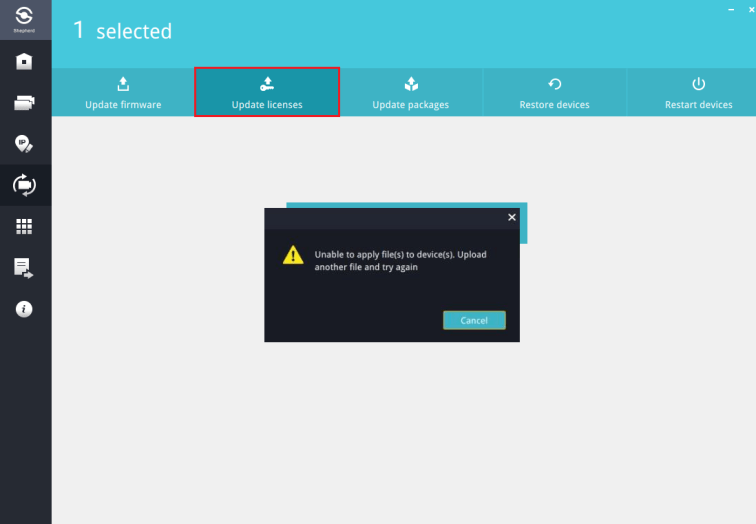
Answer
Shepherd version 3.2.0.3 and older version do not support the Trend Micro license update. We have released a new software version 3.3 and this version supports the Trend Micro license update.
There are two different filename extension in Trend Micro license: JSON and TXT. Shepherd version 3.3 supports both these two filename extension of Trend Micro license.
Failed to create OpenGL context for format QSurfaceFormat…
DESCRIPTION
When trying to run the Shepherd 2 on a server we get this error message.
Is there a way of disabling the graphics adapter requirements of the Shepherd2 as the server seem to not have the required graphics adapter support.
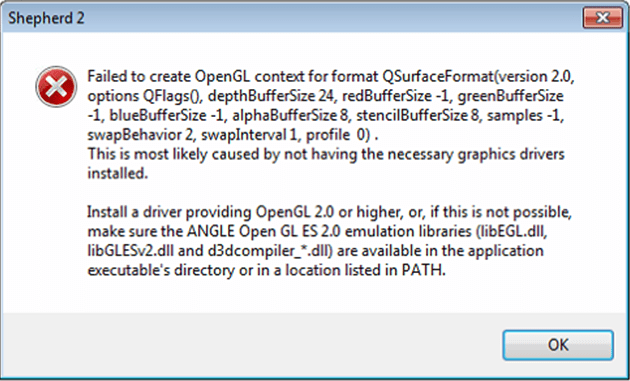
ROOT CAUSE
Shepherd2 is required to use OpenGL to draw the program layout.
For most of computer with the latest graphic card driver, it could support OpenGL.
For some did not support OpenGL, customer could use Windows built-in DirectX(ANGLE library) instead.
However, using DirectX is not default behavior of Sheperd2.
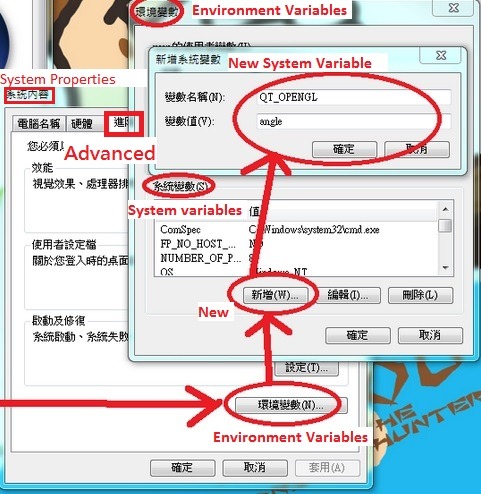
Customer needs to add new environment variables QT_OPENGL=angle into system to let shepherd2 use DirectX.
SOLUTION
For Windows 10:
1. From the Desktop, right-click the very bottom left corner of the screen to get the Power User Task Menu. From the Power User Task Menu, click System.
For Windows 7:
1. Click the Start button, right-click the Computer option in the Start menu, and select Properties.
2. Click the Advanced System Settings link in the left column.
3. (Please refer following figure) In the System Properties window, click on the Advanced tab, then click the Environment Variables button near the bottom of that tab.
4. In the Environment Variables window (pictured below), create a new environment variable, click New.
5. Enter the variable name = QT_OPENGL and variable value= angle to let shepherd2 use DirectX.
Why the application cannot be opened after Windows 10 upgrade
QUESTION
It was reported that after a Windows 10 upgrade (ver 1803), when trying to open the Shepherd application it showed the following message:
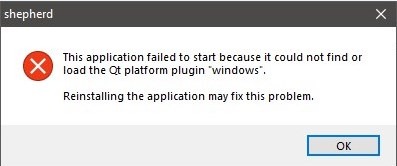
Note: The Shepherd application is an executable so cannot be reinstalled
ANSWER
The issue was caused by changes in the Windows 10 QT libraries after the 1803 upgrade. We already release a new software version (ver 2.4.0.101) that can solve the issue. Please download this version from the following link:
Shepherd 2.4.0.101: http://download.vivotek.com/downloadfile/downloads/software/shepherd.exe
How to change the Shepherd’s UI size when it is too large?
QUESTION
How to change the Shepherd’s UI size when it is too large?
ANSWER
Shepherd will change the UI size automatically when the monitor size is large(upper or equal to 3840*2000).
If you want to change the UI, you can press “F11” to adjust it.
If you open Shepherd in a system using four screens, you will see the Shepherd’s UI become large.
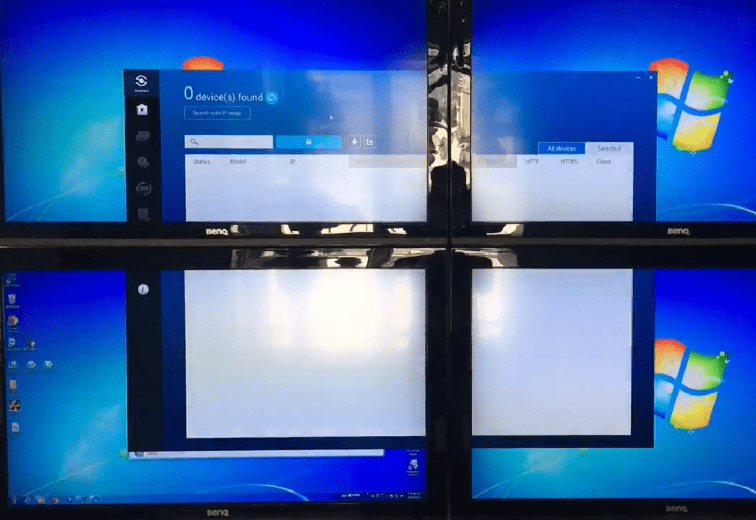
In order to make it become smaller, you can press “F11” to adjust the Shepherd’s UI size.
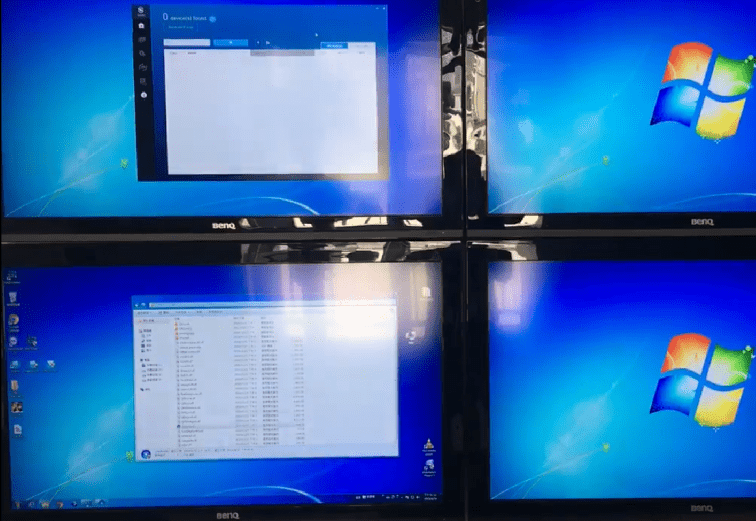
Also refer the following video: ftp://fae:fae@ftp.vivotek.com/software/TechnicalReview/2019/Shepherd%20with%204%20monitor.MOV
How to batch upload a VADP package into several cameras?
Question
How to batch upload a VADP package into several cameras?
Answer
VIVOTEK cameras have the capability of using packages that integrates specific functions (such as Smart VCA, Trend Micro, VIVOCloud, etc). If you need to upload one package into several devices please follow the next steps:
Step 1. Open the Shepherd application.
Step 2. Select the cameras that you want to upload the VADP package. For this tutorial we will use a MD9560-H.
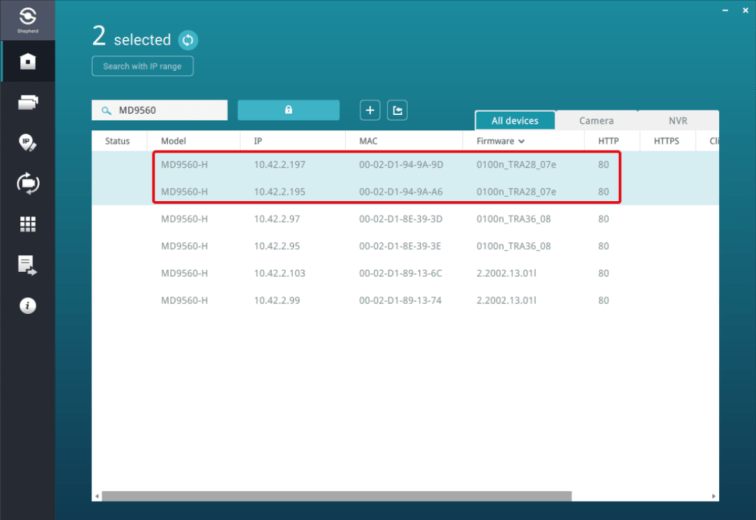
For easy manipulation you can us Ctrl + Right-click to select multiple cameras or Ctrl + A to select all the devices on the list.
Step 3. Select Maintenance icon , a “Authorize devices” message will popup before allowing access to the interface. Please be sure to enter the camera’s username and password.
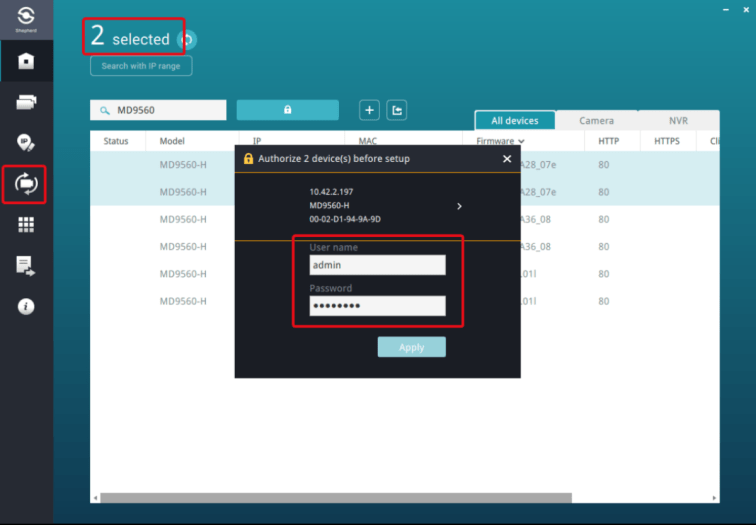
Note: If all the cameras are using a different password you wont be able to apply a batch upgrade because the software will be using the same authorization information for each camera.
Step 4. In the Maintenance interface, go to the “Upload package” tab. Change the “Save package to” option to “Internal storage”.
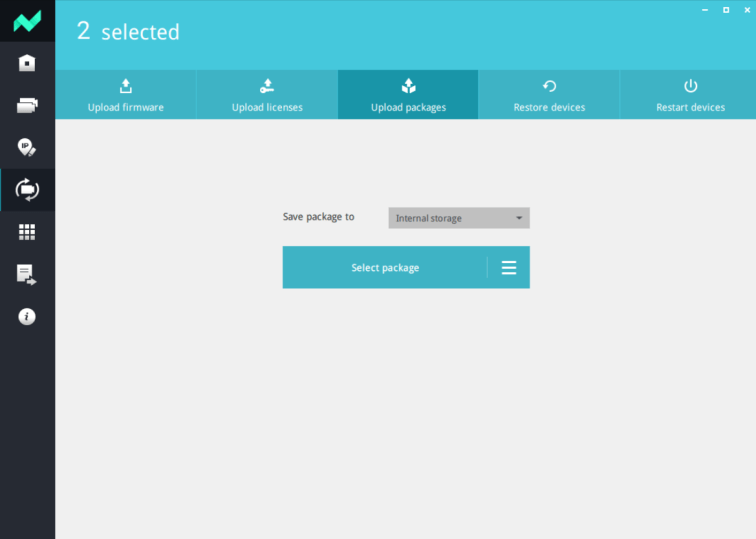
Step 5. Select the VADP package to be uploaded in the cameras:
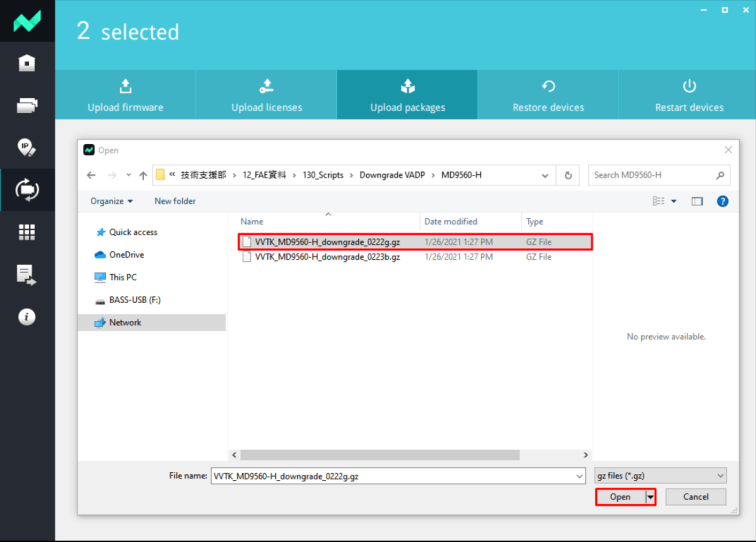
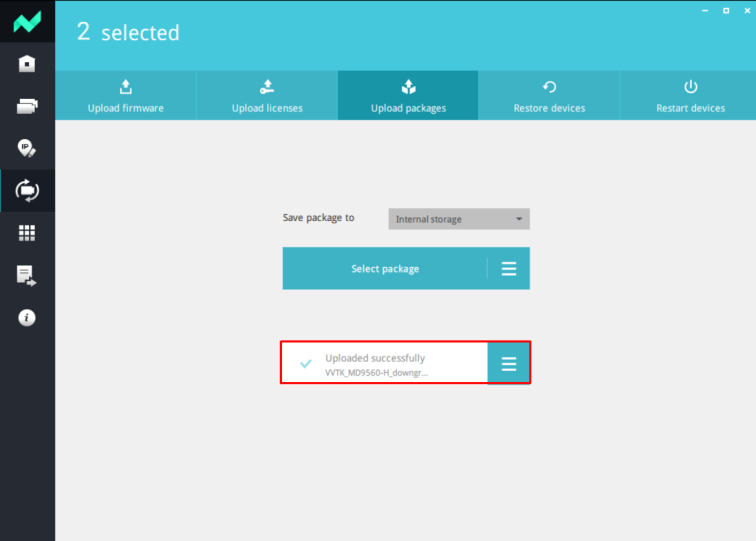
Once you select the package the Shepherd application will automatically start uploading the package to all the cameras. Once finished you will see a “Uploaded successfully” message in the interface indicating that the package was applied successfully.
How to update the device pack of Shepherd?
Question
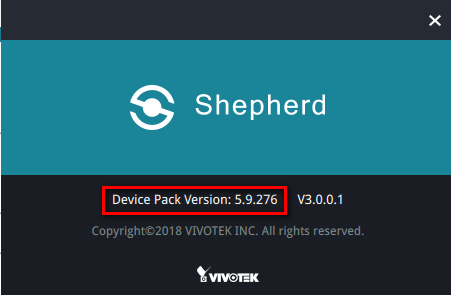
When users want to use Shepherd to batch set cameras, the device pack must contain the camera model, or the parameters shown on the template page may not be consistent with the camera web UI. So, how to update the device pack of Shepherd?
Answer
Please follow the steps below to update the device pack of Shepherd.
1. Extract the .vdp file from .zip file downloaded from our website: https://www.vivotek.com/device_pack#downloads, and move it to the folder Shepherd2.
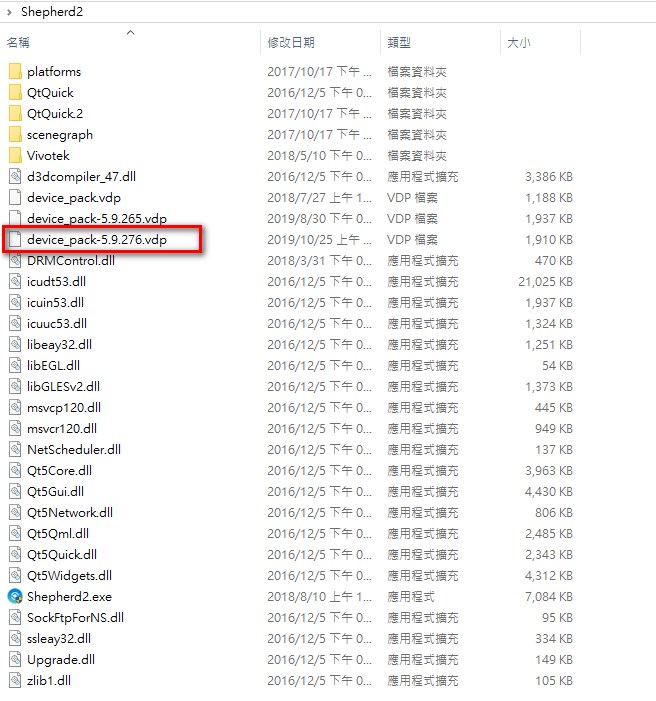
2. Executing Shepherd2.exe, it will automatically import the latest .vdp file.
3. The update process is complete.
How to find your camera using the Shepherd application
Question
How to find your camera using the Shepherd application
Answer
The VIVOTEK Shepherd application is a powerful tool that allows users to manage and find their VIVOTEK IP cameras in the network. In order to find your device please follow the next steps:
Step 1. Launch the Shepherd application on your computer.
Step 2. Once the application is running, it will automatically scan for all the devices in your network automatically.
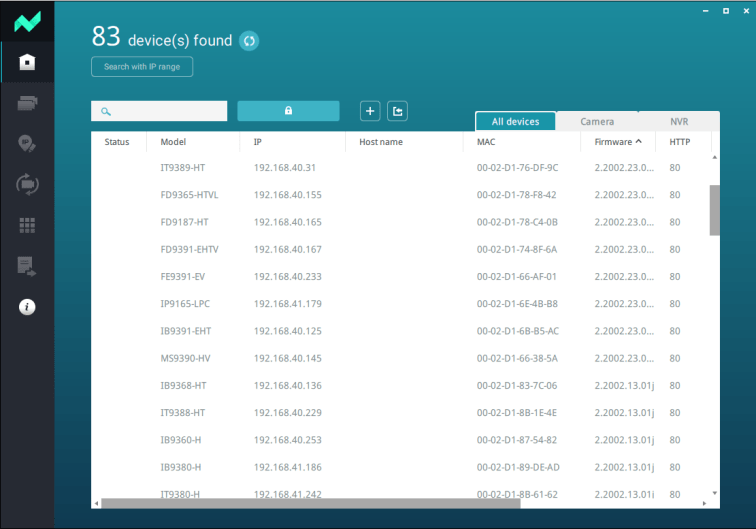
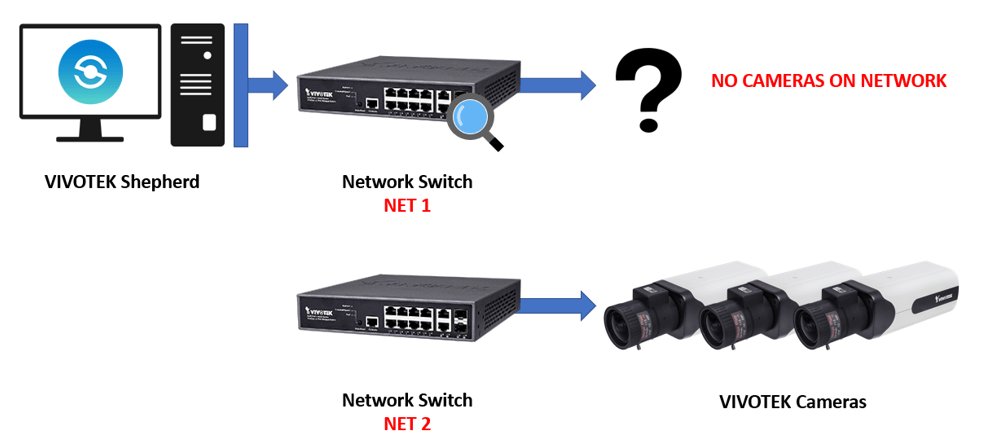
Note: You need to be sure that the PC that is searching the cameras is connected to the same subnet otherwise your camera wont be displayed in the Shepherd interface.
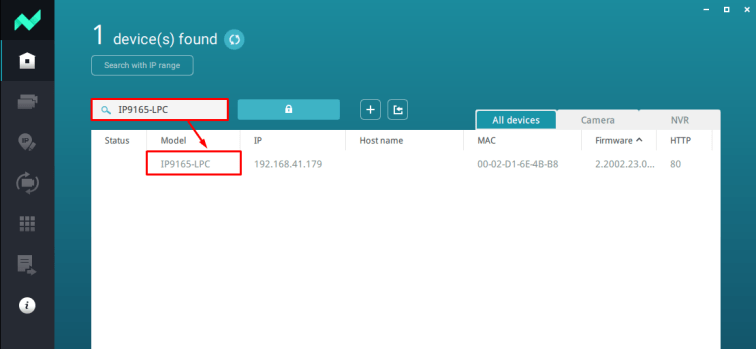
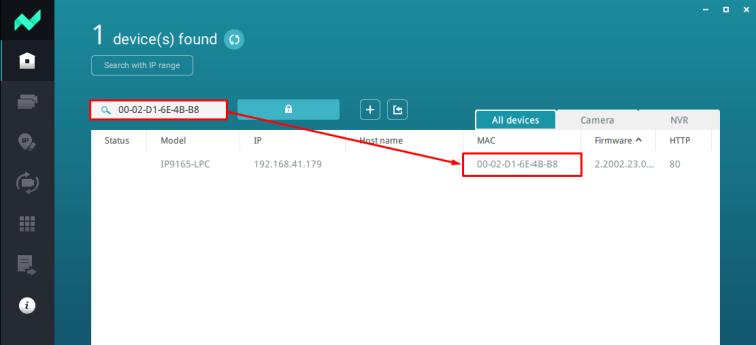
Step 3. In the search bar, type the name of the camera you are trying to find. If you have cameras with the same model and want to find one specific device, you can type the device MAC address (unique hardware address).
Camera model search:
MAC address search:
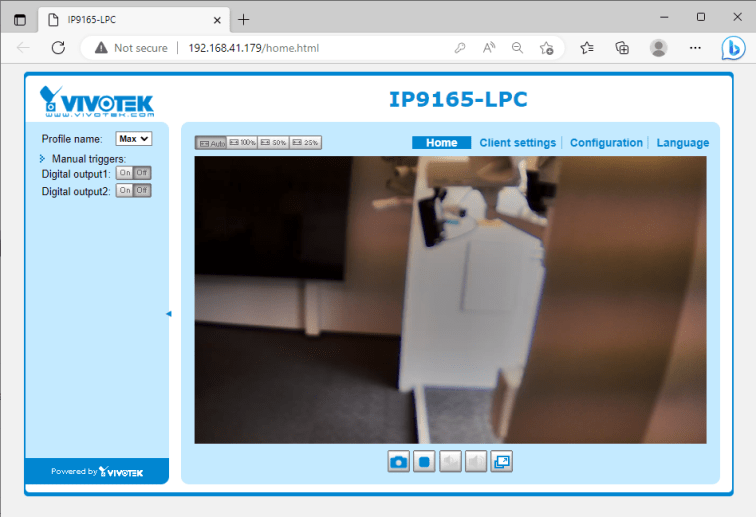
Step 4. Double click on the camera and you will be able to access to its web interface.
Note: If its the first time you are accessing the camera you will need to set a password.
If you are unable to find the camera you when using the Shepherd application, here are some useful documents that provide other suggestions in case any problem arises.
How to batch upgrade camera firmware?
The Shepherd application upgrade function can help you not only upgrade one camera but a batch of cameras. If you want to apply a new firmware to all your devices at once please follow the next steps:
Step 1. Open the Shepherd application.
Step 2. Select the cameras that you want to upgrade and be sure that all the cameras selected are the same model (every firmware is unique to each model so uploading it to a different model will not work). For this tutorial we will use a MD9560-H.
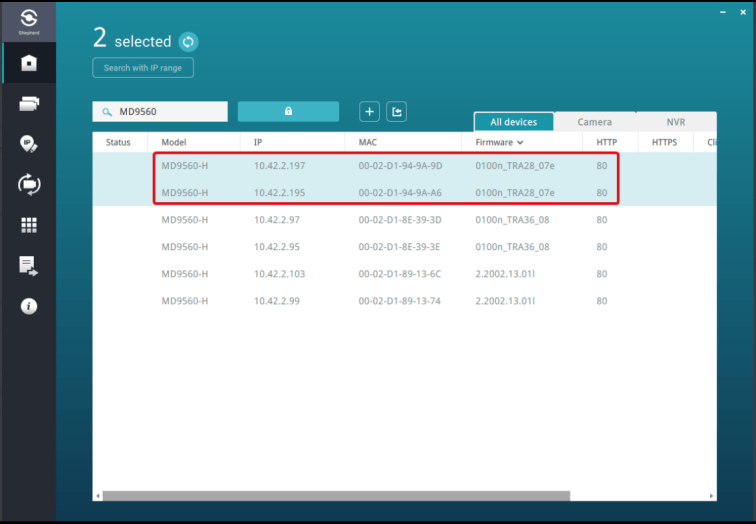
For easy manipulation you can us Ctrl + Right-click to select multiple cameras or Ctrl + A to select all the devices on the list.
Step 3. Select Maintenance icon and then enter the camera username and password.
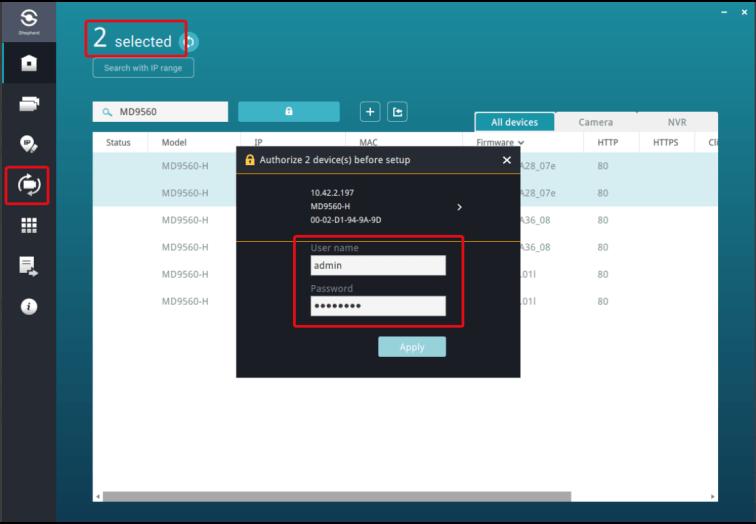
Note: If all the cameras are using a different password you wont be able to apply a batch upgrade because the software will be using the same authorization information for each camera.
Step 4. In the Maintenance interface, go to the “Upload firmware” tab and then click on the “Select firmware to upload” button to upload the camera firmware file.
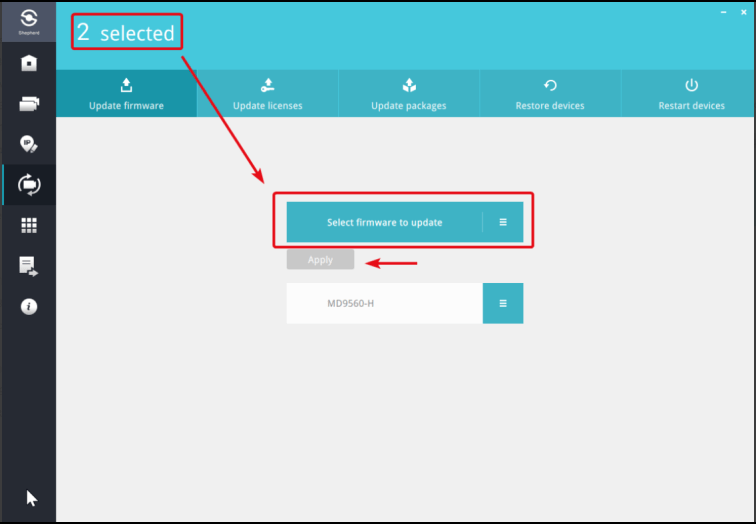
After everything is ready, click on the “Apply” button to start the upgrade process:
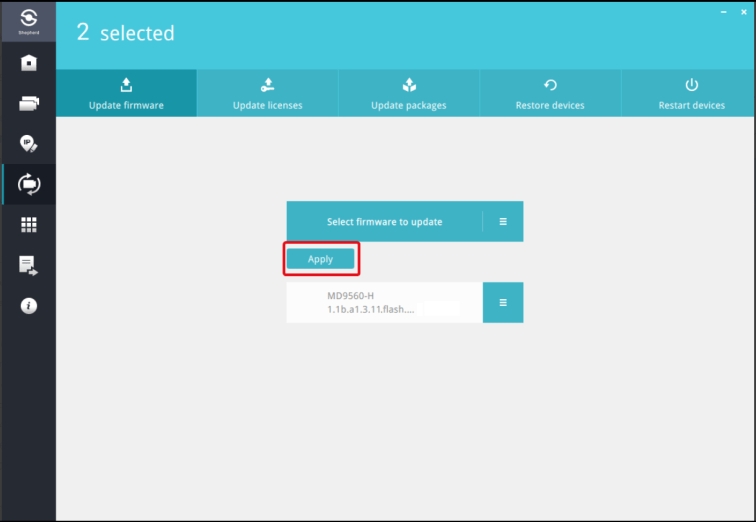
In case your system environment power off frequently or have a large number of cameras (complex network), we strongly suggest to batch upgrade the camera into a small group such as 5 ~ 10 cameras per group to avoid an unexpected abort upgrade process.
Step 5. Wait for the upgrade process to be finished. If you want to check the progress you can click on the icon.
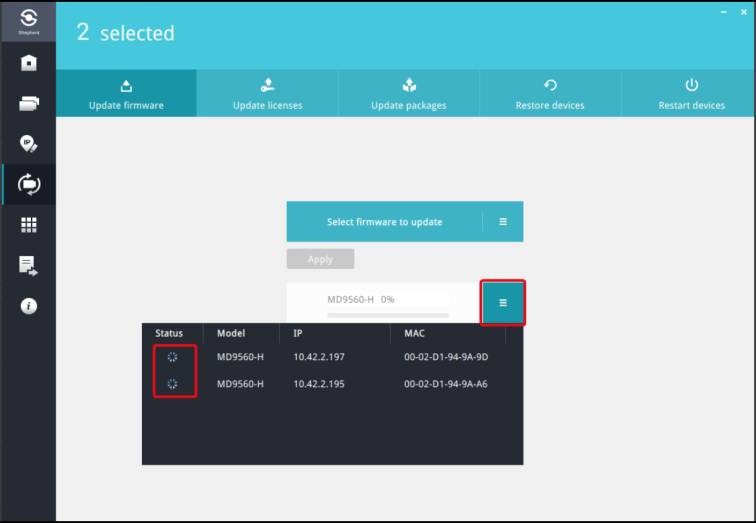
When it shows and the upgrading progress next tot he model name as 0% it means that the file is being uploaded to the camera. Once the progress bar gets to 50% it means that the file was successfully uploaded to the camera, and now the camera by itself will install the new firmware.
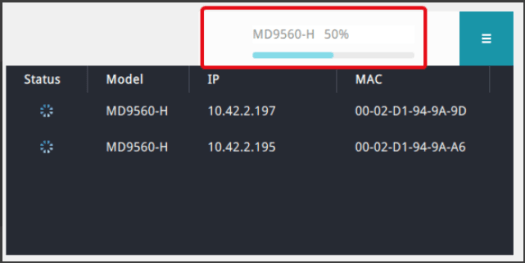
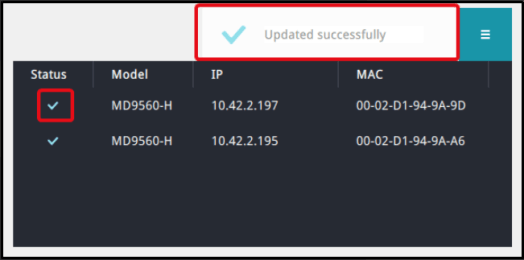
Once the camera finished the update you will see a message next to the model name showing that the camera update was successful.
IMPORTANT: Please DO NOT power off the devices during the upgrade process.
How can I import same settings to a batch of cameras?
QUESTION
How can I import same settings to a batch of cameras?
ANSWER
The Shepherd application can export the configuration of a camera and apply it to other cameras. In order to do so please follow the next steps:
Step 1. Click Shepherd.exe to run the application, once open it will automatically detect all cameras in your network.
Step 2. Select a camera to export its configuration as a *.csv file.
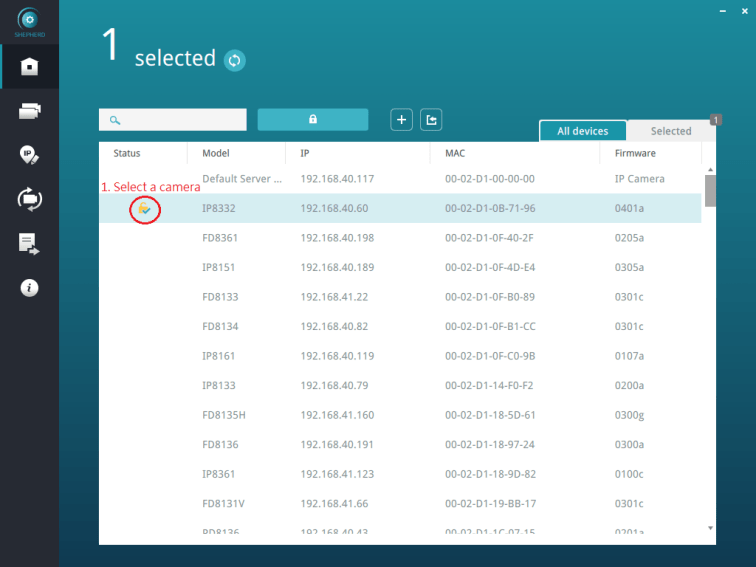
Step 3. Click on the “Batch camera setup” icon.
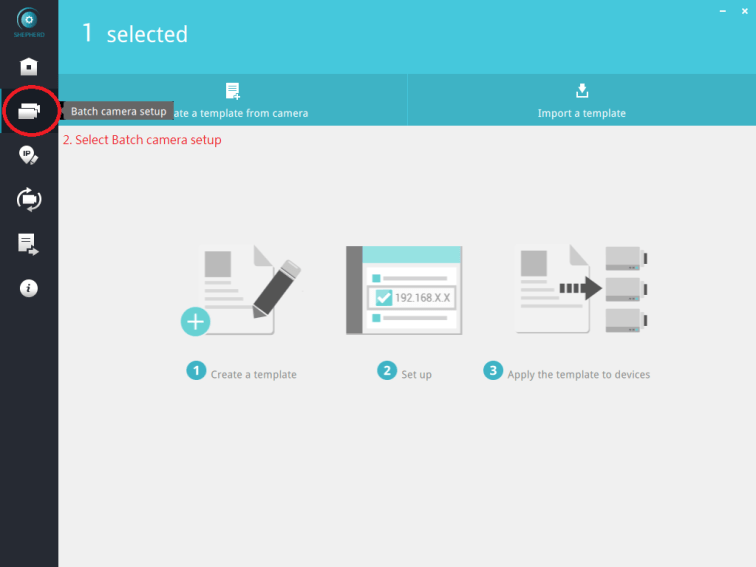
Step 4. Select “Create a template from camera” to create a file that will contain the configurations of the camera you previously selected.
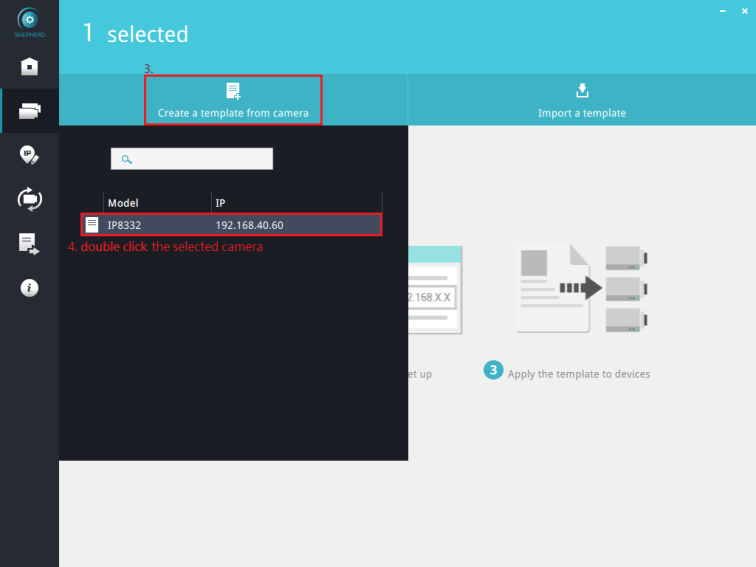
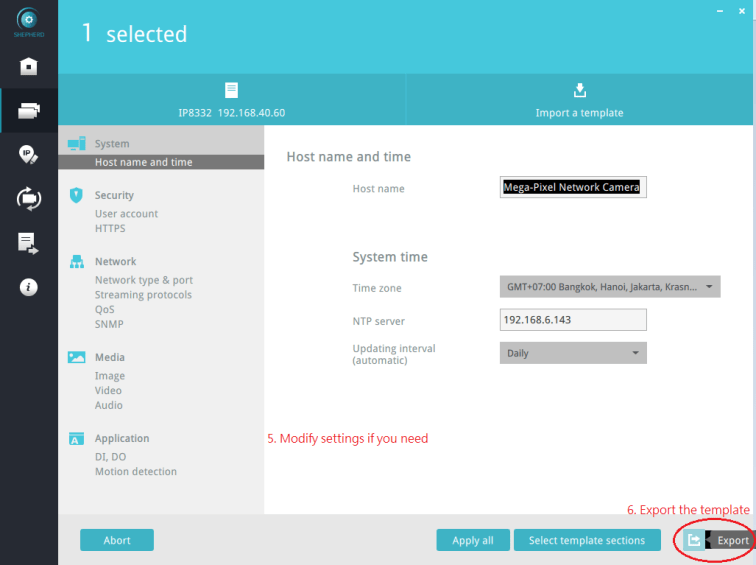
Once the configuration has been loaded into the Shepherd interface, select the sections you would like to configure in the other cameras and click the “Export” button to create a new template.
Note: You can also modify settings if needed.
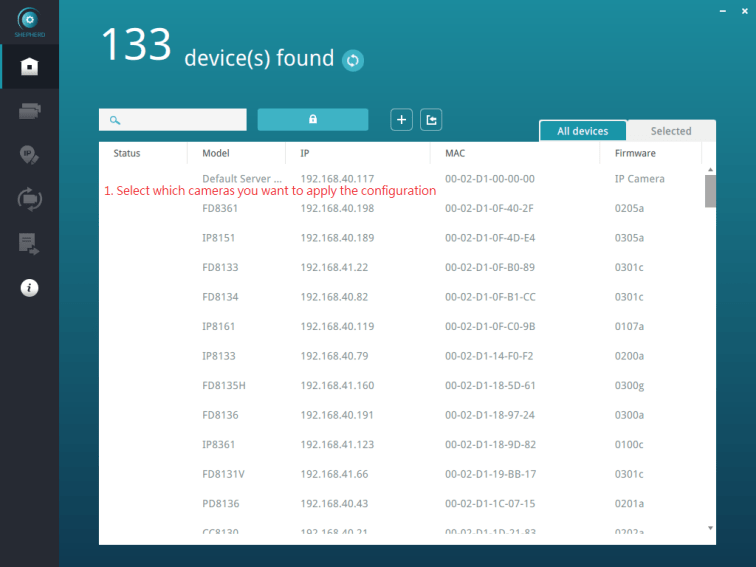
Step 5. Go back to the “Home” interface and select the cameras which you want to apply the configuration template created in the previous step.
Step 6. Go back to the “Batch camera setup” section and select “Import a template”.
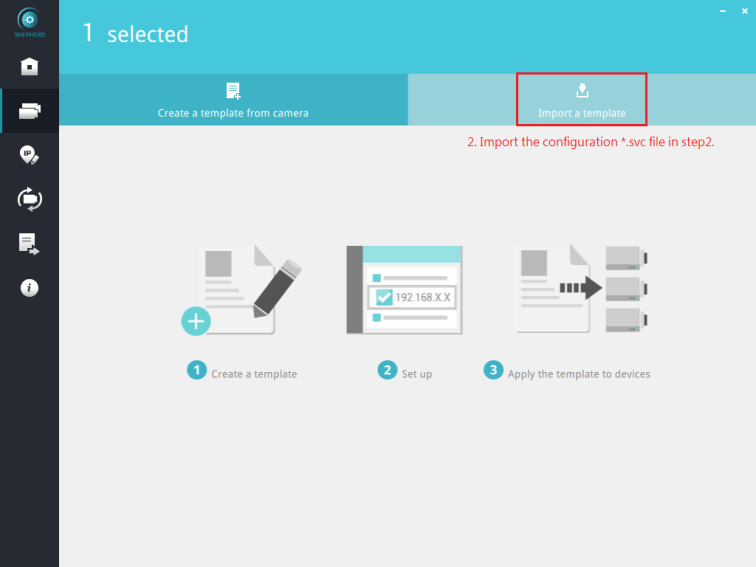
Step 7. Select the template configurations that you wish to apply to the cameras. Once selected, click on the “Apply” button to save. Note: If you want to apply all the configurations to all the devices click on the “Apply all” button.
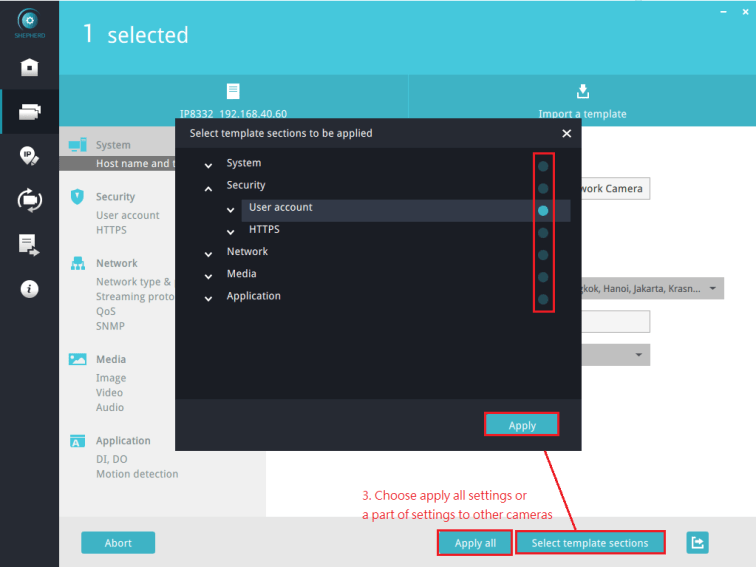
Once the process is finished, access the cameras and verify that the configurations were successfully applied.
