Verkada Viewing Station setup and user guide, The VX52 is a dedicated device that streams up to 300 camera feeds to any display with ultra-low latency, crisp video playback, customizable layouts, and configurable Smart Tiles. For customers with mission-critical real-time viewing requirements, the VX52 is the viewing platform of choice.
Viewing Station Network Settings
Learn about the required network settings for Verkada viewing stations
This article outlines the required settings that your Verkada viewing stations need to communicate with Verkada Command and to operate properly.
Requirement: Verkada devices are incompatible with LANs that require the use of proxy servers or that require Secure Socket Layer (SSL)/Transport Layer Security (TLS) inspection. If either are in use, a bypass for all Verkada devices must be implemented for Verkada devices to communicate with Command.
IP address
Viewing stations need an IPv4 address to communicate to Command through the internet. Viewing stations use Dynamic Host Configuration Protocol (DHCP), User Datagram Protocol (UDP) ports 67 and 68, to obtain their IP addresses and network configurations—on a wired or wireless internet connection.
If you want to have a specific IP address on your viewing station, set a DHCP reservation using the device’s Media Access Control (MAC) address (found on the device’s label).
Domain Name System
Viewing stations use the Domain Name System (DNS) server to resolve Verkada’s fully qualified domain names (FQDN) to IP addresses to communicate with them. Your DHCP server tells the viewing station where the DNS server is on the network and the viewing station communicates using UDP port 53.
Note: DNS over HTTPS (DoH) is currently not supported.
Firewall settings
Verkada devices require access to many endpoints to have the full-featured experience. Many customers may want to restrict devices to only communicate with the specific required endpoints.
These are the general domains to allow, applicable for all organization-regions:
• *.verkada.com – UDP/123 + TCP+UDP/443
• *.mzstatic.com – TCP/80
• *.mzstatic.com – TCP/443
• crl.entrust.net – TCP/80
• crl3.digicert.com – TCP/80
• crl4.digicert.com – TCP/80
• ocsp.digicert.com – TCP/80
• ocsp.entrust.net – TCP/80
• firebaselogging-pa.googleapis.com – TCP+UDP/443
• browser-intake-datadoghq.com – TCP+UDP/443
If your firewall does not allow wildcard masking, or you prefer to have the entire FQDN of the endpoint in your firewall rules, these are the domains to allowlist, by region:
Region: United States
Note: Your region is selected when you create an organization in Command.
• api.global-prod.control.verkada.com – TCP+UDP/443
• relay.global-prod.control.verkada.com – TCP+UDP/443
• vconductor.global-prod.command.verkada.com – TCP+UDP/443
• api.control.verkada.com – TCP+UDP/443
• relay.control.verkada.com – TCP+UDP/443
• index.control.verkada.com – TCP+UDP/443
• firmware.control.verkada.com – TCP+UDP/443
• update.control.verkada.com – TCP+UDP/443
• time.control.verkada.com – UDP/123
• user.pyramid.verkada.com – TCP+UDP/443
• device.pyramid.verkada.com – TCP+UDP/443
• nlb.verkada.com – TCP+UDP/443
• device-nlb.verkada.com – TCP+UDP/443
• vecho.command.verkada.com – TCP+UDP/443
• vmdm.command.verkada.com – TCP+UDP/443
• vprovision.command.verkada.com – TCP+UDP/443
• vvx.command.verkada.com – TCP+UDP/443
• vlocaldns.command.verkada.com – TCP+UDP/443
• vstream.command.verkada.com – TCP+UDP/443
• vsensor.command.verkada.com – TCP+UDP/443
• vsubmit.command.verkada.com – TCP+UDP/443
• *.mzstatic.com – TCP/80
• *.mzstatic.com – TCP/443
• crl.entrust.net – TCP/80
• crl3.digicert.com – TCP/80
• crl4.digicert.com – TCP/80
• ocsp.digicert.com – TCP/80
• ocsp.entrust.net – TCP/80
• firebaselogging-pa.googleapis.com – TCP+UDP/443
• browser-intake-datadoghq.com – TCP+UDP/443
• akamait.net/akamaiedge.net – TCP/80
• akadns.net/aaplimg.com – TCP/443
• *.cdn-apple.com – TCP/443
• *.cdn-apple.com – TCP/80
• *.cdn-apple.com – UDP/443
Region: Europe
Note: Your region is selected when you create an organization in Command.
• api.global-prod.control.verkada.com – TCP+UDP/443
• relay.global-prod.control.verkada.com – TCP+UDP/443
• vconductor.global-prod.command.verkada.com – TCP+UDP/443
• api.prod2.control.verkada.com – TCP+UDP/443
• relay.prod2.control.verkada.com – TCP+UDP/443
• index.prod2.control.verkada.com – TCP+UDP/443
• update.control.verkada.com – TCP+UDP/443
• vconductor.prod2.command.verkada.com – TCP+UDP/443
• time.control.verkada.com – UDP/123
• vconductor.global-prod.command.verkada.com – TCP+UDP/443
• vecho.prod2.verkada.com – TCP+UDP/443
• vmdm.prod2.verkada.com – TCP+UDP/443
• vprovision.prod2.verkada.com – TCP+UDP/443
• vvx.prod2.verkada.com – TCP+UDP/443
• vlocaldns.prod2.verkada.com – TCP+UDP/443
• vstream.prod2.verkada.com – TCP+UDP/443
• vsensor.prod2.verkada.com – TCP+UDP/443
• vsubmit.prod2.verkada.com – TCP+UDP/443
• vfilter.prod2.verkada.com – TCP+UDP/443
• *.mzstatic.com – TCP/80
• *.mzstatic.com – TCP/443
• crl.entrust.net – TCP/80
• crl3.digicert.com – TCP/80
• crl4.digicert.com – TCP/80
• ocsp.digicert.com – TCP/80
• ocsp.entrust.net – TCP/80
• firebaselogging-pa.googleapis.com – TCP+UDP/443
• browser-intake-datadoghq.com – TCP+UDP/443
.
Set Up Smart Tiles on the VX52
Learn how to set up smart tiles on the Verkada VX52 Viewing Stations
The Verkada Smart Tiles feature provides a way to display the most notable options from access events, sensor events, and notable camera data and data sets. Admins can remotely manage the Verkada VX52 Viewing Station, select video feeds and Smart Tiles to display, and customize layouts.
Verkada Viewing Station setup and user guide
Read Also : How to Configure the Light Settings on Hikvision Cameras
Find the smart tiles for your VX52
Once you set up your VX52, you can configure the tiles on the VX52 and add smart tiles.
1.In Verkada Command, go to All Products > Devices.
2.Find and select your VX52 that you want to set up smart tiles for.
3.At the top right, click Manage Tiles.
4.At the top center, select Smart Tiles.
Choose the type of smart tiles to add
There are 3 different types of Smart Tiles you can add to your VX52:
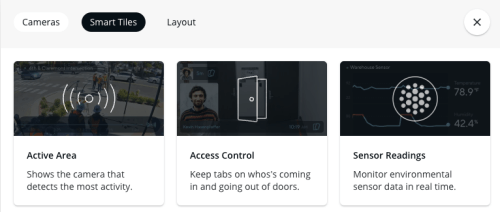
Active Area
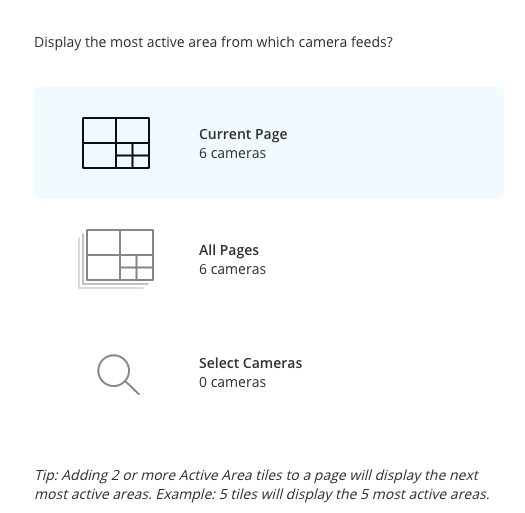
Displays the camera with the most motion. To change which camera(s) display on the active area tile, select the tile to see the information panel where you can select from the following options:
• A camera of your choice that is not already set up on the viewing station
Access Control
Displays all most recent door events, including any door event that you would see indoor history, such as:
• Door held open (DHO) and door forced open (DFO) events
When you select this tile, you can choose which door is displayed on the VX52.
Sensor Readings
Displays the air quality readings of your choice. From the Customize Data tab, you can select a sensor reading when you select the sensor tile. See Air Quality Sensor Readings.


Set Up Your Viewing Station
Learn how to set up your Verkada Viewing Station for live viewing
The Verkada Viewing Station provides a plug-and-play solution to stream multiple camera feeds simultaneously on a display with no local configuration needed.
• It serves as a dedicated, admin-managed device with customizable layouts.
• Supports 30 camera feeds per page and up to 10 pages.
Step 1: Connect your viewing station
When you open your box, you should find an HDMI cable, a power cord, and a viewing station remote. You only need to provide an Ethernet cable. See Viewing Station Network Settings.
Once you take the viewing station out of the box, follow these setup steps:
1.Attach the power cord to the viewing station and connect it to a power source.
2.Connect one end of the HDMI cord to the viewing station and the other end to your display.
3.Attach an Ethernet cable to the viewing station and connect it to your network.
Step 2: Claim your viewing station
Note: You must be an Org Admin to ensure you have access to all devices on your viewing station and to claim the viewing station.
Find your viewing station’s serial number
The are 2 ways to find the serial number:
• Once the viewing station is powered on, you should see a serial number displayed along with a QR code.
• In Verkada Command, go to All Products > Devices > select a viewing station.
• On the right panel, you should see the following settings: Site, Location, Date Added, Serial Number, Model, Timezone, and Local IP.
When you’re ready, claim the viewing station (as you would for a camera):
1.In Verkada Command, go to All Products > Devices > Add Devices.
2.When prompted, enter or scan the viewing station’s serial number.
3.When prompted, claim the viewing station and configure, as needed.
Once the VX52 is powered on you will see a serial number displayed along with a QR code. When you are ready you can claim the viewing station just like a camera from command.verkada.com/add-device.
Once claimed you are now ready to configure your viewing station.
Step 3: Configure your viewing station
Find your viewing station
To find your newly added viewing station, go to the Devices page and filter for viewing stations.
1.In Verkada Command, go All Products > Devices and filter the viewing stations.
2.At the top right, click the arrow to begin the configuration.
3.(Optional) At the top left, select the viewing station’s name and edit the name.
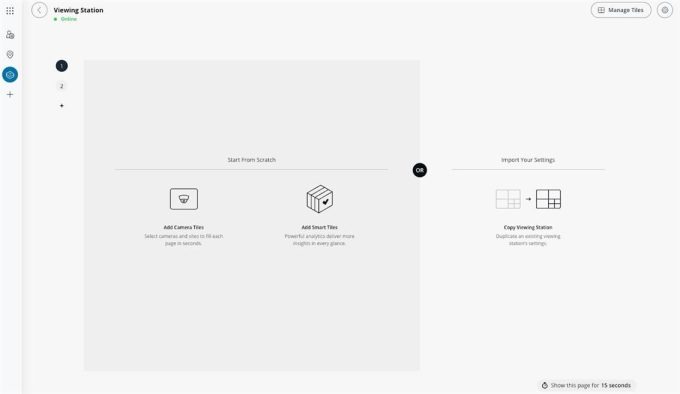
Edit the viewing station name (optional)
To edit the name of the viewing station, select its name at the top of the page and enter a unique name.

Add camera tiles and Smart Tiles
Note: You can add up to 10 pages and up to 30 live feeds per page.
1.On the selected viewing station’s page, click Add Camera Tiles. You can also select Add Smart Tiles, which enables you to display the most active camera, most recent access control event, or air quality or environmental sensor information.
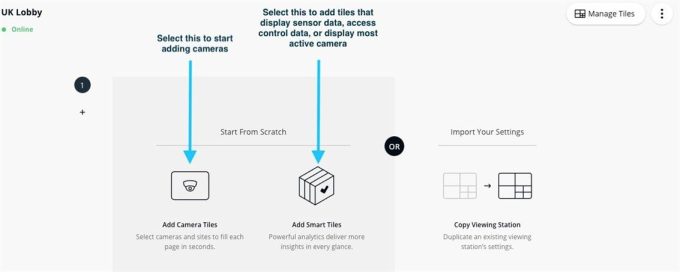
2.Once you have cameras or smart tiles added, you can change the layout of the display. Click Settings (gear icon) > Layout to change the display layout.
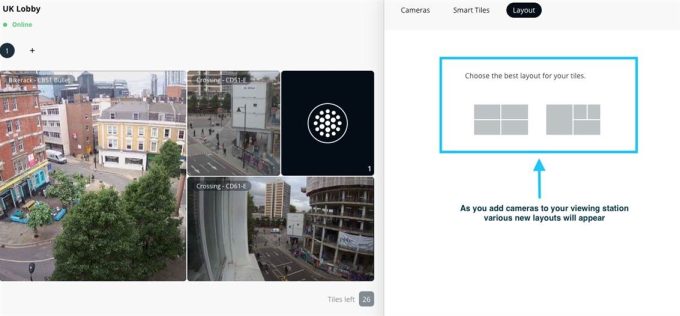
3.(Optional) Click the plus (+) icon to add an additional page. You can add up to 10 pages and up to 30 live feeds per page.
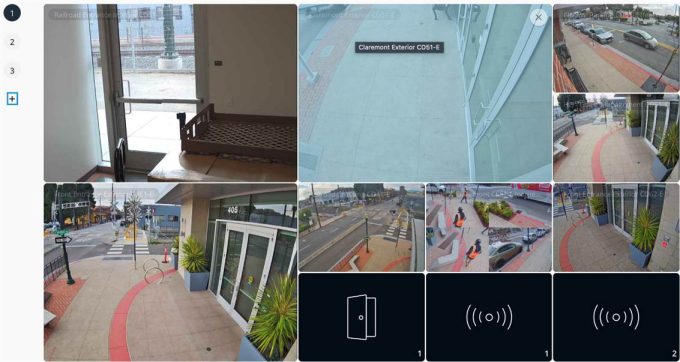
Each page has a timer to enable you to view different subsets of cameras on your viewing station.

Add Verkada viewing station admins
Note: You need to be Org Admin to ensure you have access to all devices on the viewing station.
A device that is moved to a different site (where the user does not have access) causes the same issue. It’s possible for an org to have sites that an Org Admin does not have access to, but they can grant themselves access.
Step 4: Configure viewing station settings
1.On the viewing station page, click Settings .
.
2.On Settings, you can view the current settings or delete the viewing station, if needed.
The Settings menu consists of the following options:
• Offline Alerts—Receive offline alerts for the viewing station, and select a list of users who can receive those alerts.
• Show Labels—Toggle that displays labels on the camera live feeds. If you toggle off this setting, you can only view the live feeds of the cameras and not the camera names.
• Enable Cloud Streaming—Use this setting if the cameras are remote from your location to prevent live streaming remotely or allow live streaming remotely. When this setting is toggled off, only cameras that are local to you will live stream.
• Test Offline mode—The viewing station still streams locally if the network connection is lost, and simulates a network outage on the viewing station.
• Enable Low-Latency Streaming—When cameras are fully updated and local to the viewing station, they stream with low latency.
• Copy Existing Viewing Station—Copy live feed configurations and viewing station settings from other viewing stations in your org.
Configure Wi-Fi
Note: Wi-Fi support on the viewing station requires Verkada software version 2.2.0 (137) or higher. You can find the software version and the serial number in the Device section (below Wi-Fi). If your viewing station has not yet automatically updated to this software version, please contact Verkada Support.
1.Connect the viewing station to a wired network first and complete the setup process.
2.Once it is online via a wired network, enter the Wi-Fi Network Name (SSID).
3.Select the appropriate Security type (WPA2, WPA, or WEP).
4.Enter the Wi-Fi network Password and click Save (hidden SSIDs and networks without passwords are not currently supported).
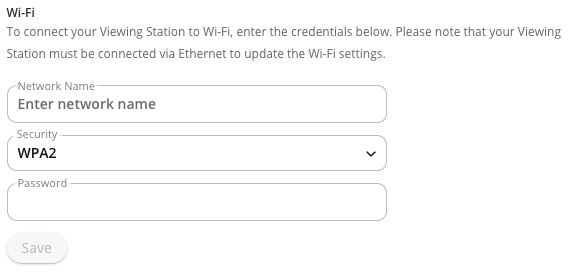
5.Wait 1–2 minutes and then power down the viewing station, disconnect the network cable, and power it back on. The viewing station should then connect to Wi-Fi and continue operating as normal.
Copy an existing viewing station
You can copy live feed configuration and viewing station settings from other viewing stations in your organization.
Restart viewing station
The viewing station becomes unavailable for a few minutes while it restarts.
.
Configure Motion Tiles
Motion tiles for the Verkada Viewing Station (VX51 and VX52)
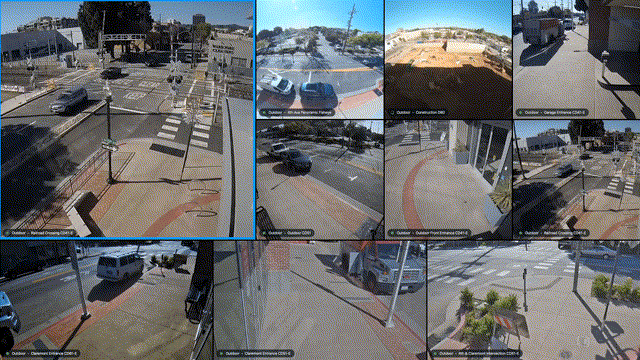
The Verkada Motion Tile feature enables the viewing station to intelligently select video feeds that are most important and brings them into a dedicated tile. This designated motion tile switches to feeds where a significant amount of motion is detected, allowing viewers to quickly see important activity and take any necessary action. You can configure motion tiles to search for activity across one or more sites, or even across an entire organization.
Configure the Motion Tile feature on VX51
1.In Verkada Command, go to All Products > Devices.
2.Select a viewing station and click the right arrow (>) to open the selected viewing station.
3.At the top right, click Manage Tiles.
4.Under the camera, select the Motion Tile.
5.In the Motion Tile Settings, you can define which cameras are eligible to display in this particular motion tile.
• If you select Current Page, it makes all cameras on this viewing station’s page eligible to be displayed on the motion tile.
• If you select Current Page with no cameras added to the page, it causes the motion tile to display nothing.
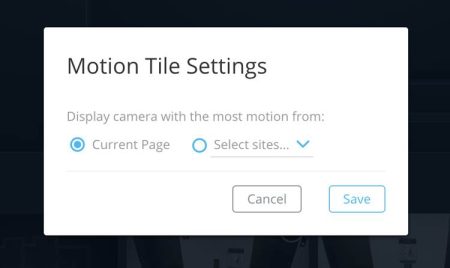
1.(Optional) Select sites or subsites to add to the motion tile.
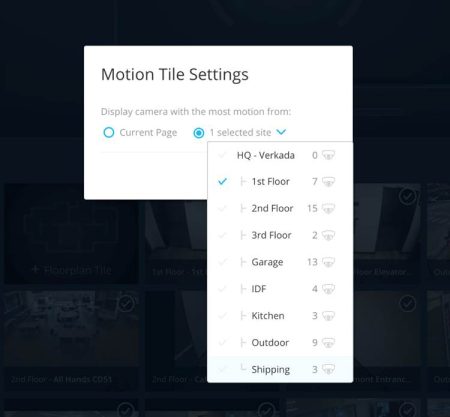
2.Click Save and your Motion Tile is ready to go.
Configure the Motion Tile feature on VX52
1.In Verkada Command, go to All Products > Devices.
2.Select a viewing station and click the right arrow (>) to open the selected viewing station.
3.At the top right, click Manage Tiles.
4.Under the camera, select the Active Area.
5.In the Motion Tile Settings, you can define which cameras are eligible to display in this particular motion tile.
• If you select Current Page, it makes all cameras on this viewing station’s page eligible to be displayed on the motion tile.
• If you select Current Page with no cameras added to the page, it causes the motion tile to display nothing.
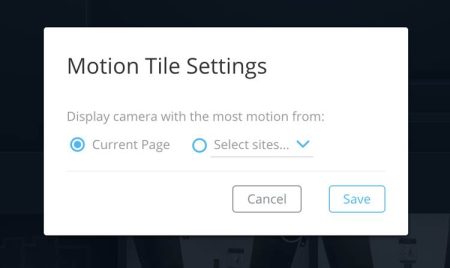
1.(Optional) Select sites or subsites to add to the motion tile.
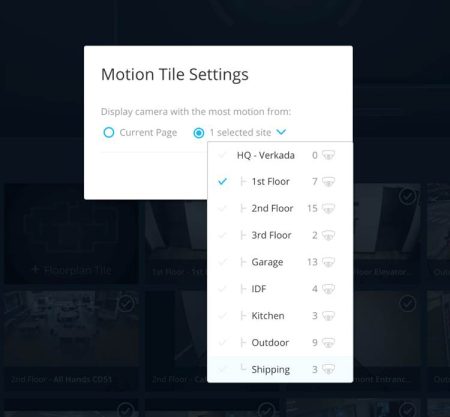
2.Click Save and your Motion Tile is ready to go.
See how this works
Watch this video to see how this feature works
Finished Motion Tile (example)
.
VX51 Viewing Station Click to Expand
Learn how to use this feature with a VX51 viewing station
You can use the Click to Expand feature to enlarge a selected tile to full screen.
Required. To utilize this feature, you must have a mouse connected to your Verkada VX51 viewing station.
Access the Click to Expand feature
1.Mouse over a tile, the tile is then outlined in blue.
2.Click a tile to make the tile expand into full screen.
3.Click the tile again to exit full screen.
.
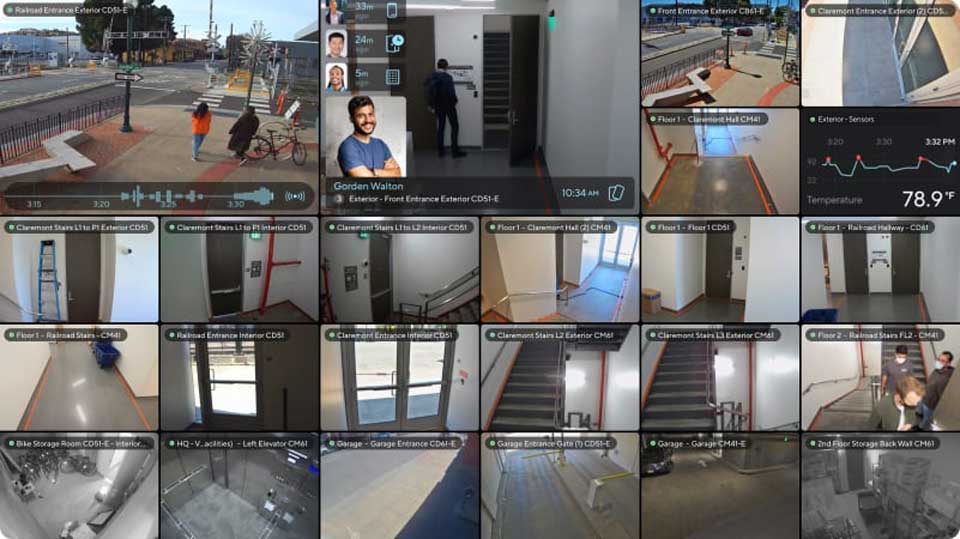


When diving into your Verkada Viewing Station setup, don’t forget to fine-tune your network for seamless video streaming. Upgrading device firmware not only boosts security but also brings exciting new features for a top-notch monitoring experience. Keep this in check for a hassle-free setup!