Troubleshooting your UNV NVR , This tutorial will cover a wide array of troubleshooting tips for the most common issues presented in UNV NVRs. This tutorial will guide you through both fixing these issues, as well as preventing them from happening in the future.
Please Note: This tutorial will cover the below topics and how to fix them from the Web GUI. Please make sure you have a computer on the same local network (or remote access) to troubleshoot.
However, the “No Mouse on Screen” issue can only be fixed from the recorder itself, so this cannot be fixed from the web.
- Scrolling Lines in Image
- Laggy Cameras/Over Encoding
- No Mouse on Screen
- Resolution Incompatibility
- Blank Grey Screen on Main Stream
- EZView Not Opening Cameras (Protocol Issue) (Streaming 95%)
Scrolling Lines
Dark scrolling lines typically appear on cameras that are in the same room as fluorescent lights. In many places, lights flicker at 50Hz. However, in America, typically lights flicker at 60Hz.
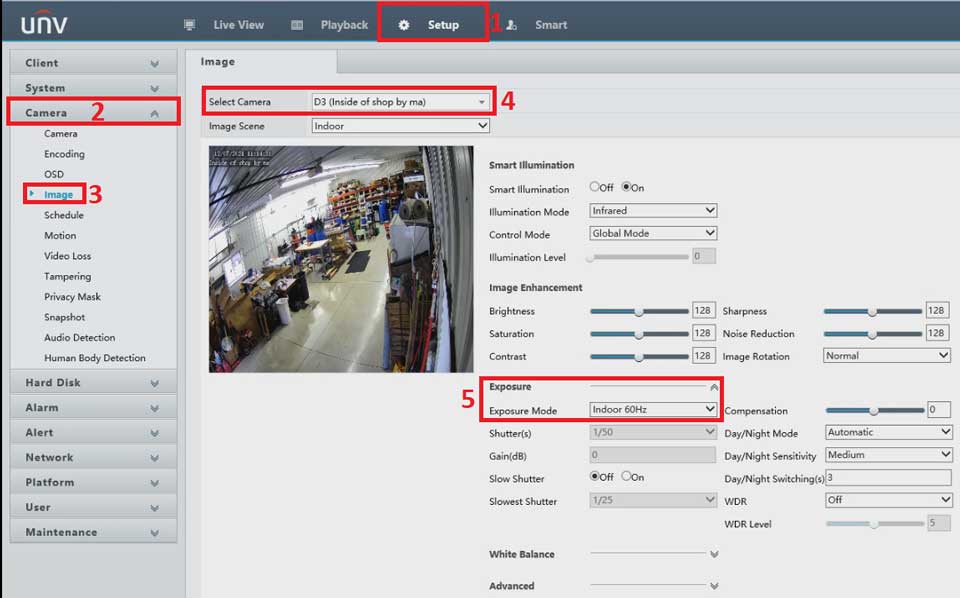
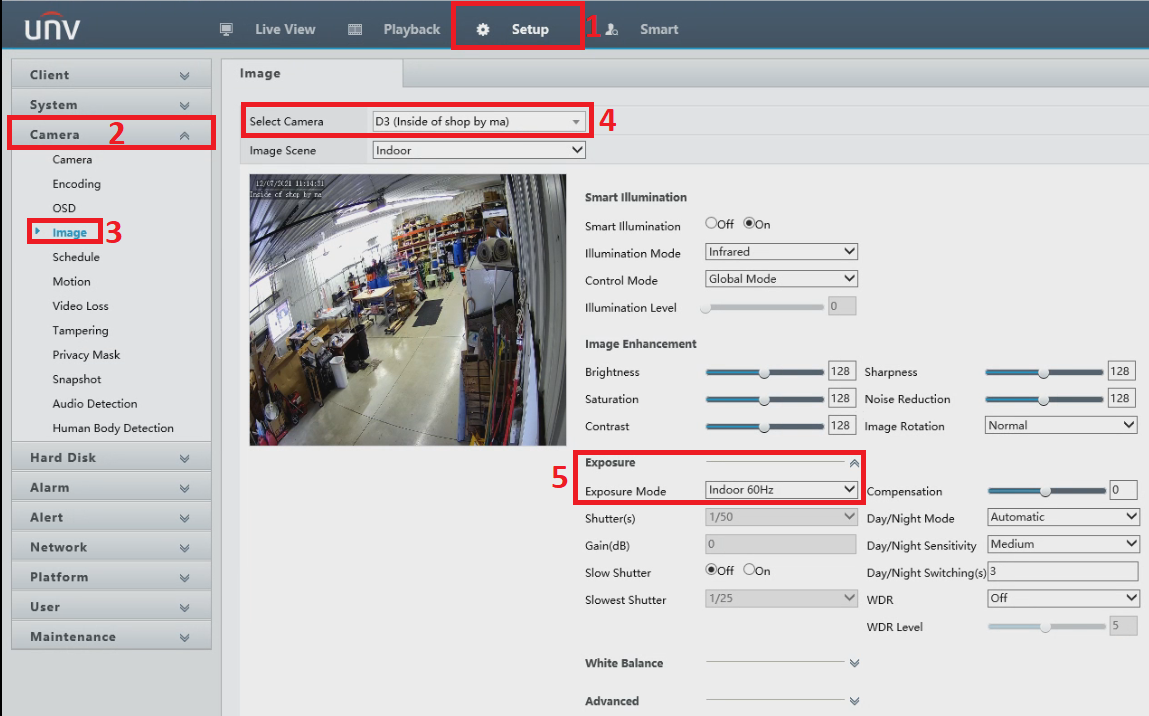
Navigate to your NVR’s web GUI and sign in. At the top of the screen, click “Setup”.
In the Setup menu, click “Camera” on the left-hand side.
Click “Image” in the Camera submenu.
On the top of the Image screen, choose the camera that’s being affected in the “Select Camera” row.
To the right of the camera’s image, you will see an option for “Exposure” with a downward facing arrow. Click the word “Exposure” to open the Exposure menu.
Change the Exposure Mode to “Indoor 60Hz”. You do not have to click Save or Apply, the change will take place automatically and you should see the scrolling lines disappear on the camera’s image.
Laggy Cameras/Over Encoding
If your cameras lag on the web, EZStation or EZView, this typically means their encoding settings are set too high. This is dependent upon the network that the camera system is connected to. Typically, with high download and upload speeds, cameras can have a higher encoding rate set, while lower tier networks need to have lower encoding. To fix this:
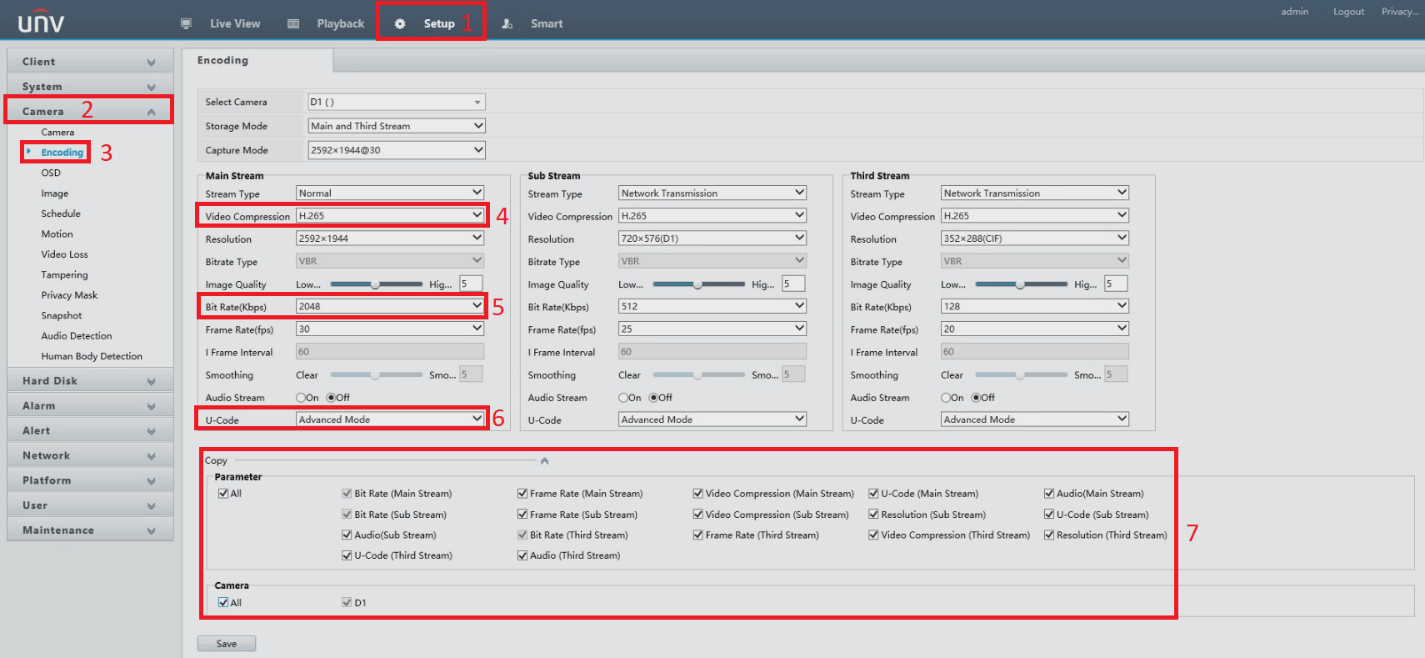
Navigate to your NVR’s web GUI and sign in. At the top of the screen, click “Setup”.
In the Setup menu, click “Camera” on the left-hand side.
In the Camera menu, click “Encoding” to open the Encoding menu.
Troubleshooting your UNV NVR
Read More :
In the Encoding menu, you will see many options to customize the encoding settings of your cameras. Typically, only three options need to be adjusted in order to fix camera lag. Below is the ‘Ideal’ setting as well as a brief explanation of the setting
- Video Compression
- Video Compression controls how the video is compressed into the HDD and over the network. H.265 is far more efficient at video compression.
- Ideal:
- H.265 FOR ALL STREAM TYPES
- Bit Rate (Kbps) (MOST IMPORTANT)
- Bit rate determines the size of each “packet” of data sent from the camera to the NVR and from the NVR to the network. The higher the bit rate, the larger the packet size. This means a high bit rate pushes more data than a lower bit rate, which could cause network lag.
- Ideal:
- 2048 FOR MAIN STREAM
- 512 FOR SUB STREAM
- 128 FOR THIRD STREAM
- U-Code
- U-Code is UNV’s proprietary video codec. Turning U-Code on adjusts the way your camera processes video, allowing for up to 70% more HDD space when turned to Advanced mode. It is highly recommended this be turned on at initialization.
- Ideal
- U-CODE ADVANCED MODE FOR ALL STREAMS
Once you are satisfied with the changes you have made click the “Copy” option under the encoding options. This will show Copy Parameters as well as your camera list. To copy your new settings to all cameras (highly recommended), select “All” under the Parameter tab and “All” under the Camera tab. Once you have done so, click “Save.”
No Mouse on Screen
If you have no mouse on the screen hooked directly into the NVR, simply click and hold the right mouse button for 30 seconds and then release. This will trigger your NVR to ‘jump’ to the screen you are currently on, allowing mouse control on your monitor
Resolution Incompatibility (NVR)
If the monitor plugged directly into your NVR is a lower resolution that the NVR is currently set to, there are two options you can try to fix this.
- First, click and hold the middle mouse button on the mouse hooked directly into your NVR. This will reset the resolution and may fix the issue quickly.
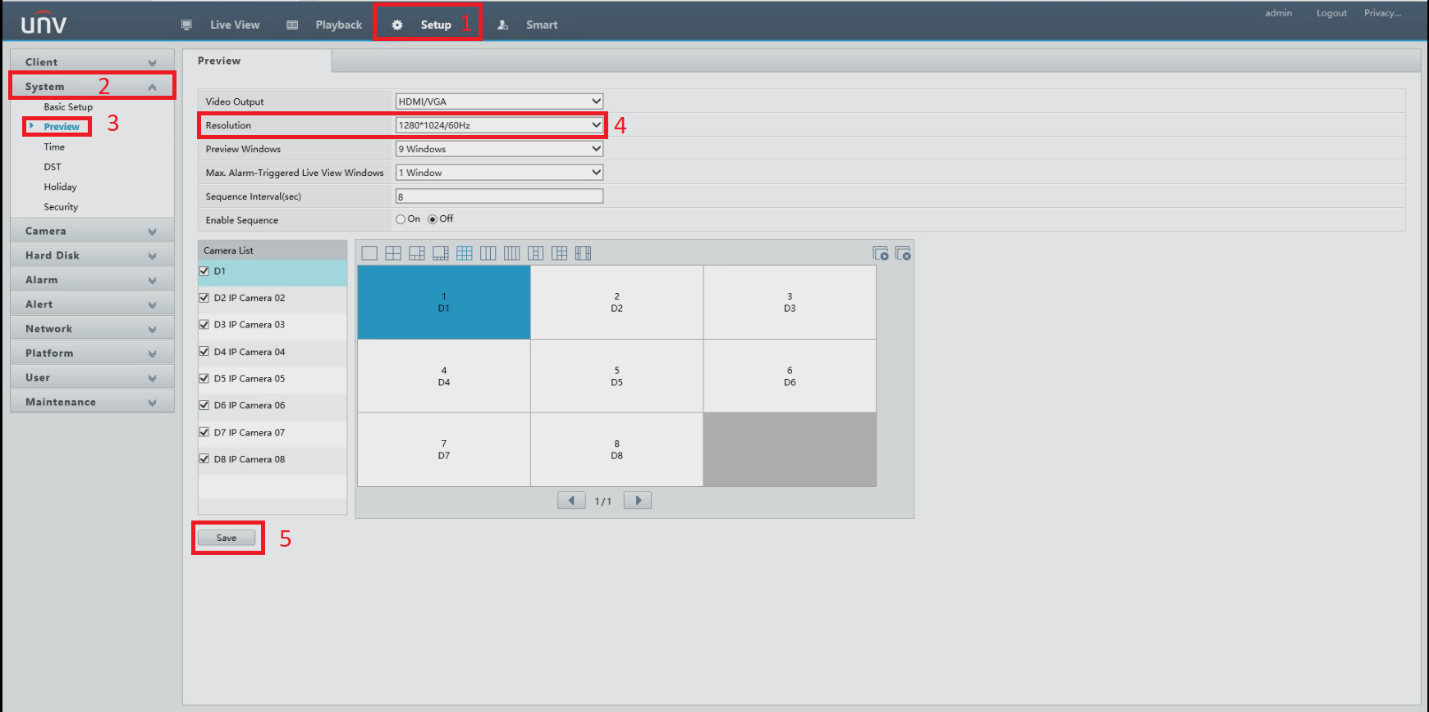
- If the middle mouse button trick does not work, navigate to your NVR’s web GUI. Select the “Setup” Menu.
- In the Setup menu, select the System menu on the left-hand side.
- Select the “Preview” option in the System submenu.
- Navigate to the “Resolution” row in the Preview Menu. Set this to match the resolution of your monitor. If you are unsure of the resolution of your monitor, google search your monitor’s model number and you will find the resolution. Typically, most monitors are 1920x1080p, so that is typically a safe option to try.
Keep in mind that changing the resolution will cause the NVR to reboot. This is normal.
Grey Screen on Camera Image
If your camera image is a grey screen, this typically means the resolution of the camera is too high for the max resolution of the NVR, or you have too many high-resolution cameras in Main Stream at the same time. To fix this:
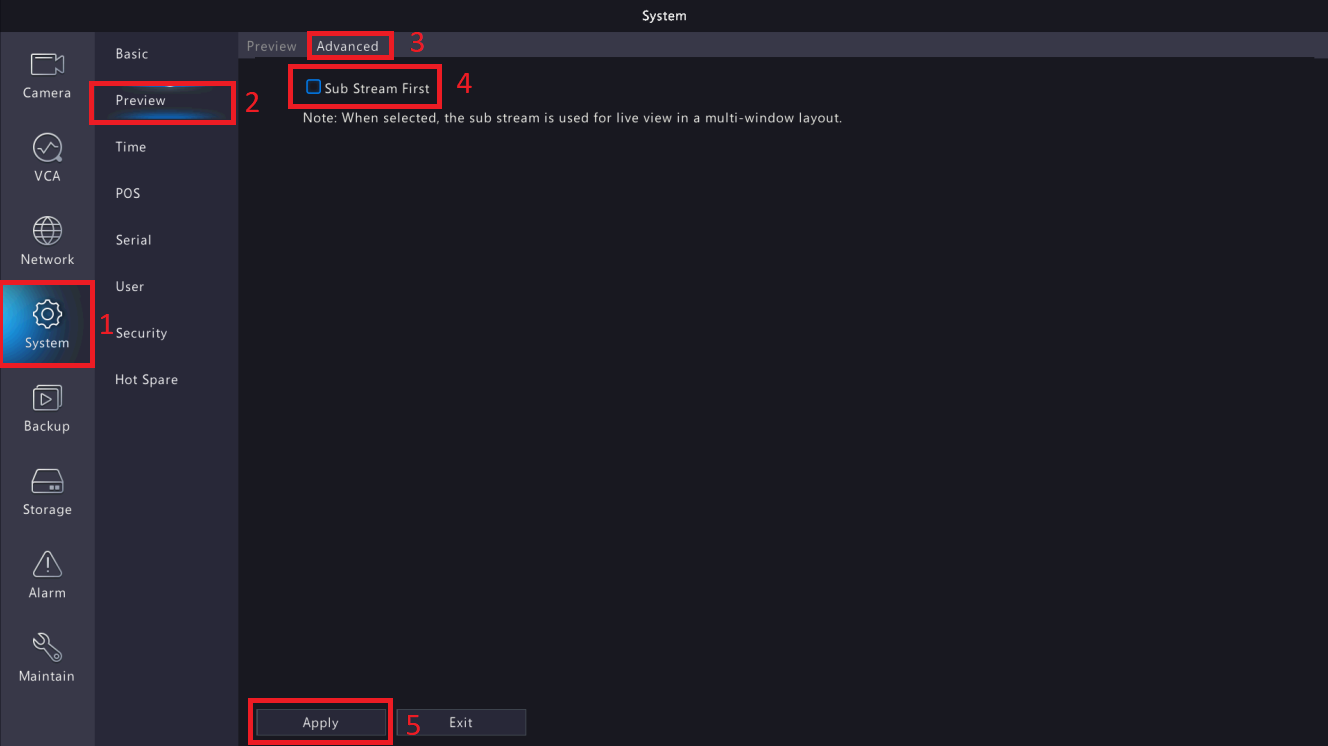
- (TRY THIS FIRST) Sub Stream First Preview (NVR Direct Only):
- On the monitor hooked directly into your NVR, open the main menu
- On the left-hand side, click “System”.
- In the System menu, click “Preview”.
- At the top of the Preview screen, click the “Advanced” tab.
- You will see an option for “Sub Stream First”. Make sure that this is turned ON. To do so, click the checkbox next to “Sub Stream First” and click “Apply” on the bottom left of the screen
- Camera Resolution:
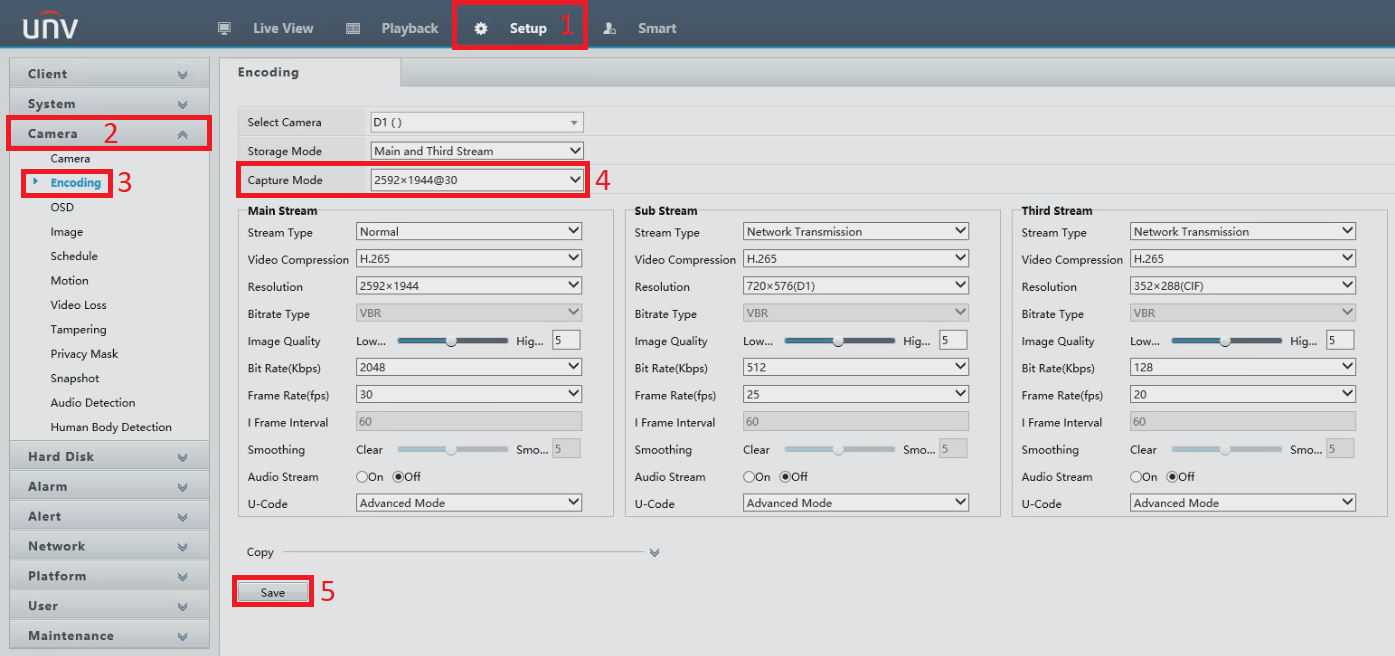
- Navigate to the Setup Menu of the NVR and click the “Camera” menu on the left-hand side.
- Click the “Encoding” sub menu.
- At the top of the Encoding menu, you will see an option for “Capture Mode”.
- Lower the capture rate incrementally until all your cameras appear on your screen.
Cameras Not Streaming on EZView
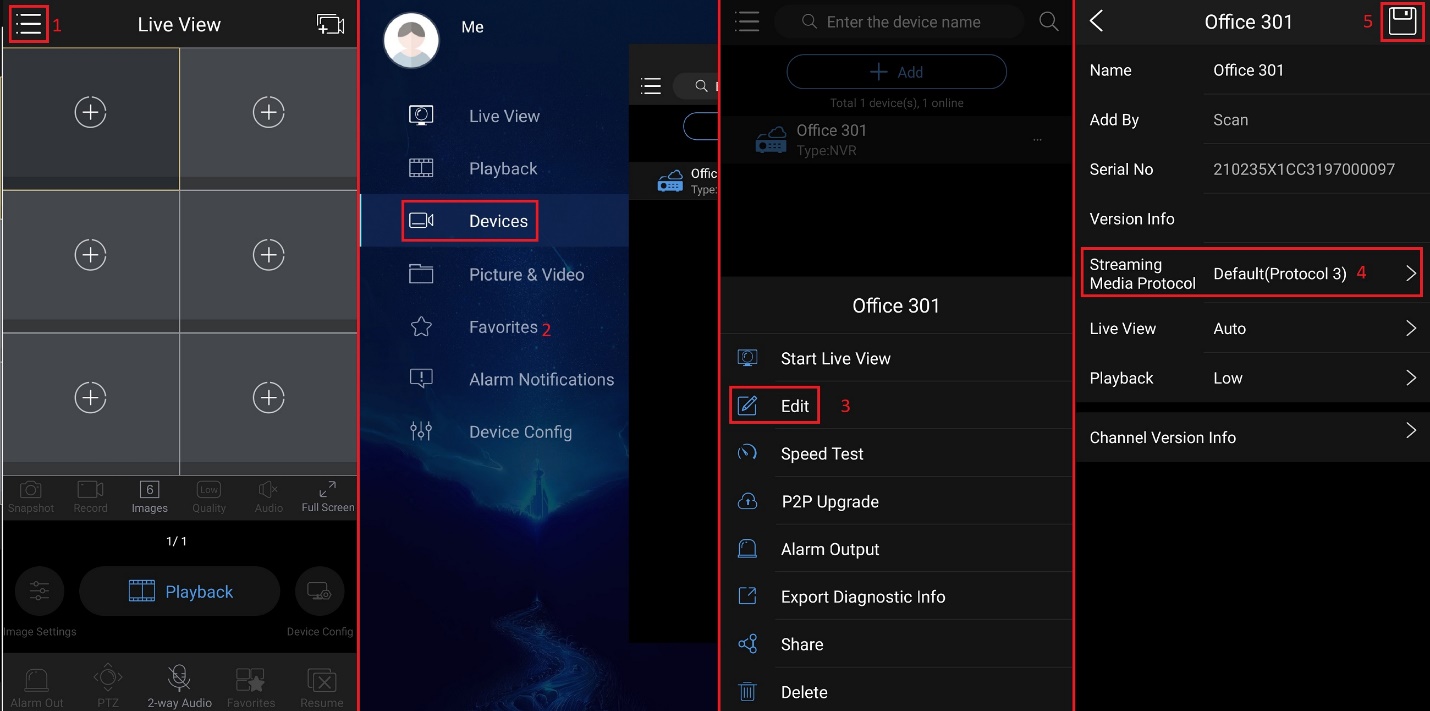
Typically, scanning and adding your cameras to EZView is very straightforward. However, from time to time the Streaming Media Protocol is not suited to certain networks and may cause the cameras to load to 95% and then fail, or not load at all. To fix this:
- Open the EZView App
- On the top left side, click on the three horizontal lines to open the app’s main menu
- Click on “Devices” in the menu.
- Click the NVR’s name to open the NVR menu.
- Click “Edit”.
- You will see an option that says, “Streaming Media Protocol”. Typically, this will be set to “Default (Protocol 3)”. Tap this option and choose “Protocol 2”.
- If the NVR is already set to Protocol 2, tap the option and choose “Protocol 3”.
- Click the Save icon on the top right of your screen.
- Open Live View for the cameras to verify the fix worked.
