Swann HomeSafe View User Manual, HomeSafe View: Live Swann DVR viewing on your iPhone and iPad, HomeSafe View supports the following features: Multi-channel viewing with up to 16 cameras on screen at the same time (16ch view works best on iPads) Play back stored recordings from your DVR on your handset or tablet (requires high upload speed internet) Capture video from your camera live view to your iPhone to play back later Capture single and multi still images and save these to your iPhone’s picture library Control PTZ (pan, tilt, zoom) cameras remotely
HomeSafe View for Windows
The new HomeSafe View software is used for our new range of hybrid HD-over-Coax recorders.
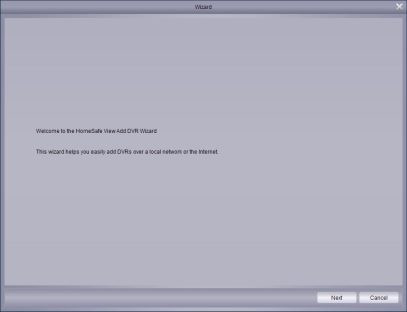
Use the Wizard in the Help menu for a walkthrough of adding a recorder.
Link to the software user guide
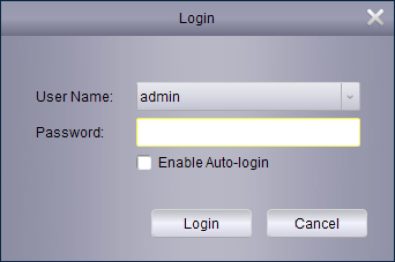
NB: The password requested when you run the software the second and subsequent times is <Blank>, unless you change this in the software. The first login screen below is for the software, not the recorder. This is, therefore, not the username/password combination you use to access the recorder itself.
Read Next : Swann Security VMS Download Guide
Installing HomeSafe View on your computer allows you to monitor the cameras on your DVR or NVR. You can also change configuration settings, access saved video files as well as the ability to retrieve your recovery code if you have forgotten your device’s password.
The following instructions are for the Windows version of HomeSafe View. For Mac users, download our separate instruction manual.
Download HomeSafe View to your computer and follow the on-screen instructions to complete installation.
Wizard
/continued on next page)
4
Wizard
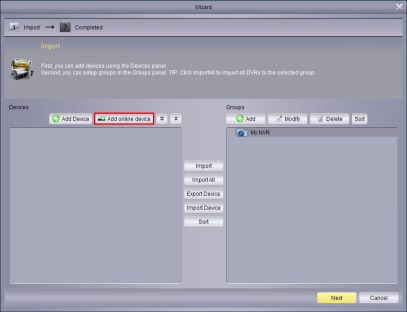
Click the “Add online device” button.
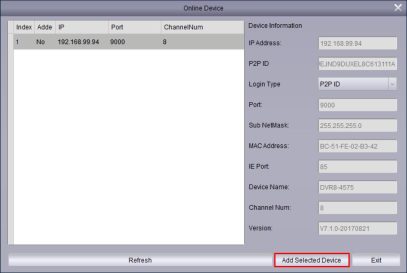
HomeSafe View will detect your DVR or NVR connected to your router (if your DVR or NVR does not appear, check that your device is connected to your router using the supplied Ethernet cable).
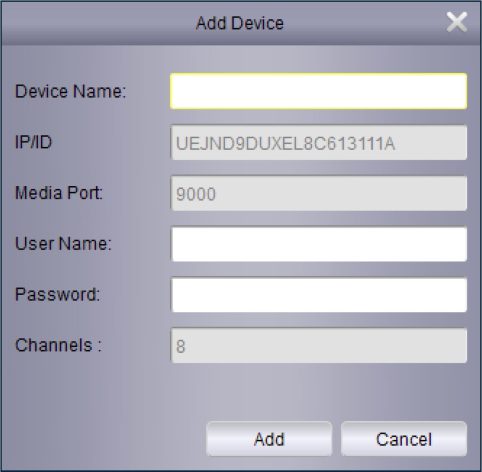
Device Name: Enter a name for your device (you may want to use the same name used for your DVR or NVR).
User Name: Enter “admin”.
Password: Enter your DVR or NVR’s password. When finished, click the “Add” button.
(continued on next page)
5
Wizard
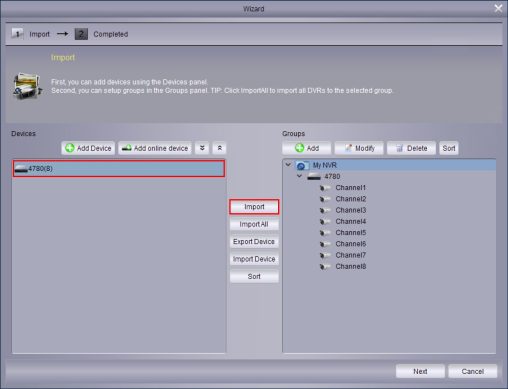
Click your device then click the “Import” button. Your DVR or NVR will be added to the Groups panel. Click the button next to “My NVR” to display the channels available.
Click the “Next” button then click the “Finish” button to complete the Wizard. The “Control Panel” will now be displayed.
6
Control Panel
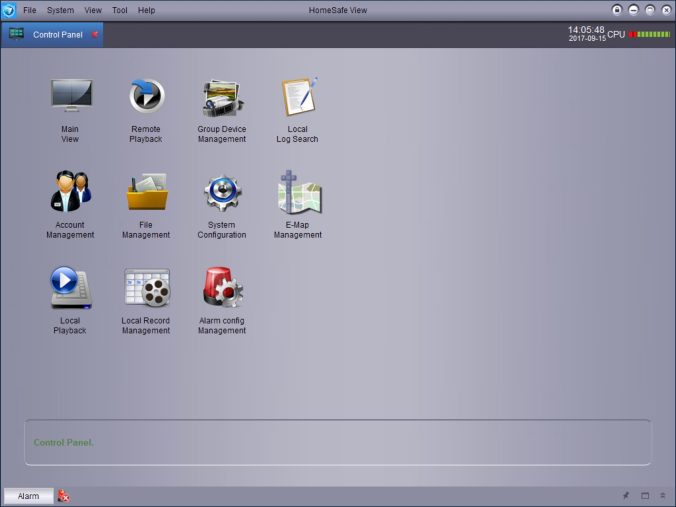
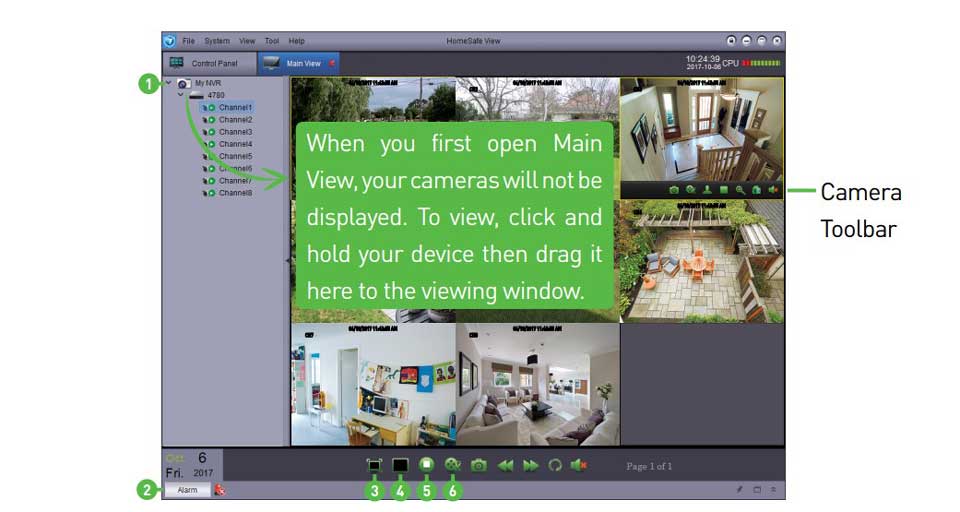
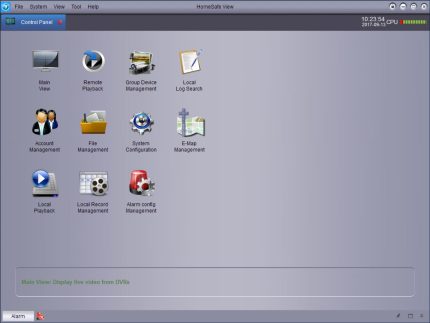
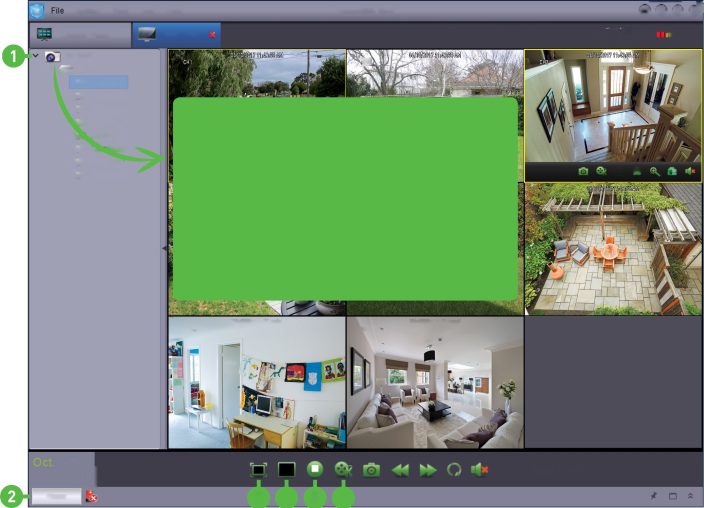
Main View: This is Live View mode. Each camera connected will be displayed. Access to the camera toolbar is available and you can record video and save snapshots directly to your computer.
Remote Playback: This allows you to remotely play video that is located on your DVR or NVR’s hard drive. You have the choice of playing video that matches your recording schedule (Motion),
continuous recordings (Normal) or events triggered by an alarm.
Group Device Management: Click this if you need to make changes to your DVR or NVR configured in the Groups panel, or if you want to add additional devices.
Local Log Search: Search log files for actions performed within the software.
(continued on next page)
7
Control Panel
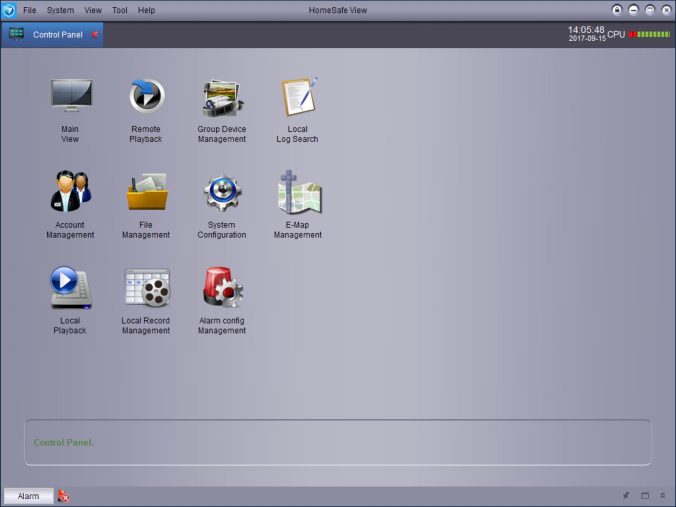
Account Management: Add or change a password or to change user privileges.
File Management: Access videos and snapshots saved directly to your computer.
System Configuration: Change configuration settings for the software such as save location for videos and snapshots, language selection and log keeping duration.
E-Map Management: This function is not com
patible with the DVR and NVR’s supported.
Local Playback: This function is not compatible with the DVR and NVR’s supported. For local playback click “File Management”.
Local Record Management: Allows you to create a local recording schedule for each camera connected.
Alarm Config Management: Change settings for alarm notification.
8
Main View
$2
HomeSafe View
J
Control Panel
System View Tool Help
06/10/201 7 1 1:43:55 AM
CH0 .
06/10/201 7 1 1:43:55 AM
My NVR
v —— 4780
tO Channell »O Channels »O Channels >O Channel tv Channels tO C.. ->nel6 to Channel/
1Q Channels
6
Fri. 2017 I
Alarm
CH7
3 4 5 6
Page 1 of 1
Main View
ofcfe el
10.24.39 Qpu ilinim 2017-10-06
When you first open Main s
View, your cameras will not be ‘
displayed. To view, click and
hold your device then drag it
here to the viewing window.
-w// lilr /
x ■
= = s
CH6
Camera
Toolbar
back to a window.
(continued on next page)
9
Main View
System View To<
Control Panel
V Q My NVR
v mm 4780
WO Channell WO Channel2 WO Channels WO Channel4 WO Channels WO Channel WO Channel? WO Channels
Sub Stream is used by default
to stream (Mobile Stream if
ofcfe el
10.24.39 Qpu ilinim 2017-10-06
Click this button to increase the size of the viewing window.
6 Fri. 2017
Alarm M
lo sli ea111 u*iou
you have an NVR). To change,
right-click a camera and
change to “Set Main Stream”. _
(V
CH4
CH7
Uli
& X ■
EH J1E5E
‘ …i
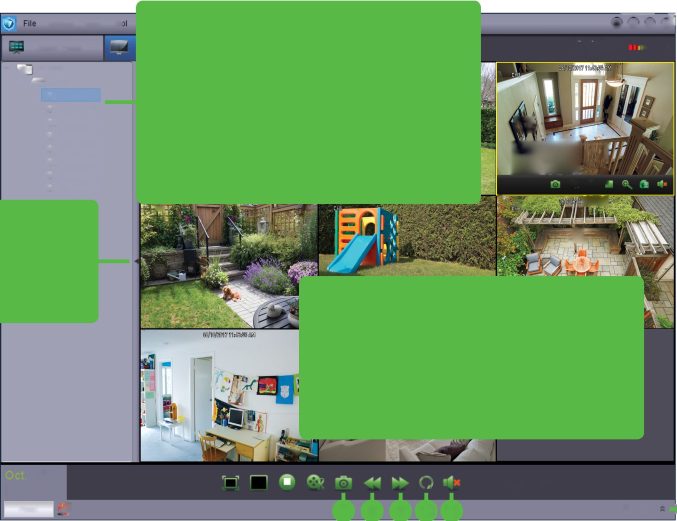
To reposition each camera within the viewing window, click and hold a camera then move it to a different position.
Page 1 of 1
7 8 9 10 11
:12
Camera
Toolbar
4-„ _4-
< □
8 & 9. When viewing a single camera or a group of four cameras, click these buttons to view the previous or next camera or group of cameras.
Camera Toolbar: Move the mouse over a camera to reveal the camera toolbar. This provides access to recording video, saving a snapshot, PTZ controls, stopping live view, digital zoom, image settings and audio monitoring.
10
Remote Playback
4
5
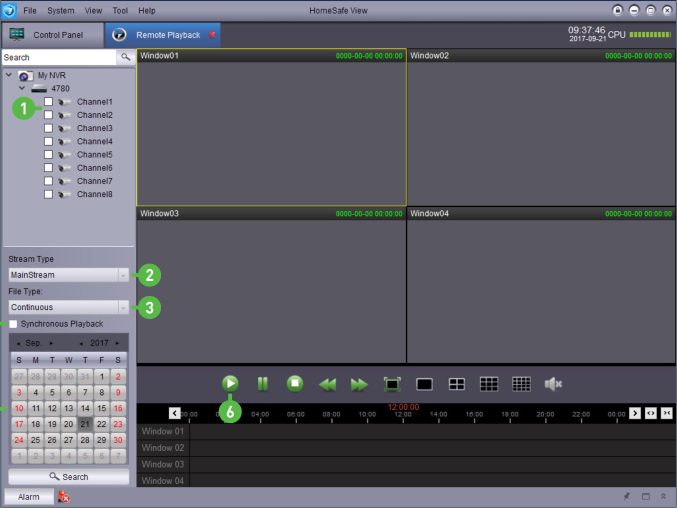
but you can change this to “All” if you want to search for all video types.
(continued on next page)
11
Remote Playback
Camera
Controls
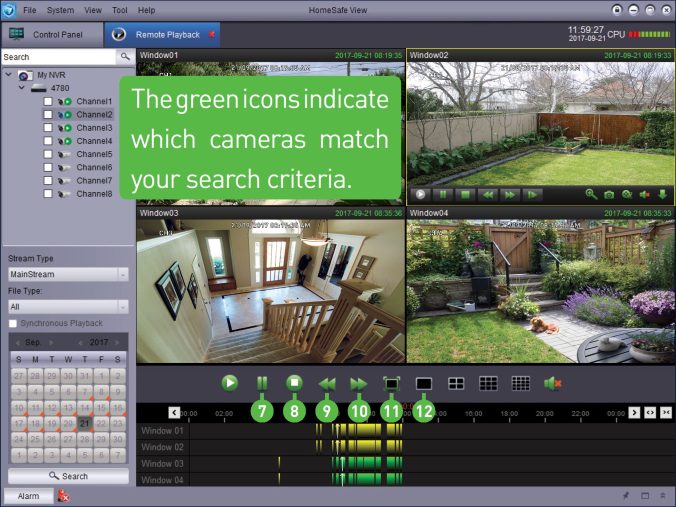
Video matching your search criteria will start playing. You can navigate by using the playback interface or by clicking directly on the timeline.
quent presses will increase the action. Press the “Play” button for normal playback.
(continued on next page)
12
Remote Playback
Camera
Controls
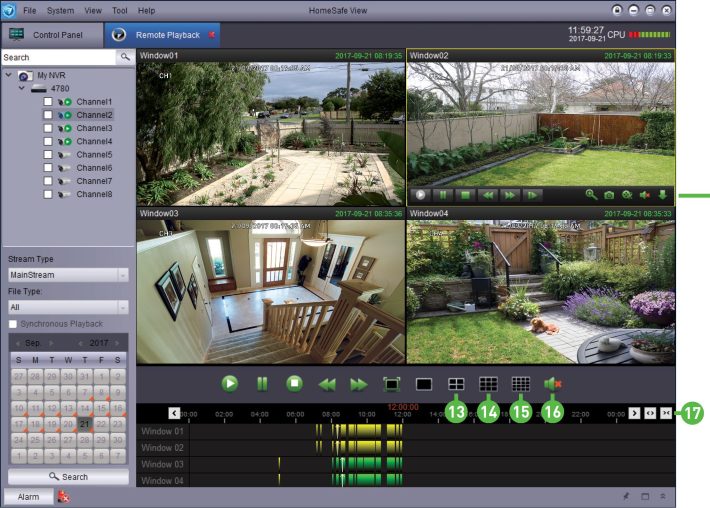
Camera Controls: The controls on the playback interface are duplicated here. There is an additional button allowing you to play video frame-by-frame (the controls are not available when selecting synchronised playback). You can also enable digital zoom, record video, save snapshots and download one or more events directly to your computer.
13
Group Device: Remote Configuration
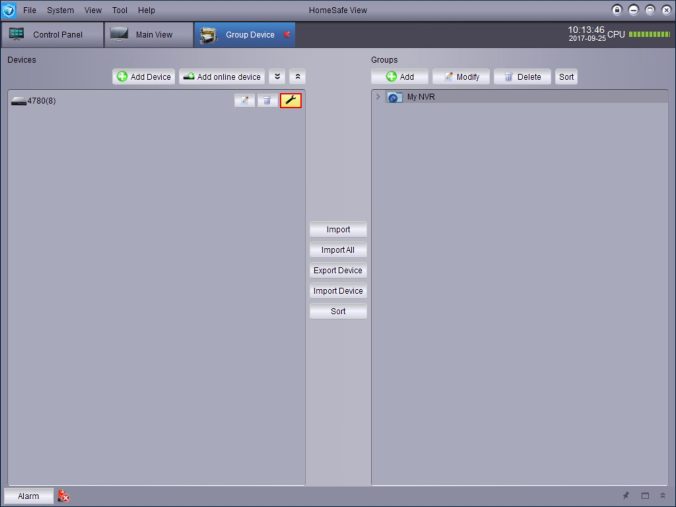
To change configuration settings on your DVR or NVR remotely, click “Group Device Management” (from the Control Panel) then click the spanner button that will appear when hovering the mouse over your device.
(continued on next page)
14
Remote Configuration: Display – IP Camera
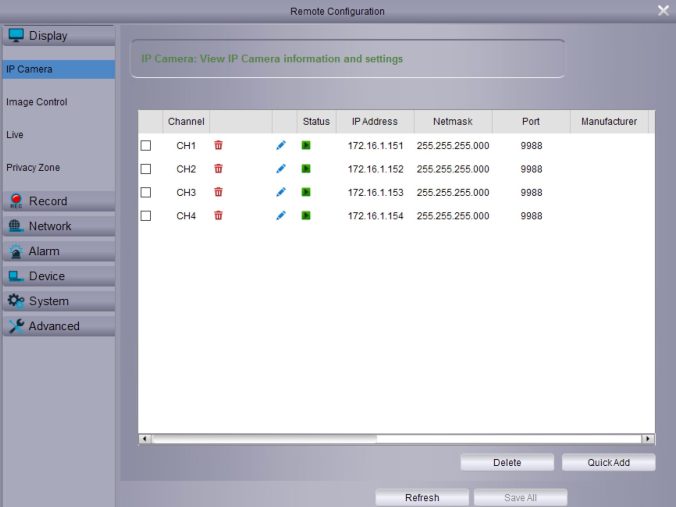
This function is an advanced feature that is used to manage the cameras connected directly to your NVR as well as compatible IP cameras connected to your router. In most circumstances, the functions available here will not be needed for general use of your NVR.
15
Remote Configuration: Display – Image Control
Remote Configuration
Lpl Display
IP Camera
Image Control
Live
Privacy Zone
O Record
Channel
Ircut Mode
Ircut Delay
Lens Flip
Back Light
cm
GPIO Auto
08:19:35 AM
Angle Flip Angle Trad 0
Network
BLC Level
a Alarm
Device
System
f Advanced
3D Noise Reduction Auto
WDR
AGC
White Balance
Auto
Shutter
Auto
Time Exposure
Defog Mode
Disable
Don’t forget to click “Save” to apply any changes made.
Refresh
Save All I Save
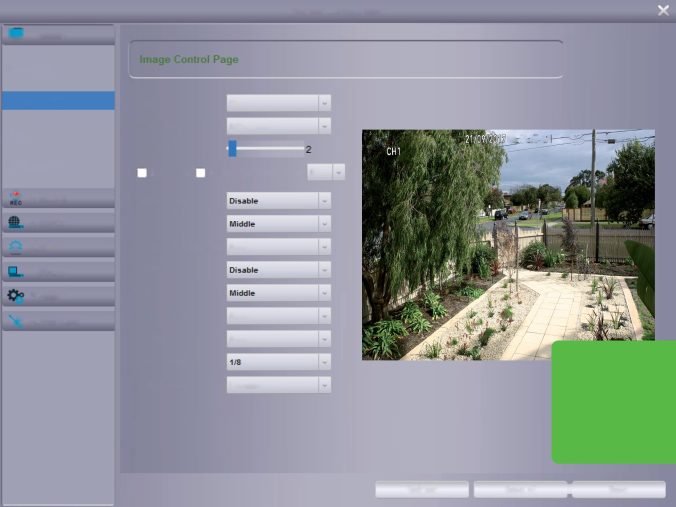
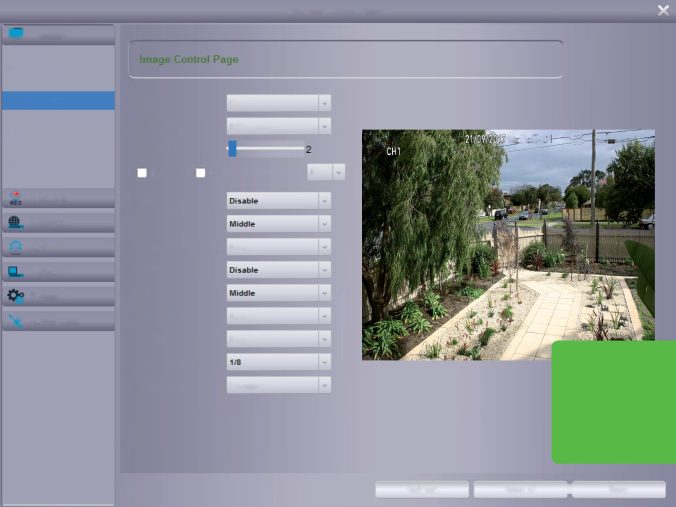
Channel: Select a camera to edit.
Ircut Mode: Lets you choose how the camera handles color and how it manages the transition from daytime to night-time and vice versa: GPIO Auto: This will instruct the camera to switch automatically from “Color Mode” to “Black White mode” and vice versa. This setting will be suitable for most camera locations. Color Mode: This will instruct the camera to
operate in color mode only. In low light conditions, the color will be quite faint. Image clarity will also be reduced in low-light conditions.
Black White Mode: This will instruct the camera to operate in black & white mode only.
Ircut Delay: Controls the delay of the IR cut filter when transitioning from daytime to nighttime.
(continued on next page)
16
Remote Configuration: Display – Image Control
Remote Configuration
Lpl Display
IP Camera
Image Control
Live
Privacy Zone
O Record
Channel
Ircut Mode
Ircut Delay
Lens Flip
Back Light
cm
GPIO Auto
08:19:35 AM
Angle Flip Angle Trad 0
Network
BLC Level
a Alarm
Device
System
f Advanced
3D Noise Reduction Auto
WDR
AGC
White Balance
Auto
Shutter
Auto
Time Exposure
Defog Mode
Disable
Don’t forget to click “Save” to apply any changes made.
Refresh
Save All I Save
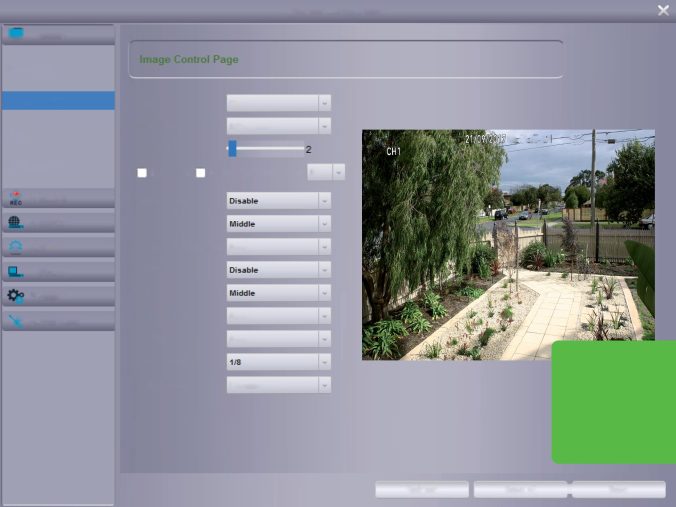
Lens Flip & Angle Flip: Turn the image upside down and/or horizontally reverse the orientation of the image.
Angle Trad (8 channel model): Rotate the image by 90°, 180° and 270°.
Back Light: Improves exposure of an object that is in front of a light source. This may happen if an object is in front of a window or if a person is coming in from the outside. The camera will
pick up the natural light, therefore the object or person in the foreground becomes dark. If the camera is mounted in a location where this is required, click the drop down menu to enable. BLC Level: If “Back Light” has been enabled, you will see this option available. Click the drop down menu to select the level of back light compensation to apply.
(continued on next page)
17
Remote Configuration: Display – Image Control
Remote Configuration
Lpl Display
IP Camera
Image Control
Live
Privacy Zone
O Record
Channel
Ircut Mode
Ircut Delay
Lens Flip
Back Light
cm
GPIO Auto
08:19:35 AM
Angle Flip Angle Trad 0
Network
BLC Level
a Alarm
Device
System
f Advanced
3D Noise Reduction Auto
WDR
AGC
White Balance
Auto
Shutter
Auto
Time Exposure
Defog Mode
Disable
Don’t forget to click “Save” to apply any changes made.
Refresh
Save All I Save
3D Noise Reduction: This function will reduce the overall noise content for recordings done at night or in lower light conditions. In most circumstances, the default selection will be suitable for most camera locations but can be adjusted if needed:
Manual: Click the drop down menu and select “Manual”. Click and hold the slider left or right to change. Just be aware that setting the value
too high, can result in a “trailing” effect (also known as motion blur) on moving objects appearing on-screen.
WDR (Wide Dynamic Range) : This function will balance out images that have a large dynamic range. It does this by brightening dark areas and darkening bright areas. Click the drop down menu to enable.
(continued on next page)
18
Remote Configuration: Display – Image Control
Remote Configuration
Lpl Display
IP Camera
Image Control
Live
Privacy Zone
O Record
Channel
Ircut Mode
Ircut Delay
Lens Flip
Back Light
cm
GPIO Auto
08:19:35 AM
Angle Flip Angle Trad 0
Network
BLC Level
a Alarm
Device
System
f Advanced
3D Noise Reduction Auto
WDR
AGC
White Balance
Auto
Shutter
Auto
Time Exposure
Defog Mode
Disable
Don’t forget to click “Save” to apply any changes made.
Refresh
Save All I Save
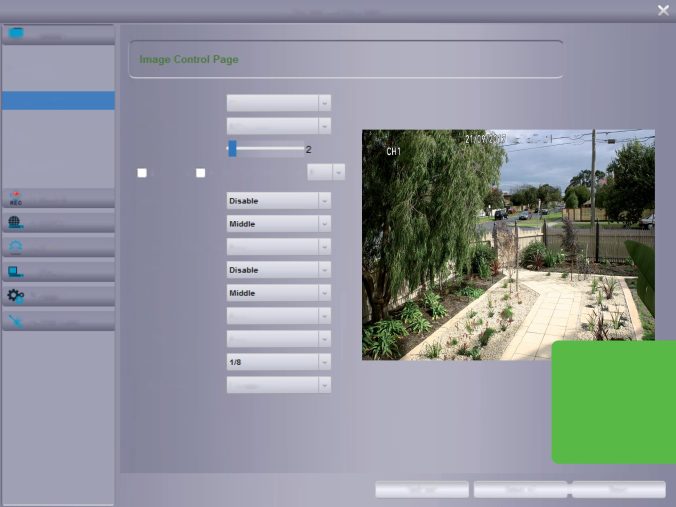
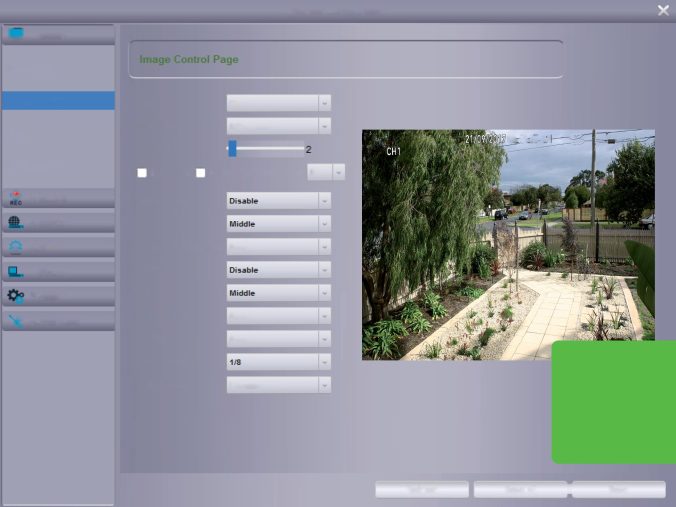
AGC (Automatic Gain Control): This function allows an increase in sensitivity, enabling operation in lower light conditions. The camera will automatically boost the gain control so that objects can be seen more clearly. Click the drop down menu to select a level of control.
White Balance: This function adjusts for lighting in order to make white objects appear white in photos. One of the factors that affect correct
image reproduction is the light source which illuminates the scene. One of the indicators for an improper white balance setting are dark colors which appear faded, shifted, or a completely different color altogether. If this is happening, click the drop down menu and change this to “Manual”. If the colors appear correctly, leave the default setting.
(continued on next page)
19
Remote Configuration: Display – Image Control
Remote Configuration
Lpl Display
IP Camera
Image Control
Live
Privacy Zone
O Record
Channel
Ircut Mode
Ircut Delay
Lens Flip
Back Light
cm
GPIO Auto
08:19:35 AM
Angle Flip Angle Trad 0
Network
BLC Level
a Alarm
Device
System
f Advanced
3D Noise Reduction Auto
WDR
AGC
White Balance
Auto
Shutter
Auto
Time Exposure
Defog Mode
Disable
Don’t forget to click “Save” to apply any changes made.
Refresh
Save All I Save
Manual: When selecting this mode, click and hold the red, green and blue sliders left or right to change.
Shutter: This function controls the length of time a camera’s shutter is open and the amount of light reaching the sensor. In low light situations, the shutter needs to stay open longer in order for the sensor to receive enough light.
Time Exposure: When selecting “Manual”,
click the drop down menu to select a different exposure time. The lower the number, the slower the shutter speed (this will create a motion blur effect). Some experimentation is recommended to select the best settings.
Defog Mode: This function extends visibility and improves video quality if there is moderate to heavy fog or haze. If selecting “Manual”, click and hold the slider left or right to change.
20
Remote Configuration: Display – Live
Remote Configuration
Lpl Display
ive display settings (e.g. OSD messages, covert, color)
Live
Privacy Zone
O Record
Channel
Show Name
Name
Record Time
Covert
CH1
Q Show Time
İCH1
Enable
Disable
Copy
PJ Capture
Network
a Alarm
Q… Device
System y Advanced
Don’t forget to click “Save” to apply any changes made.
Refresh
Save All
Save
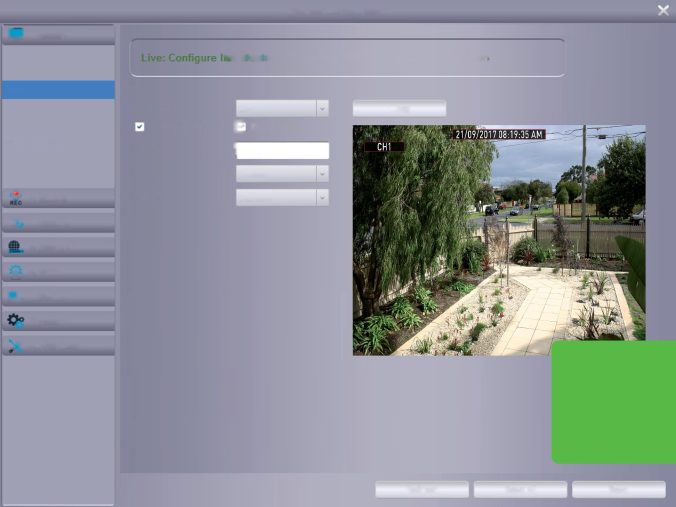
Channel: Select a camera to edit.
Show Name: Leave this enabled to display the camera name in Live View mode, otherwise click the checkbox to disable.
Show Time: Leave this enabled to display the date and time in Live View mode, otherwise click the checkbox to disable.
Name: Enter a name for the camera you’ve selected.
Record Time: It’s recommended to leave this enabled, as a timestamp will be embedded on all video recordings. This allows you to easily identify when events have occurred. You can disable this if you wish.
Covert: When enabled, the camera will detect motion and trigger your DVR or NVR to record, but you will not see an image of the camera in Live View mode.
21
Remote Configuration: Display – Privacy Zone
Remote Configuration
Lpl Display
e: Configure privacy zones
Live
Channel
cm
Copy
Privacy Zone
Clear
O Record
CS Capture
SL Network
a Alarm
Q… Device
System y Advanced
Don’t forget to click “Save” to apply any changes made.
Refresh
Save All
Save
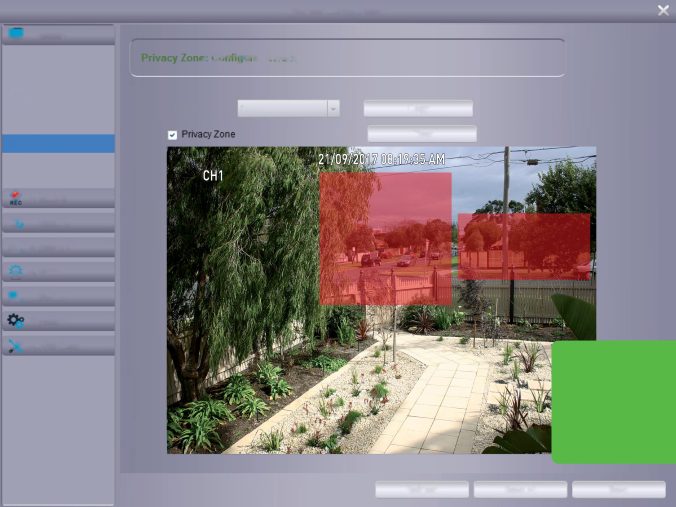
This function can be used to obscure all or part of your image for privacy (up to four privacy masks can be created per camera).
Channel: Select a camera to edit.
Privacy Zone: Click the checkbox then click and hold the mouse over the camera and select the desired area to create a mask.
You can reposition and resize each mask to overlap each other.
Copy: Click this to apply all settings to the other cameras.
Clear: Click on a mask (a yellow border will appear) then click this to delete the mask.
22
Remote Configuration: Record – Record Parameter
Display
® Record
Record Parameter
Schedule
Main Stream
Sub Stream
P Capture
Network
a Alarm
□… Device
System
S’ Advanced
Don’t forget to click “Save” to apply any changes made.
![]()
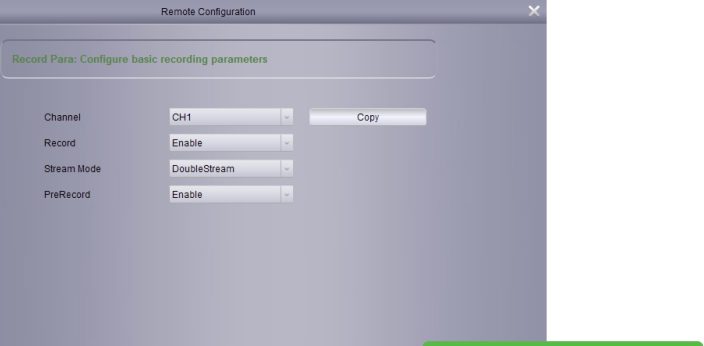
Channel: Select a camera to edit.
Record: If disabled, your DVR or NVR will detect motion but it will not record.
Stream Mode: By default, your DVR or NVR will record both Mainstream and Substream video (known as DualStream on your device).
PreRecord: Allows your DVR or NVR to record for a number of seconds before an event occurs. It’s recommended to leave this enabled.
Copy: Click this to apply all settings to the other cameras.
23
Remote Configuration: Record – Schedule
Display
® Record
Record Parameter
Schedule
Main Stream
Sub Stream
P Capture
Network
Channel
Record Schedule
Save
to click
to apply any
changes made.
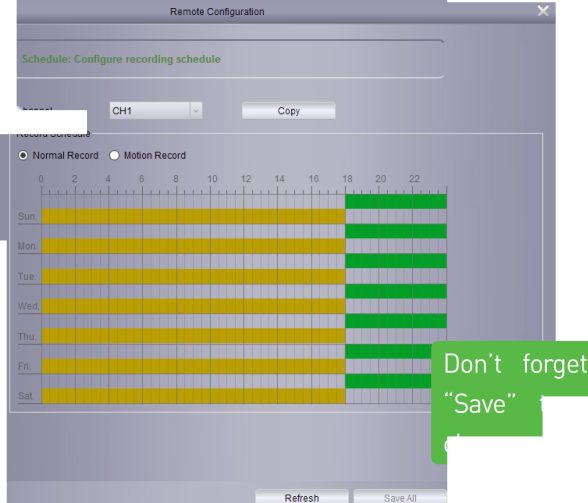
Channel: Select a camera to edit.
Normal Record: Your DVR or NVR will constantly record for a set period of time.
Motion Record: Your DVR or NVR will only record when motion has been detected from one or more cameras.
Each square represents 30 minutes. Using the mouse, select the desired recording mode then click on a particular square to change
or click and drag the mouse over the squares corresponding to your desired time period. The same action can also be applied if Normal or Motion recording is not required (on one or more sections that have recording enabled).
Copy: Click this to apply all settings to the other cameras.
24
Remote Configuration: Record – Main Stream
Don’t forget to click “Save” to apply any changes made.
Refresh I Save All
![]()
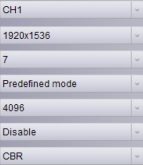
Channel: Select a camera to edit.
Resolution: The recording resolution is automatically selected to match the cameras connected. If you have a DVR with older cameras connected, lower the resolution to “960 x 480” for NTSC and “960 x 576” for PAL.
FPS: The number of frames per second (fps) that your DVR or NVR will record or stream.
Bitrate Mode: You have the choice of selecting
a predefined or user-defined bitrate.
Bitrate: The amount of data that your DVR or NVR will use to record or stream video.
Audio (DVR only): Enable this if you have an audio source connected to your DVR.
Rate Control: Select the compression used to record or stream video on your DVR or NVR.
Copy: Click this to apply all settings to the other cameras.
25
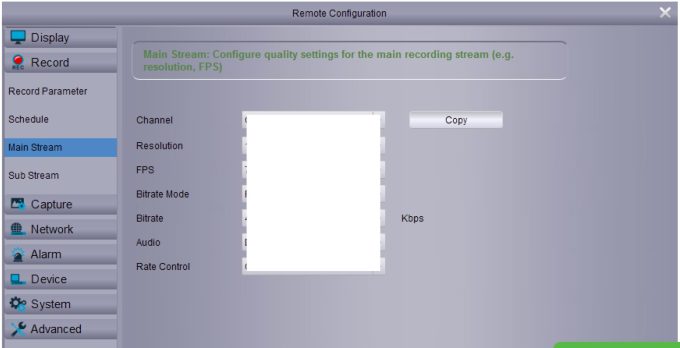
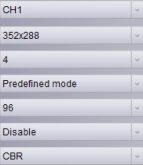
Remote Configuration: Record – Sub Stream
Remote Configuration
Display
İ* Record
Configure remote streaming quality settings
Record Parameter
Schedule
Channel
Main Stream
Resolution
Sub Stream
FPS
P Capture
Bitrate Mode
si Network
Bitrate
Audio
a Alarm
Rate Control
0,. Device
Kbps
Copy
System
Advanced
Don’t forget to click
“Save” to apply any
changes made.
Refresh
Save All
![]()
Channel: Select a camera to edit.
Resolution: The resolution is set according to the capabilities of your DVR or NVR. Some models give you the option to change the resolution (check your device’s instruction manual for more information).
FPS: The number of frames per second (fps) that your DVR or NVR will record or stream.
Bitrate Mode: You have the choice of selecting
a predefined or user-defined bitrate.
Bitrate: The amount of data that your DVR or NVR will use to record or stream video.
Audio (DVR only): Click the checkbox if you have an audio source connected to your DVR.
Rate Control: Select the compression used to record or stream video on your DVR or NVR.
Copy: Click this to apply all settings to the other cameras.
26
Remote Configuration: Record – Mobile Stream
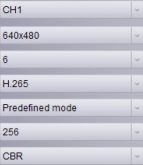
Don’t forget to click “Save” to apply any changes made.
Refresh
Save All
![]()
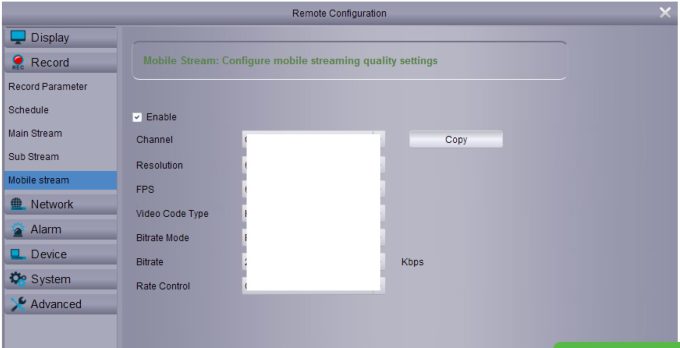
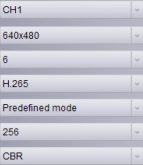
This function is only visible if you have an NVR. Enable: It’s strongly recommended leaving this option enabled as there is no benefit if it is disabled (if disabled, Substream will be used to stream video).
Channel: Select a camera to edit.
Resolution: The default resolution is 640 x 480. You can select a lower resolution if you’re having issues streaming to your mobile device or
computer via HomeSafe View.
FPS: The number of frames per second (fps) that your NVR will record or stream.
Video Code Type: The default method of compression is H.265. This will result in less hard drive space used when recording (before older videos are automatically overwritten).
(continued on next page)
27
Remote Configuration: Record – Mobile Stream
Don’t forget to click “Save” to apply any changes made.
Refresh
Save All
![]()
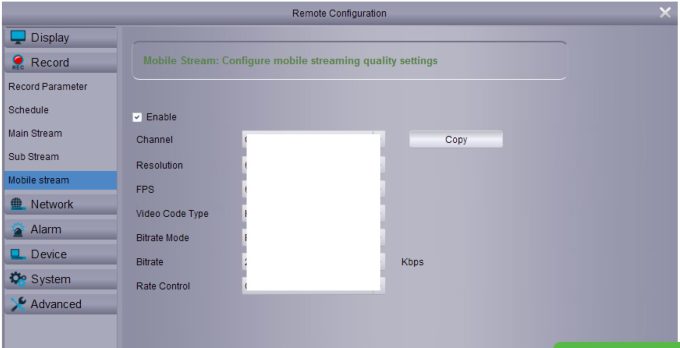
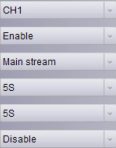
Bitrate Mode: You have the choice of selecting a predefined or user-defined bitrate.
Bitrate: The amount of data that your NVR will use to stream video to your mobile device. For cameras that monitor medium to high traffic areas, increase the bitrate to add more detail to the camera’s image, but just be aware this will increase the bandwidth required. Increase the bitrate in small doses until you are satis
fied with the image quality.
Rate Control: Change this to VBR. This will result in a lower recording size as well as a lower bandwidth requirement. You can select the recording quality that will define the variable bitrate used, from lowest to highest.
Copy: Click this to apply all settings to the other cameras.
28
Remote Configuration: Capture – Capture Setup
Don’t forget to click “Save” to apply any changes made.
Refresh
Save All
![]()
This function is only visible if you have a DVR. Channel: Select a camera to edit.
Auto Capture: When enabled, your DVR will take a snapshot each time an event occurs.
Stream Mode: Leave the default selection. This will save each snapshot at the camera’s native resolution.
Normal Interval: The length of time that must elapse before a snapshot is taken.
Alarm Interval: When setting a Motion capture schedule, a snapshot will be taken each time motion has been detected according to the interval selected.
Manual Capture: Enable this feature if you would like to manually take a snapshot using the Manual Capture button.
Copy: Click this to apply all settings to the other cameras.
29
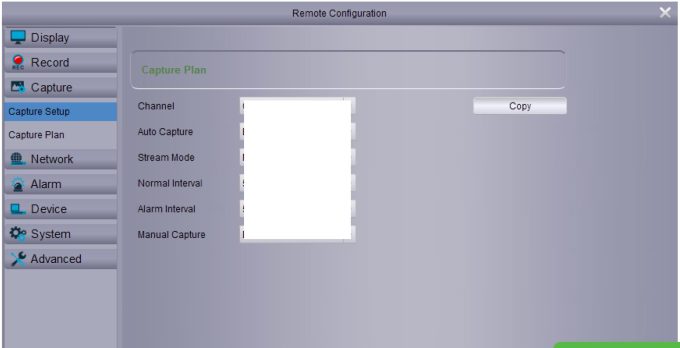
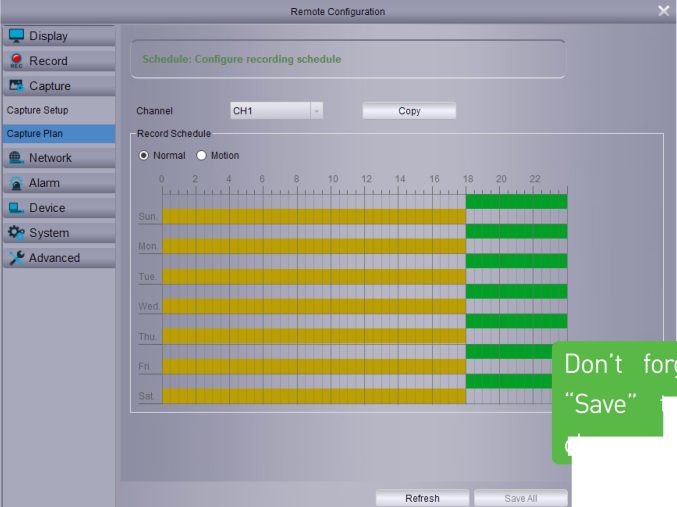
Remote Configuration: Capture – Capture Plan
Save
to click
to apply any
changes made.
![]()
Channel: Select a camera to edit.
Normal: A snapshot will be taken every 5 seconds using the default selection.
Motion: A snapshot will be taken each time motion has been detected according to the interval selected.
Each square represents 30 minutes. Using the mouse, select the desired capture mode then click on a particular square to change or click
and drag the mouse over the squares corresponding to your desired time period. The same action can also be applied if Normal or Motion capture mode is not required (on one or more sections that have been enabled).
Copy: Click this to apply all settings to the other cameras.
Q Please note: This feature is not available on all DVR or NVR devices.
30
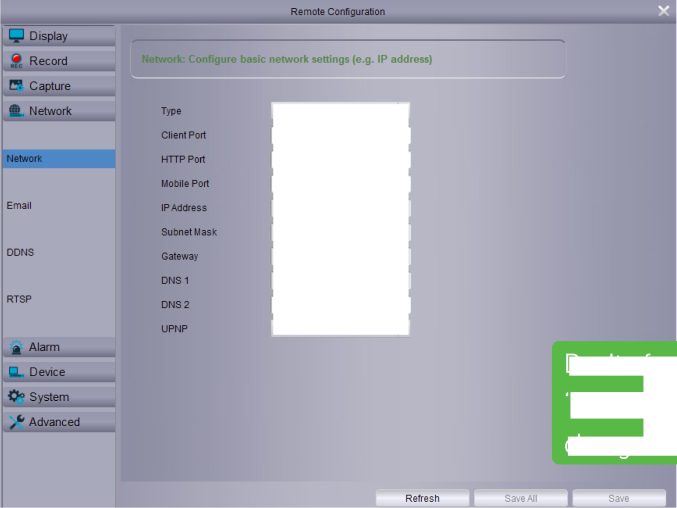
Remote Configuration: Network – Network
Don’t forget to click
“Save” to apply any
changes made.
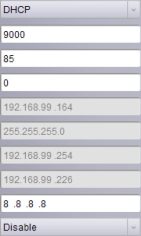
Type: The default method of connection to your network for your DVR or NVR is DHCP (check your device’s instruction manual for more information).
Client Port: This port number is used by your DVR or NVR to send information through. The default number will work in most situations.
HTTP Port: This port number is used to log into your DVR or NVR from a remote location.
Mobile Port: This port is not used.
The IP Address, Subnet Mask, Gateway and DNS can be changed when selecting “Static” for the connection type.
UPNP: This is not required when using UID to access your DVR or NVR via the HomeSafe View app. You can enable UPNP if required.
31
Remote Configuration: Network – Email
Remote Configuration
Display ®. Record CÎ Capture fl Network
I alert settings
Network
DDNS
RTSP
a Alarm
□… Device
System
S’ Advanced
Email Test
Cancel
Don’t forget to click
“Save” to apply any
changes made.
Refresh
Save All
Save
![]()
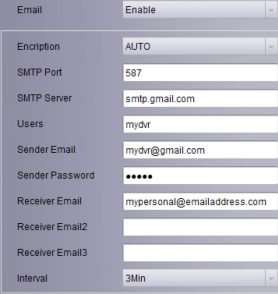
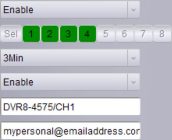
Email: Click “Enable” for email notifications.
Encryption: Leave this on “AUTO”. This ensures your device will always use the correct encryption for your email provider.
SMTP Port: Gmail 00587. Outlook 00587.
SMTP Server: Gmail “smtp.gmail.com”. Outlook “smtp.live.com”.
Users: Input the email user name.
Sender Email: Input the email address.
Sender Password: Input the email password. Receiver Email: Input the email address that you want to send email alerts to.
Interval: This is the length of time that must elapse after your device sends an email alert before it will send another.
Email Test: Click to verify the information is correct then click “OK”. A message will appear if the test has been successful.
32
Remote Configuration: Network – DDNS
X
Don’t forget to click
“Save” to apply any
changes made.
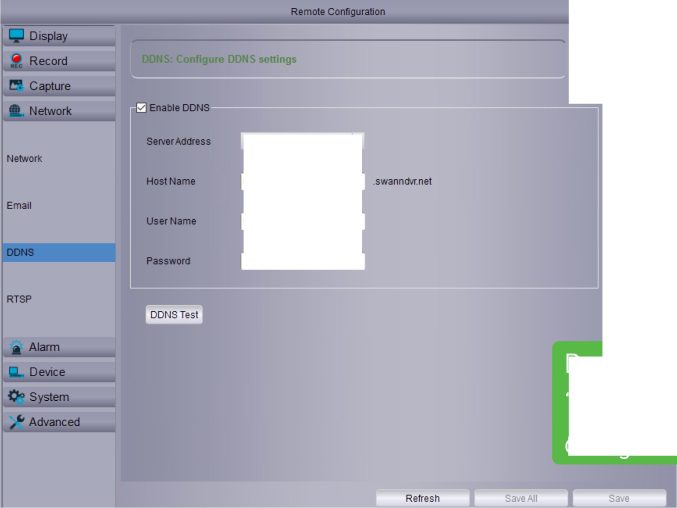
Prior to developing our SwannLink Peer- to-Peer technology, our SwannDNS service was used to connect to your device remotely. Go to www.swanndvr.com and click the “Registration” button.
Enable DDNS: Click the checkbox to enable.
Server Address: Leave the default selection.
Host Name: Enter the domain name that is
hosted on your account. For example, (user- name.swanndvr.net).
User Name: Enter the username (host name) for your account.
Password: Enter the password for your account.
DDNS Test: Click this button then click “OK” to confirm your account details. Click “OK” to close.
33
Remote Configuration: Network – RTSP
Don’t forget to click
“Save” to apply any
changes made.
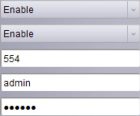
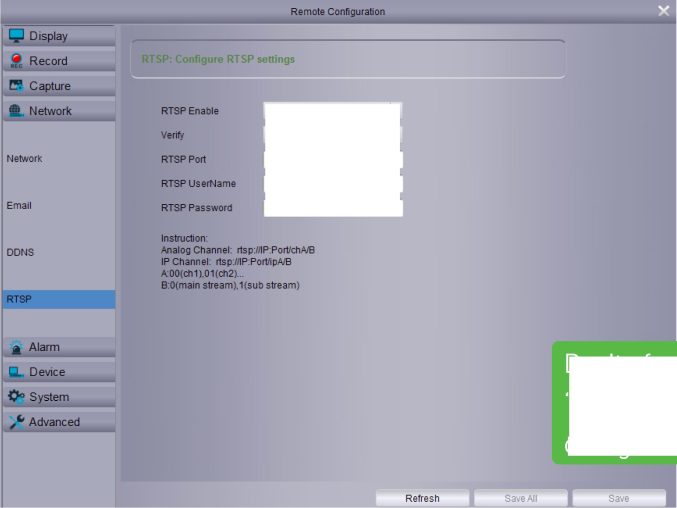
The RTSP function can be used to stream a camera’s live view image to your computer, using video streaming software such as VLC media player. You can also record each stream if required (check your device’s instruction manual for more information).
RTSP Enable: Click the drop down menu to enable.
Verify: Leave the default selection if you would
like VLC to verify your username and password for access.
RTSP Port: The default port number will work in most circumstances.
RTSP Username: This is the user name that you enter if verification has been enabled.
RTSP Password: Enter a new password if verification has been enabled.
34
Remote Configuration: Alarm – Motion
Lpl Display
O Record
K Capture
® Network
a Alarm
Post Recording
Select All
BKflMHO.’ ..
PBiffir !•’ ?W
» S’ 1K>Ş
« t»
aaaawi
BWÜîW^.f«K»SK’ J/
A®, •«/ …
Mrva. BKF;-T ■ U«fe
’
!SW. ■
it ‘:W fl
lol Ç– jnsstaa
ht ^bbbbbb
raj^nimi
»T? k:ww7? ‘* » «r*. BnBBBBBB
<■ 1 ‘i i i s ■ JBRinBar.LA
. !_J_. ..J.SBSRF. ■■.
I -■•. I ■ wnin^i
I – &. I
i &; i …
•¥■ i IBBBhi
Motion
Q… Device
System
S’ Advanced
•■MW
MKt:
bbbb«v> «rr«
ananını”•””
■EV’ m .
WHBSC-,*’ –
mtwra.
swu. >«■
— :«nr«F
i’ w»v»
itint.y wt1‘. •
raiii t? r ,z
utv .
bbrw ■■*<&
r \„İİK, __ _
Don’t forget to click
“Save” to apply any
changes made.
![]()
Channel: Select a camera to edit.
Enable: Motion detection on your DVR or NVR is enabled by default.
Sensitive: This option allows you to change the sensitivity level. The higher the number, the more sensitive your device will be when detecting motion.
Record Channel: When motion has been detected, you can instruct your DVR or NVR to
trigger recording from the other cameras available. Click the checkbox next to the camera that you want to trigger.
Select All: Click the checkbox to trigger all cameras for recording.
Post Recording: This option instructs your DVR or NVR to record for a set period of time after an event has occurred.
(continued on next page)
35


Remote Configuration: Alarm – Motion
Lpl Display
O Record
K Capture
® Network
a Alarm
Post Recording
Select All
BKflMHO.’ ..
PBiffir !•’ ?W
» « 1K>Ş
« t»
aaaawi
BWÜîW^.f«K»SK’ J/
A®, •«/ …
Mrva. BKF;-T ■ U«fe
’
!SW. ■
it ‘:W fl
lol Ç– jnsstaa
ht ^bbbbbb
raj^nimi
»T? k:ww7? ‘* » «r*. BnBBBBBB
<■ 1 ‘i i i s ■ JBRinBar.LA
. !_J_. ..J.SBSRF. ■■.
I -■•. I ■ wnin^i
I – &. I
i &; i …
•¥■ i IBBBhi
Motion
Q… Device
System
S’ Advanced
•■MW
MKt:
bbbb«v> «rr«
ananını”•””
■EV’ m .
WHBSC-,*’ –
mtwra.
swu. >«■
— :«nr«F
i’ w»v»
itint.y wt1‘. •
raiii t? r ,z
utv .
bbrw ■■*<&
r \„İİK, __ _
Don’t forget to click
“Save” to apply any
changes made.
![]()
Full Screen: Click the checkbox if you would like to view the camera full screen in Live View mode when motion has been detected.
Show Message: When motion has been detected, the motion icon will appear on-screen. Click the checkbox if you want to disable this. Send Email: Click the checkbox to enable your DVR or NVR to send an email alert when motion has been detected.
Buzzer: When motion has been detected, you can enable your DVR or NVR’s buzzer to alert you for a predetermined amount of time.
To change the default motion detection area, click “Clear” then click and hold the mouse over the camera and drag to select the area that you want to create. To select the entire area, click “Check All”.
36


Remote Configuration: Device – HDD
Remote Configuration
X
Display
İ* Record
W Capture
Network
a Alarm
Device
/e information and configure hard drive settings
Overwrite
Auto
| No. | Status | Free | Total | Free Time |
| 1 | FULL | OM | 931G | 99999Hour |
HDD
PTZ
Cloud Storage
System
S* Advanced
Don’t forget to click
“Save” to apply any
changes made.
Refresh
Save All
Save
Overwrite: This instructs your DVR or NVR to overwrite the oldest video files as the hard drive becomes full. You also have the option of disabling this or selecting the amount of days events are kept before they are overwritten. It’s recommended to leave the default selection as this prevents your device from running out of storage space.
37
Remote Configuration: Device – PTZ
Save
Don’t forget to click
“Save” to apply any
changes made.
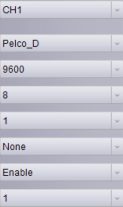
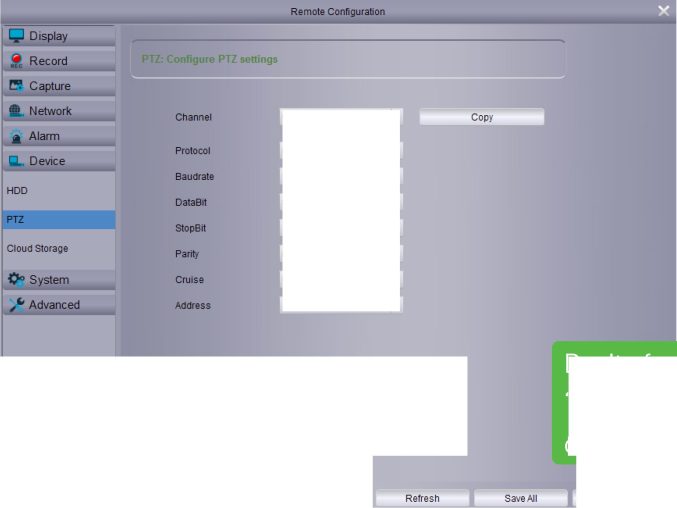
If you have a compatible PTZ camera connected to your DVR or NVR, you can use the PTZ controls to move the camera as well as the ability to zoom into an object and to control the level of focus (if available).
Consult the instruction manual included with your PTZ camera then match those settings here.
38
Remote Configuration: Device – Cloud Storage
Remote Configuration
Display ® Record
CÎ Capture
& Network
a Alarm
Device
HDD
PTZ
Cloud Storage
System
Advanced
Cloud Storage
Channel
Time Trigger
Motion Detection
Device Name
Receiver Email
Activate Cloud
igure Cloud Storage parameters
Advanced E-mail Setup
Upgrade Cloud Storage
Don’t forget to click
“Save” to apply any
changes made.
Refresh
Save All
Save
![]()
When the “Capture” function has been enabled, your DVR or NVR has the ability to copy snapshots to the cloud via Dropbox.
Cloud Storage: Click the drop down menu to enable.
Channel: Select one or more cameras that you would like to enable for cloud storage.
Time Trigger: The length of time that must elapse before snapshots are copied over.
Motion Detection: Leave this option enabled. Device Name: Enter a name to be used for the folder in Dropbox. It’s recommended to use the same folder name that is listed on your device. Receiver Email: This is the email address used to receive an email regarding cloud activation. Activate Cloud: Click this to enable cloud storage.
Upgrade Cloud Storage: This has no function.
39
Remote Configuration: System – General


| Mar. | The 2nd | Sun. | 2:00:00 AM | I ‘ |
| NOV. | The 1st | Sun. | 2:00:00 AM | EE |
| [01/01/2010 | – | [2:00:00 AM | a |
Don’t forget to click
“Save” to apply any
changes made.
Device Date: Click the calendar icon to change. Device Time: Click the dialogue box to change the time.
Use PC time: Click this to sync the time with your computer.
Date Format: Click the drop down menu to select the preferred date format.
Time Format: Click the drop down menu to select the preferred time format.
Language: Select a language you would like the system menus to be displayed in.
Video Format: Select the correct video standard for your country. USA and Canada are NTSC. UK, Australia and New Zealand are PAL.
Menu Time Out: Click the drop down menu to select the time your DVR or NVR will exit the Main Menu when idle.
(continued on next page)
40
Remote Configuration: System – General


| Mar. | The 2nd | Sun. | 2:00:00 AM | I ‘ |
| NOV. | The 1st | Sun. | 2:00:00 AM | EE |
| [01/01/2010 | – | [2:00:00 AM | a |
Don’t forget to click
“Save” to apply any
changes made.
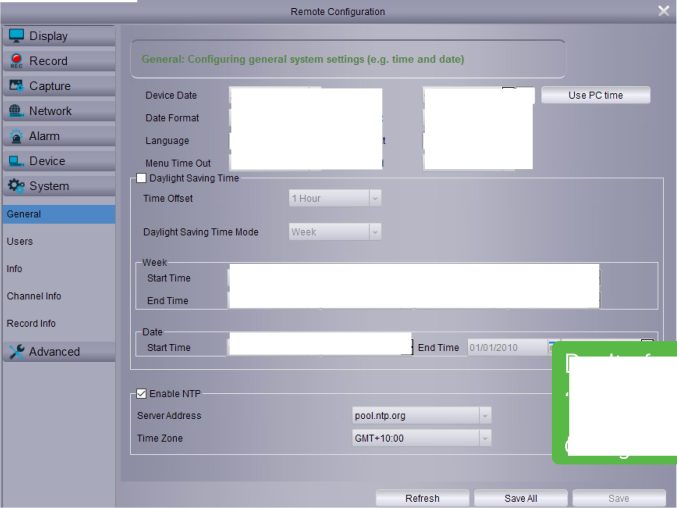
Show Wizard: You can enable the Startup Wizard to appear each time you turn on or reboot your DVR or NVR, otherwise leave it disabled.
Daylight Saving Time: If Daylight Saving applies to your time zone or region, click the checkbox to enable.
Time Offset: Select the amount of time that Daylight Saving has increased by in your time zone. This refers to the difference in minutes,
between Coordinated Universal Time (UTC) and the local time.
Daylight Saving Time: You can select how Daylight Saving starts and ends.
Enable NTP: This is enabled by default.
Server Address: The default time server will work in most circumstances.
Time Zone: Select a time zone relevant to your region or city.
41
Remote Configuration: System – Users
Display
İ* Record
W Capture
Network
a Alarm
U D evice
0° System
General
Users
Info
Channel Info
Record Info
P Advanced
admin user!
user2
users
user4
user5
user6
Save
Don’t forget to click
“Save” to apply any
changes made.
User List
Channel Rights
User Name admin
Password
Confirm Password
User Enable Enable
Generic Rights
| □ | ||
| □ | ||
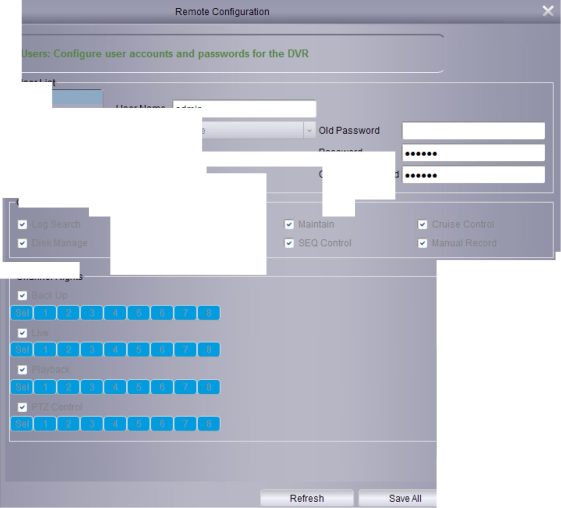
To change your DVR or NVR’s password, click able, create a password then select the per-
“admin” in the User List. Enter your current missions that you want to enable.
password first then enter the new password.
The password has to be a minimum of six char
acters and can contain a mixture of numbers
and letters. Enter your new password again to
confirm.
Additional user accounts can also be enabled.
Click “user1”, click the drop down menu to en-
42
Remote Configuration: System – Info
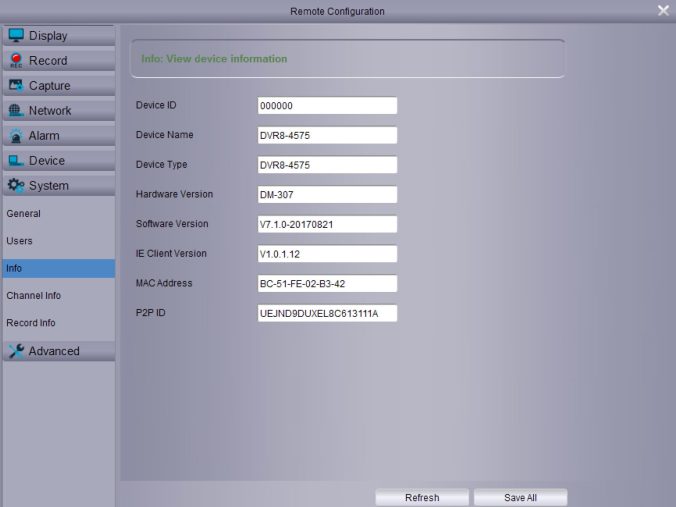
This tab displays technical information about your DVR or NVR.
If you call our helpdesk for assistance, our staff may ask you to access this tab to assist them in solving any technical issues that you may be having.
43
Remote Configuration: System – Channel Info/Record Info
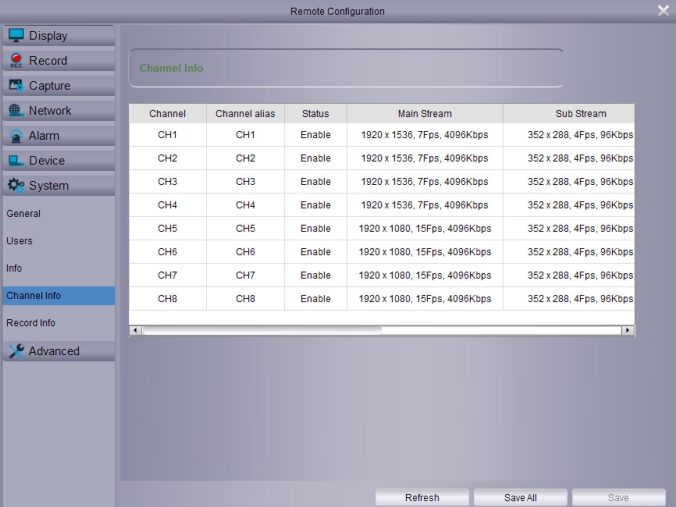
The Channel Info and Record Info tabs display the Main Stream, Sub Stream and recording settings used for each camera connected.
If you call our helpdesk for assistance, our staff may ask you to access this tab to assist them in solving any technical issues that you may be having.
44
Remote Configuration: Advanced – Firmware Update
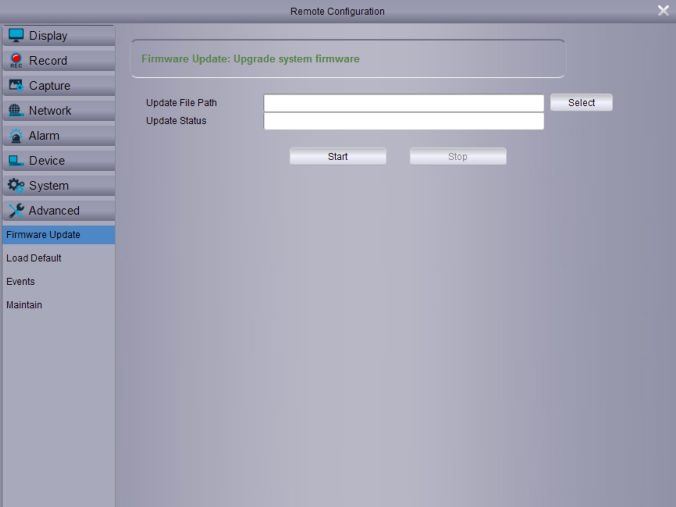
Update File Path: Click the “Select” button to load the firmware, click “Open” to confirm then click “Start”. When the firmware upgrade has completed, your DVR or NVR will reboot automatically.
45
Remote Configuration: Advanced – Load Default
Don’t forget to click
“Save” to apply any
changes made.
Select All: Click the checkbox to restore all default settings then click “Save”. Your DVR or NVR will reboot and the Startup Wizard will appear on-screen.
46
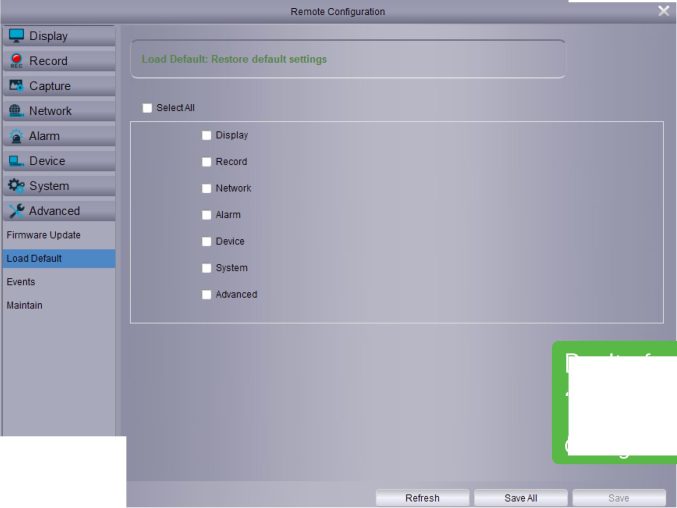
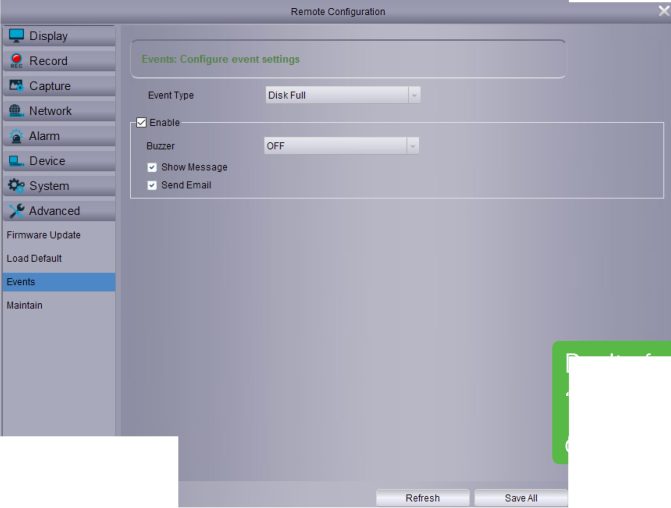
Remote Configuration: Advanced – Events
Save
Don’t forget to click
“Save” to apply any
changes made.
Whenever there is an event or if your DVR or NVR displays unusual behaviour, you can be alerted to in multiple ways.
Event Type: Select the event type that you would like to change.
Enable: Click the checkbox if you would like to disable alerts for the event selected.
Buzzer: Click the drop down menu and select the time period for the internal buzzer to acti
vate for the event selected.
Show Message: Click the checkbox if you like to disable the on-screen message for the event selected.
Send Email: Click the checkbox if you would like to disable email alerts for the event selected.
47
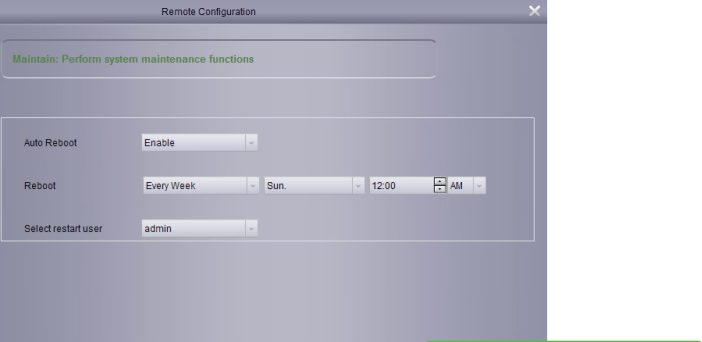
Remote Configuration: Advanced – Maintain
Display ® Record
CÎ Capture
& Network
a Alarm
Q… Device
0° System
Advanced
Load Default
Events
Maintain
Don’t forget to click “Save” to apply any changes made.
Refresh Save All
Auto Reboot: It is recommended to leave this enabled, as it maintains the operational integrity of your device
Reboot: Choose an appropriate day and time to reboot your device.
Select restart user: When rebooting, you can select which user that you want to log into as.
48
File Management
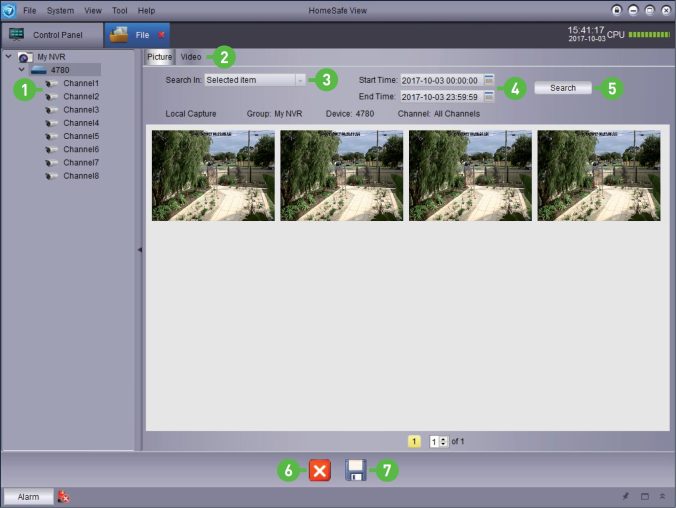
This function allows you to access videos and snapshots saved directly to your computer.
Snapshots or videos matching your search criteria will be displayed. Double click to display a snapshot or play a video.
49
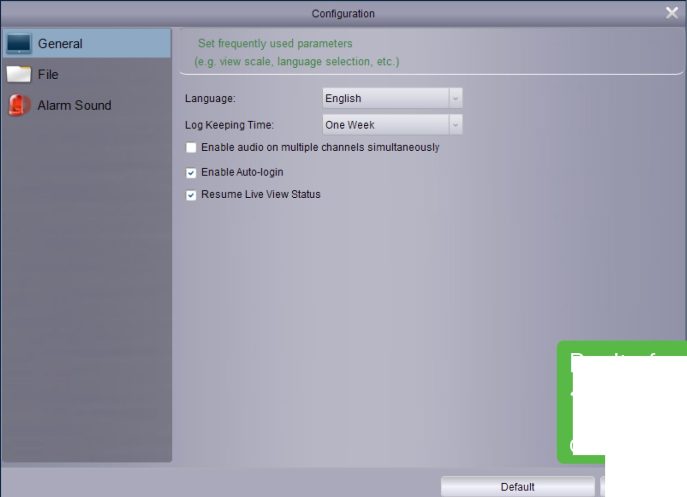
System Configuration: General
Save
Don’t forget to click
“Save” to apply any
changes made.
Language: English is the only selection available.
Log Keeping time: This controls how long log files will be kept for within the software, adjust accordingly.
Enable audio on multiple channels simultaneously (DVR only): If your device has multiple audio inputs and you have an audio source connected to those inputs, you can instruct the
software to enable these inputs in Live View mode.
Enable Auto-login: When starting HomeSafe View, you will automatically be logged in.
Resume Live View Status: When closing and reopening the software, Live View mode will run automatically.
50
System Configuration: File
X
■■ General Set file saving path
(e.g. Video files and picture files)
File
Saving Path of Video Files:
. Alarm Sound
D :/U s e rs/h a sanc/Ho me Safe Vi ewA/i d e o
Saving Path of Pictures:
D:/U s e rs/h a s anc/Ho me Saf e Vi e w/p i ctu re
Download Record Type
AVI
– Alarm when disk space is less than 500 MB
Don’t forget to click “Save” to apply any changes made.
Default Save
Saving Path of Video Files: Click this to select a different save location for videos saved directly to your computer.
Saving Path of Pictures: Click this to select a different save location for snapshots saved directly to your computer.
Download Record Type: Leave the default selection as this will save files in AVI format providing the widest compatibility for playback.
Alarm when disk space is less than: You can adjust this for low disk space notification.
51
System Configuration: Alarm Sound

Don’t forget to click “Save” to apply any changes made.
Default
Save
The options here allow you to select a different audio file (WAV format only) that can be used to alert you when an event has occurred. Click the speaker icon to play the audio file.
52
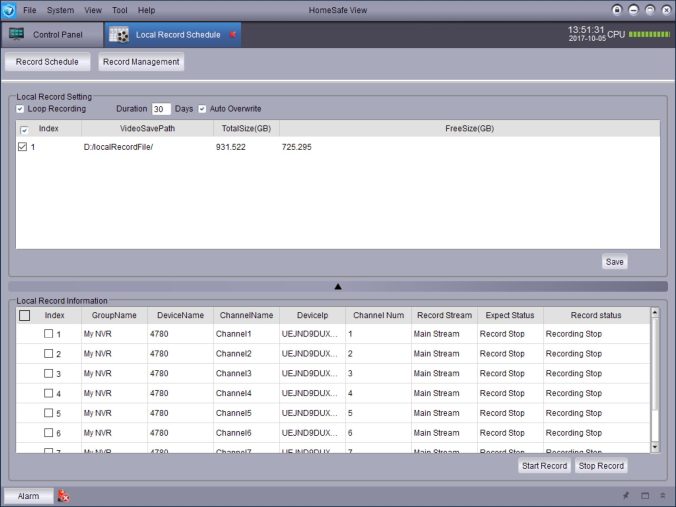
As your DVR or NVR is your primary recording device, it’s recommended that this function not be used due to the limited resources available. You can use “Remote Playback” to remotely play video that is located on your DVR or NVR’s hard drive.
53
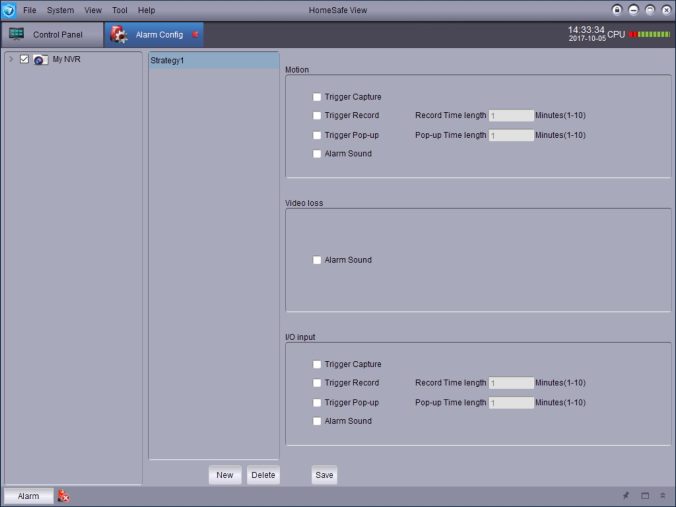
It’s recommended that you configure the alarm panel directly on your NVR (check your device’s instruction manual for more information).
54
