Speco Blue VMS is a software designed specifically for Speco’s Blue Line recorders and cameras. This powerful software allows the user to connect, configure, organize, and view their recorders and channels.
With Speco Blue VMS, the user can sort sites into areas for installations that have multiple recorders, create unique layouts consisting of channels from multiple devices, playback footage using a variety of different methods, export, and much more.
How To Install the Speco Blue VMS Program for Windows
This is a step-by-step guide on how to install the Speco Blue VMS Program on a PC
.
If the program has not yet been downloaded, please follow THIS LINK to be taken directly to the download page of the Speco Blue VMS program.
• Please select Download for Windows and fill out the form that appears.
◦ A download link will be sent to the email that was inserted on the form. Please open the email and select Download Now.
• A page will open and the download will begin.
◦ A folder named Speco Blue VMS.zip will download. When finished, please click into the folder until an application file titled Speco Blue VMS Lite x64 Ver#########is found. Please run the Speco Blue VMS Lite x64 Ver######## file.
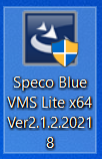 (The “Ver########” shown above is to show the files name includes the programs version number. This number may change in the future as the program gets updated.)
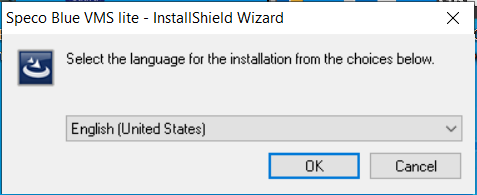
• Running the file will initiate the Installation Wizard. The first screen to appear will ask what language the installer should appear as. Please select a language and press OK.
◦ A progress bar will appear and progress from 0% to 100%.
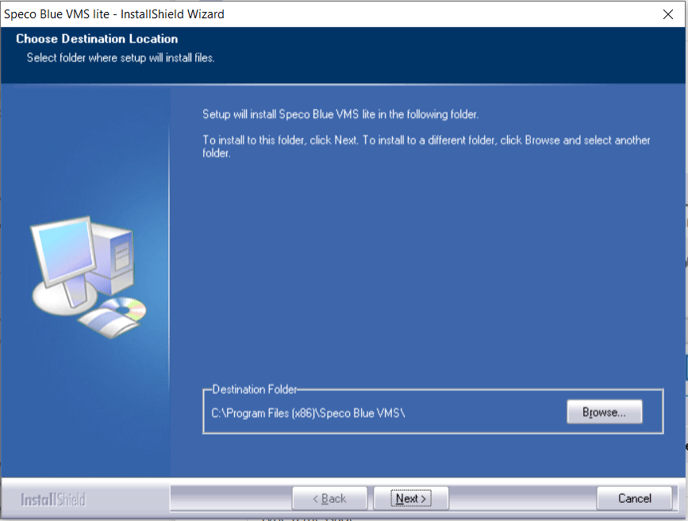
• Once the progress bar finishes, the Wizard will ask for a file destination. One is already inserted by default.
◦ Please ignore the Destination Folder option and select Next at the bottom.
◦ A progress bar will appear and progress from 0% to 100%.
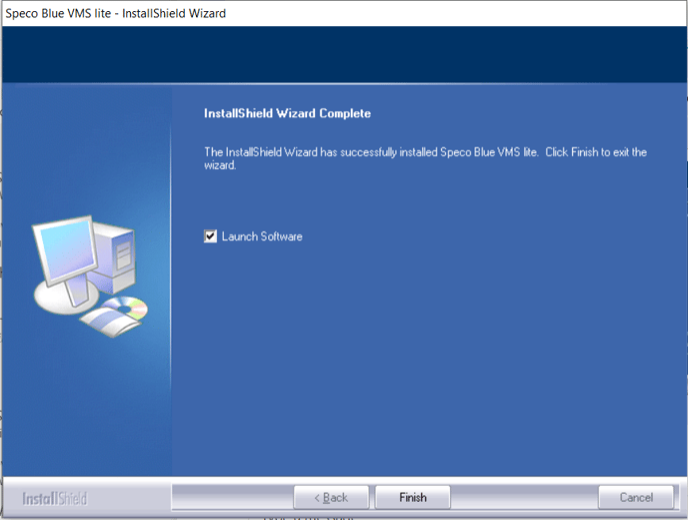
• Once the progress bar finishes, the Wizard will confirm the completion of the download. Launch Software should be selected by default.
◦ Please select Finish at the bottom.
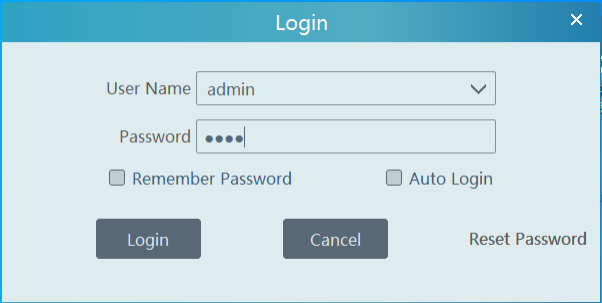
• The Speco Blue VMS program should now open and present the Login screen.
◦ The default Username is ‘admin’ and the default password is ‘1234’
◦ Select Login once both have been inserted.
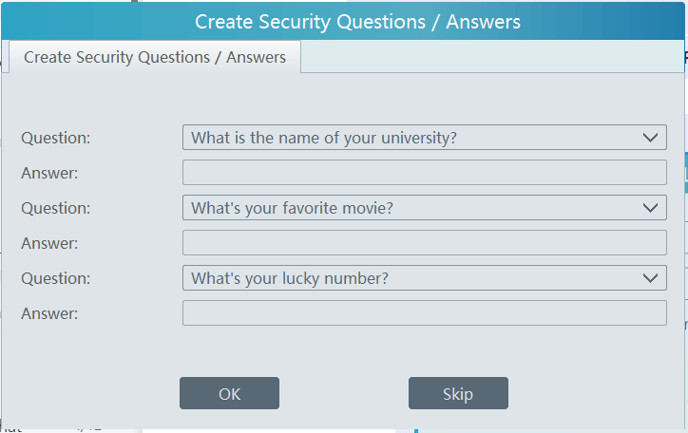
• The next screen to appear will ask for Security Questions incase a password reset is ever needed. This option can be skipped but it is recommended to select the three questions and answer all three.
◦ If the questions have been answered, select OK. If the questions are going to be skipped, select Skip.
The program should now fully open. Speco Blue VMS has now been successfully installed and initiated.
How to remotely access a Speco Blue Recorder
This is a brief article on the different ways to access a Speco Recorder when off-site.
Method #1: Web Browser – Connect.specotech.cloud
|
Requirements:
|
Pros:
|
Cons:
|
Compatibility:
|
|
|
• Can be run on almost any computer, low impact on the PC
• Can edit recorder settings
|
• Requires the download of a plugin.
|
• Speco Blue Recorders only
|
Method #2: iPhone/Android App
|
Requirements
(vary depending on app):
|
Pros:
|
Cons:
|
Compatibility:
|
|
|
|
• Cannot edit recorder settings.
• Limited export options depending on app
|
|
Method #3: Desktop Software – SecureGuard CMS
(Click here to learn more about software setup)
|
Requirements:
|
Pros:
|
Cons:
|
Compatibility:
|
|
|
• Can be run on almost any computer, low impact on the PC
|
• Cannot edit recorder settings
|
• Most Speco recorders are able to use this program
|
Method #4: Dekstop Software – Speco Blue VMS
(Click here to learn more about software setup)
|
Requirements:
|
Pros:
|
Cons:
|
Compatibility:
|
|
|
• Can edit recorder settings
|
• Powerful PC required to run VMS
|
• Speco Blue Recorders only
|
Method #5: Desktop Software – SecureGuard VMS
(Click here to learn more about software setup)
|
Requirements:
|
Pros:
|
Cons:
|
Compatibility:
|
|
|
• Can edit recorder settings
|
• Powerful PC required to run VMS
|
• Most Speco recorders are able to use this program, although not recommended.
• Made specifically for custom-built Speco Servers
|
.
What mobile app to use?
 Speco Player
VT,VX,NS, NSF,NSL,RS,NU,HU,HT,HS,VS,VT,ZS
App Store Link | Google Play Store Link
 Speco One
NXP, NXL, NLA
App Store Link | Google Play Store Link

Speco Gray
JLA, JWA
App Store Link | Google Play Store Link

Speco Silver
JLN, JWN, and Silver Cameras
App Store Link | Google Play Store Link

Speco Blue
NRL, HRL, NRP,NRE, NR, HRN,HRLN
App Store Link | Google Play Store Link

Secure Guard Client
Secure Guard Servers, IP Cameras, Speco Player series recorders,
Speco Blue Recorders, Speco One Recorders
App Store Link | Google Play Store Link
What are the differences between SecureGuard® CMS and SecureGuard® VMS
SecureGuard CMS is designed to allow for the following:
• Playback recorded video
• Supports stand-alone cameras, recorders, and servers.
.
SecureGuard VMS is shipped with our Server hardware and works with the SecurGaurd VMS Client software to allow access to the Server software and to take advantage of advanced features.
Can I access my Speco Recorder on my Smart TV?
The available application for both AppleTV and the Android Ecosystem would be the SecureGuard application.
How to Manually add a device via Speco Blue VMS
Compatible With All Speco Blue Series Devices.
STEP 1:
• On a PC: Double click the shortcut icon of “Monitor Client” to run the software as show below.
• On a Mac: Locate Speco Blue VMS in the applications folder.
If the application has yet to be downloaded, Follow this article.
STEP 2:
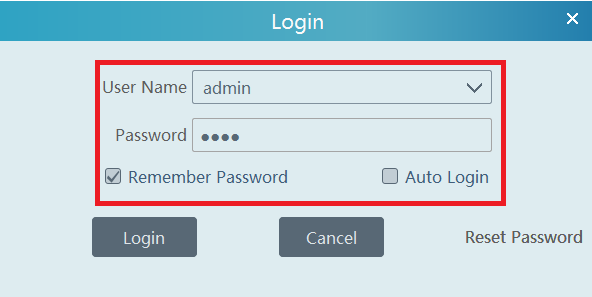
• Enter username and password
◦ The default username and password can be found in the manual which is part of the initial download package.
It is advisable to change the password from the default. Click here for instructions.
.
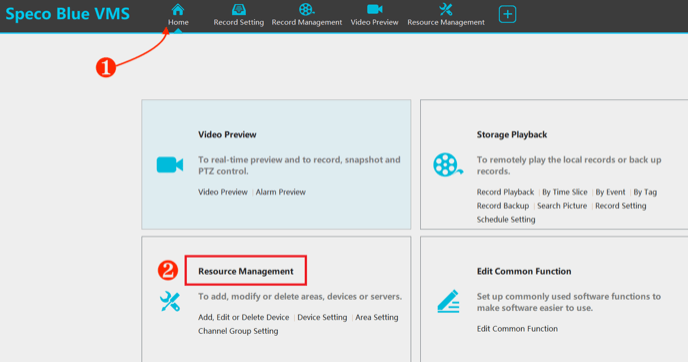
• Click on Home ❶ on the main menu
• Select Resource Management.❷
STEP 3:
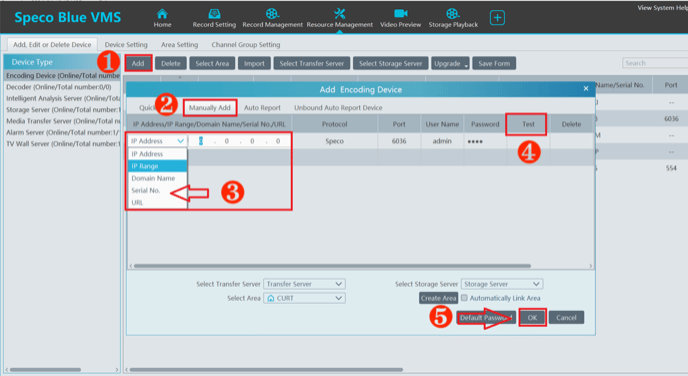
• Click ❶ “Add” and then select ❷ “Manually Add”.
• Input the ❸ IP address, IP range, or domain name, QR Code , along with the username and password, and choose the protocol type.
• Click on the ❹ [Test] button to check if the device is successfully connected
• Click ❺ [OK].
STEP 3:
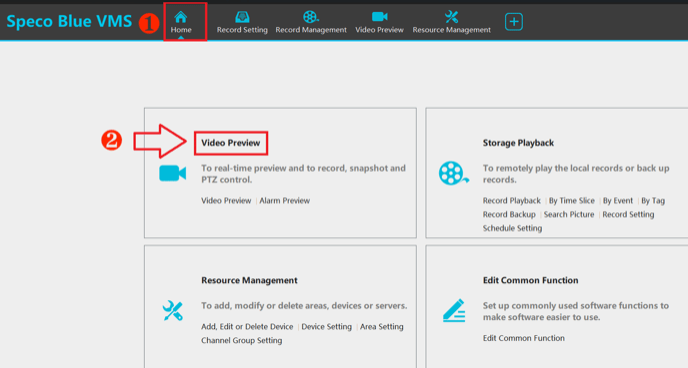
• Go to the ❶ “Home” tab on the interface.
• Choose ❷ “Video Preview” to watch the video feed from the devices you have added.
STEP 4:
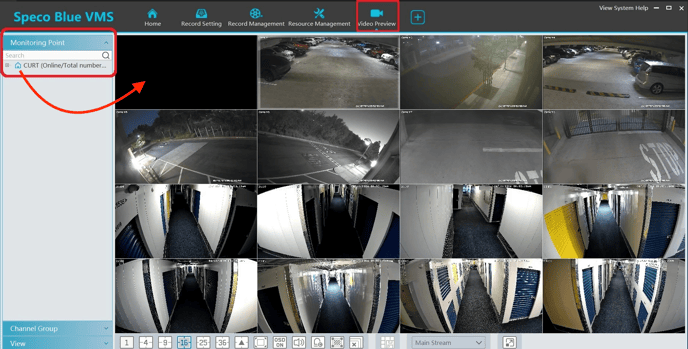
• Once Video Preview is selected, a “Monitoring Point” section can be found on the left side of the screen. Simply click and drag the House icon into the first camera frame, and all cameras will auto-populate.
◦ Click the little + next to the House icon to pull up a list of each individual camera. The individual cameras can be dragged and dropped onto the camera screens as well for more precise camera placements.
How to reset your password for SecureGuard CMS using Windows
A step-by-step guide on how to reset your password to access the SecureGuard CMS application on a Windows PC.
To reset the password to your SecureGuard CMS Login, will require you to uninstall and reinstall the program.
Here is a step-by-step guide on how to do so.
Step 1: Locate the desktop icon for SecureGuard CMS.
.
1.
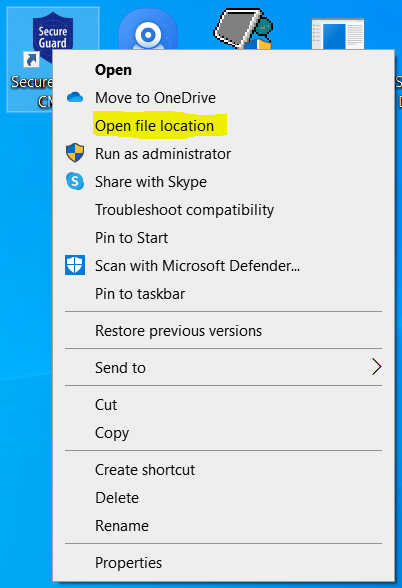
• This can be found on your computer’s desktop. Once you find it, you will want to right click on the icon, and select the option “Open file location.“
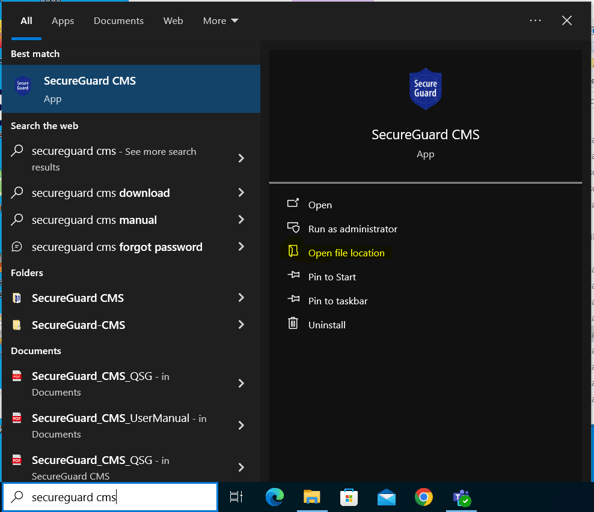
• If you do not have a desktop icon, you should be able to use the Windows Search bar and search SecureGuard CMS and you should see similar options as if you were right clicking a desktop icon.
.
Step 2: Once Open file location has been selected, it should open up the SecureGuard CMS folder.
• Within that folder, you should find an application file titled Uninstall. You will want to double click the application file to begin the uninstall process.
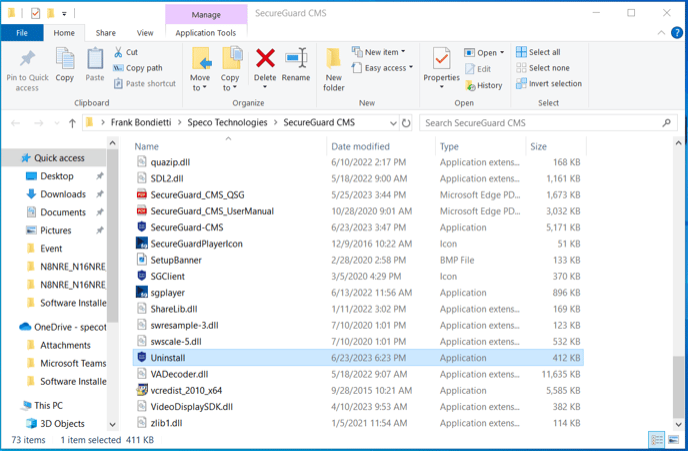
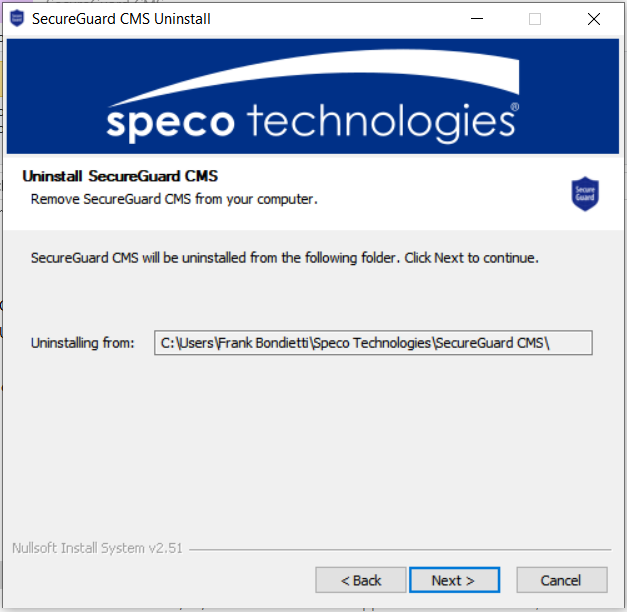
• When double clicking the uninstall file, a small screen should appear that looks like the following:
.
Step 3: Proceed through the uninstall menu.
.
• Click Next on the page shown above.
• Upon hitting Next, verify that both Uninstall and Application Data are checked with a green check.
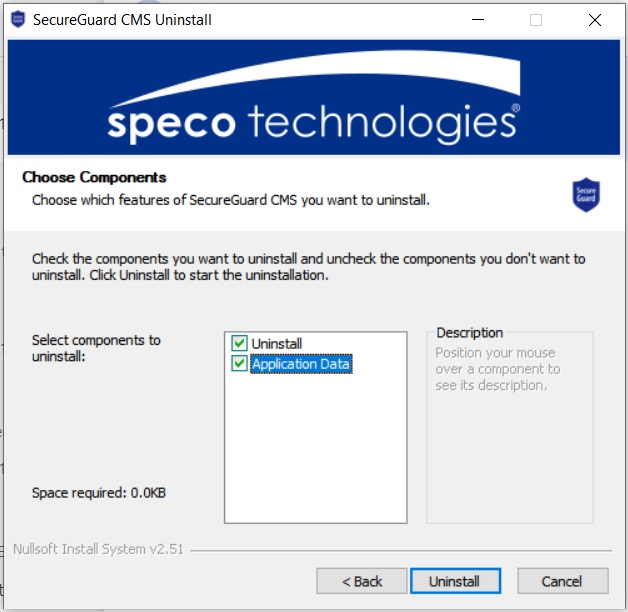
If you do not check the Application Data box when uninstalling the program, upon reinstallation, the original username and password will still be there, and you will need to restart the uninstall process over.
Select Uninstall and the process of uninstalling SecureGuard CMS program will begin.
• Once it is done, it will say Completed, and you can close it out.
.
You can now reinstall the program, and it will ask for a new username and new password upon opening the new program.
If you need to download the setup file to reinstall SecureGuard CMS, please click on the link below:
SecureGuard CMS Download – Specotech.com
How To Reset Your Password for Speco Blue VMS
A step-by-step guide on how to reset your password to access the Speco Blue VMS program.
.
*** PLEASE NOTE – If this is the first time launching the Speco Blue VMS program, the default password information is located in the manual which was downloaded when the installer package.***
.
There are several methods to resetting the password to the Speco Blue VMS program. Some methods can only be accessed if the original password is known and is just needing changing. Other methods are available if the password has been forgotten or lost and require a full password reset. This guide will go over each method.
.
Click below to choose any of the following methods.
Method #1 – Password is known.
Method #2 – Security Questions. (Password can be known or unknown)
Method #3 – Uninstall/Reinstall the program. (No Known Password)
.
Method #1 – Password is known.
• Please open the Speco Blue VMS program and insert your username and password and select Login.
◦ If Auto Login was previously selected, the program should open automatically once selected and skip to Login menu.
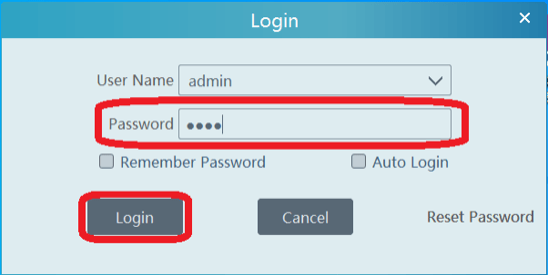
• Once the program opens, an option for System can be found at the top right corner. Please select System and a menu will appear. Please select Modify Password from the menu.
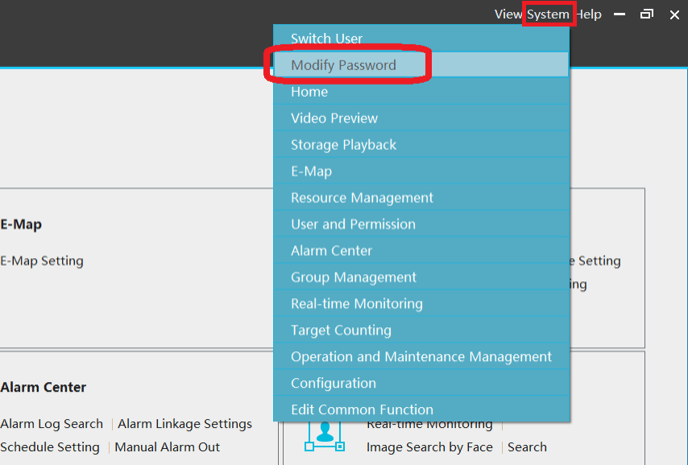
• That will open the Modify Password menu. Please insert the ‘old’ current password where it says Old Password. Then, insert the new password in the New Password line, and then type in the same new password in the Confirm Password line.
◦ Please select OK when all lines are properly filled out.
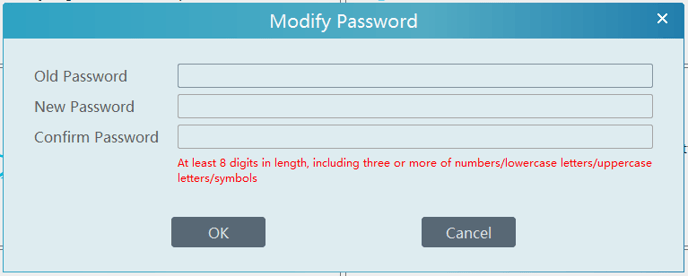
• Speco Blue VMS will now close itself and reopen. Once it reopens, insert the newly created password and it will accept it.
.
Back To Top
Method #2 – Security Questions
*** Please Note – During first time setup of the program, it is an option to skip the security questions. If the security questions have been skipped, this method cannot be utilized. ***
.
• Please open the Speco Blue VMS program and the Login screen should present itself.
◦ Please select Reset Password.
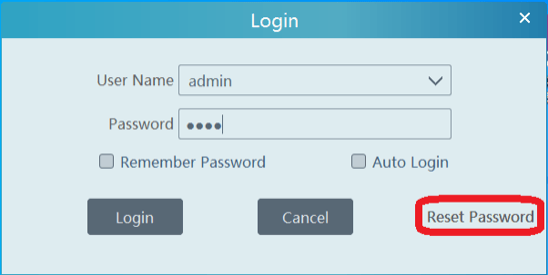
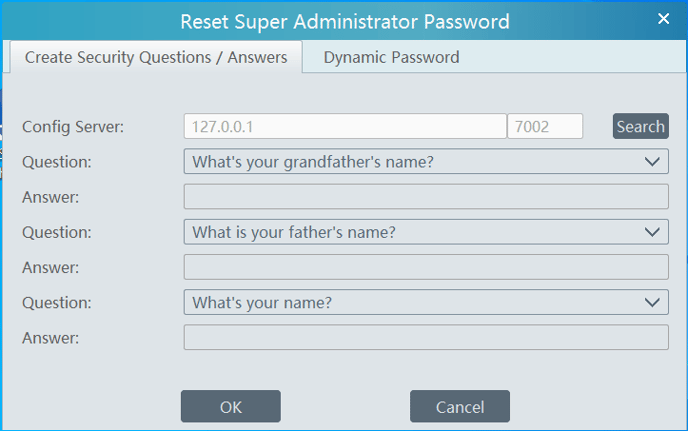
• The Reset Super Administrator Password screen will appear and pull up the questions that have been established when the program was initially downloaded.
◦ Please answer each question and select OK at the bottom.
• The Reset Password box will appear. Please insert a new password and confirm the new password. Once done, select OK at the bottom.
◦ A message will appear that reads “Reset the ADMIN user password success!“

• The initial login screen should appear. It will accept the newly created password.
.
Back To Top
Method #3: Uninstall/Reinstall the program.
• At the bottom left corner of the computer’s screen, please select the Windows search bar and type Add or Remove Programs and select the Add or Remove Programs option.
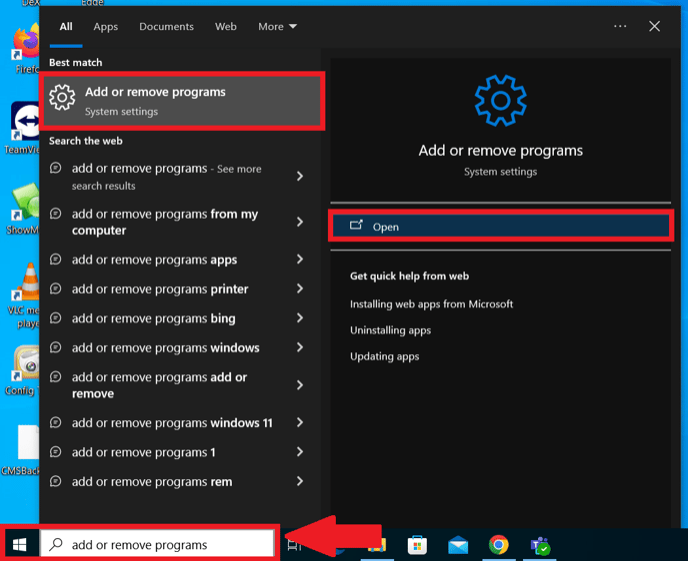
• The App and Features page should open.
◦ Scroll down and find Speco Blue VMS lite listed. Select it and press the Uninstall button.
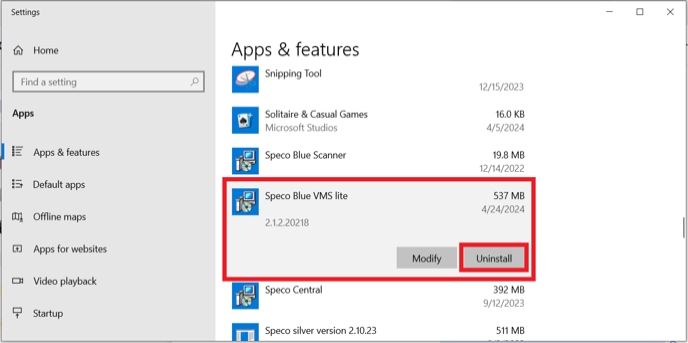
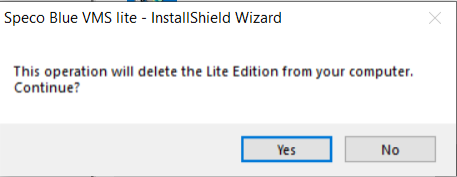
• This will initialize the Installation Wizard to uninstall the program.
◦ Please confirm the deletion of the program and select Yes.
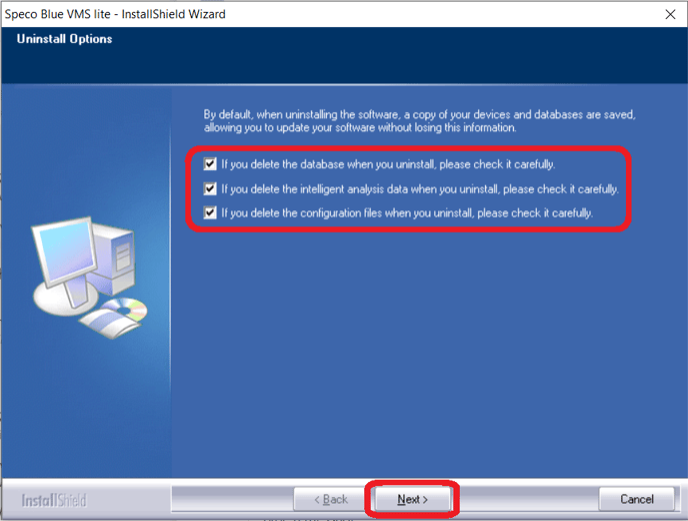
• The next page will present several Uninstall Options.
◦ Please put a checkmark in all three checkboxes to ensure the current password is wiped out. Select Next when done.
◦ A progress bar will appear and go from 0% to 100%.
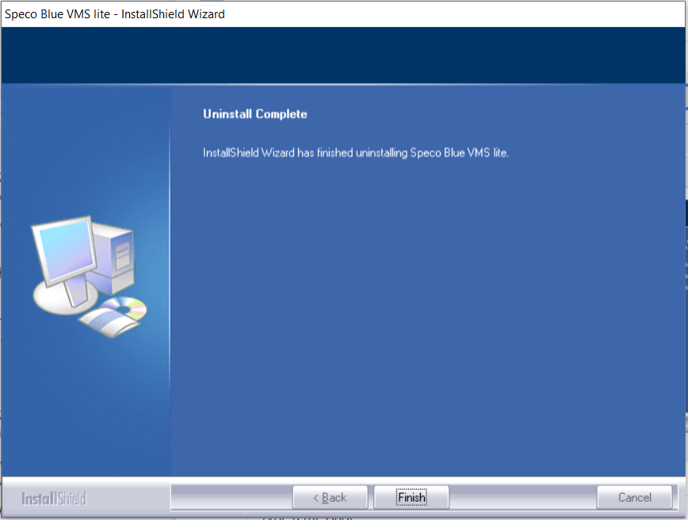
• Once the progress bar is done, the Installation Wizard will confirm the uninstall has been completed. Select Finish at the bottom to close the Wizard.
◦ You may now reinstall the program, and the username and password will be defaulted.
.
*** For instructions on how to reinstall the Speco Blue VMS program, please follow THIS GUIDE *** link page once published
Speco Silver Scanner – Web Login
How to Connect to Speco Silver Cameras Via the Network
Step 1:
◦ Speco Silver Scanner can search for devices on the Local Network.
Please note that Speco Silver is only available for Windows PC and only scans for Speco Silver devices.
• The devices also need to be on the same “subnet” to be discovered.
Step 2:
• Open up the Speco Sliver Scanner:

.
• In the device list you can view the IP address, Model number, and Mac address of each device.
• Select the applicable device and double click to open up in a web browser

Web Operation
• This device supports viewing and management via a web browser.
• Open the web browser and input the network camera IP address bar or double click the IP address in IP Scanner

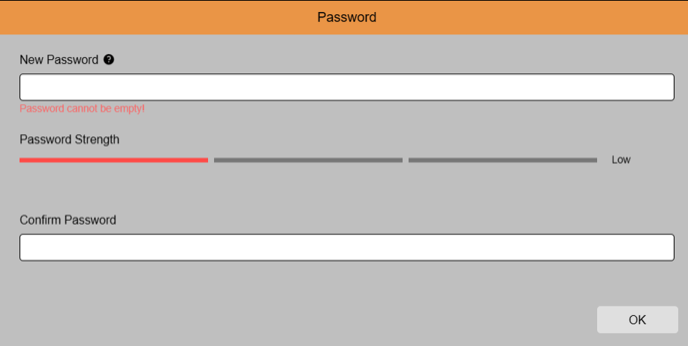
• Upon accessing the camera for the first time, a prompt to to set a NEW PASSWORD will populate.
• Enter a strong password and confirm it. Please remember the password.
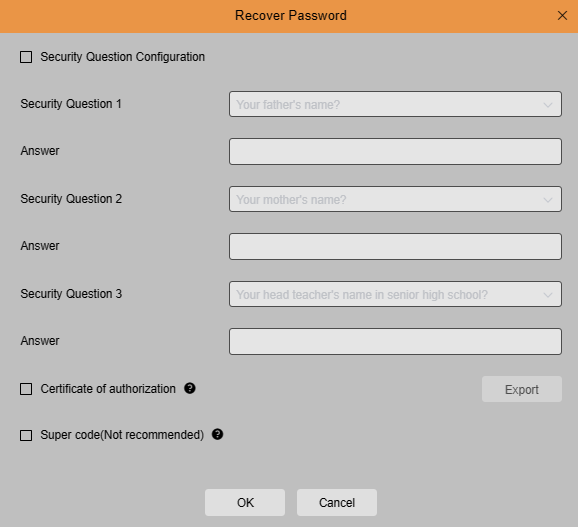
• If the password is ever forgotten or misplaced, simply click on the password recovery option on the login screen for assistance.
How to Playback & Export Video from SecureGuard® CMS
This guide will go over the steps required to view and export previously recorded footage from the SecureGuard® CMS program.
.
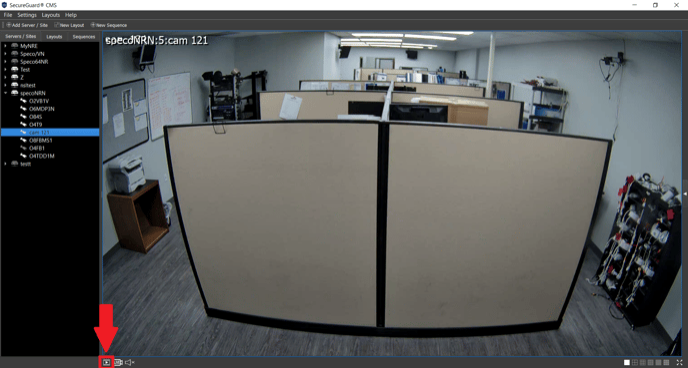
• Open the SecureGuard® CMS program and set up the Live screen so it is viewing the camera and/or recorder that requires its video exported.
◦ At the bottom corner of the program, select the film reel + play button icon, that is Playback button.
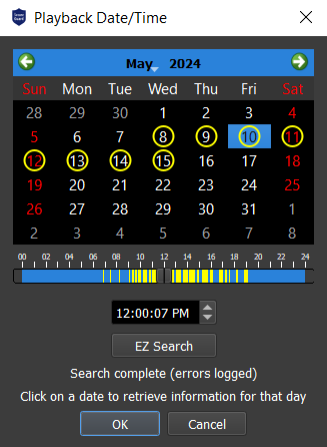
• The Playback Date/Time menu will appear. A calendar and a timeline will appear.
◦ Select a date using the calendar.
· If recorded video exists for the selected day, a yellow circle will appear on the day. If there is no recorded video, a yellow circle will not appear on the day.
◦ Select a time using the timeline or manually insert a time in the box underneath.
· Blue on the timeline represents continuous recording.
· Yellow on the timeline represents motion recording.
• Select OK once the desired date and time are selected.
• Playback will begin.
◦ The bottom of the screen will have all of the necessary start/stop, rewind/fast forward options for playback, and a larger timeline for more precise timeline time selections.
· Clicking on the timeline at the bottom will also directly change the time.
◦ Right click on the camera that needs its video exported. A menu will appear.
· Select Begin export from the menu.
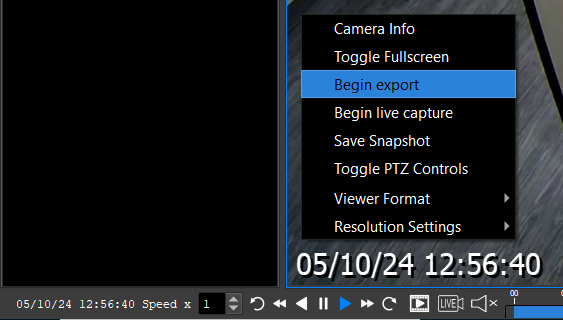
• The Export menu will appear.
◦ The left side of the menu will allow the selection of what camera is getting exported. More than one camera can be selected simultaneously.
◦ The top of the menu will have a Start Export and Stop Export time options. Change these options to the desired length of the exported video.
· Select the export location with the Folder option by selecting Browse, if necessary.
◦ The right side of the menu will have a format option. Select the desired video format for the exported video. The default .AVI selection is generally recommended.
◦ If it is known, or unknown, if the computer supports the video formats being exported, select the Export SG Player application option.
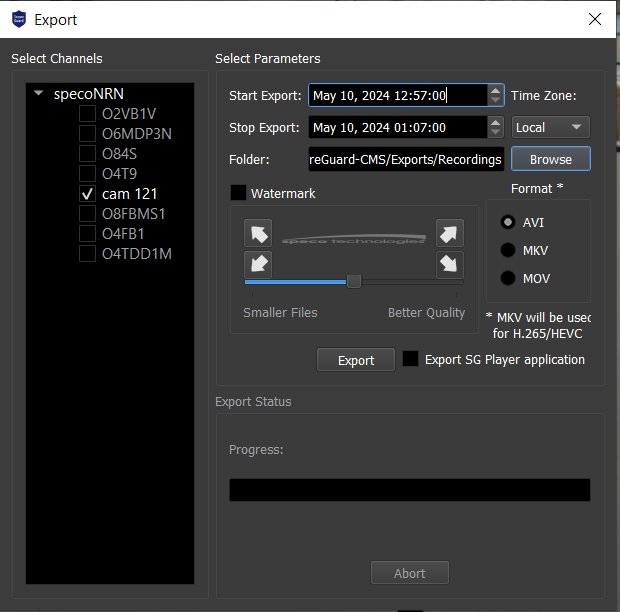
• A progress bar will progress from 0% to 100% towards the bottom of the menu.
◦ A popup will appear that reads “All exports completed successfully” to confirm a successful export. The file should now be found at the selected export location.
Downloading SecureGuard Package and installing SecureGuard VMS
Step 1
• To get SecureGuard VMS installation package, please email techsupport@specotech.com
Step 2
• After downloading the SecureGuard VMS package, you will see the following.
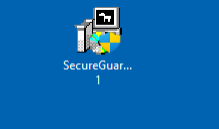
Step 3
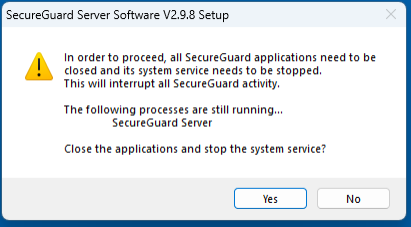
• After clicking on the SecureGuard VMS installer, it will ask you to close the SecureGuard VMS application. Click yes to continue.
Step 4
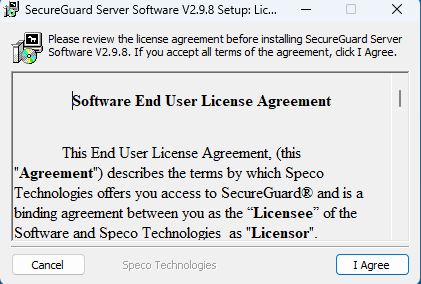
• Click I agree to the Software End User License Agreement.
Step 5
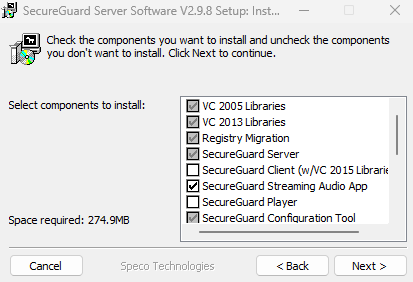
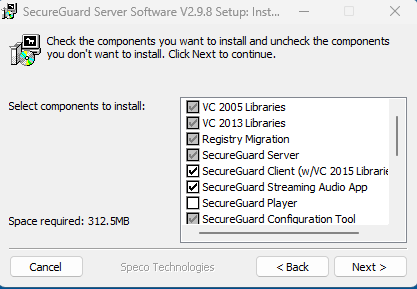
• Click the checkbox next to “SecureGuard Client” , then click next
Step 6
Step 7
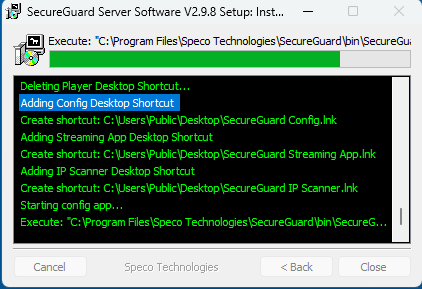
• The file is installed on the desktop.
Step 8
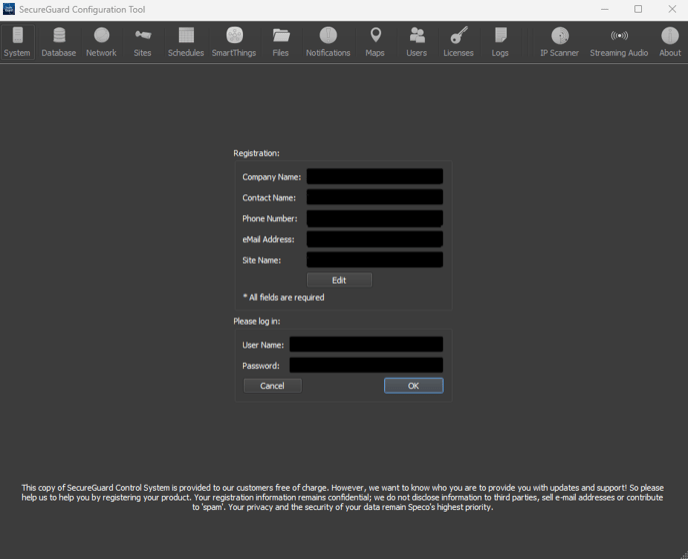
• It automatically opens up the SecureGuard Config tool after it gets done installing.
How to connect to a Speco Blue recorder from a web browser
This guide will go over the steps required to access a Speco Blue recorder from a web browser both locally and remotely.
.
Connecting to the Speco Blue Recorder Locally.
• To connect locally, the computer must first be on the same local network as the recorder. Once that has been complete, the IP address of the recorder must be known.
• First, access the Settings menu of the Speco Blue Recorder.
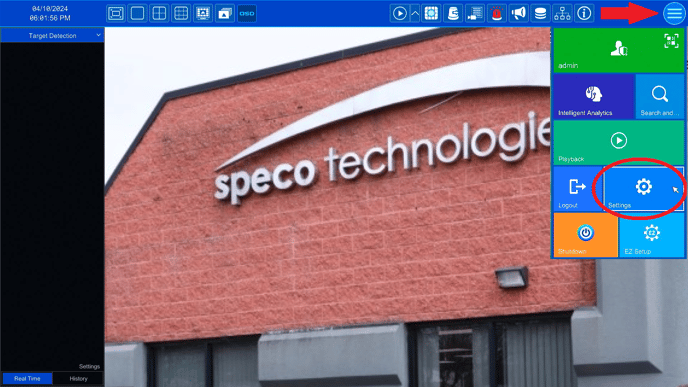
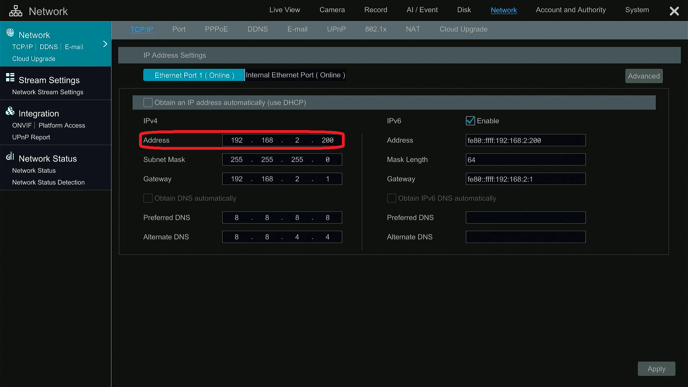
• Once the Settings menu appears, please select the Network page. That should automatically open the Network > TCP/IP page.
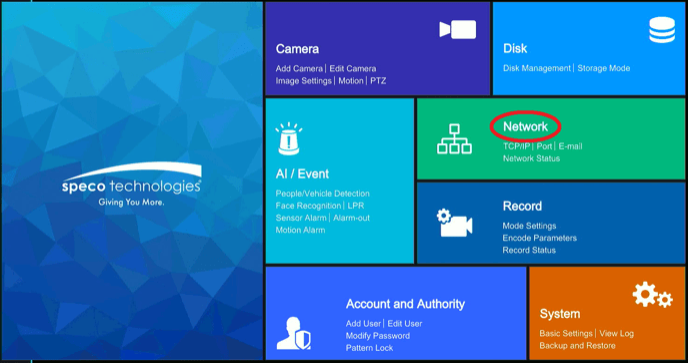
• The TCP/IP page is where the IP address information can be gathered. The location of the IP address the Speco Blue app will use is highlighted in the image below. Please take note of the IP address in the given location.
• At a computer, open a web browser.
◦ In the address bar, insert the IP address that was noted from the previous step.
· Hit enter on the keyboard.
• A login screen should present itself. Insert the username and password of the recorder.
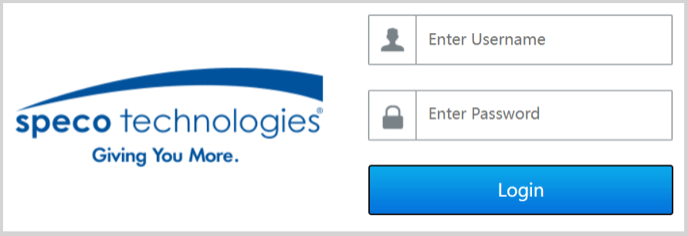
Once logged in, the web page may ask to download a plugin. Please download the plugin to proceed further, if prompted.
.
Connecting to the Speco Blue Recorder Remotely.
• To connect remotely, the written QR code of the recorder must be known.
• First, access the Settings menu of the Speco Blue Recorder.
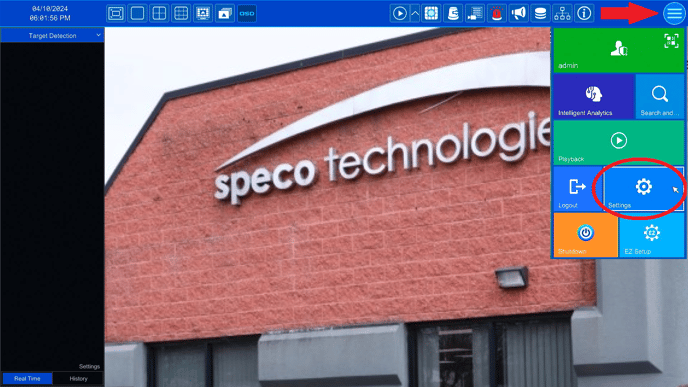
• Once the Settings menu appears, please select the Network page. That should automatically open the Network > TCP/IP page.
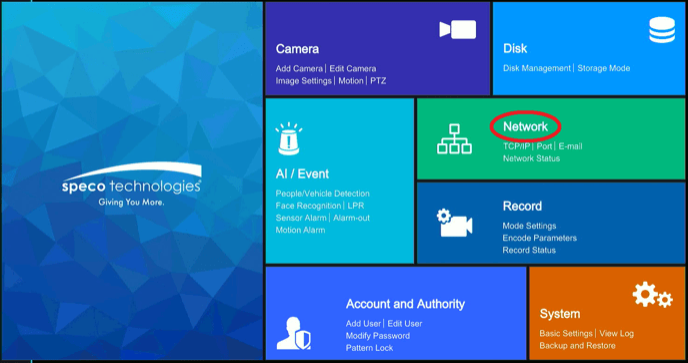
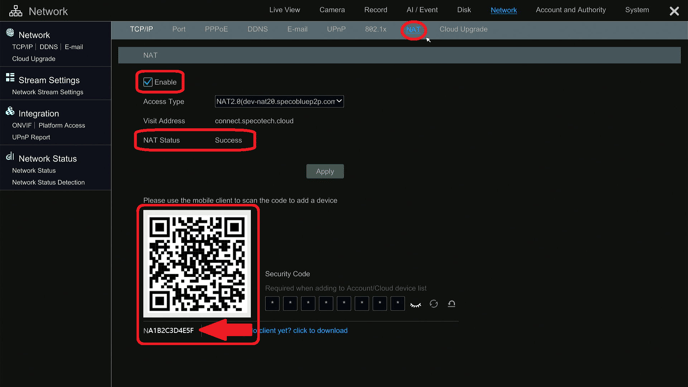
• Once the TCP/IP page opens, additional options should be made available at the top of the page. One of the options available is NAT. Please select the NAT option.
◦ Please verify that the checkbox for Enable has a checkmark. Select apply. A NAT Status of Success should be seen.
• Take note of the code written directly underneath the scannable QR code. That is the written QR code for when the actual QR code cannot be scanned. The web browser will use this code.
• At a computer, open a web browser.
· Hit enter on the keyboard.
• A login screen should present itself. Insert the written QR code that was noted from the previous step, as well as the username and password of the recorder.
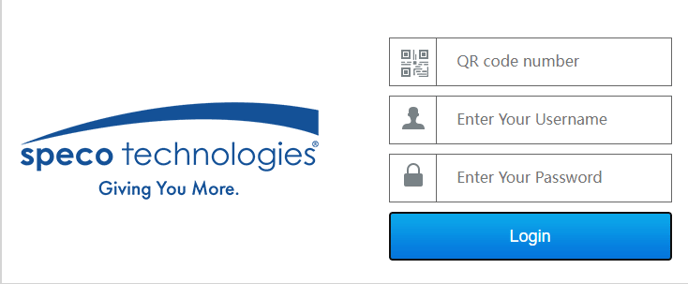
Once logged in, the web page may ask to download a plugin. Please download the plugin to proceed further, if prompted.
How to add a recorder to SecureGuard® CMS
This guide goes over how to add a recorder to the SecureGuard® CMS desktop application both locally and remotely.
PLEASE NOTE
This guide is meant for the following recorder series:
NS / NSP / NSL / NSF / NU / HU / HT / HS / HD / DS / RS / ZS / VS / VT / VX / VN
For a guide on how to add a Speco Blue recorder to SecureGuard® CMS:
CLICK HERE.
.
** Please verify the recorder unit is connected to the internet before attempting to connect to the recorder. **
.
Connecting to the Recorder Locally.
• To connect locally, the computer must first be on the same local network as the recorder. Once that has been complete, the IP address of the recorder must be known.
.
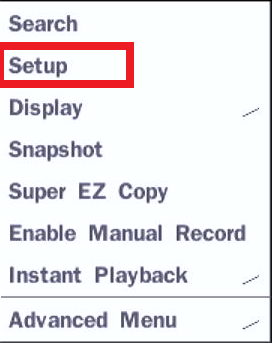
• First, right click the Live camera screen of the recorder. A menu should appear.
•
◦ Please select Setup from the menu.
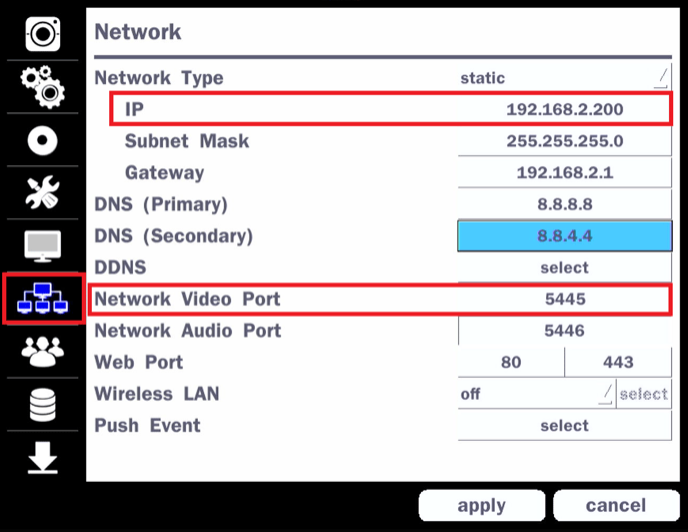
• The Setup menu will appear. On the left side of the setup menu, please select the Network settings icon.
◦ Please take note of the IP address and Network Video Port shown on the menu.
• At a computer, log into the SecureGuard® CMS program.
• The top-left corner of SecureGuard® CMS will have several options to choose from.
◦ Select Add Server / Site.

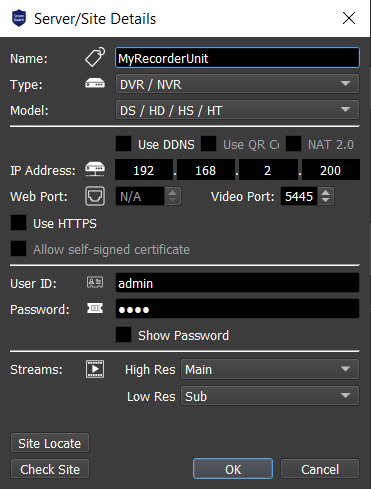
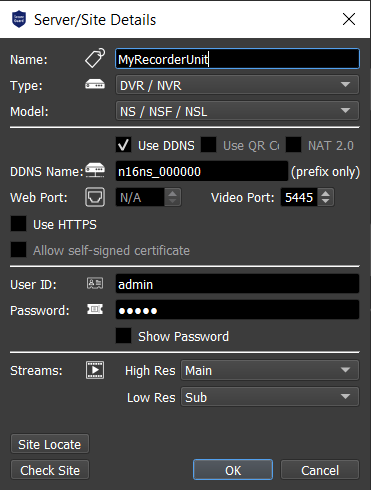
• A menu titled Server / Site Details will appear.
◦ Name is the first option. Give the recorder unit a name to help identify it. It can be given any name; it does not matter.
◦ Type is the second option. Select DVR/NVR.
◦ Model is the third option. It will appear after selecting DVR/NVR.
· Select the recorder model series that is being connected.
◦ Insert the IP address that was noted in the previous step into the IP Address section.
◦ Set the Video Port to the Network Video Port that was noted in the previous step.
◦ Insert the recorder unit’s user ID and password.
• Once all information has been inserted, select Check Site at the bottom of the menu.
◦ The program will scan the network to detect the recorder unit and report back with a successful connection.
· Select OK to close the menu.
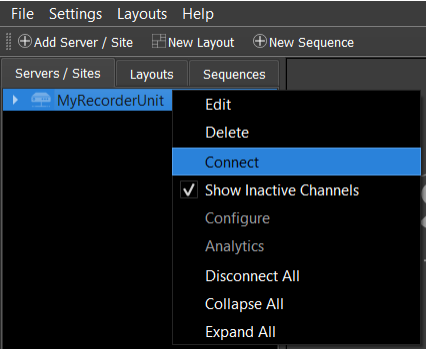
• Back to the main screen of SecureGuard® CMS, on the left side, a column for added Server/Sites can be found. The newly added recorder should appear on the list.
◦ Right click on the recorder and select Connect.
· The recorder icon next to the name will go from gray to white once a good connection has been established.
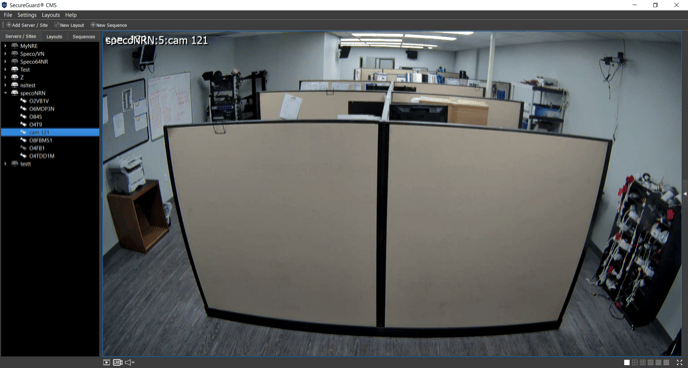
• Select the desired grid option at the bottom right corner of the screen.

• Click and drag the added recorder onto the first available camera frame. All cameras should auto-populate onto the screen.
.
Connecting to the Recorder Remotely.
Please note: Establishing a DDNS connection will require port forwarding. Speco Technologies is not responsible for port forwarding on the user’s network.
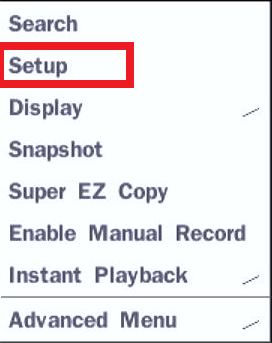
• First, right click the Live camera screen of the recorder. A menu should appear.
◦ Please select Setup from the menu.
• The Setup menu will appear. On the left side of the setup menu, please select the Network settings icon. This will open the Network Settings page. Please take note of the Network Video Port number.
◦ Please click on the select option for the DDNS.
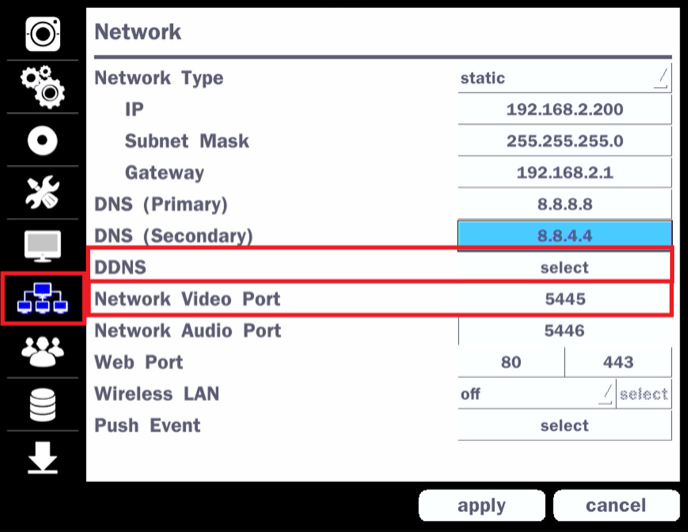
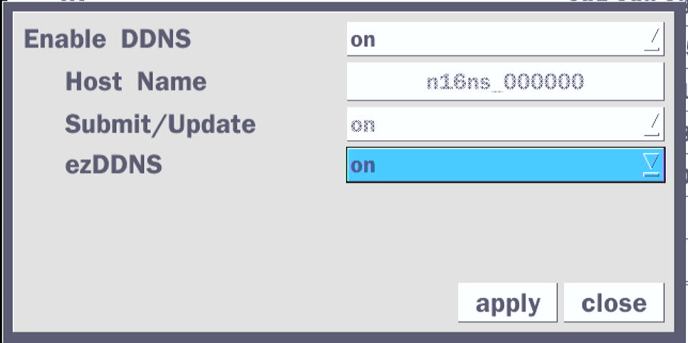
• That will open the DDNS settings page.
◦ Please set Enable DDNS to on
◦ Please set ezDDNS to on
· The other settings do not need to be touched. Please select apply at the bottom when both settings are set to on. Close the Network settings page after selecting apply.
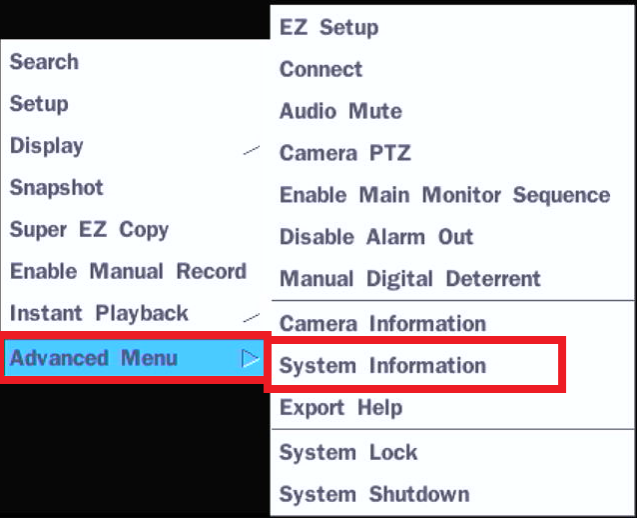
• Right click the Live camera screen of the recorder. A menu should appear.
◦ Please select Advanced Menu and then choose System Information.
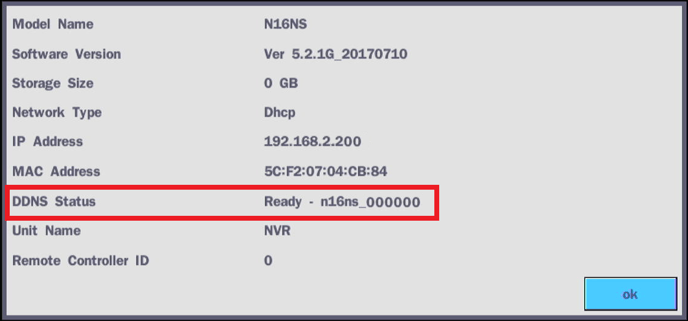
• The System Information page will appear.
◦ Please take note of the DDNS Status information. Ensure it says ready and take note of the domain name written after.
• At a computer, log into the SecureGuard® CMS program.
• The top-left corner of SecureGuard® CMS will have several options to choose from.
◦ Select Add Server / Site.

• A menu titled Server / Site Details will appear.
◦ Name is the first option. Give the recorder unit a name to help identify it. It can be given any name; it does not matter.
◦ Type is the second option. Select DVR/NVR.
◦ Model is the third option. It will appear after selecting DVR/NVR.
· Select the recorder model series that is being connected.
◦ Check off the checkbox for Use DDNS and insert the domain name that was noted in the previous step into the DDNS Name section.
◦ Set the Video Port to the Network Video Port that was noted in the previous step.
◦ Insert the recorder unit’s user ID and password.
• Once all information has been inserted, select Check Site at the bottom of the menu.
◦ The program will scan the network to detect the recorder unit and report back with a successful connection.
· Select OK to close the menu.
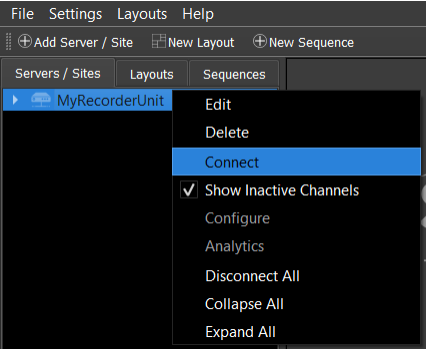
• Back to the main screen of SecureGuard® CMS, on the left side, a column for added Server/Sites can be found. The newly added recorder should appear on the list.
•
◦ Right click on the recorder and select Connect.
· The recorder icon next to the name will go from gray to white once a good connection has been established.
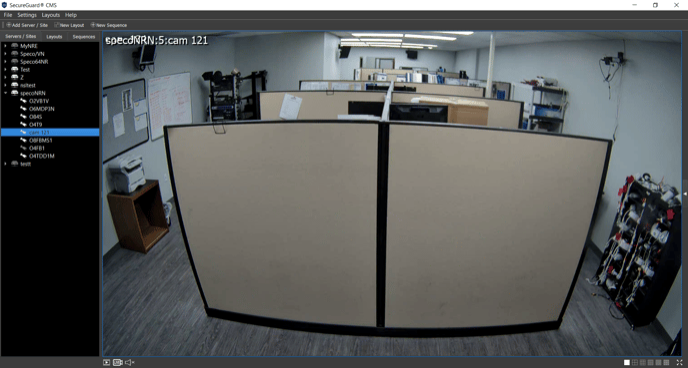
• Select the desired grid option at the bottom right corner of the screen.

• Click and drag the added recorder onto the first available camera frame. All cameras should auto-populate onto the screen.
How to add a Speco Blue Recorder to SecureGuard® CMS
This guide goes over the three methods of how to add a Speco Blue recorder to the SecureGuard® CMS desktop application.
.
** Please verify the recorder unit is connected to the internet before attempting to connect to the recorder. **
.
Click below to choose one of the three methods.
METHOD #1: Connecting via the IP address.
METHOD #2: Connecting via the DDNS Address.
METHOD #3: Connecting via the QR Code.
.
METHOD #1: Connecting via the IP address
• First, access the Settings menu of the Speco Blue Recorder.
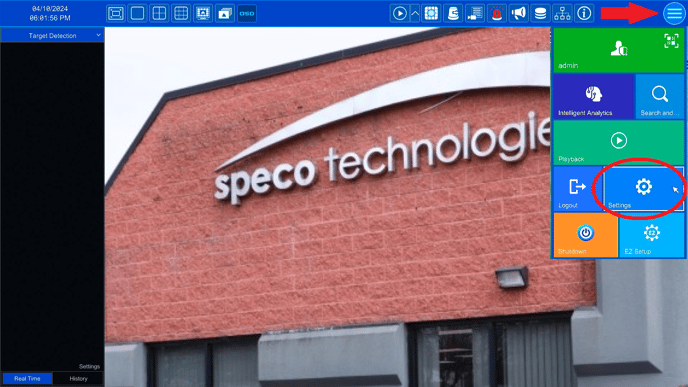
• Once the Settings menu appears, please select the Network page. That should automatically open the Network > TCP/IP page.
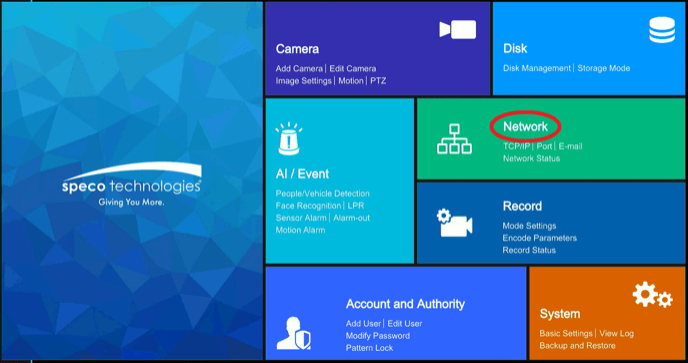
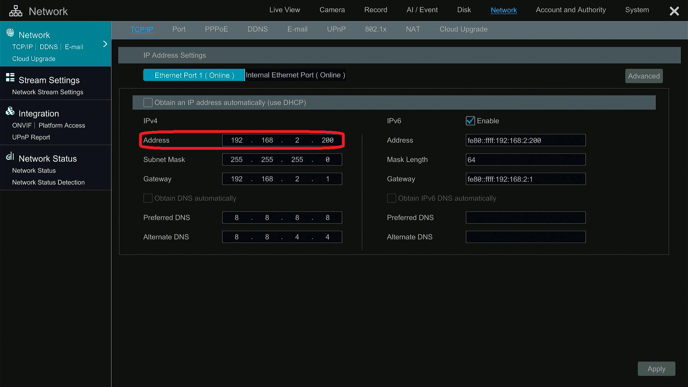
• The TCP/IP page is where the IP address information can be gathered. The location of the IP address the Speco Blue app will use is highlighted in the image below. Please take note of the IP address in the given location.
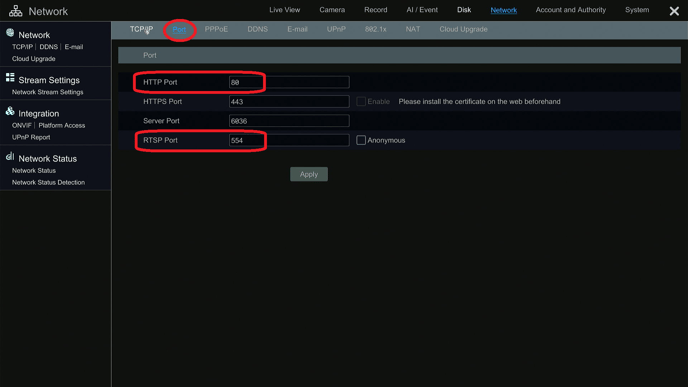
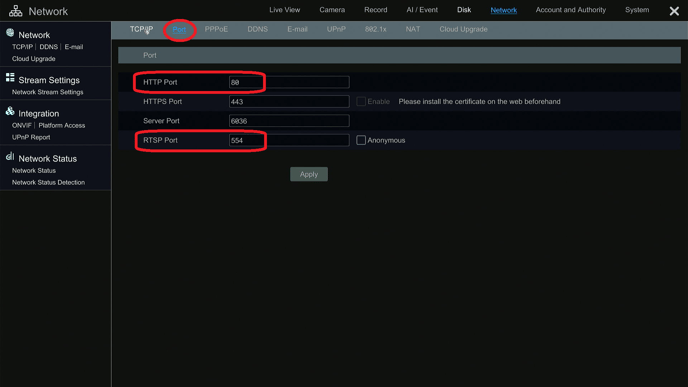
• At the top of the page, next to TCP/IP, an option for Port can be found. Please select Port. The active ports the recorder uses are listed. Please take note of the HTTP and RTSP port number.
• At a computer, log into the SecureGuard® CMS program.
• The top-left corner of SecureGuard® CMS will have several options to choose from.
◦ Select Add Server / Site.

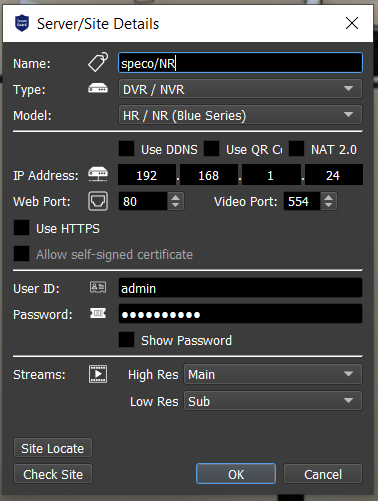
• A menu titled Server / Site Details will appear.
◦ Name is the first option. Give the recorder unit a name to help identify it. It can be given any name; it does not matter.
◦ Type is the second option. Select DVR/NVR.
◦ Model is the third option. It will appear after selecting DVR/NVR.
· Select the option that reads HR/NR (Blue Series).
◦ Insert the IP address that was noted in the previous step into the IP Address section.
◦ Set the Web Port to the HTTP Port and the Video Port to the RTSP Port that was noted in the previous step.
•
◦ Insert the recorder unit’s user ID and password.
• Once all information has been inserted, select Check Site at the bottom of the menu.
◦ The program will scan the network to detect the recorder unit and report back with a successful connection.
· Select OK to close the menu.
• Back to the main screen of SecureGuard® CMS, on the left side, a column for added Server/Sites can be found. The newly added recorder should appear on the list.
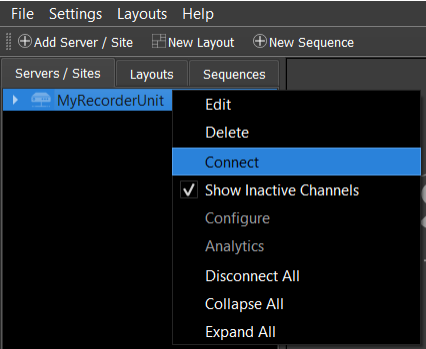
◦ Right click on the recorder and select Connect.
· The recorder icon next to the name will go from gray to white once a good connection has been established.
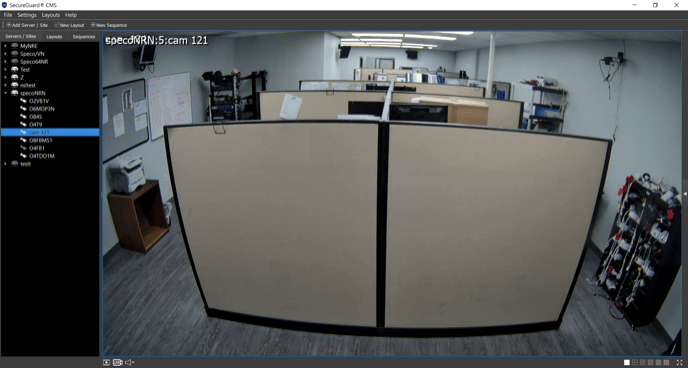
• Select the desired grid option at the bottom right corner of the screen.

• Click and drag the added recorder onto the first available camera frame. All cameras should auto-populate onto the screen.
.
METHOD #2: Connecting via the DDNS Address
Please note: Establishing a DDNS connection will require port forwarding. Speco Technologies is not responsible for port forwarding on the user’s network.
.
• First, access the Settings menu of the Speco Blue Recorder.
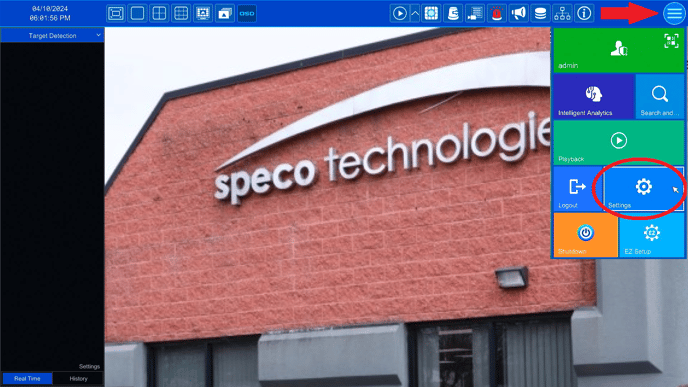
• Once the Settings menu appears, please select the Network page. That should automatically open the Network > TCP/IP page.
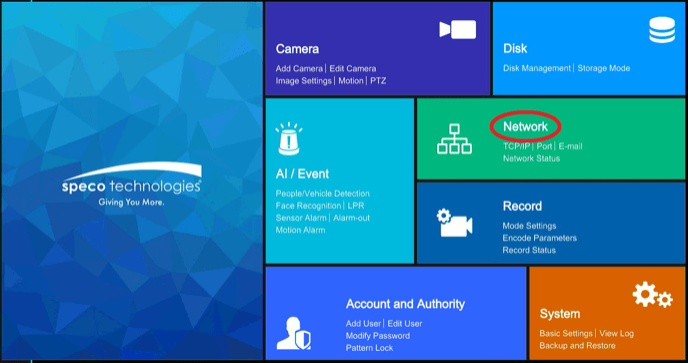
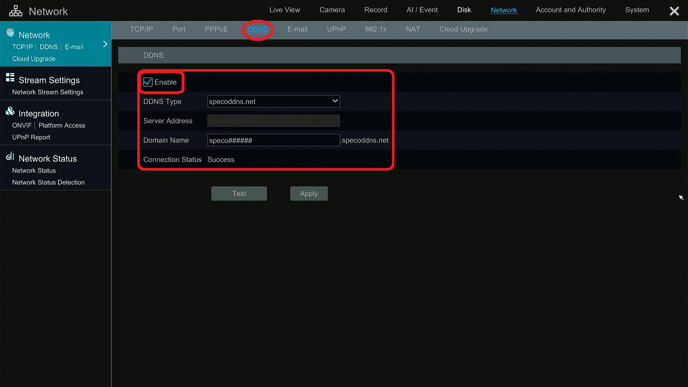
• Once the TCP/IP page opens, additional options should be made available at the top of the page. One of the options available is DDNS. Please select the DDNS option.
◦ Please verify that the checkbox for Enable has a checkmark. Select apply. A Domain Name should be given at this point. Take note of the Domain Name.
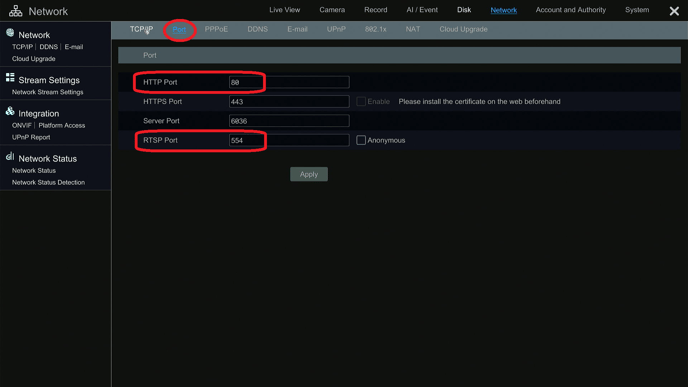
• At the top of the page, next to TCP/IP, an option for Port can be found. Please select Port. The active ports the recorder uses are listed. Please take note of the HTTP and RTSP port number.
• At a computer, log into the SecureGuard® CMS program.
• The top-left corner of SecureGuard® CMS will have several options to choose from.
◦ Select Add Server / Site.

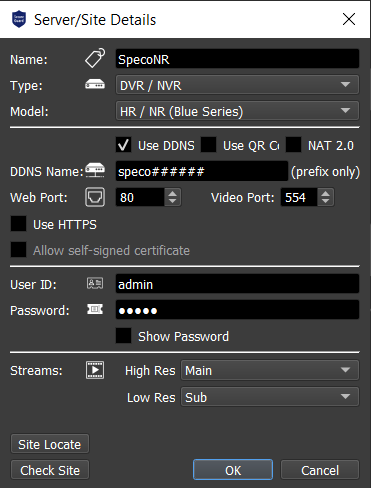
• A menu titled Server / Site Details will appear.
◦ Name is the first option. Give the recorder unit a name to help identify it. It can be given any name; it does not matter.
◦ Type is the second option. Select DVR/NVR.
◦ Model is the third option. It will appear after selecting DVR/NVR.
· Select the option that reads HR/NR (Blue Series).
•
◦ Check off the checkbox for Use DDNS and insert the domain name that was noted in the previous step into the DDNS Name section.
◦ Set the Web Port to the HTTP Port and the Video Port to the RTSP Port that was noted in the previous step.
•
◦ Insert the recorder unit’s user ID and password.
• Once all information has been inserted, select Check Site at the bottom of the menu.
◦ The program will scan the network to detect the recorder unit and report back with a successful connection.
· Select OK to close the menu.
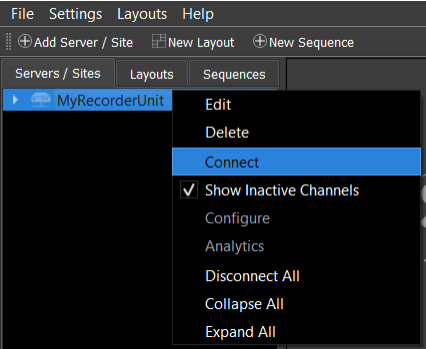
• Back to the main screen of SecureGuard® CMS, on the left side, a column for added Server/Sites can be found. The newly added recorder should appear on the list.
◦ Right click on the recorder and select Connect.
· The recorder icon next to the name will go from gray to white once a good connection has been established.
• Select the desired grid option at the bottom right corner of the screen.

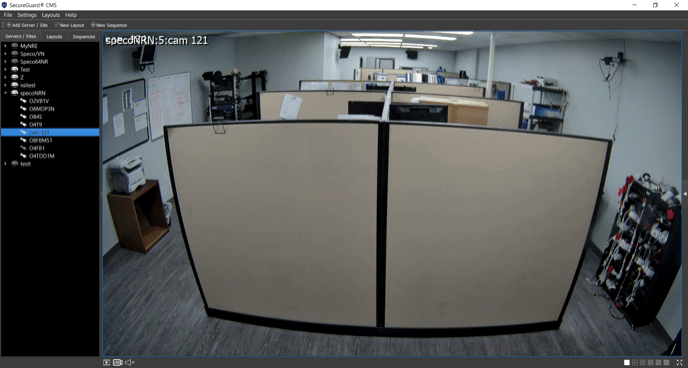
• Click and drag the added recorder onto the first available camera frame. All cameras should auto-populate onto the screen.
.
METHOD #3: Connecting via the QR Code
• First, access the Settings menu of the Speco Blue Recorder.
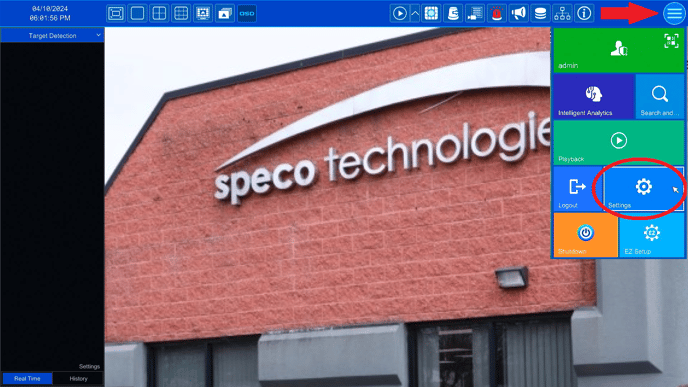
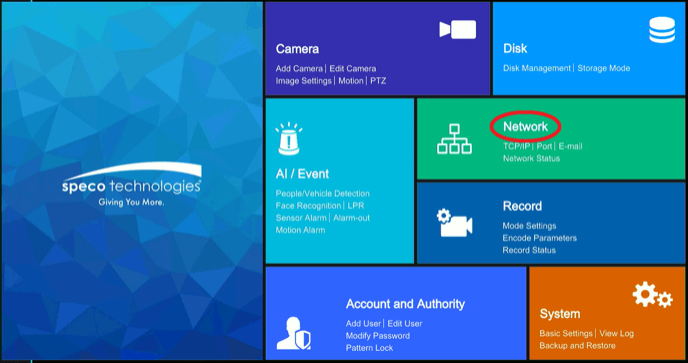
• Once the Settings menu appears, please select the Network page. That should automatically open the Network > TCP/IP page.
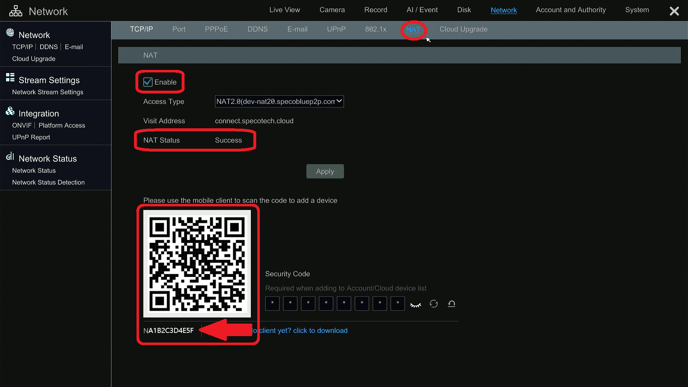
• Once the TCP/IP page opens, additional options should be made available at the top of the page. One of the options available is NAT. Please select the NAT option.
◦ Please verify that the checkbox for Enable has a checkmark. Select apply. A NAT Status of Success should be seen.
• Keep the NAT page open and/or take note of the code written directly underneath the scannable QR code. That is the written QR code for when the actual QR code cannot be scanned.
• At the top of the page, next to TCP/IP, an option for Port can be found. Please select Port. The active ports the recorder uses are listed. Please take note of the HTTP and RTSP port number.
• At a computer, log into the SecureGuard® CMS program.
• The top-left corner of SecureGuard® CMS will have several options to choose from.
◦ Select Add Server / Site.

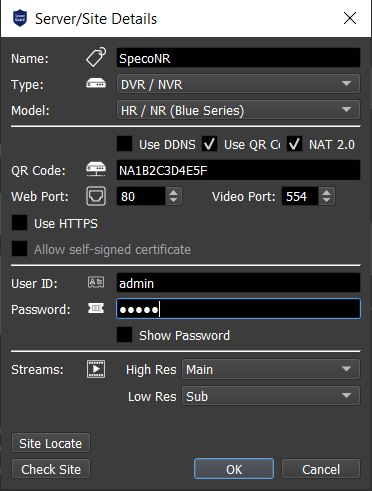
• A menu titled Server / Site Details will appear.
◦ Name is the first option. Give the recorder unit a name to help identify it. It can be given any name; it does not matter.
◦ Type is the second option. Select DVR/NVR.
◦ Model is the third option. It will appear after selecting DVR/NVR.
· Select the option that reads HR/NR (Blue Series).
•
◦ Check off the checkbox for Use QR Code as well as the NAT2.0 checkbox and insert the written QR Code that was noted in the previous step into the QR Code section.
◦ Set the Web Port to the HTTP Port and the Video Port to the RTSP Port that was noted in the previous step.
•
◦ Insert the recorder unit’s user ID and password.
• Once all information has been inserted, select Check Site at the bottom of the menu.
◦ The program will scan the network to detect the recorder unit and report back with a successful connection.
· Select OK to close the menu.
• Back to the main screen of SecureGuard® CMS, on the left side, a column for added Server/Sites can be found. The newly added recorder should appear on the list.
•
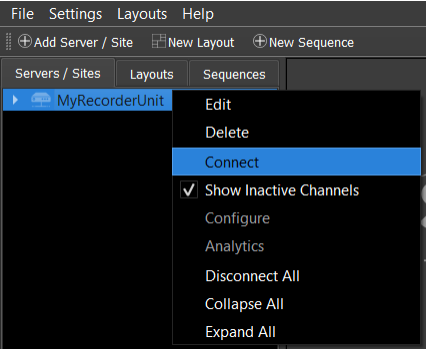
◦ Right click on the recorder and select Connect.
· The recorder icon next to the name will go from gray to white once a good connection has been established.
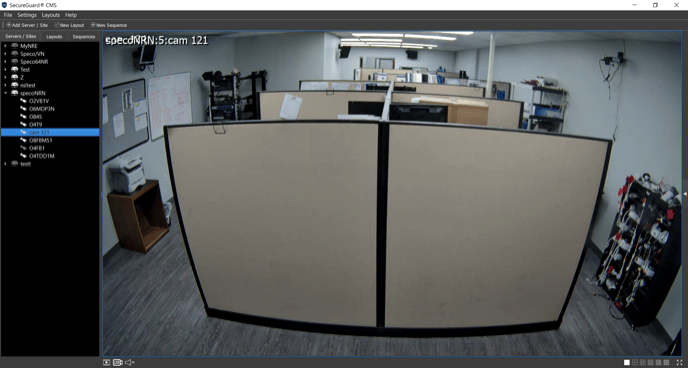
• Select the desired grid option at the bottom right corner of the screen.

• Click and drag the added recorder onto the first available camera frame. All cameras should auto-populate onto the screen.
How to Download and Use SecureGuard IP Scanner
Use the IP scanner (on a Windows PC) to find any series IP camera on the network.
.
• First, Download the program from our website
• Click below to visit the SecureGuard IP scanner download page

.
.
• Then, run the installer file that was downloaded to the computer and go through the installation process.
.
• On the PC desktop, double-click on the IP scanner icon to open the application.
.
.
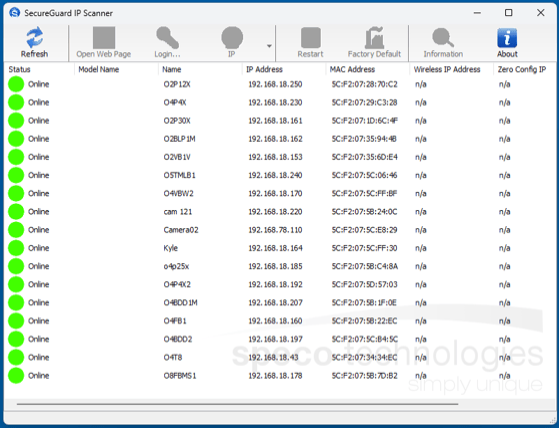
• After launching the IP scanner, it will automatically scan and display the IP address and additional info of any IP cameras on the current network.
◦ Double-click on the camera to log in to its’ interface in your web browser.
.
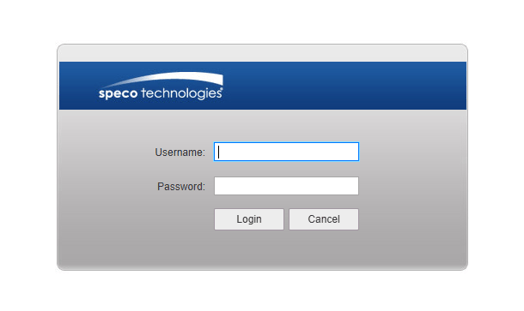
• To log into the camera’s interface, double-click on one of the cameras in the list.
• The web browser will open, then log in to the camera using the default credentials:
.
Click here to learn how to change the IP address of IP cameras.
Click here to learn how to change the default password of IP cameras.
How to reset your password for SecureGuard CMS using MacOS
A step-by-step guide on how to reset your password to access the SecureGuard CMS application for MacOS
To reset the password to your SecureGuard CMS Login on a Mac, will require the deletion of a folder in the User Library. If you are not familiar with the folder structure in MacOS, please take caution. While this process is straight-forward, Deletion of the wrong folders in User or System Library can cause the Mac malfunction.
Step 1:
1.Locate the folder for SecureGuard CMS, This folder is found in the Applications Folder.
a.Click the Finder Icon in the dock: 
b.Tap on Applications in the sidebar in the Finder window. This will open up the list of applications installed on the Mac.
c.Tap the letter “S” on the keyboard which will jump the selection to the letter S or scroll down the S.
d.Double Click on the SecureGuardCMS Folder
e.Double Click on the SecureGuard-CMS application. The application will launch. Take note that the User Name field populates the existing user name. Then quit the application by choosing cancel.
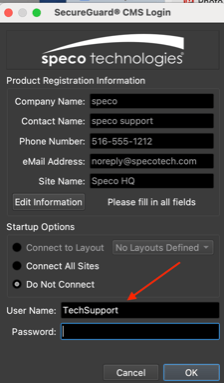
Step 2:
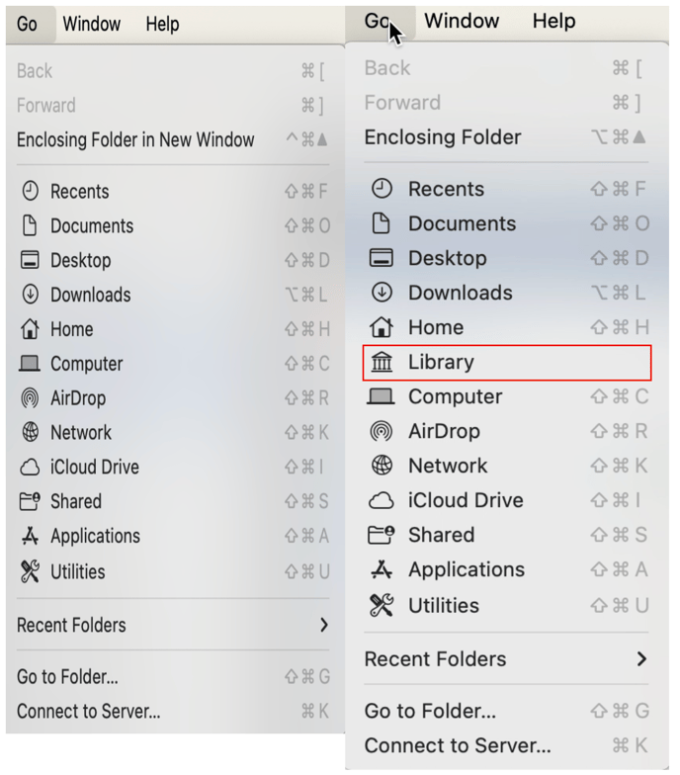
1.Click the Finder Icon in the dock: 
2.In the Menu Bar of the Mac, Click on “Go’
3.On the Keyboard of the Mac, Click the ‘Option’ Key
4.When the option Key is pressed while in the “Go’ Menu, The text ‘Library’ will appear. Click on “Library”.
+
Step 3:
1.Near the top of the list in the Library folder, the folder Application Support will be present.
2.Double Click on Application Support.
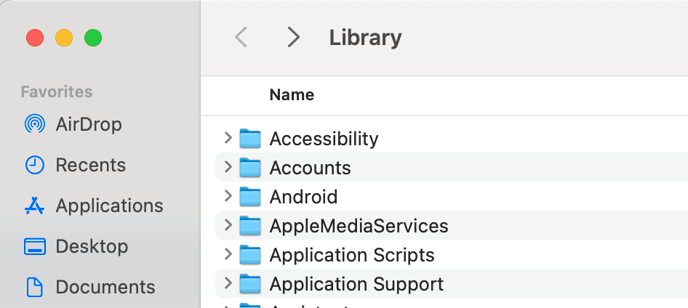
Step 4:
1.Again, Tap the letter “S” on the keyboard which will jump the selection to the letter S or scroll down the S.
2.The folder “SecureGuard-CMS” will be present:

3.Drag the SecureGuard-CMS folder over to the Trash icon in the Dock and let go.
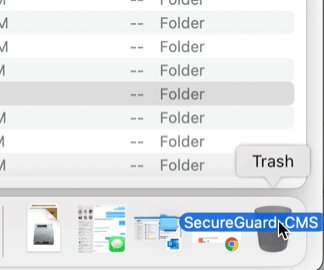
Step 5:
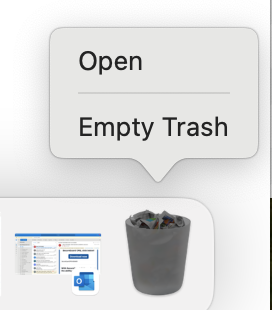
1.Click and hold on the Trash icon and select, Empty Trash.
Step 6:
1.Repeat Step 1 and relaunch SecureGuard CMS.
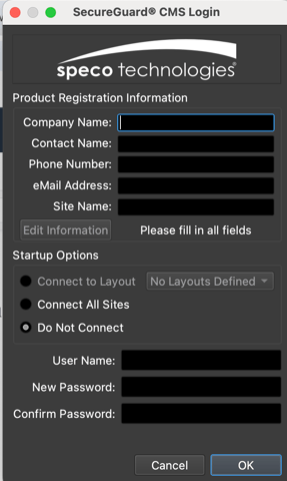
2.Upon relaunch, The previously entered credentials will be erased and the ability to create a new username and password has been enabled.
.
 (The “Ver########” shown above is to show the files name includes the programs version number. This number may change in the future as the program gets updated.)


