Security Camera Installation Guides – Install it Like a Pro ,Although we now offer installation, locally, we started as a DIY-only company, and we primarily serve those adventurous types who want to run the cable for themselves.
You’re Not Alone
Installation can be hard. We’re happy to talk it over with you or take over a DIY project that you’ve realized needs professional installation. Our support hours are from 9AM-7PM Monday – Friday (EST) and we are available via chat, email, phones, and remote PC screen-sharing, if you need any help. You can reach us at 866-414-2553.
Disclaimer: The laws governing cable and wire installation can vary from state to state and sometimes even counties and cities pass specific, unique laws regarding cabling; these state, county and city laws are too complex for us to explain. This page is not a how-to installation guide, as we cannot keep up with local laws.
Although we now offer installation, locally, we started as a DIY-only company, and we primarily serve those adventurous types who want to run the cable for themselves. Even so, we get asked about do-it-yourself installation all the time…. We wanted to post a few of our standard answers here.
Part 1
Don’t Start a Fire or Shock Yourself

Electricity Can Kill You; Avoid Electrical Lines!
Never strap, staple or otherwise run networking cable to conduit or raceways carrying electrical current. Never run any cable within 2 inches of Class I electrical lines, lighting, fire alarm, or power lines or devices.

Give a Wide Berth to High Voltage Devices or Lines
Never run any cable within 6 feet of a conductor or fuse box. A minimum 5-inch distance is required from any fluorescent lighting fixture or power line over 2 kVA and up to 24 inches from any power line over 5 kVA. If unsure about the a device or line, consult an electrician. Route cable away as far as you can from large motors, generators, induction heaters, arc welders, x-ray equipment, and radio frequency, microwave or radar sources. NEC/NFPA 70, Article 800-52

Protect it from Future Physical Damage
You might want to put a nail or screw in later and don’t want to puncture your cables, so when a cable, raceway, or soft conduit (anything you can puncture) is installed parallel to framing members (joists, rafters, or studs), furring strips, or crown molding, keep the cable at least 32 mm (1.26 inches) from the edge. NEC 300.4(D)

Don’t Leave it Dangling – Secure Your Cables
You can connect cable directly to a surface with straps, staples, cable ties, hangers, or similar fittings, but you have to secure it somehow. NEC 800.24; 300.11

Use Plenum rated cable in Areas with Airflow
If you are going to run cables through an area which is used by your heating, air circulation, or air conditioner systems (such as above a drop ceiling in an office), you must use Plenum rated cables, which have a special insulation that has low smoke and low flame characteristics. When securing cable in Plenum required areas, make sure your straps, cable ties, and similar fittings also are plenum rated. NEC 830; NFPA 90A
![]()
National Rules – Consult your local laws
These guides are meant to familiarize our clients with the national requirements as expressed in the National Fire and Alarm Signaling Code and the National Electrical Code. Your state or local laws may differ. If you live outside the USA, consult your governmental laws. Don’t consider this your only resource.

Turn the Breaker Power OFF
Any time that you will be drilling or cutting into your wall, you want to turn the power off. You don’t want to drill into a hidden electrical line. You probably already know this, but our lawyers insisted.

Wear Safety Goggles
Any time that you are drilling, you want to wear safety goggles and hearing protection, like ear plugs.
Security Camera Installation Guides
Read Next : GSurf Pro Setup and User Guide
Part 2
Drilling through Different Materials

Sheetrock (most interior walls)
A list of tools necessary, step-by-step instructions for installing SCW cameras, and how to close up the hole when drilling into a surface made of sheetrock.

Wood
A list of tools necessary, step-by-step instructions for installing SCW cameras, and how to close up the hole when drilling into a surface made of wood.

Stucco
A list of tools necessary, step-by-step instructions for installing SCW cameras, and how to close up the hole when drilling into a surface made of stucco.

Brick and Masonry
A list of tools necessary, step-by-step instructions for installing SCW cameras, and how to close up the hole when drilling into a surface made of brick.

Concrete
A list of tools necessary, step-by-step instructions for installing SCW cameras, and how to close up the hole when drilling into a surface made of concrete.

Metal Siding
A list of tools necessary, step-by-step instructions for installing SCW cameras, and how to close up the hole when drilling into a surface made of metal siding
Part 3
Running the Cable
Basic Cabling

Terminating Cable (Putting the ends on)
Instructions for putting the RJ45 ends on to ethernet (for example, Cat5 / Cat6 / Cat5e) cable.
![]()
Using Our Waterproof Connectors
When installing a camera outdoors, it is imperative that you put our waterproof RJ45 Connector on the ethernet (for example, Cat5 / Cat6 / Cat5e) cable.

No Protection – Just Running the Wire
You can connect cable directly to a surface with straps, staples, cable ties, hangers, or similar fittings, but the cable could get damaged and someone might be able to cut it.

24 Volt Wiring: PTZ
The Spotlight PTZ cameras uses 24 volt power rather than POE because it requires more power than is capable of Power-Over-Ethernet for its natural white light spotlight. The Laser can also be powered via 24 volt power and can be powered the same way, although it is not required to do so. This guide shows you how to wire these PTZs.

24 Volt Wiring: Sharpshooter
The Sharpshooter IP Bullet cameras uses 24 volt power rather than POE because it requires more power than is capable of Power-Over-Ethernet for its long range infrared. This guide shows you how to wire the Sharpshooter.
Protecting your Cabling

Liquidtight Plastic Tubing
Liquidtight plastic tubing is easier to work with than flexible metal tubing, but is less secure. It is also great for areas with lots of expected moisture as it won’t rust.

Flexible Metal Conduit (FMC)
Flexible metal conduit is difficult to cut (watch out for sharp edges), but easier than solid conduit to install.

Electric Metal Tubing (EMT)
Solid metal conduit is the most secure form of installation. It requires a specialty conduit bending tool.

Conduit Fill
This chart will let you know how many cable runs you can fit in one conduit pipe, depending on the size of the conduit.

Raceway (Outdoors) – Coming Soon
Raceways are most popular indoors to make the space look clean and professional. There are also outdoor rated raceways; this guide covers using raceways outdoors.
Clean and Professional Interiors

Raceway (Indoors)
Raceways are most popular indoors to make the space look clean and professional. There are also outdoor rated raceways. This guide covers using raceways indoors.

Ethernet Wall Plates
Not recommended. It can be difficult to find a wall plate that passes POE power and provides grounding. These devices also provide a secondary point of failure, and take up far more room than a cable pass through plate for larger systems.
Dealing with Long Distance

Using POE switches to reduce cabling
You can run one cable to a POE switch and then run several cameras to that switch, however, POE switches are not plug-n-play. POE switches do require you to know a decent amount about computer networking.

Cables run over 300 feet
Cat5e and Cat6 cable data has a limit of 300 feet, but if you need to go further than that you can use a POE extender, POE injector, or POE switch to hear and repeat the signal. This article discusses when you would use each of these tools.

Long Distance Wireless
Military-Grade Long-Range Wifi Solution are used when attempting to send wireless IP Camera video data more than 100 feet (and up to 3 Miles). These products will require a professional wireless network technician on location.
Part 4
Mounting Cameras and Recorders
Basic Camera Installation
![]()
Bullet Cameras on Walls
In this guide, we will be installing a bullet camera on a wall.

Bullet Cameras on Ceilings
In this guide, we will be installing a bullet camera on a ceiling.

Bullet Cameras on Soffits
In this guide, we will be installing a bullet camera on a soffit.
![]()
Dome Cameras on Ceilings
In this guide, we will be installing a dome camera in a ceiling tile.

Dome Cameras on Walls
In this guide, we will be installing a dome camera on a wall.

Positioning the Lens in our Dome Cameras
In this video guide, we demonstrate how to adjust the lens positioning on our Marshall, Guardian, Warden, and Mosquito Dome Cameras.

Audio and Alarm Inputs FAQ and Sample Wiring Guide
Here’s a guide on Line-Level Audio Inputs and Analog Wired Alarm Integration.
Attaching Our Camera Mounting Accessories

Electrical Mounting Boxes
Our electrical box mounts are used to give easy access to your connections, hide them inside the junction box, and allow you to drill a smaller hole in your wall. If you want to run conduit they are necessary to run conduit straight to the camera.

PTZ Wall Mount Bracket
This guide will show you how to mount your PTZ camera to the wall mount bracket.
![]()
Pole Mounts
In this guide, we will be installing a Hornet Pro bullet camera on a pole.

Pendant Mounts
In this guide, we will be installing a Radius panoramic dome camera on a pendant mount. You can install all our PTZ and a few of our dome cameras via Pendant mounts.

Screw Size Chart
Lose a screw? No problem. Here’s all our 2018 product line screw sizes in one convenient place.
NVR Mounting Options and Hard Drive Installation
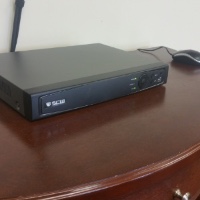 Shelf / Desk Mounting NVRs
This is what most people do: just put it on a shelf or desk. This makes it easy to connect to a TV/monitor and use the mouse (included) to control the NVR.
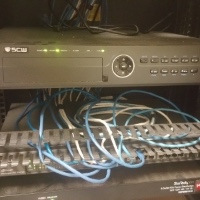 Rack Mounting NVRs
Companies often want to put the NVR in their server rack room. People who do this often to control the NVR only through our apps or web browser. Only our larger NVRs (16 channels and up) are wide enough to be rack mounted (and they come with ears). Our smaller NVRs can use our Rack Mount Shelf.
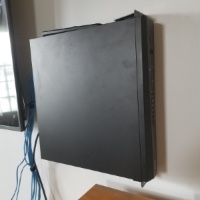 Wall Mounting NVRs
Many people choose to mount their NVR on a wall near a TV. To do this, you will want to purchase a vertical rack, like this one that matches the height of your NVR. The 16, 32, and 64 channels units have a height of 2U and the 128 channel is 3U. NVRs are heavy and you will want to make sure your wall can support the weight.
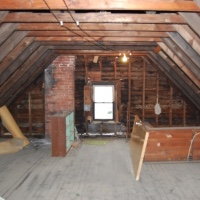 Mounting NVRs behind a Wall / in an Attic
People who are afraid of the theft of an NVR often place it behind a false wall or in an attic. People who do this control the NVR only through our apps or web browser. Be aware: Not all attics are insulated well enough to be within the temperature requirements of the NVR. Temperature range is listed on each NVR’s technical specs tab.
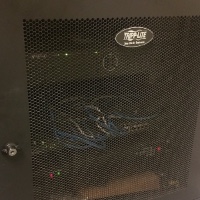 “NVR” Lock Boxes
There’s a few companies advertising “NVR Lock Boxes,” but any Server Rack or Computer Rack will do. Most Server Racks or Mounts have locks on them already. This picture is of a Tripp Lite Server Rack with Lock It houses a 32 channel NVR, two of our POE Switches, and a router, but there are tons of companies selling small server racks online.
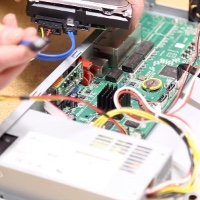 NVR hard drive installation
If you purchase both a hard drive(s) and recorder from us, we will happily install the hard drive for you. but here’s a handy guide if you want to do it yourself.
Part 5: Specialized Work
When to NOT DIY – Get an Expert

Long Distance Wireless
Military-Grade Long-Range Wifi Solution are used when attempting to send wireless IP Camera video data more than 100 feet (and up to 3 Miles). These products will require a professional wireless network technician on location. We can’t offer support on this product remotely, as once we can see it remotely, that means that it is already working.

Aerial Cable
Aerial cable clearance varies based on location (cable over a road needs more clearance than over a sidewalk, for example), needs to be enclosed within 8 feet of finished grade, and requires a on-site structural analysis to make sure the cable won’t break. Hire an expert.

Burial of Cable
Number one, call 811 before you ever dig: know where your power company has buried its power cables! The required cable burying depth also can vary based on your local zoning laws and your certificate of occupancy; you should get an expert.

Elevators
Don’t even try to install any cable in one without a licensed elevator technician’s help as the cable needs to be inside the cable traveler. An error in securing the cable can result in damage to the elevator’s operation – and potentially the people inside it. Don’t mess with it; get a licensed elevator technician to run the cable.
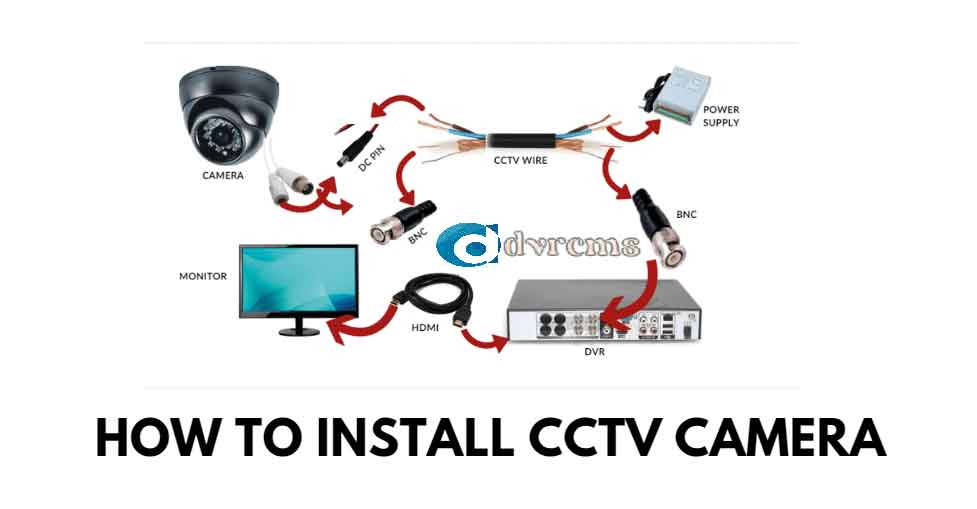


Ever wondered about the best spots to install security cameras? This guide not only covers detailed installation steps but also gives savvy tips on strategic camera placement to enhance coverage and eliminate blind spots. It’s like having a troubleshooting buddy by your side, ready to tackle any hiccups during the setup process. A smooth and secure experience awaits you!