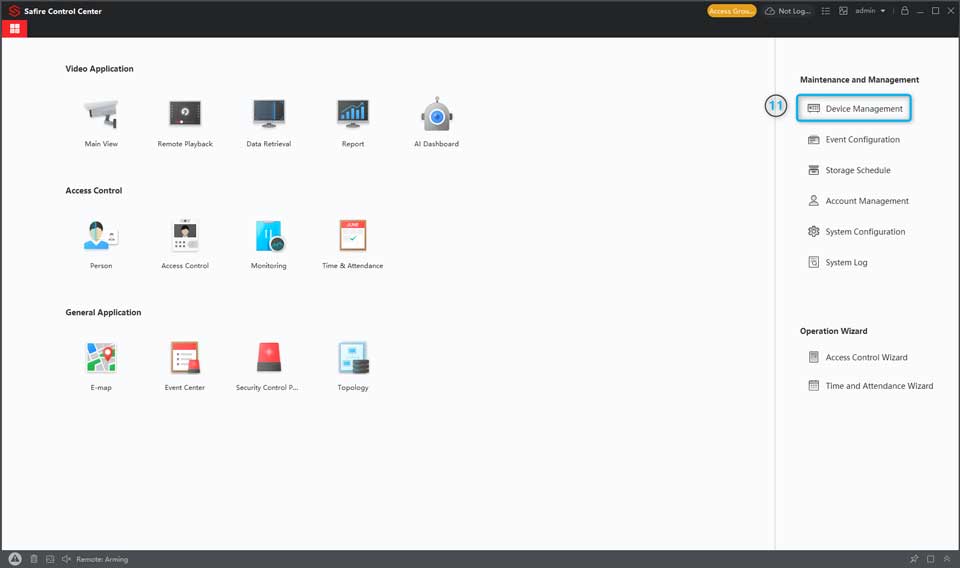
Safire Control Center setup guide,CCTV Client Software for Desktop (PC) and mobile device App. Integrated remote access for networked Safire Devices.
Minimum requirements and computer capabilities for using the SAFIRE Control Center
- Intel i5 6th Generation and above (i7 6th Generation recommended).
- 16 GB of RAM.
- Video Accelerator Card 2 GB or more.
- DirectX 11.0 or higher.
- 500 MB of free hard disk space.
Software features:
- Can manage up to 256 CCTV devices / cameras
- Can manage up to 256 DVRs / NVRs
- Supports up to 4 monitors (with 64 simultaneous camera videos).
- Supports local and remote (P2P or DDNS) equipment.
- Supports two-way audio
- Supports local and remote configuration on devices

Safire Control Center
Read Next :
- Ajax Translator Full User manual
- Ganz CORTROL VMS Client Setup Guide
- Dahua Configtool Installation Instructions
Safire DDNS services for Safire camera or recorder
To connect any Safire device that has “Safire DDNS services”
Previously, you have to be registered and your account activated before logging in at www.safiredns.com.
1. Create a domain
1. Open and log in to www.safiredns.com
2. Select SafireDNS
3. Add a domain
4. Select the zone
5. In the domain name enter any name as client name or project name
6. Group
7. Group
8. Password
9. IPv4 or IPv6 address (check the myipaddress.com site for your IP address)
10. Save

2. Add a device in ProCloud
1. Go to Procloud
2. And click on + Add device
3. Enter the name of the DDNS address you created in the previous step

4. Save
3. Port Forwarding
1. For Safire’s decisions we need to forward ports 80 and 8000
2. Port 80 is for the web interface of the camera or recorder
3. Port 8000 is for the native communication protocol
ZTE Modem router example
Xiaomi router example:

Reyee router example

3. Enter DDNS type in the camera or recorder
1. Check the ports that are used on the camera/recorder and open the(1) camera/recorder settings page
2. Select Network
3. Then the basic settings
4. Port tab

5. If it does not work, you can check the NAT configuration
6. You can also switch to manual port assignment

7. Enable DDNS on and enter credentials
8. Go to the DDNS tab
9. Enable DDNS
10. Select SafireDNS when using “Safire DDNS Servies”
11. Use the domain you created (in 2. Add a device in ProCloud)
12. DDNS username and password and not those of the device.

When all the configuration has been done correctly it should look like the image below in the Safire ProCloud.

Check that the status icon, the device is linked and the configuration options appear.
How to configure the POS function from Safire Control Center
NOTE:
POS function is present on the entire 8000 series NVR range and the entry-level 4KE range has POS function.
Also in some of the 6000 series (still to be verified)
The POS function on NVRs can only be configured from the local interface of the recorder itself or from Safire Control Center.
In NVRs, the POS is considered metadata (the same as a line crossing or area intrusion, like a VCA).
In XVRs it will not allow the POS configuration from the web interface, since the POS would be “printed” on the video stream itself.
CONFIGURATION POS NVR SAFIRE CONTROL CENTER
In the device management part, click on advanced settings:

We click on POS, and the first thing that appears is the POS rule configuration.

From here we can configure the operating hours, notification link methods, or relay activations, as well as configure the desired camera function by selecting the POS area, how we want it to be displayed on the screen, etc.
Display modes
- Scroll: The screen is filled with information, and the first information is scrolled.
- Page: The information appears all at once as it is scanned on the screen. If the second piece of information is scanned, the first information is removed.
In the next part, we configure the font. Here we make special mention of the font because not all fonts are supported by the web interface and the Safire Control Center. Only the LATIN-1 font can be displayed in real-time and in the Safire Control Center and web interface recordings.

In the local interface of the recorder, any font that the recorder allows us to use can be displayed.
Finally, the connection mode is to set the IP and port of the printer that will send us the information. We can connect several printers and assign them with the Filter Rule ID so that as you can see in the first screenshot, a different Filter Rule ID should be applied to each channel since a printer is usually used per camera (imagine a supermarket checkout, with several scanners).

When viewing and recording, as I said before that the POS is treated as a VCA, to be able to search by POS later in Safire Control Center, we should set the recording by POS in the recording schedule, like this:

This would suffice.
VISUALIZATIONS
Now, in SCC, if we go to Real-Time we can see the result of the POS as long as we have configured the font as LATIN-1:

In recordings we can search directly by POS events from here:

Search by specific KEYWORDs if we need it:

And finally, we would only get POS events as a result, which if we play it back shows the whole text string printed in the recording:

If, on the other hand, we want to visualize the POS information, from the web interface of the recorder, we don’t have to forget to enable this in the CONFIGURATION -> LOCAL part

How to recover password by email or recovery questions
To recover the password:
1. Open SADP Tool2
. Click on “Forgot Password”
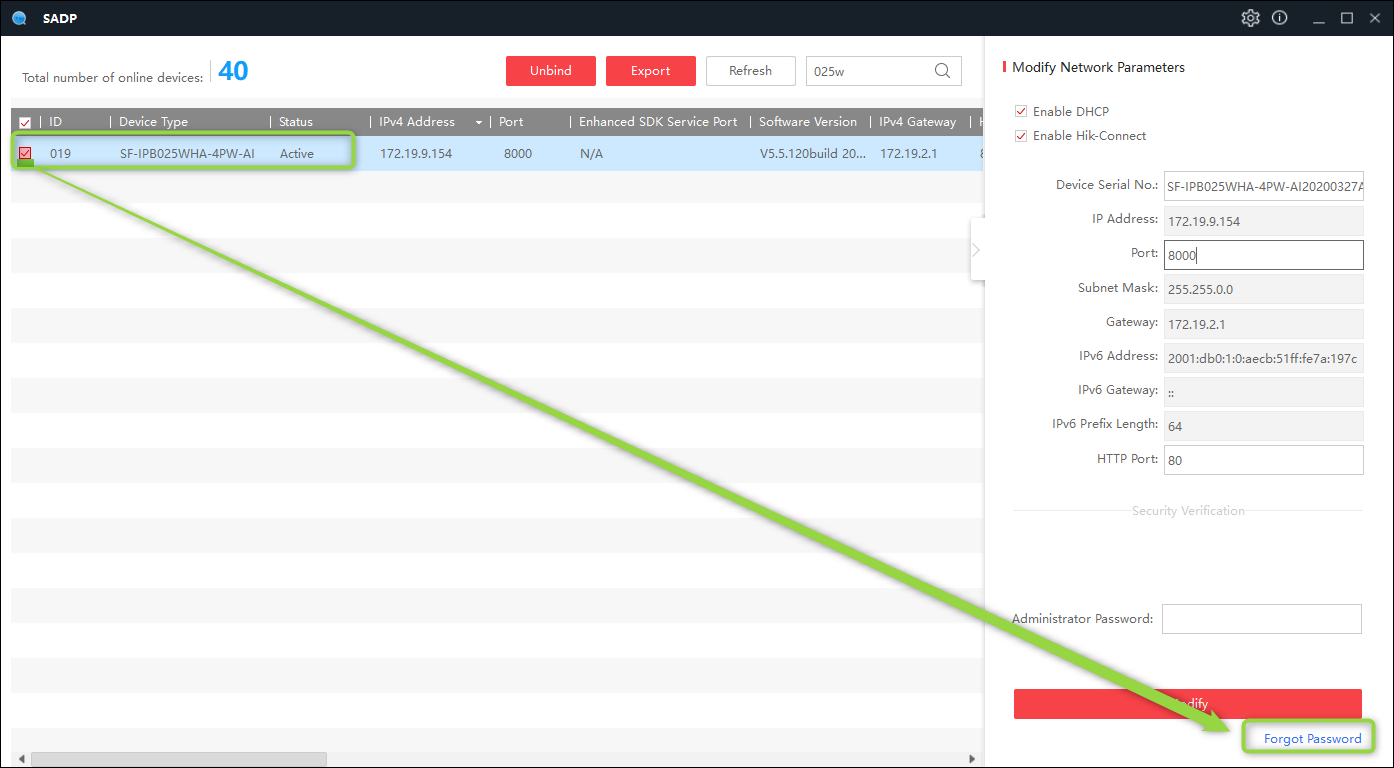
3. Use the questions or the email option
4. If the email option is chosen
Save the QR and send the QR to the email address pw_recovery@device-service.com as an attachment. (Or use the XML code)
In general, when using automated email services, you will get a retrieval file within 5 minutes.
Note:
This email address only works when you have registered the email address you registered on the device. See the article: Safire – Prepare for lost passwords

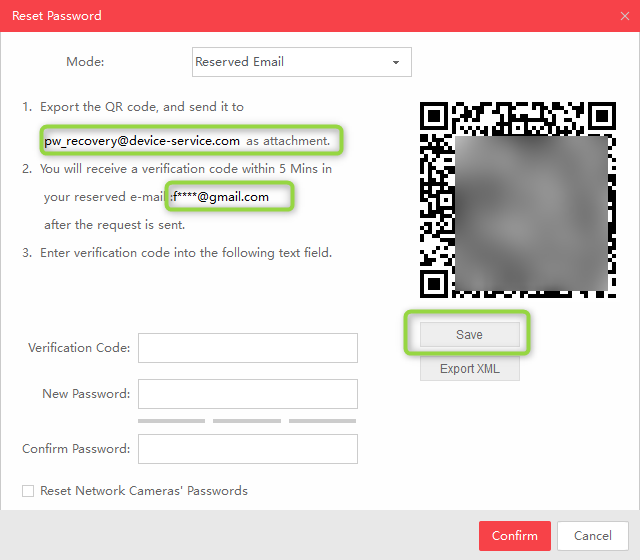
When you have received the email

Use the verification code from the email and create a new password
Note:
When deactivating the Safire network cameras that are connected to the NVR for which you have requested password recovery, also select (A) “Reset Network Camera’s Passwords”.

When not using email or questions on the device
Select the secret key export/import mode and send the XML file to your supplier or distributor.
They will process the recovery and get back to you with the key in your mail.
Please note that this is not an automated process and may take time.
Note:
The file you receive is valid for a period of 48 hours. You cannot shut down or restart your computer until after you have completed all the steps.

3. When you receive the recovery file
3.1 In step 2
A. Select import file
B. Import the XML file from the received e-mail
C. Create a new password
D. Confirm password


How to prevent password loss
You can avoid long waiting times by saving security answers and/or registering a password recovery email.
Tip:
“To view the best and largest GIF or image, right-click and open the image or GIF in a new tab.”
On an already configured camera or recorder
1. Open the web browser or the SCC (Safire Control Center)
2. Open the configuration page.
3. Go to System > Account Management and click Account Security Settings
4. Ask the security questions and most importantly associate an email.
5. And OK to save.

For when you need the password recovery service:
How to recover password by email or questions
Create a device group in Safire Control Center
In this tutorial, we use SCC (Safire Control Center) Version V3.20.57 build20210726 and a floor plan of an existing shopping mall for this demo
Tip:
“Right click and open the image or gif in a new tab if it is a large image or gif.”
Create a device group in SCC:
- Open SCC (Safire Control Center)
- Manage Open Devices
- In the Device Management section, click Group
- Then create a new group and click + Add Group
- Give the Group a name
- Click op import
- Select an option
- In the new window select the devices

E-Map in Safire Control Center
In this tutorial, we use SCC (Safire Control Center) Version V3.20.57 build20210726 and a floor plan of an existing shopping mall for this demonstration
Depending on the situation, creating a group via device management can be useful when there is more than one device for the plant. By making use of P2P devices it is also possible to deploy in the group
Tip:
“Right-click and open the image or gif in a new tab if it is a large image or gif.”
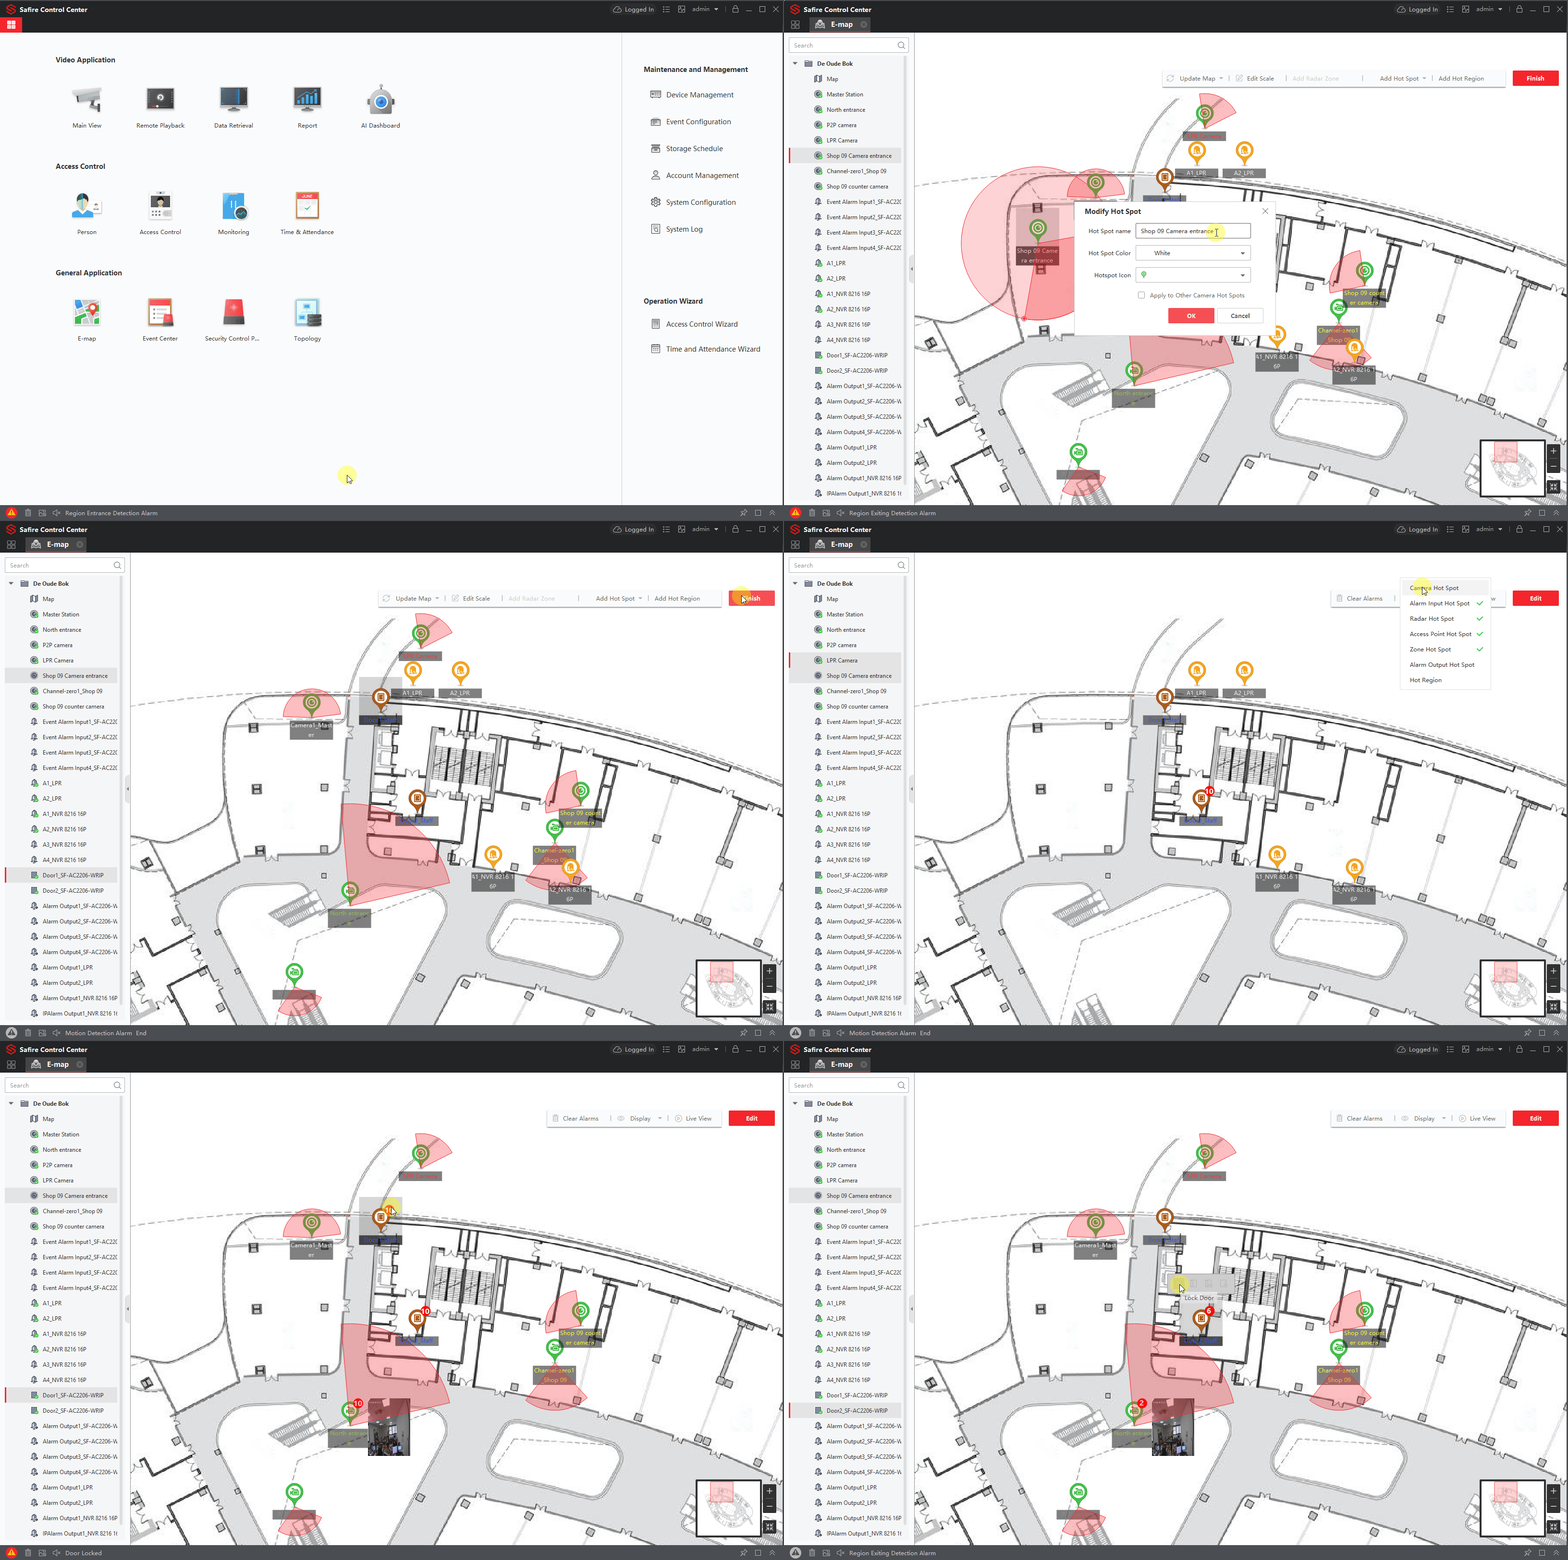
Import the blueprint image into SCC:
- Open SCC (Safire Control Center)
- Through the main page in the section
- General Application open E-map
- In the newly opened E-map tab
- Click on Add map
- Select the map directory
- And OK to import the image

Move the devices on the map:
- On the left side, you find the devices of the group
- Select keep and move the device on the map
- You can adjust the size and length through the circles
- Click in the grey zone to edit the name and color
- Ok to save
- When finished

Live camera or open a door in E-map:
- Open the E-map in SCC
- Click on the camera you want to view
- Click on the grey play icon and a new window will pop up to view the camera
- To open or one of the other actions
- Click on the chosen door
- In the new window, select the action

How to manually activate relay outputs on Safire recorders and cameras
To activate the relay output from a Safire video recorder or from an IP camera, we can proceed in two different ways:
- Via web component

- Via Safire Control Center (SCC), the brand’s main PC software


- Via the Safire Connect mobile application – works both via IP (local management) and via P2P (remote management)


How to add a map with the location of the elements in Safire Central
In this article we explain several ways to configure different maps.
Mode 1: create a map from a GIS
First we open the web server to configure it. From the settings part we can generate a map from a GIS file, as shown in the following screenshot:

Then, we go to the Logical Visualization part to define which groups of cameras we create and where we will place them.

To add a camera to the map, select the camera and the following configuration menu will open:

We select the icon we want (we can also import one), and we will click save. Then the camera will appear on the map.

In this way we could create a general map with the devices we want. We click on  so that the changes are applied in the Safire Central Control Client and we go right to the Control Client that we just mentioned.
We click on the map that appears in the Safire Central drop-down part to the left of the screenshot, and the map with all the devices that we have configured before will appear in the main part from the web server interface:

Here we can receive the alarms in real time and view the cameras at the time we want.
Mode 2: create individual map
First, we select the group on which we will configure the map:

We enable the map option, we load an image and we give it to save:
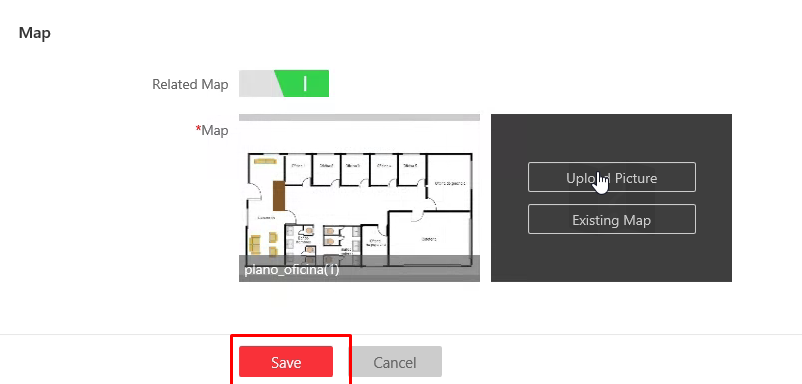
Next, we select each device and enable the map option as we have done previously and click save:

And the devices will appear on the map:

Now we go to the Safire Central Control Client, and update the changes as we have done before:

We kunnen zien dat we in de groep van verdieping 1 nu ook een MAP hebben, we kunnen deze selecteren en deze verschijnt op het hoofdscherm:

IMPORTANT: a camera cannot be associated with two different maps (it cannot be associated with a GIS map and an individual map at the same time). If it is selected in the general map, it cannot be associated with another. Similarly, if it is associated with an individual map, it cannot be associated with a general map.
Sending reports by email in Safire Control Center
To receive e-mails with the reports of the users, we will have to carry out the following steps:
- Go to the Regular Report section and add as many users as you want to receive the reports:

- Then select the user and indicate the email that will receive the report

The configuration of the email to be sent from the software is done from the following section:

It will be necessary to first verify that the sender mailbox that has just been selected is properly configured, that is to say, with all the necessary permits to be used by third-party programs.
Change language in Safire Control Center software 3.2.0.54
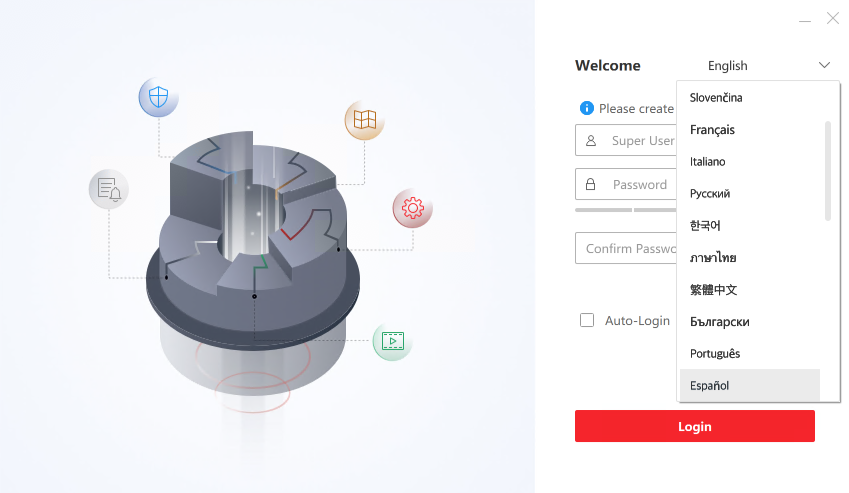
Starting from version 3.2.0.54 of Safire Control Center, the language (whose installation pack contained can be downloaded from our web page – https://athena-visiotech.s3-eu-west-1.amazonaws.com/2Oqj_HMB2AJnMa3v3oAI/Safire_Control_Center_V3.2.0.54_MULTI.zip) can be changed from the following section right after starting the software:

If we have activated the auto login without changing the language, we will have to select the following option so that the software does not start directly:

Change language in Safire Control Center
The language can be changed in the pop-up window, where the Login is made, when accessing the software.
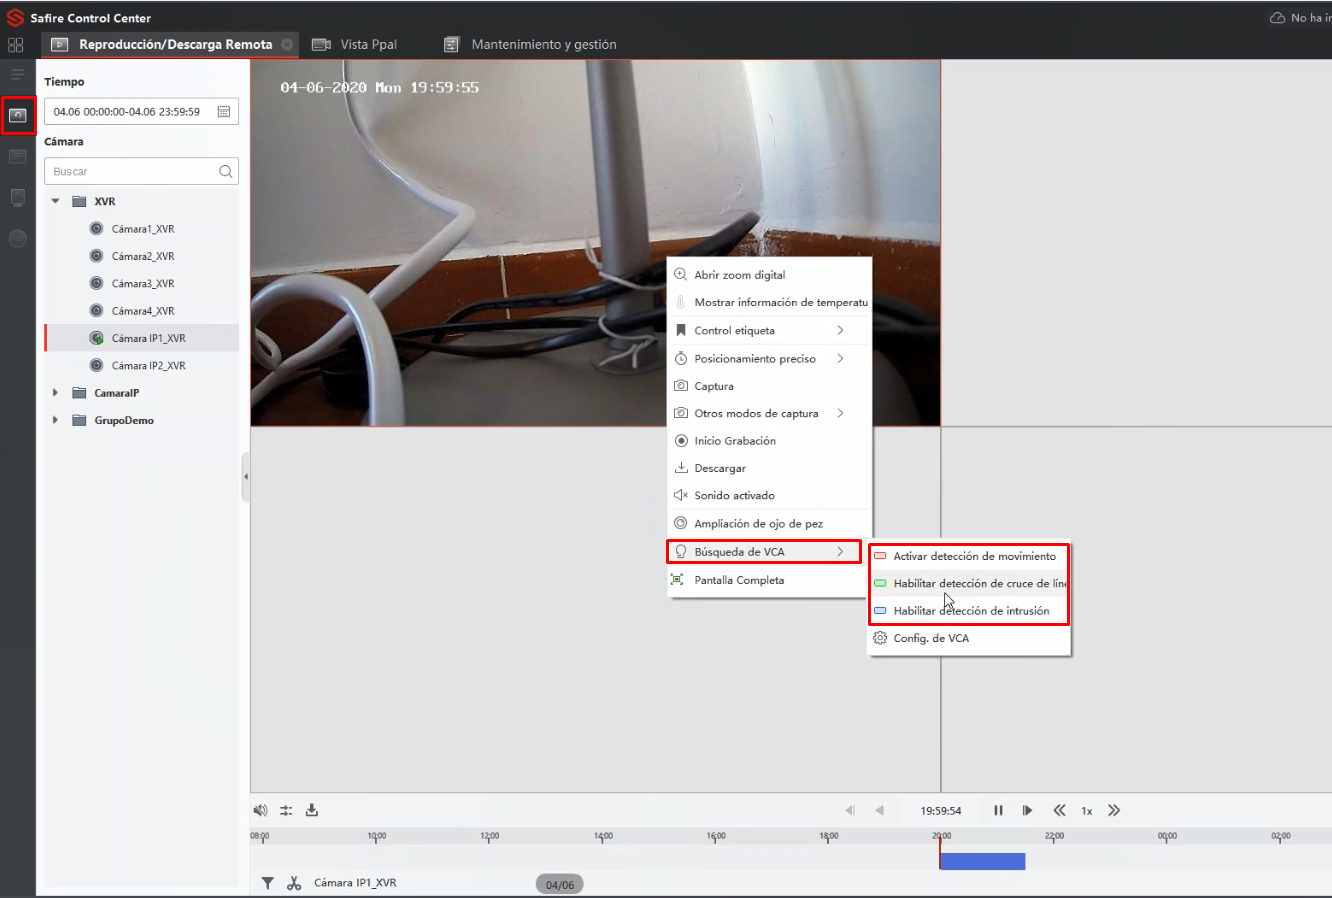
How to activate the VCA search filter in Safire Control Center
In the following image you can find the path to access this type of search filter in the Remote Playback menu:
How to install Safire Control Center on Windows Server 2012
Generally if you are installing the software on a Windows Server 2012 account with administrator permissions using the latest version that is digitally signed, you will have no problem.
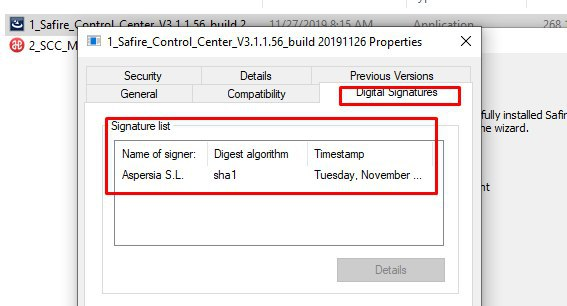
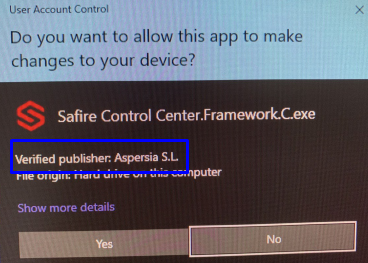
Windows Server 2012 R2 is supported by the manufacturer and we know that it has been installed correctly on other occasions.

Additionally, we recommend checking if any anti-malware or firewall software may be filtering and preventing the normal installation.
Buttons are failing in Safire Control Center!
What to do when some applications of Safire Control Center 3.1.1 just won’t work or even open?
For example: we press the people button and we visualize the loading roulette, but then it just keeps rolling without actually initiating any process.
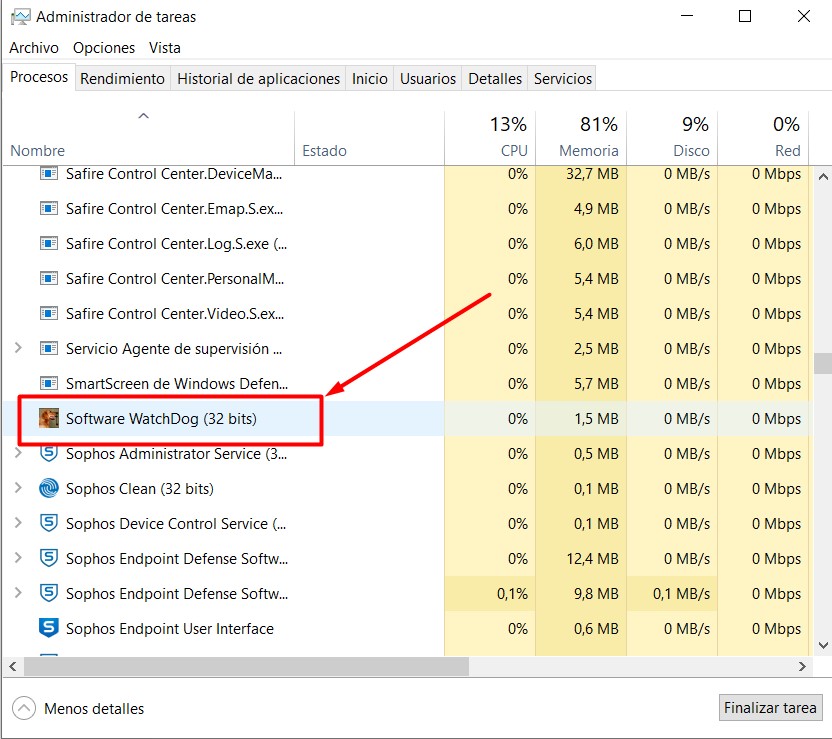
We would only have to delete, in the task manager section of our PC, the software watchdog process (32 bits) as shown in the following image. Then, we would just have to run Safire Control Center again.
Blue and Red Flags on the Safire Control Center Calendar
Red: indicates event recording
Blue: indicates continuous recording


Login error whilst opening Safire Control Center
It is possible that this error appears when you start Safire Control Center:

What you need to do to avoid this situation to repeat itself is to change the application port, as the 8080 is usually occupied by other applications (especially the other Safire applications, such as the Safire Control Center AC).
Our recommendation is to change it to anything that is not being used. For example 8081 or 7999.
P2P cloud ports targeted by a SAFIRE device
For both cameras and video recorders that connect to the cloud via P2P service, the ports they use for connection are:

They can be addressed to different domains:
- litedev.eu.guardingvision.com
- litedev.guardingvision.com
- dev.eu.guardingvision.com
- litedev.guardingvision.com
On the other hand, the cloud ports are:

Playback speed on Safire recorders from Safire Connect
Here is the table of Safire video recorder models that supports playback speed increase from the app:
SF-HTVR6116-HEVC
SF-HTVR6104-HEVC
SF-HTVR6108-HEVC
SF-HTVR8216A-HEVC
SF-HTVR8104A-HEVC
SF-HTVR8104H
SF-HTVR8108H
SF-HTVR6116A-HEVC
SF-HTVR6108A-HEVC
SF-HTVR6104A-HEVC
The models that do NOT belong to this list are:
– AI recorders
– recorders with audio over coax
– PoC recorders
– models with a higher number of channels, such as 24, 32, etc..
We do not exclude that this functionality will appear in future updates or new versions included in these last 4 groups.
Zoom problems Safire Connect APP
This happens in version V3.10.1.1015 and is resolved with the following update.
The problem is usually the horizontal left-right movement after having entered the digital zoom, since the channel change is prioritized over the displacement within the same zoom.
Possible solutions:
– select only the camera of interest before opening its image, rather than selecting it from a group of preloaded video streams
– perform a vertical physical movement (up-down) and, without lifting the finger, perform the horizontal movement, which will already be done correctly.
A video clip follows to better understand the second option.
