Troubleshooting
Ring Video Doorbell Pro 2
The Ring Video Doorbell Pro 2 requires that your transformer supply 16-24VAC (50/60 Hz, 30-40VA) to activate or use Package Alerts. If you have a lower-power transformer, you may need to change your transformer to get Package Alerts.
Purchase a Hardwired Transformer.
Ring Video Doorbell (2nd Generation) and Ring Video Doorbell 2
Low Motion Sensitivity can influence your Package Alerts accuracy. Try adjusting your Motion Sensitivity settings to the highest sensitivity:
Note: This change can affect your device’s battery life and increase the number of notifications you receive.
Turning on Push Notifications for Ring.com
Get informed about events happening on your property with push notifications delivered to your computer desktop.
You can receive push notifications when you’re logged into your Ring account as part of your Ring Protect subscription. Without a subscription, you will not receive them. Push notifications can be enabled on a compatible web browser.
Types of push notifications
Ring Alert: Someone is at your door.
Motion Alert: There’s motion at your location.
Person Detection: There’s a person at your location.
Door Intrusion: Door impact is detected on your location.
Door Activity: Someone may be at your door.
Supported browsers
For the best experience, we recommend using the following browsers.
|
Browser |
Version |
|
61.0 or later |
|
|
14.0 or later |
|
|
17.0 or later |
|
|
54.0 or later |
|
|
Mozilla Firefox ESR |
78 or later |
|
48.8 or later |
At this time, we don’t support push notifications for Incognito Mode, or on mobile/tablet browsers. You can still receive notifications* on your mobile device or tablet with the Ring mobile app.
* Ring Alarm and all Ring Alarm accessories require a subscription for digital notifications, in-app features, digital arming/disarming, and integration with other Ring, Echo, and third party products. Subscription sold separately. View ring.com/protect-plans for pricing and details.
How to turn on push notifications
You are now subscribed to push notifications.* If you’re not seeing your push notifications, see our troubleshooting section below.
* Ring Alarm and all Ring Alarm accessories require a subscription for digital notifications, in-app features, digital arming/disarming, and integration with other Ring, Echo, and third party products. Subscription sold separately. View ring.com/protect-plans for pricing and details.
Things to know
Customize your push notification preferences
Once you have enabled push notifications,* you can select which types of notifications you receive by device. Shared Users at the same location can customize notification preferences for their browser without affecting another user’s notifications. Also, changing preferences for push notifications doesn’t impact your Ring mobile app push notifications.
Follow these steps to customize your push notifications:
Browser notification preferences are unique for each type of browser. If you use Ring.com on another browser or computer, you’ll have to enable notifications for that browser and change your preferences again.
Having trouble enabling push notifications?
If you’re having trouble enabling push notifications,* follow this list of troubleshooting tips.
Confirm you’re using a compatible web browser.
For the best experience, we recommend using push notifications* on the following browsers: Google Chrome, Microsoft Edge, Mozilla Firefox, Opera. If you clear your browser’s cache, you may have to re-enable notifications. For full compatibility details, refer to the top of this article.
MacOS (Big Sur) browser
MacOS Big Sur automatically turns off notifications for applications, including browsers. If you’re not getting your push notifications,* you may need to change your system settings.
Mozilla Firefox browser
If you select a push notification* and your browser window is closed or minimized, the window will not automatically open. Before selecting a push notification, make sure your Firefox window is open on your screen.
Google Chrome browser
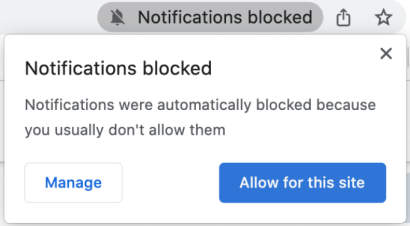
Your browser may automatically block notifications for you, based on your past behavior. If you enable push notifications on Ring.com but your notifications are blocked, select Notifications blocked (see image below), then select Allow.

Brave browser
To start getting push notifications,* first you must enable in your browser settings. On your Brave browser, go to brave://settings/privacy and turn on Use Google services for push messaging. If you don’t enable this setting and sign up for push notifications for ring.com, you won’t receive notifications.
Allow Ring.com to send you push notifications
To start getting push notifications,* Ring.com will ask you for your permission to send notifications through your browser. If you don’t see the permission pop-up or you previously denied permission, you need to modify your browser notification preferences.
Select your browser below for instructions on changing your browser settings.
When you’re editing your settings, give Ring.com permission to send you notifications.
Troubleshooting a “Device Registered to Someone Else” Setup Message
Fix issues with devices that receive a “Device Registered to Someone Else” message during setup to bring reliable security coverage to your home.
The primary reason why a message saying your new Ring device might be registered to another owner is that at some point, another person started the setup process for that device in the Ring app.
How to release ownership of a Ring device from a previous owner
During your attempt to setup the device, follow the instructions in the Ring app to Learn More About Device Transfers. You can request a transfer from the original/registered owner from there.
If you are not prompted to initiate a transfer, confirm you have the latest version of the Ring app. If you update the app and still don’t see the option for a device transfer, contact Ring Customer Support.
There may be other reasons why you’re not able to process the transfer request. In those cases, you’ll also get a message in your app to contact Ring Customer Support.
If you are in contact with the previous owner of the Ring device, you can request a device ownership from them and have them release the device from the Ring app.
Note:
If the registered owner has deleted the Ring app, they will need to re-download it, sign in, and remove the device in-app.
After requesting a device ownership transfer:
To release ownership of the device:
Download your videos before removing the device.
Once the device is removed, all data and videos will be deleted. Learn how to download videos before removing a device.
Frequently asked questions
The person who gave me the Ring device said they released ownership. Why can’t I set it up?
The previous owner may still need to remove it from their Ring account by following the instructions above. Physically uninstalling a Ring device, cancelling a subscription plan, or deleting the Ring app does not release ownership.
Do I need to request ownership of a Ring device if I simply want to share access to it?
No. Instead, ask the device owner if you can become a Shared User.
What should I do if I get a message saying my device can’t be transferred?
In cases where your device may have been reported stolen or can’t be transferred for another reason, contact Ring Customer Support.
I tried to set up a Ring device and got this message: ‘The device transfer request is in progress.’ What should I do?
If the transfer process has not been completed, you’ll need to wait until you receive an email confirming you can set up the device. Ring Customer Support cannot expedite the process.
Getting a Verification Code to Your New Phone Number
Learn how to enroll your new phone number to receive verification codes when you sign in to Ring.
Get to know Account Verification
In Control Center, you can choose how you want to receive your 6-digit verification code whenever you sign in to the Ring app or your account at Ring.com. We require you to enter this code to help protect your Ring account.
Learn more about Account Verification
Enrolling a new phone number in Account Verification
If you have access to your previous mobile device and phone number, follow these instructions.
Things to try
Check your phone settings.
If you just recently changed phones, your number may still be porting over to your new phone. Check your phone settings to make sure your number is showing correctly.
Connect your phone to wifi.
If you just activated a new phone or you have poor cellular service, you may not be receiving text messages. On wifi, you should still be able to receive texts.
Look for text messages on your other devices.
You may be receiving your verification codes on other devices, like a tablet or laptop, if you have your text messages connected.
You may still be logged in on a web browser.
If you’ve accessed your account at Ring.com in the past 30 days, you may still have access to change your phone number in Account Verification. Open Ring.com with your preferred browser application on your phone and/or laptop.
Using an Authenticator App to Sign In to Ring
Learn how to enroll a device with an authenticator app to get your verification codes whenever you sign in to Ring.
Having trouble signing in a new device?
Open the authenticator app on the personal device you originally enrolled in your Ring account. You can only use this device to generate a verification code. For example, if you originally enrolled your phone and you are trying to sign in to Ring on your laptop, you must open the authenticator app on your phone to generate your verification code to sign in your new device.
Get to know Account Verification
In Control Center, you can choose how you want to receive your 6-digit verification code whenever you sign in to the Ring app or your account at Ring.com. We require you to enter this code to help protect your Ring account.
Learn more about Account Verification
What’s an authenticator app?
An authenticator app is a security app for your phone, tablet and computer that helps prove who you are. These apps can generate verification codes to verify your online sign-in for most accounts.
Setting up an authenticator app for signing in to Ring
Download an authenticator app on your personal device.
Visit the app store on your phone, tablet, or computer and search for authenticator app. Download the app to your device.
Enroll your personal device in Account Verification.
You have the option to choose how you receive your verification codes, by Authenticator App or Text Message. To update your verification method to Authenticator App on your personal device, follow the steps below.
From the Ring app:
From your mobile or desktop browser window:
You can only use this device to generate a verification code when signing in a new device to Ring.
How to Link and Unlink your Ring Security Camera with Amazon Key In-Garage Deliveries
After you have set up Amazon Key In-Garage Delivery, you can link your Ring security cameras. You’ll need a Ring Protect plan to receive recordings of deliveries.
How to Link Your Security Camera with Amazon Key in the Ring App
Turn ON Offline Delivery.
Save Settings.
How to Unlink your Security Camera from Amazon Key in the Ring App
How to Customize Your In-Garage Delivery Notifications in the Ring App
5. On the In-Garage Delivery screen:
Getting Your Verification Code
Learn how you may be able to get your verification code from a device you’ve used in the past 30 days, and other ways to sign in.
Quick Tip: Check text messages on other devices.
You may be receiving your verification codes on an older phone or tablet, or your laptop may also be receiving texts.

