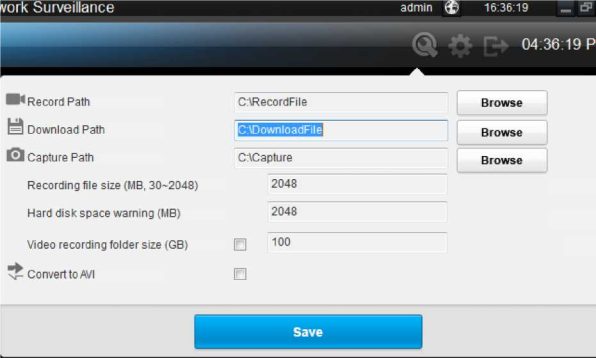
The local configuration screen is where you can customize how Smart Client will store and process footage on the local PC when you download it from the device.
Record Path: Where Smart Client will save recordings if you select Record from the Preview screen.
Download Path: Where Smart Client will save footage that you’ve downloaded from the device. Capture Path: Where Smart Client will save still images captured using the snapshot function.
Convert to AVI: When selected, Smart Client will use your PC to transcode footage from the device’s native format (H.264) into a format that your computer (indeed, almost any computer) will be able to playback without special software.
You can remote configure the parameters of the device here. The configuration menu is almost the same with device local menu.
< Device Settings
Display
Camera
Schedule
Network
Alarm
Status Motion
Exception
Video Loss
Search Device
System
General
Shut Down
Maintenance
Log Search
HDD
![]()

![]()
![]()
![]()
![]()
![]()
![]()
![]()
![]()
![]()
![]()
![]()
![]()
![]()
Whether you are having trouble getting playback to work on the web interface, or you simply want a standalone playback utility, the Smart Client Player is a very handy program to have.
Here we will show you how to download and install this software.
Compatibility: Requires Windows 7 or later.
For more information on how to Setup Amcrest Smart Client Player, click here
To begin downloading the software, please click on the link provided below.
Click here to download SmartClient Windows
How To Install SmartClient Player
1. Unzip the file and extract the Smart Client folder to your PC.
2. Open the Smart Client folder and install the WinPcap .exe file.
Note: SmartClient Player will not be able to function without the WinPcap application installed.
3. Once WinPcap has been installed, open the SmartClient .exe file in the Smart Client folder to run the SmartClient application.
The main page will look like this:

1. If your DVR is powered on and connected to your router, it should appear on the left automatically. Double-click it to send its information into the right panel.
2. At this point, all you will need to enter is your password.
3. Click login below to pull up your DVR.
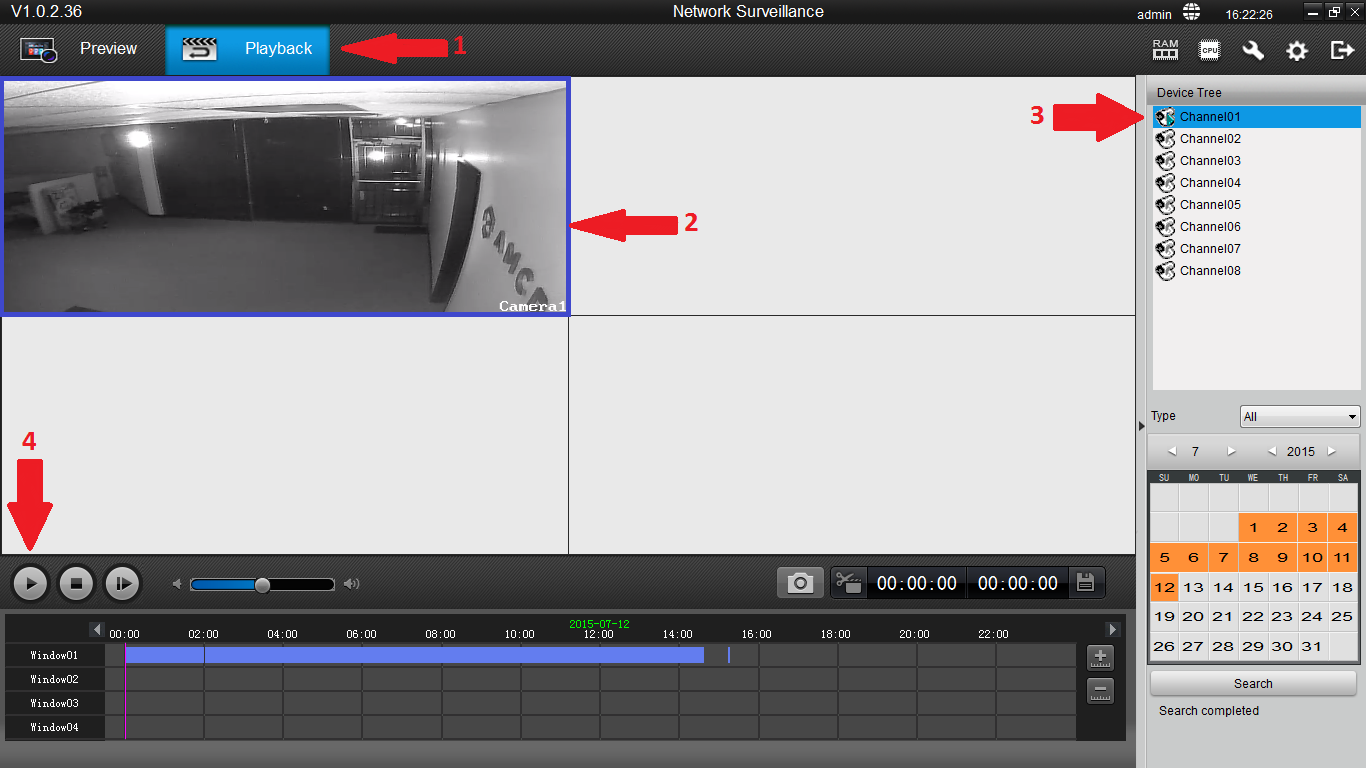
Once it launches, the window will look like this:

1. You will land on the Preview tab by default, click over to the Playback tab.
2. Then, you will want to single-click one of the four white preview windows to select it. You will notice the blue outline that appears once one is selected.
3. On the right panel, double-click one of the channels to add it to the selected window from step two.
4. Finally, click the play button towards the bottom to begin playback and wait a few seconds for it to start.
That’s all there is to it!
For more information on this software, or if you would like to download the user manual, click here.
If you still need help or are having trouble with the installation of your SmartClient software, or with logging into your DVR through the SmartClient software, please feel free to reach out to our support team by emailing.
How To Setup Smart Client
Whether you are having trouble getting playback to work on the web interface, or you simply want a standalone playback utility, the SmartClient Player is a very handy program to have.
Here we will show you how to download and install this software.
Click here to download SmartClient Windows v6.1.2.3.exe
Double-click the .exe file and run the installer.
Go through all the pages to install SmartClient and WinPcap, then run the program.
The main page will look like this:

1. If your DVR is powered on and connected to your router, it should appear on the left automatically. Double-click it to send its information into the right panel.
2. At this point, all you will need to enter is your password.
3. Click login below to pull up your DVR.
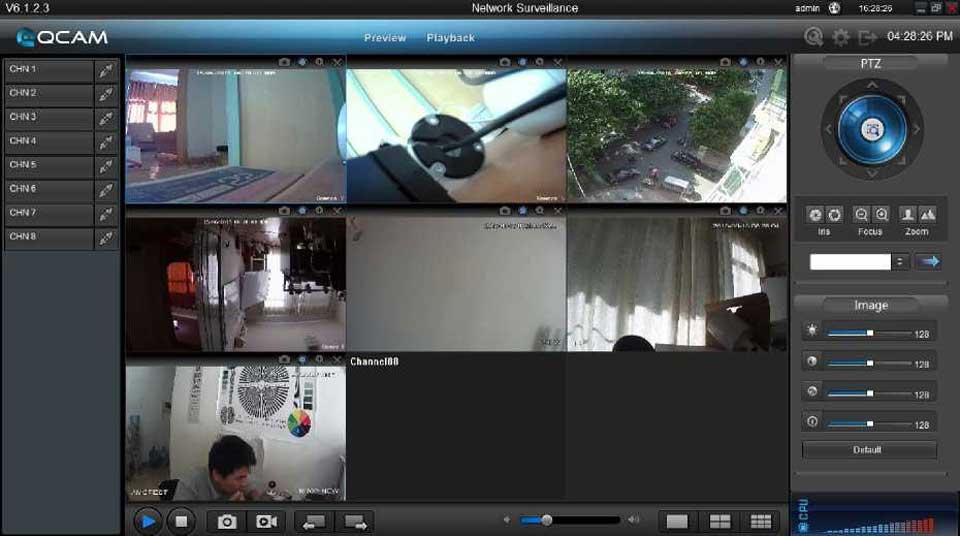
Once it launches, the window will look like this:

1. You will land on the Preview tab by default, click over to the Playback tab.
2. Then, you will want to single-click one of the four white preview windows to select it. You will notice the blue outline that appears once one is selected.
3. On the right panel, double-click one of the channels to add it to the selected window from step 2.
4. Finally, click the play button towards the bottom to begin playback and wait a few seconds for it to start.
That’s all there is to it!

