NVMS 2 Installation Guide, NVMS Lite is a newly integrated security management platform released by TVT, featuring seamless access to all TVT’s products and encoding devices of the famous manufacturers in the industry (like Hikvison, Dahua, etc.).
With the powerful capability of video surveillance management, real-time preview, record storage, record playback, record download, alarm linkage, decoding on TV Wall and keyboard control are supported.
Additionally, due to its small, exquisite, flexible and diverse deployment, NVMS Lite can meet various demands of small-sized projects and can be widely used in the video surveillance of industrial park, education, banking, chain stores, buildings and transportation.
NVMS 2 software setup guide
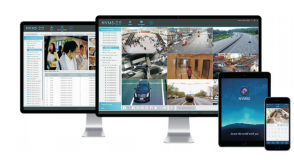
Features New Monitoring Software NVMS2.0 Lite 256CH
The new MERIVA NVMS2.0 software replaces its predecessor NVMS1000 because the new software has device management functions that make it more powerful.
The NVMS2.0 is a management platform offered by MERIVA without any type of licensing where up to 256CH (IPC / NVR / DVR) can be hosted.
With NVMS2.0 you have the ability to manage video, real-time preview, recording storage, recording playback, alarm linkage, TV Wall.
In addition, the most elegant and intuitive graphical interface for easy management of the platform where it can be applied from small to medium projects.

CHARACTERISTICS
Device Access
- Supports all MERIVA brand devices, ONVIF and RTSP protocol.
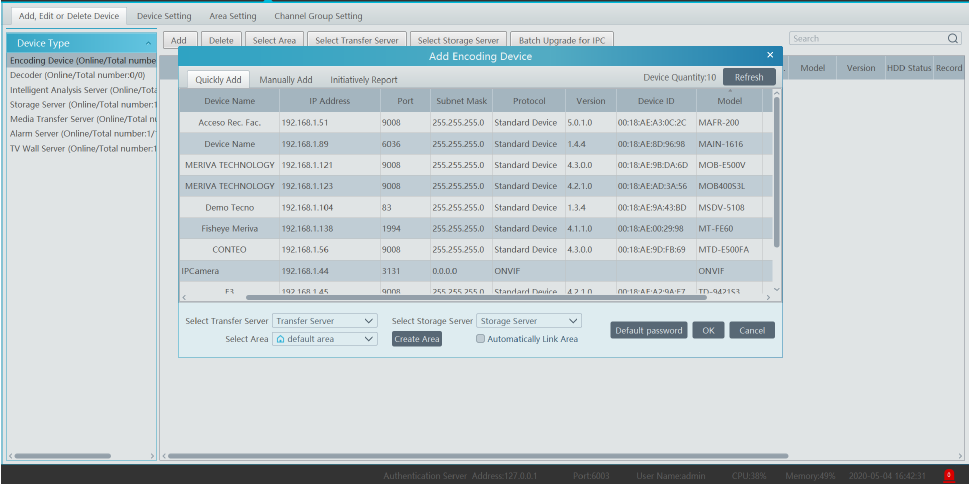
- Supports adding devices manually by entering Serial Number (QR-P2P), IP address, domain or IP range, by search or by auto report.
device management
- Support camera group management
- Supports administration by areas
- Supports centralization of decoders and encoders
Device Configuration
- Supports basic configuration and user management on devices
- Supports date, time zone, network and DDNS configuration of the devices
- Supports display of the status of the Hard Drives of the devices
- Support OSD setting
- Supports video mask setting, and motion detection
- Supports resolution, frames per second, bitrate, and quality and image settings of the camera
- Support setting of camera brightness, contrast, saturation, HLC, BLC, WDR and anti-flicker
- Support configuration of camera video streaming and copy these configuration to all cameras
- The area, streaming server, storage can be configured for various devices.
Users Management
- Supports talking to multi users
- Supports binding of the user’s MAC address
- Support user blocking
- Supports different users and permissions
- Supports permissions based on resources and operation
Views
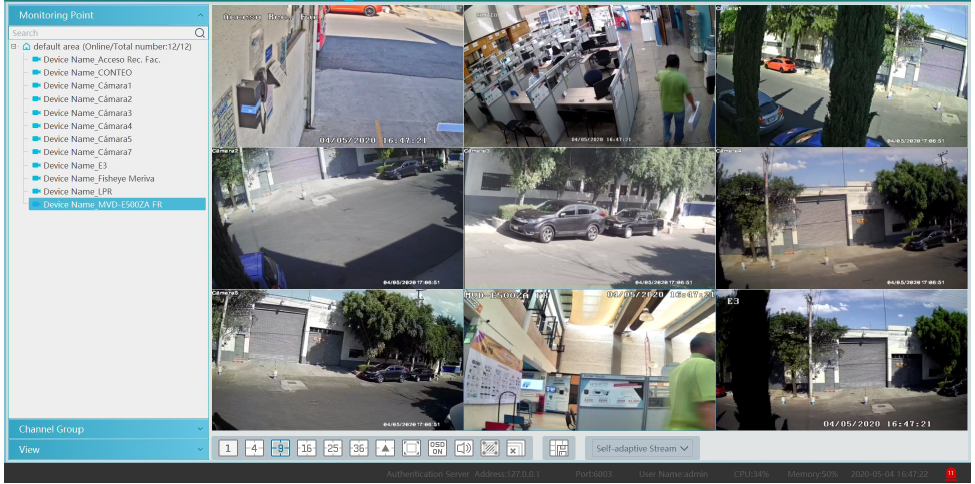
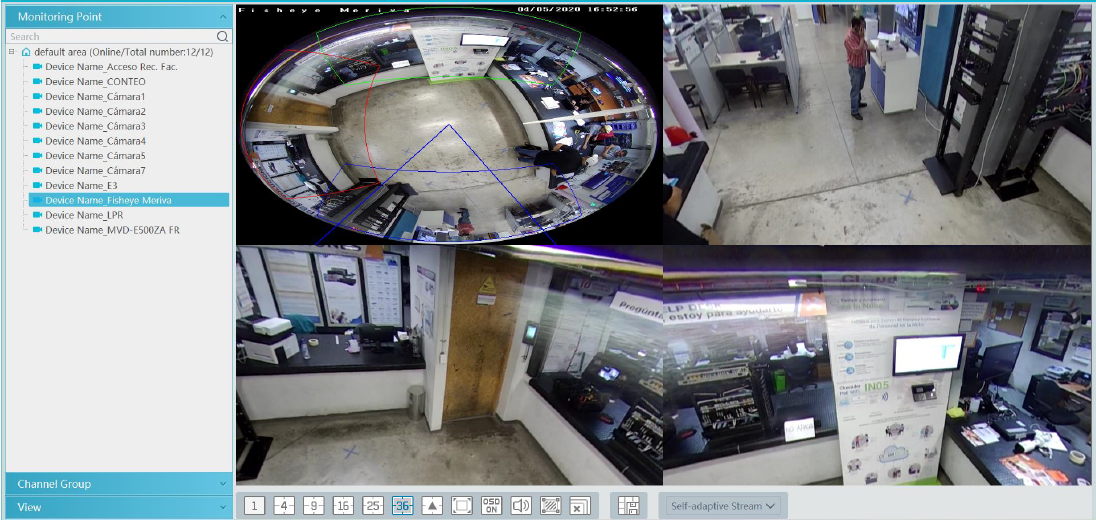
- Support multi-screen display mode: Support
1/4/6/8/9/10/16/17/21/25/33/36/49/64/81/100
standard screen display mode - Support 2/4/6/7/9/12/16/24/36/48 widescreen mode
- Support custom screen display mode
- Supports runner mode
- Supports Fisheye mode
- Support channel group sequence display
- Supports self-adaptation of streaming video transmission
- Supports multi-monitor display
- Support instant playback.
- Support OSD display
Two Way Audio
- Support remote audio
- Supports two-way talk
video storage
- Multiple types of storage
- Storage schedule, alarm linkage recording and manual recording.
- Supports image and video storage
Playback recording and video backup
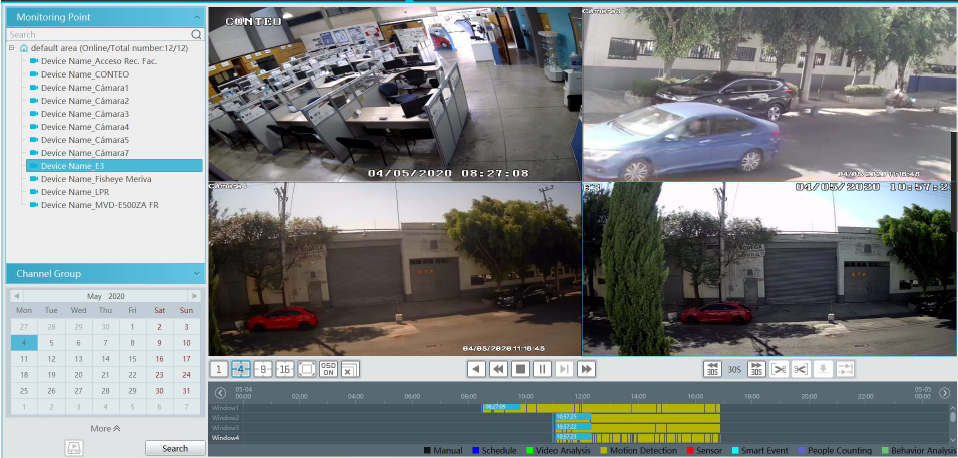
- Supports multiple simultaneous channels and asynchronous playback
- Supports playback of multiple recording sources
- Supports multi-window playback
- Supports playback by channel, time segment, time, tag and
event search - Supports playback by frame, dragging progress bar,
fast forward or slow speed - Support recording backup: manual backup, scheduled
backup, backup by channel, time, tag and event search;
Support cut recordings and backups on playback
interface
PTZ control
- 8 directions control adjustable rotation speed (range from 1~8)
- Support zoom in/out and focus +/-
- Supports recall and cruise and follow preset settings
- Support PTZ protocol setting
Alarm
- Supports multiple types of alarms: Motion alarm, sensor alarm, etc.
- Support multiple alarm linkages: Platform recording, client popup, client preview, audio, TV wall decode, snapshot etc.
- Supports self defined alarm audio
tv wall
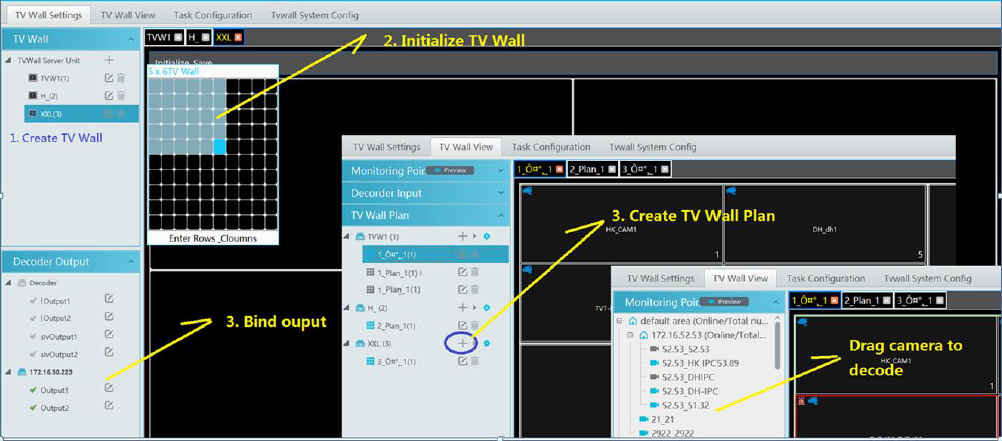
- Supports working with decoders or decoding matrix to control multiple Video Walls
- Support 8MP/5MP/4MP/3MP/1080P/720P
Support decoding on TV wall in the audio format of G.722, G.711A, G.711U or ACC - Supports live view and playback on the video wall
- Support 1/4/9/16/25/36 screen mode
- Supports merging, window splitting and window opening
- Support multiple splice modes: 1×1, 1×2, 2×1, 2×2, 3×1, 3×2, 3×3, 4×1, 4×2, 4×3, 4×4, 4×5, 4×6, 4×7, 4×8
- Supports picture-in-picture mode and roaming mode
- Up to 999 configurable plans
- Support channel plan and group sequence view
- Schedule configurable task
- Support activation decoding on the TV wall; custom alarm window (unlimited)
NVMS 2 Software PMS (Parking Management System) LPR Management Camera MAPR-200 from Meriva Technology
In this technical note you can download the NVMS 2.0 software for LPR management, camera monitoring MERIVA TECHNOLOGY MAPR-200 these standalone cameras with artificial intelligence for license plate recognition:
https://tecnosinergia.com/MAPR200.html
They can be centralized from the software and manage the entire license plate database, it allows the generation of access reports by license plate or by vehicle user.
download link:
https://files.tecnosinergia.com/descargas_portal/MerivaTechonlogy/NVMS-LPR.zip
Read More :
How to backup video in NVMS 2 software
In the following article we will see how to do a video search from the software and later how to make a backup of it, the steps to do it are as follows:
1.When opening the software, it will show us the home page, so it is necessary to go to the Record playback section.

2. On the left side, a list of the added teams will be displayed, we will select the team/teams from which we want to download the recording, and click on search.
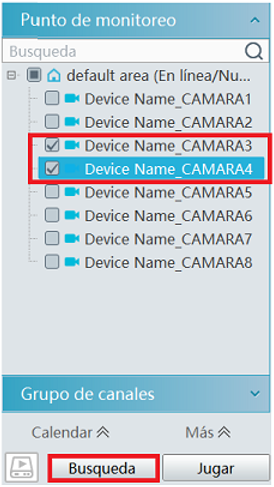
3. A colored bar will appear in the period that has recording, with the mouse pointer we locate ourselves over the start time and click on the scissors on the left side , now we will position ourselves over the end time and click on the scissors on the right side , once the download period has been selected, we click on the arrow.

4. Now you just need to wait for the download to complete.

How to create camera groups in NVMS 2.0 software
In the following article we will see how to generate a group of cameras, this in order to have a better organization.
1.You need to go to the following path:
Resource management –> Channel group configuration –> Add

In this section we have to configure the name of our channel, how long it will be displayed on the screen and if it belongs to or is derived from some other channel (1), after that the teams (2) that will belong to said group are selected, this is It is done by passing them to the right side with the symbol > (3), finally we click on Ok (4).
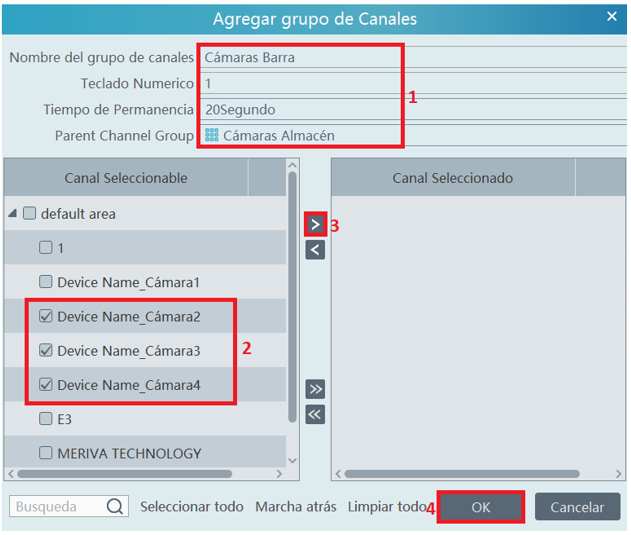
Done, our group has been created.

Monitoring/Centralization/Recording Software NVMS2.0Lite
Free Software to centralize/record/encrypt Meriva Technology devices
Hasta 256CH
P2P
People Count
Face Recognition
How to live view cameras in NVMS2.0Lite software?
Go to video live view interface, as shown below.
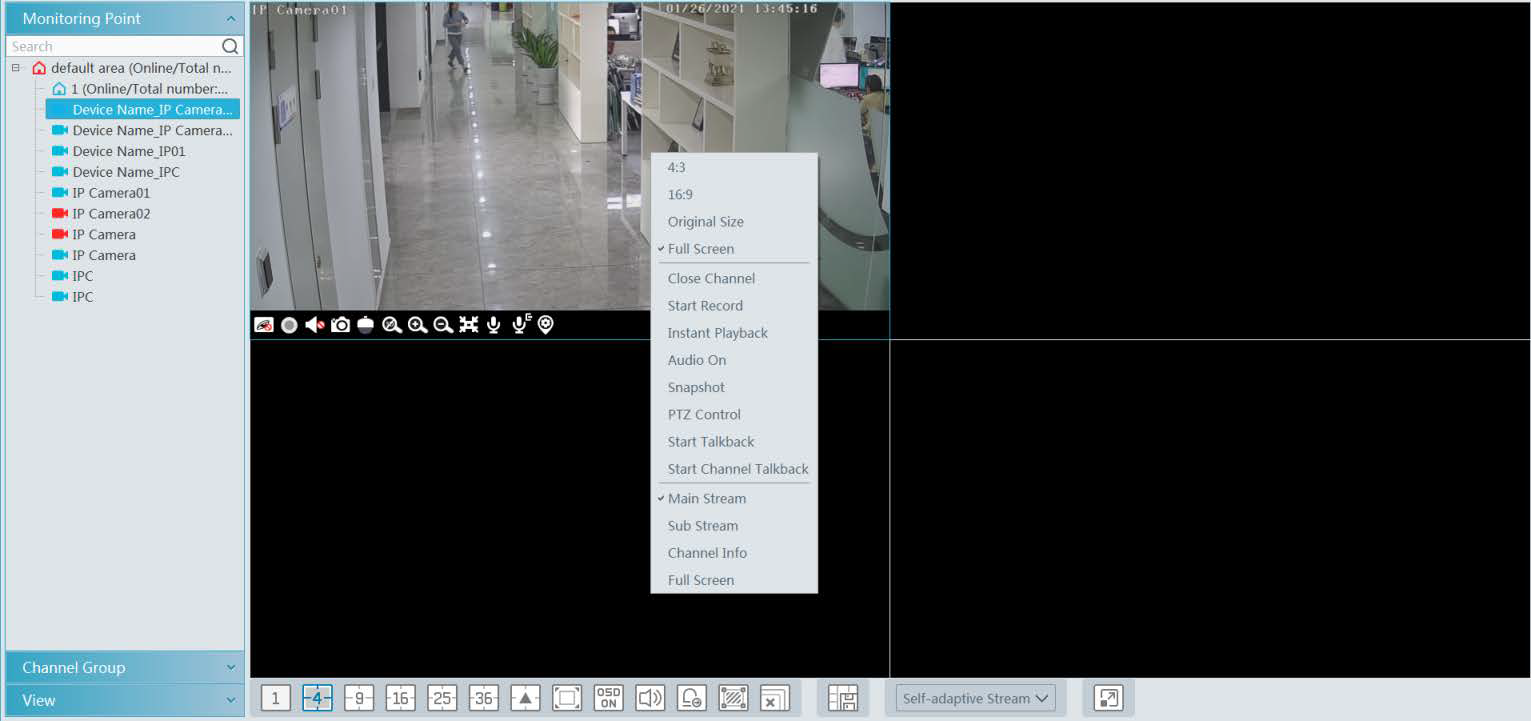
The descriptions of the video preview buttons are as follows.


Channel stream: main stream, sub stream, third stream and self-adaptive stream can be optional. When the third stream is selected, the system will automatically switch to the sub stream if the channel/camera does not support the third stream.
Toolbar in the display window:

4:3/16:9/Original size/Full screen: aspect ratio of the screen; please select it according to your needs.
How to uninstall NVMS2.0 Lite software?
Uninstalling the software
If it is necessary to install a new version or there is no need to use this software, it can be uninstalled. It is strongly recommended It is recommended to back up your configuration data before installing the new version of NVMS.
Click “Start”> All Programs> NVMS Server>Uninstall to bring up the following wizard.
Click “Yes” to confirm.
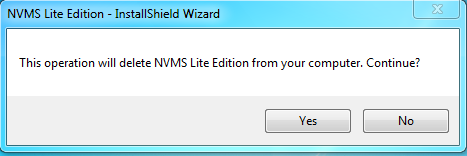
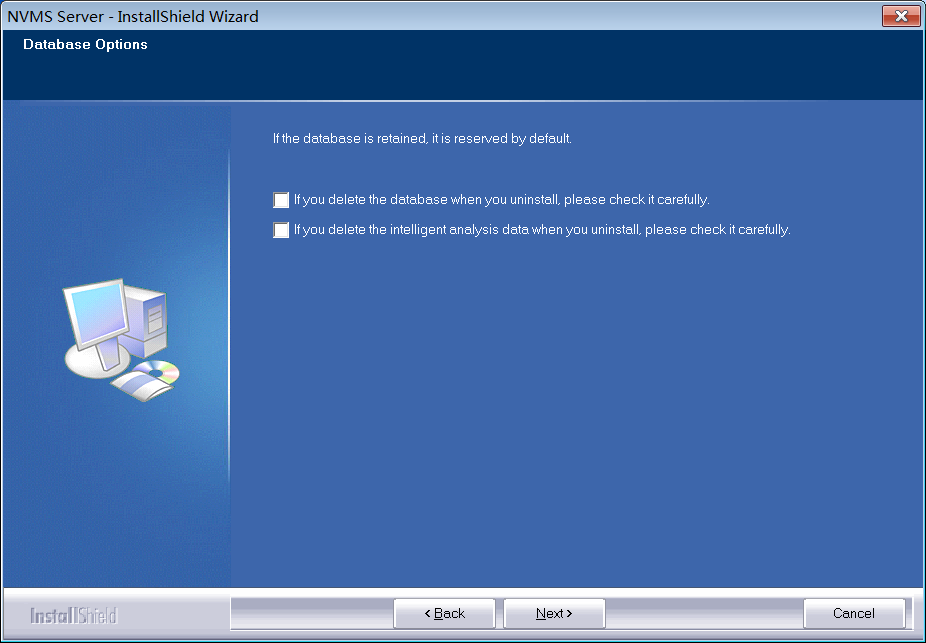
Select whether to delete the database or smart analytics data as required. Then click the “Finish” button to complete the uninstallation.
How to install NVMS2.0 Lite software?
Software Installation
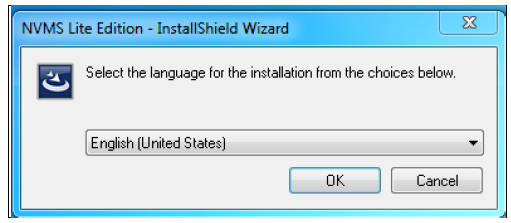
1) Double-click “NVMS server.exe”. Select the user interface language as required.
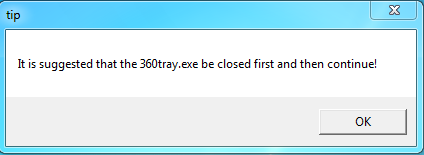
2) A prompt will appear to suggest you close the antivirus software. If no warning window appears, skip this step.
3) Click “I accept the terms of the license agreement” and then click [Next].
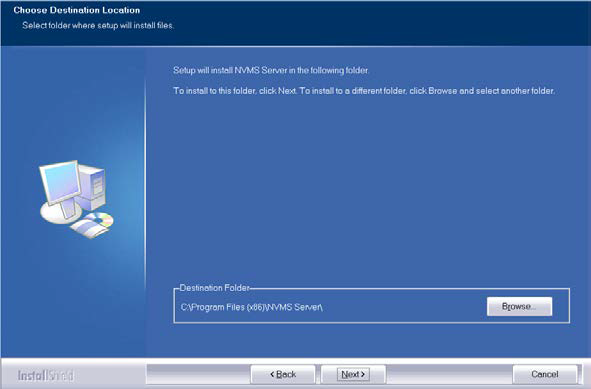
4) Click [Browse] to select the installation location, and then click [Next].
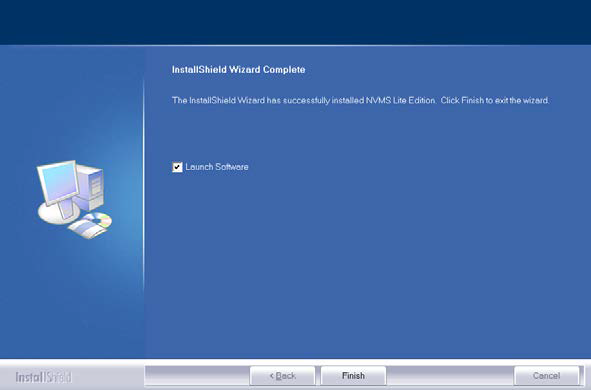
5) Check the “Start the software” option if necessary and click [Finish]”.
How to add a DVR/NVR by P2P to NVMS2.0 software?
The following tech note shows how to add a P2P recorder to Meriva Technology’s NVMS2.0 software.
First we must have the complete data of the recorder that we want to add, in this case it would be:
- QR Code Series
- User
- Password
After confirming the recorder data is correct we proceed to work in the software:
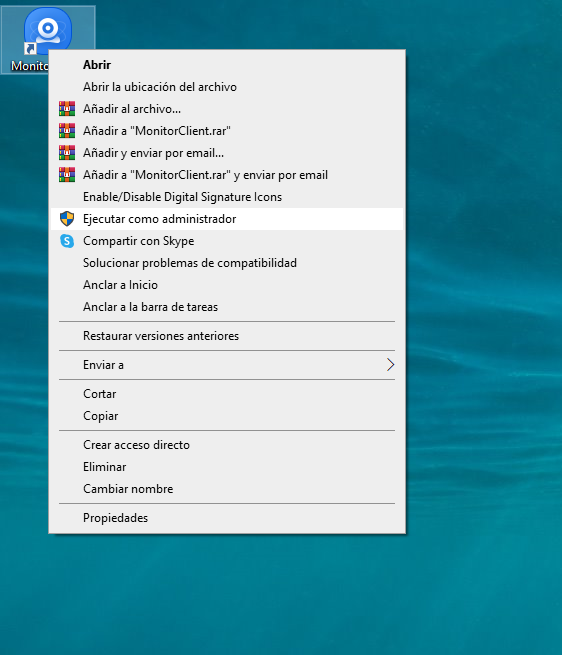
- We run the NVMS2.0 software as administrator on our PC
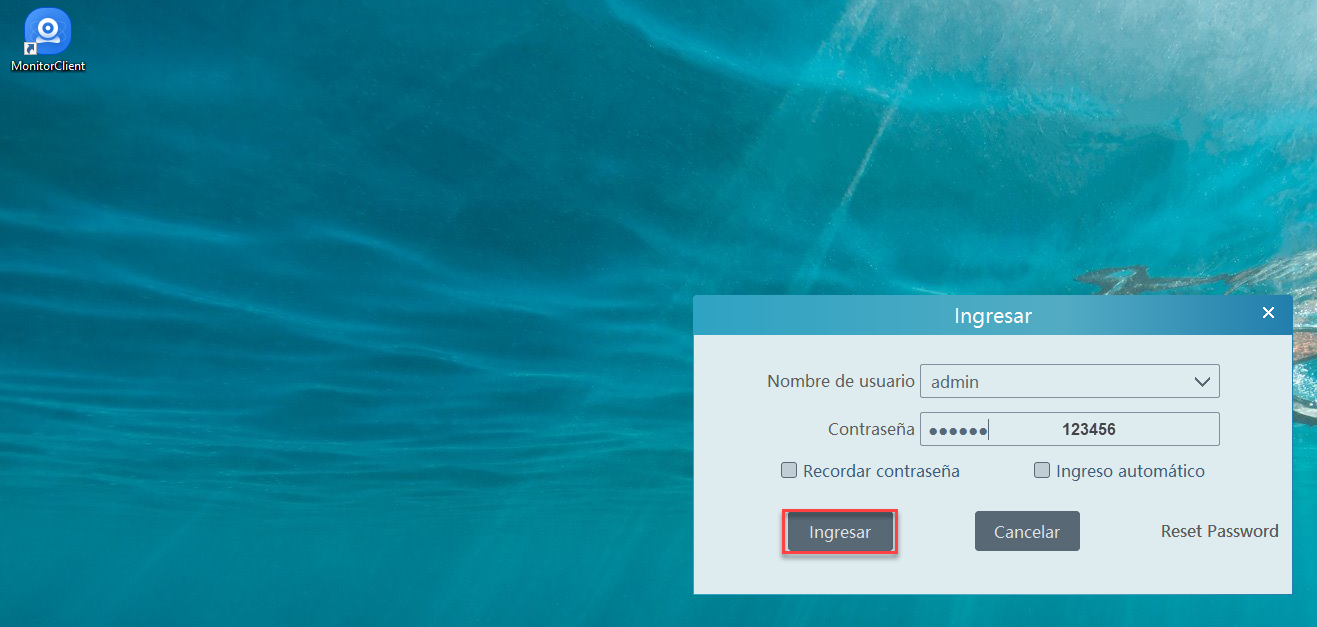
- We enter the data to access the software that is factory set User: admin Password: 123456 and press enter.
- We locate the Start Page menu and press to send us the menu options that the software has
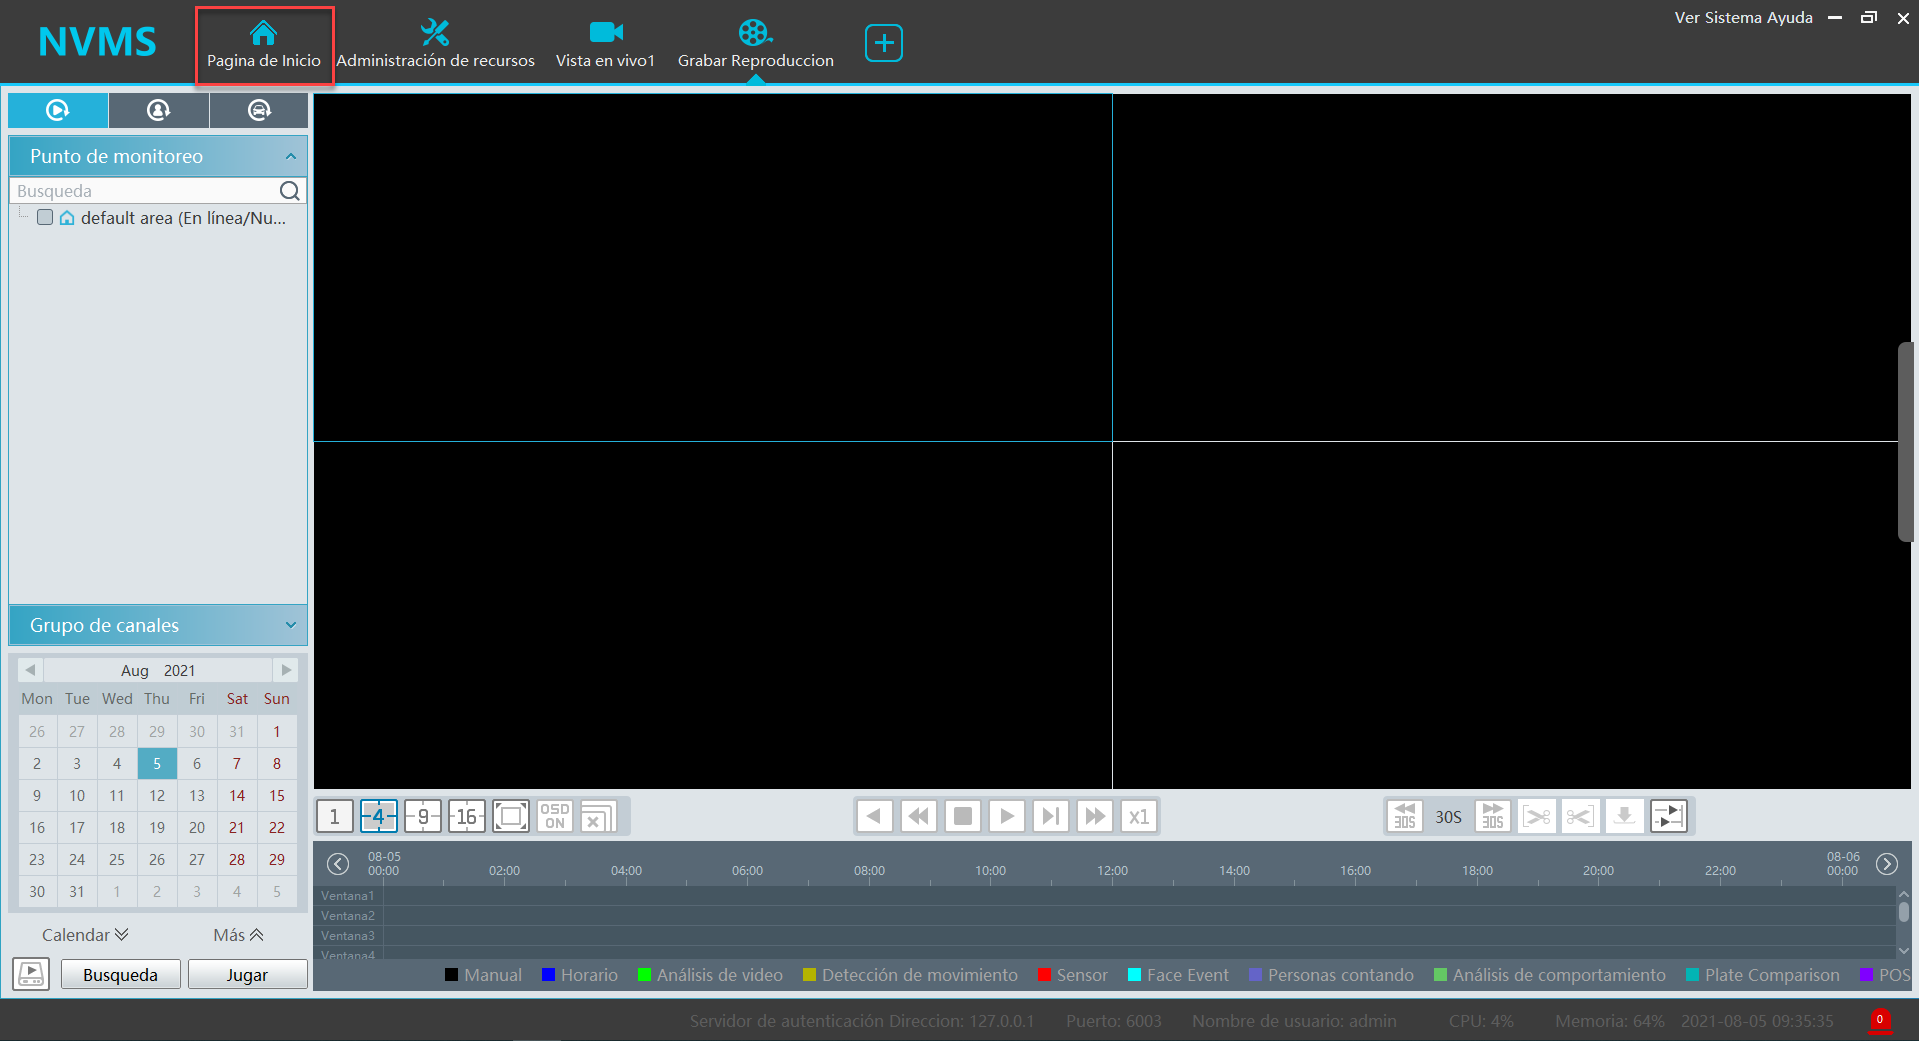
- Then in the menu we select the Resource management option
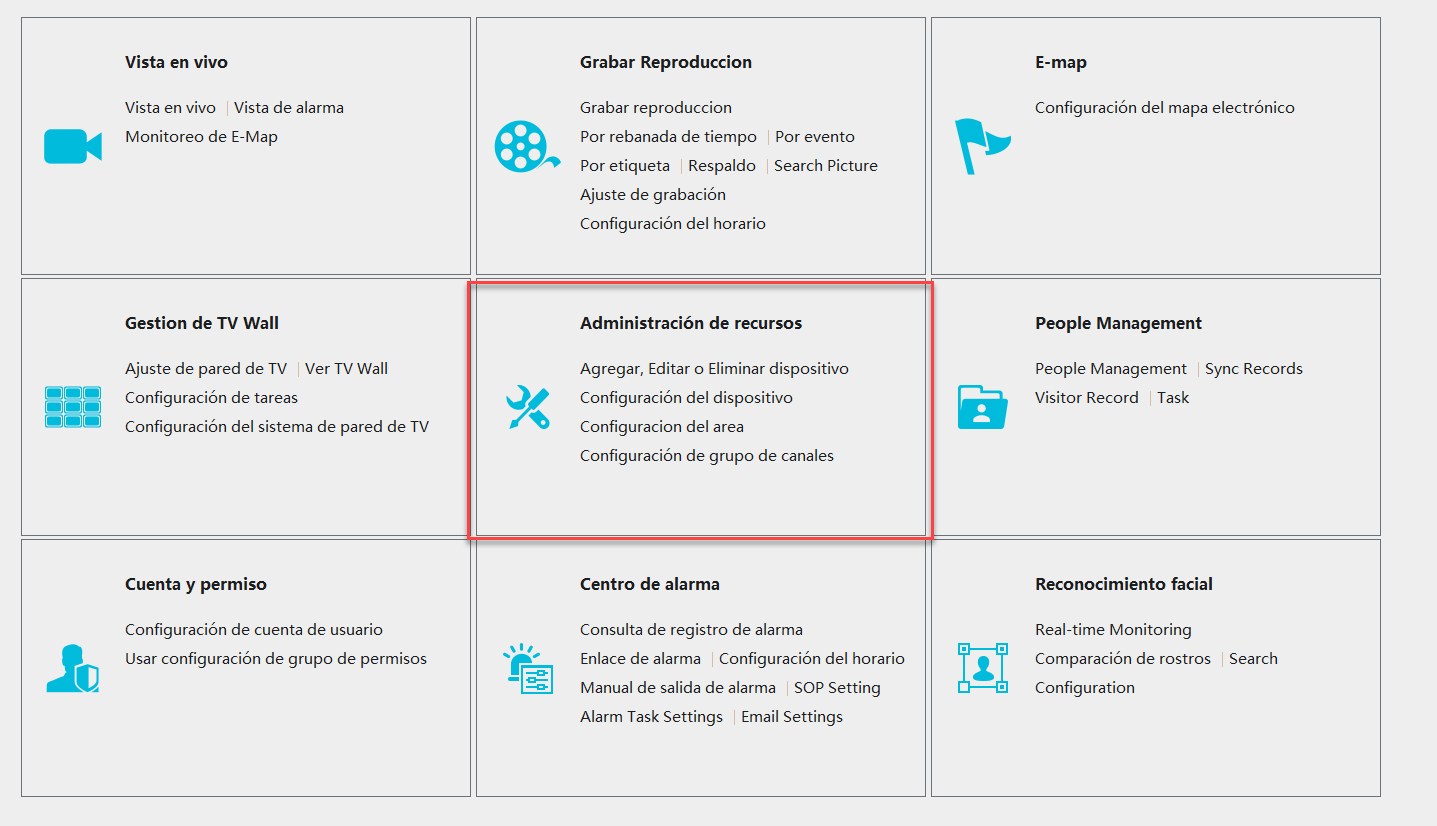
- In resource management we find the option to add
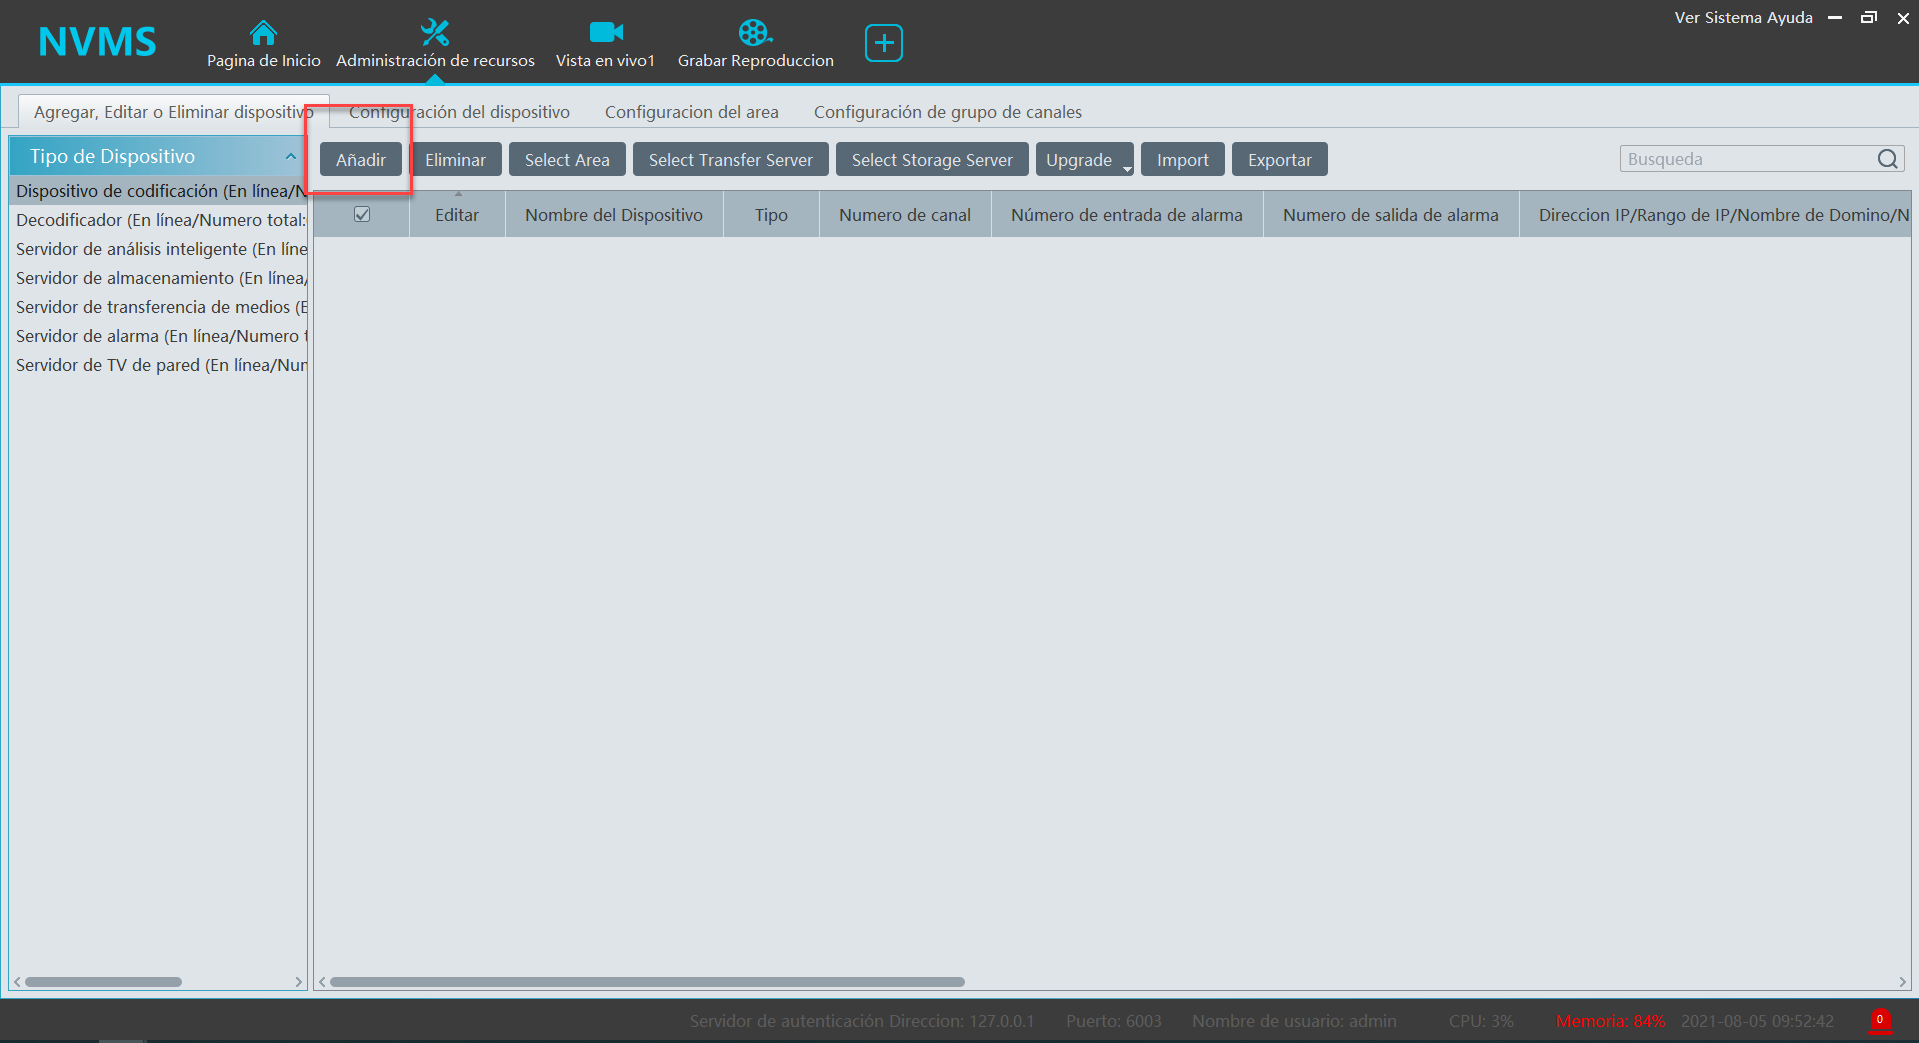
- We select Add manually and select the Serial Number option
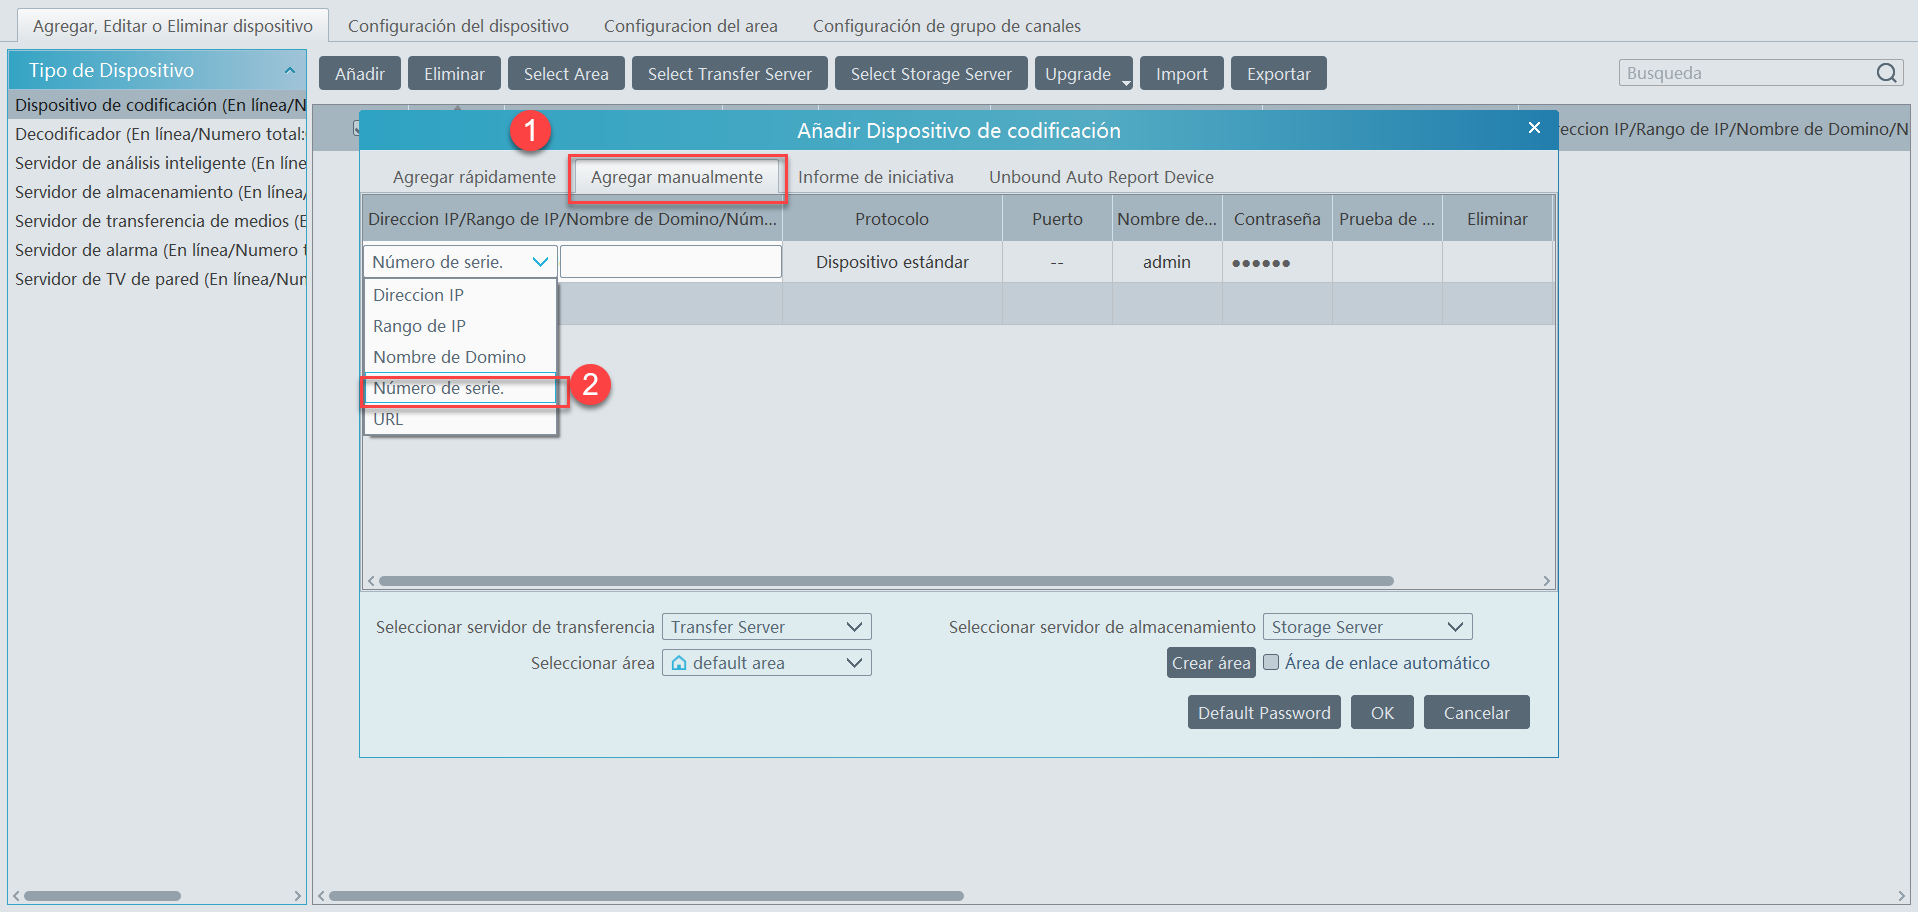
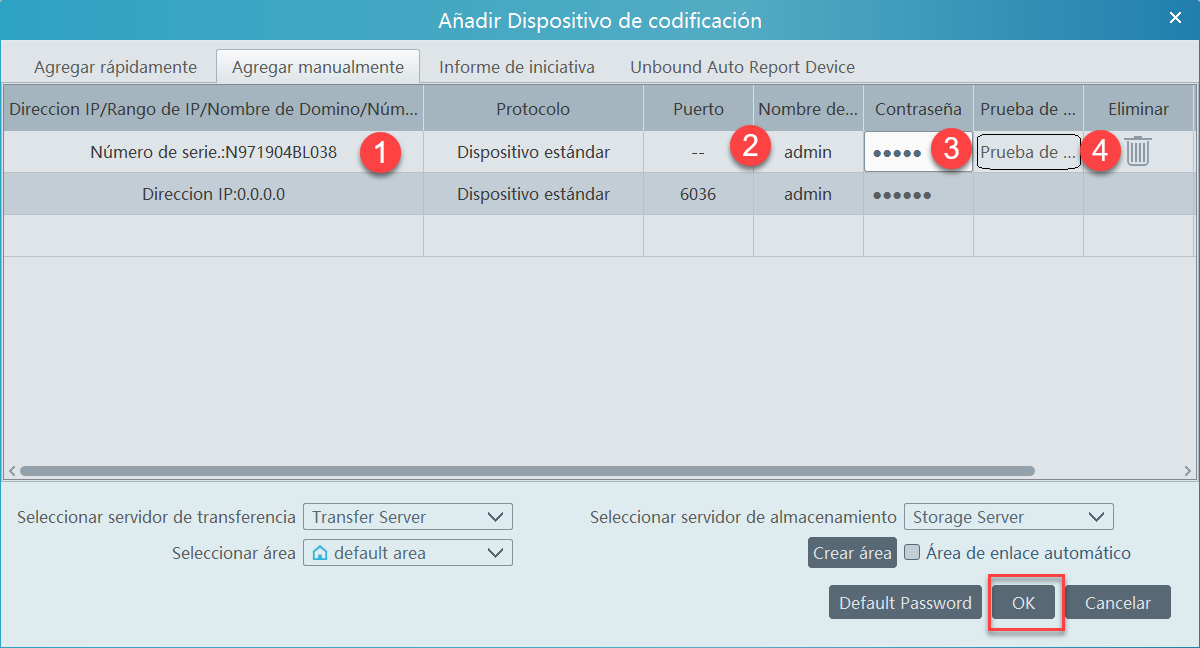
- In this box we will enter the data of the Serial Number of the recorder (Serial QR Code), username and password used to enter the recorder and at the end do a connection test, after it is successful, press the OK button. and we just wait for the equipment to come online.
How to perform license plate search in NVMS2.0 PMS software with cameras?
Search Vehicle Information
In this interface, you can search the information of the vehicles entering and leaving the parking lot.
Set the filtering condition, such as start and end time, license plate, vehicle type, and lane.

Pass Record – includes vehicle information, entry/exit time, parking, lane, pass type, etc. The pass register can also be modified as needed. Select the step record and click [Modify] to modify it.
In addition, the image of the captured vehicle can be viewed on the right by clicking on this registration information. Click [Zoom In] to enlarge the Click [Download] to download the image.
At the same time, you can also play the record by clicking .
For check out, you can see the stay time.
You can also export all searched step records by clicking [Export].
Search for information on temporary vehicles
Go to Start>Parking Management Integrated Search Information on Temporary Vehicle Charges. Information on temporary vehicle fees can be found here as shown below.

Search for payment information for vehicles on the white list
Go to Start>Parking Management> Integrated Search for Payment Information for Vehicles on the White List. Payment information of the whitelisted vehicle can be viewed as shown below.

Vehicle Search
In this interface, you can check the information of the vehicles that stay in the parking lot longer than the preset time.
Enable this function, enter the parking duration, and click [Search] to display the detailed information of the overstayed vehicles, such as license plate number, entry time, and duration.

How to monitor vehicles with NVMS2.0 PMS software and camera?
After setting up the LPR camera joint, assigning the corresponding vehicle monitoring lanes and adding vehicles to the vehicle list, the captured vehicle image and its detailed information will be displayed in the following interface when the vehicle passes the LPR camera to the lane side and your license plate number is accurately captured and recognized by LPR cameras.
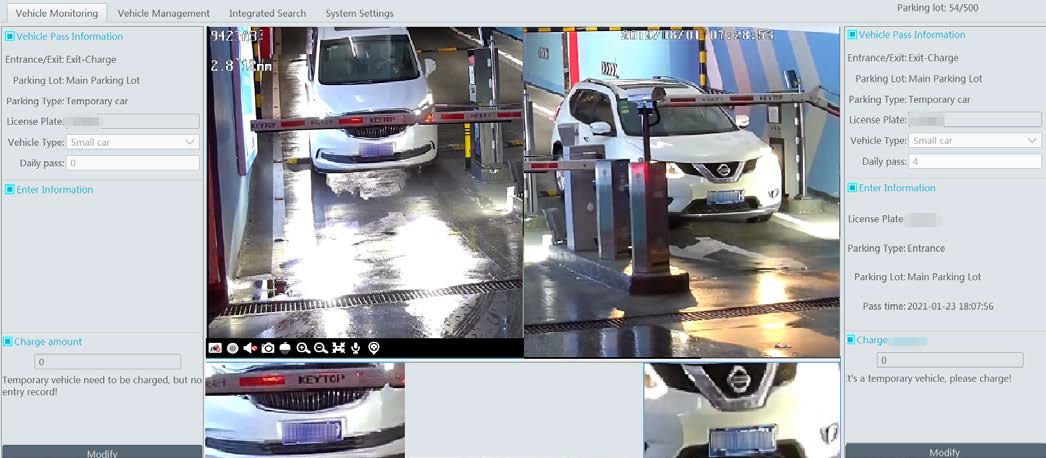
If the vehicle passing through the lane is not added to the linked vehicle list or blacklist and “Temporary vehicle” in the automatic passing rule is not selected, this vehicle will not be allowed to pass automatically.
If the lane type is set to “Exit-Free”, the temporary vehicle will be able to pass automatically; if the lane type is set as “Exit-Charge”, the temporary vehicle will be able to pass after the owner pays the parking fee according to the established temporary vehicle charging rule.
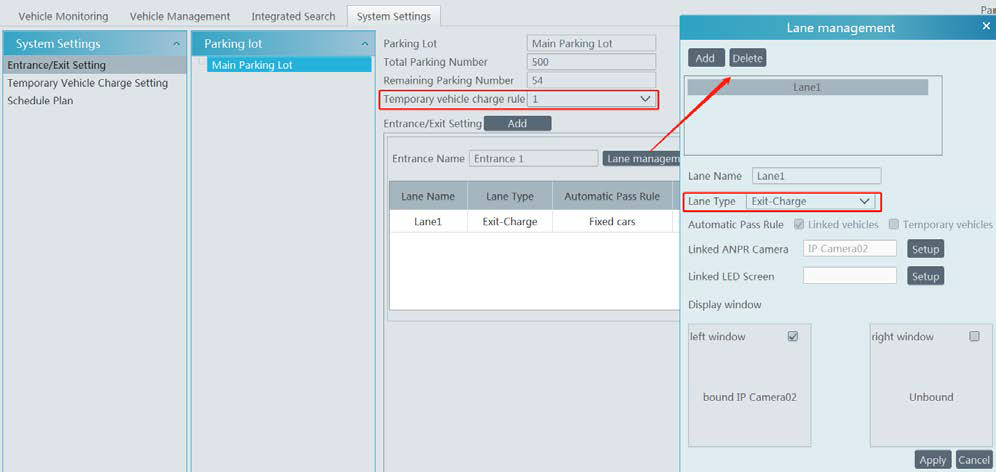
If the temporary vehicle charge rule is set to “None”, the operator will need to enter the amount of the parking fee, and then manually open the barrier to let it through.
Linked Vehicles
When the vehicle added to the whitelist vehicle group enters or leaves the parking lot, it will be considered as the vehicle whose parking fee
you have paid per month.
For example, if the owner of the linked vehicle has paid one month’s parking fee, then the vehicle can enter/exit parking automatically for one month.
At the entrance, the parking time of the linked vehicle is within the validity period, and the linked vehicle enters the effective time, it can be allowed to enter automatically. If the linked vehicle’s parking time has expired, it will be treated as a temporary vehicle.
At the exit, regardless of whether it is charged or not, the linked vehicle can automatically pass through.
Blacklisted
Vehicles Vehicles added to the blacklist cannot pass through, even if the license plate number is captured by the LPR camera.
Note: Vehicles that have been linked to a parking lot cannot be added to the blacklist, and vice versa.
How to import, export vehicle license plates from NVMS PMS software?
This technical note will show how to import or export the vehicle license plate database for LPR operation.
You can add multiple vehicles in one lot. Click [Import], and then select “Export Template” to export a template (Excel).


Fill in the vehicle information according to the template and save it. Then go to the vehicle management interface and click “Import Excel” to import the vehicle information file.
Check the vehicle you want to export and click [Export] to export the vehicle information to the designated route.
How to add and configure LPR camera in NVMS2.0 PMS Software?
The following note will show how to add a Meriva Technology MAPR-200 LPR camera to monitor the LPR function and manage the database as well as perform database plate information lookup.
Add Meriva MAPR-200 LPR Camera to PMS Software
Before using the software it is necessary to add the LPR cameras, this is used to capture the license plates of the vehicles that enter or leave a parking lot.
Option 1 to add LPR camera
Click Home>Resource Management>Add, edit or delete device>Encryption Device and add.
Option 2
Add the MAPR-200 camera to a recorder and add the recorder to the NVMS2.0 PMS platform
LPR Configuration in NVMS2.0 PMS
Input and output adjustment
Go to Start>Parking Management>System Menu; as it’s shown in the following.
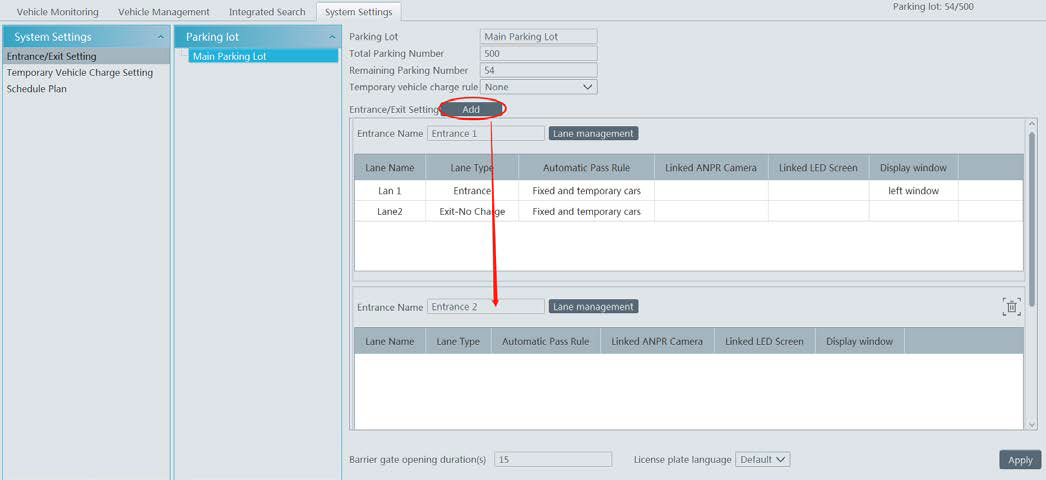
Click [Add] to add a new entry.
In the above interface, you can set the parking room total, remaining parking room, driveway and lane, barrier opening duration,
temporary vehicle charging rule, etc.
lane management
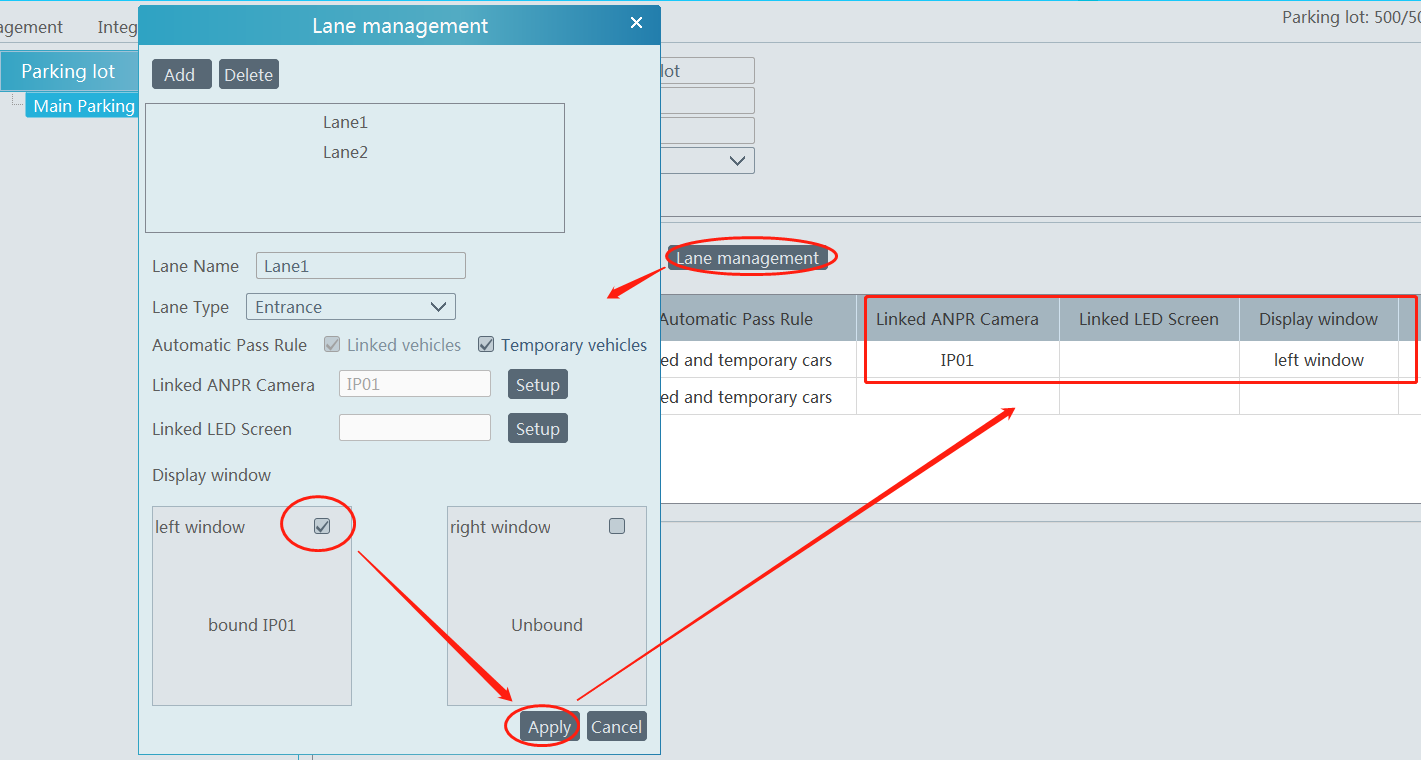
1. Click [Lane Management] to enter the lane management interface.
2. Click [Add] to add a new lane.
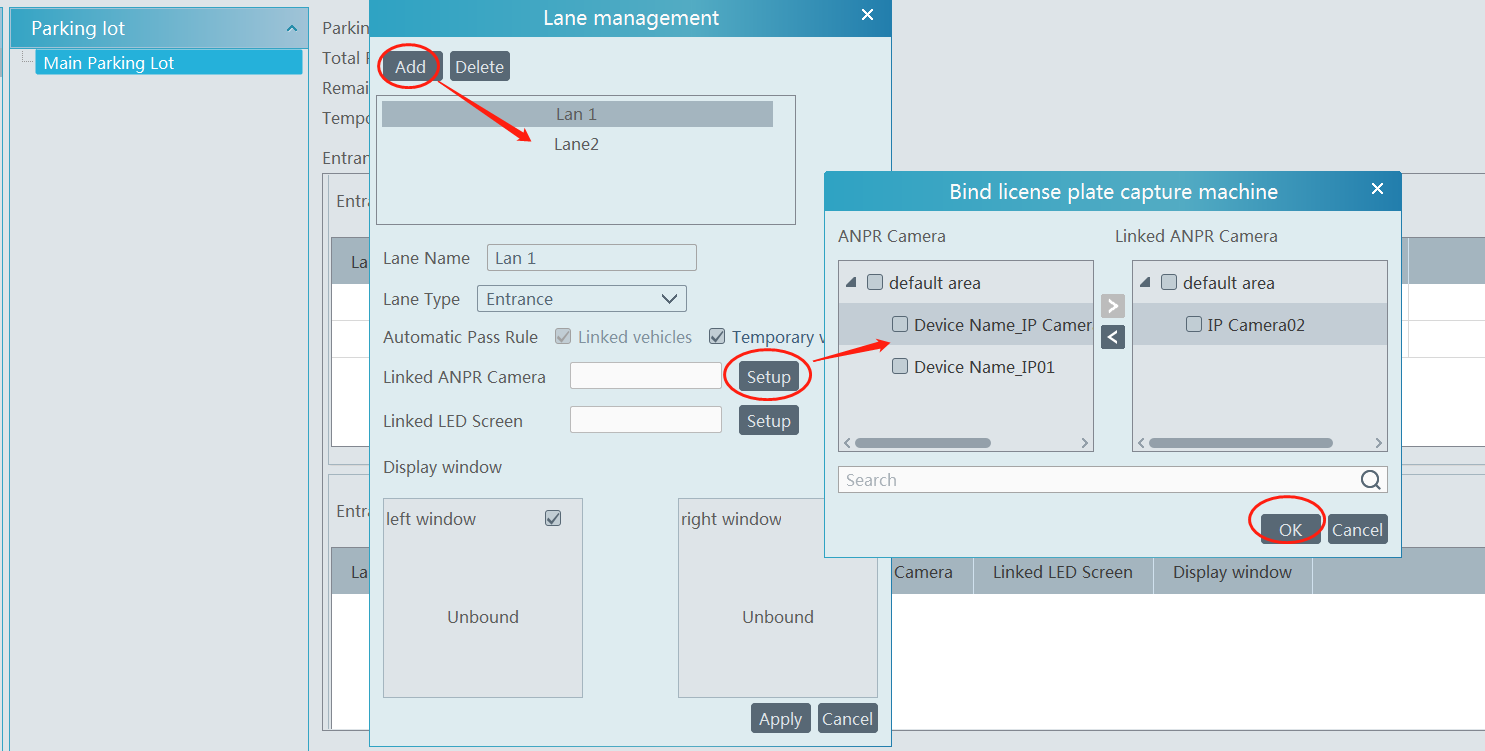
3. Select the lane, then enter the lane name and select the lane type.
Lane Type – Set to “Entry” or “Exit-Load” or “Exit-Free” as required.
4. Set the auto pass rule.
Linked Vehicles: The vehicles that are added to the allow list
Temporary Vehicles: The vehicles which are not added to the vehicle database
“Linked Vehicles” option is checked by default, these parking linked vehicles can automatically go into parking without stopping.
5. Link the ANPR camera and LED display to the rail.
6. Select the window, and then click [Apply]. Then the ANPR camera and LED display will link to this window as below.
Uncheck this window, and then click [Apply] to unlink the ANPR camera and LED display with the window.
Barrier Open Duration: For example, set to 15s. Then the barrier gate will close automatically after it is opened for 15s.
Set the rule for temporary vehicles
The charging rules include “Free”, “Charge for each exit”, “Charge for parking time” and “Custom Rules”. Configure the charging rules according to your needs.

After setting the charging rules, please click one of the charging rules on the above interface, and then the detailed information will be displayed on the right panel.
You can then select the temporary vehicle charging rule when you fill in the parking information.
Calendar Settings
Set the schedule of linked and temporary vehicles. If the vehicle in the vehicle group wants to enter the parking lot in its unscheduled period, it will not be allowed to enter. But vehicles can leave the parking lot at any time.

If you do not want to use the default time, you can click the [Add] button to set other times as needed.
Vehicle Administration
In the vehicle management interface, you can add or delete the vehicle group and add vehicles to the vehicle group. There are two default vehicle groups: the whitelist group and the blacklist group. These two default groups cannot be deleted. You can add other whitelist groups as needed.
Link vehicles to parking
Add a new vehicle group
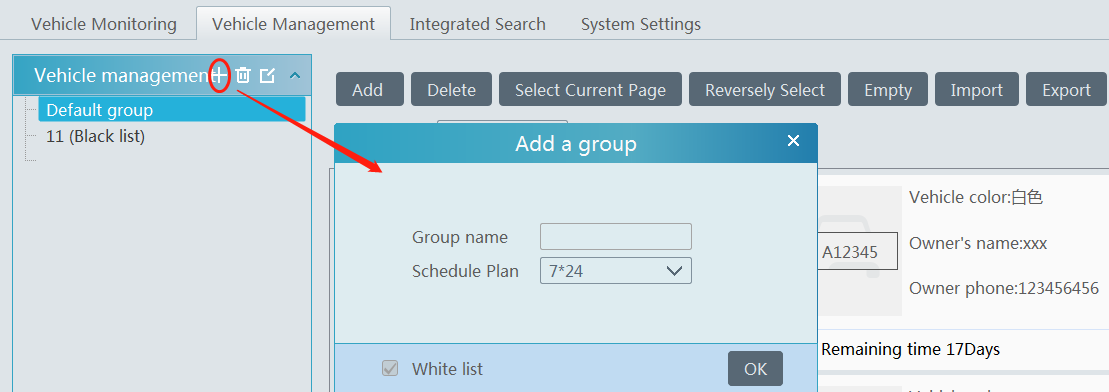
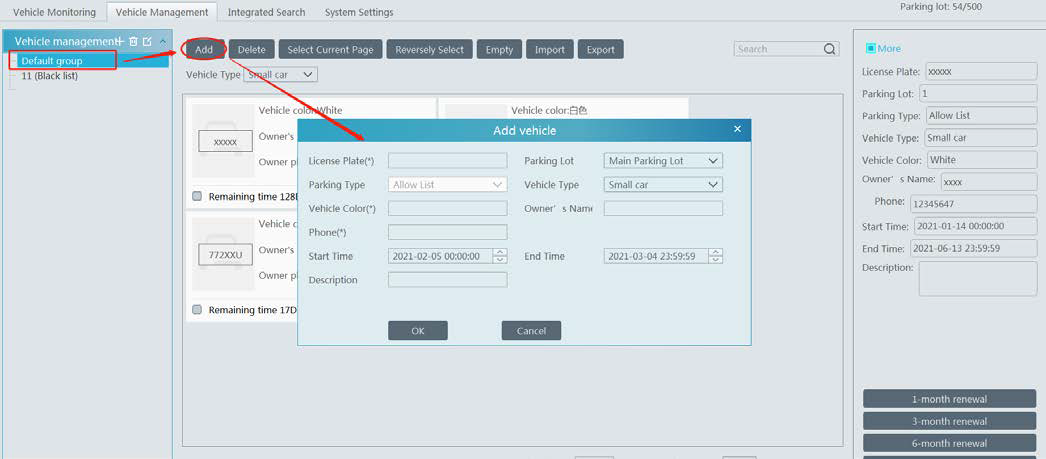
After adding the vehicle information, please click this vehicle and then its detailed information will be displayed on the right. In this interface, you can renew your vehicle, including 1-month renewal, 3-month renewal, 6-month renewal and 12-month renewal.

Click to move the vehicle to another group.
If there are so many vehicles added in the current parking lot, you can view the desired vehicle information by filtering the license plate number, vehicle color, etc.
NVMS2.0 Lite Software for PC Centralization of NVR/DVR/IPC
In this article you can download the software NVMS2.0 LITE MERIVA Version.
http://files.tecnosinergia.com/descargas_portal/Herramientas%20de%20Meriva/NVMS%20Lite%20×64%20Neutral%20Ver2.0.4.91106.exe.zip
The platform is to manage up to 256CH on the platform, if you require more information, review the following technical note.
https://tecnosinergia.zendesk.com/hc/es/articles/360043318991
Features New Monitoring Software NVMS2.0 Lite 256CH
