Night Owl Protect App Guide, Night Owl Protect lets you view all of your devices in one easy to use mobile app. Monitor your home or business, in real-time, on your Smart Phone or Tablet. Easily share images and recordings via your favorite social network or through email and text. Staying connected to your devices allows you to protect your world from potential threats. Secure, PROTECT and connect your world!
1. How to Add a Device to the Night Owl Protect App for Android
a. Adding a Recorder (DVR/NVR)
A recorder will be automatically added to the Night Owl Protect app when you set up a recorder with an Internet connection. When you log into the app, the recorder will be listed with no additional steps needed. Use the following procedure if during the initial setup of the recorder you decided not to connect to the Internet but are now okay doing so.
IMPORTANT:
• The following procedures require that you have already downloaded and installed the Night Owl Protect app onto your Smart Device and have created an account. Go to the Google Play store to download and install the Night Owl Protect app.

• The quickest way to add a recorder to your app is by having a monitor connected to your recorder and following the steps in the following section. If your setup does not have a monitor connected to your recorder then follow the steps in the “If you DO NOT have a Monitor Connected to your Recorder” section.
i.If you have a Monitor Connected to your Recorder
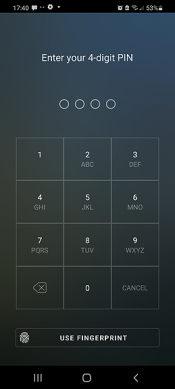
1.Log into the Night Owl Protect app by entering the PIN you created or by tapping USE FINGERPRINT.
|
.
|
2.
NOTE: If you did not setup a PIN or opt for using fingerprint recognition then you may to sign in by entering your username, email, or phone number.
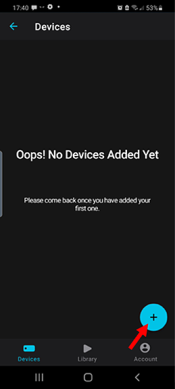
3.Tap the  (plus button).
|
.
|
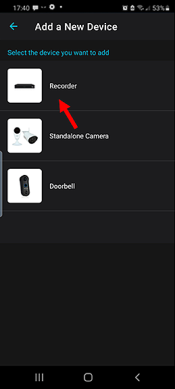
4.Tap Recorder.
|
.
|
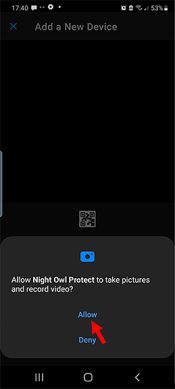
5.If a notice displays requesting permission to take pictures and record video, tap Allow.
NOTE: This may apply in the future.
|
.
|
6.Ensure the recorder is connected to your Internet using the included Ethernet cable.
|
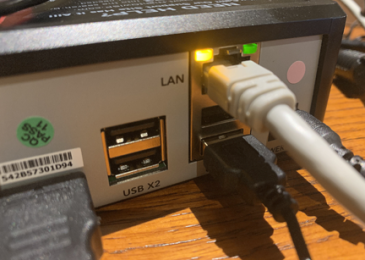
.
|
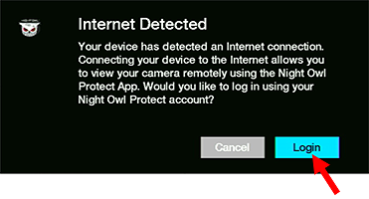
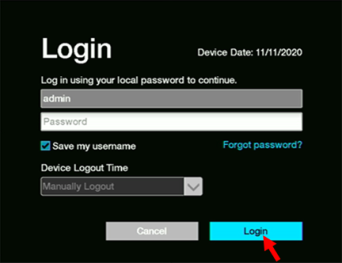
7.The Internet Detected message displays on the recorder screen. Click Login.
8.Enter your local password and click Login.
|
.
|
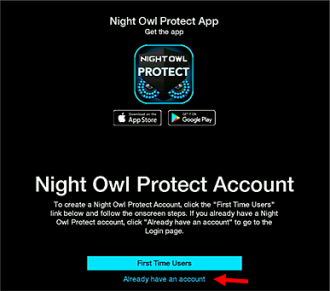
9.The Night Owl Protect Account screen displays. Click on Already have an account.
|
.
|
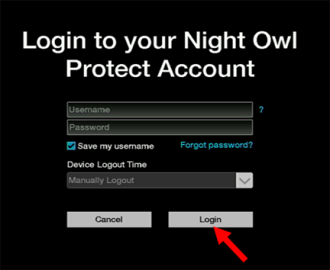
10.The Login to your Night Owl Protect Account screen displays. Enter the Username and Password that you created with the app, then click Login.
|
.
|
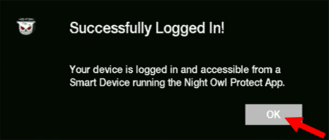
11.Click OK on the Successfully Logged In message that displays.
|
.
|
12.The recorder will now be listed when you log into the Night Owl Protect app.
ii.If you DO NOT have a Monitor Connected to your Recorder
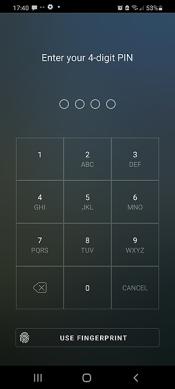
1.Log into the Night Owl Protect app by entering the PIN you created or by tapping USE FINGERPRINT.
|
.
|
2.
NOTE: If you did not setup a PIN or opt for using fingerprint recognition then you may to sign in by entering your username, email, or phone number.
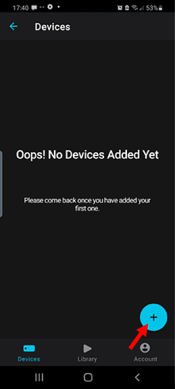
3.Tap the  (plus button).
|
.
|
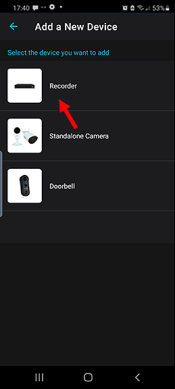
4.Tap Recorder.
|
.
|
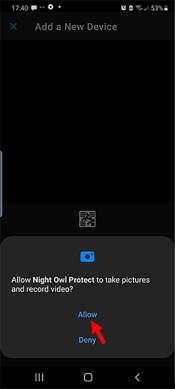
5.If a notice displays requesting permission to take pictures and record video, tap Allow.
|
.
|
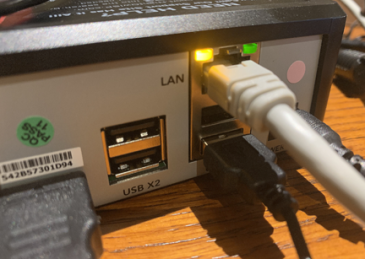
6.Ensure the recorder is connected to your Internet using the included Ethernet cable.
|
.
|
7.At this point you can add the recorder by
– Scanning the QR code on the recorder
– Using network discovery, OR
– Entering a UID.
Scanning the QR Code
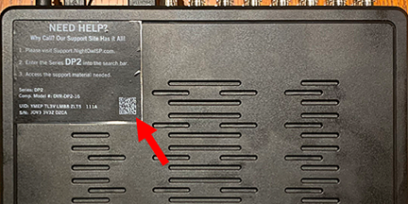
• Locate the QR code on the top of the recorder.
|
.
|
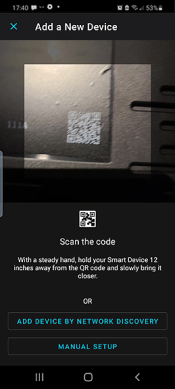
• Position your Smart Device’s camera so that the QR code displays within the lighter rectangle on the app’s screen.
|
.
|
NOTE: Continue at Step 7.
.
Using Network Discovery
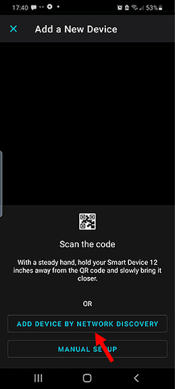
• Tap Add device by network discovery.
|
.
|
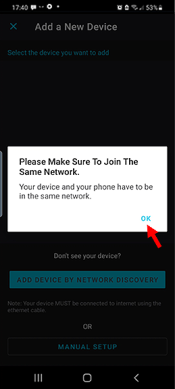
• Tap OK on the message “Please Make Sure to Join the Same Network.”
|
.
|
NOTES:
• If the recorder and your Smart Device are not on the same network this method will not work.
• Continue at Step 7.
Entering a UID
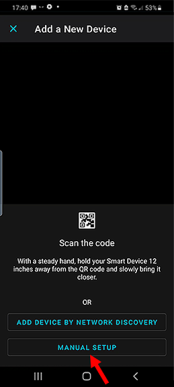
• Tap MANUAL SETUP.
|
.
|
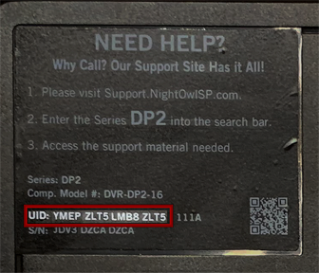
• Locate the UID on the support sticker on the top of the recorder.
|
.
|
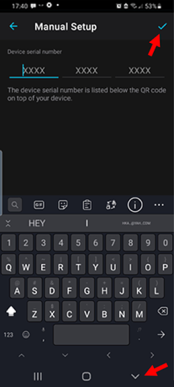
• Enter the UID on the following screen, then tap  (blue checkmark).
|
.
|
• Only the first 16 characters are required to be entered. There will be four additional characters at the end that are already entered.
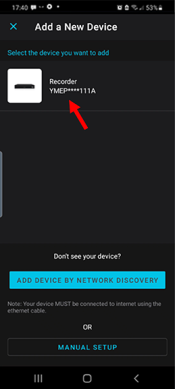
8.Tap the device that is displayed.
|
.
|
9.
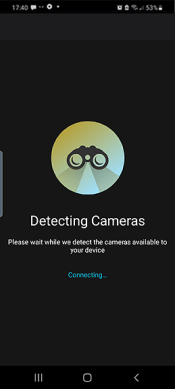
The Detecting Cameras screen displays as the app detects the available cameras.
|
.
|
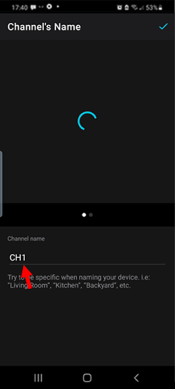
10.The Channel’s Name screen displays. If you want you can rename the channel with a descriptive name such as “Front Yard,” “Living Room,” etc. Tap on CH1 to rename.
|
.
|
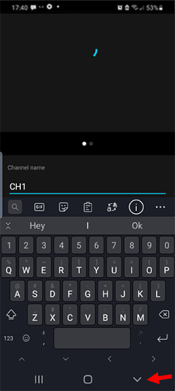
11.Enter the new name using the keyboard. When finished tap the V symbol.
|
.
|
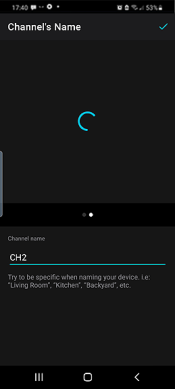
12.Swipe left to access the next channel. There should be as many channels as there are cameras attached. Rename each as desired.
|
.
|
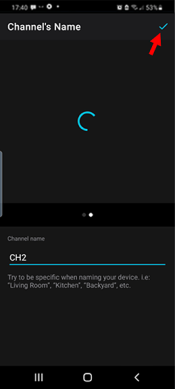
13.Tap the  (blue checkmark) when you are finished renaming the channels.
|
.
|
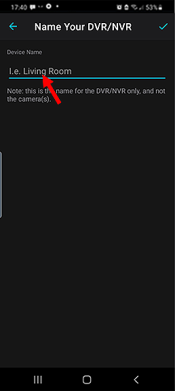
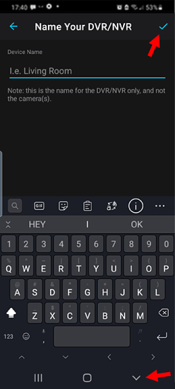
14.The Name Your DVR/NVR screen displays. Tap on the Device Name line to name the recorder.
15.Enter a name for the recorder. Examples might be “Home,” “Cabin,” “Condo,” “Recorder,” etc. When you are finished tap the V symbol and then the  (blue checkmark).
|
.
|
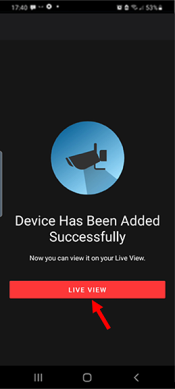
16.The recorder is named and the following screen displays. Tap LIVE VIEW to display the Device screen.
|
.
|
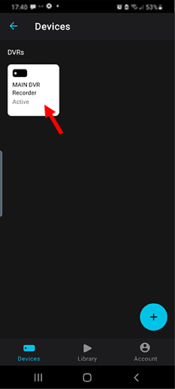
17.Tap on the newly listed recorder to display the Device Settings screen.
|
.
|
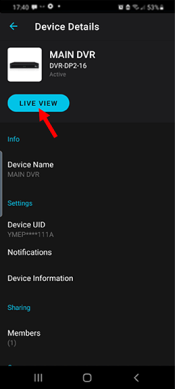
18.Tap LIVE VIEW.
|
.
|
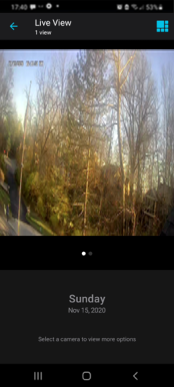
19.The Live Screen displays. Confirm that you can see a live view of the camera.
|
.
|
The recorder has now been added to Night Owl Protect app.
b. Adding a Standalone Camera
Night Owl standalone cameras are Wi-Fi devices that can be added to the Night Owl Protect app either by scanning its QR code, by using the network discovery method, or using the camera’s serial number. All methods are described below. See your camera’s setup instructions for further details.
Night Owl Protect App Anrdoid Guide
Read More : Night Owl X CMS Installation Setup
IMPORTANT:
• The following procedures require that you have already downloaded and installed the Night Owl Protect app onto your Smart Device and have created an account. Go to the Google Play store to download and install the Night Owl Protect app.

• DO NOT mount your camera in its final location until you have successfully added it to the Night Owl Protect app and you are able to see its Live View.
NOTES:
• Perform the following procedures within range of your Wi-Fi network.
• Your Night Owl standalone camera will be shipped with a Wi-Fi antenna, a power adapter cord, and a reset tool.
i.Setting Up a Standalone Camera
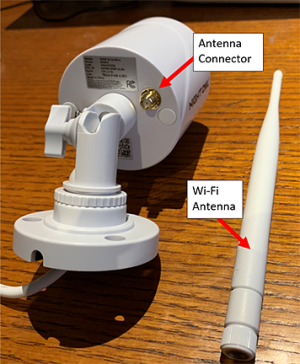
1.Screw in the Wi-Fi Antenna to the Antenna Connector found on the back of the camera.
|
.
|
2.Plug in the power adapter.
NOTE: A surge protector or Uninterruptible Power Supply (UPS) is recommended.
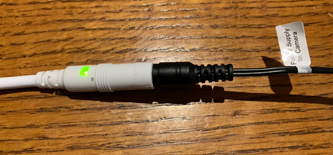
3.Connect the power adapter cord to the wire coming from the camera. The camera will announce, “Device is ready for Use.”
|
.
|
4.Shortly afterward you should hear “The camera is in pairing mode” and the green LED found on the connector at the end of the camera’s wire should flash continuously. If the camera does not go into pairing mode perform the following steps:
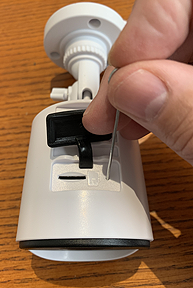
– Peel up the rubber cover on the camera that is labeled “MicroSD/Reset.”
– Insert the Reset Tool into the tiny hole next to the MicroSD slot.
NOTE: If you cannot locate the Reset Tool a paper clip can be used instead.
|
.
|
5.
– Push the Reset Tool down until the camera announces “Please be patient. Camera is resetting.” After a short delay you should hear “Device is ready for Use.” Afterwards the camera announces “The camera is in pairing mode,” and the green LED flashes continuously.
ii.Adding a Standalone Camera using the Camera’s QR Code
NOTE: Follow the steps for SETTING UP A STANDALONE CAMERA above before proceeding.
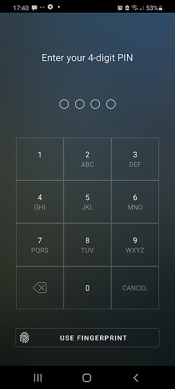
1.Log into the Night Owl Protect app by entering the PIN you created or by tapping USE FINGERPRINT.
|
.
|
2.
NOTE: If you did not setup a PIN or opt for using fingerprint recognition then you may to sign in by entering your username, email, or phone number.
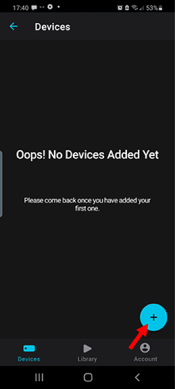
3.Tap the  (plus button).
|
.
|
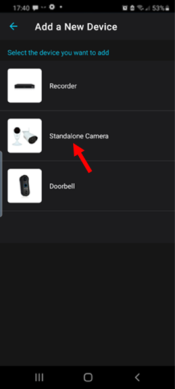
4.Tap Standalone Camera.
|
.
|
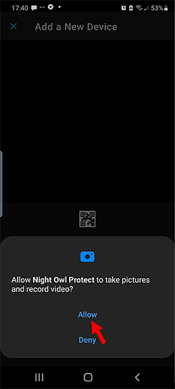
5.If a notice displays requesting permission to take pictures and record video, tap Allow.
|
.
|
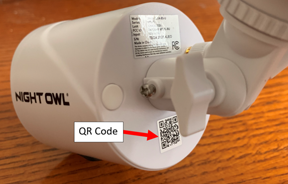
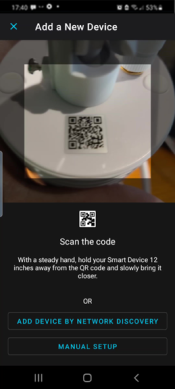
6.Locate the QR code on the back of the camera.
7.Position your Smart Device’s camera so that the QR code displays within the white square on the app’s screen.
|
.
|
8.Tap on the device that is listed.
|
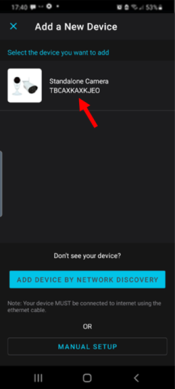
.
|
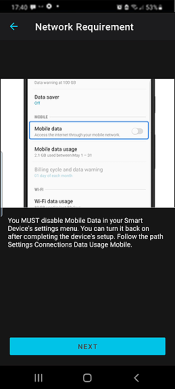
9.A message displays informing you that you MUST disable Mobile Data to continue the camera setup.
|
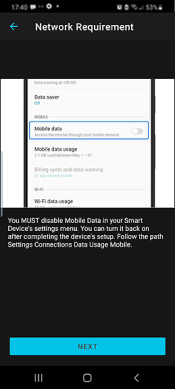
.
|
If your Mobile Data is already OFF then skip to Step 14. Otherwise, navigate to your Smart Device’s Settings screen.
.
9.Tap Connections on the Settings screen.
|
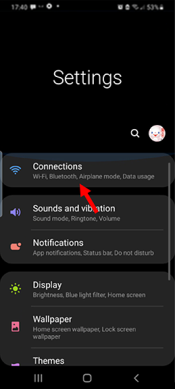
.
|
10.Tap Data usage on the Connections screen.
|
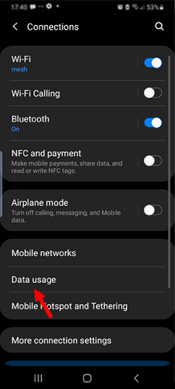
.
|
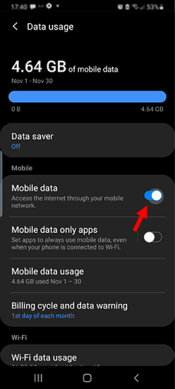
11.Slide the control for Mobile data to the left to turn it OFF.
|
.
|
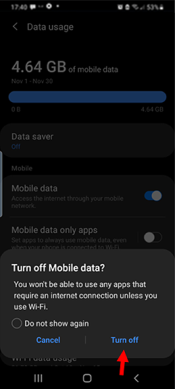
12.A confirmation message displays. Tap Turn off.
|
.
|
13.Navigate back to the Night Owl Protect app.
14.Tap NEXT.
|
.
|
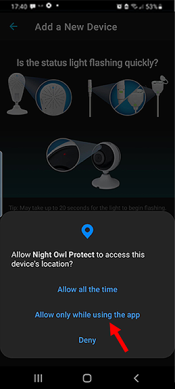
15.If a notice displays requesting permission to access the device’s location, tap Allow only while using the app.
|
.
|
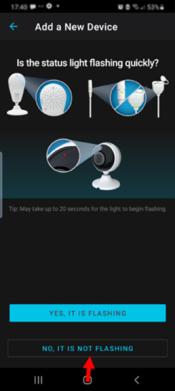
16.If the status light is NOT flashing on your standalone camera, then tap NO, IT IS NOT FLASHING. Follow the instructions on the screens that display. You will need to reset the camera and start over. If it is flashing then wait.
|
.
|
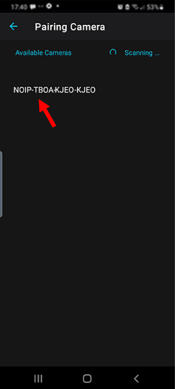
17.The Pairing Camera screen displays. When the serial number of the camera displays tap on it.
|
.
|
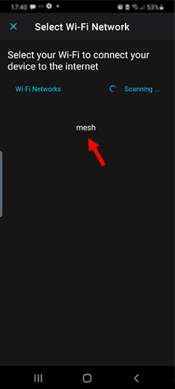
18.The Select Wi-Fi Network screen displays. Tap on your Wi-Fi network.
|
.
|
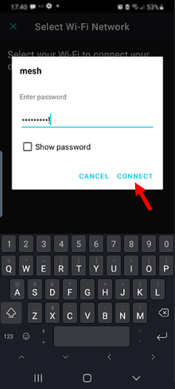
19.Tap on the Enter password line to open the on-screen keyboard. Type the password for the Wi-Fi network. Tap CONNECT when finished.
|
.
|
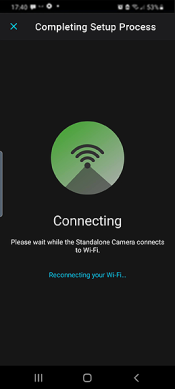
The Connecting screen displays while the camera establishes a connection to the Wi-Fi network.
|
.
|
.
The camera announces “Please be patient as the camera connects to Wi-Fi.” After it connects, the camera will announce “Woo-hoo. Setup is now complete.”
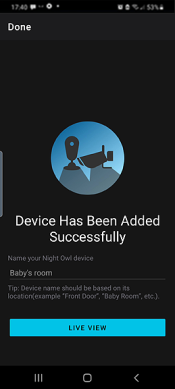
When the camera has been added the following screen displays.
.
|
.
|
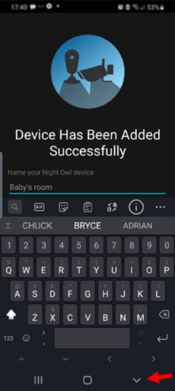
20.Tap on the Name your Night Owl device line to bring up the on-screen keyboard. Enter a name for the camera. (Required) When you are finished tap the V symbol.
|
.
|
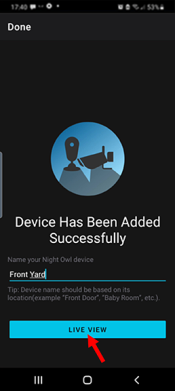
21.Tap LIVE VIEW.
|
.
|
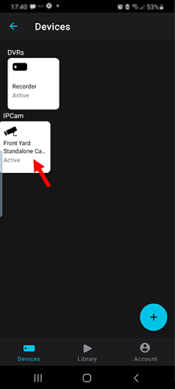
22.The Devices screen displays with the newly added camera listed. Tap on the device to open the Devices Details screen.
|
.
|
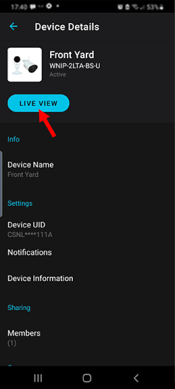
23.Tap LIVE VIEW on the Devices Details screen.
|
.
|
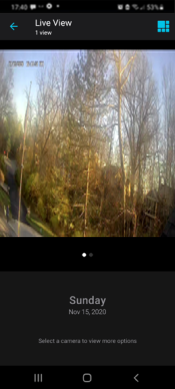
24.Confirm that you can see a live view from the camera. If so, the camera may now be installed in its final location.
|
.
|
25.Turn ON Mobile Data, if you normally have it ON. Reference Steps 9 through 11 above.
i.Adding a Standalone Camera using Network Discovery
NOTE: Follow the steps for setting up a standalone camera above before proceeding.
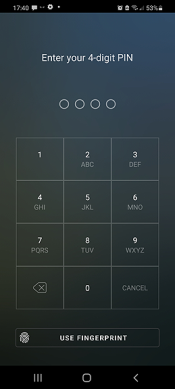
1.Log into the Night Owl Protect app by entering the PIN you created or by tapping USE FINGERPRINT.
|
.
|
NOTE: If you did not setup a PIN or opt for using fingerprint recognition then you may to sign in by entering your username, email, or phone number.
.
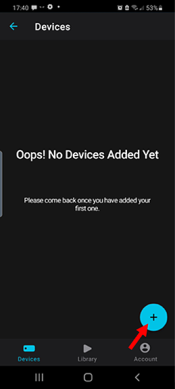
2.Tap the  (plus button).
|
.
|
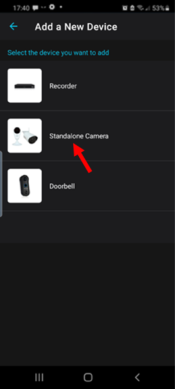
3.Tap Standalone Camera.
|
.
|
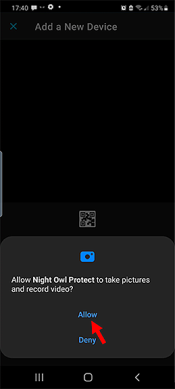
4.If a notice displays requesting permission to take pictures and record video, tap Allow.
NOTE: This may apply in the future.
|
.
|
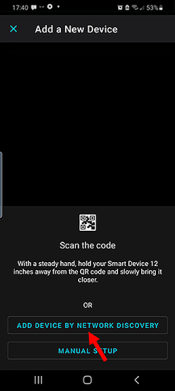
5.Tap ADD DEVICE BY NETWORK DISCOVERY.
|
.
|
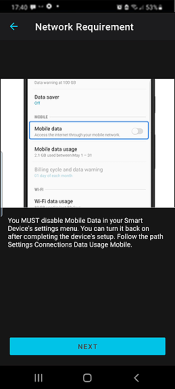
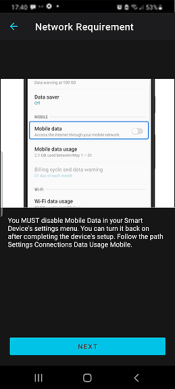
6.A message displays informing you that you MUST disable Mobile Data to continue the camera setup.
|
.
|
7.If your Mobile Data is already OFF then skip to Step 13. Otherwise, navigate to your Smart Device’s Settings screen.
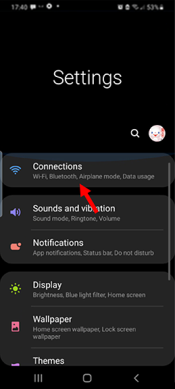
8.Tap Connections on the Settings screen.
|
.
|
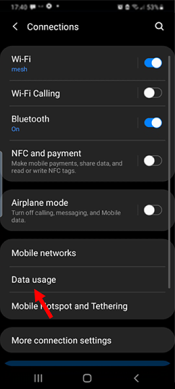
9.Tap Data usage on the Connections screen.
|
.
|
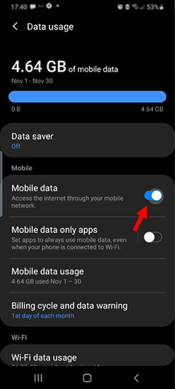
10.Slide the control for Mobile data to the left to turn it OFF.
|
.
|
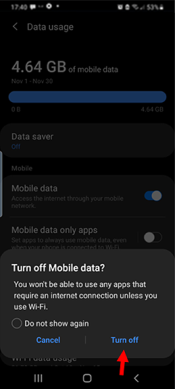
11.A confirmation message displays. Tap Turn off.
|
.
|
12.Navigate back to the Night Owl Protect app.
13.Tap NEXT.
|
.
|
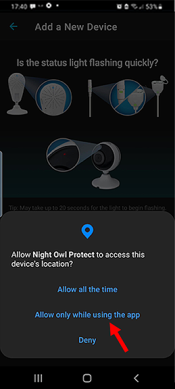
14.If a notice displays requesting permission to access the device’s location, tap Allow only while using the app.
|
.
|
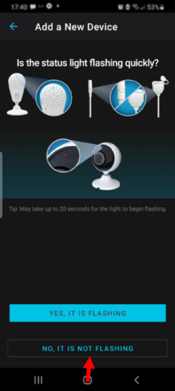
15.If the status light is NOT flashing on your standalone camera, then tap NO, IT IS NOT FLASHING. Follow the instructions on the screens that display. You will need to reset the camera and start over. If it is flashing then wait.
|
.
|
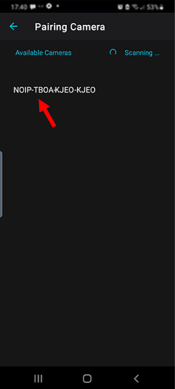
16.The Pairing Camera screen displays. When the serial number of the camera displays tap on it.
|
.
|
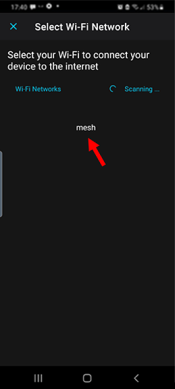
17.The Select Wi-Fi Network screen displays. Tap on your Wi-Fi network.
|
.
|
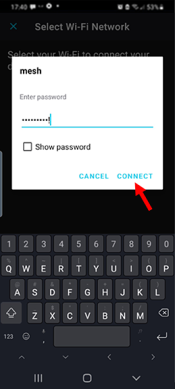
18.Tap on the Enter password line to open the on-screen keyboard. Type the password for the Wi-Fi network. Tap CONNECT when finished.
|
.
|
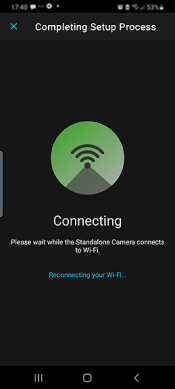
The Connecting screen displays while the camera establishes a connection to the Wi-Fi network.
|
.
|
.
The camera announces “Please be patient as the camera connects to Wi-Fi.” After it connects, the camera will announce “Woo-hoo. Setup is now complete.”
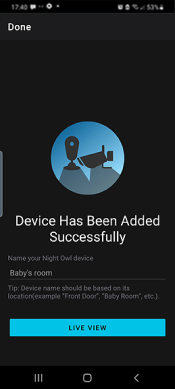
When the camera has been added the following screen displays.
.
|
.
|
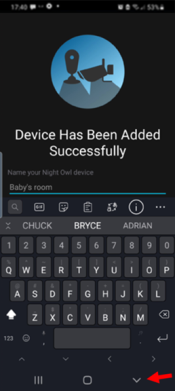
19.Tap on the Name your Night Owl device line to bring up the on-screen keyboard. Enter a name for the camera. (Required) When you are finished tap the V symbol.
|
.
|
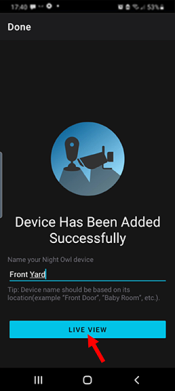
20.Tap LIVE VIEW.
|
.
|
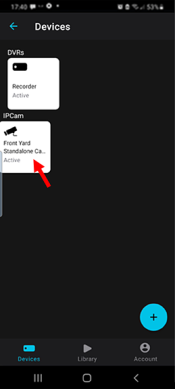
21.The Devices screen displays with the newly added camera listed. Tap on the device to open the Devices Details screen.
|
.
|
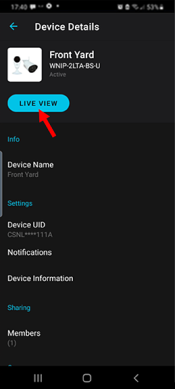
22.Tap LIVE VIEW on the Devices Details screen.
|
.
|
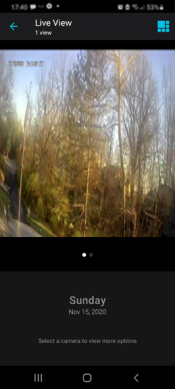
23.Confirm that you can see a live view from the camera. If so, the camera may now be installed in its final location.
|
.
|
24.Turn ON Mobile Data, if you normally have it ON. Reference Steps 8 through 10 above.
i.Adding a Standalone Camera by Entering its Serial Number
NOTE: Follow the steps for SETTING UP A STANDALONE CAMERA above before proceeding.
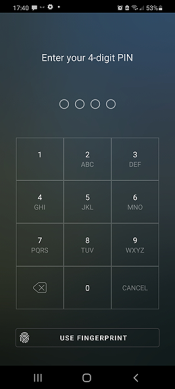
1.Log into the Night Owl Protect app by entering the PIN you created or by tapping USE FINGERPRINT.
|
.
|
NOTE: If you did not setup a PIN or opt for using fingerprint recognition then you may to sign in by entering your username, email, or phone number.
.
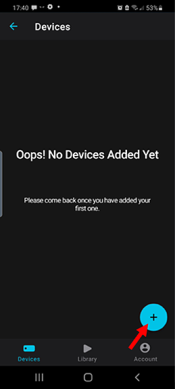
2.Tap the  (plus button).
|
.
|
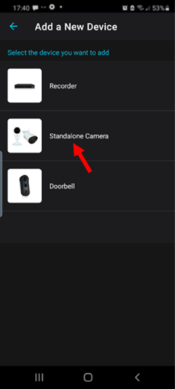
3.Tap Standalone Camera.
|
.
|
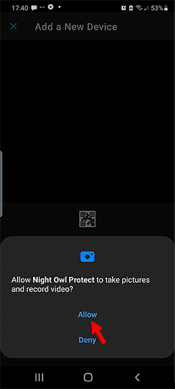
4.If a notice displays requesting permission to take pictures and record video, tap Allow.
NOTE: This may apply in the future.
|
.
|
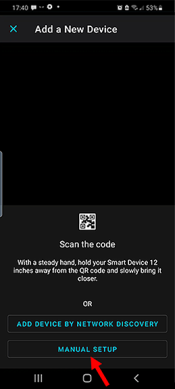
5.Tap MANUAL SETUP.
|
.
|
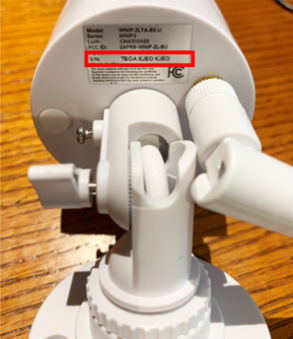
6.Locate the serial number on the camera’s sticker. NOTE: The sticker’s location may vary by camera model.
|
.
|
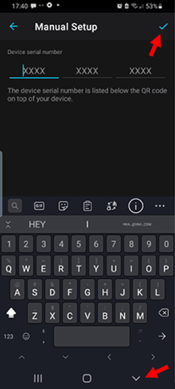
7.Tap on the Device serial number line to open the on-screen keyboard. Enter the serial number for the camera. When you are finished tap the V symbol, then tap the  (blue checkmark).
|
.
|
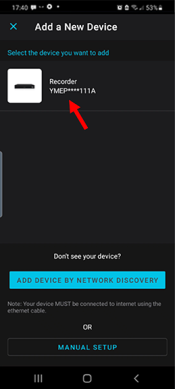
8.Tap the device that is listed.
|
.
|
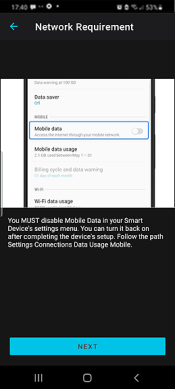
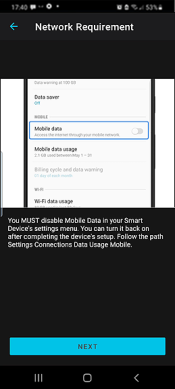
9.A message displays informing you that you MUST disable Mobile Data to continue the camera setup.
|
.
|
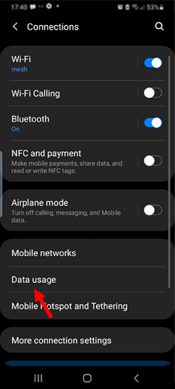
10.If your Mobile Data is already OFF then skip to Step 16. Otherwise, navigate to your Smart Device’s Settings screen.
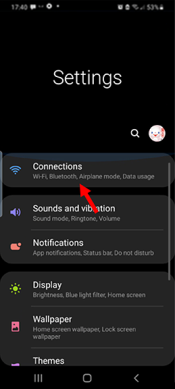
11.Tap Connections on the Settings screen.
|
.
|
12.Tap Data usage on the Connections screen.
|
.
|
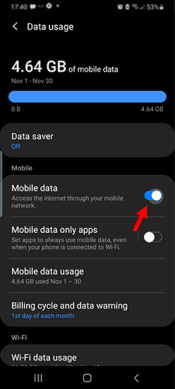
13.Slide the control for Mobile data to the left to turn it OFF.
|
.
|
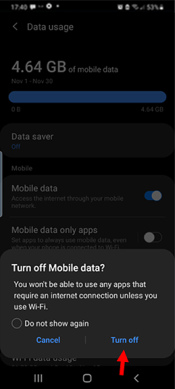
14.A confirmation message displays. Tap Turn off.
|
.
|
15.Navigate back to the Night Owl Protect app.
16.Tap NEXT.
|
.
|
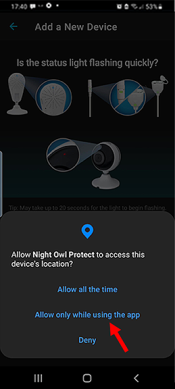
17.If a notice displays requesting permission to access the device’s location, tap Allow only while using the app.
|
.
|
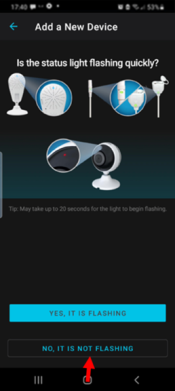
18.If the status light is NOT flashing on your standalone camera, then tap NO, IT IS NOT FLASHING. Follow the instructions on the screens that display. You will need to reset the camera and start over. If it is flashing then wait.
|
.
|
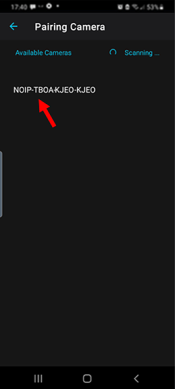
19.The Pairing Camera screen displays. When the serial number of the camera displays tap on it.
|
.
|
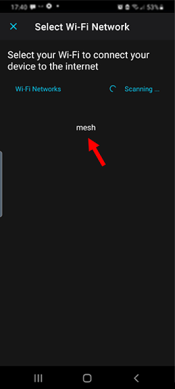
20.The Select Wi-Fi Network screen displays. Tap on your Wi-Fi network.
|
.
|
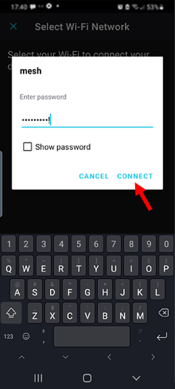
21.Tap on the Enter password line to open the on-screen keyboard. Type the password for the Wi-Fi network. Tap CONNECT when finished.
|
.
|
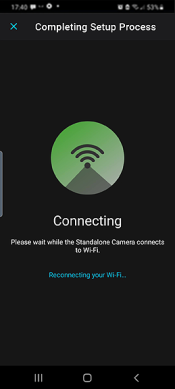
The Connecting screen displays while the camera establishes a connection to the Wi-Fi network.
|
.
|
.
The camera announces “Please be patient as the camera connects to Wi-Fi.” After it connects, the camera will announce “Woo-hoo. Setup is now complete.”
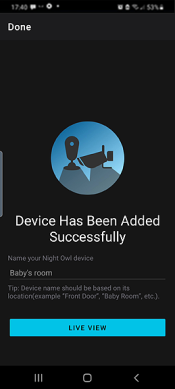
When the camera has been added the following screen displays.
.
|
.
|
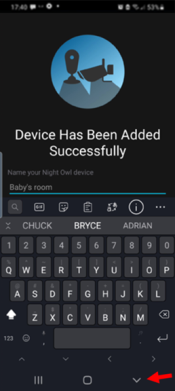
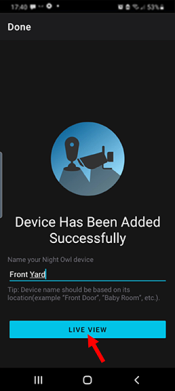
22.Tap on the Name your Night Owl device line to bring up the on-screen keyboard. Enter a name for the camera. (Required) When you are finished tap the V symbol.
|
.
|
23.Tap LIVE VIEW.
|
.
|
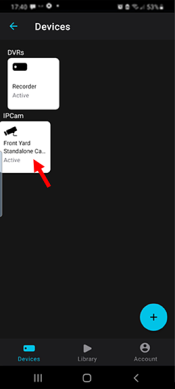
24.The Devices screen displays with the newly added camera listed. Tap on the device to open the Devices Details screen.
|
.
|
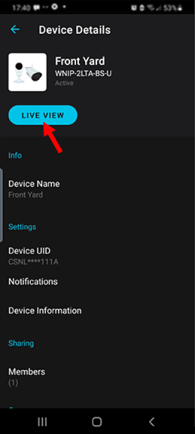
25.Tap LIVE VIEW on the Devices Details screen.
|
.
|
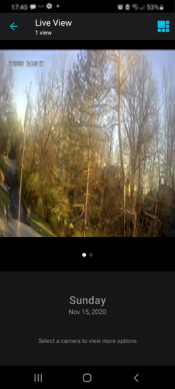
26.Confirm that you can see a live view from the camera. If so, the camera may now be installed in its final location.
|
.
|
27.Turn ON Mobile Data, if you normally have it ON. Reference Steps 11 through 13 above.
c. Adding a Doorbell
Night Owl doorbells are Wi-Fi devices that can be added to the Night Owl Protect app either by scanning its QR code, by using the network discovery method, or by using the doorbell’s serial number. All methods are described below.
The following procedures focus on the addition of the doorbell to the Night Owl Protect app. See your doorbell setup instructions for details regarding installing the doorbell.
IMPORTANT:
• The following procedures require that you have already downloaded and installed the Night Owl Protect app onto your Smart Device and have created an account. Go to the Google Play store to download and install the Night Owl Protect app.

• DO NOT install your doorbell in its final location until you have successfully added it to the Night Owl Protect app and you are able to see its Live View.
NOTES:
• Perform the following procedures within range of your Wi-Fi network.
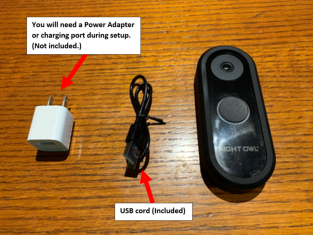
• Your Night Owl doorbell is shipped with a USB cord, but you will need a USB A power adapter or charging port.
|
.
|
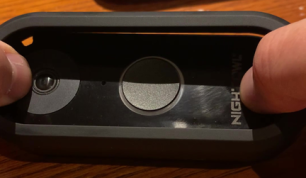
1.Remove faceplate, the protective outer shell that wraps around the edges of the doorbell.
– Grasp the doorbell face-side up.
– Position your fingertips on the bottom edge of the faceplate.
– Push down on the main body of the doorbell with your thumbs.
|
.
|
2.
NOTE: You may find that the faceplate is very tight and not moving. If so, try prying around the bottom edge of the faceplate with you fingernail to loosen it away from the main body of the doorbell then repeat the above steps.
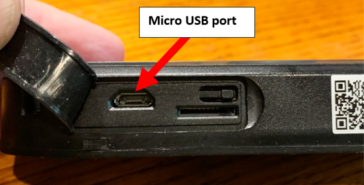
3.Peel back the rubber cover on the side of the doorbell to expose the micro USB port.
4.Insert the small connector on the USB cord into the micro USB port.
|
.
|
5.Connect the other end of the cord to a USB A power adapter or charging port that is powered. The light ring around the doorbell’s button lights up, and the doorbell announces “Doorbell is ready for use.” After a short delay you will hear “The doorbell is in pairing mode.” The light ring will light up in a clockwise spinning pattern.
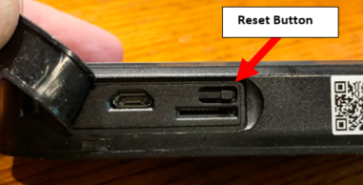
6.If the doorbell does not go into pairing mode perform the following steps:
• Locate the Reset Button next to the Micro USB port.
|
.
|
• Press on the button with your fingernail until you hear “Please be patient as doorbell resets its factory settings.” After a short delay you will hear “Doorbell is ready for use.” Next you will hear “Doorbell is in pairing mode.”
ii.Adding a Doorbell using the Doorbell’s QR Code
NOTE: Follow the steps for SETTING UP A DOORBELL above before proceeding.
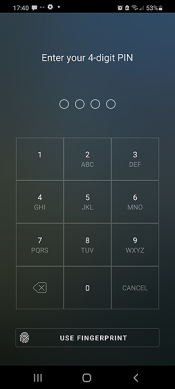
1.Log into the Night Owl Protect app by entering the PIN you created or by tapping USE FINGERPRINT.
|
.
|
2.
NOTE: If you did not setup a PIN or opt for using fingerprint recognition then you may sign in by entering your username, email, or phone number.
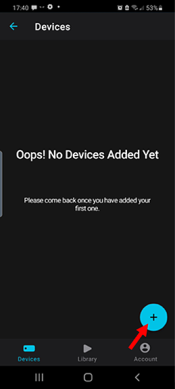
3.Tap the  (plus button).
|
.
|
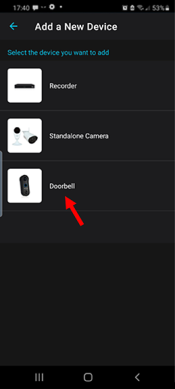
4.Tap Doorbell.
|
.
|
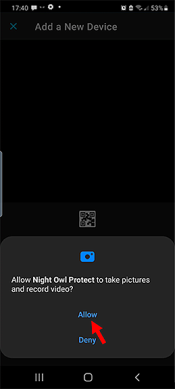
5.If a notice displays requesting permission to take pictures and record video, tap Allow.
|
.
|
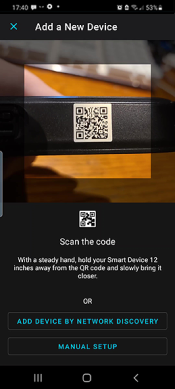
6.Position your Smart Device camera so that the QR code displays within the lighter rectangle on the app’s screen.
|
.
|
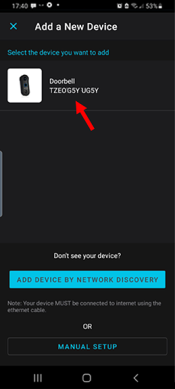
7.Tap on the device that is listed.
|
.
|
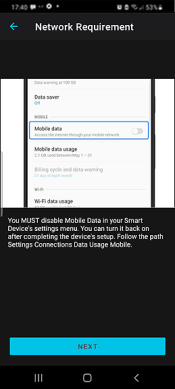
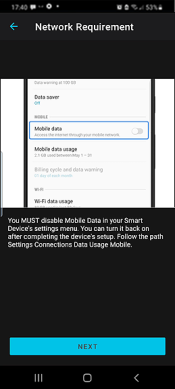
8.A message displays informing you that you MUST disable Mobile Data to continue the doorbell setup.
|
.
|
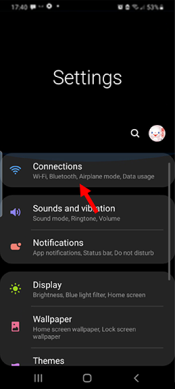
9.If your Mobile Data is already OFF then skip to Step 14. Otherwise, navigate to your Smart Device’s Settings screen.
10.Tap Connections on the Settings screen.
|
.
|
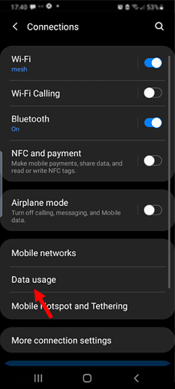
11.Tap Data usage on the Connections screen.
|
.
|
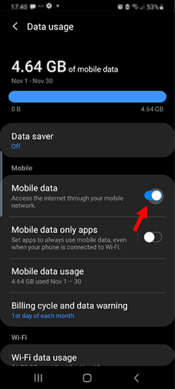
12.Slide the control for Mobile data to the left to turn it off.
|
.
|
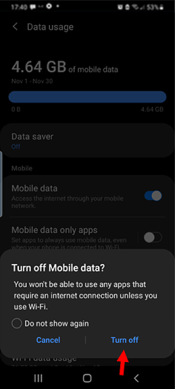
13.A confirmation message displays. Tap Turn off.
|
.
|
14.Navigate back to the Night Owl Protect app.
15.Tap NEXT.
|
.
|
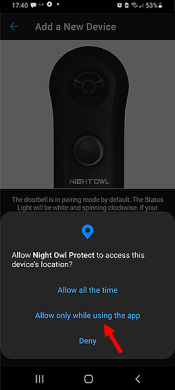
16.If a notice displays requesting permission to access the device’s location, tap Allow only while using the app.
|
.
|
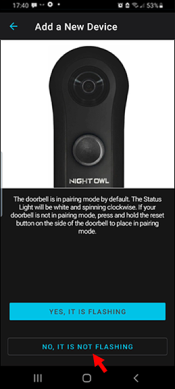
17.If the status light is NOT spinning clockwise on your doorbell, then tap NO, IT IS NOT FLASHING on the following screen. Follow the instructions on the screens that display. You will need to reset the doorbell and start over. If it is flashing then wait.
|
.
|
NOTE: “Flashing” in this case refers to the light ring lighting up in a clockwise spinning pattern.
.
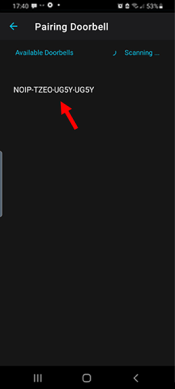
17.The Pairing Doorbell screen displays. When the serial number of the doorbell displays tap on it.
|
.
|
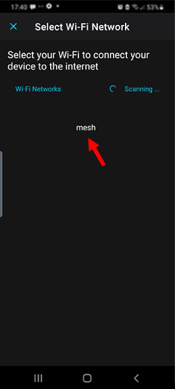
18.The Select Wi-Fi Network screen displays. Tap on your Wi-Fi network.
|
.
|
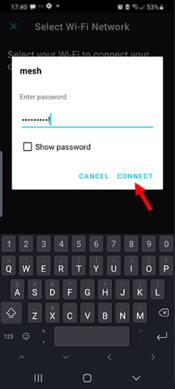
19.Tap on the Enter password line to open the on-screen keyboard. Type the password for the Wi-Fi network. Tap CONNECT when finished.
|
.
|
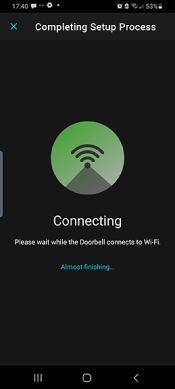
The Connecting screen displays while the camera establishes a connection to the Wi-Fi network.
|
.
|
.
The doorbell announces “Please be patient as doorbell connects to Wi-Fi.” After it connects, the doorbell will announce “Woo-hoo. Doorbell setup is complete.”
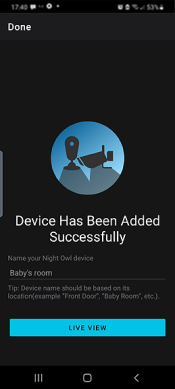
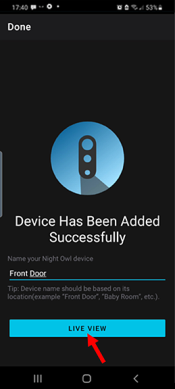
When the doorbell has been added the following screen displays.
.
|
.
|
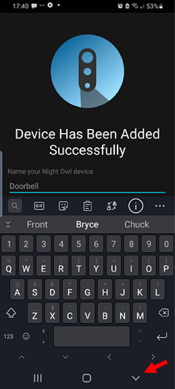
20.Tap on the Name your Night Owl device line to bring up the on-screen keyboard. Enter a name for the doorbell. (Required) When you are finished tap the V symbol.
|
.
|
21.Tap LIVE VIEW.
|
.
|
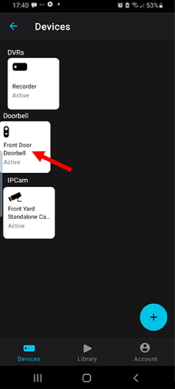
22.The Devices screen displays with the newly added doorbell listed. Tap on the doorbell to open the Devices Details screen.
|
.
|
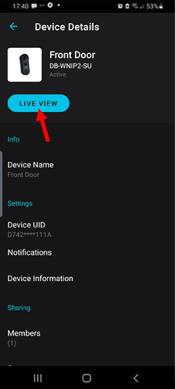
23.Tap LIVE VIEW on the Devices Details screen.
|
.
|
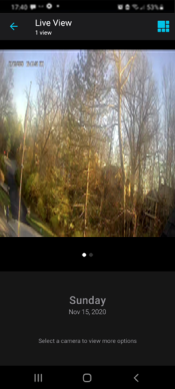
24.Confirm that you can see a live view from the doorbell’s camera. If so, the doorbell may now be installed in its final location.
|
.
|
25.Turn ON Mobile Data, if you normally have it ON. Reference Steps 9 through 11 above.
i.Adding a Doorbell using Network Discovery
NOTE: Follow the steps for SETTING UP A DOORBELL above before proceeding.
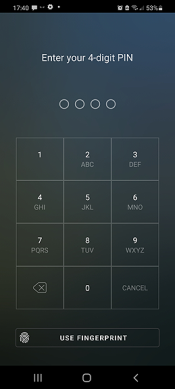
1.Log into the Night Owl Protect app by entering the PIN you created or by tapping USE FINGERPRINT.
|
.
|
NOTE: If you did not setup a PIN or opt for using fingerprint recognition then you may to sign in by entering your username, email, or phone number.
.
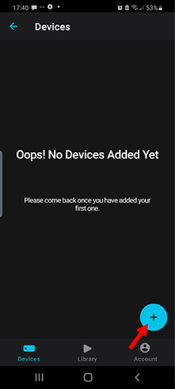
2.Tap the  (plus button).
|
.
|
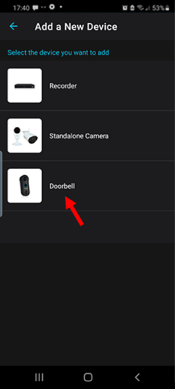
3.Tap Doorbell.
|
.
|
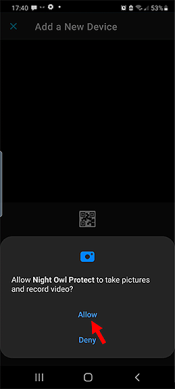
4.If a notice displays requesting permission to take pictures and record video, tap Allow.
|
.
|
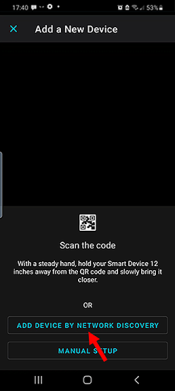
5.Tap ADD DEVICE BY NETWORK DISCOVERY.
|
.
|
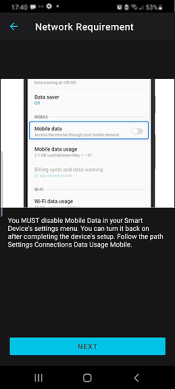
6.A message displays informing you that you MUST disable Mobile Data to continue the doorbell setup.
|
.
|
7.If your Mobile Data is already OFF then skip to Step 13. Otherwise, navigate to your Smart Device’s Settings screen.
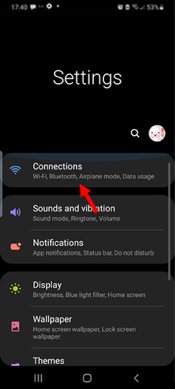
8.Tap Connections on the Settings screen.
|
.
|
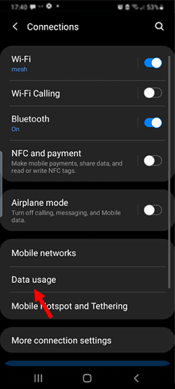
9.Tap Data usage on the Connections screen.
|
.
|
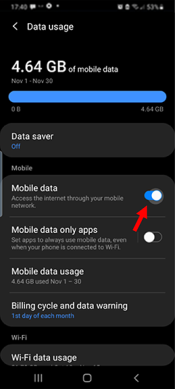
10.Slide the control for Mobile data to the left to turn it off.
|
.
|
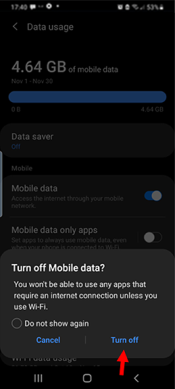
11.A confirmation message displays. Tap Turn off.
|
.
|
12.Navigate back to the Night Owl Protect app.
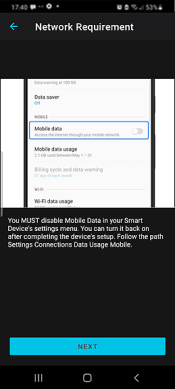
13.Tap NEXT.
|
.
|
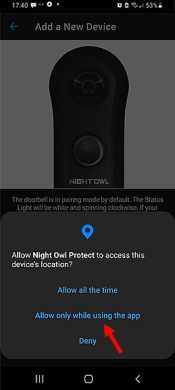
14.If a notice displays requesting permission to access the device’s location, tap Allow only while using the app.
|
.
|
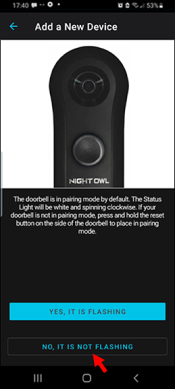
15.If the status light is NOT spinning clockwise on your doorbell, then tap NO, IT IS NOT FLASHING on the following screen. Follow the instructions on the screens that display. You will need to reset the doorbell and start over. If it is flashing then wait.
|
.
|
NOTE: “Flashing” in this case refers to the light ring lighting up in a clockwise spinning pattern.
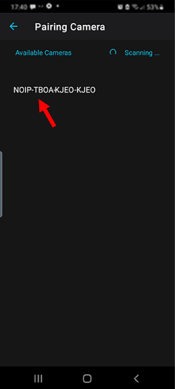
16.The Pairing Doorbell screen displays. When the serial number of the doorbell displays tap on it.
|
.
|
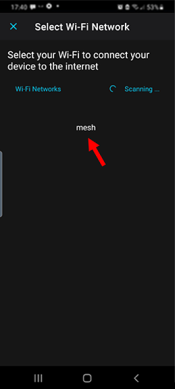
17.The Select Wi-Fi Network screen displays. Tap on your Wi-Fi network.
|
.
|
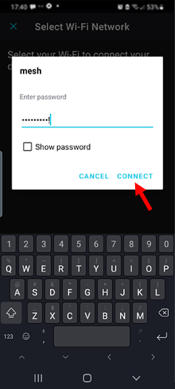
18.Tap on the Enter password line to open the on-screen keyboard. Type the password for the Wi-Fi network. Tap CONNECT when finished.
|
.
|
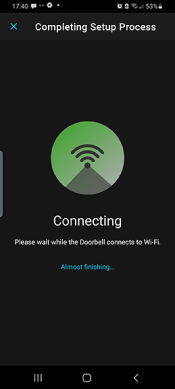
The Connecting screen displays while the camera establishes a connection to the Wi-Fi network.
|
.
|
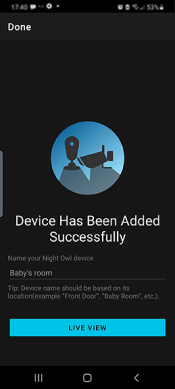
The doorbell announces “Please be patient as doorbell connects to Wi-Fi.” After it connects, the doorbell will announce “Woo-hoo. Doorbell setup is complete.”
When the doorbell has been added the following screen displays.
.
|
.
|
.
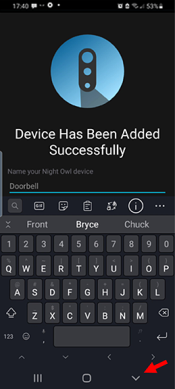
19.Tap on the Name your Night Owl device line to bring up the on-screen keyboard. Enter a name for the doorbell. (Required) When you are finished tap the V symbol.
|
.
|
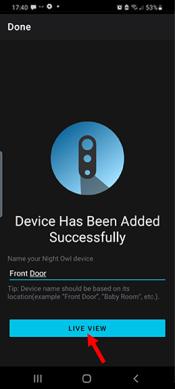
20.Tap LIVE VIEW.
|
.
|
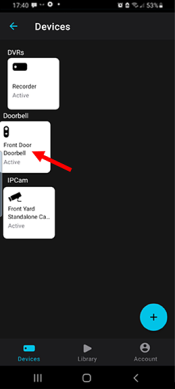
21.The Devices screen displays with the newly added doorbell listed. Tap on the doorbell to open the Devices Details screen.
|
.
|
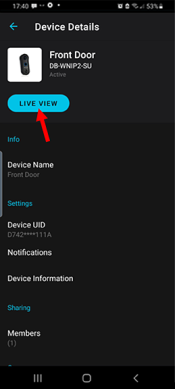
22.Tap LIVE VIEW on the Devices Details screen.
|
.
|
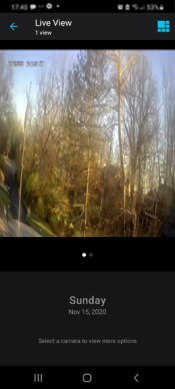
23.Confirm that you can see a live view from the doorbell’s camera. If so, the doorbell may now be installed in its final location.
|
.
|
24.Turn ON Mobile Data, if you normally have it ON. Reference Steps 8 through 10 above.
i.Adding a Doorbell by Entering its Serial Number
NOTE: Follow the steps for SETTING UP A DOORBELL above before proceeding.
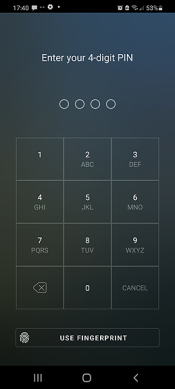
1.Log into the Night Owl Protect app by entering the PIN you created or by tapping USE FINGERPRINT.
|
.
|
NOTE: If you did not setup a PIN or opt for using fingerprint recognition then you may to sign in by entering your username, email, or phone number.
.
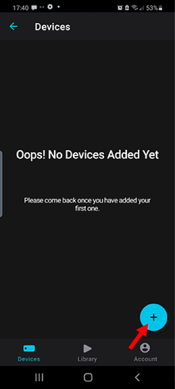
2.Tap the  (plus button).
|
.
|
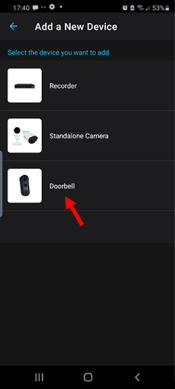
3.Tap Doorbell.
|
.
|
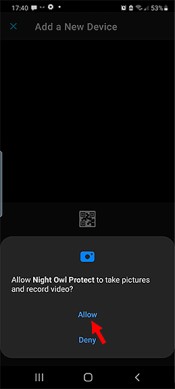
4.If a notice displays requesting permission to take pictures and record video, tap Allow.
|
.
|
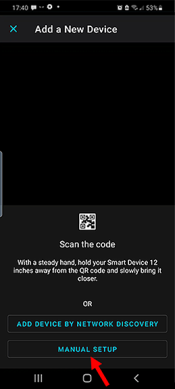
5.Tap MANUAL SETUP.
|
.
|
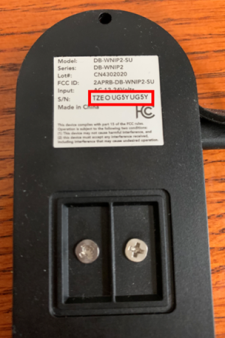
6.Locate the serial number on the back of the doorbell.
|
.
|
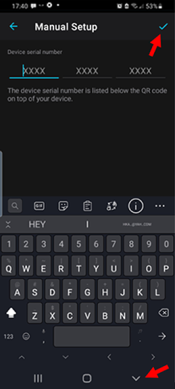
7.On the following screen, tap on the Device serial number line to open the on-screen keyboard. Enter the serial number for the doorbell. When you are finished tap the V symbol, then tap the  (blue checkmark).
|
.
|
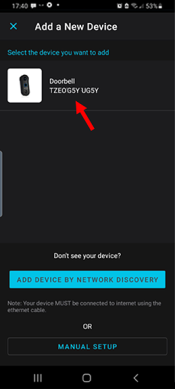
8.Tap on the device that is listed.
|
.
|
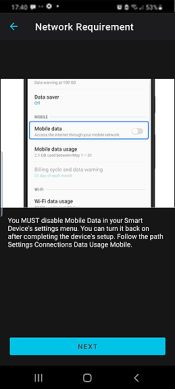
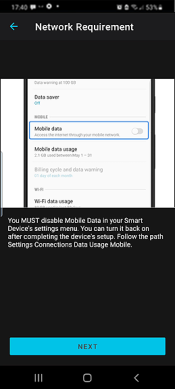
9.A message displays informing you that you MUST disable Mobile Data to continue the doorbell setup.
|
.
|
10.If your Mobile Data is already OFF then skip to Step 16. Otherwise, navigate to your Smart Device’s Settings screen.
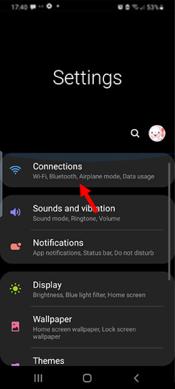
11.Tap Connections on the Settings screen.
|
.
|
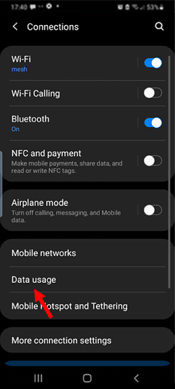
12.Tap Data usage on the Connections screen.
|
.
|
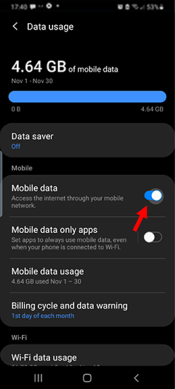
13.Slide the control for Mobile data to the left to turn it off.
|
.
|
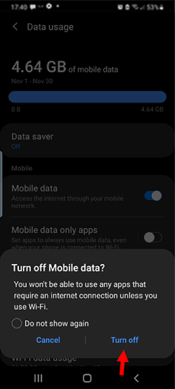
14.A confirmation message displays. Tap Turn off.
|
.
|
15.Navigate back to the Night Owl Protect app.
16.Tap NEXT.
|
.
|
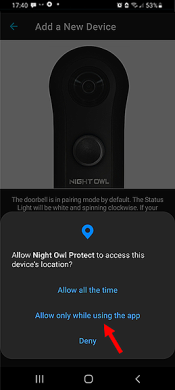
17.If a notice displays requesting permission to access the device’s location, tap Allow only while using the app.
|
.
|
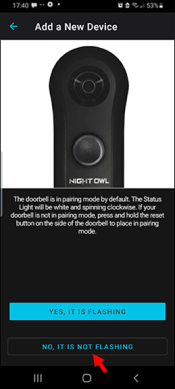
18.If the status light is NOT spinning clockwise on your doorbell, then tap NO, IT IS NOT FLASHING on the following screen. Follow the instructions on the screens that display. You will need to reset the doorbell and start over. If it is flashing then wait.
|
.
|
NOTE: “Flashing” in this case refers to the light ring lighting up in a clockwise spinning pattern.
.
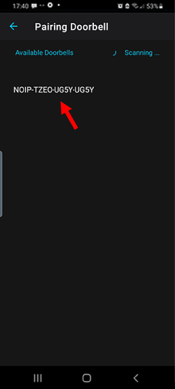
19.The Pairing Doorbell screen displays. When the serial number of the doorbell displays tap on it.
|
.
|
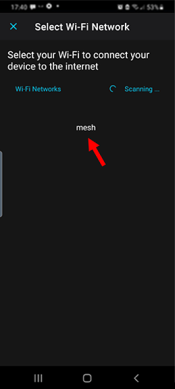
20.The Select Wi-Fi Network screen displays. Tap on your Wi-Fi network.
|
.
|
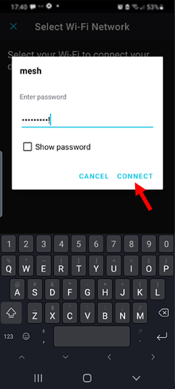
21.Tap on the Enter password line to open the on-screen keyboard. Type the password for the Wi-Fi network. Tap CONNECT when finished.
|
.
|
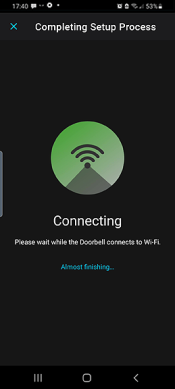
The Connecting screen displays while the camera establishes a connection to the Wi-Fi network.
|
.
|
.
The doorbell announces “Please be patient as doorbell connects to Wi-Fi.” After it connects, the doorbell will announce “Woo-hoo. Doorbell setup is complete.”
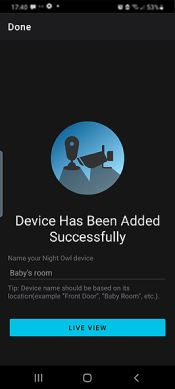
When the doorbell has been added the following screen displays.
.
|
.
|
.
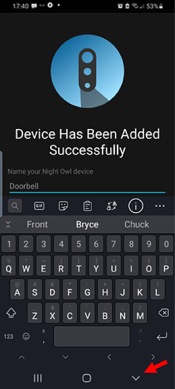
22.Tap on the Name your Night Owl device line to bring up the on-screen keyboard. Enter a name for the doorbell. (Required) When you are finished tap the V symbol.
|
.
|
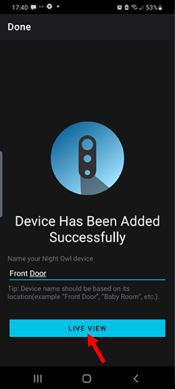
23.Tap LIVE VIEW.
|
.
|
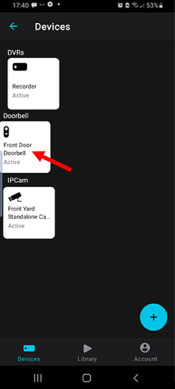
24.The Devices screen displays with the newly added doorbell listed. Tap on the doorbell to open the Devices Details screen.
|
.
|
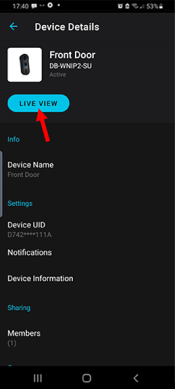
25.Tap LIVE VIEW on the Devices Details screen.
|
.
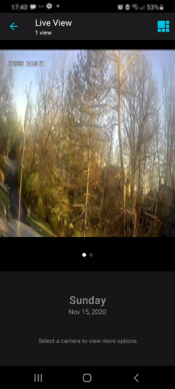
|
26.Confirm that you can see a live view from the doorbell’s camera. If so, the doorbell may now be installed in its final location.
|
.
|
27.Turn ON Mobile Data, if you normally have it ON. Reference Steps 11 through 13 above.
.


