iVMS320 Installation and User Guide, İVMS320 (Video Manage System 320, the same below) is a video management software specially designed for BitVison devices based on VMSLite. In iVMS320, users can connect the device from our server via its serial number and manage the devices on the LAN via IP address.
The main functions of iVMS320 are Live, Local playback, Remote playback, and E-map. Other functions include Device management, User management, Storage, Export List, Alarm Management, View Setup and Settings.
Live is real-time preview of the camera. You can manually take screenshots and record videos while on preview screen, switch the stream and electronically zoom in. If device supports 2-way audio, you can turn on the speaker and microphone for remote intercom.
For fisheye device, you can also switch to the Fisheye Mode.
Local Playback is for viewing the video record from the device in local computer. To save the local record, you need to set it in Storage. As long as there’s video record and corresponding information in the database, you can make screenshots, use electronic zoom and export video streams to other formats supported while using playback feature, regardless if the device is online or offline.
iVMS320 Installation and User Guide
Read More : Geovision GV-VMS Setup Guide
Remote Playback is for viewing the video record from the device memory. This function is similar to Local Playback, but the device must be online for Remote Playblack. You can also make screenshots, use electronic zoom and export video streams to other supported formats while using Remote Playback.
E-Map is used to customize the map. Drag the device to the corresponding spot and save it. After saving, you can get real-time preview by double-clicking the device.
The installation file of iVMS320 is a packaged exe. file. Generally, you only need to click “confirm” or “next” to complete the installation. The specific steps are as follows:
® Obtain the installation file of the latest released version. The installation file icon and
naming scheme are shown in Figure 1-2-1.

İVMS320 Setup
9.2.1.5.exe
Figure1-2-1
@ Double-click the file, it will pop up the dialog box “Select Setup Language” as shown in
Figure 1-2-2. The default language is same as your current system. You can click the
drop-down box to select another language for installation.
Select Setup Language | £3 |
Select the language to use during the installation:

Figure 1-2-2
@ After selecting the appropriate installation language, click ”OK”. The Welcome dialog box
will be shown as Figure 1-2-3.
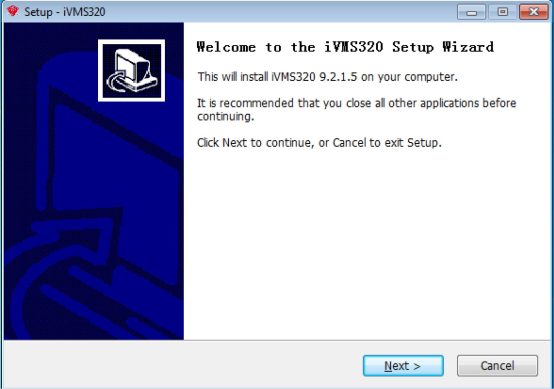
Figure 1-2-3
® Click Next, it will pop out the dialog box “Select Destination Location”. The default install location is on C folder. You can modify the installation path to any other folder, as shown in Figure 1-2-4.
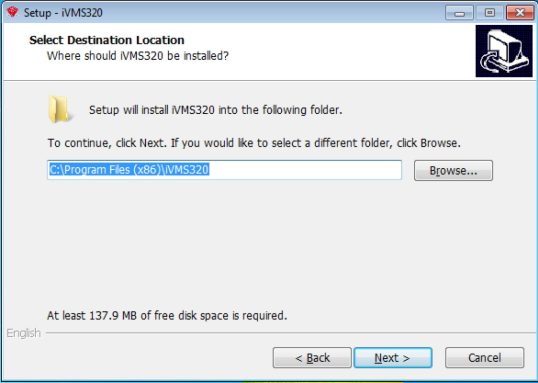
Figure 1-2-4
® Click ”Next”, it will pop out the dialog box “Select Start Menu Folder”. The default name is ”iVMS320” as shown in Figure 1-2-5.
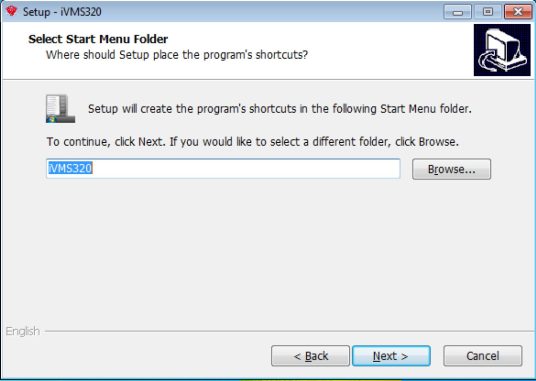
Figure 1-2-5
© Click ”Next”, it will pop out the dialog box “Select Additional Tasks”. You can choose whether to create a desktop icon as shown in Figure 1-2-6.
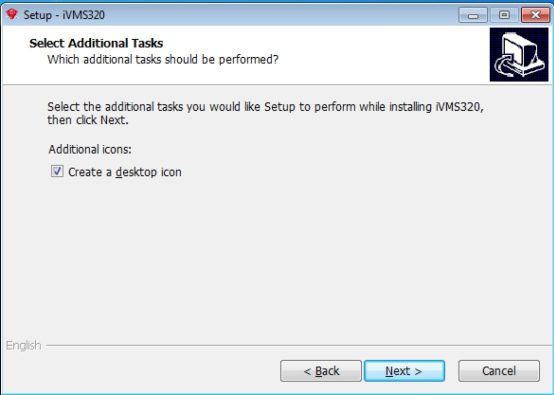
Figure 1-2-6
® Click “Next”, it will pop out the dialog box “Ready to Install” as shown in Figure 1-2-7.
You can check if all your installation settings correct. Click “Back” if you want to review
or change the settings.
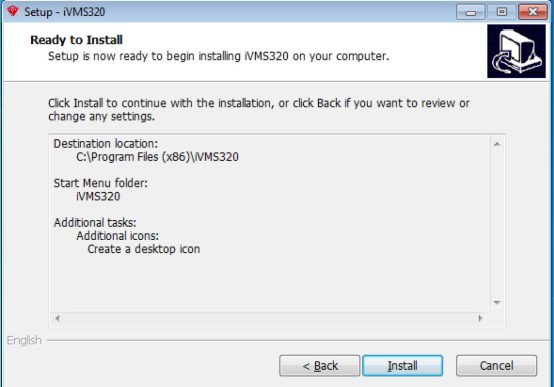
Figure 1-2-7
® After confirming the above settings, click “Install” to continue the installation. It will pop out the dialog box as shown in Figure 1-2-8.
8
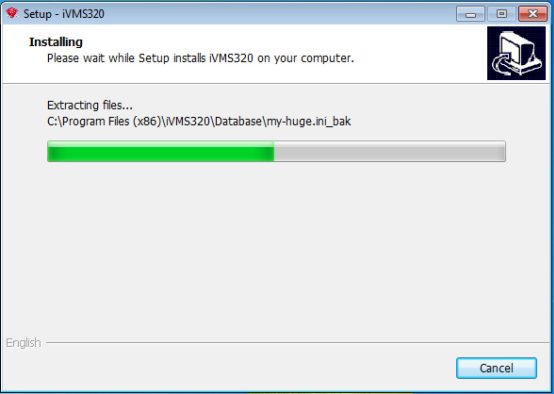
Figure 1-2-8
® After the installation is completed, it will pop out the dialog box as shown in Figure 1-2-9. Click “Finish” and it’s installed successfully.
9
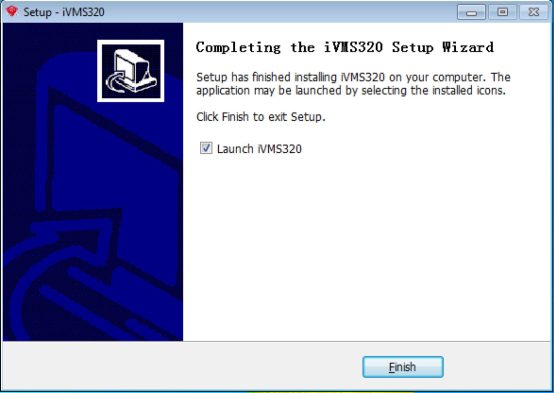
Figure 1-2-9
Shown above is the installation process for İVMS320 on win10 system. In other versions
of the system, there may be slight differences in the style of dialog box, which does not
affect the use. After the installation is successful, a shortcut will be generated on the
desktop (if the default check is not canceled), as shown in Figure 1-2-10.

Figure 1-2-10
You can uninstall iVMS320 by following these steps.
® Open Control Panel\Programs\Programs and Features as shown in Figure 1-3-1. Find
“İVMS320 Uninst” and click “uninstall”.
10
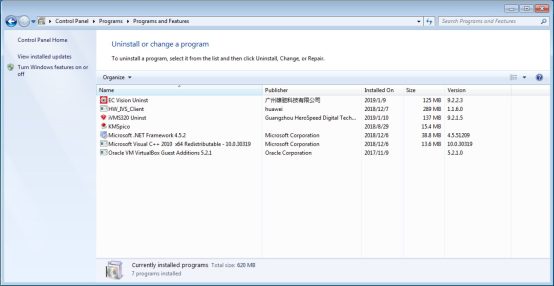
Figure 1-3-1
@ It will pop-up a “uninstall confirmation” dialogue box when uninstalling, as shown in
Figure 1-3-2.
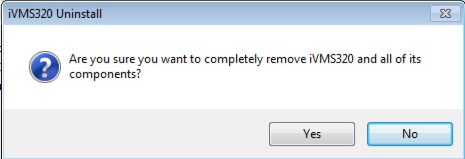
Figure 1-3-2
@ Click “Yes” to start uninstalling iVMS320, A uninstall status dialogue box will pop up, as shown in Figure 1-3-3.
11
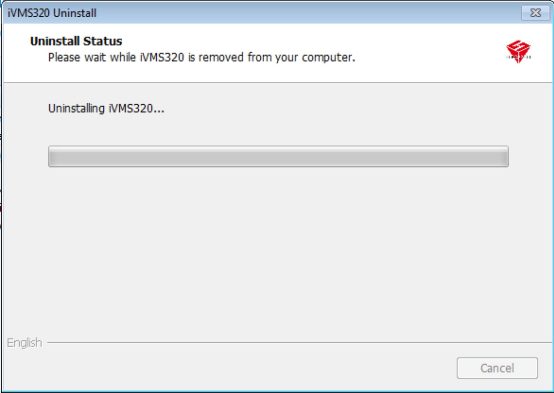
Figure 1-3-3
® After the uninstallation is completed, a success dialog will pop up. Click “OK” to finish the uninstall, as shown in Figure 1-3-4.
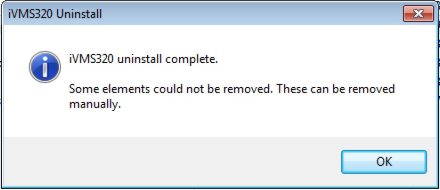
Figure 1-3-4
12
After the installation is complete, you need to create a super user to open İVMS320 for the
first time. The login screen opened for the first time is shown in Figure 1-4-1-1.
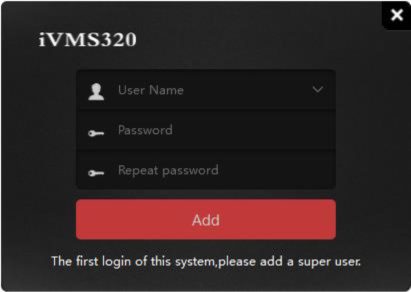
Figure1-4-1-1
The program will automatically enter into main interface after the super administrator user is successfully added. Next, navigate into the “Device Adding” interface. Please refer to the operation instructions for device adding.
Note: The first added user of system is the Super User. The Super User has the highest authority to operate on other users, but they can not delete related configuration information. For safety, we suggest setting a more complicated password for the Super User.
13
Users can be divided into Administrator and Operator based on different access. The
administrator login requires an account with the corresponding authority. Double-click the iVMS320 shortcut on the desktop to open the login page. The normal login page is shown
in Figure 1-4-2-1.
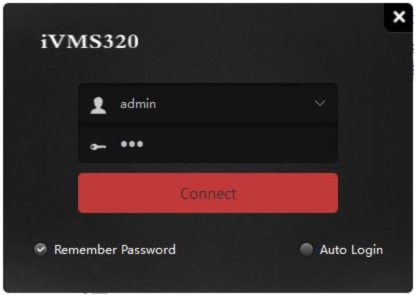
Figure 1-4-2-1
After entering the account password, click the “Connect” button or click the “enter” key to start the login.
14
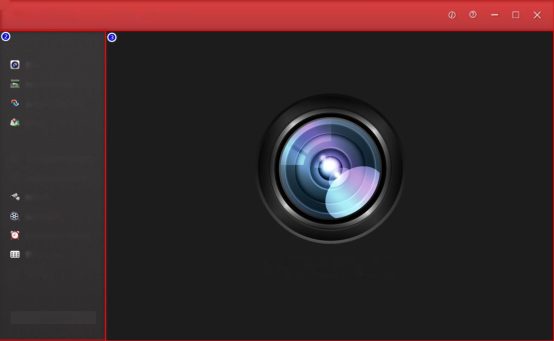
Below will detailedly introduce the functions and instructions of each control in each function interface.
Warm Tips: The program will make the interface back to the one you last opened by
default after logging, it may take a few seconds to restore before interface, and will stay on
the main page. It will stay in the Home Page if it’s opened for the first time, or if you have
not clicked on other functions. The main interface of program is shown in Figure 2-1.
Live
2019/01/10 19:50:30
Local Playback
Remote Playback
EMap
q
Device Management
□
User Management
Storage
Export List
Alarm Management
View Setup
İVMS320
Settings
Logout User
(S
°iVMS320
Figure 2-1
® The title bar includes software logo, real time, help and related, and window control buttons.
@ Menu navigation bar, open button for each function.
@ Function page, you can switch the display content by clicking the button in @.
15
Click the Live Preview button on the left navigation menu to open the live preview
interface. The real-time preview interface consists of several controls, as shown in Figure
2-1-1.
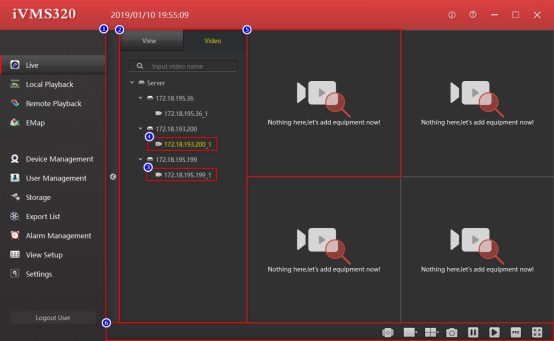
Figure 2-1-1
® View and camera list block expands the collapse button bar, click to collapse or expand the view, camera list.
@ View and camera list block, display added devices and channels or saved views, drag a channel of the device to 5 to play live preview video, click on the view list to switch views.
® Online channel.
® Offline channel.
® Play the window, drag 3 here to preview the device real-time picture.
© Toolbar.
16
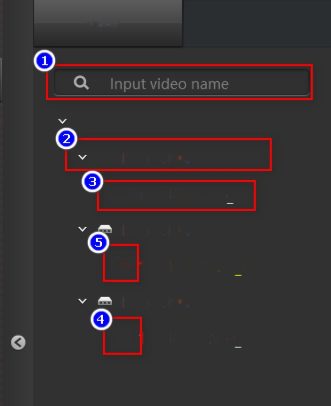
The Device list shows added devices. It will be detailedly introduced in the device
management of subsidiary management function, device list as shown in Figure 2-1-1-1.
View
Video
® Server
<=> 172.18.195.36
• 172.18.195.36 1
172.18.193.200
» 172.18.193.200 1
172.18.195.199
■* 172.18.195.199 1
Figure 2-1-1-1
® Device search box: when there are too many devices, you can quickly find the device by entering the device channel name.
@ Device name.
@ The device channel name, which can be dragged to the Play Window to start a live preview.
® Online mark.
® Offline mark.
17
The view list shows the view saved by the user. Click on the item in the View List to open
that view. If the device channel was added to the View, the live preview will start
simultaneously when the view is opened. The View List and Play Window are shown in
Figure 2-1-2-1.
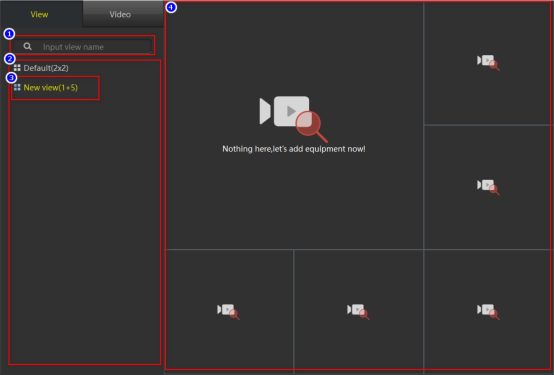
Figure 2-1-2-1
® View search box: when there are too many views, you can quickly find the device by entering the view name here.
@ The view saved by the user.
@ The currently open view.
® Open view effect.
18
The playback window is shown in Figure 2-1-3-1. Under normal conditions, ® the
playback channel title bar is a black background color, and @the display window toolbar is hidden. When the play window is selected, the real play window will have a yellow border, the title bar will change to dark red, indicating that the window is the currently selected window, and some of the function buttons of the toolbar bar need to specify a window, such as a screenshot button. When the mouse is over the play window and the play window has been dragged into the device channel, the toolbar of the play window is
displayed.
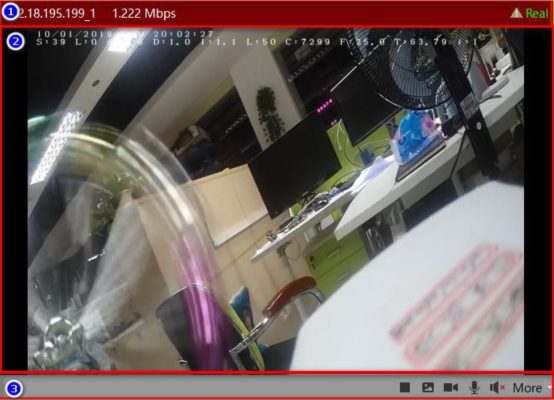
Figure 2-1-3-1
® Title bar of play window: shows the device channel name, code rate and device image status. The Triangle exclamation point indicates that the device has detected an object
19
movement on the screen.
@ Device channel real-time picture.
@ Play window toolbar, several icons as follows: stop/start live preview, screenshots, start/close recording, turn on/off the microphone, turn on/off the speaker and more functions, like switching stream, switching Fisheye mode, and Digital zoom, as shown in Figure 2-1-3-2.
Figure 2-1-3-2
![]()
Figure 2-1-4-1
® Open/close View Polling: The Rolling View is used to automatically and repeatedly open the view which has enabled the rolling settings. The view settings will be detailed in 3.6.
@ Play image size settings with 5 optional settings.
@ View layout settings with 9 optional default empty views.
® The screenshot tool is used to capture the current frame of the currently selected play window, and save it as an image format.
® Stop all play windows.
20
© Play all windows.
® PTZ control. In the security monitoring application, PTZ is shorthand for Pan/Tilt/Zoom, which represents the omnidirectional (left/right/up and down) movement of the pan/tilt and the zoom control of the lens.
® Full-screen display.
The local playback interface layout and live preview interface layout are similar. The
main difference is that the local playback toolbar has more functions, as shown in
Figure 2-2-1. Among them, @ the list fold/unfold button and @ the view device
list are exactly the same as the live preview interface in function and style, so we will
not describe this section in detail.
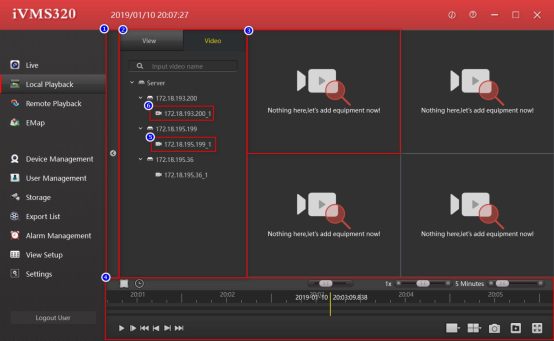
Figure 2-2-1
21
® View, camera list block fold/unfold button bar: click to fold or unfold the view, camera
list.
@ View and camera list block: display added devices and channels or saved views, drag a channel of the device to © to play live preview video. Click on the view list to switch views.
© Play the window, you can drag © to preview the real-time picture of the device.
® Toolbar.
® Online channel.
© Offline channel.
|
|
|
|
Bit stream ► |
✓ Main stream |
|
Fisheye mode ► |
Sub stream |
|
Digital Zoom |
Third stream |
Play window as shown in Figure 2-2-1 -1. Under normal conditions, ® the title bar of the play channel has a black background color. © The toolbar of the play window is hidden. When the play window is selected, a yellow border will show in the play window and the title bar will change to dark red, indicating that the window is the currently selected window. Some of the function buttons on the toolbar bar, such as the screenshot button, need to specify a window. After the play window has been pulled into the device channel, the play window toolbar will be displayed when the mouse moves over the play window.
22
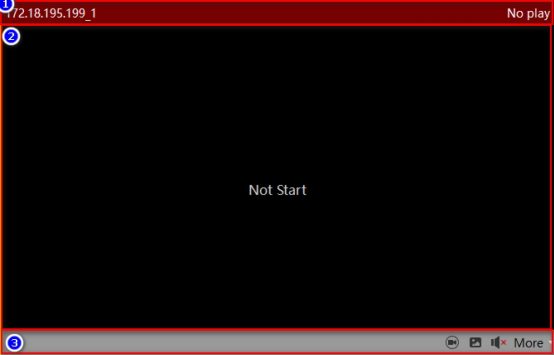
Figure 2-2-1-1
@ Play window title bar, displays the device channel name and code rate.
@ Device channel recording image.
@ Play window toolbar. The functions of the icons are as follows: turn on/off the independent play mode (Put the play controls into the toolbar and open the independent play mode. Some play control buttons and play control progress bars will be put into the play window, as shown in Figure. 2-2-1-2). Snapshot, open/close the speaker, switching bit stream, switching fisheye mode and digital zoom, as shown in Figure 2-1-3-2 in the previous section.
23
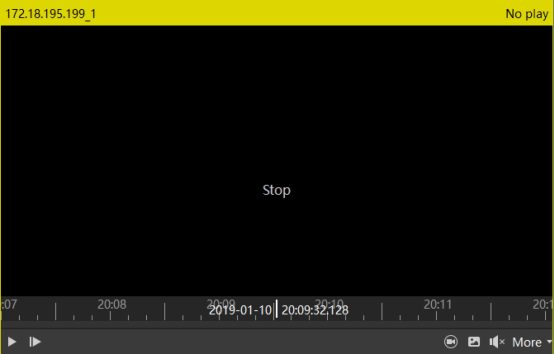
Figure 2-2-1-2
The local playback toolbar is shown in Figure 2-2-2-1.

Figure 2-2-2-1
® Turn on/off the time selection mode. Turn on the time selection mode to select a time
period for loop playback, or click the Export button to export the video of this time period as a normal video file.
@ Open the time selection panel and click on the other area. The time selection panel will be folded.
@ Quickly retrieve videos.
24
® Play speed control bar. The default speed is 1X. Pull left to slow down, and right to fast forward.
© Progress bar, zoom control bar and the left tab shows the time represented by the entire progress bar.
© The progress bar. When the device channel is pulled into the play window, there will be a green thin bar if the channel has recording saved. The time axis above shows the recording time axis of the currently selected window, and the time axis below shows the union of all camera recording time axes in the current view. You can drag the time axis and the window will play the moment where the yellow vertical line is.
® Forward play I stop playback.
© Advance to the next frame.
© Play the first record
® Play the previous record.
© Play the next record.
@ Play the last record.
© Play image size settings with 5 optional settings.
@ View layout settings, with 9 optional default empty views.
© Intercept the current frame of the currently selected play window.
© Export the time period select in ®.
© Play in full screen.
25
The remote playback interface layout and live preview interface are similar to the local playback layout, as shown in Figure 2-3-1. @ play window is basically the same as in
local playback, except not having the independent play function. So this section will not
explain in detail.
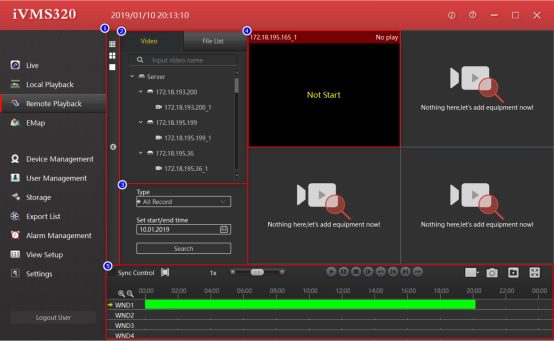
Figure 2-3-1
® View, camera list, search block list fold/unfold button and view style selection button bar, click to fold or unfold the view, camera list or change the view style.
@ View, camera list block, display the added devices and channels or saved views. You can drag the device channel to @ to play real-time preview video. Click the view list to switch the view.
® Video search panel.
26
® Display window.
® Toolbar.
Remote playback searches and displays one day’s recording by default. Select the type of video you want to search (normal, alarm or all), and the search date, then click the search button. If the device channel is online and has video, a green or red bar will be displayed on the timeline of the toolbar. Green represents normal recording and red represents
alarm recording.
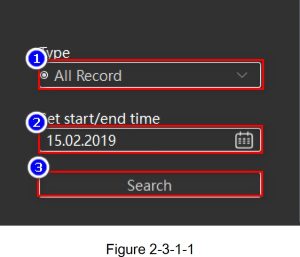
® Video type selection drop down box, can select (all, normal or alarm) recording.
@ Date selection box. Click the calendar icon on the right, a date selection panel
will pop up. Click on any date, the date in the edit box will be updated. Please note
that manually modifying the date in the edit box will not take effect.
@ Start search button.
The remote playback toolbar is shown in Figure 2-3-2-1.
27

® Turn on/off the sync control mode, and turn on the sync control mode to synchronize all playback windows.
@ Turn on/off the time selection mode, turn on the time selection mode to select a time period for loop playback, or click the Export button to export the video of this time period as a normal video file.
© Play speed control bar. The default speed is 1X. Pull left to slow down and right to fast forward.
® Play forward.
® Pause play. Progress bar zoom control bar. The left tab shows the time represented by the entire progress bar.
© Stop play.
® Advance to the next frame.
® Play the first record.
© Play the previous record.
® Play the next record.
© Play the last record.
@ Play image size settings with 5 optional settings.
© Intercept the current frame of the currently selected play window.
28
@ Export the file of the selected time period in @ or the file selected from the file list.
® Play in full screen.
® Zoom in on the timeline.
© Reduce the timeline.
® The currently selected window.
® Recording timeline. When a device channel with saved recording is pulled into the playback window, a thick green or red bar will appear. Move the mouse over it, and a yellow vertical bar will be displayed under the cursor. Click on the area with recording to start playing the video and the yellow vertical bar will move forward as the playback progresses.
The file list is shown in Figure 2-3-3-1. The green video is normal recording and the red is alarm recording.
29
Video
File List
3600
■* 172.18.195.1651 (3600 S 2019/01/10 03:00:00 2019/01/10 04:00:00
■* 172.18.195.165_1 (3600 S 2019/01/10 02:00:00
■*172.18.195.165J (3600 S 2019/01/10 01:00:00 – 2019/01/10 02:00:00
■^72.18.195.165 1
2019/01 /10 00:00:00
2019/Ü1/1Ü 01:00:00
Figure 2-3-3-1
® Channel name.
@ The length of the video recording.
@ Recording start time.
® Recording end time.
® File check box.
The electronic map editing status is shown in Figure 2-4-1, and the display status is shown in Figure 2-4-2. This section mainly introduces the editing status, how to customize a map to view and how to manage the map.
30
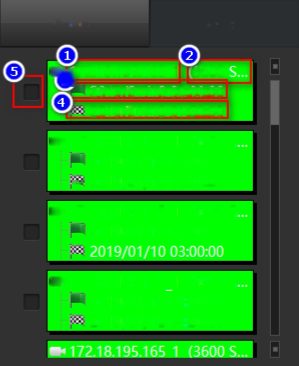
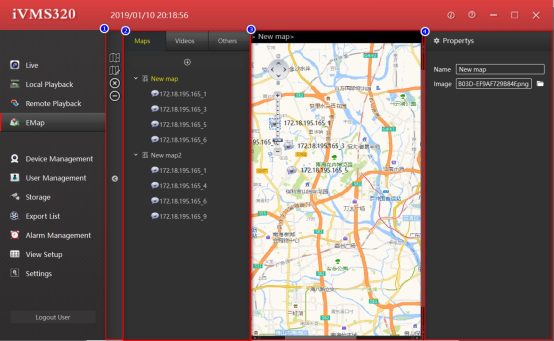
Figure 2-4-1
® Toolbar.
@ Maps, devices, and other listings.
© Map preview area.
® Element attribute editing area.
® Save settings button.
© Cancel button.
31
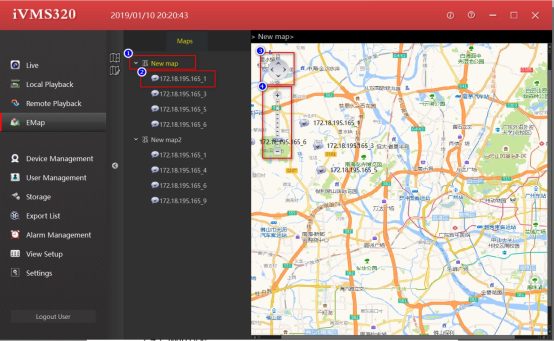
Figure 2-4-2
® Map elements.
@ Node elements.
@ Map move button.
® Map zoom ruler.
® Element node location, double click to preview the live view.
Editable maps list is shown in Figure 2-4-1-1.
32
Maps
Videos
Others
0 172.18.195.165 3
0172.18.195.165 5
0172.18.195.199 1
~ 0172.18.195.165 6
D
v jŞlNew region
J
v JE New map
©« =*
0172.18.195.165 1
Figure 2-4-1-1
® Map elements, first level, drag and drop cameras and the other list elements into the preview map.
@ The node elements, the element s in the camera list will be displayed after being dragged to the preview map.
@ Hot zones and submap elements can be embedded in the map. The other lists will be displayed after being dragged to the preview map.
® The node elements in the submap are displayed after the elements in the camera list are dragged to the preview hot zones.
® Add a new map button.
In the editable state, the map preview is shown in Figure 2-4-2-1.
33
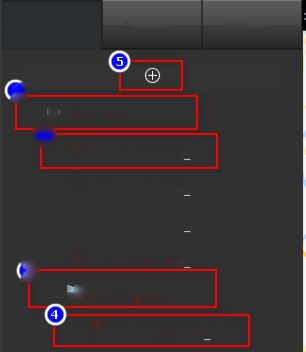
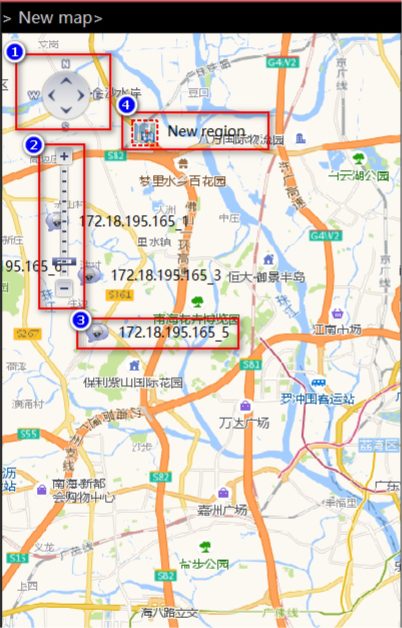
Figure2-4-2-1
® Map move button.
@ Map zoom ruler.
@ Camera element nodes, editable and mobile.
® Hot zone, editable and available to drag, double click to edit.
34
Create a new map node. Click the ® button of the map list; a dialog box for adding a new map will pop up. Enter the name and image path and click Add to create the map.
Add customized map X
Name
Image
![]()
Add Cancel
Figure 2-4-3-1
If needed, you can drag and drop the camera list and other list elements into the preview map. After editing, click the save button of the list to finish the map editing.
35
Chapter 3 Accessibility Propreties
This chapter mainly introduce the applications and usage of these functions.
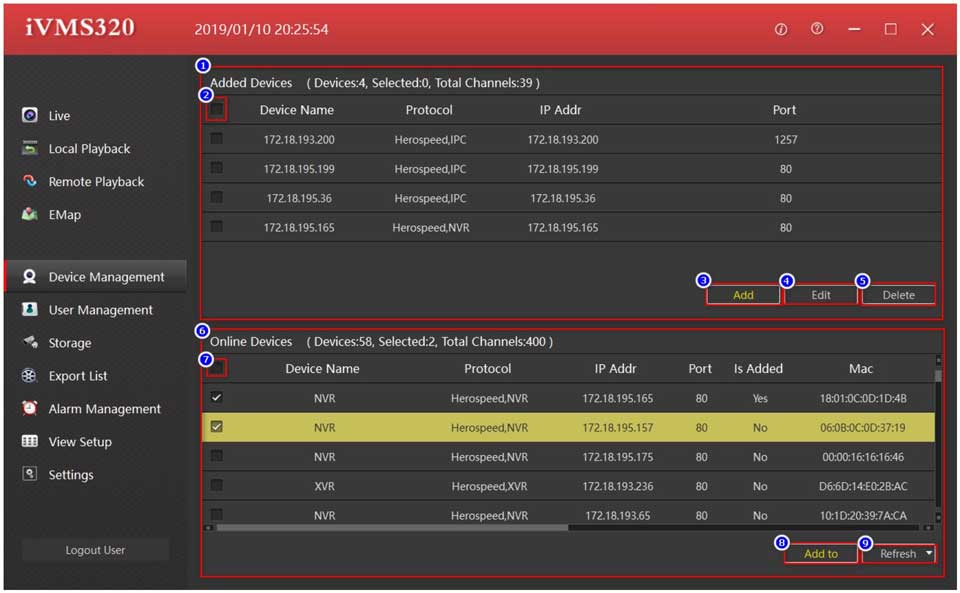
Device management is used to add, delete, modify, and view devices. You can add online
devices with the device serial number, or you can add devices in the LAN through the
channel device IP. The device management page is shown in Figure 3-1-1.
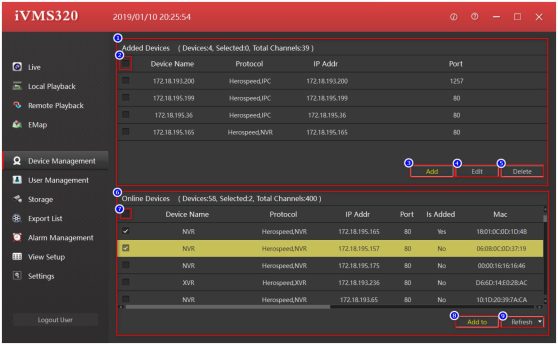
Figure 3-1-1
® Management of the added devices.
@ All check box, you can click Delete button ® after checking in batches, and then delete in batches the information of the added device..
® Add button, click to pop up the Add Device dialog box, you can manually enter the device LAN IP or device serial number to add the device.
36
® To edit the device information, you can click the item in the list of the added device with
the mouse, the selected item is displayed in yellow background, and then click the edit button to pop up the device information editing dialog box.
® Click on the device entry or check the box for the entry and click the Delete button to delete the selected entry.
© For the list of device information in the LAN, you can check the check box in the first column and click Add to button ® and enter the password to add the database.
® Select all check boxes, you can check the devices in the LAN in batches, and then click the Add to button ® to enter the password and add the database.
® Add to the database button, check the device in the LAN and click this button will pop up the Add Device dialog box. Filled in the network parameters of the device in the dialog box, just fill in the user name and password of the device, you can add to the database after the verification.
® Refresh the devices in the LAN.
This dialog box can be popped up by clicking the Add button of the added device list or the Add to button of the LAN device list. The difference is that the latter will automatically populate the checked device network parameters, and only need to supplement the device username and password. Start the next step to verify the device information. The dialog box is shown in Figure 3-1-1-1.
37
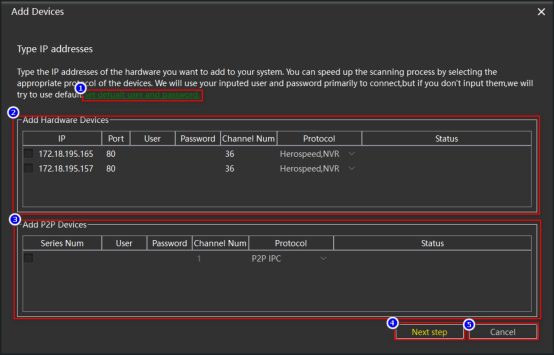
Figure3-1-1-1
® Set the default username and password, the user can set several common usernames and passwords, so that there is no need to fill in the username and password of the device every time you add the device, and directly verify the next step as shown in Figure 3-1-1-2. .
@ Add the device area with IP: the IP, port, channel numbers and protocol will be all filled by default if enter from the list of LAN devices; you need to fill in all of these if add the device area manually.
@ The serial number adds the device area, where all information is manually added by the user.
® Next step verification button, start to verify the added device, if there is verified device, it will become the confirmation add button, click Add to finish adding device.
38
® Cancel add a device to close the Add Device dialog box, the same function as ©.
© Close the Add Device dialog.
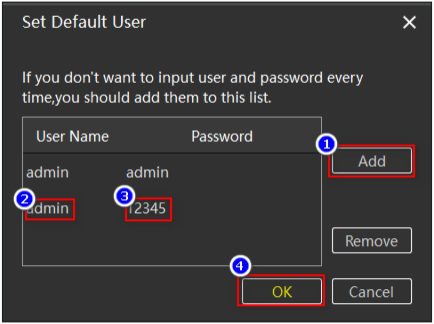
Figure 3-1-1-2
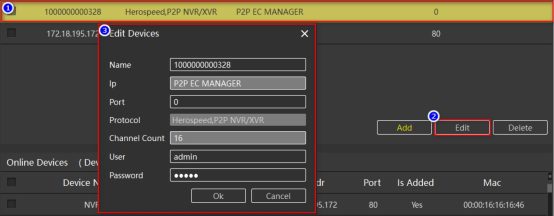
Edit the device information, first select the device to be modified, click the edit button, the
edit device information dialog box will pop up, the gray edit box is not editable, the others
are editable, click the OK button to save the modification. Modify the steps as shown in
Figure 3-1-2-1.
39
Figure 3-1-2-1
User management is used to add, delete, modify, and view users. General users can only
modify their own passwords. Administrators can view and modify their own and operator’s
information, add and delete operator users. Super administrators have all permissions.
The user management page is shown in Figure 3-2-1.
İVMS320
0 Live
Local Playback
5J» Remote Playback
6 EMap
2019/01/15 10:39:04
Q Device Management
□ User Management
Storage
Export List
W Alarm Management
BE View Setup
[$] Settings
Logout User
© © @
Add User | | Edit User | | Delete User |
Figure 3-2-1
® User Information list, click the selected device such as @ with mouse and then click ® to edit users and ® delete users.
@ Select the user item, click ® to edit users and ® delete users.
® Add a new user (the operator does not have this permission), click to pop up the Add User dialog box as shown in Figure 3-2-2.
40
® Edit user information.
® Delete user information.
Click the Add button to pop up the Add User dialog box, as shown in Figure 3-2-1-1.
Editing user is basically the same as adding user. The editing user will have the original
information of the user, and the user name cannot be modified, and will not be described.
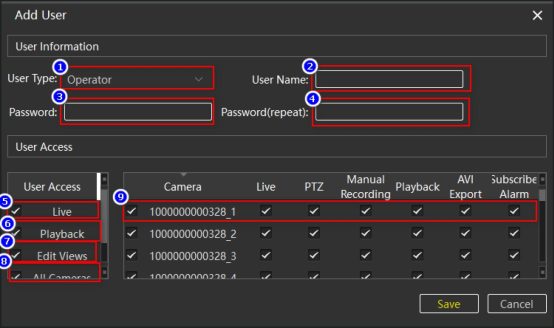
Figure 3-2-2
® The type of user added.
@ username.
© password.
® Repeat the password to avoid the wrong character, Submitted successfully if it is
consistent with @.
© Live permission, if cancelled, the user cannot enter the live preview page.
© Local playback and remote playback permissions, if unchecked, the user can not enter
41
these two pages.
® View management permission. If canceled, the user cannot enter the view management page.
® All Check box in All cameras option, you can select all or cancel all , such as ® and you can select other devices.
® Device channel level permissions.
The storage is used to develop a storage plan for the channel level. Users can set a storage plan for the channel of each device. (The device added with the serial number does not support the storage plan temporarily, the back-end device is the NVR, and the XVR device does not support motion detection.) The setted plan will be only be saved to the local computer; it will not affect the original settings of the device. It will be stored in the C drive by default. If necessary, you can re-select the save path to other drive letters. The storage plan interface is shown in Figure 3-3-1.
42
İVMS320
2019/01/15 10:44:11
Template
0 Live
Local Playback
Template-*
Record On
Schedule
Retention Time
Recording Stream Recording Path
| | WAYS • ~][ 5 |Day ][Mainstream ~][ C:/VMS/Record ]ft
Logout User
Figure 3-3-1
® Template settings, edit the settings here, and then select the checkbox of device channel, such as @, or select all option, such as @. And then click the button of Apply Template to set the channel of selected device to be the same as the template.
@ Select all / cancel all selections.
@ Select the checkbox.
® Optional plan, default selection never.
® Video recording, default always, if ® selected motion detection or video recording, you can choose to edit the plan, click Edit and it will pop up the dialog box for plan editing , as shown in Figure 3-3-2.
43
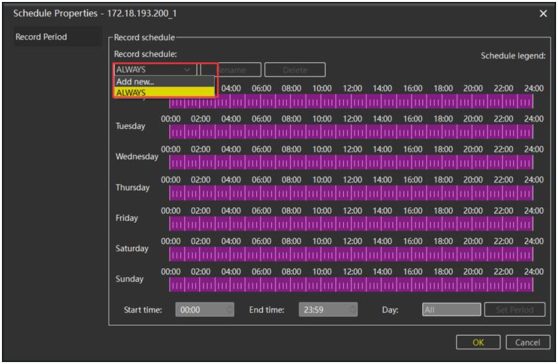
Figure 3-3-2
© The Retention Time for Recording, the input range is 1-365 days.
® The stream setting to save the recording, you can select the main stream, the sub
stream and the third stream.
® The path to the parent folder where the video is saved.
© Apply template, the template setting © is set to the checked device channel.
® Save changes.
The export list is used to view the export task information. All the export tasks are displayed here. The user can cancel the export task in progress, check the cause of the failure, and view saved address for Export successfully. The export list is shown in Figure
44
3-4-1.
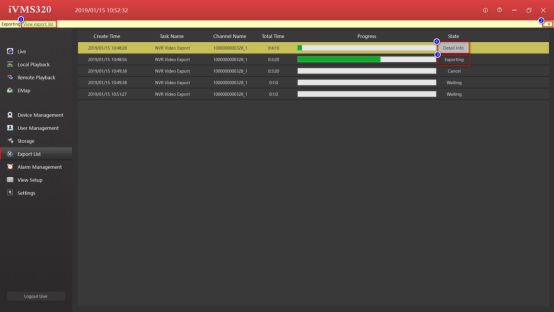
Figure 3-4-1
® Jump to the link to the export list, click to jump to the export list, and then the message
bar automatically closes.
@ Close the message bar.
@ Task status.
® Task details, click to view the cause of the task error or save the address, as shown in
Figure 3-4-2, click on the save address to the path to save video recording.
Detail information
X
State: Download finished
Detail: C:\VMS\export\1000000000328 1 \20190115002711 20190115003031.avi
Figure 3-4-2
45
Alarm management is used to view IPC alarm information. At present, only IPC devices support the alarm function, mainly to detect the movement of objects, when the camera
detects that there is an object moving, it sends out an alarm to the beginning of the action,
and when the action ends, it also gives an alarm, you can select @ to Stop refreshing the
alarm information. The alarm page is shown in Figure 3-5-1.
İVMS320
0 Live
Local Playback
5J» Remote Playback
6 EMap
Q Device Management
□ User Management
Storage
Export List
V Alarm Management
BE View Setup
[$] Settings
Logout User
Figure 3-5-1
® The total number of alarms.
@ Stop/start refreshing the alarm message.
@ Alarm information entry.
View management is used to customize the edit view. Users can select the appropriate
46
image scale and view style to add the device channel to the view, so you can switch to this
view through the view list during live preview or local playback to play the channels you
want, instead of being dragged in one by one, can be dragged into the device channel,
and can also be dragged into the URL, image and Carouseled device. If the Carousel
function is enabled in the view, the Carousel can be turned on in the real-time preview
interface, and cycle switch between these views with Carousel function enabled. More
content in this section and it will be described graphically.
Click the button
![]()
to select the desired view layout type, as shown in Figure 3-6-1.
Figure3-6-1
|
|
|
|
|
Index |
User Name |
Type |
|
©z |
admin |
Super User |
|
a |
|
|
|
003 |
afa |
Administrator |
|
004 |
aha |
Operator |
|
2. |
Remote Playback |
|
|
EMap |
|
Ö |
Device Management |
|
□ |
User Management |
|
|
Storage |
|
®. |
Export List |
|
w |
Alarm Management |
|
ffl |
View Setup |
|
|
Settings |
|
Camera Summary Camera Name |
Record On |
^chedule |
Retention Time |
Recording Stream |
Recording path |
||
|
kx kJ 172.18.195.172 1 ] |
Timer recording | |
ALWAYS |
5 Day |
|
Main stream |
C:/VMS/Record |
|
|
|
|
Always |
|
|
|
|
|
|
|
1000000000328 1 |
Never |
|
5 Day |
|
Main stream |
CyVMS/Record |
|
|
|
|
|
|
|
|
|
|
0 |
1000000000328_2 | |
|
|
5 Day |
|
Main stream |
Cr/VMS/Record |
|
|
172.18.195.172 2 |
Never |
|
5 Day |
|
Main stream |
CyVMS/Record |
|
|
1000000000328 3 |
Never |
|
5 Day |
|
Main stream |
Q/VMS/Record |
|
|
172.18.195.172 3 |
Never |
|
5 Day |
|
Main stream |
Q/VMS/Record |
|
|
1000000000328 4 |
Never |
|
5 Day |
|
Main stream |
CyVMS/Record |
|
172.18.195.172 4 |
Never |
5 Day |
Main stream |
C/VMS/Record |
|
172.18.195.172 5 |
Never |
5 Day |
Main stream |
C/VMS/Record |
|
1000000000328_5 |
Never |
5 Day |
Main stream |
Cr/VMS/Record |
|
|
|
© | Apply Template |
“|@ 7 | [ Save |
Cancel |
|
2019/01/15 10:57:30 |
|
|
© |
© – □ X |
||
|
|
0 |
|
|
|
|
0 |
|
Alarm Num |
|
2 |
|
|
|
Pause Refreshing |
|
ID |
|
Alarm Type |
Alarm Time |
Device |
|
Channel |
|
1 |
|
Motion Detect – Start |
2019-01-15 10:55:58 |
172.18.193.200 |
|
172.18.193.200_1 |
|
|
|
|
|
|
|
|
|
— |
|
Motion Detect – End |
|
|
■ |
|
|
iVMS 320 |
2018/12/2513:50:14 O |
|
|
© |
© |
— |
□ |
X |
|
|
Views Videos |
Others |
|
|
|
|
|
|
|
|
|
|
|
|
|
|
|
|
|
0 Live |
|
|
|
|
|
|
|
|
|
A Local Playback |
:: KvA(2×2) |
|
1×1 |
|
|
|
|
|
|
|
|
4:3 Portrait ► |
2×2 |
|
|
|
|
|
|
0» Remote Playback |
|
16:9 ► |
1+5 |
|
|
|
|
|
|
|
|
16:9 Portrait >| |
|
|
|
|
|
|
|
6 EMap |
|
|
3×2 |
|
|
|
|
|
|
|
|
|
3×3 |
|
|
|
|
|
|
Q Device Management |
|
|
3×4 |
|
|
|
|
|
|
D User Management |
|
|
4×3 |
|
|
|
|
|
|
|
0 |
|
1+12 |
|
|
|
|
|
|
Storage |
|
|
4×4 |
|
|
|
|
|
|
|
|
|
2+18 |
|
|
|
|
|
|
Export List |
|
|
5×5 |
|
|
|
|
|
|
W Alarm Management |
|
|
6×6 6×8 |
|
|
|
|
|
|
SJ View Setup |
|
|
7×7 |
|
|
|
|
|
|
|
|
|
8×6 |
|
|
|
|
|
|
® Settings |
|
|
8×8 |
|
|
|
|
|
|
|
|
|
9×9 |
|
|
|
|
|
|
|
|
|
9×12 |
|
|
|
|
|
|
|
|
|
10×10 |
|
|
|
|
|
|
Logout User |
|
|
12×9 |
|
|
|
|
|
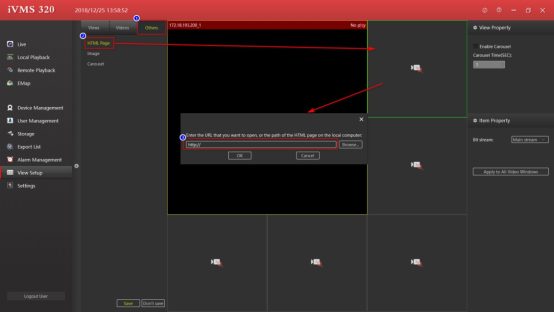
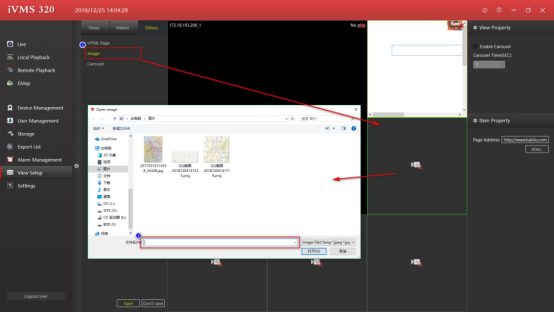
There are 4 types of view content:®Camera,©Image,©HTML page,©Video Carousel, select the view to be edited, as shown in Figure 3-6-1-1.
47
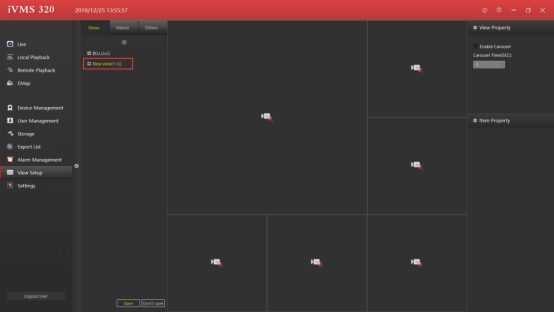
Figure3-6-1-1
® Set the view window to add a video device, select the camera, drag it to the target
window, and complete the device channel addition, as shown in Figure 3-6-1-2.
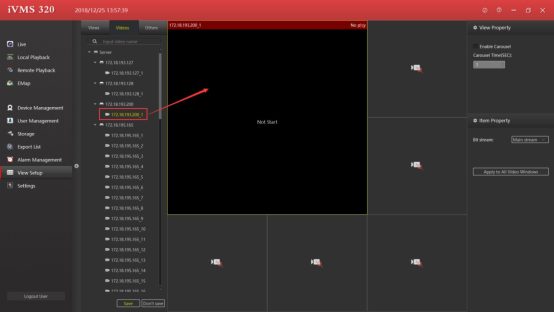
Figure3-6-1-2
@ Set the view window to add a text page
48
Double-click the view to be modified to enter the edit state and modify the view name, as
shown in Figure 3-6-2-1.
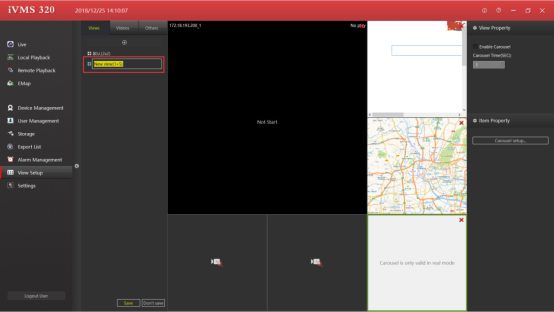
Figure 3-6-2-1
51
Select the view right-click pop-up menu and choose Delete View. Click Delete, as shown
in Figure 3-6-3-1.
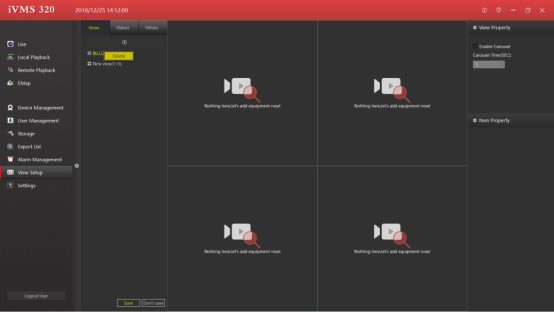
Figure 3-6-3-1
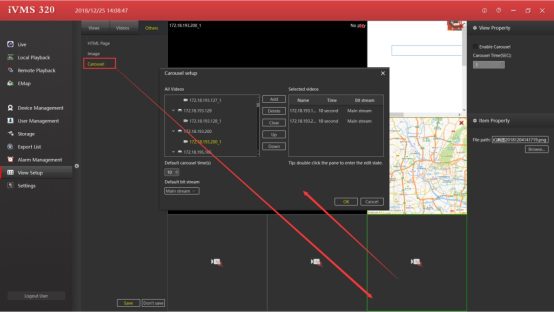
The procedure for setting up carousel for a playback window, shown as Figure 3-6-4-1.
52
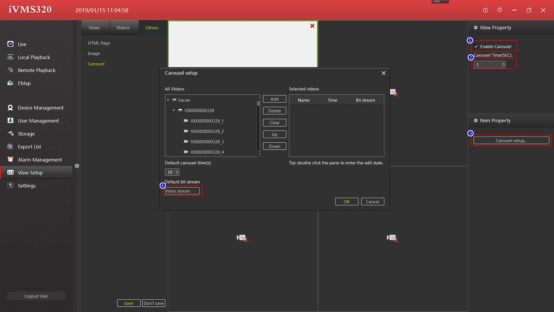
Figure 3-6-4-1
® Select enable carousel.
@ Set up the carousel Time (SEC), which is the time interval for view carousel. The Default carousel Time in the dialog box, which is the time interval for the device channel carousel.
@ Select carousel setup.
® Set the stream of video carousel.
The system settings are used to save the user’s default settings, such as remembering passwords and auto-login, etc. The saved settings are valid only after the software is restarted. The system settings page is shown in Figure 3-7-1.
53
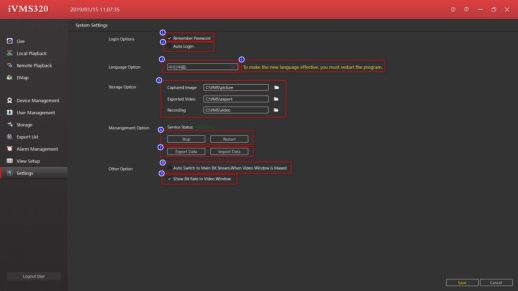
Figure 3-7-1
® Remember password. The next time you log in, the username and password will be automatically filled in.
@ Auto Login, log in directly using the last login username and password.
© Language Option, the software supports multiple languages, you can select the right language. To make the new language effective, you must restart the program, such as ® prompt.
® Modify the software language prompts.
® The save path of the file generated by the software operation
© The button for Service control
® Import and export data from the database, please pay more attention when importing data, after the data is successfully imported, the previous settings will be fully covered.
® As shown on the label: “Auto Switch to Main Bit Stream, When Video Window is Maxed “.
© As shown on the label: “Show Bit Rate in Video Window “.
54
