iSpy Software User Guide, iSpy is the world’s most popular open source video surveillance application. It’s compatible with the the vast majority of consumer webcams and IP cameras. With more than 2 million users worldwide, iSpy works with more cameras and devices than anything else on the market.
Using iSpy you can do pretty much anything, from protecting your business and home with realtime SMS and Twitter alerts to scanning the skies for UFOs, nanny cams, machinery monitoring, neighbourhood watch, iSpy does it all! The best thing about iSpy though is that it’s open source and can therefore leverage some of the best open source libraries around representing literally millions of man hours of work – code that isn’t available to proprietary developers. No wonder iSpy is the most popular and downloaded home and business security and surveillance application in the world! It’s not just us saying that – check out our feedback.
This manual is a detailed guide to how iSpy works, what it can do and how you can get the most out of it. New software can seem daunting at first so we’ve put a lot of effort in to cover the most common scenarios along with comprehensive coverage of every feature of the software. iSpy has been designed to be easy to use although that simplicity belies the complexity under the hood – iSpy is capable of much more than just motion detection!
Throughout this guide we assume you have an iSpyConnect subscription and so have access to remote services, alerts, remote commands and the full feature set of the web side of iSpy. Without an online services subscription you are missing out on a large part of the functionality available within iSpy and iSpyConnect. Choose a subscription.
Supported Operating Systems
iSpy currently works on Windows based PCs only (both x86 and 64 bit versions). iSpy has been tested on Windows 7, 8 and 10 but may work on other Windows variants that support the .Net v4 Framework.
Recommended Hardware
Hardware recommendations vary a lot depending on how many cameras and microphones you are going to be using at any given time. A modern PC with 2GB of RAM and 200 GB of free hard disk space should be more than capable of running 4 cameras simultaneously at 320 x 240 resolution.
Performance Tips
iSpy will let you add an unlimited number of cameras and microphones – right up to the point where your computer cannot cope and will crash. Keep an eye on the performance counters on the status bar of iSpy as they will tell you when you are running out of memory or CPU. Note that CPU can spike when recording video and encoding. There are a number of things you can do to squeeze better performance out of iSpy:
You can also set a maximum CPU target value in settings. By default this is set to 90%. This means that when your CPU usage goes over 90% iSpy will start reducing the framerates of your cameras to help protect against a crash. Once the CPU drops back below 90% iSpy will increase the framerates again. Common causes for this are multiple simultaneous recordings or scheduled tasks like disk defragmenting.
Of course the better the hardware the better results you will get from iSpy. Using iSpyConnect you can connect multiple computers to one online account with a web based management interface that allows iSpy to scale up to any number of monitored cameras and microphones. A few of our users are monitoring over 150 cameras simultaneously via iSpyConnect. To work with multiple computers you must assign each computer a different external port address. See Multiple Computers for more information.
Agent DVR USER Guide
About
Agent DVR is a standalone replacement for iSpy that runs as a service, uses less CPU and features a web user interface that is accessible from anywhere with no port forwarding required!
We recommend that you use either iSpy or Agent – you can use both but it may cause issues with device drivers and network access.
Tip: Click the Menu button above to show/ hide the userguide index.
Using Agent DVR
Agent does not have a windows forms user interface like iSpy does. The user interface is all browser based via the local portal, web portal or mobile applications
Agent runs it’s own webserver. By default this is running at http://localhost:8090 on the PC running Agent (although it may be using a different port if that wasn’t available or was changed when it was installed – see the link “Agent UI” on the desktop on Windows). Agent will also work over your local network – you can use private IP addresses or computer names to access Agent locally (examples: http://192.168.1.10:8090 or http://nvr:8090). You may need to open your firewall to Agent for your local network.
Getting Started
Once you have the local UI open you can start adding devices to Agent. To add your first device click on the red Edit button in the UI:
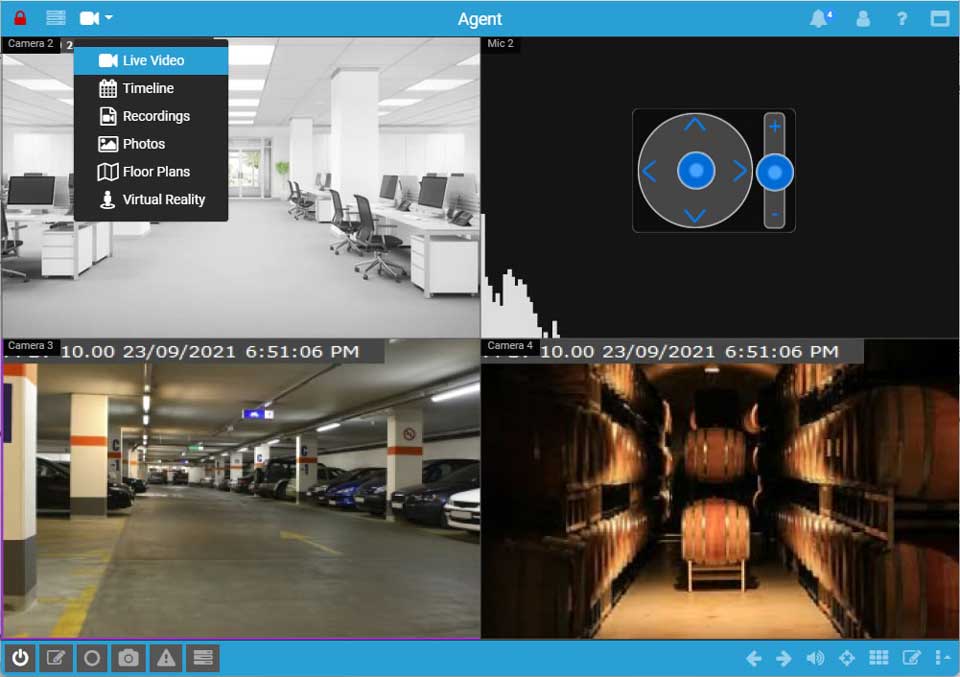
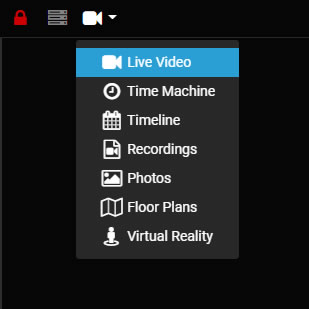
You can use the top left menu to navigate Agent’s interfaces. The padlock indicates whether Agent is armed or not (will generate alerts). Click it to toggle. A green unlocked padlock means it’s disarmed. The icon opens a menu to configure your Agent server settings. The menu next to that provides links to all the content views in Agent. The icon will change depending on which view you are currently working with.
Agent has help built into it – click on the “?” icon at top right of nearly all panels and menus to access contextual help.
Tip: Enable shortcut keys in Account menu – Theme Settings. “C” opens the Commands menu, “S” opens the server menu. Numeric digits open the various views. Enable Tool-Tips and mouse-over the bottom controls in the UI to show additional shortcut keys.
Any issues? First thing to check is the logs at /logs.html on the local server. That will give you details about any problems Agent is having. If that doesn’t help please feel free to jump onto our Reddit group and ask a question – include the logs and steps to reproduce the problem if possible.
Pro Tip: Watch a video to learn how to add cameras into Agent DVR with the wizard. Be sure to read the Performance Tips to get the most out of your system.
Supported Languages
The Agent DVR application has been translated into English, Arabic, Bengali, Czech, Danish, German, Spanish, Finnish, French, Hindi, Italian, Japanese, Dutch, Polish, Portugese, Russian, Swedish, Mandarin and Taiwanese.
To change the language, click on Account – Language.
Installing
Download Agent DVR from here and run the installer. Agent runs as a service or as a console application on Windows 7+, Linux X64 (tested with Ubuntu 18.04+), OSX (+M1), Arm and Arm64 based operating systems (like Raspberry Pi).
Follow the setup instructions for your operating system on the download page
Once Agent is running, you can access it via most web browsers at http://localhost:8090
Installing (offline/ manual) on Windows
If for some reason you can’t use the installer from the download page (eg: no internet on the target device) then you can install AgentDVR on Windows offline instead. Note that the computer you install Agent DVR on will need to have network hardware installed and active for it to be able to start the server. Follow these steps:
Updating
Before updating Agent make sure you backup your configuration – either copy the files in Agent/Media/XML or export them via the web interface via server menu – backup/ restore.
You can check the update log for update inforrmation
If you have a business license or a subscription you can update Agent by clicking on the server menu and “Update Agent” at the top (will only display if an update is available).
To update Agent for Linux or OSX manually see the update instructions on the readme page of the install scripts
To update Agent for Windows manually just re-run the installer from the download page.
Uninstalling
If you installed Agent using the installer it will be in the add/ remove programs list on Windows. Use that to uninstall it. If it’s not there:
If Agent is running as a service then stop the service:
sudo systemctl stop AgentDVR.service
sudo systemctl disable AgentDVR.service
sudo launchctl unload -w /Library/LaunchDaemons/com.ispy.agent.dvr.plist
sudo rm -f /Library/LaunchDaemons/com.ispy.agent.dvr.plist
To remove the Agent DVR files just delete the Agent directory. By default Agent DVR is installed to C:\Program Files\Agent on Windows. On Linux/ OSX it will be installed wherever you ran the install script.
Troubleshooting Install
See offline install instructions for Agent DVR on Windows.
If the installer on Windows fails to complete and Agent doesn’t start or you are having issues accessing Agent or you need to use functionality that isn’t available when running as a windows service (like some GPU drivers and desktop monitoring) then you can run Agent from a command prompt:
Agent will then tell you if there are any problems starting and what local port it is running on. You can quit Agent at any time by pressing the enter key. When Agent is running in the console it is able to use more GPU devices and can record from the Desktop.
If you get an error like The type initializer for ‘Emgu.CV.Cuda.CudaInvoke’ threw an exception. on Windows you will need to install the Windows Media Feature Pack for your OS
If there is an anti virus app or firewall blocking Agent from listening on a local port then you may need to add Agent.exe to a safe list or open the port it is listening on in the local firewall.
If you are using a Windows N variant you will need to install the media feature pack for Windows N
On OSX, Linux and Raspberry Pi your system may not have some required libraries installed and Agent may fail to start with an error like libcvextern.so could not be found. You will need to use ldd or “objdump -r –dylibs-used /path/to/failed/library” on OSX to find which libraries are missing. To do this, open a terminal window, change to the Agent directory and run ldd libcvextern.so (or whatever library is causing issues). The output should tell you which dependencies need to be installed. Please let us know what’s needed and what operating system you are using so we can update our docs.
Corrupted Video / Playback Issues
Agent defaults to using UDP to connect to cameras. UDP is a fast network protocol which prioritises real-time, low delay video. Unfortunately UDP doesn’t have any error correction built into it so any electronic noise from faulty cabling to interference from power cables, amplifiers or other sources can result in corrupted video by the time the signal gets to Agent. You can switch to TCP instead which does have error correction built into it – but at the cost of some buffering and potential lag on the live feed. To switch to TCP instead, edit the camera, click to edit the Source on the General tab, select “FFMPEG” in the menu at top right and change the RTSP mode to TCP.
If you can’t get a good connection other options to try are available under General – Edit Source Type:
Corrupted video can result from too much noise on the network or when your computer is under too much load to decode the live video stream. Other ways to avoid it are to use a lower resolution video feed from the camera or to check the Resize option on the Adjustments tab when editing the camera.
Reolink Cameras are known to be susceptible to corrupted RTSP streams. You may get better results by going into the camera’s own User Interface and setting the encoder to use H264 instead of H265 (if available). Reolink cameras sometimes have alternate video endpoints that use the RTMP:// protocol instead of RTSP://. You can try using the Add Camera wizard in Agent DVR to scan the camera for RTMP:// options instead.
Stuttering Video? Some cameras (notably Reolink) emit frames in groups of audio and video which can result in stuttering live and recorded playback. To work around this, edit the camera, click to configure the videosource settings, select the FFMPEG tab and set a value for Max Delay (for example 4 seconds) and a value for Max Reorder Queue Size (for example 500).
Accessing Logs
Agent provides formatted live logs on the local server at /logs.html (so on a default install at http://localhost:8090/logs.html). As of version 3.5.6.0+ Agent also saves the 5 most recent raw logs in .json format to your Media location (on Windows that’s C:\Program Files\Agent\Media). You can use these for debugging and getting more information on what Agent is doing. You can also download the raw logs remotely via the server menu in the web portal. Feel free to jump on our Community boards to ask questions!
Upgrading from iSpy
Moving to a new Computer
Windows
Linux
sudo systemctl stop AgentDVR.service
sudo systemctl disable AgentDVR.service
sudo systemctl stop AgentDVR.service
sudo systemctl start AgentDVR.service
OSX
sudo launchctl unload -w /Library/LaunchDaemons/com.ispy.agent.dvr.plist
sudo rm -f /Library/LaunchDaemons/com.ispy.agent.dvr.plist
sudo launchctl unload -w /Library/LaunchDaemons/com.ispy.agent.dvr.plist
sudo launchctl load -w /Library/LaunchDaemons/com.ispy.agent.dvr.plist
Important
If you have a subscription you will now need to connect the new instance to your account – click on the Server icon in the local UI and Remote Access to pair it with your online account.
If you have a business license you will need to copy the license code to the new PC. See your license receipt email for instructions.
If you have a basic subscription and have 2 instances of Agent connected to your account only one will be visible on the web portal – you will need to stop the first one for the other to connect successfully.
If you had setup drives and storage directories on your old PC you will need to go into settings on the new PC and configure the storage settings for your new environment
Remove an instance from my account
You can either just uninstall Agent or if you want to keep it running just not connected to your account then:
Windows: click Start – Run – Type “services.msc” Find Agent in the list, right click -> click stop.
Linux: open a terminal window and run sudo systemctl stop AgentDVR.service
OSX: open a terminal window and run sudo launchctl unload -w /Library/LaunchDaemons/com.ispy.agent.dvr.plist
Windows: click Start – Run – Type “services.msc” Find Agent in the list, right click -> click start.
Linux: open a terminal window and run sudo systemctl start AgentDVR.service
OSX: open a terminal window and run sudo launchctl load -w /Library/LaunchDaemons/com.ispy.agent.dvr.plist
Using Claim Codes
99% of the time you won’t need a claim code – they’re only used if you have installed Agent DVR on an operating system without a GUI and have retrieved a claim code by using the command line options. To connect your server to website services you just need to click on the server icon in the local Agent DVR UI and Remote Access. This will pass through the code to the website automatically.
Move instance to another account
Reset local login
If you’ve forgotten your login for local Agent DVR you can reset it (back to no login):
Windows: click Start – Run – Type “services.msc” Find Agent in the list, right click -> click stop.
Linux: open a terminal window and run sudo systemctl stop AgentDVR.service
OSX: open a terminal window and run sudo launchctl unload -w /Library/LaunchDaemons/com.ispy.agent.dvr.plist
chmod +x agent-reset-local-login.sh
).
Windows: click Start – Run – Type “services.msc” Find Agent in the list, right click -> click start.
Linux: open a terminal window and run sudo systemctl start AgentDVR.service
OSX: open a terminal window and run sudo launchctl load -w /Library/LaunchDaemons/com.ispy.agent.dvr.plist
Remote Access
Agent DVR uses WebRTC to setup remote connections so doesn’t require any port forwarding setup and will work even over mobile internet connections. To connect remotely you will need to pair Agent with your iSpyConnect account. To do this, click on the server icon in the local web interface and “Remote Access”. You’ll be redirected to the online portal.
Important: You do not need to install Agent DVR on other computers or setup port forwarding for remote access. Just open up a web browser on any device at https://www.ispyconnect.com/app once Agent is connected. Remote access to Agent is a subscription service.
Subscription not applied?: Usually payment notifications come through immediately and you are good to go – but sometimes it can take a few days for things to clear. With Agent DVR you don’t need a license code so no need to waiit for one to appear in your inbox – it’s all automatically done on our side.
If your trial had ended before you subscribed you will need to use the local UI of Agent DVR and click on the server icon and Remote Access button. This will tell Agent to reconnect to your account.
Is Agent is connecting with the same account you have upgraded? If it isn’t you will need to change it to link with the right account Any problems? Please Contact Us
No UI?: If you have downloaded Agent DVR to a VPS or a PC with no graphical UI you can still setup Agent for remote access by calling “Agent.exe register” on Windows or “agent-register.sh” on Linux/ OSX. This will give you a claim code you can use to access Agent from another PC.
Can’t connect?: In rare instances a connection may fail due to content filtering on a VPN connection. You’ll need to add exceptions in your content filtering software for *.ispyconnect.com and *.azurewebsites.net
Why use the website?: Agent uses webrtc for media connections which gets around most firewalls and port forwarding issues. On your local network your web browser can connect directly to Agent but for remote access web browsers can require SSL connections, STUN, TURN and relay servers for connection establishment which we provide via ispyconnect.com
Port Forwarding Access
Port forwarding is disabled with the free version of Agent DVR. To enable port forward access you will need to purchase a license. Note that port forward access isn’t guaranteed to work as some networks and firewalls will block the traffic that webrtc needs to establish a connection. If you have issues accessing Agent via port forwarding check that your firewall is not blocking the application and you have forwarded the following ports (both in and out) and unblocked them from any firewall or antivirus:
See SSL for instructions on setting up SSL connections.
LAN Access
To access Agent over your LAN you may need to open up several ports in your firewall/ antivirus as Agent uses Web RTC for connections:
To secure LAN access setup a login under Server Settings – Users. If you forget this password you can reset it by stopping Agent and calling “Agent.exe reset-local-login” on Windows or “agent-reset-local-login.sh” on OSX and Linux.
Some browser extensions can also block access so if you have issues connecting locally try a different browser (Safari, Chrome, Firefox and the latest version of Edge should all work). Also try disabling any extensions and clearing your cache.
Passing in Parameters
You can add parameters to the url of the Agent DVR UI to customize it:
Set default theme options (theme options are available in the account menu – theme settings):
Auto play audio on load (v3.7.7.0+ may also require changing browser settings):
Start in minimised mode (top and bottom UI bars hidden) (v3.8.7.0+):
Pass in local username and password for auto login (v4.7.6.0+) (caution – this will expose your credentials to the network):
Start on a specific view and select a device (v4.9.8.0+)
Adding Cameras
Click on the Server icon at the top left of the Agent UI and “Add Device” under Devices. Or in Live View click on the Edit icon at the bottom right and “Add New Device”
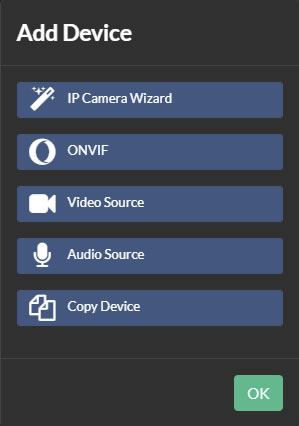
Choose from the available list. To start the wizard, which walks you through discovering devices on the local network and uses the Agent camera database to connect to your camera click on “IP Camera Wizard”. If you have an ONVIF compatible camera click on “ONVIF”. If you have an RTSP or MJPEG or other URL already for your camera click on Video Source or if you are adding an audio source like a local USB microphone or other network audio source click on “Audio Source”.
Configuration
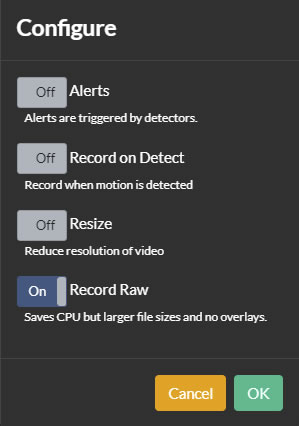
The second step when adding a new device is to setup some basic features. If you check “Alerts” Agent will setup your camera with a simple motion detector so it’s ready to raise Alert events. To record when Agent detects motion check the “Record on Detect” option. If you have a high resolution camera you can check “Resize” to reduce the resolution of it and save some CPU usage. “Record Raw” means that Agent will record the stream directly from the camera to disk without encoding it which can dramatically reduce resource usage. Raw Record is only available for network video sources (not USB cameras or other local devices like Desktop streams). All of these options can be edited later.
Using the Wizard
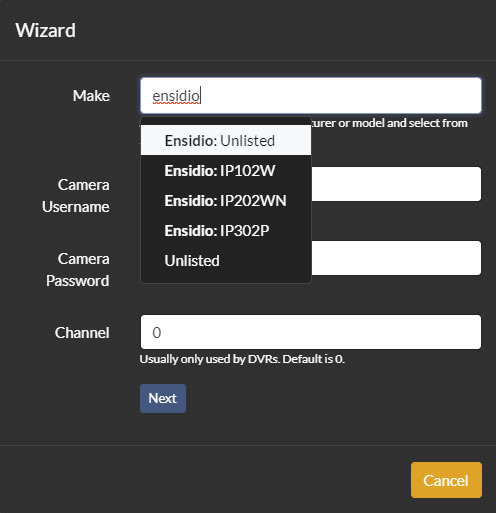
Start by typing the name of your camera manufacturer. Agent will provide suggestions. Click on a suggestion to select it. If your manufacturer isn’t known or isn’t listed you can choose “Unlisted” or if the model isn’t listed you can choose <Manufacturer>: Unlisted. Agent will use this to narrow down the addresses it will try to get a video connection (using just Unlisted may take a while as Agent has a database of tens of thousands of cameras).
Next enter your camera username and password. These should be the details you enter into the web or app interface to login to your camera (not your iSpyConnect.com login details!)
Enter the Channel (usually 0 for IP cameras but if you have a DVR with multiple cameras attached to it this might be a different number)
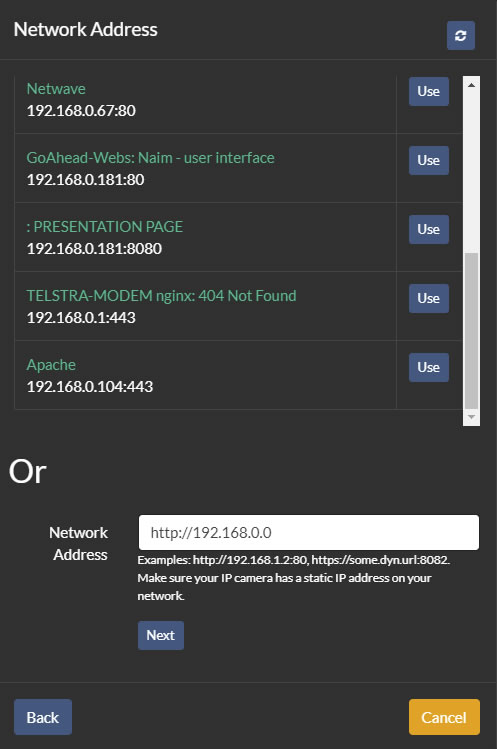
Next you will need to find or enter the Network Address of your camera. Agent can discover local addresses automatically. There’s usually not a lot of information available about the devices from the network scan unfortunately so this might take a bit of trial and error. Click on the Device name to open the address up in a web browser (if you’re on the same network Agent is running on) and if it’s your IP camera click “Use” next to it. Alternatively you can enter your network address manually. This should be formatted like http://IP-ADDRESS:PORT or https://WEB-ADDRESS:PORT if you are adding a camera from an internet address. Click the icon to make Agent re-scan your network for devices.
Tip: It’s important to setup your IP cameras with static IP addresses on your local network. If the IP address changes then Agent won’t be able to connect to it. You can usually do this via your router configuration. There’s a good guide for this here
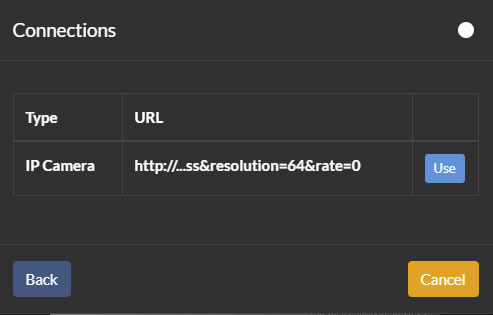
When you have selected an address Agent will use the information you provided to scan the camera for available video endpoints. The ones it finds are provided in a list. Click “Use” to select it and finish adding the camera.
Tip: Try to choose an IP Camera option (instead of MJPEG or JPEG). IP Camera options frequently have audio and better framerates.
If nothing is found double check the details you entered are correct. You may need to contact the manufacturer and ask them how to connect directly to their camera video streams and then add a device using “Video Source” and manually configure the video stream URL instead of using the Wizard, or if it supports ONVIF then add it as an ONVIF device instead.
Live View
The live view is where you watch live streams from your devices. You can setup multiple live views in Agent and add whatever devices you like to them. Agent will intelligently arrange your devices to maximise the available space on whatever device you are using.
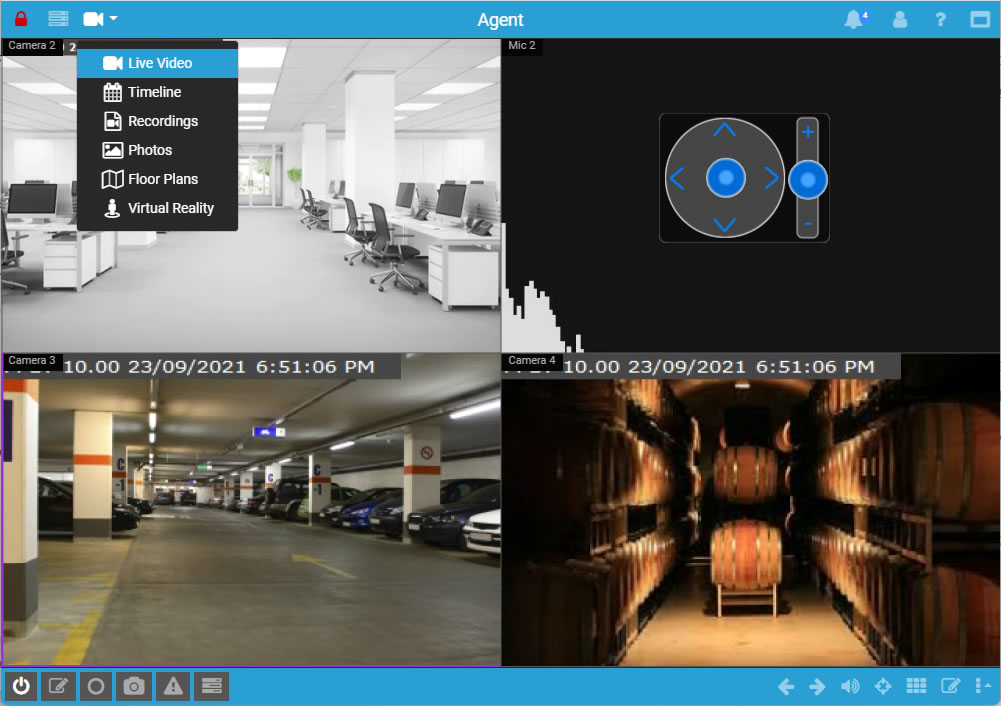
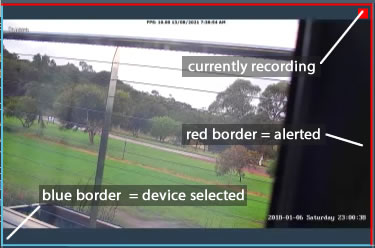
Panel markers
The live view has some markers to provide device state and recording status:
Buttons/ Icons
The live view has icons along the bottom for controlling the selected device and the view itself. Buttons on the left control the current active device in the UI and on the right control the current View. The buttons on the left can change depending on what type of device is selected and what state it is currently in. Mouse-over the buttons to see a tool-tip explaining what they do and optional shortcut keys.
Buttons you may see in the device (left) section include:
Buttons you may see in the view (right) section include:
Using Views

Click the views icon at bottom right to open the views menu. Each view shows a preview of the layout that is associated with it. Click on a view button to switch to that view. If you set Cycle to a non-zero number like 3, Agent will automatically cycle through any views containing devices every 3 seconds. Default View sets the view that Agent first displays when you open the browser.
To edit the view (add devices to the view, rename, change layout etc) click on the edit icon at bottom right.
To manually cycle through configured views from the live screen use the and controls (note: these will only show views you have added devices to)
See layouts for more information on using and customising layouts.
Using the PTZ Controller
Click on the icon to show/ hide the PTZ controller. Click on a device in the live view to select it and then you can use the PTZ controller to control it. Make sure you have configured PTZ on the device – edit the device and see See PTZ.
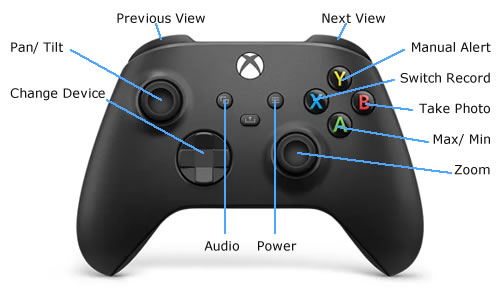
Gamepad/ Joystick control:
As of v3.9.7.0+ Agent supports PTZ via gamepad controls:
Tips:
