Installing DW Spectrum (Windows)
Creating A New System
DW Spectrum is composed of two parts:
- DW Spectrum® Media Server – the Media Server is Spectrum. The media server is responsible for the recording, contains the database information of your added cameras and user profiles, and is arguably the most important aspect of the DW Spectrum IPVMS platform. The Media Server is supposed to be installed on a computer that will be acting as your server. If you have a DW Blackjack server, this software is already installed.
- DW Spectrum® Client – the Client software provides the graphical interface with which users may utilize to interact with the Media Server and allows users to see what the Media Server is doing. Some features include allowing users to configure settings, view live and recorded video, and manage device connections. The Client is helpful for accessing the Media Server, but is not required to remain running for the Media Server to do its job. Instead, it is recommended that users install the DW Spectrum Client software on a separate computer from the DW Spectrum Media Server computer to save on processing.
These two portions of DW Spectrum IPVMS coordinate to comprise a System. A System can refer to a group of merged servers or to a single server.
This article will explain how to install DW Spectrum IPVMS, create a new server, create a new System, and how to change the System name and password.
Supported/Affected Devices
- DW Blackjack® Server Series
Installing DW Spectrum on Windows
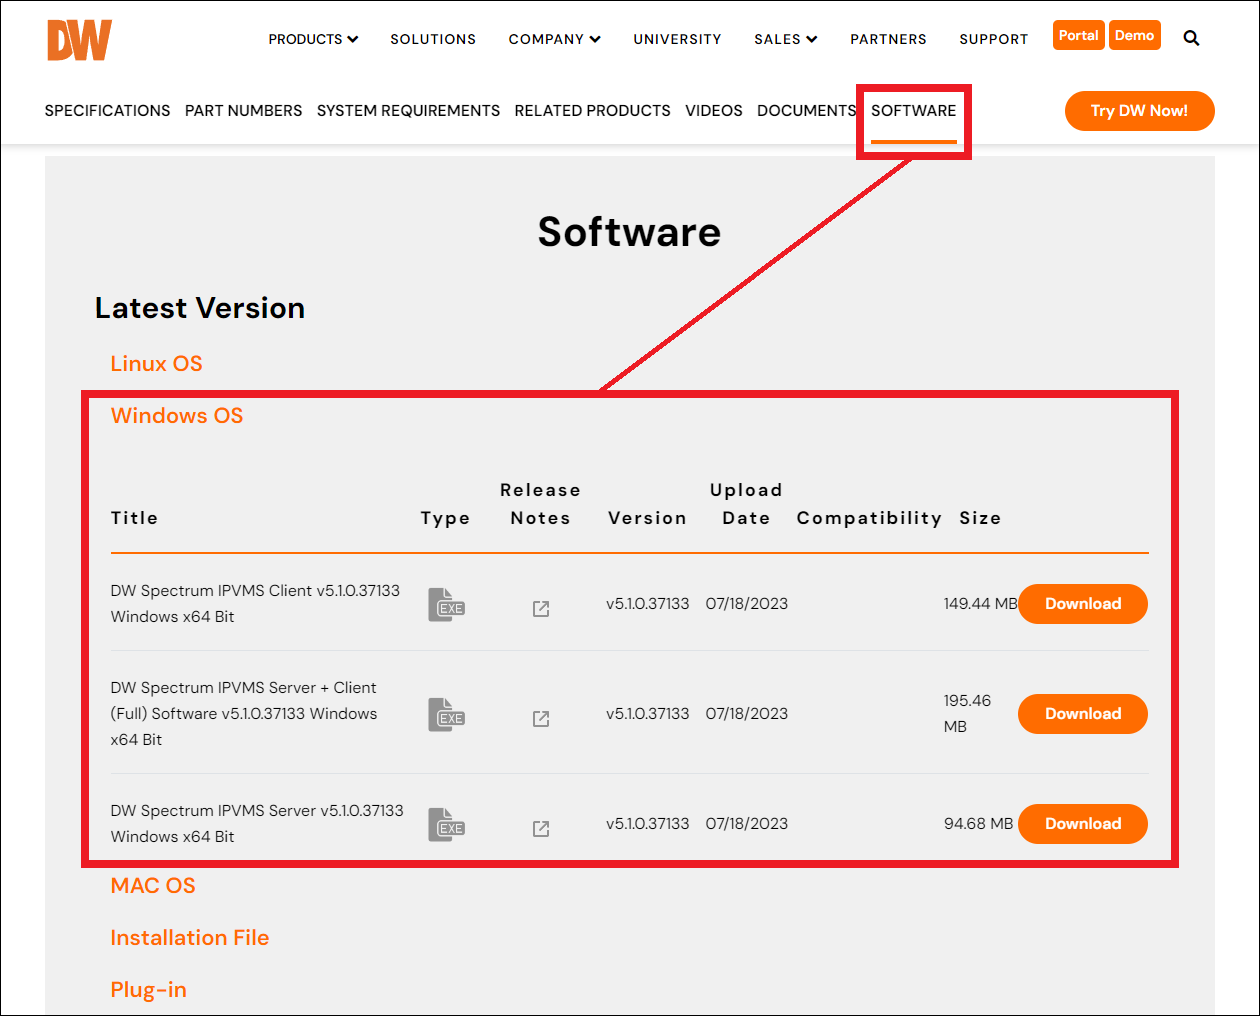
- To obtain the installation files for DW Spectrum, open a web browser and visit the DW Spectrum IPVMS product page on the Digital Watchdog website.
- Click on the Software tab.
Select the version of DW Spectrum that you want to install, then select the operating system that you will be installing with.
Click on the Download symbol to download an installation file.
**NOTE: The Full Software option contains a bundle of both the DW Spectrum Client and DW Spectrum Server software (Windows only).
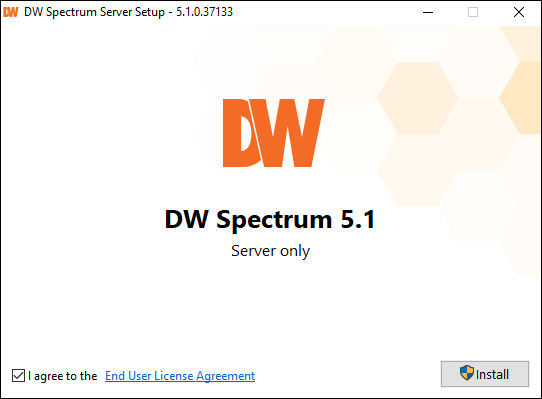
- Run the installation wizard and complete the installation of DW Spectrum IPVMS on your computer. By default, a shortcut will be added to the computer desktop.
Read Next :
Creating a New System
1. Launch DW Spectrum and create a New Server.

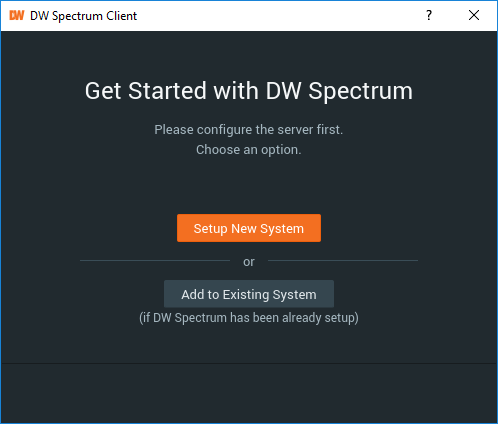
- As this is a first-time setup for DW Spectrum, select Setup New System, then name the System. The System name can be changed at a later time.
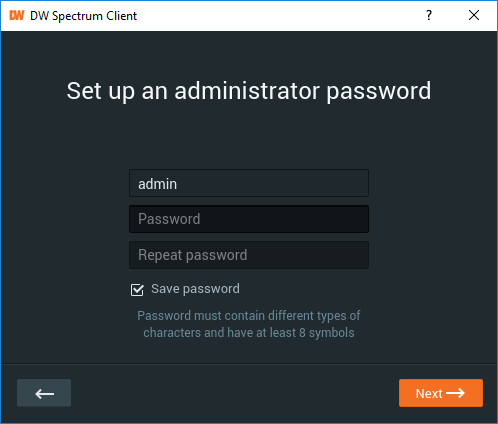
- Create an Administrator password. This password will be the login password for the Administrator user profile and can be changed at a later time.
**NOTE: It is recommended to create a password that uses at least eight characters and contains at least two variations of lowercase letters, capitalized letters, numbers, or non-roman symbols.
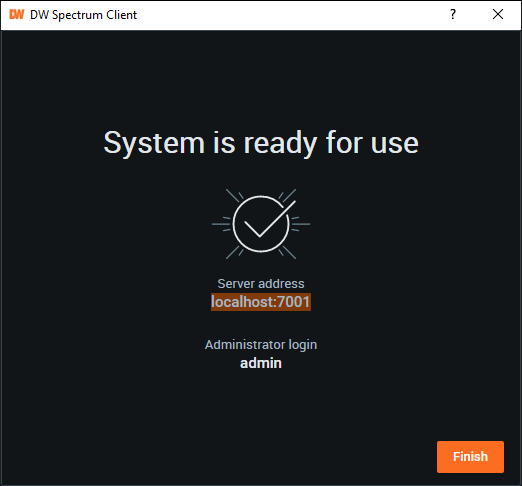
- The System is now created and ready to use.
Use the login of admin and the password that you created in the previous step to log in and use the System.
Changing the Administrator Password and System Name
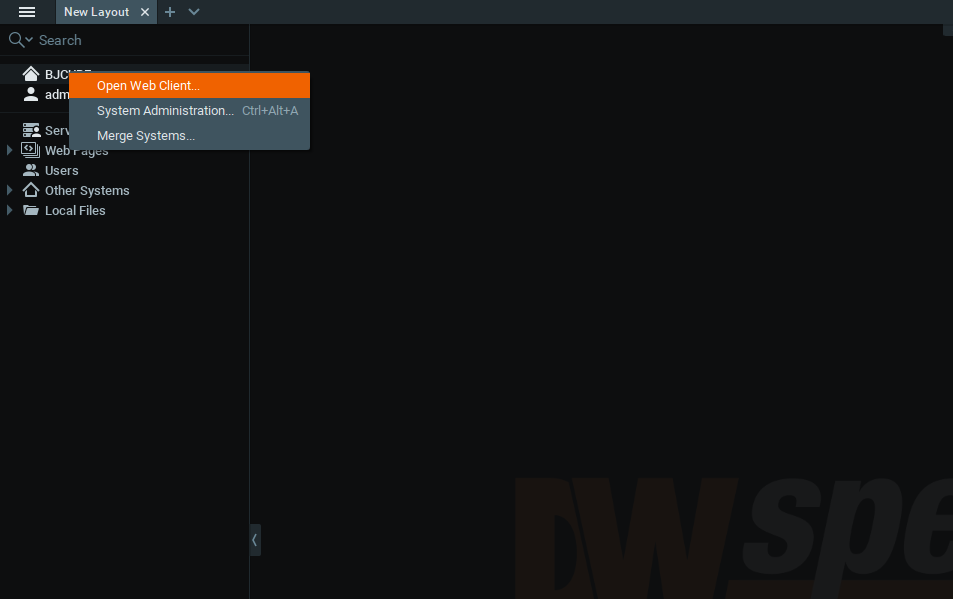
- To change the password of the local Admin user, launch DW Spectrum and connect with the System.
Right-click on the System (house icon) and select Open Web Client.
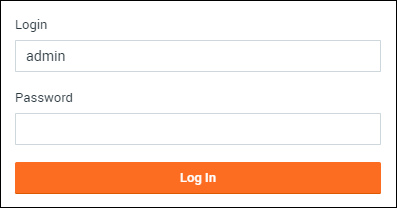
- A browser will open and connect with the System. Enter the Administrator ID and Password to log in.
**NOTE: An alternate method of accessing this web client is to use the Server IP Address to connect through a web browser.
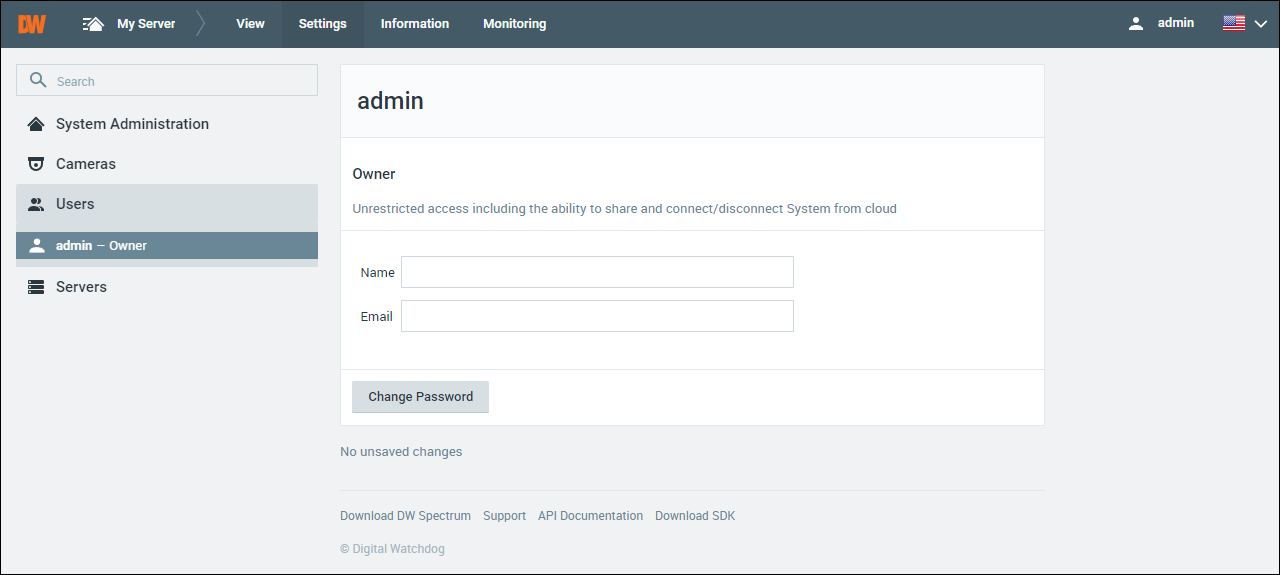
- After logging into the System Web Client, open the Settings tab then open the Users menu.
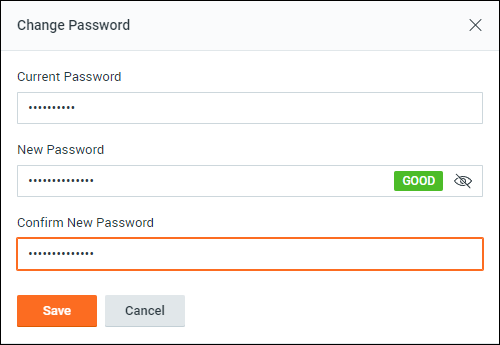
Select the admin (Owner) profile and click the Change Password button.
Enter the current admin password and new admin password for the system then click the Save button.
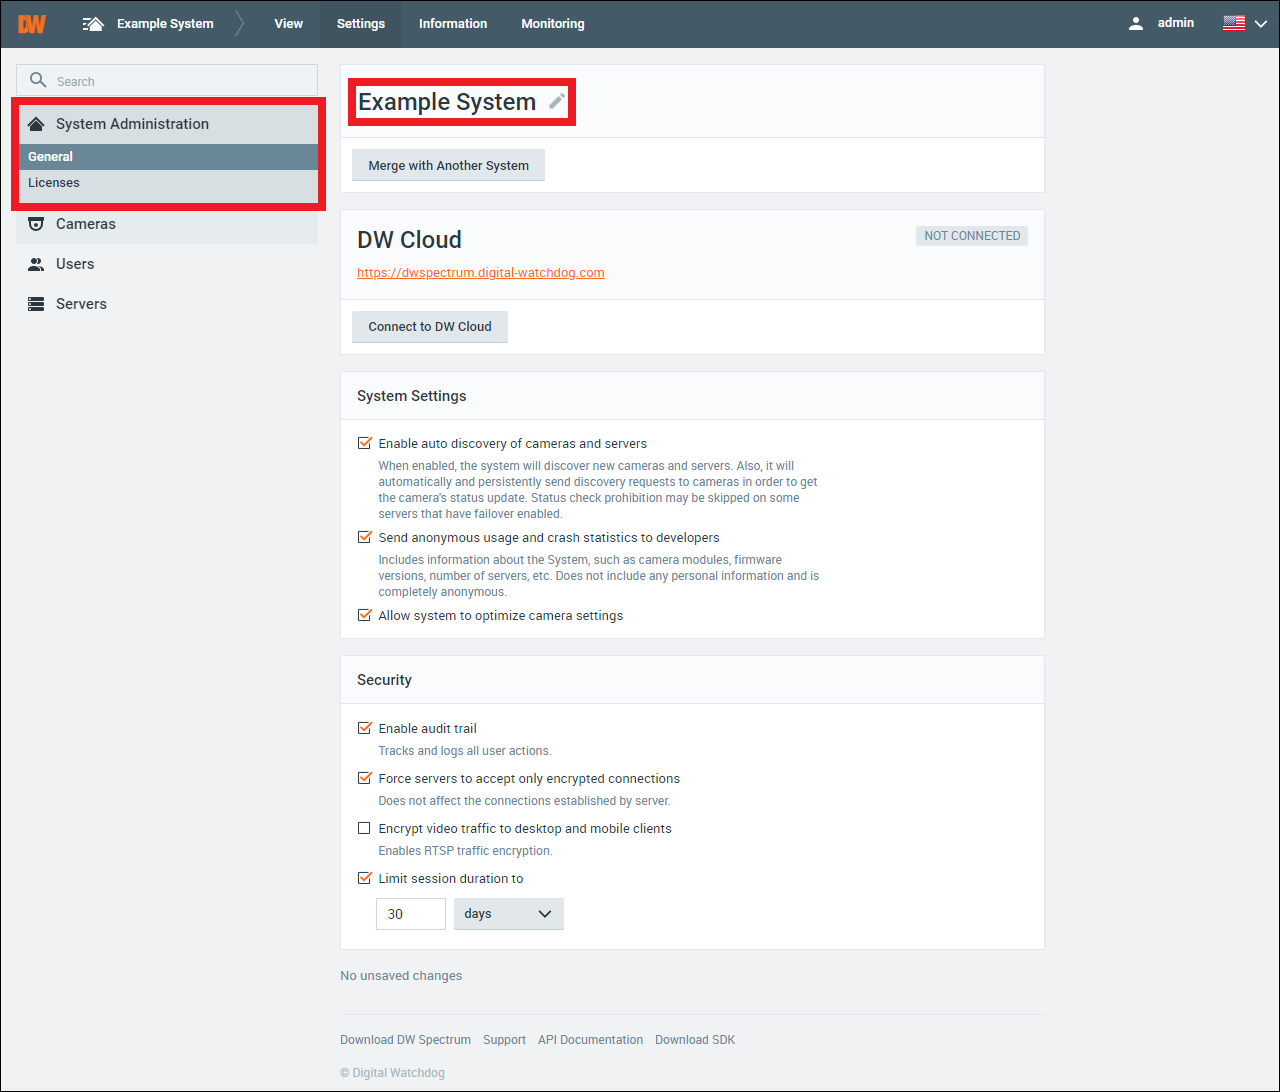
- To change the System name, select the System Administration tab and open the General menu.
Click the edit icon beside the current system name and enter the new name of the System, then click the Save button to rename the System.
It is recommended that keep track of your password. If the Administrator password is forgotten, a password reset form must be submitted for all Blackjack Series NVRs.
If the DW Spectrum Server is installed on a custom-built server (not a DW Blackjack Series NVR), a clean reinstallation of the DW Spectrum Server will be required to reset a forgotten password. To learn how to completely uninstall DW Spectrum, check out DW Spectrum Clean Reinstall.
DW Spectrum – Installing DW Spectrum for Ubuntu
Creating a New System
DW Spectrum is composed of two parts:
- DW Spectrum® Media Server – the Media Server is Spectrum. The media server is responsible for the recording, contains the database information of your added cameras and user profiles, and is arguably the most important aspect of the DW Spectrum IPVMS platform. The Media Server is supposed to be installed on a computer that will be acting as your server. If you have a DW Blackjack server, this software is already installed.
- DW Spectrum® Client – the Client software provides the graphical interface with which users may utilize to interact with the Media Server and allows users to see what the Media Server is doing. Some features include allowing users to configure settings, view live and recorded video, and manage device connections. The Client is helpful for accessing the Media Server, but is not required to remain running for the Media Server to do its job. Instead, it is recommended that users install the DW Spectrum Client software on a separate computer from the DW Spectrum Media Server computer to save on processing.
These two portions of DW Spectrum IPVMS coordinate to comprise a System. A System can refer to a group of merged servers or to a single server.
This article will explain how to install DW Spectrum IPVMS, create a new Server, create a new System, and how to change the System name and password.
If you are currently using Ubuntu 14.04, or are unsure what version you are currently using, please read Upgrading to Spectrum 4.0 From An Ubuntu 14.04 Server.
Supported/Affected Devices:
- DW Blackjack® Server Series
Installing DW Spectrum on Ubuntu
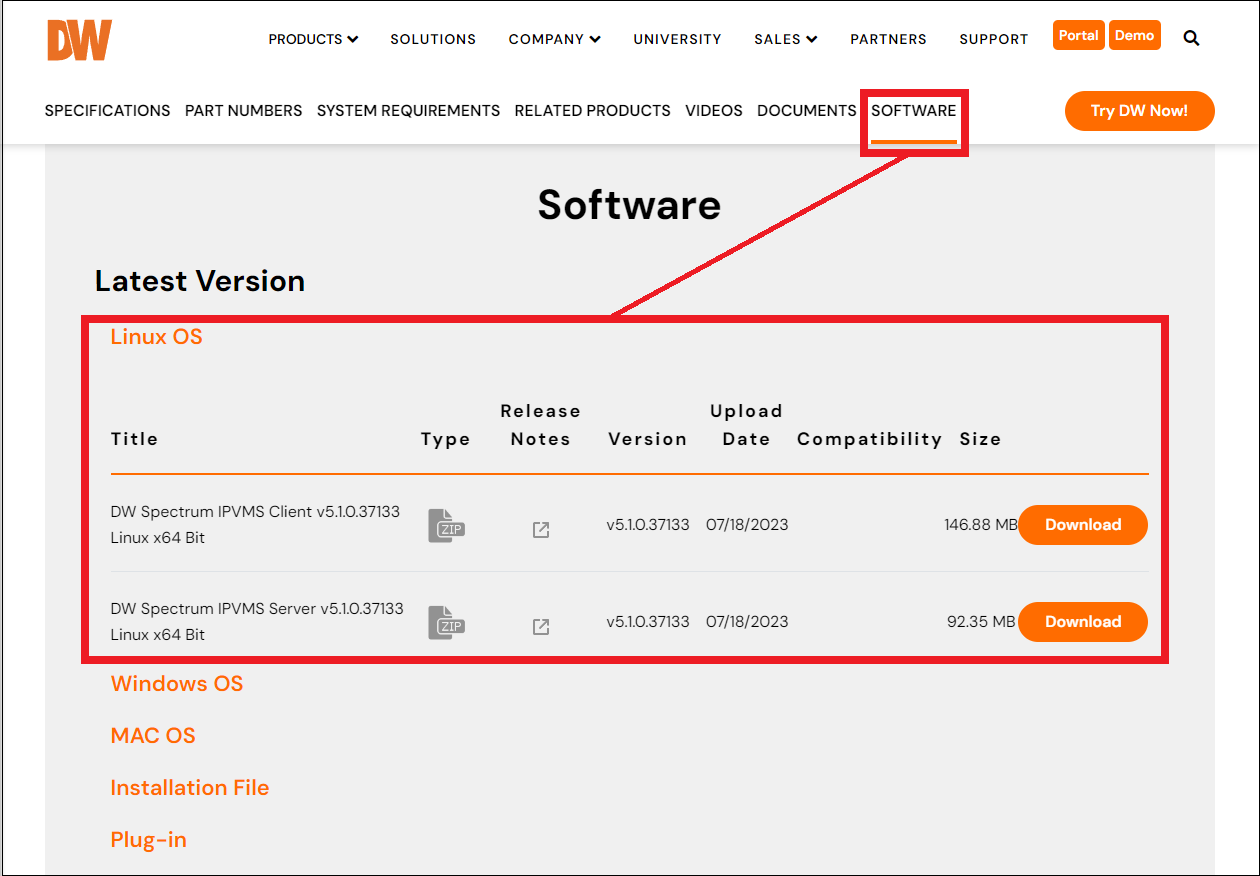
- To obtain the installation files for DW Spectrum, open a web browser and visit the DW Spectrum IPVMS product page on the Digital Watchdog website.
- Click on the Software tab.
Select the version of DW Spectrum that you want to install, then select the operating system that you will be installing with.
Click on the Download symbol to download an installation file.
**NOTE: You can install both the DW Spectrum Server and the DW Spectrum Client on the same computer, but it is also highly recommended to use the DW Spectrum Client on a different computer than the Server to save on processing resources.
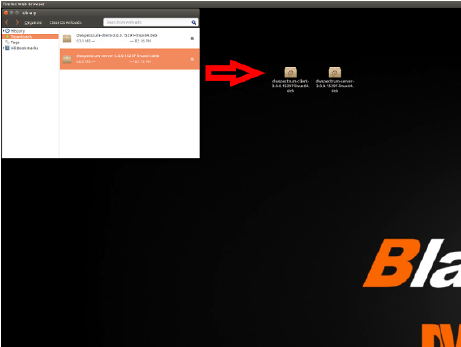
- Open your computer’s Downloads folder, then move the DW Spectrum installation file(s) to the Desktop.
- After copying the installation files to the desktop, open the Terminal (CTRL+ALT+T).
**NOTE: The Ubuntu OS Terminal program is case-sensitive. Use the following commands exactly as they are written.
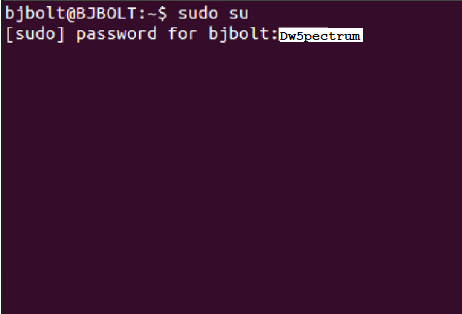
- Log in as a Super User by using the following command:
sudo su
You will then be asked to enter the system password. The root password will remain invisible as you type. Use the password of:
Dw5pectrum
**NOTE: For older DW Blackjack units purchased prior to June 18, 2021, the previously utilized default Linux OS login was “admin/admin”.
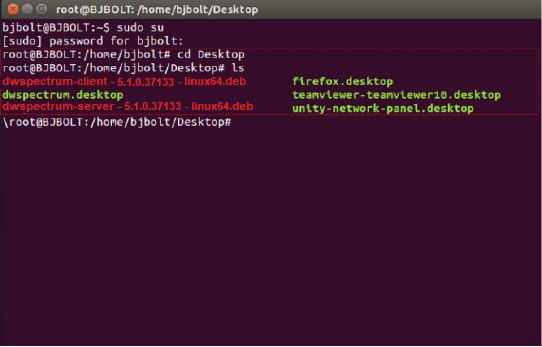
- Next, navigate to the Desktop by using the following commands:
cd Desktop
Next, to list the available files on the desktop and confirm that the installation files appear, use the command:
ls
- To install the DW Spectrum Server, enter the command:
dpkg –i dwspectrum-server-5.1.0.37133-linux64.deb
**NOTE: You can press the Tab key after partially entering the command (dpkg –i dwspectrum-server) to automatically complete the file name.
- A EULA message will appear. Use the arrow keys to select Yes, then press the Enter key to confirm. Allow the command to run.
When finished, the DW Spectrum Server program will then be installed.
- To install the DW Spectrum Client, enter the command:
dpkg –i dwspectrum-client-5.1.0.37133-linux64.deb
**NOTE: You can press the Tab key after partially entering the command (dpkg –i dwspectrum-client) to automatically complete the file name.
- Allow the command to run and complete the installation. When finished, you may close the Terminal.
Creating a New System
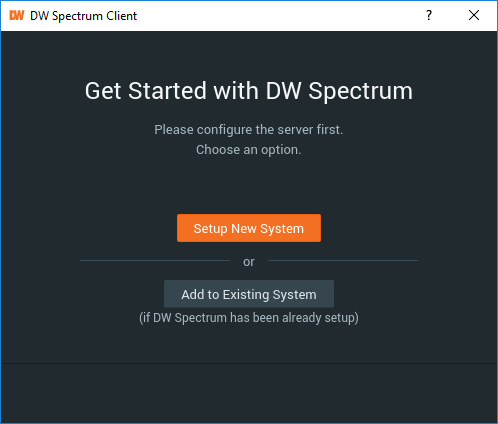
1. Launch DW Spectrum and create a New Server.

- As this is a first-time setup for DW Spectrum, select Setup New System, then name the System. The System name can be changed at a later time.
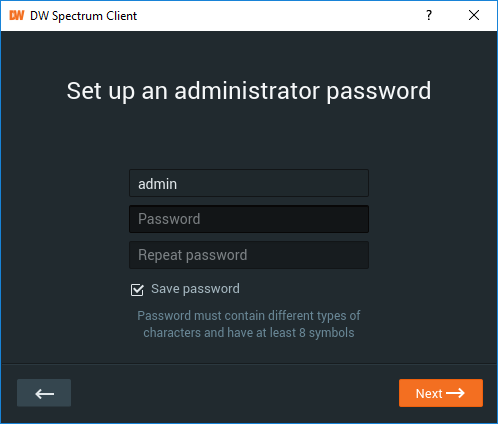
- Create an Administrator password. This password will be the login password for the Administrator user profile and can be changed at a later time.
**NOTE: It is recommended to create a password that uses at least eight characters and contains at least two variations of lowercase letters, capitalized letters, numbers, or non-roman symbols.
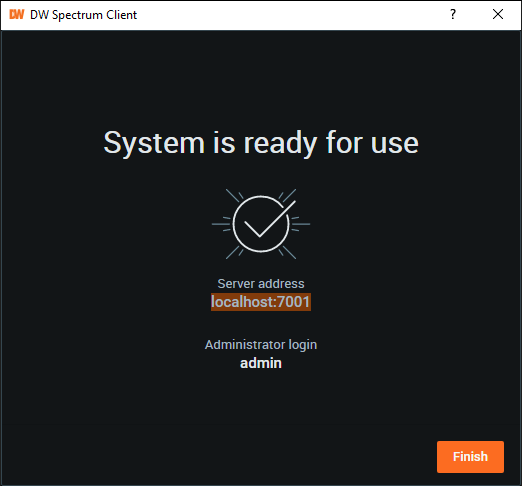
- The System is now created and ready to use. To log in and begin using the System, use the login ID of “admin” and the password that you created in the previous step.
Changing the Administrator Password and System Name
- To change the System Owner/Administrator password, launch DW Spectrum and connect with the System.
Right-click on the System (house icon) and select Open Web Client.
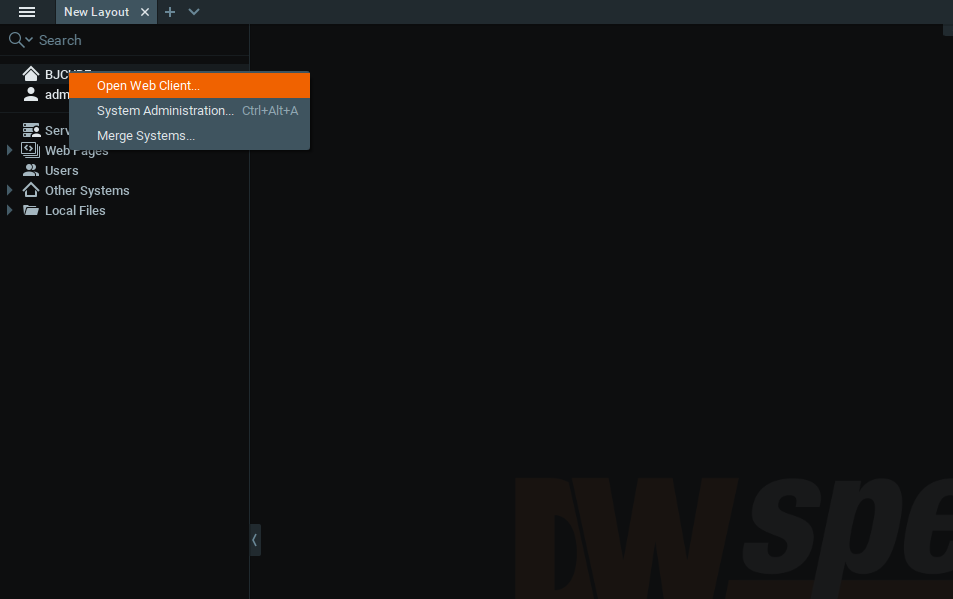
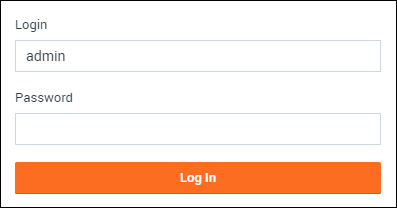
- A browser will open and will attempt to connect with the System.
Enter the Administrator ID and Password to log in.
**NOTE: An alternate method of accessing this web client is to use the Server IP Address to connect through a web browser.
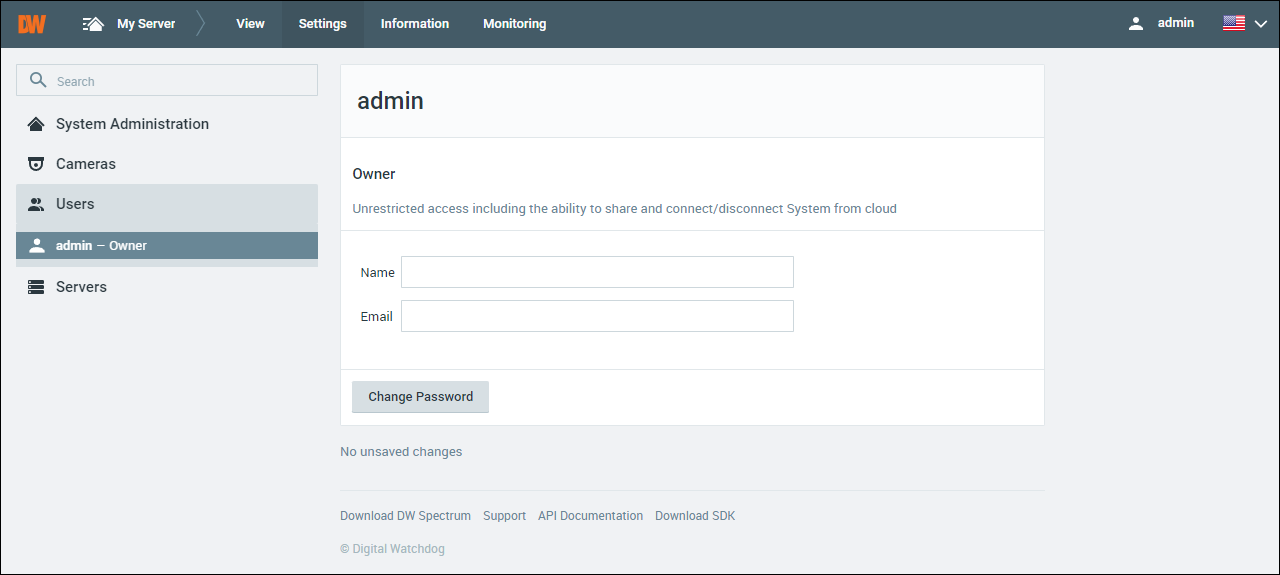
- After logging into the System Web Client, open the Settings tab then open the Users menu.
Select the admin (Owner) profile and click the Change Password button.
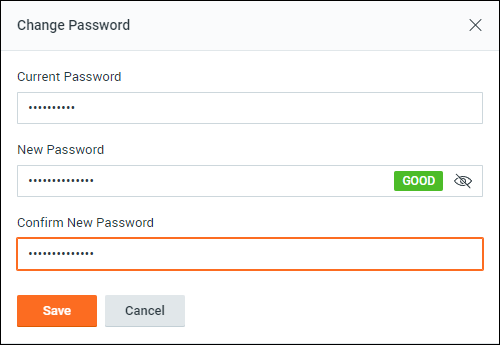
Enter the current admin password and new admin password for the system then click the Save button.
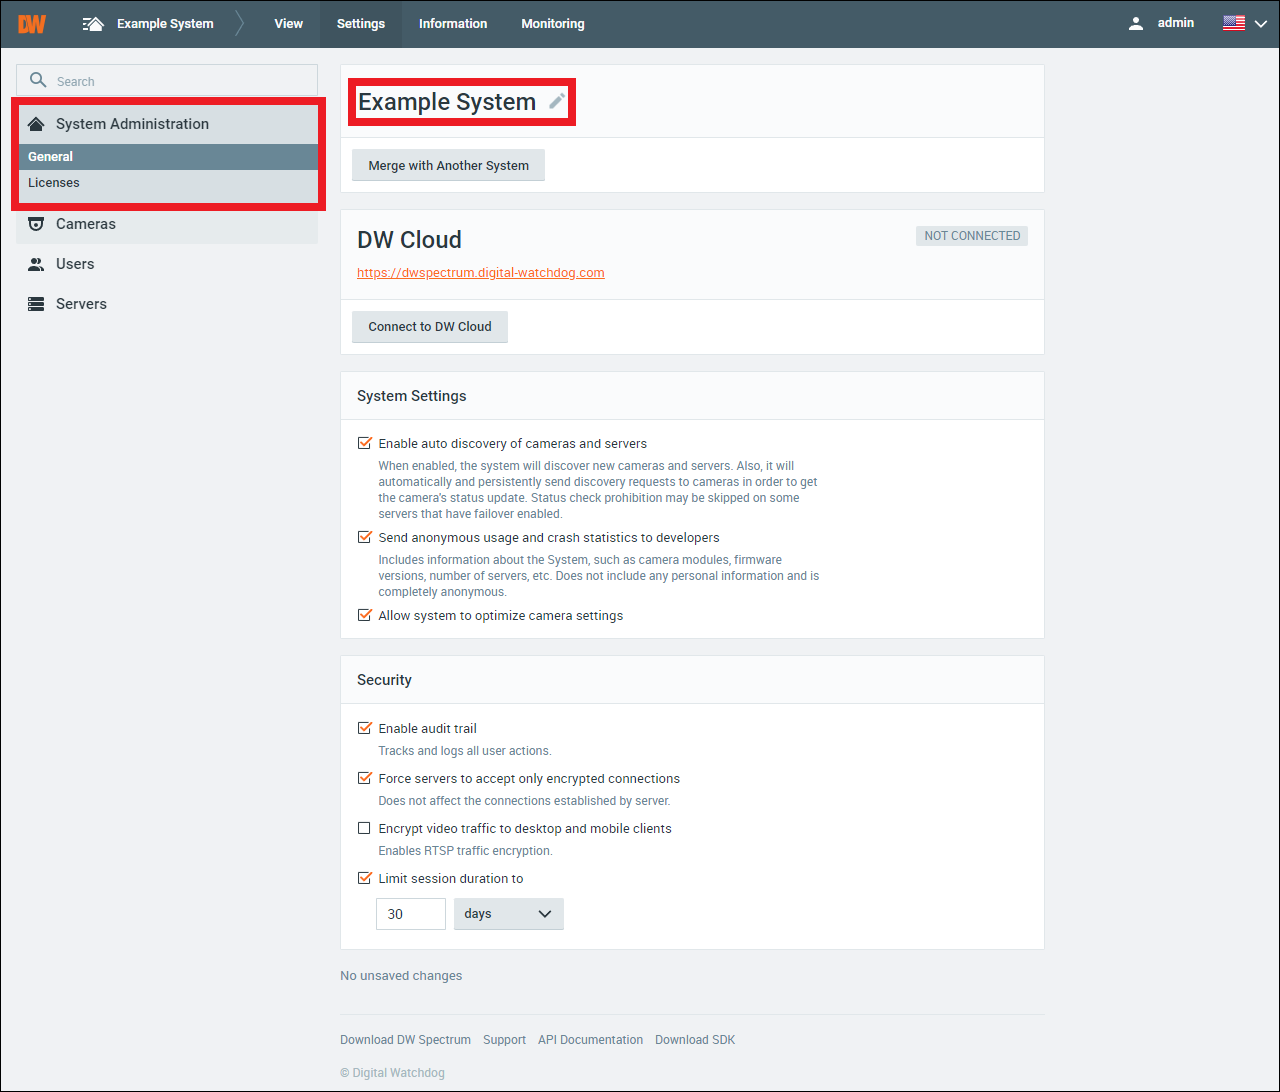
- To change the System name, select the System Administration tab and open the General menu.
Click the edit icon beside the current system name and enter the new name of the System, then click the Save button to rename the System.
It is recommended that keep track of your password. If the Administrator password is forgotten, a password reset form must be submitted for all DW Blackjack Series NVRs.
If the DW Spectrum Server is installed on a custom built server (not a DW Blackjack Series NVR), a clean reinstallation of the DW Spectrum Server will be required to reset a forgotten password.
To learn how to completely uninstall DW Spectrum, check out DW Spectrum Clean Uninstall.
DW Spectrum – Clean Uninstall Spectrum
DW Spectrum Clean Uninstall (Windows & Ubuntu)
When DW Spectrum is uninstalled, the default behavior of the software is to leave behind data regarding the user’s preferences. As a result, when the DW Spectrum Server component is reinstalled, the previous settings will remain. This can be an issue if you intend to perform a clean re-installation of DW Spectrum or must delete all DW Spectrum data from the Server’s host computer.
This article will guide you through how to completely remove all DW Spectrum Server files. Please follow the steps below to delete any DW Spectrum remnants from your machine.
**NOTE: If you are trying to replace the DW Spectrum Application Bundle version with the individual Client and Server software components, you can refer to the article “DW Spectrum – Bundle Replacement Procedure”.
**NOTE: If any recording licenses were registered for the DW Spectrum System on the computer, make sure to deactivate the registered licenses before removing DW Spectrum from the computer.
Create a Database Backup
Please be aware that by completing a clean uninstallation of DW Spectrum IPVMS, you will have removed all data and loss of custom settings will occur. It is highly recommended to create a Database Backup and to document Recording Licenses before removing DW Spectrum.
For more information on creating a Database Backup, you can refer to the article “DW Spectrum – Creating a Database Backup”.
Removing DW Spectrum (WinOS)
To completely remove the DW Spectrum Server program in Windows OS:
Part 1: Stop the Server
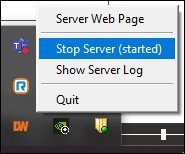
Close the DW Spectrum Client program and stop the DW Spectrum Server application.
Part 2: Uninstall DW Spectrum
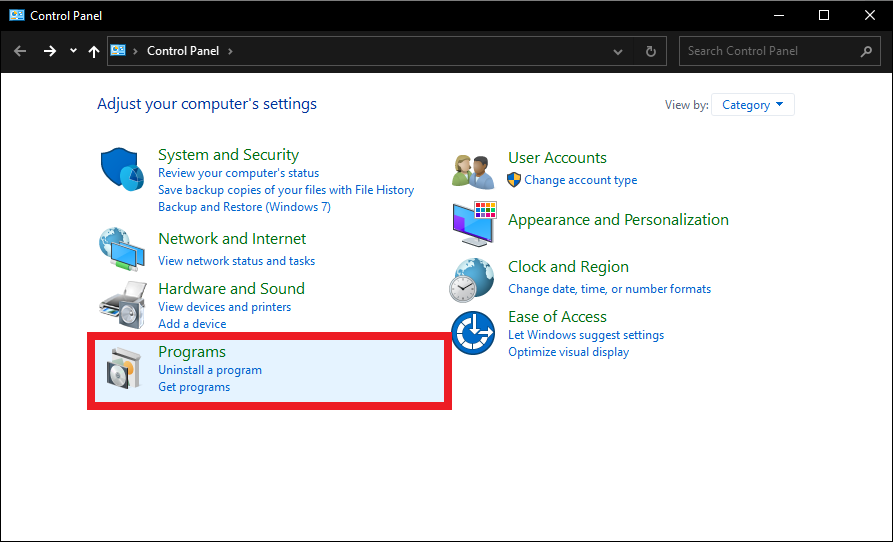
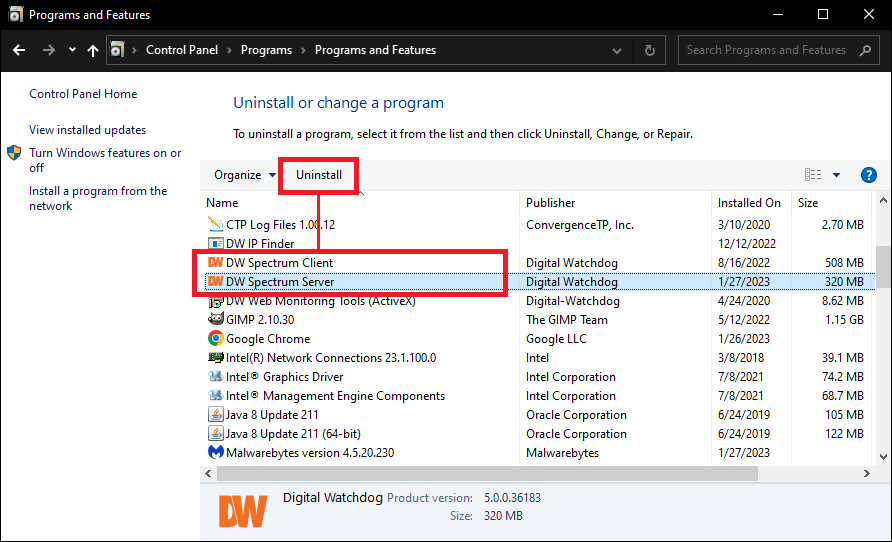
- Open Control Panel and click “Uninstall a program”to open the Programs and Features utility.
- In Program and Features select the DW Spectrum programs then click “Uninstall”.
Part 3: Delete Raw Database Files
- After uninstalling the DW Spectrum program(s), navigate to:
C:\Windows\System32\config\systemprofile\AppData\Local\Digital Watchdog\Digital Watchdog Media Server
Before deleting the folder, copy the raw database files from this location. Be sure to save the raw files if you intend to restore the database after completing the clean uninstallation.
It is also recommended to create a copy of the HW_log file inside log folder.
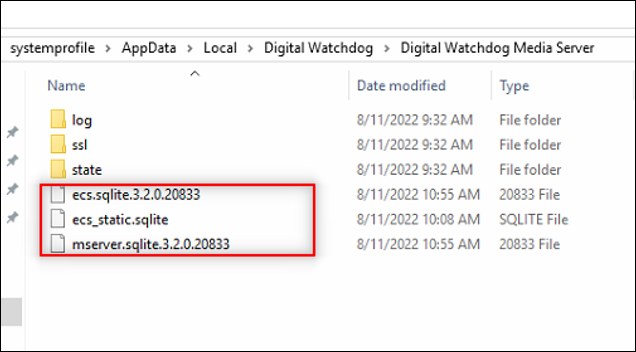

- After copying the raw database files and hardware log (hw_log) as needed, back out to:
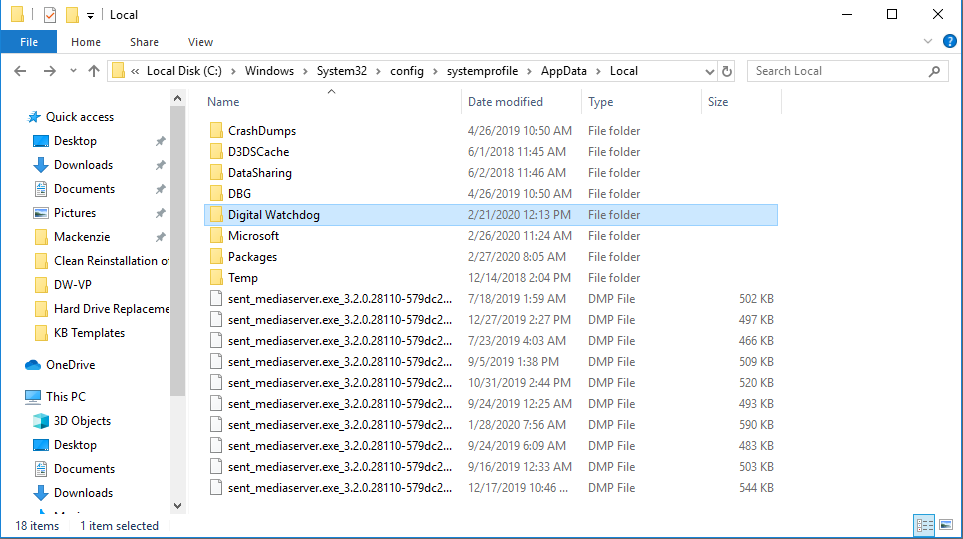
C:\Windows\System32\config\systemprofile\AppData\Local\
Delete (Shift+Del keys) the Digital Watchdog folder.
- In addition to deleting the raw database files, each additional media drive (D:\, E:\, etc.) will contain video archive folders and the TMP and NXDB files.
Backup the archive, hi_quality and low_quality folders that contain the raw archived video footage from the server as needed.
Then delete the TMP and NXDB files from each of the media drives.

Part 4: Delete Local AppData
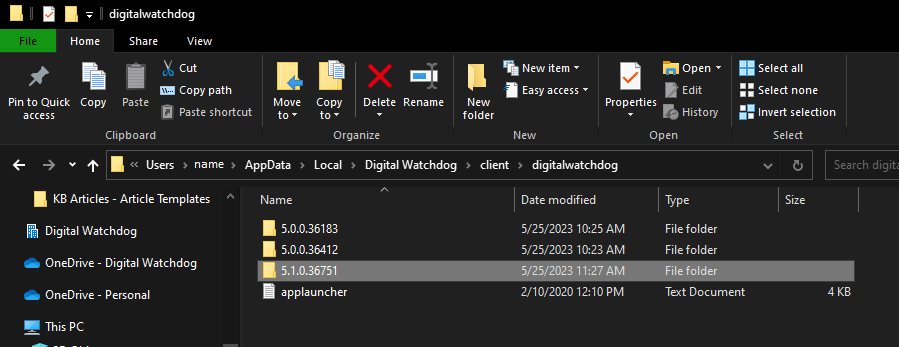
For Windows installations, you will need to delete the local AppData folders for the DW Spectrum Server and Client components as well.
- In the File Explorer window, you will need to enable the View > Hidden Items setting.

- Find and delete the AppData folders in the following locations:
C:\Users\<username>\AppData\Local\Digital Watchdog\server\digitalwatchdog
And
C:\Users\<username>\AppData\Local\Digital Watchdog\client\digitalwatchdog
Part 5: Delete DW Spectrum Registration
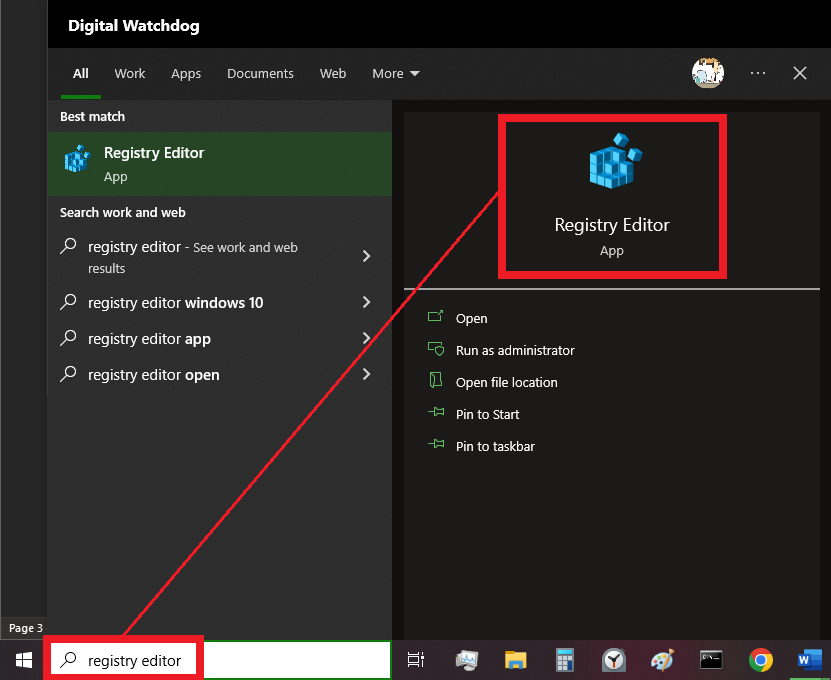
The final remnant of DW Spectrum that must be removed can be found using the Registry Editor desktop app.
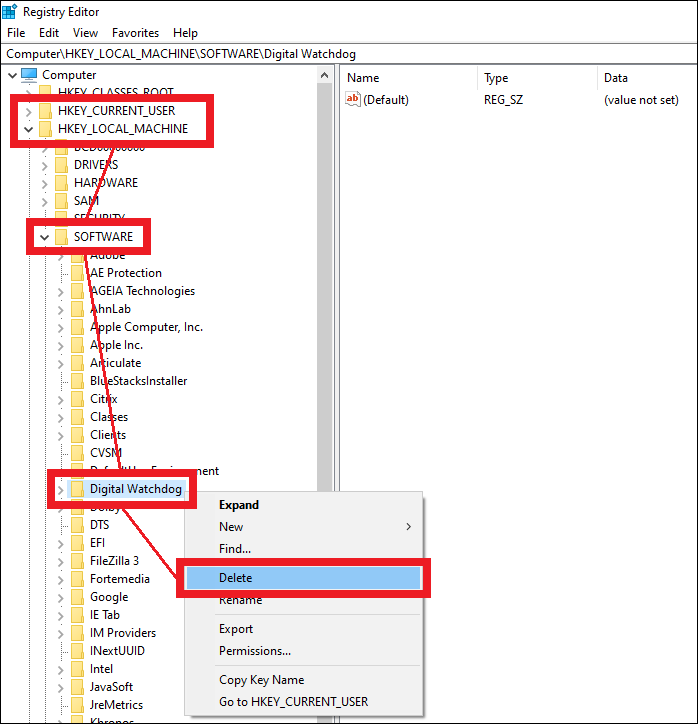
In Registry Editor, right-click on the “Digital Watchdog” folder and select “Delete” from the context menus in the following locations:
- HKEY_LOCAL_MACHINE\SOFTWARE\Digital Watchdog
- HKEY_CURRENT_USER\SOFTWARE\Digital Watchdog
At this point, the DW Spectrum program will be completely removed from the computer. Reinstalling DW Spectrum on the computer will be treated as a fresh installation.
You can restore the system from the Database Backup files after creating a new server as needed.
**NOTE: If you need to reinstall DW Spectrum IPVMS on the computer, check out Installing DW Spectrum (Windows).
Uninstalling DW Spectrum on Ubuntu Linux
To remove DW Spectrum from an Ubuntu Linux computer using the Command Terminal:
Part 1: Access Terminal as Super User
- Prompt the uninstallation of DW Spectrum by
Open the Terminal in Ubuntu.
-
- Keyboard Shortcut: CTRL + ALT + T
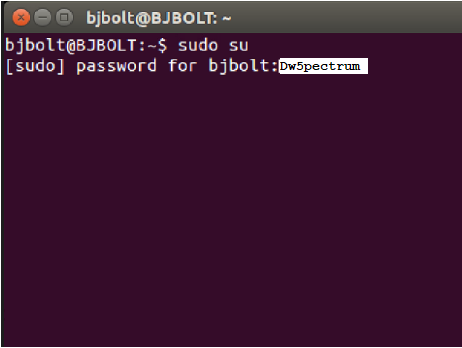
- Log in as a Super User with the command:
sudo su
- You will then be asked to enter the system password to log in. Depending on your DW Blackjack product, the default Super User password will be:
Dw5pectrum |or| admin
**NOTE: Your entry will not display as you enter/type the password in Terminal.
Part 2: Remove DW Spectrum Server
- To prompt the removal of the DW Spectrum Server application, use the command:
apt-get remove –purge digitalwatchdog-mediaserver
- When asked “Do you want to continue [Y/N]”, type Y and press the Enter key.
- Use the Arrow Keys to navigate to select “Remove the Database”, then press the Enter key.
- To prompt the removal of DW Spectrum Client application, use the command:
apt-get remove –purge digitalwatchdog-client
- When asked “Do you want to continue [Y/N], type Y and press the Enter key.
Part 3: Final Cleanup
Enter the following commands in Terminal to remove the remaining DW Spectrum registration files:
echo PURGE | sudo debconf-communicate digitalwatchdog-mediaserver
echo PURGE | sudo debconf-communicate digitalwatchdog-client
At this point, the DW Spectrum program will be completely removed from the computer. Reinstalling DW Spectrum on the computer will be treated as a fresh installation.
You can restore the system from the Database Backup files after creating a new server as needed.

