Recording could be checking by channel, time and different type and replay/edit.
Detailed playback operation steps:
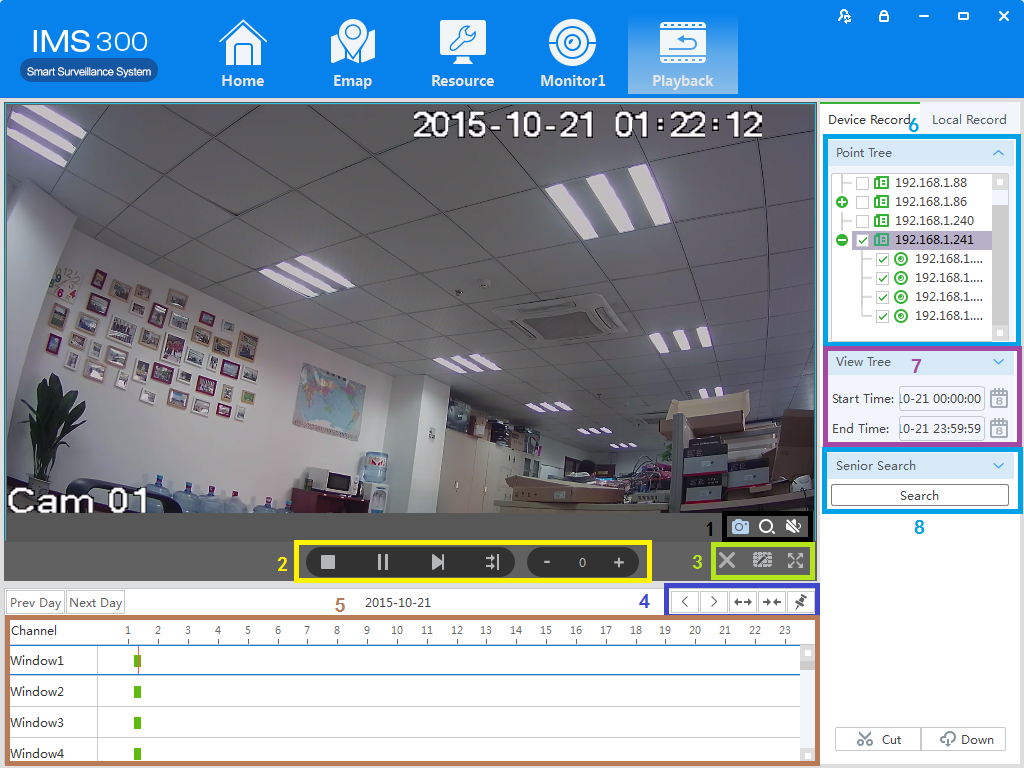
Step 1:Click [Playback] (see Figure 3-2,section 2), it will show [Playback] interface,see figure 5-1:

Figure 5-1 Video playback
|
No |
Item |
Description |
|
1 |
Shortcut Key |
Screenshot:Screenshot on current recording;
Area Image:Elec-amplify on/off;
Voice:Adjust voice of current recording.
|
|
2 |
Play Toolbar |
Stop:Stop playback on current channel;
Pause:Pause/play on current channel;
FF:Fast forward on current channel;
Synchronization:Multi-channel replay Synchronization;
Slow down:Slow down replay on current channel;
Speed up:Speed up replay on current channel.
|
|
3 |
Window Shortcut |
Stop all:Stop all replay;
Division:Division current replay user-defined
Full Screen:Switch to Full Screen.
|
|
4 |
Time Schedule Control |
Left:Time schedule move left;
Right:Time schedule move right;
Zoom in:Time schedule unit amplification;
Zoom out:Time schedule unit reduced;
Watermark:Watermark for current recording.
|
|
5 |
Time Schedule Bar |
Choose replay position on current channel. |
|
6 |
Point Tree |
Device/channel display. |
|
7 |
View Tree |
Date of recording |
|
8 |
Advanced Search |
Recording searching. |
|
9 |
Video Cut/Download |
Cut/Download Video. |
Step 2:Choosing device channel at upper right side.
Step 3:Choosing starting/ending time, click [search]
Available recording will be shown at time schedule bar when searching finished, Figure 5-2:

Figure 5-2 Recording search
Step 4:Choosing target channel, click , recording replay, see figure 5-3
![]()

Figure 5-3 Playback
Step1:Clickfrom the clip download area(No.9 area of Diagram5-1) of【Playback】interface.
![]()
Then mouse will show as in time bar。
![]()
Step2:Left click to select start point at the channel time bar which want to clip, Then left Click again at another position to select the end point. See figure 5-4:

Figure 5-4 Video cut and download
Step3: Right click at the time bar to select【Plan Add】after you select the starting point and end point;
Step4: Continue click at the video clip area (No.9 area of figure5-1)), see figure 5-5;
![]()

Figure 4-5 Video download
|
Item |
Name |
Description |
|
|
Downloading |
Display the current progress of the download tasks |
|
|
Finish |
Display download task has been completed |
|
|
Start |
Start all download tasks in list |
|
|
Start/ Suspend |
Start to download current task |
|
|
Cancel |
Cancel download current task |
|
|
Open |
Open the folder which video download |


