Guarding Vision Setup Complete Guide, Guarding Vision Mobile Software has been designed to help small businesses effectively operate and manage security devices from a smartphone or tablet. The power to view live images, play back footage, and receive notifications remotely keeps owners and operators in touch with their business, even when away.
Network Setup for NVR/DVR/IP Camera before adding to Guarding Vision
The Following network settings must be checked before adding the device to Guarding vision App.
Method 1: From NVR Local menu
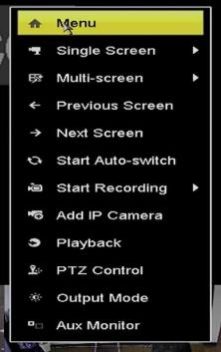
Step 1: Right Click on the NVR Monitor and select “Menu”.
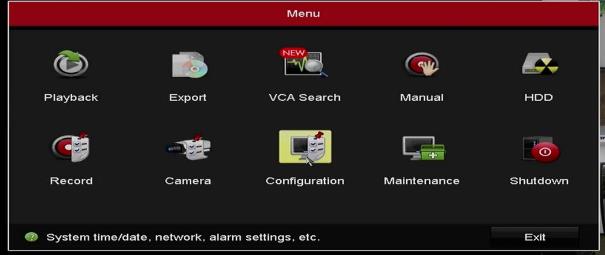
Step 2: Select “Configuration” from the Menu options.
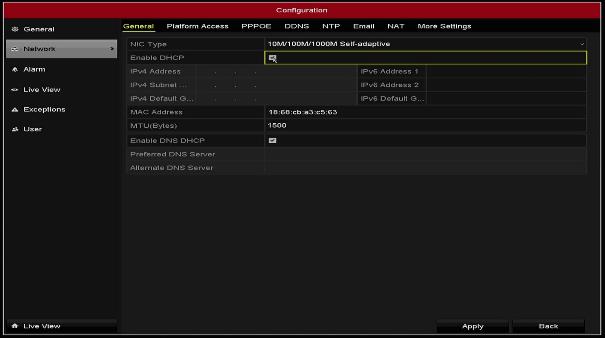
Step 3: Select “Network” and check the option “Enable DHCP” Click “Apply”
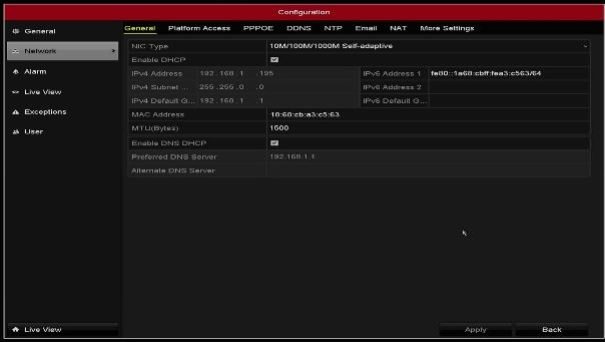
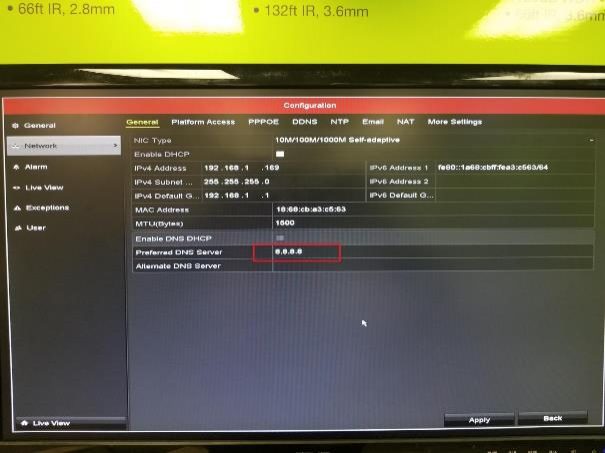
Step 4: Make sure your NVR/DVR obtained an “IPV4 Address” and “Preferred DNS Server” values automatically. If not, check your network settings and make sure your device is properly connected to your network router or switch.
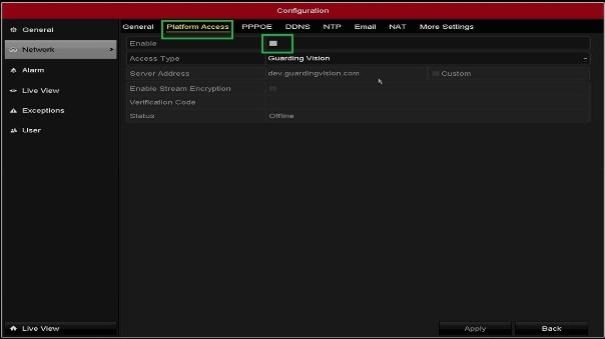
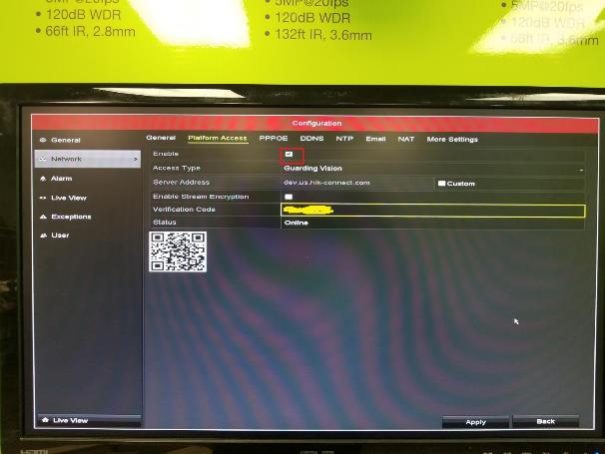
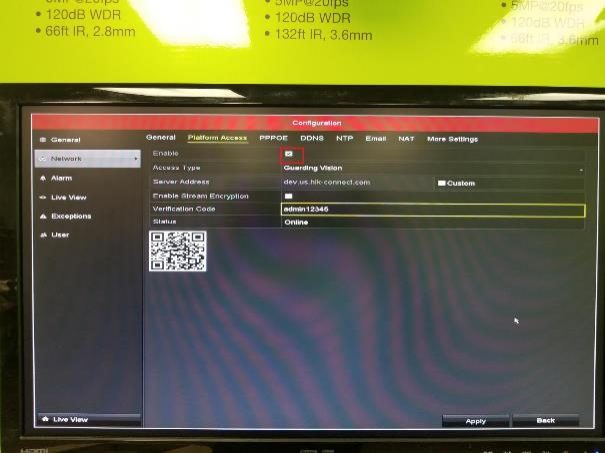
Step 5: Select “Platform Access” and check “Enable”. You will be taken to the service terms window.
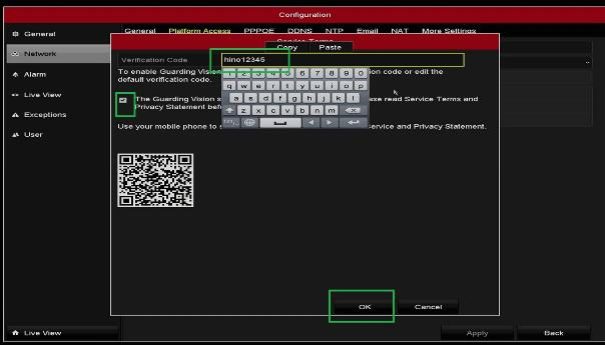
Step 6: Create a “Verification Code” check the “Guarding Vision service terms” click “OK”.
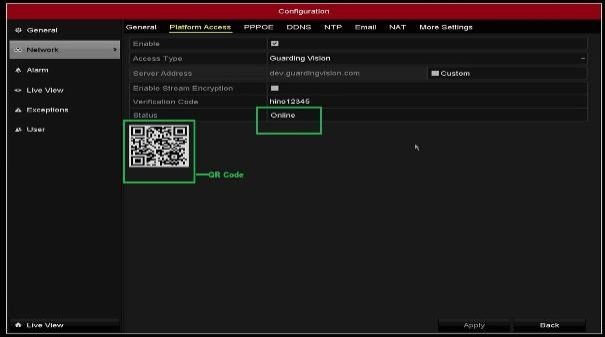
Step 7: Click “Apply” to apply the settings. The status will change to “Online”. The QR Code being displayed on your device “Platform Access” page can be scanned with Guarding Vision app to add the device into your App. To proceed with adding the device into the app scroll down to “Adding NVR/DVR to Guarding Vision App”.
Method 2: From the NVR/DVR/IP Camera Web page.
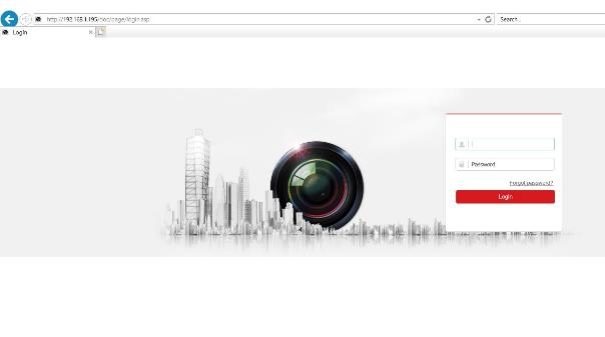
Step 1: Input the IP address of the NVR into the address bar and login with the credentials.
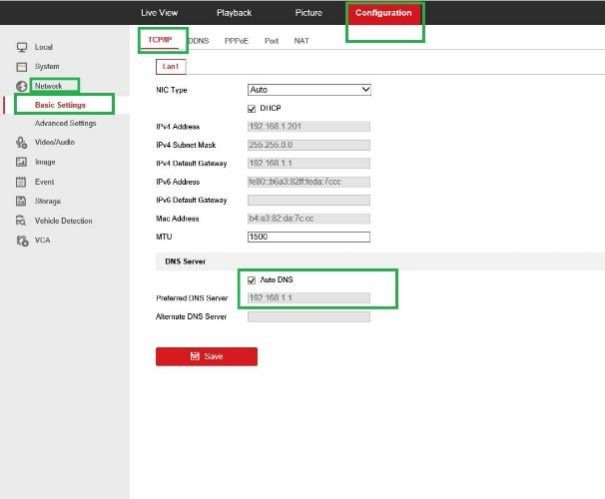
Step 2: Go to Configuration Network Basic Settings
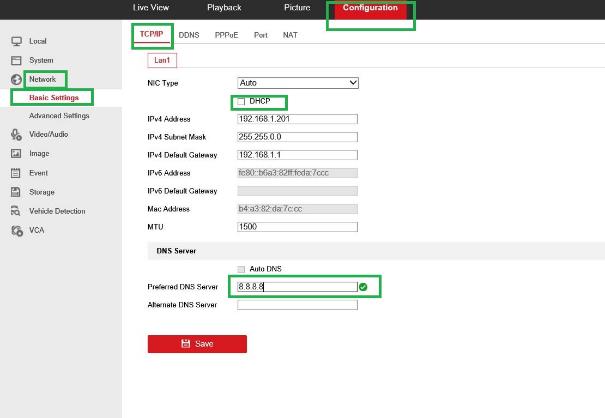
Step 3: This step should be performed if you do not see a “Preferred DNS Server” address.
Go to Configuration Network Basic Settings TCP/IP Uncheck “DHCP“ Uncheck “Auto DNS” and input 8.8.8.8 for “Preferred DNS Server”. Click “Save”
(Refer to the figure below)
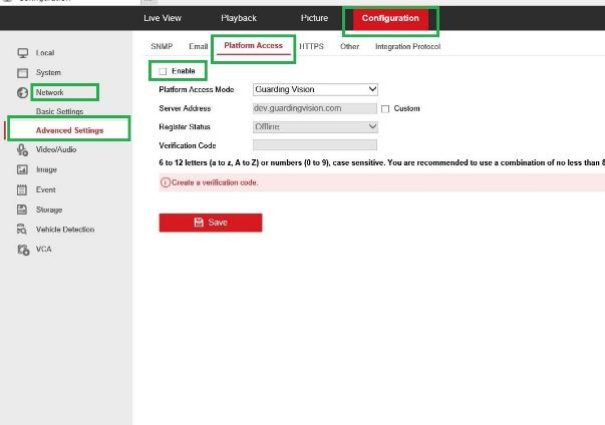
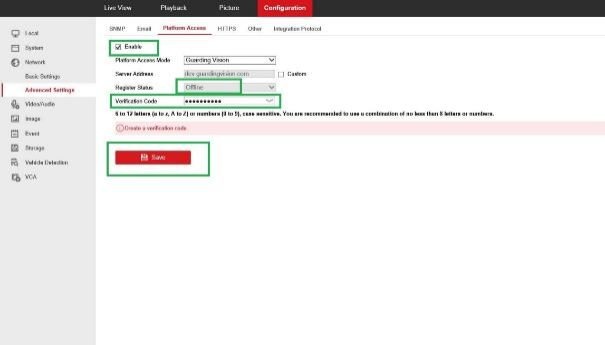
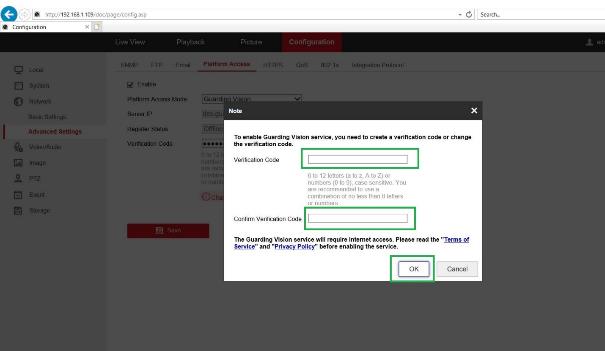
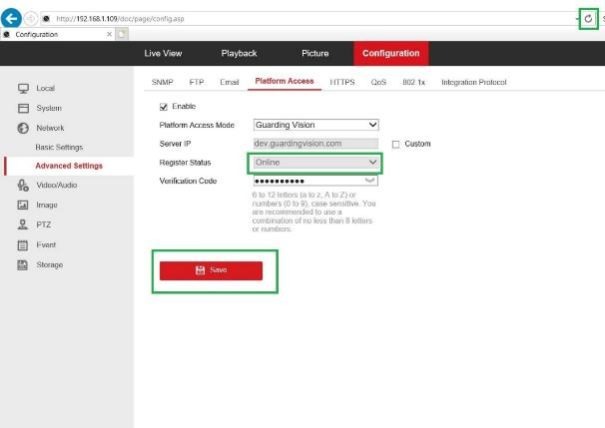
Step 4: Go to Configuration Network Advanced Settings Platform Access Check “ Enable”
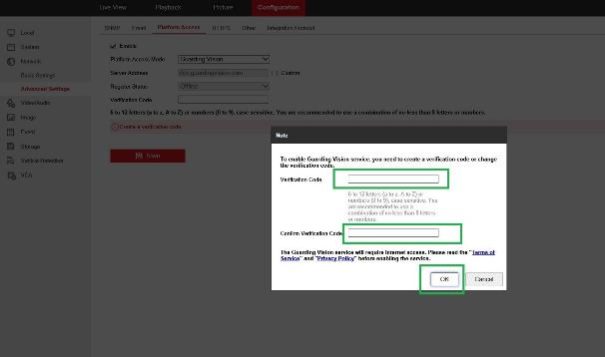
Step 5: Create a “Verification Code” and Click “OK”
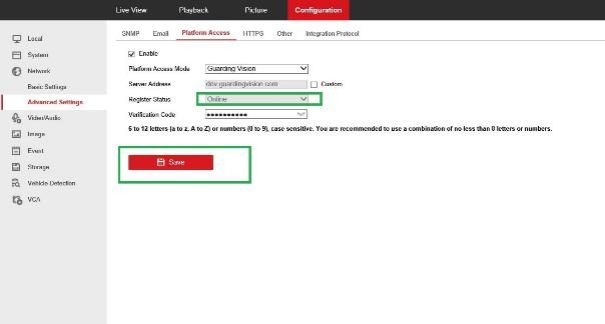
Step 6: Click “Save” to save the “Platform Access” Settings. Now refresh the browser page to check the Register status. After refresh the register status should show “Online”.
(See the figures below for reference)
Guarding Vision Setup Complete Guide v2
Adding the NVR/DVR to Guarding Vision App
Method 1: Using the QR Code
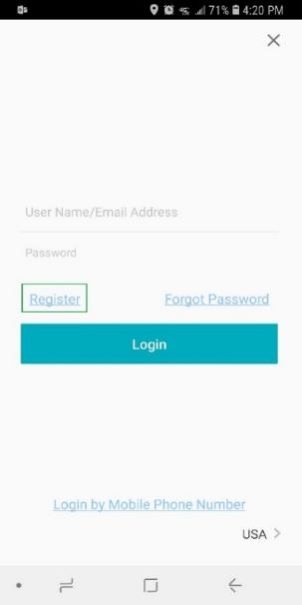
Download and install the Guarding vision app on the Mobile. Register and Create a Guarding vision account on the App.
.
.
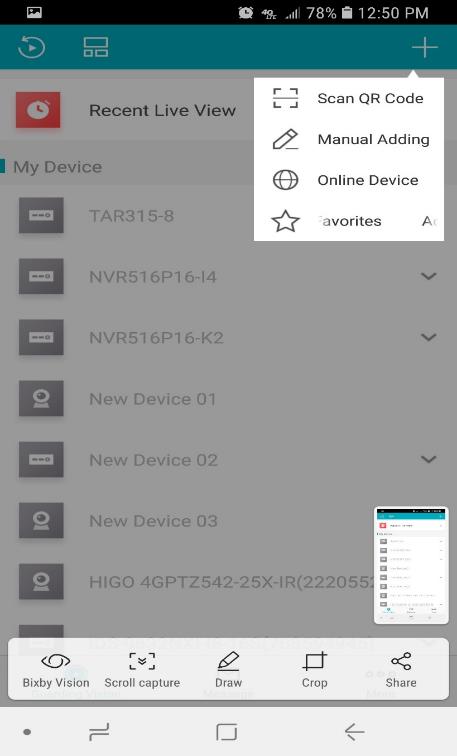
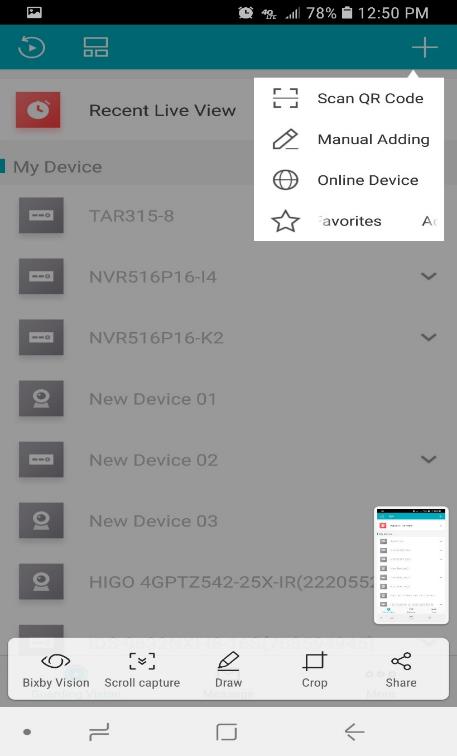
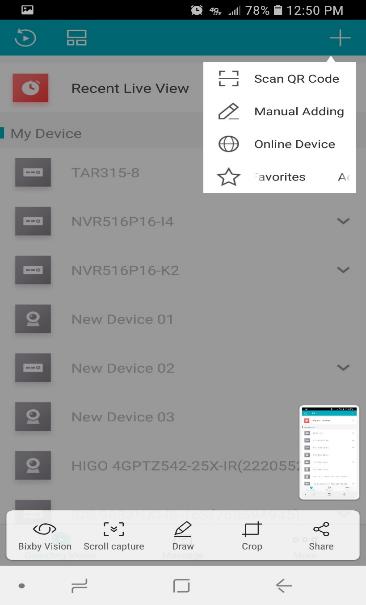
Step 1: Tap on the “+” to add a new device. Select “Scan QR Code”. Scan the QR Code displayed on the NVR’s Monitor.
.
.
.
.
.
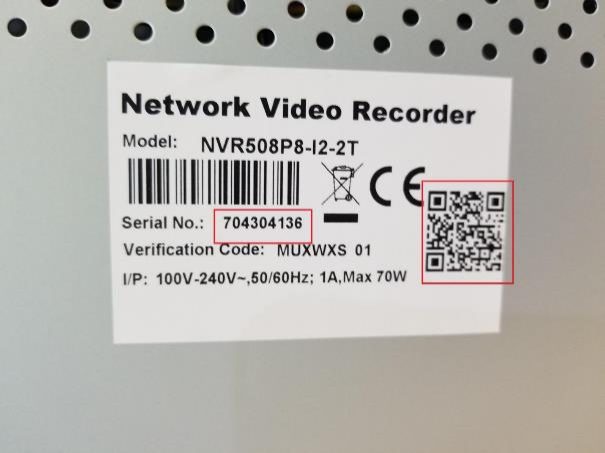
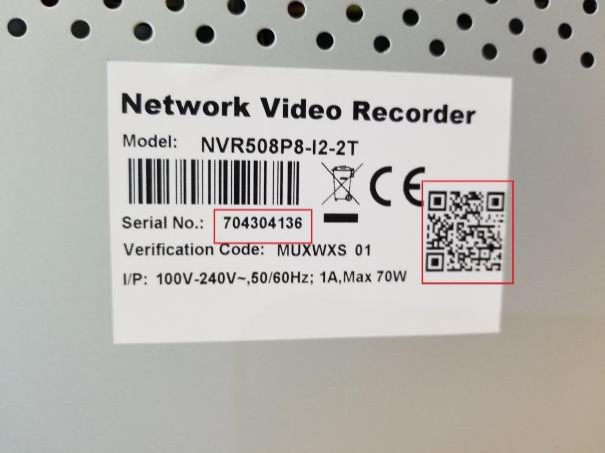
Step 3: Scan the QR code from the device sticker or Login to the device Local Menu and go to Menu Configuration Network Platform Access to access the QR Code.
.
.
.
.
.
.
.
Method 2: Add Device with Serial Number
.
(Only the last 9 digits of the serial number are needed to add the device into the App.)
.
Step 1: Tap on the ‘+’ icon and select “Manual Adding”
.
.
.
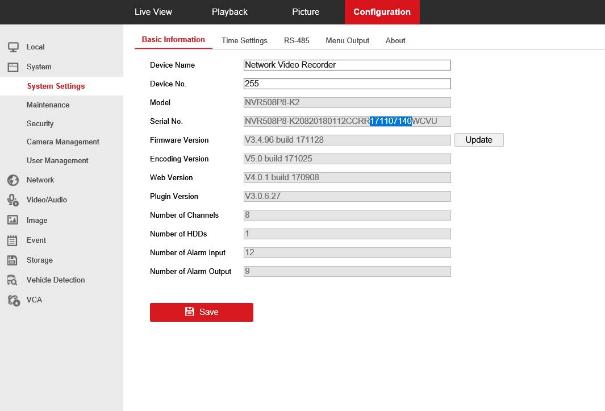
Step 2: The serial number can be accessed from the device sticker. To access the serial number from the web config, go to Configuration System System Settings Basic Information
.
(Refer to the figure below)
.
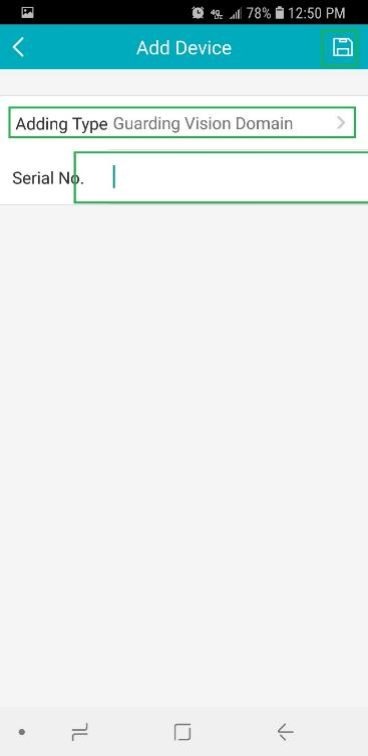
Step 3: Once the “Manual Adding” Option is selected, You will be directed to the Add device page with “Serial No.” Input the serial number and click on  to save.
.
.
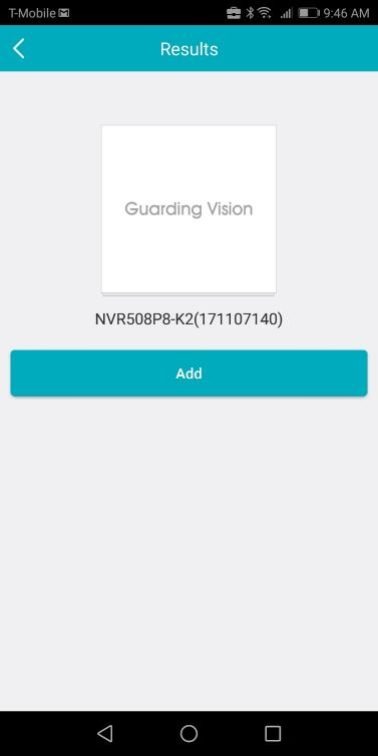
Step 4: Click “Add” to add the Device.
.
.
.
.
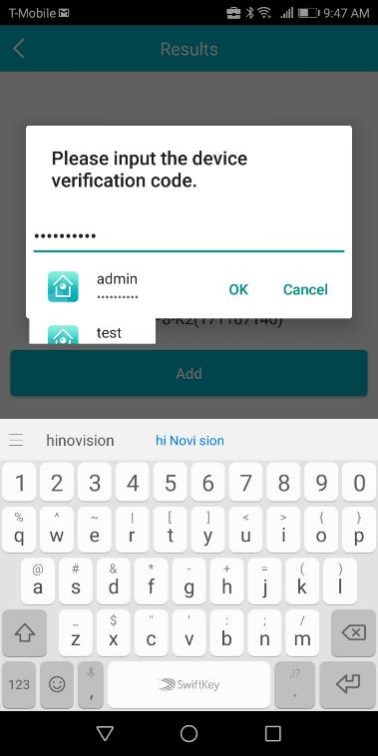
Step 5: Input the Verification Code that was created and click “OK”.
.
(You can find the code from the device web Config. Go to Configuration Network Advanced settings Platform Access.)
.
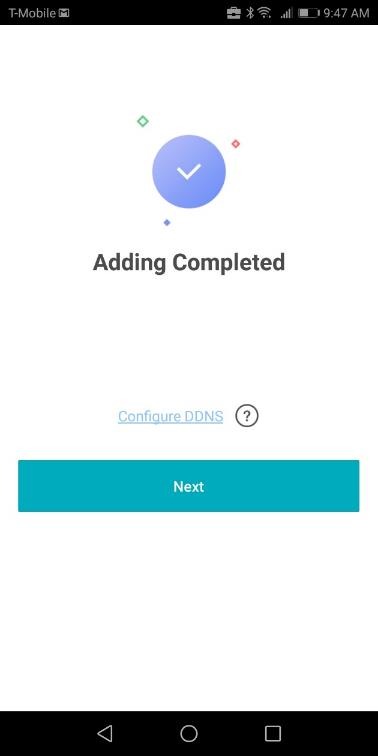
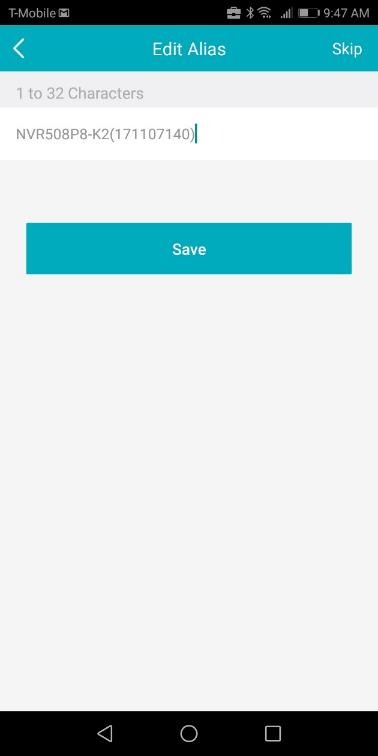
Step 6: Tap on “Next”. Create a Device name in the “Edit Alias” page. Tap “Save”
.
.
.
.
.
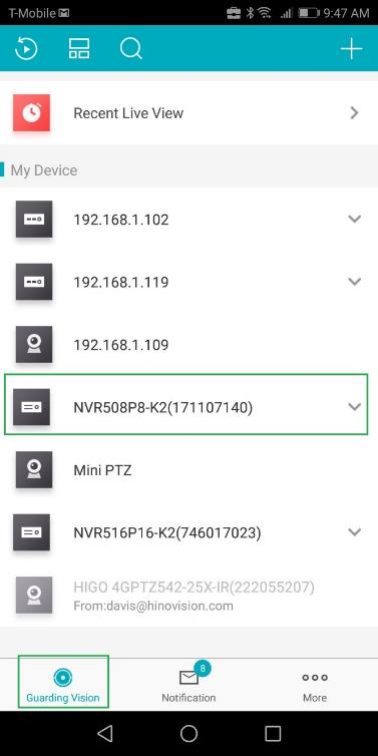
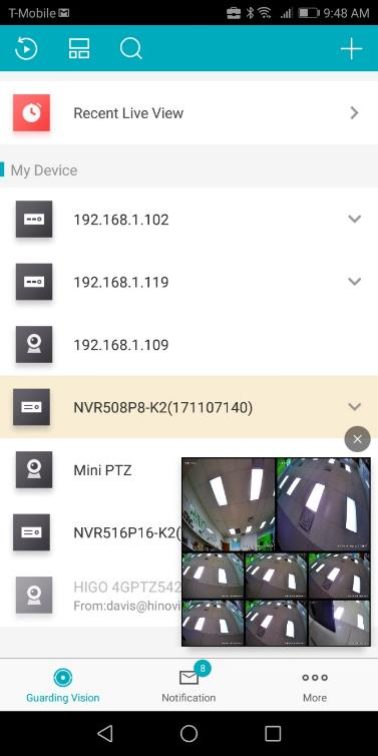
Step 7: Tap on “Guarding Vision” at the bottom of the app to see your device listed. Tap on the device name to view the cameras connected to the device.
.
.
.
.
.
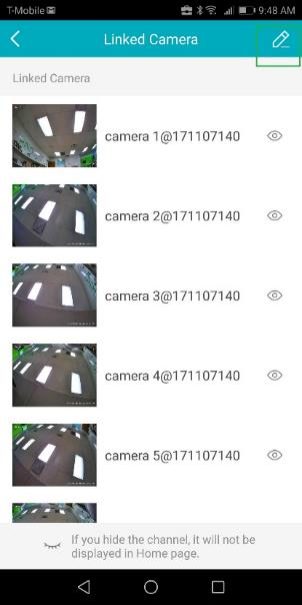
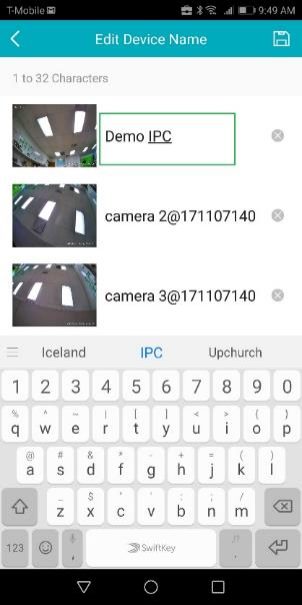
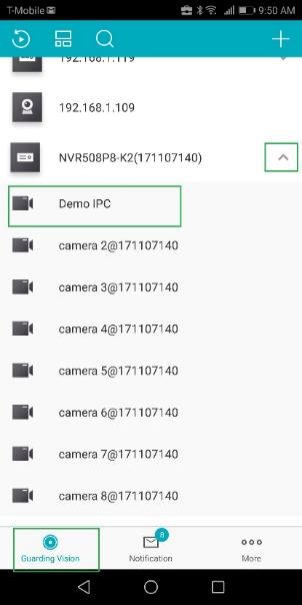
How to Change Camera names on the App
.
Guarding vision Setup from browser (www guardingvision com)
.
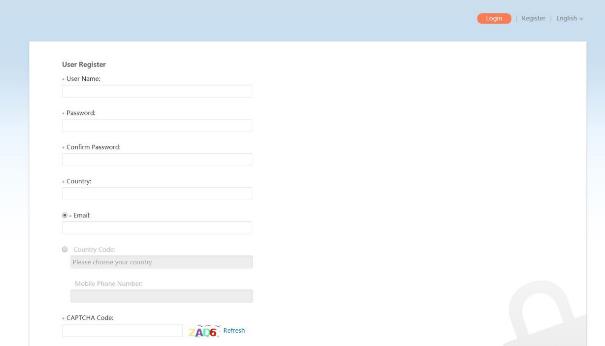
Step 1: Open browser (Internet explorer/Chrome) and input the address www.guardingvision.com. And click on “Register” to register for a new account.
Step 2: In the registration page, input the mandatory credentials and select “Email” for registering with email or “Country Code” for registering by a phone number.
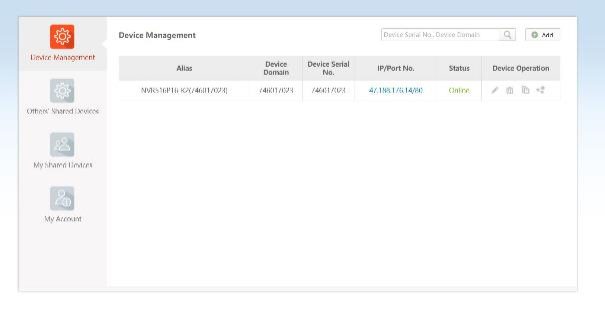
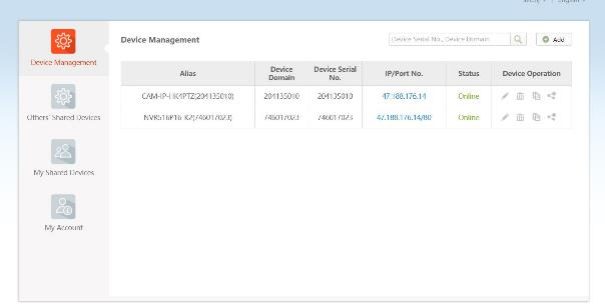
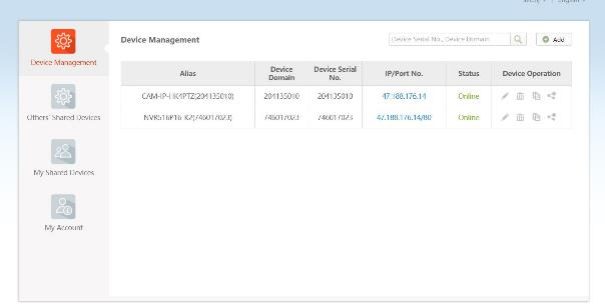
Step 3: Once the account is created, select “Device Management” and select “Add” to add a new device.
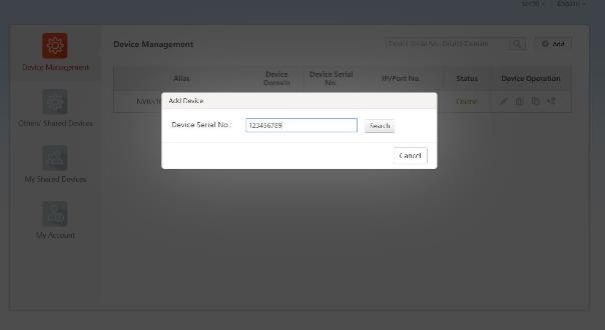
Step 4: In the “Add Device” pop-up window, input the device serial number (Last 9 digits of the serial number found on the device sticker) and click on “Search”.
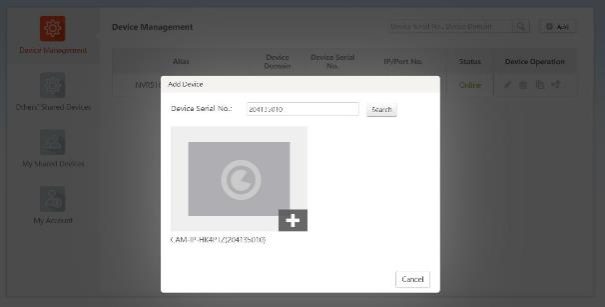
Step 5: If the platform access is enabled on the device, then you should see the device on the “Add device” window. Click on the ‘+’ icon for the device. Click on the link for Enabling “Platform Access” https://app.box.com/s/ftj2keo6pvvvkpif9ukquyp7jrvhktwx.
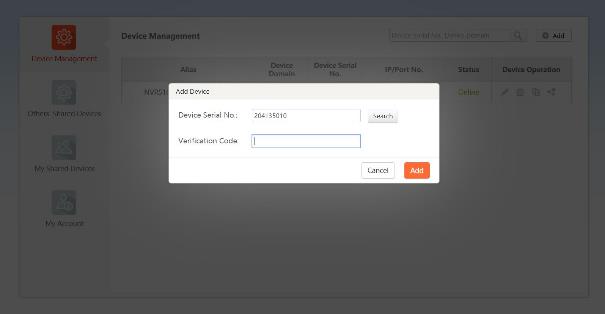
Step 6: Enter the verification code found on the platform access page of the device. Click “Add”.
.
Step 7: Click “OK”. Now the device should be added into the Guarding vision account. To view video stream, download the Guarding vision ass on your mobile phone and login with the account credentials just created.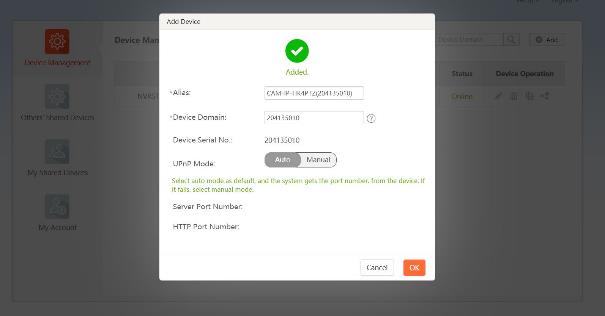
.
.
Sharing the device:
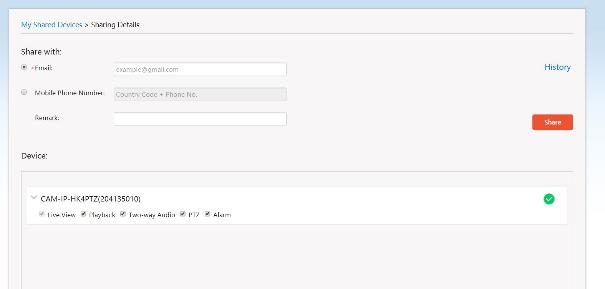
To share the device with another Guarding vision account, click on the “Share” icon next to the device name
Select “Email” for sharing by email or select “Mobile Phone Number” to share by mobile number. Click on the check mark next to the device and click “Share”.
.
Initialize/Setup SD Card from Guarding Vision App
SD Card Setup for IP Camera from Guarding Vision
.
Purpose:
This document provides instructions on how to initialize a brand new SD card that is inserted into the IP Camera.
(Note: When a brand new SD Card is inserted into a IP Camera, it has to be initialized/formatted before it can start recording data)
.
Steps to Initialize/Format the SD card
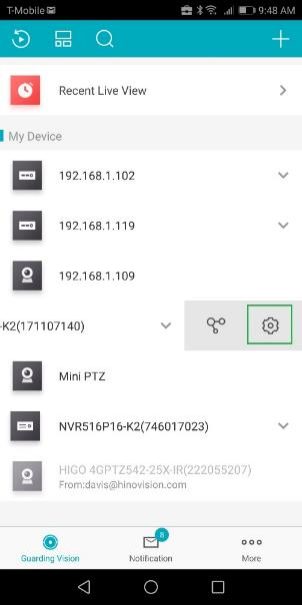
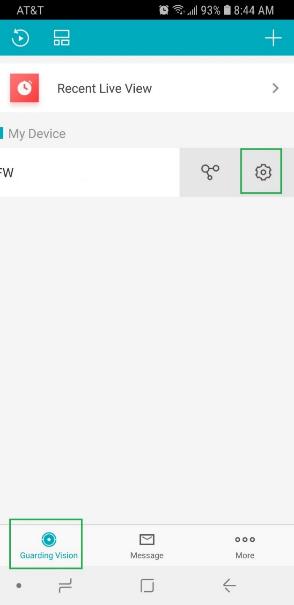
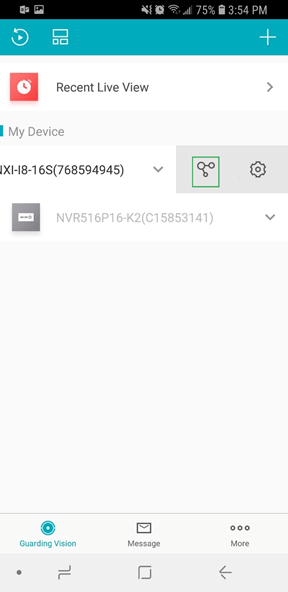
Step 1: Open the app, Select ‘Guarding Vision’ on the bottom left and slide the device name to the left and select the  icon.
icon.
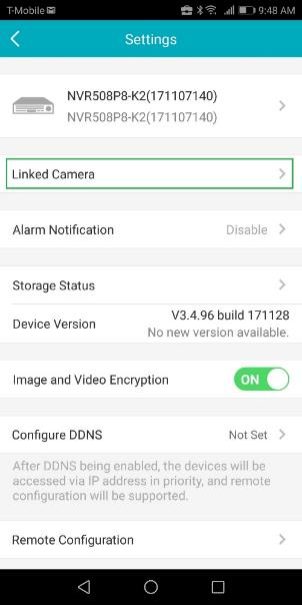
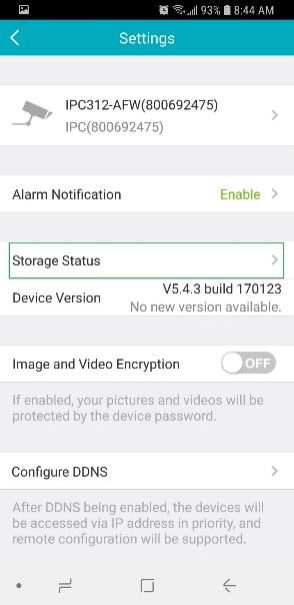
Step 2: Once in the device settings page select ‘Storage Status’
.
.
.
.
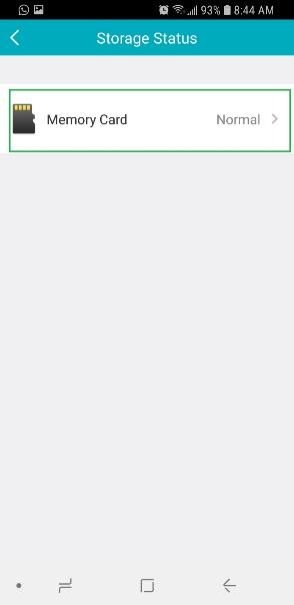
Step 3: In the storage status page, select ‘Memory Card’, which will take you to the ‘Initialize Storage’ page.
.
.
.
.
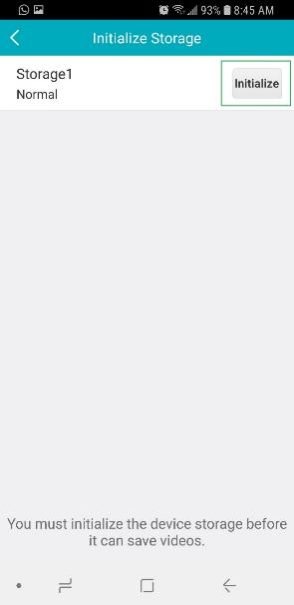
Step 4: In the initialize storage page, select Initialize. This will format or initialize the sd card and the sd card should be ready for recording.
.
Reset device with Guarding Vision
Reset NVR using Guarding Vision
Purpose:
The purpose of this document is to be able to reset an NVR with the vuarding vision account.
Currently Supported HINO devices:
NVR532P16-I4
NVR516P16-I4
NVR732-I8
NVR764-I8
Required Firmware:
V4.1.65 or above
Initial setup for enabling Password reset from Guarding Vision
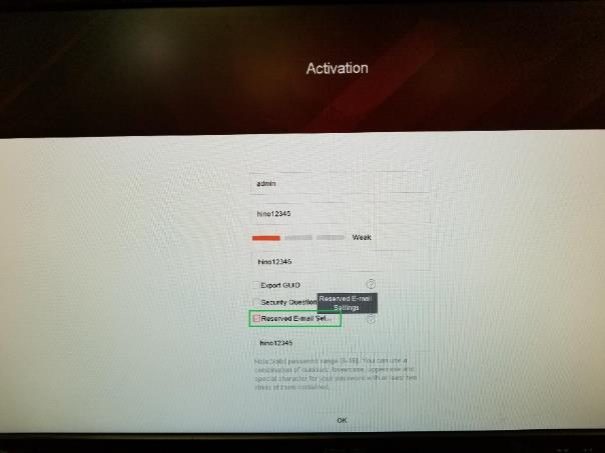
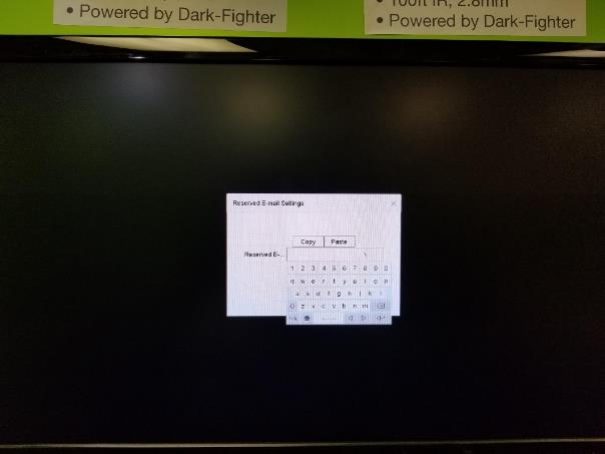
Step 1: During the initial device setup, make sure the “Reserved Email Settings” option is checked.
.
.
.
Step 2: Since the Reserved email settings option is enabled, the following screen as shown in the figure below should appear. Input the email that you wish to receive a password reset verification code.
(Note: Please enter a valid email)
.
.
.
Resetting password from the Guarding Vision App
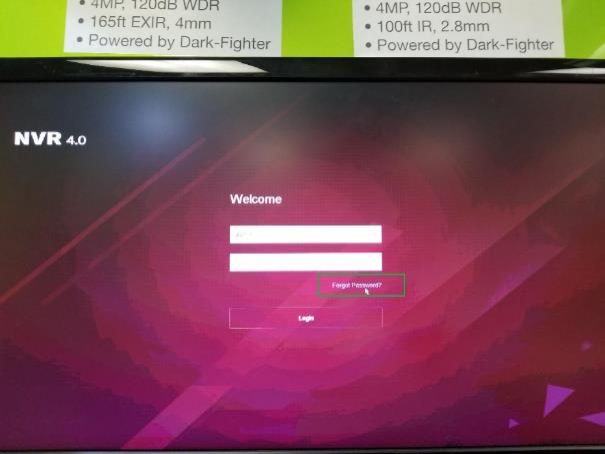
Step 1: On the NVR login screen, click on “Forgot Password”
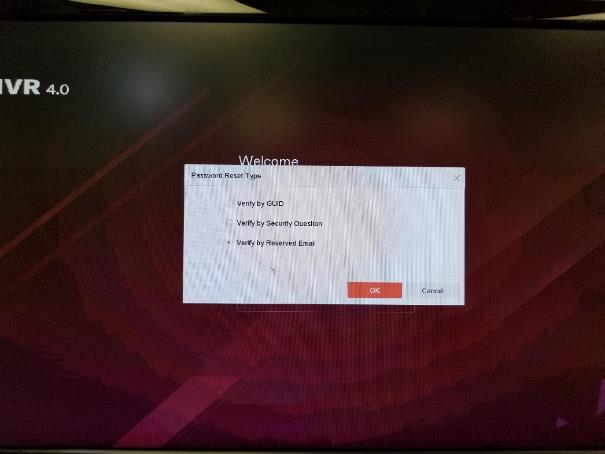
Step 2: On the following screen as shown in figure below, select “Verify by Reserved Email” and click “OK”
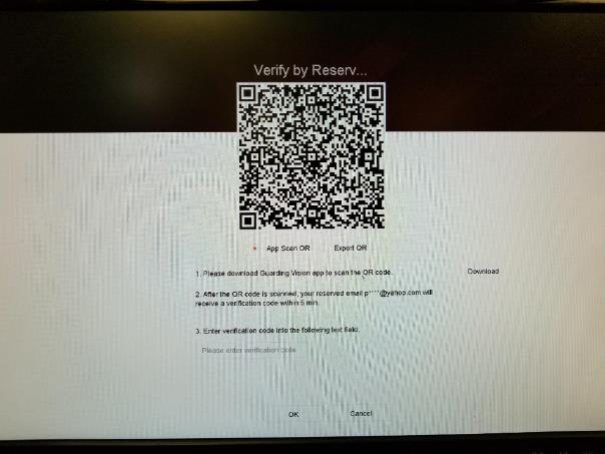
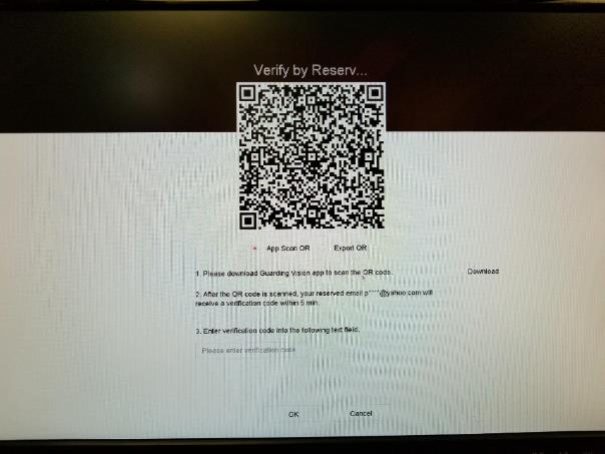
Step 3: You will be brought to a screen with QR Code.
.
.
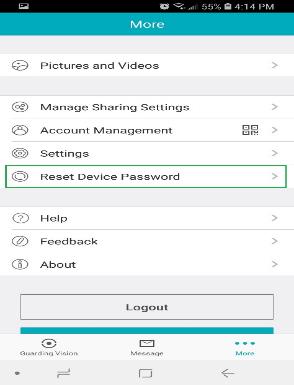
Step 4: Open the Guarding vision App on your phone and go to More Reset Device Password.
.
.
.
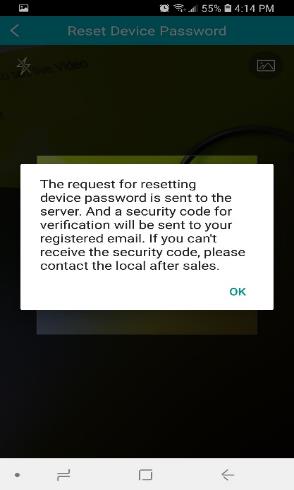
Step 5: Scan the QR Code shown on the NVR screen. You should see a message as shown in the figure below.
Step 6: Check your email to find the verification code and enter the code in the field provided and click on “OK”.
.
Platform Access for Guarding Vision Offilne Issue
Guarding Vision Offline Issue
Purpose:
This document provides steps to fix the Platform Access “Offline” status issue on your NVR/DVR.
Solution:
The most common cause for “Offline” status is when the “Preferred DNS Server” space is empty. Follow the steps below to fix this issue.
NVR Local menu
Step 1: On the monitor connected to the NVR, Right click and go to Menu Configuration Network General
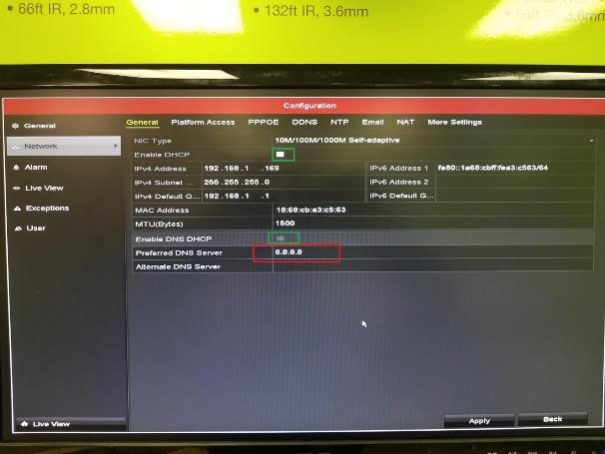
Step 2: Enter the “Preferred DNS server” address as 8.8.8.8
(Note: If “Enable DHCP” is checked, you can check the option “Enable DNS DHCP” which will let the NVR/DVR pullup its own Preferred DNS Server)
Step 3: Click “Apply”. The device might take a few seconds before applying the new values.
Step 4: Now go to Menu Configuration Network Platform Access. The status should show “Online”. The device might take up to 60 sec before showing the new status. Click “Back” wait 60 sec and check the status again.
(Note: You can scan the QR code on your “Platform Access” page to add the device directly to your Guarding Vision App.)
.
Guarding Vision Quick Setup
Guarding Vision Setup Instructions
Setting up the DVR/NVR
Step 1: On the DVR/NVR screen, right click Select Menu Configuration Network.
Step 2: Under “General” input the “Preferred DNS Server” as 8.8.8.8 as shown in the figure below.(If you have “Enable DHCP” and “Enable DNS DHCP” option on this page selected, then you do not have to perform this step)
Step 3: Select “Platform Access” and check “Enable” and create a verification code. Click “Apply”.
.
(Note: The QR code displayed on the platform access page can be used to add the device into the guarding vision app.)
Adding the device on Guarding Vision App.
Step 1: Tap on the “+” to add a new device. Select “Scan QR Code” to scan the QR code being displayed on the NVR monitor. Input the Verification Code that was created under “Platform Access” in the NVR.
.
.
.
.
Step 3: For Manual Adding, input the “Serial No”. For QR code, Scan the QR code from the device sticker or the QR code displayed on the NVR. (Note: You can also scan the QR Code you see on the monitor. Refer to Step 3)
.
Guarding vision sharing and registering
Guarding Vision ‘Register’ ‘Login’ and ‘Share’
Registering on Guarding vision
.
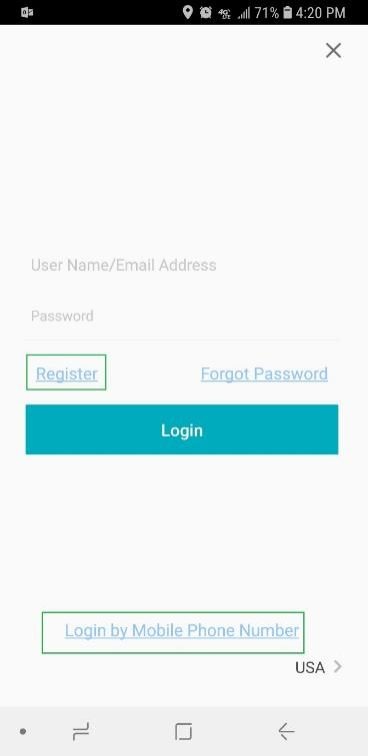
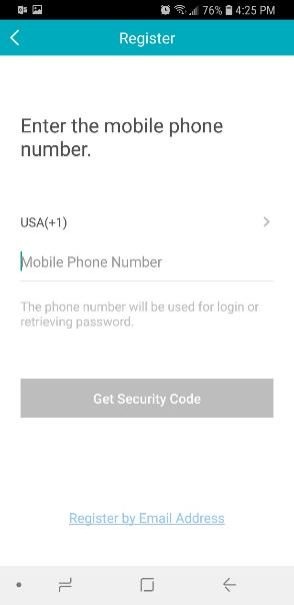
Option 1: Tap on the “register” option. Now in the Register page enter the Mobile Phone number and tap on “Get Security Code”. You will receive a code by “Text”. Input the code you just received and complete the process.
Option 2: Tap on “Register by Email Address” for registering by email. You will receive the security code to the email address entered.
.
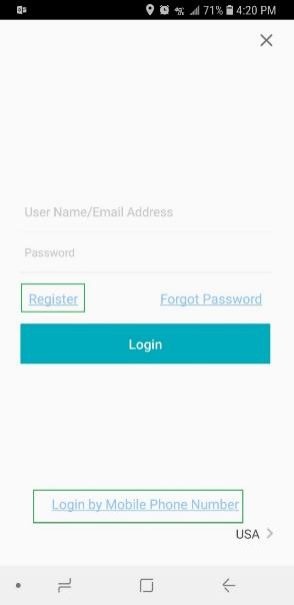
How to select Login options on Guarding vision
.
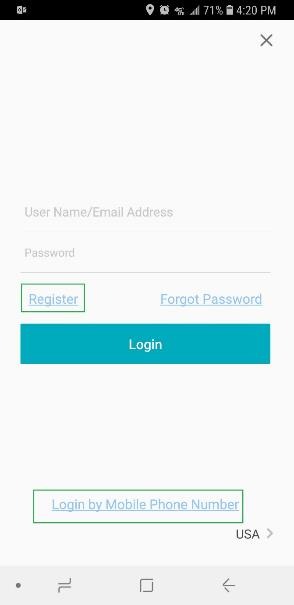
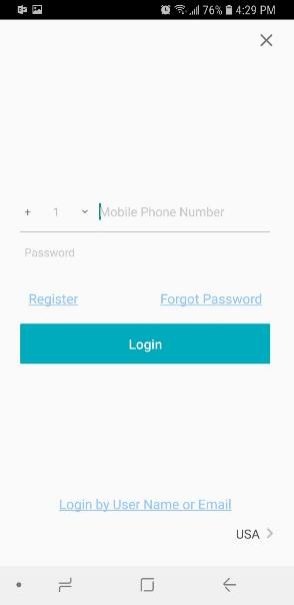
To Login using a mobile number, tap on the “Login by Mobile Phone Number” option. Now input the phone number and password and tap “Login”.
.
.
.
.
Sharing a device on Guarding vision
Method 1: Sharing from the Primary account
On the Primary account, swipe the device name to the left to access the “Share” Icon. Tap on the Share icon. This will take you to the “Recipient” page.
In the “Recipient” page enter the email or phone number of the user you want to share the device.
When sharing, make sure the Phone number/email/username are entered as shown in the account details.
Finding Account Details:
On the bottom of the app, Tap on “More” and select “Account Management” to view the Account details like Username, Email address(if used to register) and Mobile Phone Number (If used to register).
.
.
.
Add Stand alone device to Guarding Vision
.
Adding a Stand Alone IP Camera to Guarding Vision App
Step 1: Log in to the IP Camera with internet explorer and Go to Configuration Network Advanced Settings Platform Access
Step 2: Check the “Enable Option” you will see a pop-up window asking to create a verification code. Enter the desired verification code and click “OK”
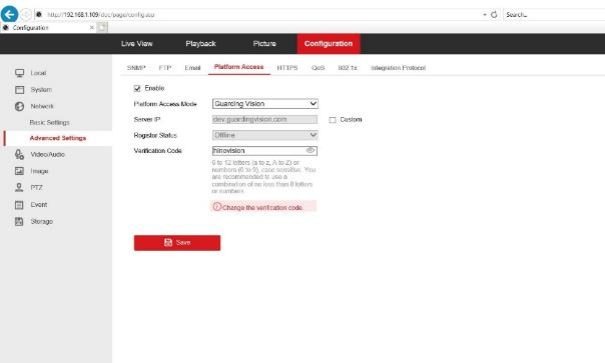
Step 3: You can view the verification code by clicking on the eye lid icon.
Step 4: Click “Save” and refresh the page. The status should turn from offline to online.
.
Step 5: Now you can add the device into guarding vision by entering the las 9 digits of the serial number which can be viewed by going in to
Configuration System System Settings.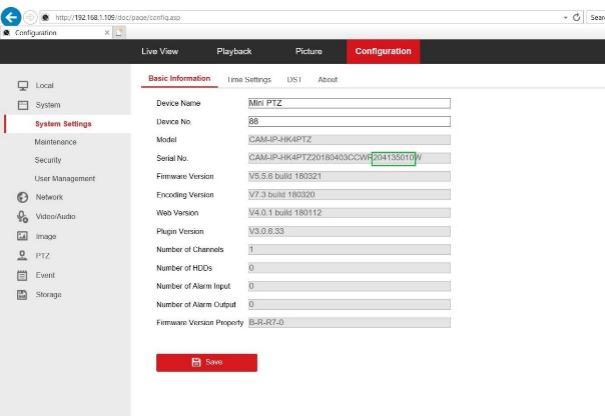
.
Step 6: Open the guarding vision app on your mobile device and register for a new account.
Step 7: Click on the ‘+’ sign on the top right corner of the app and select manual add for serial number or QR code to scan the QR code on the device sticker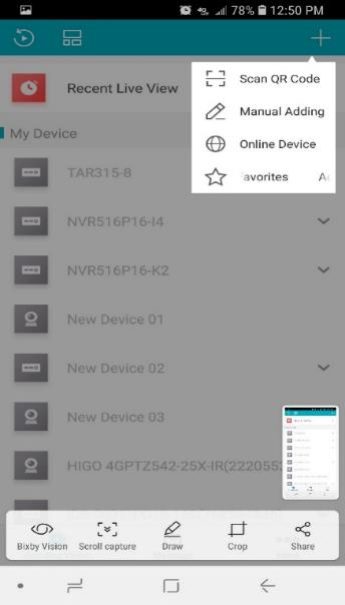
(Note: Playback can be viewed on the App for IP Cameras that support Micro SD Card)
.
Add Device with Static IP into Guarding Vision for Local Access
.
Add IP Camera to Guarding Vision with Static IP Address
Purpose: This document provides instructions on how to find and add a IP camera with static IP address into the Guarding Vision App.
Note:
Method 1: Adding an online device in the local network
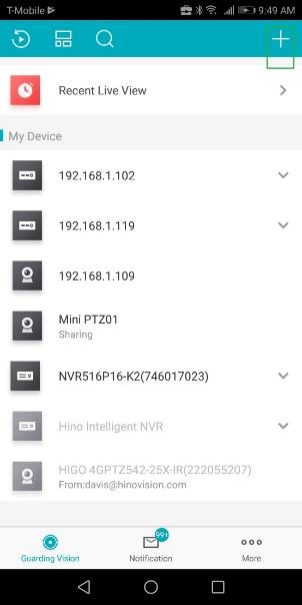
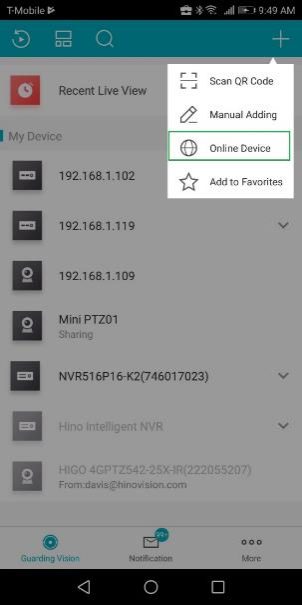
Step 1: Open Guarding vision App and select “Guarding Vision” on the bottom of the App. Click on the “+” icon on the top right to access adding menu.
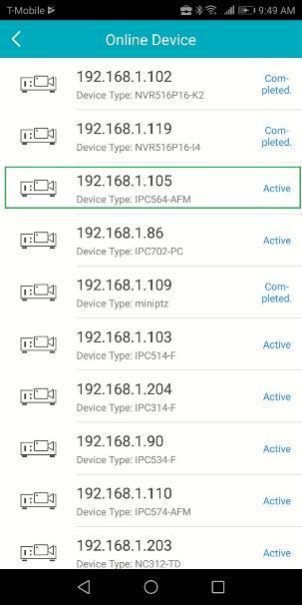
Step 2: From the Add menu, select “Online Device”
.
.
.
.
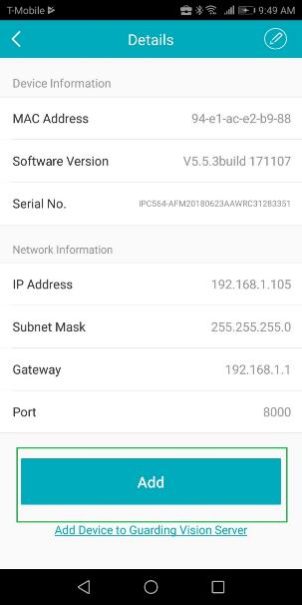
Step 3: In the online device list, tap the device you want to add. You will be taken to a details page.
Step 4: The details page shows you the info of the device that you just selected.
(Note: Select the “Add Device to Guarding Vision Server” option available under the “Add” button for remote access over cloud. For this, the device should be connected to the network and the “Platform Access” option should be enabled from the local menu/web menu for NVR/DVR. For a IP Camera, the “Platform Access” should be enabled from the web menu.)
.
.
.
.
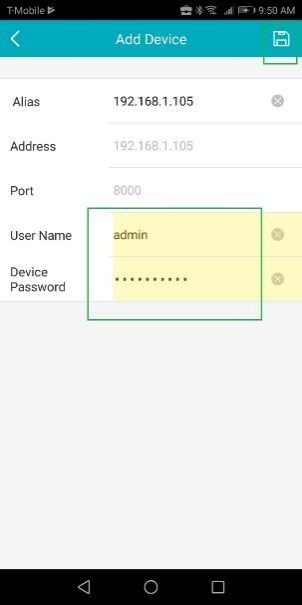
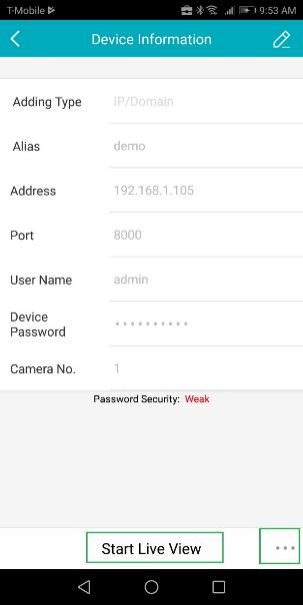
Step 4: in the “Add Device” page, input the Username and Password for the device and click on  icon on the top right corner to save the login credentials and finish adding the device.
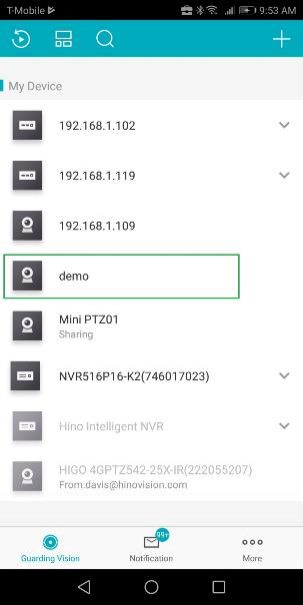
The device should be added to your App.
.
.
.
.
.
Method 2: Manual Adding option
(Note: Using this method, you can add a portforwarded device with a public IP address.)
Step1: Open the App and click on the “+” icon on the top right to access the add menu. Select “Manual Adding”.
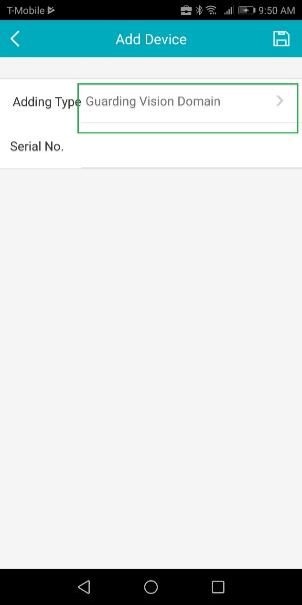
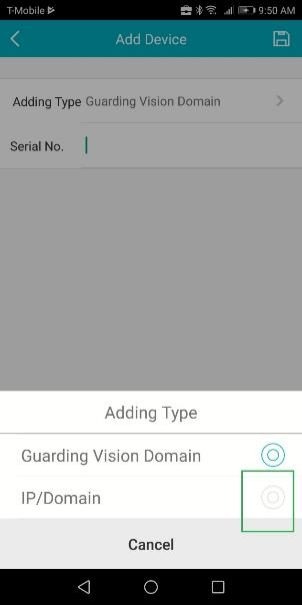
Step 2: Select “IP/Domain” to change the adding type.
.
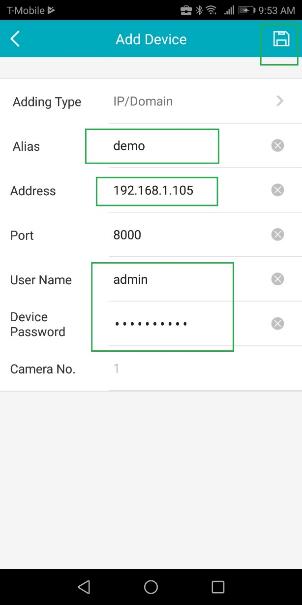
Step 3: Create a name for the device by typing in the “Alias” option.
(Note: If you have a device with a port forwarded IP address, you can enter that public IP address in the address space with the device login credentials.)
.
.





Great post.