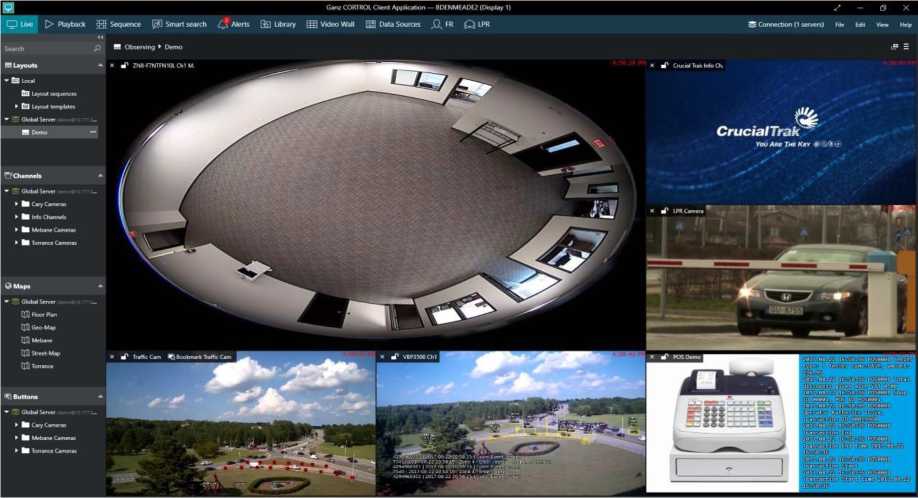
Ganz CORTROL VMS Client Setup Guide, GANZ ® CORTROL VMS is the Core Command Center of your security installation. CORTROL unifies Video Surveillance, Access Control, Video Analytics, IoT Sensors ( vape detectors, bullying, and gunshot detectors ), License Plate Recognition (LPR), intercom communications, biometrics , and other IP Systems to provide real-time situational awareness. With intelligent network systems in critical areas, incidents are quickly detected and prevented. Thus, emergency response times are shortened.
Main window
The main window displays content provided by the server, which depend upon the selected tab. Please see the corresponding sections of this document for detailed information about each mode.
The Ganz CORTROL Client application window title displays window name, display number, and computer station name.
Upper right corner – window controls
![]()
From this panel, the Ganz CORTROL Client application window can be:
- Opened in full screen mode
- Minimized to taskbar
- Maximized/restored to default size
- Closed
To enter full screen, F11 can also be used; to exit full screen mode, press Escape or F11 on the keyboard.
Ganz CORTROL VMS Client Setup Guide
Read More :
Upper panel – tabs
I I Live £> Playback Sequence \0] Smart search /A Alerts pa] Library
The upper panel contains tabs that allow you to quickly switch between main software functionality. The following tabs may be available, depending on the software version:
- Live: real-time video
- Playback: recorded video
- Sequence Explorer: recorded video analysis
- Smart Search: recording motion video analysis
- Alerts: generated alerts
- Library: exported video and snapshots
Upper panel – server connections
* Connection (1 servers)
The Connection button opens server connection setup window and displays the number of currently configured servers.
Upper right: main menu
File Edit View Help
This section contains the main application menu items.
- File; Exit: close the Ganz CORTROL Client Application
- Edit; Settings: application settings
- View: operation modes
o Always on top
o Exclusivity Mode
o Locked application
- Help; About: about Ganz CORTROL Client
Server Connections
If you wish to connect to a remote server, follow the steps below.
Select the Connection section in the upper panel to bring up the dialog box.
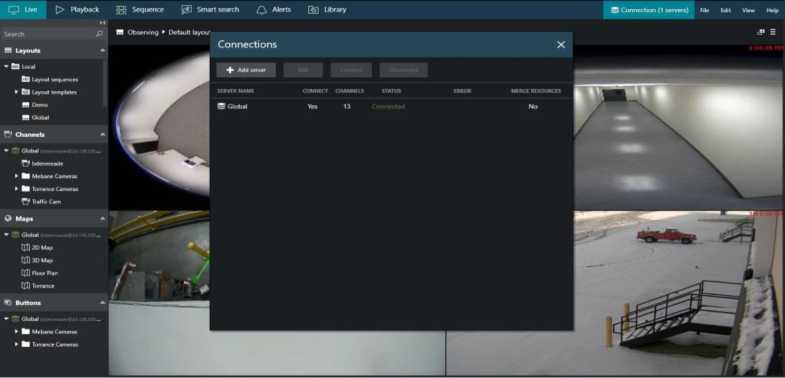

Select a server by clicking it in the item list and click Connect to connect with the selected server. Server resources will automatically appear in the left-hand panel.
Click Disconnect in this same dialog box to log out from the selected server.
Video Channels
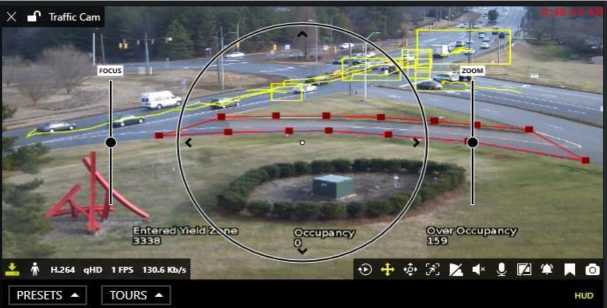
Each video displayed in live view is placed into a ‘slot’, a part of the layout, called viewport.
![]()
X rf* Traffic Cam
Lower-left: Stream details
i f H.264 VGA 30 FPS 2.5 Mb/s
Enabled items are highlighted yellow:
Upper-left: general viewport controls
o X: close the stream and free the viewport
o Lock: unlocked/locked (Unlocked video in can be replaced by other cameras)
o Camera name: Name given the camera
Upper-right: Current time on the server from which the device originates
o Recording status: X = not recording, yellow arrow = recording
o Motion detector status: running = motion present, standing still = no motion
o Video codec of the stream: H.264, MJPEG
o Picture resolution: XVGA, 2.8MP
o Stream frame rate: xFPS
![]() o Stream bitrate: xKb/s, xMb/s
o Stream bitrate: xKb/s, xMb/s
Lower-right: Controls
o Instant playback: Playback of currently select time, (Default, last five minutes)
o PTZ toggle: PTZ HUD and bottom panel ON/OFF
o DPTZ toggle: Toggle digital PTZ control
o Motion grid: ON/OFF
o Substream: Auto/main/substream
o Incoming audio: ON/OFF
o Audio OUT: Press and hold the microphone to speak
o Aspect ratio: Auto/stretch to fill viewport/original
o Notification panel toggle: Toggle display of device centric notification panel
o Bookmark: Bookmark current selection of time for later retrieval, review
o Snapshot: Export snapshot of current image to library
Bottom: PTZ controls
PRESETS * TOURS *
HUD
- Presets Tours: Listing presets, with option to initiate tour
- HUD (Heads Up Display): ON/OFF (Centre: PTZ HUD controls) o Pan and tilt arrows
o Zoom slider
o Iris slide (If camera supported)
o Focus slider (If camera supported)
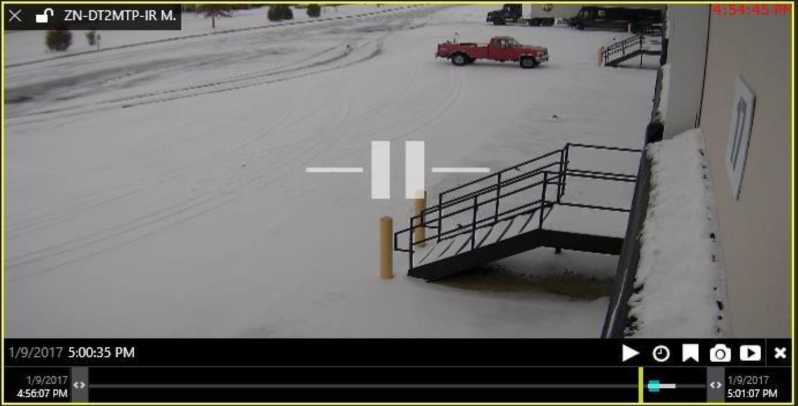
Instant Playback
The following overlay controls are available in the instant playback mode:
Camera Center: Play/Pause
o Drag to the center of the line to pause drag right to go fast forward o Drag left to rewind fast
o Release from dragging to continue normal playback
• Bottom right: Controls C
o Place: Click to play
o Clock icon: Specify time, date/hours/minutes
o Bookmark: Bookmark current selection of time for later retrieval, review
o Snapshot: Snapshot of current image, saved automatically
o Archive: Export loaded footage displayed in timeline
Bottom: Navigation
1/9/2017 L
4:5607 PM
11/9/2017
5:01:07 PM
o Left/Right <> arrows: Adjust loaded video time boundaries (Default, last five minutes) ■ Drag right to go forward in time drag left to go backwards in time
o Vertical yellow line: Indicates current playback moment, ■ Drag it anywhere or click to move along the timeline
![]()
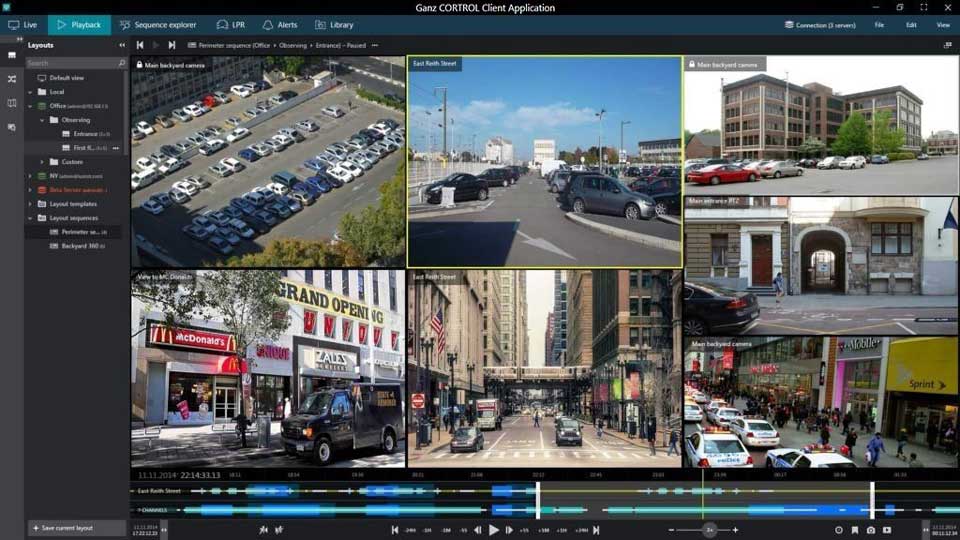
Playback (Archive) Mode
For security reasons, it has been made impossible to erase recordings from individual channels and/or time periods. Recordings
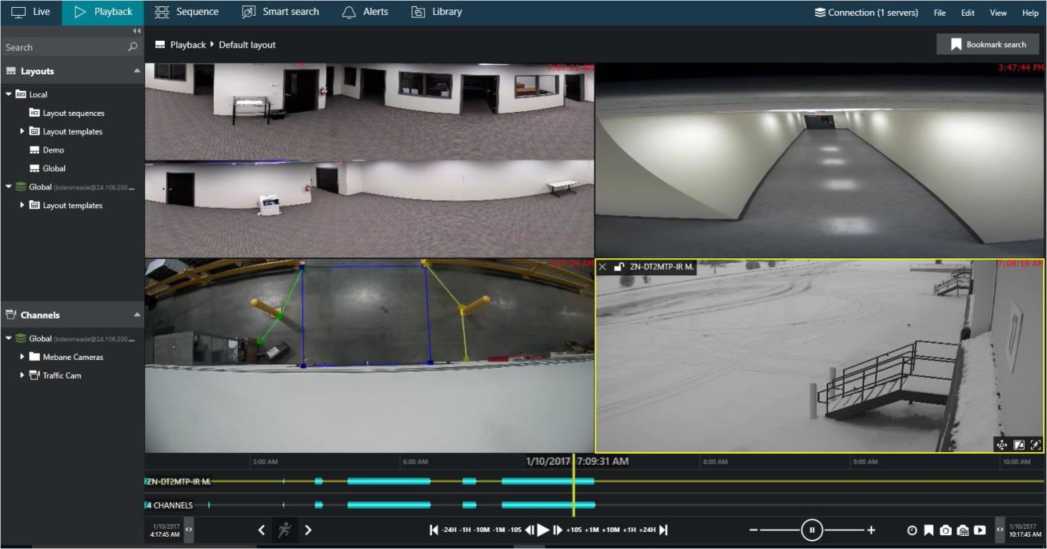
Select Playback tab to switch to archive playback mode. Your current layout will be used, and recorded video streams will be displayed for channels with enabled recording.
- Layouts: Double-click your desired layout to load it
- Layout templates: Double-click your desired layout template to load it
- Channels:
o Double-click or drag and drop the channels of your choice to fill the viewports
o First empty viewports are filled; then non-locked channels are replaced one by one)
o Each channel can be expanded to access recordings of its main or secondary stream.
o All footage having no associated active channels will be available under Orphan archive tracks.
The following viewport overlay controls are available in the playback mode, upon selection of a viewport:
- Upper left:
o X: close the stream and free the viewport
o Lock: unlocked/locked (Unlocked video in this viewport can be replaced by other cameras)
o Camera name: Name given the camera
- Lower-right: Controls
o DPTZ toggle: Toggle digital PTZ control
o Aspect ratio: Auto/stretch to fill viewport/original
o Motion grid: ON/OFF
Playback timeline

Right below the video stream, the Timeline is displayed:
- Time intervals: Show the timeline scale;
o Click and drag left/right to move the timeline
The video footage outline is shown twice:
o Upper timeline: Contents of currently selected stream, with corresponding channel name
o Lower timeline: Content summary for all channels currently present in the viewport layout
- White line: Indicates recorded video data
- Cyan line: (A little bit wider than the white line) indicates recorded motion data
- Blue line: (A little bit wider than the cyan line) indicates recorded incoming audio data
- Yellow vertical line: Denotes current playback position
Playback Navigation controls

The playback navigation controls are located at the bottom of the window:
- Timestamps: Timeline start and stop
 Left/Right <> arrows: Adjust the loaded footage time boundaries (Default, last five minutes) o Drag right to go forward in time drag left to go backwards in time
Motion Search:
Left/Right <> arrows move forward or back to next recorded motion
Playback Navigation:
o Use the Play/Pause button to start playback
o Use the <> arrows near the Play button to go one frame back/forward
o -/+ steps: click to go back/forward with a step of 5 seconds, 1 minute, 1 hour or 24 hours o |< >| arrows: go to the very beginning/very end of the footage
- Playback speed:
o Drag the blob to adjust playback speed from +/-0.5x to +/-32x
o The Pause button duplicates the main pause control
- Clock icon: Specify time, date/hours/minutes
- Bookmark: Create bookmark for later retrieval, review
- Snapshot: Snapshot of current image, saved automatically
- Multi-Snapshot: Snapshot of all channels currently present in the viewport layout
- Archive: Export loaded footage displayed in timeline
o Option of multi-channel, or single channel archive export
![]()
Related settings
Additional administrative tools
Bitlocker settings
Device Manager
System into
There are a few requirements for the system the GANZ CORTROL Client will run on.
The ports for remote connections should be enabled through the firewalls (default ports are 60554 for the GANZ CORTROL Client)
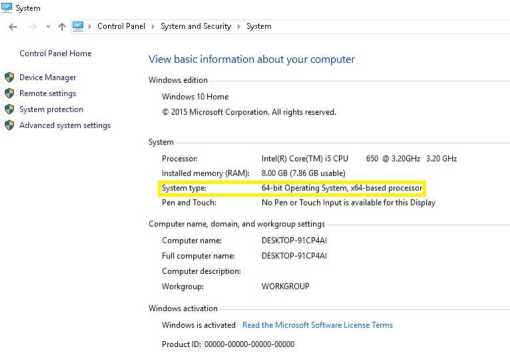
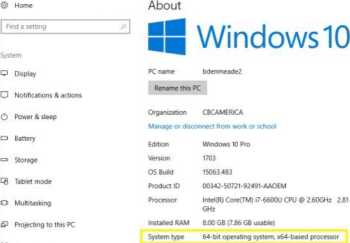
The Bit version of Windows, 32-Bit vs. 64-Bit on the PC/Server should be confirmed.
For Windows 7: To confirm your Windows bit version, go to Control Panel > System and confirm System type as 32-Bit or 64-Bit.
For Windows 10: To confirm your Windows bit version, go to “Settings > System and confirm System type as 32-Bit or 64-Bit.
 Have a question?
Pen and touch No pen or touch input is available tor this display Change product key or upgrade your edition of Windows
Read the Privacy Statement for Windows and Microsoft services
Read the Microsoft Services Agreement that applies to our services
Read the Microsoft Software License Terms
Get help
Make Windows better.
Give us feedback
The CORTROL Client Installer can be found at Ganz Security/Software includes both the CORTROL Management Console, and the CORTROL Client installer.
From the link please select and download either CORTROL Console 32bit or 64bit, depending on the Windows OS bit version of the host server.
For convenience, links to the 32Bit, and 64Bit versions of the CORTROL Console are provided below.
Note: For most browsers, any downloaded files can be found in the Windows Download folder.
I
/* GANZ
JyCDRTRDL Client 32Bit
I
/* GANZ
y’CORTROL Client 64Bit
v — J
- Navigate to the Microsoft Windows download folder.
- Double click on the CORTROL Client installer, to begin the installation process.
- Select the installation language and click Next.
- Accept the terms of agreement and click Next.
- Accept default installation location and click Next. (Change location destination if required.)
- Select the needed application language and click Next.
- Once installation is complete, click Finish.
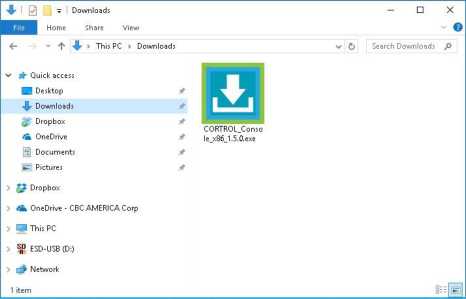
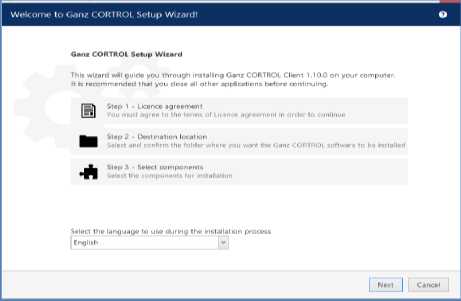
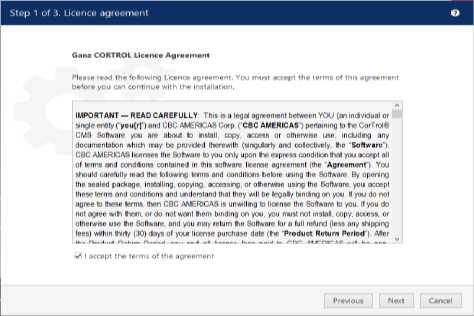
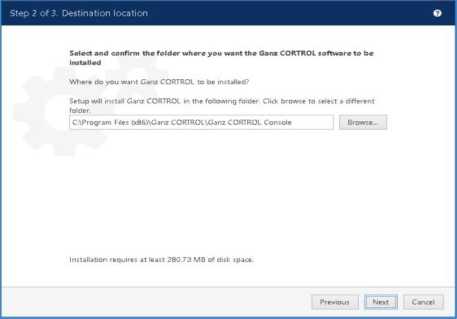
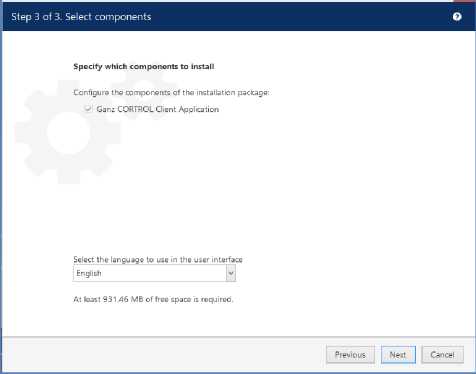
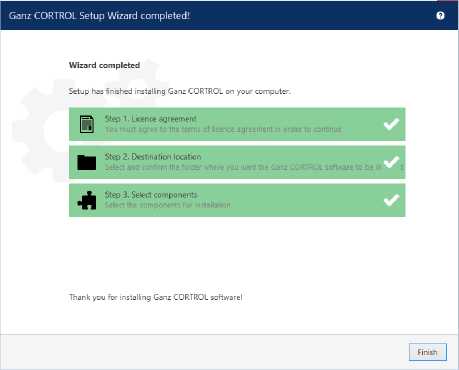
To launch the CORTROL Client interface, double click on its desktop icon. H
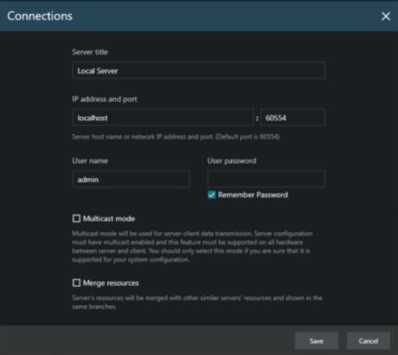
The Client will require configuration, to connect to the CORTROL Global Demo Server.
- Select “Disconnect”, as no server is currently configured.
- Select “Connection” located in the top right corner.
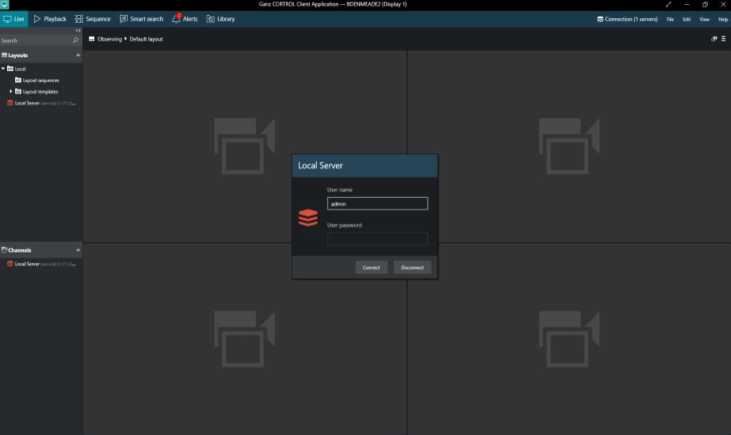
- Select the “Local Server” listed under “Connections, and then select “Edit”
- Leave the default “Server title”
- For the “IP address and port” enter: 173.42.78.61 – Leave the default port at 60554.
- Enter “demo” all lower case for the “Username”
- Enter “2468” for the password.
- Select “Remember Password” and then click on “Save”.
- Select the “Local Server” listed under “Connections” and then click on “Connect”.
- Click on the “X” to close / exit, “Connections”
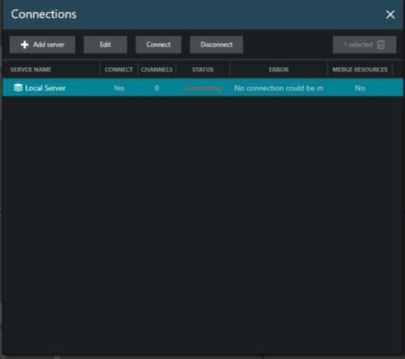
The “Demo” user have been giving no restriction on functionality within the GANZ CORTROL Client.
Please reference the CORTROL Client Manual for navigation, and usage.
