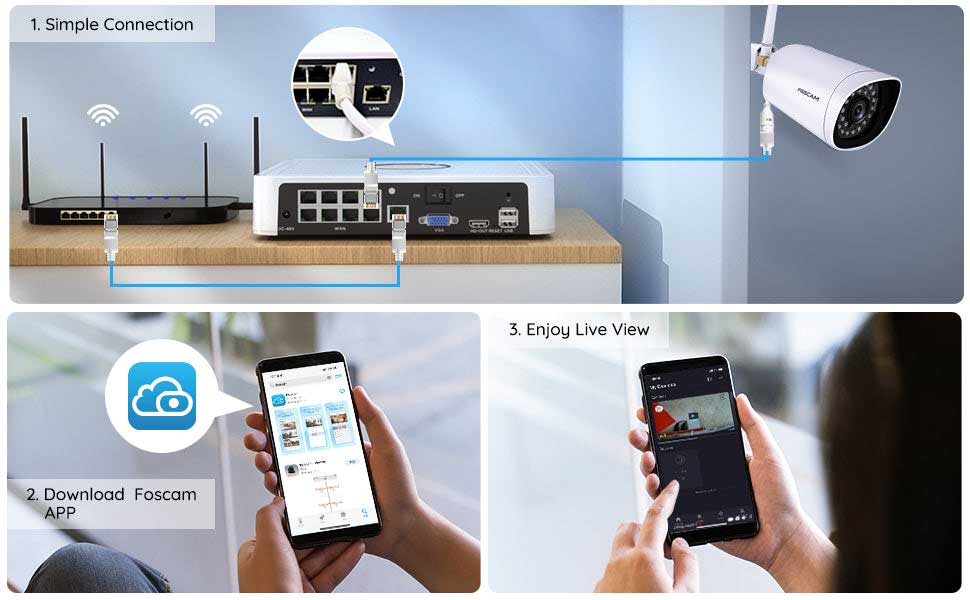
Foscam APP Complete Guide, Foscam is the trusted, world leading IP security camera provider with over 10 years of design, manufacturing and distribution in 80+ countries.
Foscam App keeps you connected to your home or business anytime, anywhere.
Check in on your pets while at the office, keep tabs on the nanny while on vacation, or find out who’s been stealing those Amazon packages from your front door – with Foscam App, you can.
In the second iteration of Foscam App, we bring you an all-new design, featuring a convenient side-menu, intuitive cloud timeline, stable software architecture and more. From the app, you can add your camera in minutes, then view what matters most from anywhere, anytime.
You can also control and setup your camera and receive alerts in realtime when it detects motion or sound.
With Foscam Cloud, you can access alert recordings through an intelligent and intuitive timeline.
There’s no need for a standalone app – it’s all accessible through Foscam App and myfoscam.com. Whether you upgrade or lose your smartphone, we’ve got you covered – your cloud recordings are safely stored on our military-grade servers for your viewing anytime, anywhere.
Follow the troubleshooting steps below to resolve issues preventing the Foscam App from accessing the video feed of a camera.
Solution: The Foscam App generates the error message ‘Failed to connect, please try again”.
Step 1:Check to see if the Foscam camera is connected to the internet.
If you can login to the camera from the Foscam App when the mobile device is connected to the same network as the camera it is connecting to the internet.
Step 2: Verify the mobile device is connected to the internet.
Open a web browser on the mobile device and attempt to access a web site. If the site is accessible, the mobile device has access to the internet.
Step 3: Verify the P2P feature of the camera is enabled.
Login to the camera via a web browser on a computer connected to the same LAN. Navigate to Settings → Network → P2P and verify the feature is enabled. Or modify P2P port to any other one.
Click here for instructions on how to log in the camera via web browser on computer
Step 4: Lower the bit rate and frame rate of the live video feed from the camera.
There are times when network speeds and traffic can reduce the amount of data/video feed that can be accessed by the mobile device.
In this case lowering the amount of raw video data being sent to the mobile device can correct a network related issue such as this.
Step 5: Change the P2P port of the camera in the event the port is being blocked by a firewall of the router or the ISP.
If your camera supports to change the P2P port number like below, you can change the P2P port to any number between 10000 to 60000.
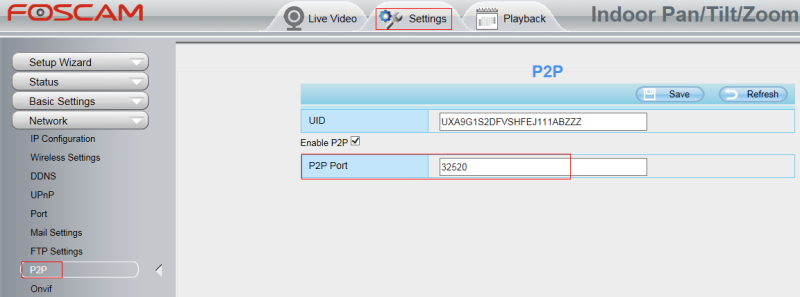
Step 6: Check for any firmware updates that may be needed on the camera and be sure that the Foscam App is up to date with the latest version. Once updated attempt the connection again.
Step7: If all above steps do not solve your case, please send the UID of your camera to support@foscam.com for help.
How to add a Foscam camera back to the Foscam app after the network of camera was changed?
Overview: This article will introduce the process of adding an existing camera back to the Foscam app after the network of camera was changed. The type of change could be a replacement router or the network was moved to a different location. This includes changing the network name or password for security purposes.
Step 1: Delete the old Foscam camera from the app first.
See here for how to delete camera from Foscam app
Step 2: If the camera was connected to a wireless network in the past connect it to the WiFi router with an Ethernet cable.
Note: The smart device/phone should be connected to the same WIFI network the camera is to be setup on.
Step 3: Power on the camera and perform a hard reset of it.
Foscam APP Complete Guide
Read Next : CCTV Super Password
See here for how to reset camera
Step 4: Add the camera once again to the Foscam App.
See here for how to add camera to Foscam app.
Once the camera has been added to the Foscam App again the video feed can be viewed. Be sure to go through the steps of setting it up on the wireless network if needed.
Note: After a hard reset the camera will prompt for a new username and password.
The maximum username is 20 characters in length including numbers, symbols and characters. The password should be between 6-12 numbers, letters, symbols, or a combination. Symbols recognized are ~ ! @ # % ^ * ( ) _ + { } : “| <> ? ` – ; ‘ \ , . /
To connect camera wirelessly to a router,click here for the instructions FAQ.
How to add a HD camera to the Foscam app?
Overview: This article will introduce three methods of adding a HD camera to the Foscam app using a smartphone. Once the camera is added, live video feed can be viewed from the device.
Please be sure the Foscam app is installed on the smartphone and that a Foscam cloud account is already established.
Step 1: Add the information for the camera to the Foscam App
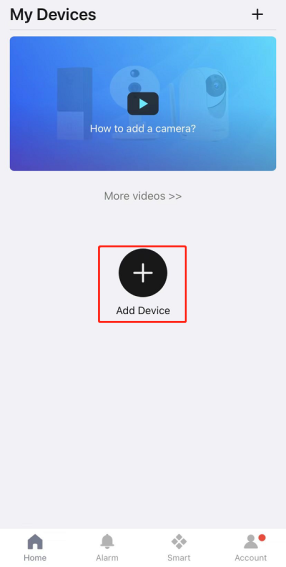
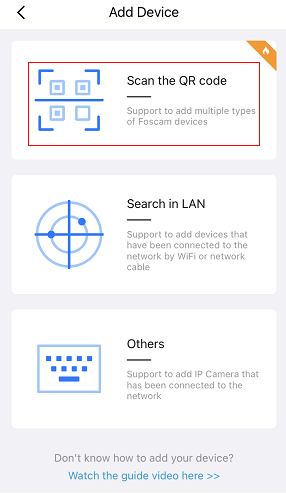
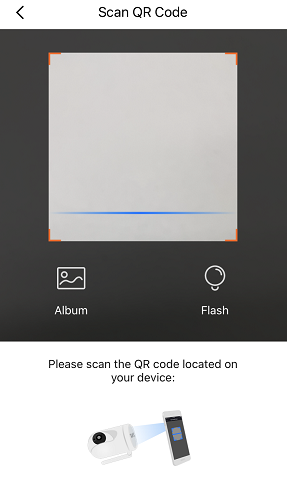
Method 1: Add a camera via the QR Code.
• Login to the Foscam app
• Click the + button
• Scan the QR code from the bottom or back of the camera
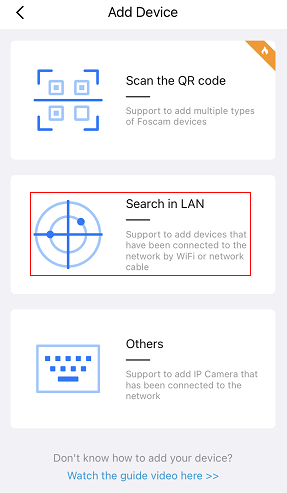
Method 2: Add a camera from the LAN Camera List
• Login to the Foscam app
• Click the + button
• Choose Search in LAN
Note: To use this option the camera must already be connected to the same LAN the smartphone is connected to.
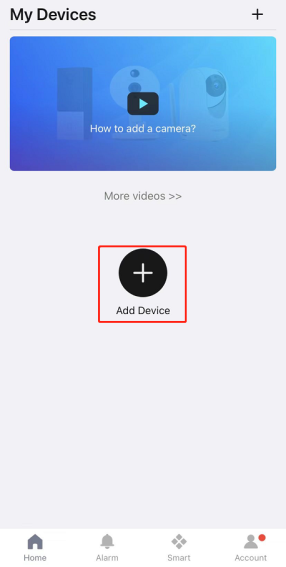
Click here for detailed steps on adding camera from the LAN.
Method 3: Add a camera manually using DDNS/UID/IP
• Login to the Foscam app
• Click the + button
• Choose Others and input the required information of your camera.
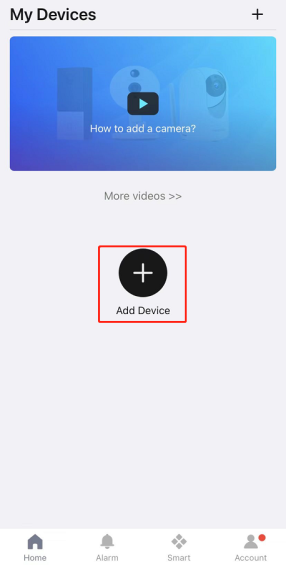
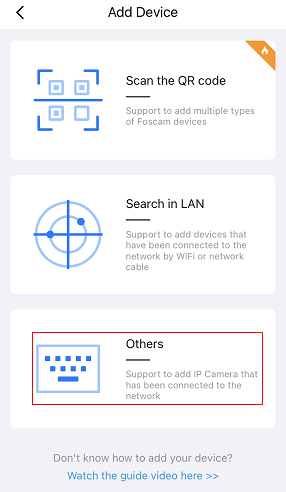
Click here for detailed steps for adding camera manually by DDNS
Click here for detailed steps for adding camera manually by IP
Click here for detailed steps for adding camera manually by UID
Step 2: View the live video feed from the camera.
• After the camera is successfully added to the app the live video feed can be viewed.
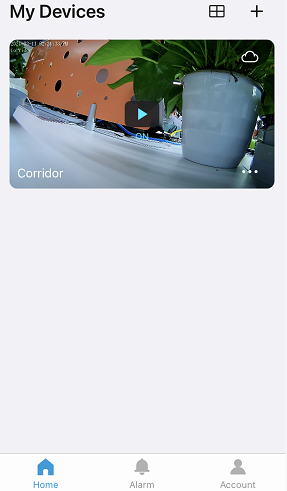
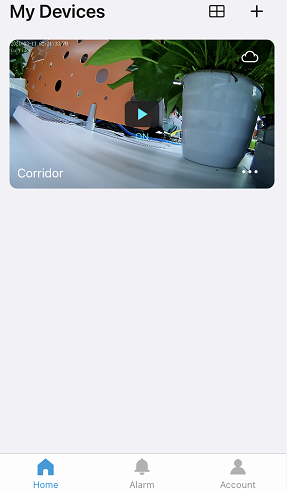
• Check for the camera under the My Devices Menu
• Click on the Play button to view the video feed
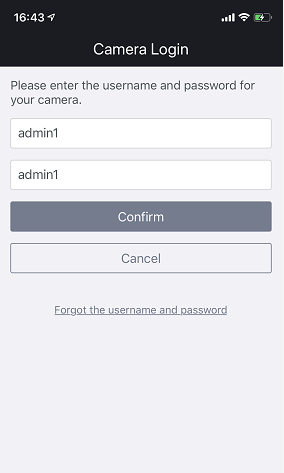
Note: If this is the first time the camera is being access, you may be prompted to enter the username and password for the camera.

Technical Note: The maximum username is 20 characters in length including letters, numbers and symbols. The password length should be between 6-12 characters long including letters numbers and symbols. Characters supported include ~ ! @ # % ^ * ( ) _ + { } : “| <> ? ` – ; ‘ \ , . /
How to set up wireless connection for Foscam camera by the Foscam App if the camera is already connected to the router with a cable?
Overview: This article will introduce the procedure of setting up the wireless configuration on a Foscam camera using the Foscam app while the camera is connected to a router via an Ethernet cable.
Note: In some cases, this method may be the best solution to connect a Foscam camera to an older wireless router which does not support the standard method of adding a camera wirelessly. This method has also proven to be effective during situations where the connectionconfiguration for wireless has proven to be difficult.
Pre-conditions:
Be sure the following steps/conditions are met before proceeding.
1)Connect the camera with an Ethernet cable directly to the wireless router.
2)Maintain a distance between the camera and wireless router of 2-5 meters (6-12 feet) maximum.
3)Verify the cellphone is connected to the wireless router’s 2.4GHz wireles. (If your Foscam camera supports dual-band wireless, your cellphone can connect to either 2.4GHz or 5.0GHz wireless.)
4)Verify that no special characters are used in the wireless password. These include characters outside of A-Z and 0-9.
Step 1: Add the camera to the Foscam App.
Refer this page for add camera to Foscam app firstly in LAN.
Proceed to Step 2 if the camera has already been added to the App.
Step 2: Navigate to the Live Video page and click on the Settings icon to proceed to the camera settings.
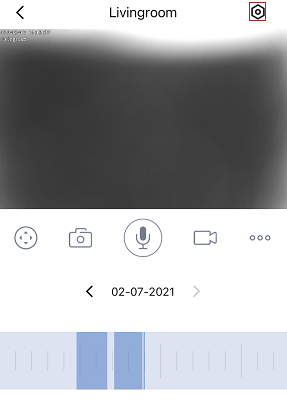
Step 3: Find the WiFi Settings Icon and click on it to access the settings page.
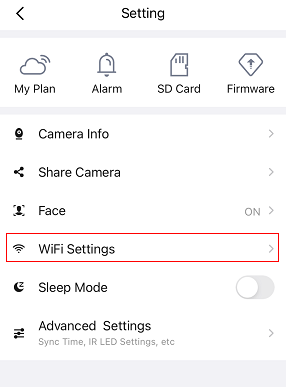
Note: At this point the internal wireless adapter of the camera is scanning nearby WIFI networks to show what networks are currently within radio range of the camera.
Step 4: Find and select the correct WIFI SSID. The app will prompt for the WIFI password. Be sure to enter the password correctly and click the Connect button.
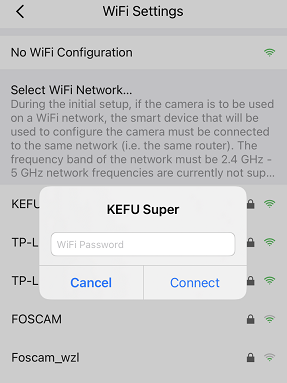
After the above steps are completed standby for approximately 30 seconds before unplugging the Ethernet cable from the camera. After unplugging the Ethernet cable the wireless module in the camera should take over and attempt to login to the wireless network.
The camera should reappear on the Foscam app after a few minutes.
Unable to connect to video after unplug Ethernet cable? See this page.
How to share your camera with others on Foscam app?
Foscam app has added a new feature to let you share your cameras with other Foscam app users to let them view your camera’s live video. Here is the instruction of that new feature.
1. Please log in your Foscam account, login the camera and tap on the camera settings button.
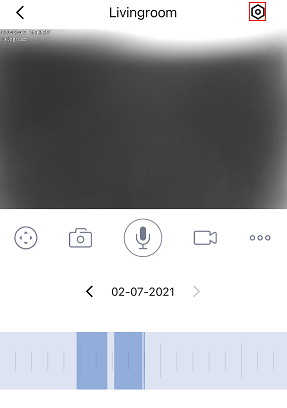
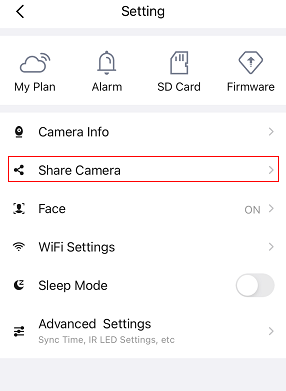
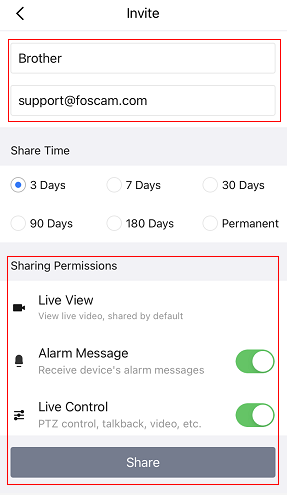
2. Please tap on the “Share Camera” , choose “Invite”, input the Nickname and other’s Foscam account address, and tap on “Share” button.
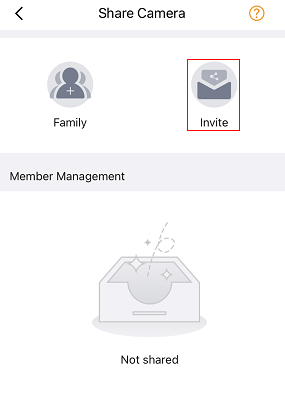
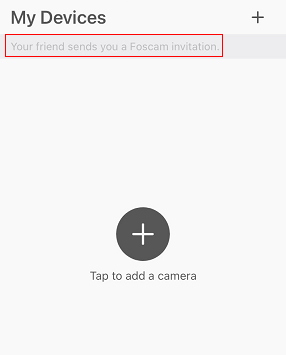
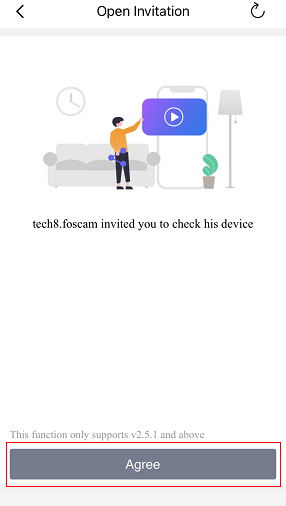
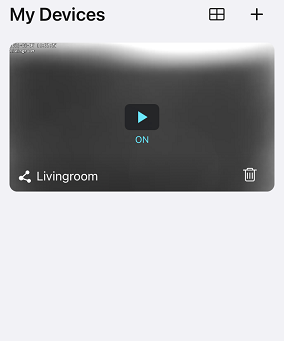
3. Then please ask others to login his/her Foscam account and there will be a message shown up. After he/she accepted that, he/she will be able to see the shared camera.
Why do I not receive alarm push messages on the Foscam App?
Overview: Normally alarm messages can be received via the Foscam App after Foscam camera alarms on the human/motion/sound detection. If these messages are not being received, please follow the Solutions below to correct this situation.
Solution 1: Please be sure the firmware of the camera is running the latest version and the Foscam App has been updated to the latest version.
Visit the Apple App Store or the Google App store and verify the latest version of the app is currently installed on the cellphone.
Solution 2: Verify that the motion/sound detection settings are enabled on the camera being monitored.
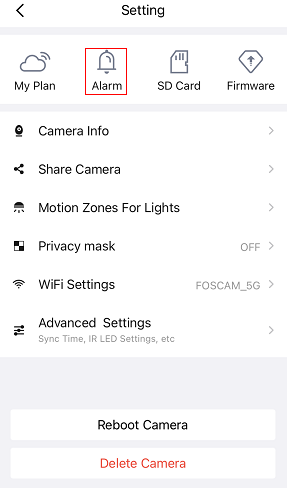
• Log in the camera via Foscam app on cellphone and go to camera’s live video–>Settings–>Alarm to enable the alarm for your camera.
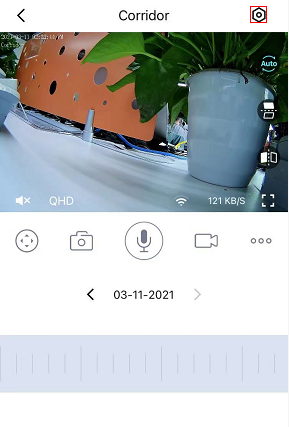
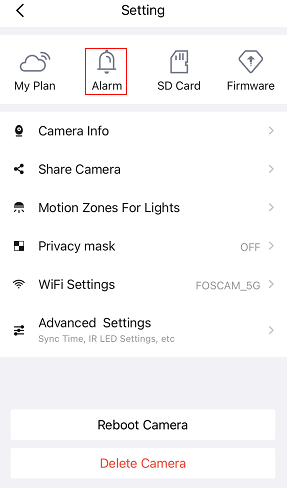
Solution 3: Verify the push message feature is enabled on the Foscam App.
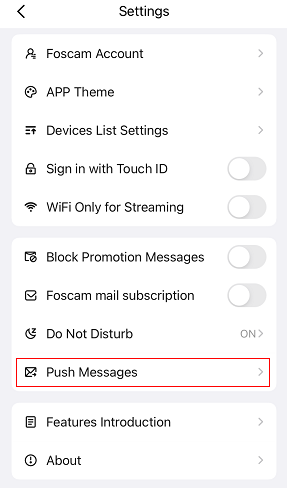
• Login to the Foscam App and navigate to App Settings → Push Messages to enable it for your camera.

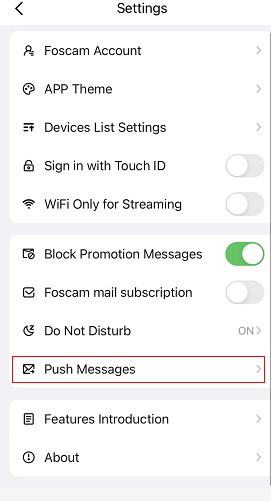
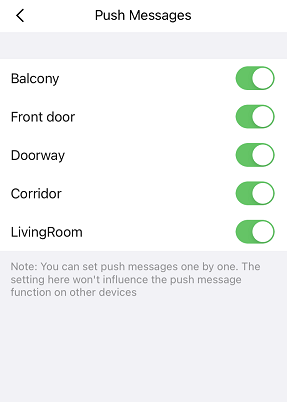
Solution 4: Verify that the notification for the Foscam App are enabled on the smart device and are not blocked. This should be under the Notification Settings on the Smart Device.
Solution 5: Verify if an alarm triggered event occurred on the camera.
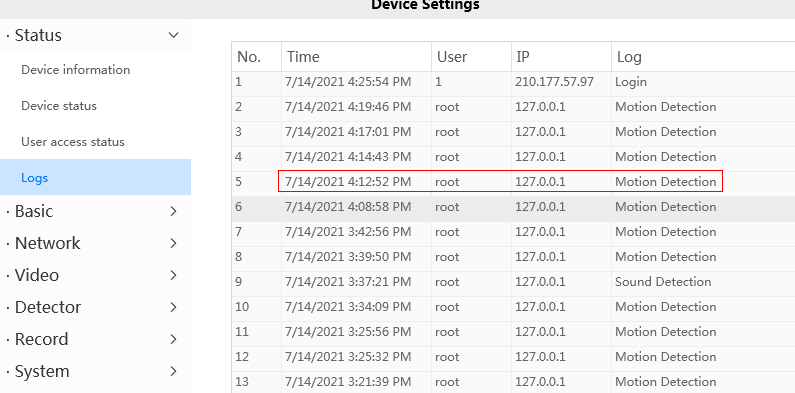
Login to the camera via the LAN with a web browser or Foscam VMS and navigate to Settings → Status → Log to check the activity of the camera to see if any alarm events have been logged by the unit.

Step 6: Remove the camera from the Foscam App temporarily and re-add it.
In the event a saved setting may have been corrupted this will clear the recent settings stored by the App in the event this occurred.
If after performing the above steps this still does not resolve the situation be sure to contact Foscam Technical Support via email at support@foscam.com.
How to update the camera’s firmware using the Foscam app?
Overview: There are two ways to update the firmware of a Foscam camera. The first way is to update the firmware via the camera’s web page using aweb browser. The second way to upgrade a camera’s firmware is to use the Foscam App. This article will introduce the simplest way to upgrade the firmware of Foscam camera using the app. Please be sure to follow all the instructions below for a successful update.
Note: As the end user, you may experience a slight delay in the responsiveness of the Foscam app due to cellular network delays and slower network speed. These conditions can be caused by cellular network congestion, data throttling initiated by the cellular provider and weak cellular data connections.
If the Foscam app is responding slowly please give it a few moments to update as you proceed through the firmware update process. It is recommended that the smartphone and camera be connected to the same network before proceeding.
Initial Preparation:
1) Verify that the Foscam camera to be upgraded is powered on and currently connected to the network. Make sure you can see the camera’s live video on Foscam app first.
2) During the upgrade, it is best to connect the cellphone and camera to the same network.
Technical Advisory: While it is possible to upgrade the firmware while using a cellular data network connection it is not recommended. Especially in the event the data connection to the camera is lost mid-way through the upgrade process. This can cause irreversible data loss to the camera which may result in bricking the device.
Step 1: Using the Foscam App login to the camera and select the Settings icon.
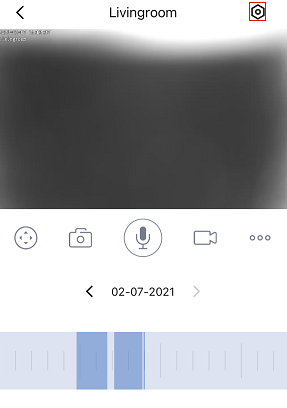
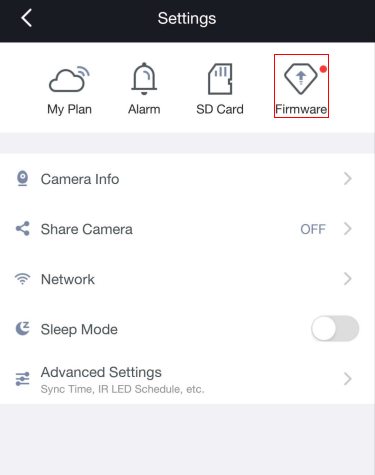
Step 2: Click on the Firmware Update option.
(It will normally have a red indicator near it showing that a firmware update is available for the camera.)
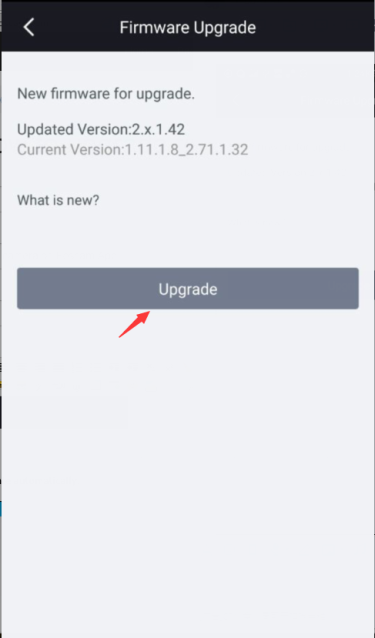
Step 3: The Foscam app will check for the firmware update and indicate a new update if it is available. A new page will open indicating the information for the new update. Click on the Upgrade button to initiate the firmware update process.
Note: If there is no firmware update the page will indicate that the firmware is up to date.
Step 4: The App will indicate the progress of the firmware download to the camera. Once the download is completed standby to see the completion of the upgrade.
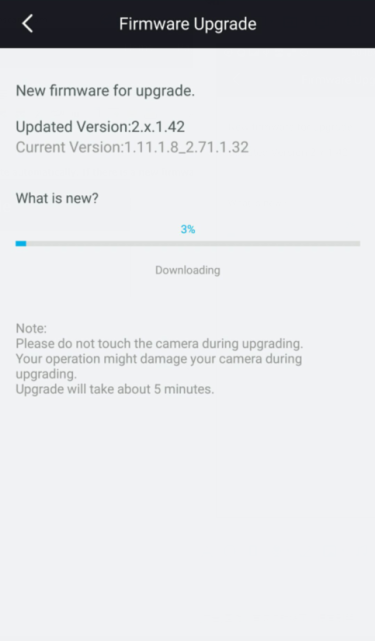
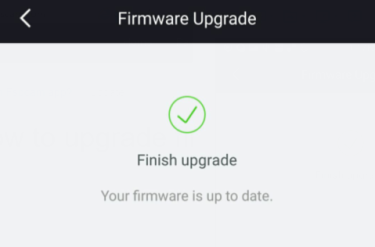
NOTE: Please do not interrupt power to the camera or attempt any other functions with the app during the firmware upgrade process. This may interrupt the installation of the newer firmware which could brick the phone. This one of the reasons the cellular data connection is NOT recommended.
How to add a camera with 3rd party DDNS URL for remote access to the Foscam App?
Overview: This article will introduce the process to add a camera with 3rd party DDNS URL for remote access to the Foscam App.
Step1: Please follow the instruction here to set up the 3rd party DDNS remote access for the camera first.
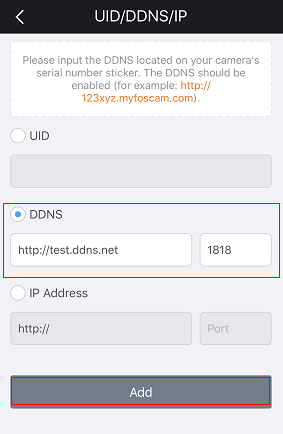
Step2: Please log-in the Foscam app, click ‘+’ icon, then choose ‘Others’.
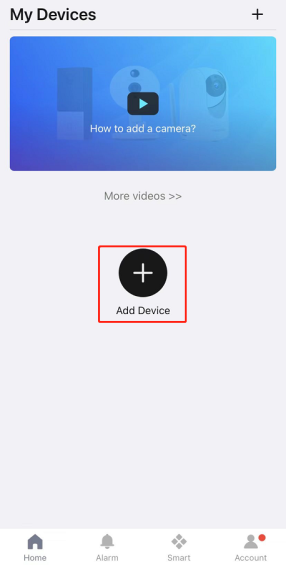
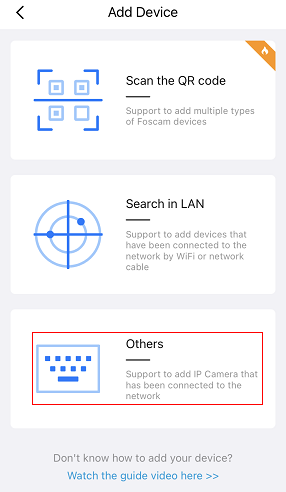
Step3: Input the DDNS and port number to add.
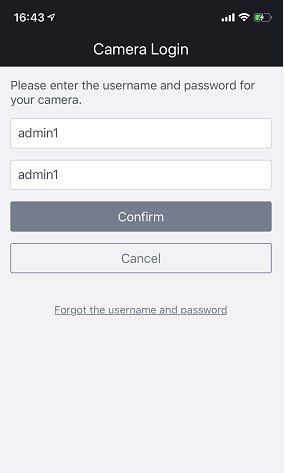
Step4: Input the camera username and password.
In Security Settings input the username and password of the camera being added.
Standby for up to two minutes for the camera to be added to the app.
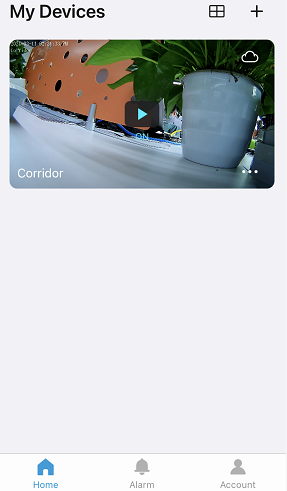
Step5: Log-in to the camera to view the video feed.
Once the camera has been added click on the play button to login to the unit and view the video feed. If this is the first login or the camera has been recently reset to factory settings you may be prompted to enter a new password and username.
How to add a camera with P2P UID for remote access to the Foscam App?
Overview: This article will introduce the process of adding a Foscam camera by entering its UID number to the Foscam app.
Note:
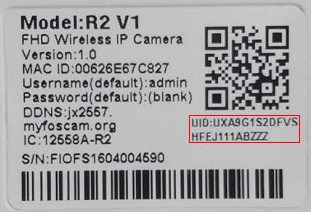
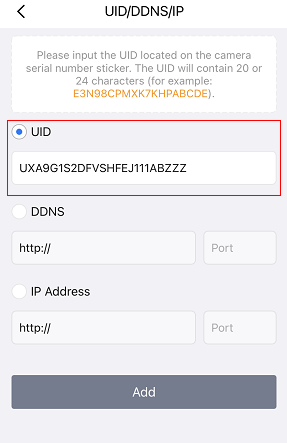
To prepare for this configuration the UID must be documented for the camera. The number is usually located on a label on the bottom or the side of the camera. Be sure all the numbers and letters are correct otherwise it will be impossible to add the camera using this method.
Step 1: Launch the Foscam app from your cellphone and log into the Foscam cloud account.
Click the + icon and choose “Others”.
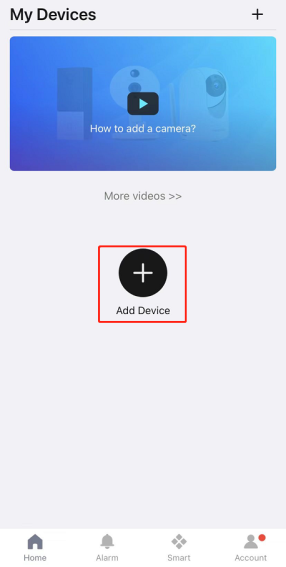
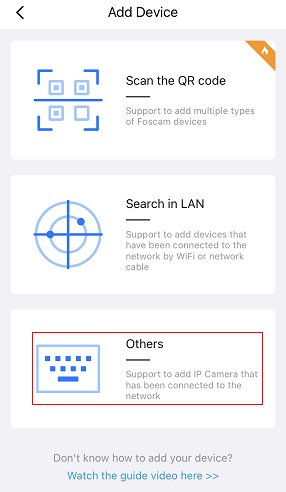
Step 2: Enter the UID of the camera and tap on Add.
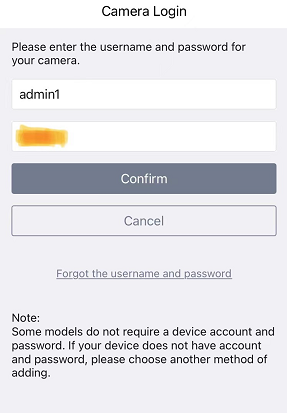
Step 3: Enter the username and password for the camera and view the video of the camera.
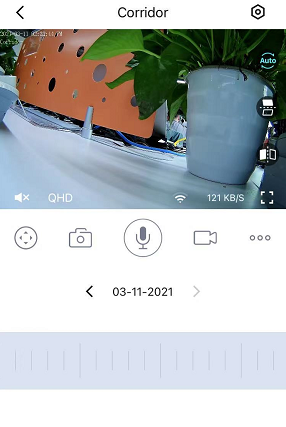
How to set up wireless connection for Foscam camera by Focsam app using the Ezlink feature 2.0? What is the App-generated QR Code method?
This article will guide you through the steps of easily setting up a Foscam camera using a process known as the QR Code method and Ezlink 2.0.
If your camera’s UID does not end with ZZZ, please follow below steps to set up wireless connecton for it by Ezlink 2.0.
If your camera’s UID ends with ZZZ, please click here to see the steps of setting up wireless connection.
Before moving forward with the camera setup verify the following steps are completed.
1)Download the Foscam App from the Apple Store or Google Play Store and install it to the cellphone.
2)Apply power to the camera and allow it to complete the self-test.
3)Verify the camera is set to the factory settings
If this is in question perform a hard reset of the device. To perform a hard reset on the device press and hold the reset button down for 12-15 seconds. The camera will announce reset succeeded,
power cycle, and perform the movement test if it is a motorized Port and Tilt camera. For steps on how to hard reset Foscam cameras, please click here.
4)Connect the cellphone to the wireless network which the camera is going to connect to and verify the cellphone is connected to the 2.4 GHz wireless band on the wireless network. If your camera supports dual-band wireless, your cellphone can connect to either 2.4GHz or 5.0GHz wireless.
5)Verify the cellphone and camera are within 3 meters (10 feet) of the wireless router.
6)DO NOT power off the camera during the setup process unless it is to move the cellphone screen closer to the camera lens.
Perform the following steps to configure the camera for connection to a wireless Network:
Step 1: Please power on the camera and allow it to complete the initial startup tests and standby until the camera announces “Hello Foscan” and “Ready for wireless Configuration”.
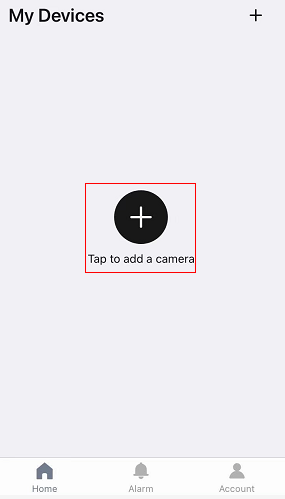
Step 2: Launch the Foscam App on the cellphone, login to the account and tap the + button to add the camera.
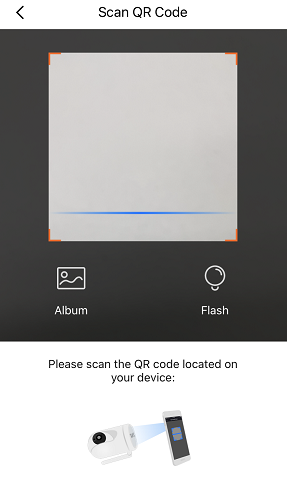
Step 3: Scan the QR code of the camera using the camera of the cellphone. (The sticker with the code on it is on the bottom or the side of the camera depending on the model.)
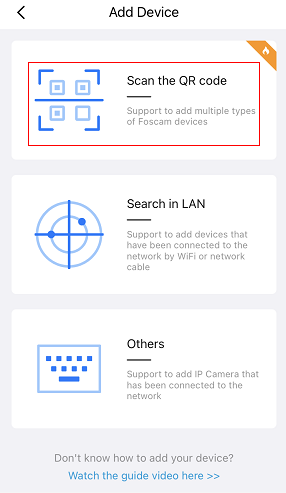
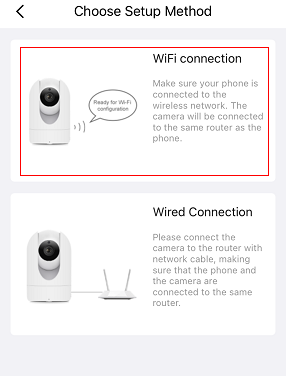
Step 4: Within the Foscam app, please select WiFi connection.
Note: Some cameras will announce with a voice prompt “Ready for WIFI configuration”.
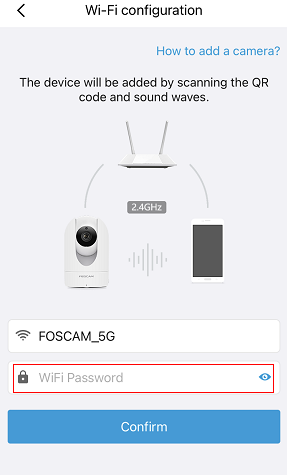
Step 5: Within the Foscam app, please enter the router’s WiFi password and click “Confirm” to generate the QR code.
Note: Verify that the correct WiFi password was entered before proceeding
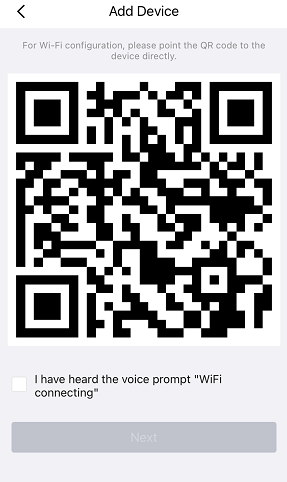
Step 6: Standby for the Foscam app to generate the QR code. Once the process is complete the app will announce that the code has been generated and it will be displayed on the screen of the cellphone. Position the screen of the cellphone toward the camera lens so the camera can collect the information to configure itself to login to the wireless network.
Note: The distance between the cellphone and the camera lens should be within 15 centimeters. The camera is using two methods of communication to self-configure. One is transmitting and receiving wireless broadcast packets and the other is scanning the QR code identification information which contains the login password for the wireless network.
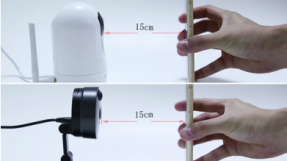
Step 7: After the configuration process is completed the camera will announce “Wireless connection succeeded” and the camera will be added to the Foscam app.
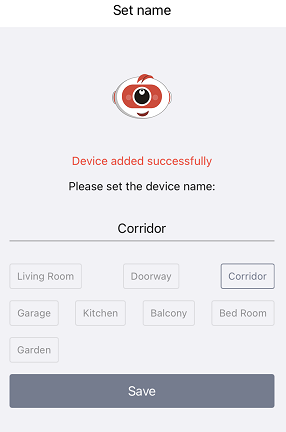
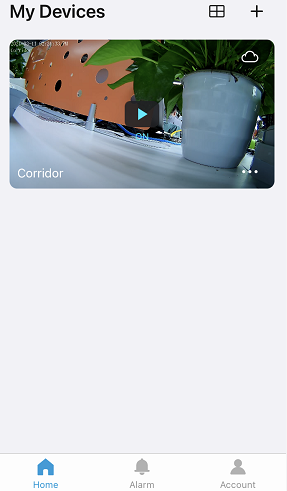
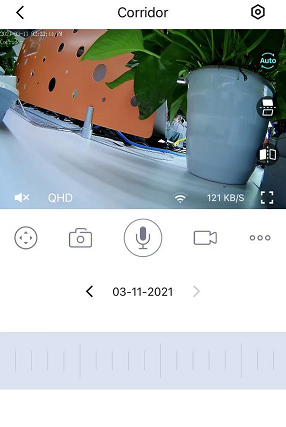
Step 8: After the camera is added to the network, please click on the play button to view video feed from the camera.
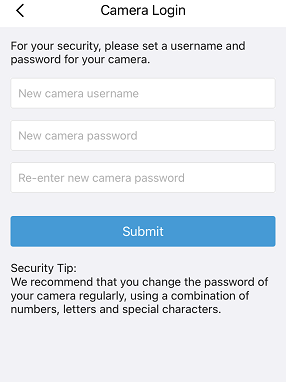
The app will ask you to create a new username and password for the camera if the unit has not been configured yet or has been reset to factory settings.
How to set up wireless connection for Foscam camera by Focsam app using the Ezlink feature 1.0?
Overview: This article will introduce the process of setting up wireless connection for Foscam camera by Focsam app using the Ezlink 1.0.
If your camera’s UID ends with ZZZ, please follow below steps to set up wireless connecton for it by Ezlink 1.0.
If your camera’s UID does not end with ZZZ, please click here to see the steps of setting up wireless connection.
Technical Note: If you experience difficulties connecting the camera via this method, the alternative is to connect the camera via an ethernet cable. Follow this link to connect the camera via an Ethernet cable. https://www.foscam.com/faqs/view.html?id=19
Pre-paration:
1.Verify the camera supports the Ezlink feature and power it on.
a.If the camera UID ends with ZZZ, it supports Ezlink feature. The UID number is on the camera’s sticker.
2.Make sure the camera is in the Ezlink mode.
a.Reset camera to default to put it in Ezlink mode, see here on how to reset the camera.
3.Maintain a distance between the camera and router between 2-5 meters. (6-15 feet)
4.Verify the cellphone is connected to the 2.4 GHz wireless band on the wireless network. If your camera supports dual-band wireless, your cellphone can connect to either 2.4GHz or 5.0GHz wireless.
Verify that there are no specialty characters present in the wireless network password. If so the password for the wireless network will need to be updated. Specialty characters include !@#$% etc.
Step 1: Launch the Foscam app and login to the Foscam Cloud account.
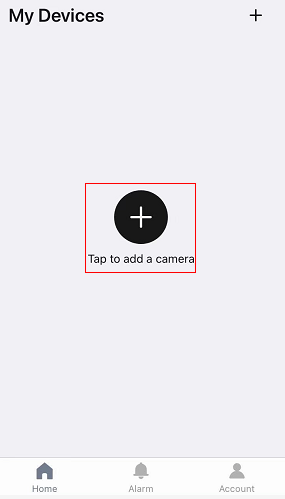
Click the + button to add a new camera by scanning the QR code located on the sticker of the camera.
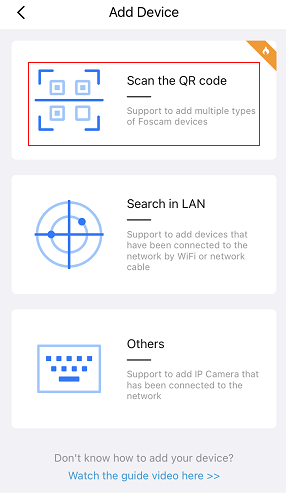
Step 2: Then please choose “Scan the QR code”
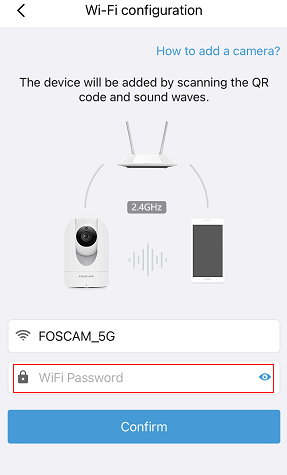
Step 3: Input the Wi-Fi network password and click “Confirm” .
Please wait for about two minutes while the cellphone communicates across the wireless network to configure the camera’s wireless connection.
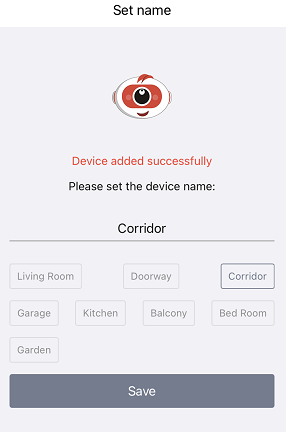
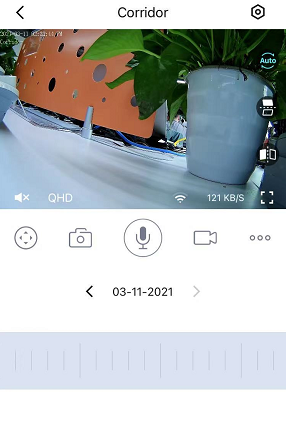
Step 4: After the camera is added to the network, please click on the play button to view video feed from the camera.
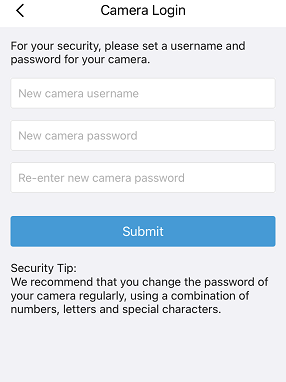
The app will ask you to create a new username and password for the camera if the unit has not been configured yet or has been reset to factory settings.
How to set up alarm push message on the Foscam App?
Overview: This article will introduce the process of enabling Push Messages from the Foscam App in order to help you receive alarm messages when camera alarms.
Note: The camera’s motion/sound/human detection alarm should be enabled before receiving the push messages by Foscam app.
Technical Note: Please be sure the latest firmware is installed on all Foscam products and that the app is up to date with the latest version.
Step 1: Launch the Foscam App on the cellphone and login with the Foscam cloud account
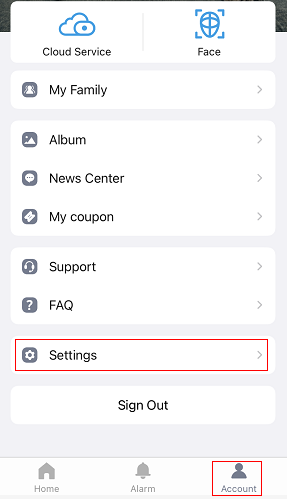
Step 2: Tap on Account option on the right bottom corner, go to Settings and tap on the Push Messages option to enable it for the camera.
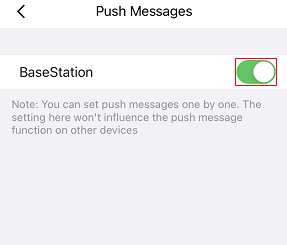
Note: The user will need to make sure that the desired camera is already add to the Foscam Cloud account and App first.
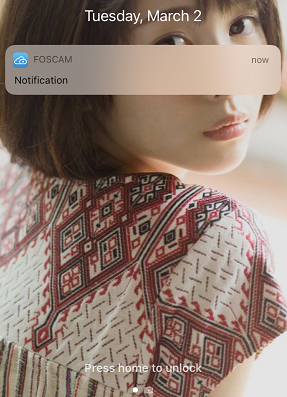
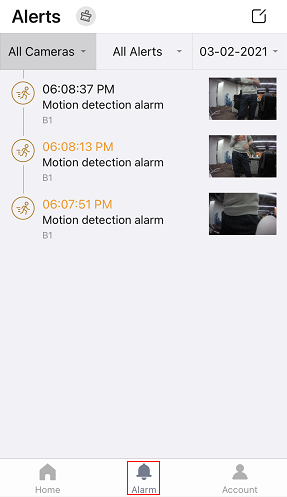
Step 3: After the camera alarms on the motion/sound/human, the user should now get a push message on the Foscam App.
Introduction of Foscam NVR app
Foscam NVR app is designed to allow Foscam NVRs to be viewed on mobile phone. It has android and iOS version you can download the app from app store for free. It supports below features.
1.Live Video Preview
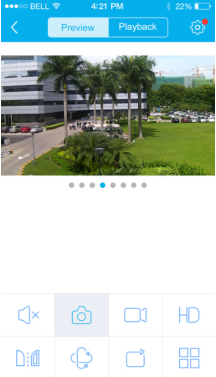
Below buttons are used to control camera, from left to right they are
Audio: Get the audio information around the camera
Capture: Can snap individual pictures
Record: Manual record on the local
Image Quality: Fluent / HD
Image Rotation: Rotate Horizontally/Rotate Vertically
PTZ: Control pan, tilt, or zoom of camera
Cruise Settings: Add at least two preset points to the cruise track box to make it as a track, then you can have camera cruise via the track.
Screen Control: 1 / 4 / 9 split-screens
2. Recording Playback
You can playback the recording saved in NVR.
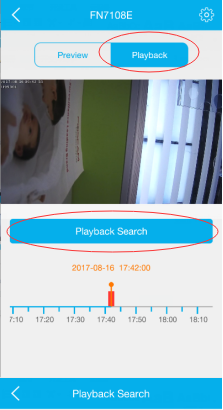
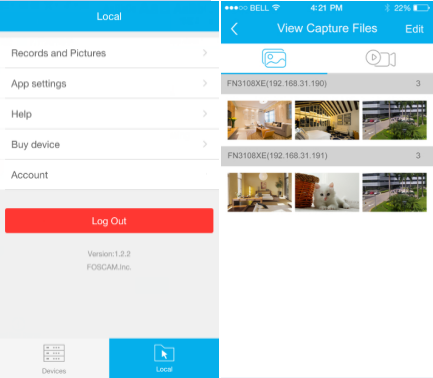
3. View recording and picture saved on mobile phone.
From main page tap “Local” then “Record and Pictures” button:
You will see the manually captured pictures and manual recording.
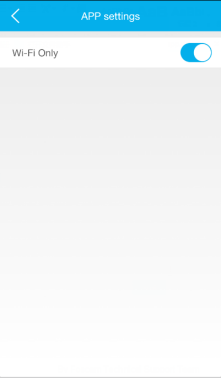
Note, if you want to view video using mobile data please go to App settings then “WiFi only” to switch it off.
If you want to buy device, please tap on “Local” then “Buy device” and it’ll open amazon directly.
How to disable the Wi-Fi only option in the Foscam App so I can view Foscam camera using cellular data?
Overview: This article will introduce the process of how to disable the Wi-Fi only option in the Foscam App.
Note: Verify that the cellular data plan can handle the amount of data that may be used while viewing the video stream of a camera to avoid unwanted fees that may be added to the cellular bill.
Follow the steps below to access the camera via a cellular data network.
Step 1: Login to the Foscam App
1) Go to the App settings.
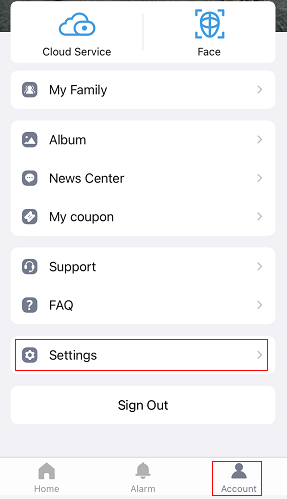
Step 2: Disable the Wi-Fi Only for Streaming option.
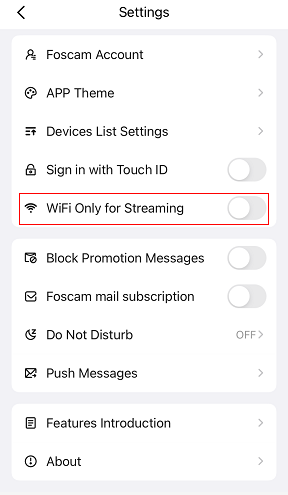
After the process is completed the camera will now be accessible via cellular data. Please be sure to monitor your data plan to prevent overages on data usage. As a precaution, you may check with your cellular provider on details of the data plan you are currently enrolled in.
How to fix the error Configuration timeout for Ezlink on the Foscam App?
Overview: Setting up a camera with the Foscam app for a wireless network involves connecting a cellphone to the same wireless network. Normally during this process, the login information for the wireless network is sent to the camera and the camera logs into the network at the end of the procedure. Once completed, the camera is listed as one of the devices available to access from the app.
If something goes wrong with the procedure a user may encounter the error message “Sorry, your camera has failed to be added, Configuration time out for Ezlink.”
To correct this error message, follow the steps below.
Step 1: Perform a hard reset of the camera to make sure the camera is in Ezlink mode and you will hear camera saying “ready for WiFi configuration” if your camera has built-in micphone and speaker.
Step 2: Confirm that the cellphone is connected to the same wireless network that the camera is supposed to be connected to.
• Note: Disabling cellular data may make the configuration process easier to perform.
Step 3: Verify the frequency band of the wireless network is 2.4 GHz if your camera only supports 2.4GHz wireless. If your camera supports dual-band wireless, your cellphone can connect to either 2.4GHz or 5.0GHz wireless.
Step 4: During the setup process, please maintain a distance between the phone, camera, and wireless network around 2-5 meters (6-15 feet.)
• The camera can be placed in the place intended for installation after the network configuration steps are completed.
Step 5: Confirm the password for the wireless network has been properly input into the configuration settings of the Foscam App.
• The use of special characters for the wireless network password may cause connection difficulties. If there are repeated problems being encountered with a password using special characters @()*^&*(&*^% consider changing the wireless password to something containing letters and numbers only..
• NOTE: In the event the password is changed for the wireless network all devices that were connected to that network will need to have their password information updated to connect in the future.
Step 6: Check to see if the MAC ID filter is enabled on the router.
• If the MAC ID filter is enabled only the devices authorized to be connected to the router have access to the network.
• The work around is to temporarily disable the filter to allow the camera to connect. Once the camera is connected add it’s wireless MAC ID to the filter and re-enable the filter.
Step 7: Check to see if the router is running the latest firmware update.
• Visit the Support page for the wireless router at the manufacturers web site. Some earlier versions of firmware and some routers may prevent the wireless procedure from sending the login information to the camera.
• Some routers may block this process and a different means of sending the login information to the camera will need to be implemented.
Step 8: If all the above steps fail connect the camera with an Ethernet cable to the router so it can access the wired network.
• Allow the camera to establish a connection to the network via the Ethernet cable.
• Add the camera to the Foscam App, once added navigate through the app and setup the camera for a wireless network using the app.
• Download our Quick Reference Guide for your camera for this alternative setup process for the camera to connect to the network. Once the camera is setup with the login information for this network it will not have to be done unless a notable change to the network occurs or a new router is installed in the future. (New network password, new network name, etc.)
How to delete an old camera from the Foscam app?
Overview: This article will introduce the procedure on how to delete a camera from the Foscam app which is no longer used or needed.
Steps:
1)Launch/Open the Foscam App from cellphone.
2)Go to the camera settings and you will find that delete button.
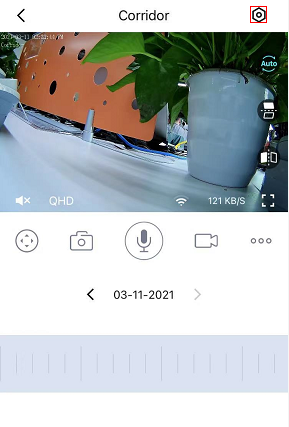
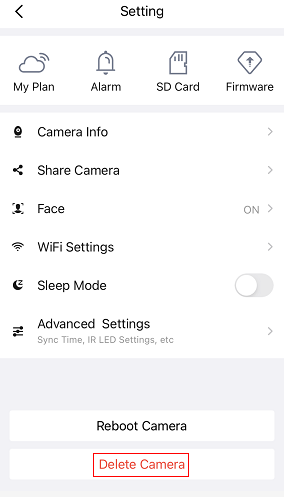
Note: This completely deletes the camera from the app and the Foscam Cloud account.
How to set up cloud service once it is paid?
This article will introduce how to set up a Foscam camera to use the Foscam cloud service.
In order to use Foscam Cloud Service once it was paid for your camera, please follow the steps below.
Enable the motion/sound detection alarm for the camera.
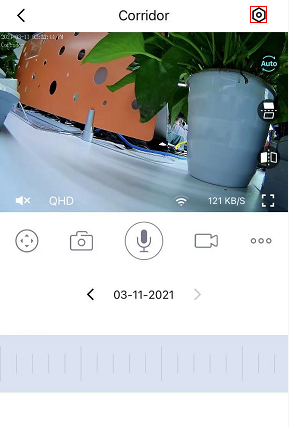
1) Open the Foscam App and click the play button to view the camera.
2) Click the Settings button to navigate to the alarm settings page of the camera. Please make sure the camera’s alarm schedule and detection area is set.
How to view the cloud recordings of Foscam cameras?
This article will introduce the process of viewing the recordings of Focam camera stored on the Foscam Cloud.
Pre-conditions:
1)The Foscam camera that the user is using must support Foscam Cloud Storage Service.
2)Foscam Cloud Storage Service has been purchased and the account is currently paid up to date and valid.
3)The camera is properly configured for Foscam Cloud Service.
4)An alarm event was triggered by the camera and the video was uploaded to the Foscam Cloud Service already.
5)Active internet connection from the login device and the Foscam Cloud Server.
Method 1: Use the Foscam App
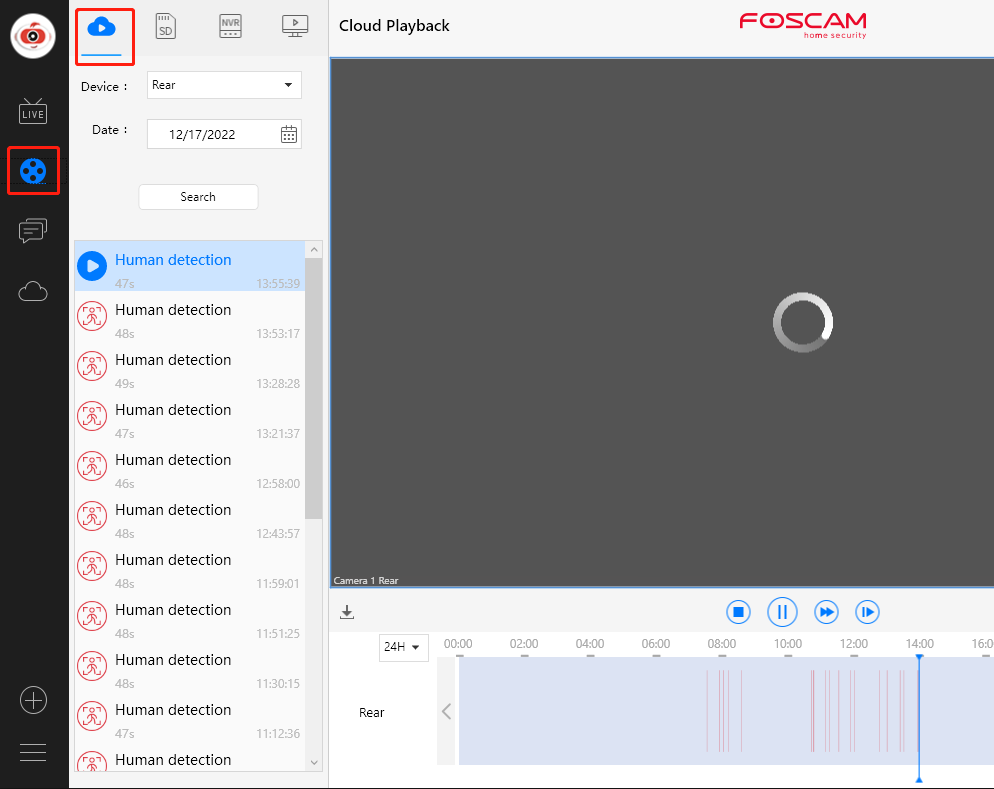
1.Open the Foscam App and navigate to Live Video. Cloud recording will show up in time line below live video, in blue bars.
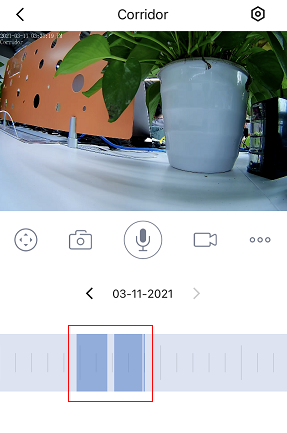
2.Tap on date and choose the recording to playback pay tap on the time line.
Method 2: Use the computer software Foscam VMS
1.Login the Foscam VMS with Foscam cloud account.
2.Go to cloud recording playback page to choose the recordings to play.
How to add a camera with WAN IP URL for remote access to the Foscam App?
Overview: This article will introduce the steps to add a camera with WAN IP URL for remote access to the Foscam App.
Step1: Please follow the instruction here to set up WAN IP remote access for the camera first.
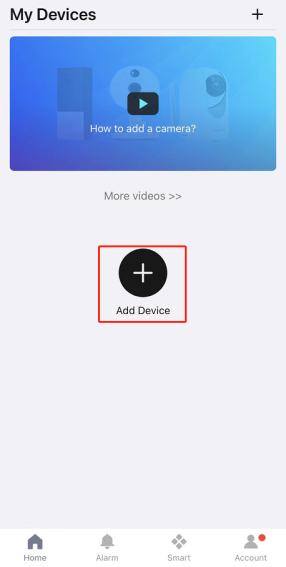
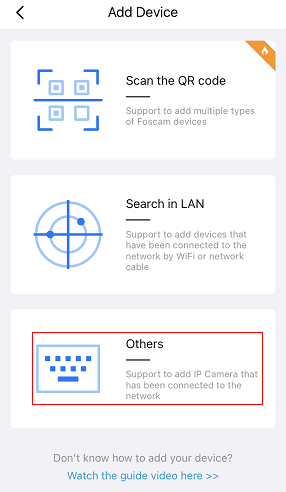
Step2: Login to the Foscam app and click the + button and then choose “Others”.
Step3: Input WAN IP Address and port numeber to add.
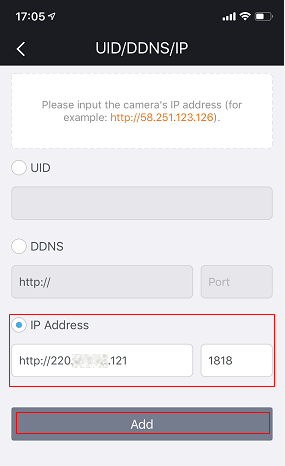
Step4: Input the camera username and password.
Step5: Log-in to the camera to view the video feed.
Once the camera has been added click on the play button to login to the unit and view the video feed.
What is Foscam Cloud Service?
This article will introduce the Foscam Cloud Service.
The Foscam Cloud Service allows the end user to save alarm videos or 24H-CVR to the Foscam cloud platform. It gives the end user the ability to recall or playback video clips via computers and smart devices.
Visit www.myfoscam.com for additional information regarding the services provided by Foscam.
See here for how to purchase cloud storage service
How to purchase Foscam Cloud Service?
On phone:
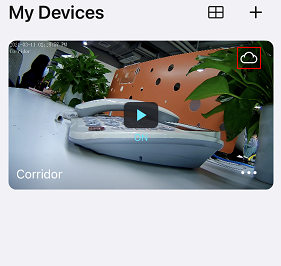
1)Login the Foscam app and tap on the cloud button of Foscam camera.
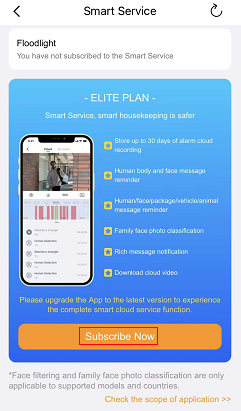
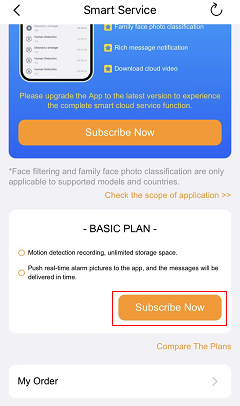
2)You can purchase the plan for your camera.
Elite Plan:
Basic Plan:
On PC:
1)Login the Foscam VMS with Foscam account.
2)Please click on the cloud button to purchase the cloud service.

The camera will need to be configured to take full advantage of the Foscam Cloud Service.
Note: If you have any problem or have a request on cloud service cancellation,please feel free to contact us at support@foscam.com with your order number.
How to activate the Human Detection of Foscam cameras?
Overview: This article will introduce the steps of activating the Human Detection of Foscam cameras.
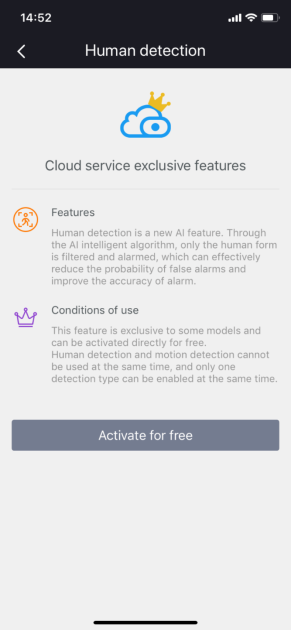
Some Foscam cameras support Human Detection now. Please refer to here to confirm if your camera supports it.
Before using, please follow below steps to activate it.
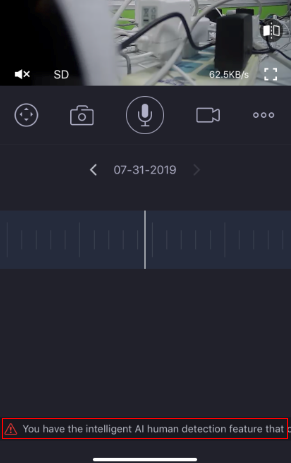
1.Please add your camera to Foscam app and you will see a message under the live video screen of your camera.
Please choose that message to activate it.
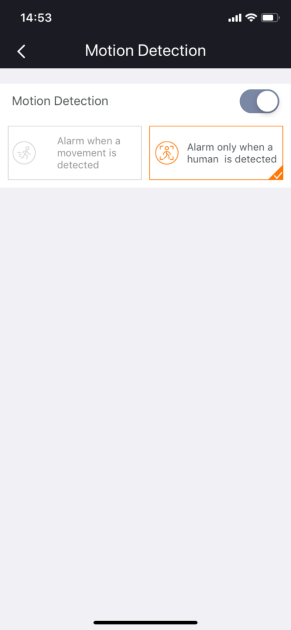
2. After that, the human detection option is available to select and the human detection feature has been activated now.
How to renew the Foscam Cloud service?
This article will introduce the process of renewing a Foscam Cloud subscription.
Method 1: Login to the website www.myfoscam.com and select the option to Purchase Cloud Recording from the web page.

Method2:
Step1:Renew the cloud service via the Foscam App from cellphone. Please be sure it is logged into your Foscam account. Please go to the cloud service purchase page according to below snapshots.
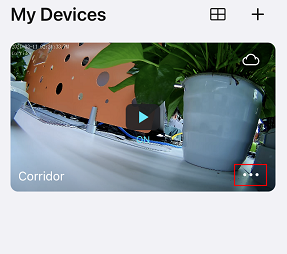
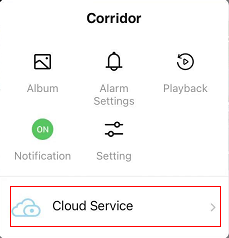
Step2:During te payment process if the Monthly Service button is checked the cloud service will be automatically enrolled in monthly renewal and the credit card used will be billed on a monthly bill.

What are the advantages of Foscam Cloud Service?
This article will introduce the advantages of Foscam Cloud Service.
There are five advantages of Foscam Cloud Service.
1)Alarm videos or 24H-CVR can be uploaded to Foscam Cloud platform.
2)Recordings can be played back on a computer or smart device anytime anywhere.
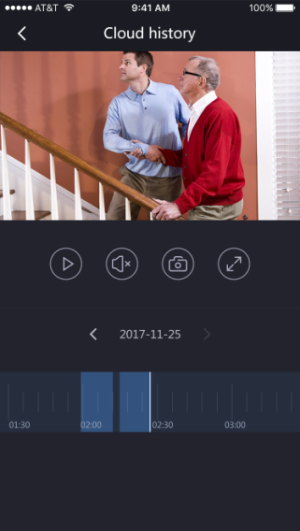
3)Media files can be accessed directly by the user for immediate use after an alarm triggered event. (Notification of triggered event and access to the media when necessary.)
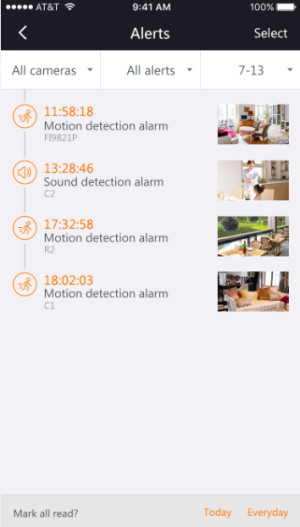
4)No limits on the amount of Cloud Server Space that is needed for triggered alarm events or 24-CVR.
5)Secure and private Cloud Service for videos stored on Foscam Cloud platform. Only the user of the camera can access the cloud videos with the correct access credentials. Foscam uses the latest technology to ensure that the user’s information is secure and safe on the Cloud.
How to download cloud recordings from Foscam app?
Overview: This article will introduce the process of downloading cloud recordings from Foscam app.
Step1:Please login the Foscam app and go to live video screen of your camera. Then please tap on the time line to get into the play page of your camera cloud recordings.
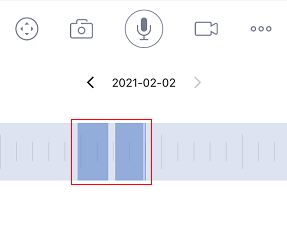
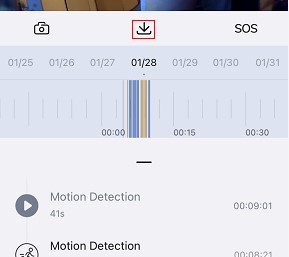
Step2:After you choose the time table to play the cloud recording, you can tap on the download button to get it downloaded to your cellphone.
What is the Alarm Push Message on the Foscam App?
Overview: This article will introduce Alarm Push Message while using the Foscam App on a cellphone. The feature allows the App to notify the end user in the event a specifically configured Foscam camera has a triggered alarm event.
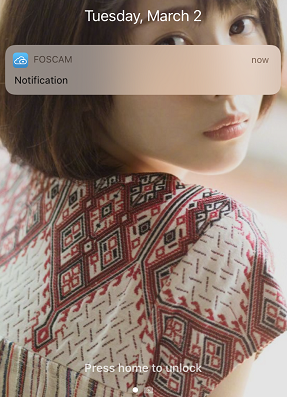
When the camera detects an alarm condition an alert is displayed as a banner on the Foscam app icon.This allows the user to be notified in the event of abnormal activity in the event a camera detects an event triggered alarm.
See the example below of an alarm triggered message showing on the cellphone.
What web browsers are supported by Foscam Cloud website?
This article wil introduce web browsers that are currently able to access the Foscam Cloud website.
Windows OS: Internet Explorer, Firefox and Chrome
Mac OS: Safari
Linux: At this moment in time Foscam does not support browsers running on Linux platforms. Please check some of the various user forums for solutions. Additional check the software repositories for other options and plugins.
For mobile devices please use mobile applications instead.
iOS: https://itunes.apple.com/us/app/foscam/id924381688?l=zh&ls=1&mt=8
Android: https://play.google.com/store/apps/details?id=com.foscam.foscam

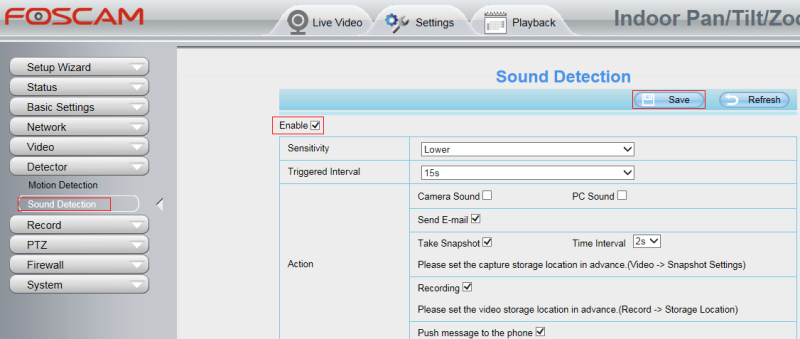
How to set up sound detection alarm for Foscam cameras?
Overview: This article will introduce the steps to set up sound detection alarm for Foscam cameras.
There are two ways to set it up. One is by Foscam app and the other is by the camera web page.
If your camera does not have built-in microphone, it needs to connect an external microphone to use sound detection function.
Below lists up which model has built-in microphone and which does not.
Models that have built-in microphone: R2, R2E, R4, FI9926P, R2M/R2C, R4M/R4S, C2M, X1, X2, C1 Lite V3, C1 V3, FI9816P V3, FI9821EP V2, FI9821P V3, FI9826P V3, FI9831P V3, C2E, C2
Models that do not have built-in microphone: FI9900EP, FI9900P, FI9901EP, FI9961EP, FI9928P, G2/FI9902P/FI9912P, G2EP/FI9912EP/QJ2, G4/G4P, G4EP/QJ4
By Foscam app:
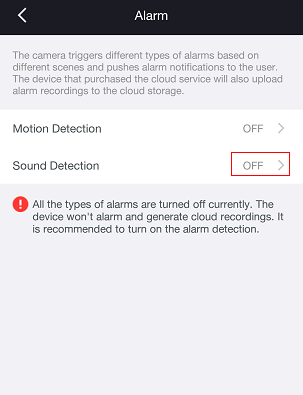
1. Please log in the camera on Foscam app and go to camera settings to find the Alarm option.

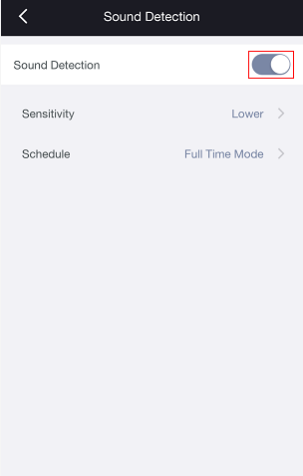
2. Please choose the Sound Detection option and enable it. Then if your camera detects abnormal sound, you will get a push notification.
By web page:
Please log in camera web page and go to Settings–>Detector–>Sound Detection to enable it.
