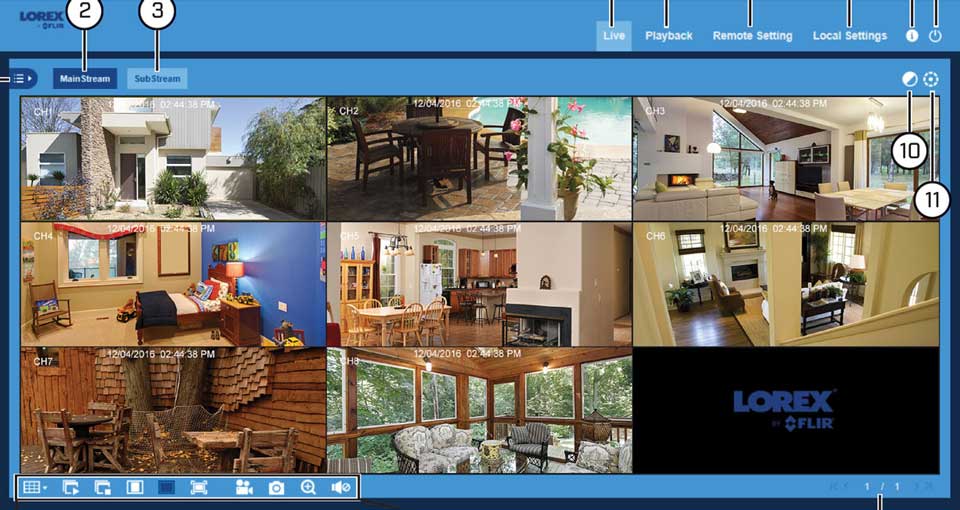
FLIR Client 12 Software: Accessing System Information, Flir Cloud Client Software for PC. Here we are going to demonstrate how you can download and install the client software for you Flir Cloud DVR/NVR or IP camera. Here you can download Flir Cloud Client Software For PC free of cost. This software is also named lorex cloud for pc. We are also going to tell you how can use the software.
Your FLIR Client 12 software system information screen displays useful system information such as the IP address, MAC address, device ID, Device model, and firmware version for your DVR / NVR system.
To access system information:
1.Launch the FLIR Client 12 software on your PC / Mac.
2.Click Remote Setting in the top-right corner of the window.
3.Under System, click Info to open the Info tab.

You can add, edit, or delete IP cameras from your LNK Series NVR from the local area network (LAN) using the FLIR Client 12 software for PC / Mac. IP cameras connected directly to the NVR automatically appear in the IP Cameras menu.
Prerequisites:
• Ensure that you have connected your IP camera(s) to the same network as your NVR. Refer to your included Quick Start Guide for details. Click here for downloads and documentation for your product.
• Ensure that you have downloaded and installed the FLIR Client 12 software on your PC / Mac. Click here for more information on locating software downloads.
To add an IP camera:
1.Launch the FLIR Client 12 software for PC / Mac.
2.Click Remote Setting in the top-right corner of the window.
3.Under Settings, click Display to open the IP Camera tab.
4.Click Quick Add to search for and add IP cameras from the LAN.
OR
5.Click the Add icon ( ) next to an empty channel to manually add an IP camera.
LIMITATION: LHK Series NVRs only support Lorex IP cameras. Visit www.lorex.com/compatibility for a complete list of compatible IP cameras. When adding Lorex PTZ cameras, ensure that you change the Protocol from Private to ONVIF.
To edit IP cameras:
• Click the Edit icon ( ) to edit a connected IP camera using the camera attributes window:

To delete an IP camera:
• Click the Delete icon ( ) to delete a connected IP camera.
REMINDER: Deleting an IP camera removes it from the channel it is currently connected to. You can add these cameras to the system again at any time. You can only delete cameras from the LAN, and not those which are connected directly to the NVR.
FLIR Client 12 Software: Changing a camera’s On-Screen Display (OSD)
The On-Screen Display (OSD) shows the channel name with the date and time stamp on the top-right corner of the live feed or video playback. You can change the settings and the position of the OSD using the FLIR Client 12 software for PC / Mac.
Prerequisites:
• Ensure that you have downloaded and installed the FLIR Client 12 software on your PC / Mac. Click here for more information on locating software downloads.
• Ensure that you have logged in and added your DVR / NVR system to the FLIR Client 12 software. Click here for information on how to log in to the FLIR Client 12 software.
To change a camera’s OSD name / timestamp:
1.Launch the FLIR Client 12 software for PC / Mac.
2.Click Remote Setting in the top-right corner of the window.
3.Under Settings, click Display and then click the Live tab.

4.In the Channel drop-down menu, select the channel to configure the OSD for.
5.Click the field next to Channel Name to edit the channel name.
6.Click the Show Name switch to enable ( ) or disable (
 ) the channel name shown on-screen in live viewing and recordings.
7.Click the Covert switch to enable ( ) or disable (
 ) the timestamp shown on-screen in recordings.
IMPORTANT: By default, the system is set to show timestamps in video recordings. It is highly recommended to show timestamps in recordings for legal reasons.
8.Click Save to save settings.
Click here for information on how to change a camera’s OSD on your LHA / LNK Series DVR / NVR system.
Click here for information on how to change a camera’s OSD on your LHB Series DVR system.
FLIR Client 12 Software: Configuring basic network settings
The LHA / LNK Series DVR / NVR requires an IP address to communicate with the router. The IP address can be automatically assigned by the router using Dynamic Host Configuration Protocol (DHCP), or can be manually assigned a static IP address. You can configure these settings using the FLIR Client 12 software for PC / Mac.
Prerequisites:
• Ensure that you have downloaded and installed the FLIR Client 12 software on your PC / Mac. Click here for more information on locating software downloads.
• Ensure that you have logged in and added your DVR / NVR system to the FLIR Client 12 software. Click here for information on how to log in to the FLIR Client 12 software.
REMINDER: DHCP is the recommended default network setting. A static IP address requires you to configure the IP address, subnet mask, gateway, and DNS settings.
To configure basic network settings:
1.Launch the FLIR Client 12 software for PC / Mac.
2.Click Remote Setting in the top-right corner of the window.
3.Under Settings, click Network to open the Network tab.
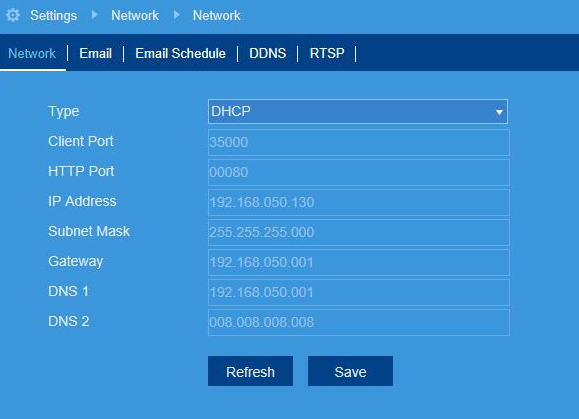
4.Click the Type drop-down menu and select DHCP (default — recommended) or Static. Selecting Static requires you to edit the IP Address, Subnet Mask, Gateway and DNS settings.
REMINDER: If you have selected Static, click the fields next to IP Address, Subnet Mask, Gateway and DNS to edit as required.
5.Click Save.
FLIR Client 12 Software: Configuring mainstream recording settings
Your DVR / NVR system uses two different recording streams:
• Mainstream: a high-quality stream used for live viewing and recording.
• Substream: a lower quality stream used for remote viewing and playback.
You can use these recording streams to record high-quality video locally and review video remotely with low bandwidth. These settings can be configured using the FLIR Client 12 software for PC / Mac.
Prerequisites:
• Ensure that you have logged in and added your DVR / NVR system to the FLIR Client 12 software.
• NVR units also support a Mobilestream to set a custom video stream for remote viewing purposes. The following instructions require you to access your system using your DVR / NVR and a monitor.
To configure a mainstream recording stream:
1.Launch the FLIR Client 12 software on your PC / Mac.
2.Click Remote Setting in the top-right corner of the window.
3.Under Settings, click Record, then click on the Mainstream tab.
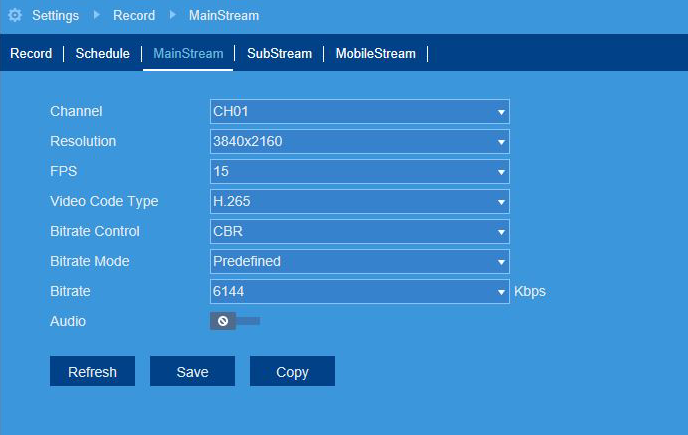
4.In the Channel drop-down menu, select a channel to configure the mainstream for.
5.In the Resolution drop-down menu, select the recording resolution.
6.In the FPS drop-down menu, select the number of frames per second.
7.In the Bitrate Control drop-down, select a control method:
◦ CBR (default): Constant Bit Rate.
◦ VBR: Variable Bit Rate. In the second drop-down, select a quality level for the video stream.
8.In the Bitrate Mode drop-down menu, select the bitrate mode:
◦ Predefined: select a preset value.
◦ User-defined: enter a custom bitrate value.
9.In the Bitrate drop-down menu, select the bitrate mode (predefined bitrate mode), or enter a custom bitrate between 1024-8192Kbps (user-defined bitrate mode).
10.Click the Audio switch to enable ( ) or disable (
 ) audio on the selected channel (audio-enabled camera required).
FLIR Client 12 Software: Configuring motion detection settings
You can configure your DVR / NVR system to record motion detection events using the FLIR Client 12 software for PC / Mac.
Prerequisites:
To enable and configure motion detection:
1.Launch the FLIR Client 12 software for PC / Mac.
2.Click Remote Setting in the top-right corner of the window.
3.Under Settings, click Alarm to open the Motion tab.
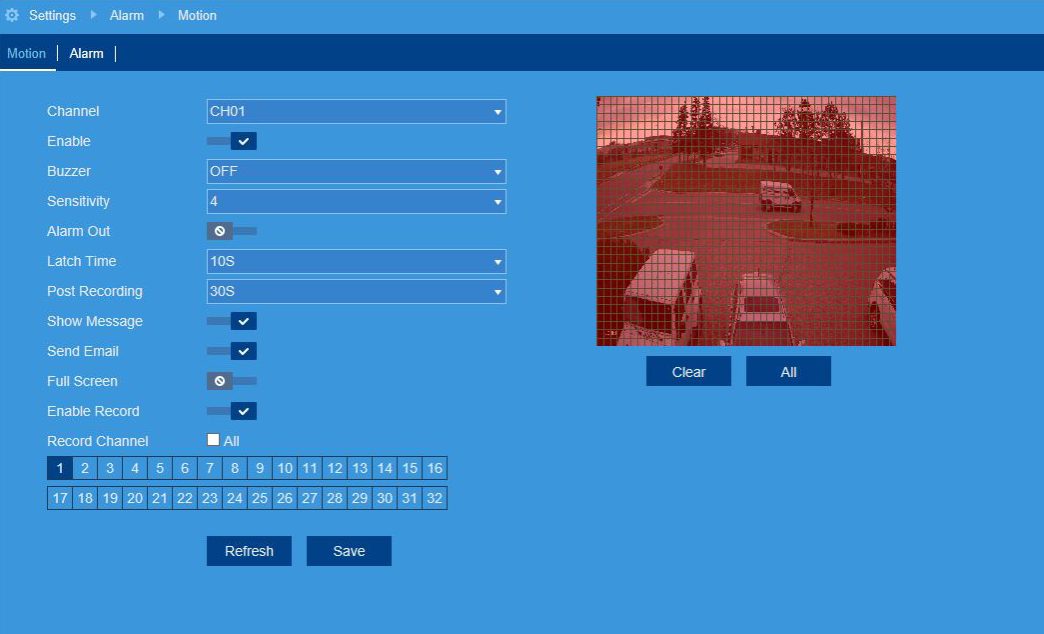
4.In the Channel drop-down menu, select a channel to configure motion detection for.
5.Click the Enable switch to enable ( ) or disable (
 ) motion detection.
6.In the Sensitivity drop-down menu, select a sensitivity level for motion events. The lower the sensitivity value, the more movement is required to trigger motion detection.
7.In the Buzzer drop-down menu, select whether you would like the DVR to make an alarm sound when motion is detected.
8.Click the Full Screen switch to enable ( ) or disable (
 ) full screen viewing when motion is detected.
9.In the Post Recording drop-down, select the amount of time the system will record video for after motion is detected.
10.Click the Show Message switch to enable ( ) or disable (
 ) on-screen messages when motion is detected.
11.Click the Send Email switch to enable ( ) or disable (
 ) email notification when motion is detected.
IMPORTANT: Ensure you have enabled email notifications.
12.Click the Record Channel switch to enable ( ) or disable (
 ) recording when motion is detected.
13.Click on the numbered boxes representing channels that should also be recorded when motion is detected on the selected channel. Check the Analog All checkbox to select all.
14.The camera image appears with a red grid overlay on the entire image, letting you know that motion detection is active for the entire image. Click or click-and-drag to add / remove area from the red grid.
REMINDER: Motion detection will be disabled for areas of the image without red overlay. Motion events which occur in the red overlay will not trigger motion detection. Disabling motion detection in certain areas of the image is an effective way to eliminate unwanted recordings and notifications, such as those caused by trees blowing in the wind or street traffic seen through an open window.
FLIR Client 12 Software: Configuring recording settings
Your DVR / NVR system has recording settings that can be configured using the FLIR Client 12 software for PC / Mac. Basic configuration options include recording for specific channels, selecting a stream mode, and enabling pre-recording.
Prerequisites:
To configure recording settings:
1.Launch the FLIR Client 12 software on your PC / Mac.
2.Click Remote Setting in the top-right corner of the window.
3.Under Settings, click Record to open the Record tab.
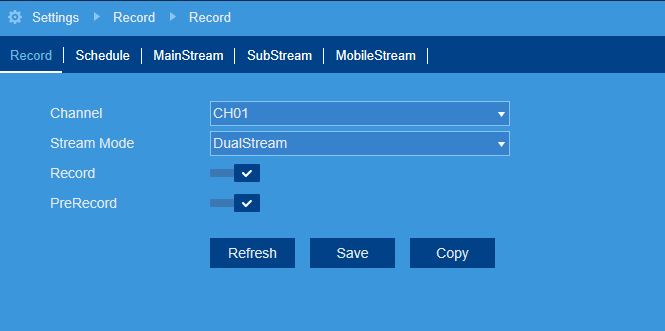
4.In the Channel drop-down menu, select a channel to set recording parameters for.
5.In the Stream Mode drop-down menu, configure the recording mode:
◦ Select DualStream to record using mainstream recording settings while using the substream for remote viewing.
◦ Select MainStream to use mainstream recording only.
IMPORTANT: You must set the Stream Mode to DualStream in order to play back recordings using the FLIR Secure mobile app. Live viewing will not be affected.
· Click here to configure Mainstream recording settings using FLIR Client 12 software.
6.Click the Record switch to enable ( ) or disable (
 ) recording.
7.Click the PreRecord switch to enable ( ) or disable (
 ) pre-recording of motion events.
FLIR Client 12 Software: Configuring substream recording settings
Your DVR / NVR system uses two different recording streams:
• Mainstream: a high-quality stream used for live viewing and recording.
• Substream: a lower quality stream used for remote viewing and playback.
You can use these recording streams to record high-quality video locally and review video remotely with low bandwidth. These settings can be configured using the FLIR Client 12 software for PC / Mac.
Prerequisites:
• Ensure that you have downloaded and installed the FLIR Client 12 software on your PC / Mac. Click here for more information on locating software downloads.
• Ensure that you have logged in and added your DVR / NVR system to the FLIR Client 12 software. Click here for information on how to log in to the FLIR Client 12 software.
To configure a substream recording stream:
1.Launch the FLIR Client 12 software for PC / Mac.
2.Click Remote Setting in the top-right corner of the window.
3.Under Settings, click Record, then click on the Substream tab.
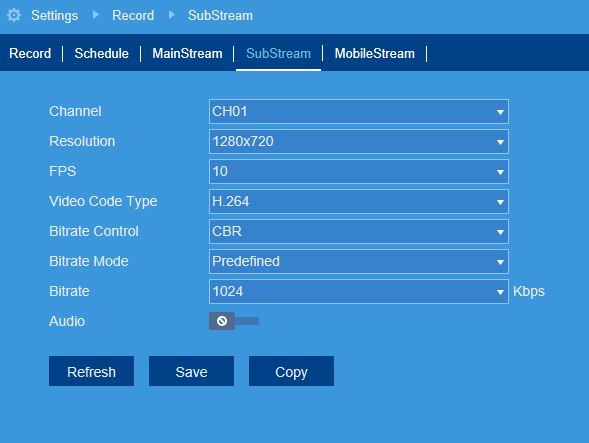
4.In the Channel drop-down menu, select a channel to configure the substream for.
5.In the Resolution drop-down menu, select the recording resolution.
6.In the FPS drop-down menu, select the number of frames per second.
7.In the Bitrate Control drop-down, select a control method:
◦ CBR (default): Constant Bit Rate.
◦ VBR: Variable Bit Rate. In the second drop-down, select a quality level for the video stream.
8.In the Bitrate Mode drop-down menu, select the bitrate mode:
◦ Predefined: select a preset value.
◦ User-defined: enter a custom bitrate value.
9.In the Bitrate drop-down menu, select the bitrate mode (predefined bitrate mode), or enter a custom bitrate between 1024-8192Kbps (user-defined bitrate mode).
10.Click the Audio switch to enable ( ) or disable (
 ) audio on the selected channel (audio-enabled camera required).
FLIR Client 12 Software: Date and time on the DVR / NVR
If you would like to correct or adjust your DVR / NVR system time, you can configure time settings by enabling / disabling the Network Time Protocol (NTP), adjust Daylight Savings Time (DST), or manually enter the time using the FLIR Client 12 software for PC / Mac.
Prerequisites:
• Ensure that you have downloaded and installed the FLIR Client 12 software on your PC / Mac. Click here for more information on locating software downloads.
• Ensure that you have logged in and added your DVR / NVR system to the FLIR Client 12 software. Click here for information on how to log in to the FLIR Client 12 software.
• Ensure your DVR / NVR is connected to a Router or switch on your network using the included Ethernet cable. A constant connection to the Internet is required to use NTP.
To enable / disable NTP:
1.Launch FLIR Client 12 software for PC / Mac.
2.Click Remote Setting in the top-right corner of the window.
3.Under System, click General to open the General tab.
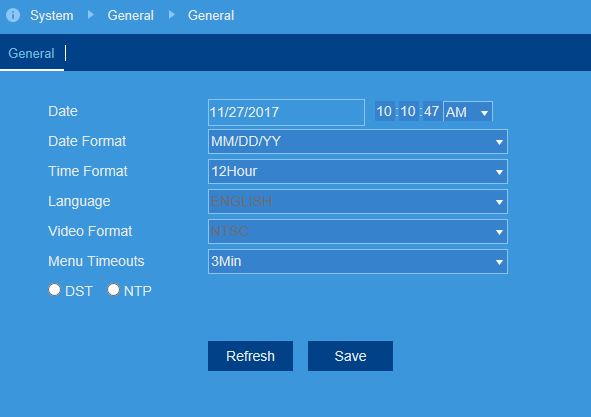
4.Click the NTP checkbox to show NTP options.
5.Click the NTP switch to enable ( ) or disable (
 ) NTP on the system.
6.In the Server Address drop-down menu, select the desired NTP server.
RECOMMENDED: Use the default Lorex server: ntp.lorexddns.net.
7.In the Time Zone drop-down menu, select the correct region.
REMINDER: In most cases, the region should already be correct as it was configured during the DVR setup wizard. The selected region is also used by the system to intelligently determine the correct video format for that region, which may change automatically when changing the region. For example, changing the region from New York to London will also switch the video format of the system from NTSC to PAL.
8.Click Save to sync with the NTP server.
You can also enable / disable DST if required.
To enable / disable DST:
1.Launch FLIR Client 12 software for PC / Mac.
2.Under System, click General, then click the DST tab.
3.In the DST drop-down, select Enable.
4.In the Time Offset drop-down menu, select the time difference to use for DST.
5.In the Daylight Saving Time drop-down menu, select a mode of entry for effective dates:
◦ Select Week to choose DST time changes that are relative to the day of the week (for example, on the second Sunday of March).
◦ Select Date to choose a specific date and time for each DST time change (for example, on March 13th at 2:00AM).
6.Enter the desired Start Time and End Time for Daylight Savings Time. System time will move forward an hour at the start time, and back an hour at the end time.
You can also manually enter a time in your DVR / NVR system using the FLIR Client 12 software for PC / Mac.
To manually configure the date and time:
1.Launch FLIR Client 12 software for PC / Mac.
2.Under System, click General to open the General tab.
3.Click the field next to Date to select the correct date from the calendar.
4.Enter the correct time and use the Time drop-down menu to select AM or PM if using 12-hour time format.
5.In the Date Format drop-down menu, select how you want the date to appear.
6.In the Time Format drop-down menu, select how you want the time to appear.
FLIR Client 12 Software: Downloading recorded video on PC / Mac
FLIR Client 12 software allows you to download recorded video for storage or playback on your PC / Mac.
The following instructions require you to access your system using the FLIR Client 12 software and a PC / Mac.
To download recorded video:
1.Launch the FLIR Client 12 software on your PC / Mac.
2.Click Playback in the top-right corner of the home page.
3.Click the Download icon ( ) to open the Download menu.
TIP: Video files available for download during your current playback period are shown in the Download menu.
4.Click the checkbox next to the video files you want to download to your computer. You can see the start time, end time, and file size of each video before downloading.
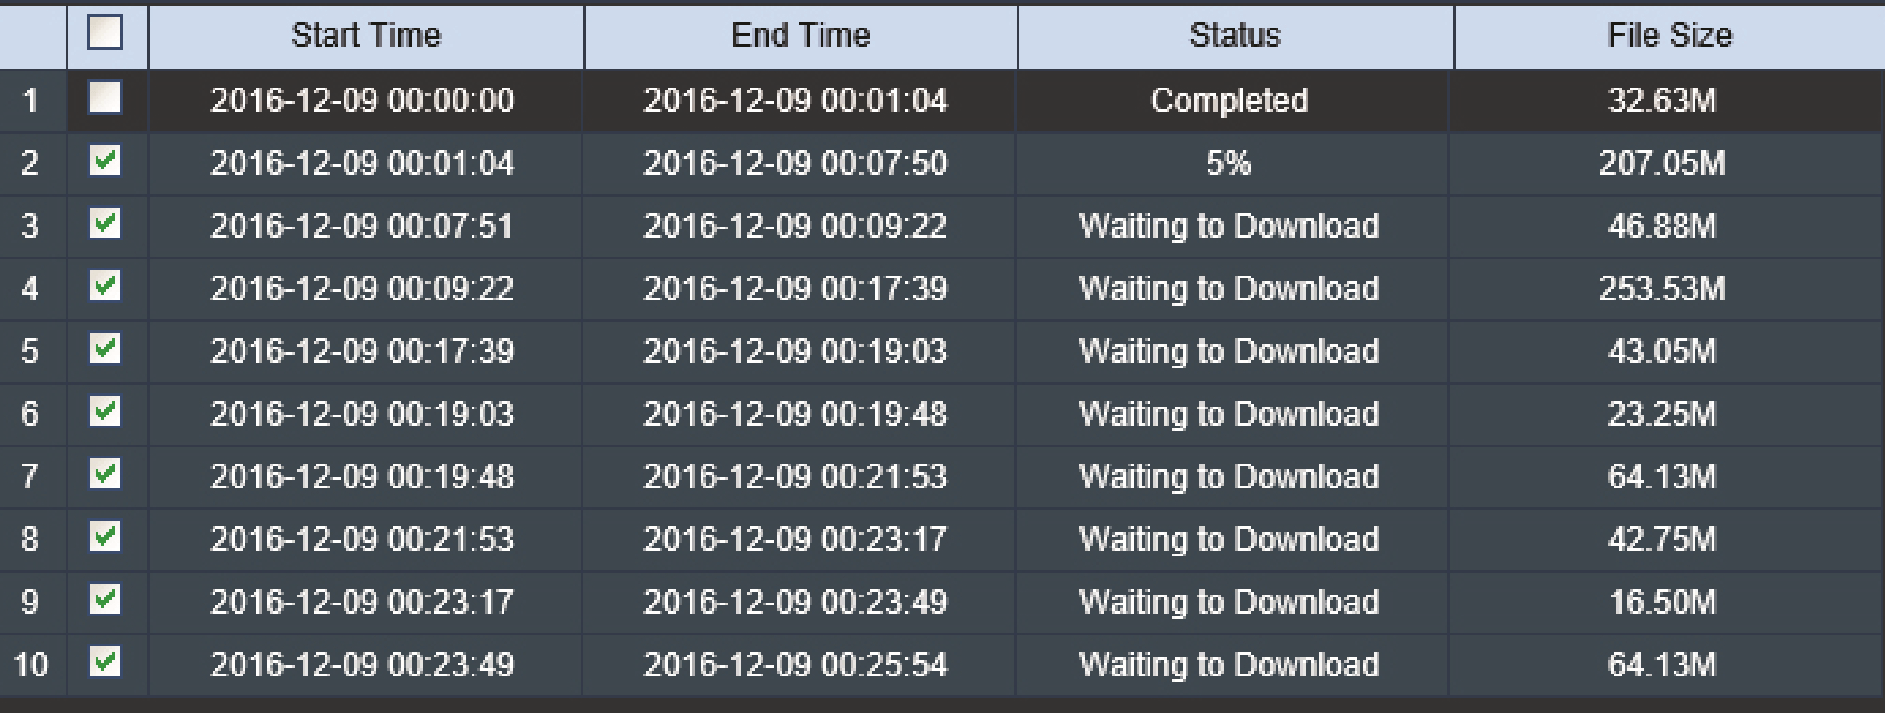
5.Click Start Download to download the selected files on your PC / Mac.
Once you have downloaded recorded video to your PC / Mac. You can play downloaded files using the Lorex Player 11 bundled software. Click here to learn how to view and play recorded video files.
FLIR Client 12 Software: Viewing downloaded video with Lorex Player 11 on PC / Mac
When you download recorded video using the FLIR Client 12 software, the software allows you to select the file type.
• For Mac users who wish to view backed up video on their computer, it is recommended to select AVI or MP4 file type, which can be played by most video player software.
• PC users have the option of using the Lorex Player 11 software which is capable of playing H.264 files. Click here for more information on locating software downloads.
The following instructions require you to access your system using the Lorex Player 11 software and a PC / Mac.
To view downloaded video using Lorex Player 11:
1.Launch Lorex Player 11 on your PC / Mac.
2.Click Open File to load a single video file. If you want to load a folder, click the Arrow icon ( ) next to Open File.
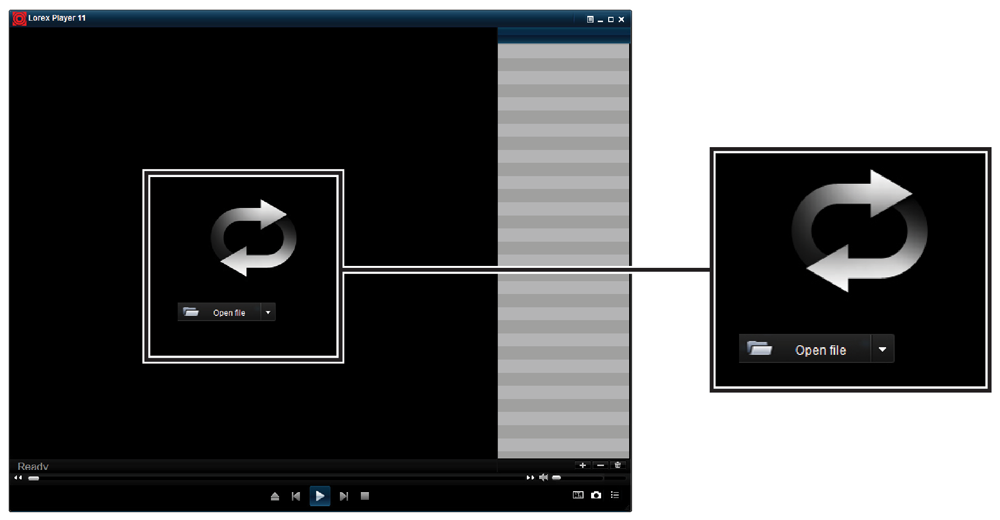
TIP: If you wish to learn more about where your downloaded video file is located, click here for details on setting video download location and file type.
3.Select the file and click Open. If you are opening a folder, click Add.
4.Double-click the file in the list on the right-side to begin playback.
FLIR Client 12 Software: Enabling and configuring Auto Capture of snapshots
You can set the your DVR / NVR system to record snapshots using the Auto Capture feature on your FLIR Client 12 software. Auto Capture automatically saves snapshots of a camera image at time intervals, and help to conserve hard disk drive (HDD) space during times when video recording is not required. Auto Capture is disabled by default.
To enable and configure Auto Capture:
1.Launch the FLIR Client 12 software for PC / Mac.
2.Click Remote Setting in the top-right corner of the window.
3.Under Settings, click Picture to open the Picture tab.
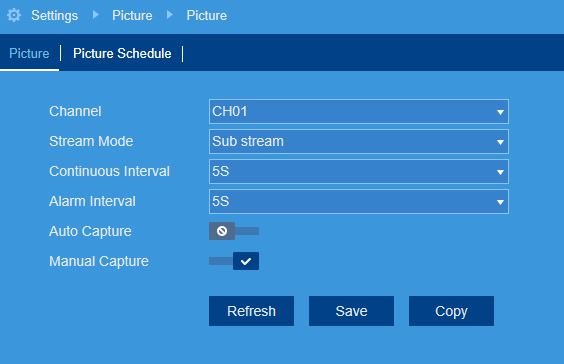
4.In the Channel drop-down menu, select a channel to configure Auto Capture for.
5.In the Stream Mode drop-down menu, select Main stream or Sub stream for Auto Captures.
6.In the Continuous Interval drop-down menu, select a time period. A snapshot will be captured at every continuous interval even if there is no activity in the camera image.
7.In the Alarm Interval drop-down menu, select a time period. A snapshot will be captured at every alarm interval while a motion event is occurring.
8.Click the Auto Capture switch to enable ( ) or disable (
 ) Auto Capture for the selected channel.
FLIR Client 12 Software: Enabling and configuring Manual Capture of snapshots
You can quickly take snapshots from enabled channels using the Manual Capture feature using the FLIR Client 12 software for PC / Mac. Capture by default, is disabled.
To enable and configure Manual Capture:
1.Launch the FLIR Client 12 software for PC / Mac.
2.Click Remote Setting in the top-right corner of the window.
3.Under Settings, click Picture to open the Picture tab.
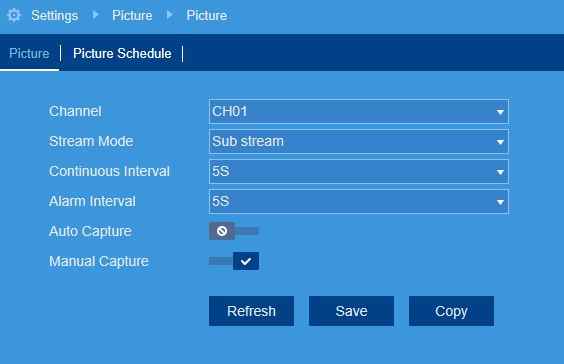
4.In the Channel drop-down menu, select a channel to enable Manual Capture for.
5.Click the Manual Capture switch to enable ( ) or disable (
 ) Manual Capture for the selected channel.
6.Click Save.
Once you have enabled manual capture, you can manually capture snapshots.
To manually capture a snapshot:
Click the Manual Capture icon ( ) on the Mini Menu above a camera’s live display.
FLIR Client 12 Software: Logging in on PC / Mac
You can access your LHA / LNK Series DVR / NVR System using the FLIR Client 12 software on your PC / Mac.
Prerequisites:
• Ensure that you have completed basic setup and the Setup Wizard on your DVR / NVR system. Refer to your included Quick Start Guide for details.
• Ensure that you have recorded the device ID from the QR code label on the top panel of your DVR / NVR and the Client Port value from the system information screen on your DVR / NVR. Accessing system information.
Once you have completed these prerequisites, you can log in to the FLIR Client 12 software.
To log into the DVR using FLIR Client 12:
1.Launch the FLIR Client 12 software on your PC / Mac.
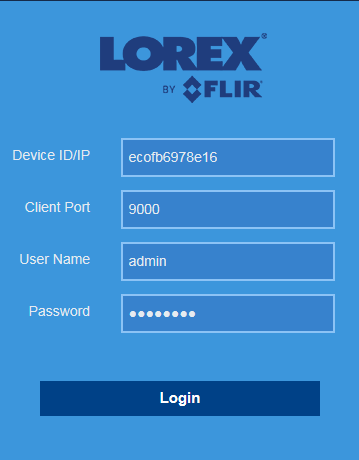
2.Enter the Device ID of the DVR / NVR.
5.Enter the Password.
REMINDER: The default password will only work if you are accessing the DVR / NVR for the first time using the FLIR Client 12 software. If you completed initial setup on the DVR / NVR, you will have already created your own, secure password.
7.If you are accessing the DVR / NVR for the first time from your PC / Mac, you will be asked to enter a new password. Enter the password in the New Password and Confirm Password fields.
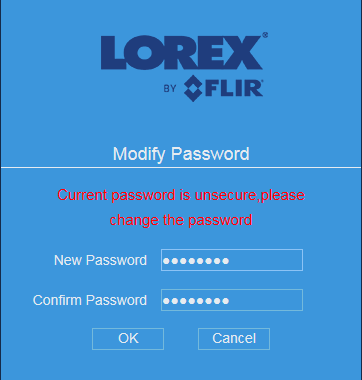
RECOMMENDED: Your new, secure password should be used from now on to access your DVR / NVR locally, as well as remotely using FLIR Client 12 or the FLIR Secure app for smartphones and tablets.
FLIR Client 12 Software: Manually updating DVR / NVR firmware on PC / Mac
Your LHA / LNK Series DVR / NVR can receive firmware updates:
• Automatically over a network, connected by an Ethernet cable (included). Click here for information on how to automatically upgrade firmware.
• Manually by connecting a USB flash drive (not included) to your DVR / NVR. Click here for more information about manually upgrading firmware through your DVR / NVR.
• Manually by connecting a USB flash drive (not included) to your PC / Mac and using the FLIR Client 12 software.
IMPORTANT: It is recommended to use automatic upgrade unless directed by technical support to perform a manual upgrade. Technical support will provide you with a .bin file for manual firmware upgrade. Do not power off the DVR / NVR during a firmware upgrade.
Prerequisites:
• Download and install the FLIR Client 12 software on your PC / Mac. Click here for more information on locating software downloads.
• Save the .bin file on your PC / Mac.
To manually update the DVR / NVR firmware:
1.Launch the FLIR Client 12 software on your PC / Mac.
3.Under Advanced, click Maintenance > Firmware Update tab.
5.Select the .bin file saved on your PC / Mac, and then click Open.

6.Click Start to upgrade the firmware.
7.Allow 5-10 minutes for the system to upgrade. The DVR / NVR will automatically restart when the firmware upgrade is complete.
Click here for information on how to manually update firmware using your LHA / LNK Series DVR / NVR system.
Click here for information on how to manually update firmware using your LHB Series DVR.
FLIR Client 12 Software: Modifying user accounts on PC / Mac
You can use the FLIR Client 12 software on your PC / Mac to change user passwords, change permissions, or enable / disable user accounts.
Prerequisites:
• Ensure you have downloaded and installed FLIR Client 12 software on your PC / Mac. Click here for more information on locating software downloads.
• Use a monitor and mouse to complete the basic setup steps and the Setup Wizard on your DVR / NVR. Refer to your included Quick Start Guide for details.
• Ensure that you have at least one camera connected to your DVR / NVR.
• Ensure you have logged in with your administrator account to manage user settings
The following instructions require you to access your system using the FLIR Client 12 software and a PC / Mac.
To modify user accounts:
1.Launch the FLIR Client 12 software on your PC / Mac.
2.Click Remote Setting in the top-right corner of the home page.
3.Under System, click Users to open the Users tab.
4.Click the administrator or user account you would like to edit.
5.Configure the following:
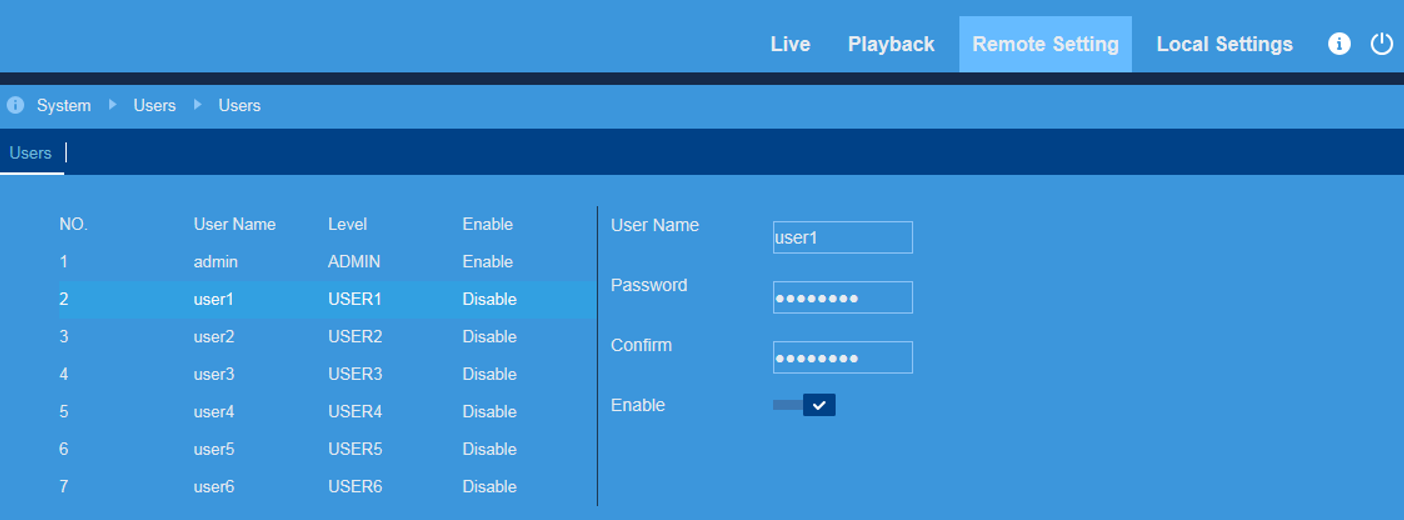
◦ User Name: Modify the user name for the selected account.
◦ Password / Confirm: Modify and confirm a new password for the selected account.
◦ Enable: For user accounts, click the slider to enable ( ) or disable (
 ) the user account.
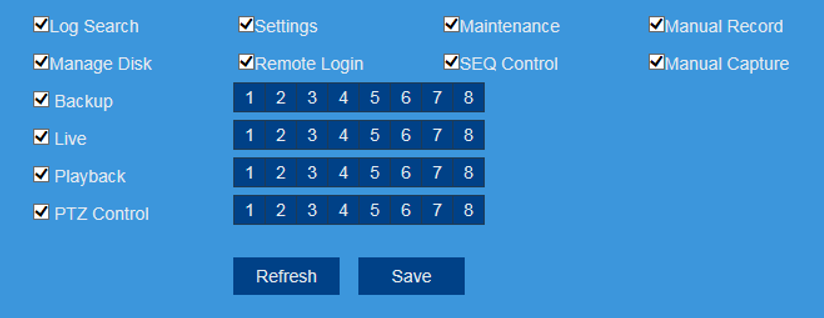
6.For user accounts, edit the user permissions to your preference:
◦ Check the boxes next to any system menus or capabilities you would like the user to access.
◦ Click All to check all boxes.
◦ Click Clear to check none of the boxes.
FLIR Client 12 Software: Restoring to default settings
You can restore your DVR / NVR system to default settings using the FLIR Client 12 software for PC / Mac. You can choose to restore all settings at once, or just settings on specific menus. Restoring default settings does not affect recordings and snapshots saved to the hard drive.
To restore default settings:
1.Launch the FLIR Client 12 Software for PC / Mac.
2.Click Remote Setting in the top-right corner of the window.
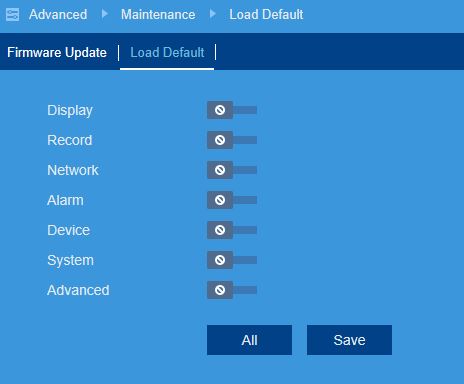
3.Under Advanced, click Maintenance, then click the Load Default tab.
4.Click the switches next to the system menus to you would like to include ( ) or discard (
 ) from the restore, or click All to reset all menus.
5.Click Save to confirm. The DVR / NVR will reboot automatically.
FLIR Client 12 Software: Setting a picture schedule for Auto Capture
You can configure your DVR / NVR system to set a picture schedule for Auto Capture using the FLIR Client 12 software for PC / Mac.
To set a picture schedule:
1.Launch the FLIR Client 12 software for PC / Mac.
2.Click Remote Setting in the top-right corner of the window.
3.Under Settings, click Picture, the click the Picture Schedule tab.
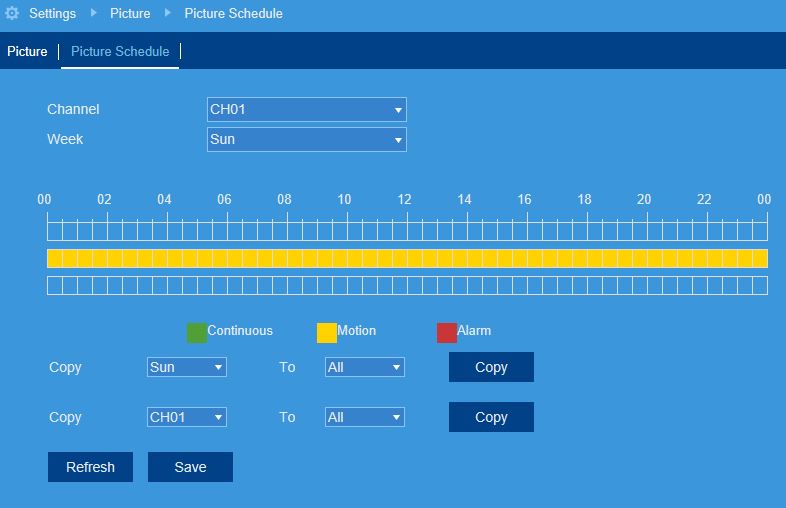
4.In the Channel drop-down menu, select a channel to set a privacy zone for.
5.In the Week drop-down menu, select the day of the week you would like to set the schedule for.
6.The times of day during which continuous Auto Capture is enabled are represented by green bars, and motion by yellow. Click-and-drag to enable or disable continuous or motion captures during a certain time of day.
TIP: Repeat steps 5 and 6 for as many days of the week you would like to configure the schedule for.
7.If needed, use the Copy functions to copy the schedule for one day to other days of the week, or to copy one channel’s entire schedule to other channels.
FLIR Client 12 Software: Setting a recording schedule
You can set your DVR / NVR system to a custom recording schedule according to your needs using the FLIR Client 12 software for PC / Mac. For example, you can set the system to record continuously during business hours and record on motion detection only outside of business hours. A custom recording schedule helps reduce the amount of hard disk drive (HDD) space required, increasing the time your system can retain recordings.
Prerequisites:
• Ensure that you have downloaded and installed the FLIR Client 12 software on your PC / Mac. Click here for more information on locating software downloads.
• Ensure that you have logged in and added your DVR / NVR system to the FLIR Client 12 software. Click here for information on how to log in to the FLIR Client 12 software.
To set a recording schedule:
1.Launch the FLIR Client 12 software for PC / Mac.
2.Click Remote Setting in the top-right corner of the window.
3.Under Settings, click Record, then click on the Schedule tab.
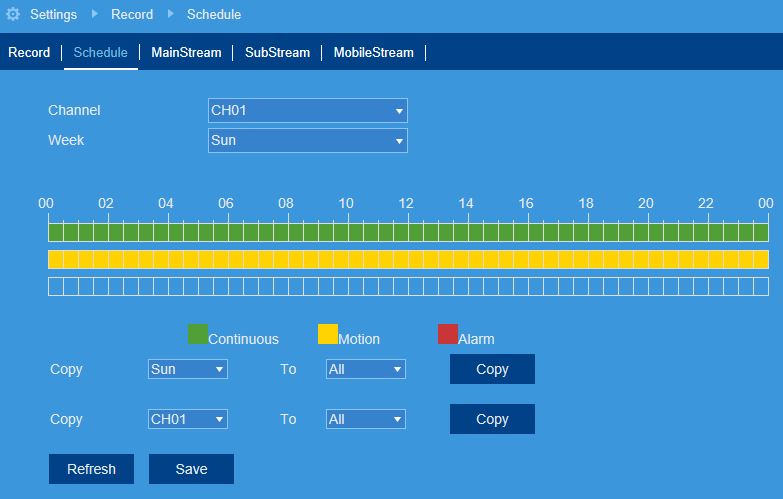
4.In the Channel drop-down menu, select a channel to set the recording schedule for.
5.In the Week drop-down menu, select the day of the week you would like to set the schedule for.
6.The times of day during which continuous recording is enabled are represented by green bars, and motion by yellow. By default, the system is set the record at all times. Click-and-drag to enable or disable continuous or motion recording during a certain time of day.
TIP: Repeat steps 5 and 6 for as many days of the week that you would like to configure the schedule for.
7.If needed, use the Copy functions to copy the schedule for one day to other days of the week, or to copy one channel’s entire schedule to other channels.
FLIR Client 12 Software: Setting an email schedule
Your DVR / NVR system email settings can be configured using the FLIR Client 12 software for PC / Mac. You can configure settings so that email notifications are only sent at certain times / days. You can also set separate schedules for motion events and system warnings per channel.
Prerequisites:
• Ensure that you have downloaded and installed the FLIR Client 12 software on your PC / Mac. Click here for more information on locating software downloads.
• Ensure that you have logged in and added your DVR / NVR system to the FLIR Client 12 software. Click here for information on how to log in to the FLIR Client 12 software.
• Ensure that you have set up email notifications:
To set an email schedule:
1.Launch the FLIR Client 12 software for PC / Mac.
2.Click Remote Setting in the top-right corner of the window.
3.Under Settings, click Network, then click the Email Schedule tab.
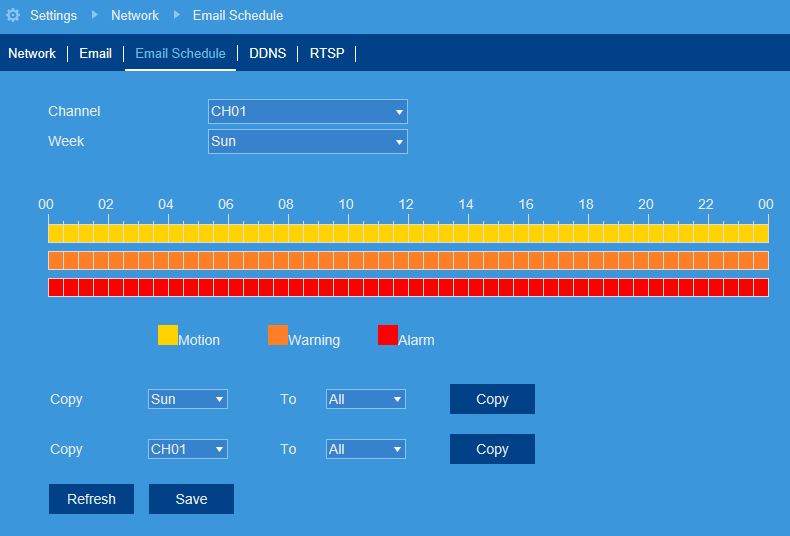
4.In the Channel drop-down menu, select a channel to set the email schedule for.
5.In the Week drop-down menu, select the day of the week you would like to set the schedule for.
6.The times of day during which email notifications for motion events are enabled are represented by yellow bars, and system warnings by red. Click-and-drag to enable or disable email notifications during a certain time of day.
7.If needed, use the Copy functions to copy the schedule for one day to other days of the week, or to copy one channel’s entire schedule to other channels.
FLIR Client 12 Software: Setting file type and download location
Your FLIR Client 12 software allows you to set the download location and file type for video recordings and snapshots.
Prerequisites:
• Configure the FLIR Client 12 software with your DVR / NVR system.
The following instructions require you to access your system using the FLIR Client software and a PC / Mac.
To set download location and file type:
1.Launch the FLIR Client 12 software on your PC / Mac.
2.Click Local Settings in the top-right corner of the window.
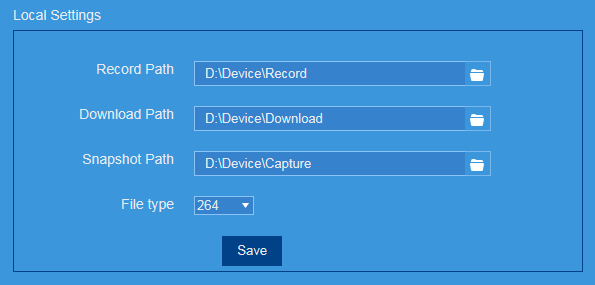
3.Click the Browse icon ( ) next to each of the path fields to display the Browse for Folder window.
4.Select the folder you would like to save recorded video, downloaded video, and snapshots, and then click OK.
5.In the File type drop-down, select a file type for video downloads.
RECOMMENDED: For Mac users who wish to view backed up video on their computer, select the AVI or MP4 file type, which can be played by most video player software.
PC Users have the option of using the Lorex Player 11 software which is capable of playing H.264 files.
FLIR Client 12 Software: Setting up email notifications using custom server information
You can use custom server information to send and receive notifications on your DVR / NVR system using the FLIR Client 12 software for PC / Mac. You can configure your email notifications to receive emails for events like motion detection or system warnings.
To enable email notifications using custom server information:
1.Launch the FLIR Client 12 software for PC / Mac.
2.Click Remote Setting in the top-right corner of the window.
3.Under Settings, click Network, then click the Email tab.
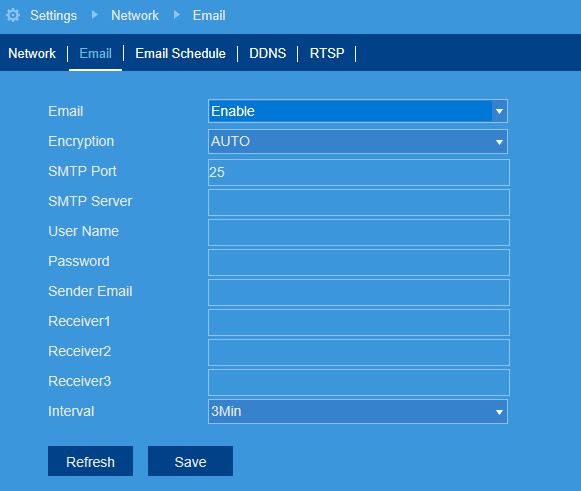
4.In the Email drop-down menu, select Enable from the to enable email notifications using a custom mail server.
5.In the Encryption drop-down menu, select an encryption type.
7.Enter the URL used by your mail server in the SMTP Server field.
8.Enter the user name for the mail server.
9.Enter the Password password for the mail server.
10.Enter the sending email address in the Sender Email field. This can be any email of your choice.
11.Enter up to 3 email addresses that will receive email notifications from the system in the Receiver fields.
12.In the Interval drop-down menu, select the minimum amount of time between email notifications. This can be used to limit the number of notifications you receive throughout the day.
FLIR Client 12 Software: Setting up email notifications using the Lorex email server
You can use the free Lorex email server (recommended) to send and receive notifications on your DVR / NVR system using the FLIR Client 12 software for PC / Mac. You can configure your email notifications to receive emails for events like motion detection or system warnings.
Prerequisites:
• Ensure that you have downloaded and installed the FLIR Client 12 software on your PC / Mac. Click here for more information on locating software downloads.
• Ensure that you have logged in and added your DVR / NVR system to the FLIR Client 12 software. Click here for information on how to log in to the FLIR Client 12 software.
To enable email notifications using the Lorex server:
1.Launch the FLIR Client 12 software for PC / Mac.
2.Click Remote Setting in the top-right corner of the window.
3.Under Settings, click Network, then click the Email tab.
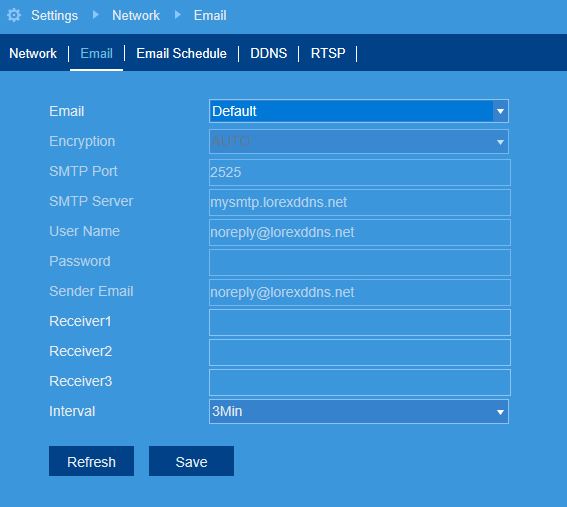
4.In the Email drop-down, select Default to enable the default Lorex mail server.
5.Enter up to 3 email addresses in the Receiver fields that will receive email notifications from the system.
6.In the Interval drop-down, select the minimum amount of time between email notifications. This can be used to limit the number of notifications you receive throughout the day.
7.Click Save.
Once you have enabled email notifications, you can configure your email schedule.
.


 ) on the Mini Menu above a camera’s live display.


