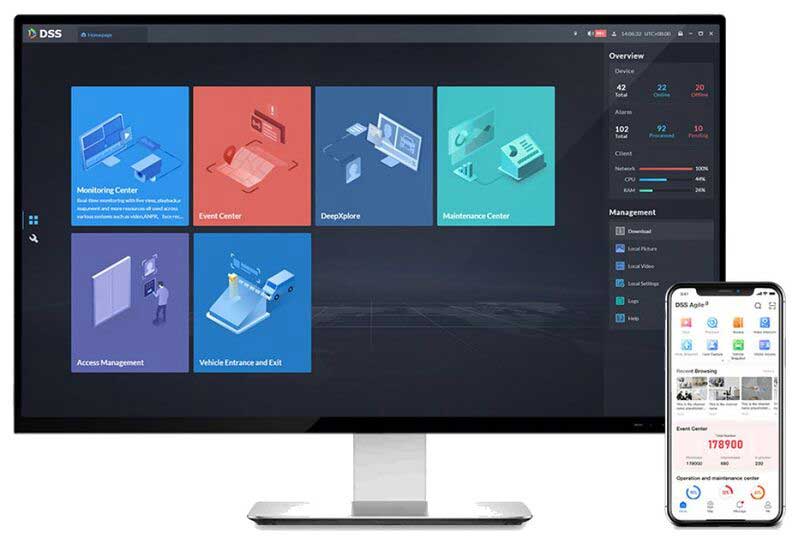
DSS Pro is a comprehensive and expandable Dahua VMS for flexible, scalable, reliable and powerful central management. With client-server architecture, DSS Pro provides central management, information sharing, convenient connections, and multi-service cooperation. The software provides basic functions such as user permission management, device management, alarm management, and central storage, but also delivers advanced features of video wall and map configuration, access control features, video intercom, attendance, and analytic functions such as face detection and object detection. It also integrates add-ons such as business intelligence and traffic surveillance.
DSS Server Installation
This guide will show how to download and install DSS Pro.
Read Next :
Step by Step Instructions
Install Server Software
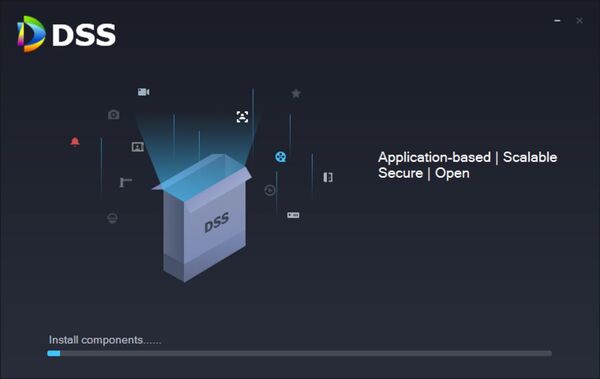
1.Download and run the Install package for DSS Pro
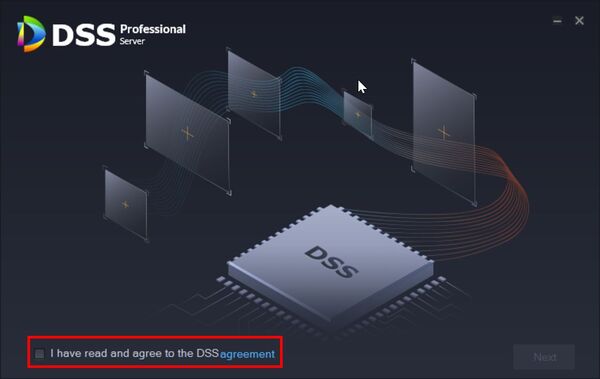
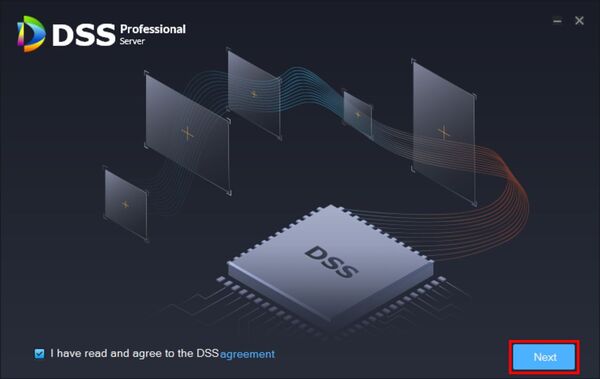
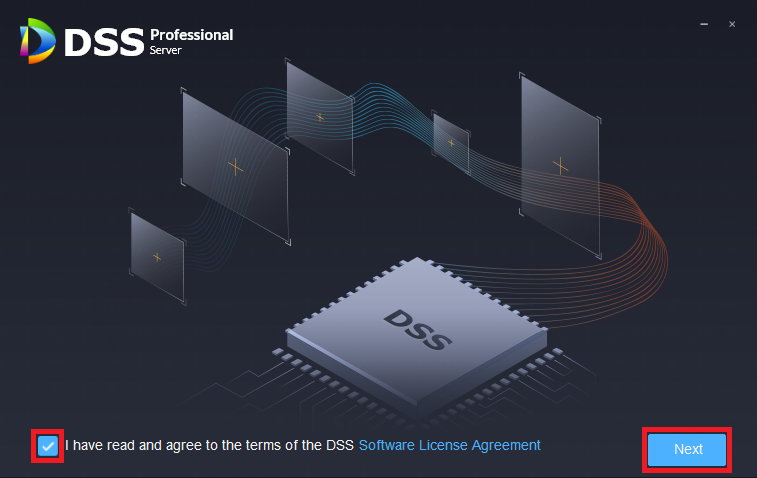
Check the box to agree to the Software agreement.
Click Next
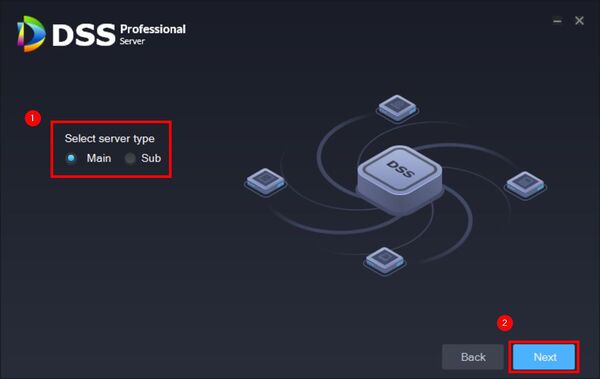
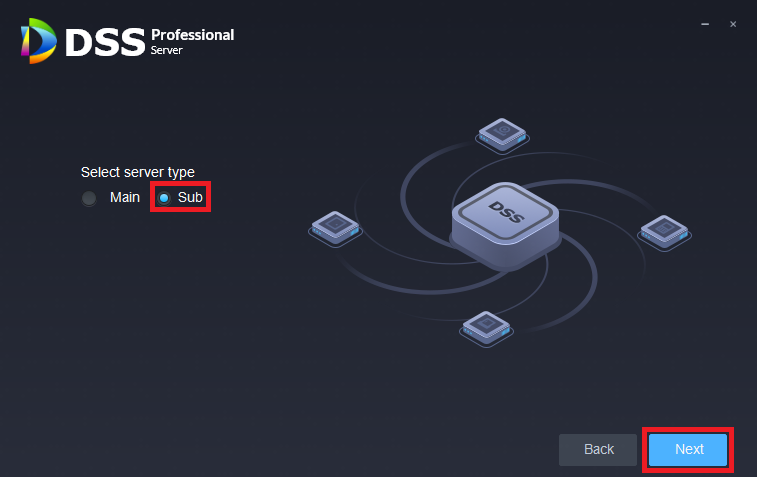
2. Select Main Server when you first install
If you are installing the server in a distributed network, select Sub Server
Click Next
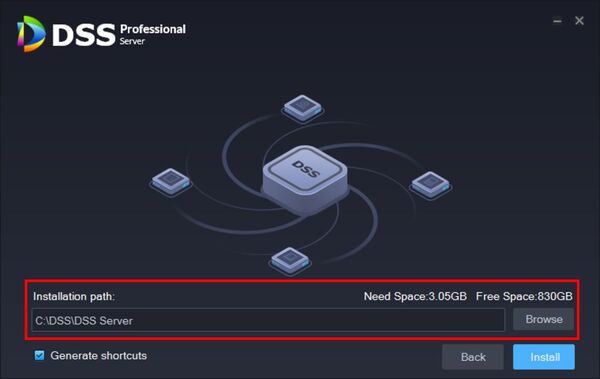
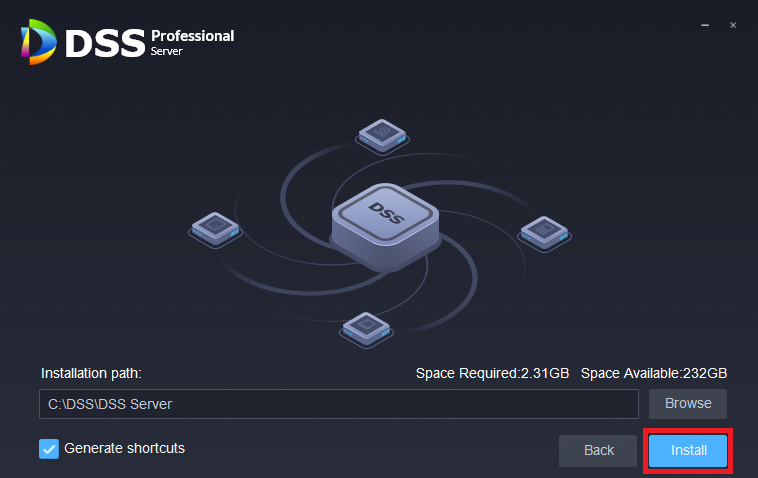
3. Select the installation path
– Make sure there is enough space on the disk for the server software – It is suggested to install in a non-system disk
Click Install
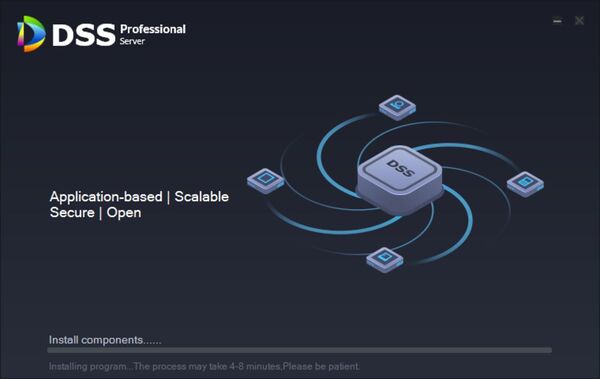
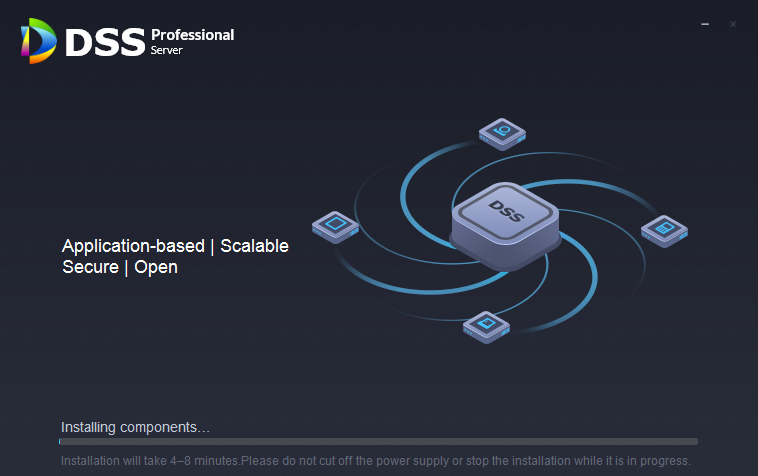
The process may take 4-8 minutes.
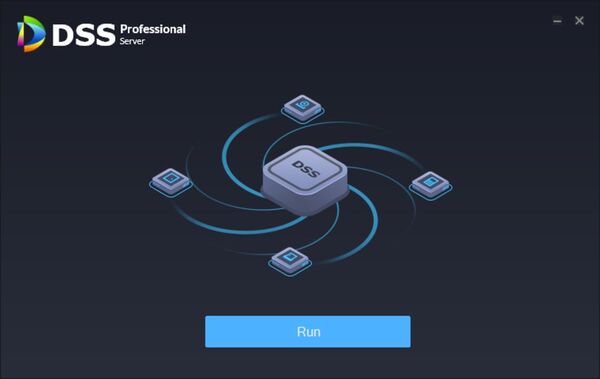
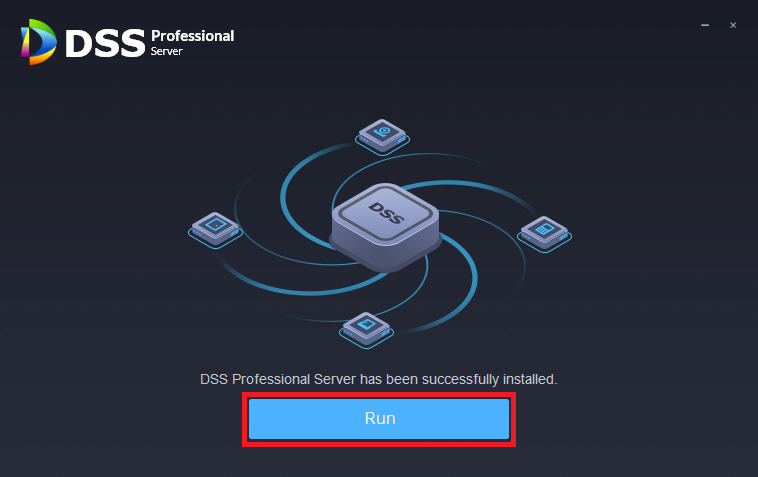
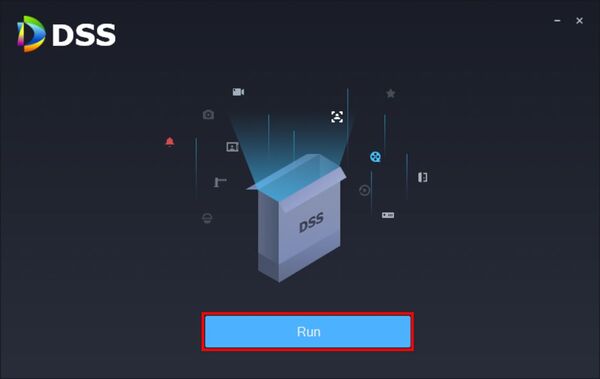
Once fully installed click Run to start DSS Pro server
DSS Pro Server configuration
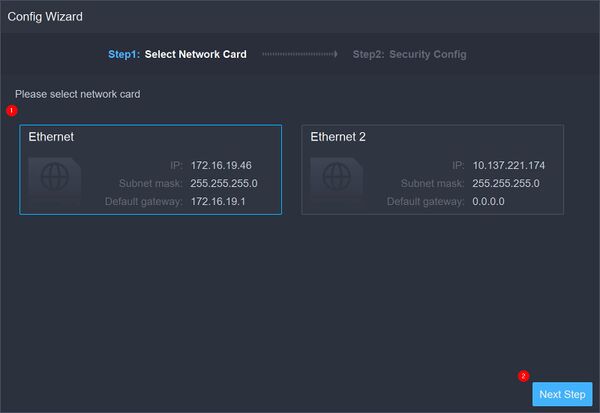
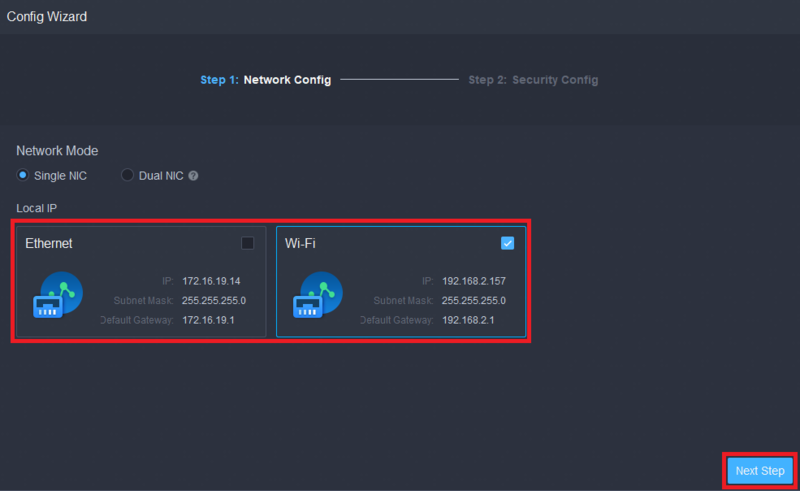
The DSS Professional Server software will display the Config Wizard on first startup
All network cards for the server will be displayed.
Select the network card and click Next Step
Please note the license key can only be bound to one network card, if you change the network card the license key will be void.
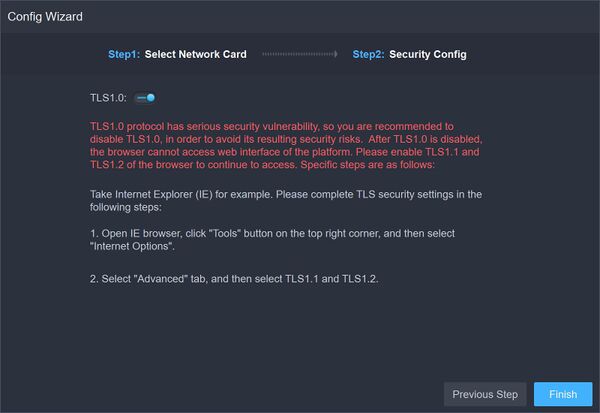
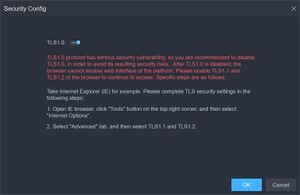
Disable or enable TLS1.0
It is recommended to disable TLS1.0 due to serious security vulnerability in the TLS1.0 protocol
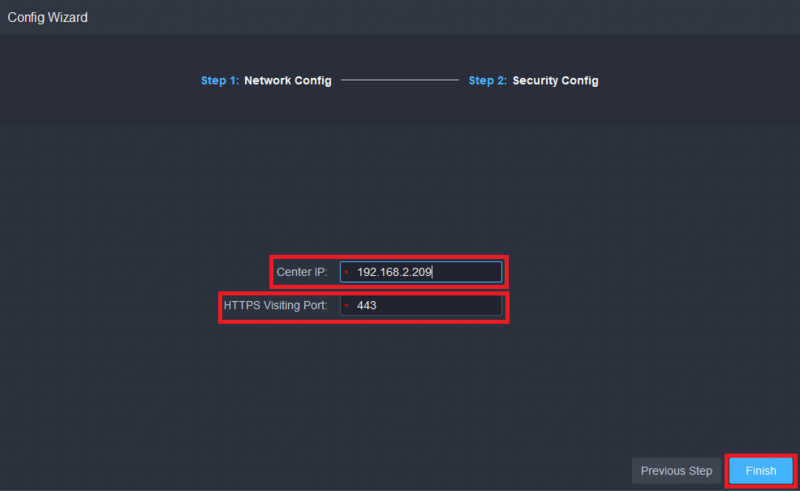
Click Finish
DSS Server software is now installed.
DSS Sub Server Installation
This guide will show how to install and setup a DSS Pro Sub Server.
Prerequisites
- DSS Pro V8 installed as a Main Server on another computer on the same network:
DSS Pro Main Server Installation
- DSS Pro V8 Client installed:
- DSS Pro V8 installer downloaded:
- A computer that meets DSS Pro Requirements:
Step by Step Instructions
1. Download and run the installer package for DSS Pro.
Check the box to agree to the Software License Agreement and then click on Next
2. Select the option for Sub under “Select server type”.
Then click on Next
3. Choose the installation path or leave it as default.
Then click on Install
4. Wait as the software is installed
5. When the installation is complete, click on Run
6. After the DSS Pro software starts up, check on the box next to the network card you want to use for the Sub Server to communicate with the Main Server and the rest of the network.
Then click on Next Step
7. Enter the local IP address of the DSS Pro Main Server that is already running in the Center IP field.
Then enter the HTTPS port of the DSS Pro Main Server in the HTTPS Visiting Port field.
And click on Finish
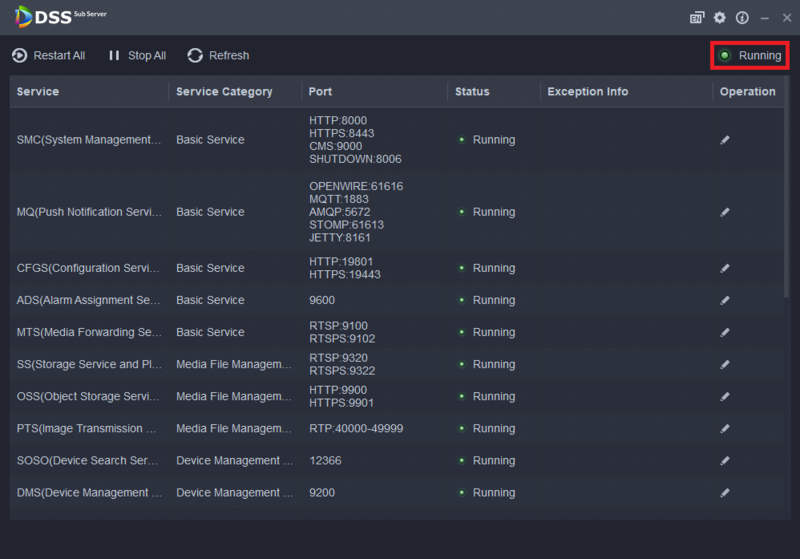
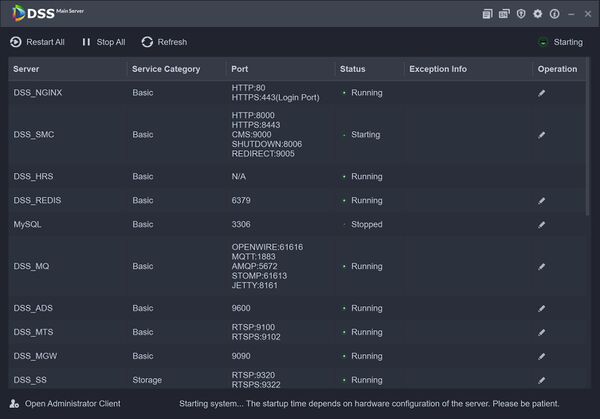
8. Wait for all the Sub Server’s services to start up.
It will says “Running” at the top right when they have all started
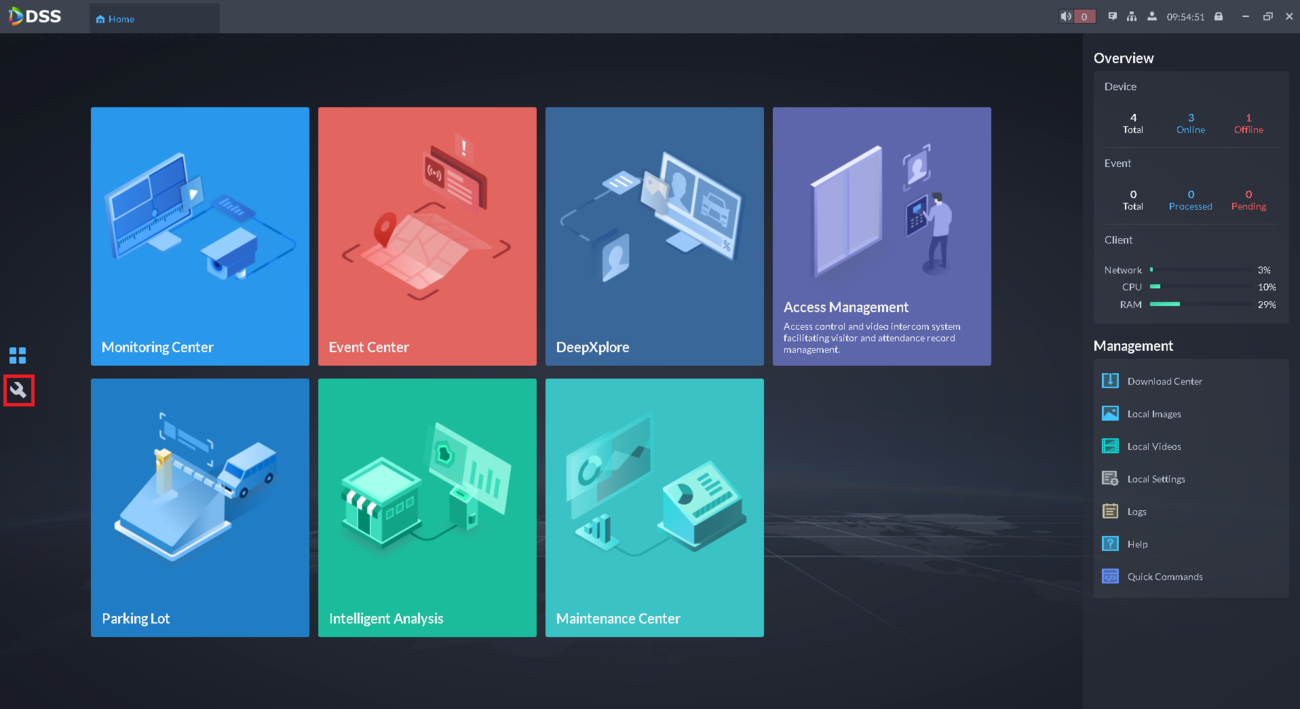
9. Log into the Client of the DSS Pro Main Server and click on the Setting icon on the left
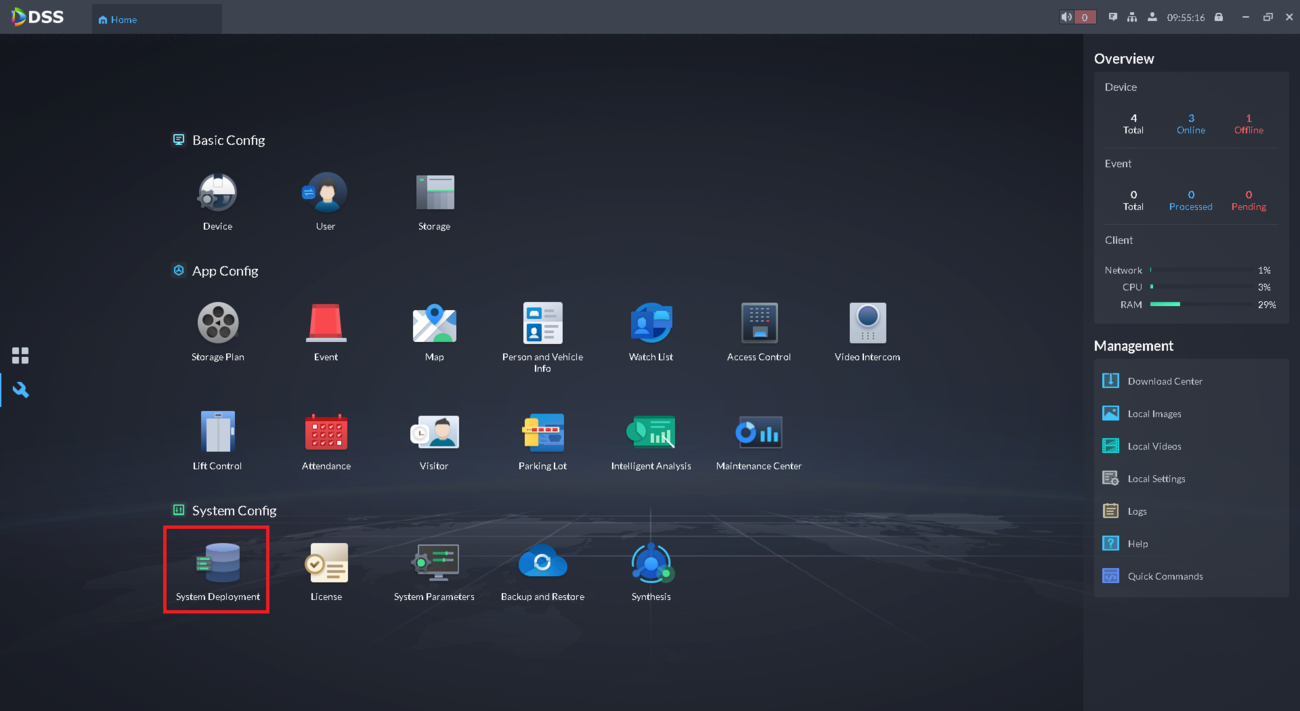
10. Select System Deployment at the bottom
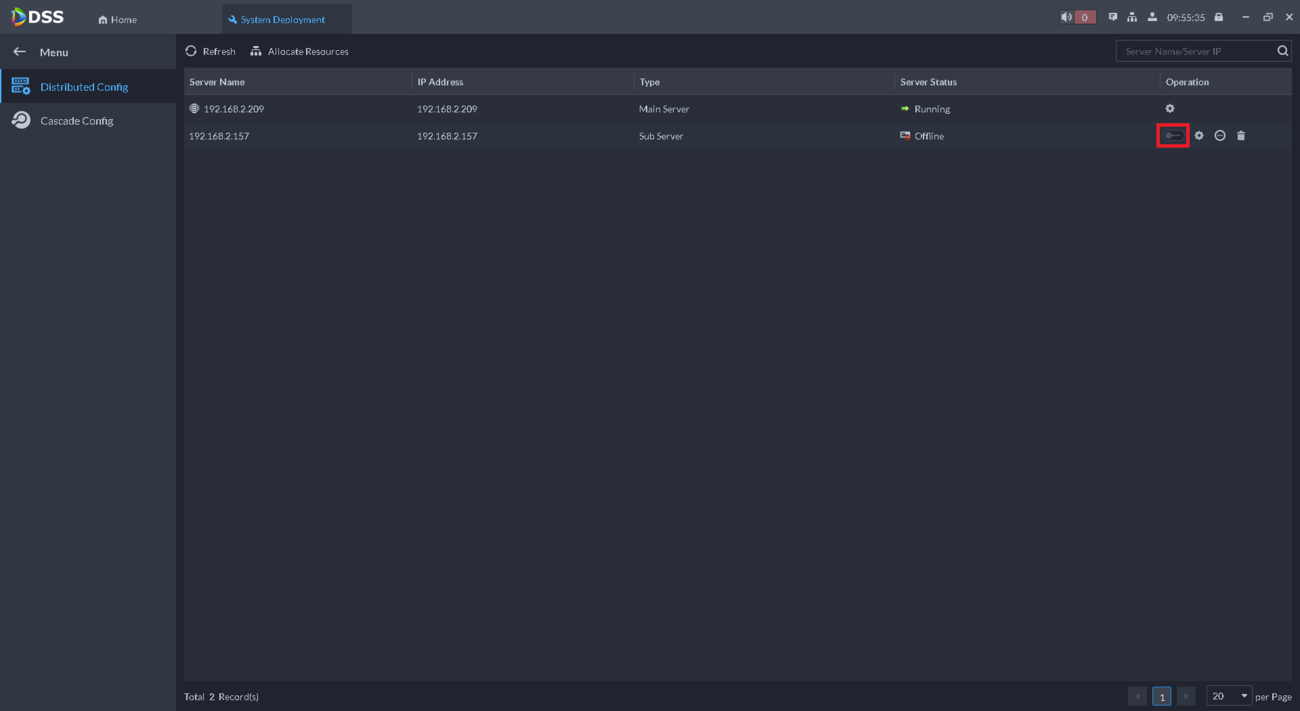
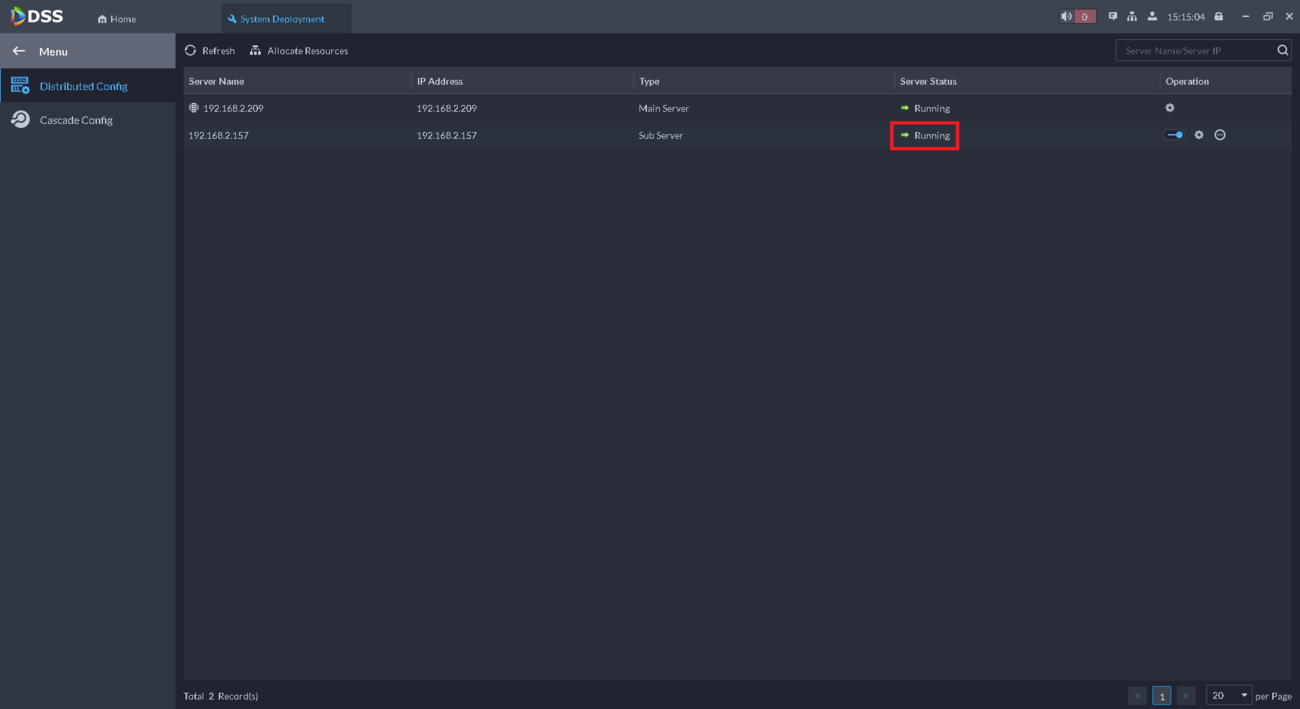
11. You should see the Sub Server’s IP address listed with “Sub Server” under “Type”.
Enable the slider next to it under “Operation”
12. The DSS Pro Sub Server’s services will all restart.
Once all the services are running again, you should see “Running” under Server Status
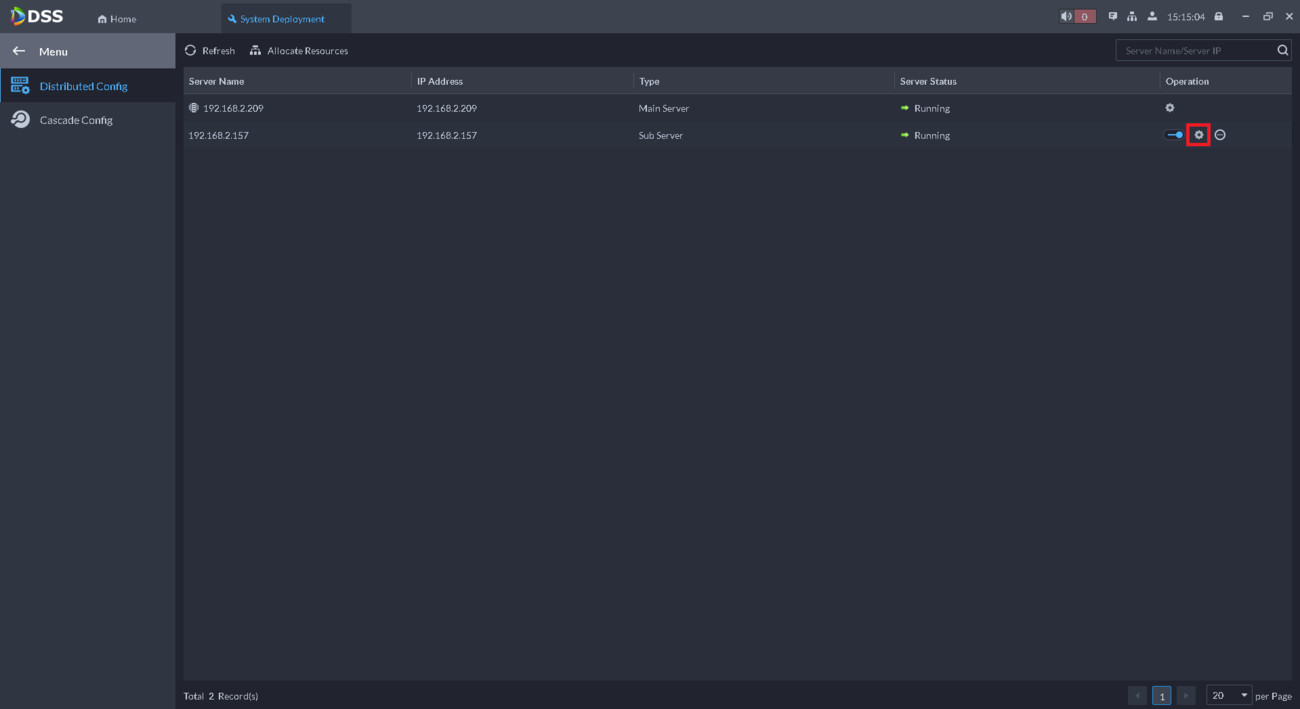
13. Click on the Gear icon to the right of the Sub Server
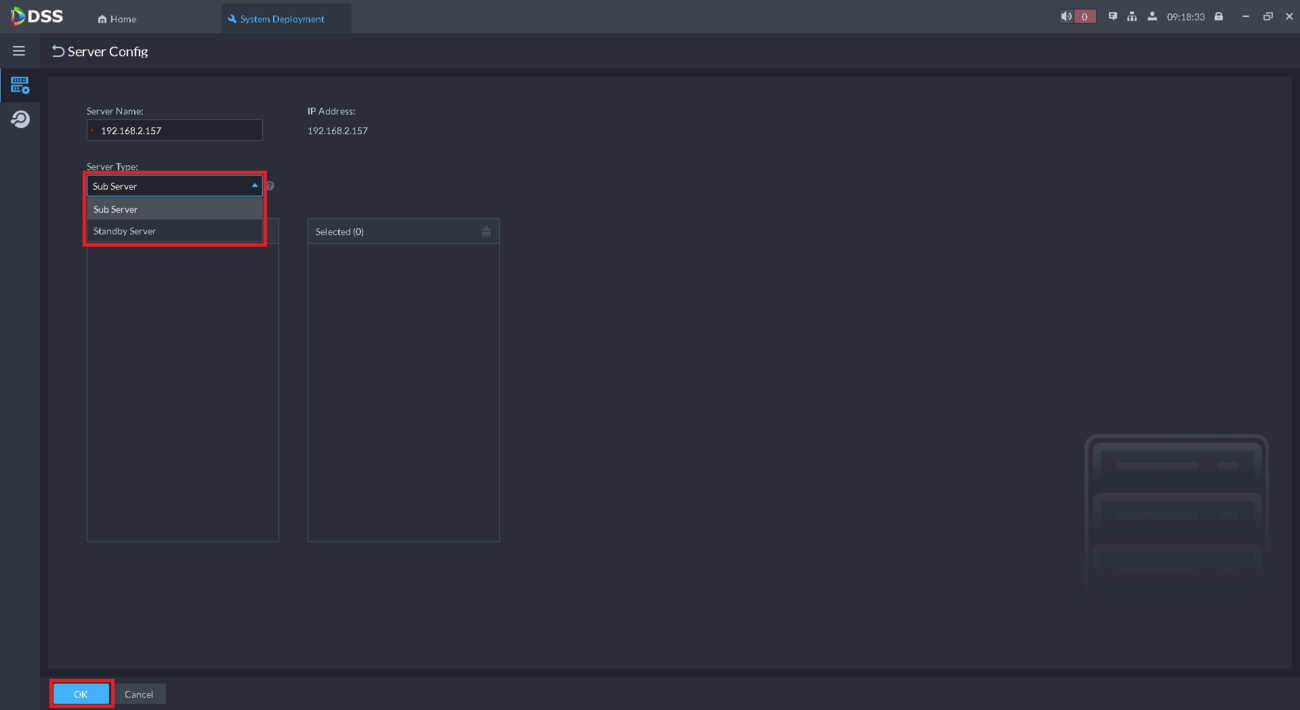
14. Click on the drop-down below “Server Type” and either choose Sub Server to keep it as a standard Sub Server that only helps distribute the load from connected devices, or select Standby Server so that the Standby Server takes over if another Sub Server goes down. (Which requires another Sub Server to be setup in addition to the Standby Server.)
Then click on OK
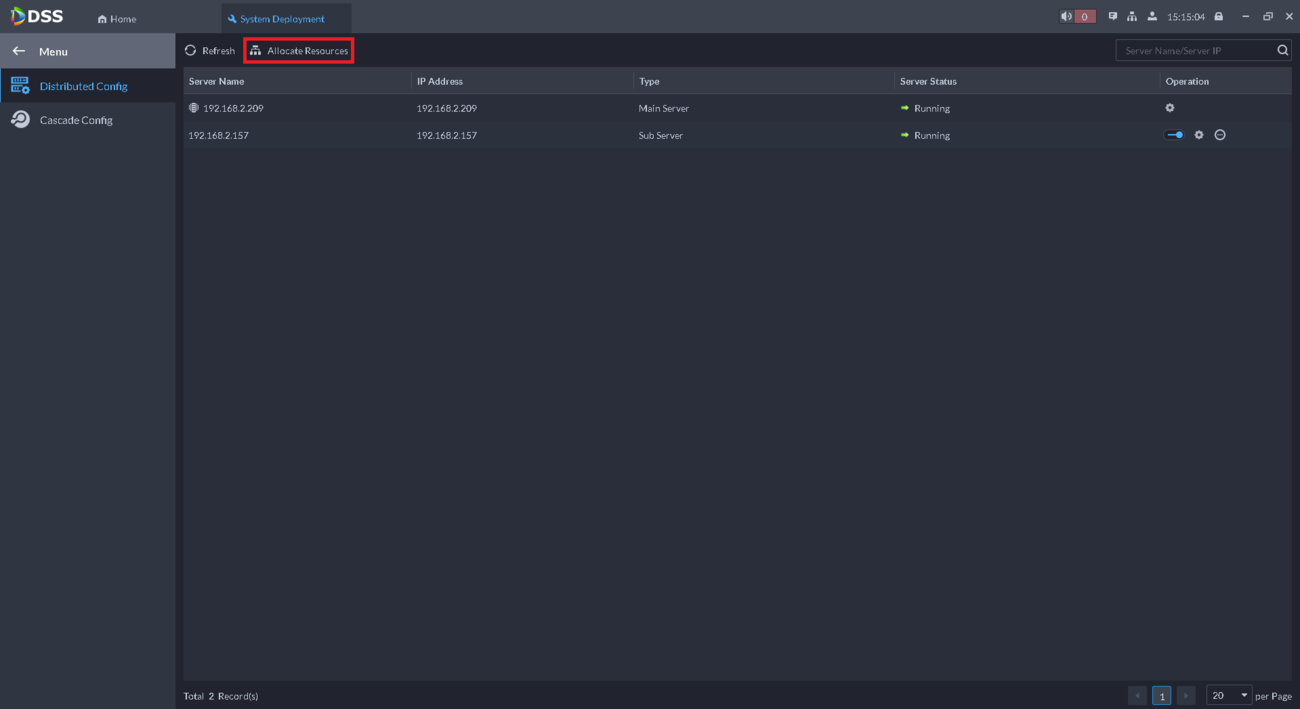
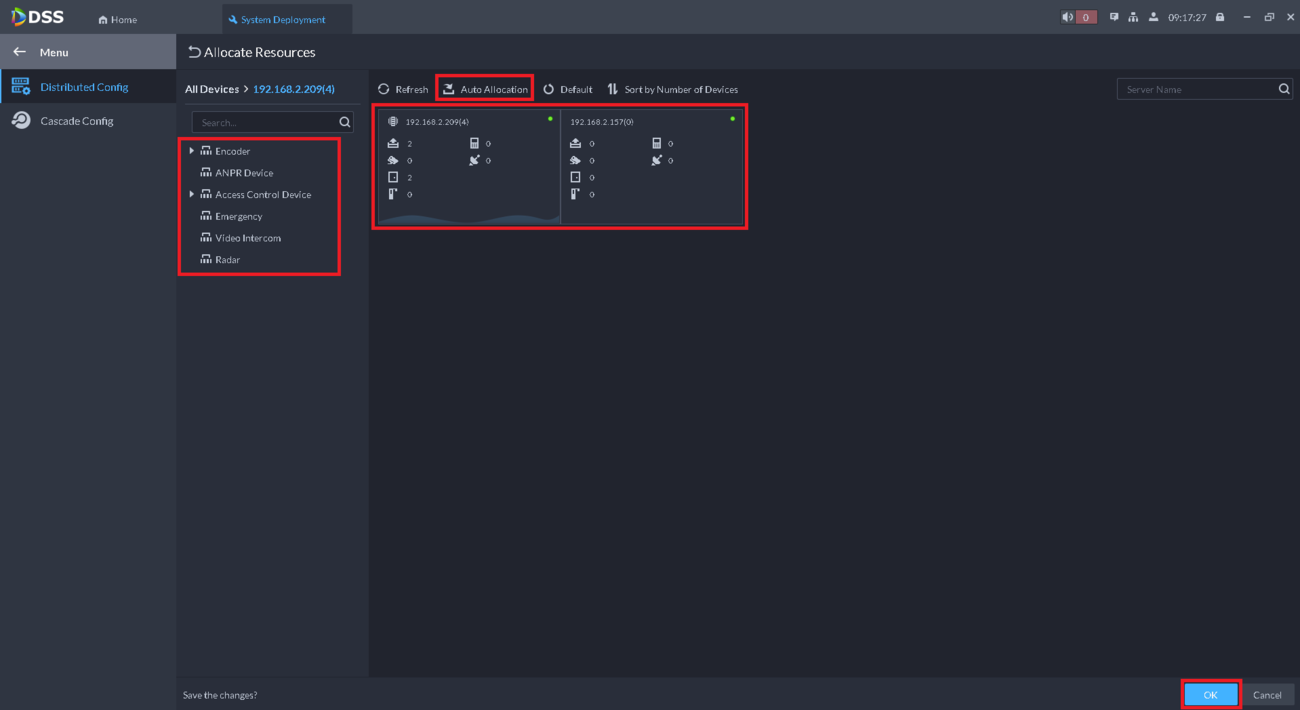
15. Click on Allocate Resources at the top
16. Drag an added device from the list on the left to either the Main Server or Sub Server to choose which server manages that device’s resources.
Repeat this process for all devices in the list.
Alternatively you can select Auto Allocation and the system will automatically choose which server manages each device’s resources.
When you are done, click OK
DSS Server Configuration
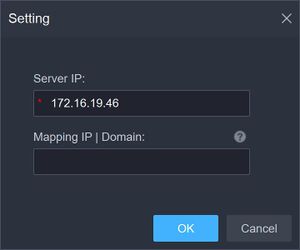
This guide will show how to configure DSS Pro server settings, such as external IP mapping, port mapping , and the ability to start and restart the server and server services.
Prerequisites
- DSS Express V8 Pro server installed – How To Install DSS Pro Server
Step by Step Instructions
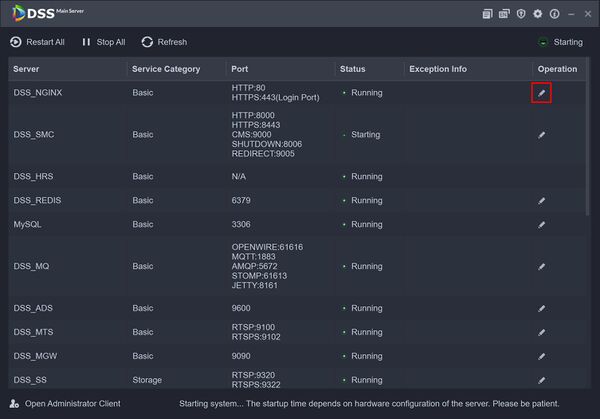
Click DSS Professional Server icon to open the Server software for configuration
DSS Professional Server
Server status is displayed on the top right corner of the window
![]() Server Starting
Server Starting ![]() Running
Running ![]() Server Offline
Server Offline ![]() Exception
Exception
Use the buttons on the top left of the window to control the server services – Restart All, Stop All and Refresh all services are available
Use the buttons on the top right of the window for different DSS server functions:
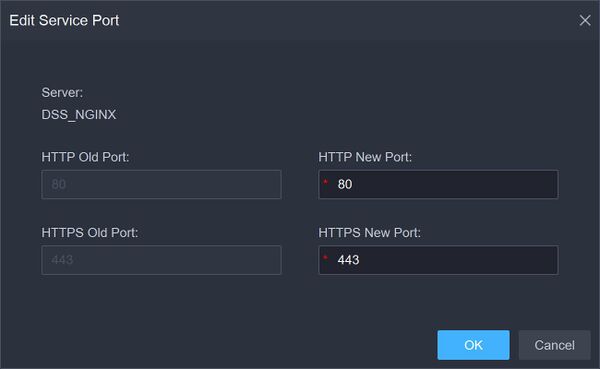
Click the ![]() to modify the service port number. Server will automatically restart after modification.
to modify the service port number. Server will automatically restart after modification.
DSS Server Parameters
This guide will show how to configure System parameters for DSS Pro server such as
- Message Retention Period
- Time Sync
- HTTPS setup
- Login Mode
- Remote Log
Prerequisites
- DSS Pro V8 installed
Step by Step Instructions
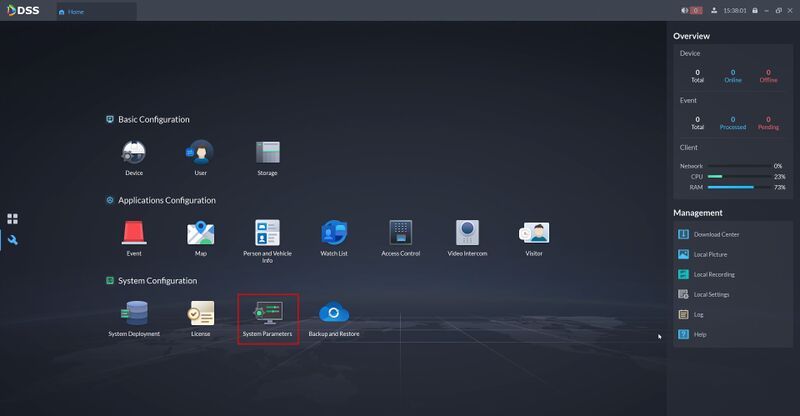
1.Login to DSS Pro Client and then go to System Parameters menu.
Message Retention Period
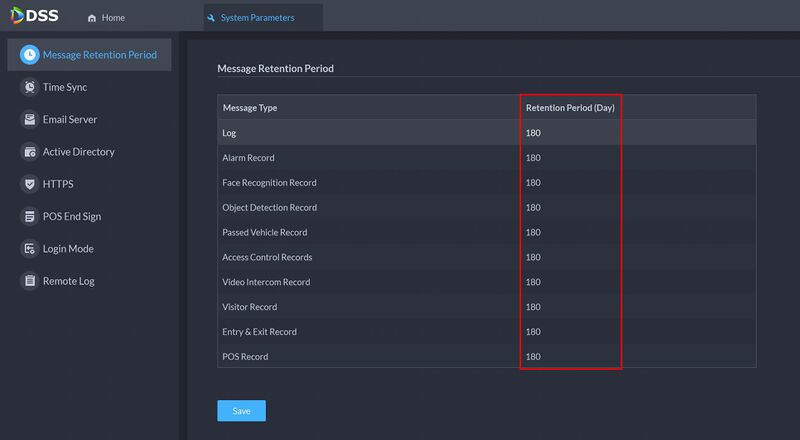
Set the retention period for different types of message/records from the server.
Click in the Retention Period field to adjust the Retention Period for the Message Type
Records beyond the defined retention period will be automatically deleted.
Click Save
Time Sync
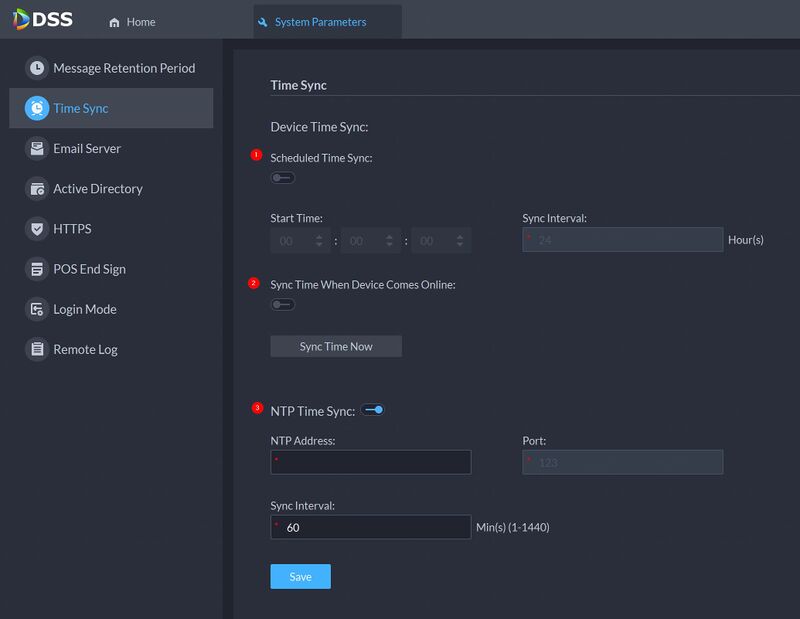
Set the time for devices to sync time with DSS
1. Schedule Time Sync – enter a start time in time sync for each day and the interval
2. Sync Time When Device Comes Online – syncs device time when the devices goes online
3. NTP Time Sync – If there is an NPT server in the system you can enable this function to let DSS sync time with the NTP server
Backup and Restore
This guide will show how to backup and restore settings for DSS Pro.
Prerequisites
- DSS Pro V8 Server and Client
Step by Step Instructions
1.Login to DSS Pro Client and then go to Configurations > Device menu.
From Home Select the Configuration menu
2. Click on Backup and Restore
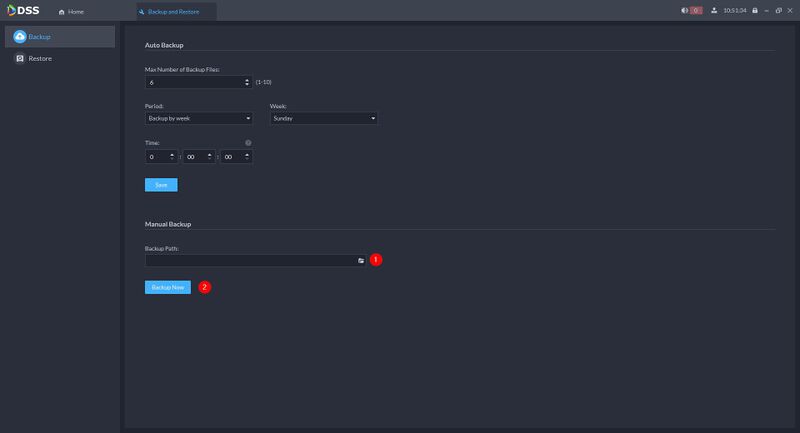
3. Under Manual Backup
1. Backup Path – Select a location to save the backup file to
2. Click Backup Now
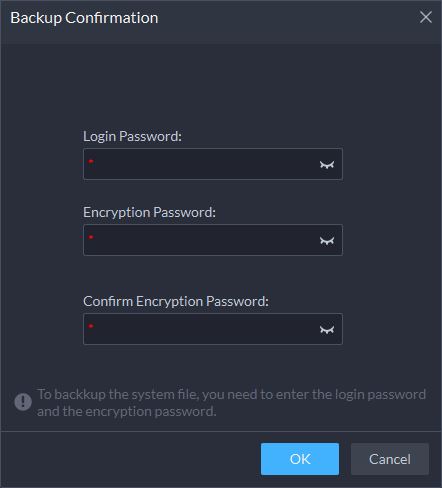
3. Enter the Login and Encryption (if enabled) Password for the server
Click OK
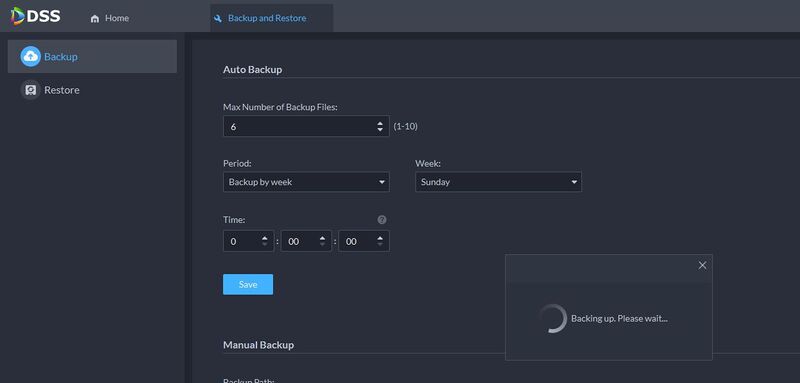
The Backup file will process
A prompt will confirm a successful backup
License Activation
Description
This guide will show how to activate the DSS Pro license.
Four ways to activate license:
- Normal offline activation
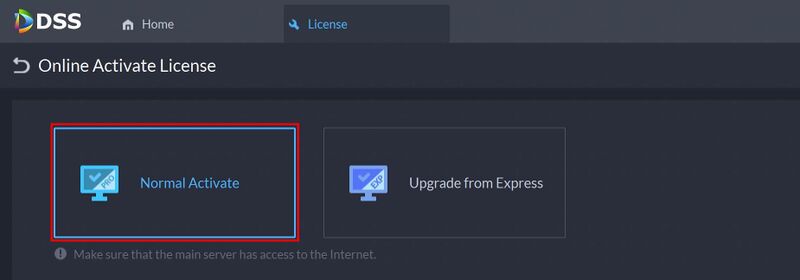
- Normal online activation
- Upgrade from Express through offline activation
- Upgrade from Express through online activation
Prerequisites
- DSS Express V8 Pro installed
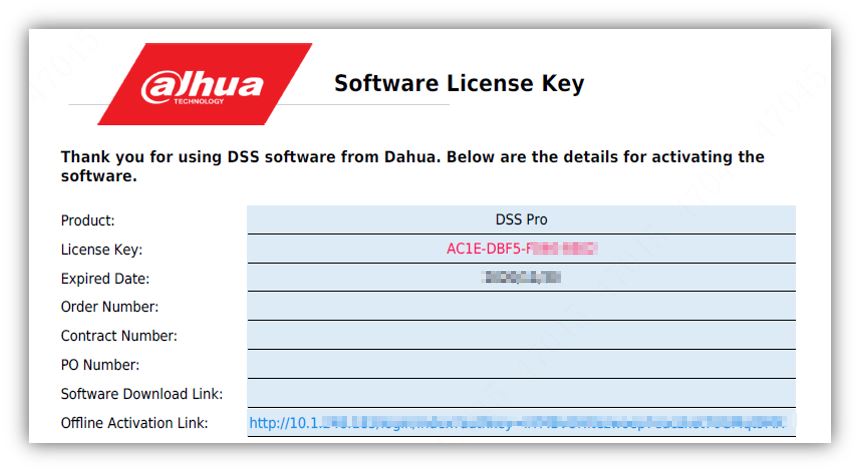
- License Key that you received from your Sales Rep
Example:
Step by Step Instructions
Normal Offline Activation
1.Login to DSS Pro Client and then go to License menu.
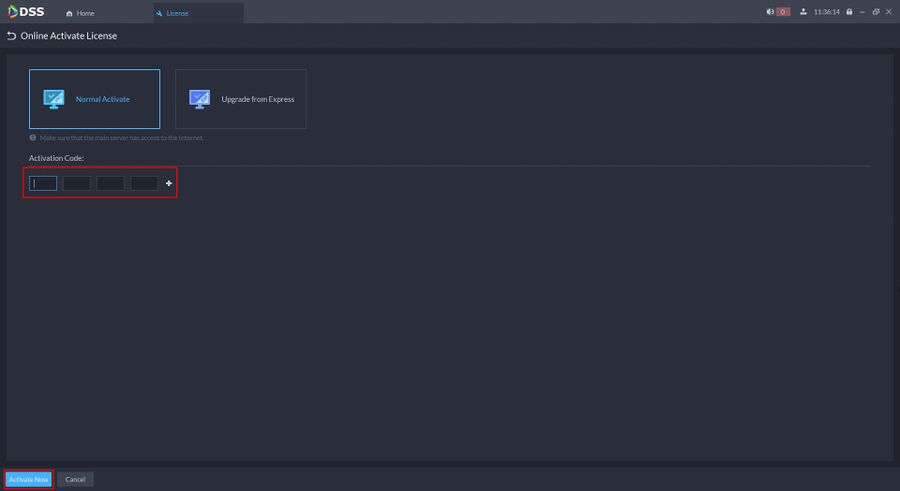
Copy the License Key from the key file obtained and then click Activate Now
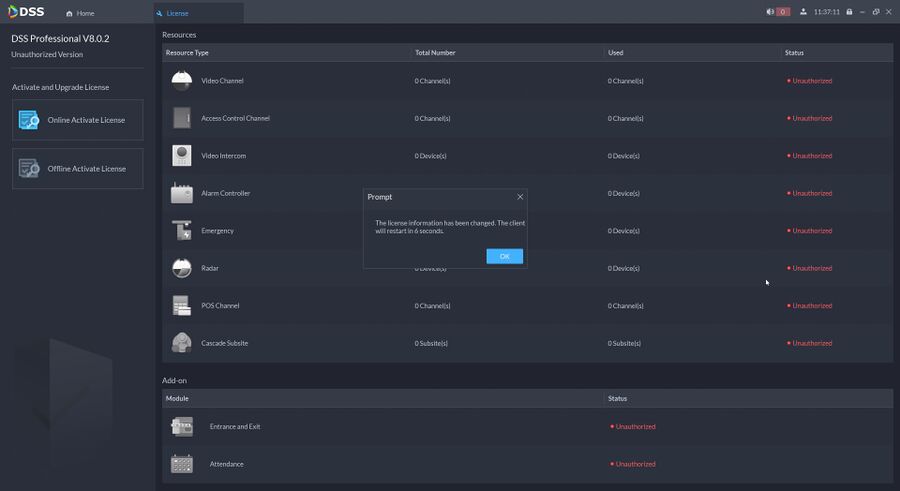
The software will confirm the license and restart
Normal Online Activation
The procedure for applying for an activation code is similar to offline activation, if your server is connected to the Internet, you can click Activate Now button and wait for activation.
Normal Offline Activation
Coming Soon
Upgrade from Express
Coming Soon
DSS Client Installation
Description
This guide will show how to download and install DSS Pro Client software.
Prerequisites
- DSS Express Pro server installed
- Windows computer
Step by Step Instructions
Download and Install DSS Client
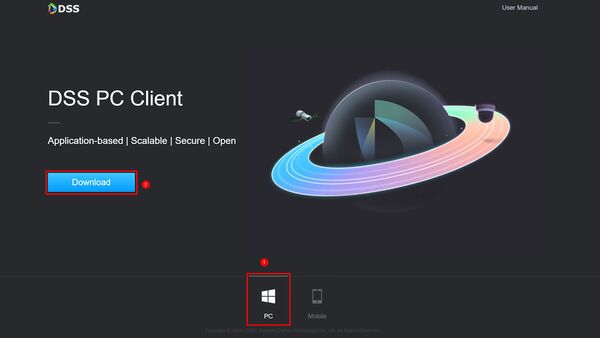
1. You can Download the Install package for DSS Pro PC Client, from the DSS Pro server itself.
There are two methods:
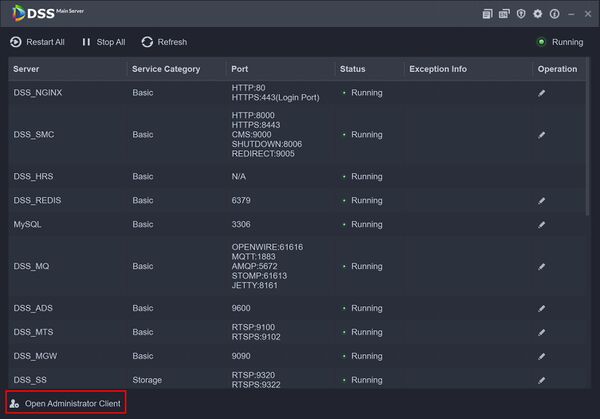
- open DSS Server click Open Administrator Client
OR
- Input the address of DSS Server in browser
Both will direct you to the server page, here you can
Select which client you need to download PC or Mobile Click Download
2. Run the DSS Pro Client installer
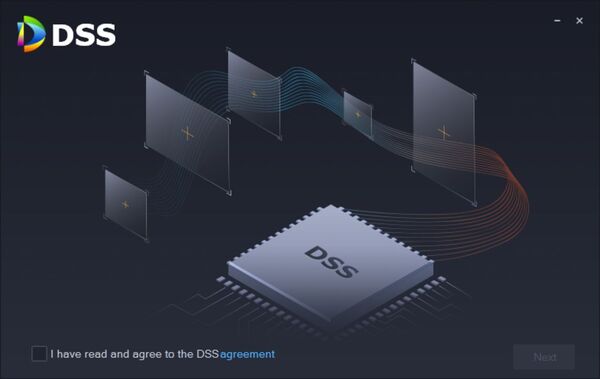
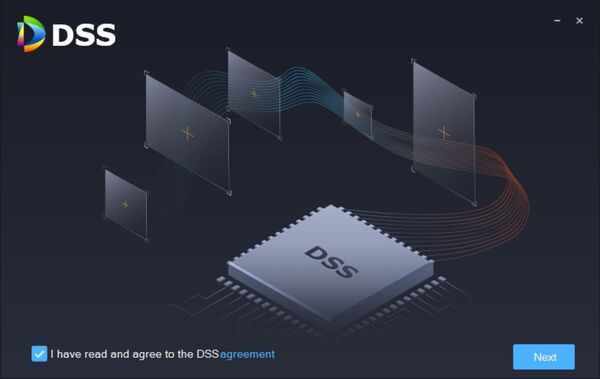
Check the box to agree to the Software agreement.
Click Next
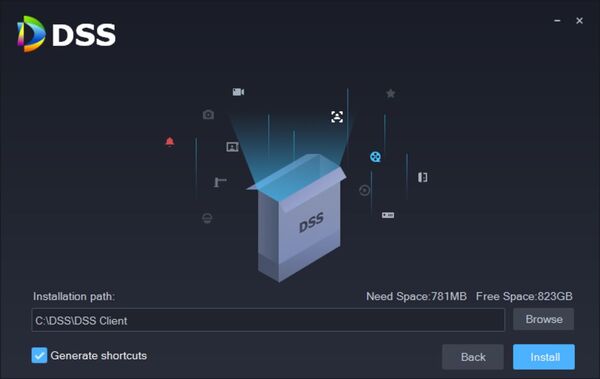
3. Select the installation path
Click Install
The installation process will begin
Once fully installed click Run to start DSS Pro Client
First Time DSS Pro Client Configuration
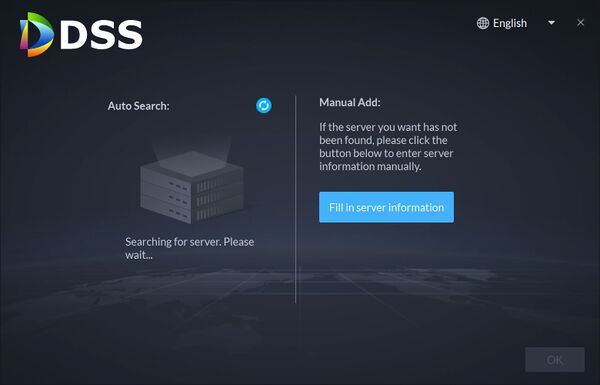
The DSS Client needs to be configured to connect to the desired DSS Pro server
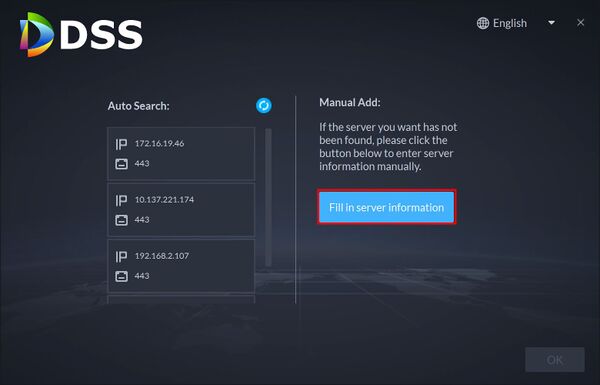
Auto Search will display any DSS servers discovered on the local network
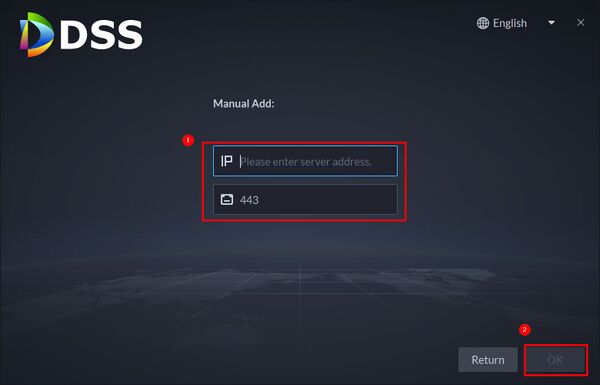
Click Fill in server information to Manually Add the DSS Pro Server by IP
Enter the IP of the server Enter the Login port, default 443
Click OK
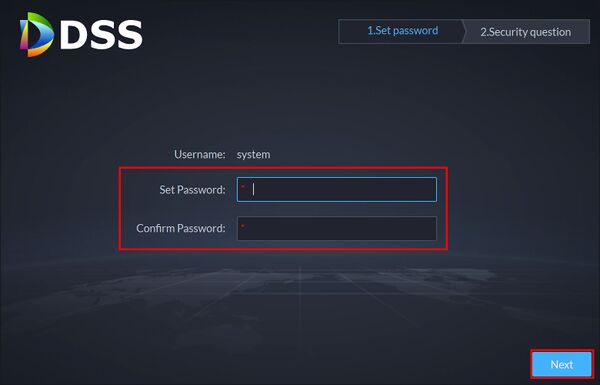
Create a Password for the system user for DSS Pro
Enter a password twice to confirm
Click Next Step
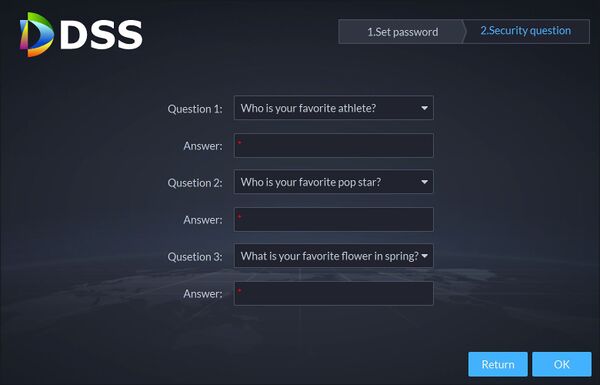
Set up security questions for password recovery
Click OK
Add Device
This guide will show how to add a Dahua device to DSS Pro.
Prerequisites
- DSS Pro V8 Server and Client
- Dahua Device connected to the network
Step by Step Instructions
1.Login to DSS Pro Client and then go to Configurations > Device menu.
From Home Select the Configuration menu
2. Click on Device.
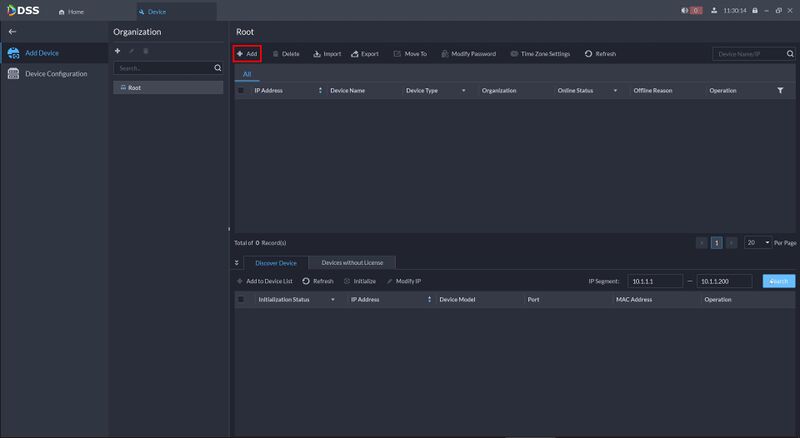
4. Click on Add.
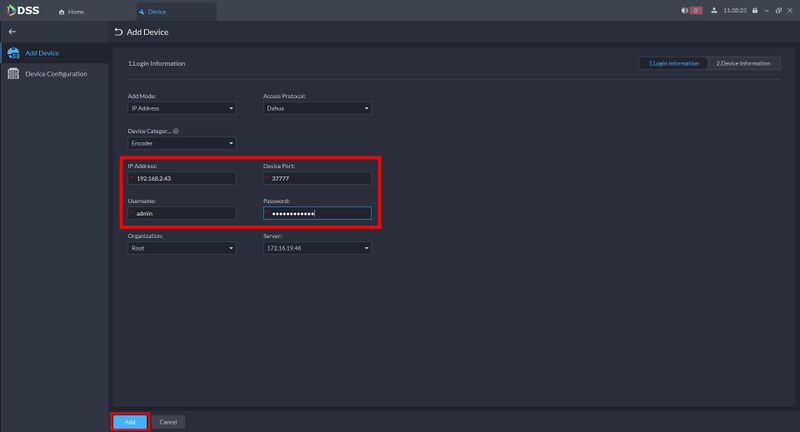
5. Select the adding mode and then enter device information. In this example, we are using IP address mode. For P2P and Auto-register, it must be setup first from recorder or IP Camera. Click Add.
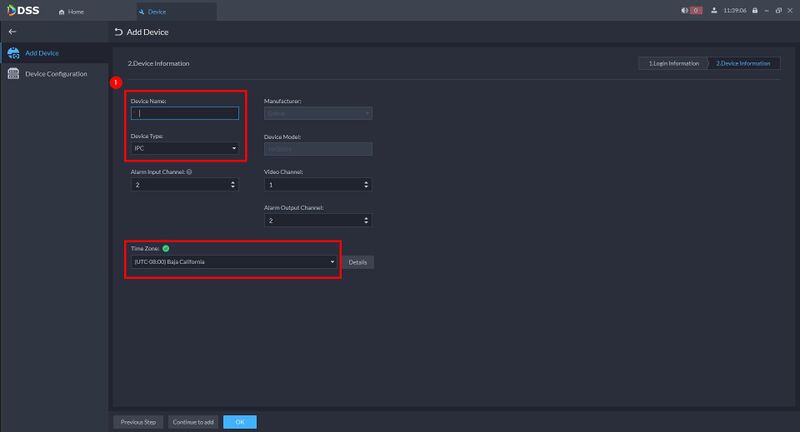
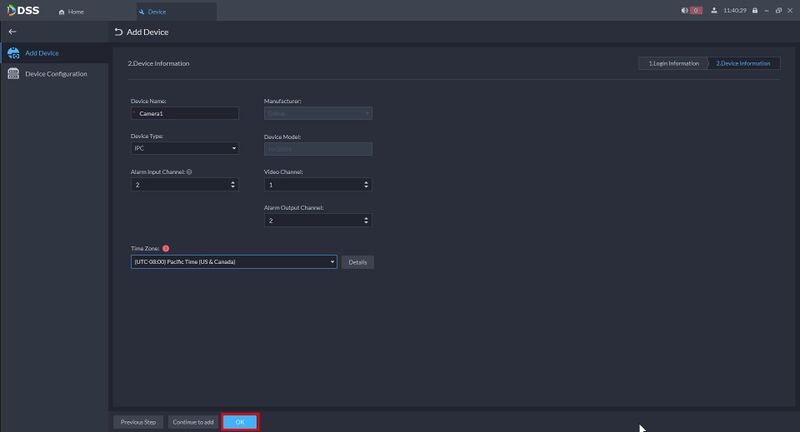
6. Enter Device Name, select Device Type, and use the dropdown box to select the Time Zone. Click OK.
The device is now added to DSS.
> Return to DSS Pro instructions
Troubleshooting Tips
In the event that your device added but can’t see any cameras added to the software, please follow this following steps.
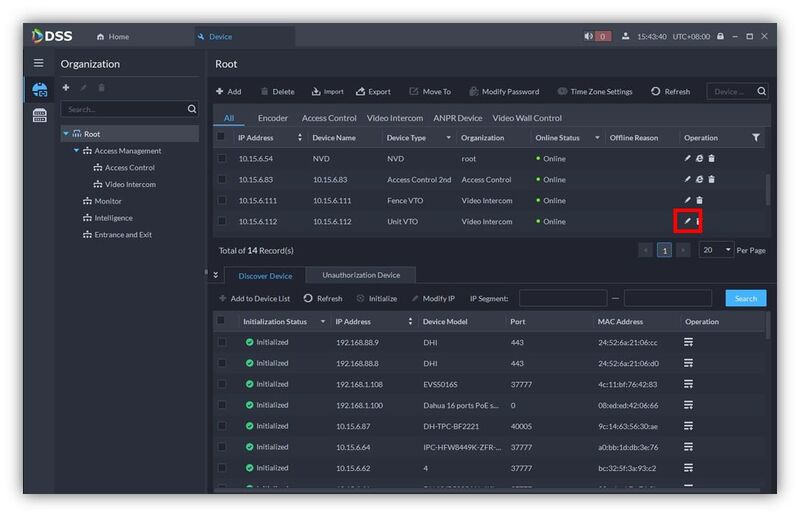
1. Click on the Edit button on your device.
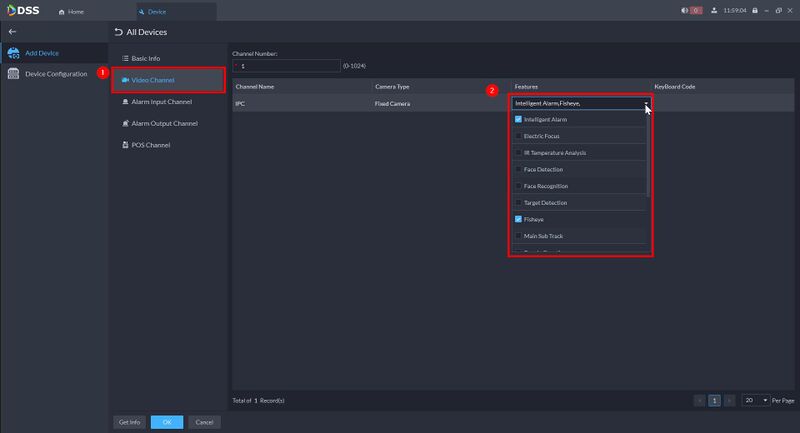
2. Go to Video Channels. And then click on Get Info.
You can also use the dropdown box under Features to manually select the device features
3. The software will refresh the connection to the device and retrieve the camera channels that added to recorder. Once populated, click OK.
Import Device
This guide will show how to multiple Dahua devices at once to DSS Pro using the Import feature.
Prerequisites
- DSS Pro V8 Server and Client
- Dahua Devices connected to the network
Step by Step Instructions
1.Login to DSS Pro Client and then go to Configurations > Device menu.
From Home Select the Configuration menu
2. Click on Device.
3. Click Import
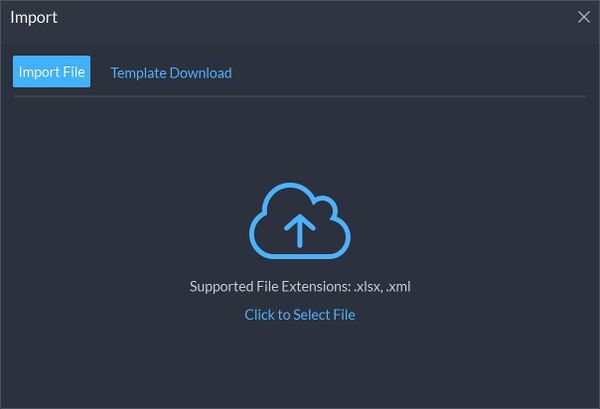
4. Click Template Download to download an example import template file that can be used.
Open the template file in Excel and modify as required.
Template requirements/example:
Click to Select File – Click this to upload the completed template file with all device information.
Channel Features Selection
This guide will show how to configure advanced features for channels, important such as for devices with features such as Intelligent Alarms such as Face Detection or ANPR cameras.
Prerequisites
- DSS Pro V8 Server and Client
- Device(s) connected to the network, added to DSS Pro
Step by Step Instructions
1.Login to DSS Pro Client and then go to Configurations > Device menu.
From Home Select the Configuration menu
2. Click on Device.
3. Click the ![]() next to the device/channel to modify the features for
next to the device/channel to modify the features for
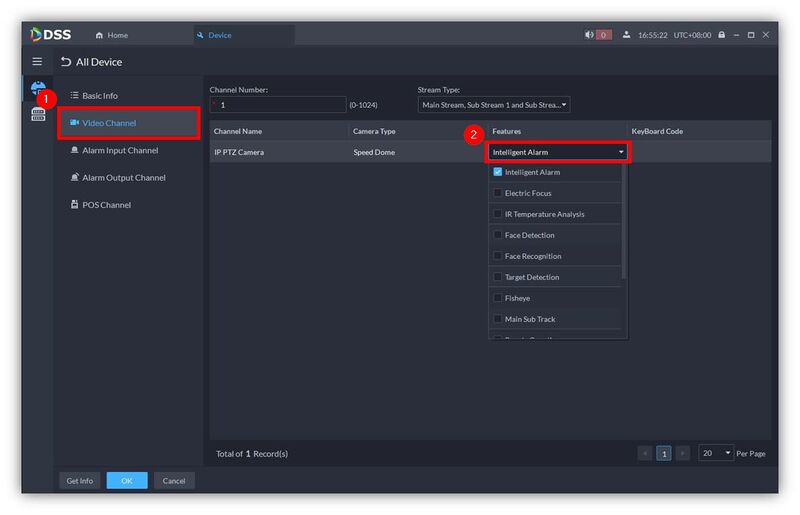
4. Select Video Channel
Click the dropdown box under Features then click to select the features to enable for this channel, for example Intelligent Alarm
Click OK to save
Device Configuration
This guide will show how to configure device settings, such as for devices added to DSS Pro.
Prerequisites
- DSS Pro V8 Server and Client
- Device(s) connected to the network, added to DSS Pro
Step by Step Instructions
1.Login to DSS Pro Client and then go to Configurations > Device menu.
From Home Select the Configuration menu
2. Click on Device.
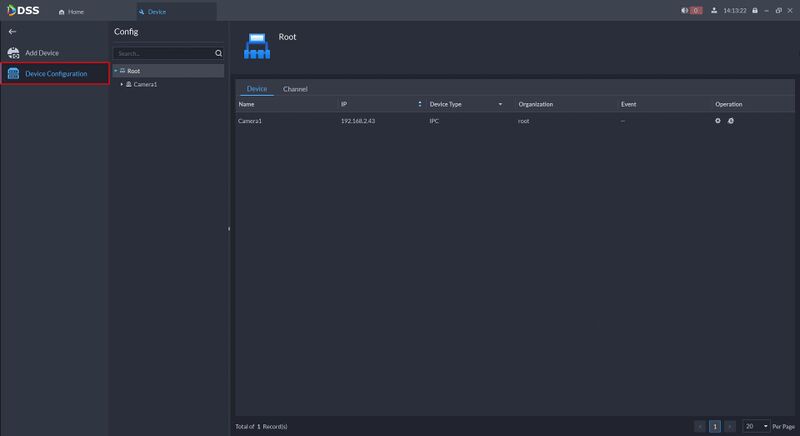
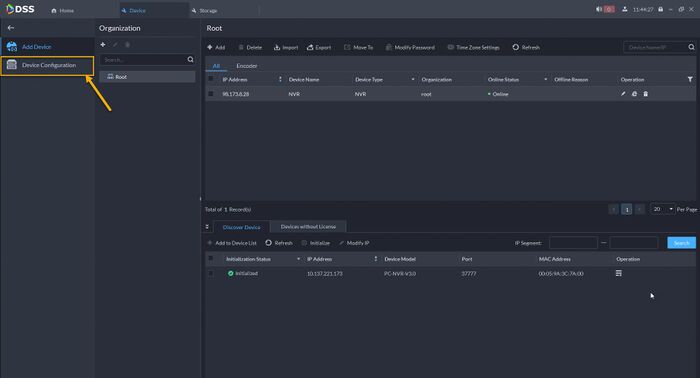
3. Click Device Configuration
Devices that are added to DSS Pro will appear in the Device Tree in the center
4. Expand the device tree and select the channel to configure (for example, the video channel)
5. Configure Device settings as desired:
| Feature | Description |
|---|---|
| ① Configuration | Configure Smart Plan / Intelligent Analysis settings for the device* |
| ② Event Information | |
| ③ Recording Information | Add or remove record plans for devices. Click here for how-to setup Recording Schedules. |
| ④ Record Retrieval | Configure backup so videos on the device can be automatically uploaded to DSS for redundancy. Click here for instructions. |
| ⑤ Recording Storage Config | Configure the video retention period for the device’s recorded video. Click here for instructions. |
| ⑥ Channel Bind | Bind a video channel with an alarm input channel, ANPR channel, access control, or another video channel to view associated video when an event occurs. Click here for instructions. |
* For supported devices
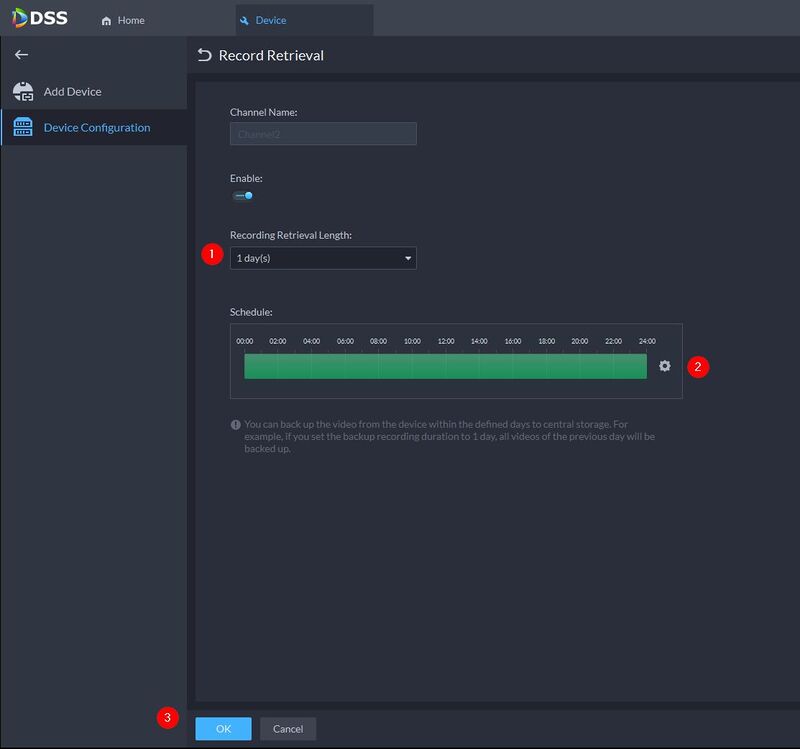
Add Retrieval Plan
- Toggle to enable/disable
- Use the dropdown box for Recording Retrieval Length to select 1, 2, 3, Days
- Configure the schedule to select
Click OK
Note: Up to 3 days of recordings can be backed up to DSS Server
Recording Storage Config
For videos stored on the DSS server you can configure video retention period. When the storage space runs out, new recorded videos will overwrite the oldest videos automatically.
- Toggle to enable/disable
- Enter a Retention Period (in Days)
Click OK
Note: Retention Period is 0-180 Days
Add Device LPR
This guide will cover how to add LPR camera to DSS Pro V8.
Prerequisites
- DSS Pro V8 Server
- DSS Pro V8 Client
- Dahua License Plate Recognition Camera
Step by Step Instructions
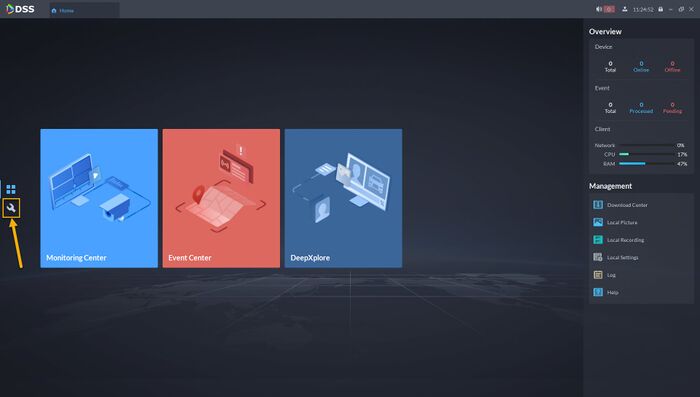
1. Open the DSS Pro V8 Client.
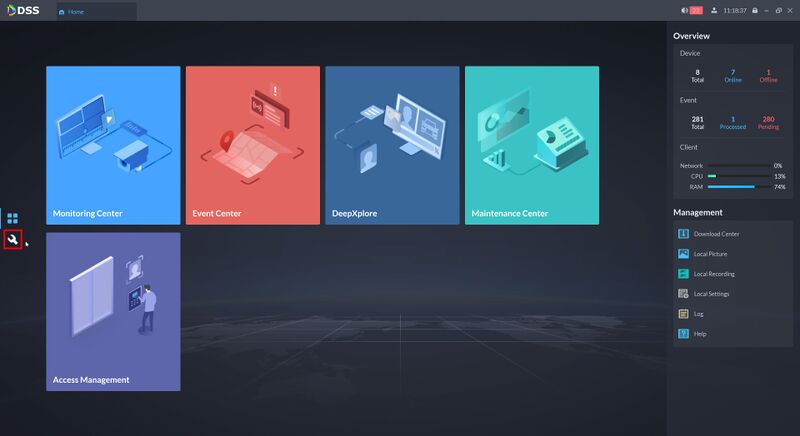
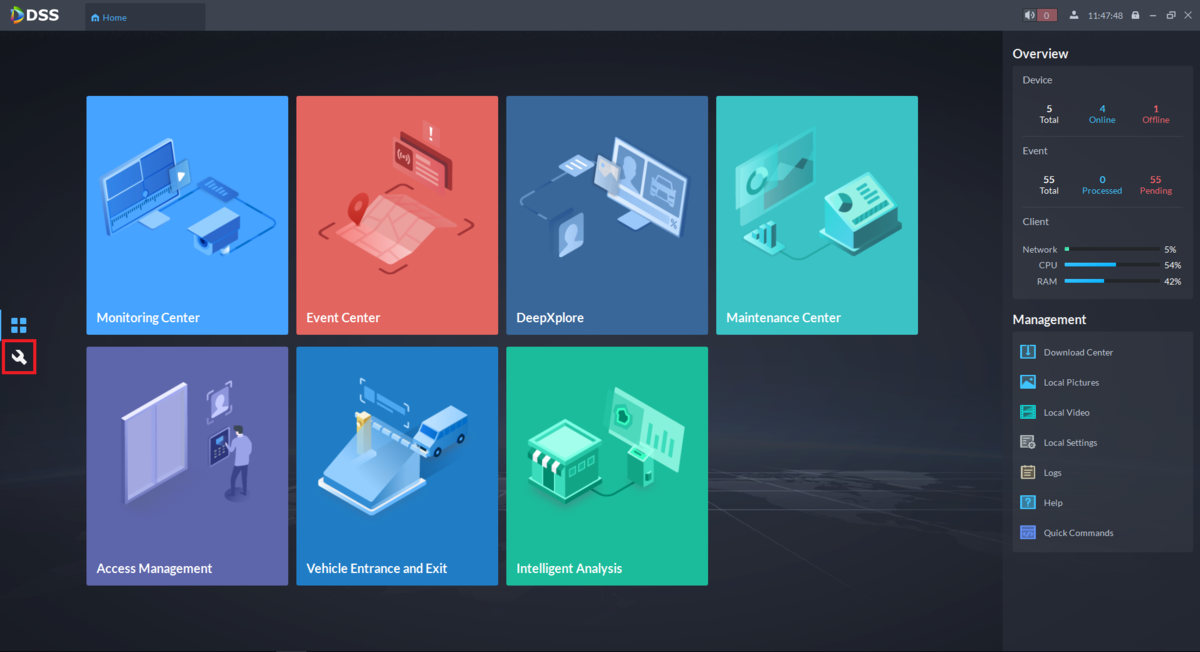
From the Home page select the Wrench icon on the left
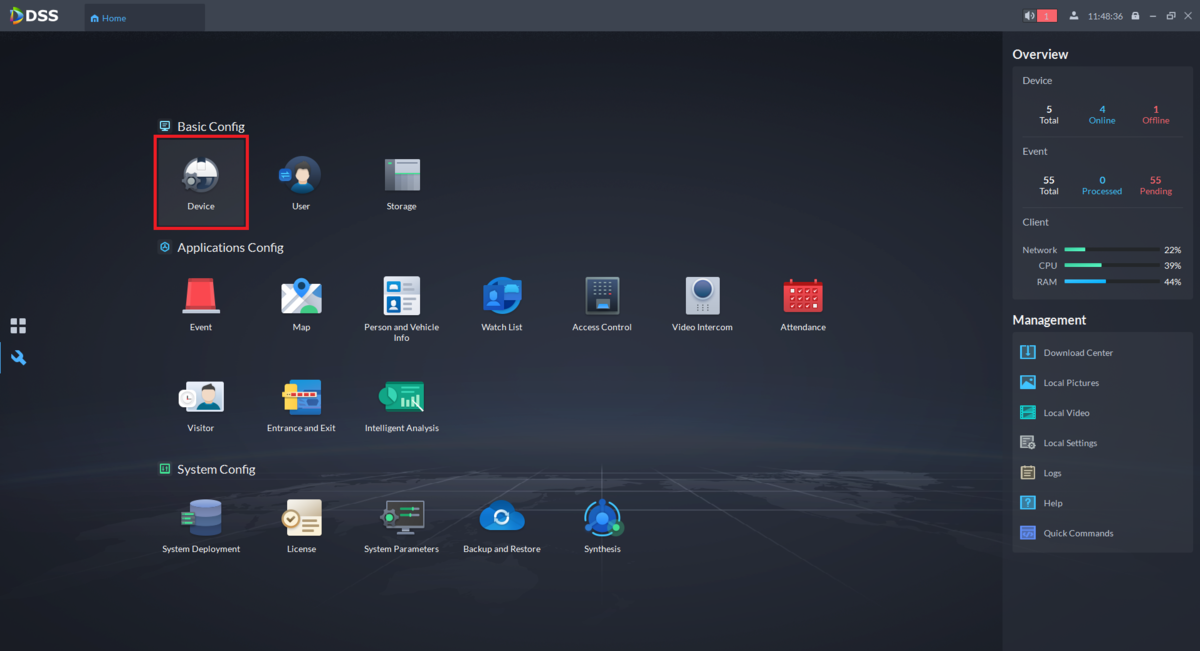
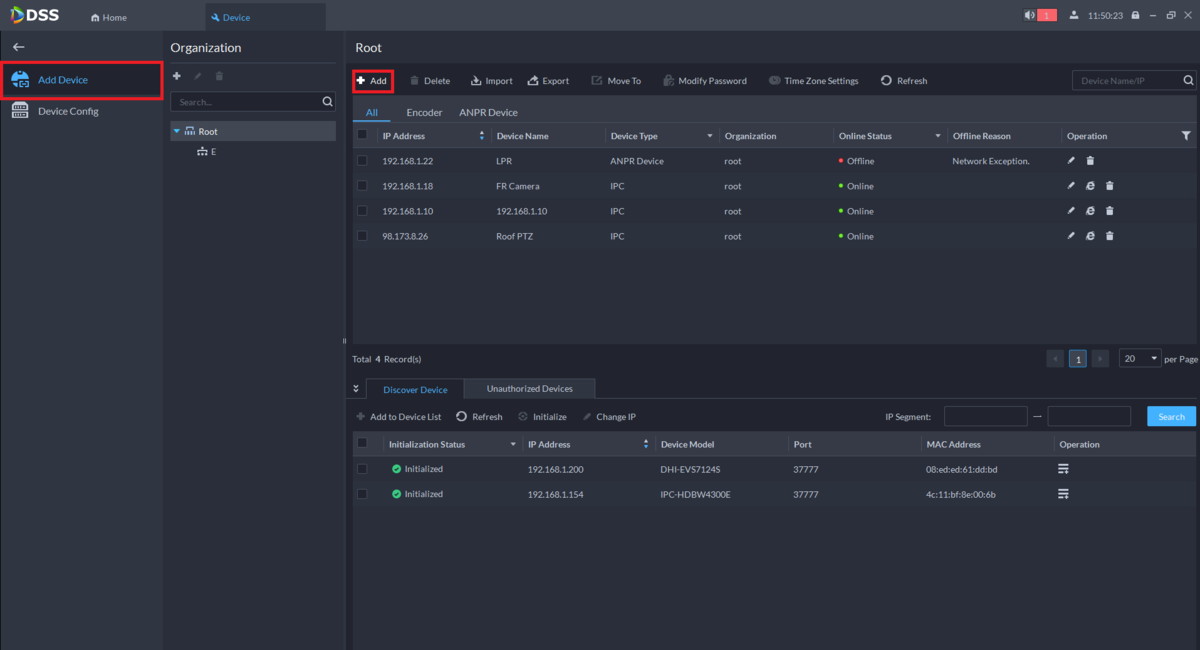
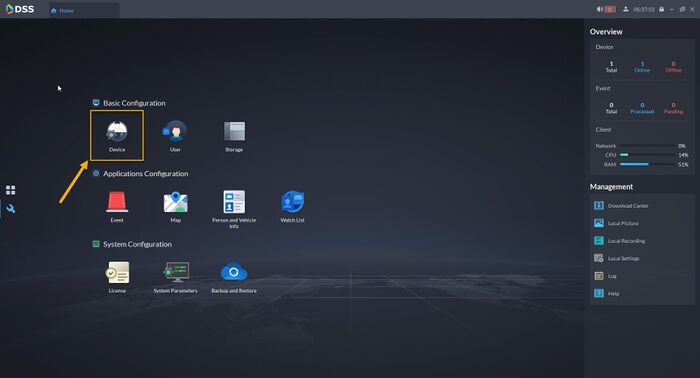
2. Under “Basic Config” select Device
3. Select Add Device on the left.
Then select the Add option at the top
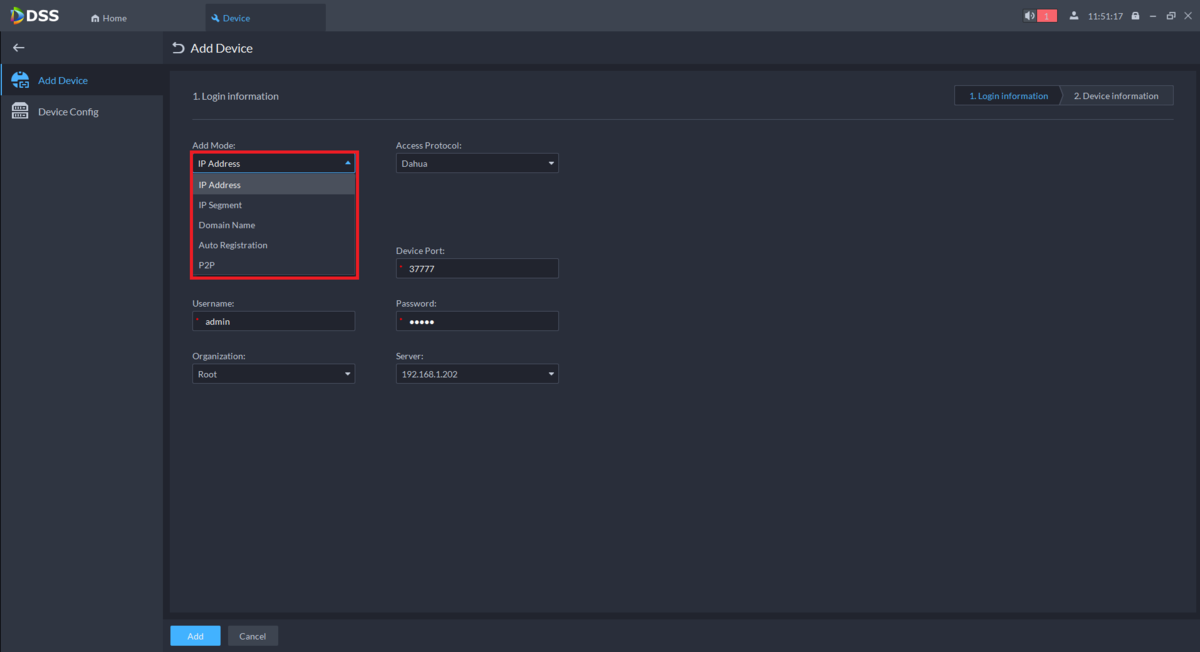
4. Under “Add Mode” click on the drop-down and select the appropriate option for how the DSS will connect to the License Plate Recognition Camera
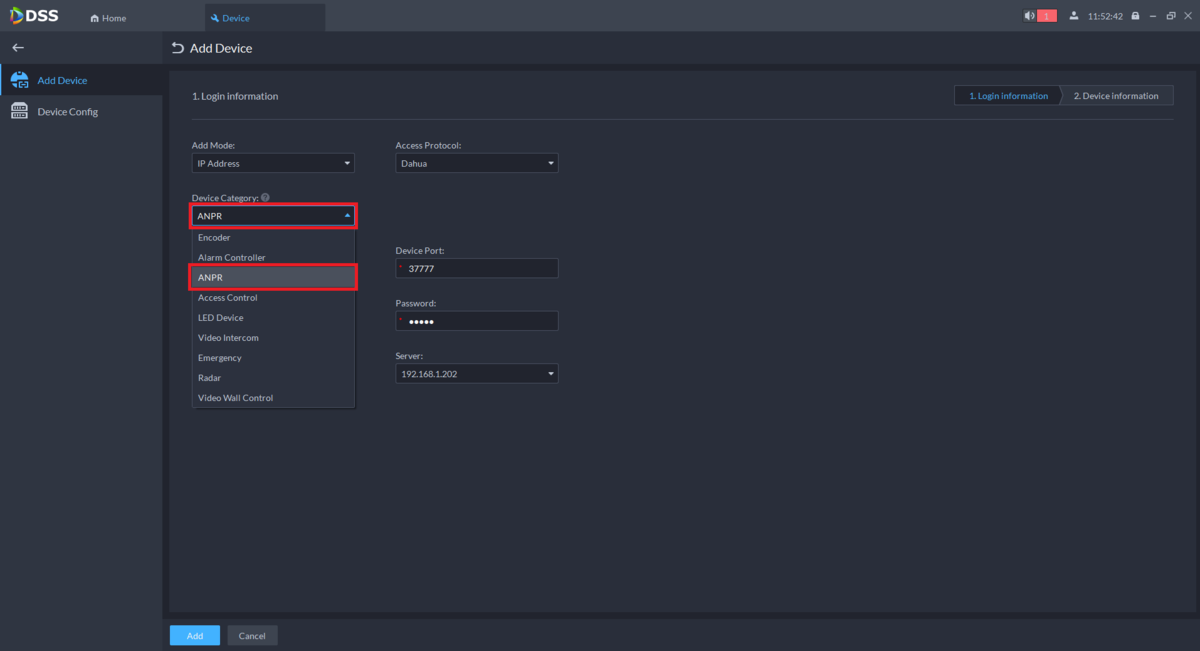
5. Under “Device Category” click on the drop-down and select ANPR
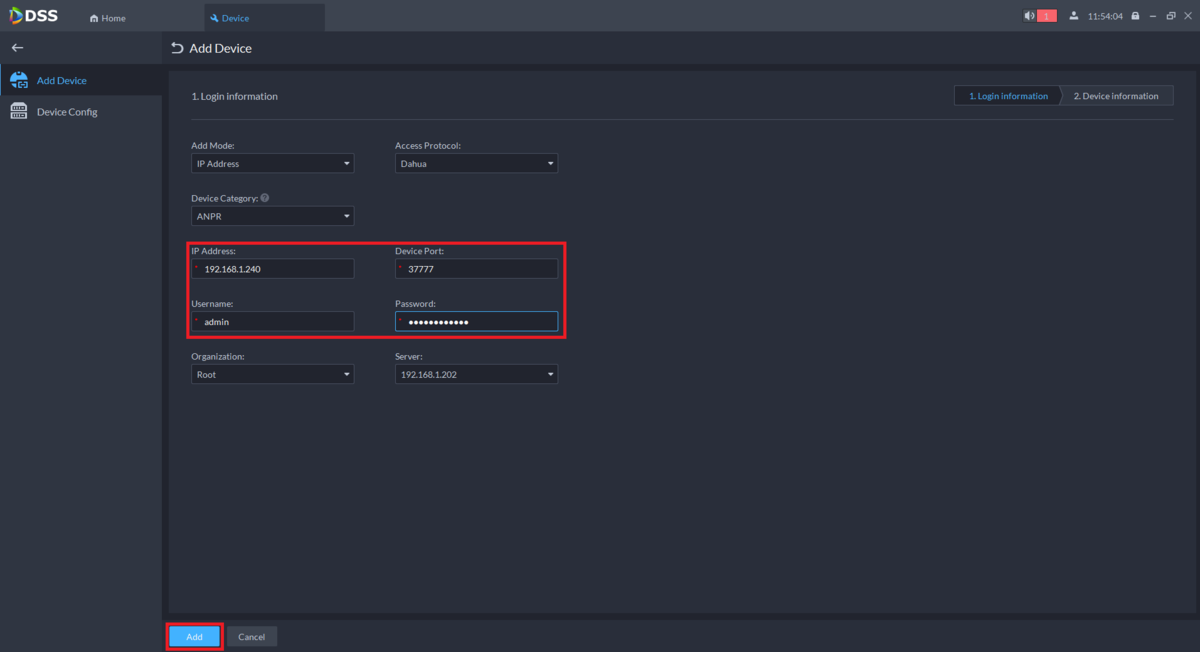
6. Enter the information for connecting to the camera.
(In this case IP Address was selected as the Add Mode.)
Then select Add at the bottom
7. Enter a name for the camera under “Device Name”.
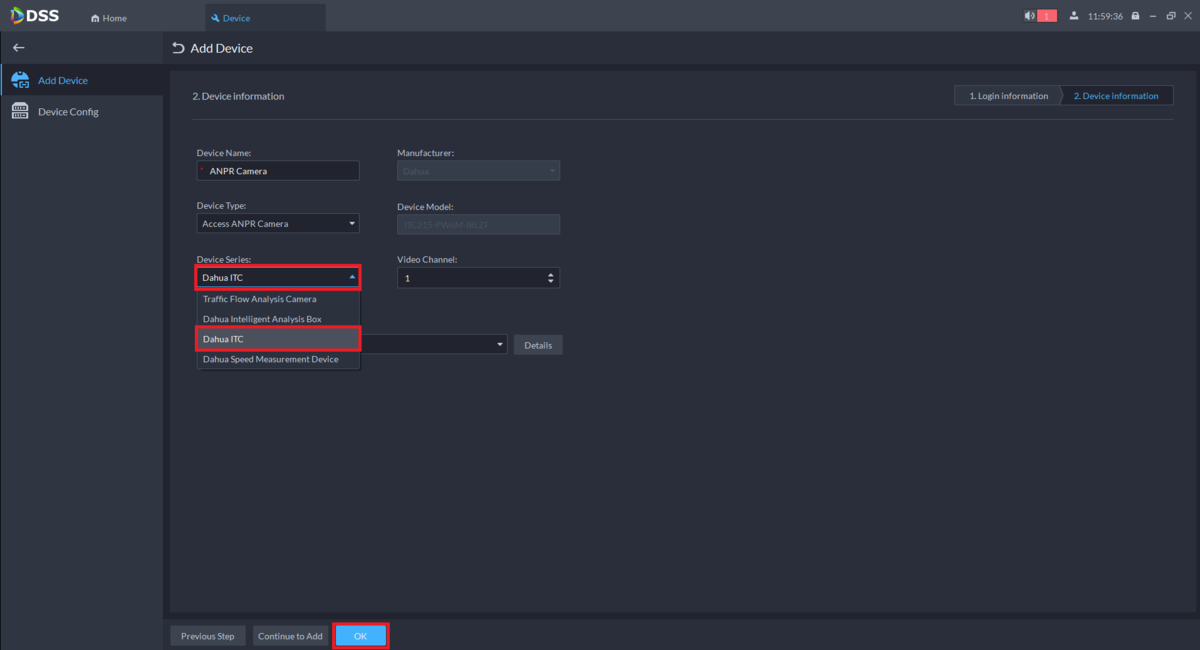
Then click on the drop-down below “Device Type” and select Access ANPR Camera
8. Click on the drop-down below “Device Series” and select Dahua ITC
Make sure the number of channels and the Timezone are correct.
When you are done, select OK at the bottom
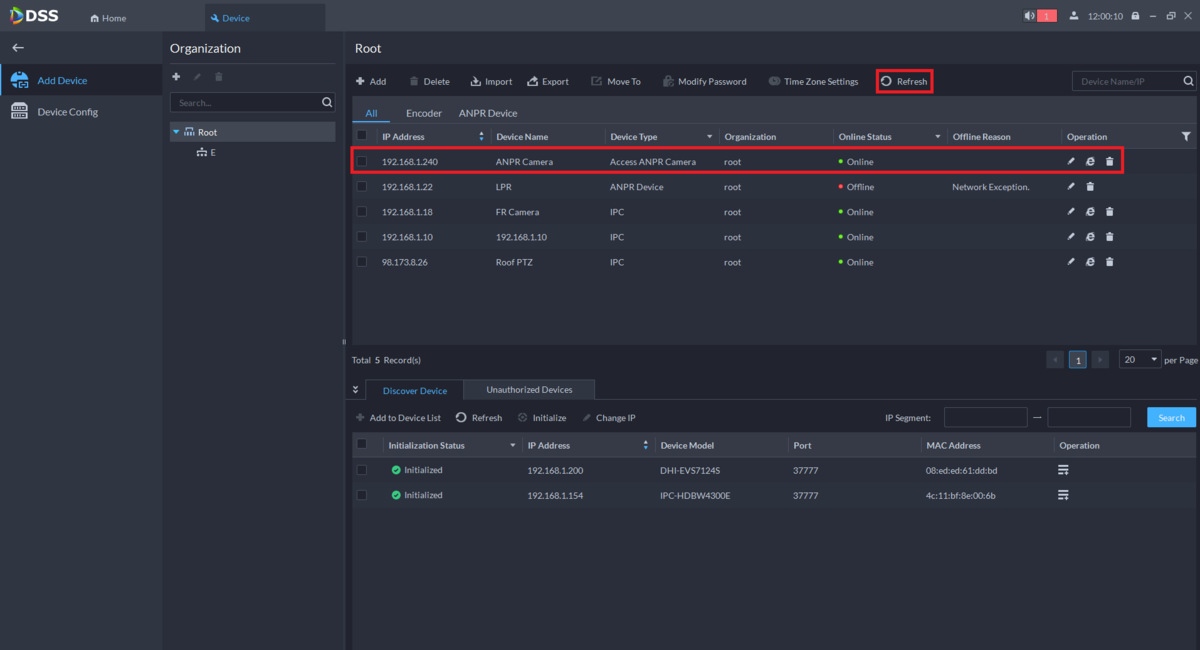
9. You should see the camera listed in your device list at the top.
If it does not show an Online Status of “Online” immediately, select the Refresh option at the top until it does
Liveview Playback
This guide will show the options that available for Playback in DSS Pro V8 Client.
Prerequisites
- DSS Pro V8 Server and Client
- Dahua Device connected to the network
- Dahua Device added to DSS Pro V8 – Click here for how-to add device instruction.
Step by Step Instructions
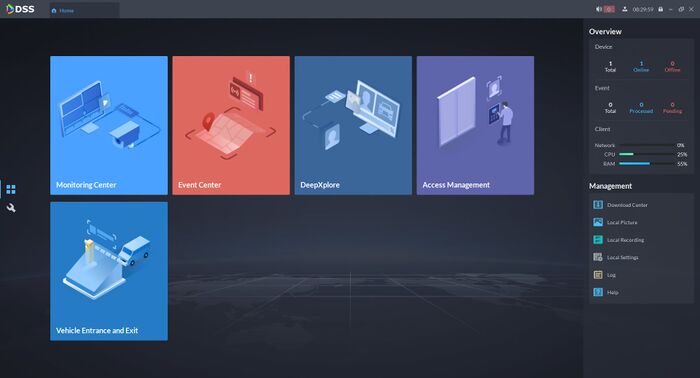
1.Login to DSS Pro Client and click on Monitoring Center.
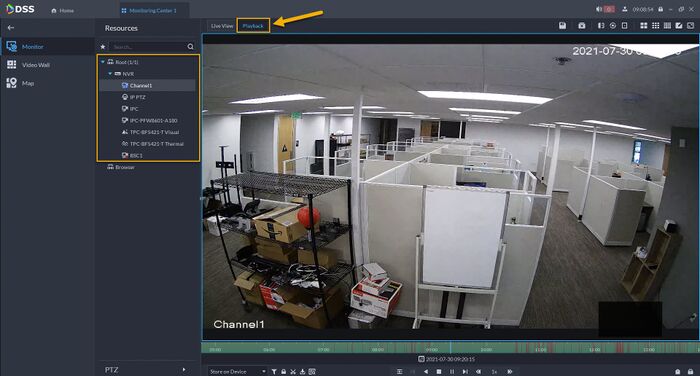
2. Click on Playback and select the camera channel under Resources.
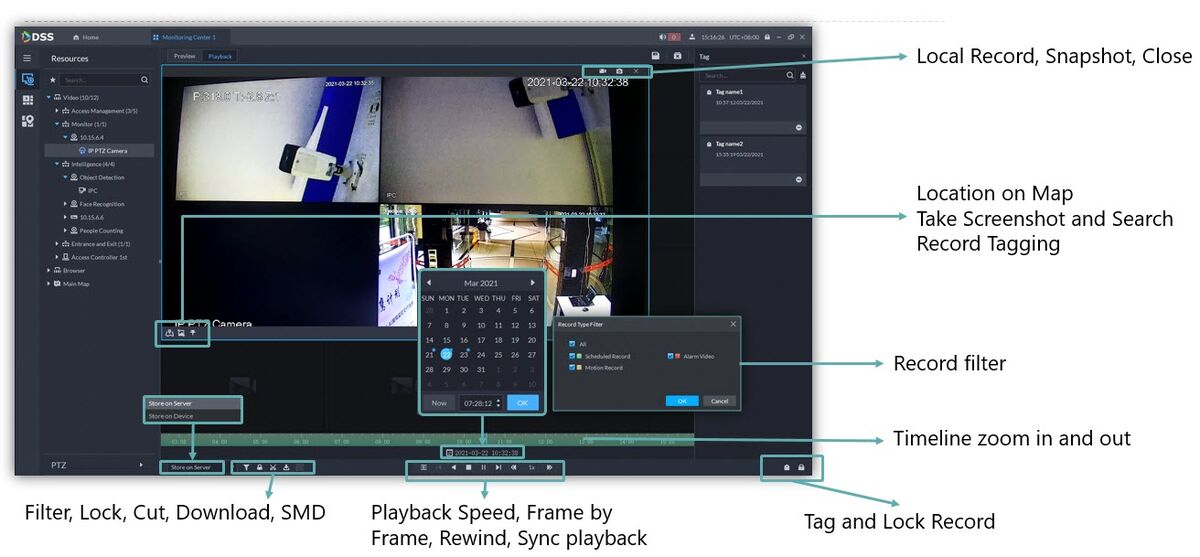
Below is the operation menu that available under Playback.
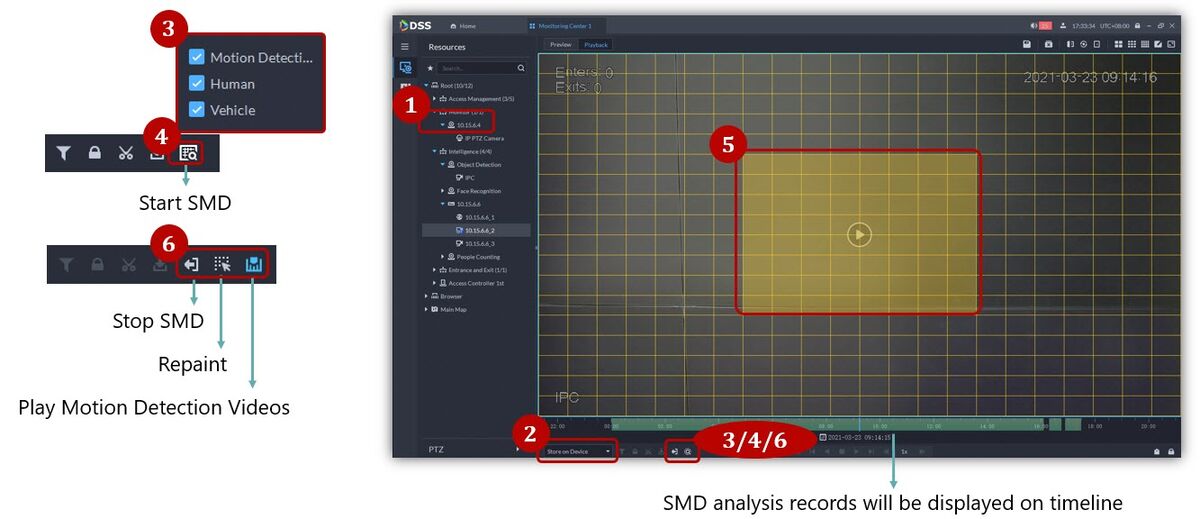
SMD Search
If you would like to download video footage, please click here for instructions.
Download
DSS Pro V8 – Download Center
Description
This guide will show how to download recorded video using DSS Pro V8 Client.
Prerequisites
- DSS Pro V8 Server and Client
- Dahua Device connected to the network
- Dahua Device added to DSS Pro V8 – Click here for how-to add device instruction.
Step by Step Instructions
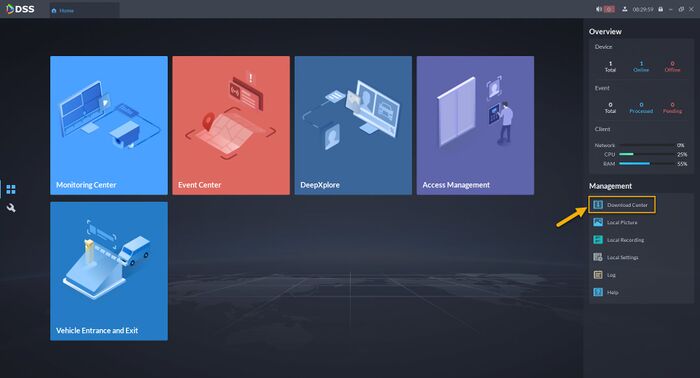
1. Go to Home, and then click on Download Center.
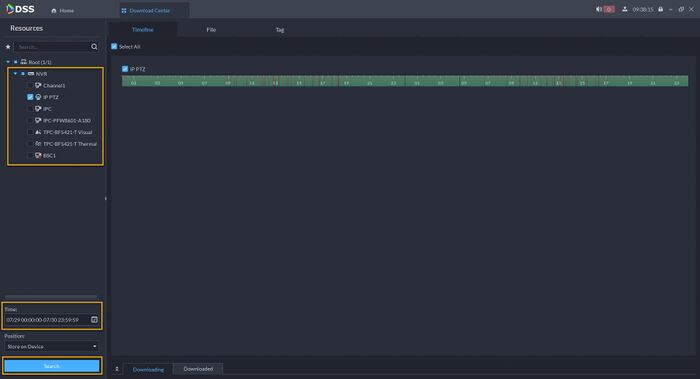
2. Select the Camera channel, choose the Date and Time for video footage you wish to review, and click Search.
NOTE: under Position option, you need to select where the recording is saved. Store on Device is searching playback file from the recorder and Store on Server is searching playback file from DSS Storage.
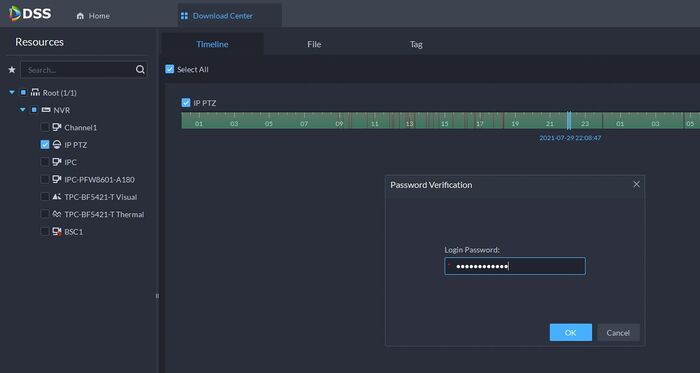
3. Select the time period from the timeline. It will prompt user to enter the device password.
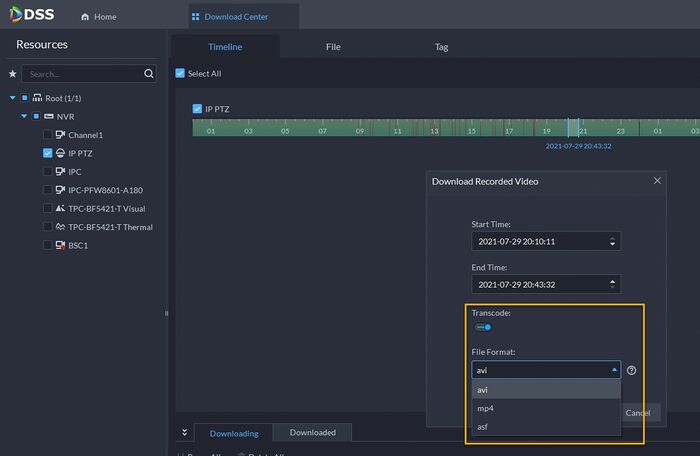
4. Enter the date and time you world like to download, and you can also choose the video format by clicking on the Transcode. By default the format will be .dav.
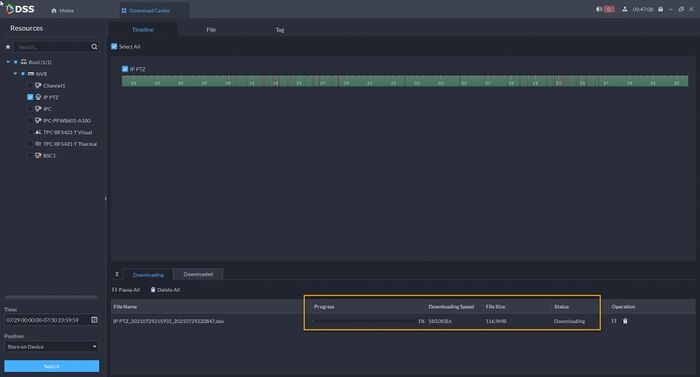
5. Your download will begin.
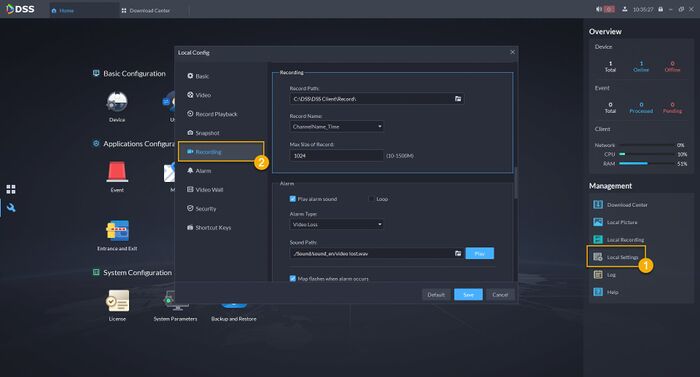
6. You can modify the storage path through the local settings.
User Management
This guide will show how to add Users and Roles for DSS Pro.
Prerequisites
- DSS Pro V8 Server and Client installed
Step by Step Instructions
Create Role
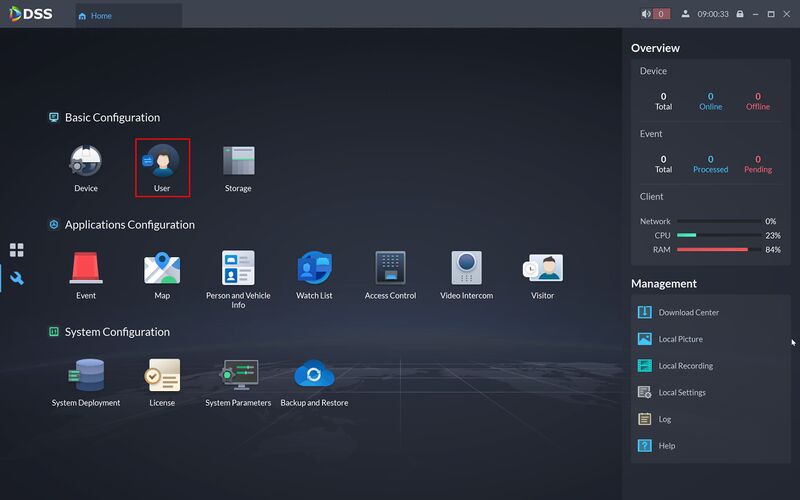
1.Login to DSS Pro Client
From Home Click User
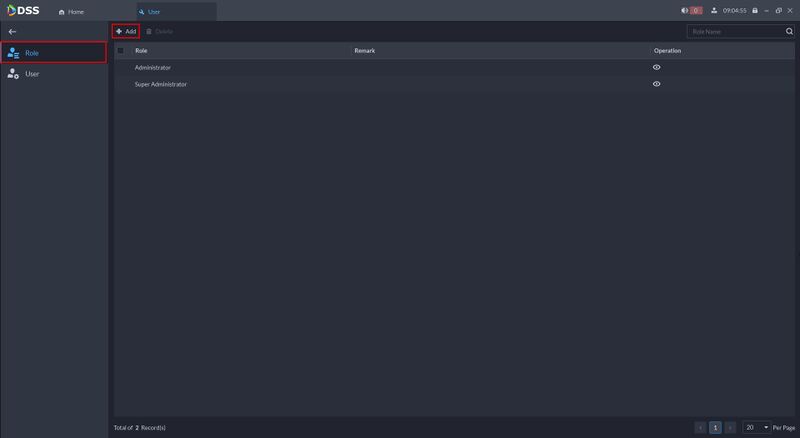
2. To add a Role
Select Role
Click Add
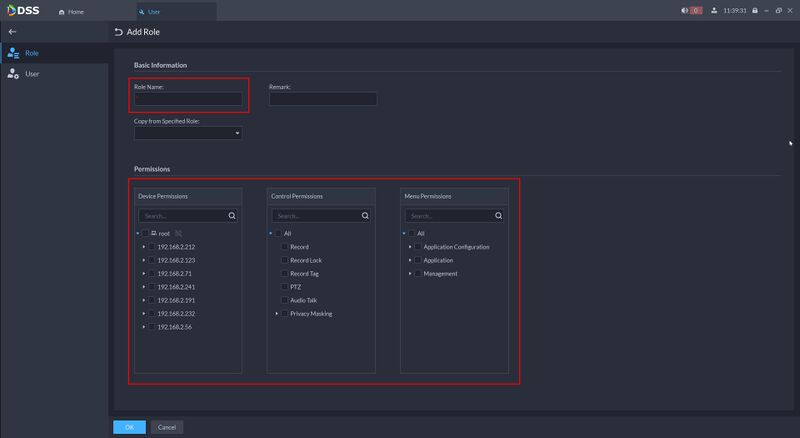
3. Enter the role name (if required copy the permissions from another role)
Select the corresponding permissions
Device Permissions – Select which devices are visible to the role Control Permissions – Select which device control options for the role Menu Permissions – Select which menu permissions for the role
Click OK to save all changes.
Create User
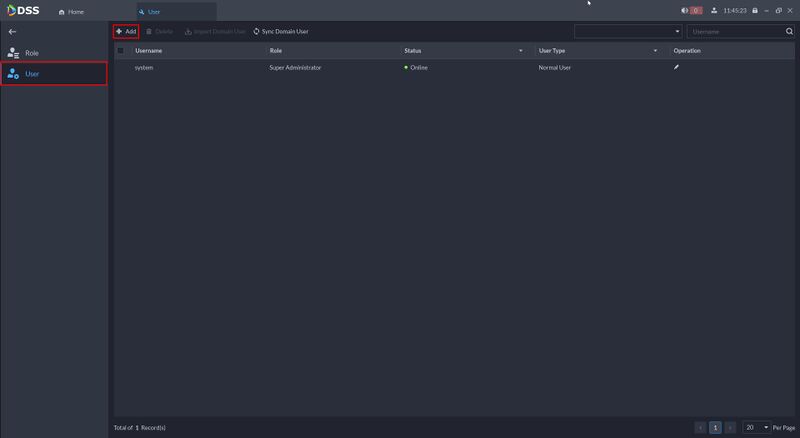
1. To add a User
Select User
Click Add
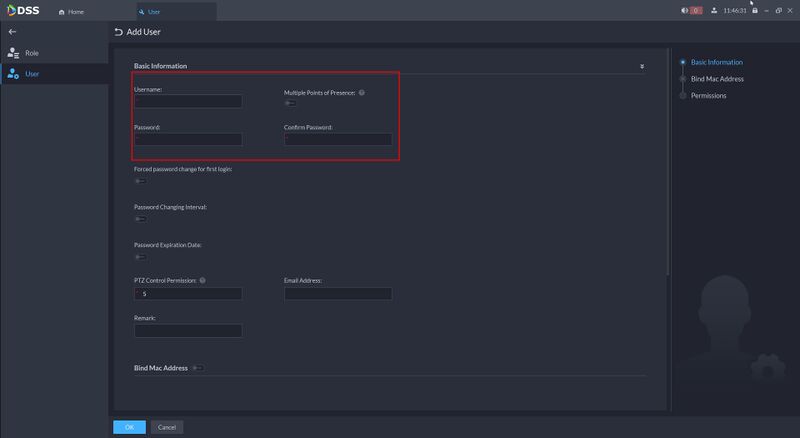
2. Enter the basic user information, such as username and password
You can also select which other options you want for the user, such as Password Changing/Expiration policy
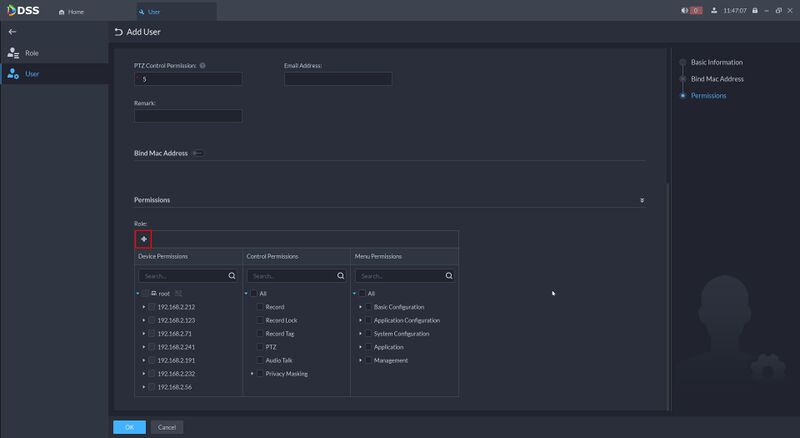
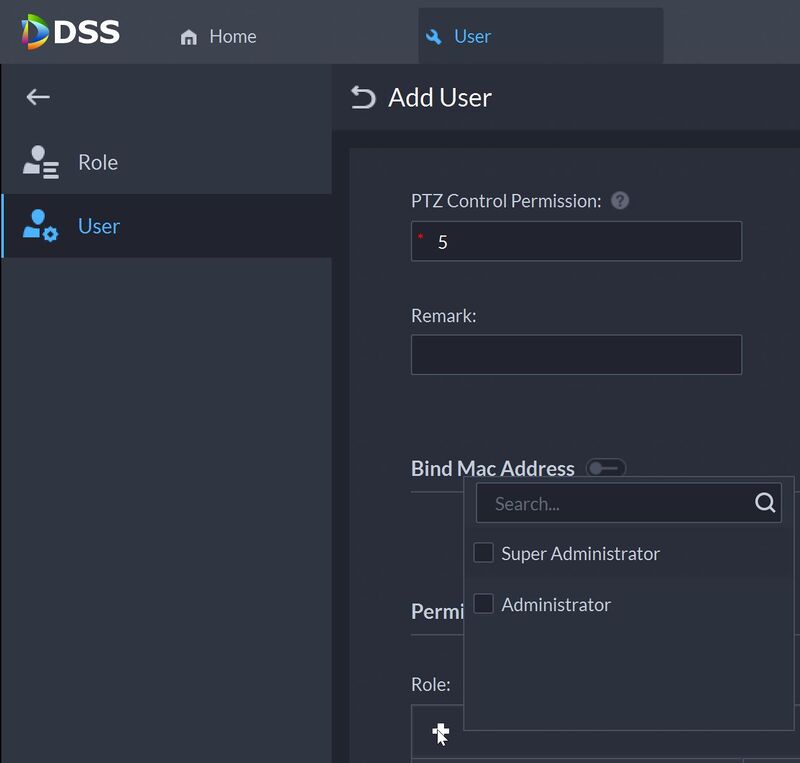
3. Click the +
Local Disk Configuration
This guide will show how to setup and configure local disks for DSS Pro.
Prerequisites
- DSS Pro V8 Server and Client
- HDD installed to DSS Pro
Step by Step Instructions
1.Login to DSS Pro Client and then go to Configurations > Device menu.
From Home Select the Configuration menu
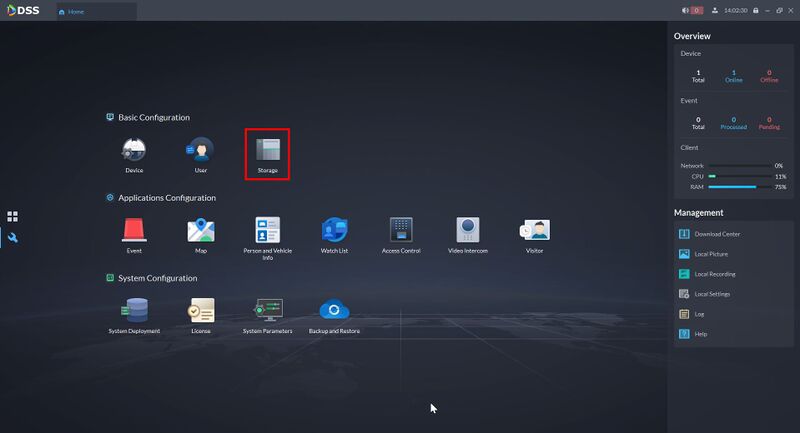
2. Click on Storage
3. Click on “Server Disk”. and then choose your drive and click on the Initialize button.
NOTE: This will format your HDD, all files inside that drive will be removed.
4. Once the drive is initialized, click on Settings button to assign disk type. There are 3 types for storage, they are Video, Picture (Snapshot), and ANPR Picture (for LPR camera).
5. Once completed, your storage is now ready.
Please click here on how to schedule a recording to DSS Storage.
Net Disk Configuration
This guide will show how to setup and configure a Net Disk for DSS Pro.
Prerequisites
- DSS Pro V8 Server and Client
- Net disk – in this guide the EVS will be used
It is recommended to setup/configure EVS first before adding as a Net Disk to DSS
Click here for instructions on how to setup the EVS as a Net Disk
- Use Ethernet cable to connect DSS (Port 3/4) and EVS (Port 1)
- If you need to configure RAID, you should configure it on EVS first
- The IP address of the EVS device network port and the IP of the DSS device network port should be in the same network segment (for example 192.168.1.x for Both Devices)
Step by Step Instructions
1.Login to DSS Pro Client and then go to Configurations > Device menu.
From Home Select the Configuration menu
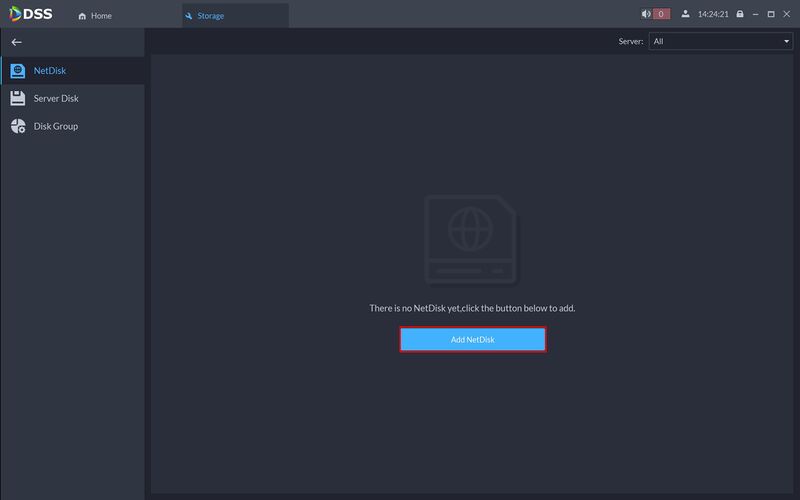
2. Click on Storage
3. Click Add NetDisk
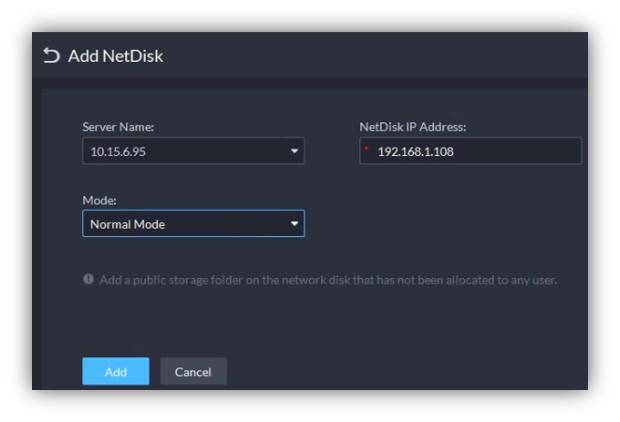
4. Enter the information of the Net DIsk
Click Add
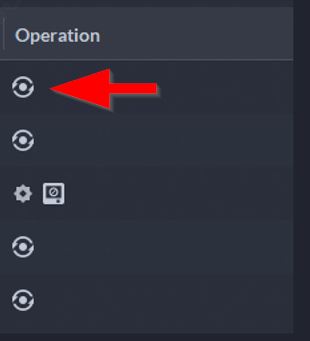
5. Initialize/Config/Format the disk using the Operation functions
Disk Group Operation
Description
This guide will show how to setup and configure a Disk group for DSS Pro.
Disks that are added to DSS Pro can be grouped together to create a Disk Group.
You can then configure devices added to DSS Pro to record to specific Disk Groups.
Prerequisites
- DSS Pro V8 Server and Client
- Devices added to DSS Pro
Step by Step Instructions
1.Login to DSS Pro Client and then go to Configurations > Device menu.
From Home Select the Configuration menu
2. Click on Storage
3. Click Add
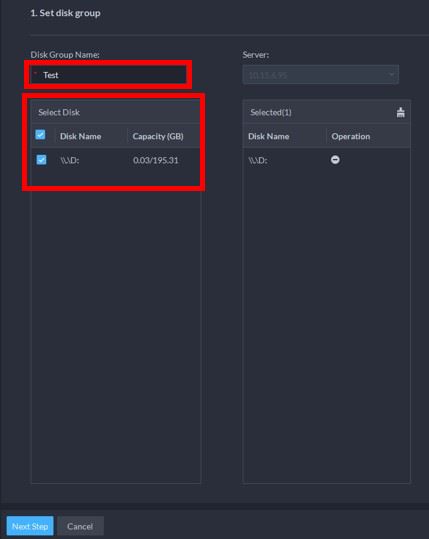
4. Enter a disk group name
Select the disks to add to the group
5. Select the channels to record to this disk group
Click OK to save
Local Recording Schedule
This guide will show how to setup local recording in DSS Express V8.
Prerequisites
- DSS Pro V8 Server and Client
- DSS Local Storage has been setup. – Click here for how-to setup local storage instruction.
Step by Step Instructions
1.Login to DSS Pro Client and then go to Configuration menu.
2. Click on Device.
3. Click on Device Configuration menu.
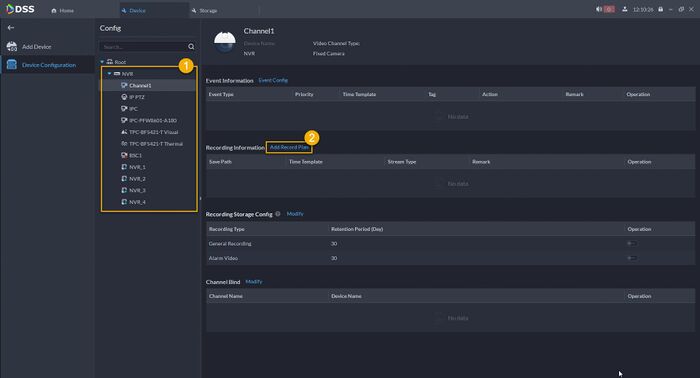
4. Select your Camera Channel from device root. You will see option for Recording Information. Click on Add Record Plan.
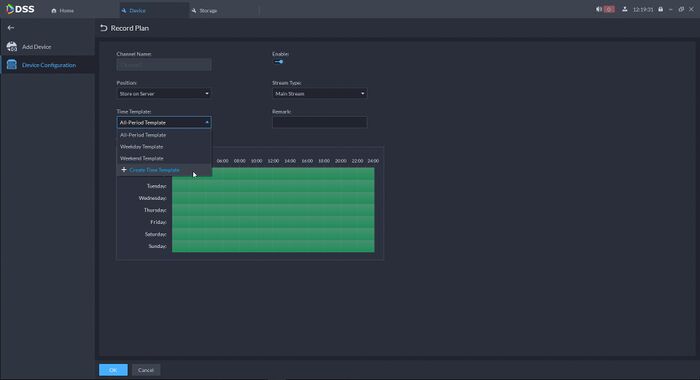
5. Under Record Plan, make sure you Enable it, and then select the Stream type and create your recording schedule. By default, it is set to 24/7 recording. To modify the Time Template, click under Time Template Selection, and click on Create Time Template.
Once everything set, click OK.
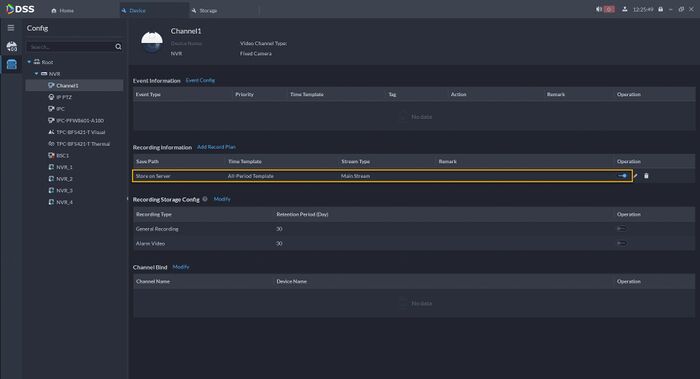
6. Your device will now record to DSS Local Storage.
Please click here on how to review recorded video from DSS Local Storage.
DSS Agile 8 Setup
Description
This article will cover how to setup DSS Agile 8 with DSS Pro V8
Prerequisites
- DSS Pro V8 Server Setup and Running
- DSS Agile V8 Downloaded and Installed on an Android or iOS device
- All Default DSS Pro V8 Ports forwarded on the network: List of Ports to Forward
Step by Step Instructions
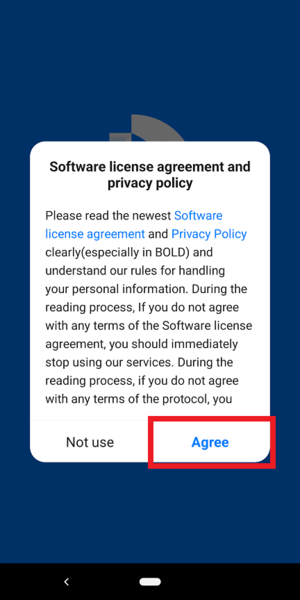
1. Open the DSS Agile 8 app on your mobile device.
Select Agree to accept the Software License Agreement and Privacy Policy
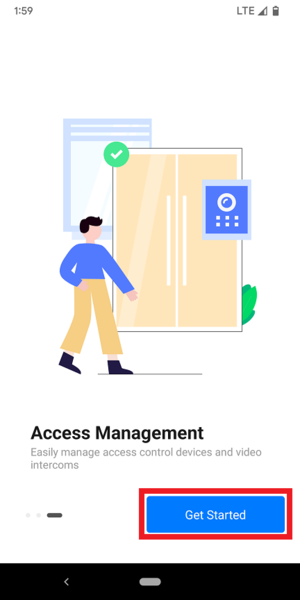
2. Swipe the screen from right to left to flip through the introduction images.
Then select Get Started
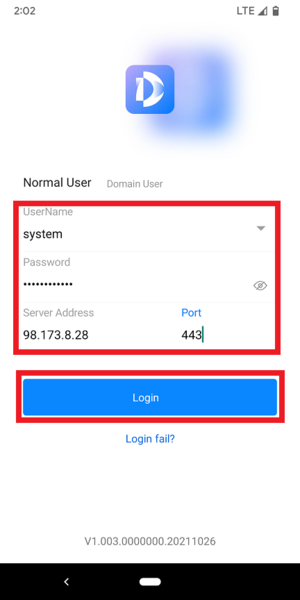
3. Enter the following information:
– Username
– Password
– Server Address
– Port (The HTTPS Client Login Port)
Then select Login
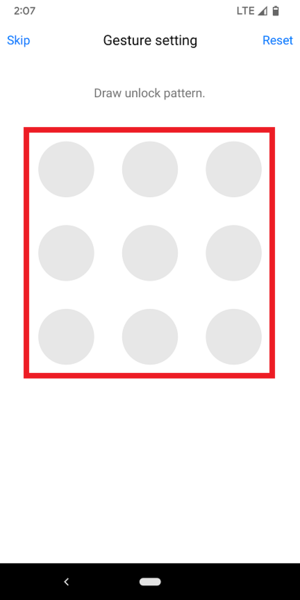
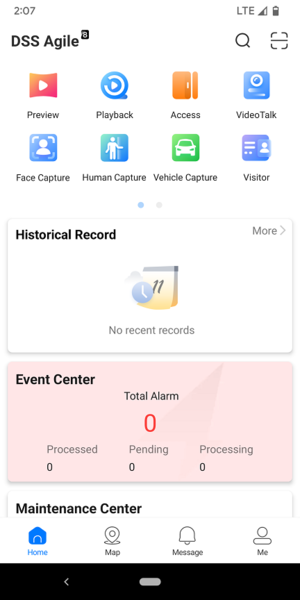
4. If your mobile device was able to connect and login to your DSS Pro V8 server you will see the following page.
Draw the login pattern so you can quickly login to the server in the future.
(If you don’t want an unlock pattern select “Skip” at the top left and skip to Step 6.)
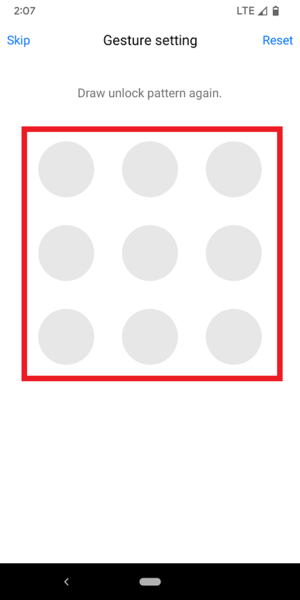
5. Confirm the same pattern from Step 4
6. You are now connected to your DSS Pro V8 Server
