DSS Express V8 User Manual, DSS (Digital Surveillance System) is an all-in-one Central Management System (CMS) / Video Management System (VMS) that encompasses a wide range of features and functions within video surveillance. It manages IP cameras and recorders and is able to connect to third-party cameras via the standard ONVIF protocol.
DSS/V8/DSS Express/Instruction/Server Config
This guide will show how to configure DSS Express server settings, such as external IP mapping, port mapping , and the ability to start and restart the server and server services.
Prerequisites
- DSS Express V8 server installed
Read More : SmartPSS Installation and User guide
Step by Step Instructions
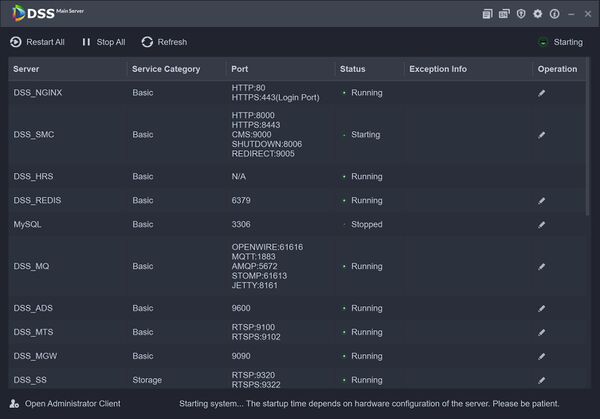
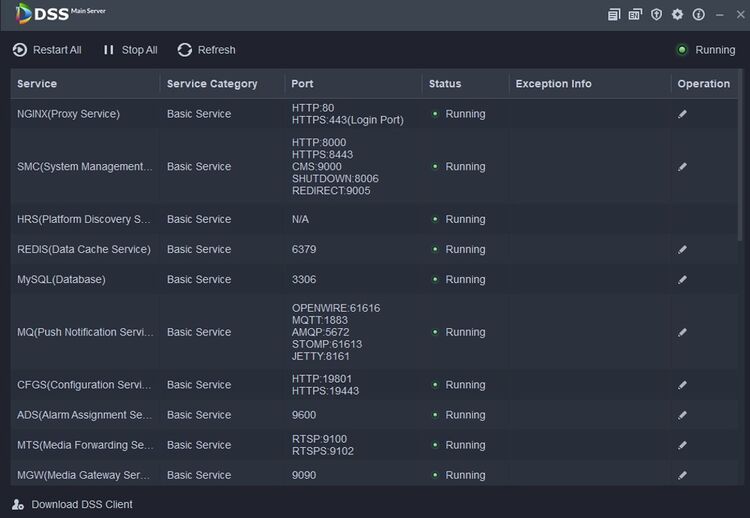
Click DSS Express Server icon to open the Server software for configuration
DSS Express Server
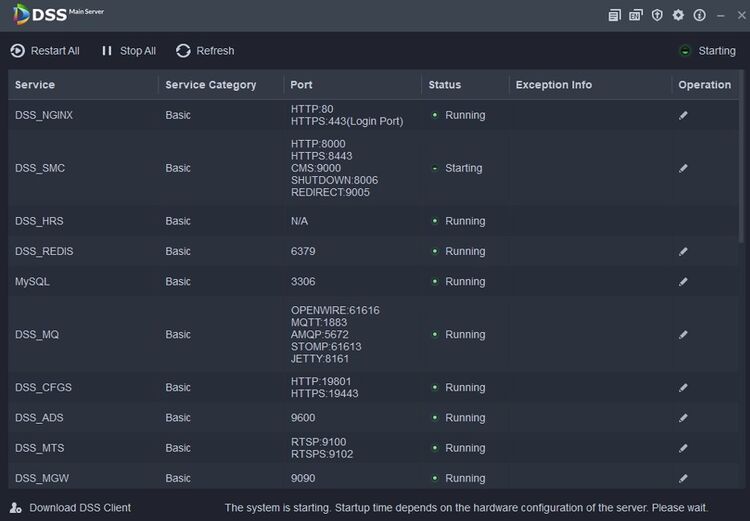
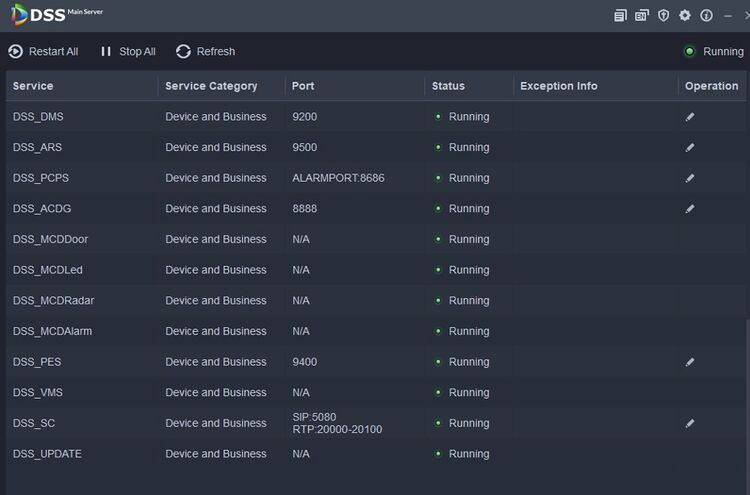
Server status is displayed on the top right corner of the window
![]() Server Starting
Server Starting ![]() Running
Running ![]() Server Offline
Server Offline ![]() Exception
Exception
Use the buttons on the top left of the window to control the server services – Restart All, Stop All and Refresh all services are available
Use the buttons on the top right of the window for different DSS server functions:
| Function | ||
|---|---|---|
| 1 | User Manual – Open User Manual for DSS | |
| 2 | Language – Select English or Chinese | 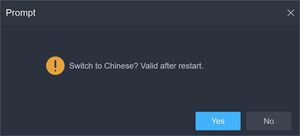 |
| 3 | Security – Disable or enable TLS1.0 | 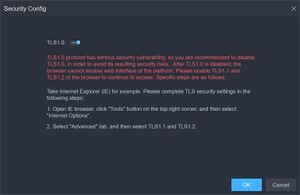 |
| 4 | Setting – Map the IP of DSS Express server to an external IP address | 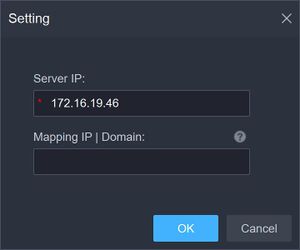 |
| 5 | About – Click to Display Version information of DSS Server | 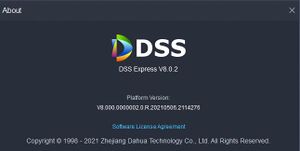 |
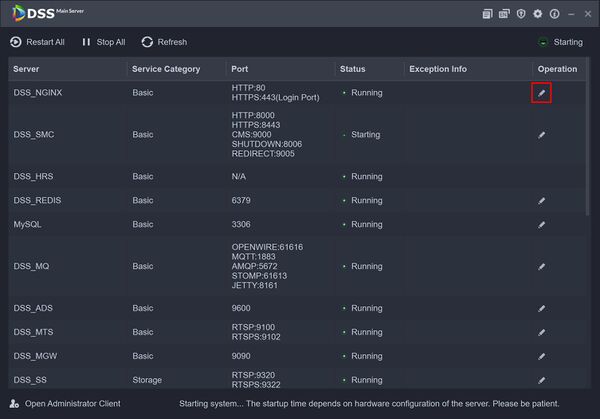
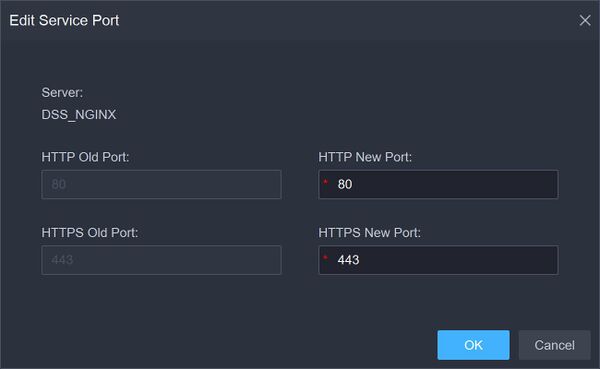
Click the ![]() to modify the service port number. Server will automatically restart after modification.
to modify the service port number. Server will automatically restart after modification.
DSS/V8/DSS Express/Instruction/License Activation
Description
This guide will show how to activate the DSS Express license.
Prerequisites
- DSS Express V8 Server and Client
- License Key that you received from your Sales Rep
Step by Step Instructions
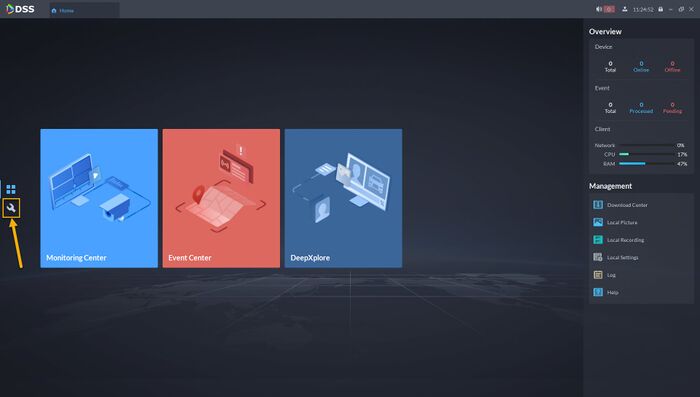
1.Login to DSS Express Client and then go to Configuration menu.
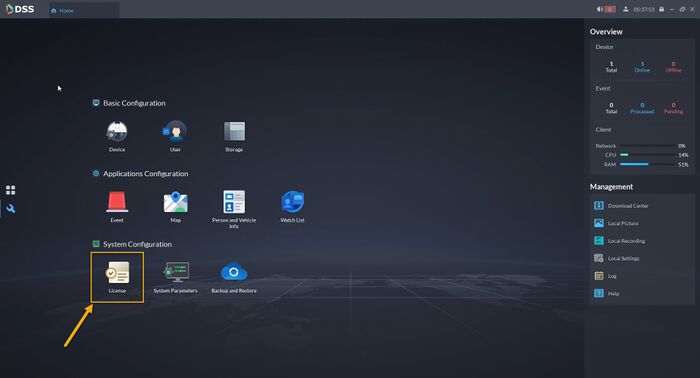
2. Click on License.
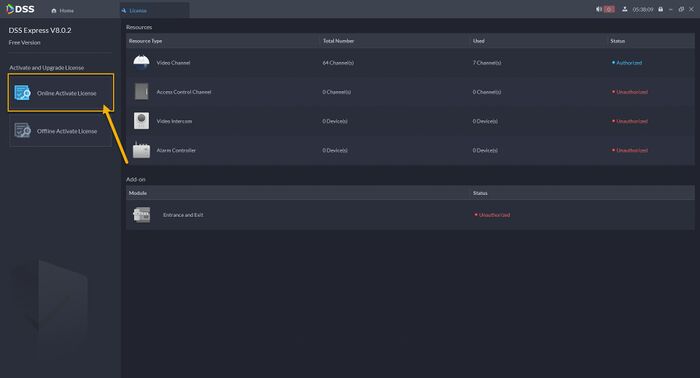
4. Click on Online Activation.
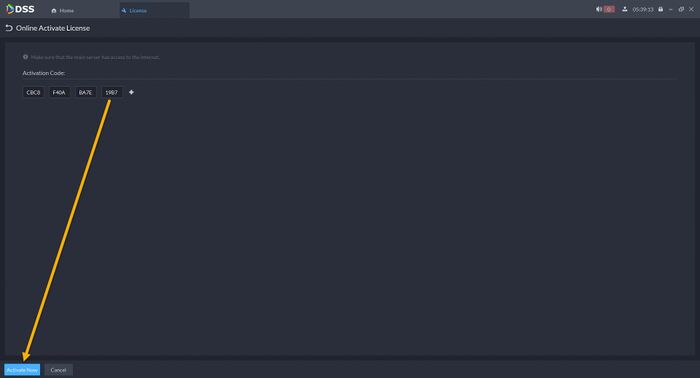
5. Enter the 16 digits license code that you received from Dahua. Then click on Activate now.
5. Your DSS Express is successfully activated, you will be able to see all available modules and license expiration.
DSS/V8/DSS Express/Instruction/License Activation (Offline)
Description
This guide will show how to activate the DSS Pro/Express license.
! Note: this guide is for DSS Servers not connected to the Internet.
You will need to have another computer with Internet Access to activate the License.
Prerequisites
- DSS Pro / Express V8 Server and Client
- License Key that you received from your Sales Rep
- Another computer that has Internet Access
- USB Drive
Step by Step Instructions
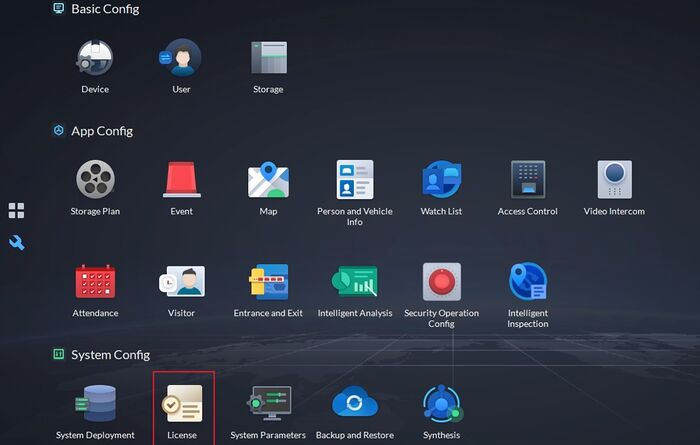
1.Log into DSS and select [License].
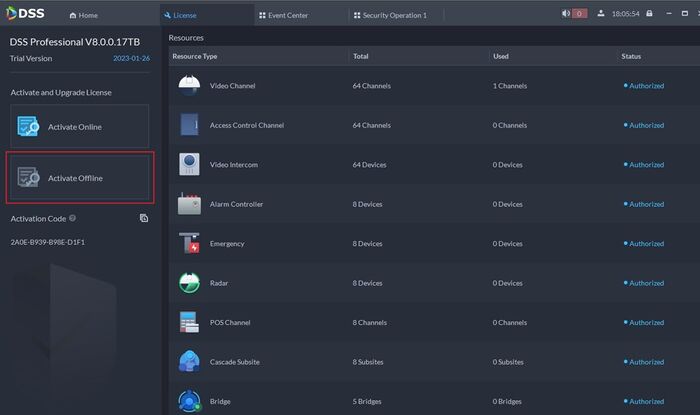
2. Select [Activate Offline].
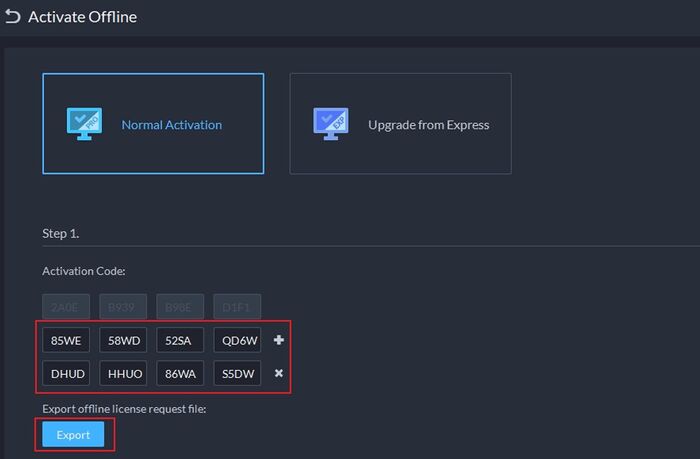
3. Insert the 16-digit License Key. If you have multiple License Keys, you can add them all together.
After adding all the License Keys, click on [Export]
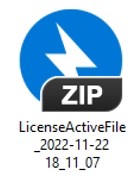
4. DSS will then generate a LicenseActiveFile.zip.
Copy this file to another PC which has public Internet access.
5. Click on the blue link to go to DSS License Management Page
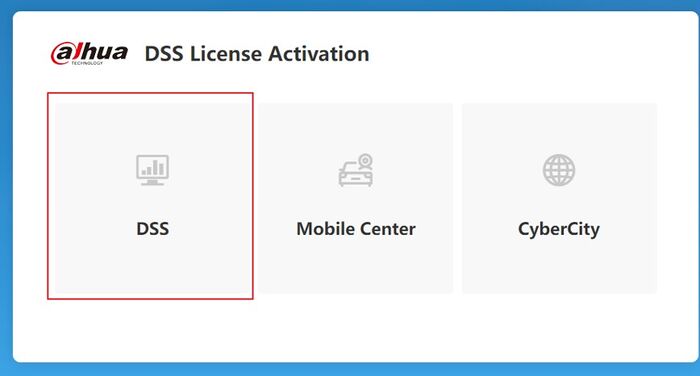
6. Select [DSS]
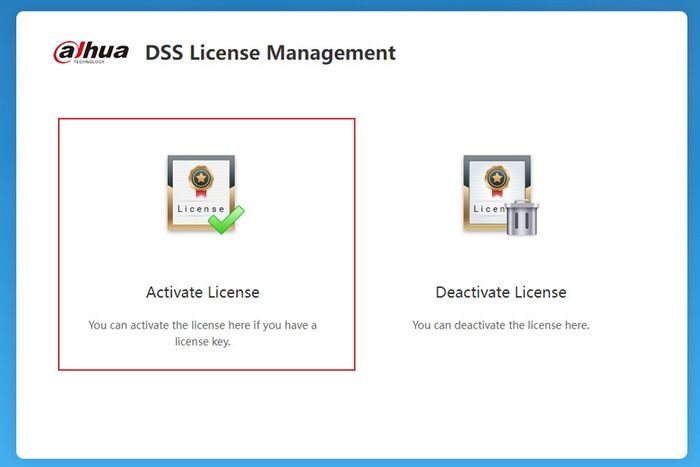
7. Select [Activate License]
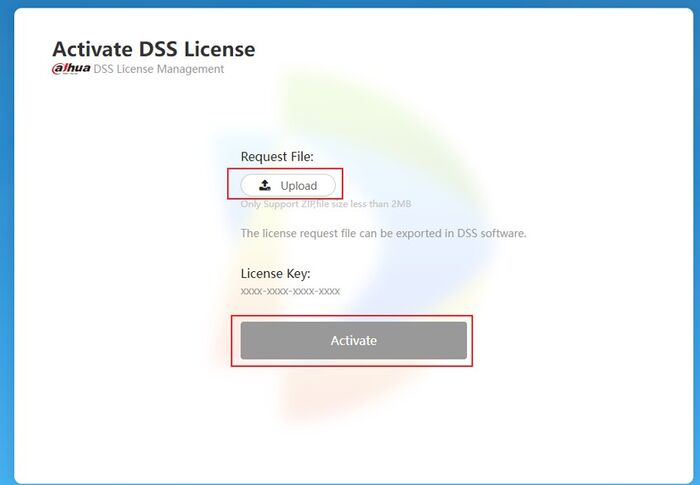
8. Upload the LicenseActiveFile.zip.
Dahua DSS License Management System will check the file.
If the License is valid, it will activate it for you.
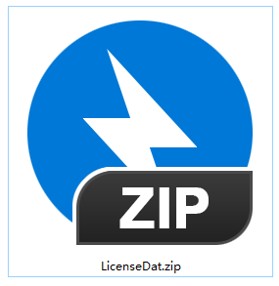
9. Once the License is activated, you will be requested to download a LicenseDat.zip.
10. Copy the LicenseDat.zip back to the PC that has DSS Client.
Click on [Import] and upload the LicenseDat.zip. Then DSS will be activated successfully.
!Note: LicenseActiveFile.zip and LicenseDat.zip are correlated. You cannot use the LicenseDat.zip on another PC rather than the one from which you extract the corresponding LicenseActiveFile.zip.
DSS/V8/DSS Express/Instruction/License Dectivation (Online)
Description
This guide will show how to deactivate the DSS Pro/Express license.
! Note: this guide is for DSS Servers connected to the Internet.
Prerequisites
- DSS Pro/Express V8 Server and Client
- License Key that you received from your Sales Rep
- The computer on which DSS is running has Internet
Step by Step Instructions
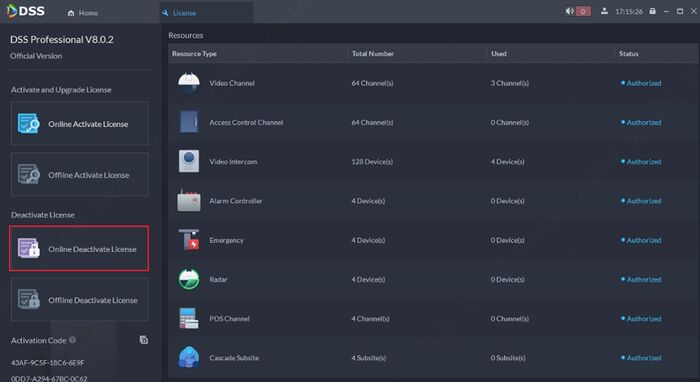
1.Log into DSS and select [License].
2. Click on [Online Deactivate License].
3. Click on [Deactivate Now].
4. Now, the License Key is deactivated. You could use it on a new installation.
All DSS Modules have become gray.
DSS/V8/DSS Express/Instruction/License Dectivation (Offline)
Description
This guide will show how to deactivate the DSS Pro/Express license.
! Note: this guide is for DSS Servers not connected to the Internet.
You will need to have another computer with Internet Access to deactivate the License.
Prerequisites
- DSS Pro / Express V8 Server and Client
- Another computer that has Internet Access
- USB Drive
Step by Step Instructions
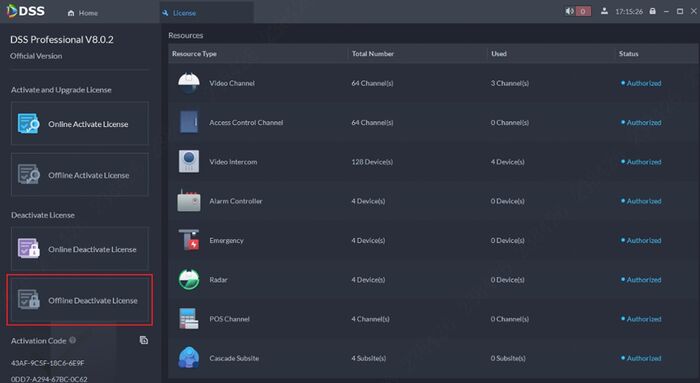
1.Log into DSS and select [License].
2. Click on [Offline Deactivate License].
3. Click on [Export].
DSS will generate a LicenseDeactivateFile.zip. Copy this file to another PC that has public Internet access.
! Note: the moment you click on [Export], DSS stops working. Make sure that you are prepared for this.
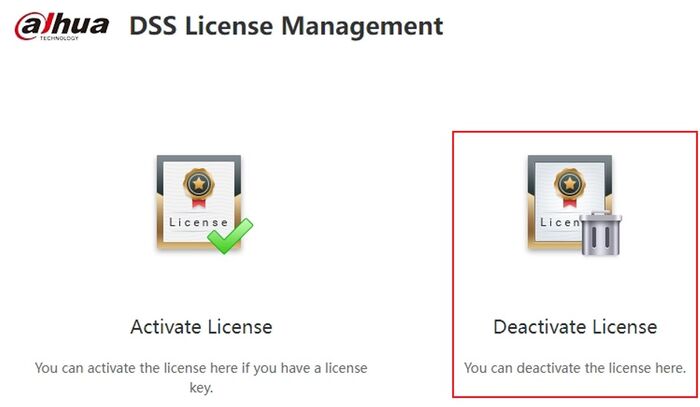
4. Click on the blue link to jump to DSS License Management Portal.
5. Select [Deactivate License] on the webpage.
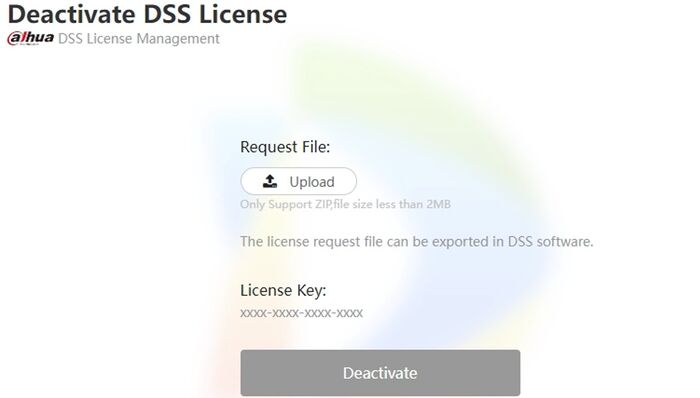
6. Click on [Upload] and select the LicenseDeactivateFile.zip.
DSS License Management Portal will verity the file and deactivate the License Key for you.
7. Now, you can use the License Key on a new installation.
Add device to DSS Express V8
Description
This guide will show how to add Dahua device to DSS Express Software.
Prerequisites
- DSS Express V8 Server and Client
- Dahua Device connected to the network
Step by Step Instructions
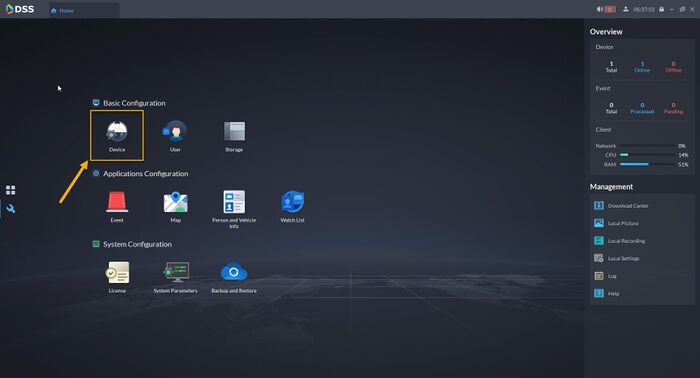
1.Login to DSS Express Client and then go to Configuration menu.
2. Click on Device.
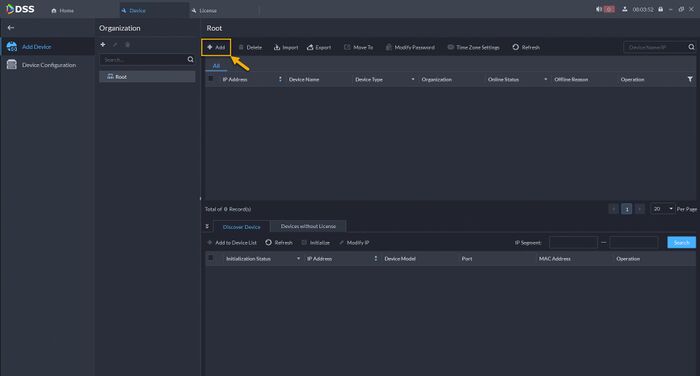
4. Click on Add.
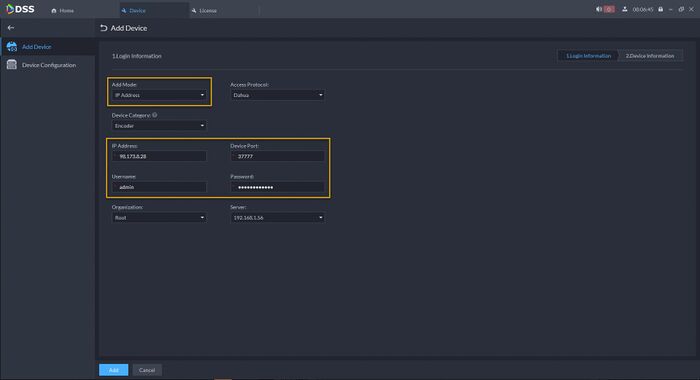
5. Select the adding mode and then enter device information. In this example, we are using IP address mode. For P2P and Auto-register, it must be setup first from recorder or IP Camera. Click Add.
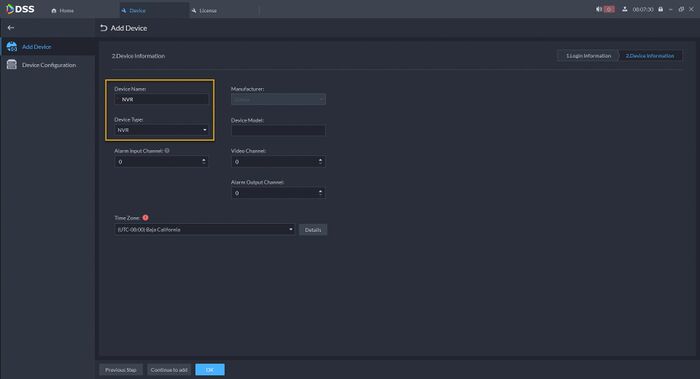
5. Enter Device Name and select Device Type. Click OK.
6. Your device is now added to DSS.
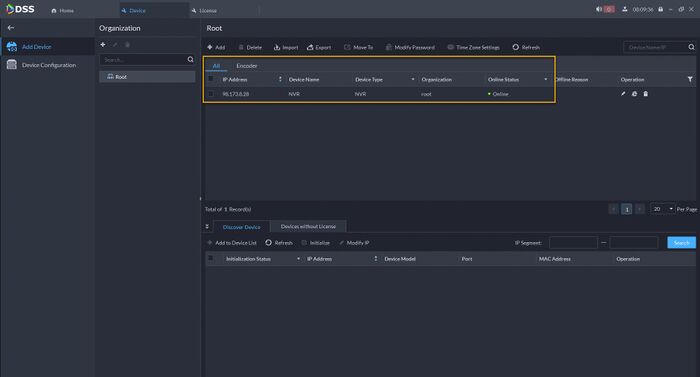
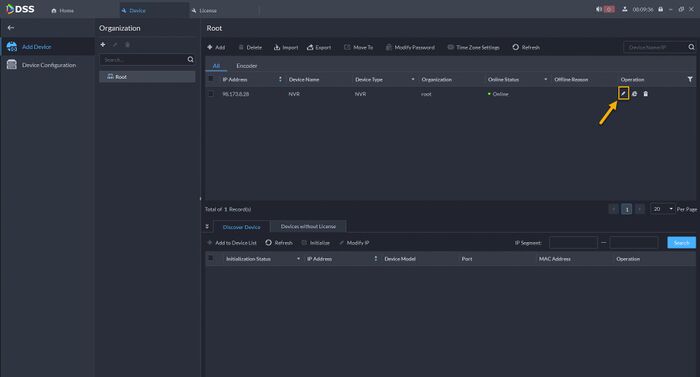
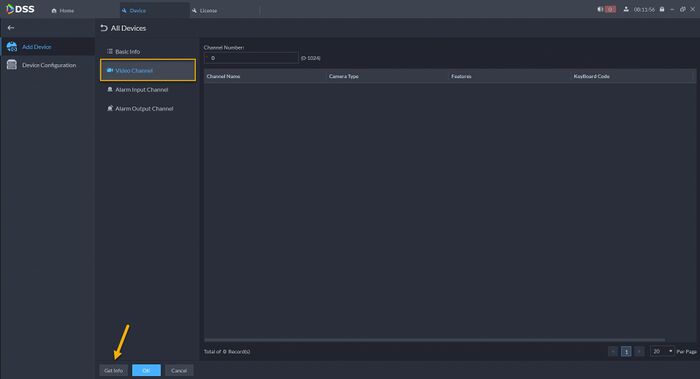
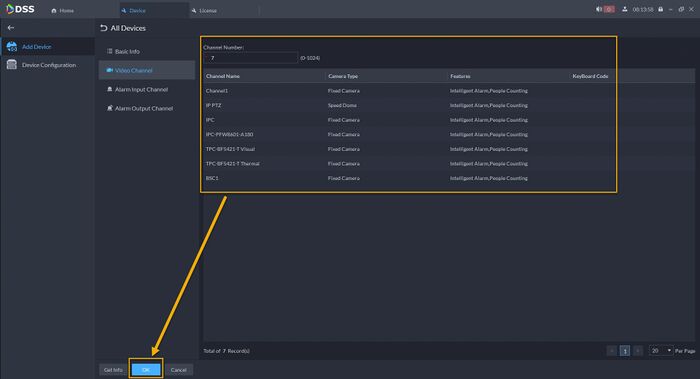
Tips: In the event that your device added but can’t see any cameras added to the software, please follow this following steps.
1. Click on the Edit button on your device.
2. Go to Video Channels. And then click on Get Info.
3. The software will refresh the connection to the device and retrieve the camera channels that added to recorder. Once populated, click OK.
DSS/V8/DSS Express/Instruction/Import Device
Description
This guide will show how to add multiple Dahua devices at once to DSS Express using the Import feature.
Prerequisites
- DSS Express V8 Server and Client
- Dahua Devices connected to the network
Step by Step Instructions
1.Login to DSS Express Client and then go to Configurations > Device menu.
From Home Select the Configuration menu
2. Click on Device.
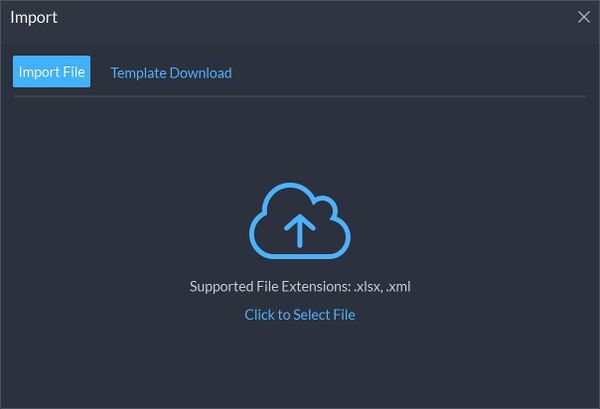
3. Click Import
4. Click Template Download to download an example import template file that can be used.
Open the template file in Excel and modify as required.
Template requirements/example:
Click to Select File – Click this to upload the completed template file with all device information.
DSS/V8/DSS Express/Instruction/Channel Features
Description
This guide will show how to configure advanced features for channels, important such as for devices with features such as Intelligent Alarms such as Face Detection or ANPR cameras.
Prerequisites
- DSS Express V8 Server and Client
- Device(s) connected to the network, added to DSS Express
Step by Step Instructions
1.Login to DSS Express Client and then go to Configurations > Device menu.
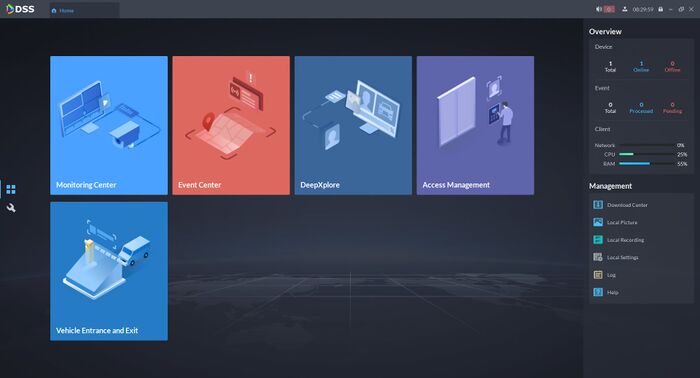
From Home Select the Configuration menu
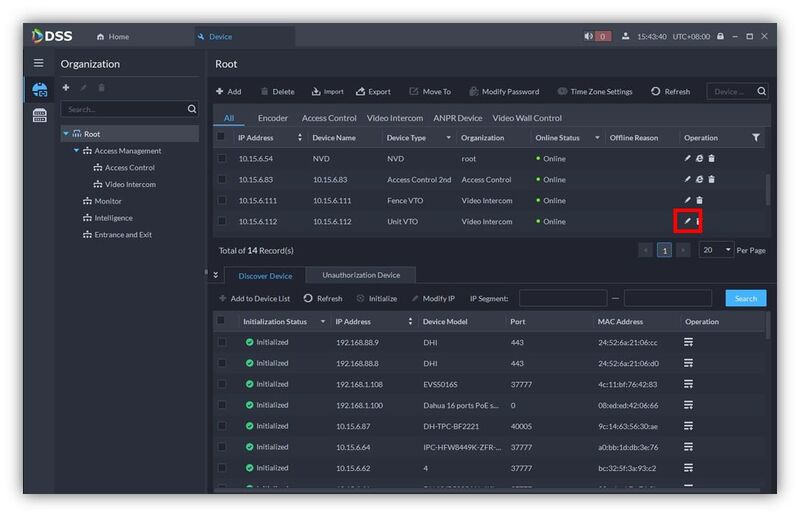
2. Click on Device.
3. Click the ![]() next to the device/channel to modify the features for
next to the device/channel to modify the features for
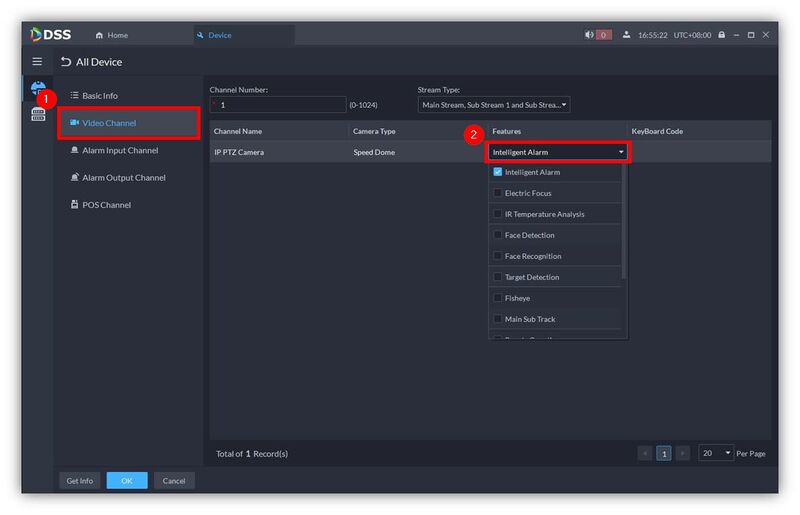
4. Select Video Channel
Click the dropdown box under Features then click to select the features to enable for this channel, for example Intelligent Alarm
Click OK to save
DSS Express V8 – Live View
Description
This guide will show the options that available for Live View in DSS Express V8 Client.
Prerequisites
- DSS Express V8 Server and Client
- Dahua Device connected to the network
- Dahua Device added to DSS Express V8 – Click here for how-to add device instruction.
Step by Step Instructions
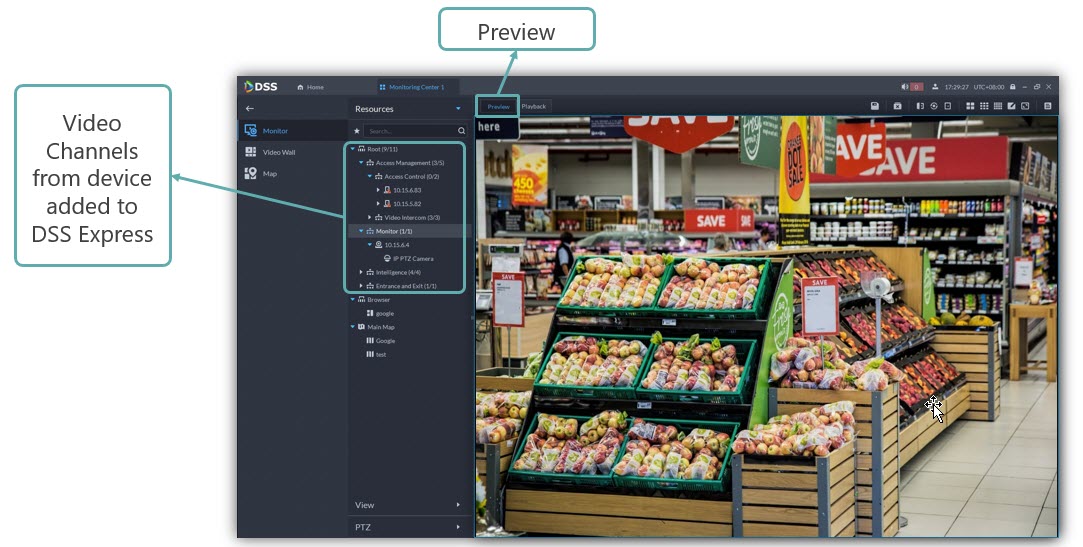
1.Login to DSS Express Client and click on Monitoring Center.
2. Select the camera channel under Resources.
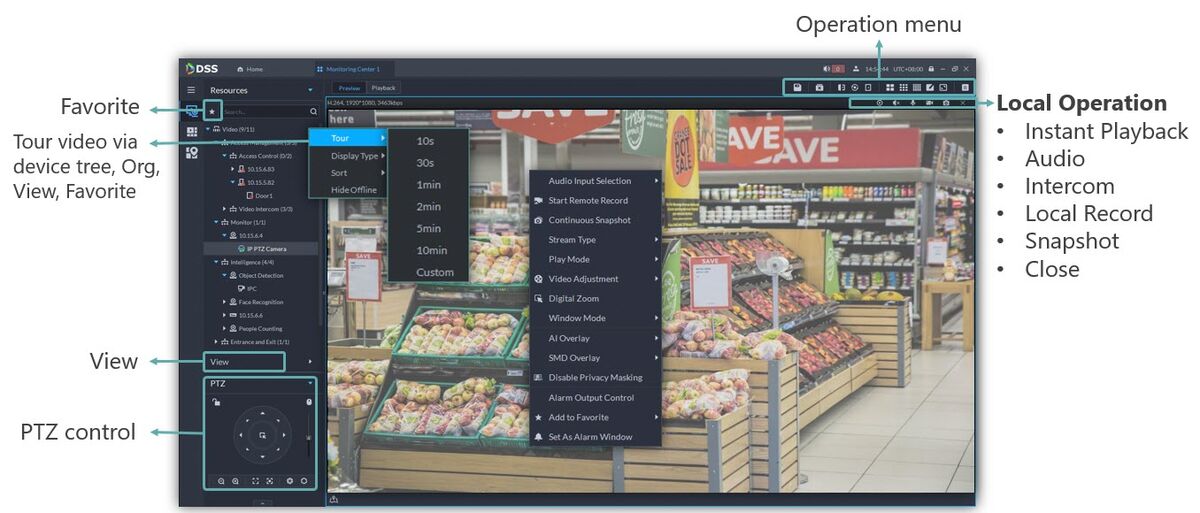
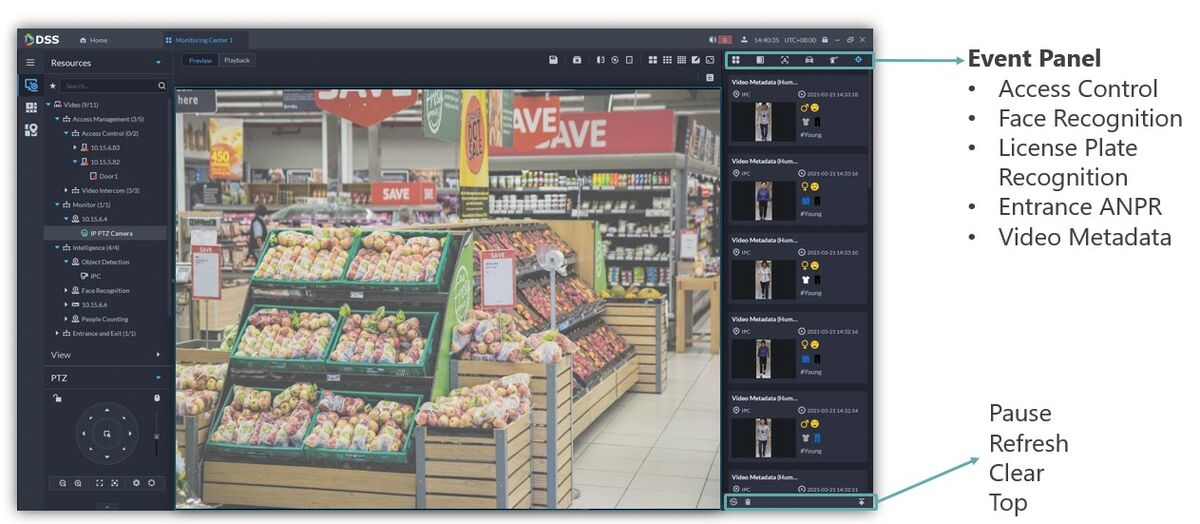
Below is the operation menu that available under Live View.
Tips: In the event that your device added but can’t see any cameras added to the software, please follow this following steps.
1. Click on the Edit button on your device.
2. Go to Video Channels. And then click on Get Info.
3. The software will refresh the connection to the device and retrieve the camera channels that added to recorder. Once populated, click OK.
DSS Express V8 – Playback
Description
This guide will show the options that available for Playback in DSS Express V8 Client.
Prerequisites
- DSS Express V8 Server and Client
- Dahua Device connected to the network
- Dahua Device added to DSS Express V8 – Click here for how-to add device instruction.
Step by Step Instructions
1.Login to DSS Express Client and click on Monitoring Center.
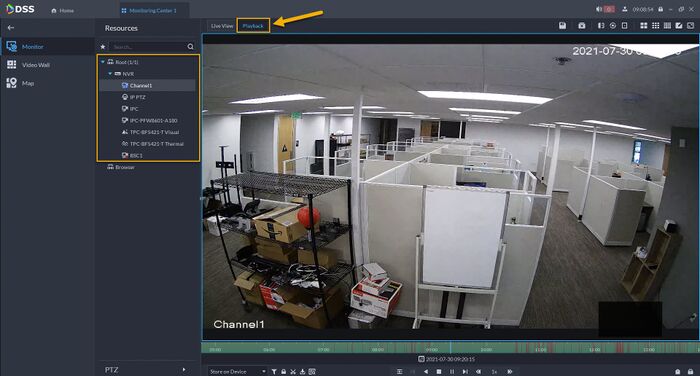
2. Click on Playback and select the camera channel under Resources.
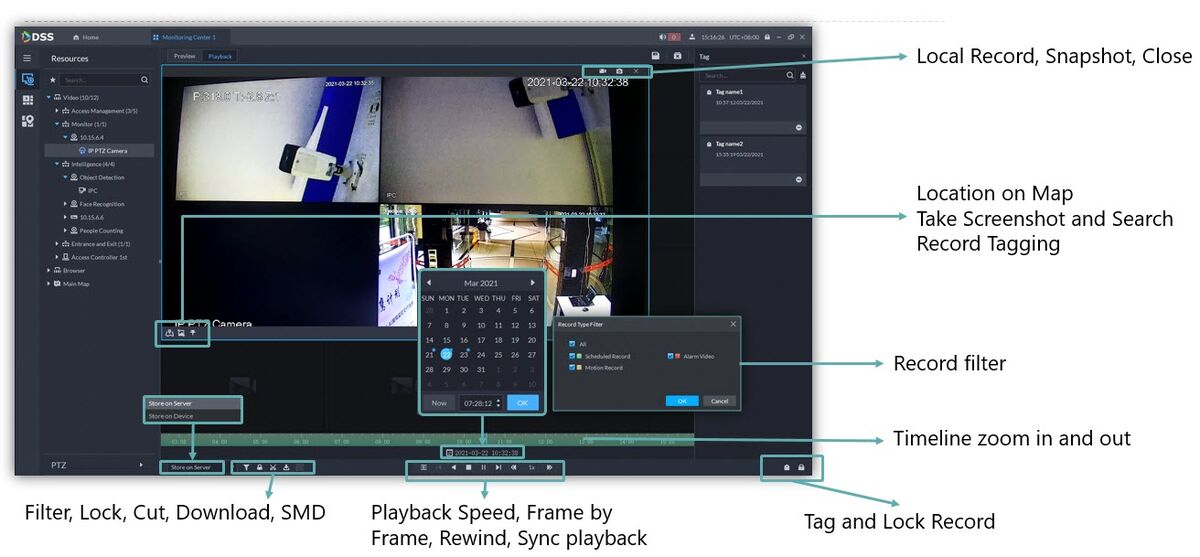
Below is the operation menu that available under Playback.
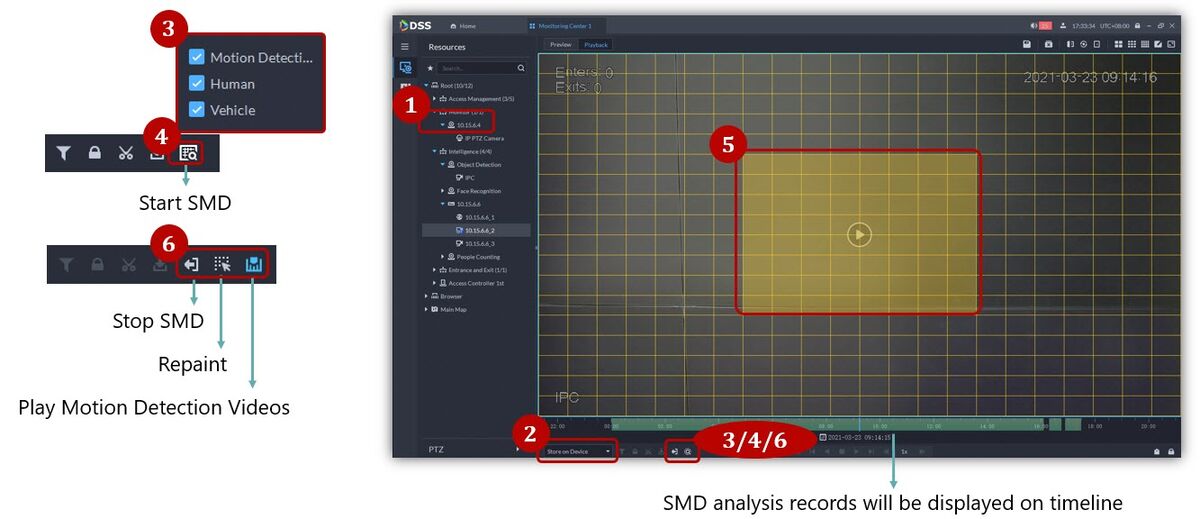
SMD Search
If you would like to download video footage, please click here for instruction.
DSS Express V8 – Download Center
Description
This guide will show how to download recorded video using DSS Express V8 Client.
Prerequisites
- DSS Express V8 Server and Client
- Dahua Device connected to the network
- Dahua Device added to DSS Express V8 – Click here for how-to add device instruction.
Step by Step Instructions
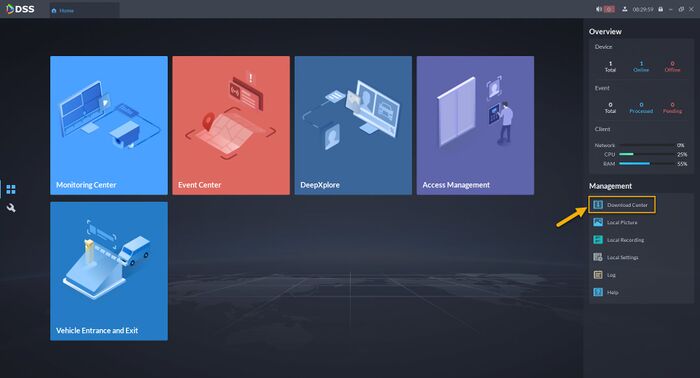
1. Go to Home, and then click on Download Center.
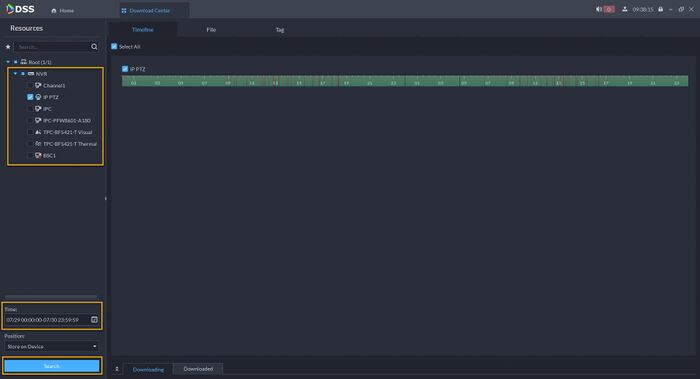
2. Select the Camera channel, choose the Date and Time for video footage you wish to review, and click Search.
NOTE: under Position option, you need to select where the recording is saved. Store on Device is searching playback file from the recorder and Store on Server is searching playback file from DSS Storage.
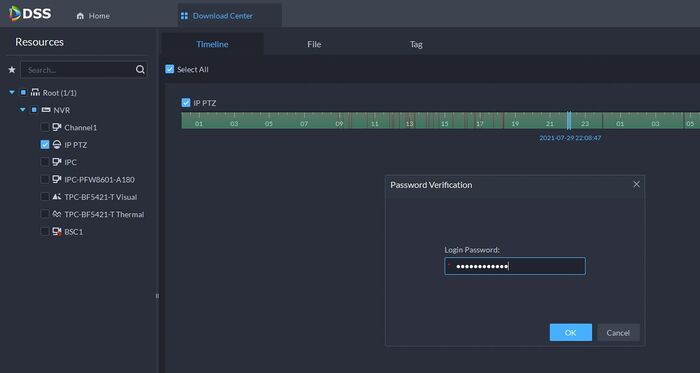
3. Select the time period from the timeline. It will prompt user to enter the device password.
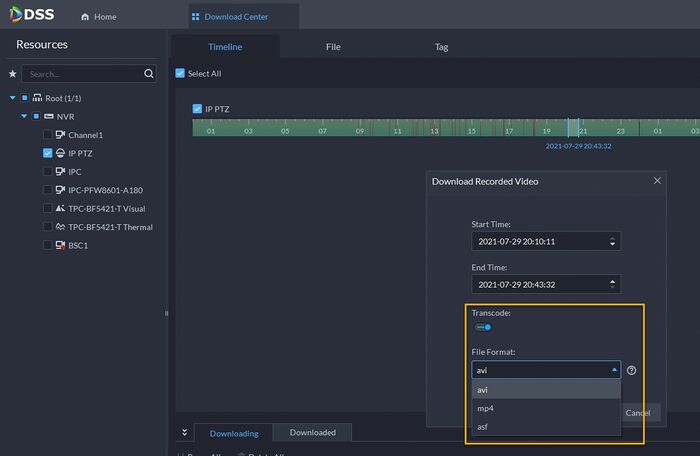
4. Enter the date and time you world like to download, and you can also choose the video format by clicking on the Transcode. By default the format will be .dav.
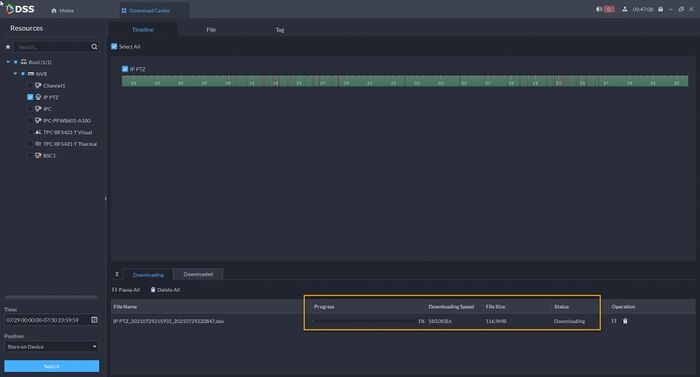
5. Your download will begin.
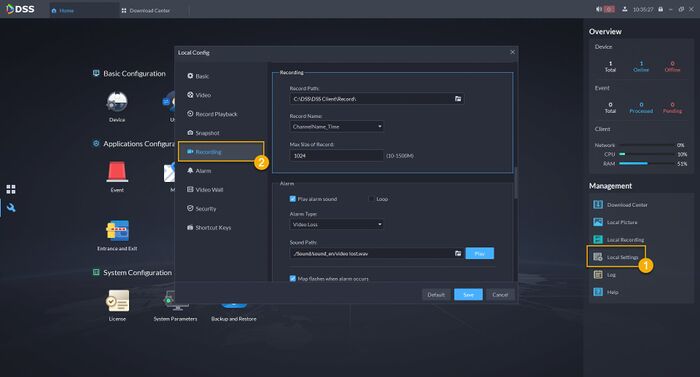
6. You can modify the storage path through the local settings.
DSS Express V8 – Local Storage
Description
This guide will show how to setup local recording in DSS Express V8.
Prerequisites
- DSS Express V8 Server and Client
- 1 partition per physical HDD
- Separate physical drives are needed for each recording function.
- HDD format recommendation is in NTFS
Step by Step Instructions
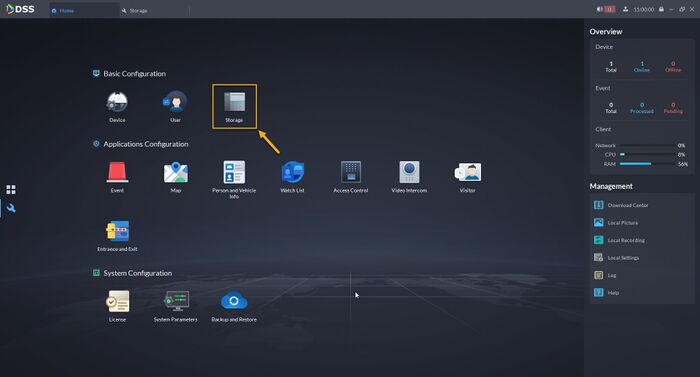
1.Login to DSS Express Client and then go to Configuration menu.
2. Click on Storage.
3. Click on “Server Disk”. and then choose your drive and click on the Initialize button.
NOTE: This will format your HDD, all files inside that drive will be removed.
4. Once the drive is initialized, click on Settings button to assign disk type. There are 3 types for storage, they are Video, Picture (Snapshot), and ANPR Picture (for LPR camera).
5. Once completed, your storage is now ready.
Please click here on how to schedule a recording to DSS Storage.
DSS Express V8 – Local Recording Schedule
Description
This guide will show how to setup local recording in DSS Express V8.
Prerequisites
- DSS Express V8 Server and Client
- DSS Local Storage has been setup. – Click here for how-to setup local storage instruction.
Step by Step Instructions
1.Login to DSS Express Client and then go to Configuration menu.
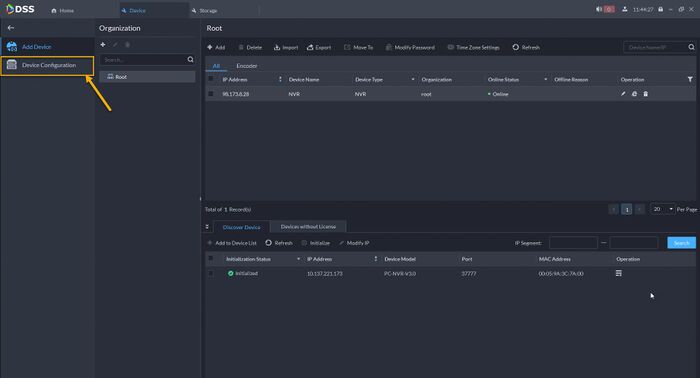
2. Click on Device.
3. Click on Device Configuration menu.
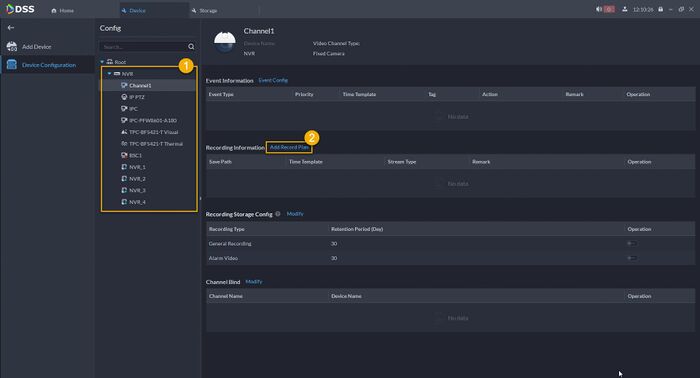
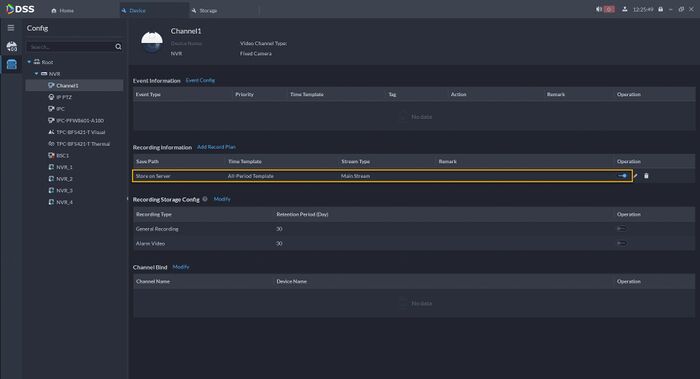
4. Select your Camera Channel from device root. You will see option for Recording Information. Click on Add Record Plan.
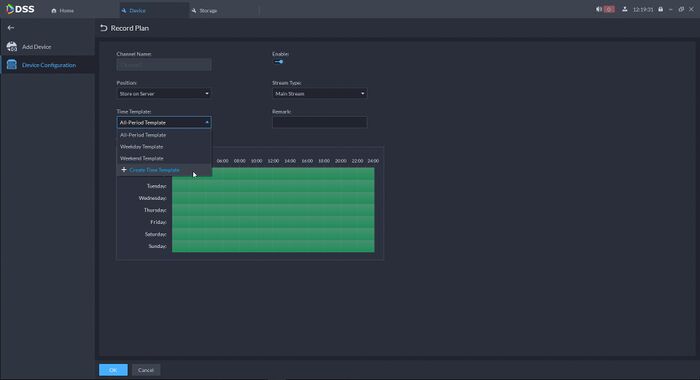
5. Under Record Plan, make sure you Enable it, and then select the Stream type and create your recording schedule. By default, it is set to 24/7 recording. To modify the Time Template, click under Time Template Selection, and click on Create Time Template.
Once everything set, click OK.
6. Your device will now record to DSS Local Storage.
Please click here on how to review recorded video from DSS Local Storage.
DSS/V8/DSS Express/Instruction/DSS Upgrade
Cautions and Disclaimers
- This document shows how to update from DSS V8.0.4 to DSS V8.1
- Please note that the following instructions only apply to DSS Baseline. If you are using a customized version of DSS, that will be a case-by-case discussion if you want the update. Please consult Tech Support for more information
- Only Baseline DSS Express and DSS Professional can be upgraded in this way
- Because DSS is Server-client structure, you need to upgrade DSS Server before upgrading DSS Client
Step by Step Instructions
Part 0: Check the Current DSS Version
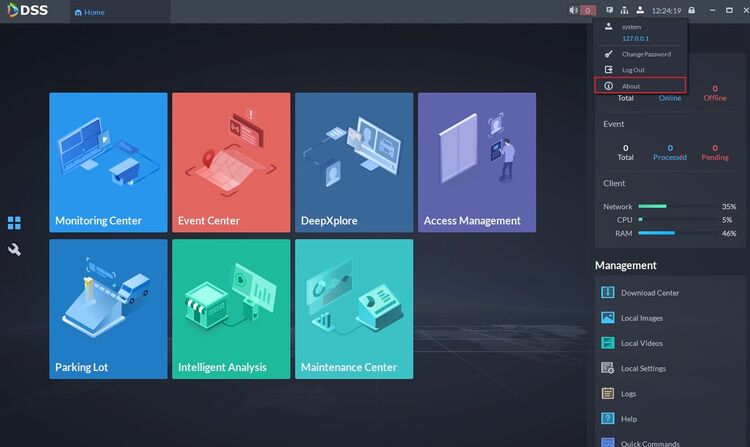
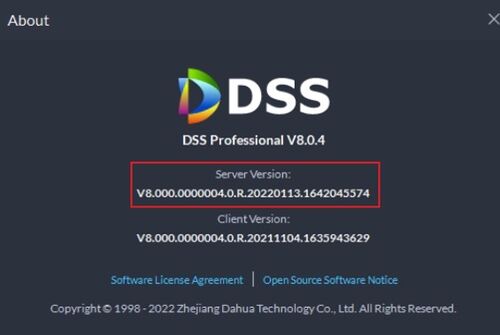
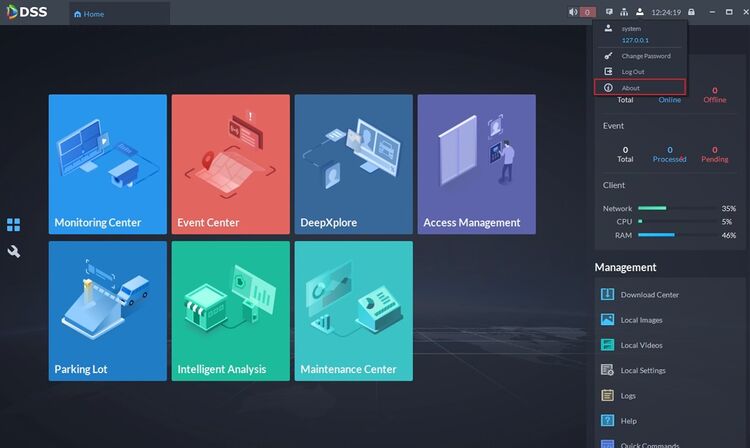
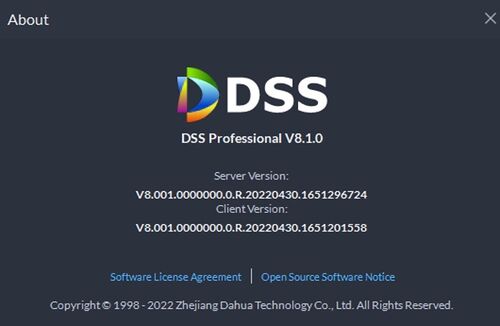
Log into DSS Client and select [About]
Here you can see the DSS Server Version. Make sure the Installation Package is later than this version.
Part 1: Back up the current system Database – this will prevent data loss in case of update failure
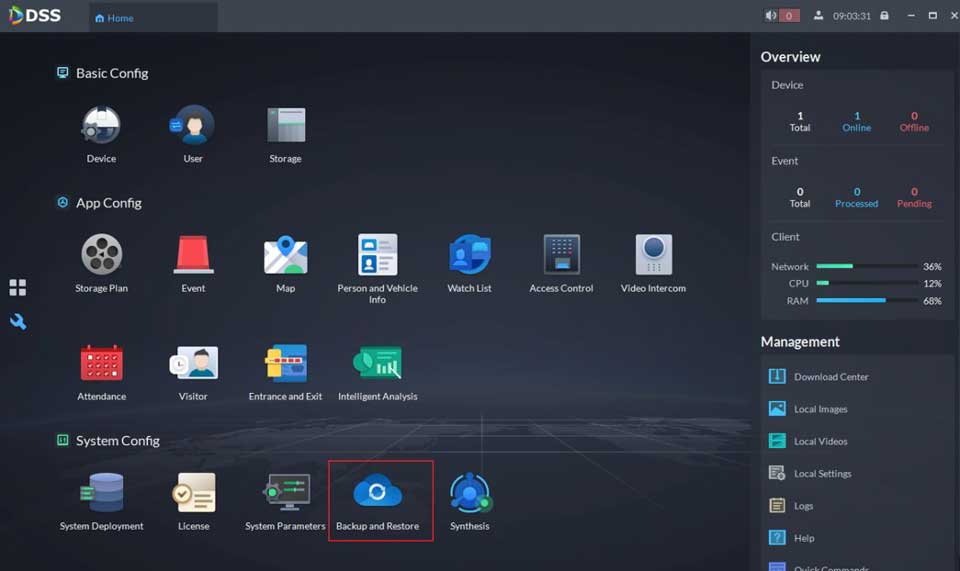
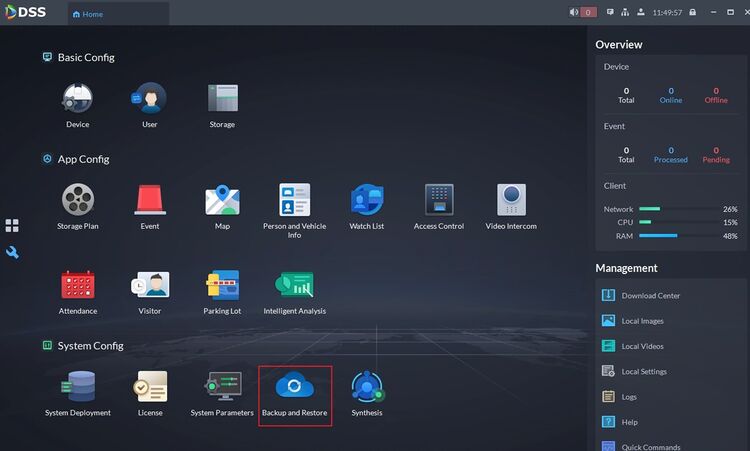
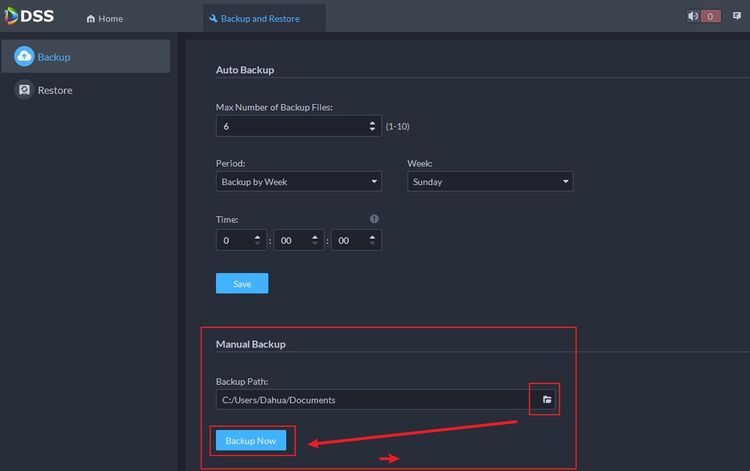
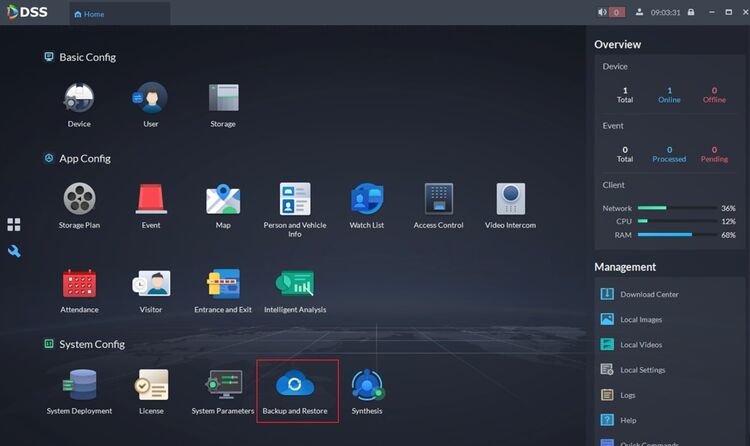
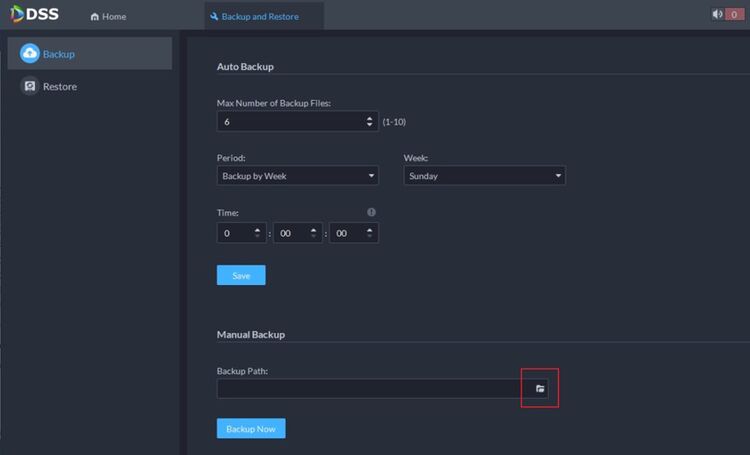
1. Go to the Home menu of DSS – Select [Backup and Restore]
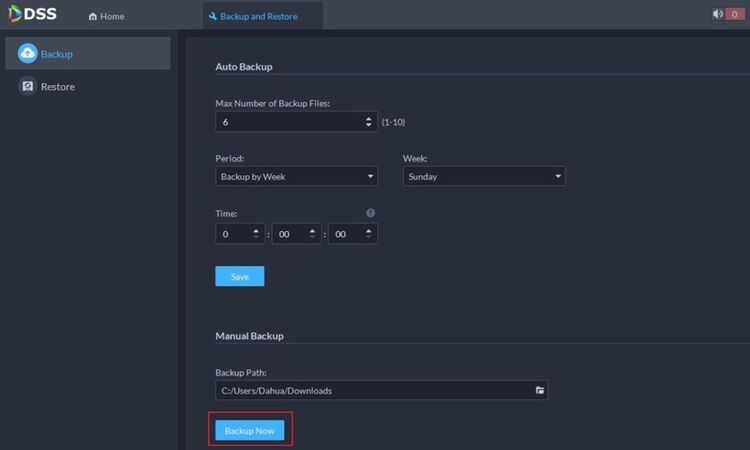
2. Click on the folder icon to select the directory where you want to save the backup file. Then, click on [Backup Now]
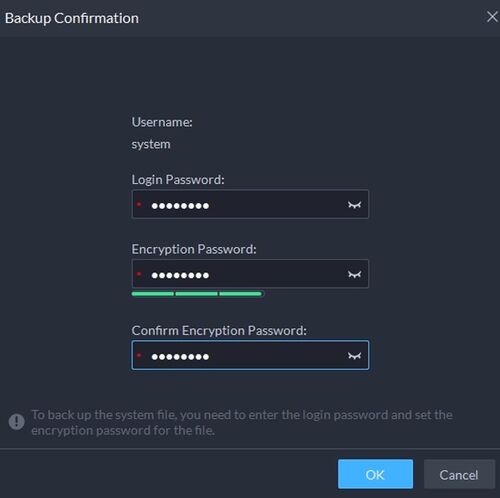
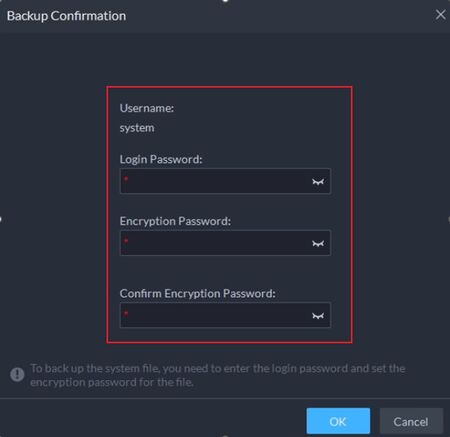
3. Insert the Login Password of DSS Client and Encryption Password twice.
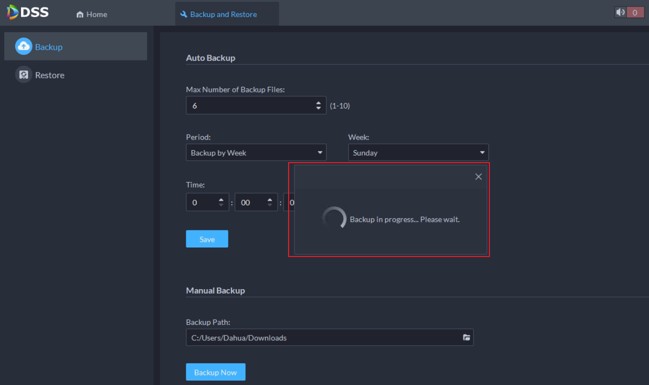
In the end, Click on OK and DSS will export the Backup File automatically.
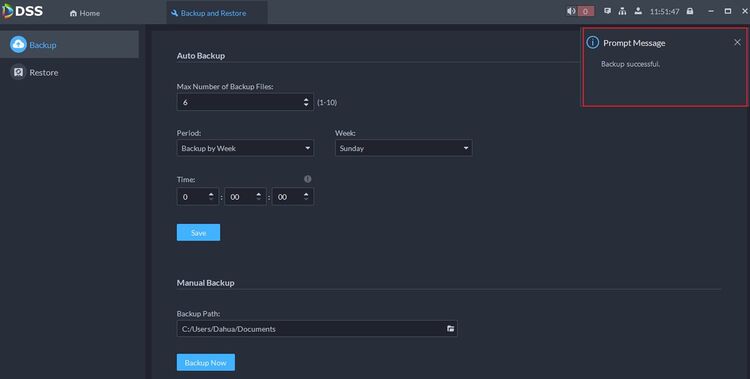
4. When DSS finishes exporting the Backup File, you will receive a prompt message saying Backup successful
https://dahuawiki.com/DSS/V8/DSS_Express/Instruction/DSS_Database_Backup_Restore
Part 2: Upgrade DSS Server
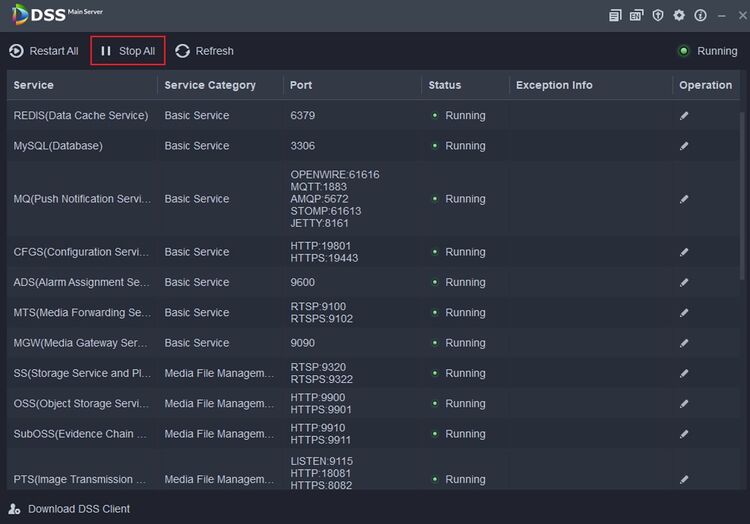
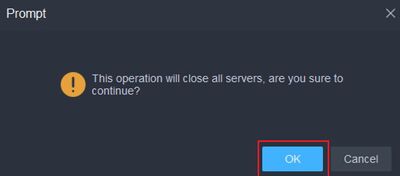
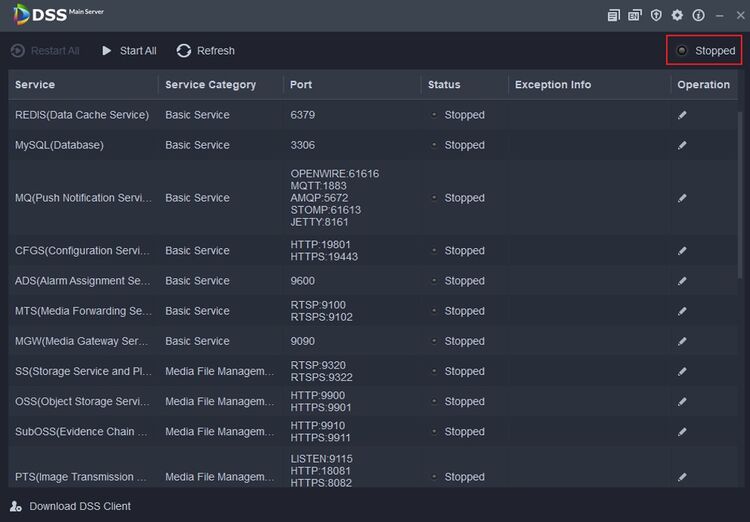
5. Go to DSS Service Manager and click on [Stop All] to temporarily pause DSS Services.
6. Click on [OK] to continue
7. Make sure DSS Services are stopped
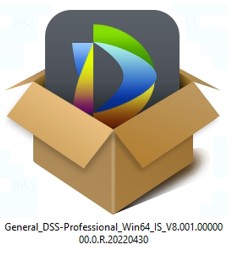
8. Double click to run the newer version of DSS Installation Package
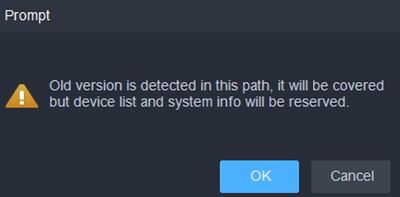
9. DSS Package will automatically detect the older version and overwrite the current directory. Click on [OK] to continue
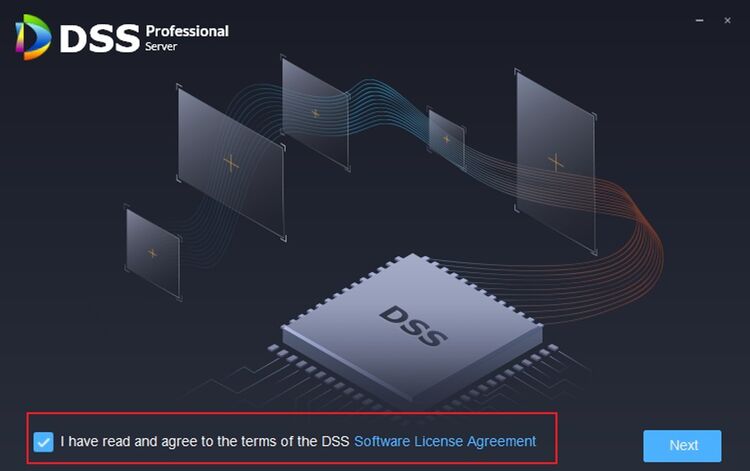
10. Select [Agree] and click on [Next]
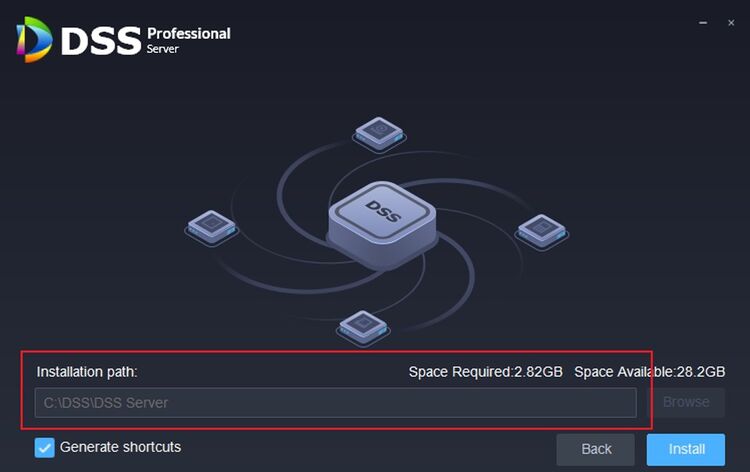
11. As you can see, you cannot manually change the installation path, because DSS Installation Package will automatically detect and overwrite the existing directory of DSS Server
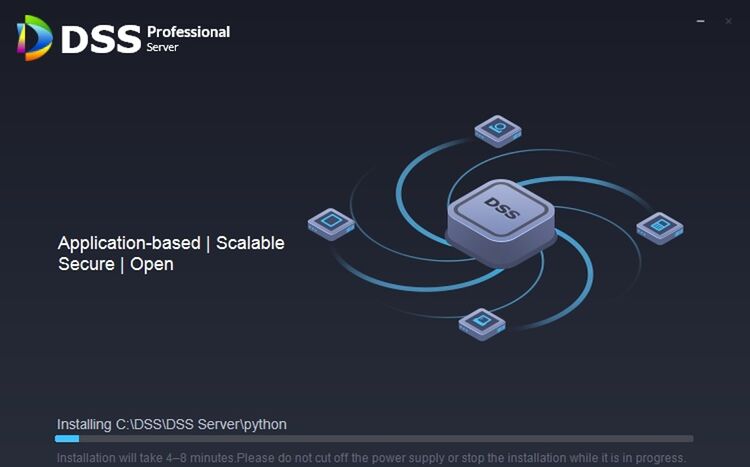
12. Click on Install and wait for the Upgrade to complete
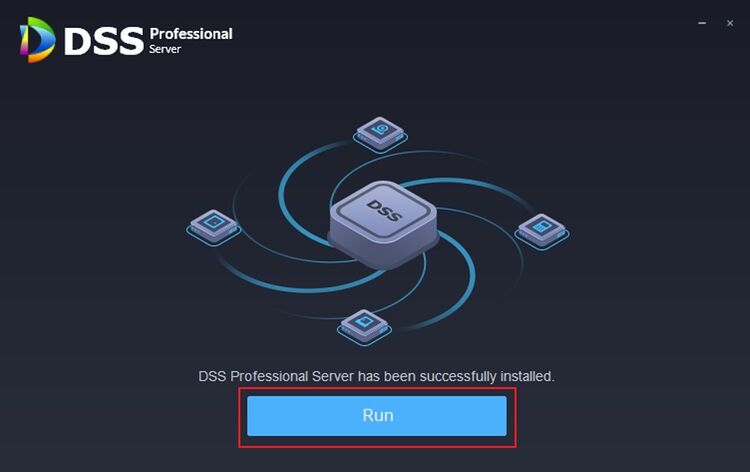
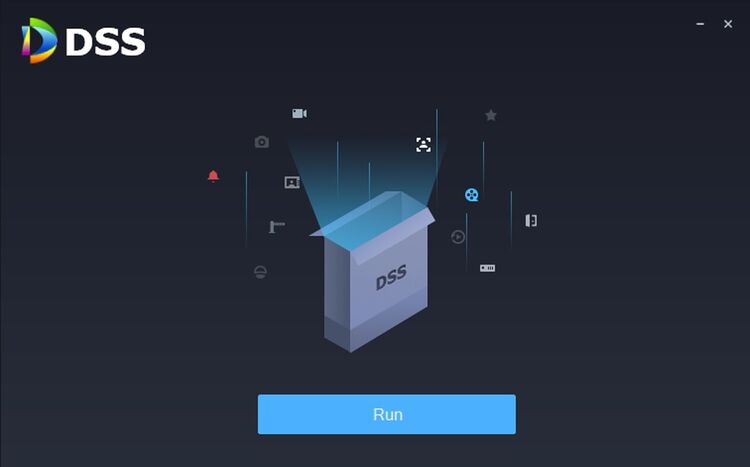
13. Click on [Run] and wait for DSS Services to restart
!Note: It may take some time for SMC Service to start, depending on the hardware of the Server
Part 3: Upgrade DSS Client
14. Run DSS Client as usual, and log in.
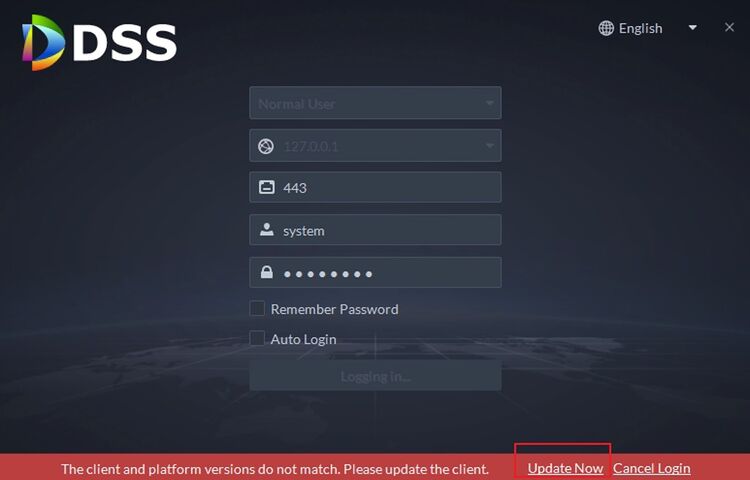
15. Then DSS Client will tell you to do an Update. Click on [Update Now]
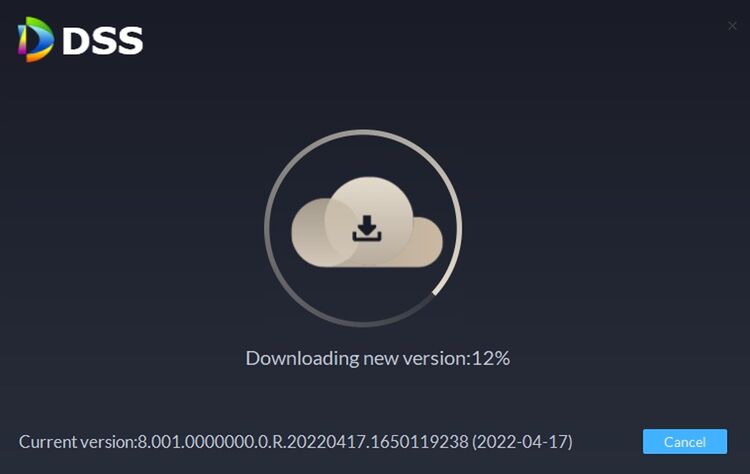
16. DSS Client will automatically download the newer package
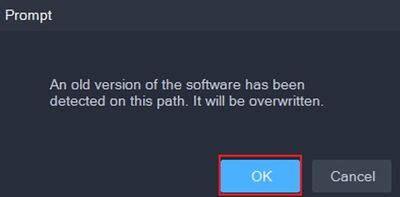
17. Then the upgrade will start. DSS Client Installation Package will detect the older version of DSS Client and overwrite it. Click on [OK] to continue
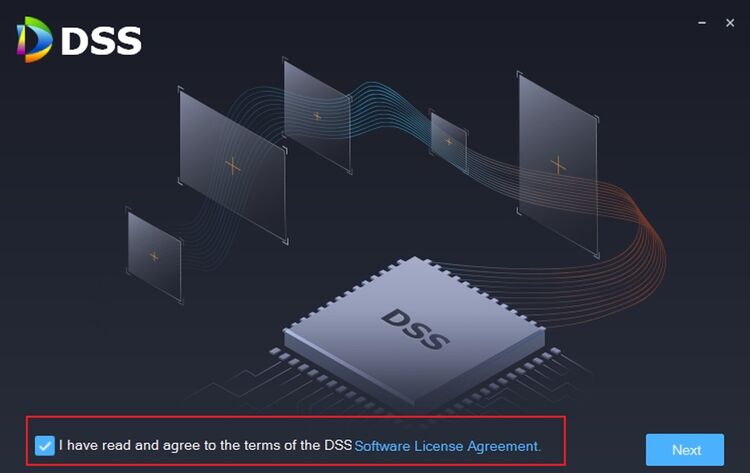
18. Select [Agree] and [Next]
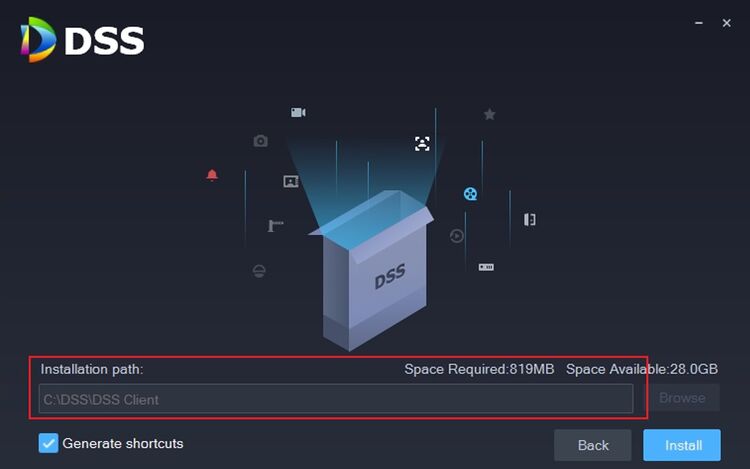
19. As you can see, DSS Client Installation Package detects the existing DSS Client Directory and is ready to overwrite it
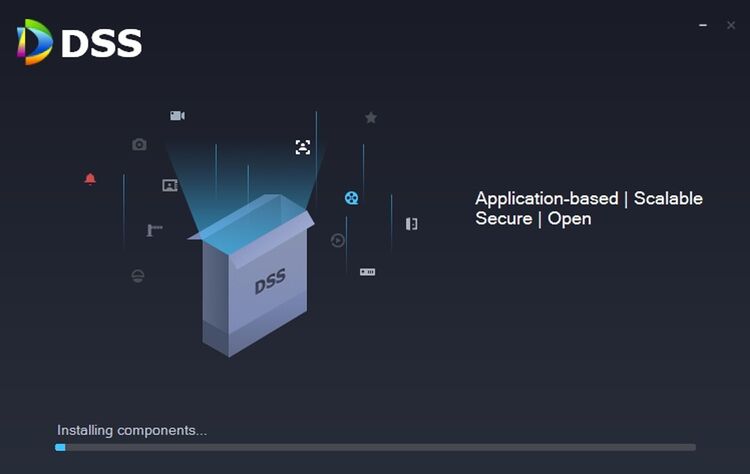
20. Click on [Install] and wait for the update to complete
21. In the end, click on run, log in and use DSS as usual.
22. You can go to [About] to check the current version of DSS
DSS/V8/DSS Express/Instruction/DSS Database Backup Restore
Cautions and Disclaimers
You can backup DSS Database before reinstalling DSS on another server. When the installation is complete, you can use the Database backup file to restore DSS configurations, which include Device information, Storage Plan, Event and User.
DSS Database Backup File can only be used for a DSS Installation Package of the same version.
For example, if you have backed up DSS Database from DSS V8.0.4, then this Database backup file can only be used on DSS V8.0.4. If you want to upgrade to DSS V8.1, you should install V8.0.4 first, restore DSS Database and then perform the upgrade to DSS V8.1.
Step by Step Instructions
Part 1: backup DSS Database
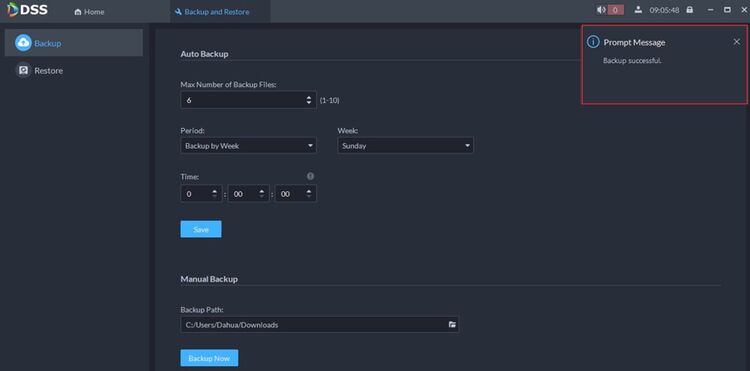
1. Log into DSS Client and select [Backup and Restore]
2. Click on the folder icon to select the directory where you want to save the Database backup file
3. Click on [Backup Now]
4. Insert DSS Log in Password and the password to encrypt DSS Database Backup File
5. Wait for DSS to complete the backup
6. There will be a prompt when backup is complete
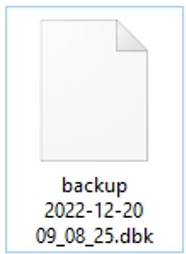
7. In the directory you have chosen, there will be a dbk file. Keep this file in a safe place.
Part 2: Restore DSS Database
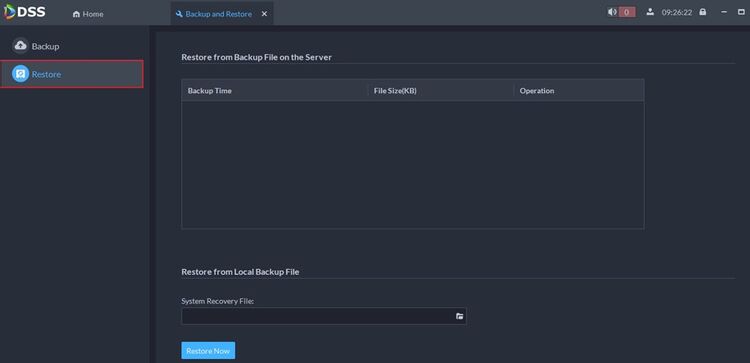
8. Log into DSS Client and select [Backup and Restore]
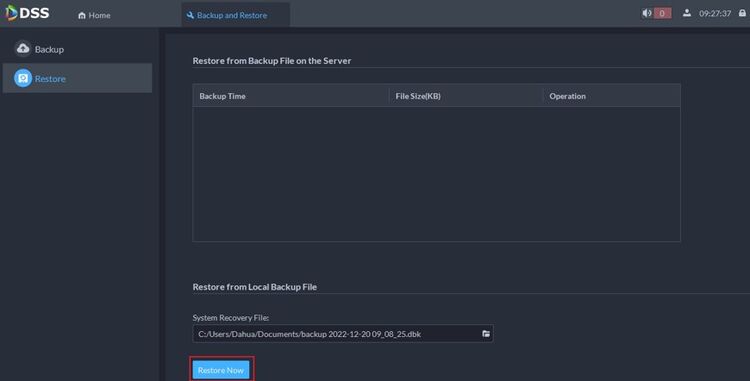
9. Select [Restore]
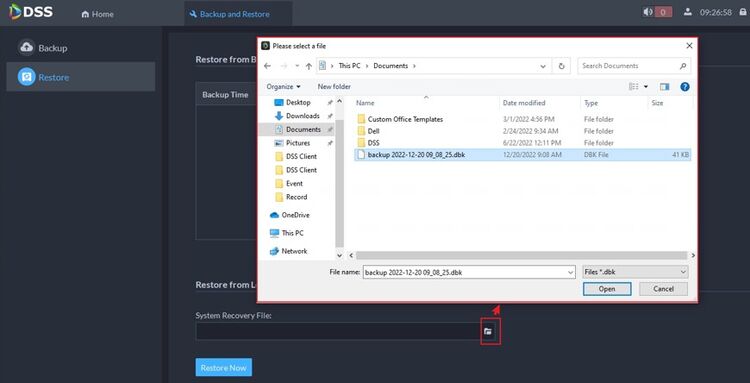
10. Click on the folder icon and select the Database Backup File that you want to use
11. Click on [Restore Now]
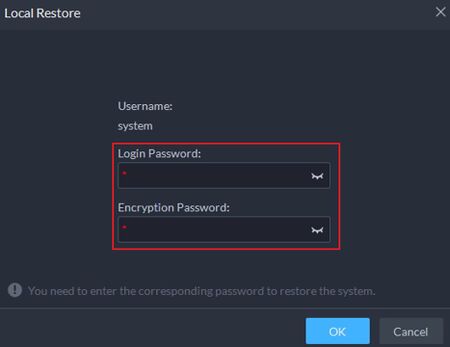
12. Insert DSS Login Password and the Encryption Password for the Database Backup File. Then click on [OK]
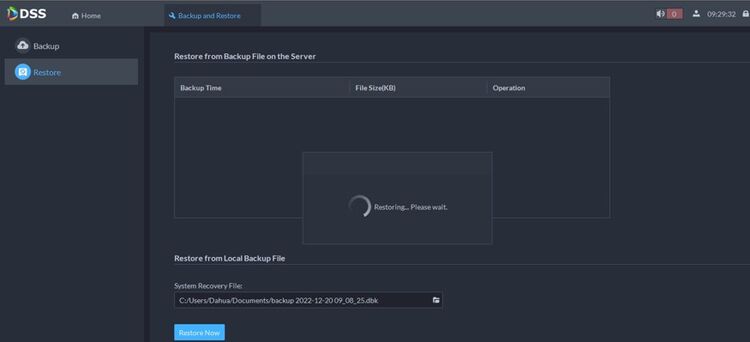
13. Wait for DSS to complete the restore
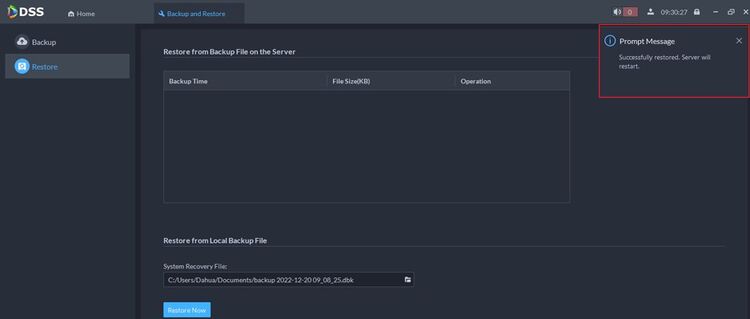
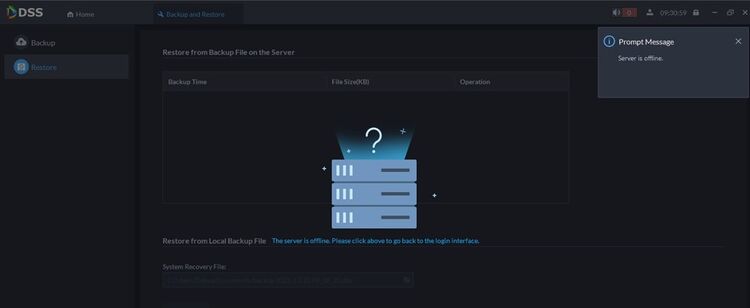
14. When the restore is complete, there will be a prompt saying that DSS will restart itself
15. Rest assured. DSS needs some time to restart itself
16. In DSS Service Management Center, you may notice that DSS is starting
17. When DSS starts to run as normal, the restore process is complete. Now your Database is restored.
