Dahua Config Tool Operating Instructions
Reset Dahua Device Password Using ConfigTool
Description
These instructions will show how to reset the password of a Dahua device using ConfigTool on a local computer
| PLEASE NOTE: These instructions can not be completed without assistance from Dahua Technical Support. Please contact Dahua Technical Support via one of the methods HERE |
Prerequisites
- Dahua IP camera, connected to network
- Local computer , with ConfigTool installed
Step by Step Instructions
1. Open ConfigTool
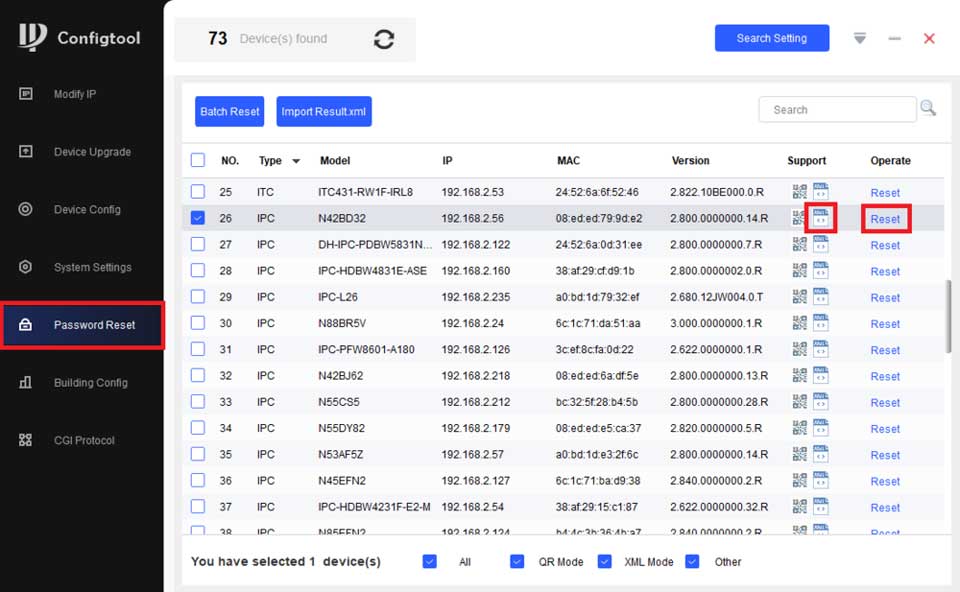
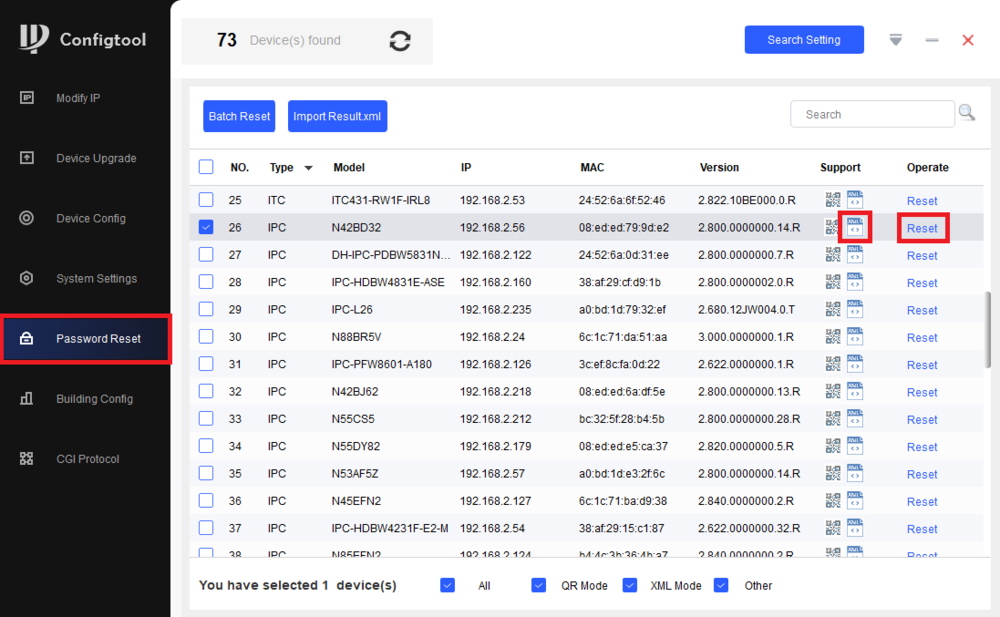
Select “Password Reset” on the left.
Find the device in the list, and verify it has the XML reset option under “Support”.
Click the Reset button on the right
| You can select Multiple cameras per export file. Please select all the IP Cameras then click on “Batch Reset” to make a single XML file. |
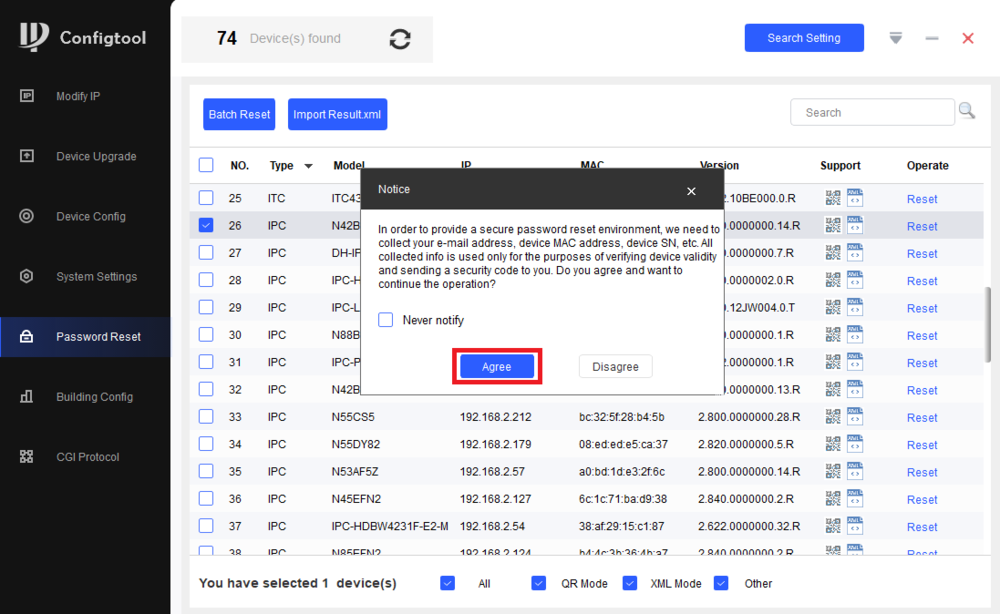
2. Click Agree
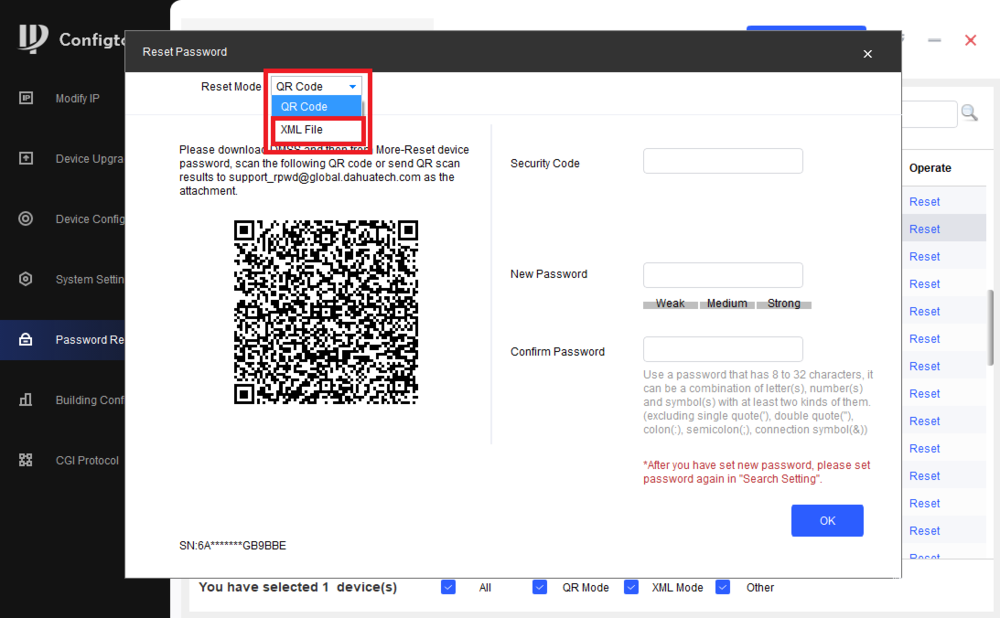
3. Select the Reset Mode drop-down and then select XML File
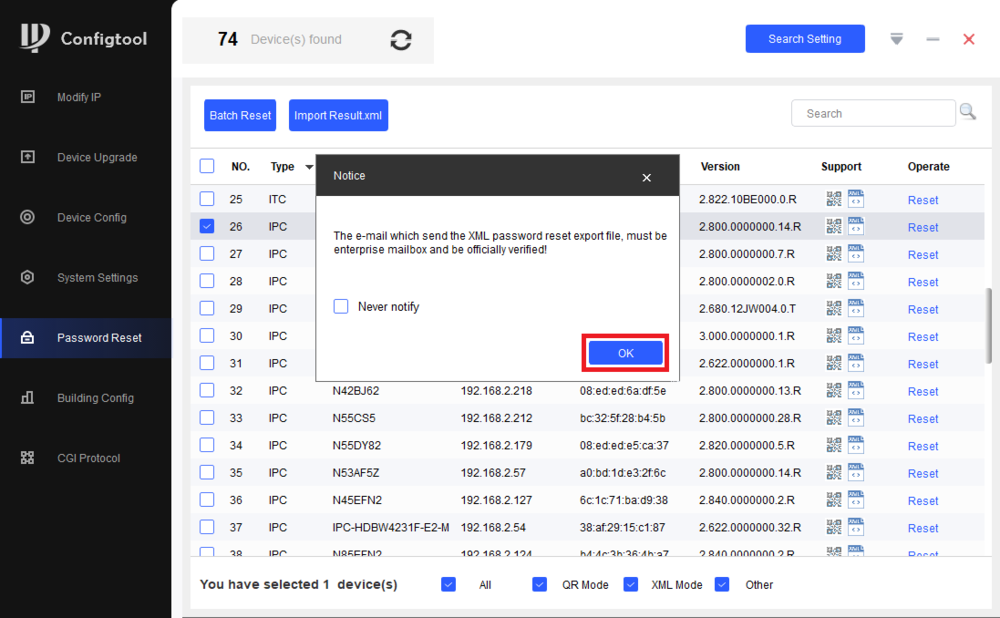
4. Click OK to confirm XML password reset method
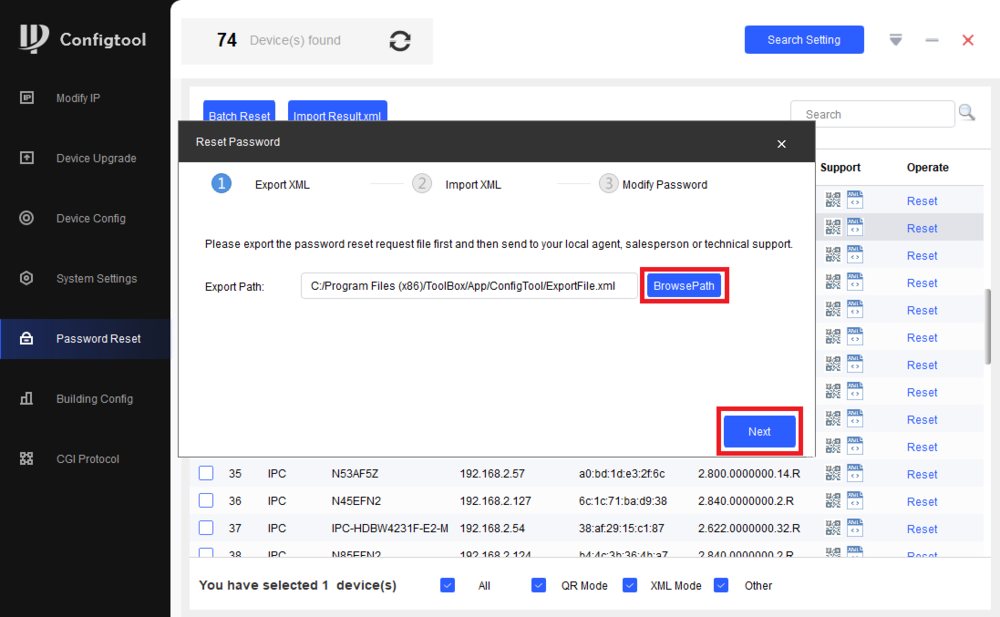
5. The default location the XML file will be saved to is displayed. Click Browse Path to select a new location. Click Next
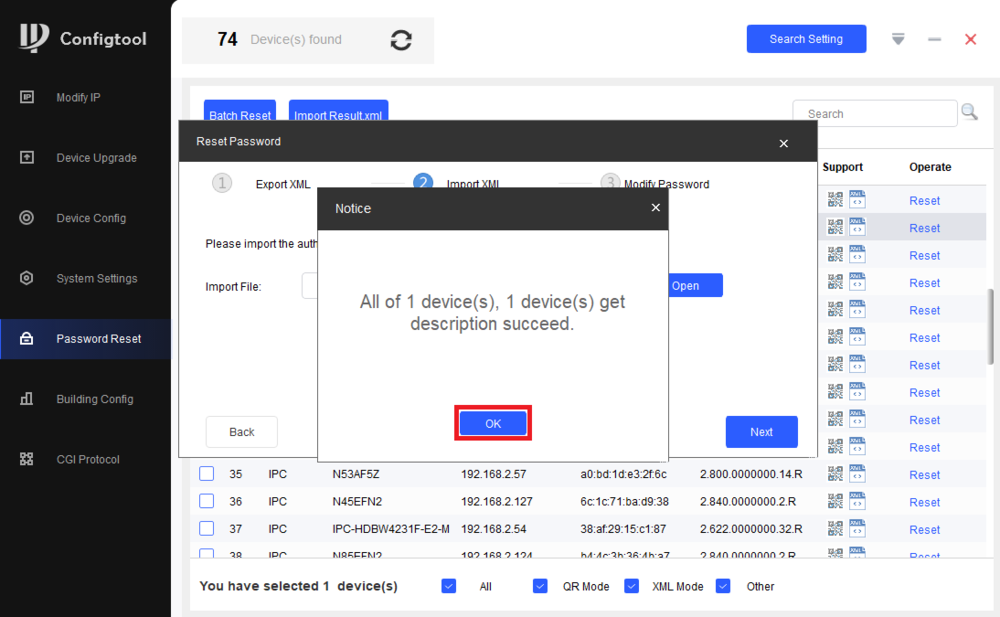
6. The ExportFile XML file will be created. Click OK to continue
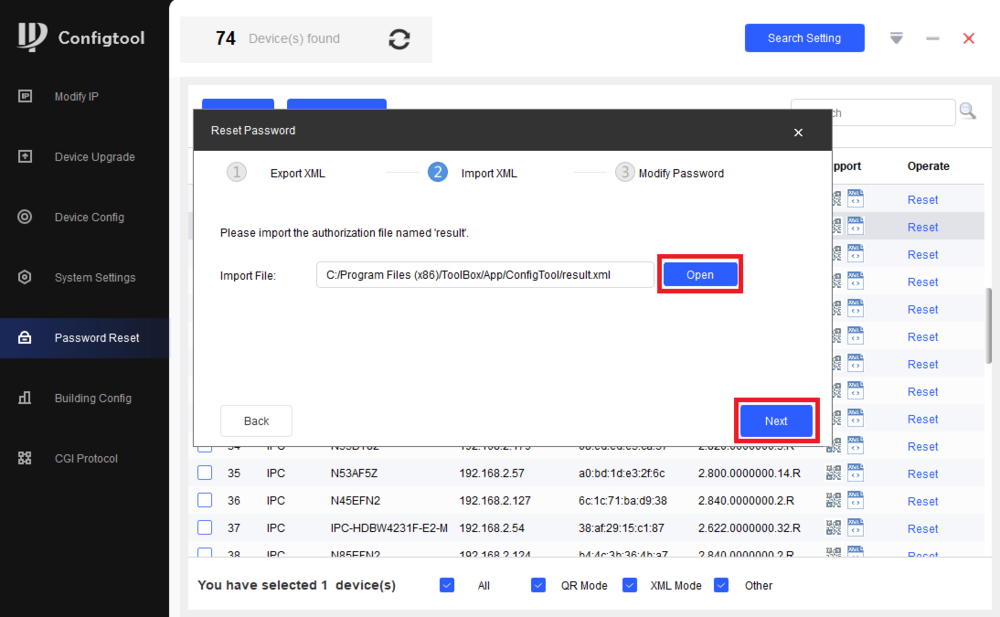
7. This file will be used in the password reset process. Contact Dahua technical support via one of the methods HERE for the result file. Once you recieve the Result file, select Open and choose the file on your file system. Click Next
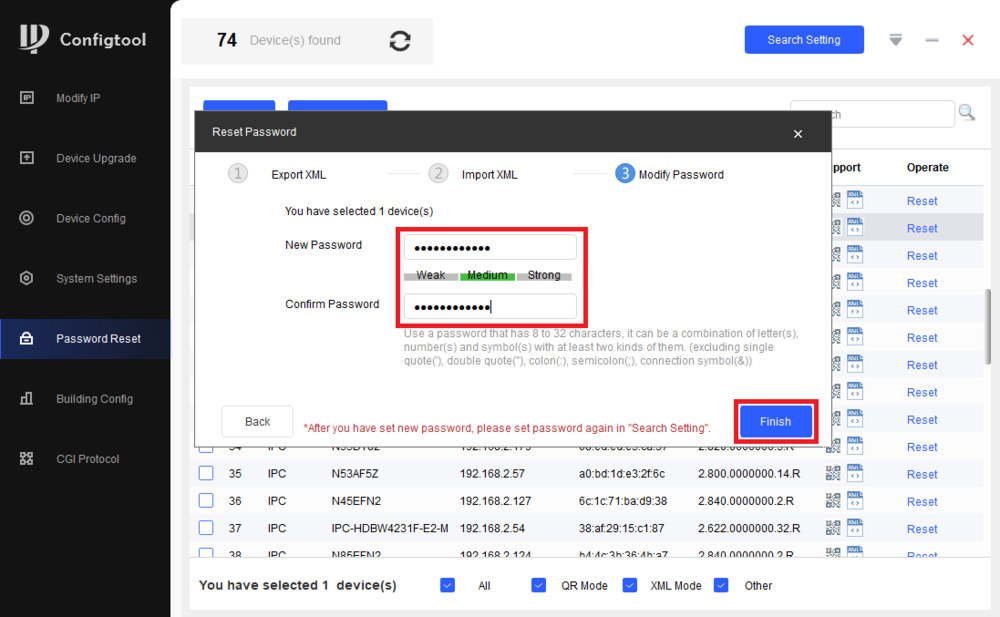
8. If the Result file is accepted, it will allow you to set the new password. Input a new password in the New Password and Confirm Password fields. Click Finish
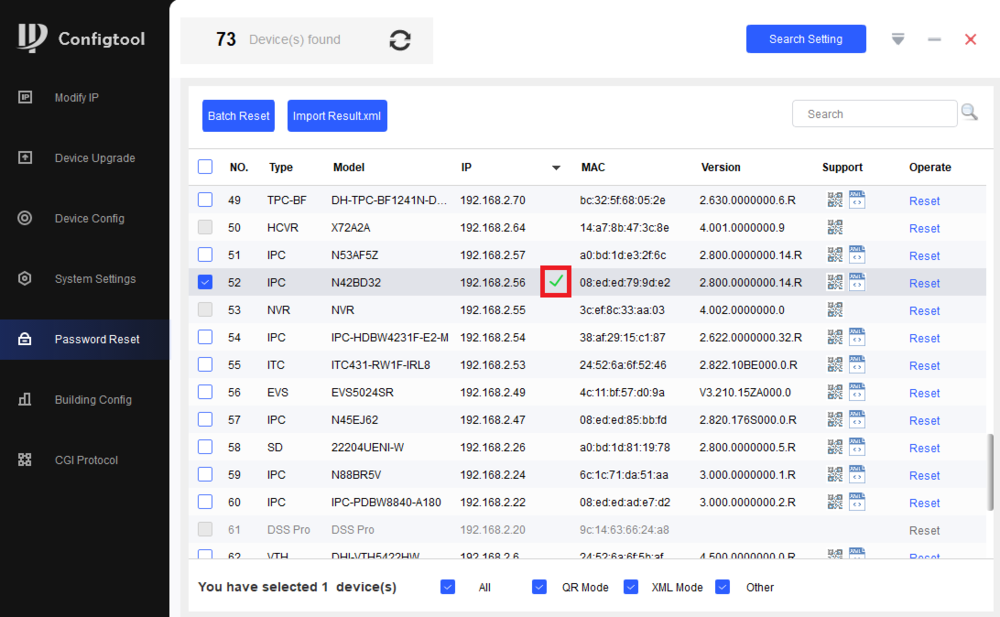
9. If the password is successfully reset, you will see a Green Check Mark next to the camera in the list
Read More :
Dahua Toolbox Dahua Config Tool Locate Dahua Device
Description
- How to locate and identify Dahua devices on LAN
- Note: If your IP Camera is connected to the back of an NVR, these instructions will not apply. Please see, “How to Connect IP Camera to NVR“
Prerequisites
 Dahua Toolbox installed
- Windows PC.
- Dahua Devices on the same LAN as the PC for using the ConfigTool.
Video Instructions
Step by Step Instructions
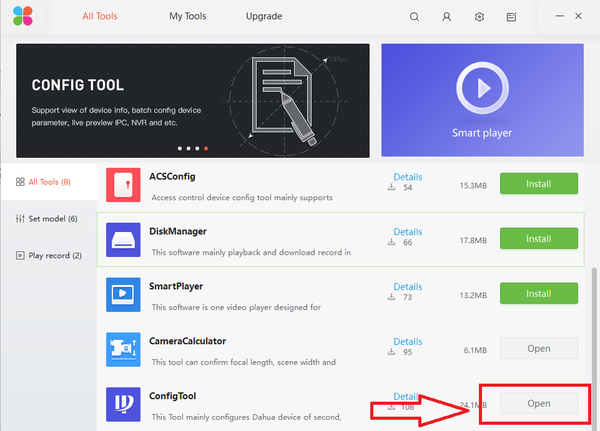
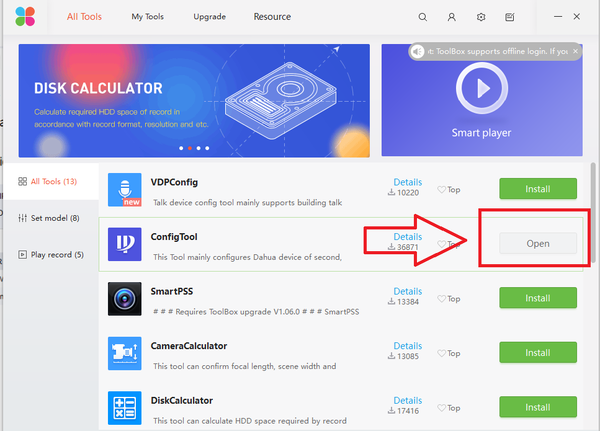
1. With the Dahua Tool box being already installed onto your PC, from the Toolbox home menu select install/open “ConfigTool”.
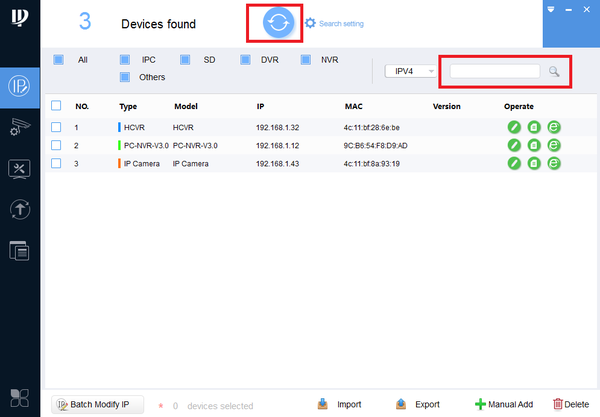
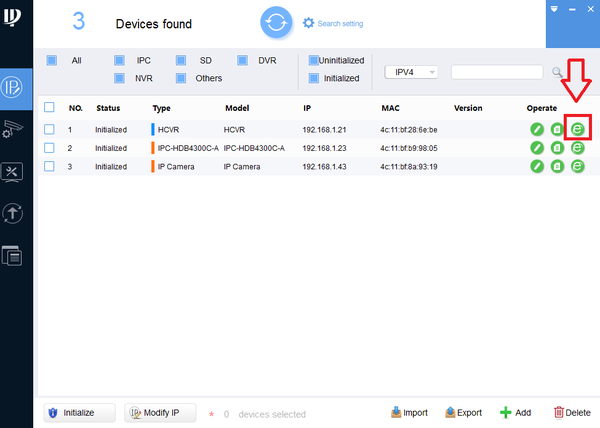
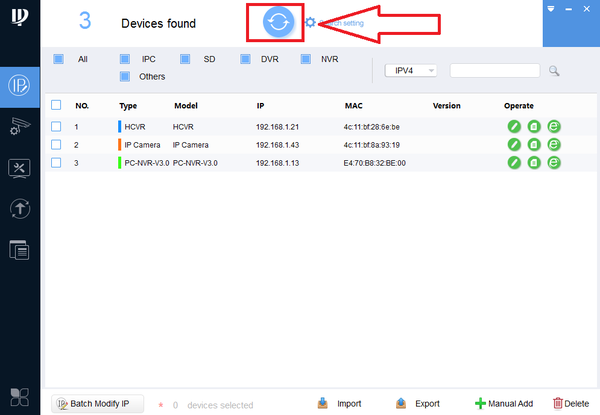
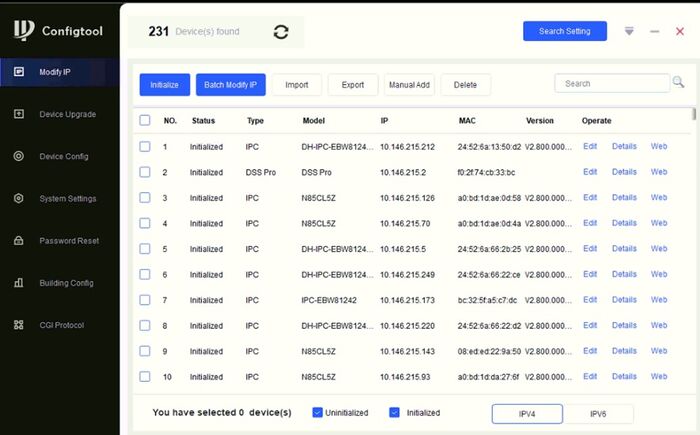
2. Upon opening the ConfigTool application, here you can see Dahua Devices on the same LAN are located. Refresh if Dahua devices are not located. You can also manually locate the device by typing in the IP address of the device in the search.
3. To view the device live click on the IE (Internet Explorer) icon.
- This will open an IE web browser to access the web service of the device.
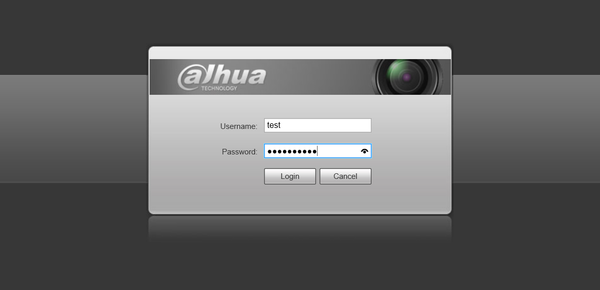
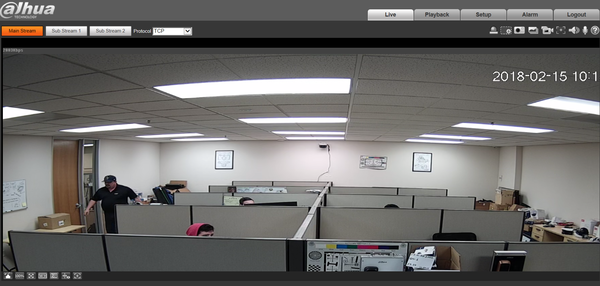
- From this step, by logging in you can select live view.
Update firmware using the ConfigTool via Dahua ToolBox
Description
- Update firmware of Dahua Device using the ConfiTool via Dahua Toolbox.
- Note: If your IP Camera is connected to the back of an NVR, these instructions will not apply. Please see, “How to Connect IP Camera to NVR“
Prerequisites
 Dahua Toolbox installed
- Windows PC.
- Dahua Devices on the same LAN as the PC for using the ConfigTool.
Step by Step Instructions
1. From the Dahua ToolBox, open the ConfigTool.
2. Upon opening the ConfigTool application, here you can see Dahua Devices on the same LAN are located. Refresh if Dahua devices are not located. You can also manually locate the device by typing in the IP address of the device in the search.
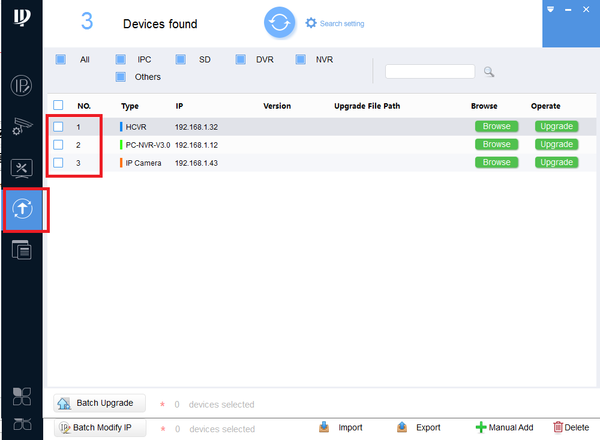
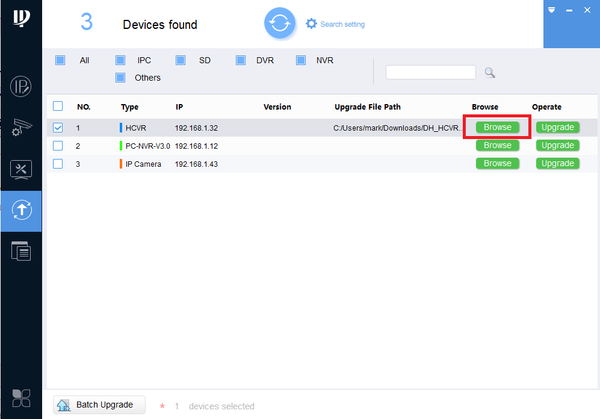
3. Click on the upgrade icon. Here you will see a list of located Dahua devices.
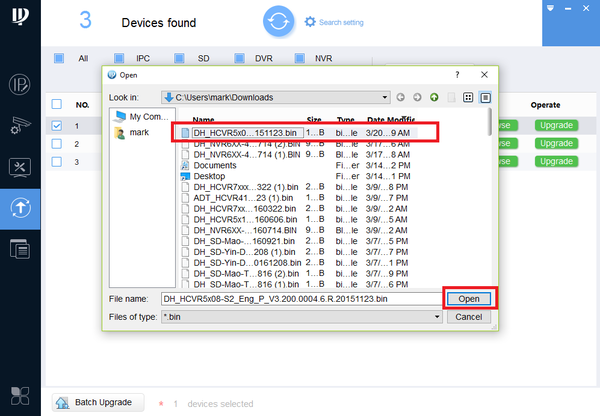
- With the appropriate firmware for the device model already downloaded, click on browse and locate the upgrade BIN file.
- Once BIN file is located click on Open.
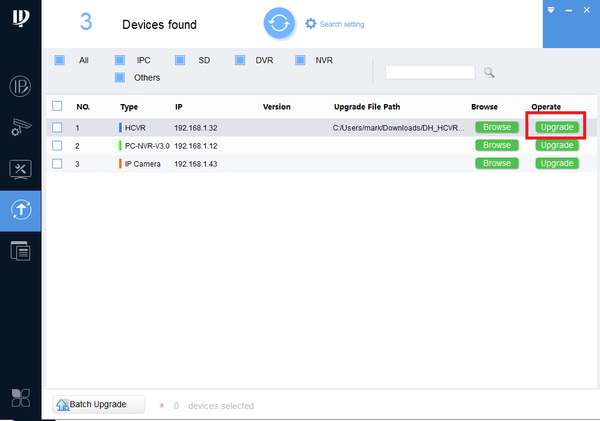
- Click on upgrade. Once firmware is upgraded, the device should reboot and be ready to go.
Modify IP address of Dahua Device through ConfigTool via Dahua ToolBox
Description
- Modify IP address of Dahua Device if user name and password are factory default.
- Modify IP address of Dahua Device if user name and password are modified.
- Note: If your IP Camera is connected to the back of an NVR, these instructions will not apply. Please see, “How to Connect IP Camera to NVR“
Prerequisites
Step by Step Instructions
1. Launch the Dahua ToolBox and open the ConfigTool.
- Upon opening the ConfigTool application, here you can see Dahua Devices on the same LAN are located. Refresh if Dahua devices are not located. You can also manually locate the device by typing in the IP address of the device in the search.
2. To modify IP address of selected device, select the edit button.
- Note: this step pertains if Dahua Devices are using factory default user names and passwords.
- Select DHCP or for static change the IP address according to the LAN configuration -> Select “OK” to save changes.
- Refresh to verify modified IP address.
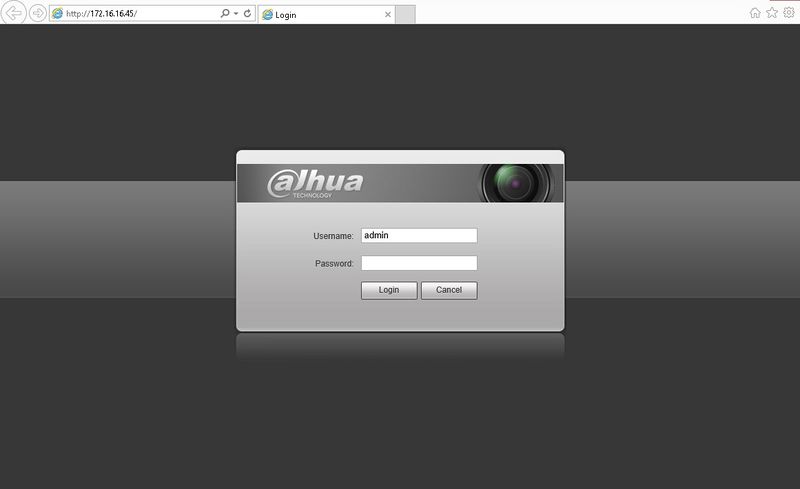
3. To modify IP of device with modified user names and passwords, click on the IE (Internet Explorer) icon of the selected device. This will open the web service of the device through IE.
- Log in with associated user name and password.
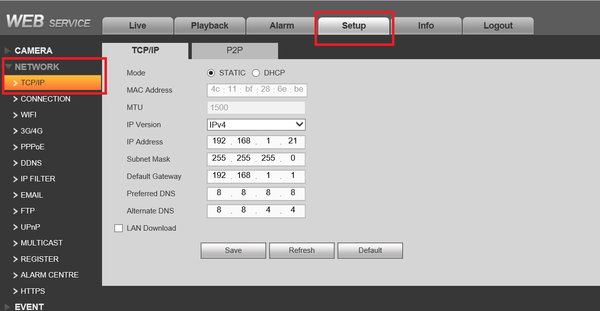
- Select the setup tab -> Select TCP/IP
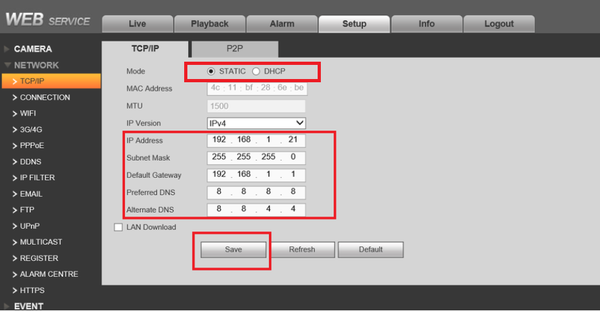
- Select DHCP or Static to modify IP along with associated LAN configuration -> Select Save.
Dahua ConfigTool Version 4.05 Locate Dahua Device
Description
- How to locate and identify Dahua devices on LAN
- Note: If your IP Camera is connected to the back of an NVR, these instructions will not apply. Please see, “How to Connect IP Camera to NVR“
Prerequisites
- ConfigTool Version 4.05
- ConfigTool Downloads
- Windows PC.
- Dahua Devices on the same LAN as the PC for using the ConfigTool.
Video Instructions
Step by Step Instructions
1. Install ConfigTool, Run and Open.
2. Upon opening the ConfigTool application, here you can see Dahua Devices on the same LAN are located. Refresh if Dahua devices are not located. You can also manually locate the device by typing in the IP address of the device in the search.
3. To view the device live click on the IE (Internet Explorer) icon.
- This will open an IE web browser to access the web service of the device.
- From this step, by logging in you can select live view.
How to locate device on LAN via ConfigTool 3.20
Description
- How to locate and identify Dahua devices on LAN
- Note: If your IP Camera is connected to the back of an NVR, these instructions will not apply. Please see, “How to Connect IP Camera to NVR“
Prerequisites
- ConfigTool 3.20
ConfigTool download - Windows PC.
- Dahua Devices on the same LAN as the PC for using the ConfigTool.
Video Instructions
Step by Step Instructions
Note: If your IP Camera is connected to the back of an NVR, these instructions will not apply. Please see, “How to Connect IP Camera to NVR” 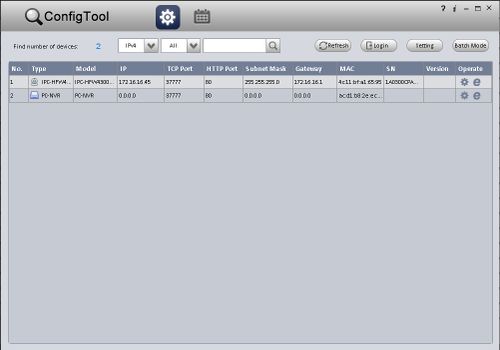
1. Download and install ConfigTool.
2. Run the ConfigTool.
3. The ConfigTool should display your IP Camera’s IP address. Click the, “![]() ” icon to open Internet Explorer and access your IP Camera. Alternatively, you can input that IP address into your browser manually.
” icon to open Internet Explorer and access your IP Camera. Alternatively, you can input that IP address into your browser manually.
4. Login with the default credentials: User Name: admin Passsword: admin
Modify IP address of Dahua Device via ConfigTool 4.05
Description
- Modify IP address of Dahua Device if user name and password are factory default.
- Modify IP address of Dahua Device if user name and password are modified.
- Note: If your IP Camera is connected to the back of an NVR, these instructions will not apply. Please see, “How to Connect IP Camera to NVR“
Prerequisites
- ConfigTool Version 4.05
- ConfigTool Downloads
- Dahua Devices on the same LAN as the PC for using the ConfigTool.
- Windows PC.
Step by Step Instructions
1. Upon opening the ConfigTool application, here you can see Dahua Devices on the same LAN are located. Refresh if Dahua devices are not located. You can also manually locate the device by typing in the IP address of the device in the search.
2. To modify IP address of selected device, select the edit button
- Note: this step pertains if Dahua Devices are using factory default user names and passwords.
- Select DHCP or for static change the IP address according to the LAN configuration -> Select “OK” to save changes.
- Refresh to verify modified IP address.
3. To modify IP of device with modified user names and passwords, click on the IE (Internet Explorer) icon of the selected device. This will open the web service of the device through IE.
- Log in with associated user name and password.
- Select the setup tab -> Select TCP/IP
- Select DHCP or Static to modify IP along with associated LAN configuration -> Select Save.
Firmware Upgrade via ConfigTool
Description
This page will show you how to upgrade the firmware of your Dahua device via ConfigTool
Note: All devices should be “Factory Reset” once the firmware update is complete.
Prerequisites
- Dahua device(s) with network connection(s)
- ConfigTool installed on a local computer
- Firmware file for device(s) downloaded to computer – Firmware by Device
Step by Step Instructions
Single Device Upgrade
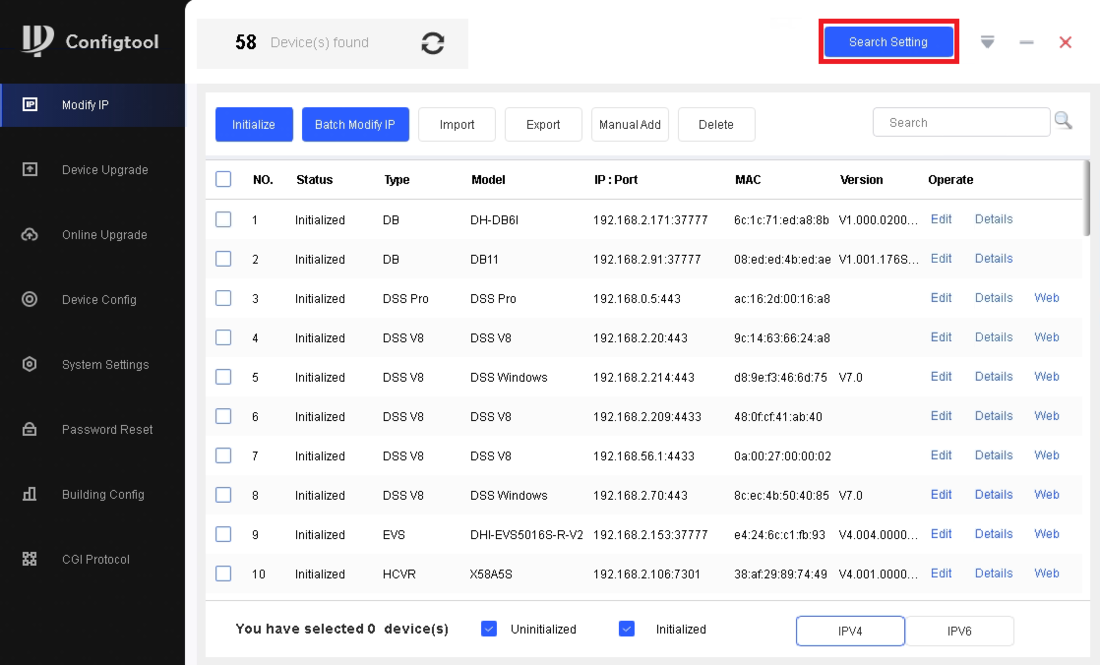
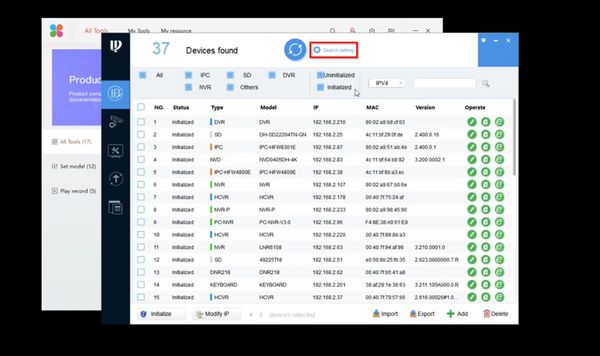
1. Open ConfigTool and click on Search Setting at the top
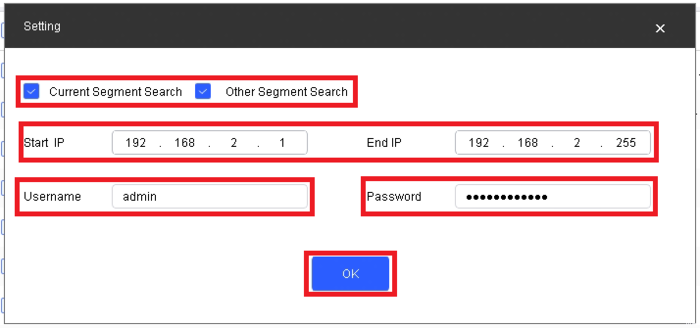
2. Check the boxes for both Current Segment Search and Other Segment Search.
Enter the IP range for the device you are looking for in Start IP and End IP.
Enter the login information for that device in Username and Password.
Then click OK at the bottom
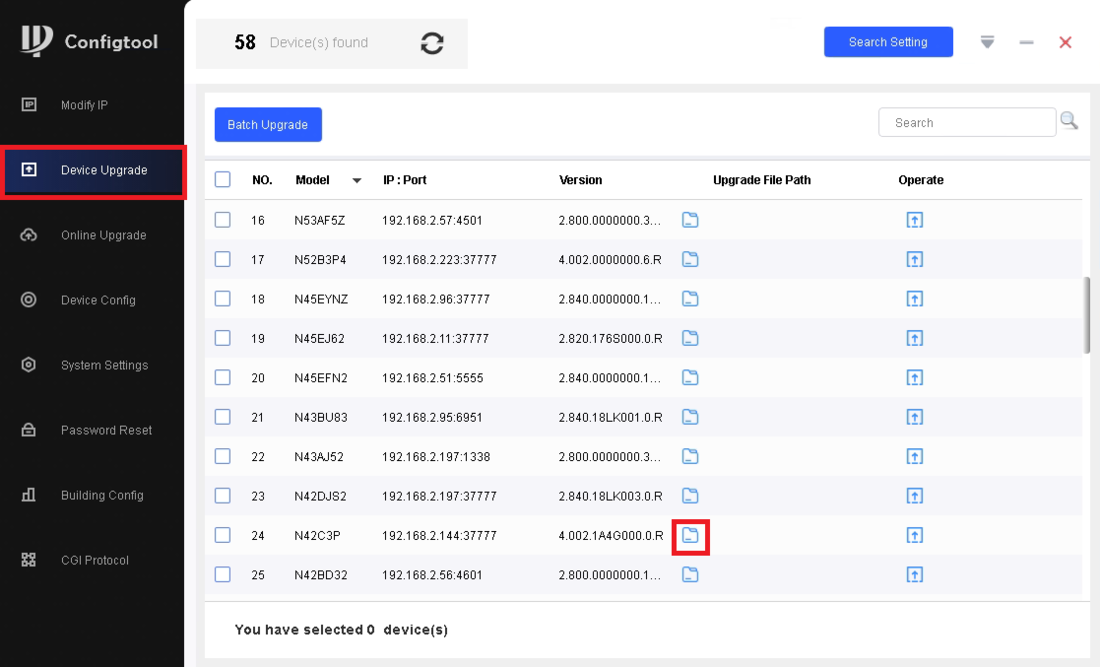
3. Click on Device Upgrade on the left.
Find the device you want to upgrade in the list and click on the Folder icon next to it under the Upgrade File Path column
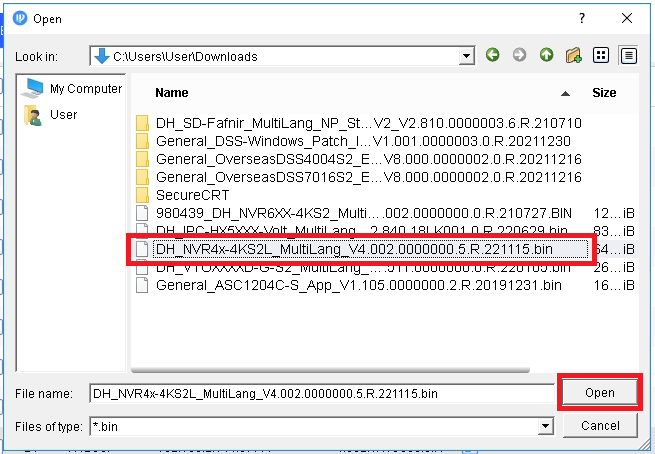
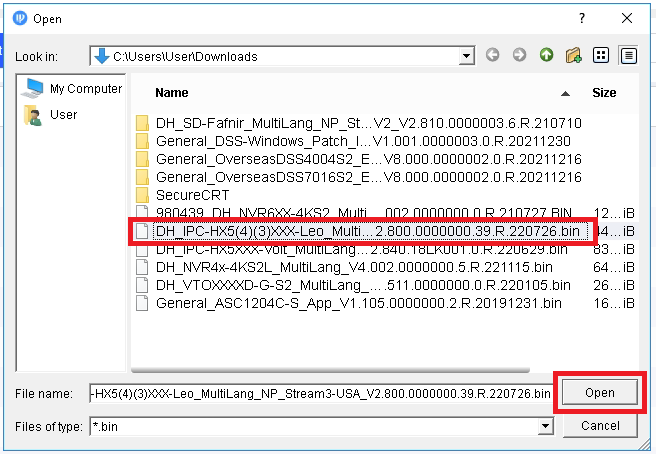
4. Use the file explorer to find the firmware file on your computer and select it.
Then click on Open
5. Verify the file path is listed next to the device in the list.
Then click on the Upgrade icon to the right of the device in the Operate column
6. Click on OK
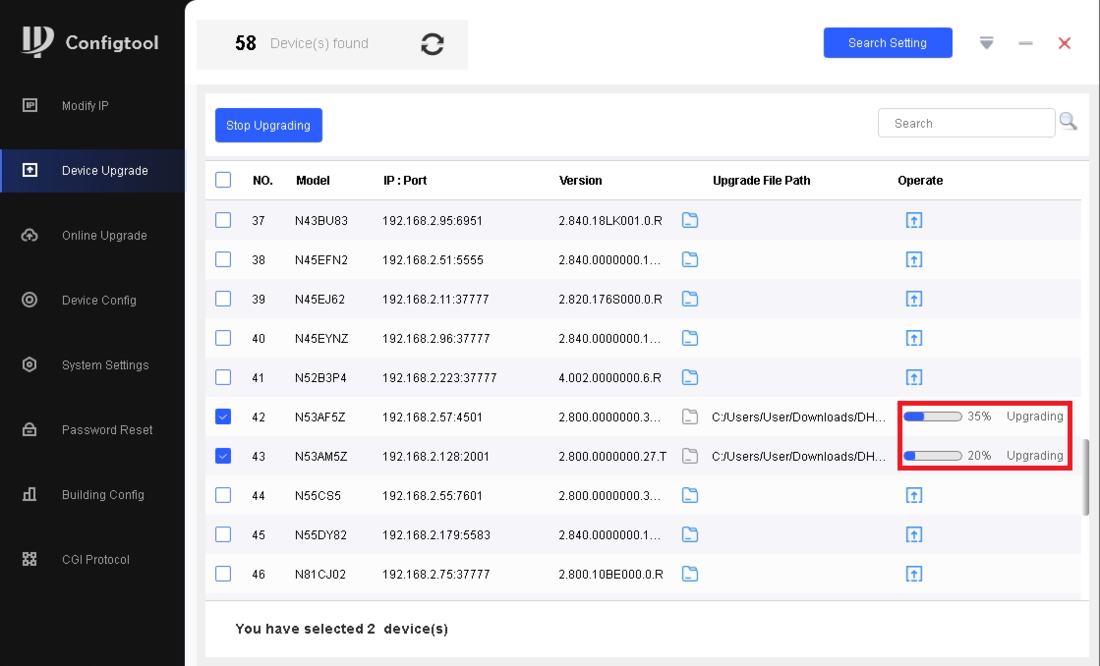
7. The progress bar will fill up as the device is upgraded
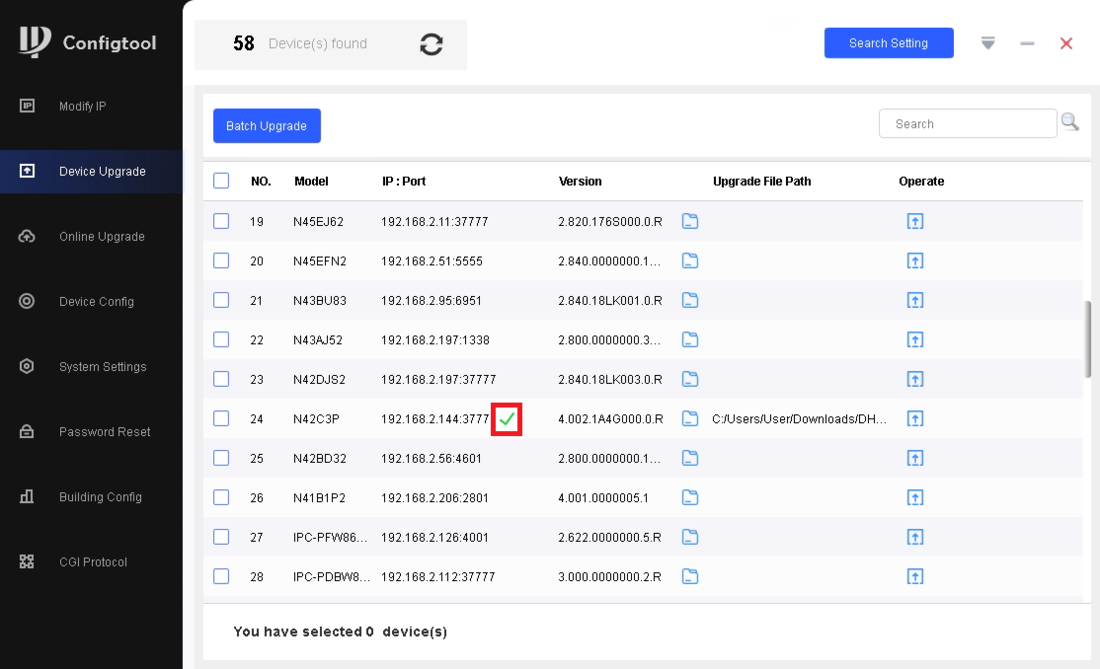
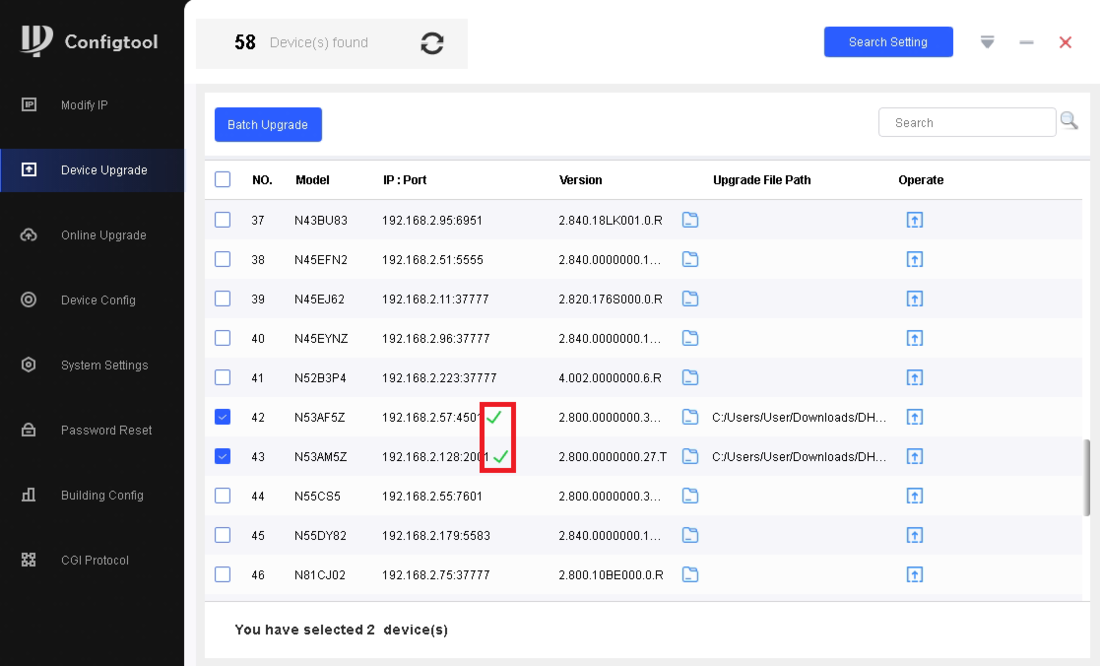
8. Once the device has been successfully upgraded you will see a Green Check Mark next to it in the list
Batch Device Upgrade
1. Open ConfigTool and click on Search Setting at the top
2. Check the boxes for both Current Segment Search and Other Segment Search.
Enter the IP range for the devices you are looking for in Start IP and End IP.
Enter the login information for those devices in Username and Password.
Then click OK at the bottom
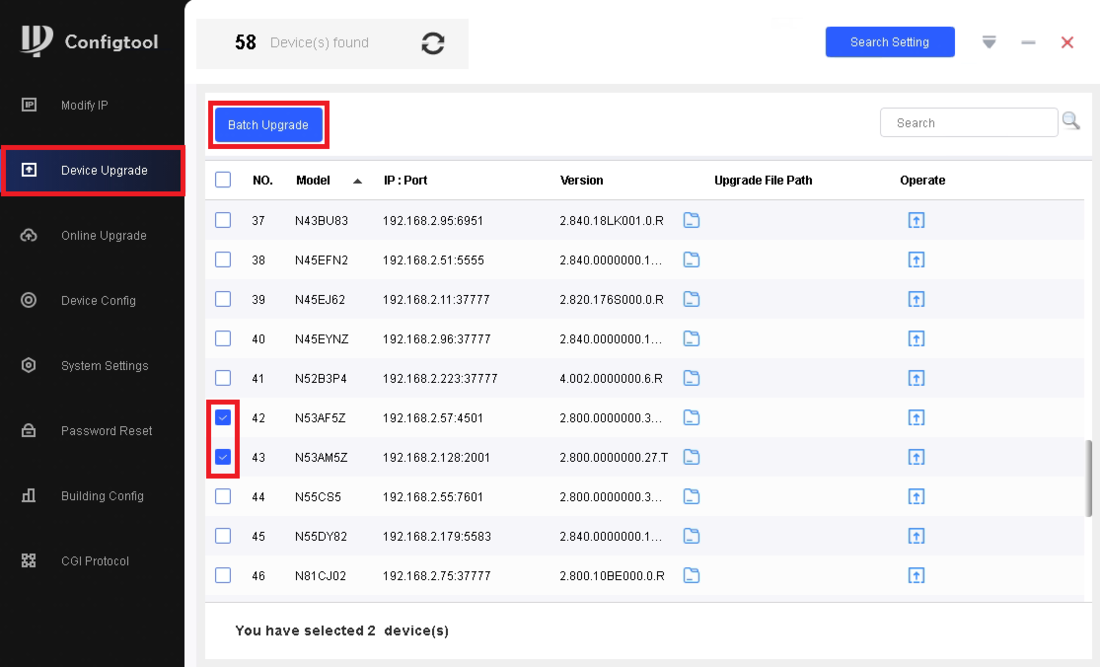
3. Click on Device Upgrade on the left.
Find the devices you want to upgrade in the list and check the boxes next to them. (Make sure all devices you check require the same firmware.)
Then click on Batch Upgrade at the top
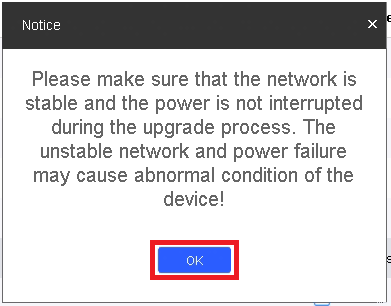
4. Click on OK
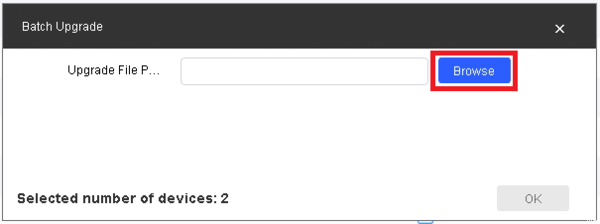
5. Click on Browse
6. Use the file explorer to find the firmware file on your computer and select it.
Then click on Open
7. Click OK at the bottom
8. The progress bars will fill up as the devices are upgraded
9. Once the devices have been successfully upgraded you will see Green Check Marks next to them in the list
ConfigTool Template Setup
Description
You can create and apply the templates.
- Creating the template: Back up or save the video and encoding parameters for the device.
- Applying the template: Restore or batch configuring the video and encoding parameters for the device.
Please Note:
These instructions do not copy the network settings or email notifications.
Template Import/Export will work only between identical model devices
Prerequisites
For this example we will be using the following:
- 2x N41BK22s on DH_IPC-HX2X3X-Rhea_MultiLang_NP_Stream2_V2.800.0000008.0.R.190619
- ConfigTool Version V4.011.00GP001.0 from the Dahua ToolBox
Notes:
- N41BK22s on Firmware Version: 2.622.0000000.31.R Build Date: 2018-08-13 -DID NOT WORK, UPDATING BOTH IPCs to latest current fw and trying again
Template Examples
Video Instructions
Export Device Config
Import Device Config
Step by Step Instructions
Export Device Config
1. Launch Toolbox, and login.
2. Download and install ConfigTool.
3. Launch ConfigTool.
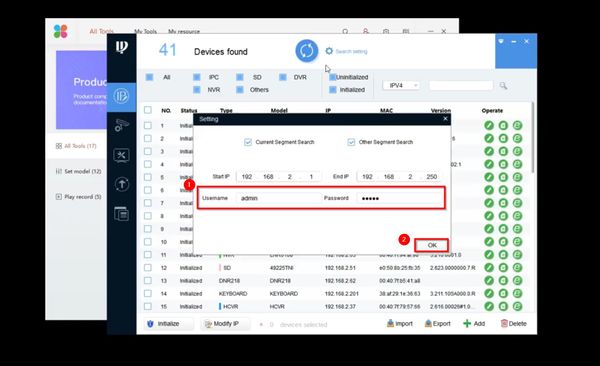
4. Click Search Setting at the top of the window
5. Enter the credentials (username and password) for the device, then click OK
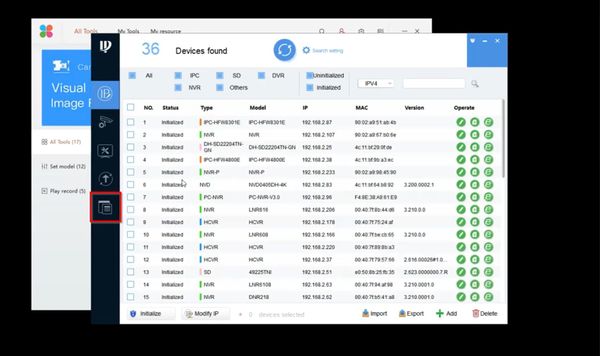
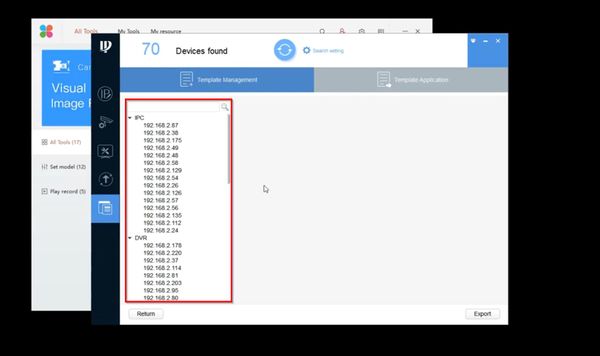
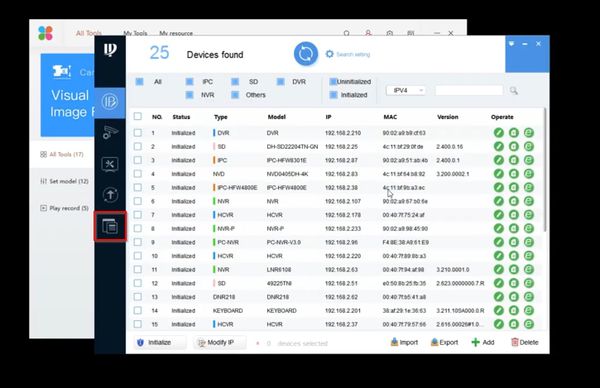
6. Click on the icon at the bottom of the bar on the left hand side of ConfigTool.
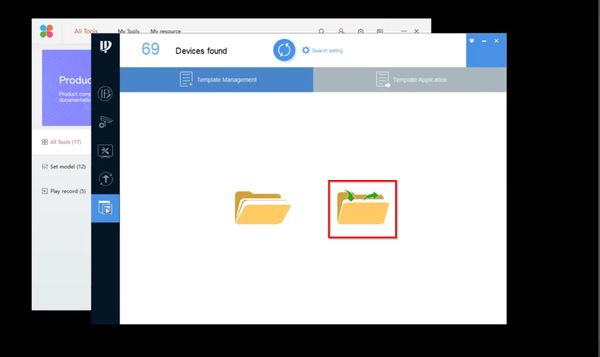
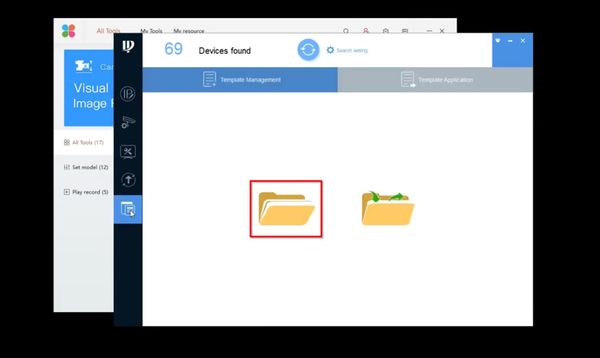
7. Click on the Folder icon with the two green arrows.
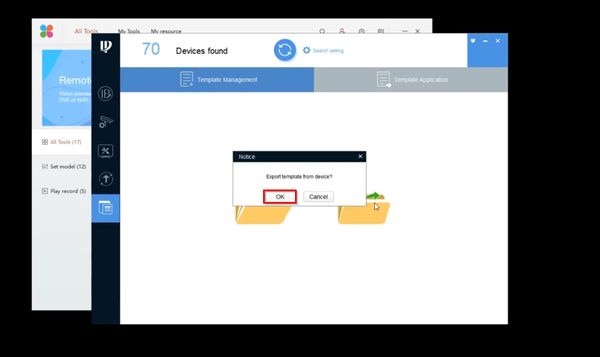
8. A prompt will pop up asking, “Export template from device?” click, “OK”
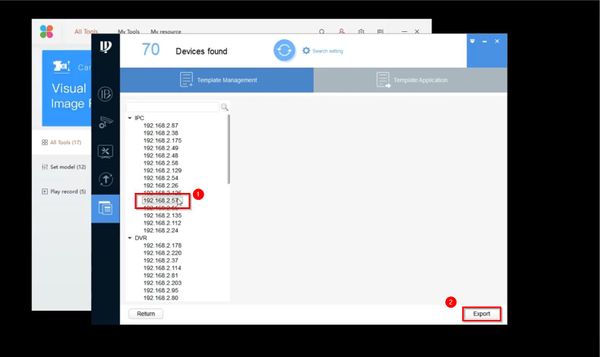
9. Locate the device you want to export the configuration of in the device list, and left click on it.
10. Click, “Export”
11. A prompt will pop up asking, “Export template from (IP Address of Device Selected), continue? Click, “OK”
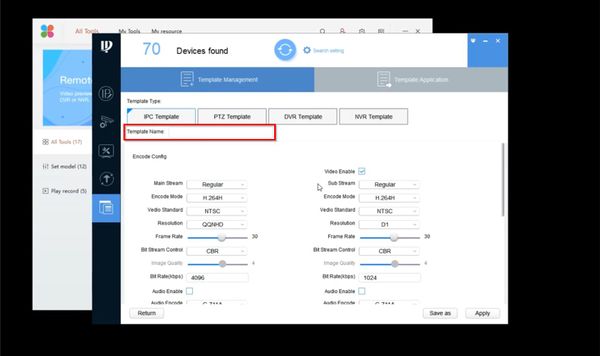
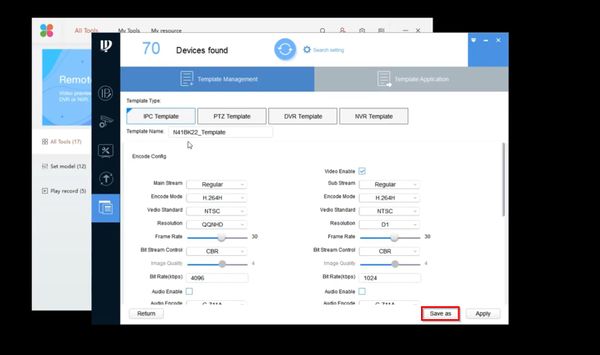
12. Input a name into “Template Name”
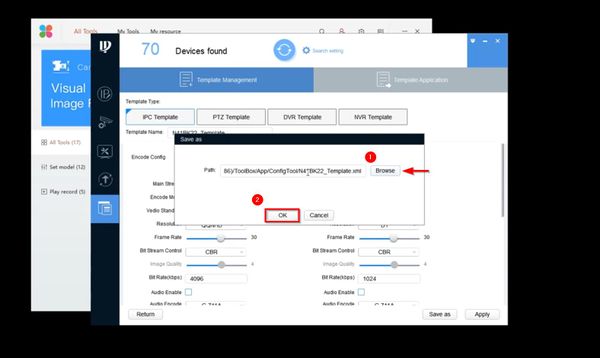
13. Click, “Save as”
At this point ConfigTool crashed. I relaunched ConfigTool, and get, “Export Template Failed”
14. A prompt will pop up asking where you would like to save the file. Select where you would like to save the file, and click, “OK”
Import Device Config
1. Launch Toolbox, and login.
2. Download and install ConfigTool.
3. Launch ConfigTool.
4. Click Search Setting at the top of the window
5. Enter the credentials (username and password) for the device, then click OK
6. Click on the icon at the bottom of the bar on the left hand side of ConfigTool.
7. Click on the Folder icon without the two green arrows.
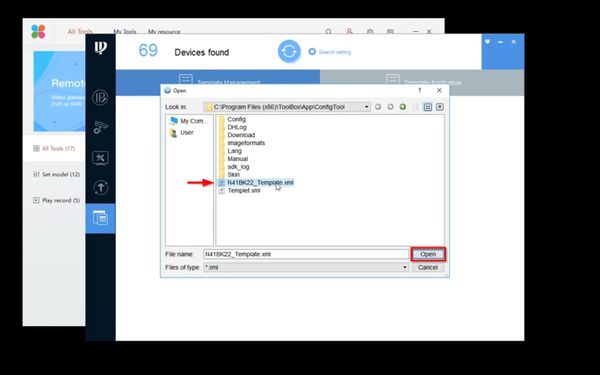
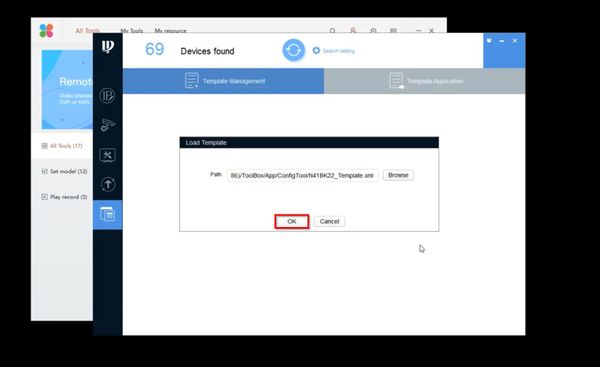
8. A window will pop up, click, “Browse” and locate the Device Template file you backed up in the previous instructions.
9. Click on the Device Template file, then click, “Open”
10. Click, “OK”
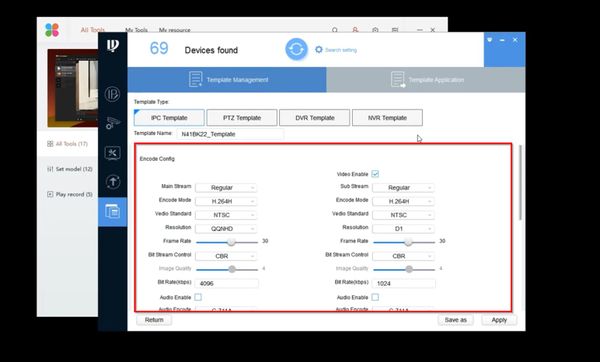
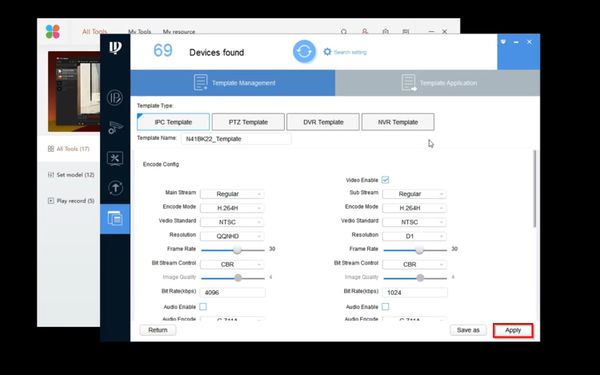
11. The template settings should load and display in ConfigTool. Verify that all the settings are correct.
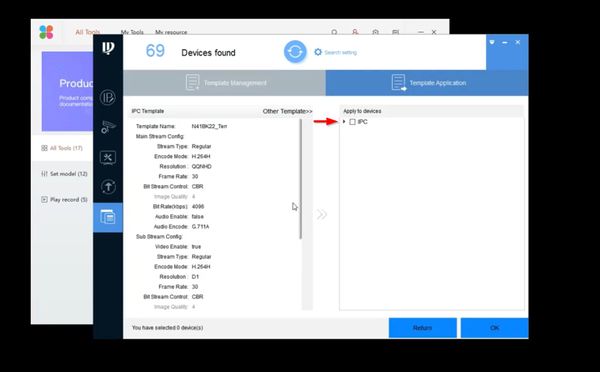
12. Click, “Template Application”
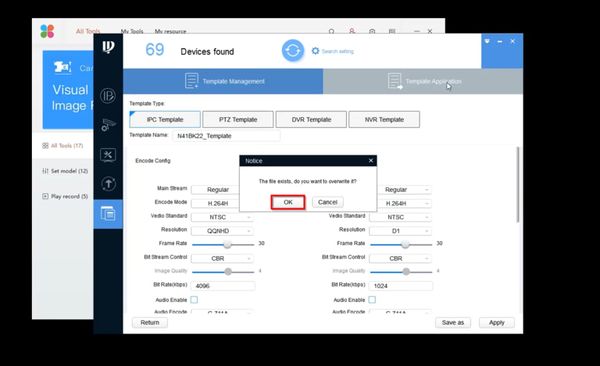
13. A window will pop up stating, “The file exists, do you want to overwrite it?” select, “OK”
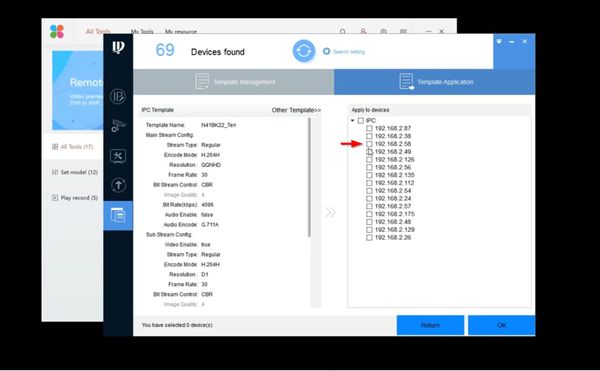
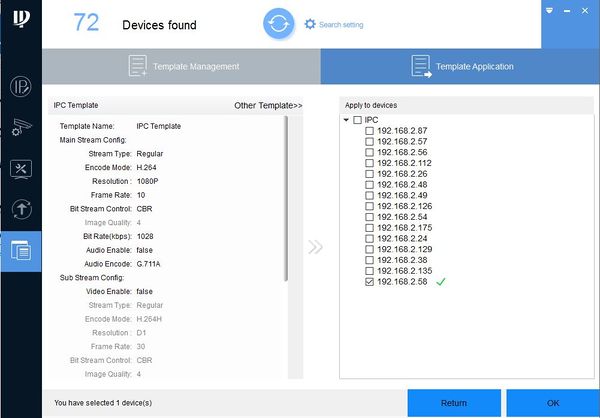
14. Expand the dropdown box on the right hand side to list all the devices.
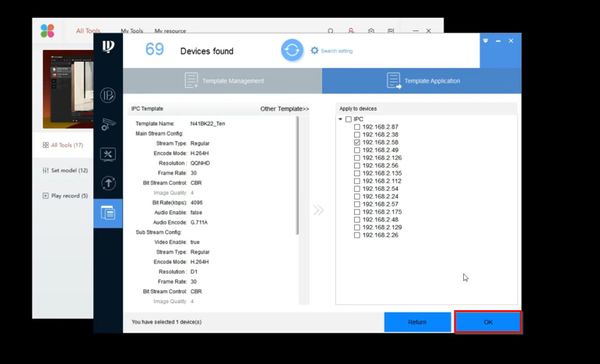
15. Check the box next to the device you wish to apply the template.
16. Click, “OK”
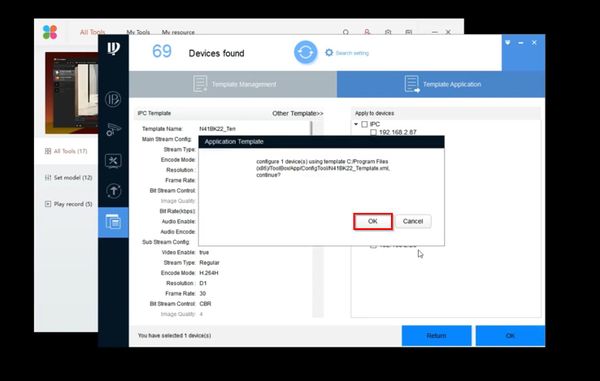
17. A window will pop up stating, “Configure 1 device(s) using template “C:/ProgramFiles/Toolsbox/Template_Name.xml” click, “OK”
A green check mark will confirm a successful import
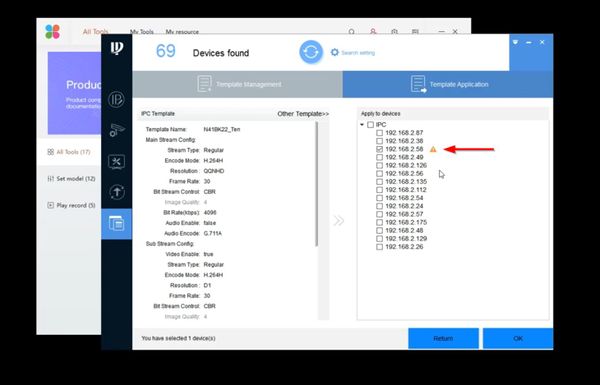
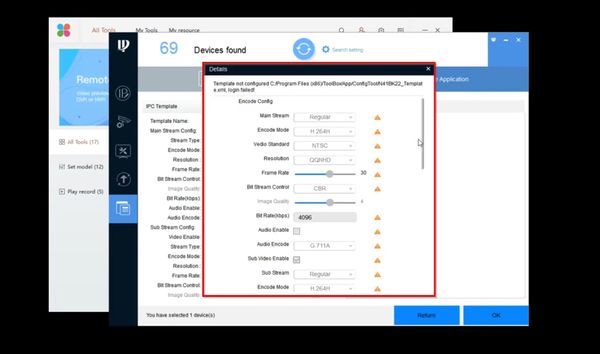
NOTE: A yellow exclamation icon will display next to a device when there is an issue with the import.
Click the icon to obtain more details about which setting(s) were not successfully imported
ConfigTool/How to configure Device DST settings
Description
This guide will walk you through the process to configure DST settings for Dahua Cameras and Recorders in batches.
! Note: make sure the devices that you want to configure are in the same network.
Prerequisites
- ConfigTool
- The devices that you want to configure are in the same network.
Step by Step Instructions
1. Launch ConfigTool
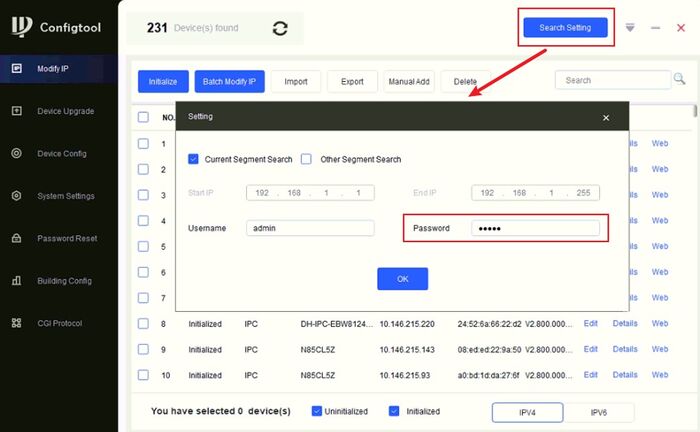
2. Click on [Search Setting]on the right-upper corner and insert the device password on [Password].
If the password is not correct, no settings can be applied on devices.
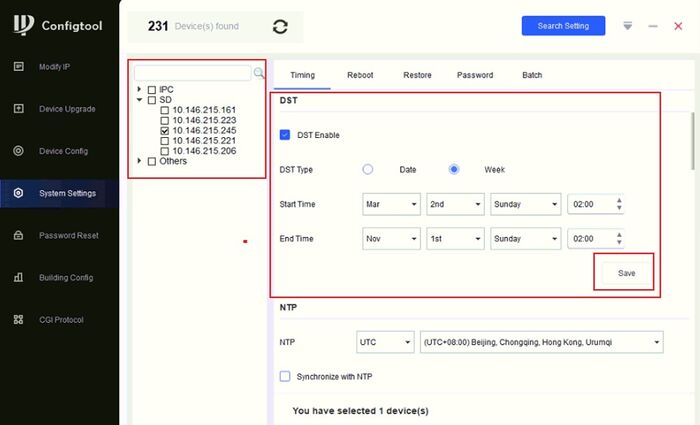
3. Go to [System Settings], and select from the device list the devices whose DST settings you want to modify.
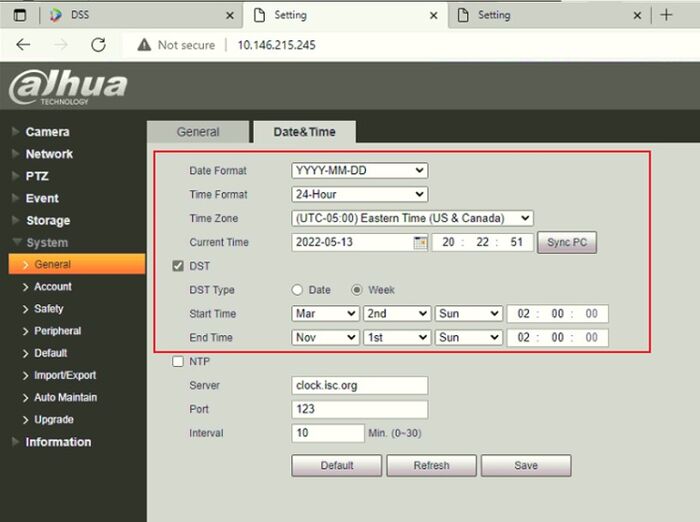
Check [DST Enable], and insert the exact information on the picture:
- DST Type: Week
- Start Time: Mar 2nd Sunday 02:00
- End Time: Nov 1st Sunday 02:00
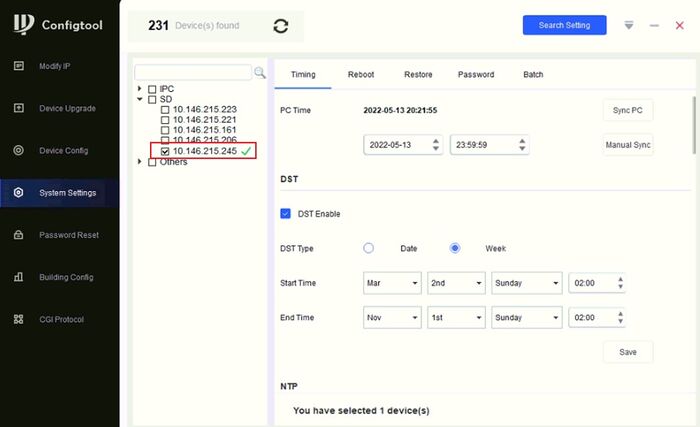
If the DST settings are applied successfully on the device, you will see the green check mark next to the device IP.
Please try again, if it is a yellow warning mark.
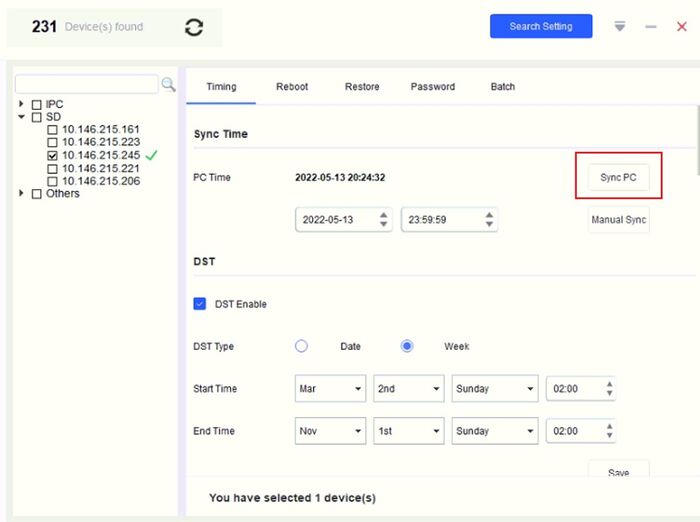
4. After modifying DST settings, you should also re-sync the time of the devices, just to make sure that the Time is also correct.
This is because when DST is modified, cameras’ time may jump one hour forward or backward!
This is crucial, therefore it is necessary to re-sync the time.
Click on [Sync PC], and when the green mark appears, then the Time of the devices is successfully synced.
5. In the end, go to the webpage of the camera, to double check if the setting is correct on the device end.
