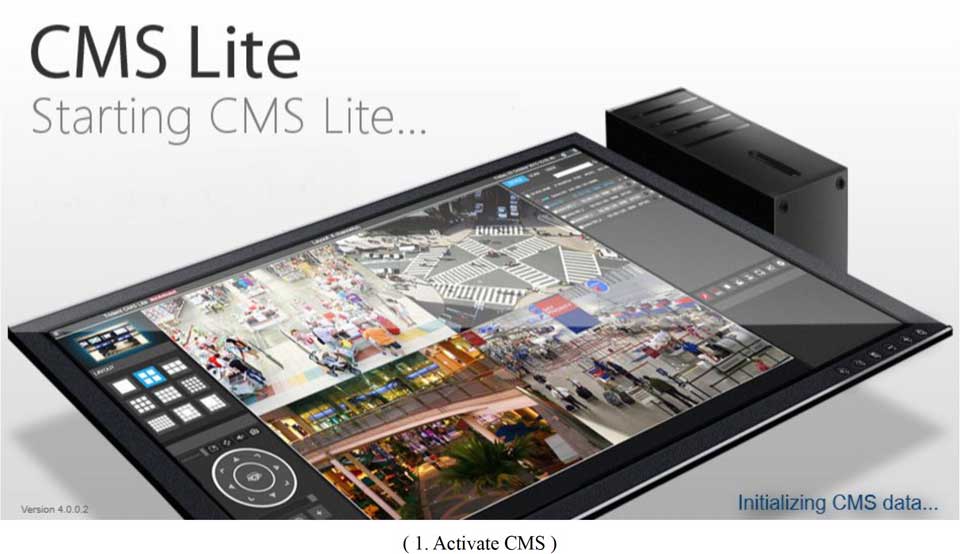
AVTECH CMS Lite Quick Guide Installation Guide, AVTECH, founded in 1996, is one of the world’s leading CCTV manufacturers with more than 20 years of experiences in product innovation, developement and global distribution. In 2018, we’re releasing a series of compact but smart surveillance devices to re-define and transform the cold image of video surveillance.
Of course, we’re still capable of offering a complete suveillance system to satisfy every demand from single watch to multiple-spot monitoring, from home safety to enterprise access guarding, always stay focused on the move.
Prerequisite PC Setting
- Log in Windows account with administrator user level
- Disable Windows firewall
- Change the power configuration
Control Panel ^ Hardware and Sound ^ Power Options ^ Change plan settings
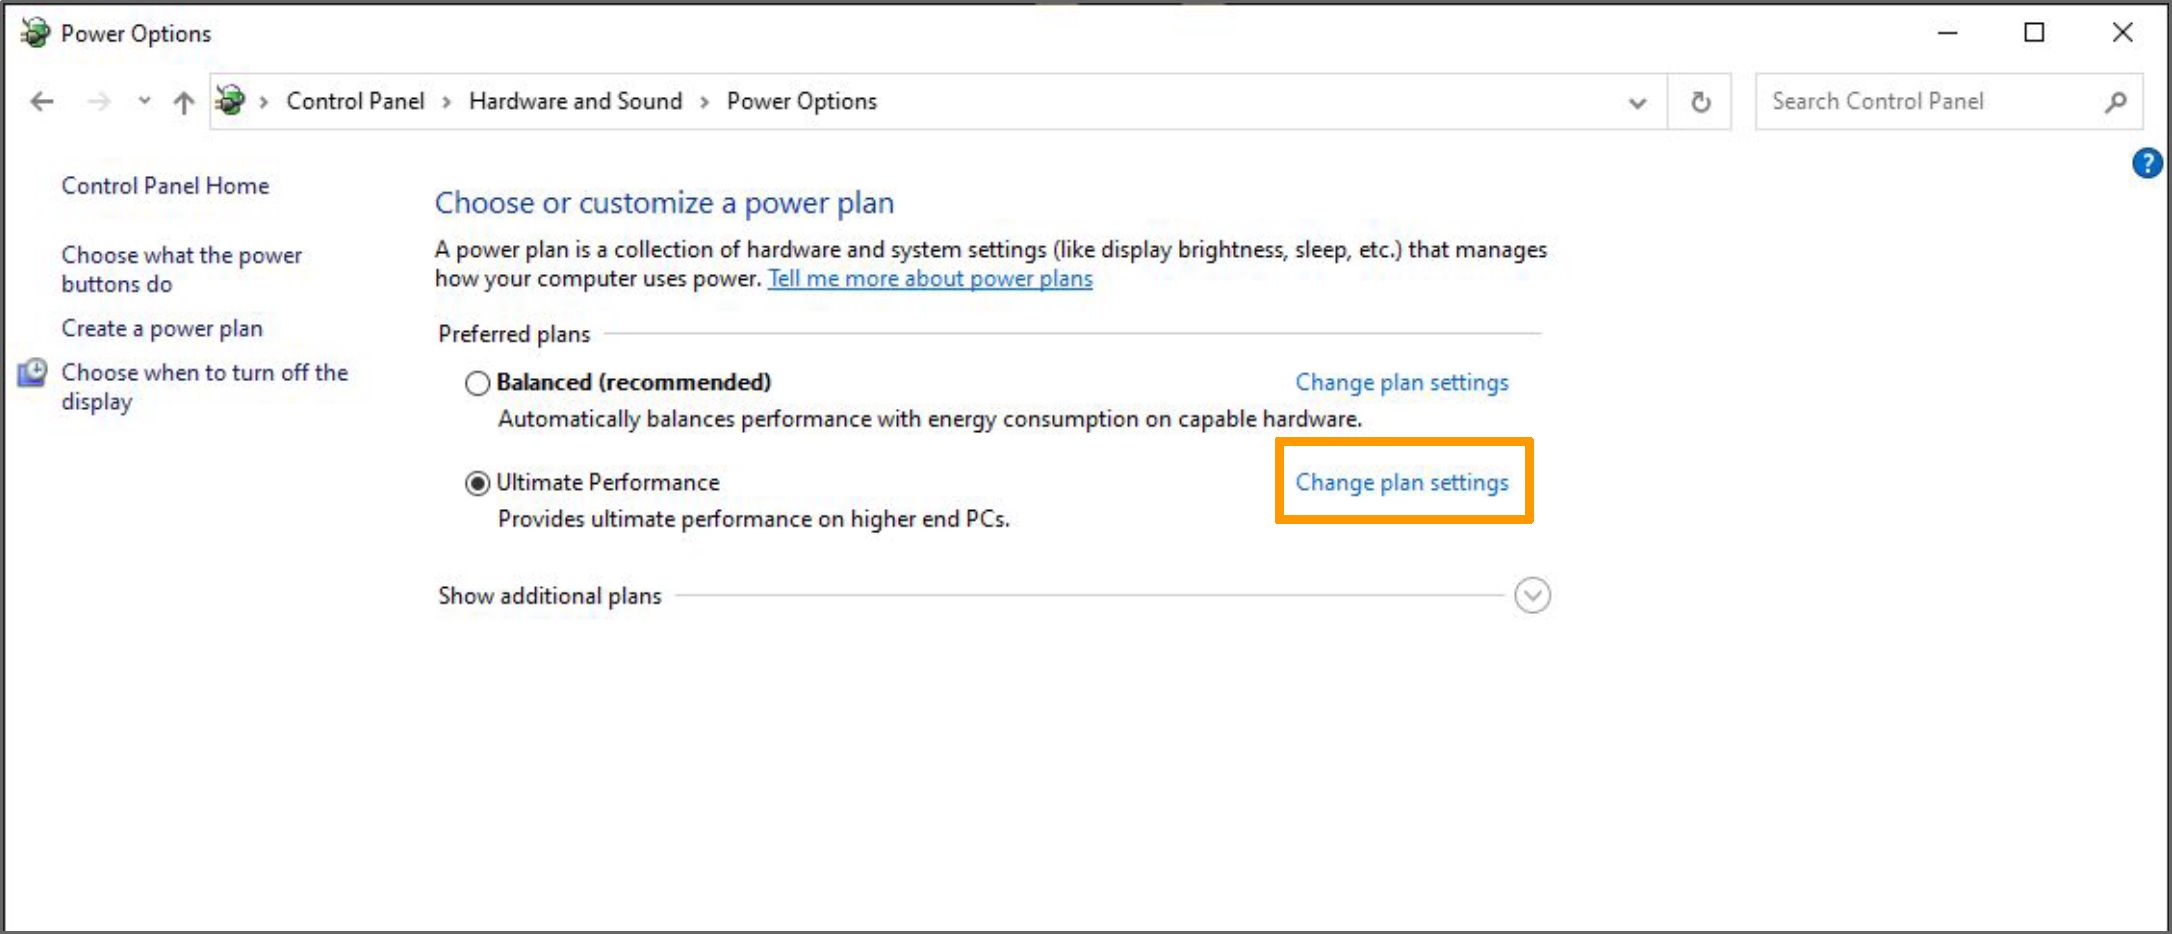
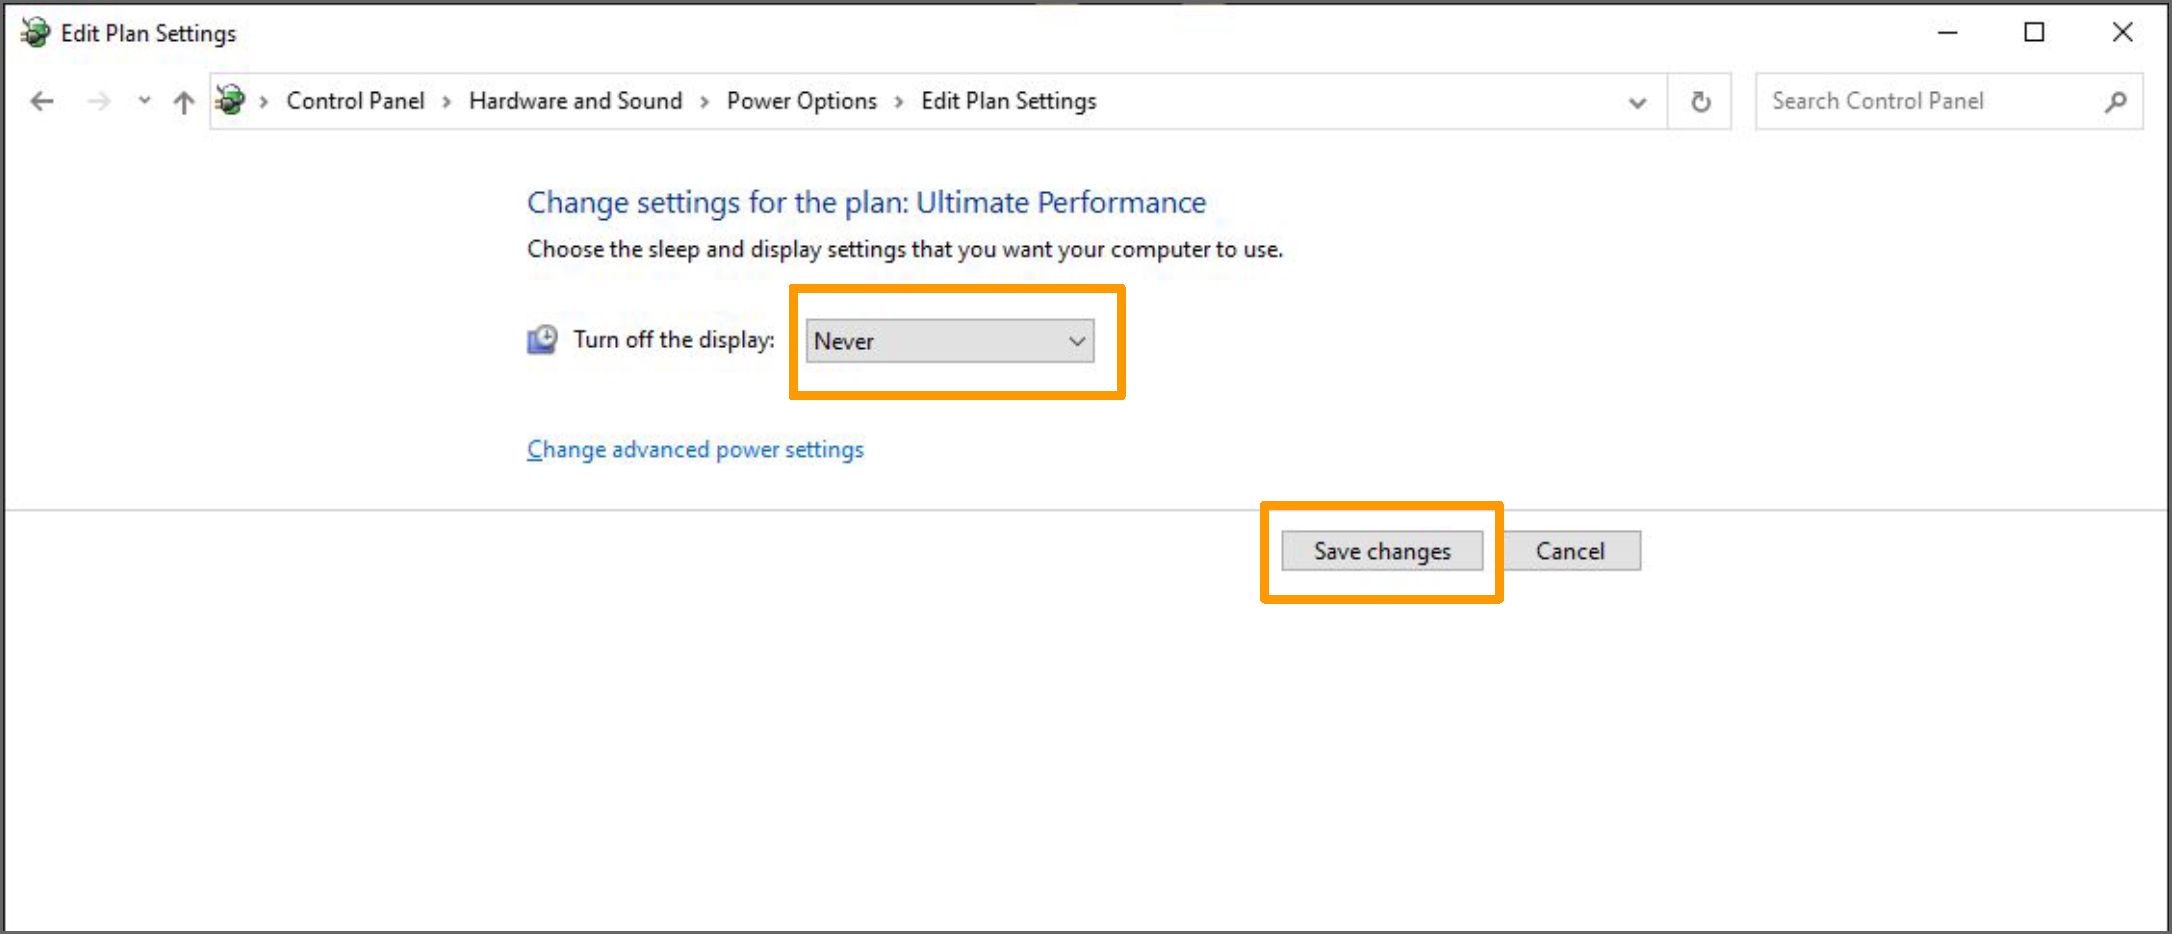
To avoid the abnormal shutdown caused the damage of CMS system while the CMS system is working, please change “Turn off the display” to “Never” ^ Click “Save changes”
4
Prerequisite PC Setting
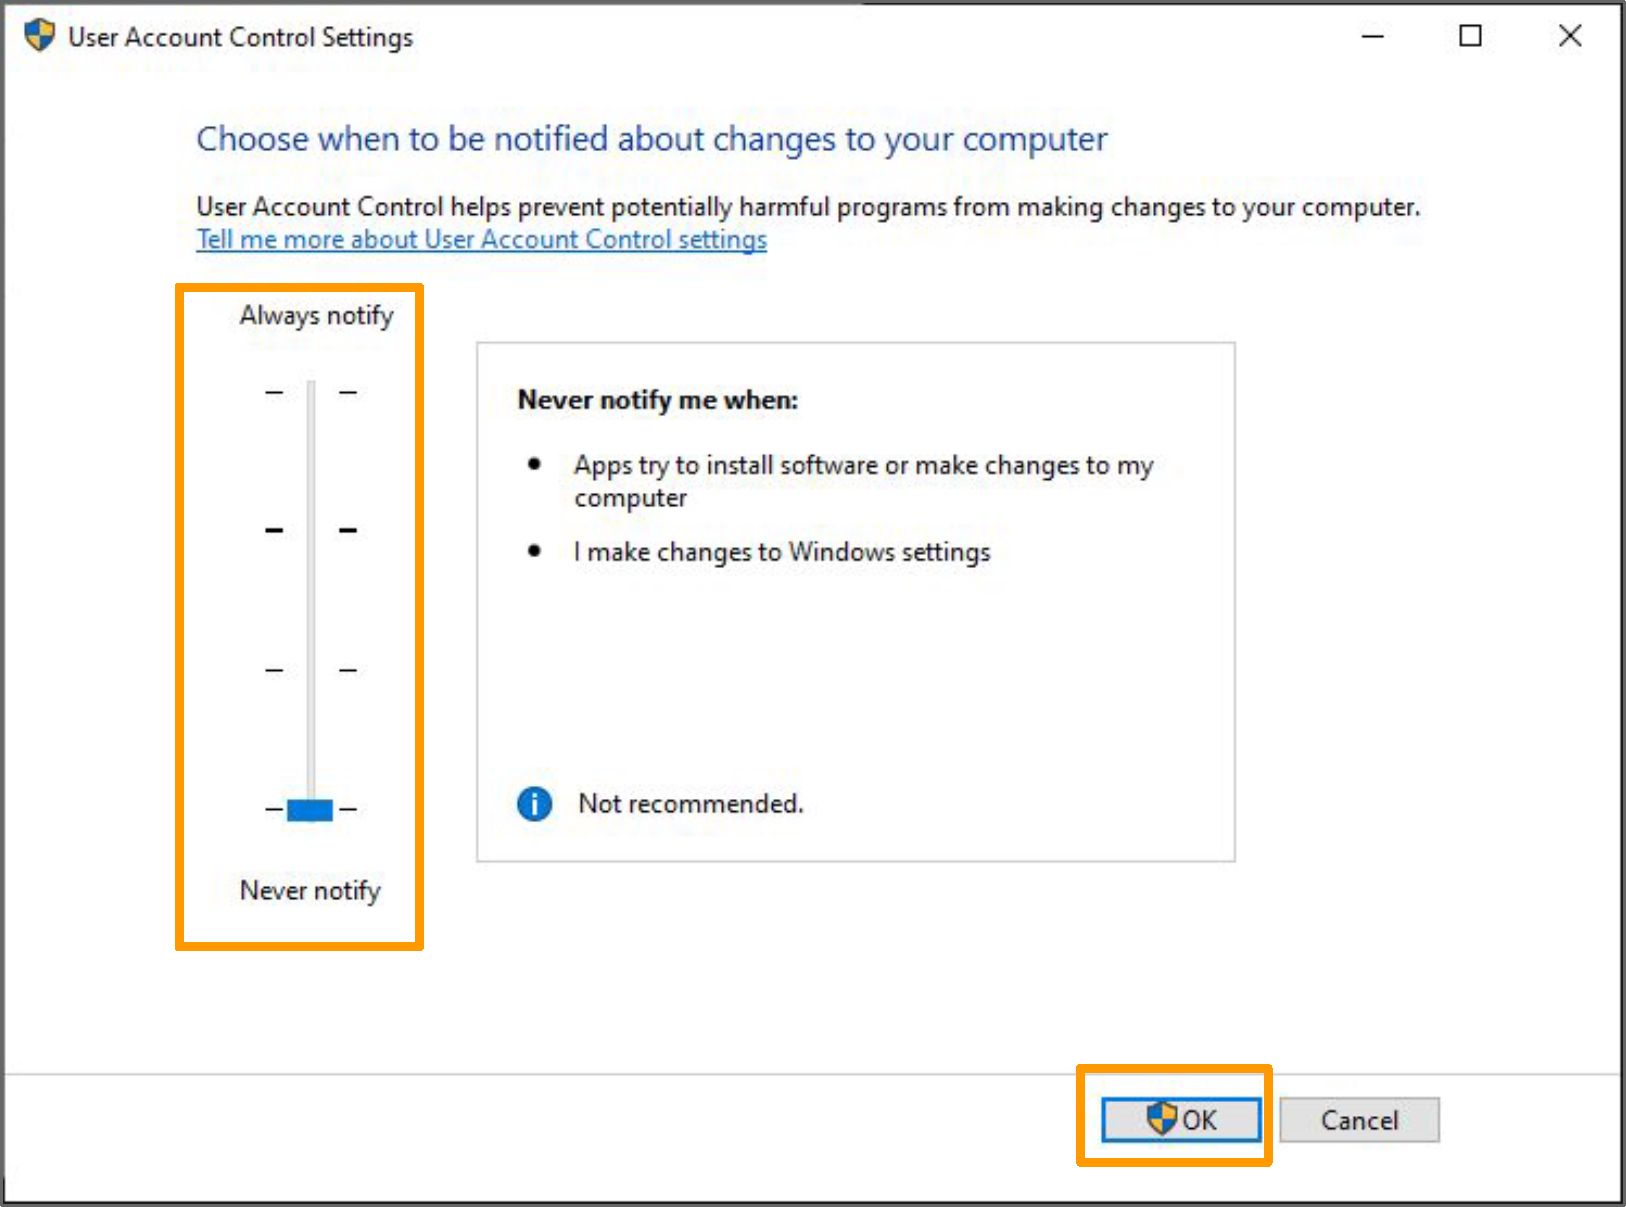
Control Panel —> System and Security —> Security and Maintenance —> Change User Account Control settings
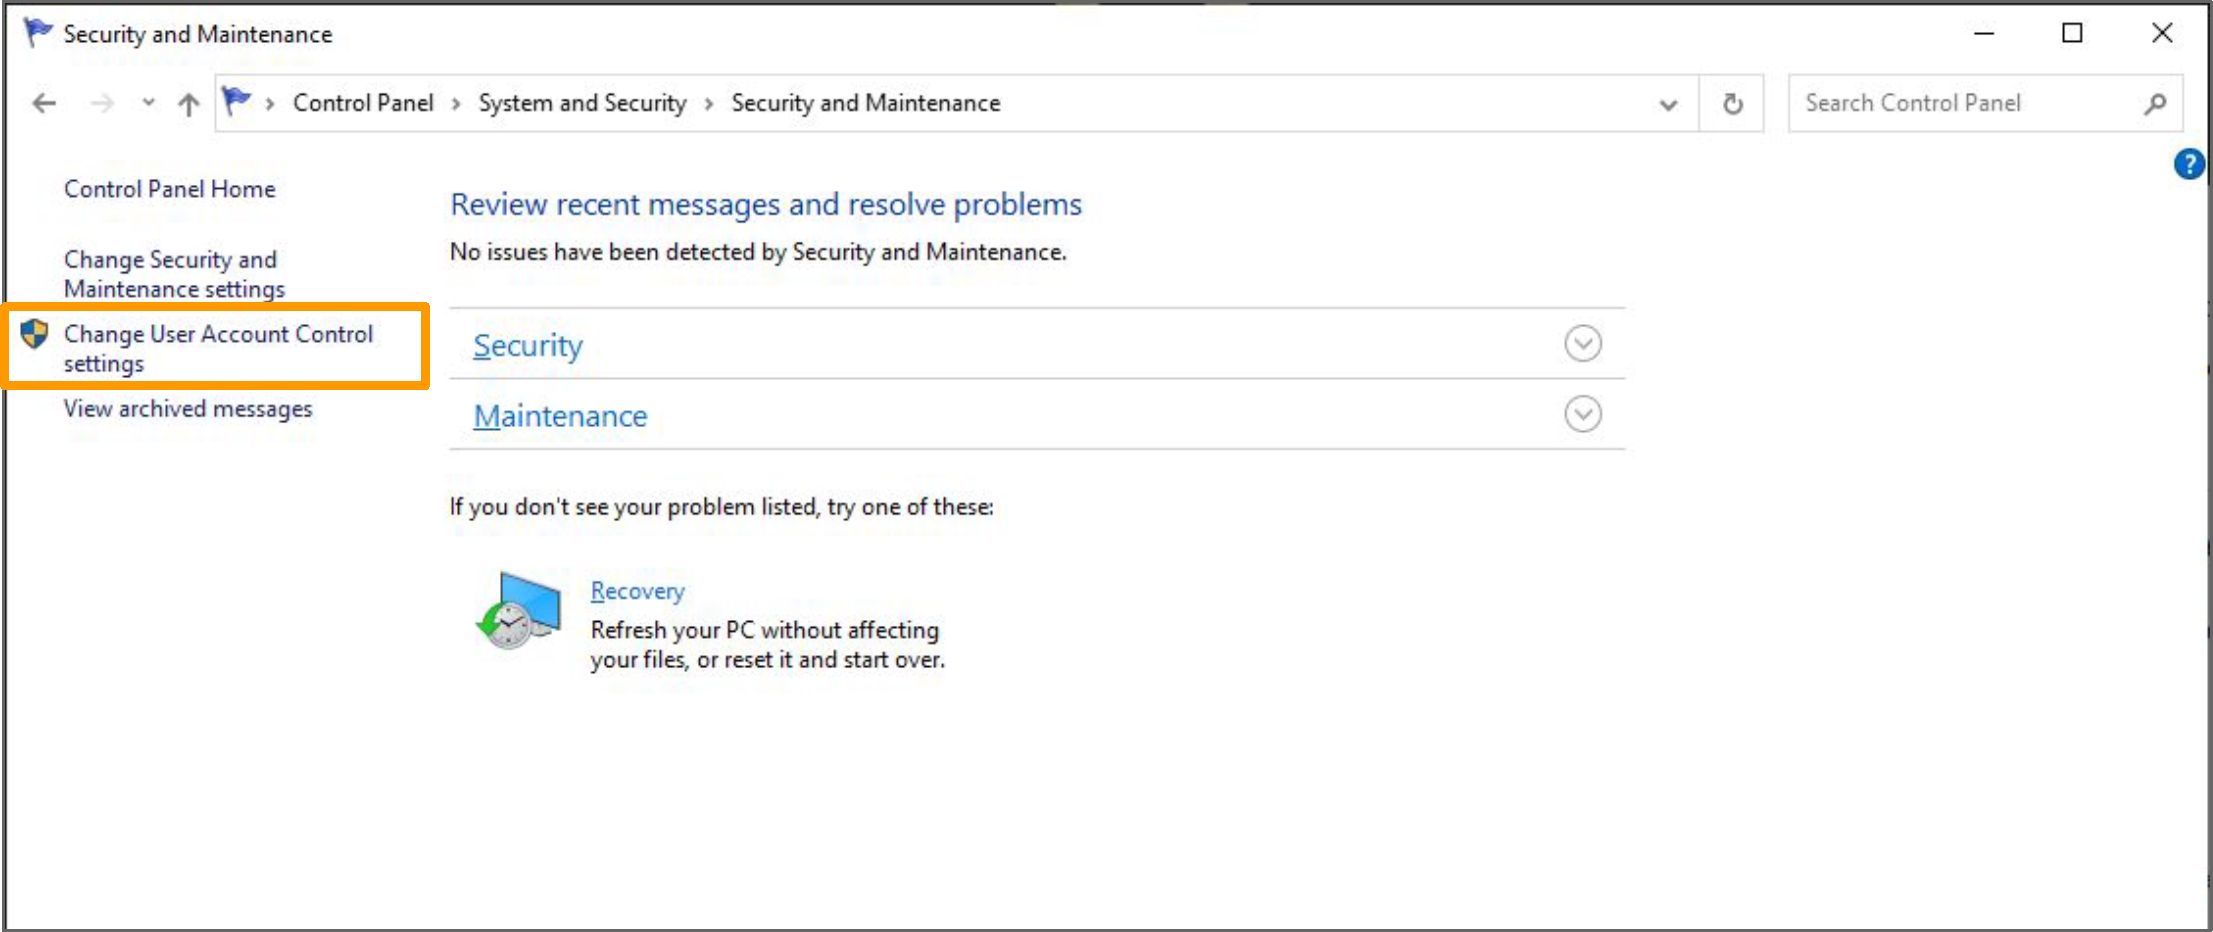
For the popup window not to be blocked while installing or working the CMS system, please adjust the user account control settings to “Never notify” ^ Click “OK”
AVTECH CMS LITE Installation Guide
Read More :
- VIGI Security Manager Setup Guide
- Gamut Surveillance Client Guide
- Comfast Long Range WiFi Access Point Setup
AVTECH CMS Lite Quick Guide
5
Prerequisite PC Setting
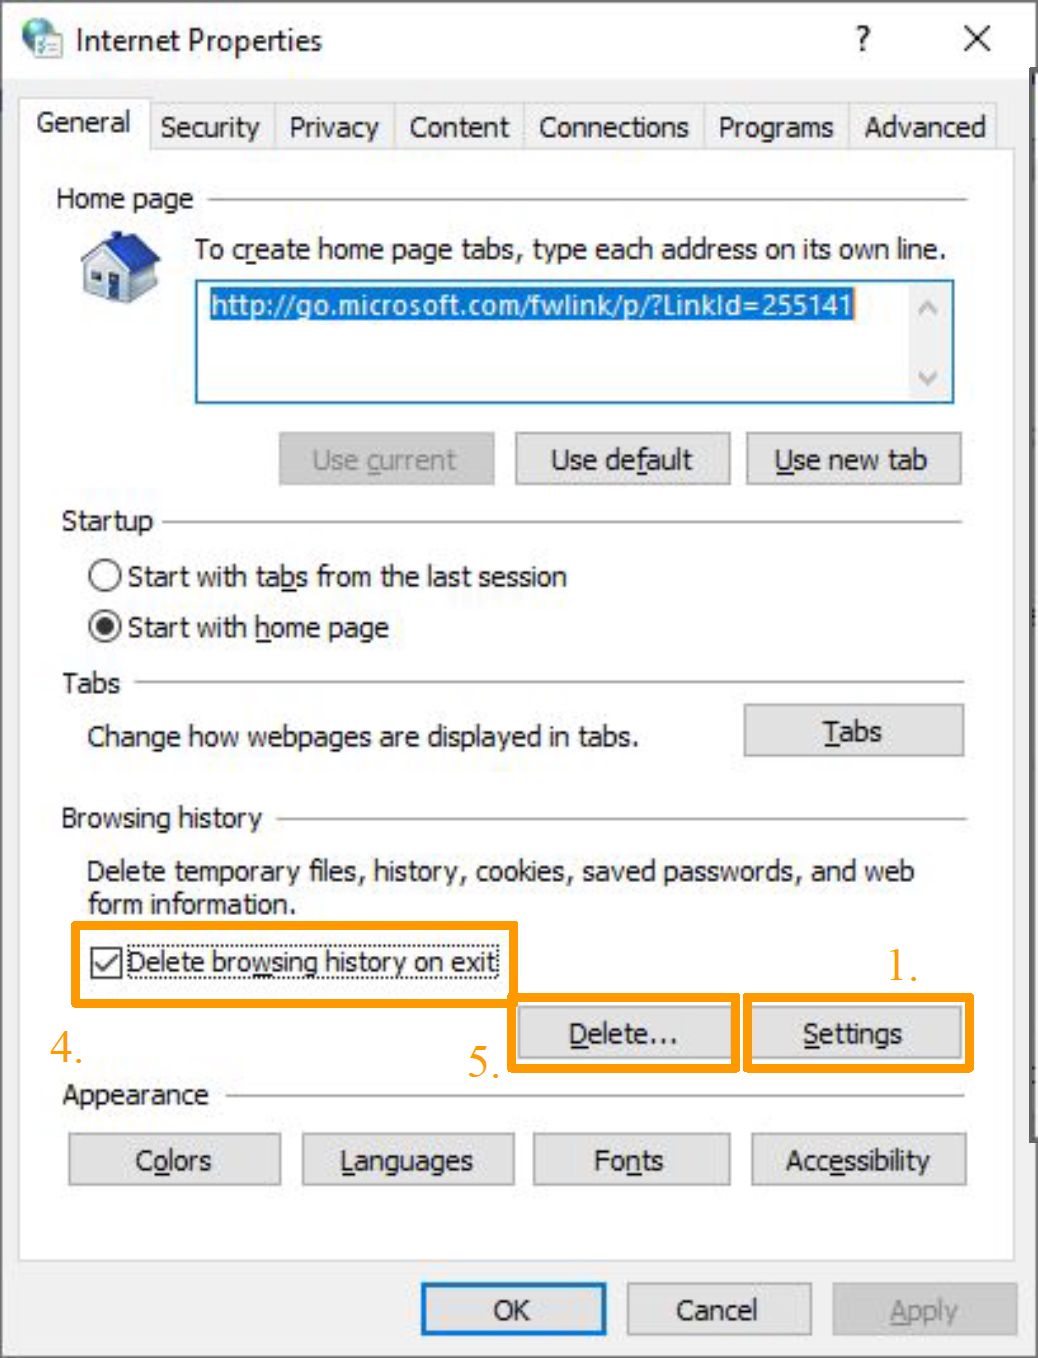
Control Panel Network and Internet Internet Options
| □ Network and Internet |
| * t *8 * Control Panel > Network and Internet > v ö Search Contrc |
| Control Panel Home . – .. , > > <-■ . – .
Network and Sharing Center – . . c . View network status and tasks Connect to a network View network computers and devices System and Security |
| • Network and Internet A Ik. Internet Options |
| Hardware and Sound Change your homepage Manage browser add-ons Delete browsing history and cookies
Programs User Accounts Appearance and Personalization Clock and Region |
In order not to affect the UI loading of CMS system by the existing cookie, please follow the steps, “Settings” ^ Check “Every time I visit the webpage” ^ Click “OK” ^ Check “Delete browsing history on exit” ^ Click “Delete”
?
V’ Website Data Settings
X
Temporary Internet Files History Caches and databases
Internet Explorer stores copies of webpages, images, and media
for fester viewing later.
Ch Ark for npwpr versions of stored nenes:
2.
O Every time I start Internet Explorer
O Automatically
O Never
Disk space to use (8-1024MB)
(Recommended: 50-250MB)
I 330 |jj|
Current location:
C: VJsers ^t\AppData V-ocal Microsoft \Wmdows \INe tCache \
Move folder…
View objects
3.
View files

Cancel
AVTECH CMS Lite Quick Guide
6
Prerequisite PC Setting
Step 1. Go to “Run” (Windows+R) ^ Enter “cmd” ^ Click “OK”
Run
Type the name of a program, folder, document, or Internet resource, and Windows will open it for you.

Step 2. Enter “netstat -nao|find “0.0.0.0:80”” ^ Click “Enter” to execute the command
C:\> netstat -nao |find “0.0.0.0:80” PID number
TCP 0.0.0.0:80 0.0.0.0:0 LISTENING 4116
Step 3. Enter “tasklist /fi “pid eq PID number”” ^ Click “Enter” to execute the command
| C:\> tasklist /fi “pid eq 4116” | |||
| Image Name | PID Session Name | Session# | Mem Usage |
| —
skype.exe |
—
4116 Console |
0 |
6,476 K |
Step 4. To close the program or service, please enter “taskkill /pid PID number /F” ^ Click “Enter” to execute the command
C:\> taskkill /pid 4116 /F
SUCCESS: The process with PID 4116 has been terminated.
AVTECH CMS Lite Quick Guide
7
Installation
Procedure (Step 1 and 2)
Overall Steps
- Start Install Application
- Enter Main Interface
- Check Hardware Requirements
- Choose Install Location
- Start Running Installer
- Install Necessary Packs
- Installation Complete
- Reboot Computer
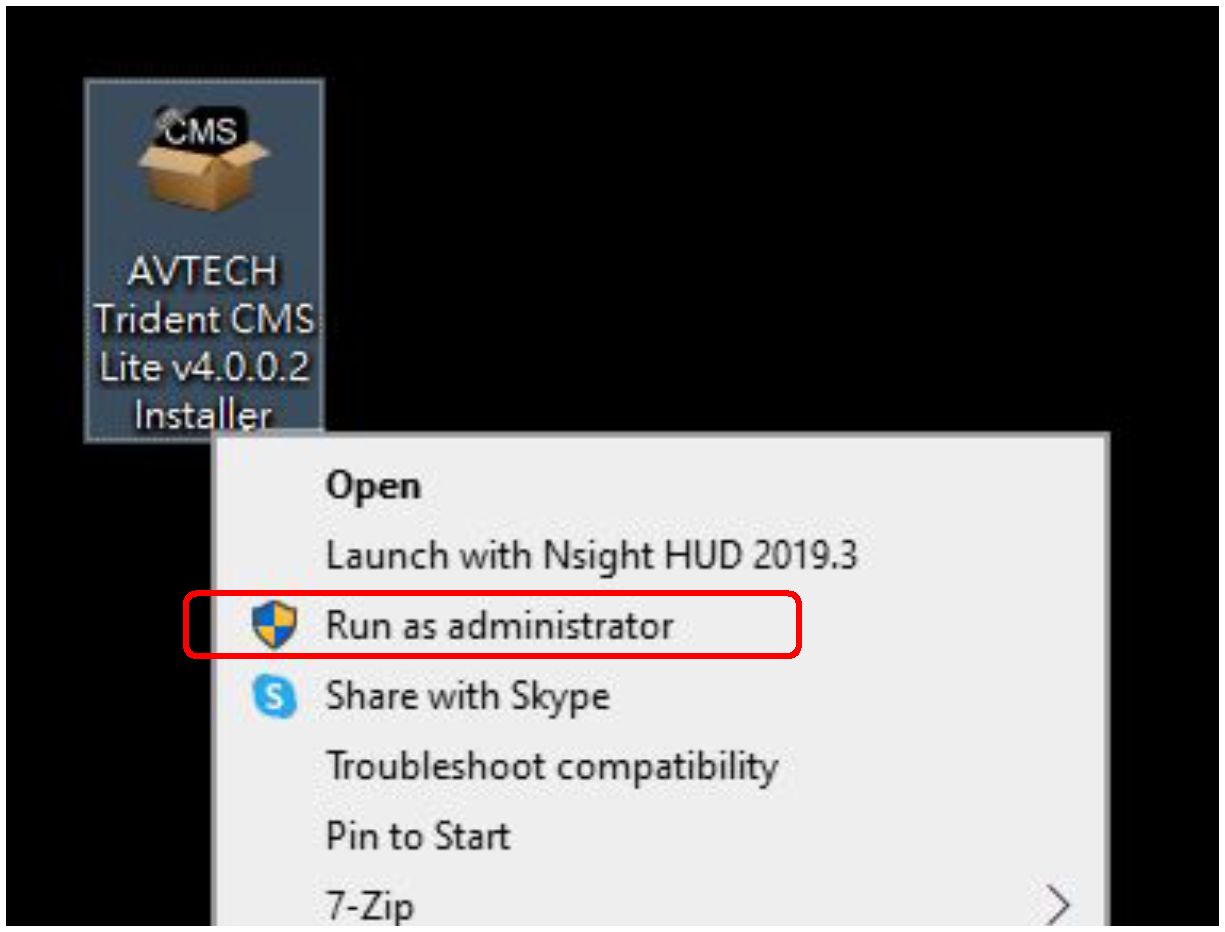
( Step 01 – Start Install )
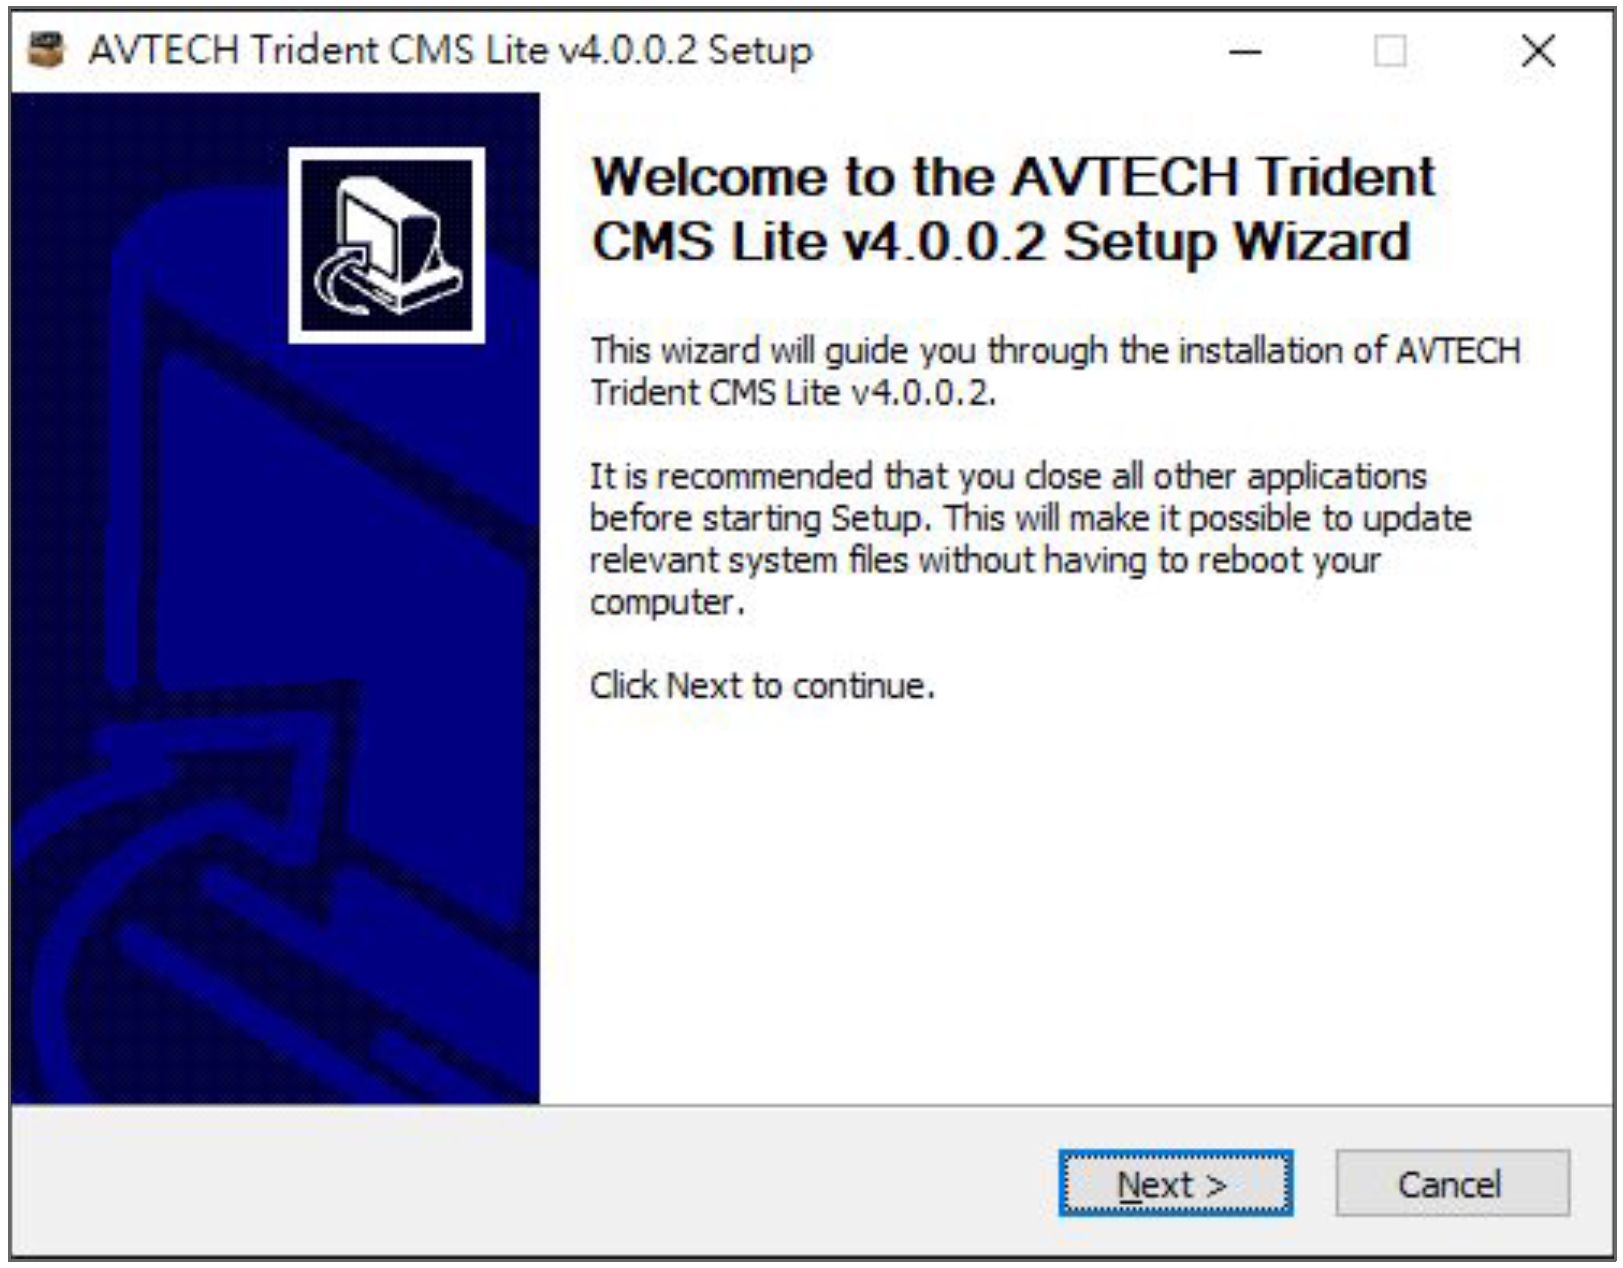
( Step 02 – Enter Main Interface )
AVTECH CMS Lite Quick Guide
8
Installation
Procedure (Step 3 and 4)
3 AVTECH Trident CMS Lite v4.0.0.2 Setup – X
License Agreement __
^0
Please review the license terms before installing AVTECH Trident CMS Lite V4.0.0.2.
Press Page Down to see the rest of the agreement.
AVTECH HyDRA System Software License Agreement a
IMPORTANT NOTICE: You should read the following terms and conditions of this license agreement before using this package. Once you have installed or otherwise used this package you are bound by the terms and conditions of the license and the limited warranties.
GNU GENERAL PUBLIC LICENSE
Version 2, June 1991
Copyright (C) 1989, 1991 Free Software Foundation, Inc.,
51 Franklin Street, Fifth Floor, Boston, MA 02110-1301 USA
Everyone is permitted to copy and distribute verbatim copies v
If you accept the terms of the agreement, dick I Agree to continue. You must accept the agreement to install AVTECH Trident CMS Lite V4.0.0.2.
AVTECH Corporation
< Back I Agree
Cancel
( Step 03 – License Agreement)
3 AVTECH Trident CMS Lite v4.0.0.2 Setup — X
Choose Install Location .•CP
Choose the folder in which to install AVTECH Trident CMS Lite V4.0.0.2.
Setup will install AVTECH Trident CMS Lite v4.0.0.2 in the following folder. To install in a different folder, dick Browse and select another folder. Click Next to continue.
Destination Folder
‘rogramData \AVTECHCMSLite
Browse…
Space required: 954.9MB
Space available: 26.2GB
AVTECH Corporation
< Back Next >
Cancel
( Step 04 – Choose CMS Install Location )
AVTECH CMS Lite Quick Guide
9
Installation
Procedure (Step 5 and 6)
3 AVTECH Trident CMS Lite v4.0.0.2 Setup –
Installing __
Please wait while AVTECH Trident CMS Lite v4.0.0.2 is being installed.
Execute: C:\WINDOWS\SysWOW64Vcads ‘C: V>rogramData\AVTECHCMSLite\VMS\syncmode*
Create folder: C:\programDataV\VTECHCMSLite\VMS a
Execute: C:\WINDOWS^ysWOW64Vcads ’C:\programData\AVTECHCMSLite’ /t /gra… Execute: C:\WINDOWS\SysWOW64Vcads •C:V’rogramData\AVTECHCMSLite\VMS*/t… Execute: C:\WINDOWS\SysWOW64Vcads ‘C: V>rogramData\AVTECHCMSLite\VMS\av… Execute: C: \WINDOWS\SysWOW64Vcads “C: V’rogramData \AVTECHCMSLite \VMS \ac… Execute: C:\WINDOWSV5ysWOW64Vcads “C: V’rogramData \A VTECHCMSLite \VMS\c… Execute: C:\WINDOWS\SysWOW64Vcads *C: V>rogramData\AVTECHCMSLite\VMS\db…
Execute: C:\WINDOWSV5ysWOW64Vcads •C:V’rogramData\AVTECHCMSLite\VMSVe… Execute: C:\WINDOWS^ysWOW64Vcads ‘C:V’rogramData\AVTECHCMSLite\VMS\şa…
Execute: C:\WINDOWSV5ysWOW64Vcads “C:\programData\AVTECHCMSLite\VMS\sy… v
AVTECH Corporation
< Bade Next x- Cancel
( Step 05 – Execute CMS Installation )
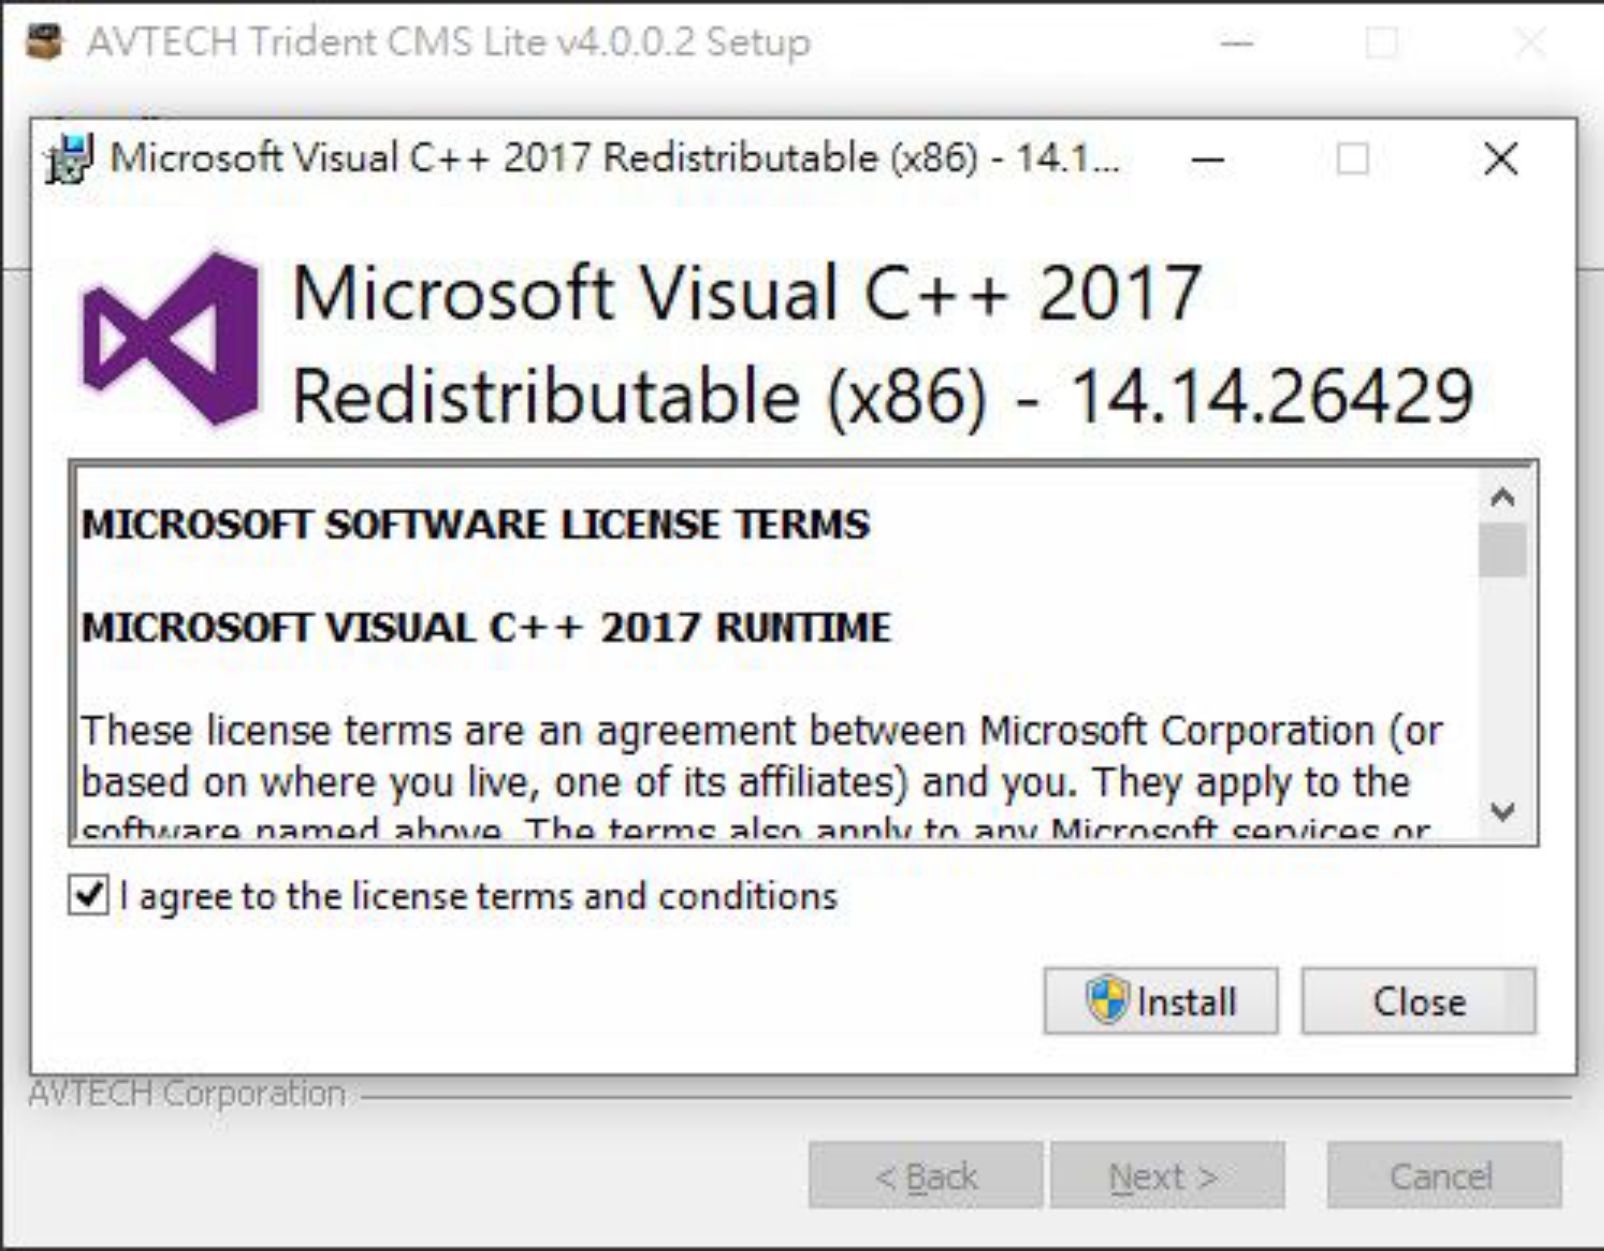
( Step 06 – Install Necessary Packs )
AVTECH CMS Lite Quick Guide
10
Installation
Procedure (Step 7 and 8)
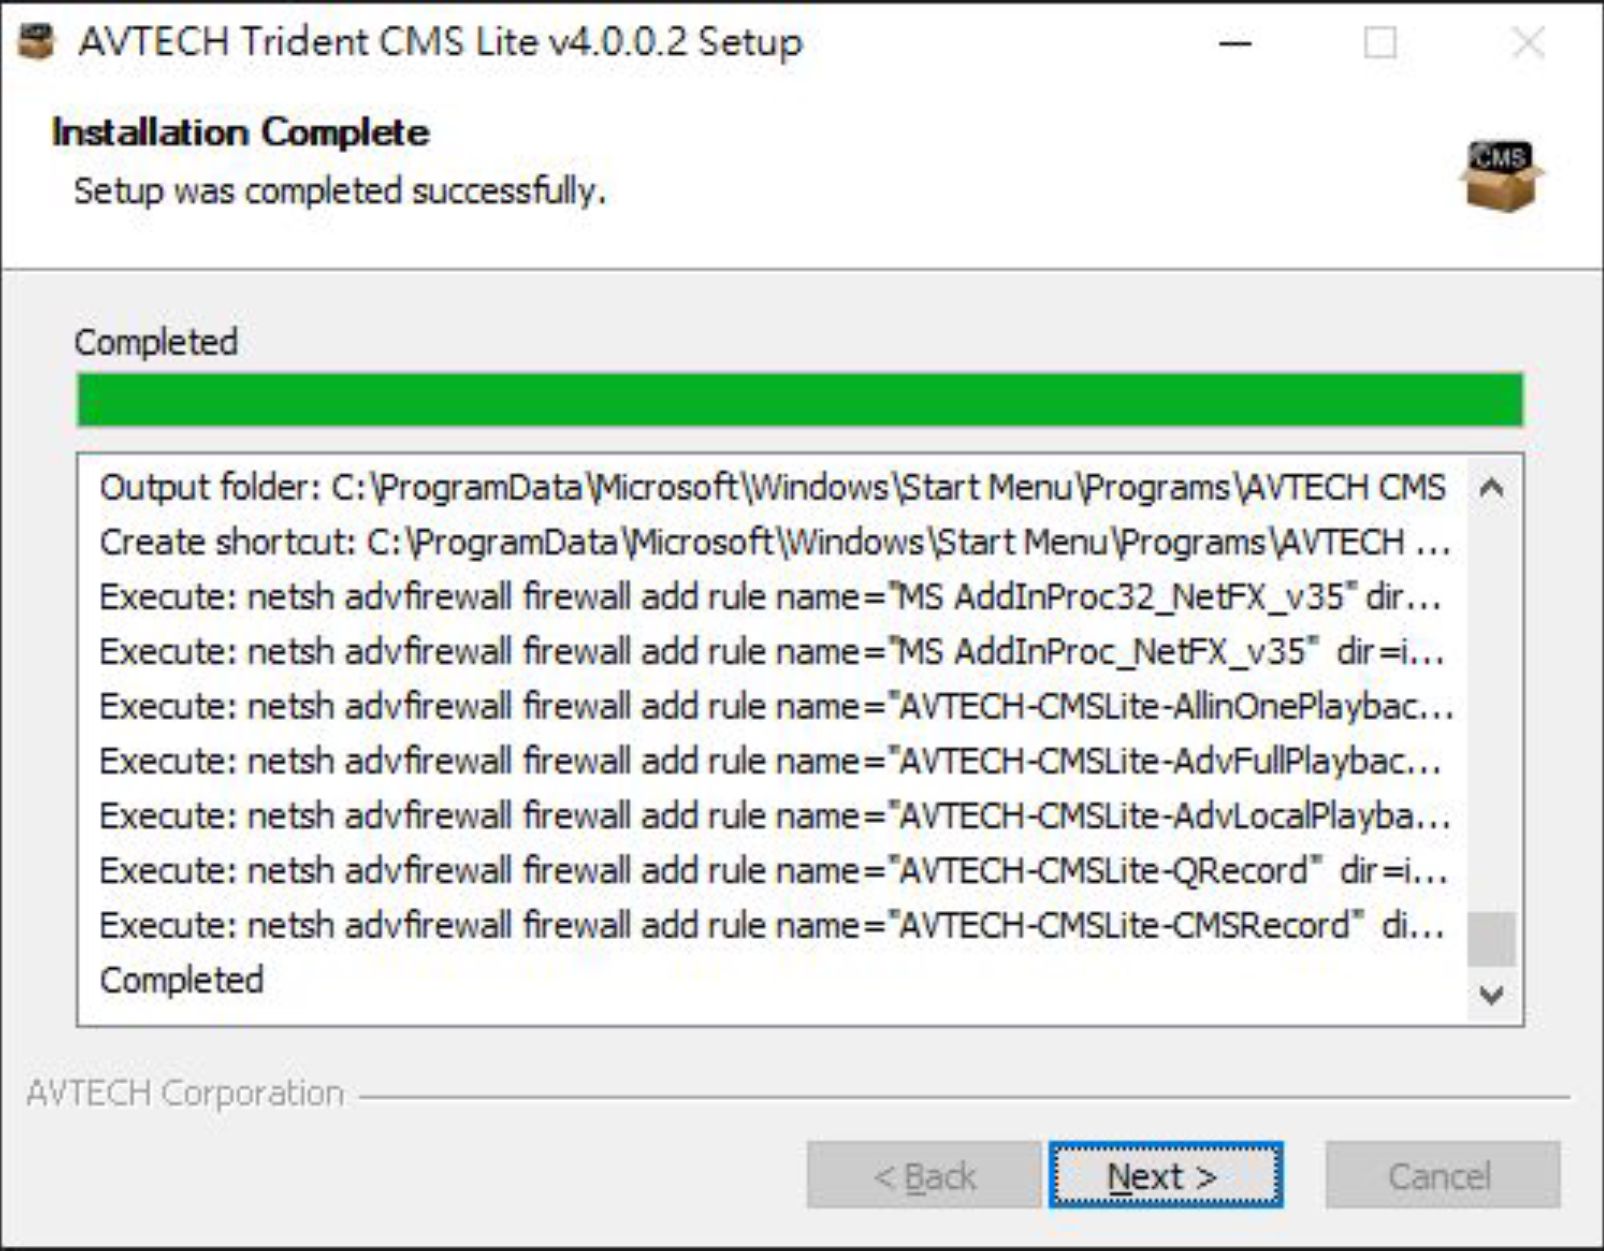
( Step 07 – Make Sure the Install Completed )
©Reboot nowi
OI want to manually reboot later
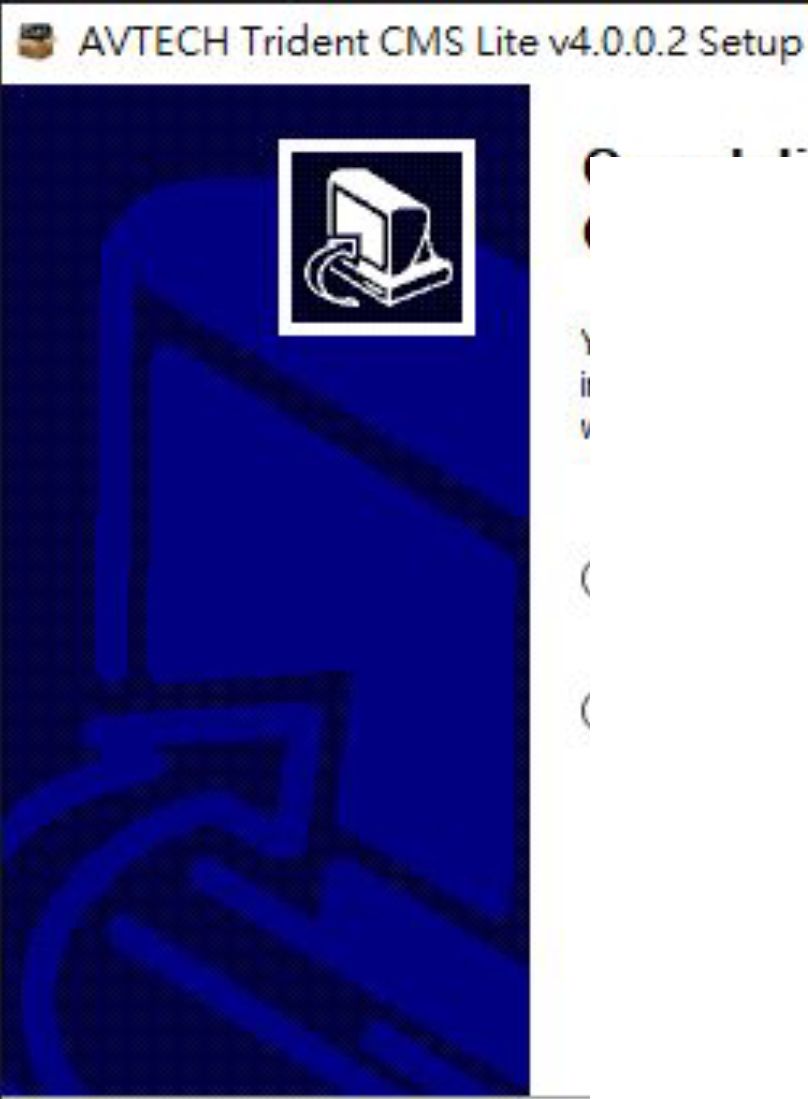
Completing the AVTECH Trident
CMS Lite v4 0 0 2 Setup Wizard
Your computer must be restarted in order to complete the
installation of AVTECH Trident CMS Lite V4.0.0.2. Do you
want to reboot now?
Finish

( Step 08 – Restart Windows Operating System )
AVTECH CMS Lite Quick Guide
11
Quick Start
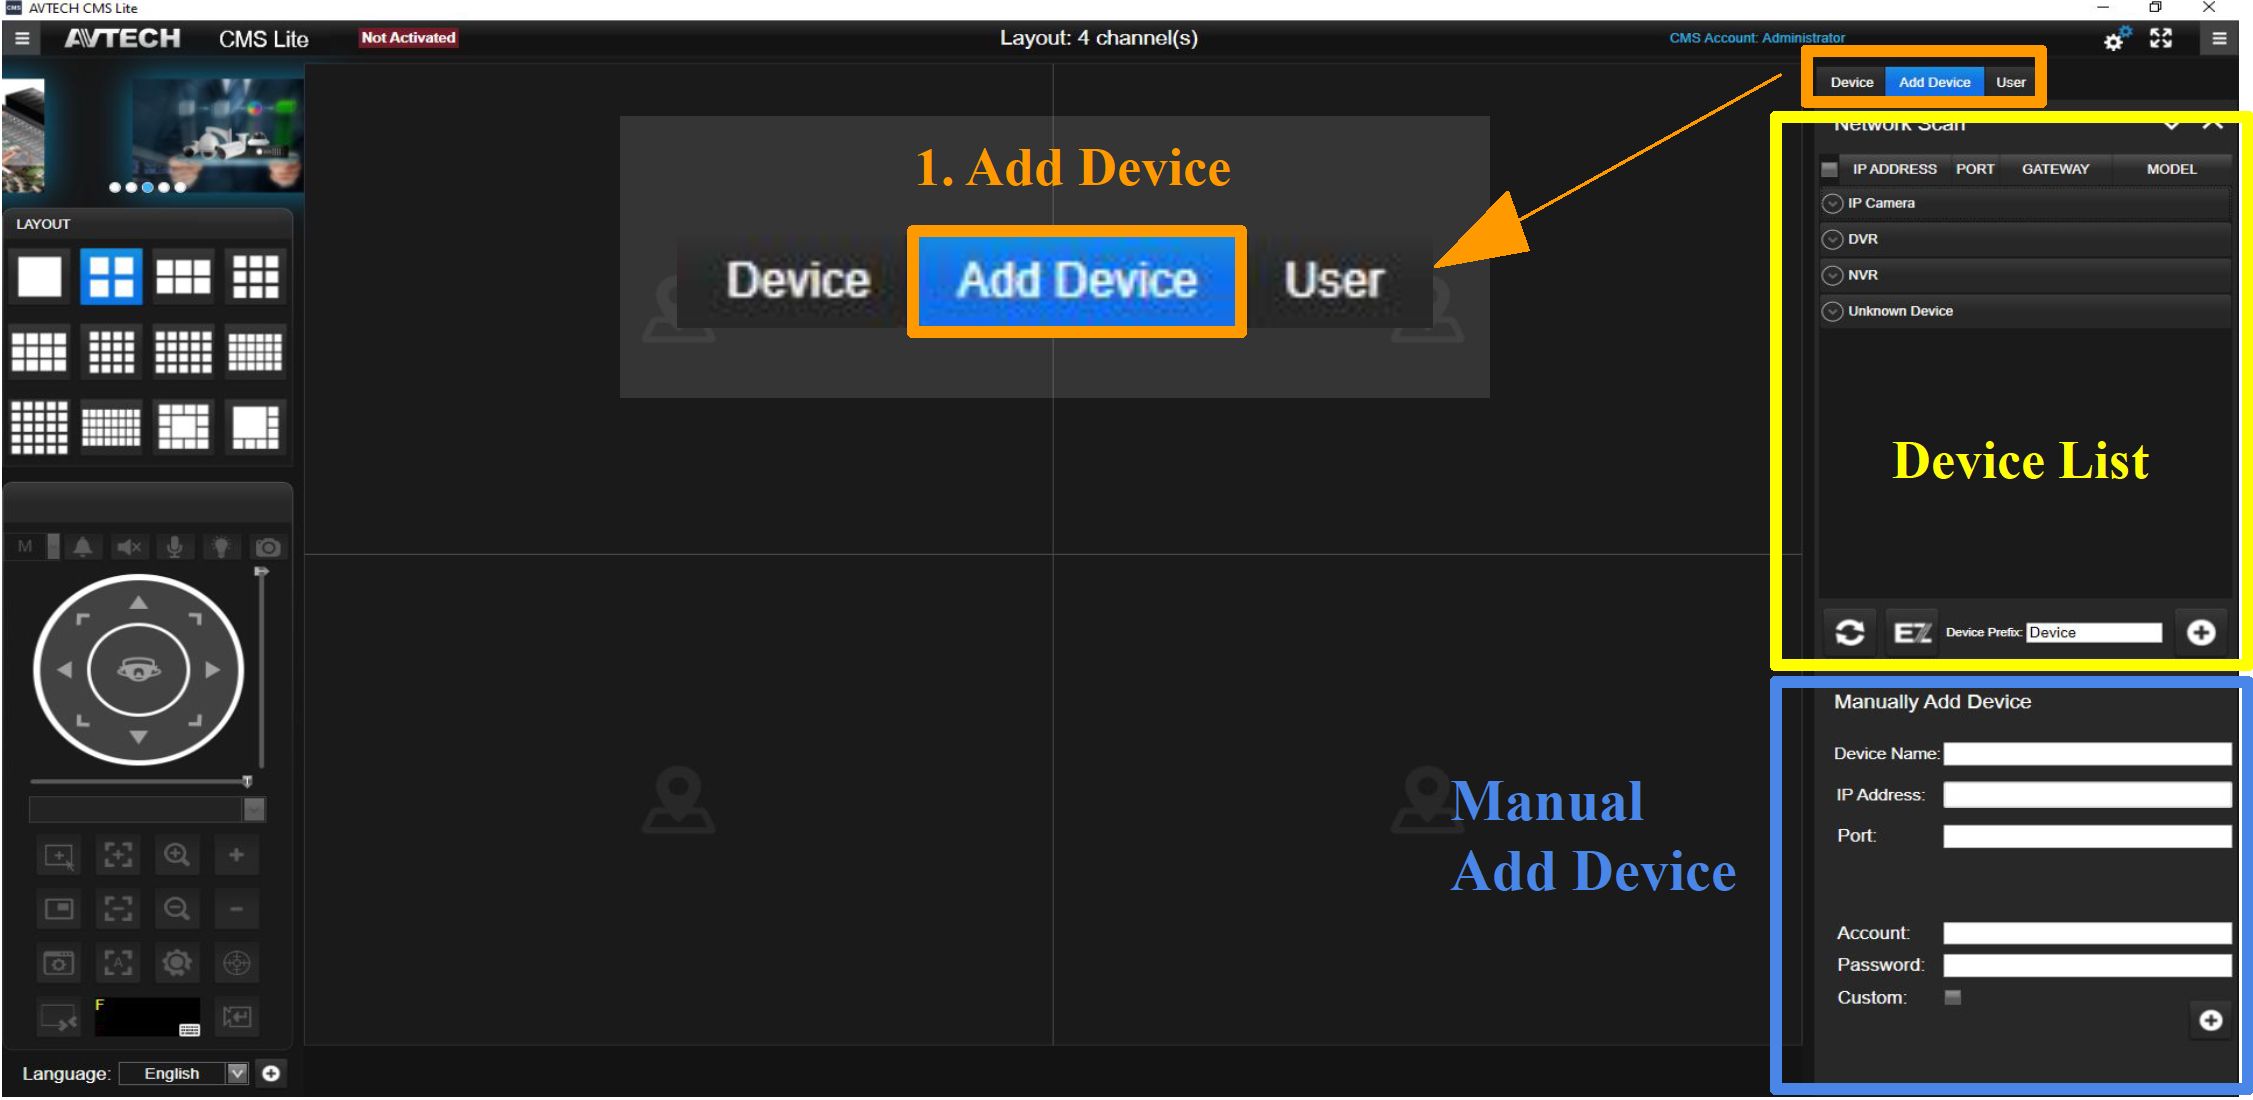
Add Devices
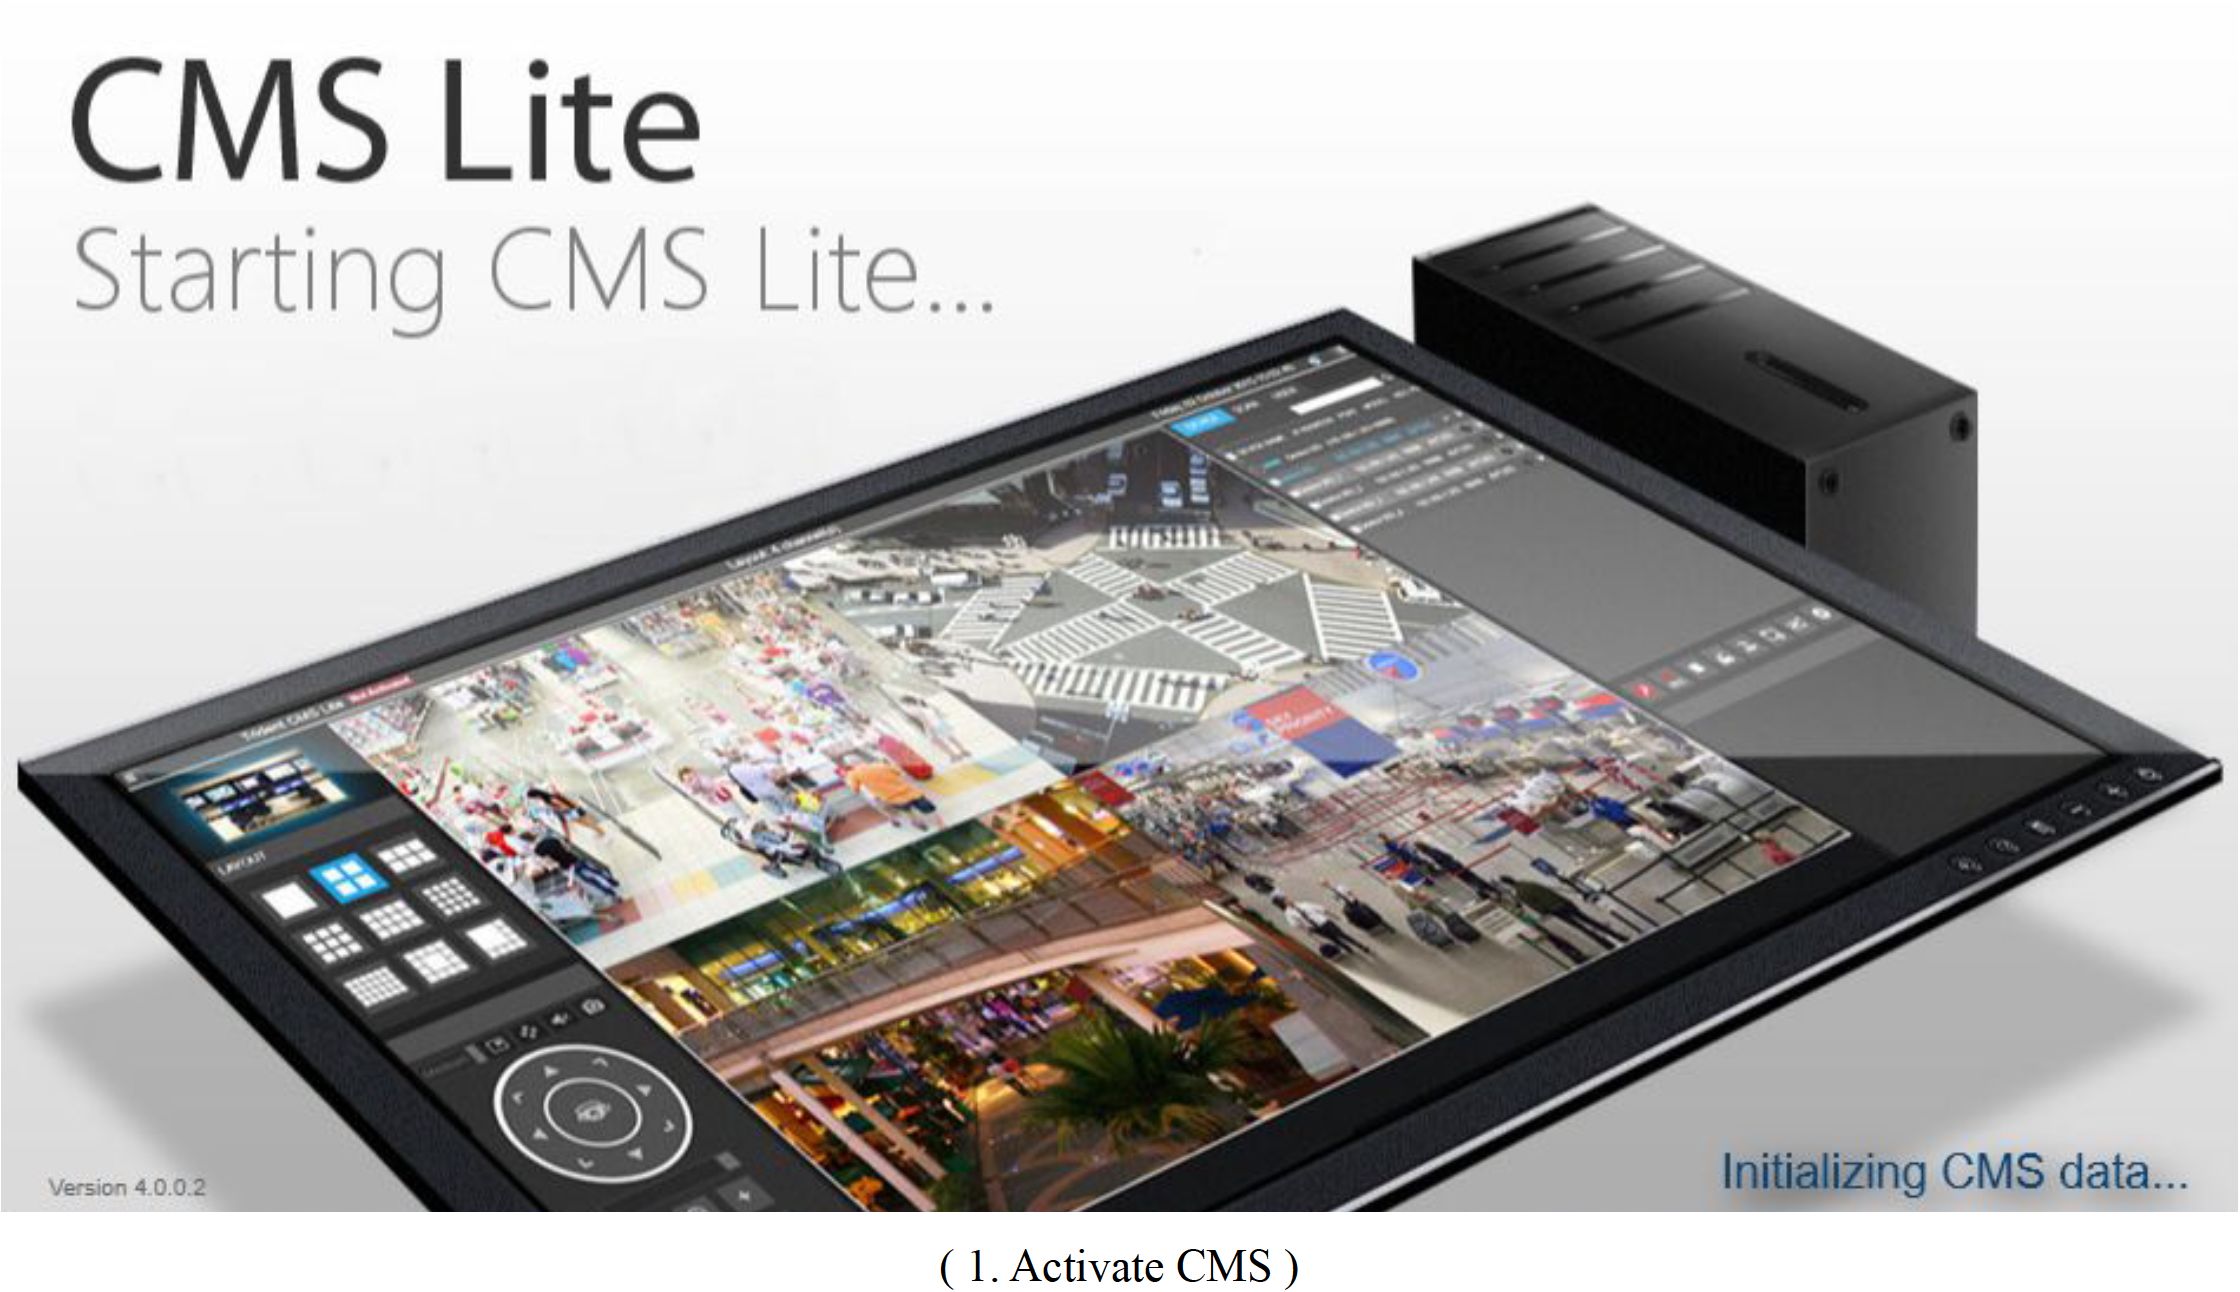
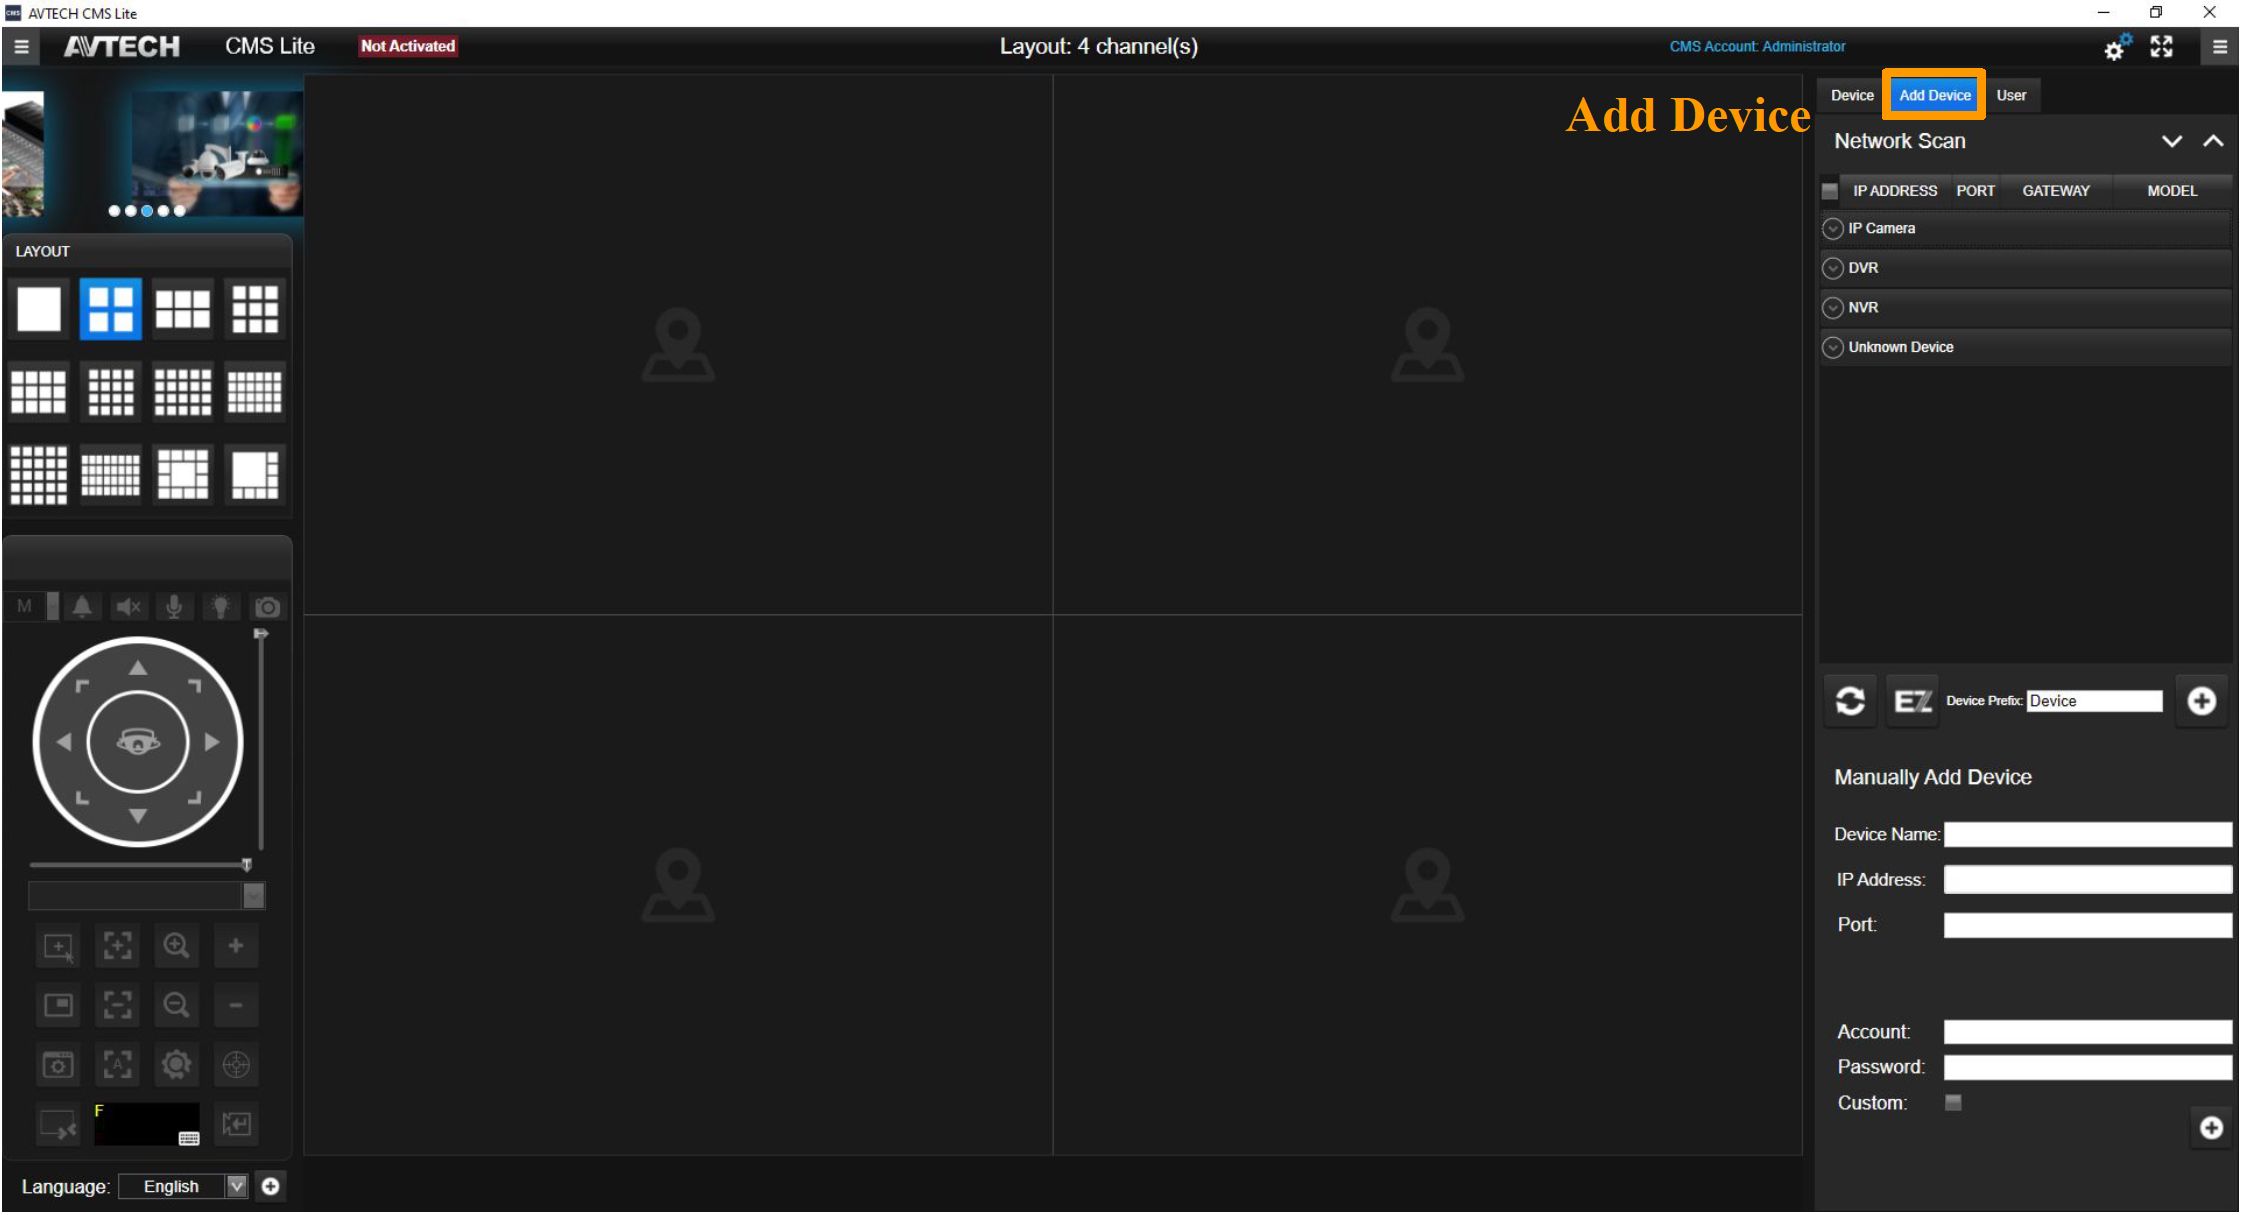
( 2. Click “Add Device” )
AVTECH CMS Lite Quick Guide
12
Quick Start
Add Devices
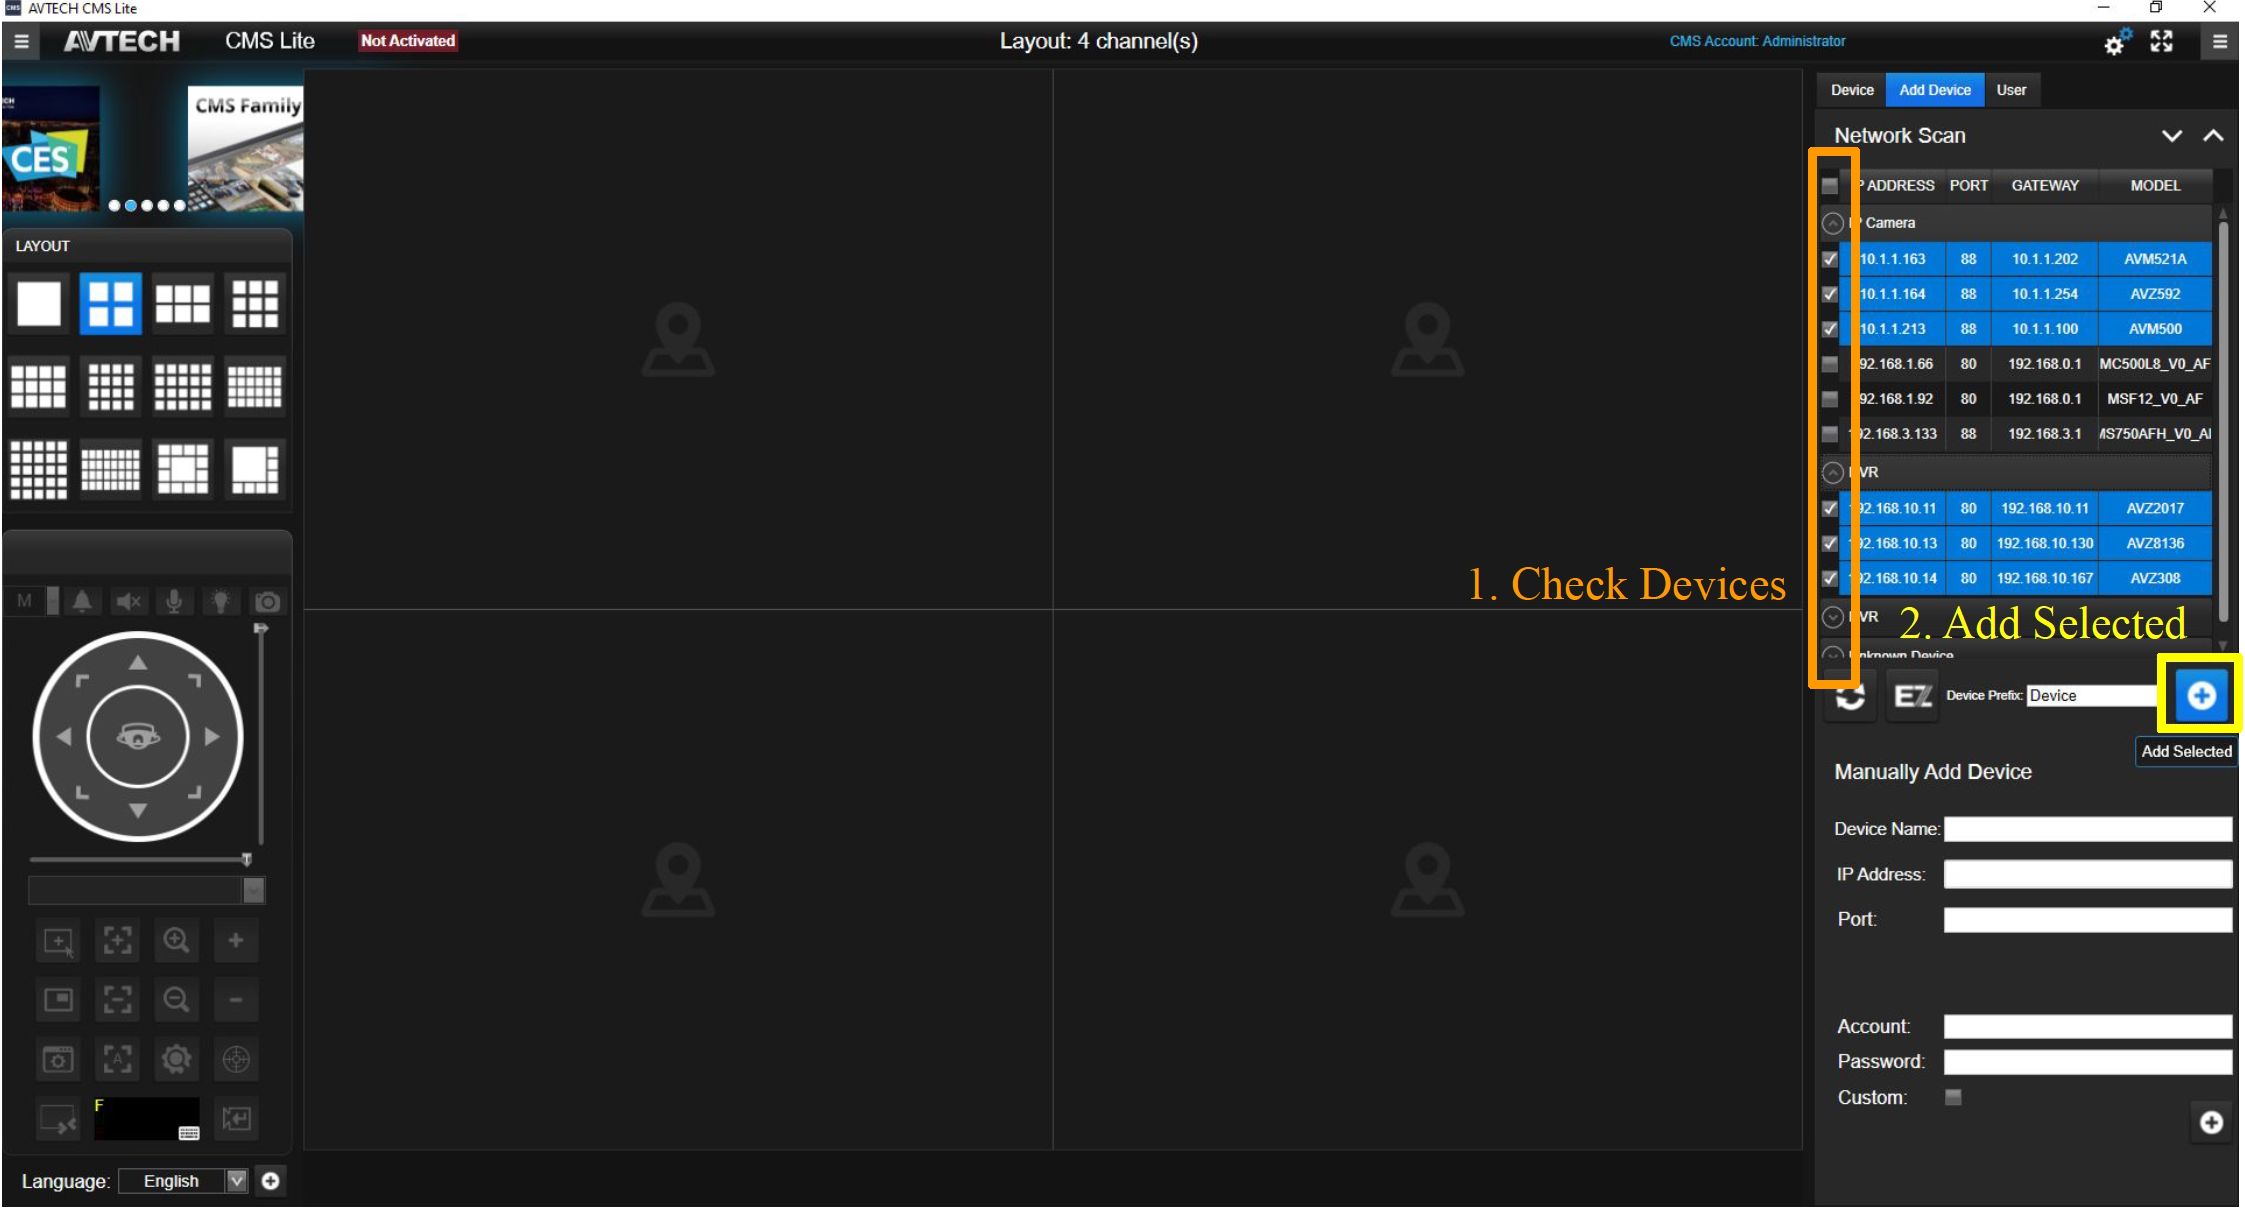
( 3. Check the needed devices and click “Add Selected” ^ Wait for the system complete )
S AVTECH CMS Lite
a
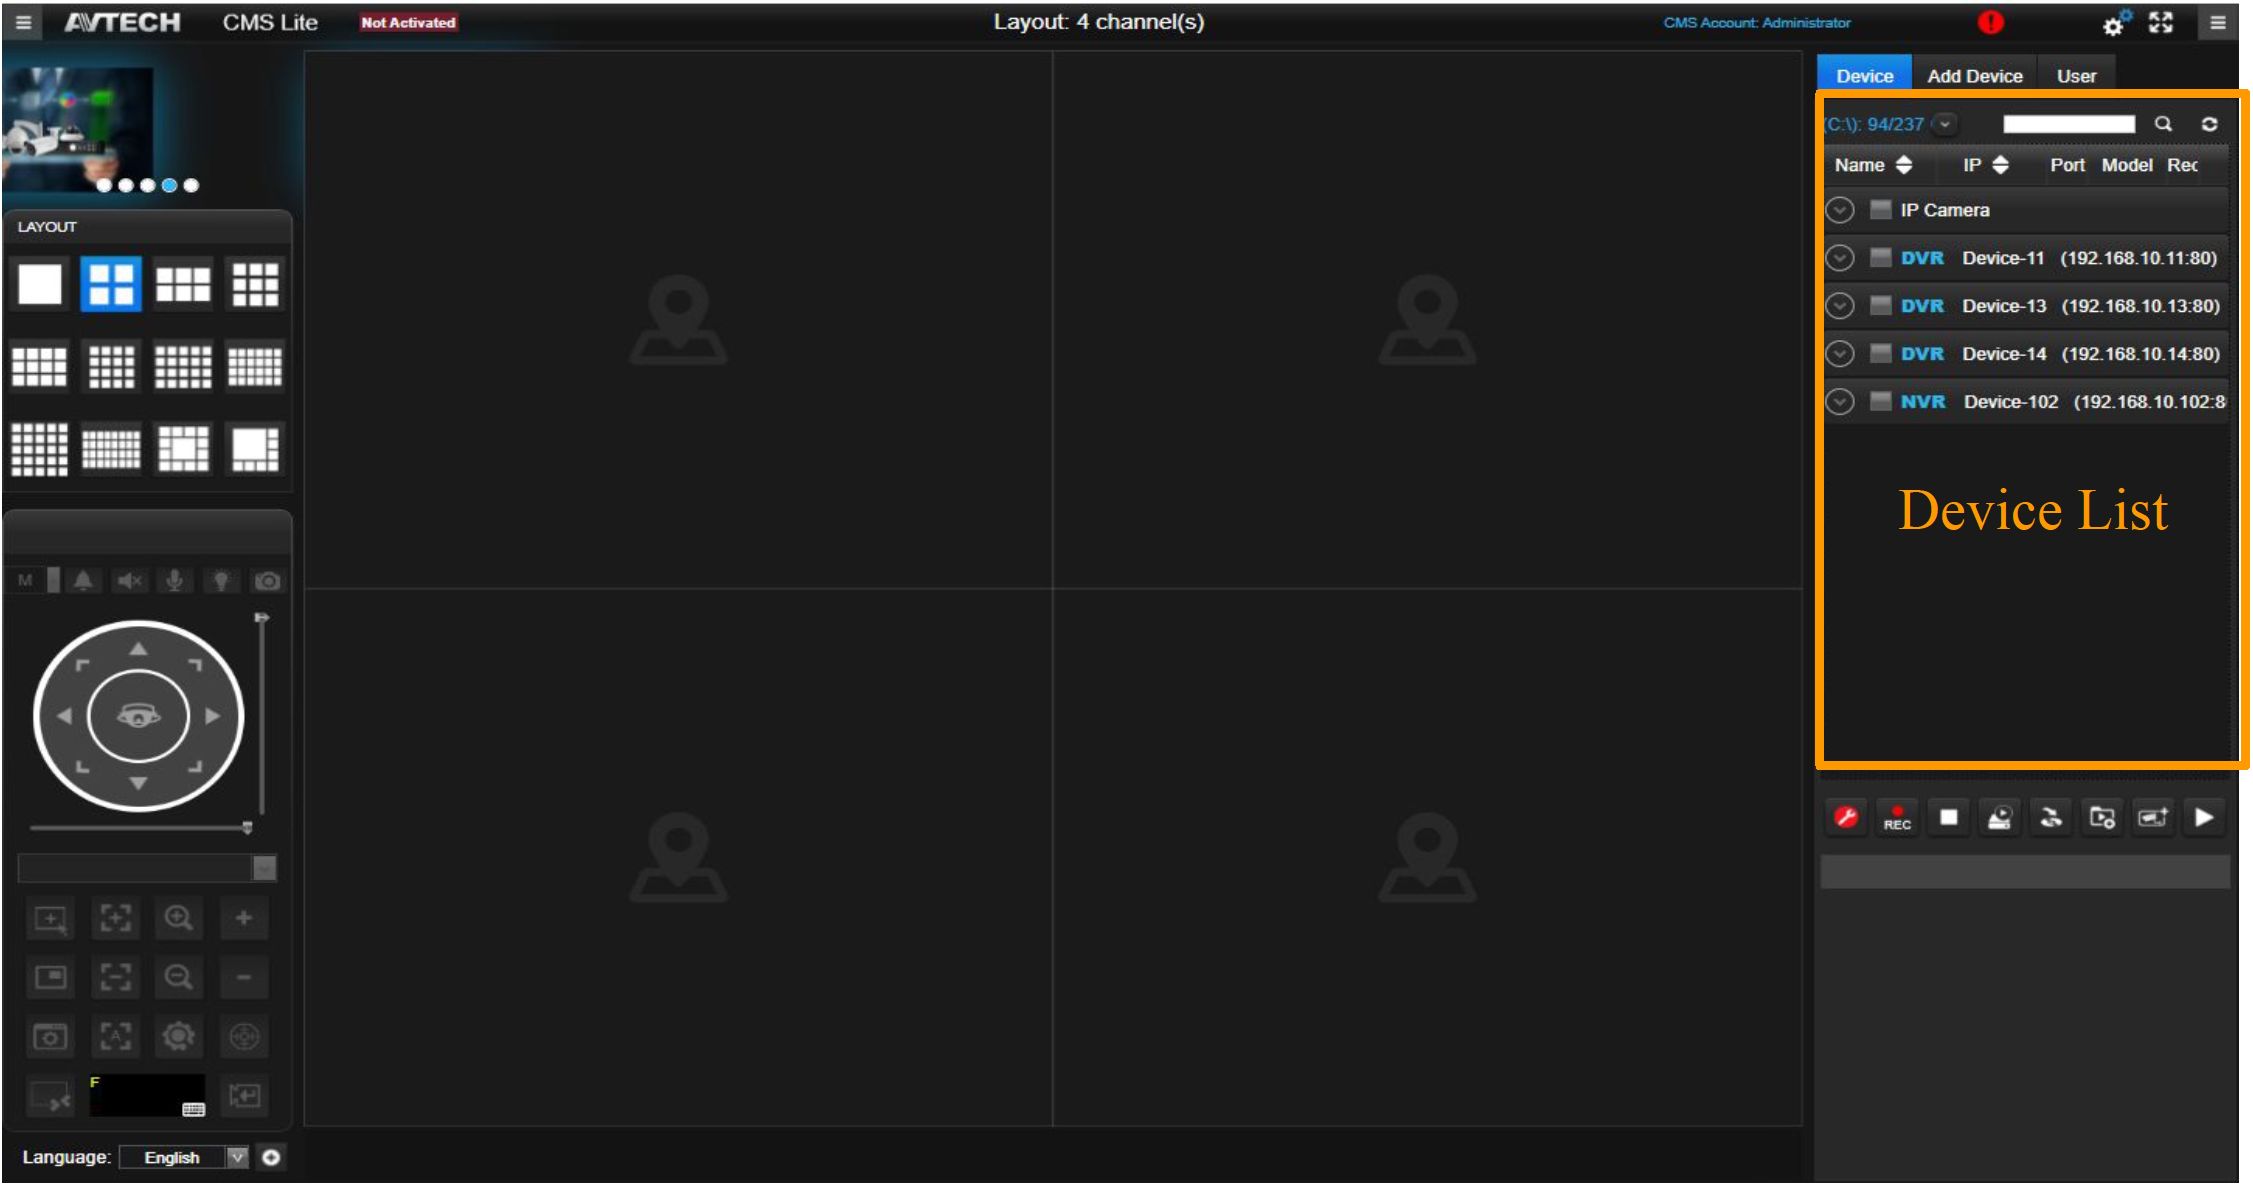
( 4. The devices will display in the “Device List”)
AVTECH CMS Lite Quick Guide
13
AVTECH
-far Vîtteo
Control Panel Overview
Main Control Panel
S3 AVTECH CMS Lite
a
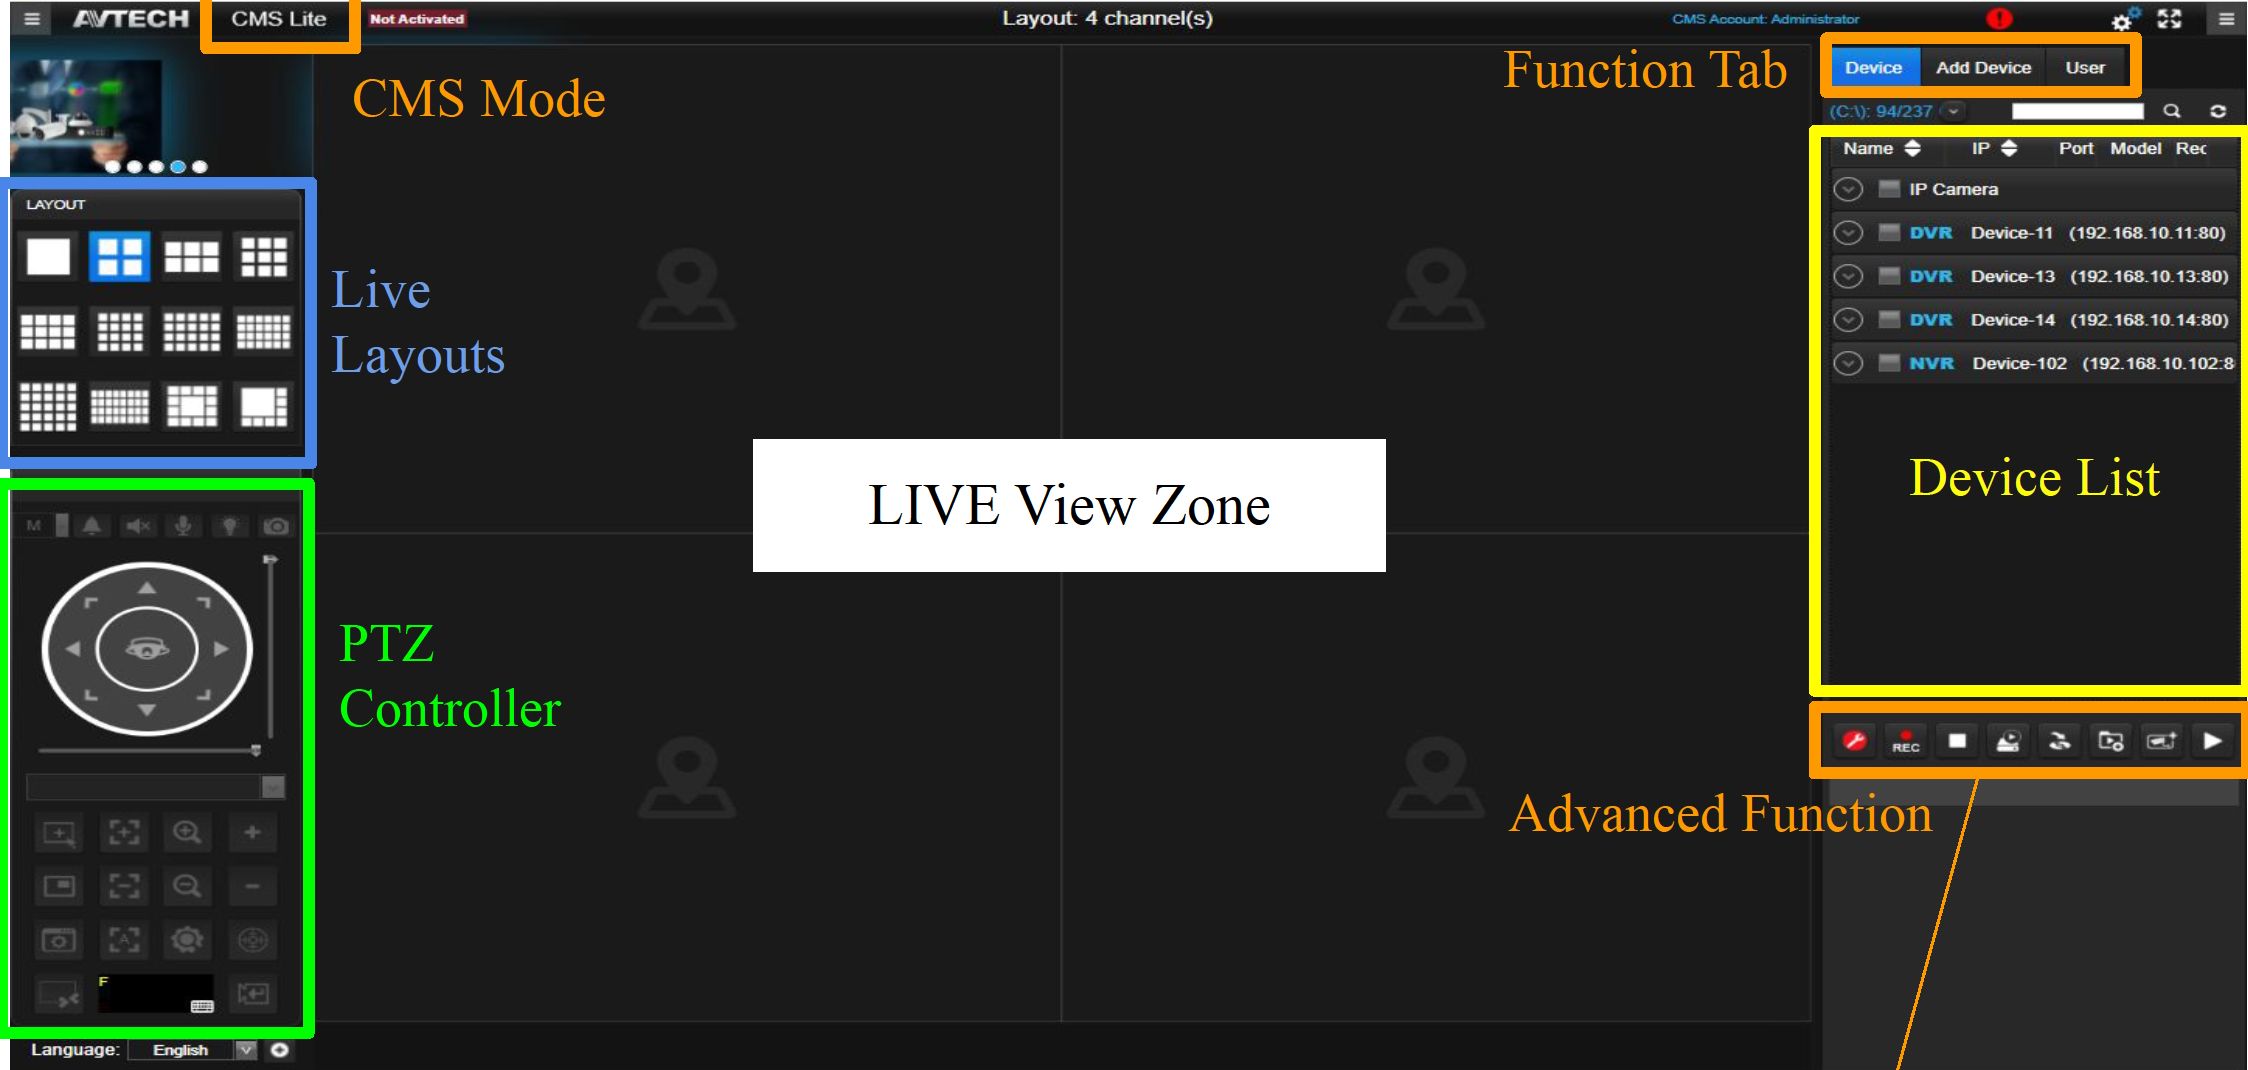
| Function | Icon | Description |
| Record Setting | Alter record setting | |
| Start Recording | Start record for the selected devices | |
| Stop Recording | Stop record for the selected devices | |
| Recording Playback | B | Playback record video from the CMS recorder |
| Backup Recording | ||
| Backup record data | ||
| Add to Group | Add the selected devices to the video group and play live | |
| Add to Live | Add the selected devices to the Live View Zone | |
| Device Playback | Playback record video from the IP Cameras |
AVTECH CMS Lite Quick Guide
14
ZW/TECH
-far Vidlto
Control Panel Overview
System Configuration
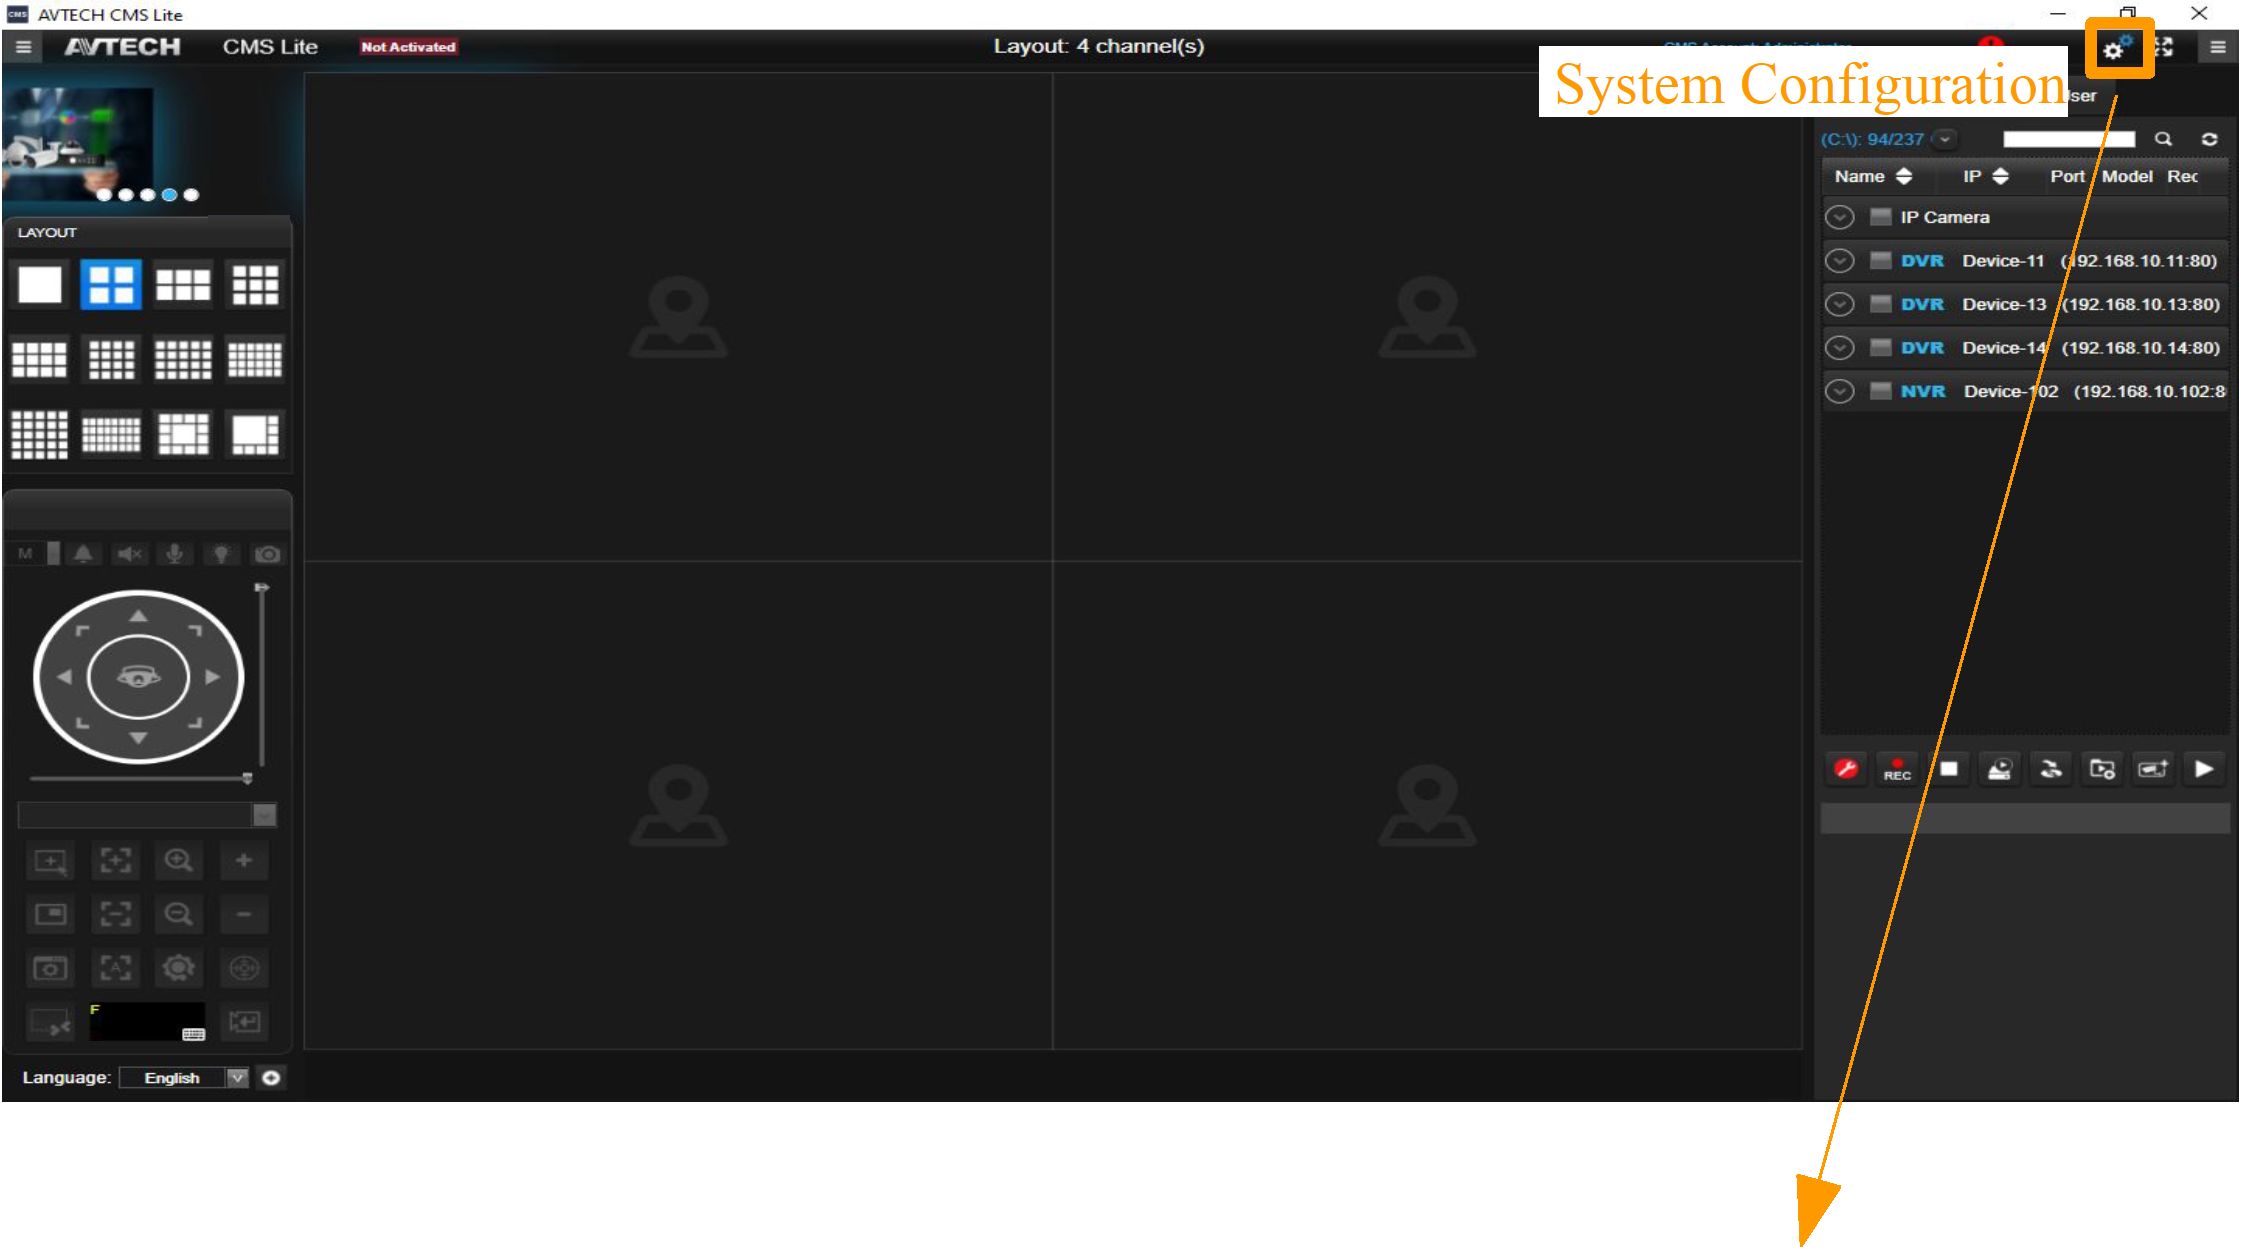
General and Advanced Setting
AVTECH CMS Lite Quick Guide
15
ZW/TECH
-far Vidlto
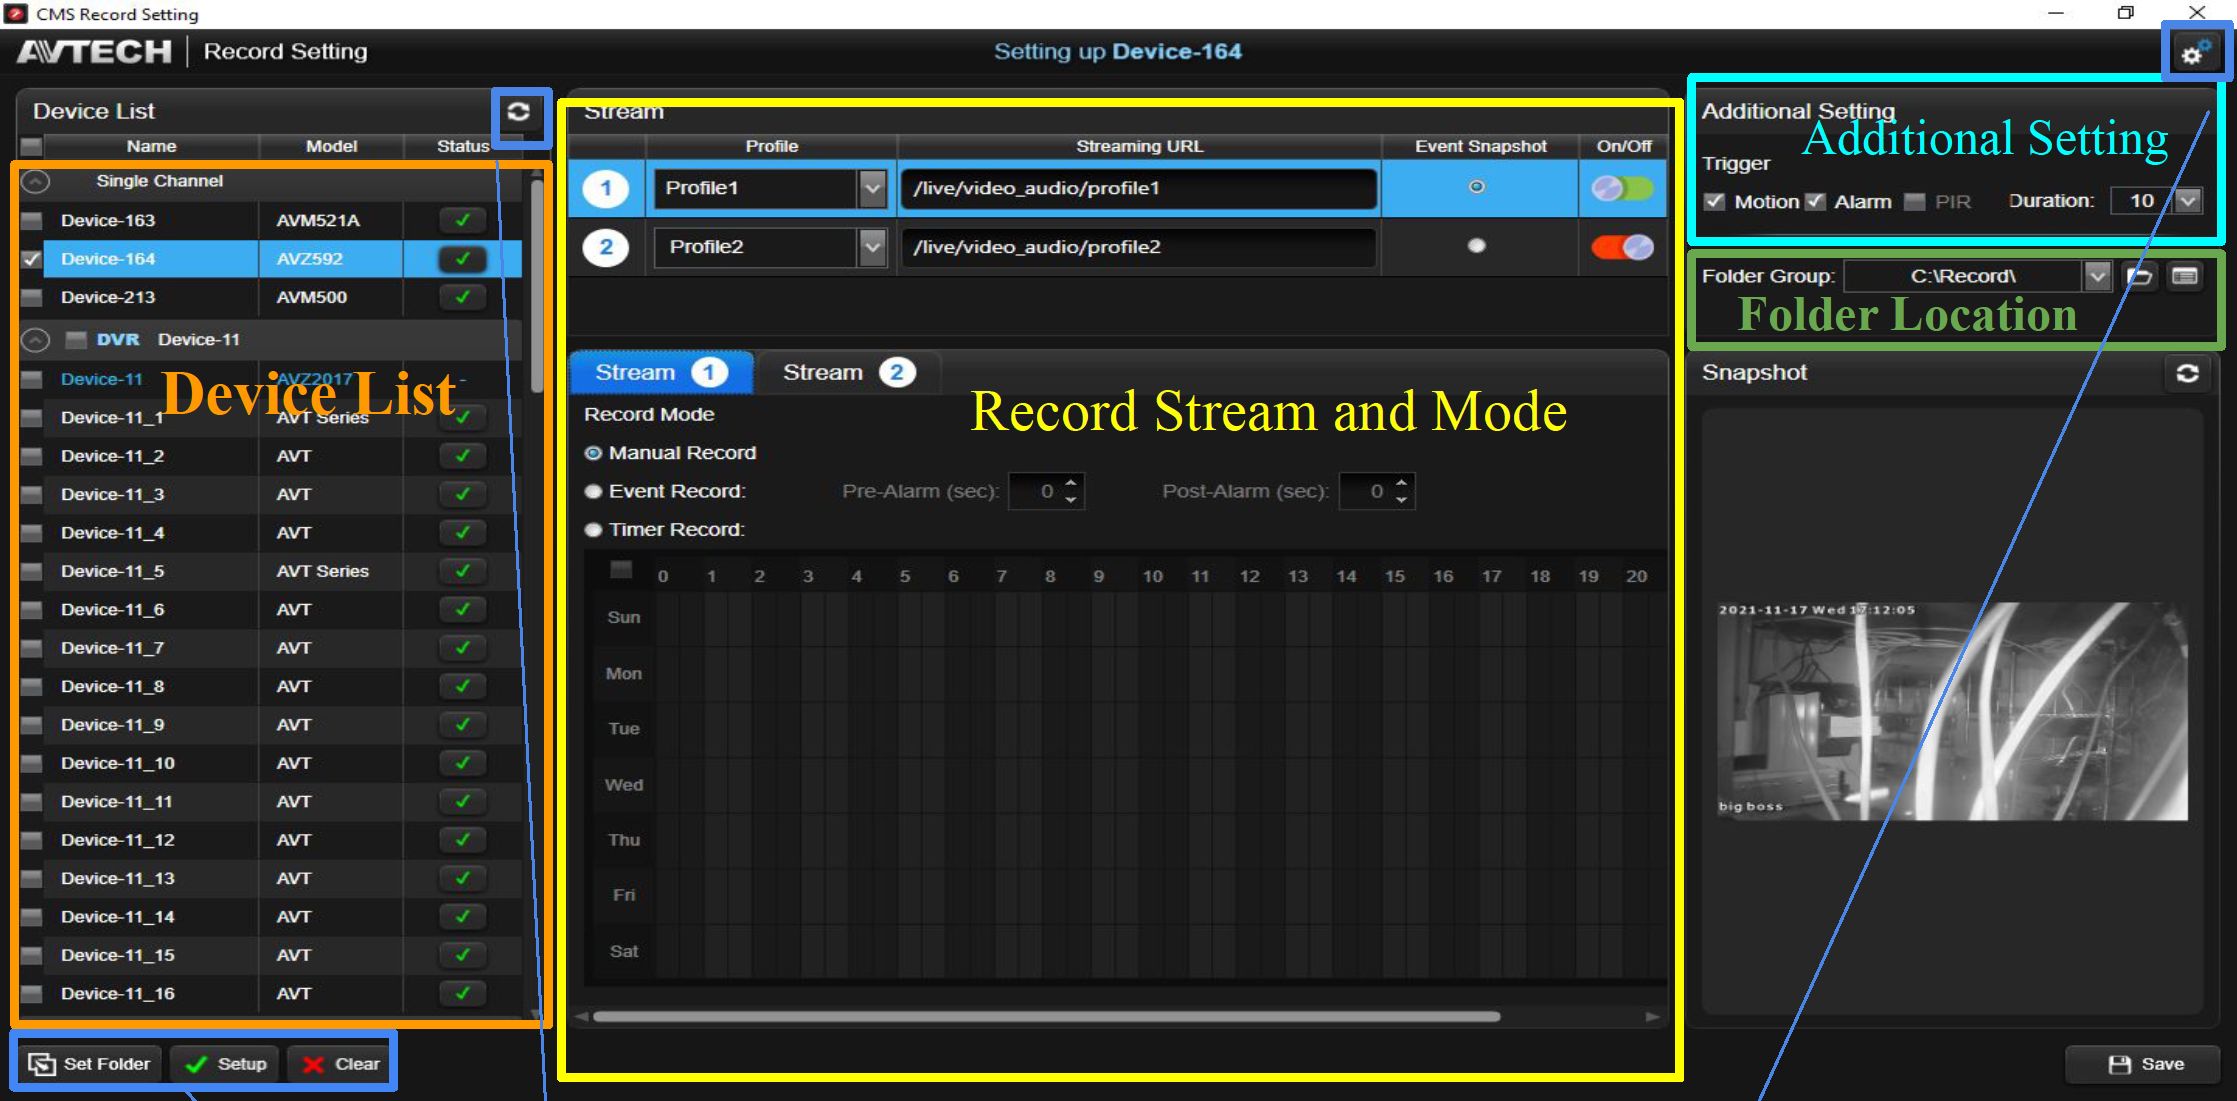
| Function | Icon | Description | ||||
| Reload | □ | Update all the devices to the latest status | ||||
| Set Folder | Set Folder | Setup the folder location of the selected device | ||||
| Setup | y Setup | Initiate device’s record setting | ||||
| Clear | Clear | Erase device’s record setting | ||||
| Advanced Setting | 0 | Setup local disk, remote assess and edge record | ||||
| Choose Folder | e> | Choose the folder location | ||||
| Folder Group List | Inspect the saving location | |||||
| Save | H Save | Save the settings | ||||
AVTECH CMS Lite Quick Guide
16

ZW/TECH
-far Vidlto
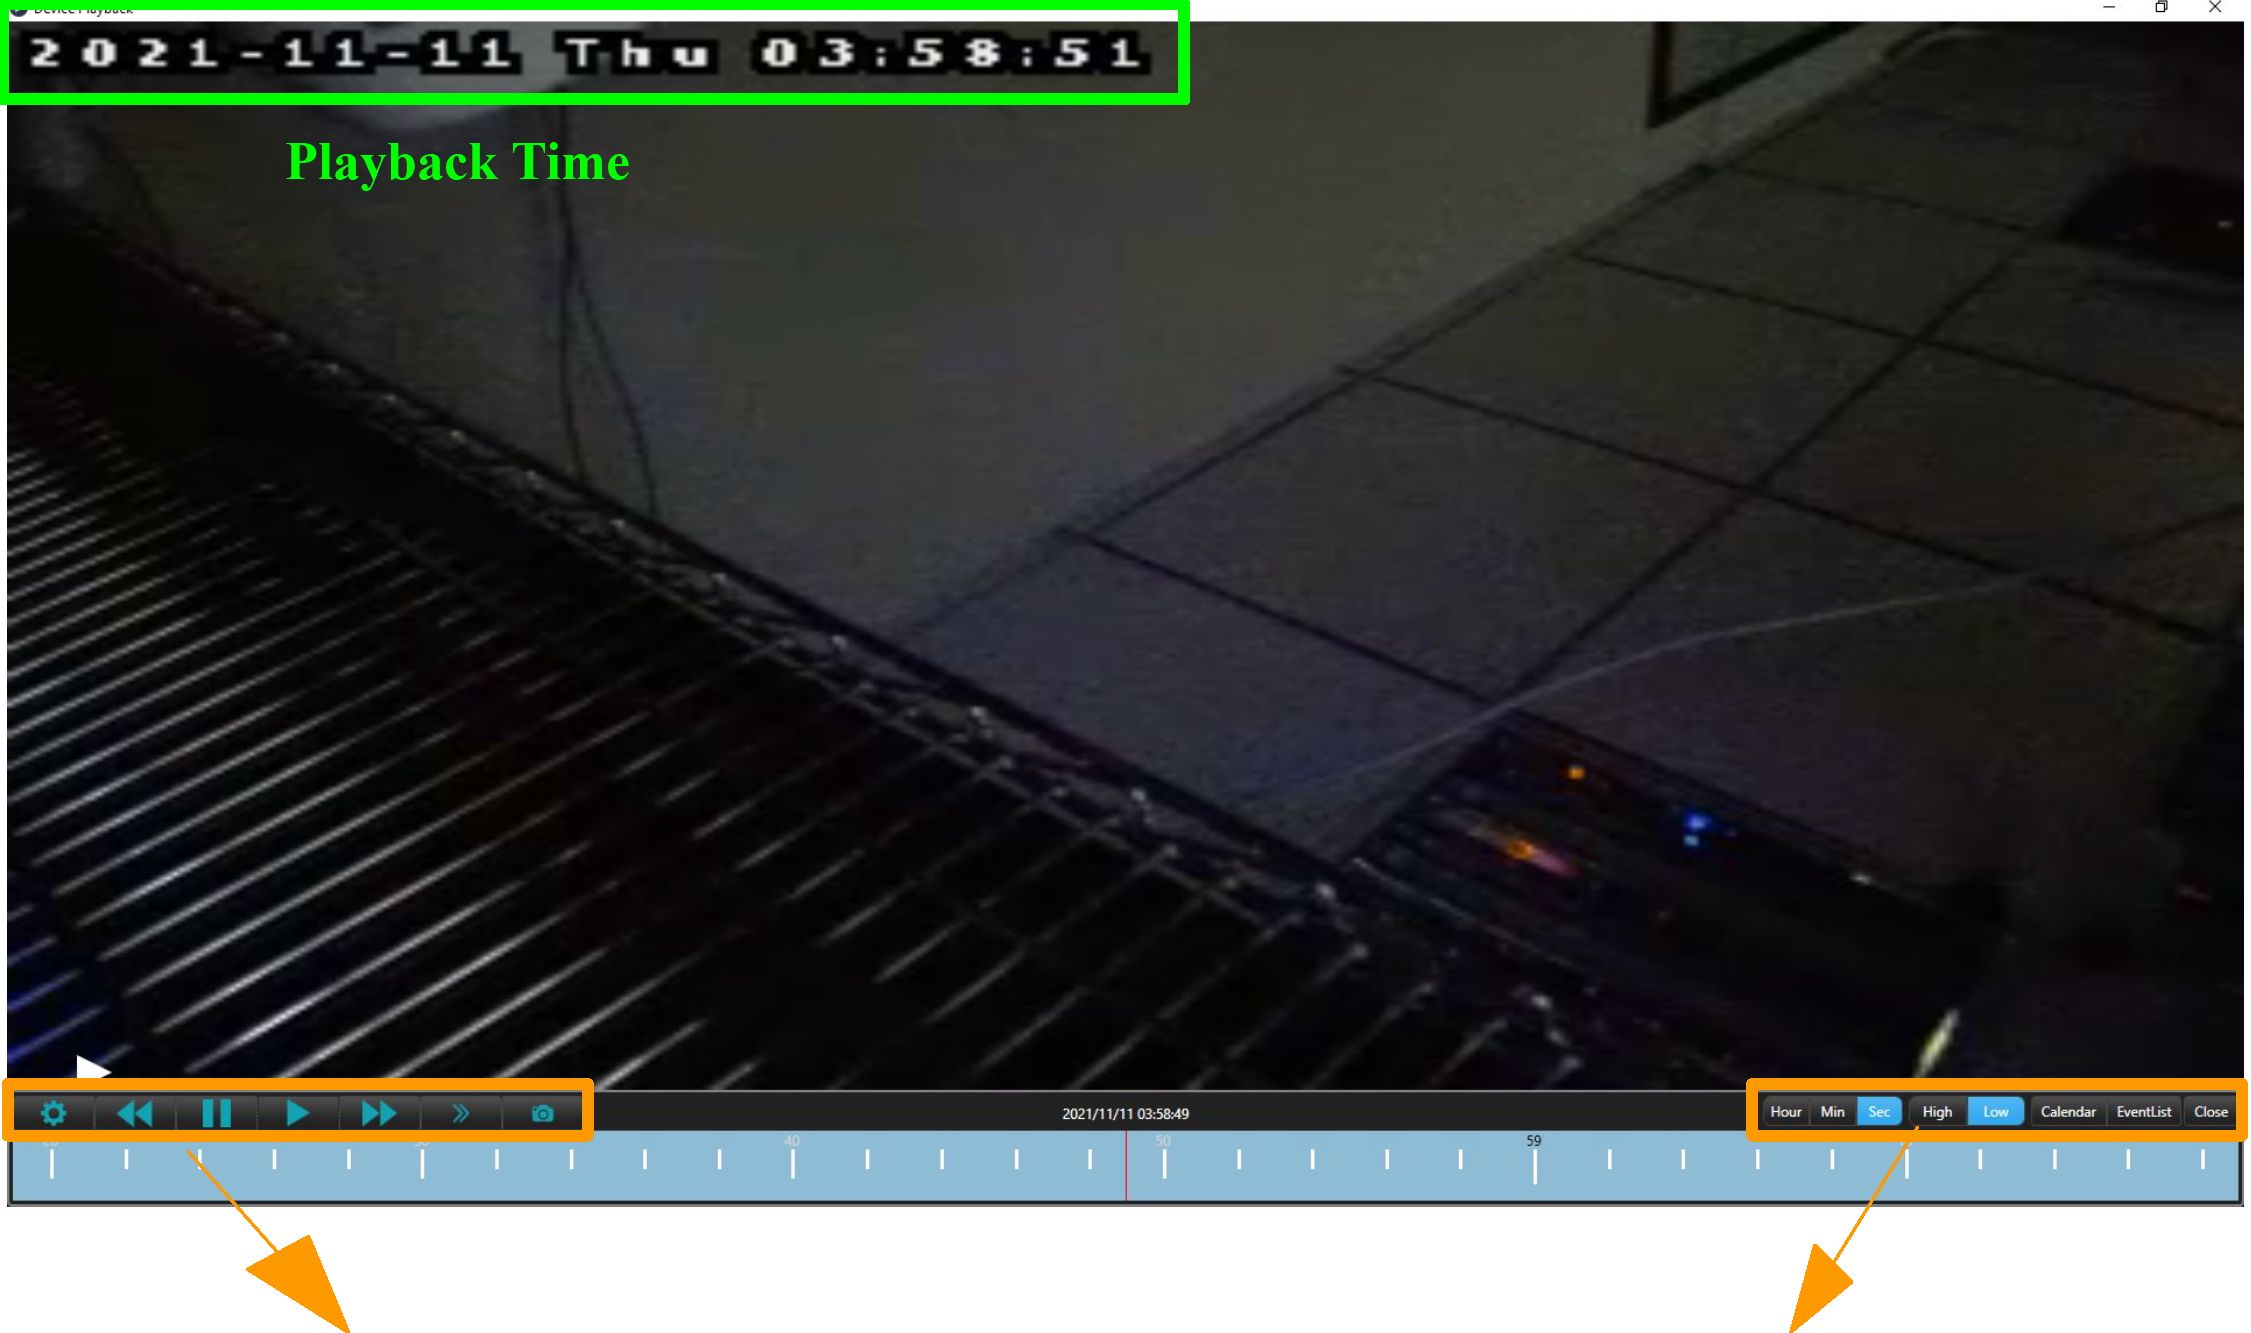
| Video Function | ||
| Function | Description | |
| Play | Play video | |
| Pause | Pause video | |
| Forward | 1 | Fastforward the video up to 32X |
| Rewind | 1 | Backward the video up to 32X |
| Custom
Display |
Alter display | |
| Slow | Slow down video speed | |
| Snapshot | Quick screen shot | |
Advanced Function
| Function | Icon | Description |
| Timeline Controller | Adjust timeline display | |
| Hour Min Sec |
High Low
Quality
Calendar
Calendar
Adjust picture quality
Change the playback date
Event List
EventList
Playback event
Close
Close the window
AVTECH CMS Lite Quick Guide
17
ZW/TECH
~Lnnovorh’an -far Vidlto
Device Area
Add Devices
Click “Add Device” ^ Check the needed devices ^ Click “Add Selected” ^ Wait for the
| strator | o | ** ** | |||
| Device Add Device | User | ||||
| Network Scan | |||||
| IPADDRESS | PORT | GATEWAY | MODEL | ||
| P camera 2. Check Devices | |||||
| r | 10.1 1.163 | 88 | 10.1.1.202 | AVM521A | |
| ■1 | 10.1.1 164 | 88 | 10.1.1 254 | AVZ592 | |
| 10.1.1.213 | 88 | 10.1.1 100 | AVM500 | ||
| 192.168.1.66 | 80 | 192.168 01 IC500L8_V0_A | |||
| 192 168 1 92 | 80 | 192 168 01 MSF12_V0_AF | |||
| B | 192 168 3 133 | 88 | 192 168 3 1 3750AFH_V0_. | ||
| © | )VR | ||||
| T | 192.168 10.11 | 80 | 192 16810.11 | AVZ2017 | |
| ■1 | 19Z168.10.13 | 80 | 92.168 10.13ı | AVZ8136 | |
| ✓ | 192168.10.14 | 80 | 92.16810.16 | AVZ308 | |
| © | 4VR | ||||
| | 192 168 10 100 | 80 | 92 168 101» | AVH8516 | ||
3. Add Selected
^

AVTECH CMS Lite Quick Guide
18
ZW/TECH
~Lnnovorh’an -far Vidlto
Device Area
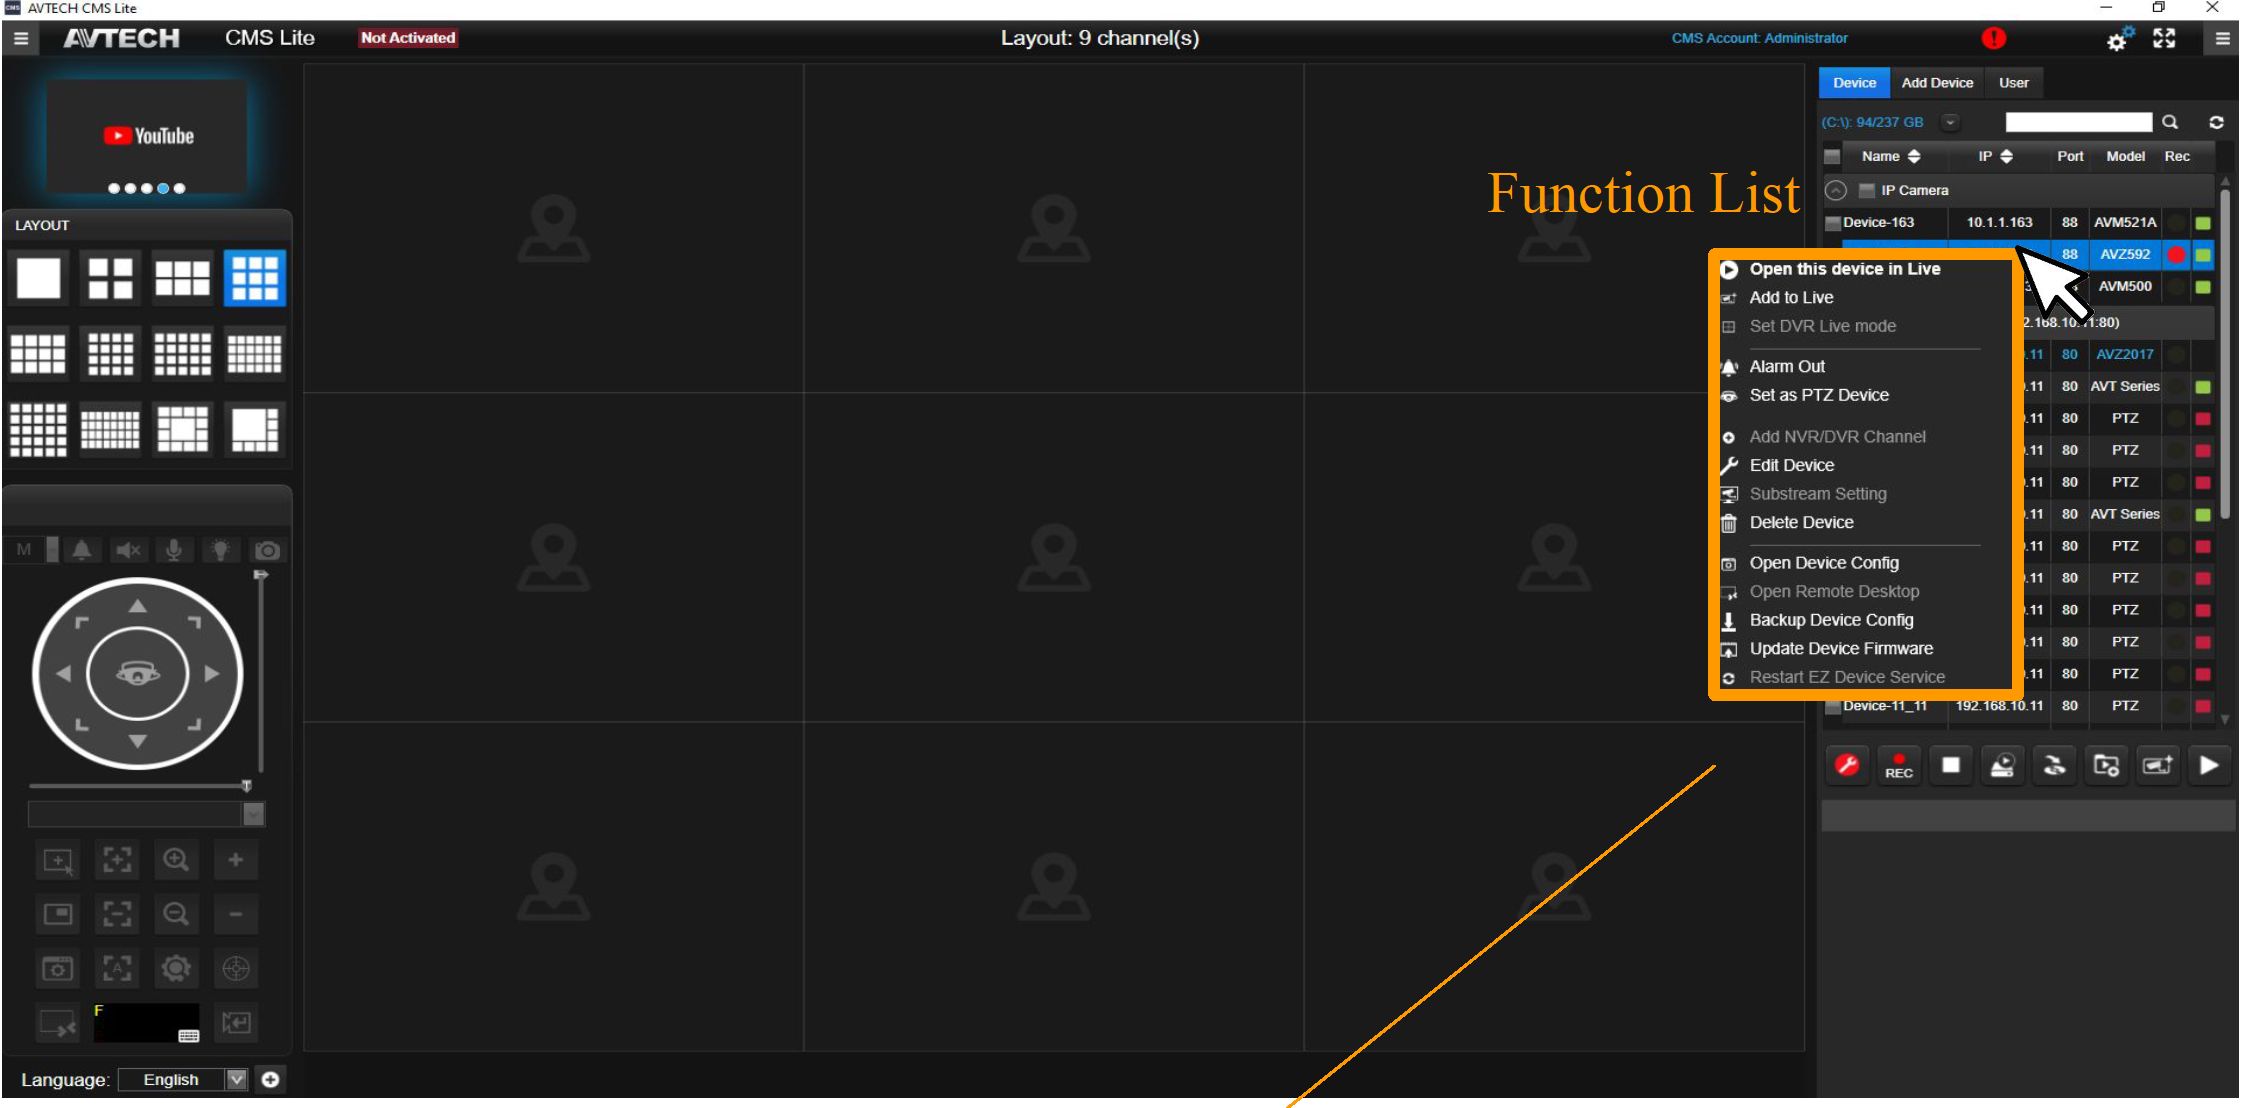
Delete Devices
Choose the needed device to delete by click the right click ^ Click “Delete Device”
Q Open this device in Live
at Add to Live
□ Set DVR Live mode
‘A1 Alarm Out
Set as PTZ Device
O Add NVR/DVR Channel
Edit Device
[*1 Substream Setting
Delete Device
n Open Device CorTiS
“S Open Remote Desktop
| Backup Device Config
Q3 Update Device Firmware
O Restart EZ Device Service

Delete Confirmation
^
AVTECH CMS Lite Quick Guide
19
ZW/TECH
-far Vidlto
Device Area
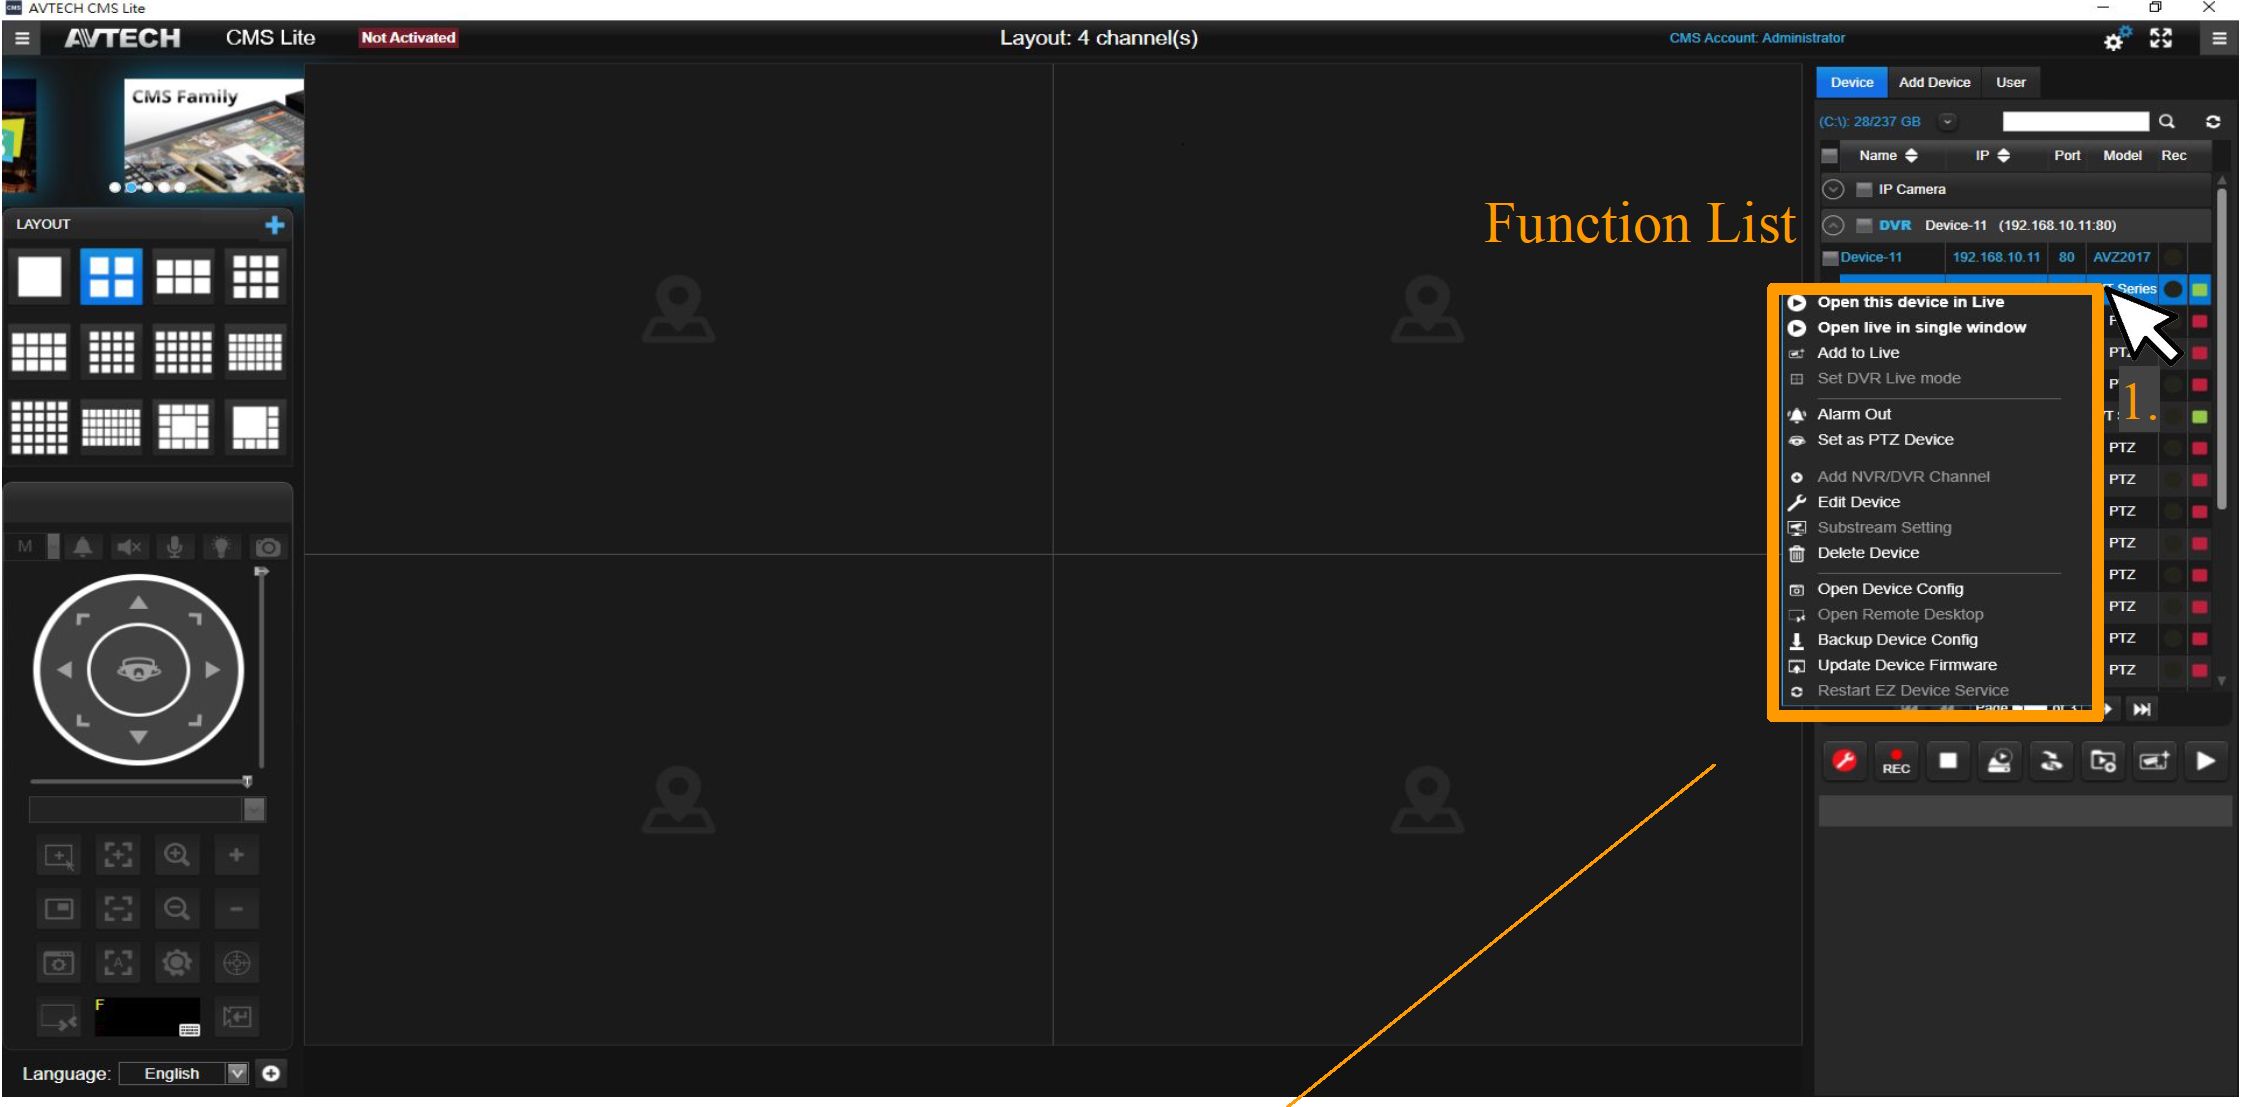
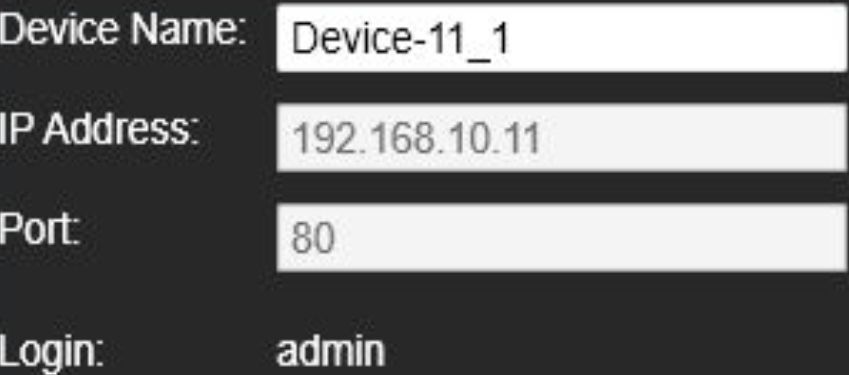
Edit Devices
Choose the needed device to delete by click the right click ^ Click “Delete Device
Q Open this device in Live at Add to Live
□ Set DVR Live mode
‘A1 Alarm Out
Set as PTZ Device
O Add NVR/DVR Channel
f Edit Device ,
, .
Delete Device
föi Open Device Config
71 Open Remote Desktop | Backup Device Config 53 Update Device Firmware O Restart EZ Device Service
^
Model: AVT Series (3
3.
Alter device name and update settings
AVTECH CMS Lite Quick Guide
20
ZW/TECH
-far Vidlto
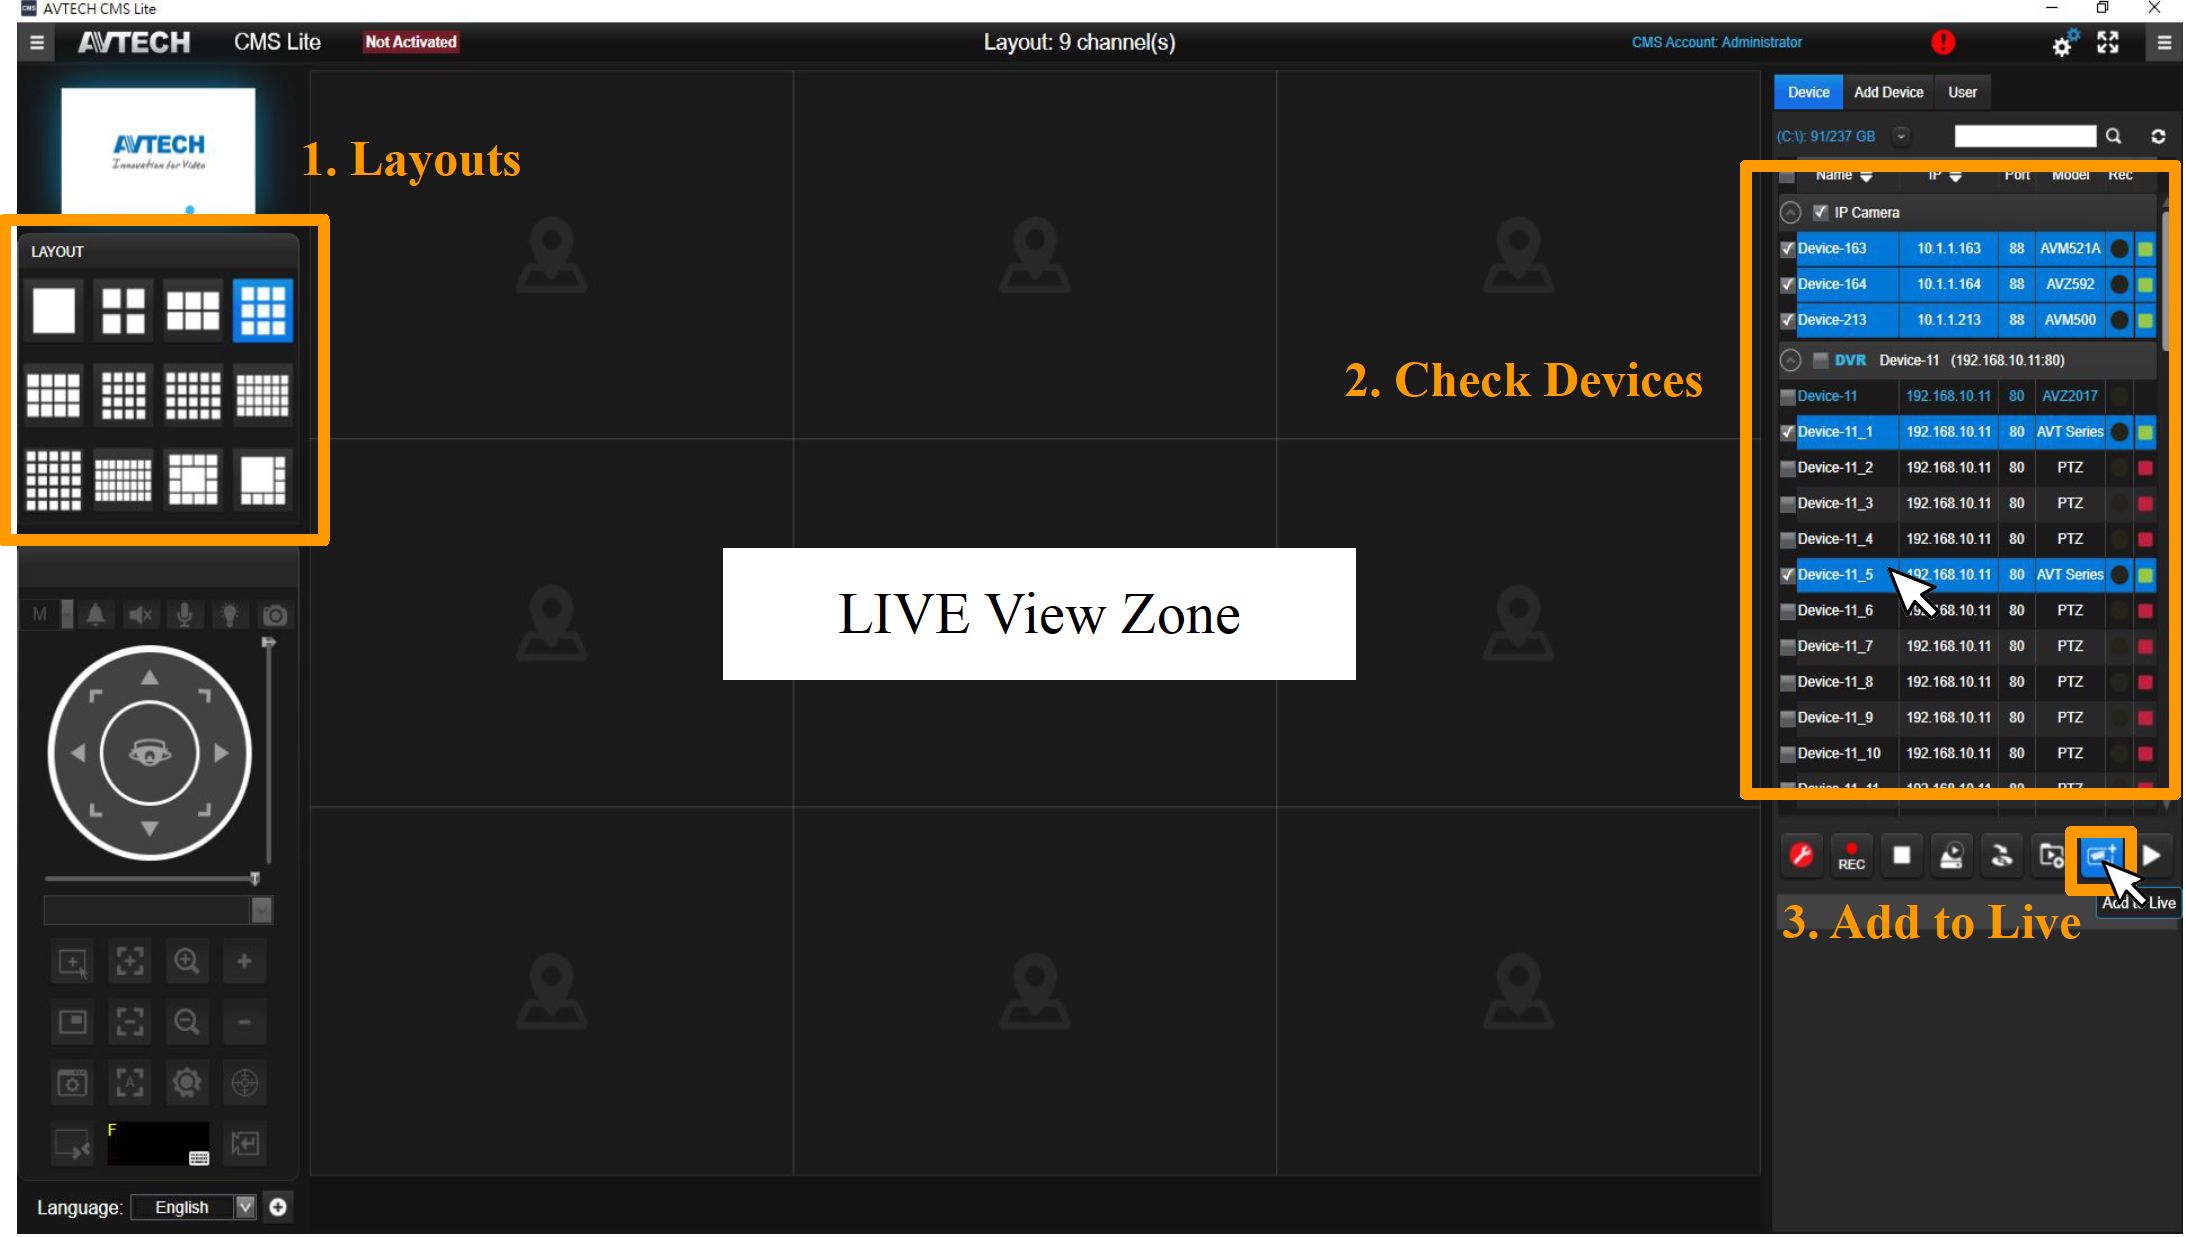
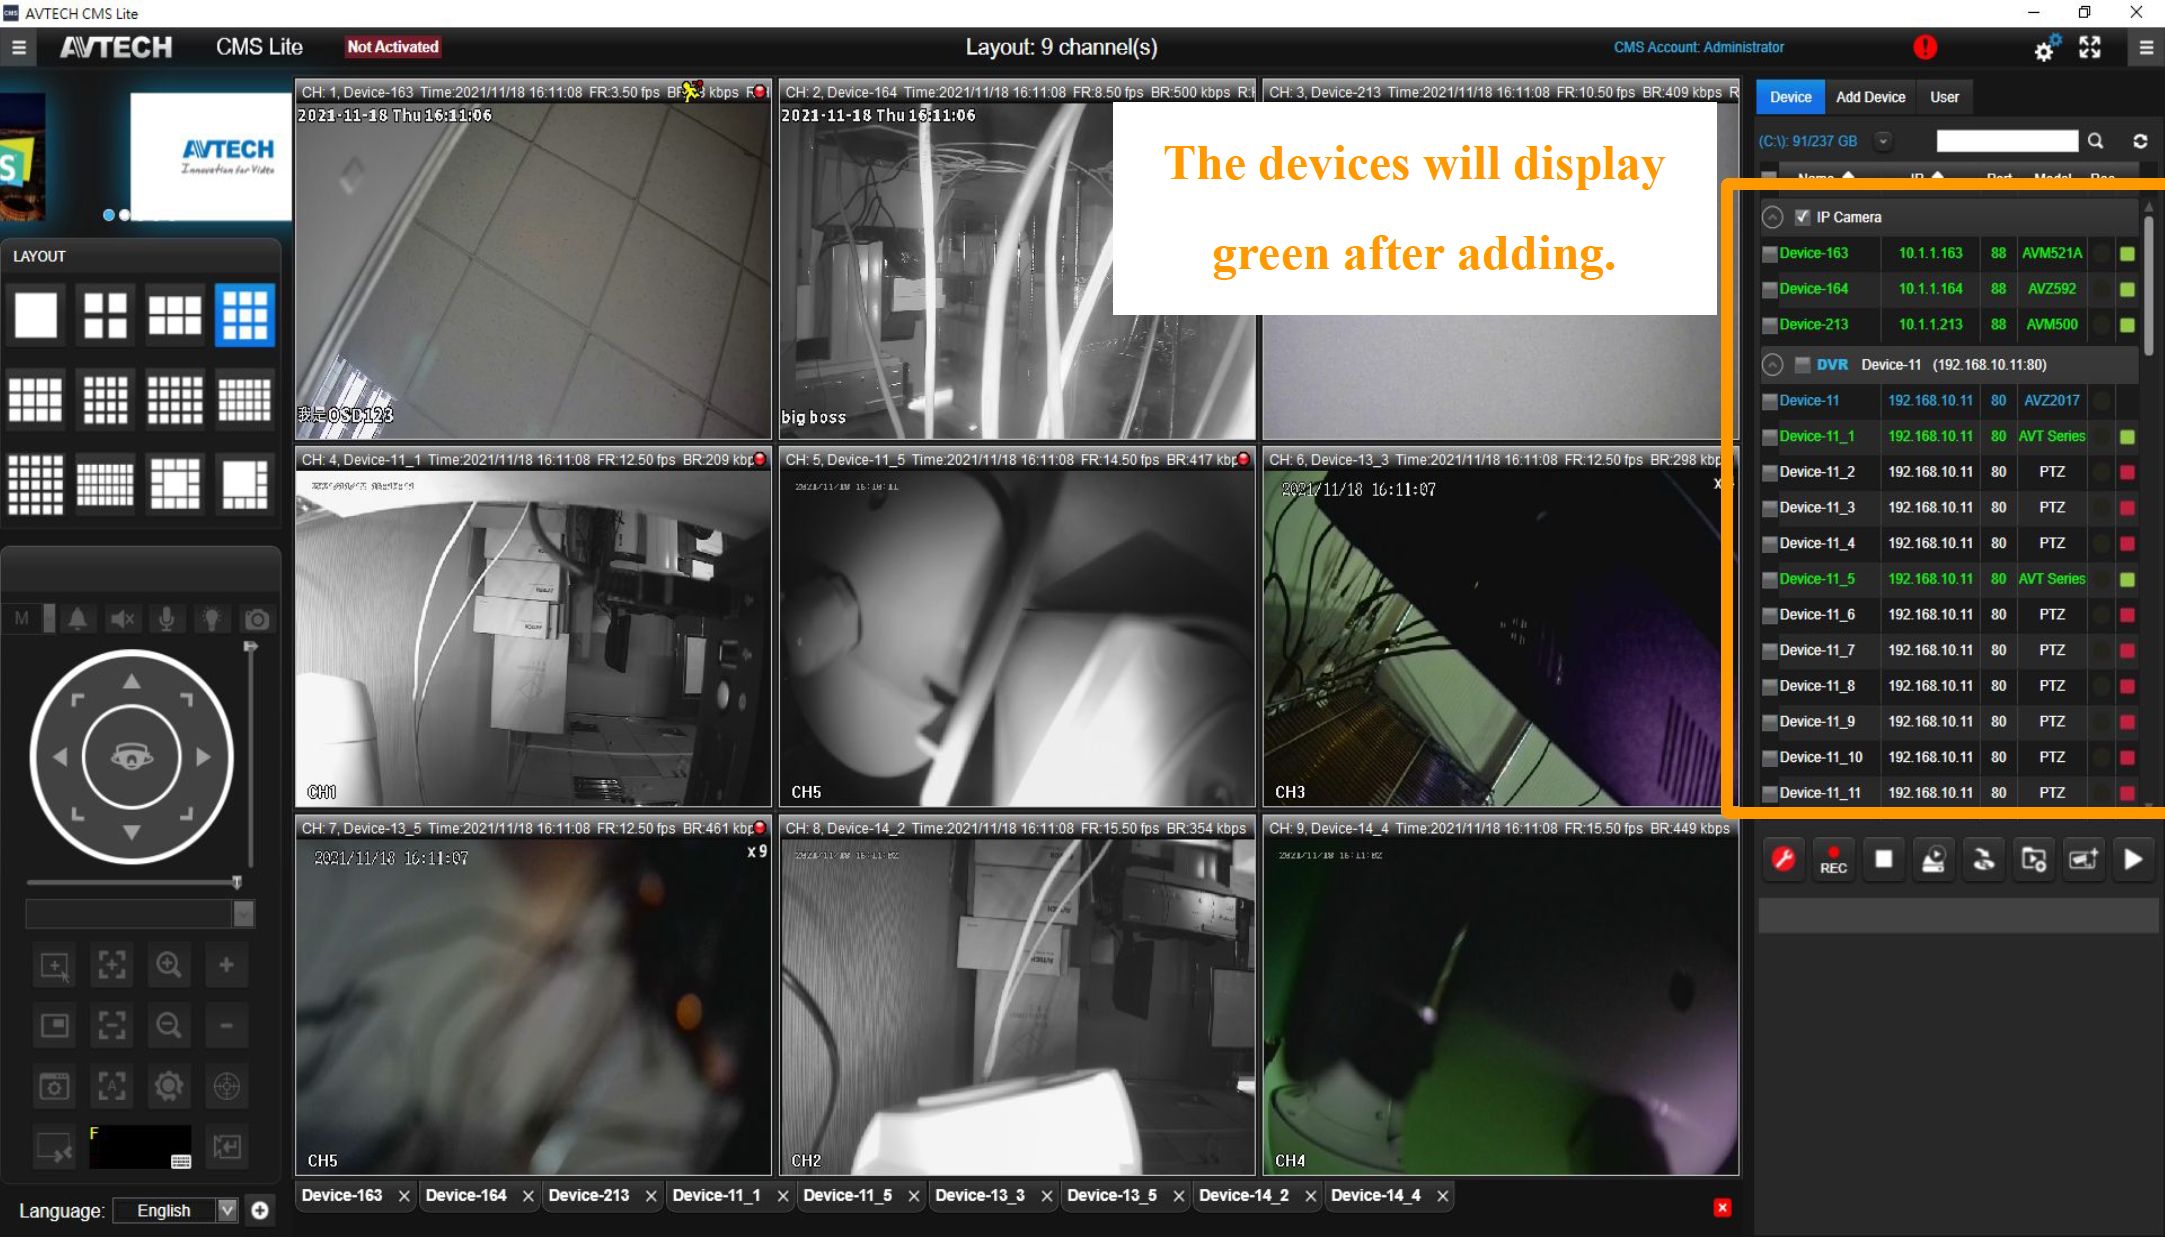
Add to Live
Add devices to the LIVE View Zone.
Choose a needed layout to display your devices ^ Check the needed devices ^ Click
“Add to Live” ^ Wait for the images appear
AVTECH CMS Lite Quick Guide
21
ZW/TECH
-far Vidlto
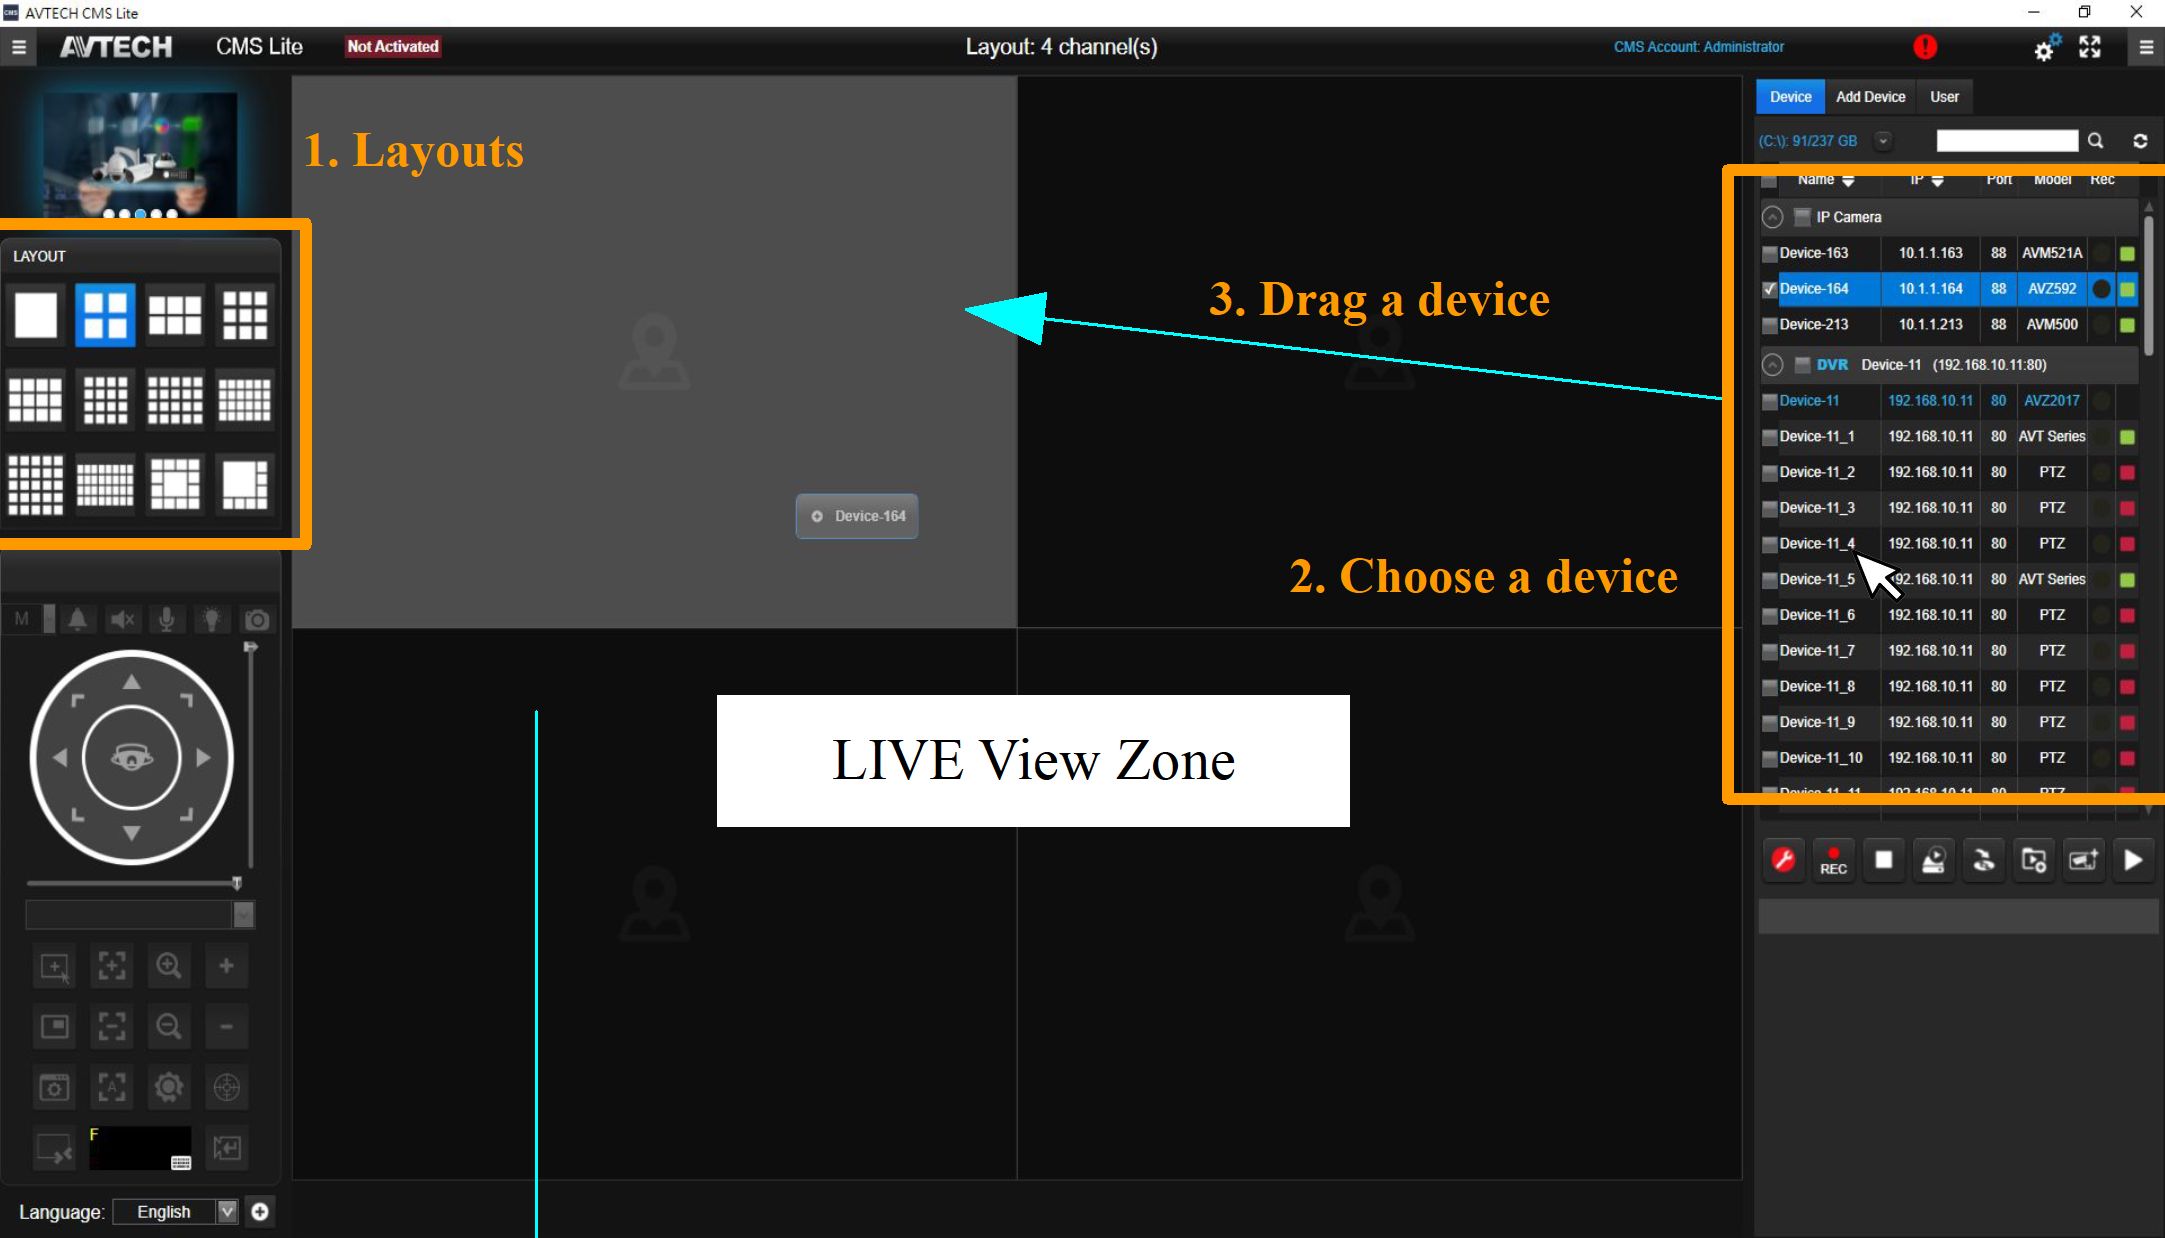
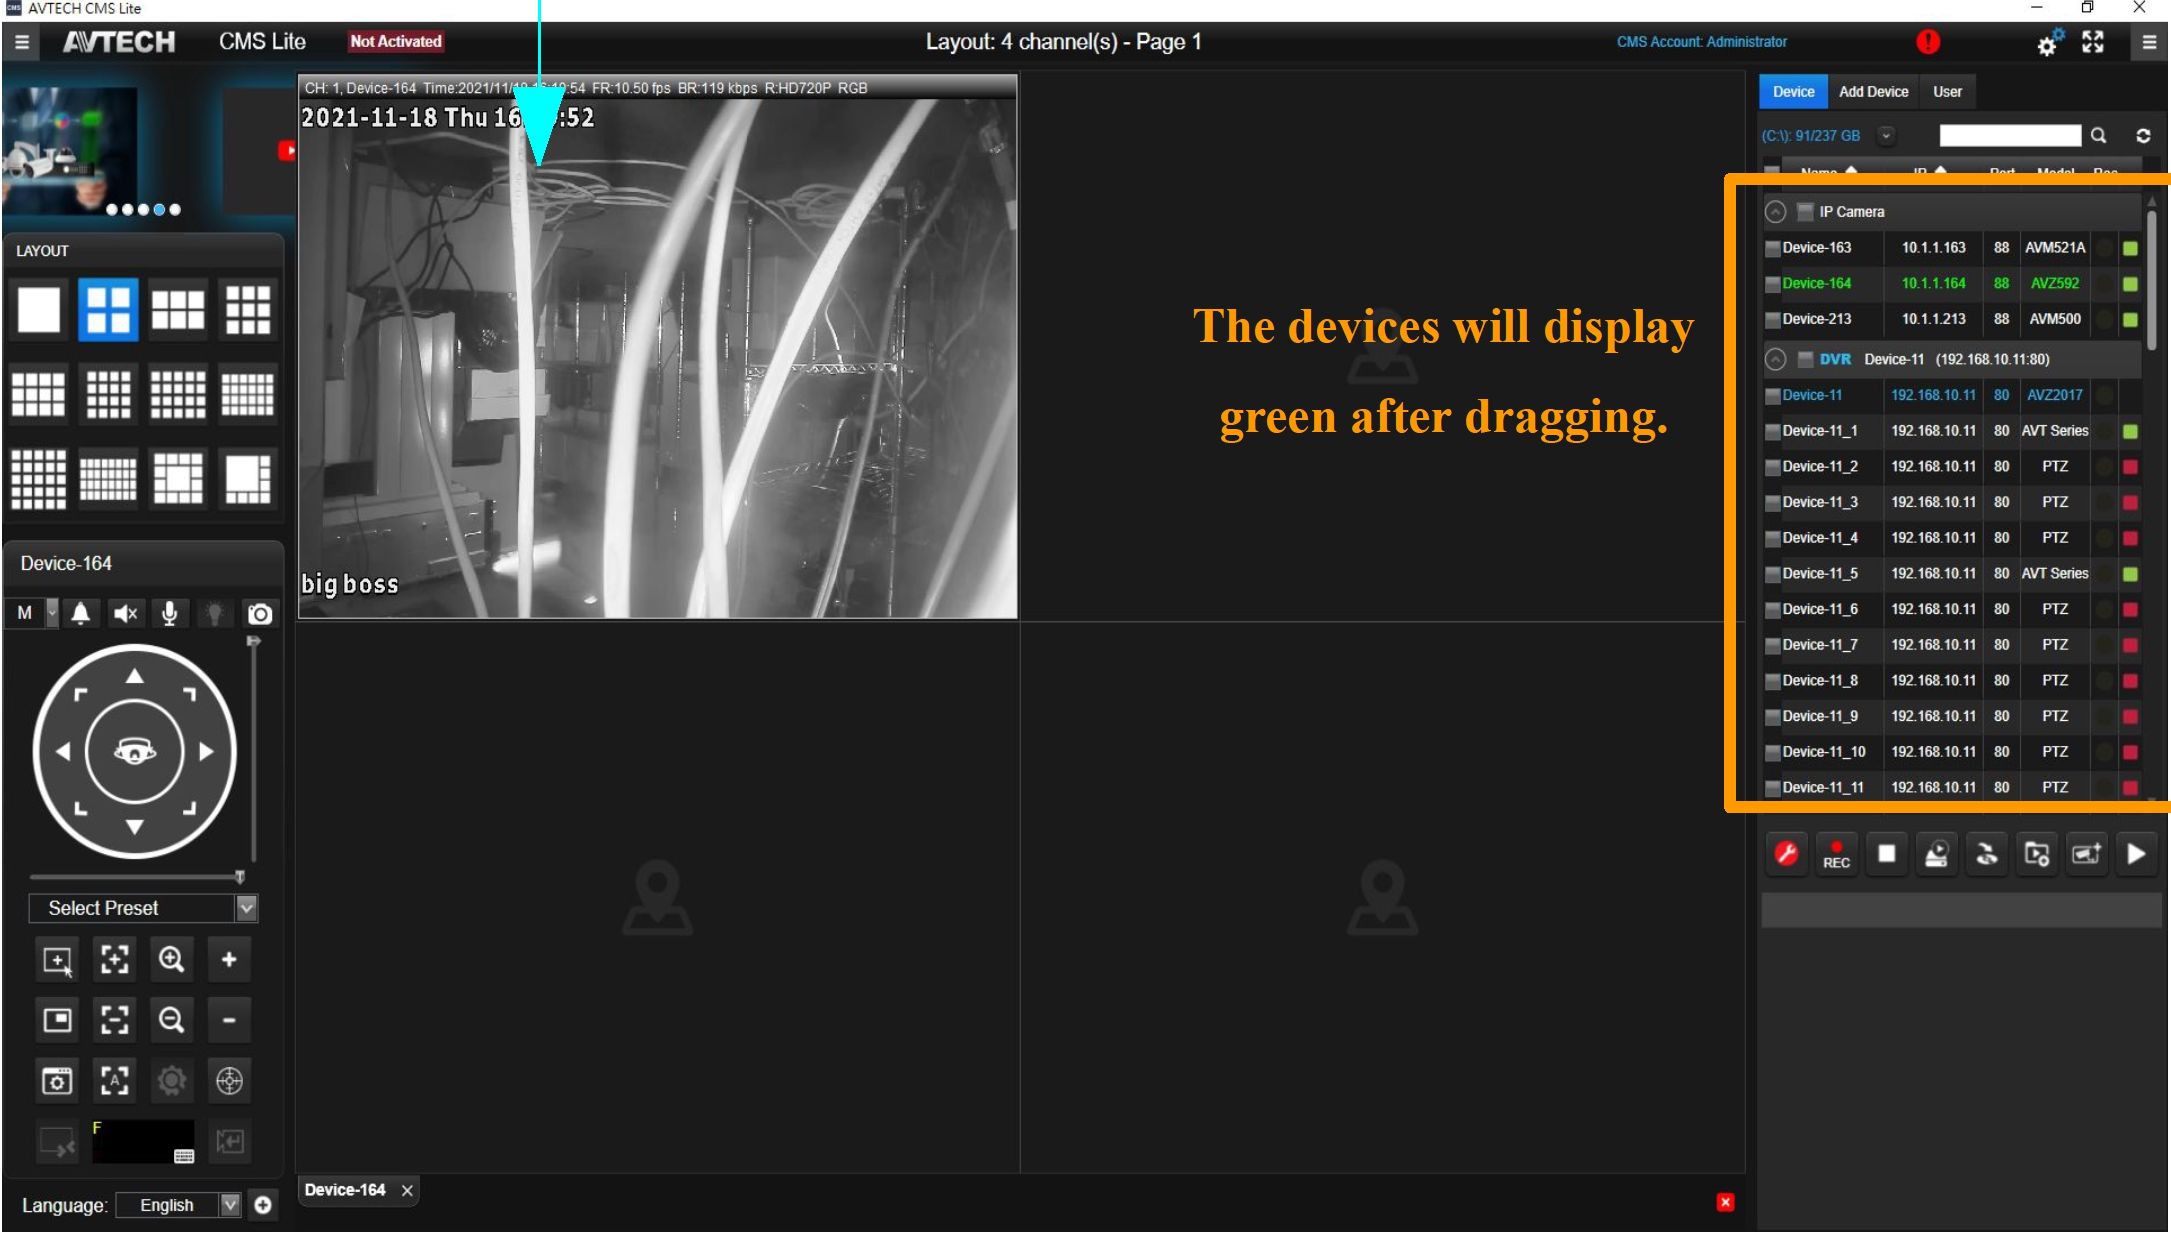
Drag a Device
Add devices to the LIVE View Zone.
Choose a needed layout to display your devices ^ Click on a needed device by the left click and drag it to one of the columns ^ Wait for the images appear
AVTECH CMS Lite Quick Guide
22
ZW/TECH
-far Vidlto
Add to Group
Click “Add to Group” ^ Enter a name ^ Choose a layout to display ^ Select the needed devices according to the number of layout ^ Click “OK” ^ Double-click the group to open it
D AVTECH CMS Lite – O
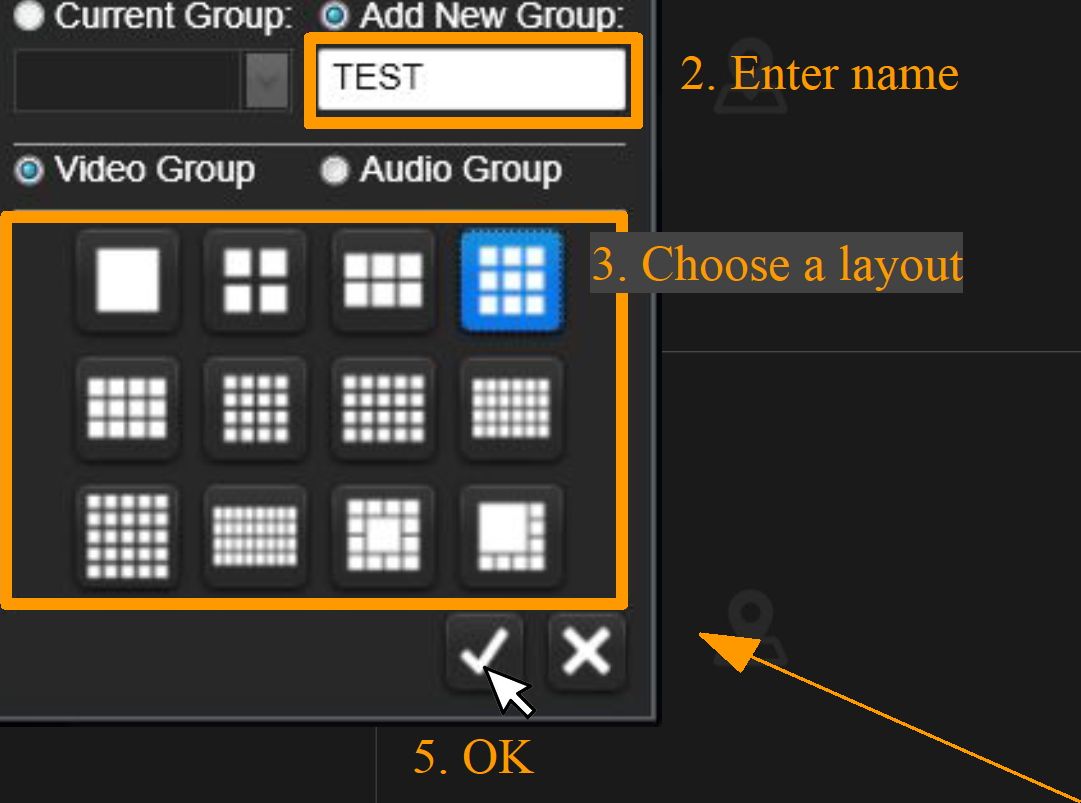
^ Video Group
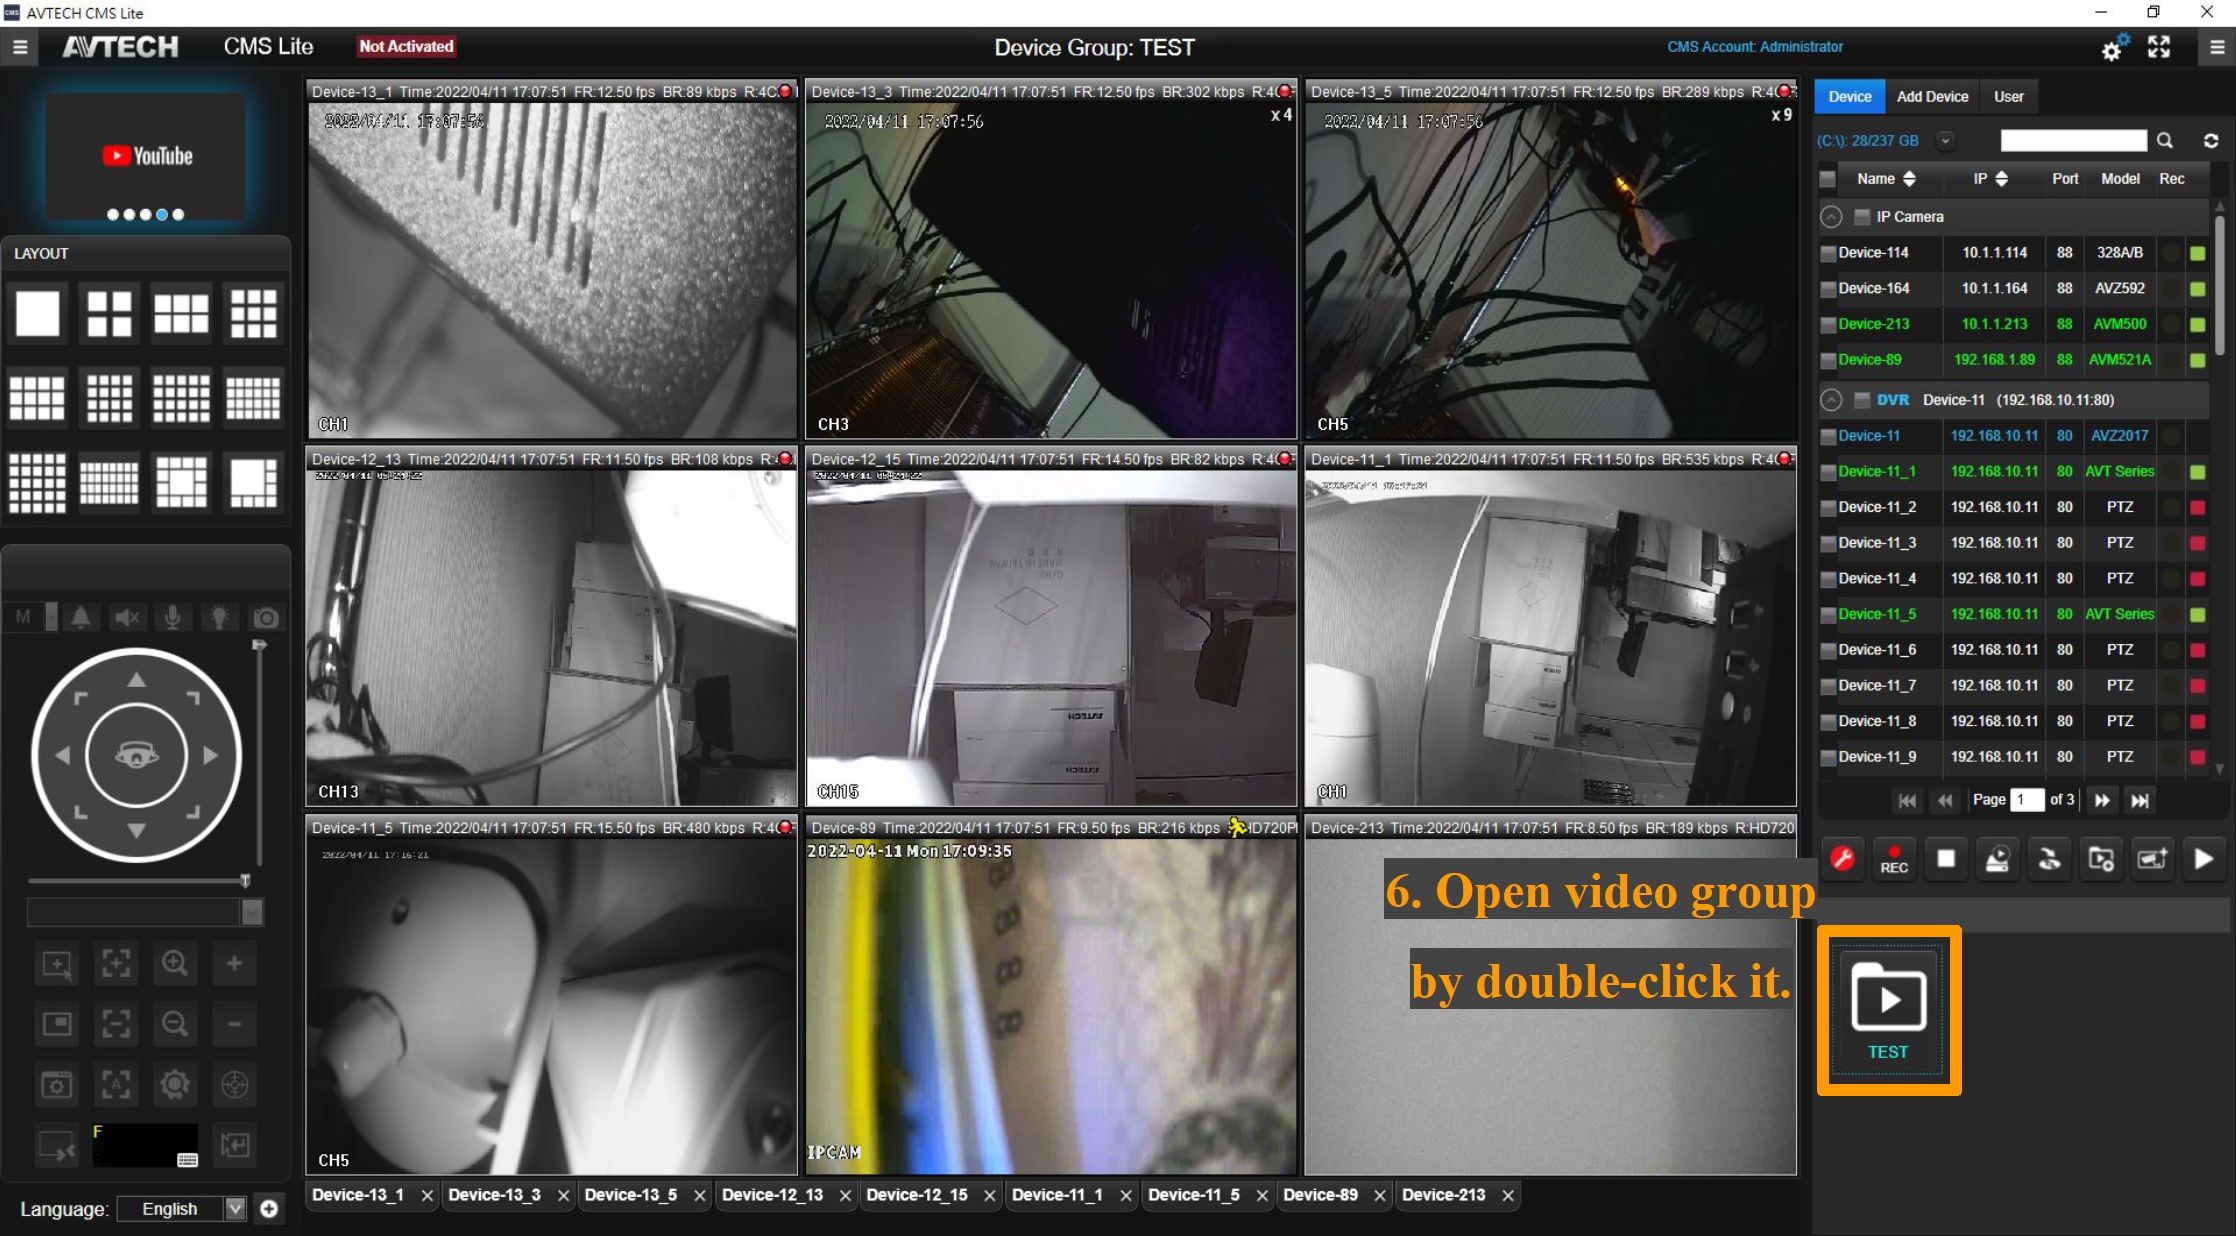
AVTECH CMS Lite Quick Guide
23
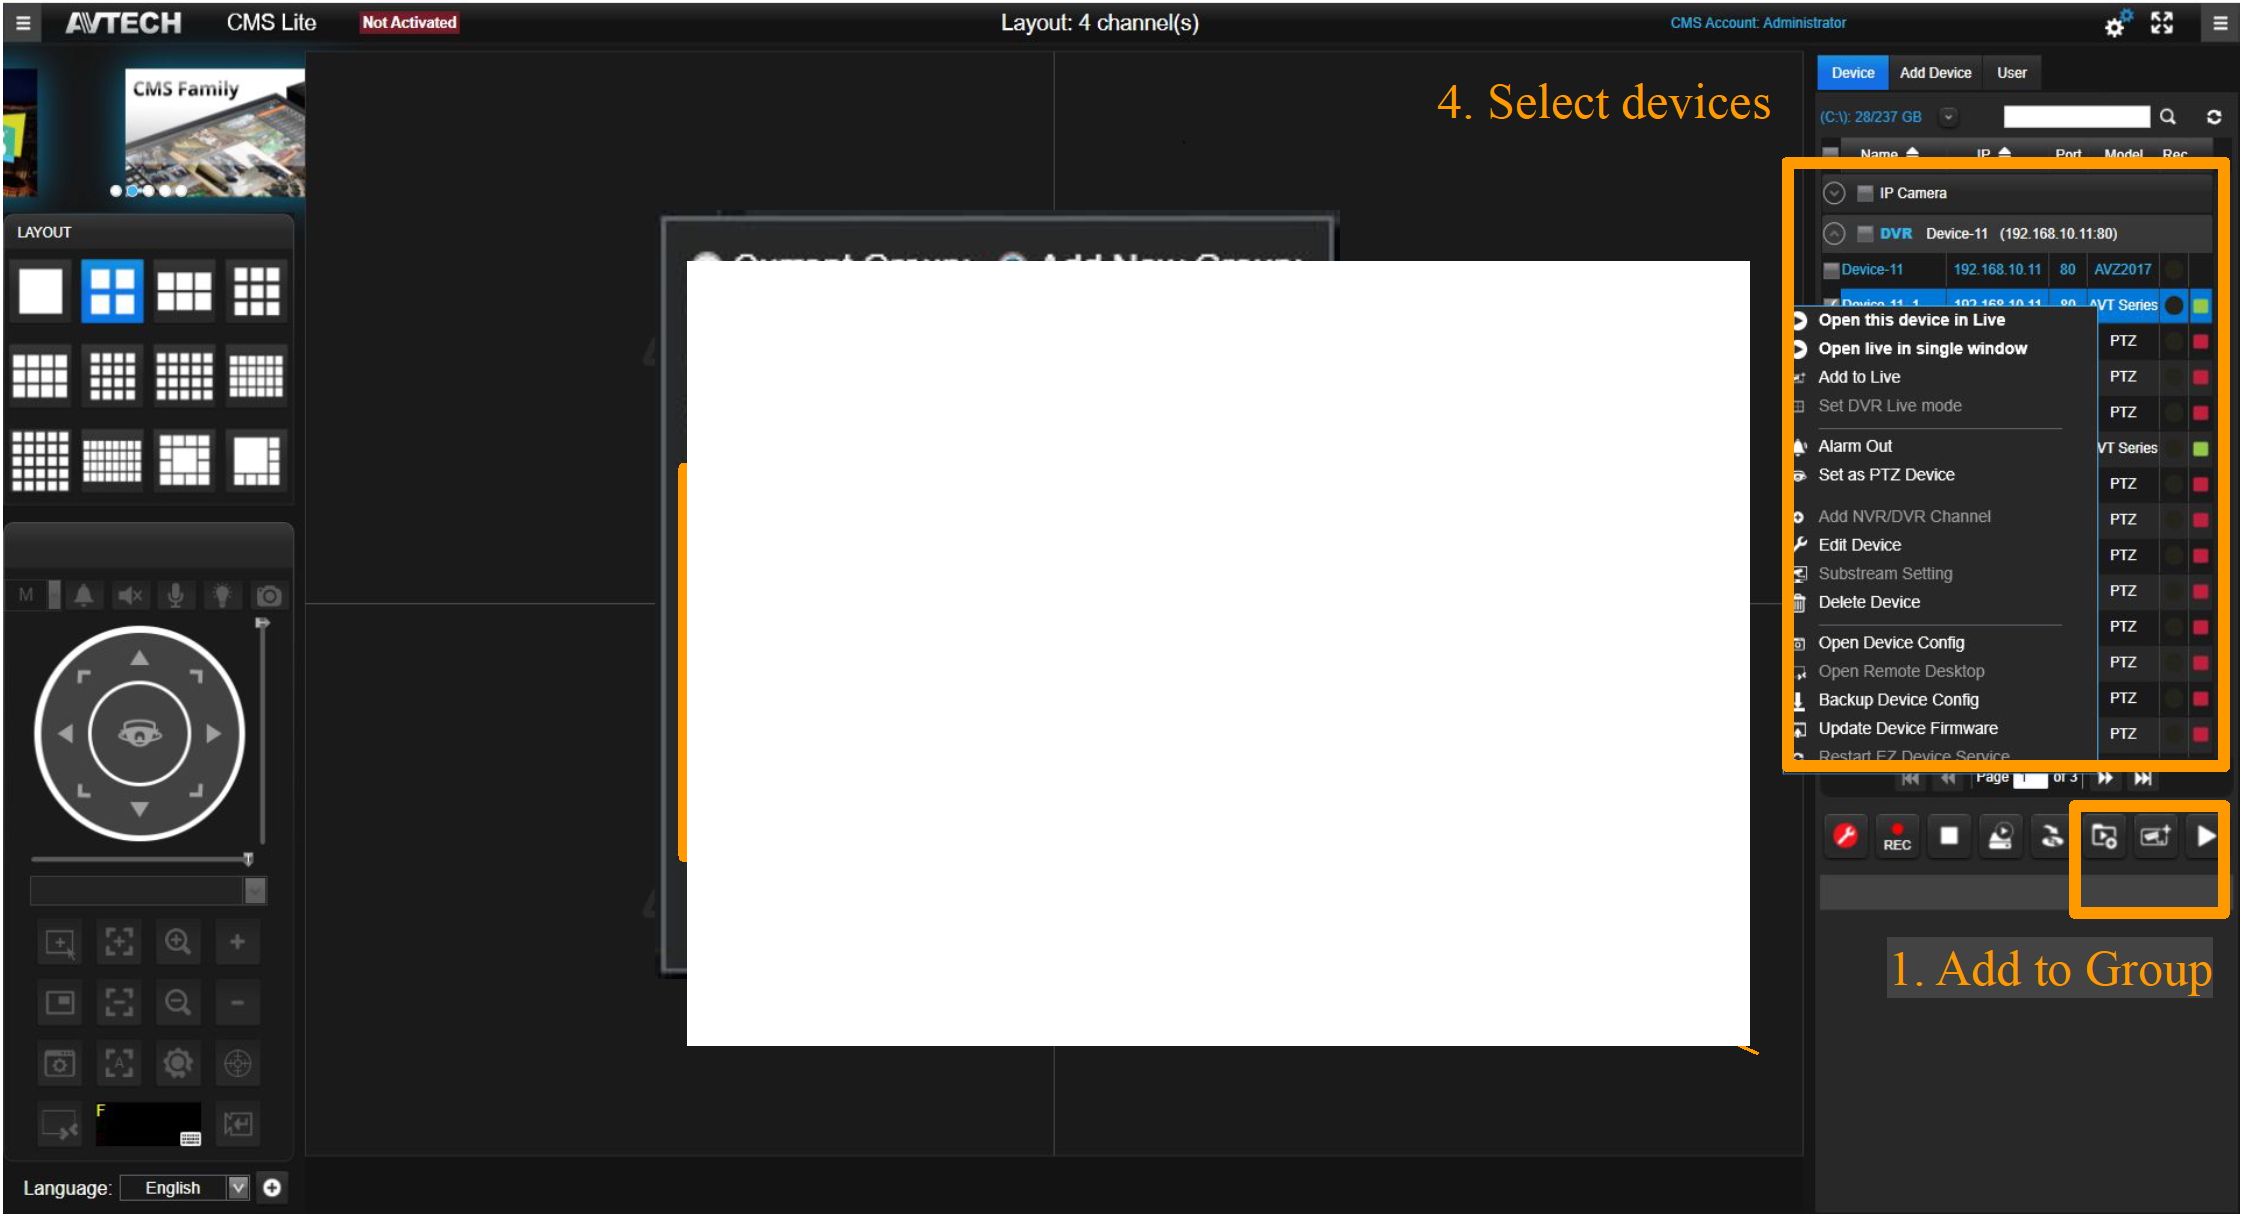
ZW/TECH
-far Vidlto
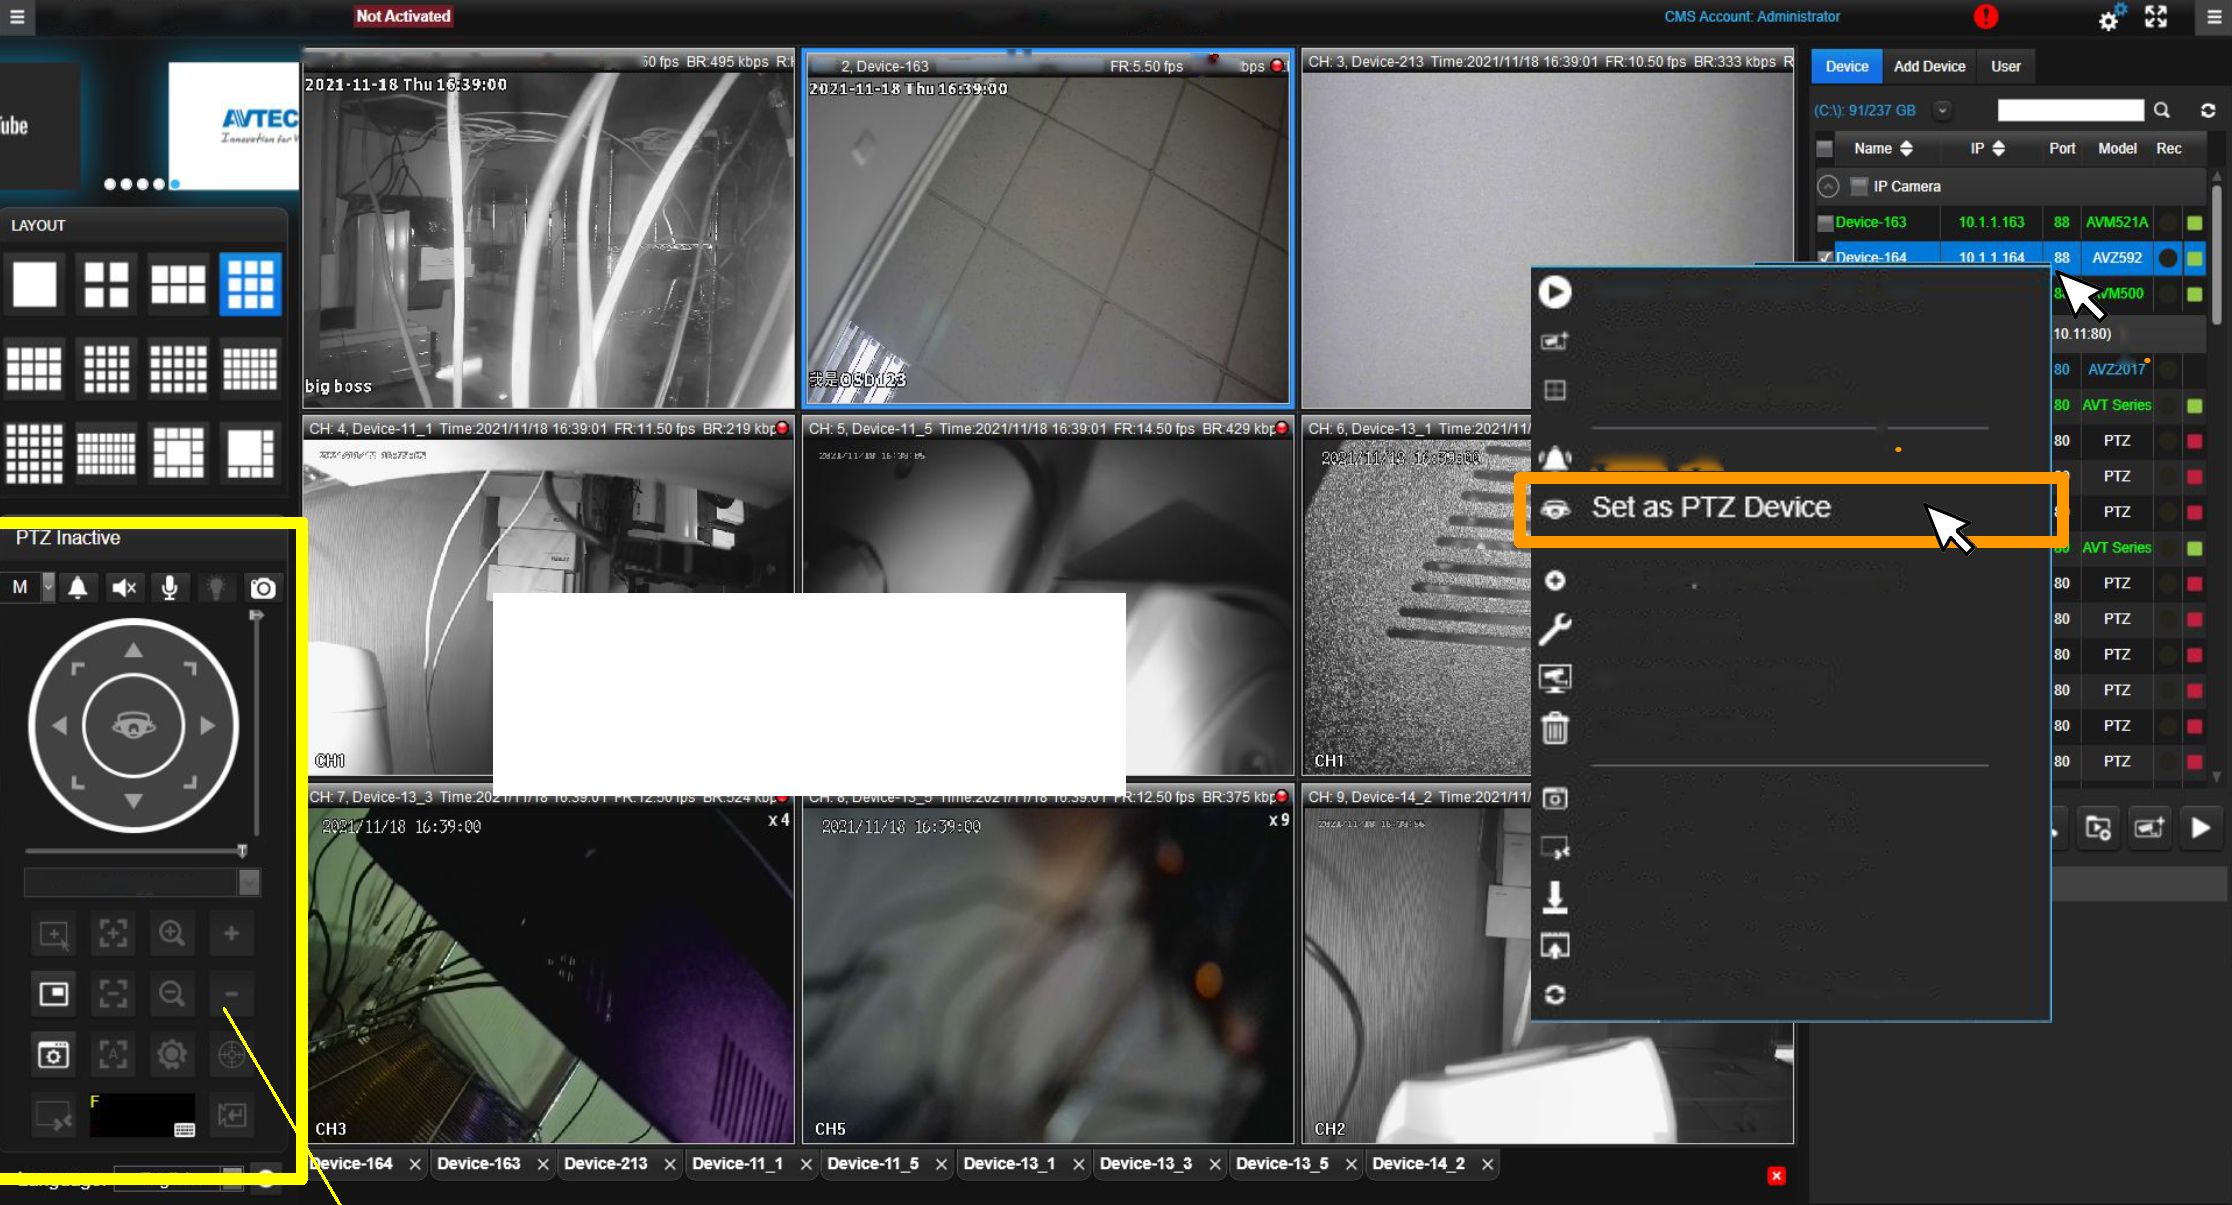
Supporting the device which equipped with PTZ function.
If inactivate, by clicking right click on a needed device ^ Click “Set as PTZ Device”
Q AVTECH CMS Lite
Enlarge picture by
double-click it
I CH: 1. Device-164 Time:2021/11/18 16:39:01 FR:9.I
Open this device in Live
1
Add to Live
Alarm Out
Add NVR/DVR Channel
Edit Device
Suhstream Setting
Delete Device
Open Device Config
Open Remote Desktop
PTZ not supported
Backup Device Config
Update Device Firmware
Restart EZ Device Service
A/TECH CMS Lite
Set DVR Live mode
2
Layout: 9 channel(s) – Page 1
CH T,3..992,,1,1,9,939:9. »39.
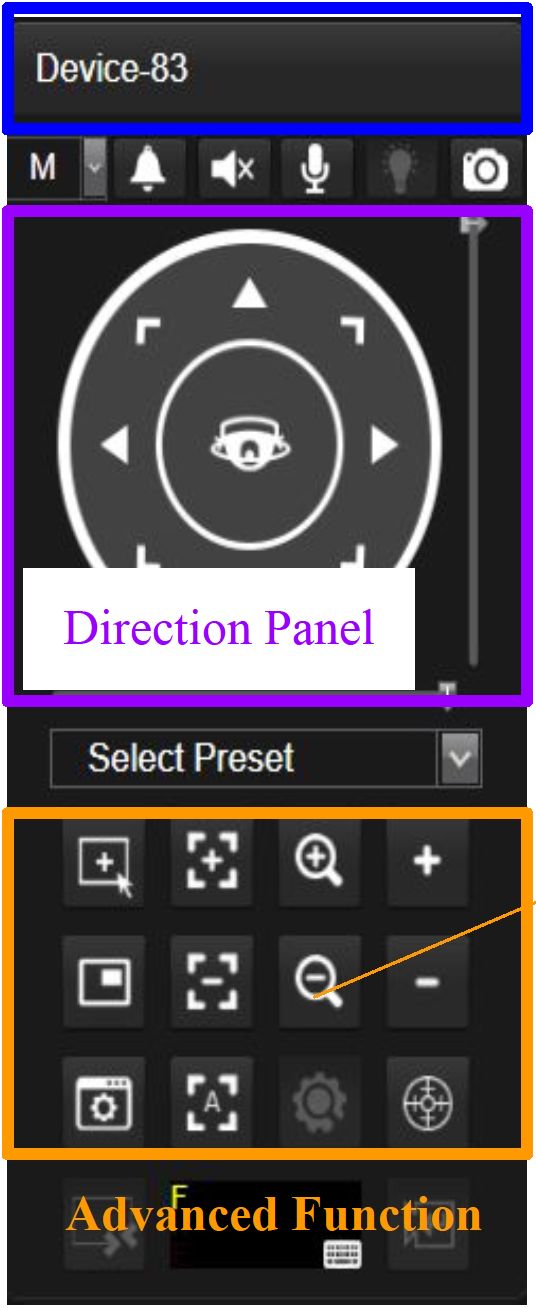
Device Name (If unavailable, it wil show “PTZ Inactive”)
| Function | Icon | Description | Function | H | Description |
| Hotpoint | 1 + 1
| L–L* | |
Click to the position | Zoom In | |~ö~| | Pull-in picture |
| DPTZ | □ | Partial enlarge | Zoom Out | □ | Pull-out picture |
| Focus In | □ | Adjust definition | Zoom In Max | □ | Pull-in picture to maximum |
| Focus Out | □ | Adjust definition | Zoom Out Max | □ | Pull-out picture to maximum |
| Autofocus | □ | Auto-adjust definition | Auto Track | Auto-adjust picture |
AVTECH CMS Lite Quick Guide
24
ZW/TECH
-far Vidlto
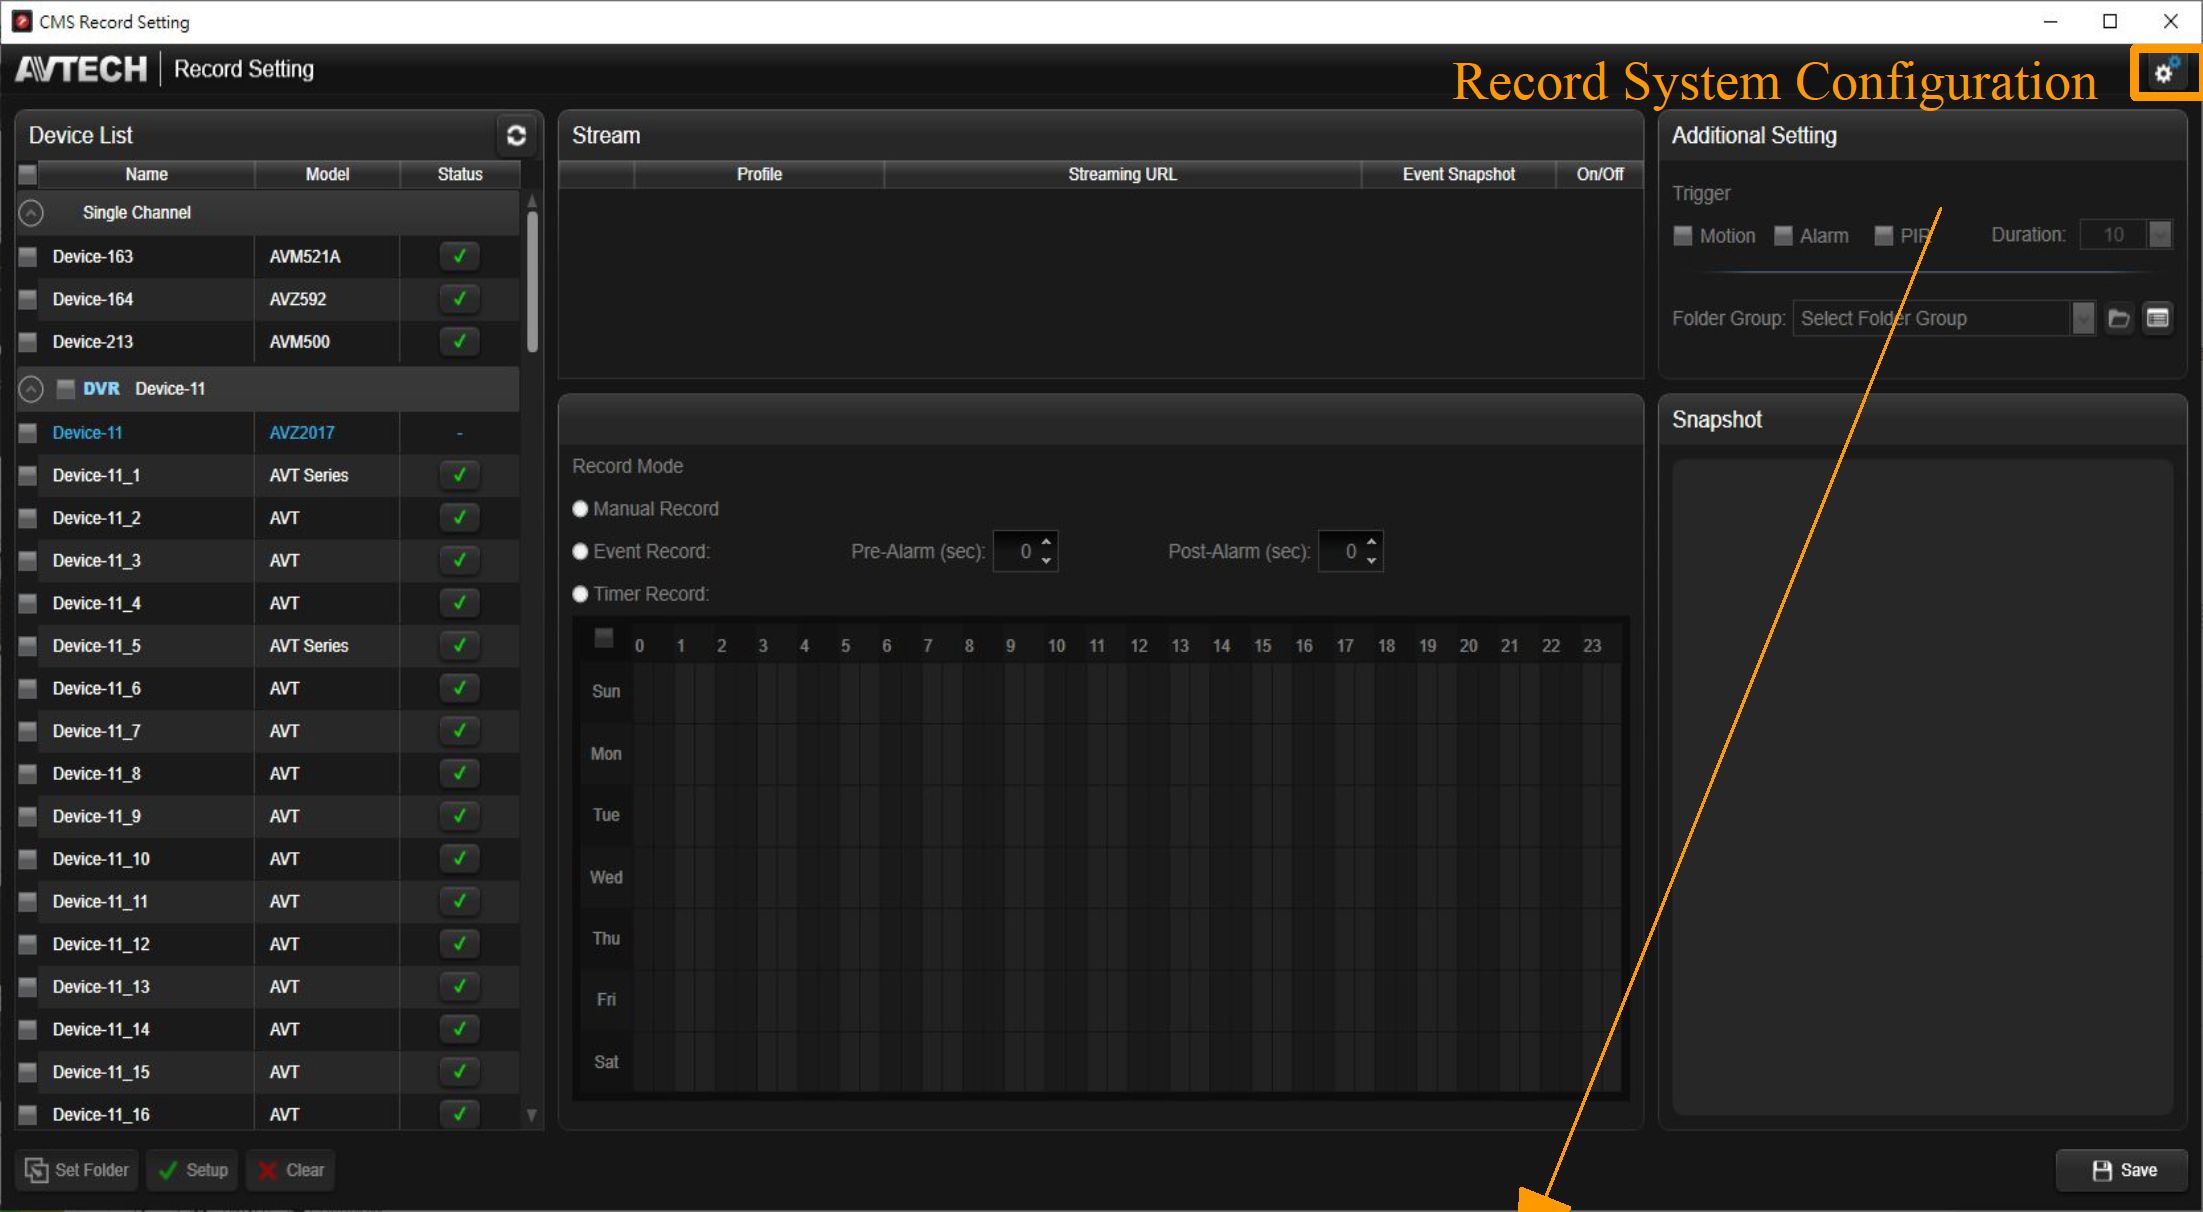
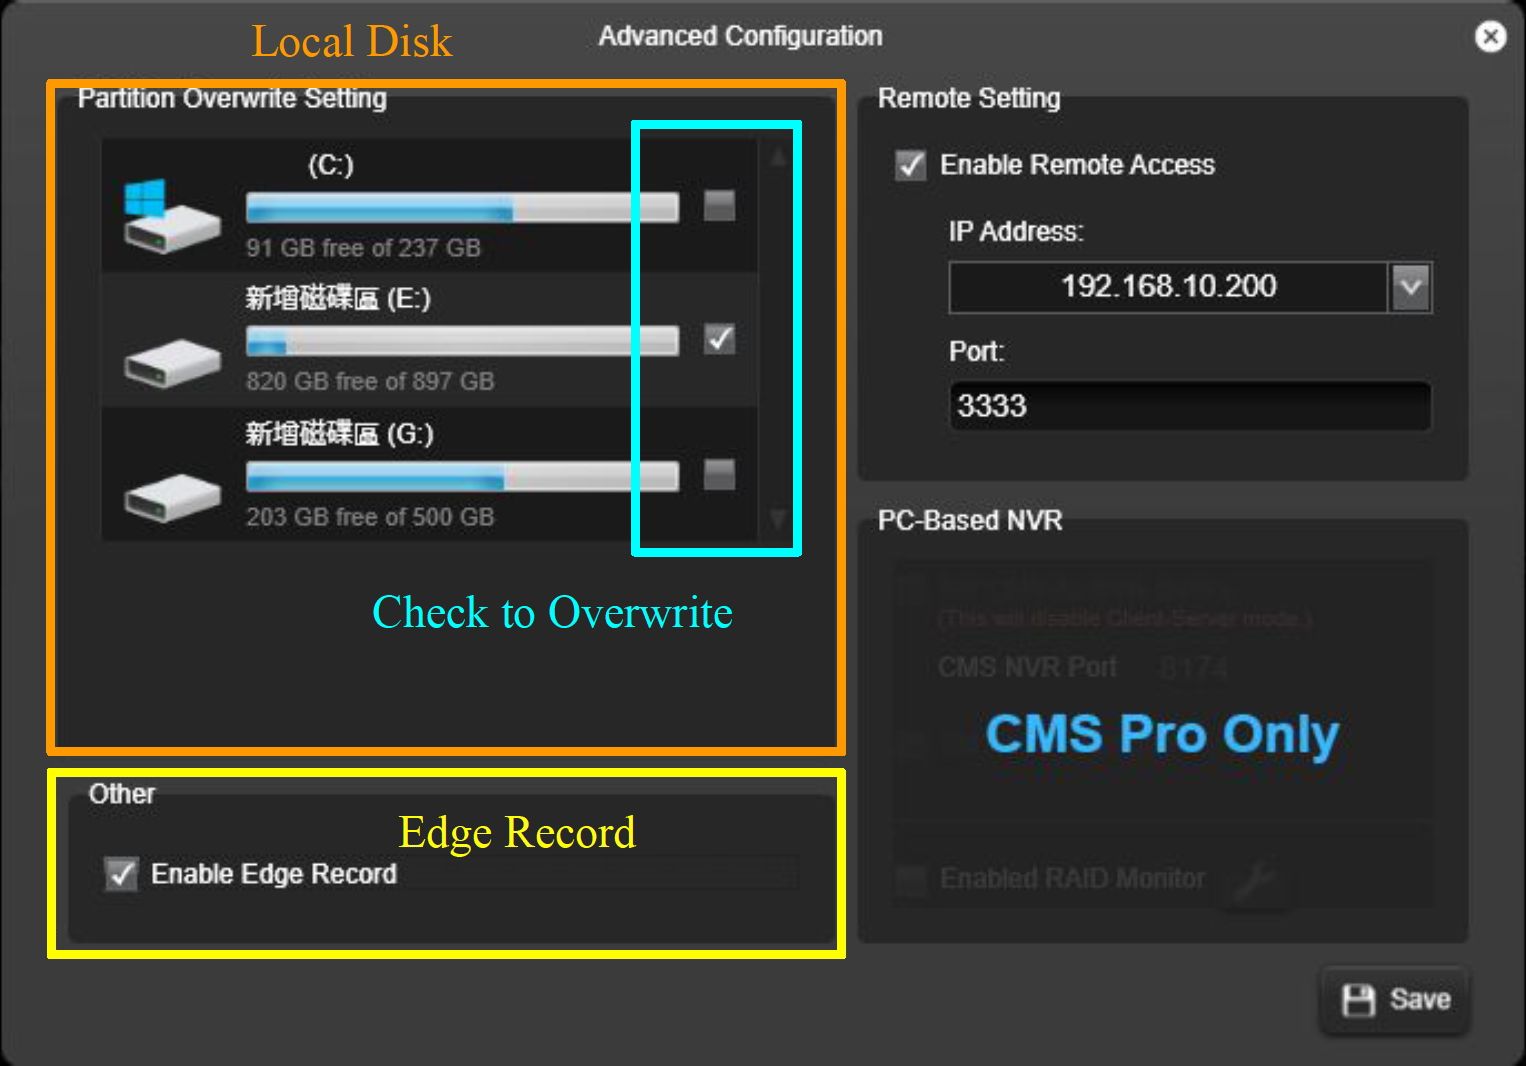
Local Disk Overwrite and Edge Record
Before start recording, please setup local disk overwrite, edge record, and other record
related settings.
1. Setup overwrite can erase the older record data automatically when out of space.
AVTECH CMS Lite Quick Guide
25
ZW/TECH
-far Vidlto
Adjust Setting to the Individuals
Record stream, additional setting and mode can be set individually to a single device.
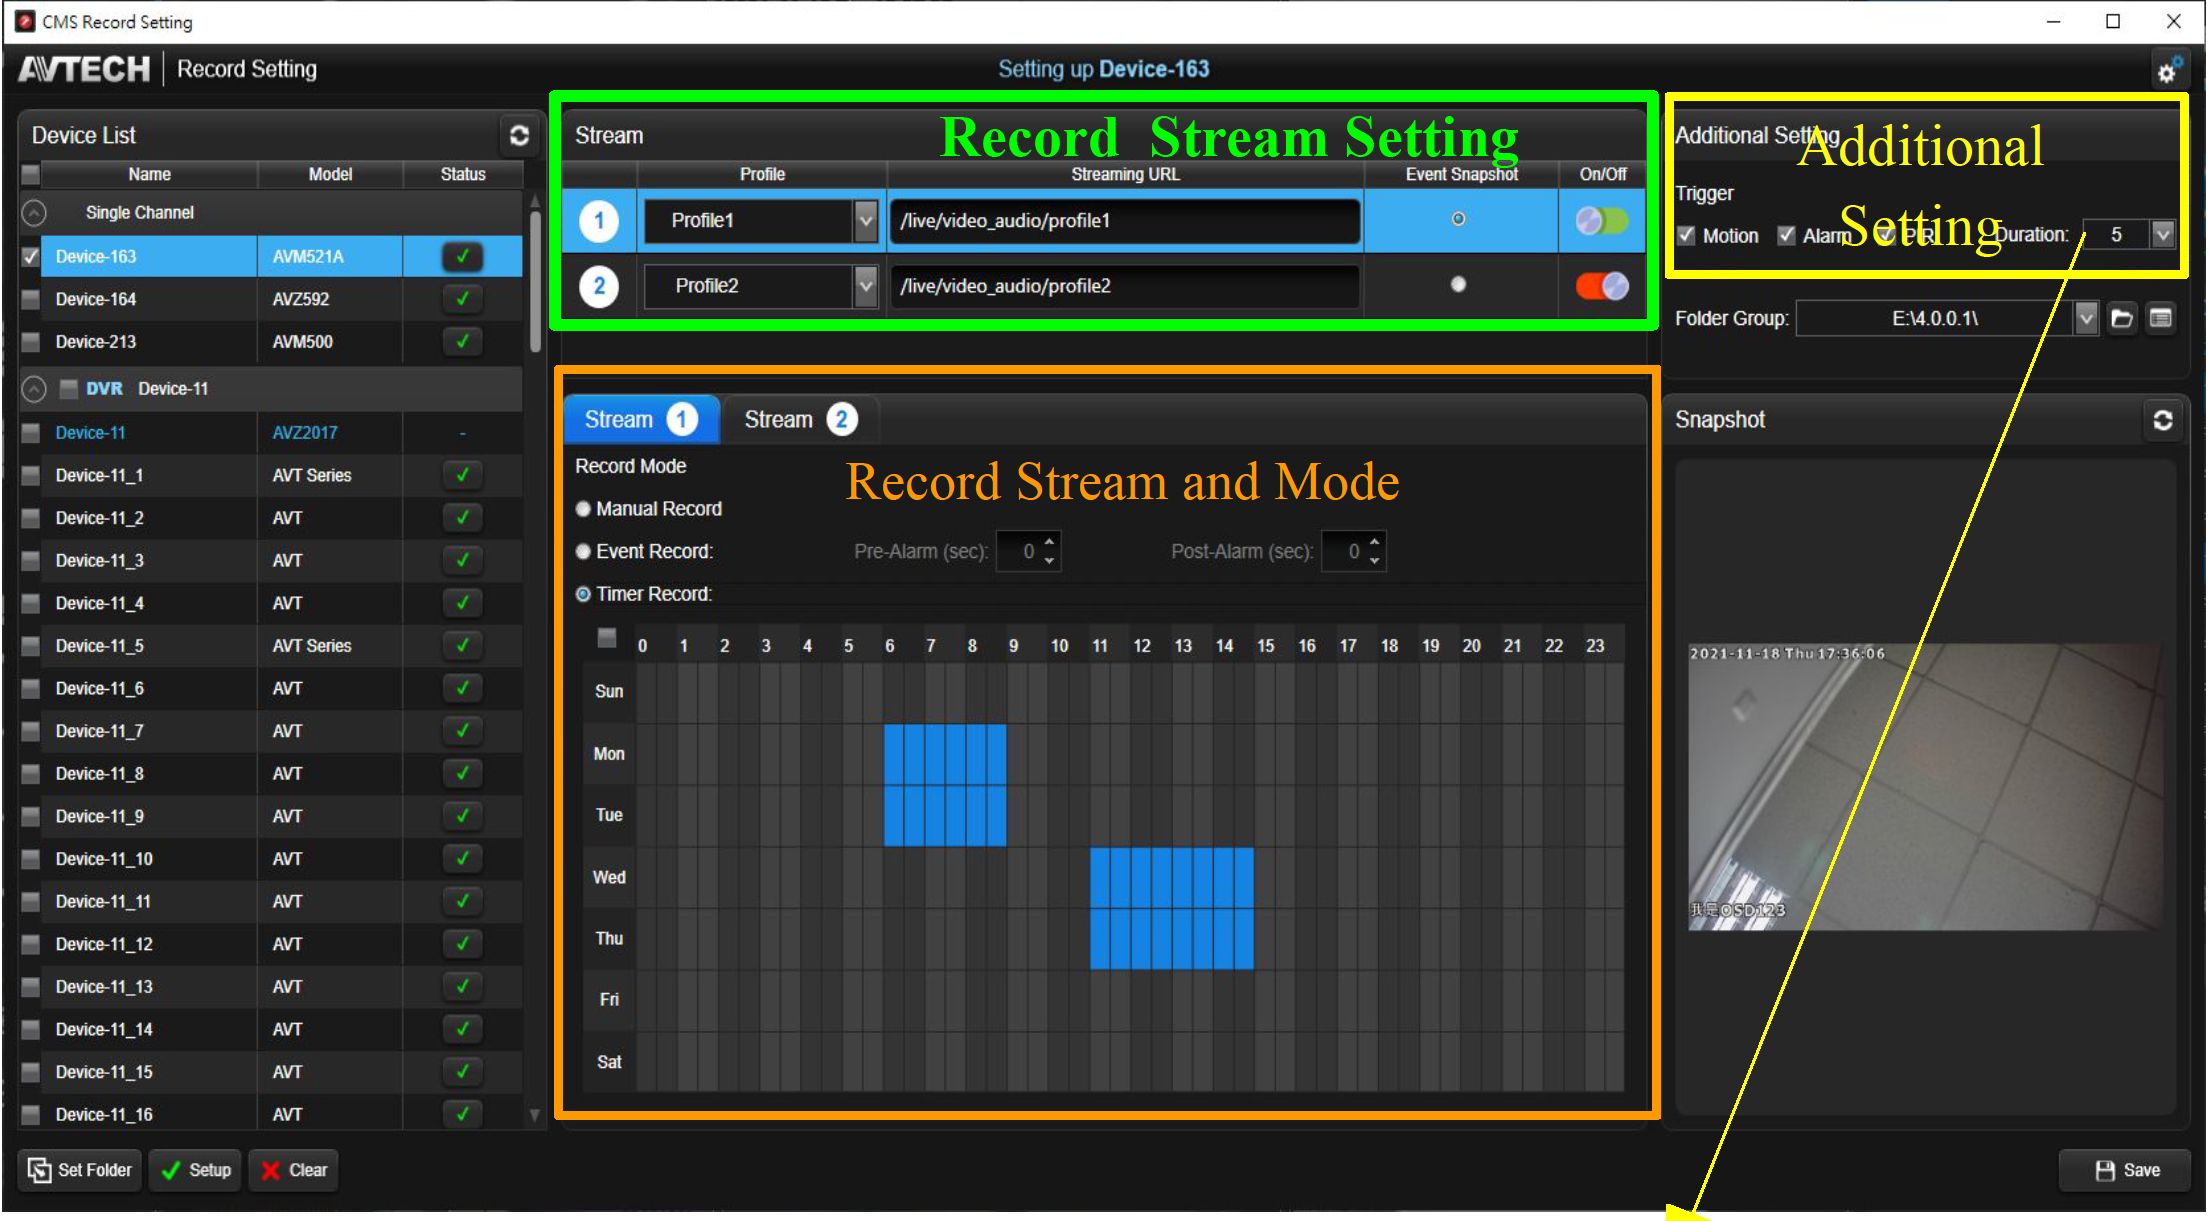
Additional Setting
^ Additional Setting – Trigger Check the trigger rules and choose the duration time. Any event occurs, it will show on Event Playback.
Trigger
T Motion T Alarm
![]()
Duration: 10 v
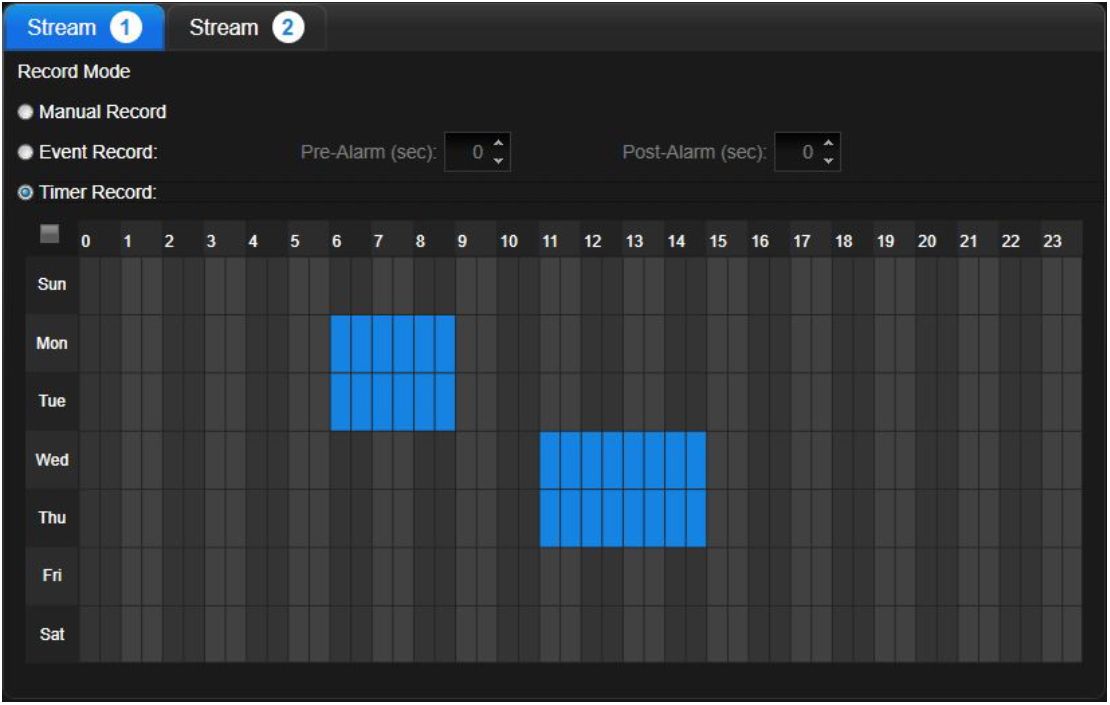
^ Record Stream and Mode
- Manual Record: Preset mode to all the
devices, all day recording. - Event Record: Automatically start
recording when event detects. Custom the
pre-alarm and post-alarm time. - Timer Record: Reserve to start
recording can assign to the selected time.
Mark it on the timetable.
AVTECH CMS Lite Quick Guide
26
ZW/TECH
-far Vidlto
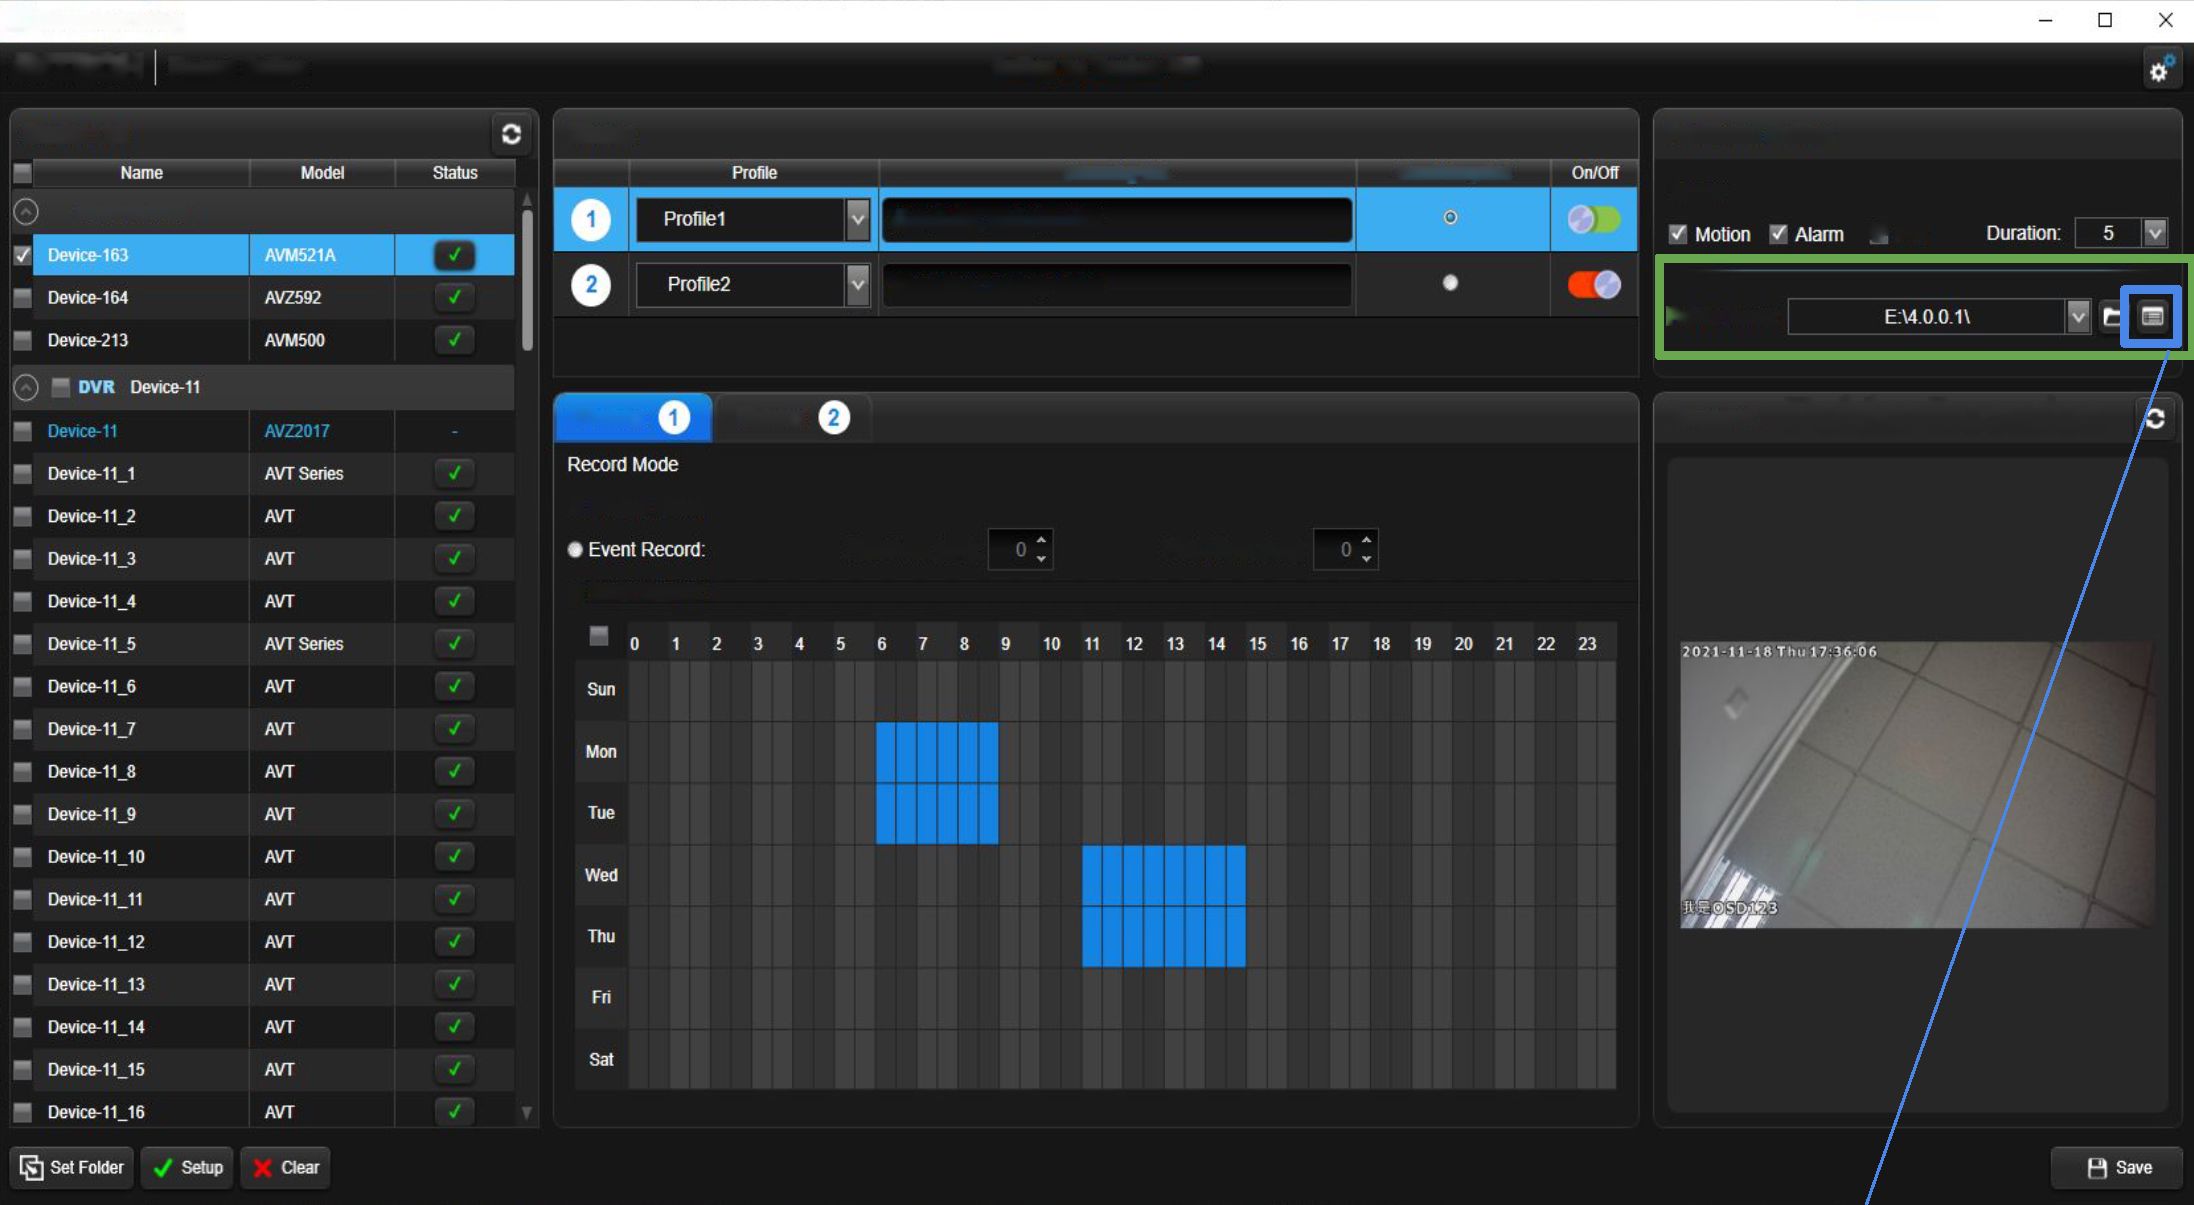
Record data can be saved not only to the appointed folder that setup at the local disk but also save to the separate folder to manage.
O CMS Record Setting
AVTECH Record Setting
Setting up Device-163
Device List
Stream
Additional Setting
Streaming URL
Event Snapshot
Trigger
Single Channel
/live/video_audio/profile1
T PIR
/I ive/video_audio/ profi Ie2
Folder Group:
Stream
Stream
• Manual Record
Pre-Alarm (sec):
Post-Alarm (sec):
© Timer Record:
snapshot Folder Location
o
Folder Group
| Folder Group List | |
| Name | |
| 0 (2) E:\4.0 0.1\ | |
| Device-163 Delete
Device-164 |
0 •
0 |
| (133) CARecord\ | |
Device-213
Device-11
Device-11_1
Device-11_2
Device-11_3
Device-11_4
Device-11_5
Device-11_6
^ Folder Group List Check on the devices of the local disk, and the device can also be deleted from here.
Footnotes: The deleted device will be automatically moved to
the default location.
AVTECH CMS Lite Quick Guide
27
ZW/TECH
~Lnnovorh’an -far Vidlto
Start, Stop Record
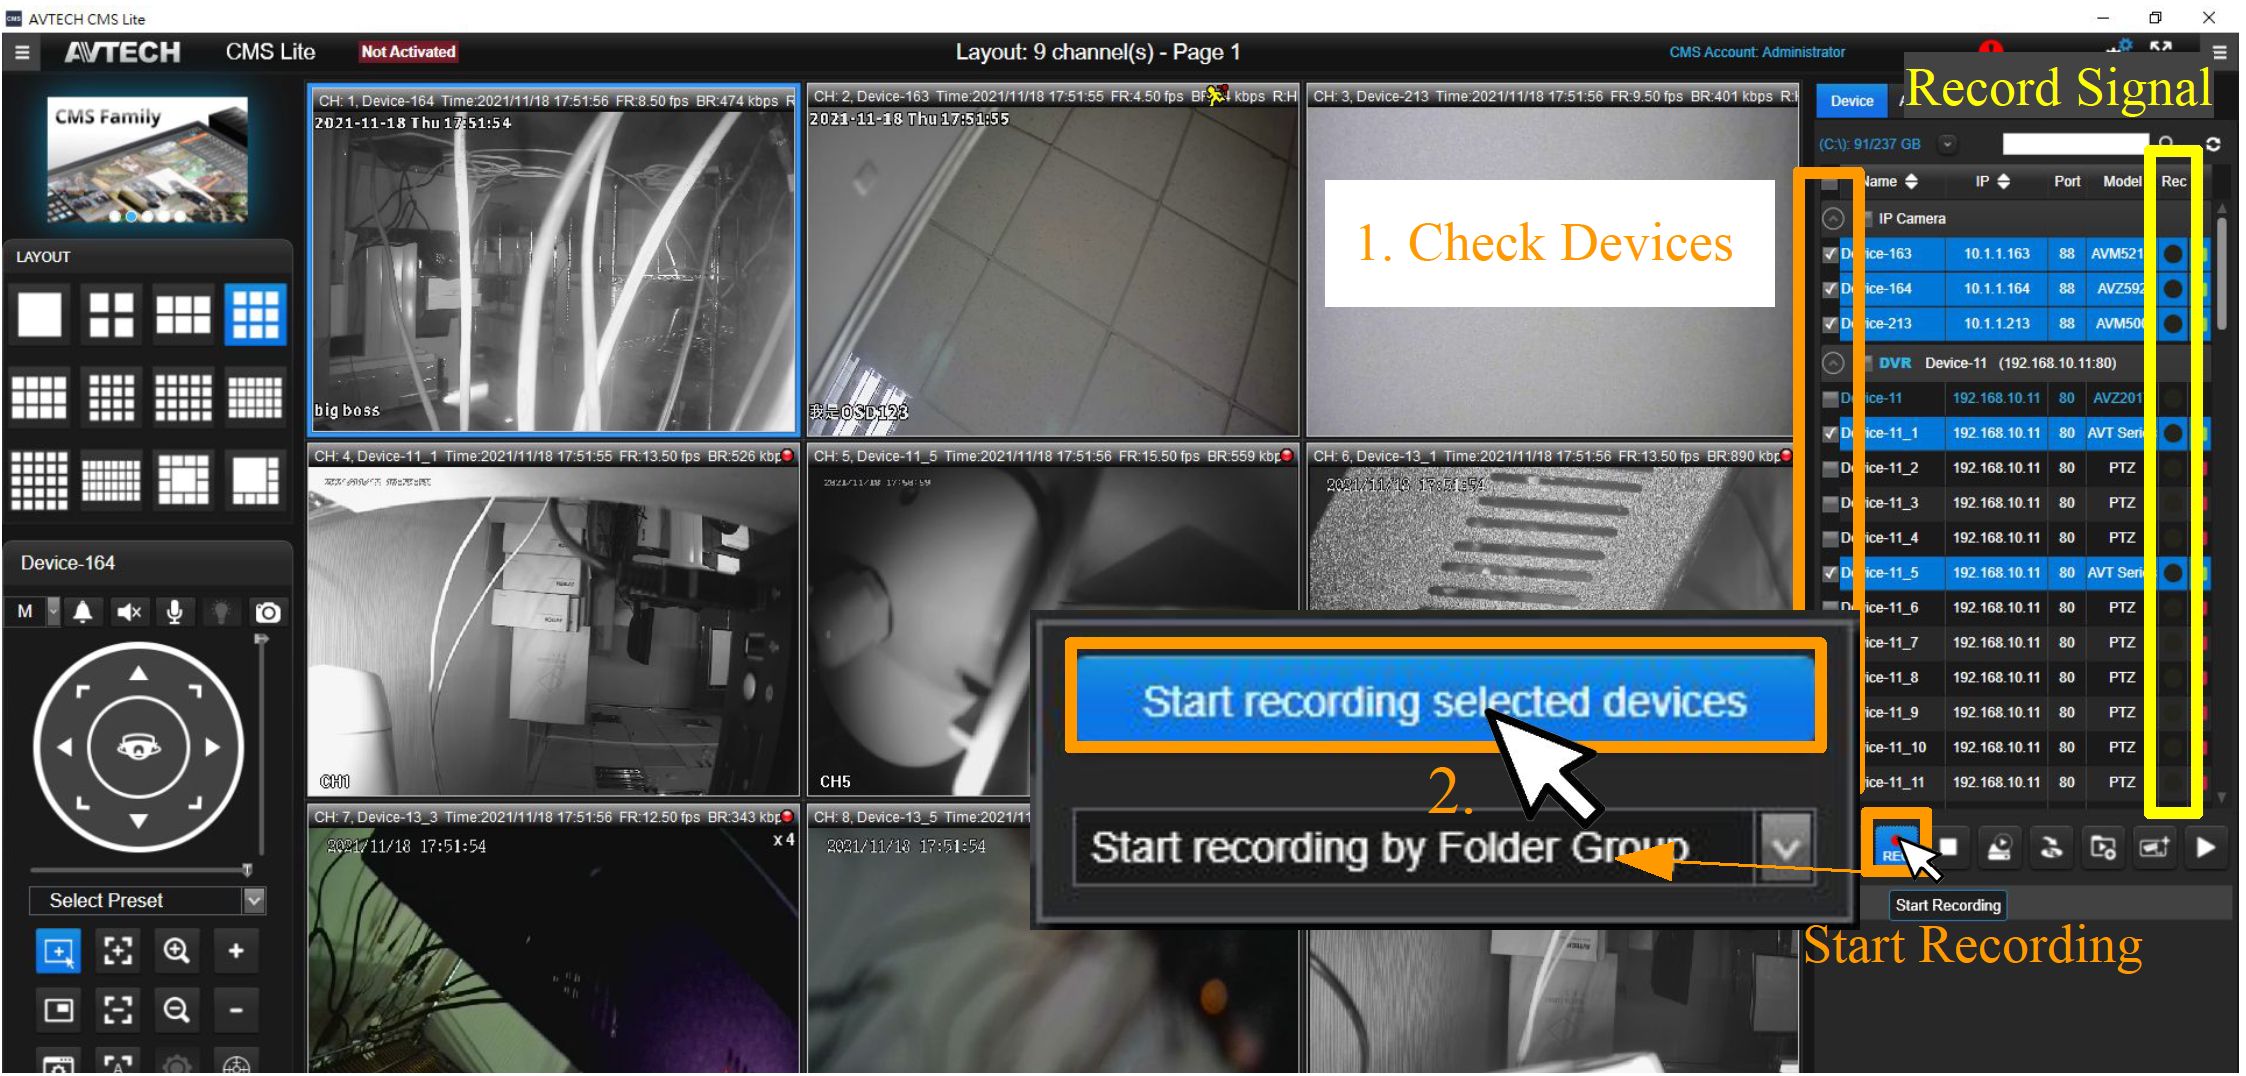
Start recording.
Check the needed devices ^ Click “Start Recording” then click “Start recording selected devices” ^ Wait for the red record signals appear
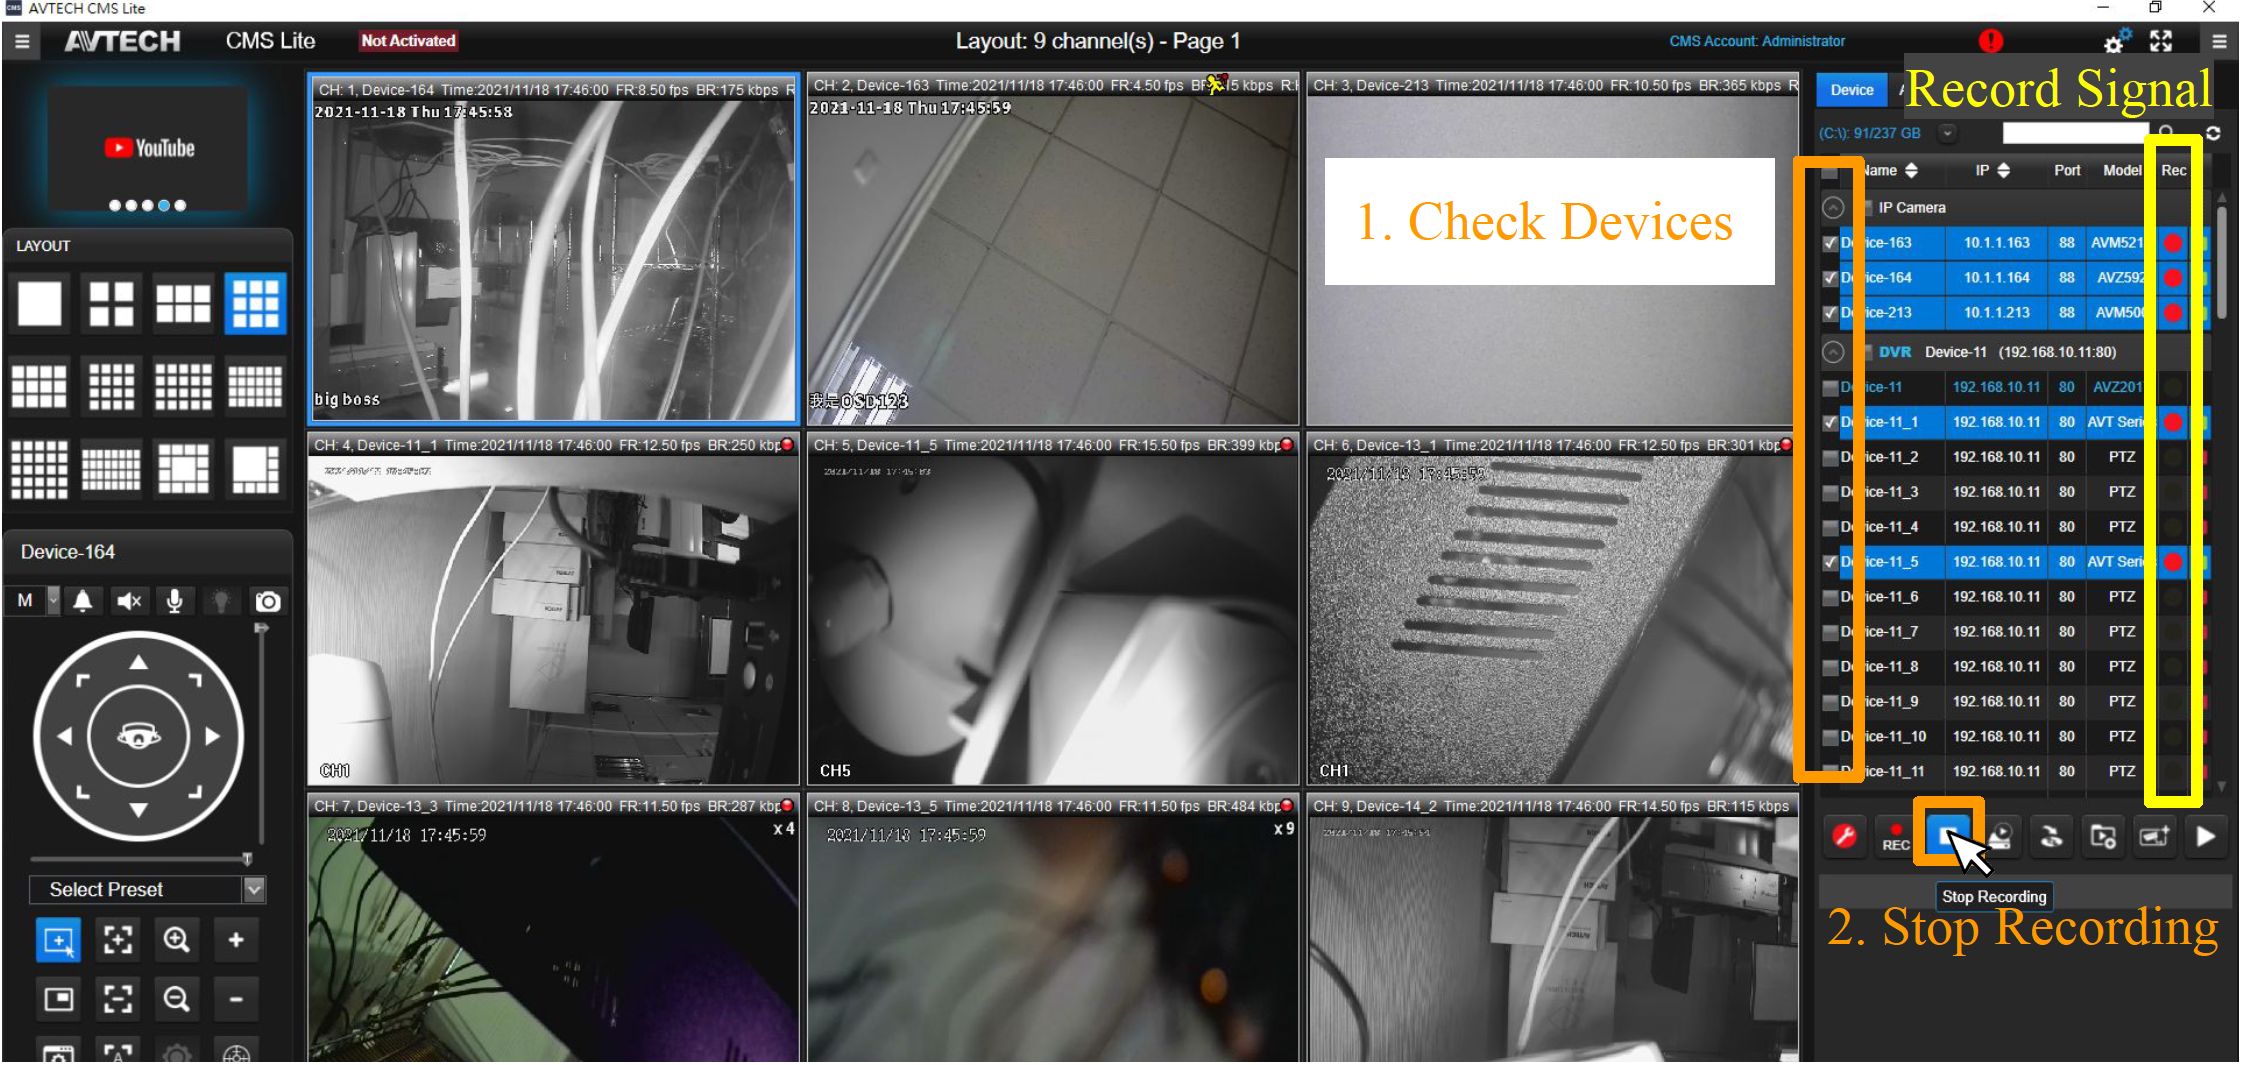
Stop recording.
Check the needed devices ^ Click “Stop Recording” ^ Wait for the red record signals disappear
AVTECH CMS Lite Quick Guide
28
ZW/TECH
-far
Device Playback
Playback the record date from the device.
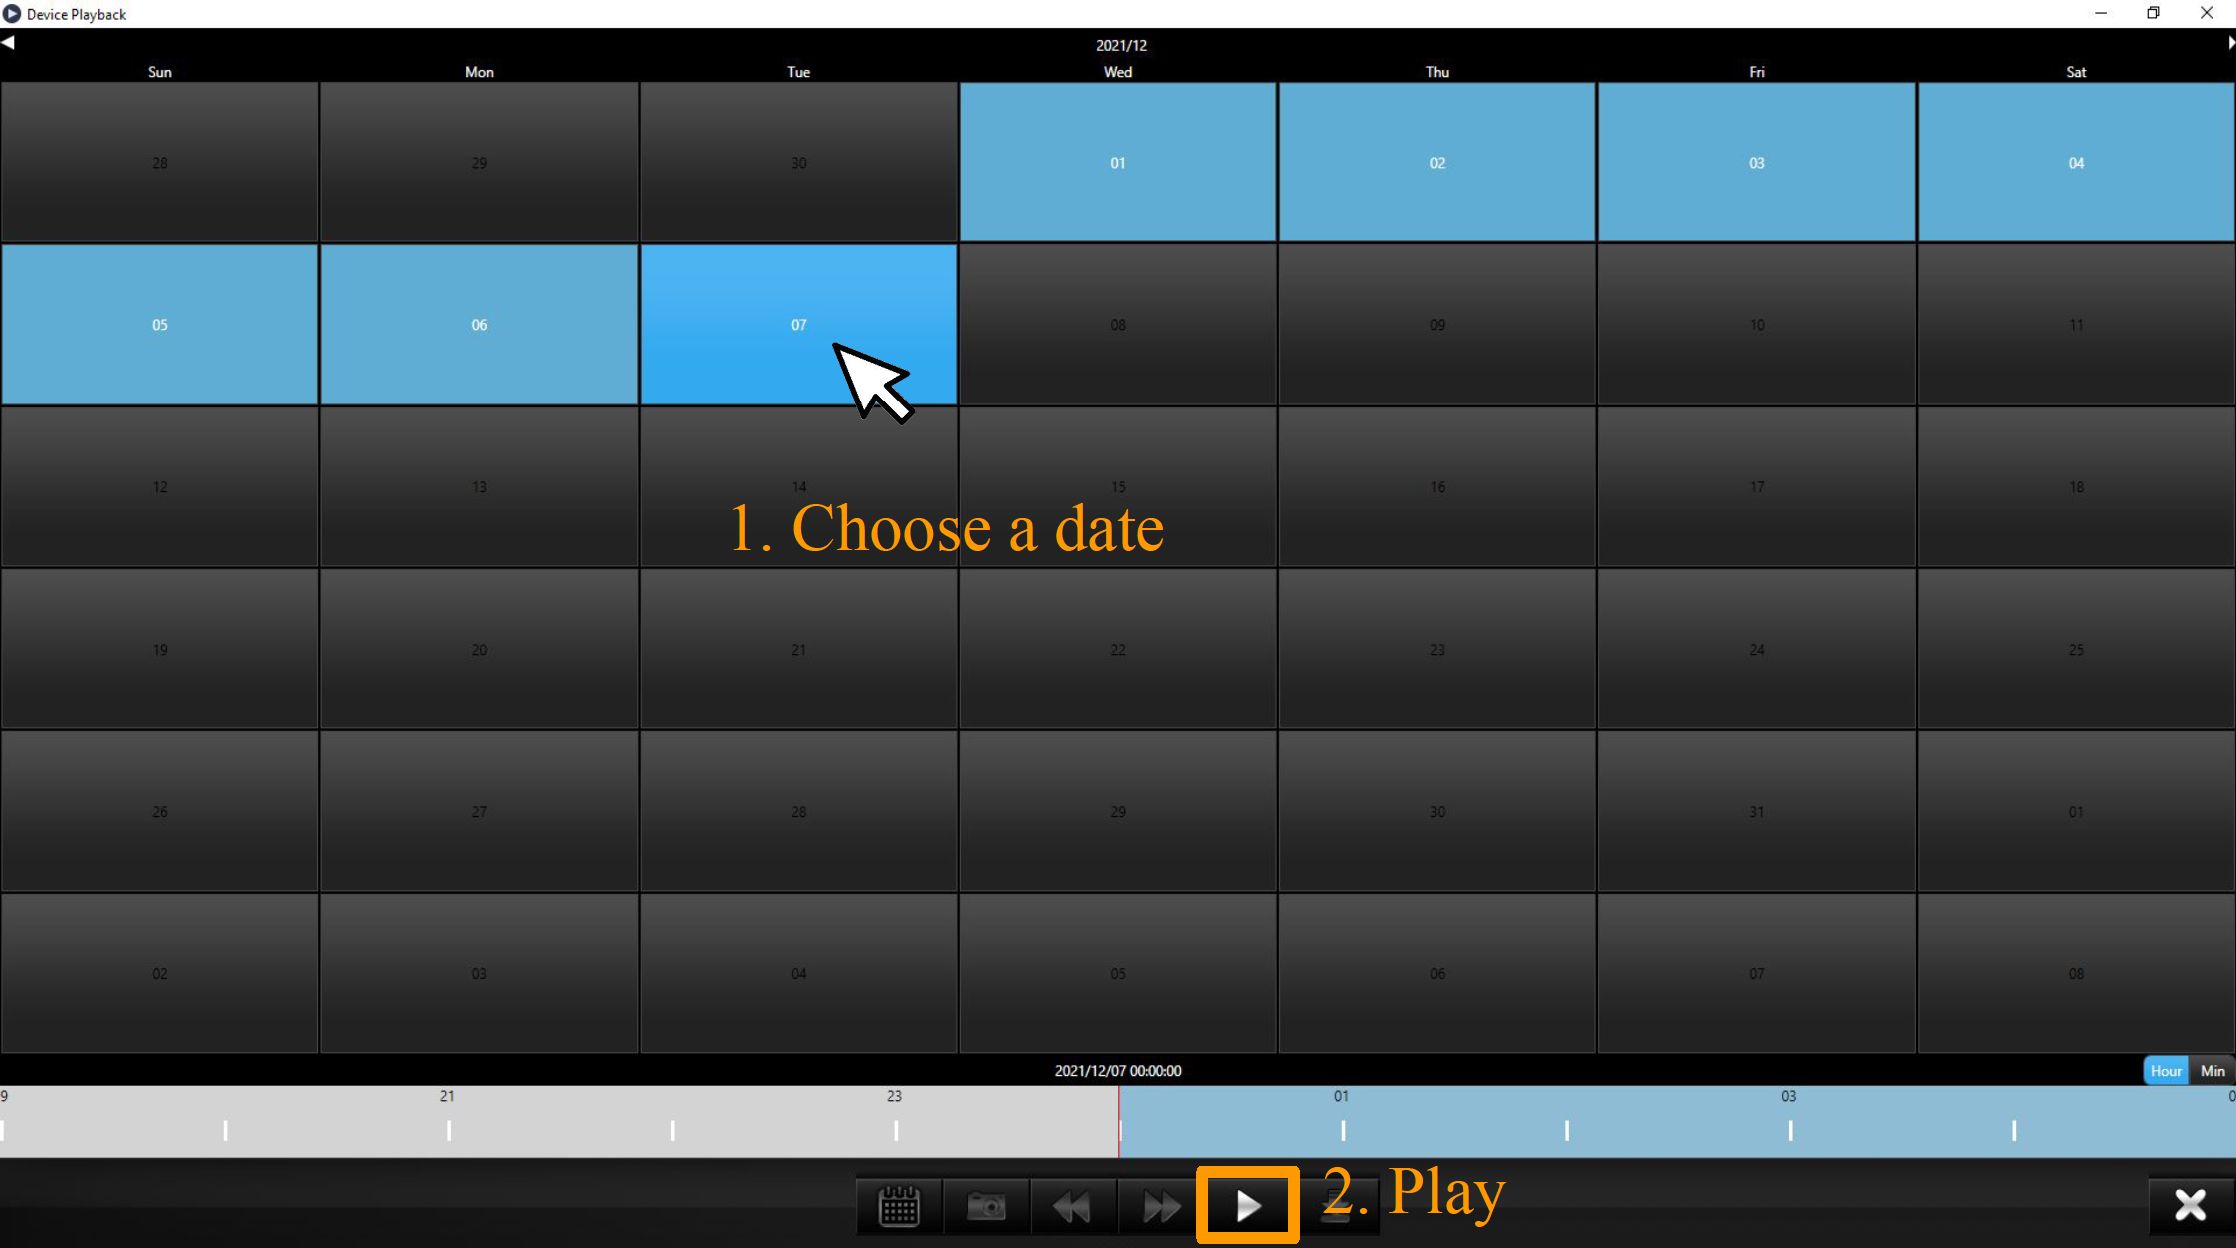
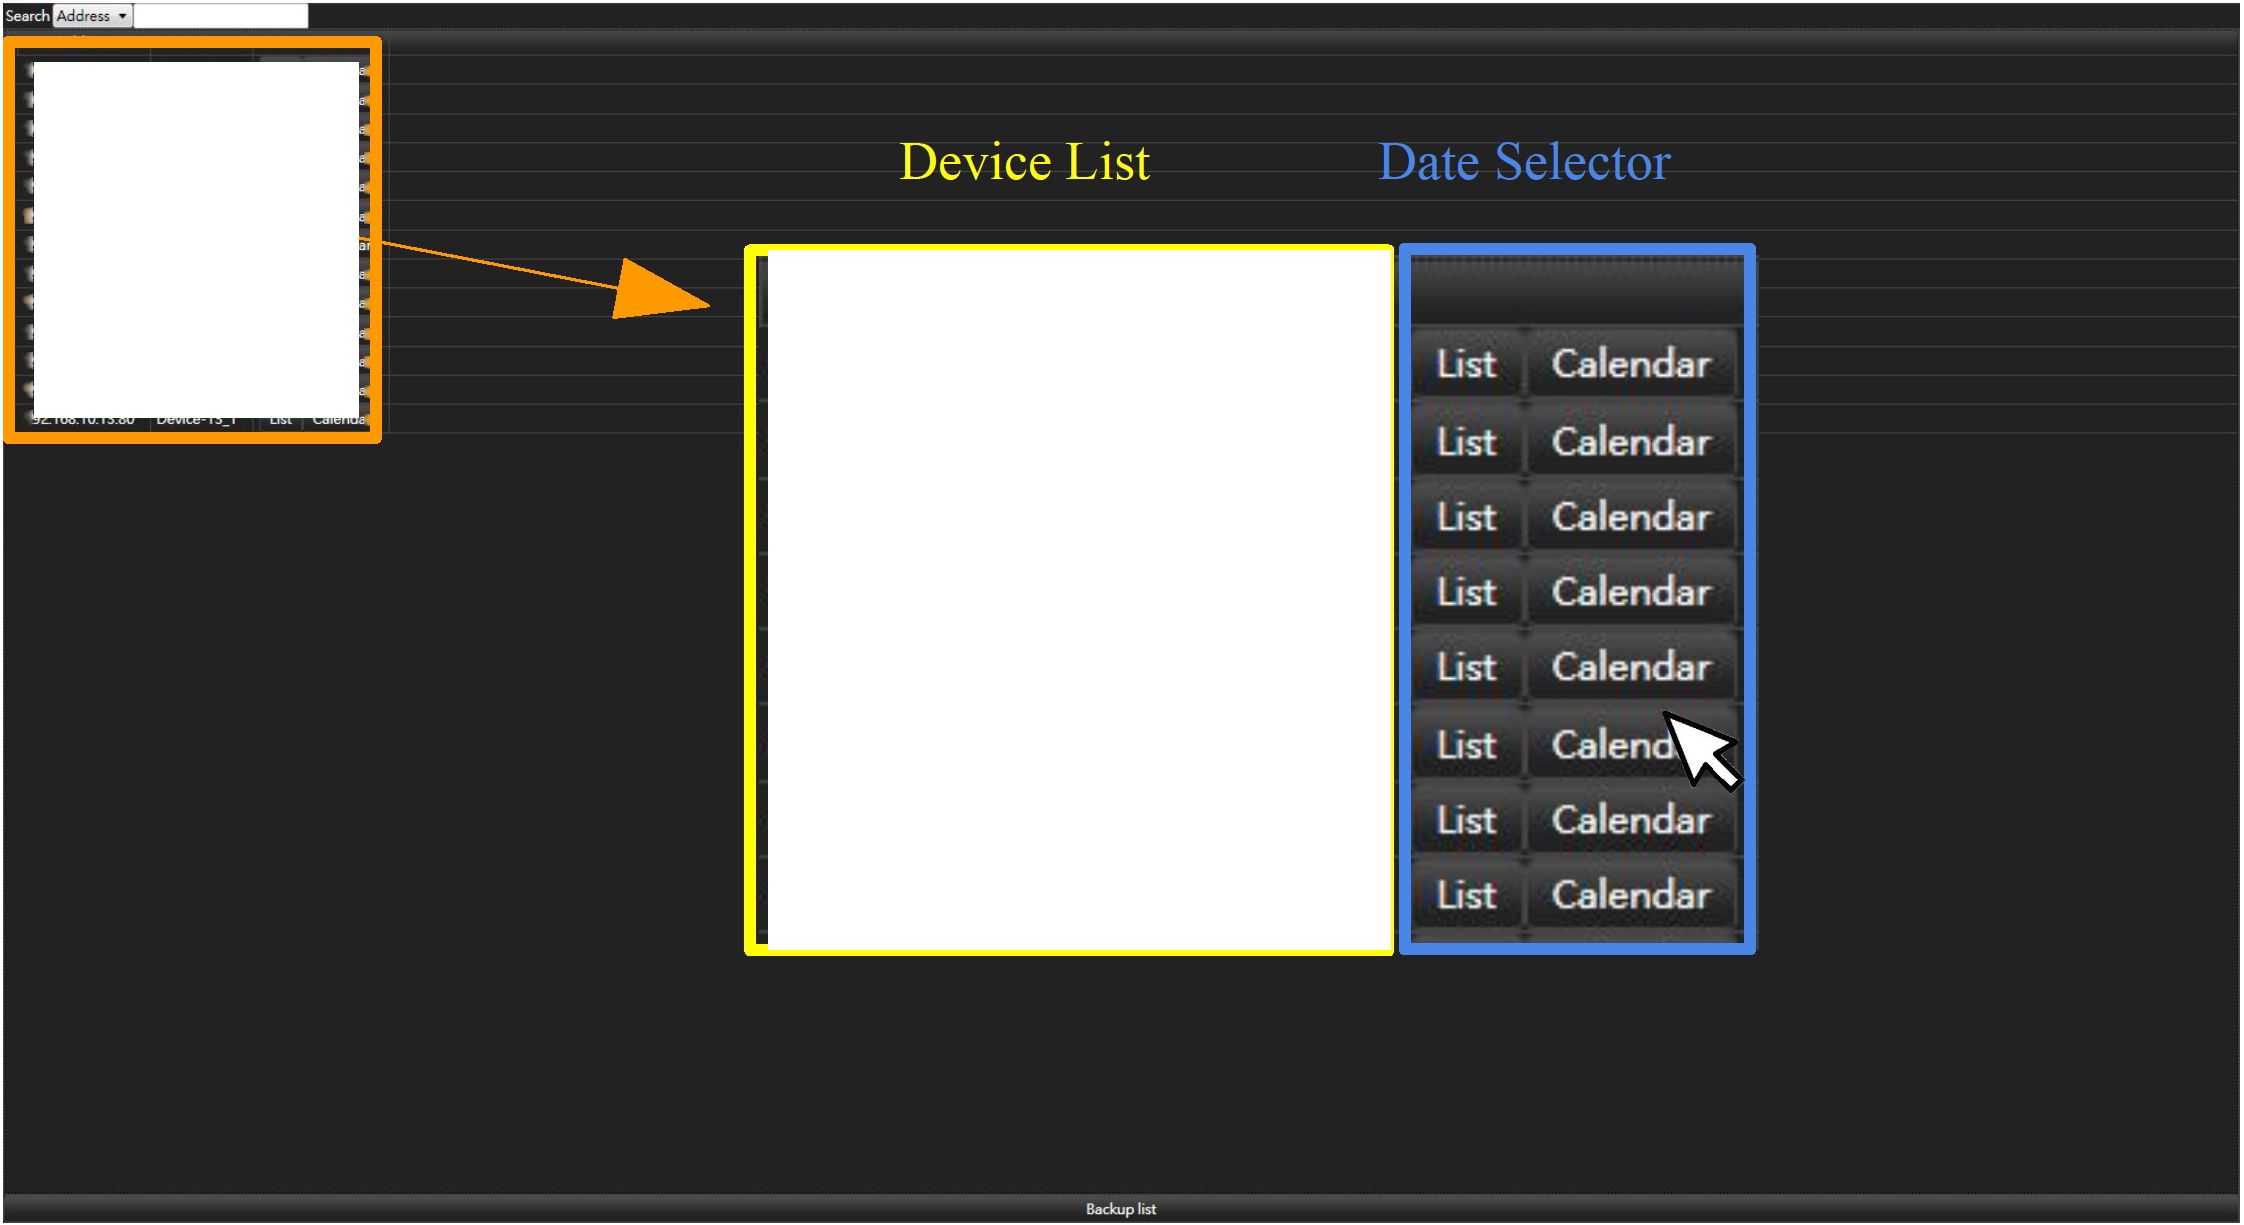
“Advanced Function” from the main control panel ^ Click “Device Playback” ^ Choose a type of date selector (List, Calendar or Allinone) on the needed device
| 9 Device Playback | -ax | |||
| Address Name | ||||
| 1 10.1.1.163:88 Device-163 List Calendar | ||||
| 1 10.1.1.213:88 Device-213 üst Calendar | ||||
| ■3 192168.10.11:80 Device-11 Ust Calendar Allinone 1 | ||||
| 1 192168.10.11:80 Device-11_1 Ust Calendar | -w—• -w • —— | |||
| 1 192168.10.11:80 Device-11_2 Ust Calendar | Device List | Date Selector | ||
| 1 192168.10.11:80 Device-11_3 List Calendar | ||||
| 1 192168.10.11:80 Device-11_4 Ust TMendar
1 192168.10.11:80 Device-11_5 Ust Calendar 1 |
Annrprr Mamp | |||
| rAUUlCjj 1’401 iic | ||||
| 1 192168.10.11:80 Device-11_6 Ust Calendar | ||||
| 1 192168.10.11:80 Device-11_7 Ust Calendar 1 | I 1 C*t* f apnnar | |||
| 1 V. 1. 1 . 1 UO.OO L/C Vive 1 Uj | Idol volet KJai | |||
| ■ 192168.10.11:80 Device-11_8 Ust Calendar | ||||
| 1 192168.10.11:80 Device-11_9 Ust Calendar | ||||
| 1 192168.10.11:80 Device-11_10 Ust Calendar | 10.1.1.Z13.88 üevıce-213 | Ust Calendar | ||
| 1 192168.10.11:80 Device-11_11 Ust Calendar | ||||
| 1 192168.10.11:80 Device-11_12 Ust Calendar | 192168.10.11:80 Device-11 | Ust Calendar Allinone | ||
| 1 192168.10.11:80 Device-11_13 Ust Calendar | ||||
| 1 192168.10.11:80 Device-11_14 Ust Calendar | 192168.10.11:80 Device-11_1 | Ust Calendar | ||
| 1 192168.10.11:80 Device-11_15 Ust Calendar | , It | |||
| 1 192168.10.11:80 Device-11_16 Ust Calendar | 19216810.11:80 Device-11.2 | Ust Calenda^X | ||
| □ igsjâyoiiaOlJeYİKd^^ LjstCfllfindnrAllinpne 1 | ||||
| 192168.10.13:80 Device-13_1 Ust Calendar | 192168.10.11:80 Device-11_3 | Ust Calendar | ||
| 192168.10.13:80 Device-13_2 Ust Calendar | ||||
| 192168.10.13:80 Device-13_3 Ust Calendar | 19216810.11:80 Device-11_4 | Ust Calendar | ||
| 192168.10.13:80 Device-13.4 Ust Calendar | ||||
| 192168.10.13:80 Device-13_5 Ust Calendar | 192168 101180 Device-11 5 | 1 i^t C^lpnnar | ||
| 1 1 V/KJ. 1 KJ. 1 1 AJV V/V VIVC 1 1 -J | Lljl VtJIVIIKJul | |||
| 192168.10.13:80 Device-13_6 Ust Calendar | ||||
| 192168.10.13:80 Device-13_7 Ust Calendar | 1Q? 10 11 flfl 1 6 | 1 i c*t* 1 Apnri^r | ||
| 1 2/2__ 1 UO- 1 KJ- 1 1 .Okj L/CVILC 1 1 KJ | I—IjL VOICIlUOf | |||
| 192168.10.13:80 Device-13_8 Ust Calendar | ||||
| 192168.10.13:80 Device-13_9 Ust Calendar | ||||
| a a c a r\ a a nrt * a a **7 | ||||
| 192168.10.13:80 Device-13_10 Ust Calendar | 192.168.10.11:80 Device-11_7 | Ust Calendar | ||
| 192168.10.13:80 Device-13_11 Ust Calendar | ||||
| 192168.10.13:80 Device-13_12 Ust Calendar | ||||
| 192168.10.13:80 Device-13_13 Ust Calendar | ||||
| 192168.10.13:80 Device-13_14 Ust Calendar | ||||
| 192168.10.13:80 Device-13_15 Ust Calendar | ||||
| 192168.10.13:80 Device-13_16 Ust Calendar | ||||
| 192168.10.13:80 Device-13_17 Ust Calendar | ||||
| 192168.10.13:80 Device-13_18 Ust Calendar | ||||
| 192168.10.13:80 Device-13_19 Ust Calendar | ||||
| Backup list | ||||
CH.
| 4
Sun |
Mon | Tue | 2021/12
Wed |
Thu | Fri | ►
Sat |
| 01 | 02 | 03 | 04 | |||
| 05 | 06 | |||||
| 1. | Choose a date | |||||
| 2. Movable Timeline | 5 | |||||
2021/12/07 00:00 Hour Z”|
^ Calendar
Choose a date to playback ^ Click
“Play” to open playback window

AVTECH CMS Lite Quick Guide
29
Device Playback
^ Allinone
Choose a date ^ Click “Play” to open the whole channels window of NVR or DVR
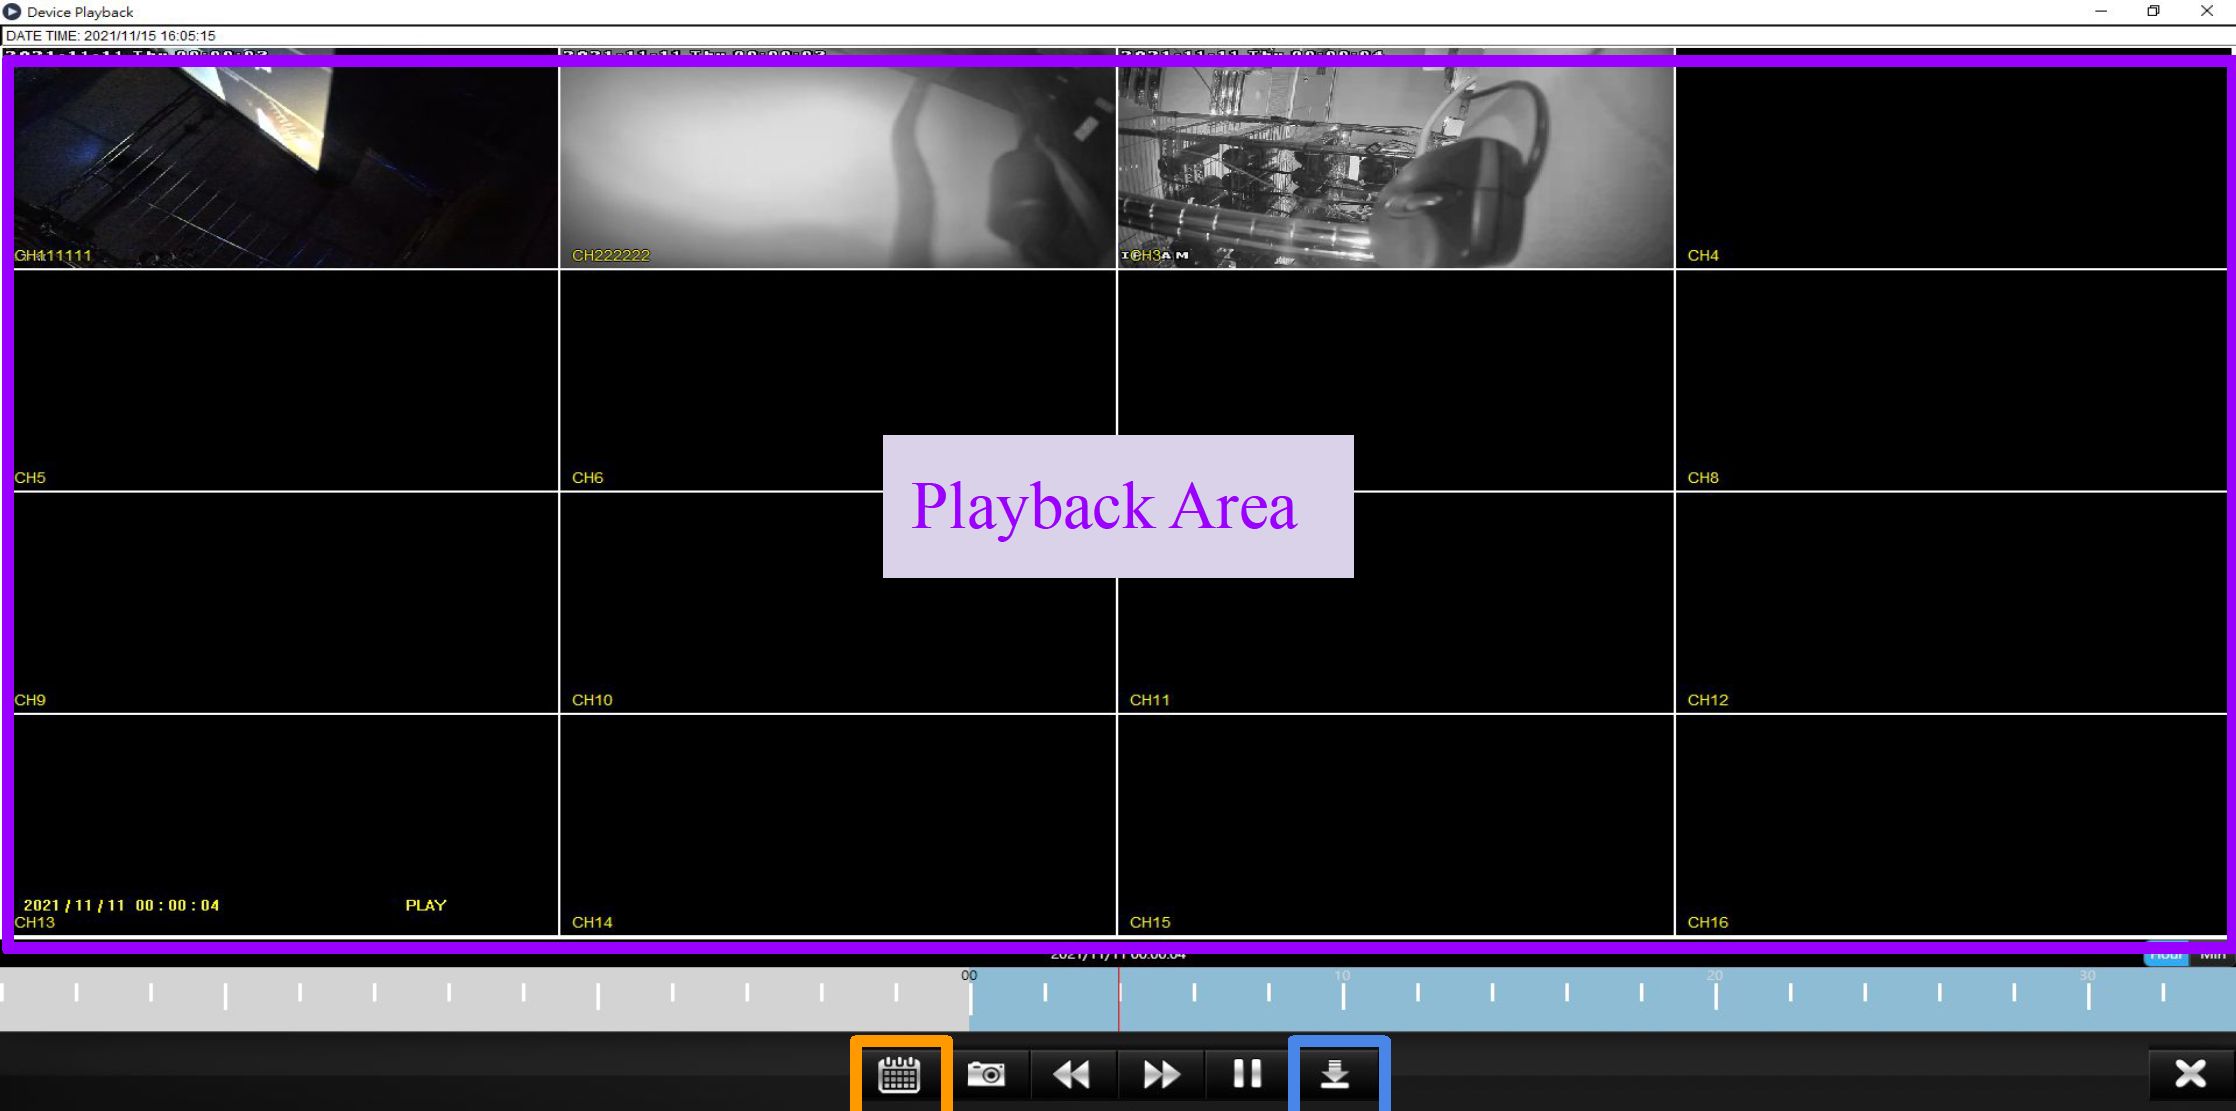
Return to the calendar
Backup
AVTECH CMS Lite Quick Guide
30
ZW/TECH
-far
“Advanced Function” from the main control panel ^ Click “Recording Playback” ^ Choose a type of date selector (List or Calendar) on the needed device
O Recording Playback
| 10.1.1.164:88 | Device-164 | List | Calendai |
| 10.1.1.163:88 | Device-163 | List | Calendai |
| 10.1.1.213:88 | Device-213 | List | Calendai |
| 192168.10.11:80 | Device-11_1 | List | Calendai |
| 192168.10.11:80 | Device-11_5 | List | Calendai |
| 192168.10.100:80 | Device-100.1 | Uj£t__ | Calendai |
| 192168.10.100:80 | Device-100.2 | List | ~Calenda |
| 192168.10.100:80 | Device-100.3 | List | Calendai |
| 192168.10.14:80 | Device-14_2 | List | Calendai |
| 192168.10.14:80 | Device-14_4 | List | Calendai |
| 192168.10.13:80 | Device-13_5 | List | Calendai |
| 192168.10.13:80 | Device-133 | List | Calendai |
| 192168.10.13:80 | Device-13_1 | List | Calendai |
| Address | Name |
| 10.1.1.164:88 | Device-164 |
| 10.1.1.163:88 | Device-163 |
| 10.1.1.213:88 | Device-213 |
| 192.168.10.11:80 | Device-11.1 |
| 192.168.10.11:80 | Device-11_5 |
| 192.168.10.100:80 | Device-100.1 |
| 192.168.10.100:80 | Device-100.2 |
| 192.168.10.100:80 | Device-100_3 |
CH.
| 4
Sun |
Mon | Tue | 2021/12
Wed |
Thu | Fri | ►
Sat |
| 01 | 02 | 03 | 04 | |||
| 05 | 06 | KS | ||||
| 1. | Choose a date | |||||
| 2. Movable Timelint | 5 | |||||
Choose a date to playback ^ Click
“Play” to open playback window
2021/12/07 00:00 Hour Z”|

AVTECH CMS Lite Quick Guide
31
ZW/TECH
-far Vîdlto
Backup for Device
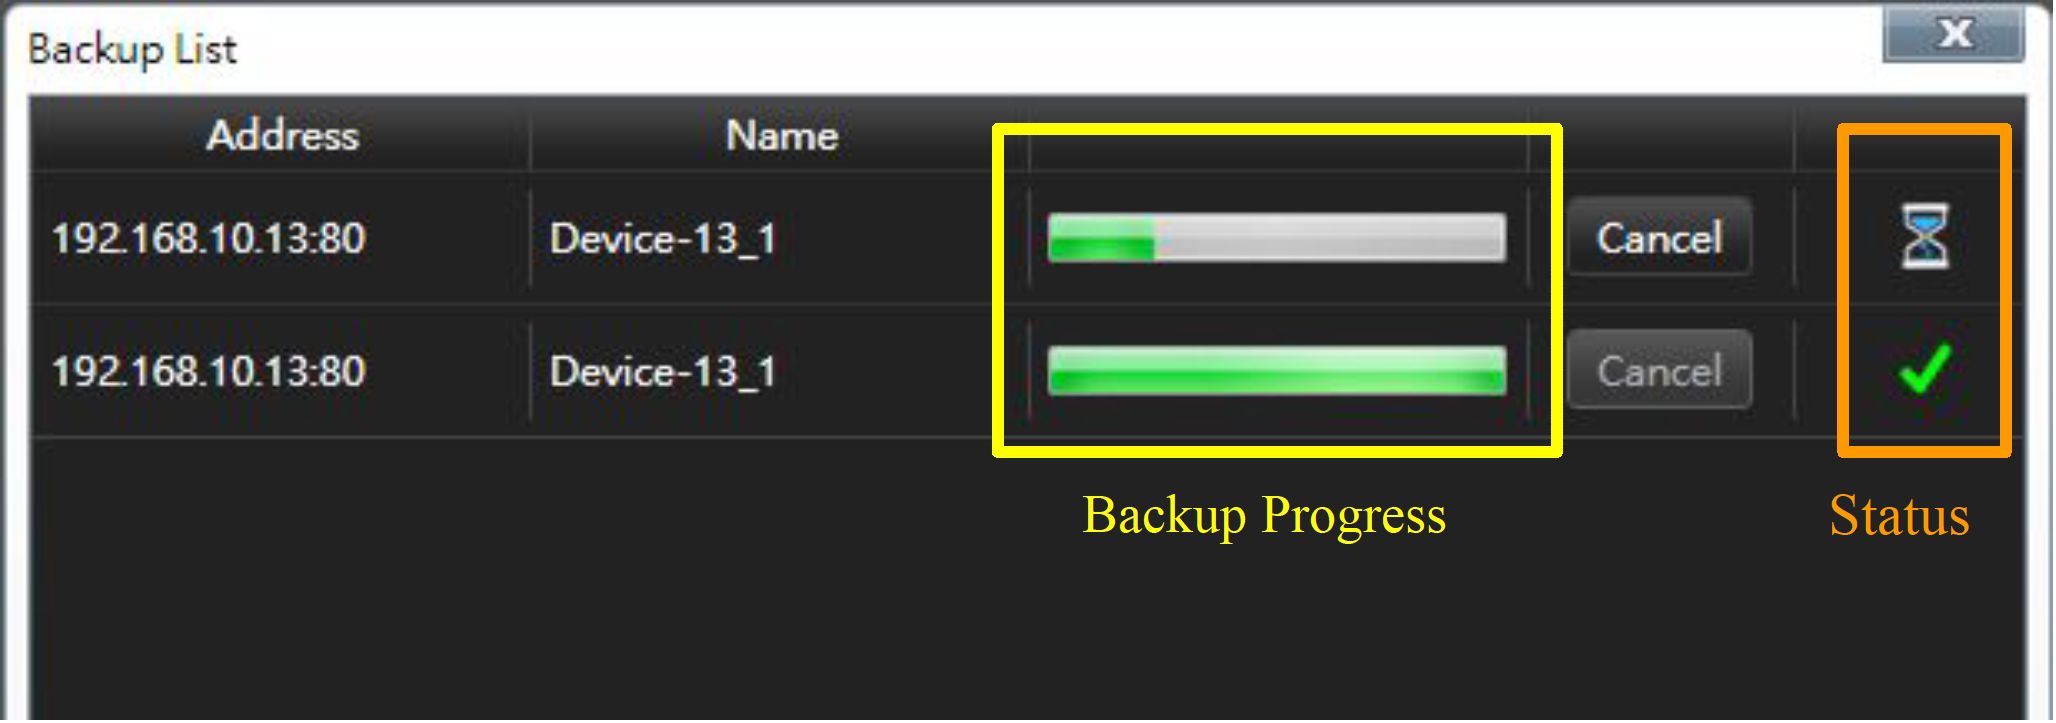
From the Device Funtion on the Main Control Panel, click “Device Playback” ^ Click “Backup” on the calendar to open the windows ^ Setup the date and time ^ Choose a resolution and format for the video then click ”Backup” and save the file to the customize location ^ After clicking “Confirm” it will display process in the Backup List
^ Backup Windows
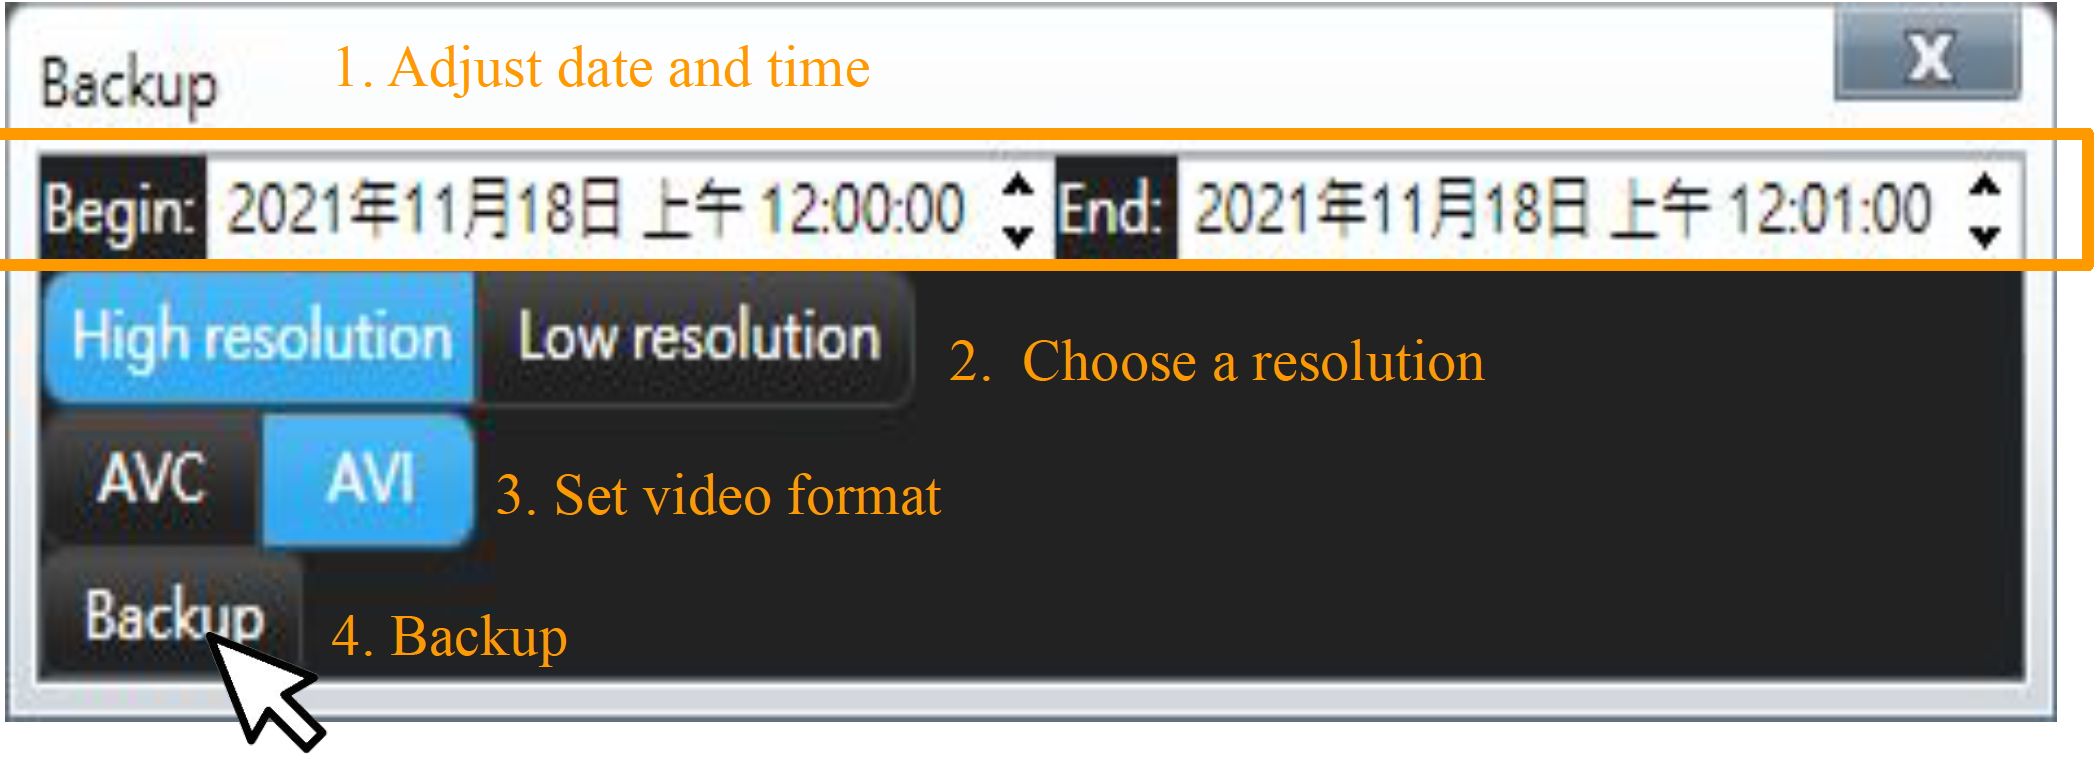
^ Backup List
AVTECH CMS Lite Quick Guide
32
ZW/TECH
-far Vîdlto
Backup for Recording
Check the needed device that has activated record ^ Click “Backup Recording” from the
main control panel Advanced Function ^ Adjust backup time ^ Choose a folder to save
the record data
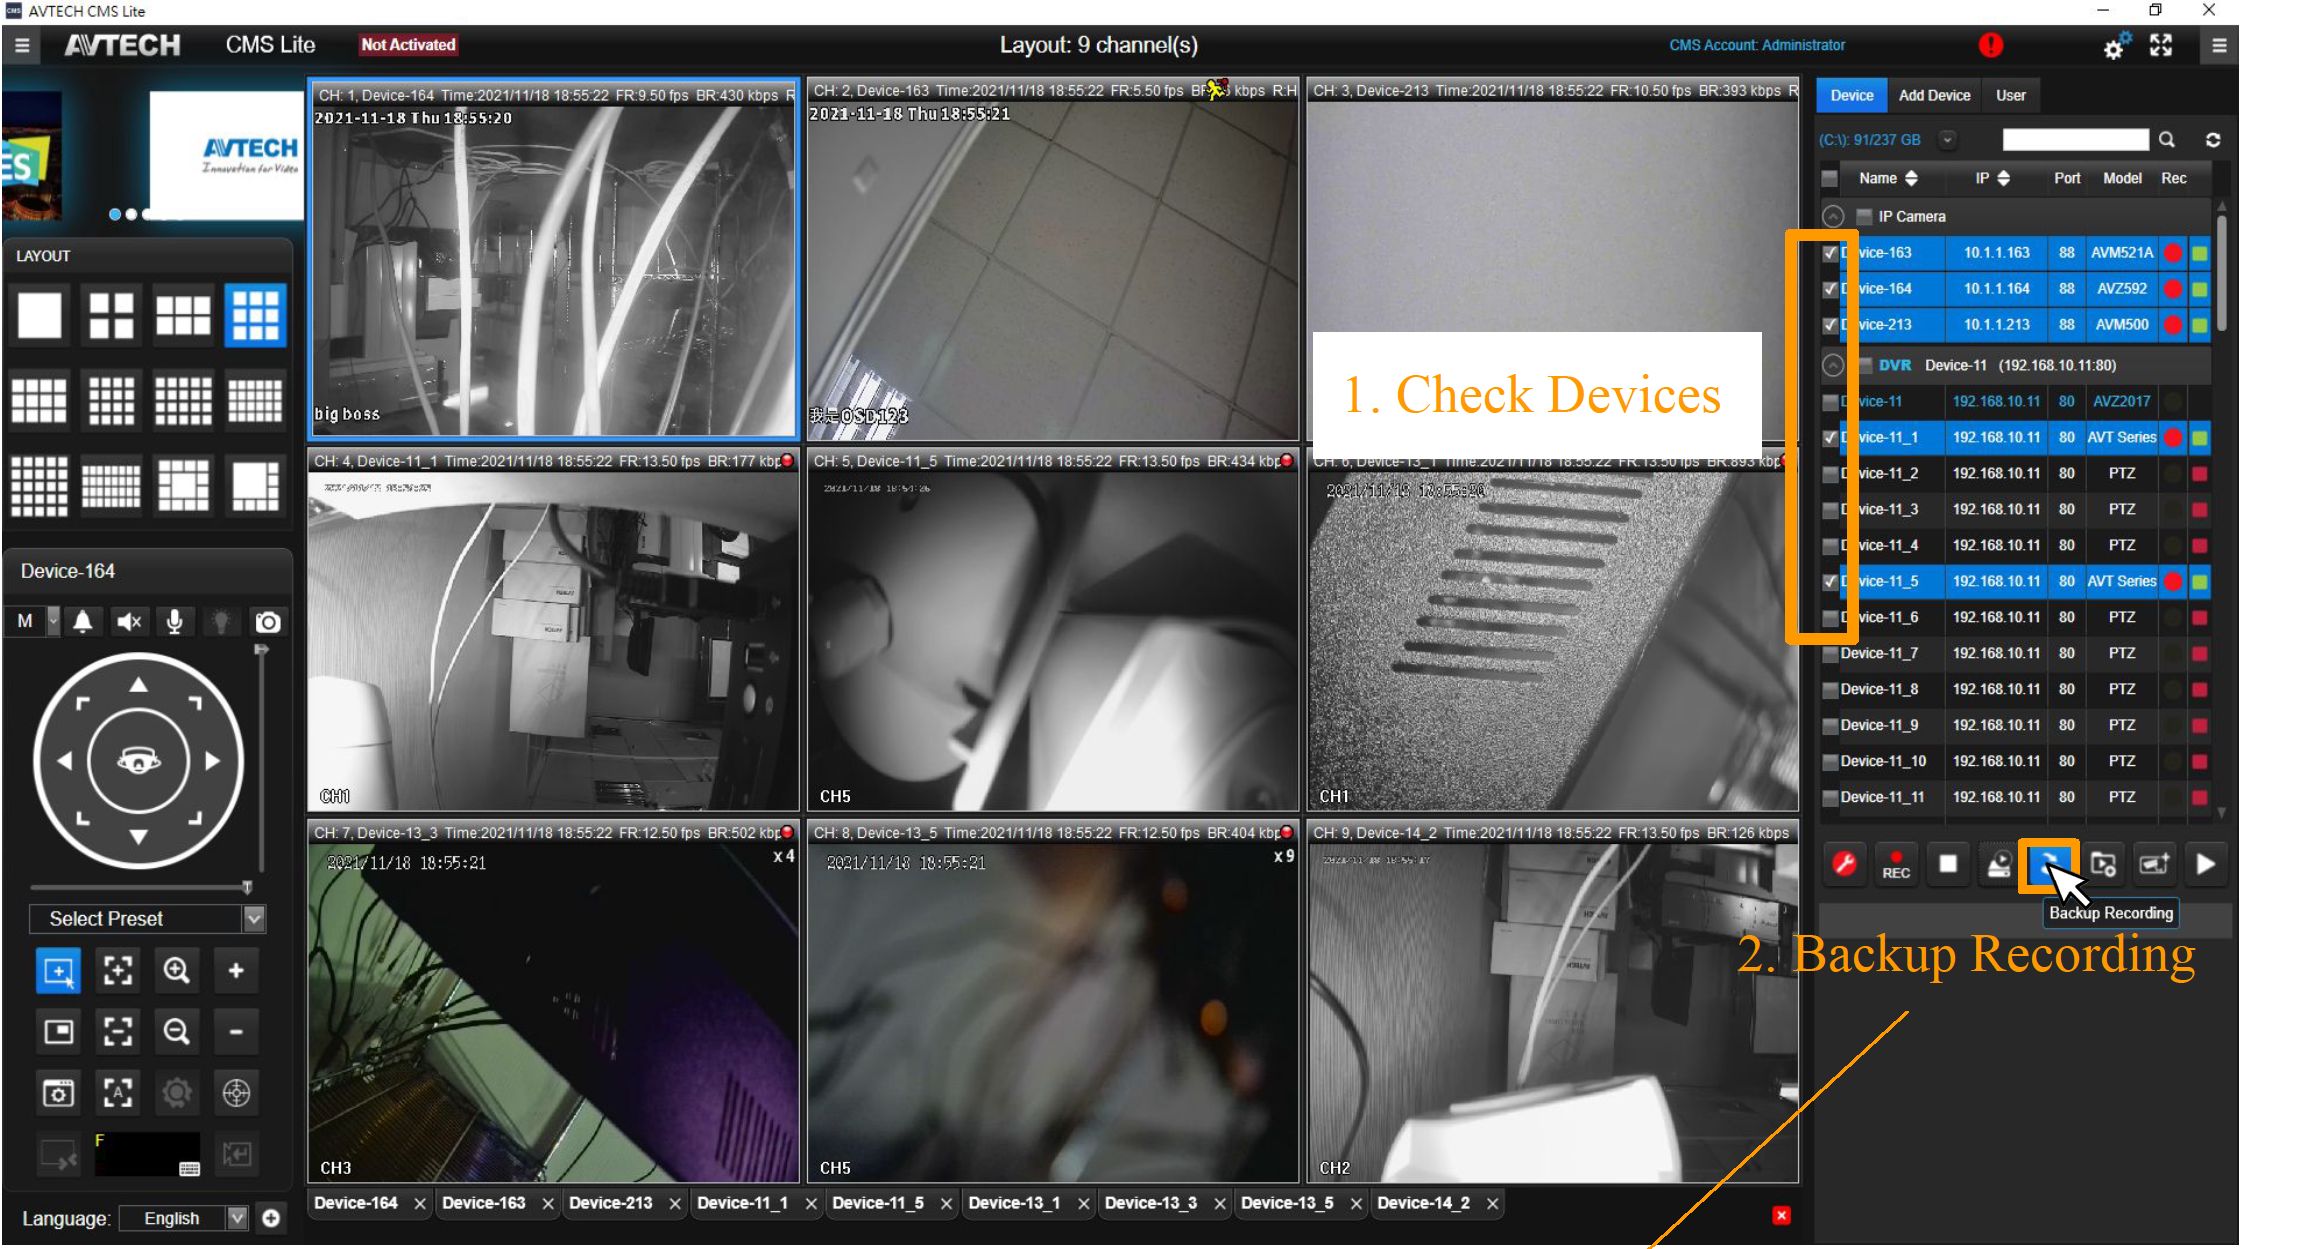
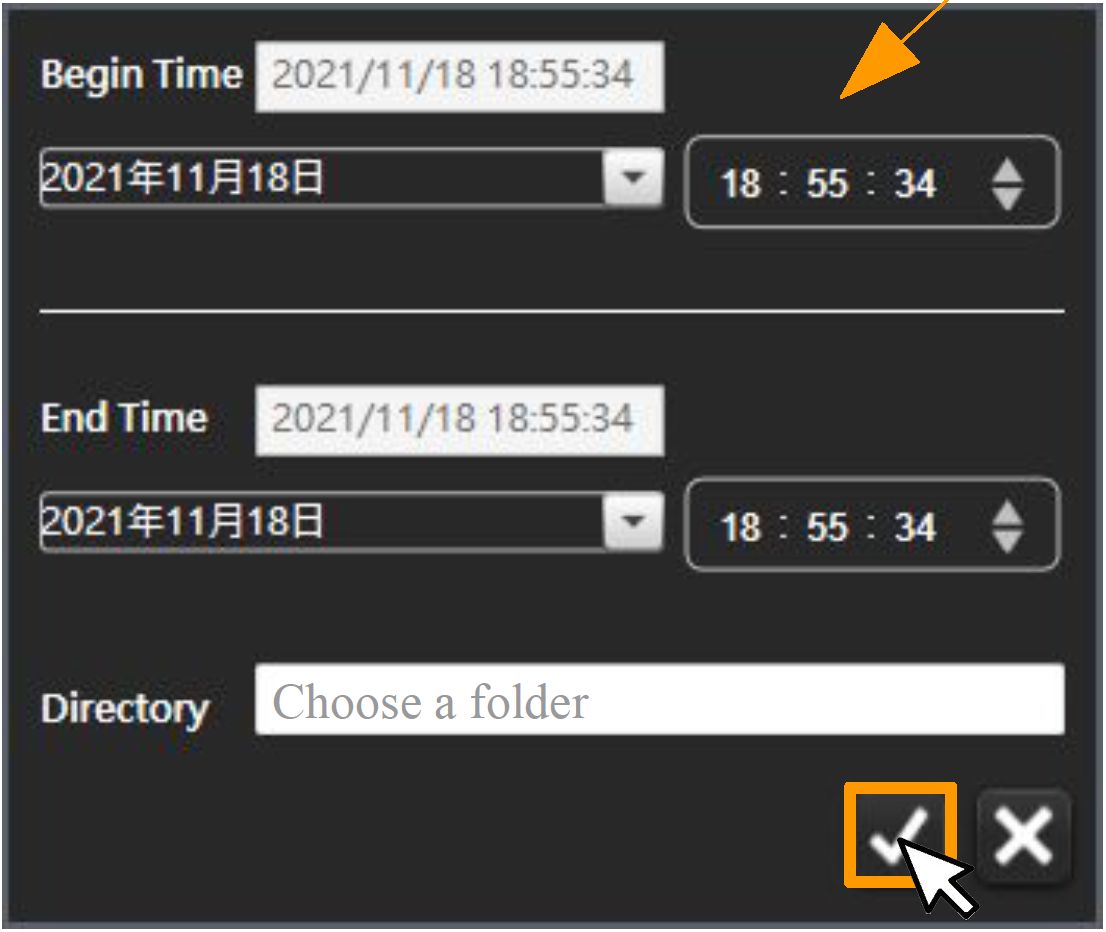
Footnotes: It could also backup from the Recording Playback, click ”Backup” from the
calendar to execute.
AVTECH CMS Lite Quick Guide
33
ZW/TECH
-far Vidlto
General Settings
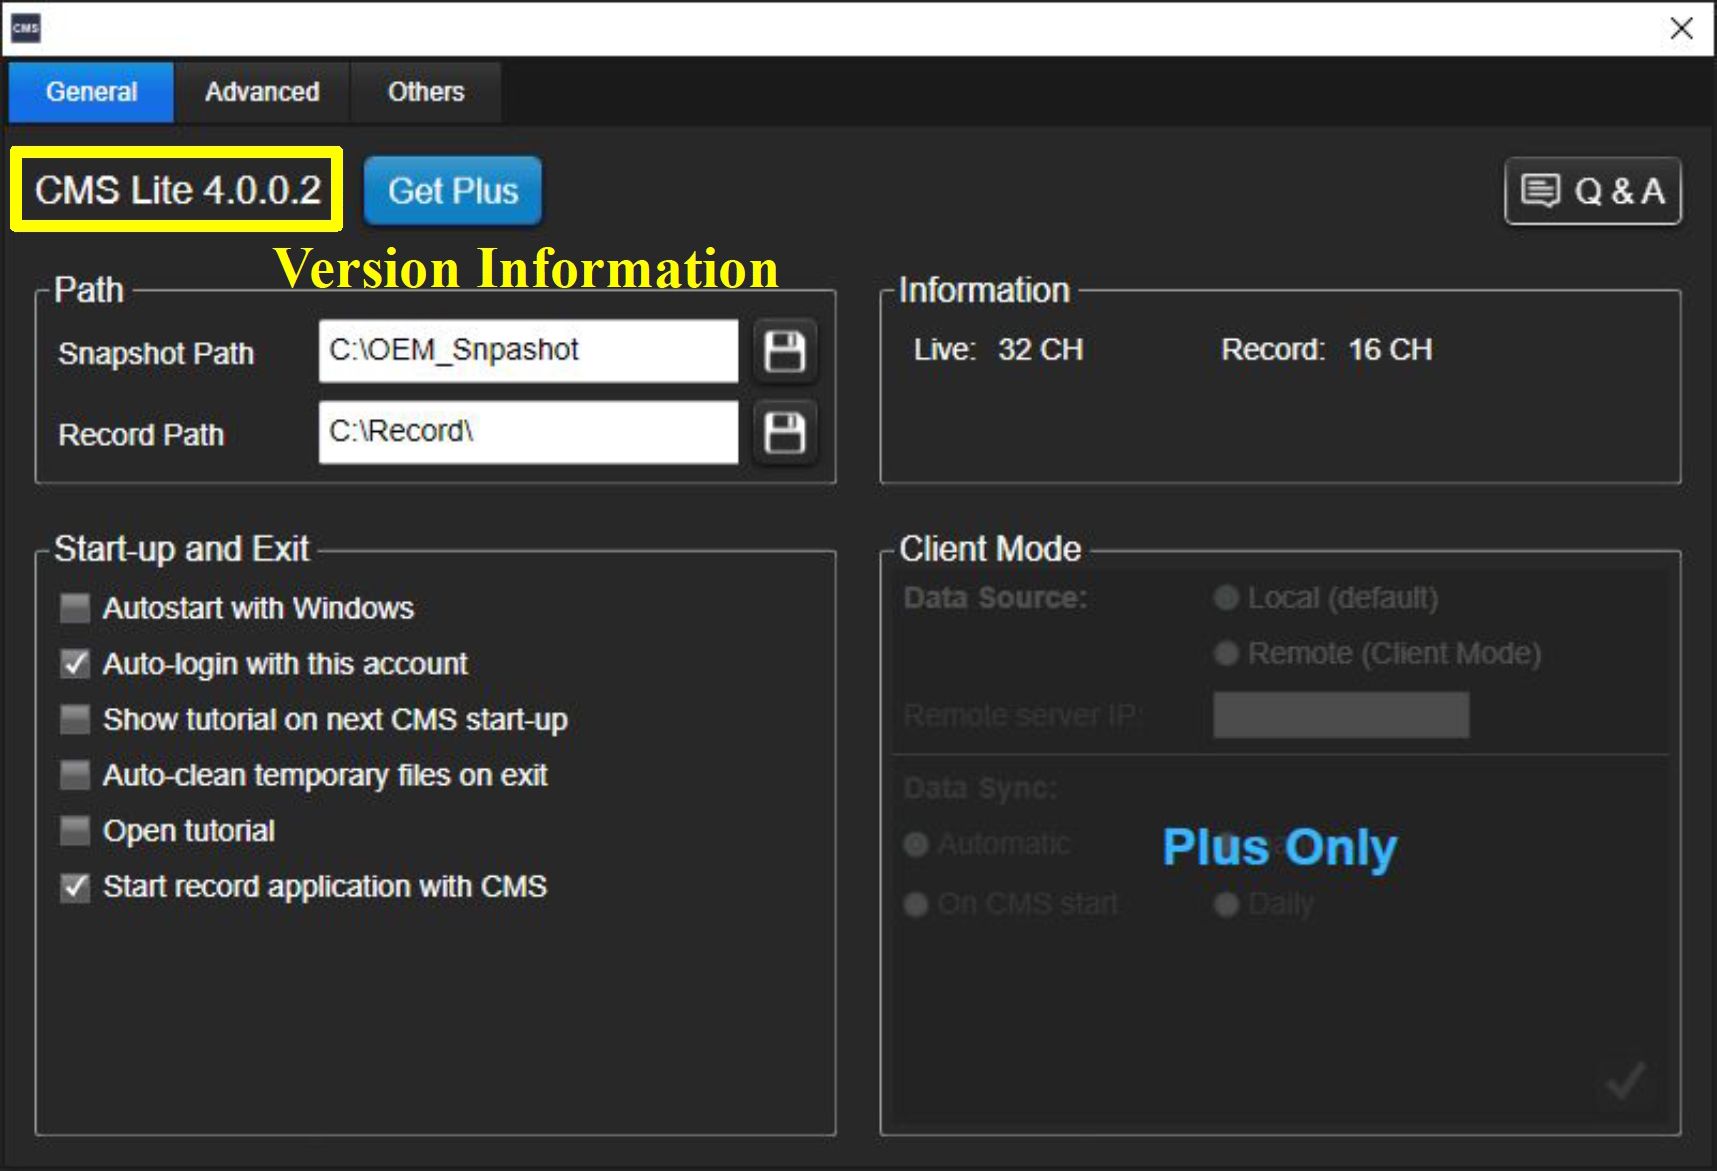
Click “System Configuration” from the main control panel which provides with the
information, general and other advanced setting for CMS.
System General Functions
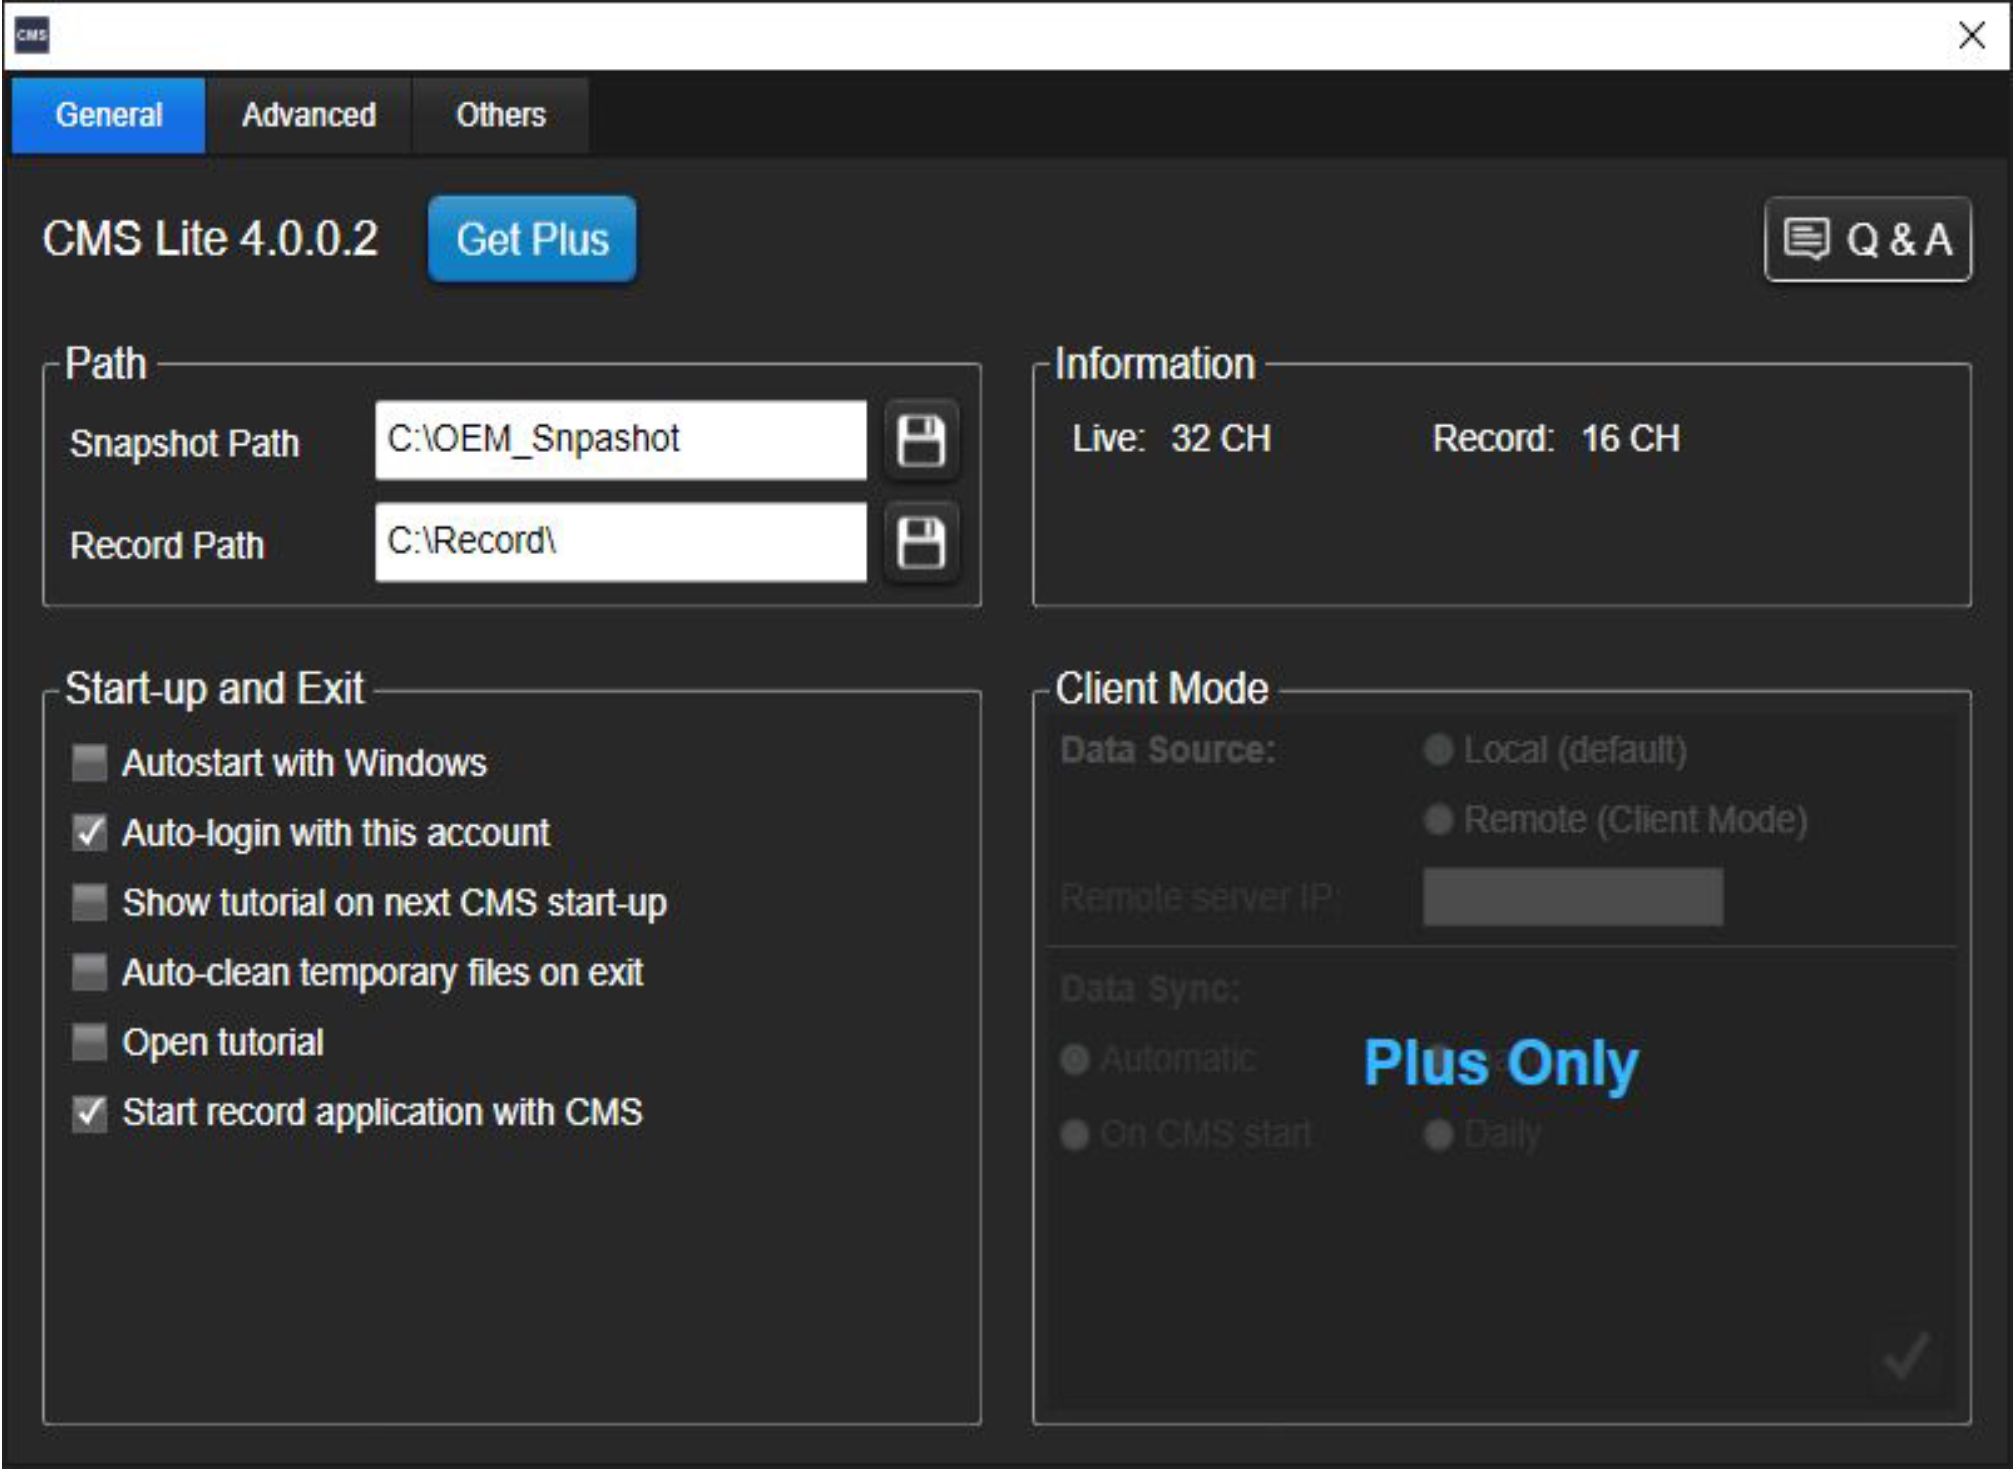
| Function | Description |
| Path | File saving path (Snapshot / Video Backup) |
| Start-up and Exit | System startup and shut down |
| Information | The limitation for live and record |
| Client Mode | Alter data source for CMS |
AVTECH CMS Lite Quick Guide
34
ZW/TECH
-far Vidlto
Advanced and Other Settings
^ System Advanced Functions
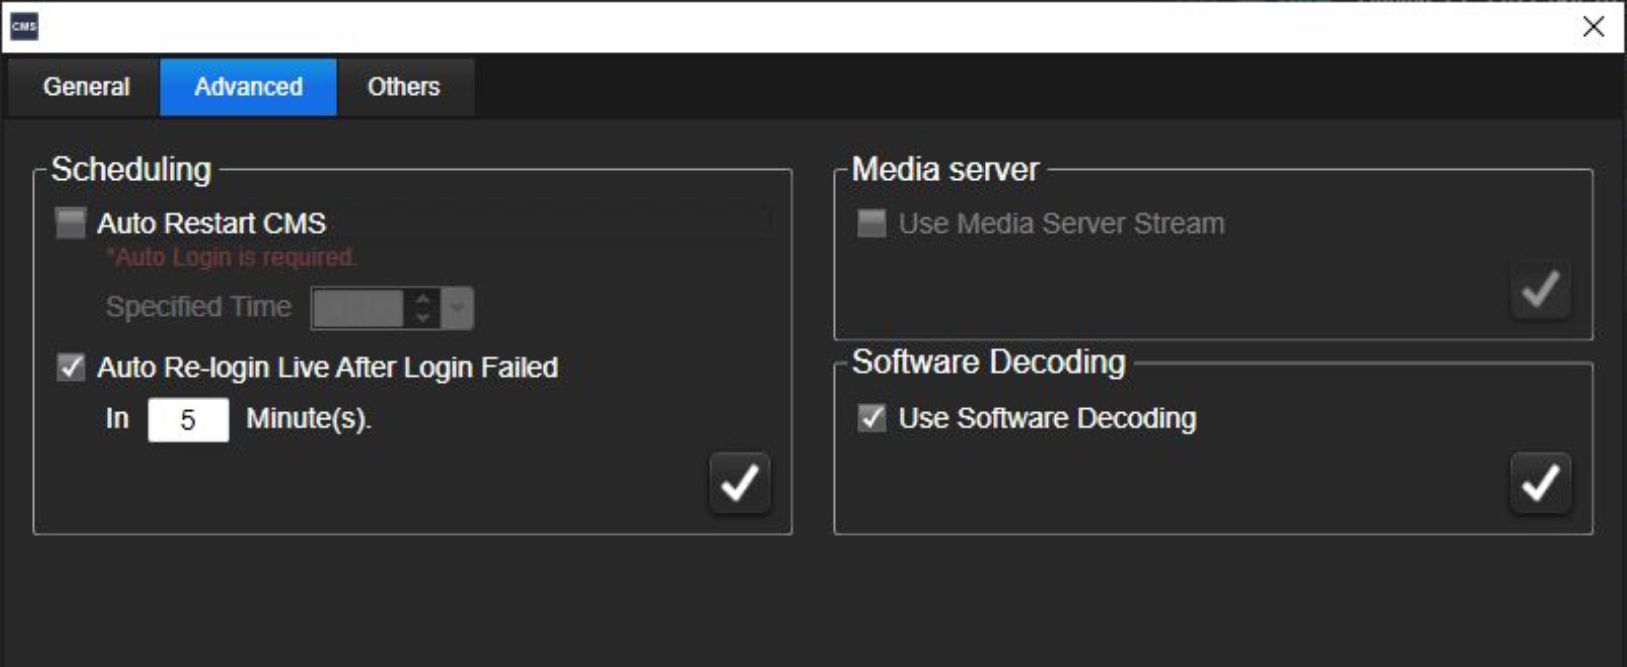
| Function | Description |
| Schedule | Restart setting for the CMS |
| Media Server | Server for instant live |
| Software Decoding | Decoding setting for instant live |
^ System Other Functions
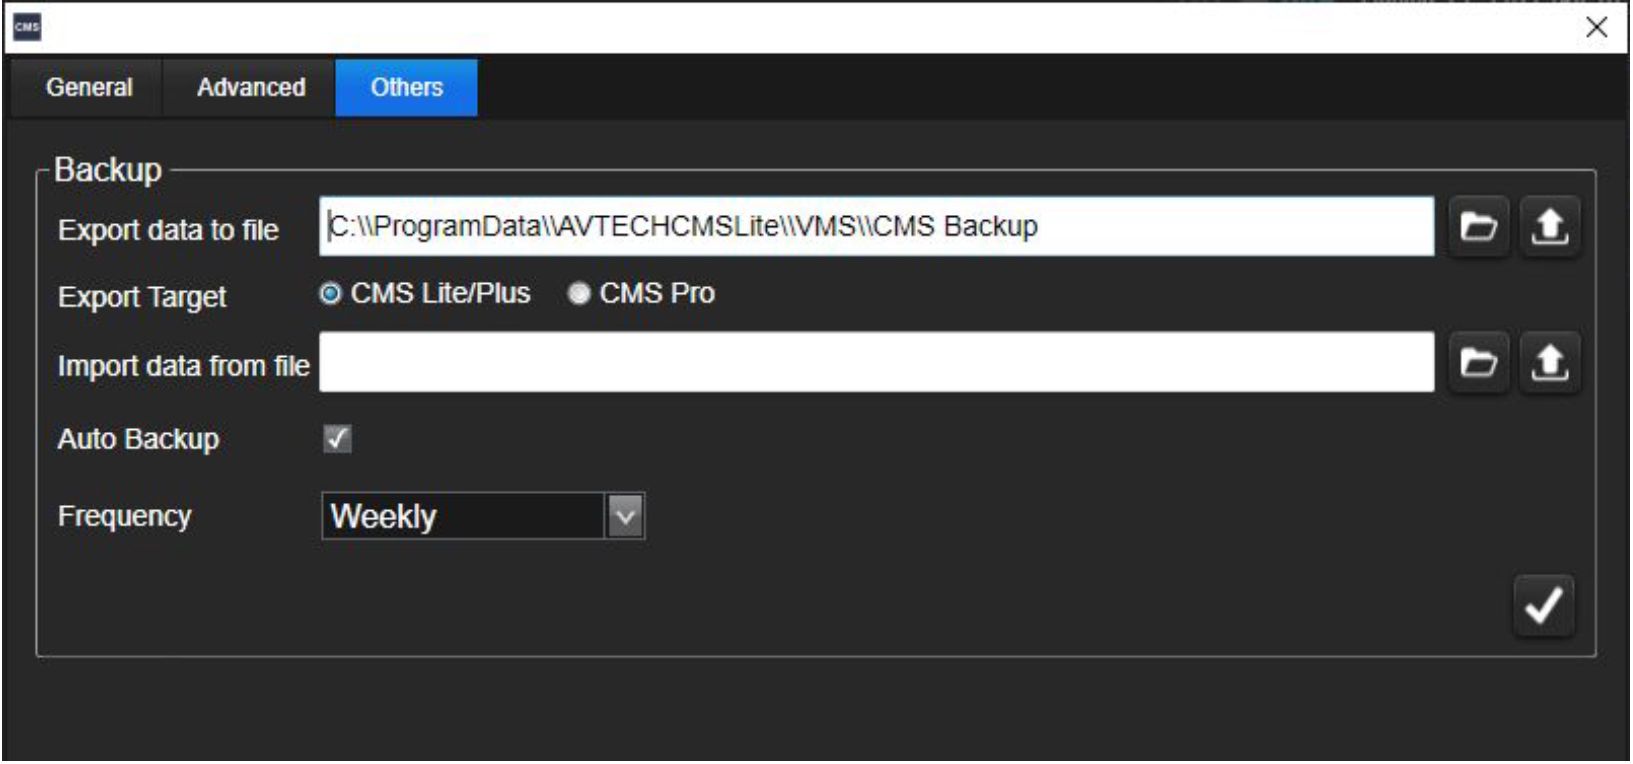
| Function | Description |
| Backup | Backup location and frequency |
