Titanium CMS NVMS 2 User Guide, NVMS Lite is a newly integrated security management platform released by TVT, featuring seamless access to all TVT’s products and encoding devices of the famous manufacturers in the industry (like Hikvison, Dahua, etc.). With the powerful capability of video surveillance management, real-time preview, record storage, record playback, record download, alarm linkage, decoding on TV Wall and keyboard control are supported.
Additionally, due to its small, exquisite, flexible and diverse deployment, NVMS Lite can meet various demands of small-sized projects and can be widely used in the video surveillance of industrial park, education, banking, chain stores, buildings and transportation.
If you see the CPU and Memory red and maxed out while trying to see live view, follow the steps below.
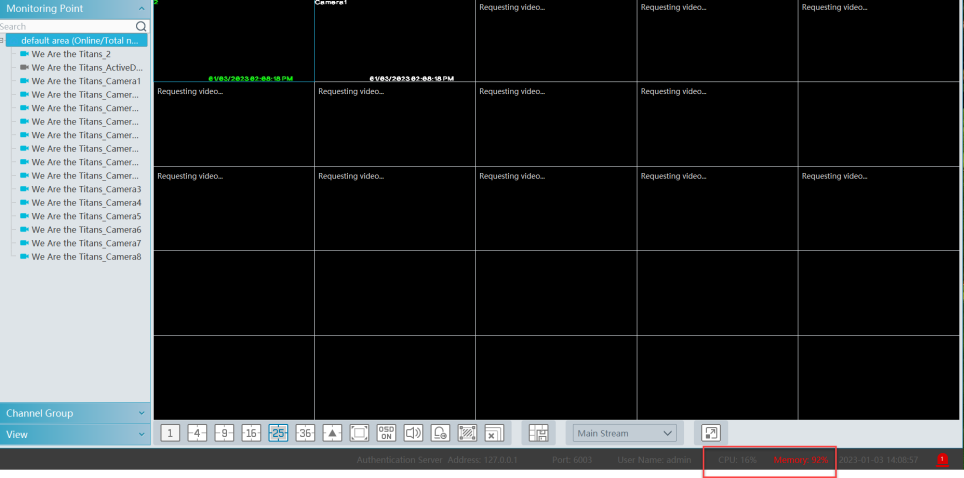
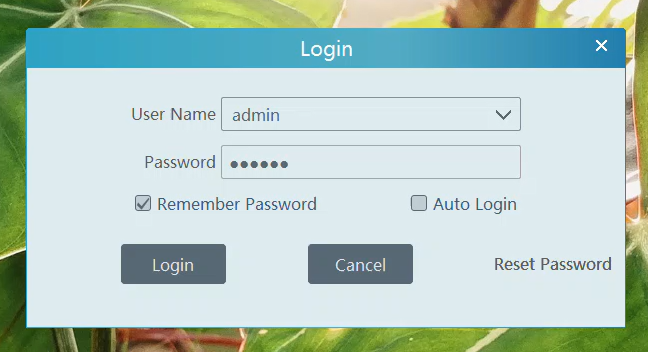
Log into NVMS.
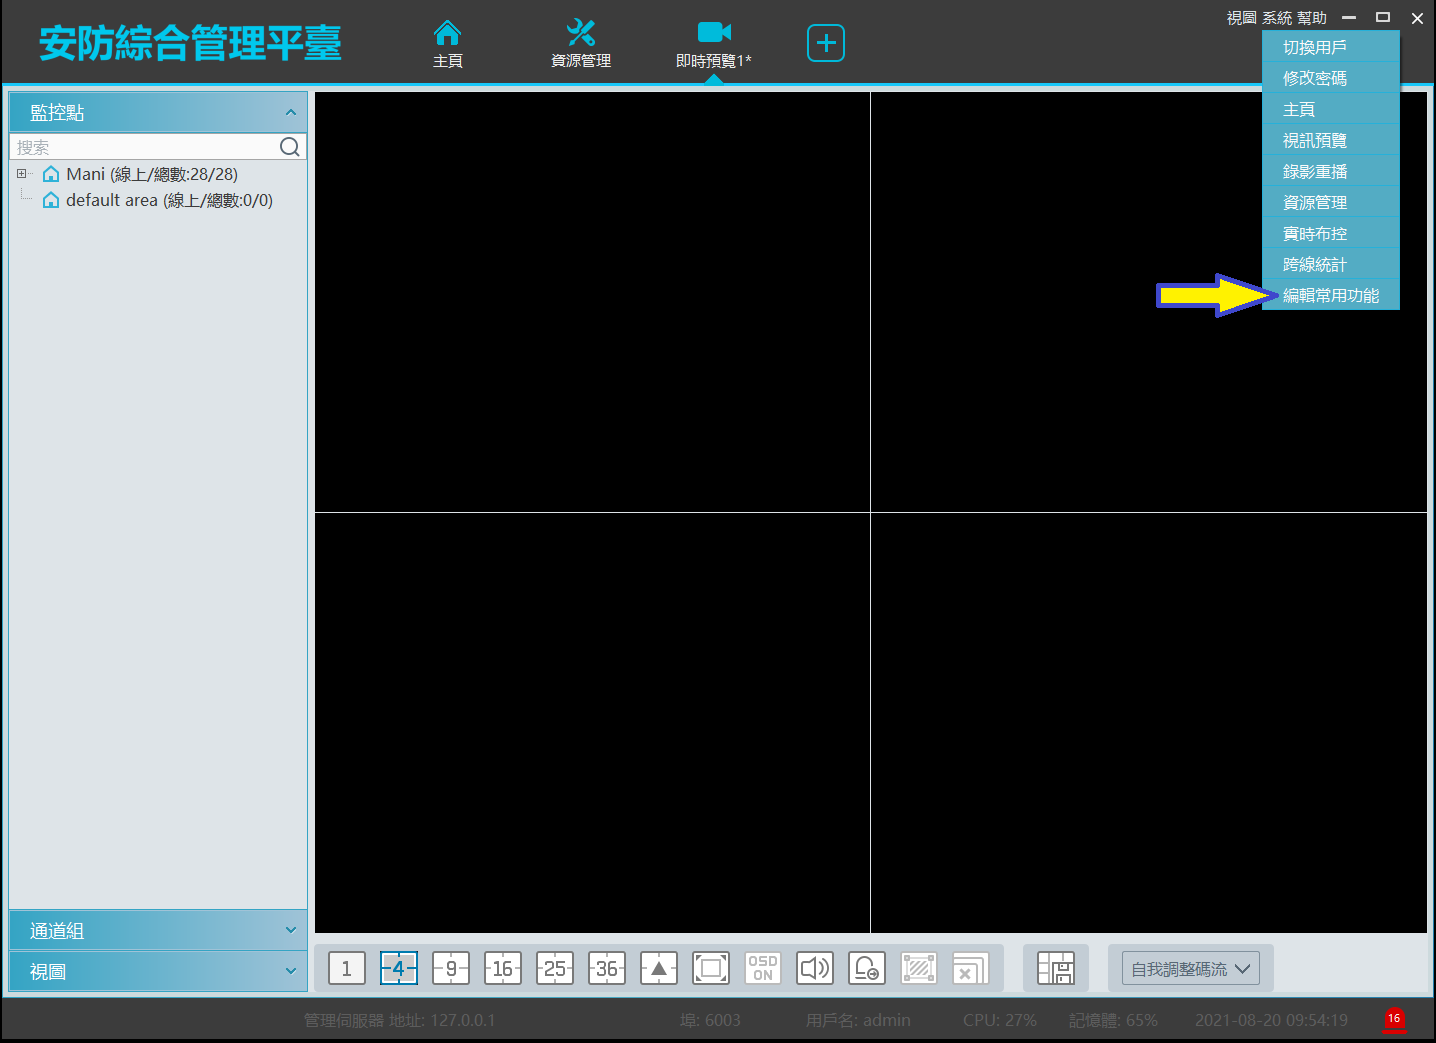
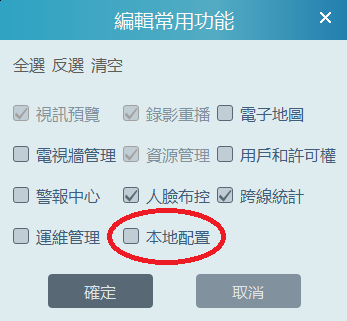
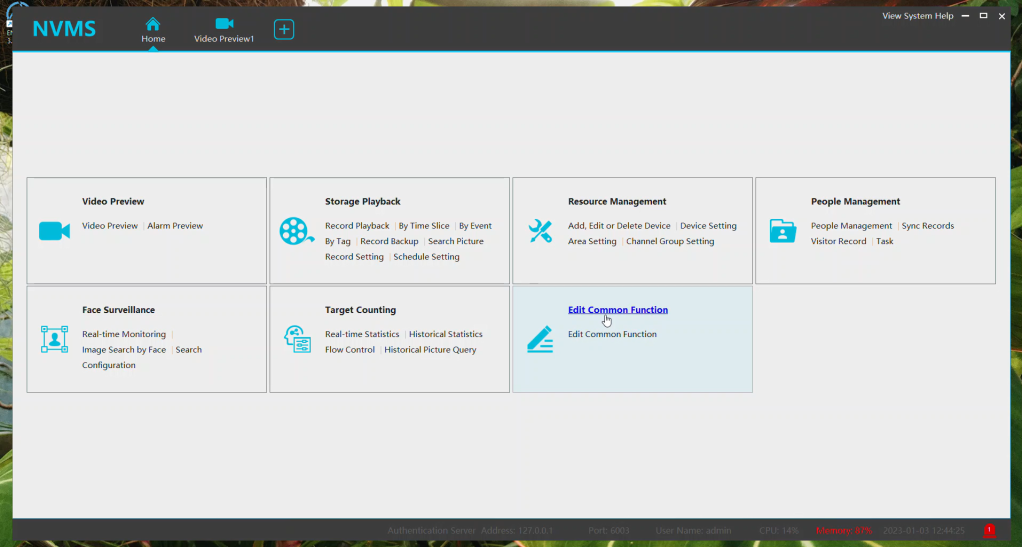
Click on Edit Common Function. (If you have this function already, skip to the next step)
Titanium CMS NVMS 2 User Guide
Read More : NVMS 2 Installation Guide
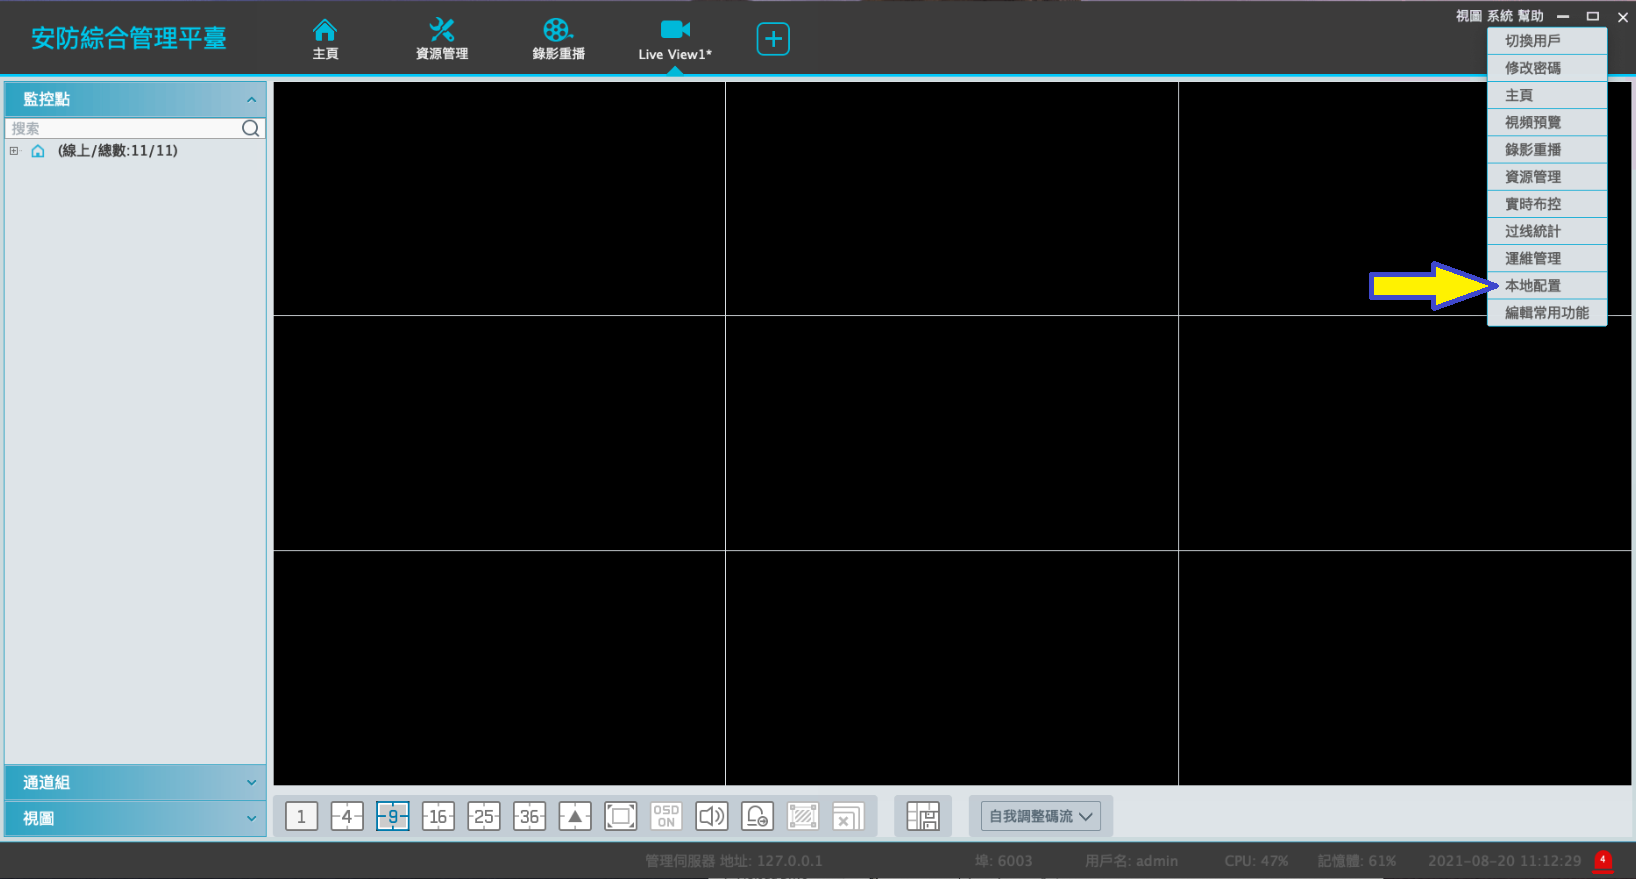
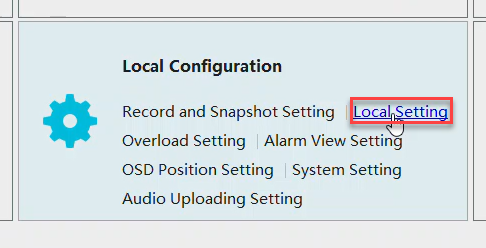
Select Local Configuration and click OK.

Click on Local Setting.
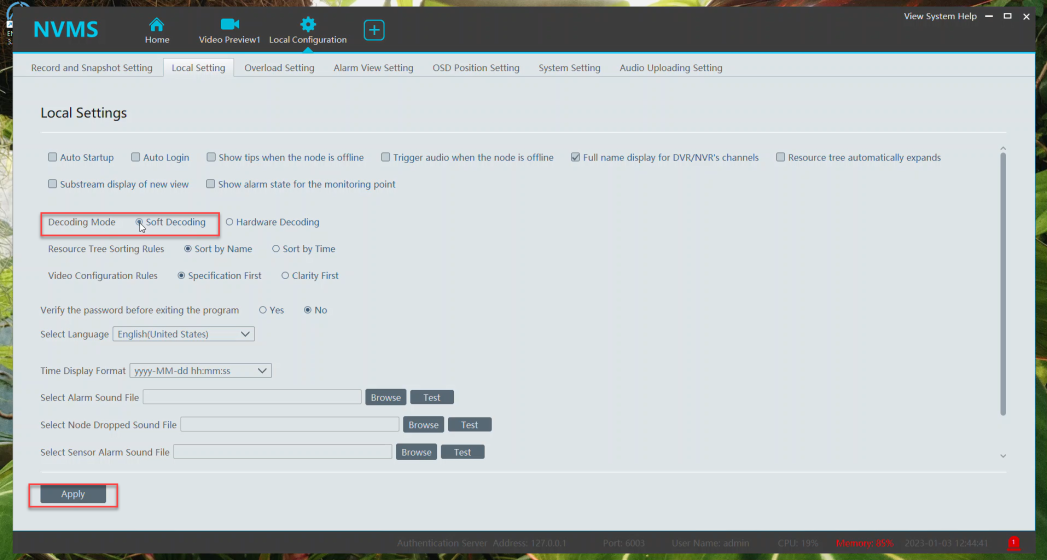
Under Decoding Mode, select Soft Decoding and click Apply.
At the top, select Overload Setting.
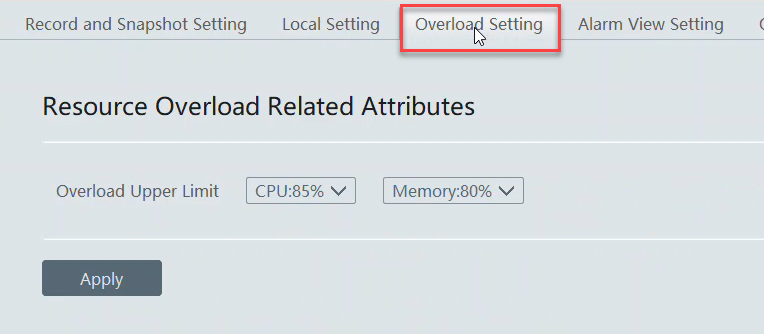
Select max CPU and Memory.
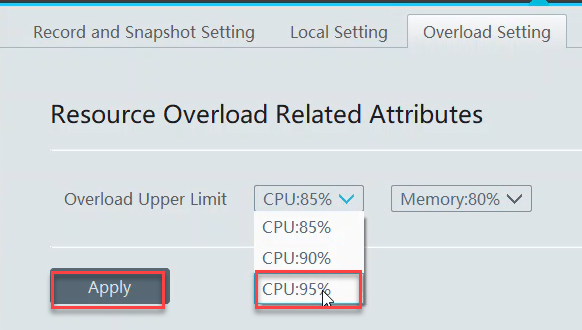
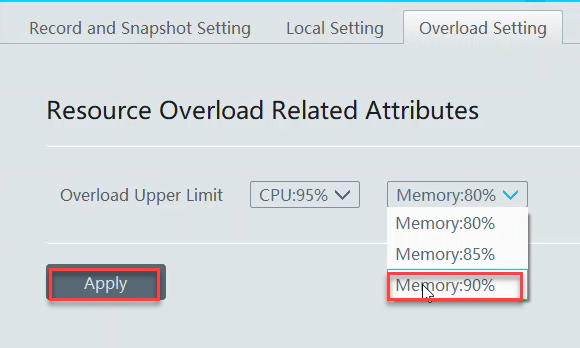
Close NVMS and don’t save live view settings.
Restart NVMS. The changes made will help lower overloading. If it’s still maxing out and struggling to stream live view, consider changing the stream to sub stream, lowering the resolution on the cameras and not using any other applications in the background.
Link to video:
https://app.screencast.com/AjNAFgyJz4jQN
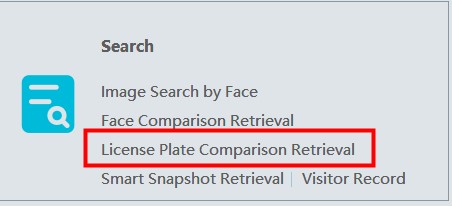
Plate Capture Export on NVMS / Monitor Client
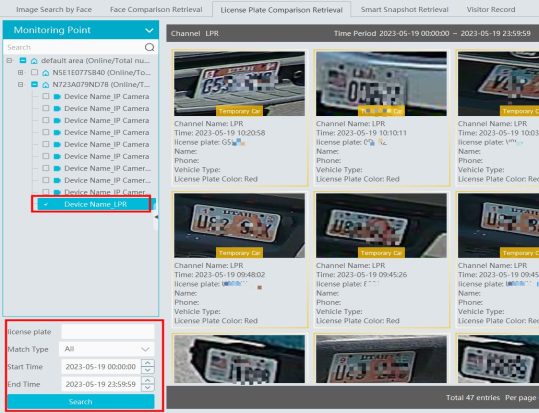
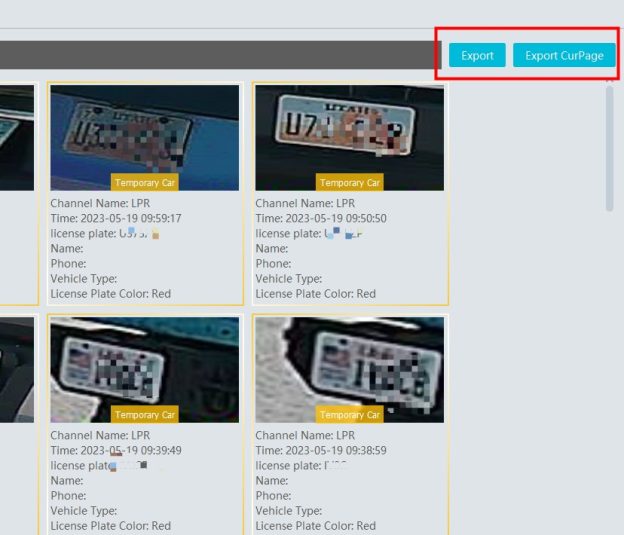
NVMS1000 Notice
The NVMS1000 program is EOL.
3.4.5 is the final version for the software with 3.0 recorders. No future updates.
Recorders on the Titanium Interface will require the use of NVMS 2.0 Lite(256 Ch free) or Standard (32 Ch free)
Windows:
https://drive.google.com/drive/u/0/folders/1nOxFnJBzBmqln2mUiD0Uo7GRInsj1shl
Mac (NVMS Lite ONLY):
https://drive.google.com/drive/u/0/folders/1noAUhQbofFP8natvOt4WsVNJigxRQvOs
Installing NVMS 2.0 Lite (2.1.1)
Default username: admin
Default password: 123456
Download and run the NVMS Lite exe.
https://drive.google.com/drive/u/0/folders/1tarCVJie8corwQIx46_OGde6k3Nc6SOR
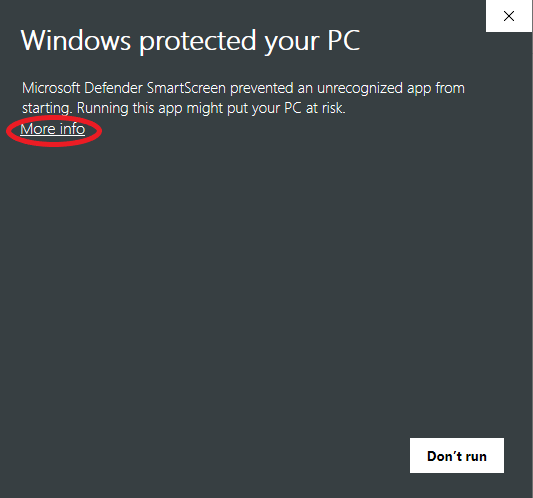
Click “More Info” when the splash screen displays.
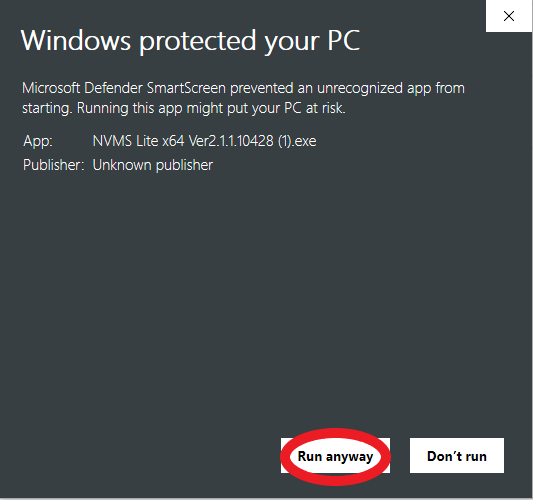
Click “Run Anyway”
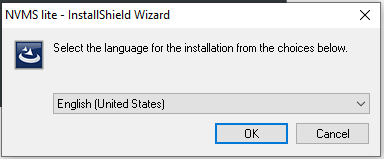
Select your desired language and click “OK”
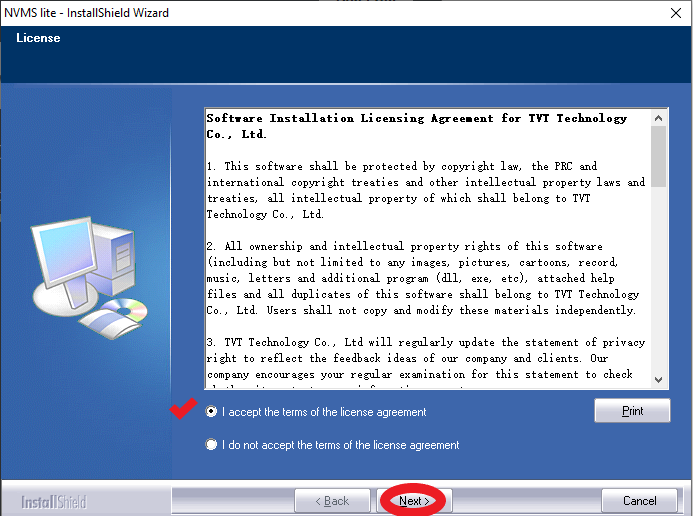
Read the software license agreement and select the “I accept” option and click “Next” to continue.
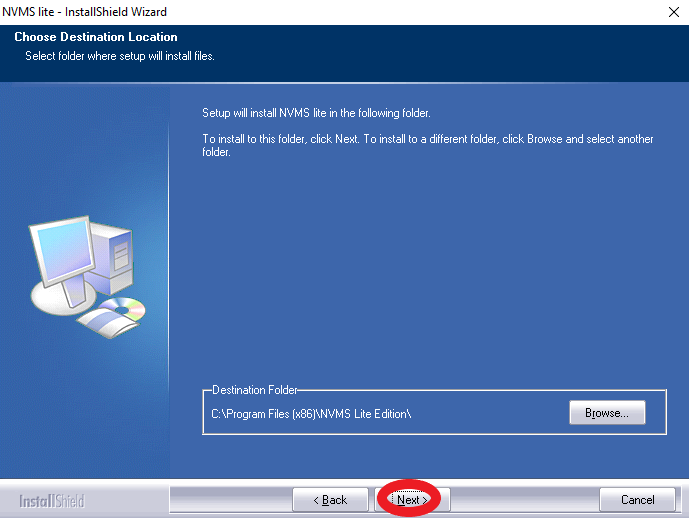
Click next on the next screen. (Note: You may change the install directory by clicking “browse”)
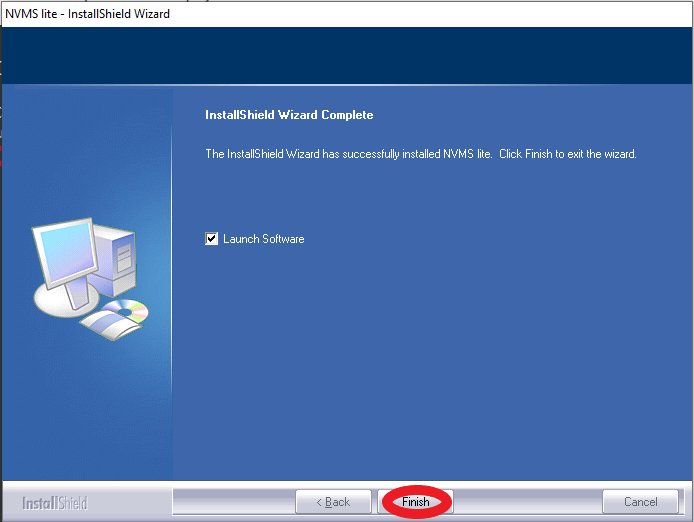
Click “Finish” to complete the install.
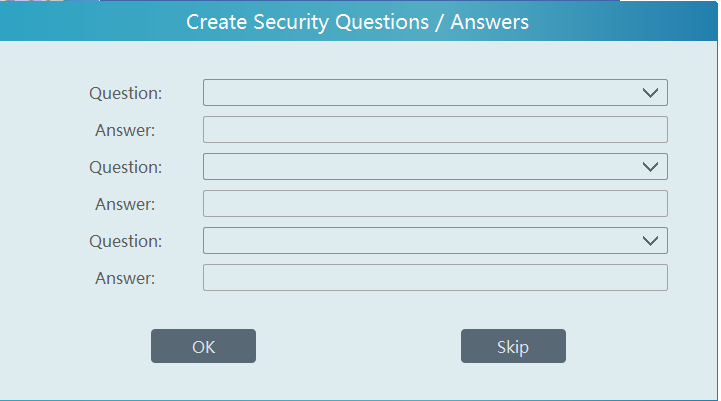
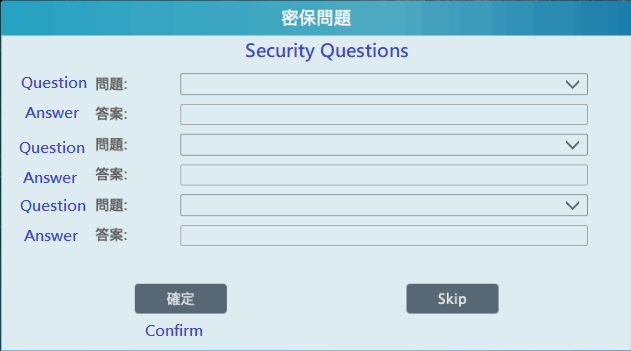
You may use the drop down menus under “Question:” to select security questions. Otherwise, hit “Skip”.
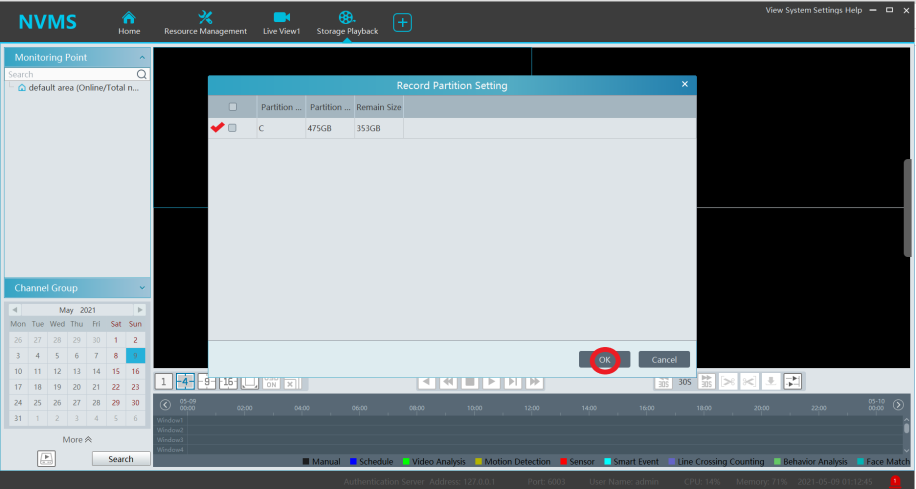
Once the software launches, you will need to select a record partition.
Live View NVMS 2.0 (2.1.1)
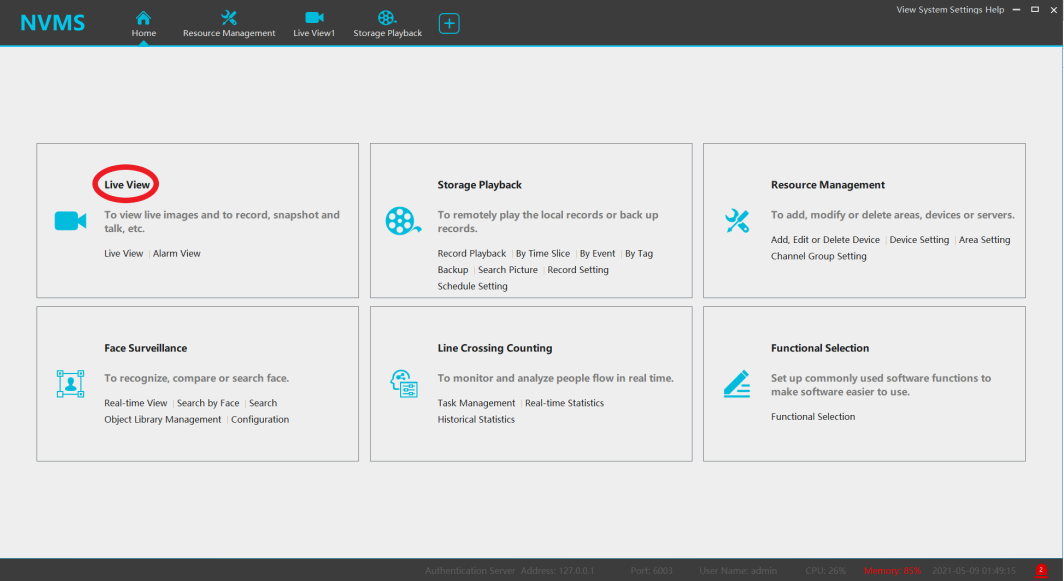
Select “Live View”
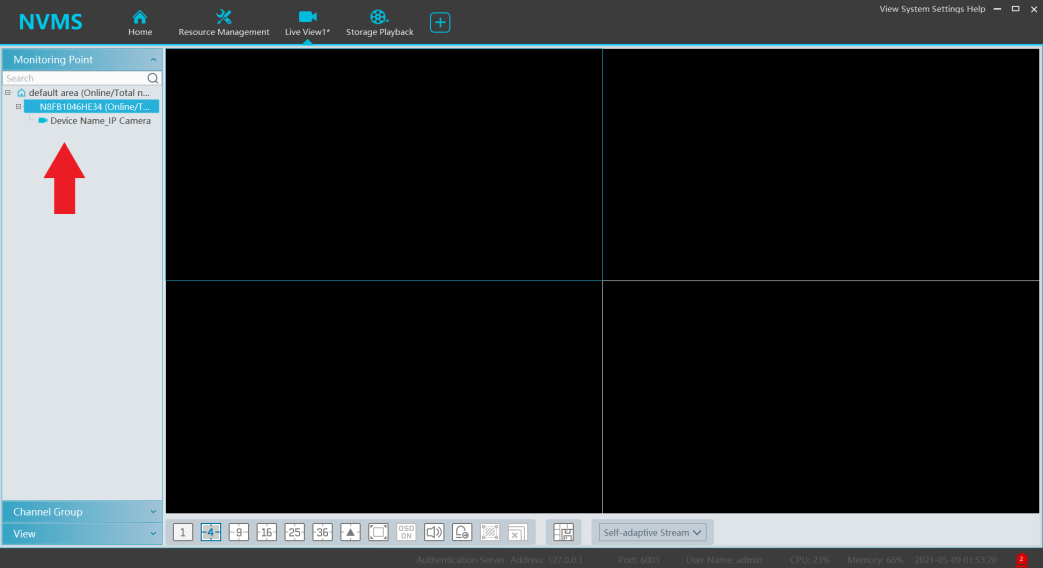
You may use the “area” (house icon) to call the cameras within the area. Alternatively, you may call the cameras individually.
To call a channel you can either drag and drop OR select a channel within the layout then double click the channel.
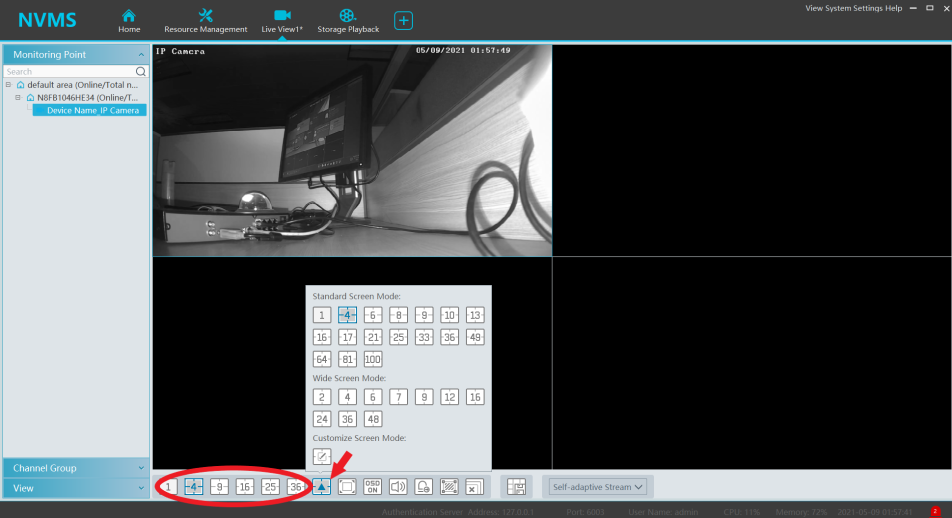
You can modify the channel layouts by selecting them at the bottom of the screen. The arrow will provide additional options.
The full screen button will expand your active channels to full screen. Press Escape on your keyboard to exit the mode.
Select OSD to toggle the On Screen Display Overlay. This setting is off by default. Enabling will make the NVMS 2.0 create an overlay with the Device and channel name.
The audio enable button will start audio on the selected channel. The camera must be audio capable for this function to work.
The Intelligent function sense button will toggle the intelligent function overlays. (e.g. line crossing, intrusion, etc)
The close stream button will close all active streams.
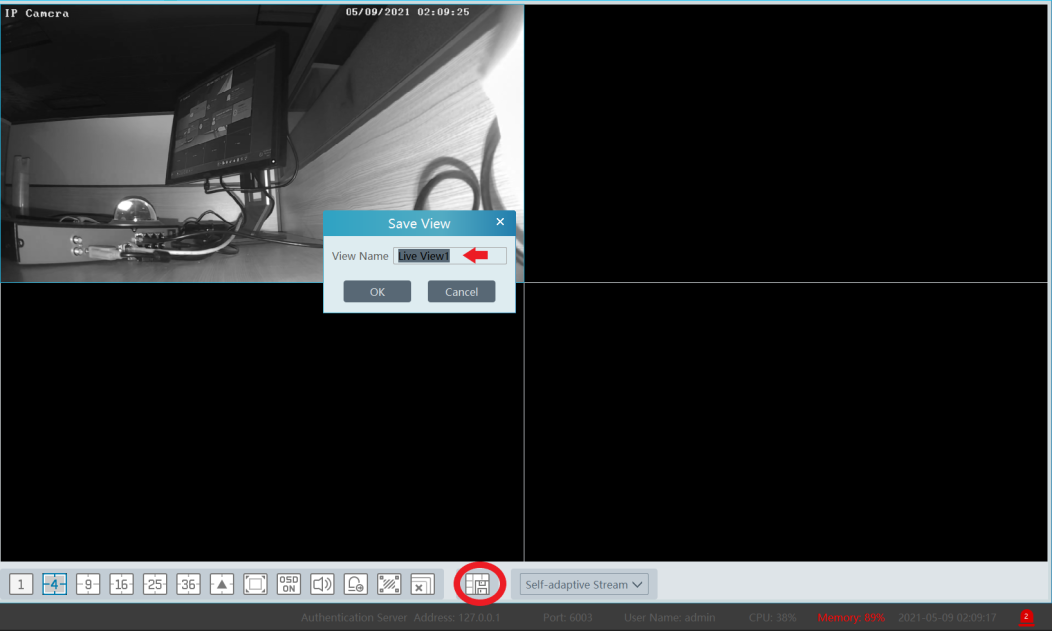
The “Save View” button will allow you to name the active channel layout and save it.
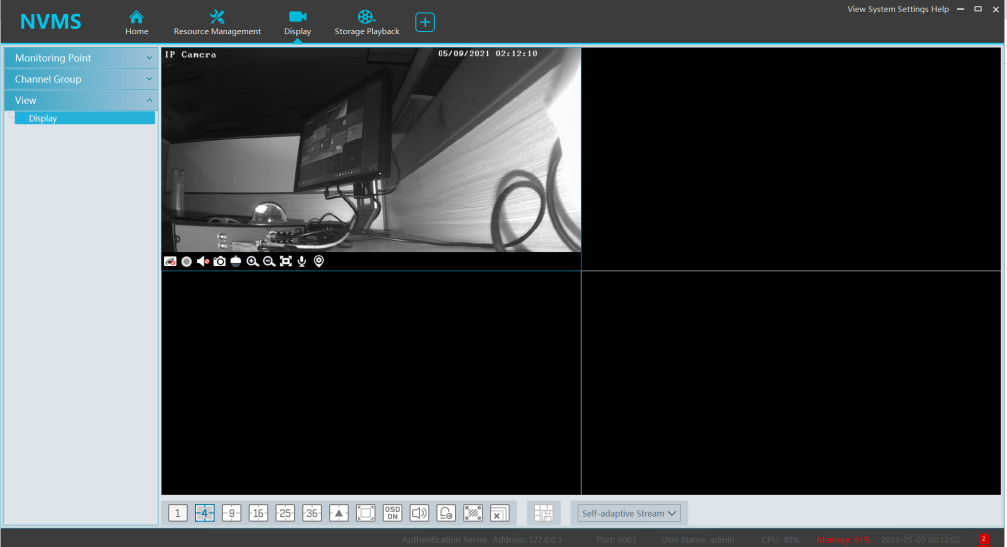
To call the saved view, click the “View” button on the sidebar. This section will contain any saved views.
Playback on NVMS 2.0 (2.1.1)
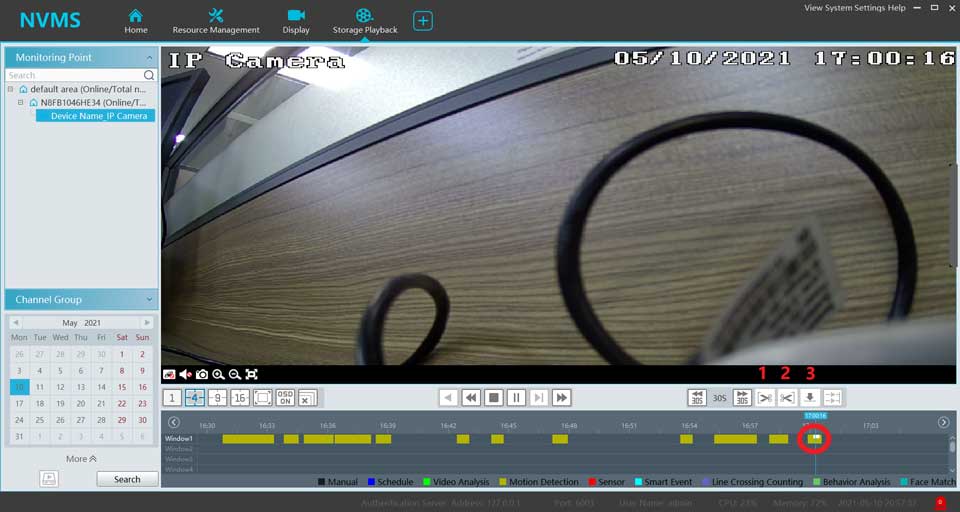
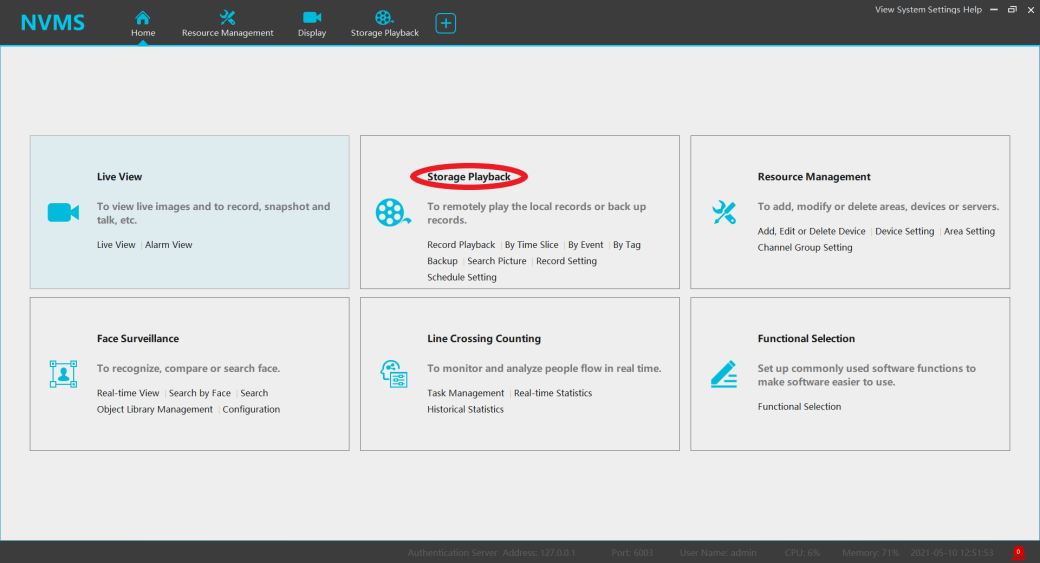
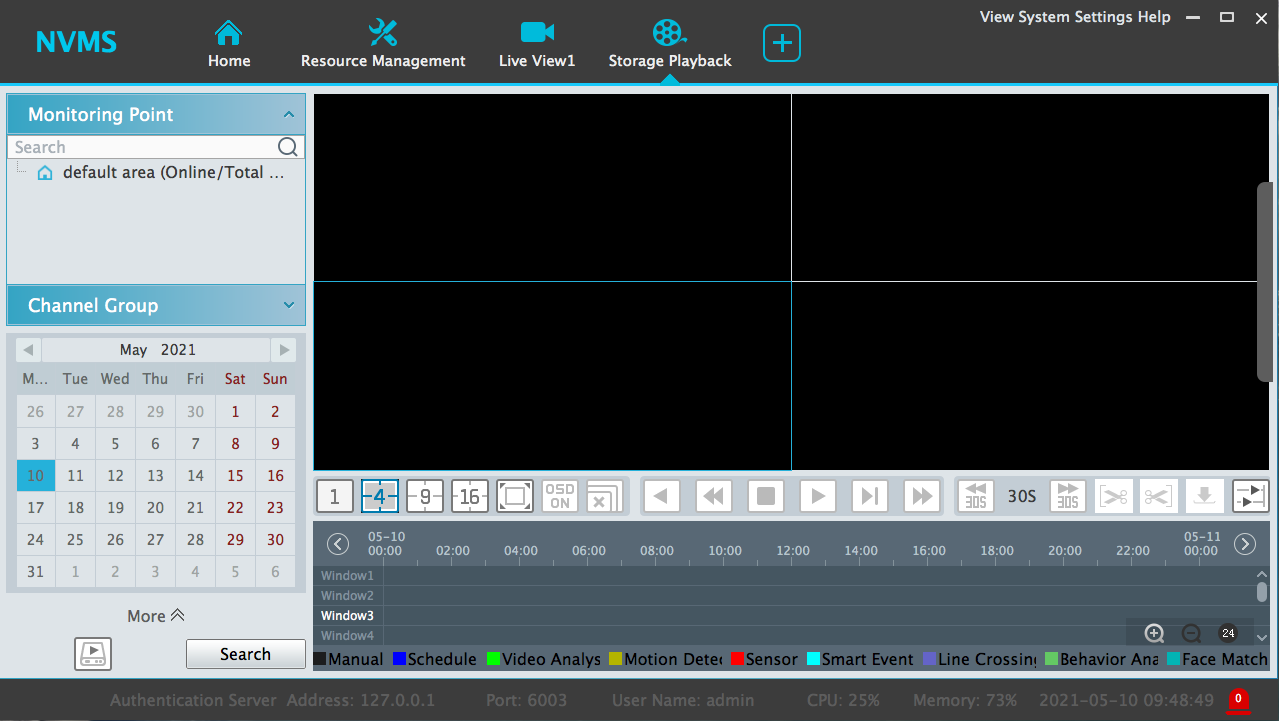
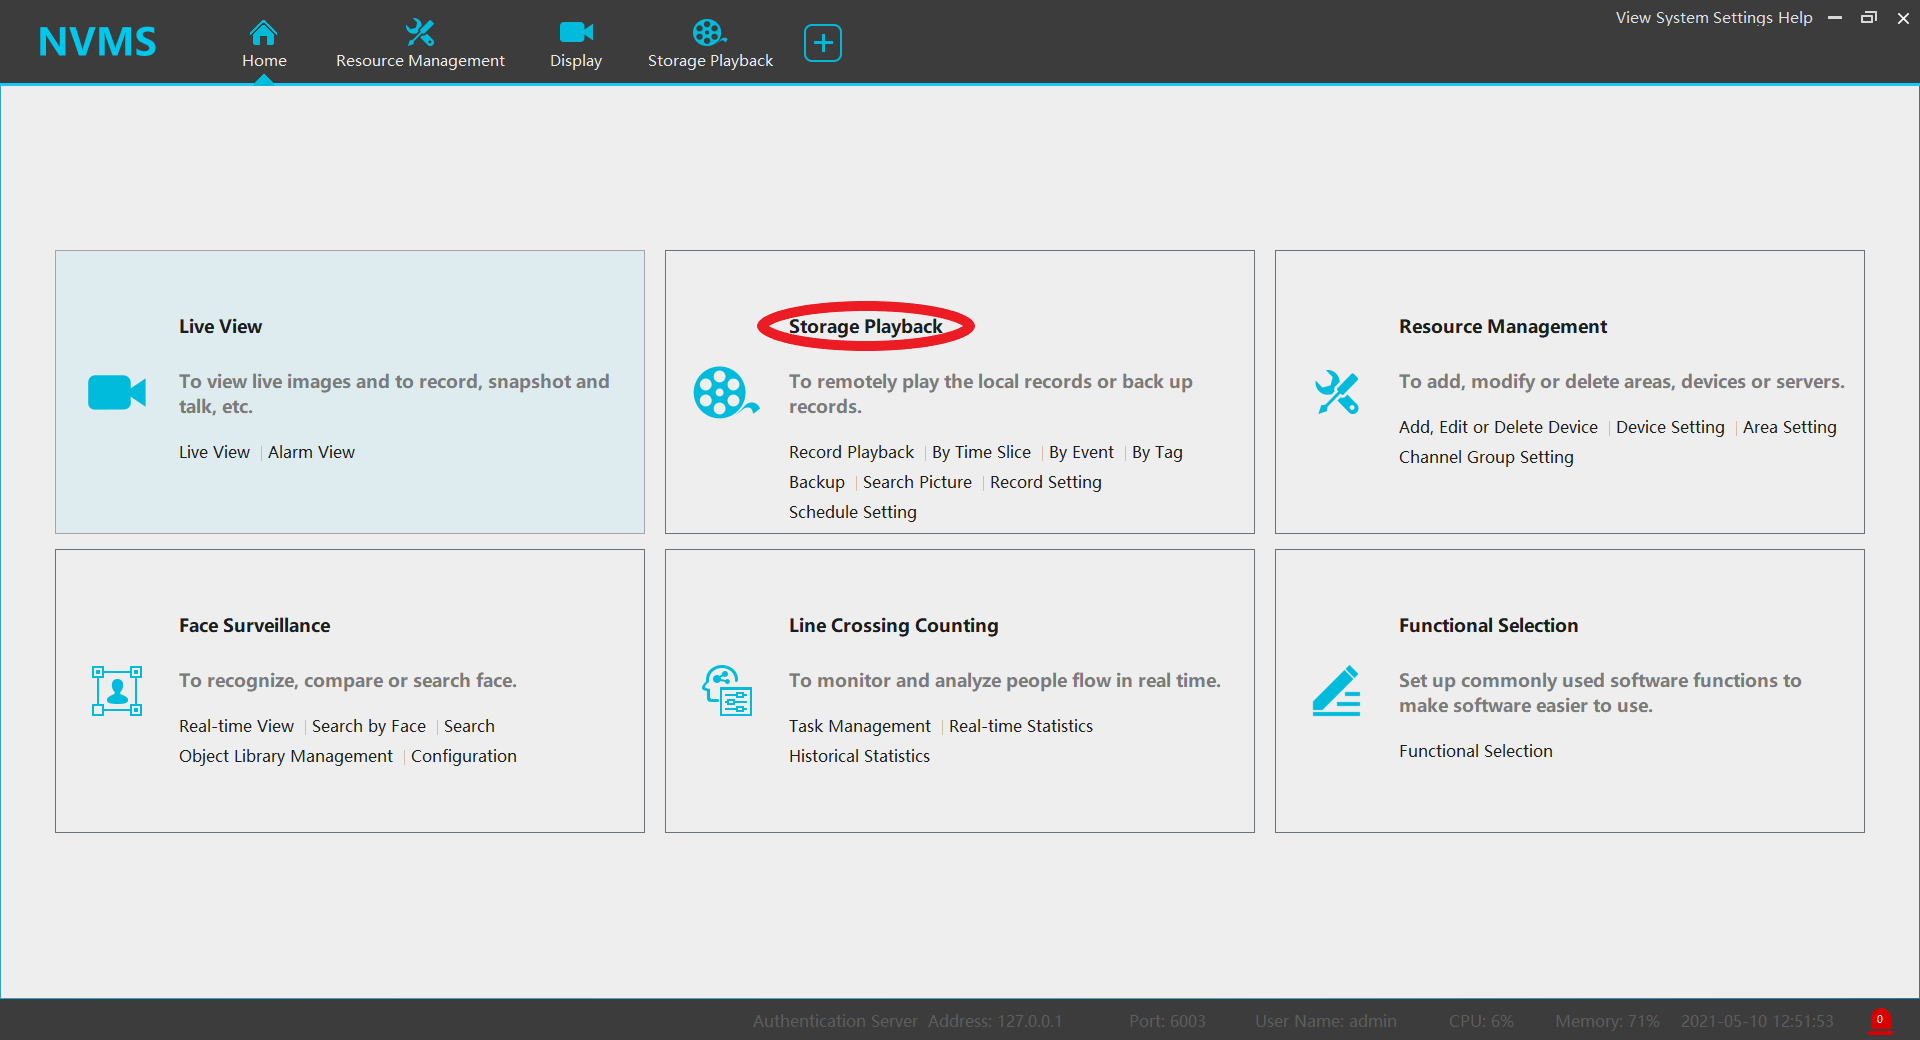
Click on “Storage Playback“
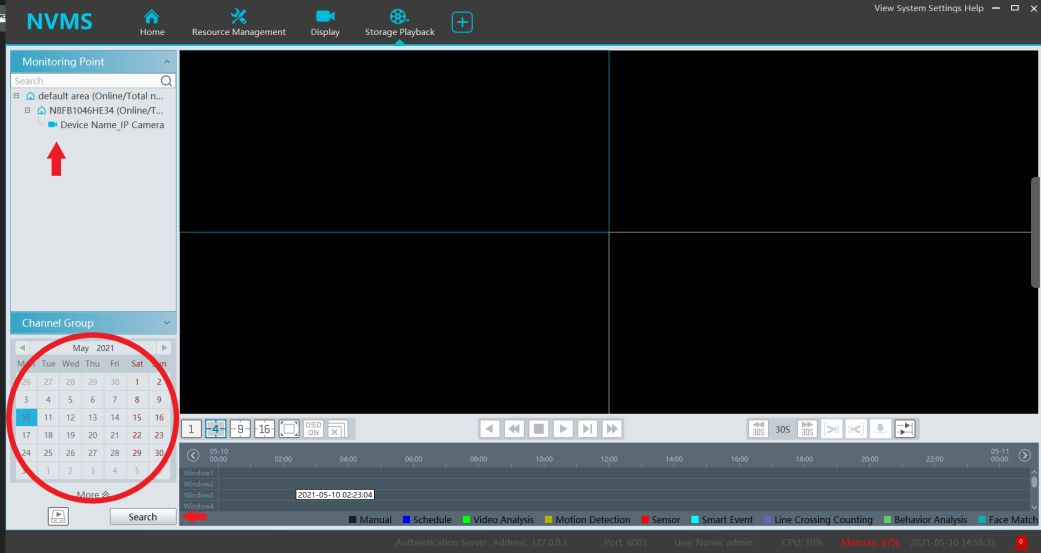
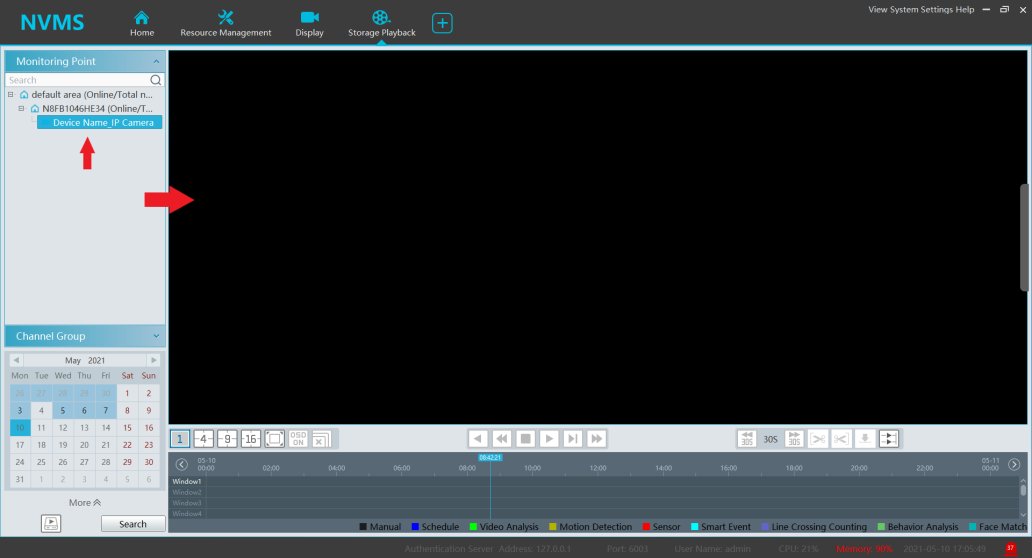
Select the device & channel you want to perform playback on.
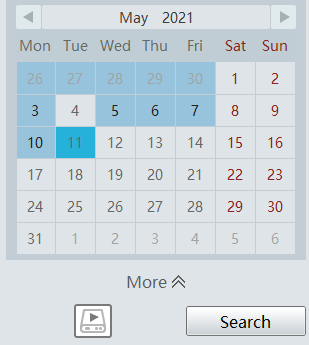
Use the calendar icon to select the date, then press search.
When you highlight a channel, the device will report whether footage is present or not by shading the day.
If you wish to synchronize the display please click the “Sync/Async” button to toggle the option.
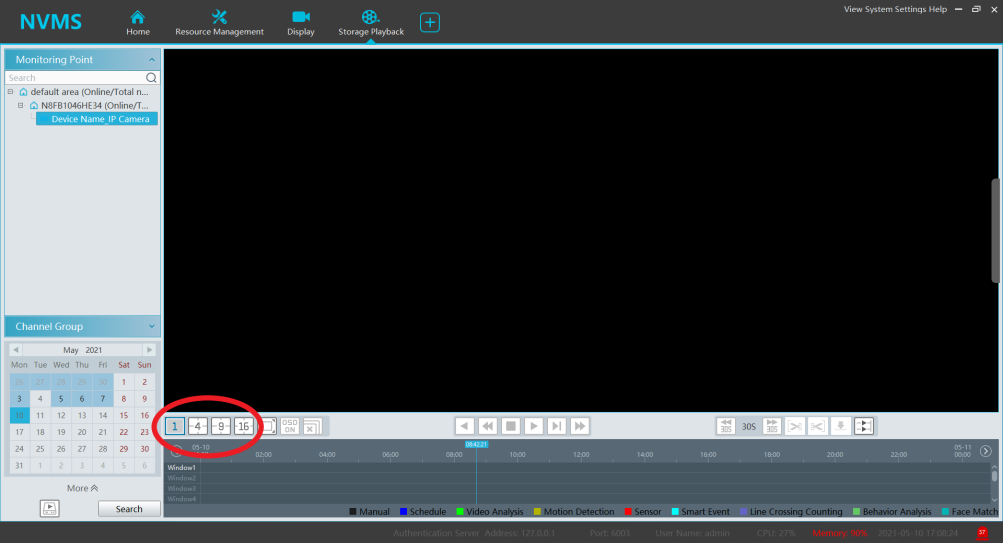
You can change the Storage Playback layout by selecting the desired channel configuration.
To call the footage you can drag and drop the channel or area into a blank space.
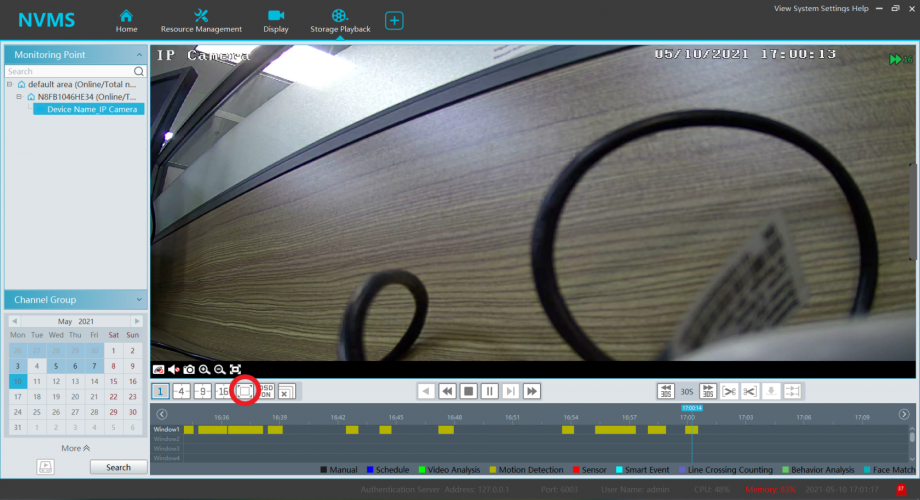
Use the “Full Screen” Button to turn on full screen mode. Press escape to exit.
Select OSD to toggle the On Screen Display Overlay. This setting is off by default. Enabling will make the NVMS 2.0 create an overlay with the Device and channel name.
The close stream button will close all active streams.
You can slow down the speed of the footage by clicking the “Slow” button. Note: You can slowdown the speed multiple times. Allow for a few seconds to switch mode.
You can terminate the playback stream and close the channel by clicking the “Stop” button.
You can fast forward the footage by clicking the “Fast” button. Note: You can speed up the playback multiple times. Allow for a few seconds to switch mode.
Use the “Pause” button to pause playback.
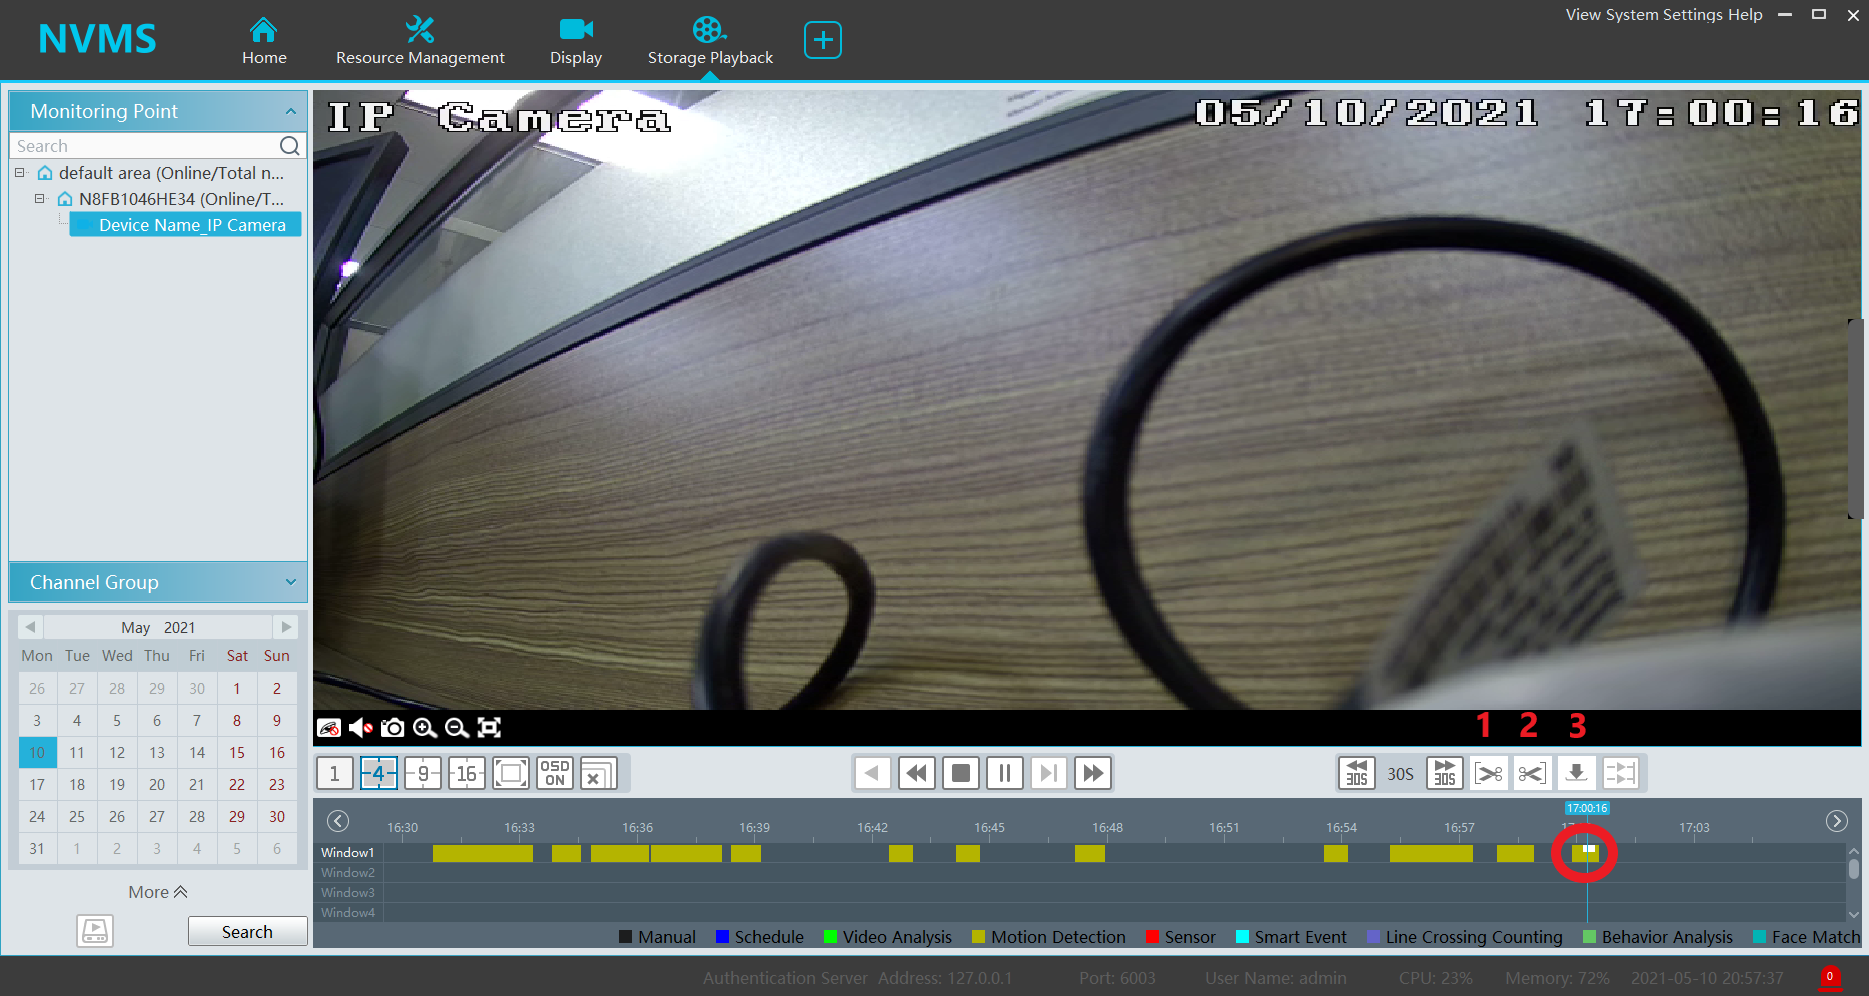
The << 30S button will rewind 30 seconds.
The 30S >> button will jump forward 30 seconds.
The “Back up start time” button will mark the start of the footage back up. (Scissor icon pointing left)
The “Back up end time” button will mark the end of the footage back up. (Scissor icon pointing to the right)
The “Download” button will redirect you to Record Management and Download the clip.
NVMS 2.0 Channel Group Control (2.1.1)
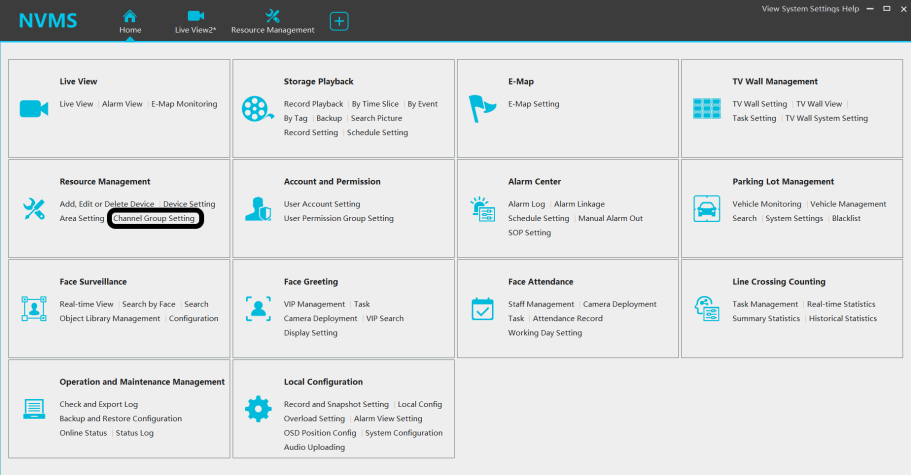
Click “Channel Group Setting” under “Resource Management”
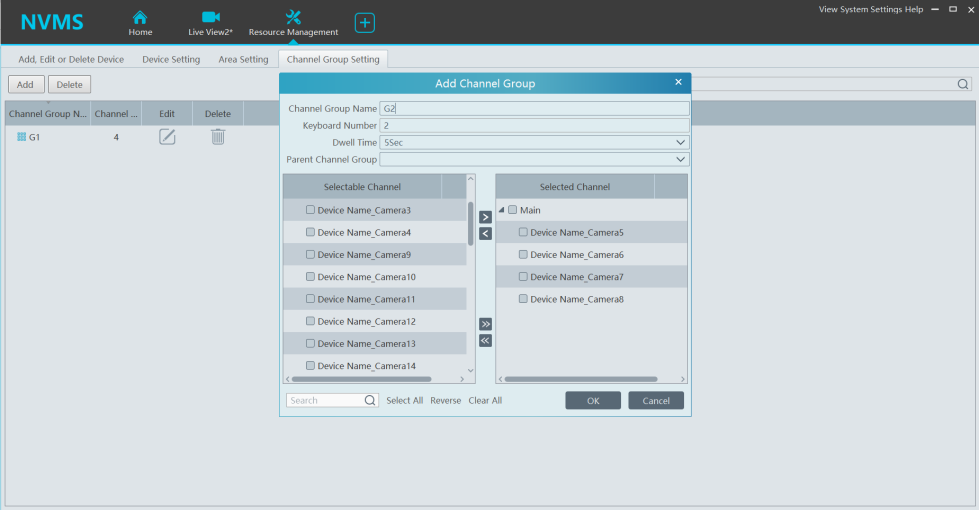
Click add
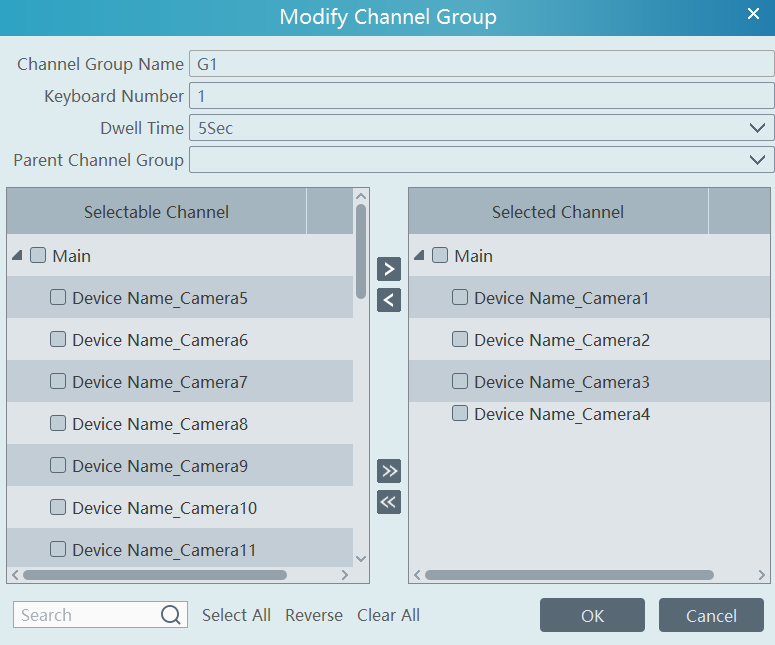
Enter a “Channel Group Name”
Select the desired cameras for the group
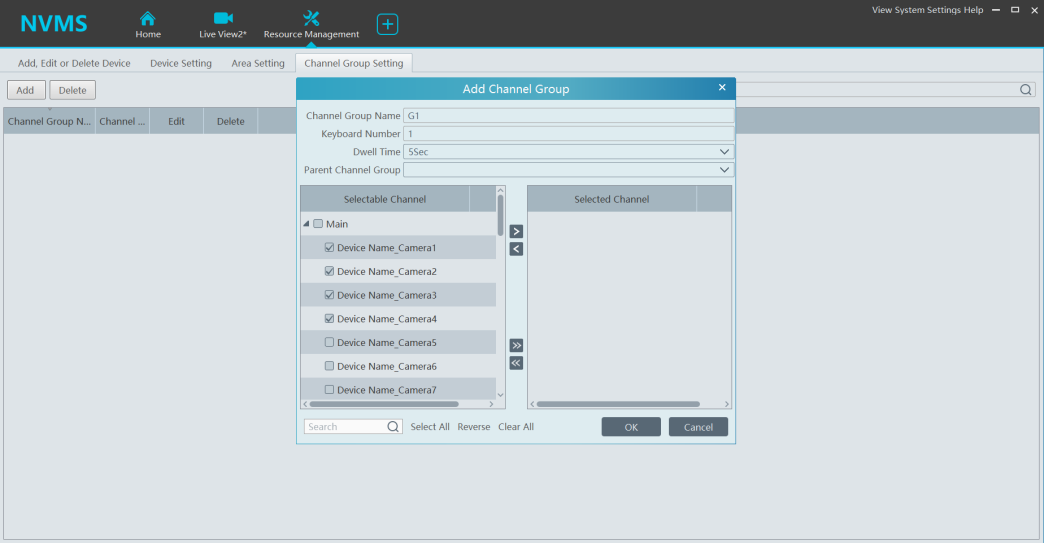
Click the right arrow to add the checked cameras into the group
Click OK
Repeat the process for additional camera groups
Be mindful of the “Parent Channel Group” – leave blank to keep at the same level
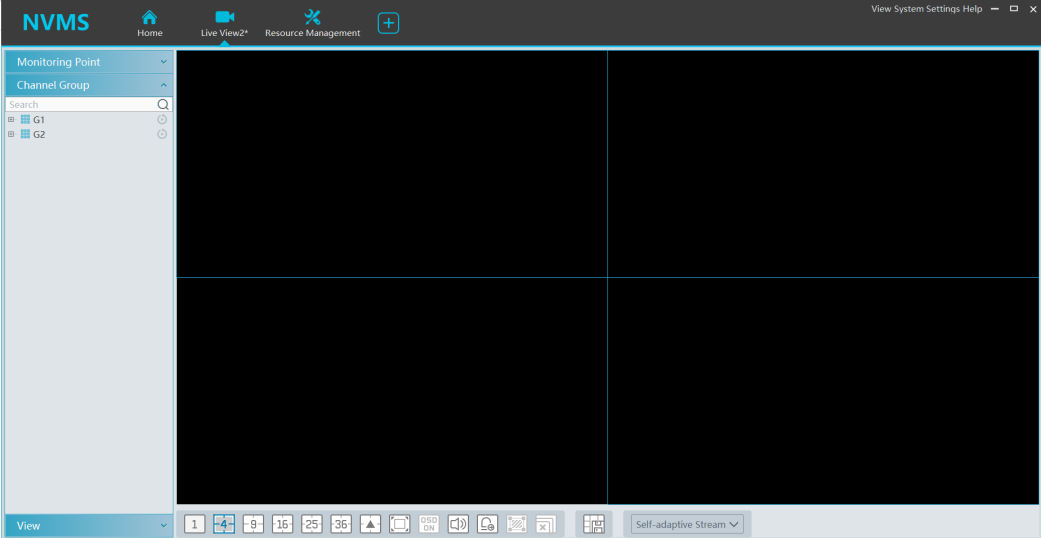
Open a Live View Tab
Drag and drop the Channel Group to begin streaming
Export/Import NVMS-1000 Configurations- Windows
Please make sure you are logged into NVMS-1000 prior to continuing with the following steps :
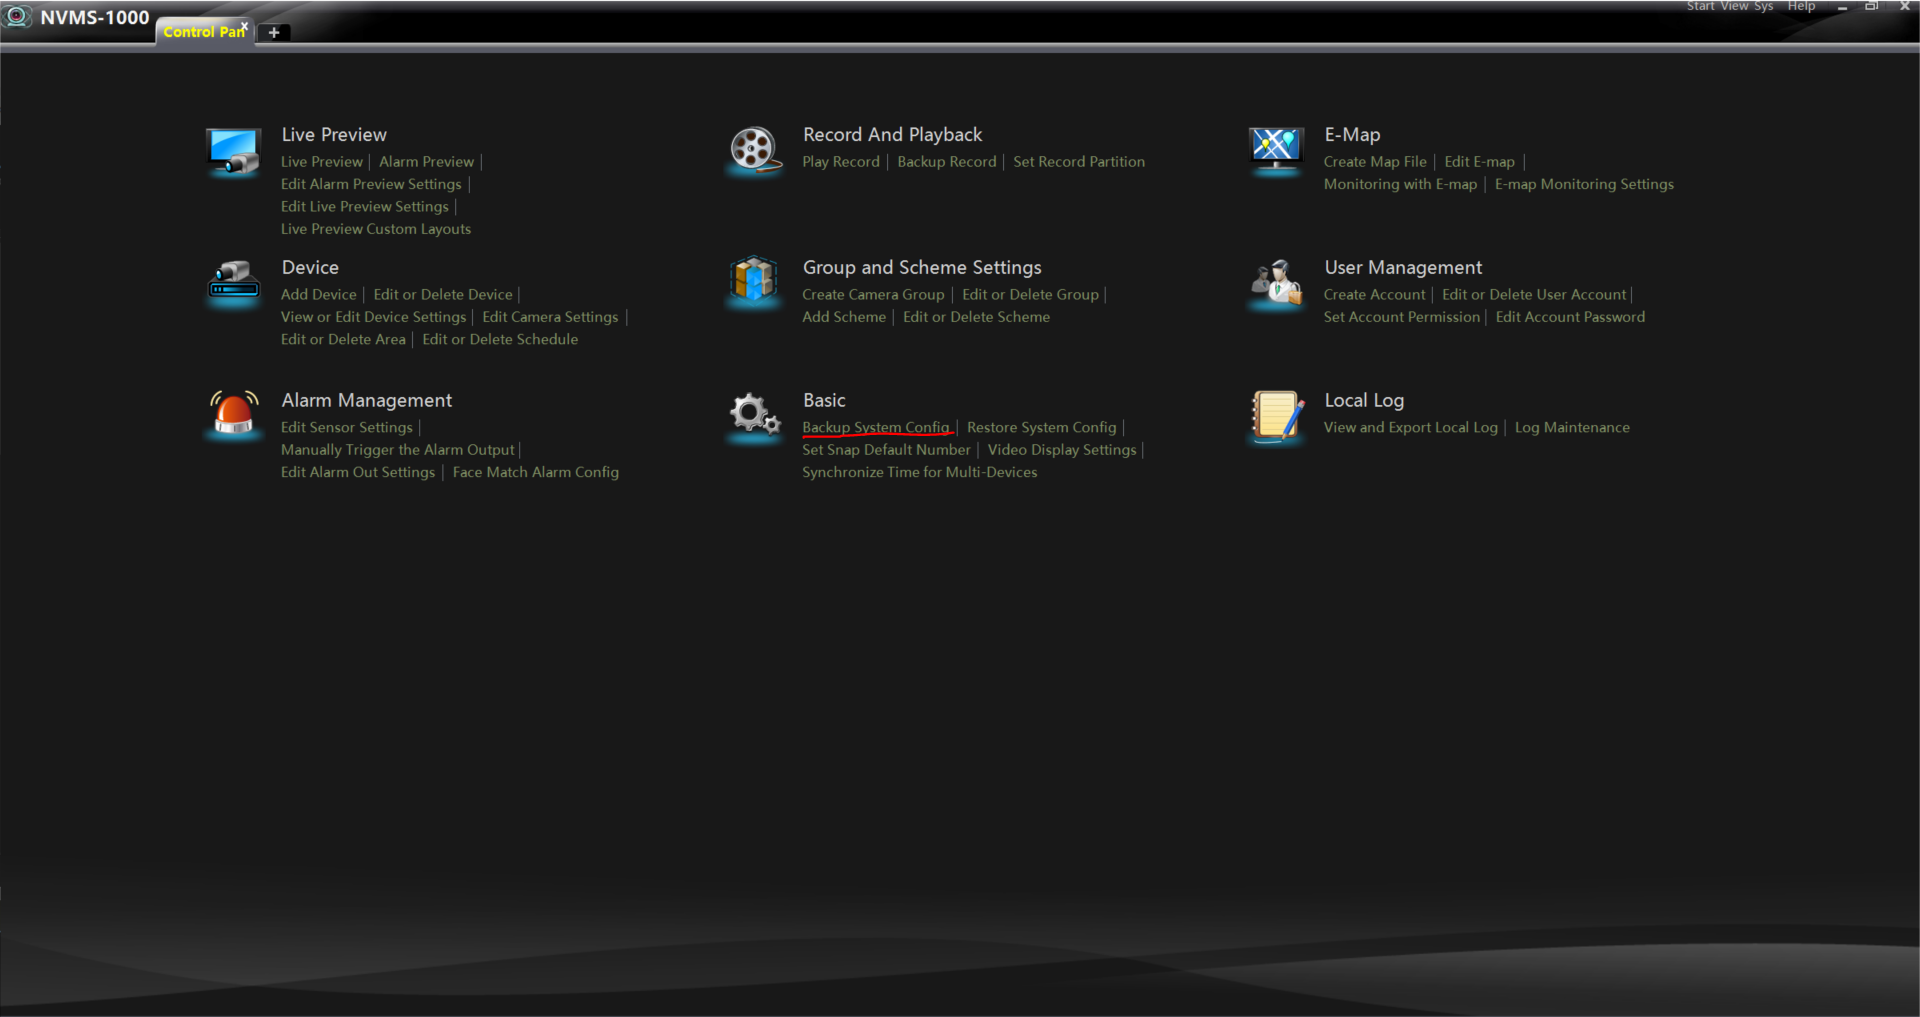
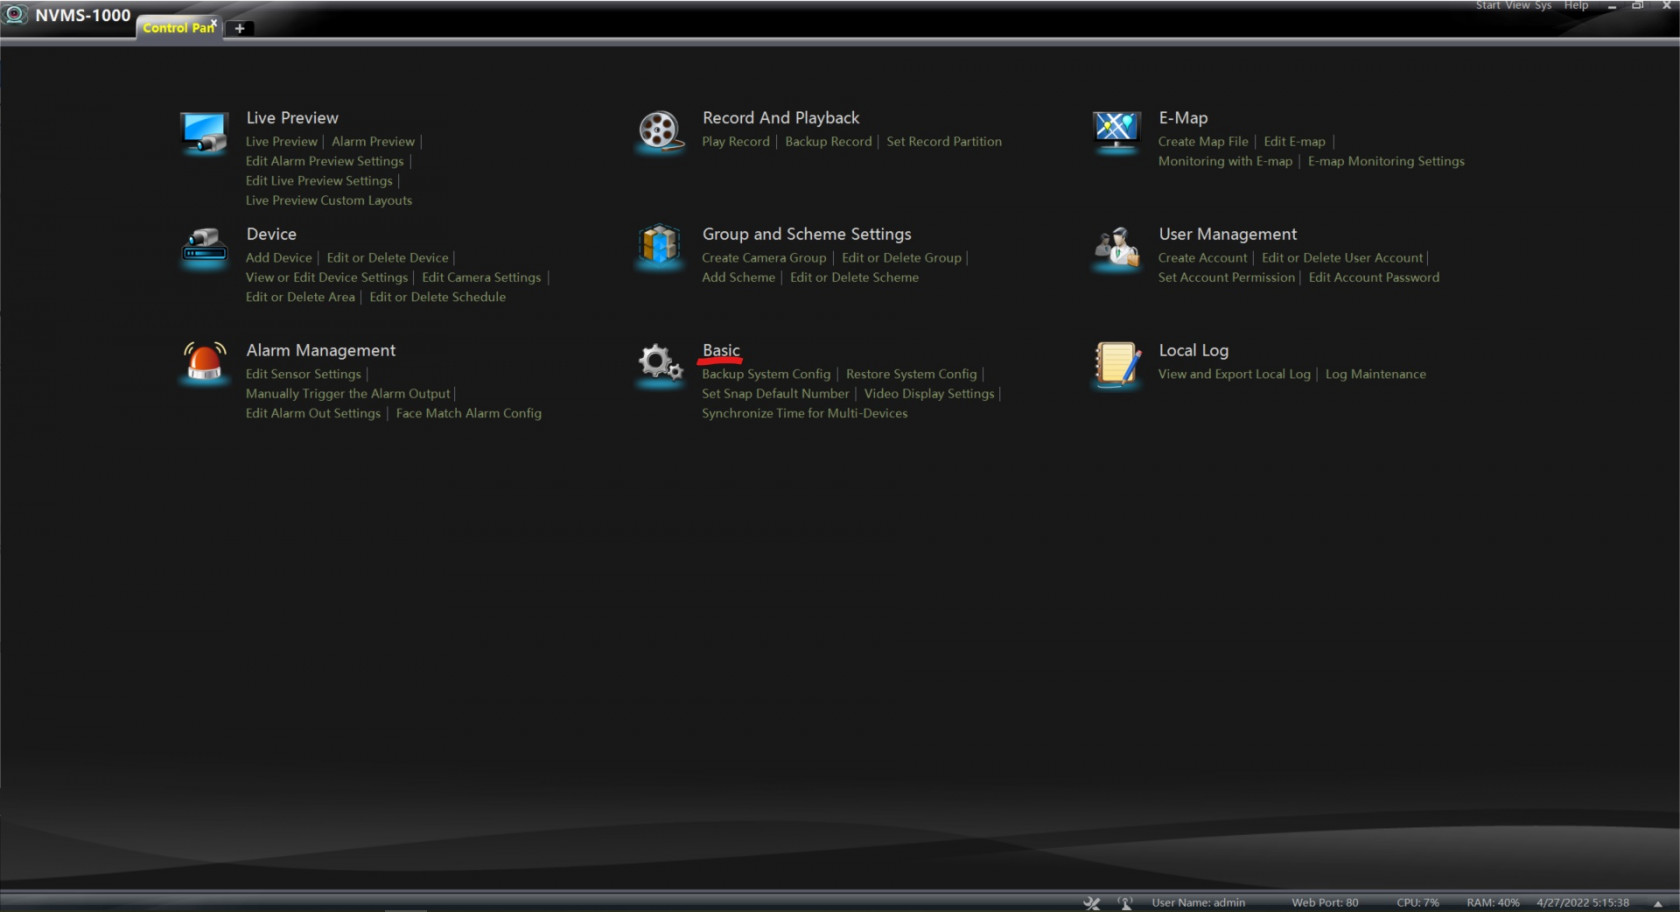
Step 1- Please select the Control Panel option located above
Step 2- Under Basic please select- Backup System Config
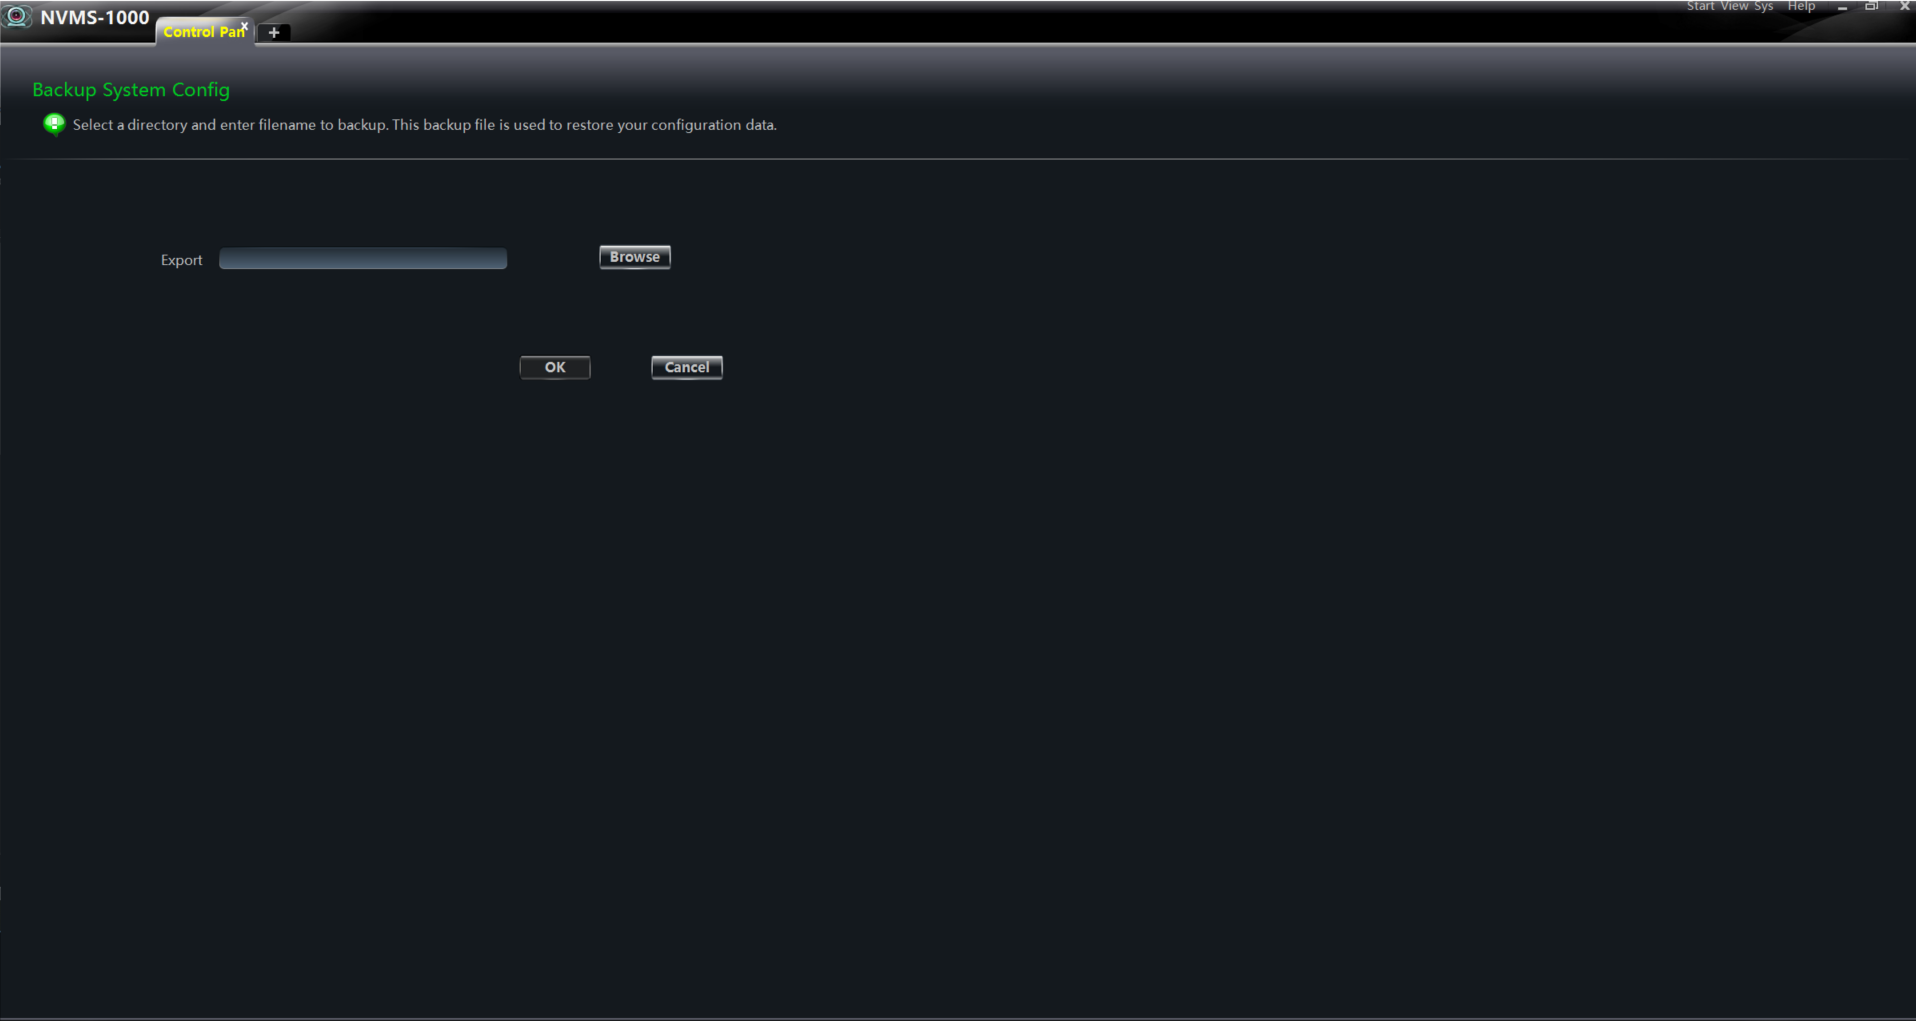
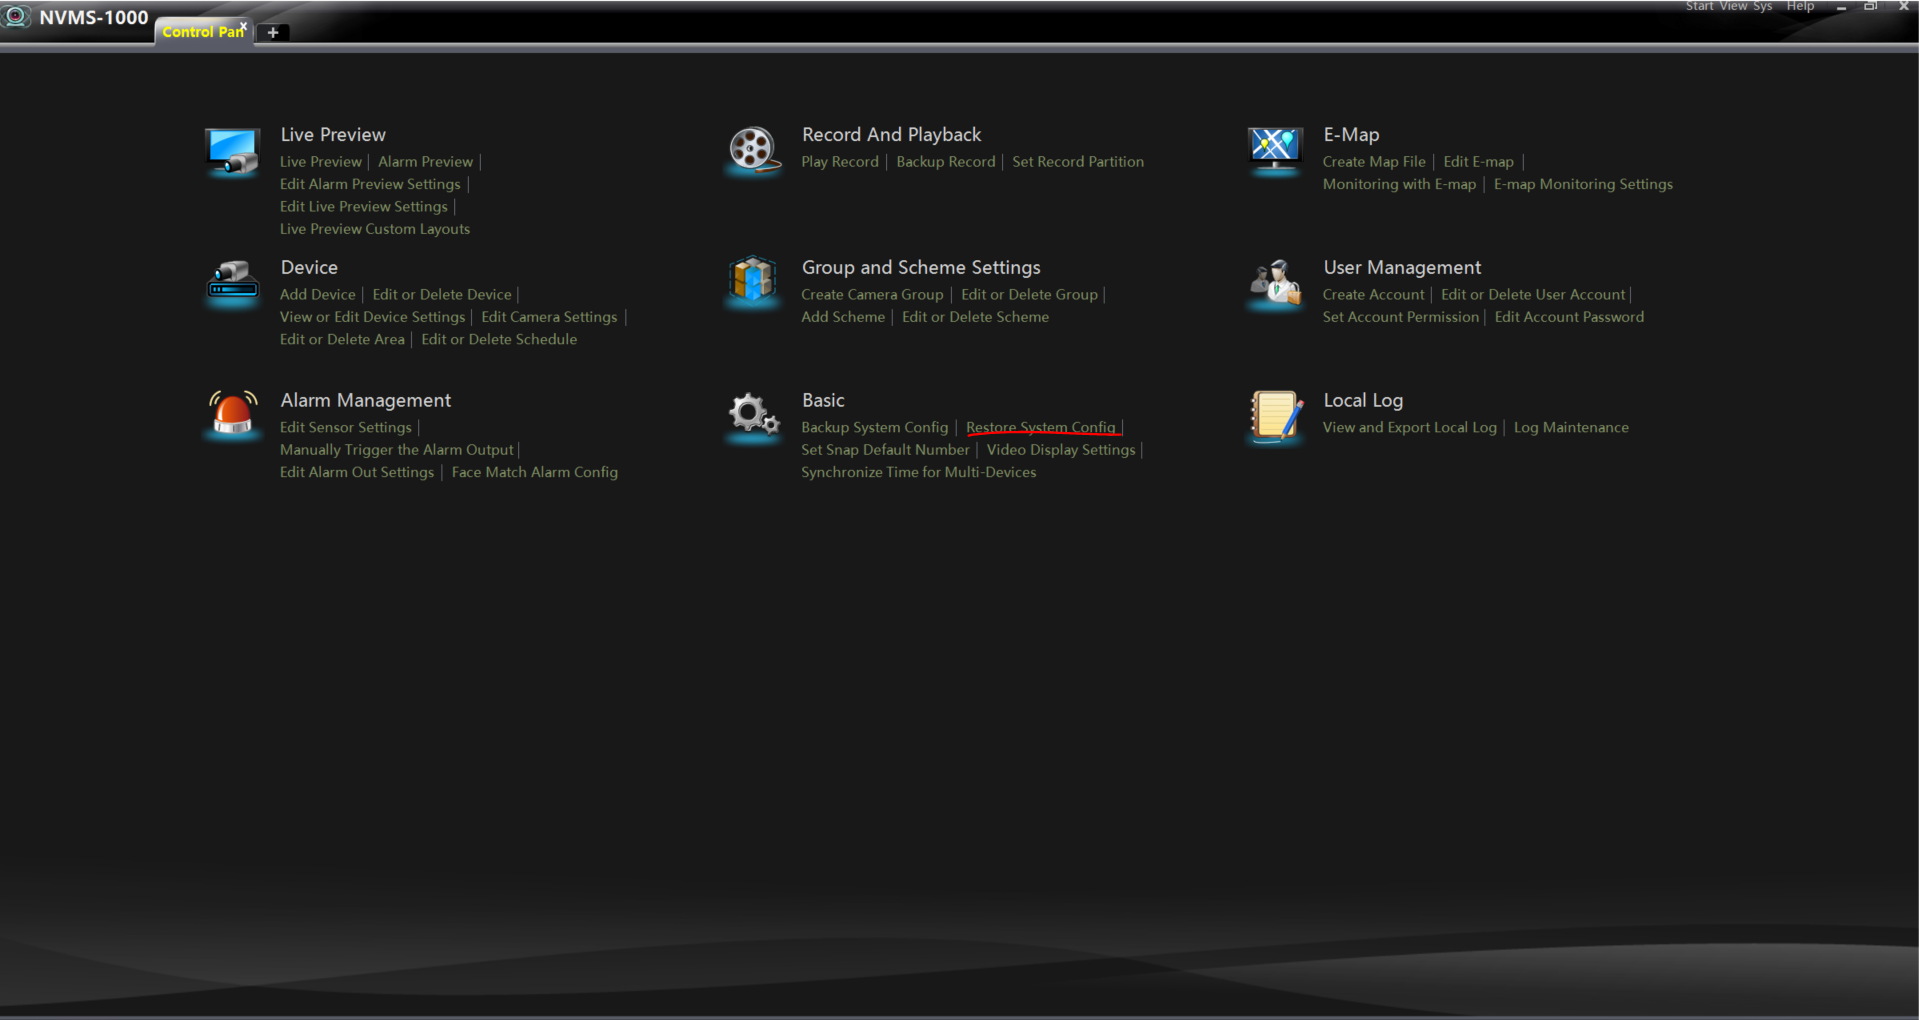
Step 3- Select Browse – Create file name and select the location you wish to back up the Backup File(Dat)
Step 4- Select Save once Step 3 is completed
Please note: Once you confirmed the files have been exported successfully. Please proceed with Importing NVMS-1000 configuration.
NVMS Importing:
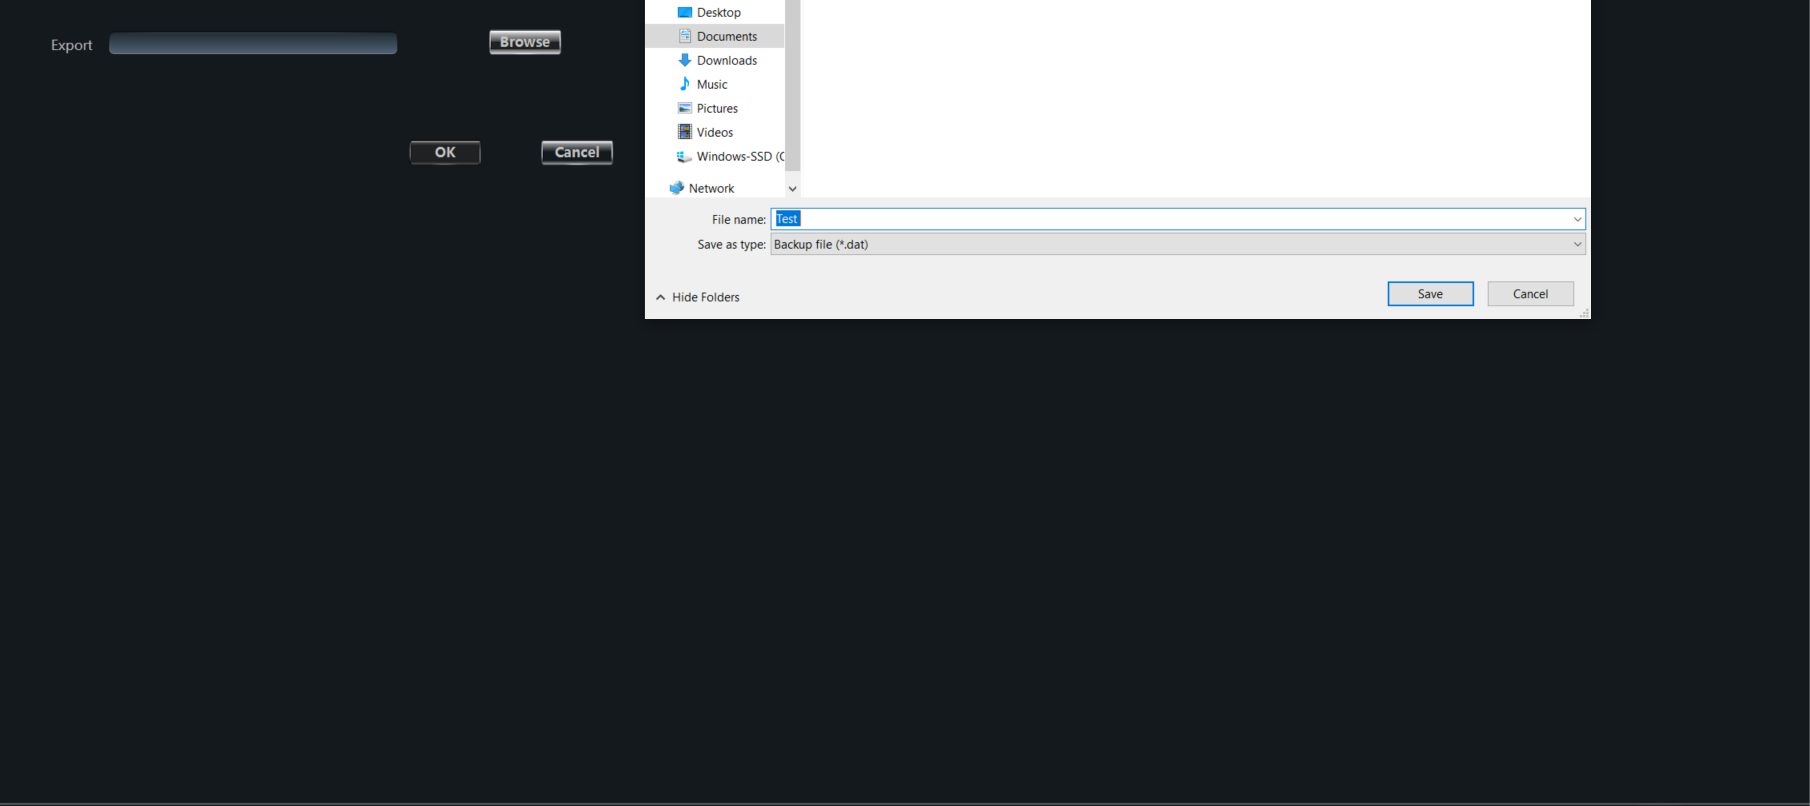
Step 1- Please select the Control Panel option located above
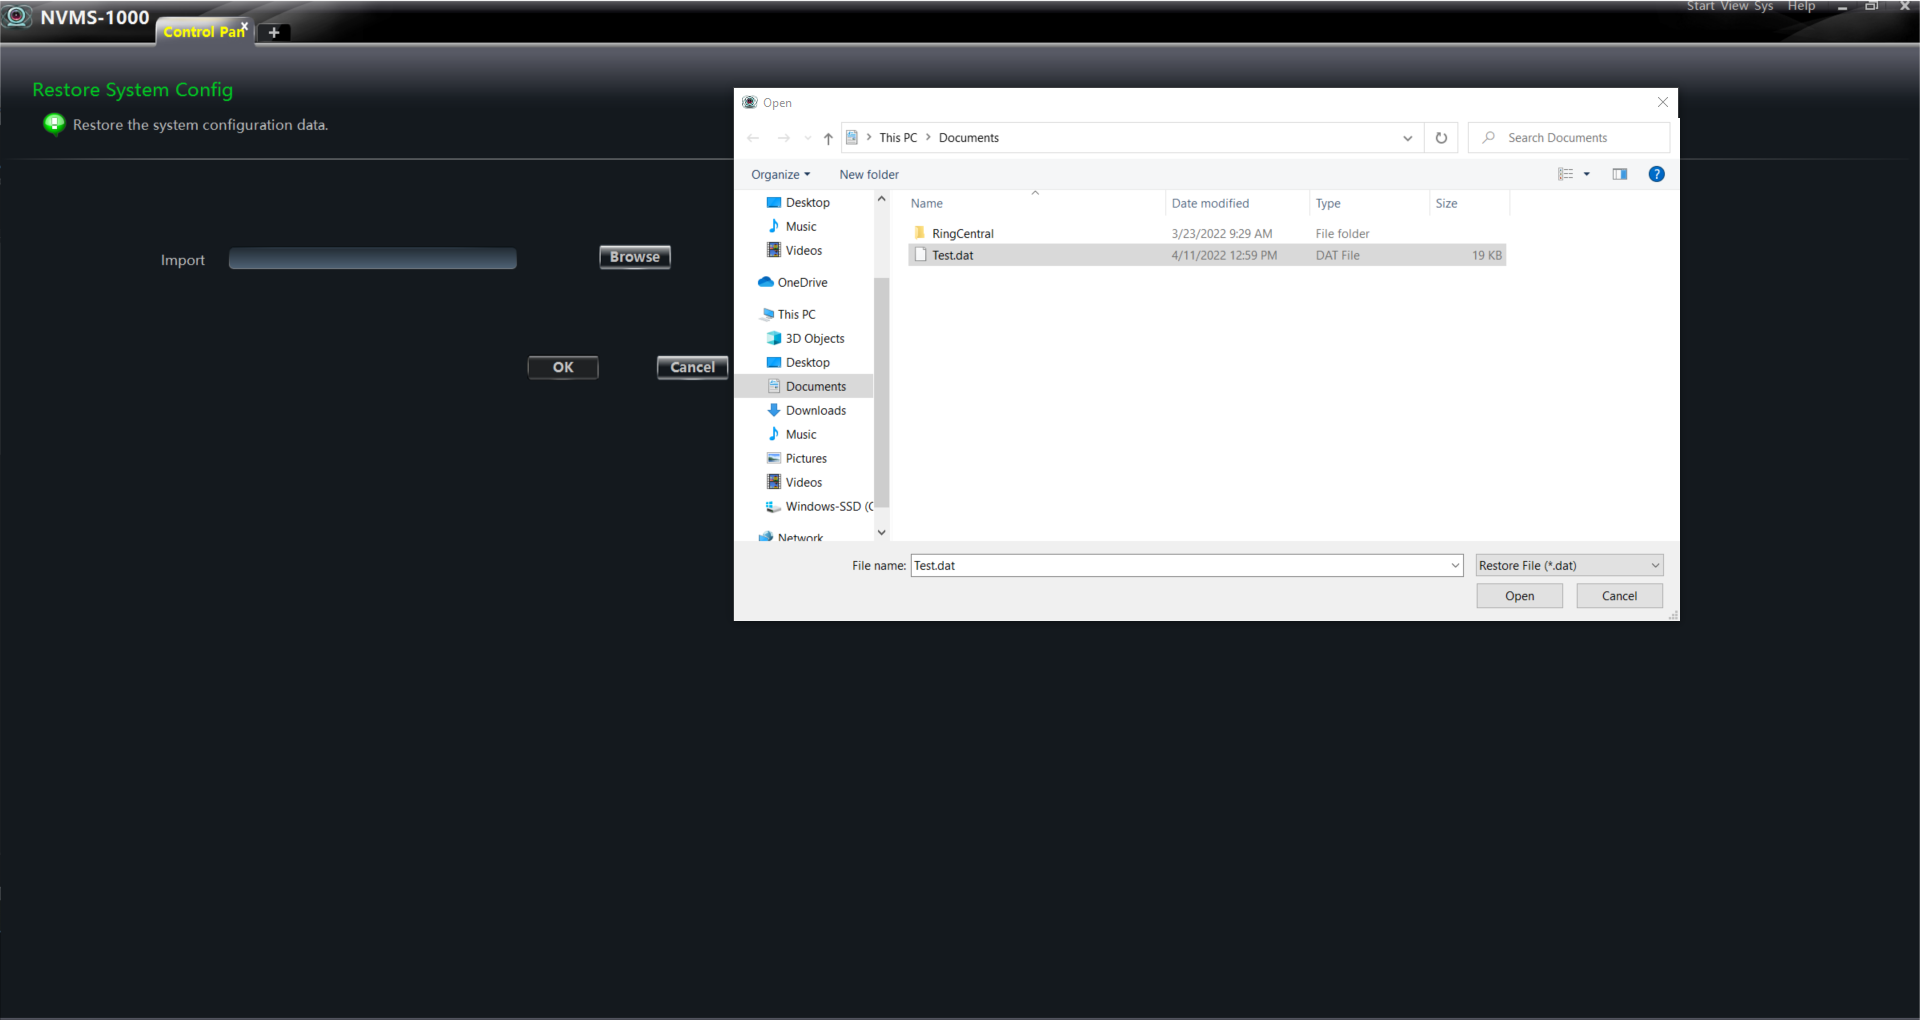
Step 2- Under Basic please select- Restore System Config
Step 3- Select browse and Open the Exported file you created
Once the file is selected please select Ok
Please note: NVMS-1000 Application will close out but will open automatically reflecting the correct configuration exported.
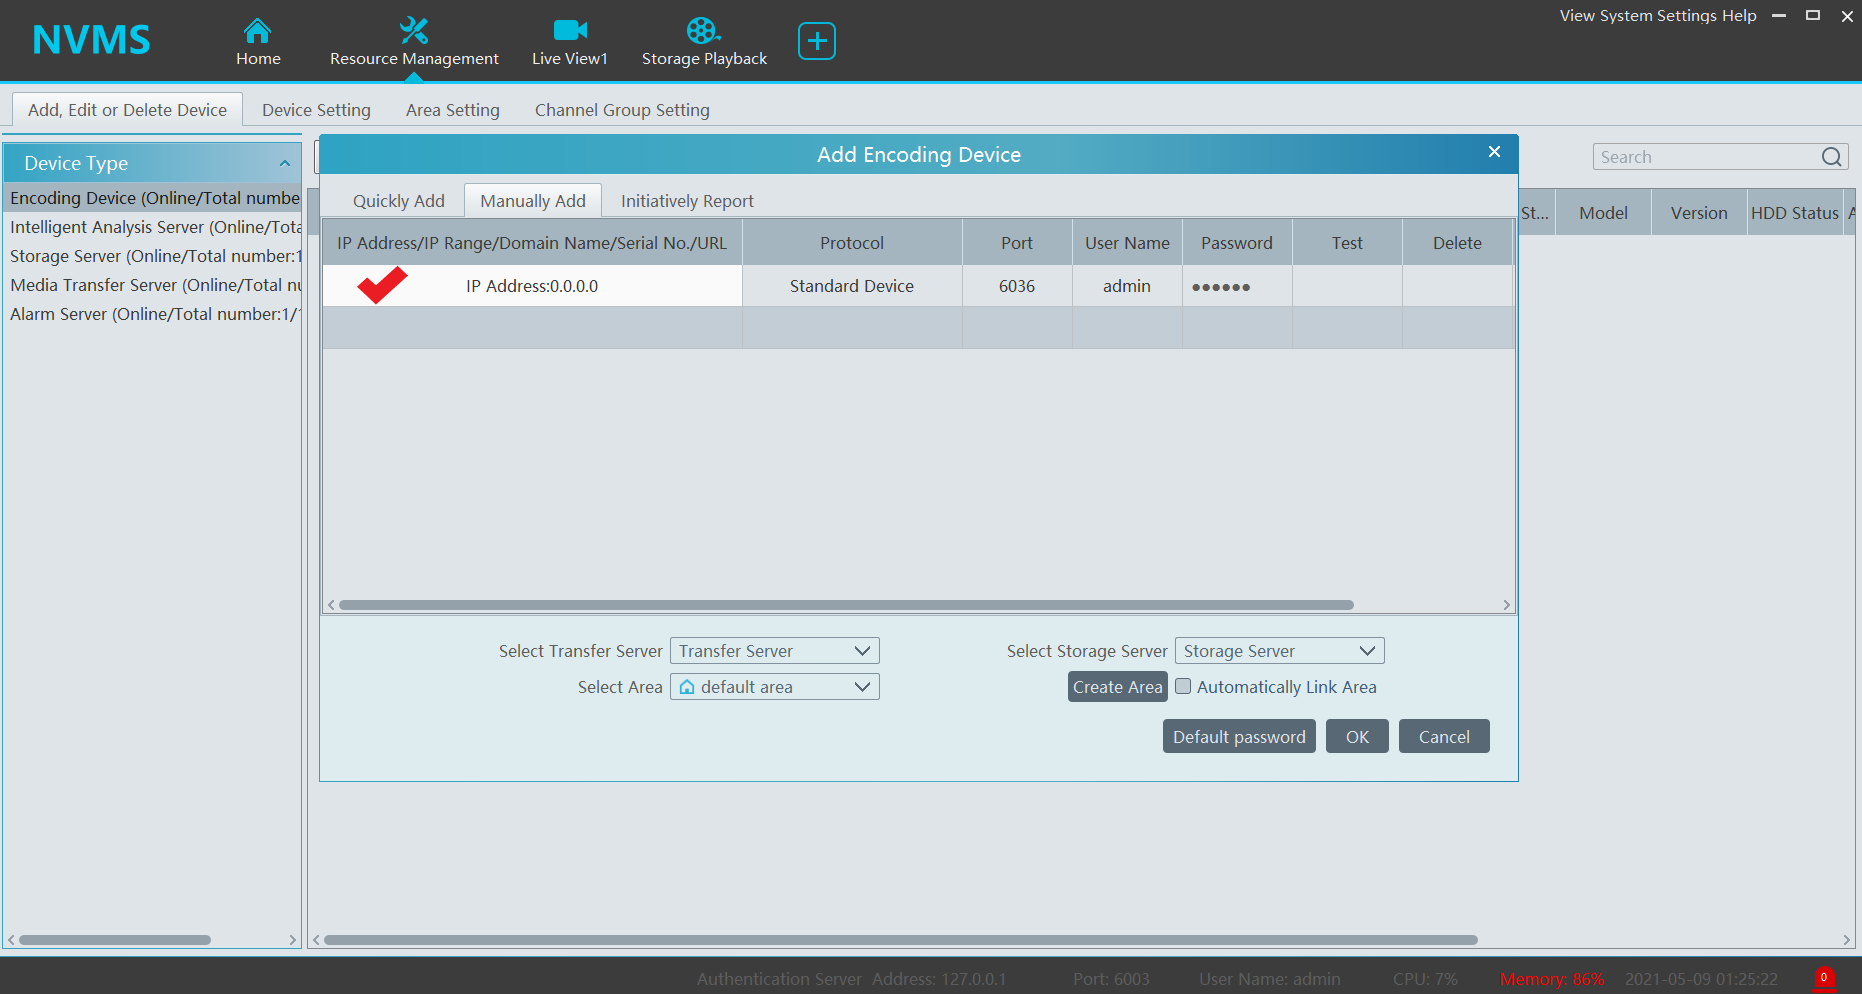
Adding P2P Device to NVMS 2.0 (2.1.1)
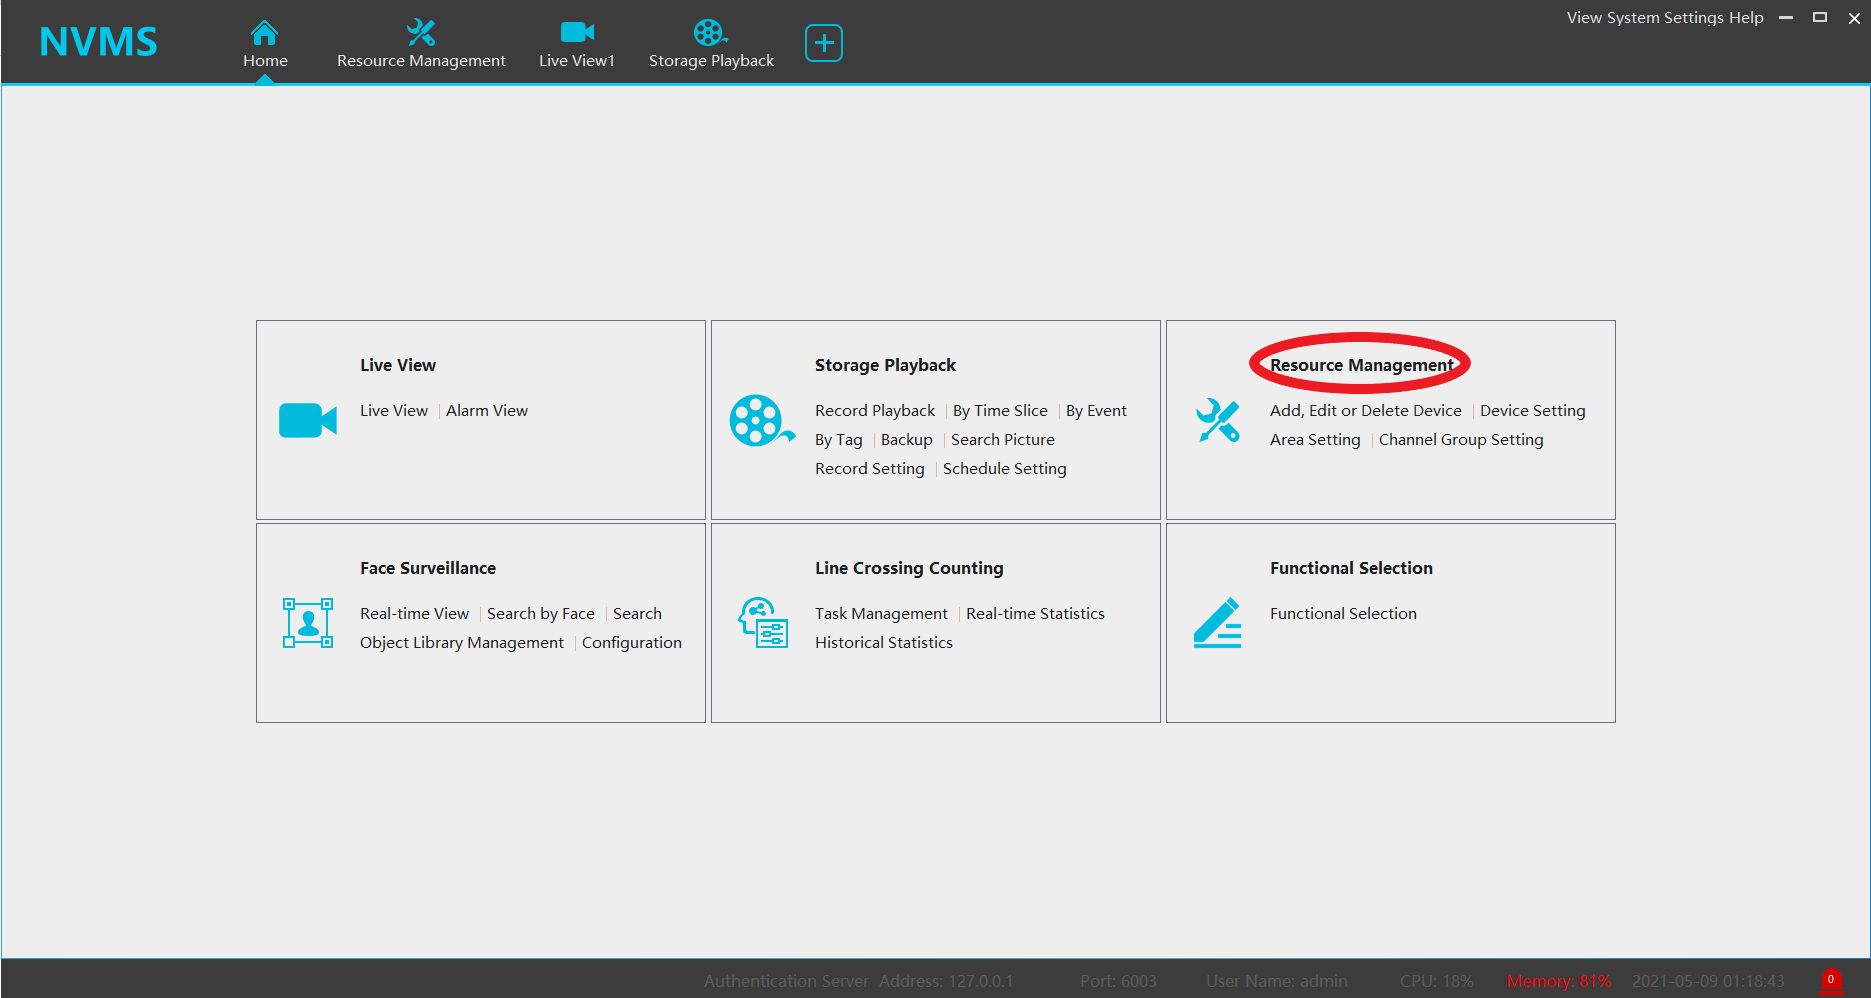
Click “Resource Management”
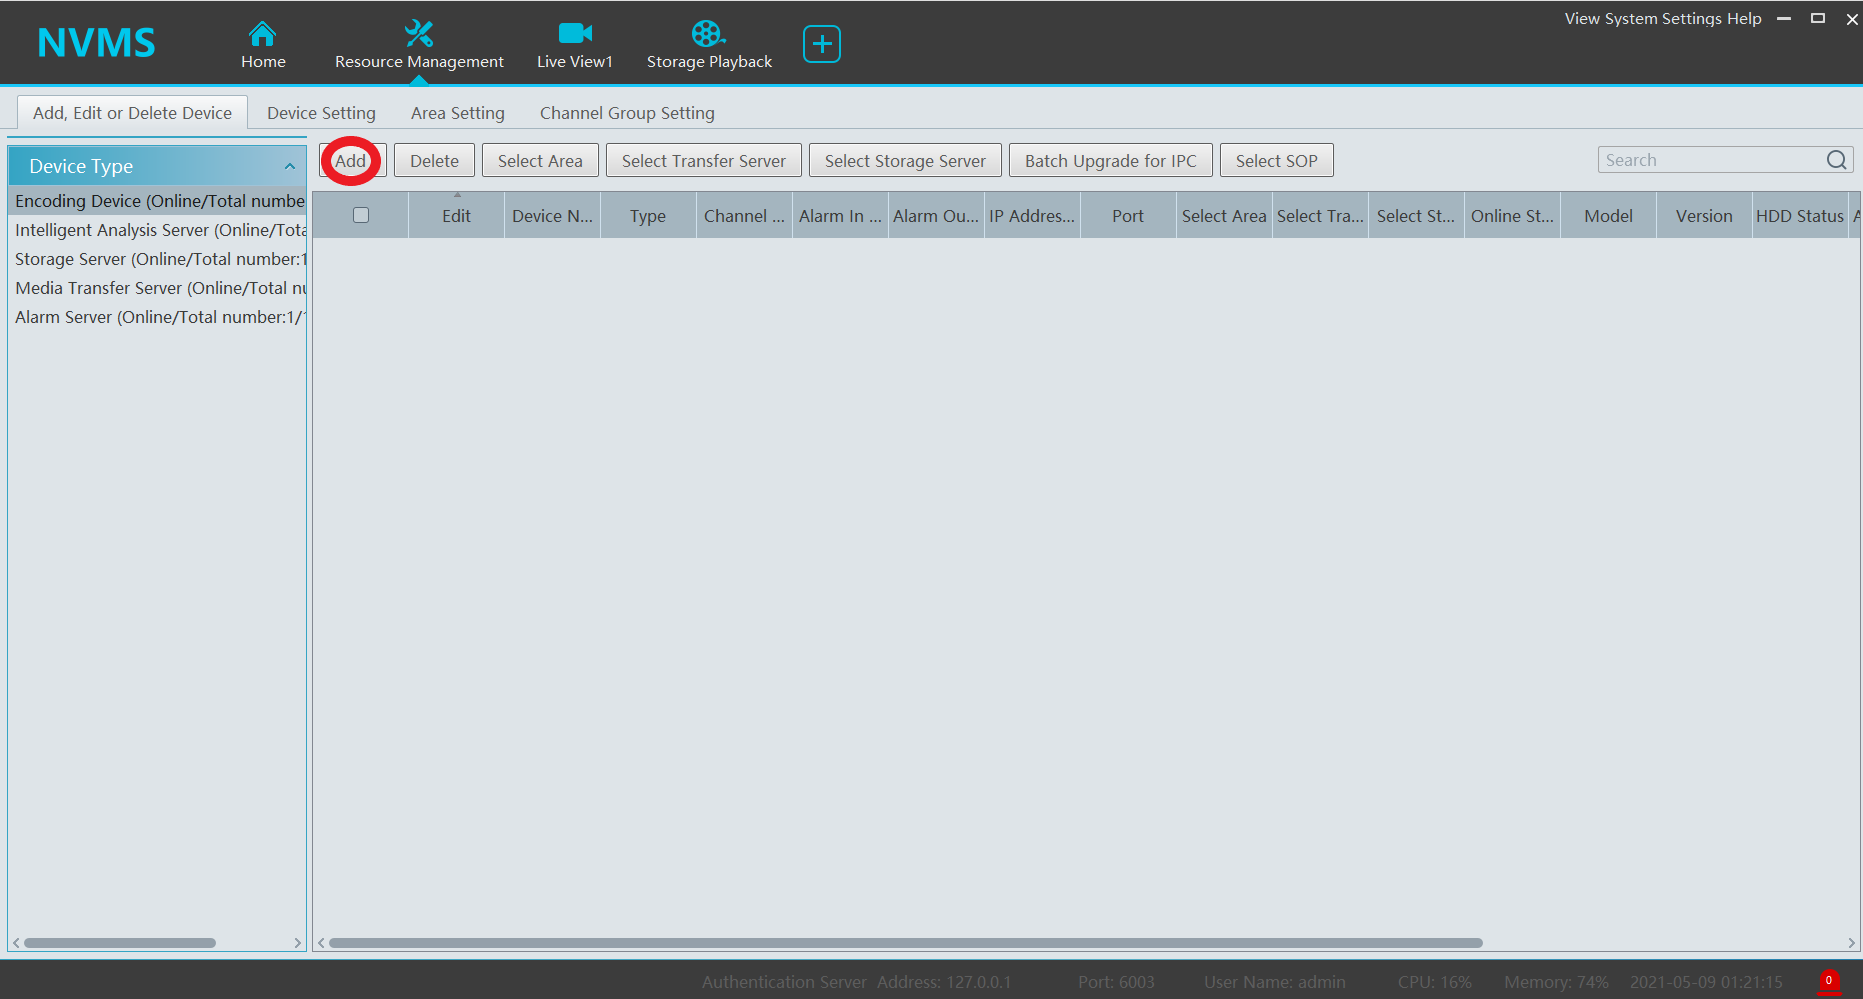
Click “Add”
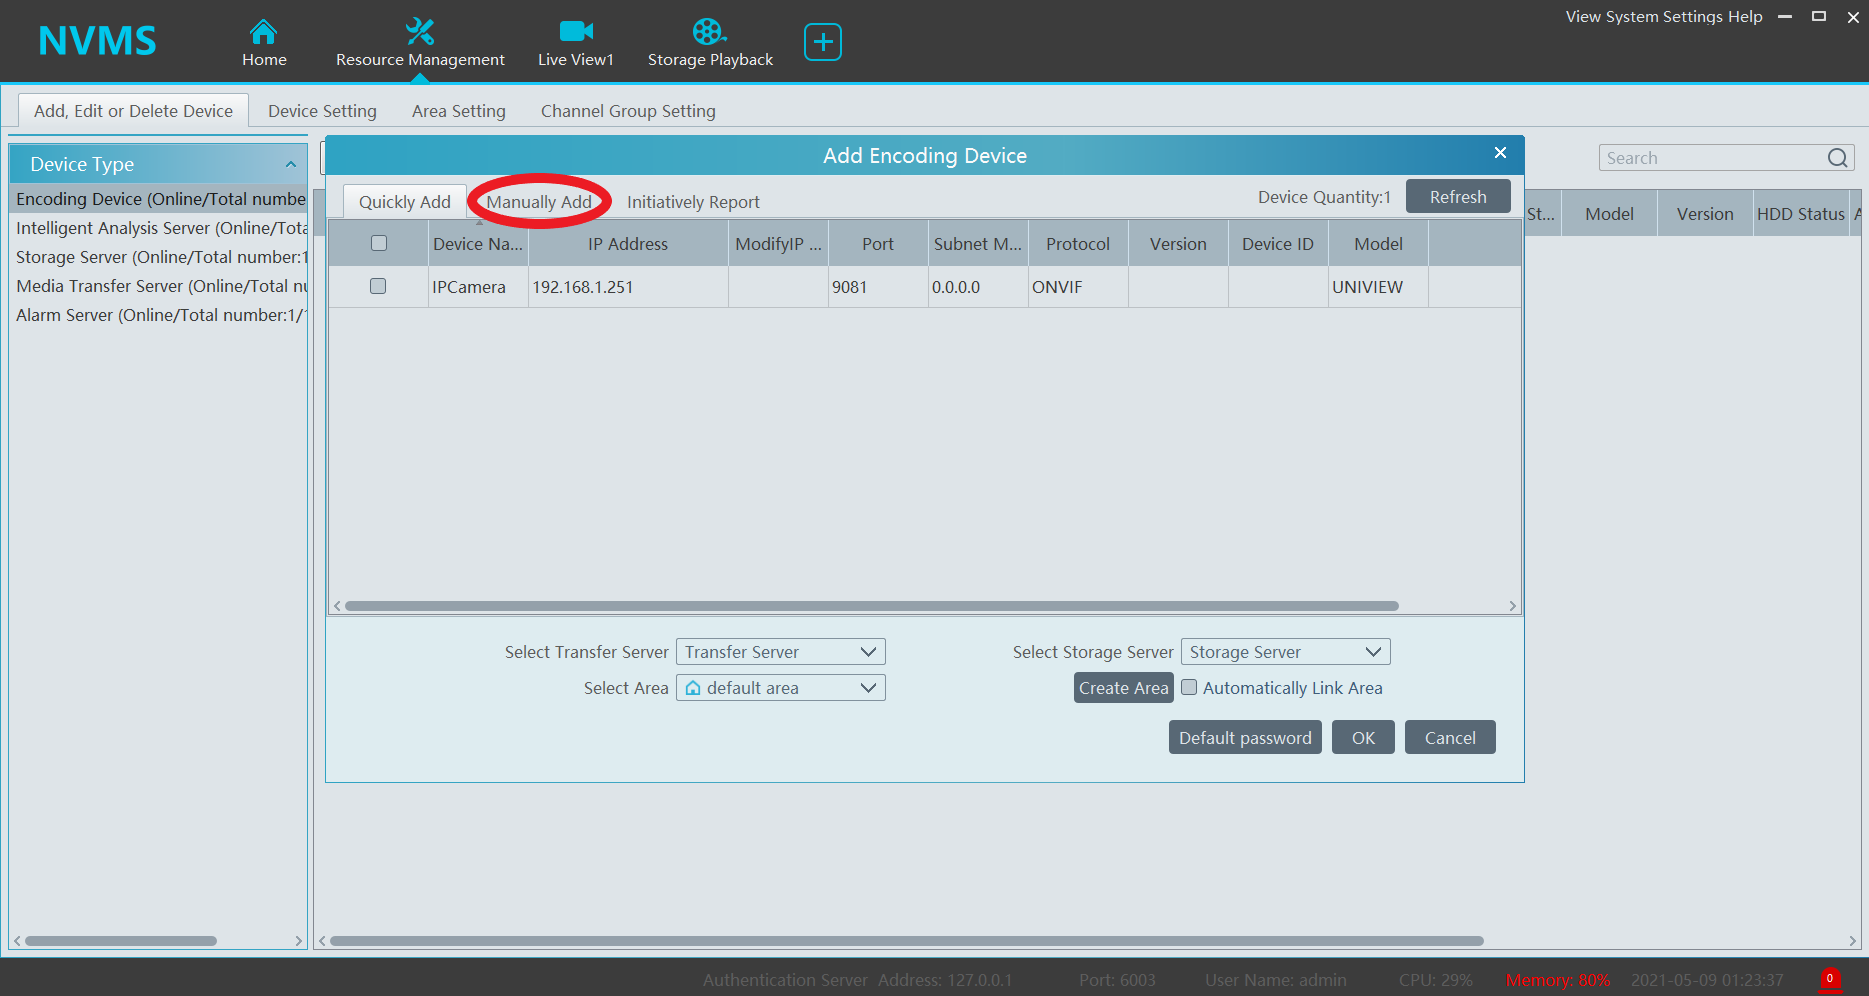
Click “Manually Add”
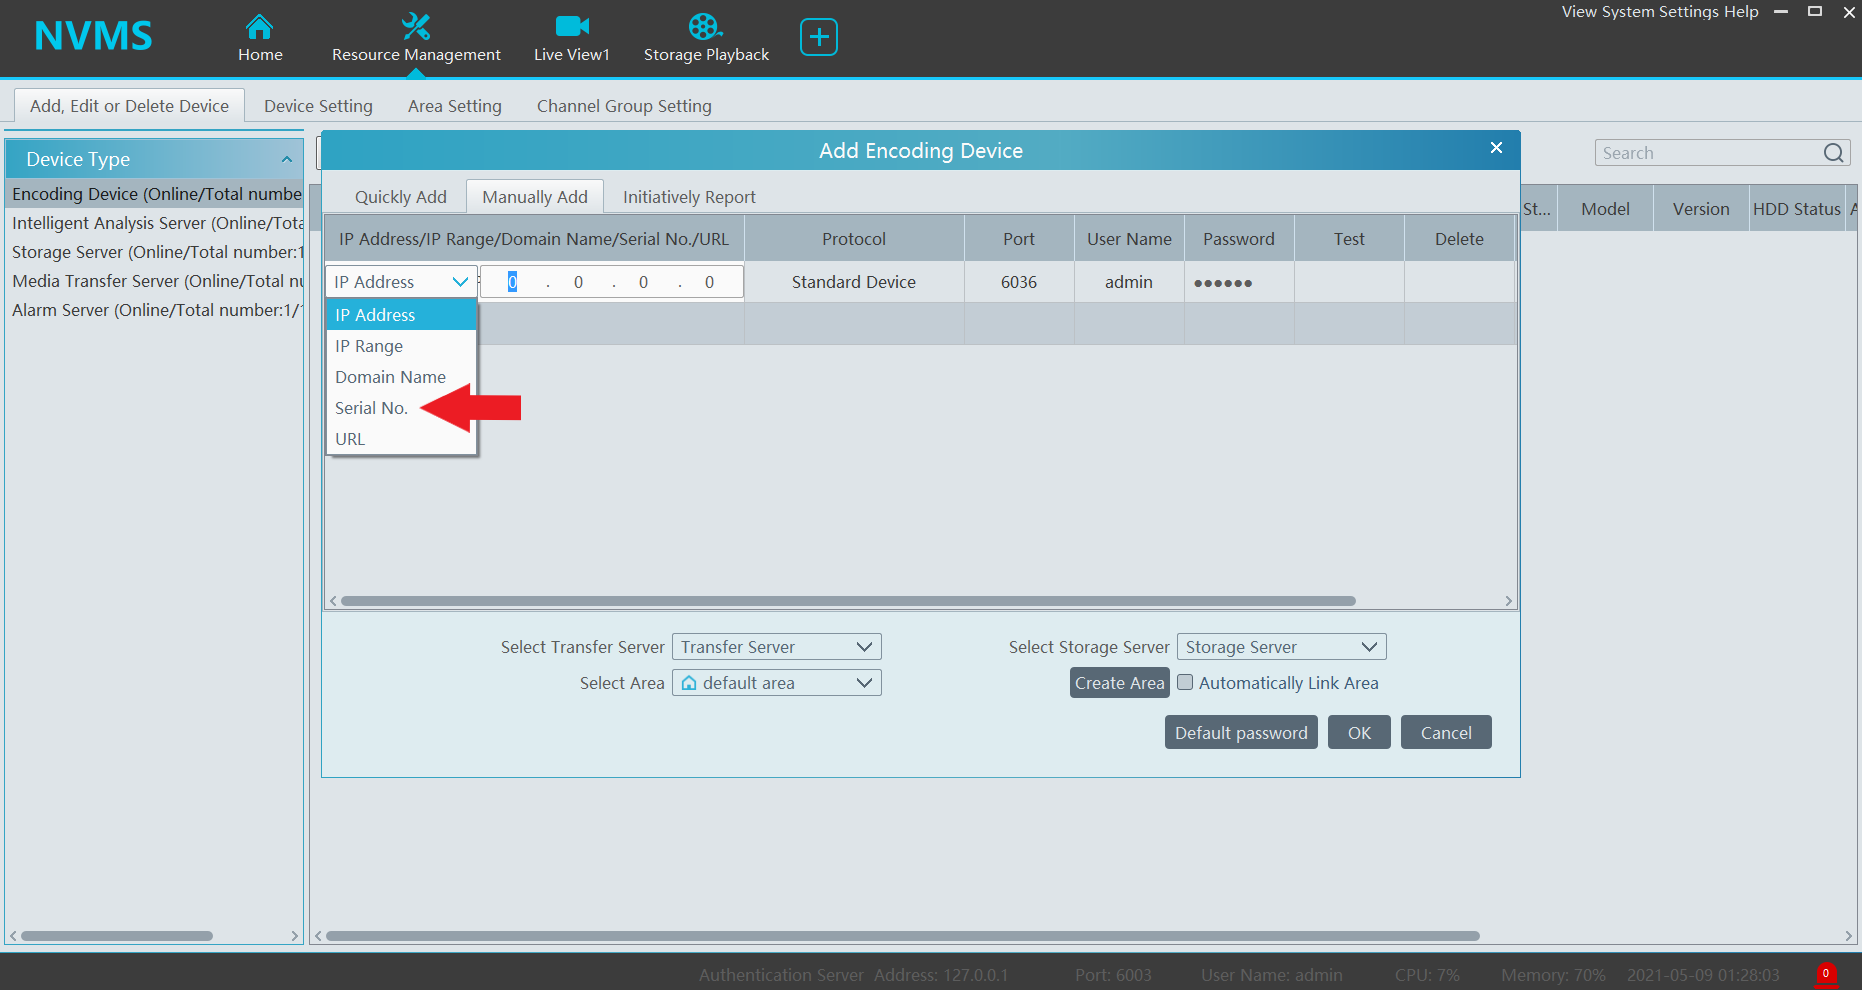
Click in the blank section next to “IP Address”
Select “Serial No.”
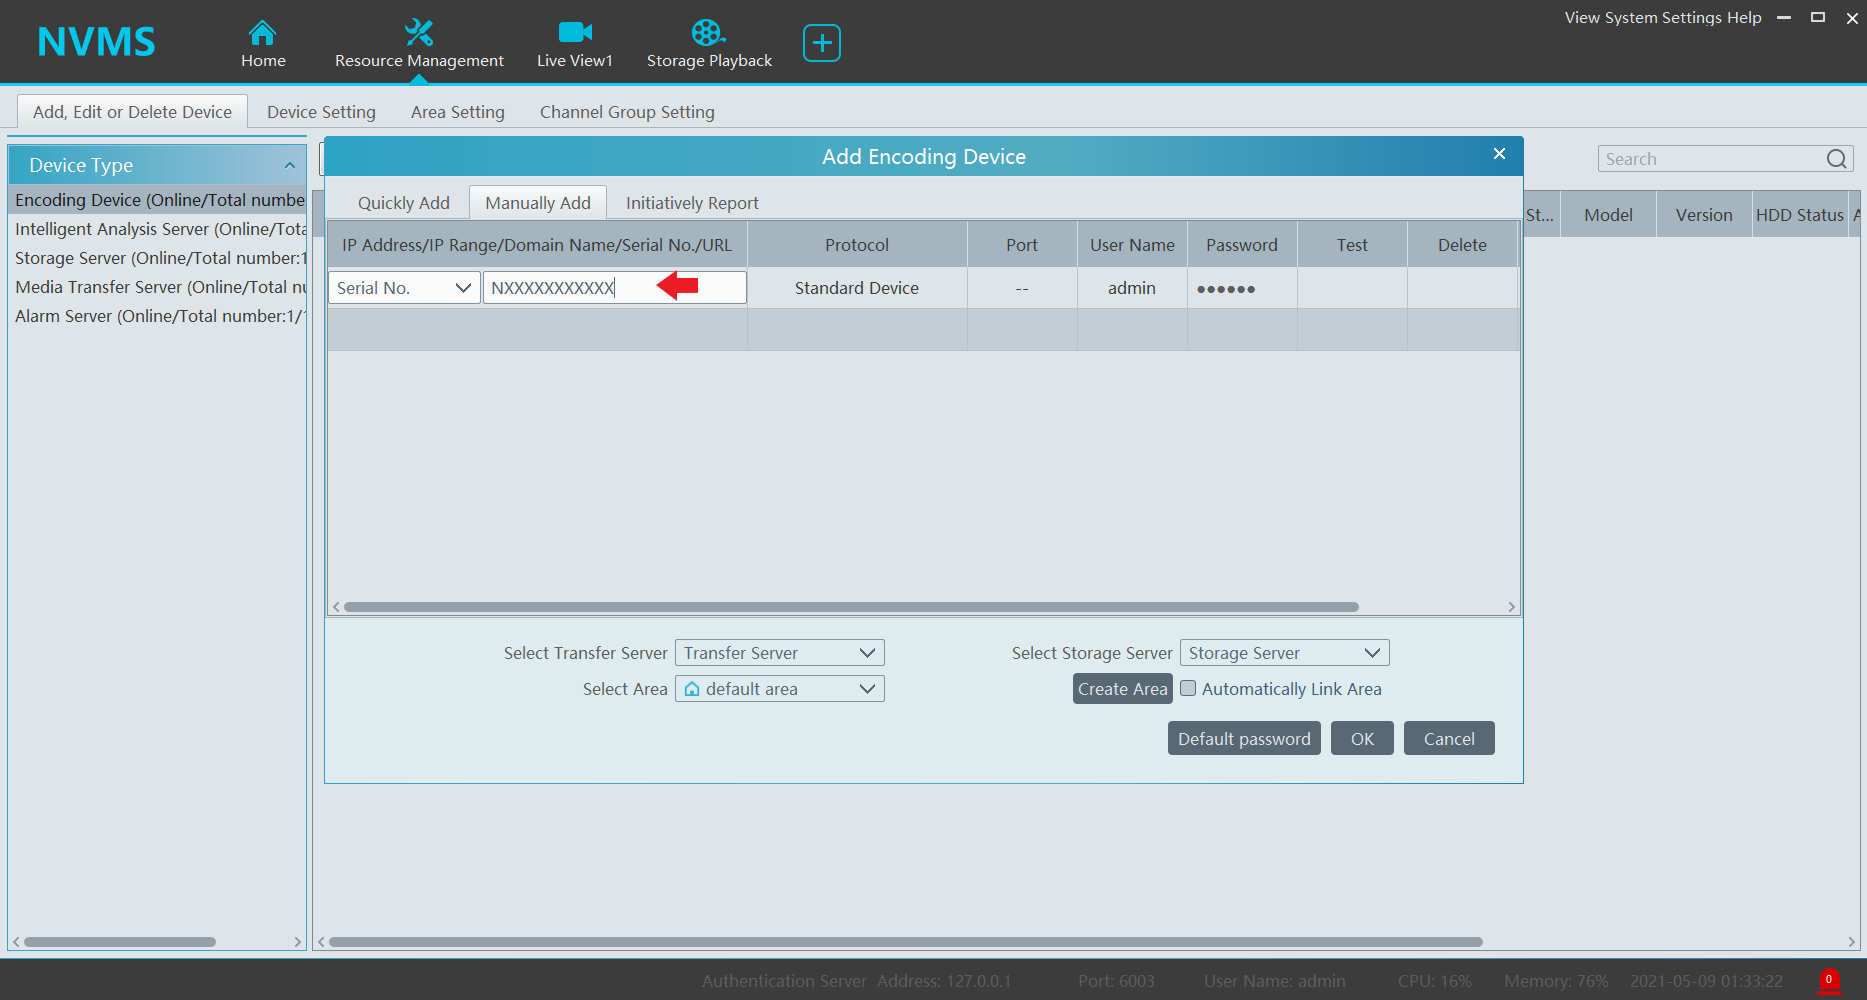
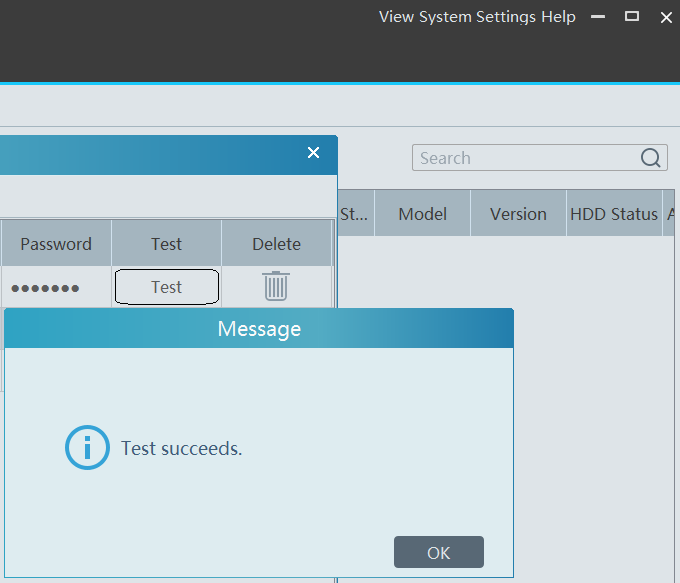
Enter the QR Code / P2P Code / Serial No. of the device to add. Enter your desired username and password. You may click “Test” to confirm that the device is reachable.
It is recommended to select “Automatically Link Area”. This will create an area based on your device’s name.
The “Online Status” section will say “Online” upon successful connection.
NVMS 2.0 Mac firewall configuration
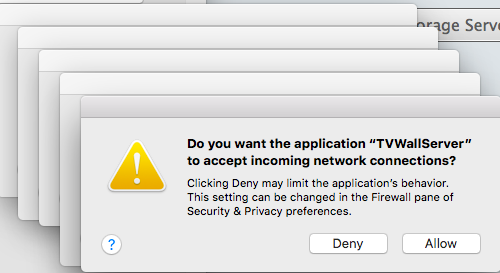
There is an option to automatically allow signed software to receive incoming connections. This means the NVMS2.0 apps and services signed by a valid certificate authority will automatically added to this list. Any app that is created by Apple, for example, that needs to receive incoming connections will be automatically added to the list. If NVMS2.0 can not connect to devices successfully, the firewall may be blocking the network access of NVMS 2.0.
Blocking all incoming connections will “prevent incoming incoming connections to nonessential services and apps.” This means that the firewall allows your Mac to find authorized services provided by other computers on your network, but prevents connections to all other sharing services.
Adding NVMS 2.0 services to the OS Firewall whitelist
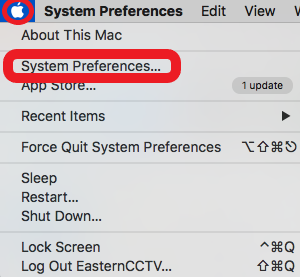
Click on the Apple icon and select “System Preferences”
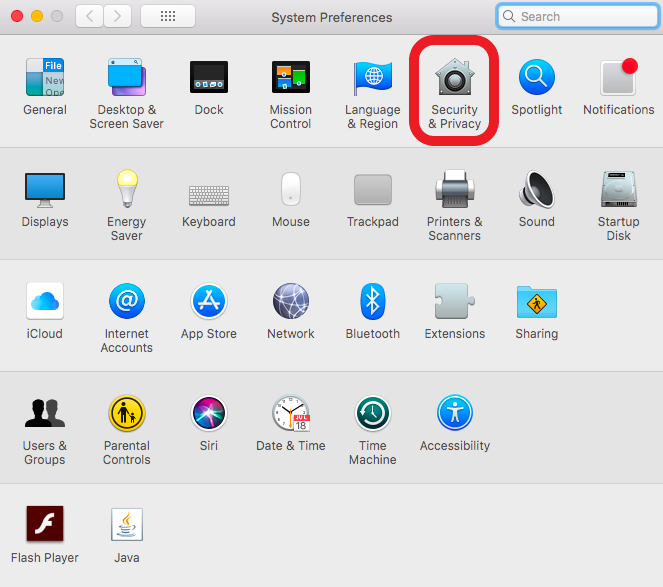
Click “Security & Privacy”
Select “Firewall”
Select “Firewall Options”
You may need to click the lock icon to make changes to the setting. You will be prompted to enter your Mac OS credentials.
Select “Firewall options”
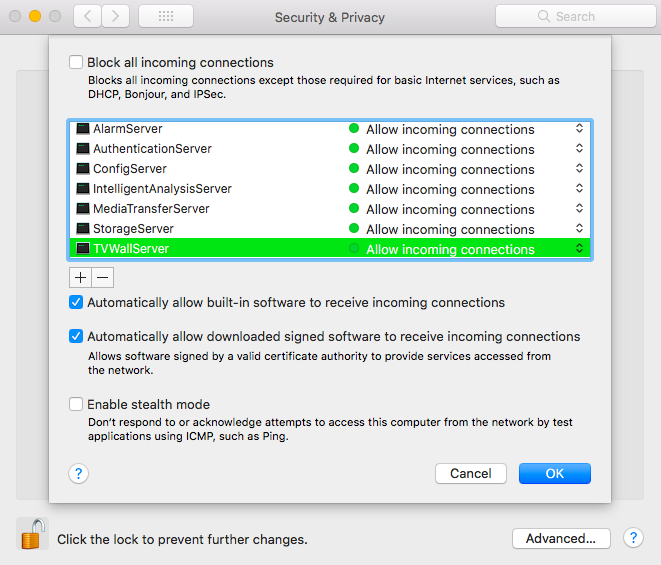
You will need to allow connections on the services listed in the snapshot below. Press “OK” to confirm.
Installing NVMS 2.0 Lite (2.1.1) MAC
Default username: admin
Default password: 123456
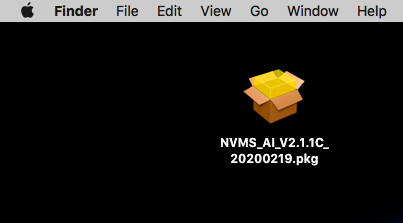
Download and run the NVMS 2.0 pkg.
https://drive.google.com/drive/u/0/folders/1g2TmrNn7ecJy0LLQPX5tILYZ0S6xWJYk
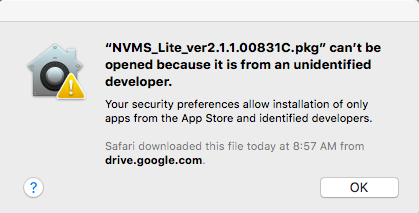
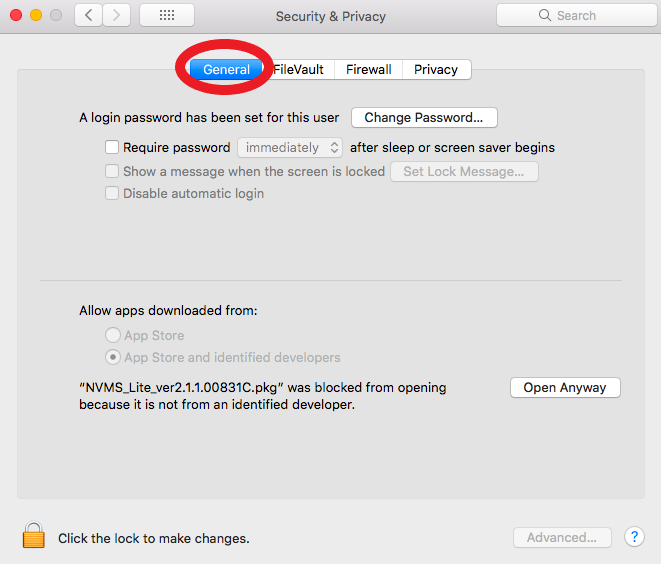
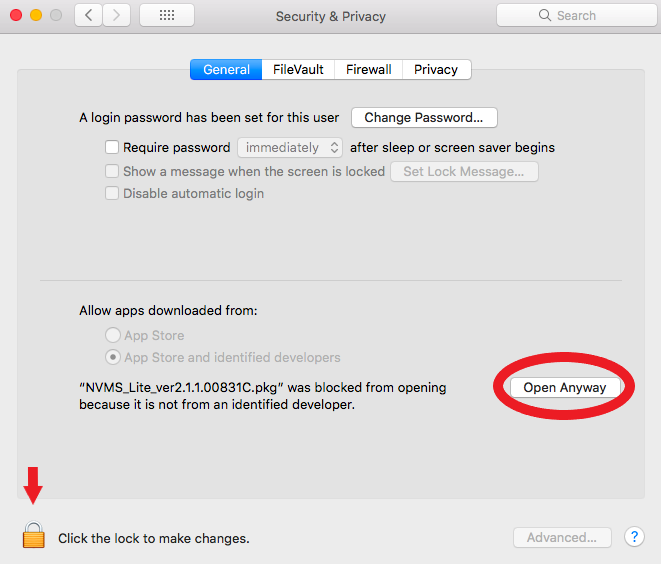
You might receive a notification that the OS put a hold on the installation.
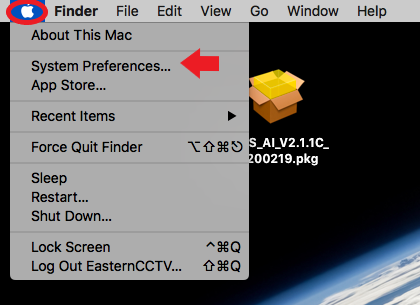
Click the Apple icon, then “System Preferences”
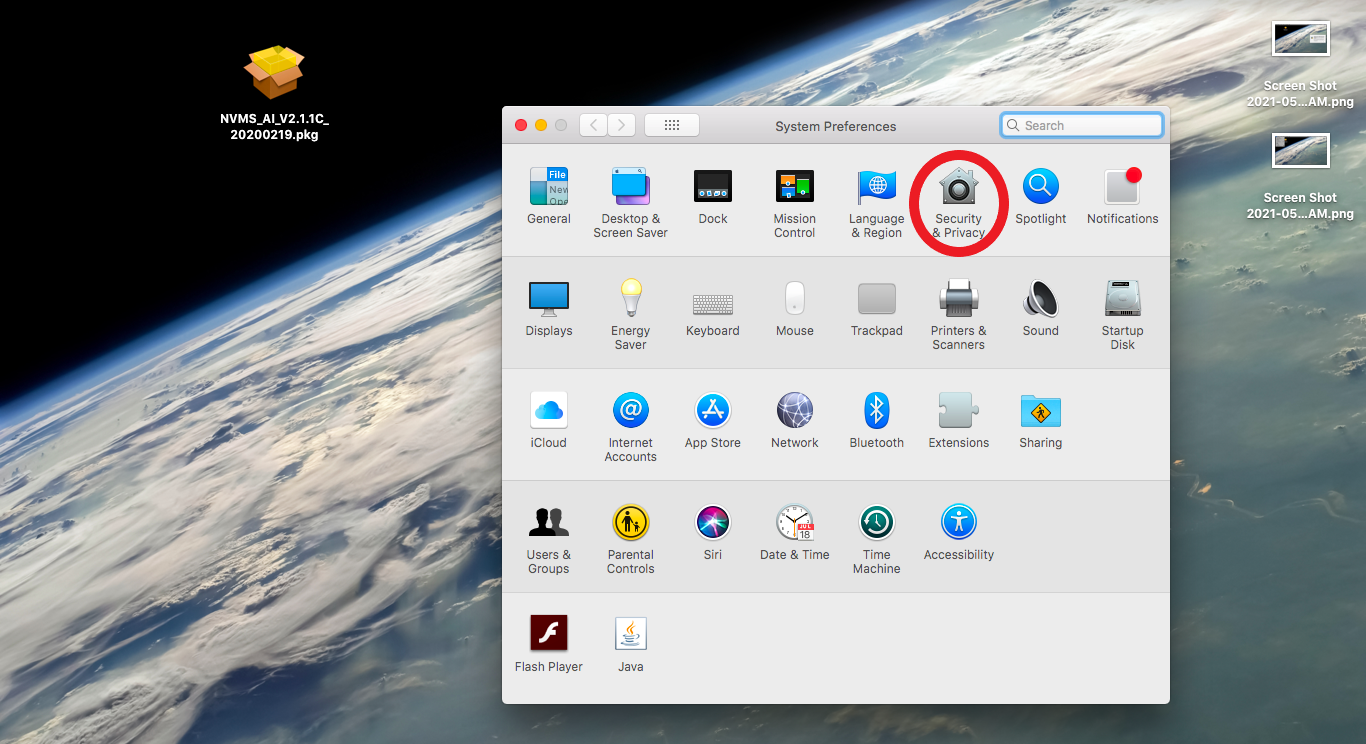
Click on “Security & Privacy”
Select “General”
Click the lock icon if “Open Anyway” is not selectable.
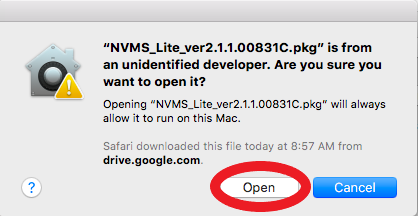
Click “Open”
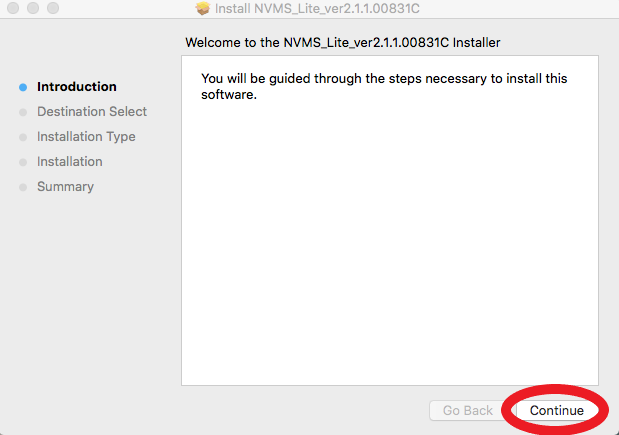
Click “Continue”
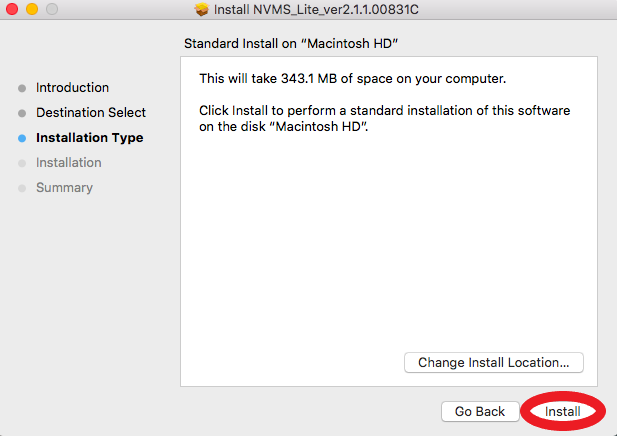
If you wish to change the install location, you may do so here. Otherwise, click “Install”
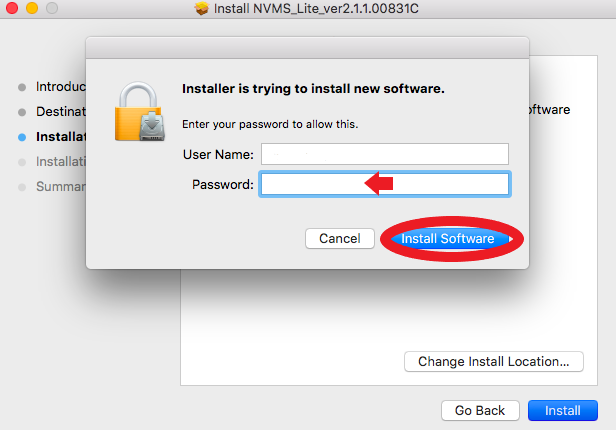
Login using your computer’s credentials to continue the Installation.
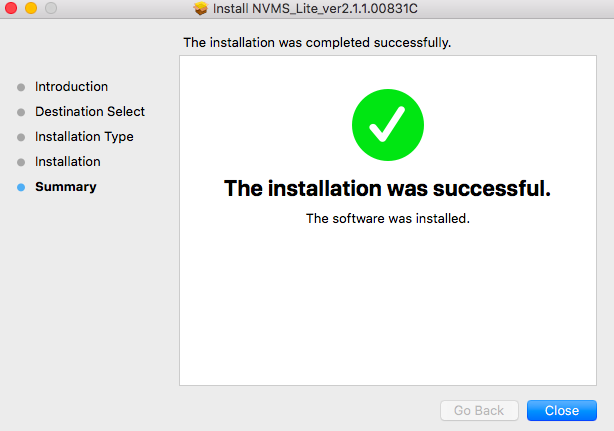
You will receive a prompt that the install was successful.
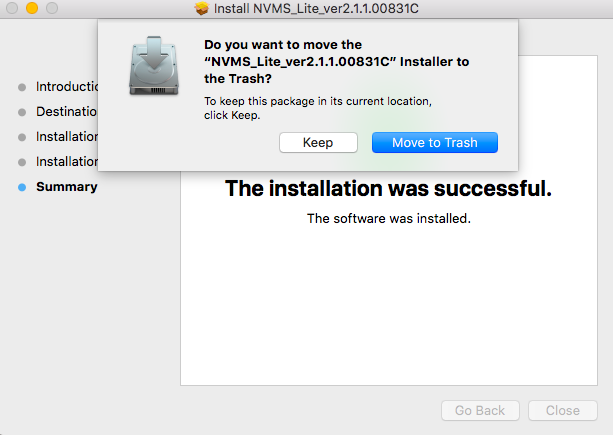
You may “Keep” or discard the installation file using “Move to Trash”
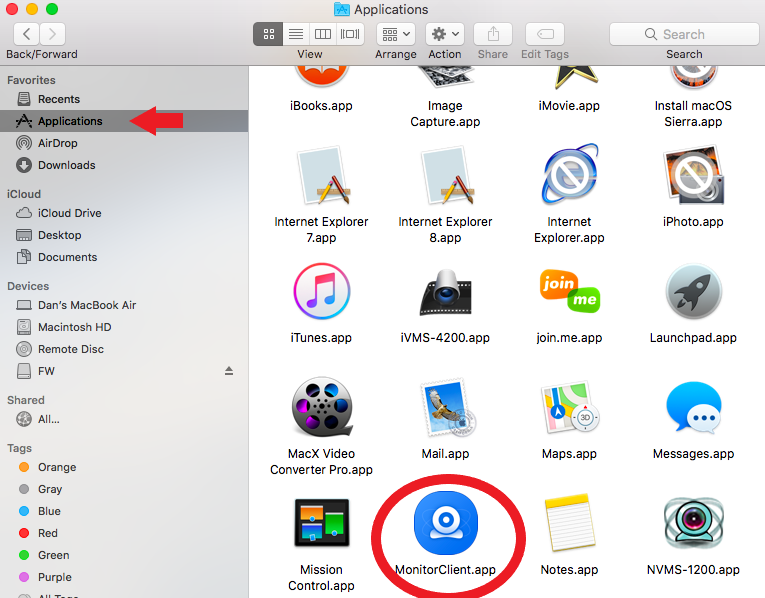
To open the NVMS 2.0, open the “Monitor Client.app” in Finder->Applications.
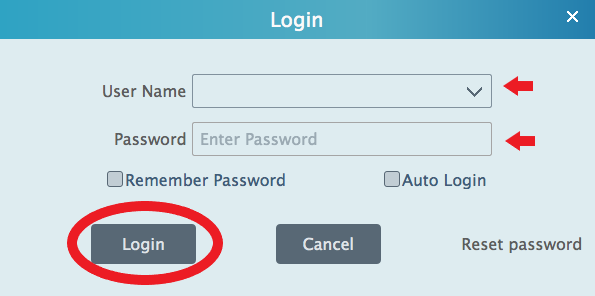
When you open the program you will be prompted for the username and password. The defaults are admin/123456. Click Login.
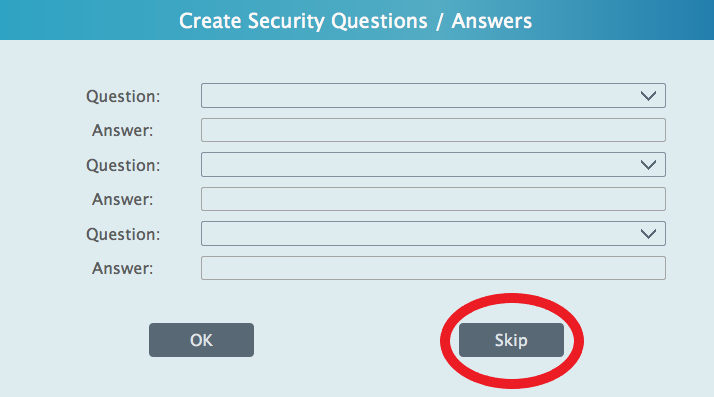
You will be prompted to create security questions. This is optional. You may hit “Skip”
Back up footage through NVMS 2.0 (2.1.1)
Playing back using the clip option
To Back up footage using the clipping function, open “Storage Playback” and playback the desired footage.
Once you have found the desired footage:
Click the “Back up start time” button will mark the start of the footage back up. (Scissor icon pointing left)
Click the “Back up end time” button will mark the end of the footage back up. (Scissor icon pointing to the right)
Click the “Download” button will redirect you to Record Management and Download the clip.
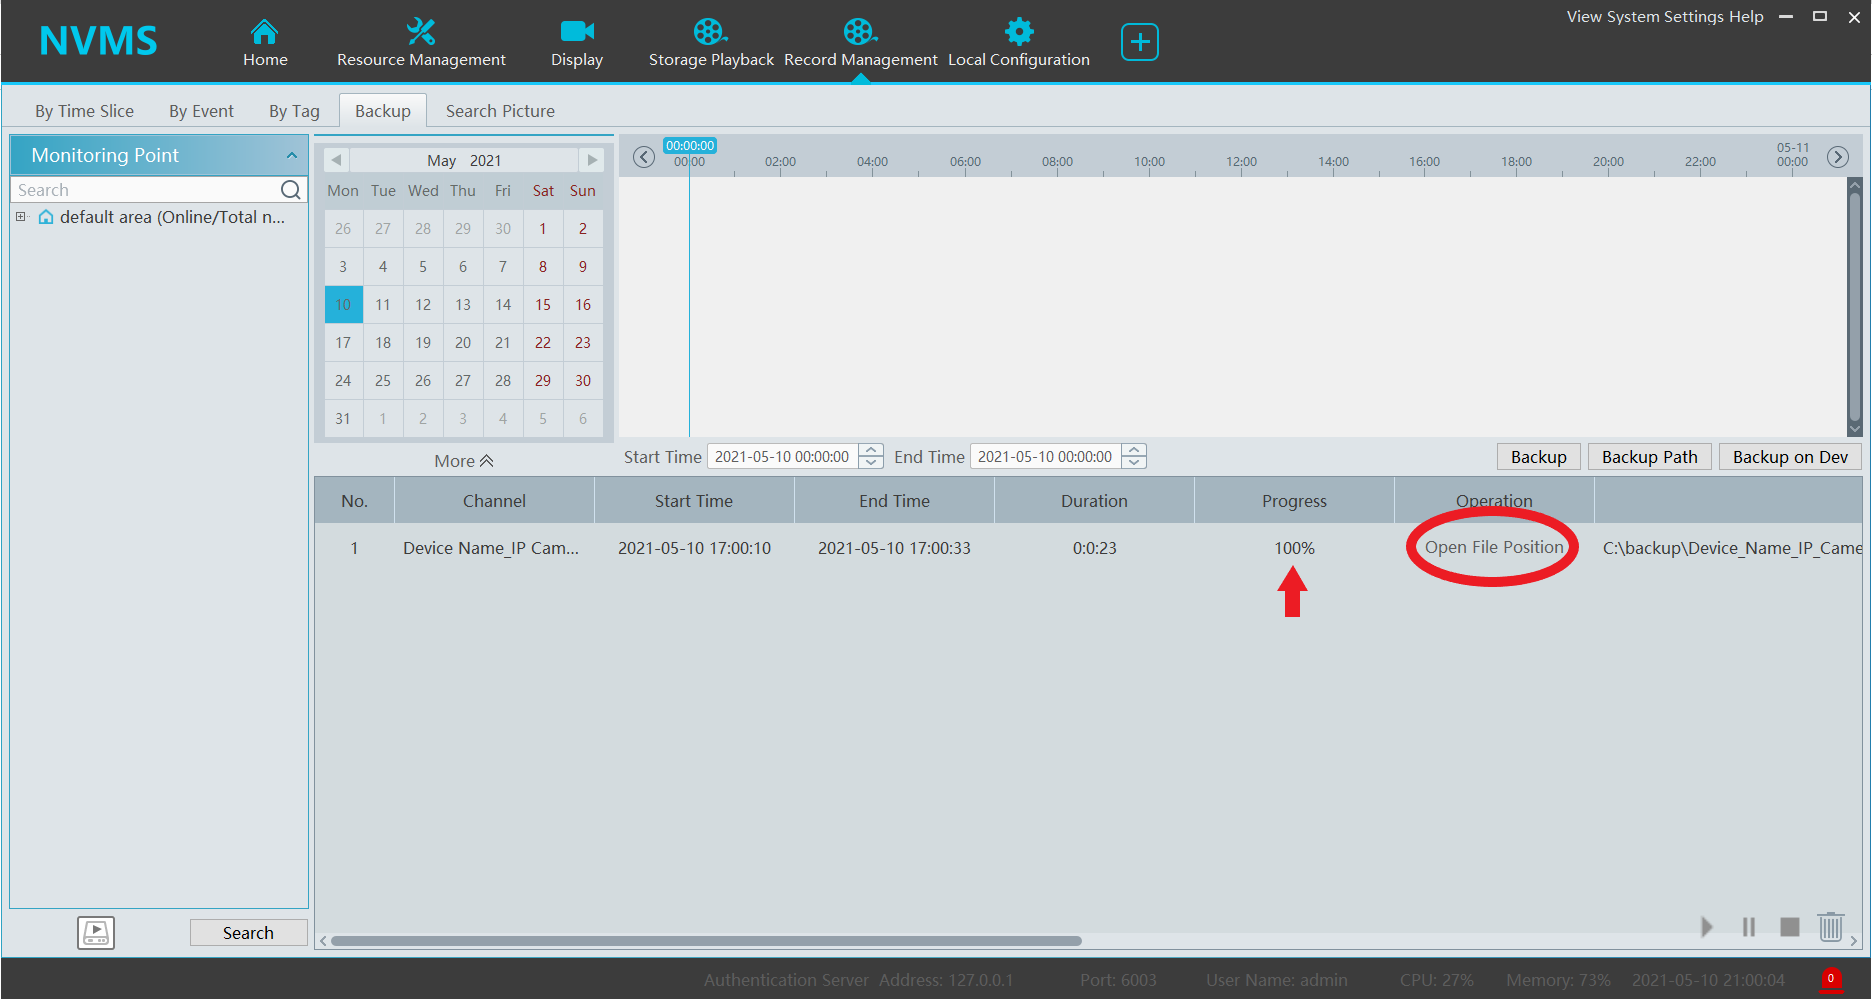
When the back up starts you will be able to see the progress and have the ability to cancel the back up using “Stop” or “Pause” to pause the download.
You can use the “Open File Position” to open the folder containing back up footage.
You will also have a progress bar. When the progress bar reaches 100%, the footage download is complete.
Back up using Record Management
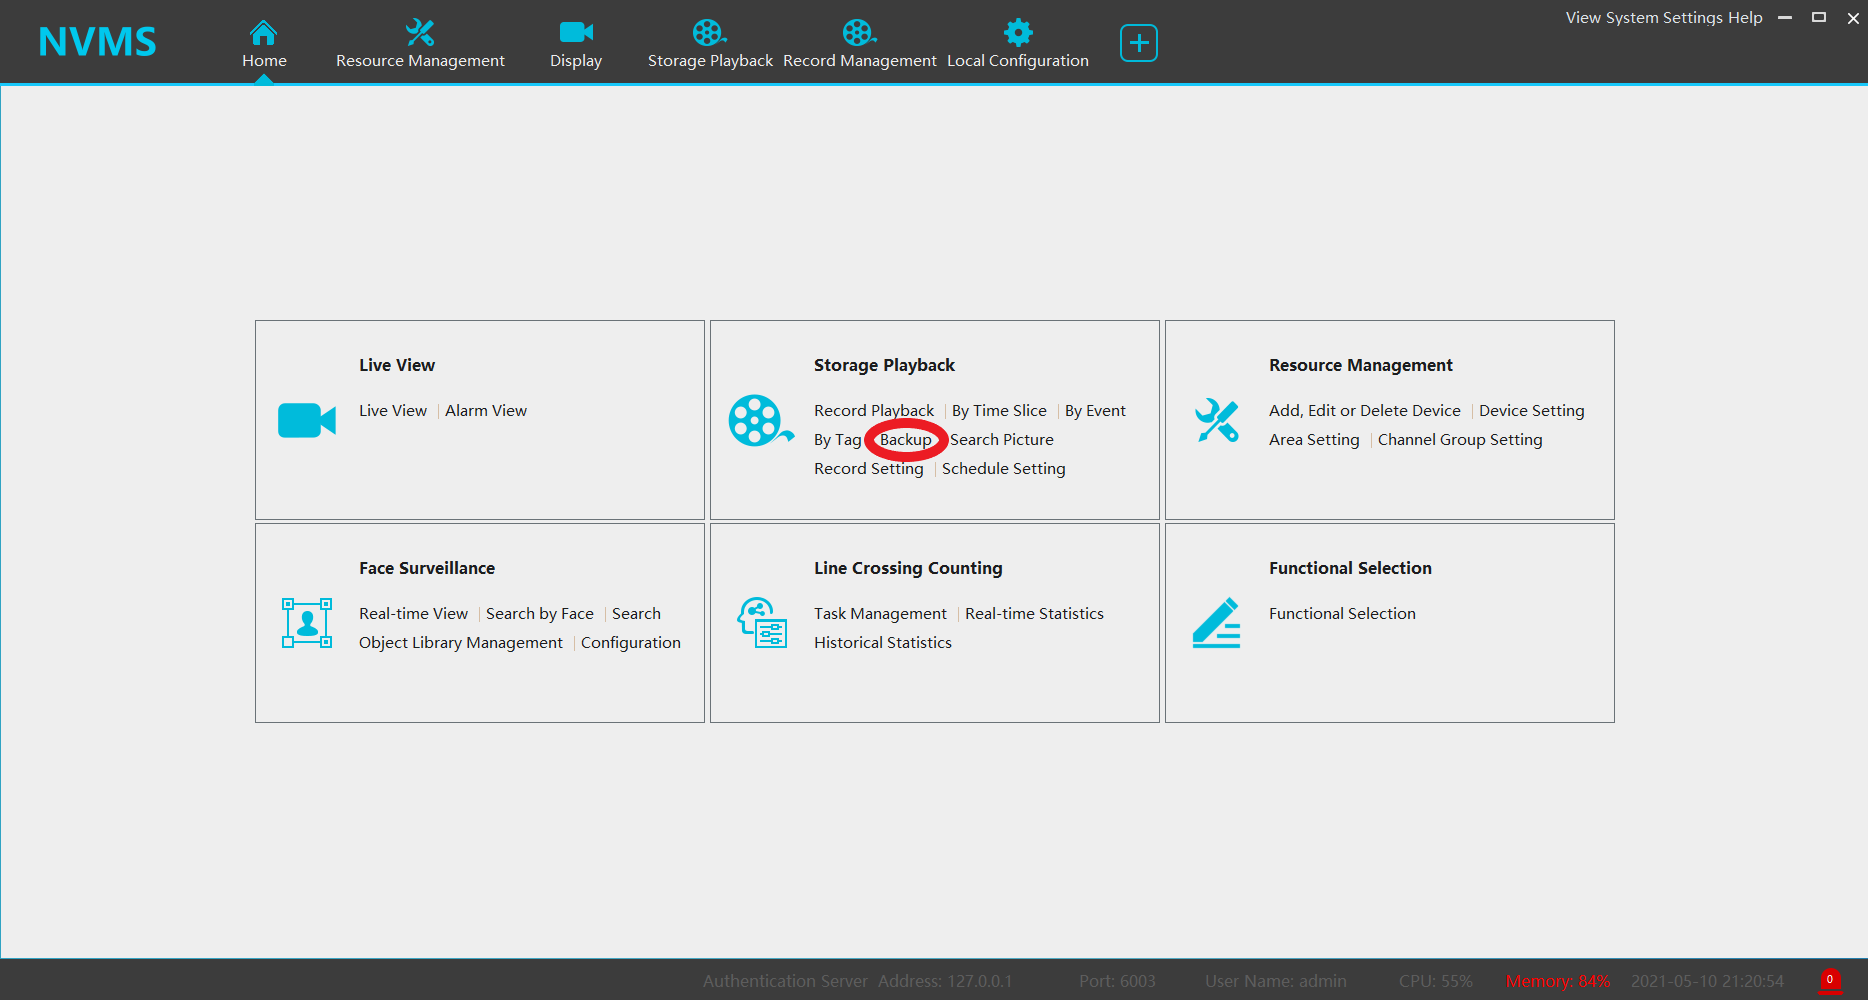
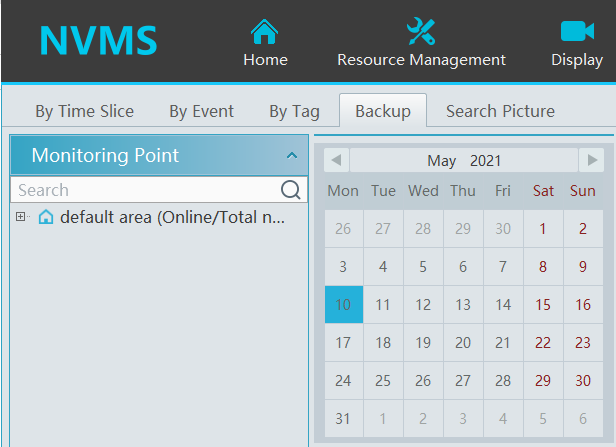
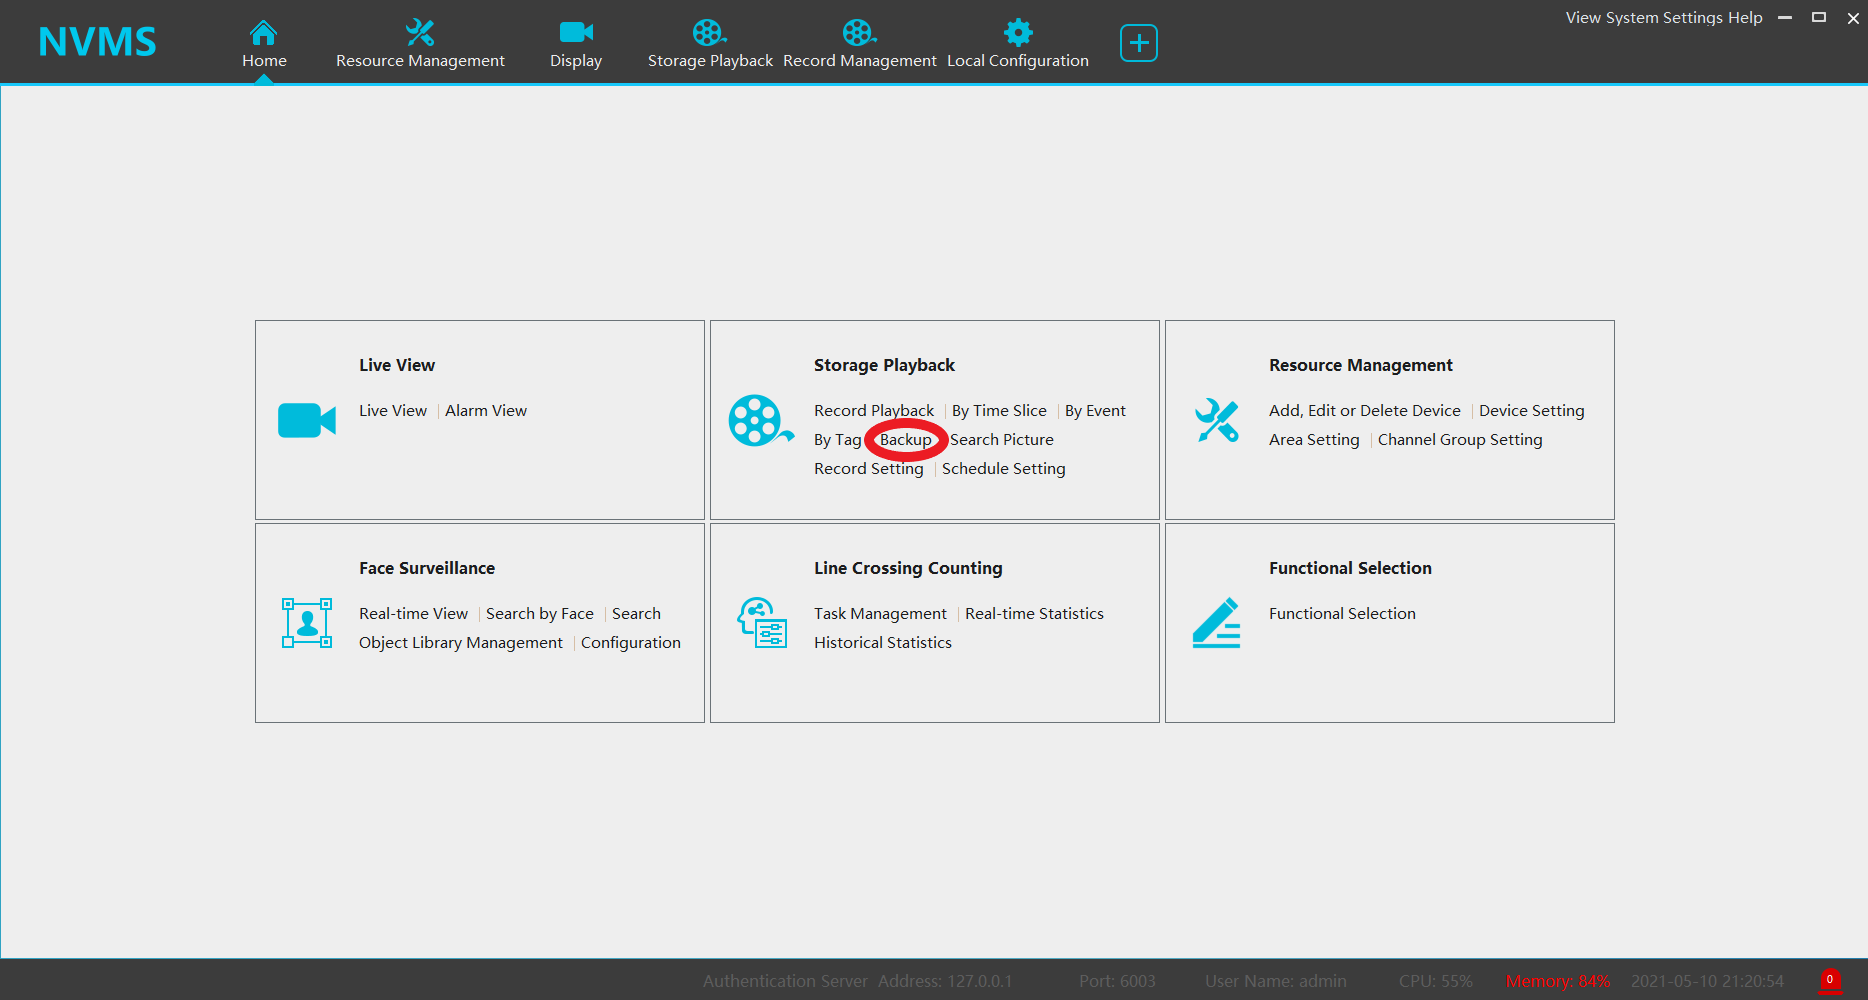
Select “Back up” under “Storage Playback”
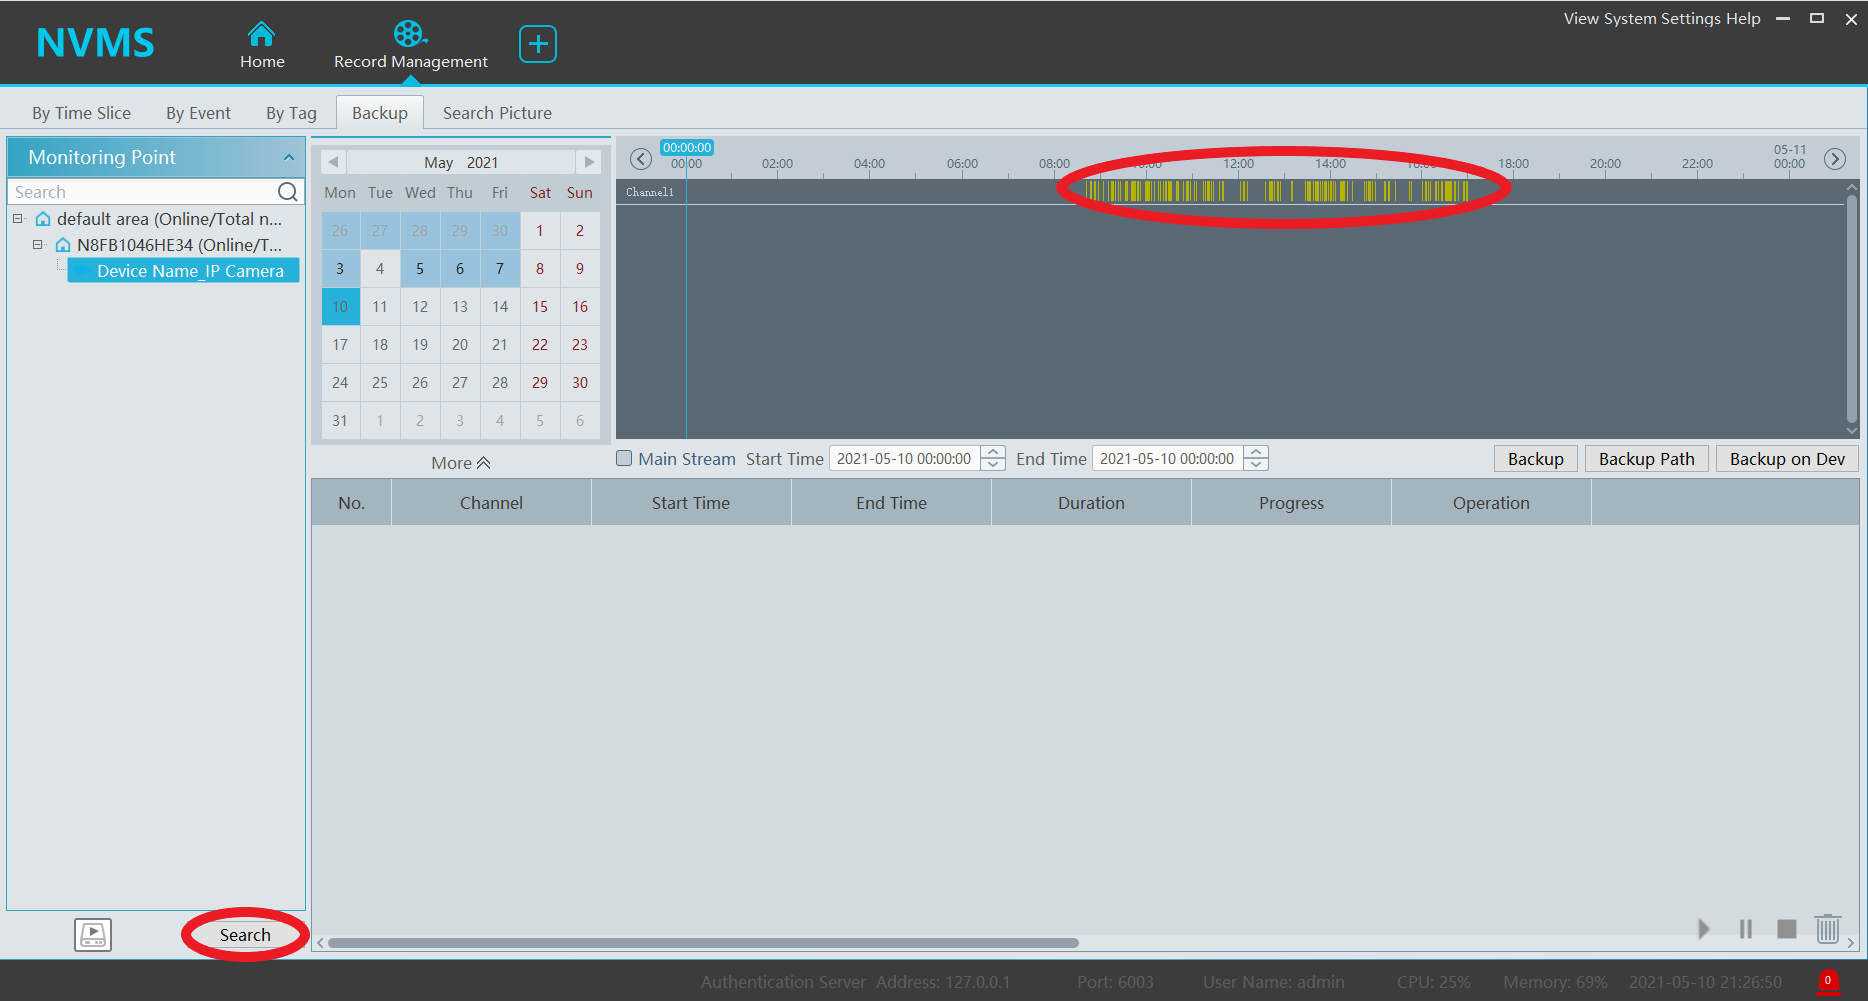
Expand the area and select your desired channels and date.
Click the “Search” button to populate the Backup timeline.
Click and drag your mouse cursor to mark the desired Playback footage.
The “Backup” button will begin the download.
You can use the “Zoom In”, “Zoom out”, and “24hr” button to manipulate the timeline.
When the back up starts you will be able to see the progress and have the ability to cancel the back up using “Stop” or “Pause” to pause the download.
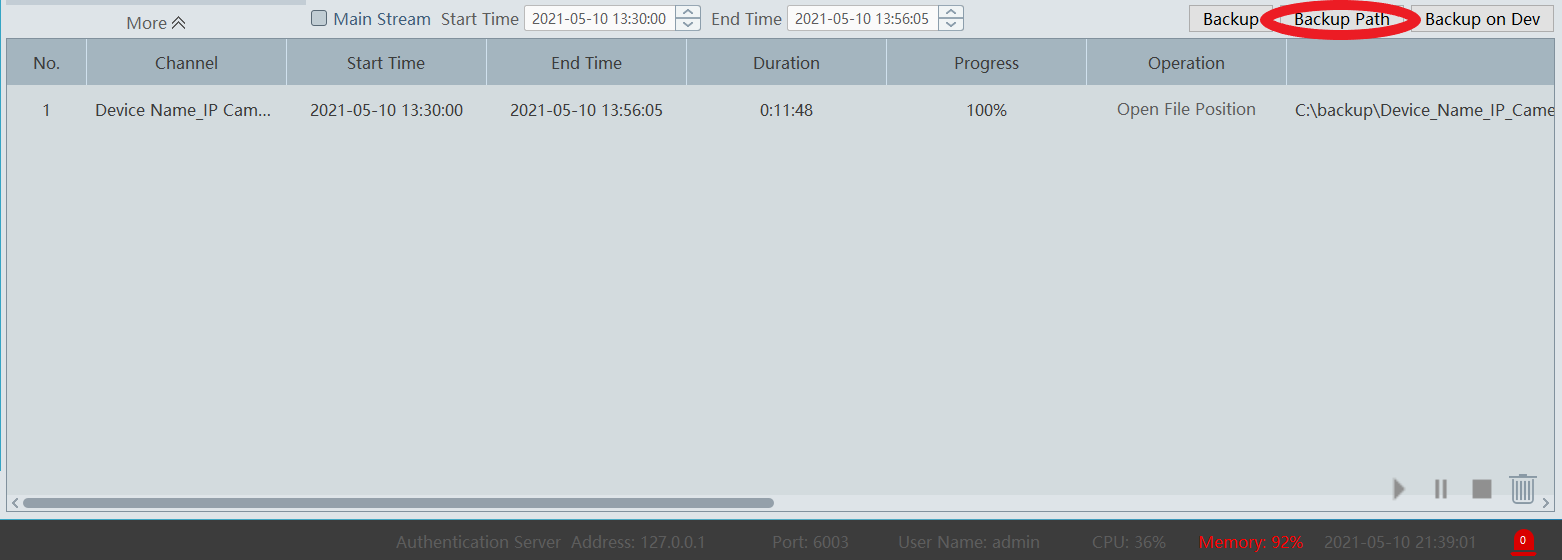
When the footage completes, you will be able to click “Open File Position” to locate the back up folder.
Changing the Back up path
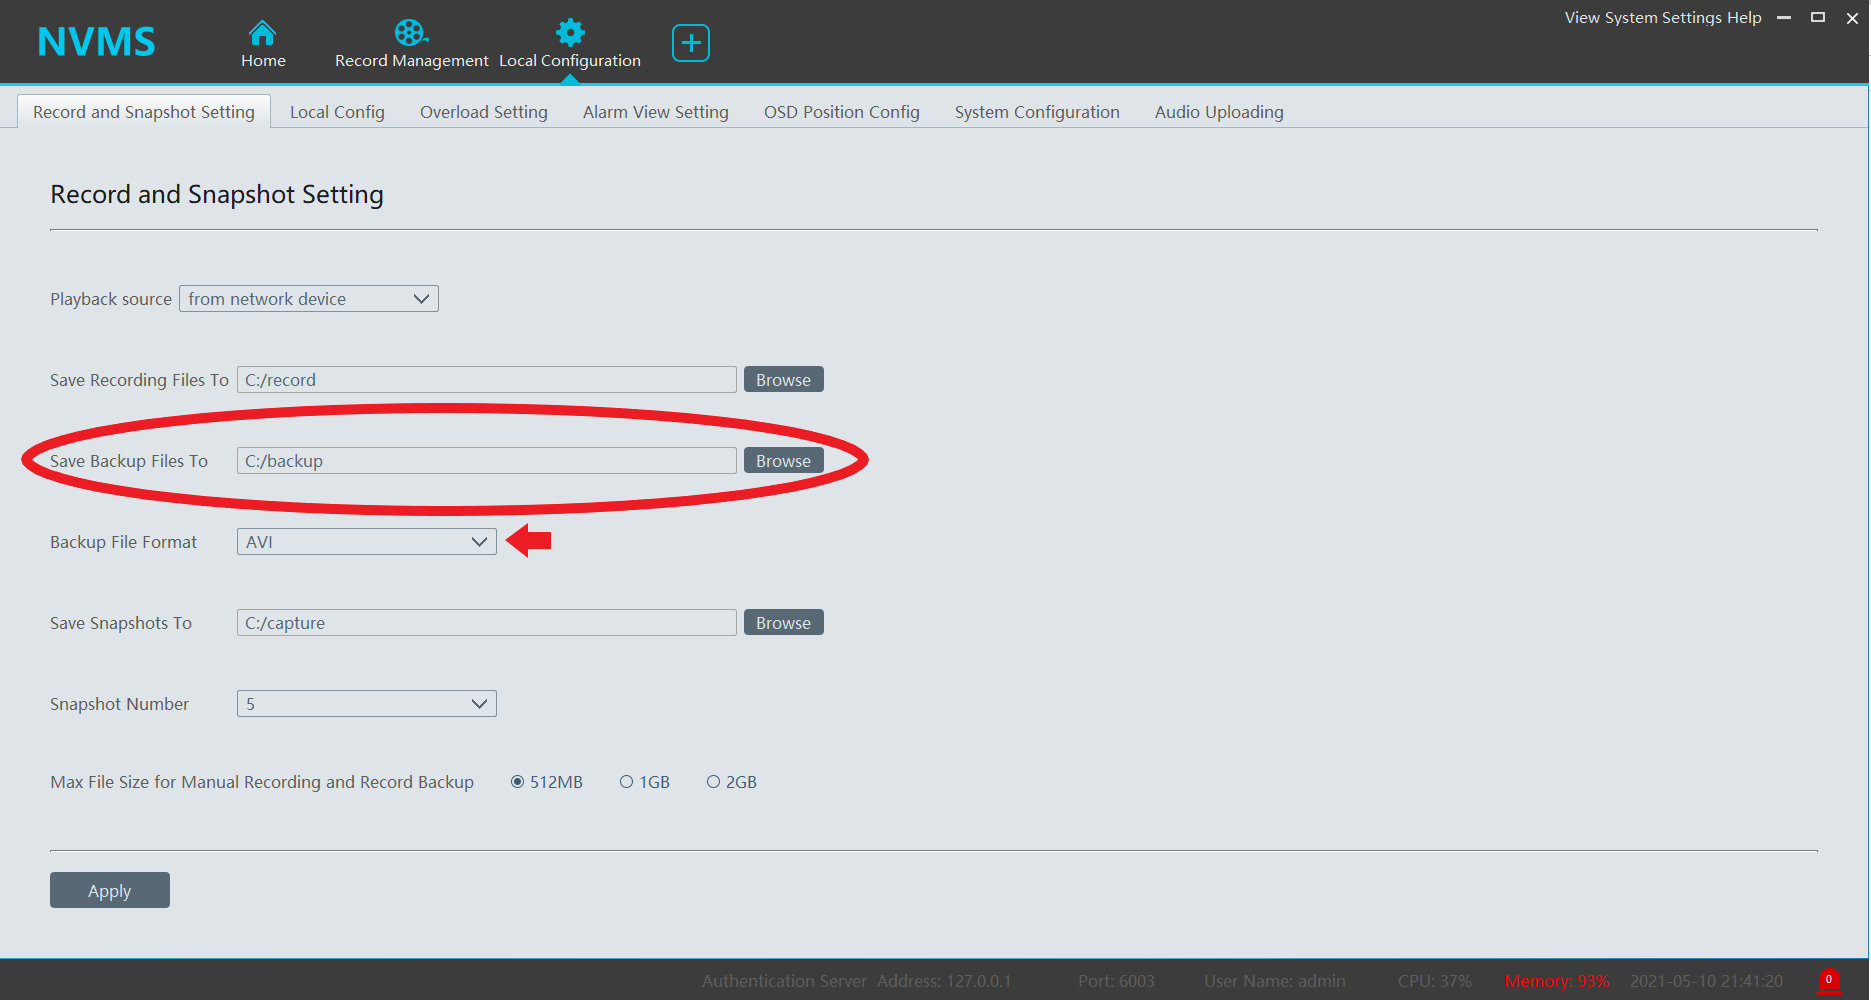
Click the “Backup” option from the main menu.
Select “Backup Path”
To change the backup location, select “Browse” next to the “Save Backup Files to” option.
You may also change the “Backup File Format”
AVI will allow for playback in common video players when the codec is present. The DAT option will use the proprietary file format.
Click Apply to save settings. Note: You will need to close any active Record Management tabs to reflect the updated Backup location.
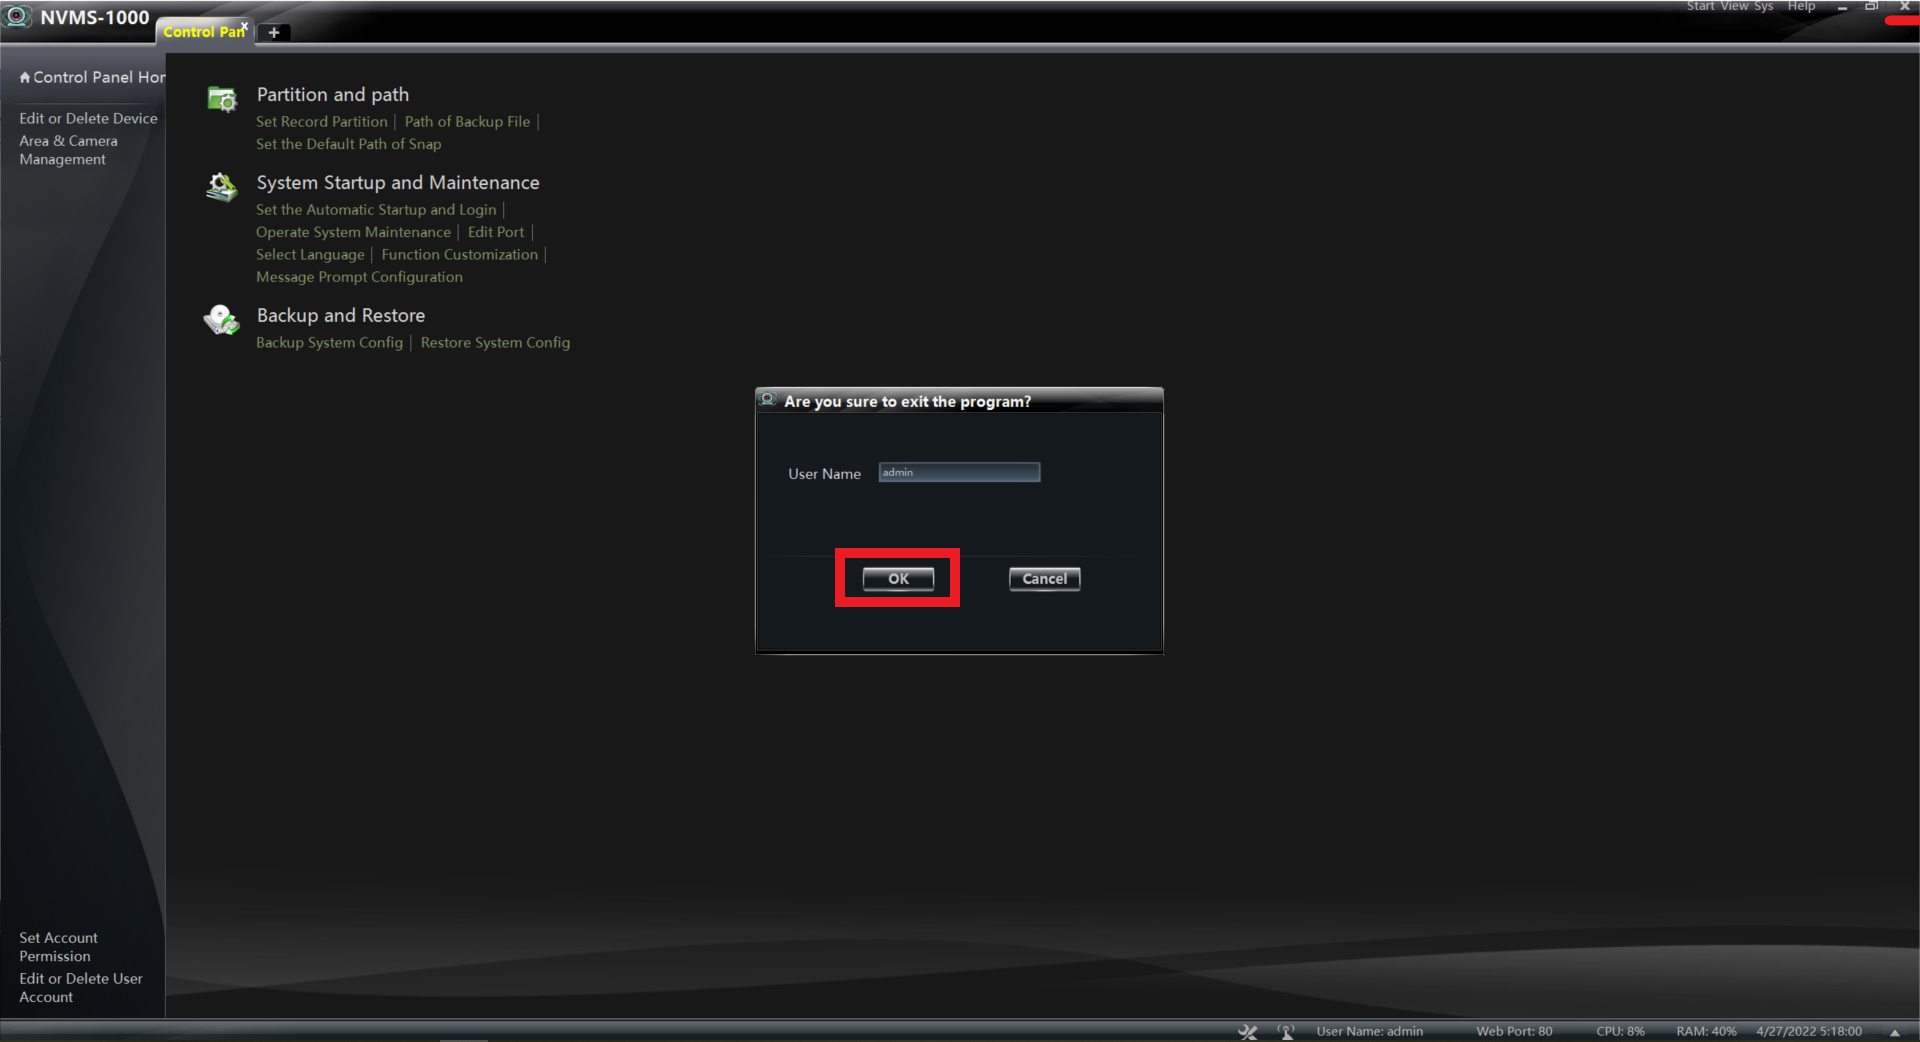
Disable Password Authentication when Closing NVMS-1000 – Windows
Please make sure you are logged into NVMS-1000 Prior to continuing:
Step 1- Please select “Basic“
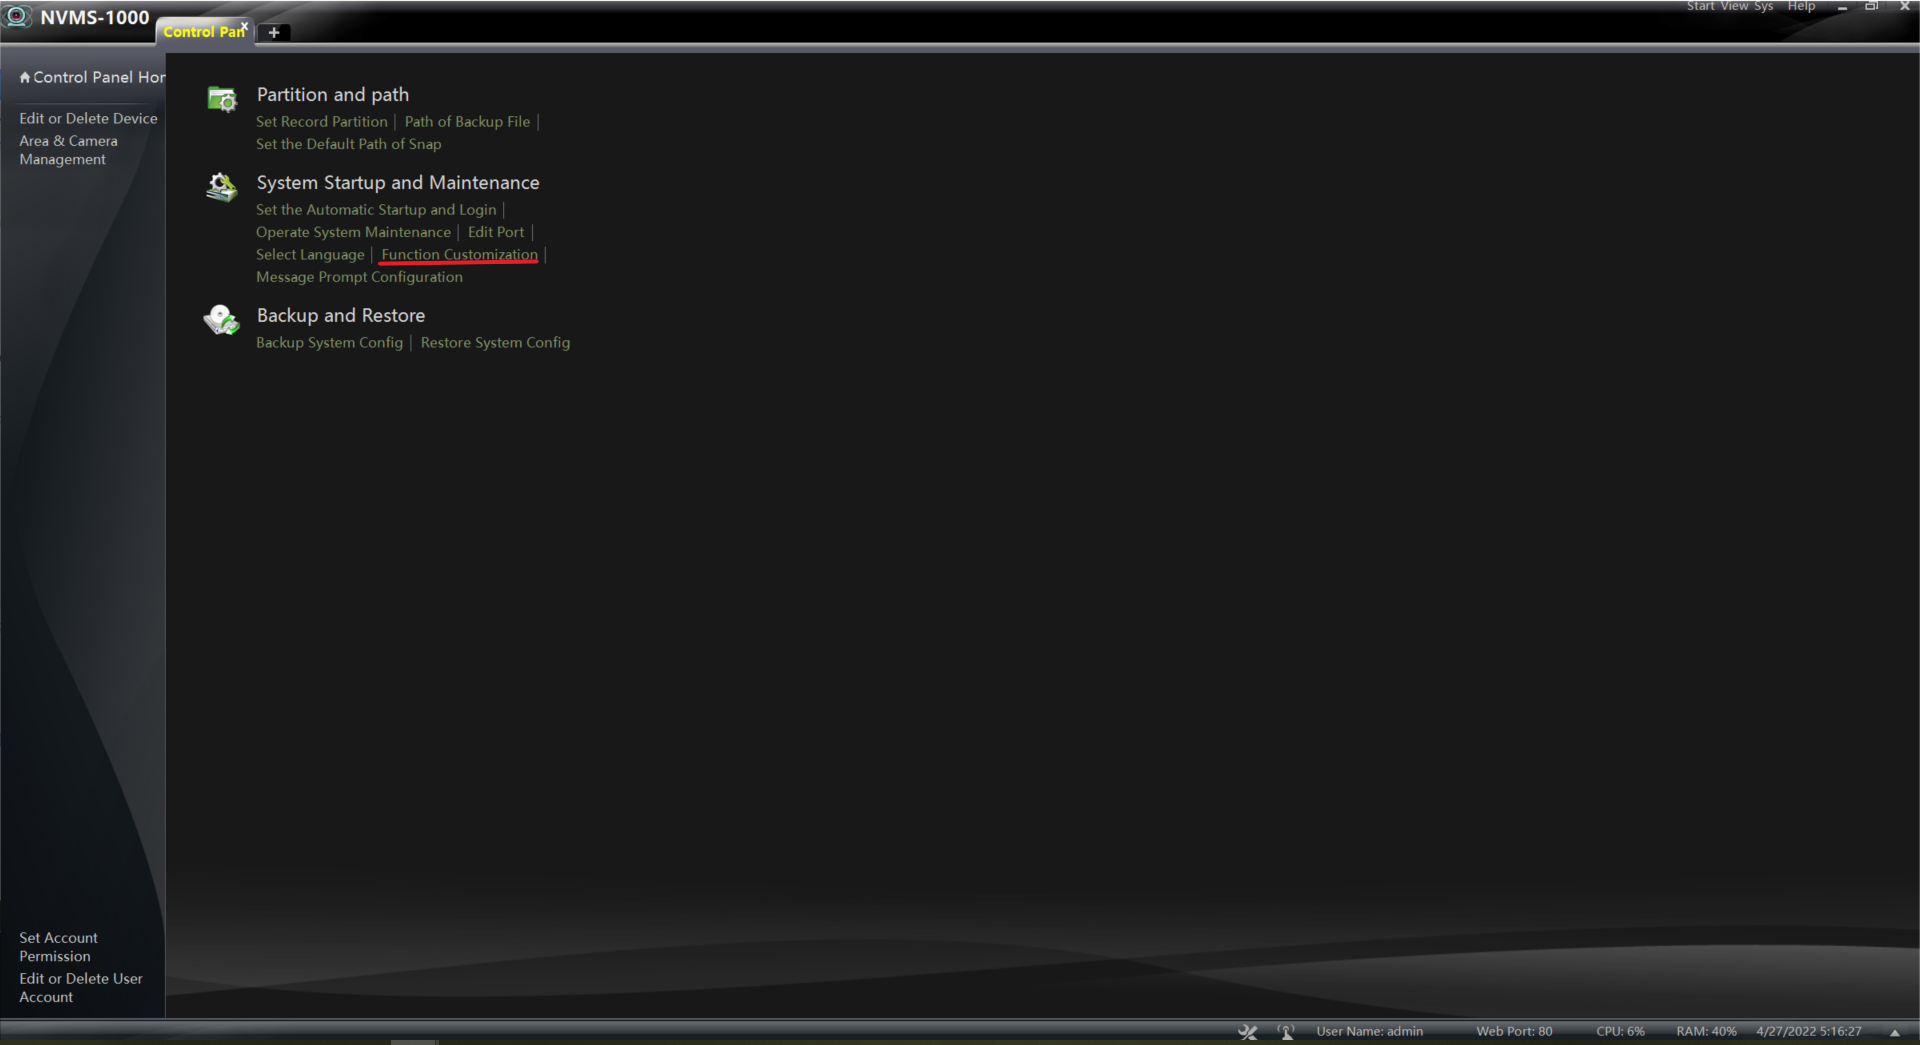
Step 2- Under System and Maintenance please select- “Function Customization”
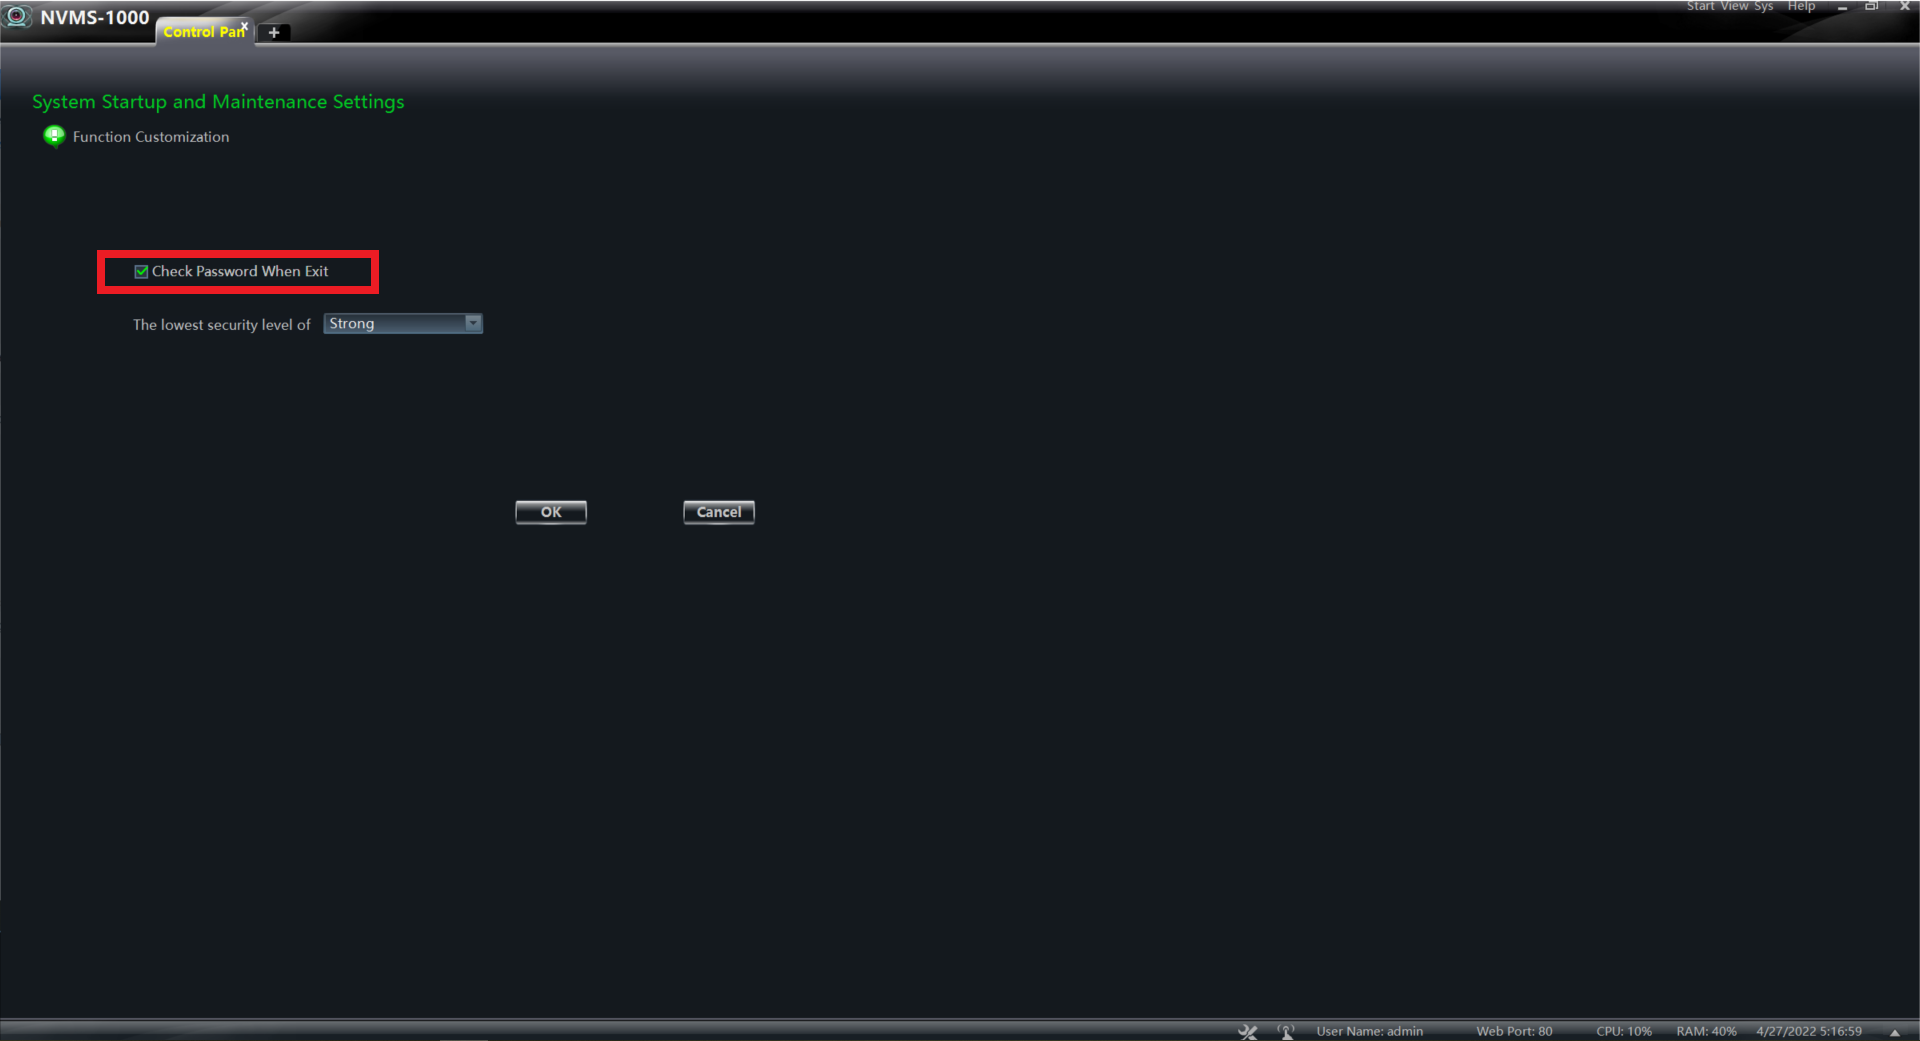
Step 3- Unselect “Check Password When Exit” and Select “OK”
Step 4- You can now close the application without being asked to confirm your Password. Select “OK” to close the application
LPR Initial Configuration for NVMS 2.1.3
LPR Initial Configuration for NVMS 2.1.3
Preface – This is for the first time configuration of an LPR to NVMS. This will allow the export of plate captures.
Requirements
NVMS V2.1.3
LPR connected to an NVR
NVR connection through AutoNAT
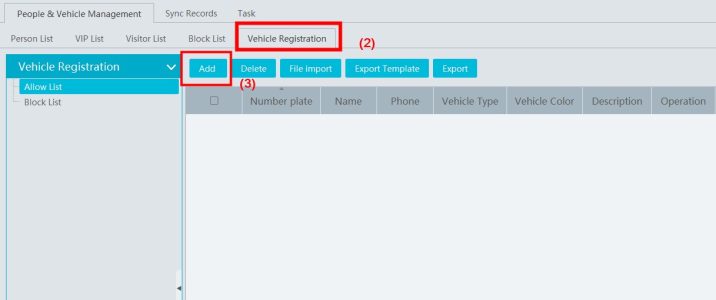
1. Go to Group Management (1) > People & Vehicle Management (1) > Vehicle Registration interface (2) > Click [Add] to add the vehicle information to Allow List or Block List (3).
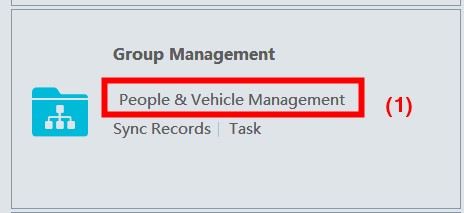
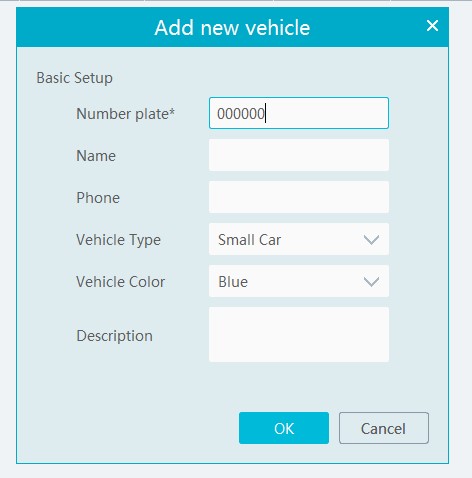
2. Add a single license plate using 00000 and save.
3. Click the “Task” tab to setting license plate recognition task (1). Select the license plate recognition camera(2) and then click applicable scenario(3). Select “Vehicle deployment control” (4) and click “OK” (5).
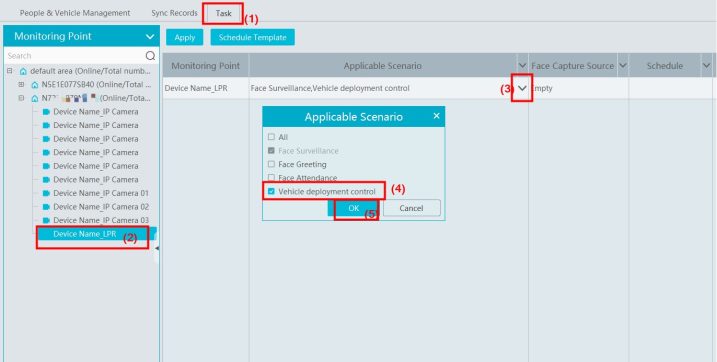
4. The LPR Capture and Comparison is now added to NVMS and this will allow exporting of plate captures.
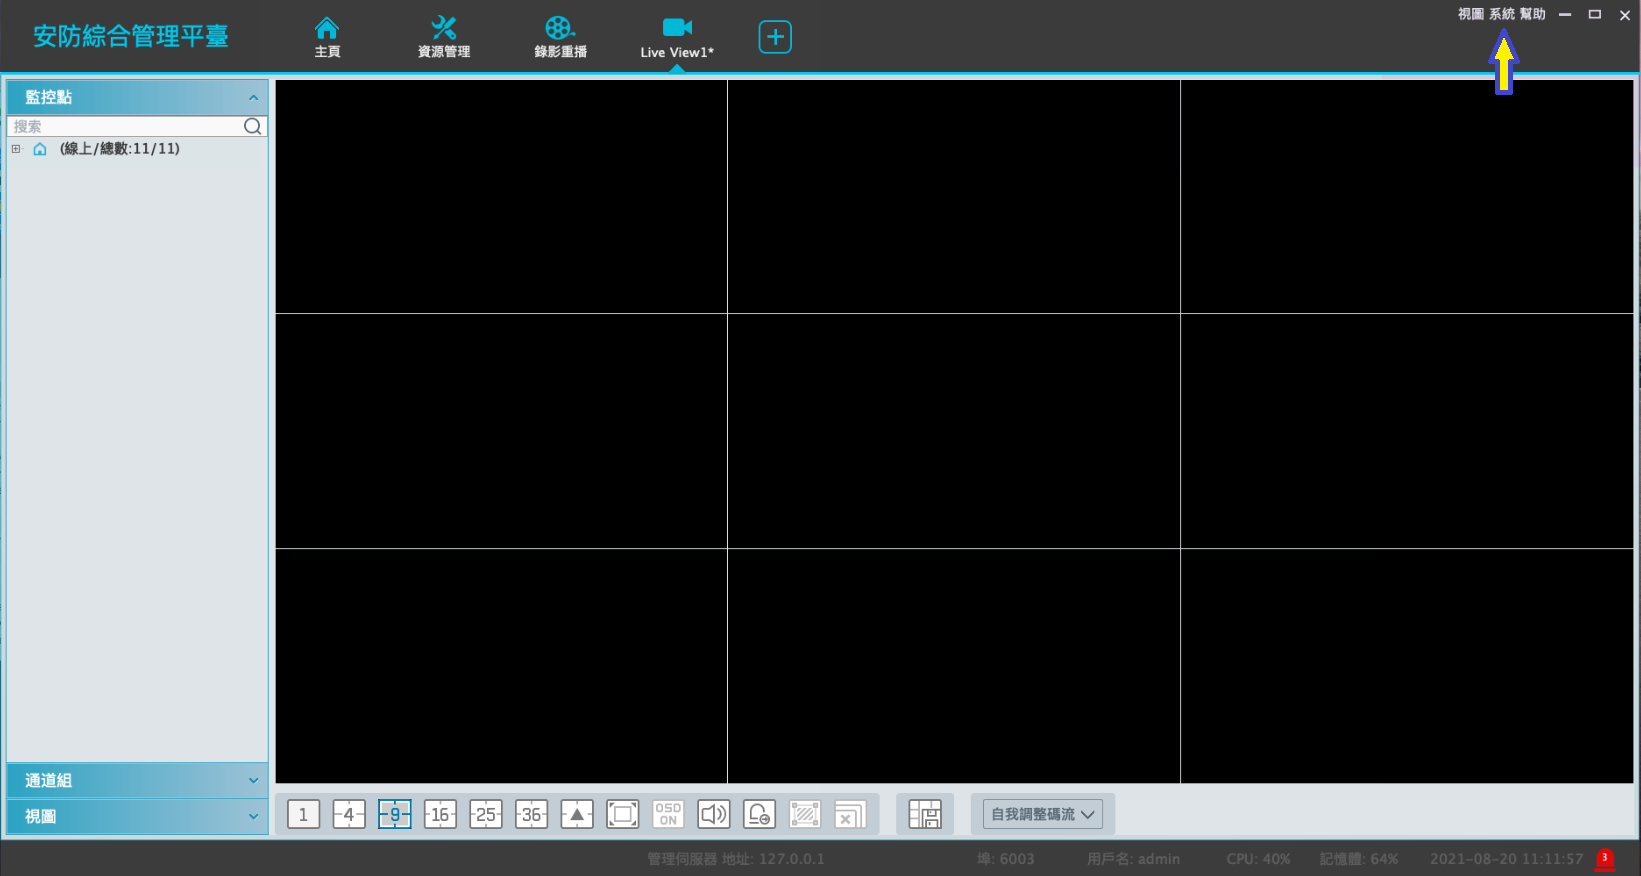
Change NVMS 2.0 language from Chinese to English
By default, the username is admin, and the password is 123456
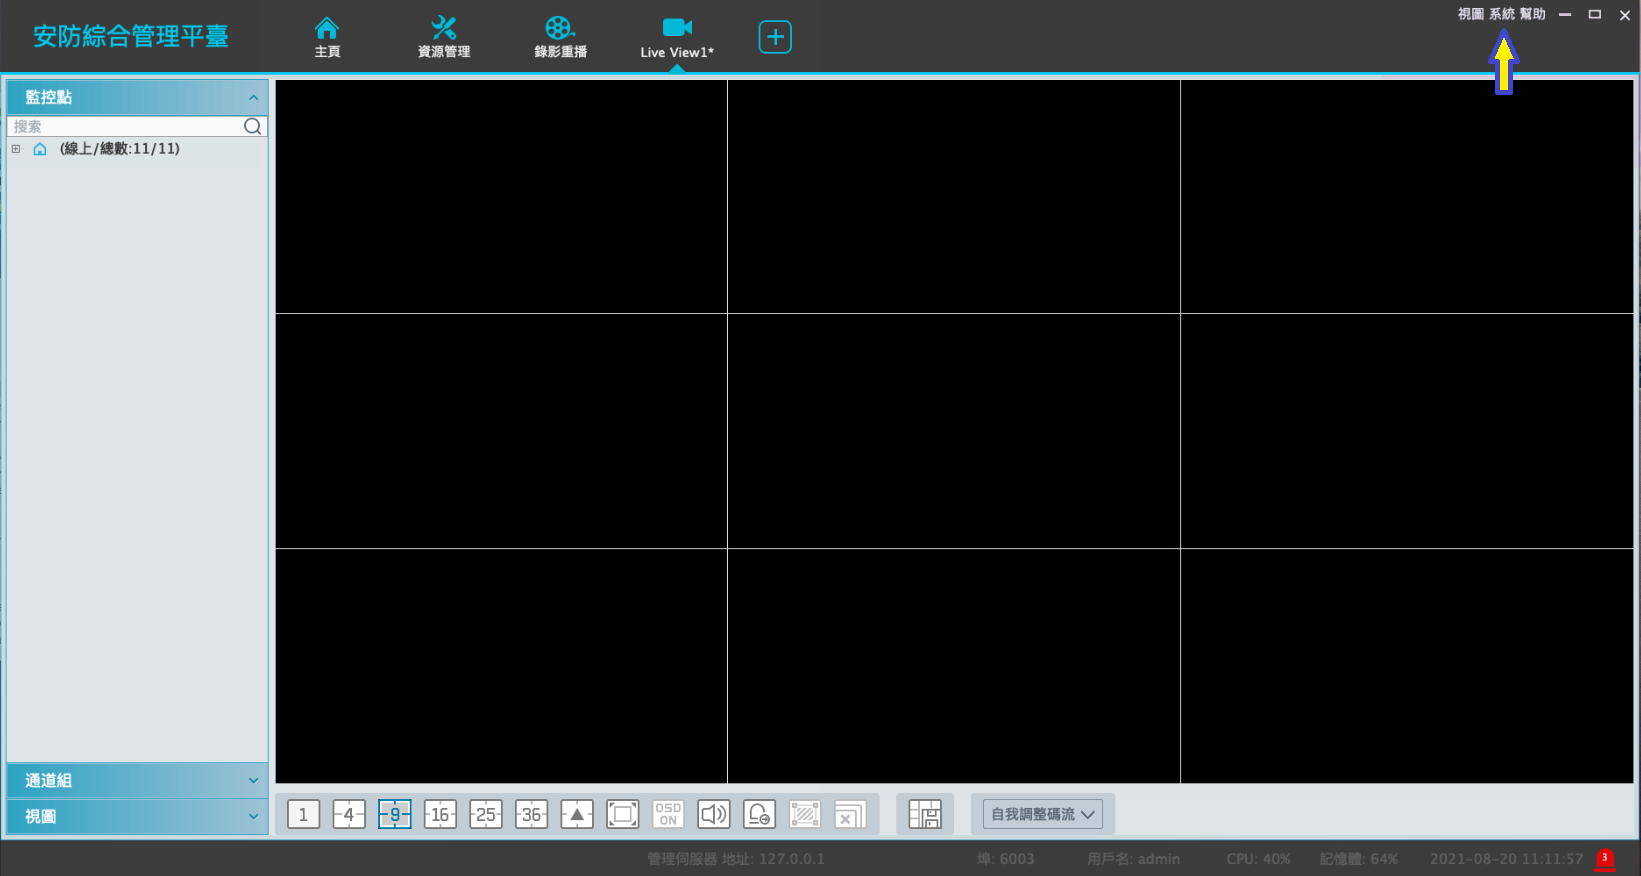
This port we select skip.
Click the button that the arrow pointed
put the check mark on it
select this one
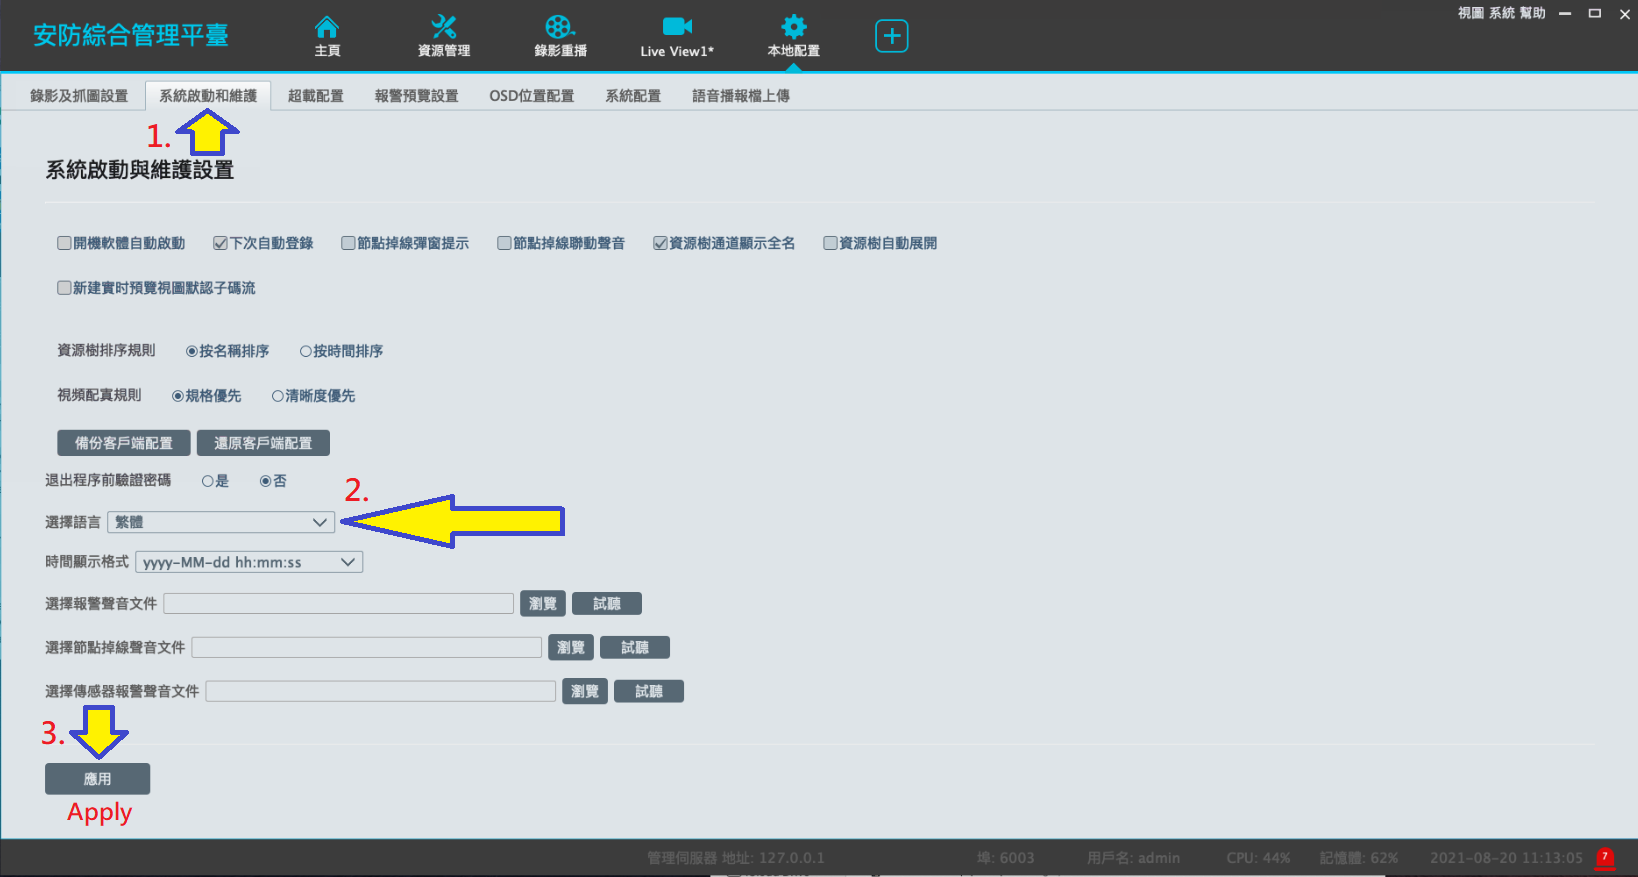
First, go to the second tab
and then the arrow point to left is for language select
remember to Apply
Question:
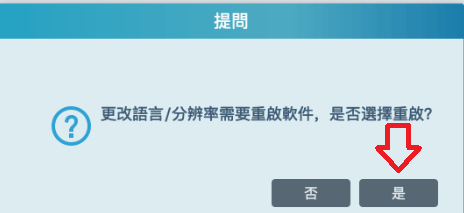
Change Language / Resolution will reboot the software, do you want to continue?
It’s NO on the left and YES on the right.
Question:
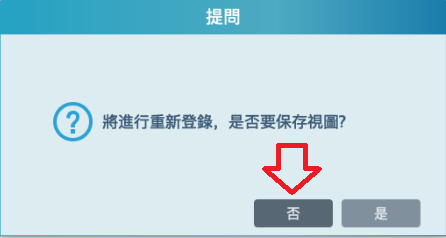
It will reboot the software, do you want to save the Live View?
If we select YES, NVMS will save a live view in Chinese title, so we select NO.
NVMS will get the selected language after restarting.
Cheat Sheet
Titanium-General-Cheat-Sheet
Answer
|
Recorder Ports: |
|
|
|
|
HTTP port |
80 |
Web access *Required for port forwarding. |
|
|
HTTPS port |
443 |
HTTPS web access |
|
|
Server port |
6036 |
server port for general comm *Required for port forwarding. |
|
|
POS port |
9036 |
Port for Point-of-Sale comm |
|
|
RTSP |
554 |
|
|
|
|
|
|
|
|
IP Cam Ports |
|
|
|
|
HTTP port |
80 |
Web access *Required for port forwarding. |
|
|
HTTPS port |
443 |
HTTPS web access |
|
|
Data port |
9008 |
Data port for general comm *Required for port forwarding. |
|
|
RTSP port |
554 |
Real time streaming protocol port |
|
|
|
|
|
|
|
Mac address prefix: |
0018AE 585B69 |
|
|
|
|
|
|
|
|
Recorder default IP |
192.168.1.200 |
|
|
|
IPC default IP |
192.168.226.201 |
|
|
|
Default switch IP |
10.151.151.1 |
|
|
|
|
|
|
|
|
Password |
Forced activation or 123456 |
|
|
|
|
IP-PT1100 – 8888 |
|
|
|
|
|
|
|
|
Phone app |
Super Live Plus |
|
|
|
Legacy phone app |
Super Live Pro |
Super Live Pro should be replaced by SLPlus. SLPro only to be used when legacy equipment does not function on SLPlus. |
|
|
|
|
|
|
|
CMS Software |
NVMS 2.0 |
256Ch limit w/o license. Program titles are MonitorClient and ServerTrayUI |
|
|
Legacy CMS |
NVMS1000 (Windows) /1200 (Mac) |
Push to use NVMS 2.0. Only use legacy NVMS for old 3.0 FW models. Autonat 2.0 not compatible. |
|
|
|
|
|
|
|
Tools |
|
|
|
|
|
IP Manager Tool |
Used for detecting Titanium devices on Network. Activate IPC, FW update, batch addressing, detects ONVIF devices. |
|
|
|
IPTOOL 2.0 |
Used for detecting Titanium devices on Network. Can default IPCs with tool. |
|
|
|
IPTOOL 1.8 |
Used for detecting Titanium devices on Network. Can Upgrade Titanium equipment using the tool. |
|
|
|
RPAS |
Used to playback proprietary record files. Used for opening HDDs that were formatted on Titanium. |
|
|
|
SDPlayer |
Used to playback record files from Titanium IPC when SD card is removed from device. |
|
|
|
SuperPlayer |
Used to playback proprietary record files. Used for opening HDDs that were formatted on Titanium 3.0. Not usable on Titanium GUI. |
|
|
|
|
|
|
|
RTSP Strings |
|
|
|
|
|
RTSP IPC String |
rtsp://IP or domain name:port/profile1 |
|
|
|
|
Main = profile1, Sub = profile2, Thirdstream = profile 3 |
|
|
|
example |
|
|
|
|
RTSP NVR/DVR String |
not available on 3.0 GUI |
|
|
|
|
ChID=Ch# | Type=main or sub |
|
|
|
example |
rtsp://192.168.1.192:554/chID=1&streamType=main&linkType=tcp |
|
