The Wisenet SKY Cloud Video Management System (VMS) is a Cloud-based service that replaces traditional digital video recorders (DVRs) and network video recorders (NVRs). The system is completely based on a modern redundant Cloud architecture that provides a web-browser-based interface and comprehensive mobile applications for iOS and Android.
The Wisenet SKY Cloud Video Management System (VMS) is a Cloud-based service that replaces traditional digital video recorders (DVRs) and network video recorders (NVRs). The system is completely based on a modern redundant Cloud architecture that provides a web-browser-based interface and comprehensive mobile applications for iOS and Android.
The Wisenet SKY Cloud VMS is utilized for traditional security applications such as securing buildings, properties, apartment complexes, factories, critical infrastructure, police stations, retail stores, and restaurant chains. However, it is used for many applications related to “business optimization” as well. Business optimization is the use of video to make a business or service run better by being more reliable, more efficient, or providing better customer service. In retail, this can be applied to perfecting the retail displays, sales process, training of employees, compliance with safety rules, and much more.
The Wisenet SKY Cloud VMS is built on the Wisenet SKY Video Platform. The Wisenet SKY Video Platform provides simple, modern API access to live and recorded video from the cameras, as well as all of the attached data of motion, tags, objects, and activity. These APIs are used to develop custom user interfaces and analysis applications for safety, motion, and other summary reports. The APIs are also used for creating integrations with external systems for monitoring and analysis, as well as development of custom user interfaces both in the mobile and web browser interfaces.
Who Should Use the Wisenet SKY Cloud VMS?
The Wisenet SKY Cloud VMS is a Cloud-based solution designed to operate for customers that have some Internet connectivity. It is NOT suitable for use by a customer that does not have an Internet connection. In general, the more bandwidth the customer has available, the better the system will work.
The key component of the bandwidth used by the Wisenet SKY Cloud VMS is the upload speed. Download speed is not as important. The minimum upload bandwidth that is recommended is 768 kbps. With this small amount of bandwidth, the system can operate properly with standard definition (SD) cameras. Using a Cloud-managed video recorder (CMVR) will allow higher resolution cameras to be used.
How Does the Wisenet SKY VMS Work?
The operation of the Wisenet SKY system is very simple. The digital and/or analog cameras communicate with the Wisenet SKY Bridge or CMVR, which is located at the customer’s site. This communication can occur either over the network (ethernet or wireless) or through an analog coax connection. Any configuration required by digital cameras will be performed by the bridge/CMVR.
The bridge/CMVR will record the video and audio to the local storage (located in the bridge/CMVR). This is necessary to buffer the video, but becomes extremely important if the Internet connection should go down.
Once the data is recorded to local storage, the bridge/CMVR will process the video and analyze it for any motion. If motion is detected, the video will be tagged with object and motion information. The video is then encrypted, and, if there is available bandwidth, the video is transferred to the Wisenet SKY Cloud Data Center for longer-term storage. In the case of the CMVR, the video may be kept locally rather than sent to the Cloud.
Using a CMVR with the Wisenet SKY Cloud VMS provides complete flexibility for storage of audio/video. In this case, the video may be stored locally, in the Cloud, or both. Different retention periods can be set for on-premises (local) and Cloud storage, and these periods can be adjusted for each individual camera. Furthermore, it is possible to transmit low-resolution video to the Cloud and keep high-resolution video local, or vice versa.
All access to both the live and recorded video is obtained via a connection to the Wisenet SKY Cloud VMS using a web browser or mobile application. The video and audio data will then be viewable. All configurations and
settings modifications are performed via this same Cloud connection. If the desired footage has not been transmitted to the Cloud or a live video feed is requested, the Wisenet SKY Cloud Data Center will quickly request the necessary data or feed from the bridge or CMVR. This is considered “on-demand” viewing.
Security is crucial in an environment like this. All data is encrypted from the moment it reaches the bridge/CMVR until it is viewed through the Wisenet SKY Cloud VMS. The data on the bridge/CMVR is encrypted at rest, meaning that if the device is stolen, the data onboard cannot be viewed. The Wisenet SKY Bridges and CMVRs also only have outbound communication with the Wisenet SKY Cloud Data Centers. This means that they do not have any open ports, nor do they require any port forwarding on firewalls. They are inherently safer and more secure because of this.
The Wisenet SKY Cloud VMS encrypts all video, audio, and any other data that is transmitted to and from the Cloud. All data in the Wisenet SKY Cloud Data Centers is encrypted at rest.
The Wisenet SKY Cloud Data Center, although referred to as a single data center, is actually a series of data centers distributed throughout the world. These data centers communicate with each other and maintain connections to Wisenet SKY Bridges and CMVRs to provide functionality. Data is protected through a redundant architecture where customers’ video is actually stored 3 different times, making loss of any video highly unlikely.
Wisenet SKY Bridges and CMVRs are critical components to making the Wisenet SKY Cloud VMS operate. They are the connection between the cameras (and other input devices) and the Wisenet SKY Cloud Data Center.
Without them, no data can get to the Cloud, and no data or video can be seen by the user. We won’t dive into each function performed by the bridges and CMVRs here, however, it is important to understand that the bridge/CMVR receives all the video (and audio) from the cameras and configures and controls IP cameras via the camera’s ONVIF interface.
Bridge/CMVR Security and Maintenance
Bridges and CMVRs only communicate with the Wisenet SKY Cloud Data Center. Because of this, they do not require any inbound open ports or firewall inbound openings. This keeps the data on the bridge/CMVR secure.
The Wisenet SKY Bridges and CMVRs are remotely managed and maintained by Wisenet SKY. The reseller or customer does not need to perform any software, firmware, or security updates. All of this type of maintenance is done automatically by the Wisenet SKY Cloud VMS. When the bridge/CMVR boots, it checks to see if there are any available updates and automatically applies them. This makes for a more secure and more reliable environment.
The Wisenet SKY Bridge and CMVR are available in over 20 different models. Careful consideration needs to be taken to choose the appropriate model for each situation. There are bridges and CMVRs available that can support up to 180 cameras. More cameras at a single location can be supported by using multiple bridges/CMVRs.
The most popular bridge model for new installations is the 304. This is a physically small bridge, supporting up to 15 IP cameras, and is appropriate for remote locations. For retrofit applications using analog cameras, the most popular bridge models are the 310 and 410, which support 8 and 16 BNC (HD-over-coax) cameras, respectively.
The 310 and 410 models are known as Combo Bridges because they support both analog and digital cameras. It is a
1:2 relationship in the number of cameras supported: for every 1 analog input not used, 2 IP cameras can be used. So the 310 supports up to 8 analog or 16 IP cameras, and the 410 supports up to 16 analog or 32 IP cameras. Any combination of analog and IP can be used following the 1:2 rule of 1 analog or 2 IP cameras.
There are a large variety of CMVRs as well. Like the bridges, they are available in combo and digital-only versions. CMVRs are used when it is necessary, whether because of policy, compliance, or customer preference, to keep some or all of the video on-premises, or if there is not enough bandwidth available to transmit all of the recorded video to the Cloud.
The Bridges and CMVRs also have multiple options when it comes to physically mounting them. When server racks are available, we generally recommend rack mountable units, but, for other situations, smaller units that can be mounted in data closets or underneath desks are available.
All bridges and CMVRs include storage. For bridges, however, the storage is intended only as a buffer to hold the video for a short time in case bandwidth is not immediately available to transmit to the Cloud. CMVRs are designed for longer-term on-premises storage. However, the videos stored on the CMVR are still managed, controlled, and viewed from the Wisenet SKY Cloud VMS.
So, even with the CMVR, when the user wants to view the video, the encrypted data is sent through the Cloud to the Wisenet SKY Cloud VMS, allowing the video to be viewed from anywhere with an internet connection. This provides for a consistent user interface and better user experience, keeping it the same regardless of the hardware type (as long as minimum upload bandwidth is available). For a CMVR or bridge, we recommend a minimum of 2 Mbps upload above the preview transmit.
Some bridge and CMVR models have a video output connector and support local display. Using this connector, live video can be displayed on a monitor attached to the bridge or CMVR. This is useful in many situations where a manager wants the live view available at all times, or an overhead display is desired to show that surveillance is in use. Local display, like all items in the Wisenet SKY Cloud VMS, is managed and configured from the Cloud.
For details on current Wisenet SKY Bridge and CMVR models, please check https://www.hanwhasecurity.com/solutions/wisenet-sky/
Bridges and CMVRs are basic computers (similar to a PC or the insides of an NVR or DVR), and are therefore susceptible to hardware failure. This can occur due to failure with the power supply, hard disk, or general electronics. If the bridge or CMVR fails, video recording will typically stop. With a bridge, video that has not been transmitted to the Wisenet SKY Cloud Data Center may be lost, and the bridge will need to be replaced. A CMVR may need to be replaced, or it could be repaired (depending on its size).
Because all the configuration information for the bridge/CMVR is stored in the cloud, replacing a bridge/CMVR is quick and painless. The Wisenet SKY Cloud VMS will push all the configuration information for the bridge/CMVR and cameras to the new device. The only work needed by the technician or customer is to physically replace the bridge/CMVR.
The Wisenet SKY Cloud VMS uses the ONVIF standard to communicate with digital IP cameras. Unfortunately, this does not mean that the system works with all cameras that claim to be ONVIF compliant. ONVIF is only a small part of the complexity of communicating with Digital IP Cameras. The list of supported cameras is located at: https://www.hanwhasecurity.com/wisenet-sky-camera-compatibility-list/
If purchasing new cameras, we recommend using cameras that are listed on our website. If you have existing digital IP cameras that claim to be ONVIF compliant, we can often make them work. Please contact us for support.
The Wisenet SKY Cloud VMS can also support cameras that are manually configured and output RTSP streams. This is an advanced feature so please contact our support team for details on how to configure this for your specific situation.
Some Wisenet SKY customers have attempted to utilize the multi-stream capabilities of cameras to feed two different VMS systems. We strongly advise against this. There is too much complexity and crossover in the communications with the cameras to do this reliably. A camera should only communicate with the Wisenet SKY Cloud VMS.
Today’s digital IP cameras are very complex. They contain a tremendous amount of hardware and software. The software almost always has security issues and serious bugs, so it is common for these cameras to crash and hang. The Wisenet SKY Cloud VMS will automatically do everything it can to restart cameras that crash or fail like this, however, the cheaper cameras tend to crash and fail more often because the testing processes applied to them by the manufacturer are less stringent. If you want a reliable system we recommend choosing quality cameras.
Analog cameras can also be used with the Wisenet SKY Cloud VMS. Analog cameras typically require power from an external source, though. This is different from digital IP cameras that often use power-over-ethernet (POE) and can be powered directly from bridges/CMVRs/switches with POE.
Analog cameras need to be connected to Wisenet SKY Combo Bridges, typically using coaxial cable connections. Other connections are possible, but the most common (and the connectors provided by Wisenet SKY) are coax.
The Wisenet SKY Combo Bridges support both NTSC and PAL. Additionally, the combo bridges have been tested with over 1,000 different analog cameras, with 100% success.
This is a quick overview of the physical and network installation for the Wisenet SKY Cloud VMS. A bridge is used in this example, however, a CMVR is nearly identical.
Internet connection and bandwidth: Each location requires an Internet connection for the Wisenet SKY Cloud VMS to function correctly. The available bandwidth is very important. Higher bandwidth provides faster response for the user, leading to a better experience. For each 1MP HD camera, we recommend about 500 Kbps upload speed. Note that these upload speed bandwidth suggestions compound, so two of those cameras will need 1 Mbps, and so on. Consumer grade bandwidth is acceptable; you do not need “business grade”.
DHCP enabled: The Wisenet SKY Bridge and most cameras will use DHCP IP addresses by default, so it’s best to make sure the modem or router supplied by your Internet provider has DHCP enabled. If you need to implement static IP addresses on either the Wisenet SKY Bridge or the cameras, please see the OPTIONAL section below.
Wisenet SKY Cloud VMS User Manual
Read Next : Wisenet WAVE User Guide
Wisenet SKY Bridge: Connect the Wisenet SKY Bridge to the router or modem through the WAN port on the Bridge. This can be done either through a switch or directly. Make certain that you use the WAN port for this and not the CamLAN port. DO NOT CONNECT THE CAMLAN PORT TO YOUR REGULAR NETWORK – IT IS FOR CAMERAS ONLY!
Connecting the CamLAN port to a router or modem will serve addresses to any devices that are set to DHCP client, exposing them to the internet. When connected to cameras or a switch, the CamLAN does not allow internet connection whatsoever; it is a private network designed just for cameras in order to isolate them from the wide area network (WAN).
After connecting to the internet, connect the power supply to turn on the bridge. After booting up, the bridge will check for updates then download and install them if available.
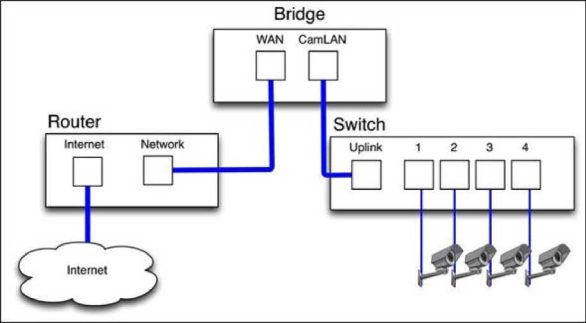
Figure 1 – Wiring Diagram for Wisenet SKY Bridge or CMVR
Page 9 of 92
rev 2.0
2021-07-01
WISeNET SKY
Wisenet SKY Cloud VMS User Manual
Power over Ethernet (PoE) Switch (for Digital Cameras): If there are more cameras than available ports on the bridge (or if your bridge does not support PoE), connect a PoE switch to the CamLAN port of the Wisenet SKY Bridge to supply power to your digital cameras. If you are using analog cameras the switch is not needed. The CamLAN port provides DHCP addresses for the cameras and is non-routable to the WAN. Alternatively, cameras may be connected to the same switch as the WAN port of the bridge. If you are using managed switches be sure to enable multicast.
Cameras: Connect each camera to the bridge, POE switch, or analog BNC connectors and power them up. The Wisenet SKY Quickstart Guide included with the camera has detailed instructions for different camera manufacturers, but, typically, no configuration via the camera’s web interface is needed. If reusing cameras from a previous setup, make sure they are set to factory defaults and that DHCP is enabled. It is best to upgrade the firmware on the cameras to receive the latest fixes and security from the manufacturer.
Log in to your Wisenet SKY Reseller Account and Create a Customer Account: Log in to your Wisenet SKY Reseller Account at https://wisenetsky.com. If your company does not have an account, please contact Wisenet SKY Support (insidesales@hanwha.com).
After logging in you will see your Reseller Dashboard. Create an account for your customer by clicking the Add Account button. After the account has been created, click the “eye” icon next to the customer name to jump into the customer’s account.
Attach the Bridge to Customer Account: Attach the Wisenet SKY Bridge to the customer account by pressing the Add Bridge button on the Dashboard page. Enter the AttachId of the bridge you are installing and give the bridge a name. To follow best practices, choose a naming convention that will make sense to identify the bridge’s location and will be scalable.
Note that a bridge can only be attached to one account at a time; if you have already added the bridge to another account (for testing or evaluation) you need to delete it from the previous account before adding it for the customer.
Also note that a bridge cannot be reused with a different customer. It will need to be returned to Wisenet SKY so that the data can be erased and the hardware recertified. A new bridge is required for each new customer location.
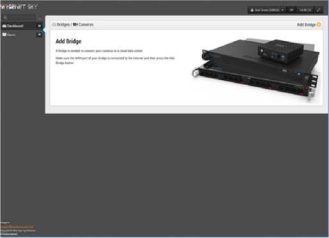
Figure 2 – Add a bridge
Page 10 of 92
rev 2.0
2021-07-01
WISeNET SKY
Wisenet SKY Cloud VMS User Manual
0
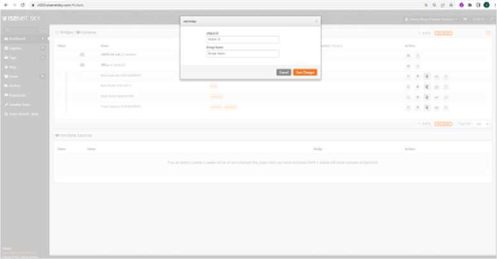
Figure 3 – Attach a Bridge
Add Cameras: The Wisenet SKY Bridge will continually scan for cameras on the network. After attaching a camera to the bridge (whether directly or using a switch), it should appear on the Customer Dashboard as an Available Camera after about 5 minutes. Click the plus sign to attach a camera and start transmitting video.
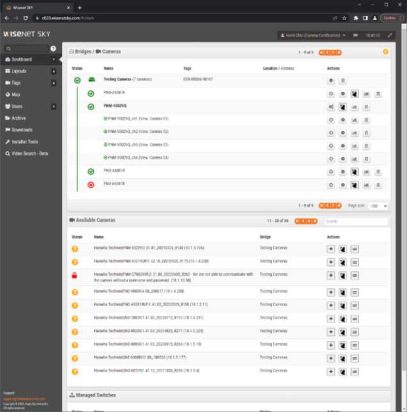
Figure 4 – Add Cameras
Page 11 of 92
rev 2.0
2021-07-01
WISeNET SKY
Wisenet SKY Cloud VMS User Manual
Camera Doesn’t Appear: If no cameras appear after five minutes, power cycle the cameras. Some camera manufacturers only reply to ONVIF commands when the camera is first powered up, so if the bridge is booted after the camera, the camera may never be discovered. To further troubleshoot, connect a laptop to the same network as the cameras and scan to see if the cameras appear.
Note: Some camera manufacturers will default to a static IP address and not DHCP. Verify this using your camera manufacturer’s manuals and/or by checking the cameras’ IP addresses on the network.
Configure Camera Settings: Select the gear icon $ next to the camera name on the Dashboard to adjust the camera settings.
This can also be accessed when using a layout or camera view by clicking the drop-down arrow in the top-right corner of the camera’s preview image (see Figure 7 Camera Action Menu). Enter the appropriate values for the Camera, Retention, and Resolution tabs, in particular. You may have to enter the ONVIF username and password for the cameras if you set them up with one (see optional settings below).
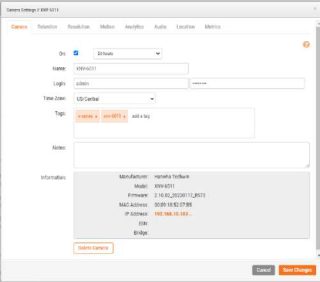
Figure 6 – Camera Settings
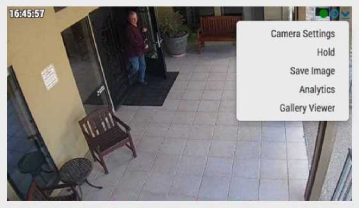
Figure 7 – Camera Action Menu
Page 12 of 92
rev 2.0
2021-07-01
WISeNET SKY Wisenet SKY Cloud VMS User Manual
Optional Bridge and Camera Settings
The settings mentioned above work for most situations. However, there are times when additional settings need to be made.
Camera Web Password: It is strongly recommended that you change the default passwords on your cameras using their web interface. Most cameras use the same password for ONVIF and their web interface so you will need to update the ONVIF username and password in the Wisenet SKY Cloud VMS Camera Settings with the correct password when you change the web password.
Camera ONVIF Passwords: Some cameras may have separate accounts for ONVIF and the web interface. A new ONVIF user may need to be created in the web interface. The ONVIF username and password will need to be updated in Camera Settings.
Bridge Static IP Address: To configure the Wisenet SKY Bridge with a static IP address, you will need to connect a monitor and keyboard to the bridge. You can log in to the Admin Interface with username “admin” and the password is the last 5 digits of the bridge’s serial number. In the Admin Interface, choose “Configure Network”, then “WAN” and fill in all of the fields to set the static IP address.
Camera Static IP Address: You can configure cameras with static IP addresses without requiring any changes in the Wisenet SKY Cloud VMS. Simply make sure the IP addresses you use do not conflict with each other or any other devices on the network. Note that you must set the static address for the camera using the camera’s web interface. If using CamLAN, addresses 10.143.0.2–99 are available to use as static addresses; CamLAN begins serving DHCP addresses at 10.143.0.100.
Cameras on Bridge WAN Port: The Wisenet SKY Bridge will scan the WAN and CamLAN ports for cameras, and cameras found on either network port will appear as “Available Cameras”. The Wisenet SKY Bridge uses multicast to discover ONVIF cameras and multicast should be enabled on any connected switches.
Page 13 of 92
rev 2.0
2021-07-01
WISeNËT SKY
Wisenet SKY Cloud VMS User Manual
The Web Based user interface for Wisenet SKY Cloud VMS is available at the following url: https://wisenetsky.com
Enter your email address and password to log in to your account. If you do not know your login credentials, check your email account. When your account was created by a Wisenet SKY admin or a Reseller, you should have received an email with a link to set your password. If you did not receive this email, please contact Support.
Once you have your account you can add Bridges and cameras to it.
Bridges and Cameras must be added to your account before you can record video using the Wisenet SKY Cloud VMS. Bridges are added first, then cameras can be added to each bridge.
Adding a Bridge
When a Bridge or CMVR is first used it must be connected to your Wisenet SKY Account before you can add cameras, record video, or perform any functions. From the Dashboard, click the yellow plus sign button in the top right to add the bridge to your Account. You will need the AttachID, which is on the Quickstart Guide packaged with the bridge.

Figure 8 – Add a Bridge
Enter the AttachID and a name for the bridge. The AttachID can be typed with or without the dashes. The bridge name is for your convenience; We recommend using a bridge name that denotes its location and follows a standard that will allow multiple bridges to be added using the same naming convention. Once the bridge is added you will be able to add cameras and start the recording process.

Figure 9 – Attach a Bridge
Page 14 of 92
rev 2.0
2021-07-01
WISeNET SKY
Wisenet SKY Cloud VMS User Manual
Once a bridge has been added to an account it will begin to scan the network for compatible cameras through both the WAN and CAMLAN ports of the bridge. Wisenet SKY recommends only connecting cameras to the CAMLAN side (in more complex network environments, it may be necessary to have cameras on the WAN network, but this can expose camera IP addresses). When cameras are found, they will appear in the Available Cameras section.
Hanwha TechWin|LNO-6022R| 1.41.00 J 0190909_R102 (192.168.30.31)
HanwhaTechwin|PND-A&081 RF, PHD-A6081RV,PN0-A6O81R, PNV-A6081R|2.11.01.2021 WKRI 54 (192.158.30.22)
HANWHA FAR-Bradford
S’ Installer Tools
Q Video Search – Beta
Figure 10 – Add a Camera
Camera discovery can take up to five minutes. If attached cameras do not appear in the Available Cameras list after 5 minutes, try power cycling them. Some cameras, such as those made by Samsung, will only make an ONVIF announcement upon their startup. If the bridge is booted after a camera that is programmed by the manufacturer this way, the camera will need to be power cycled to be discovered.
Add an available camera by clicking on the green plus button to the right of the camera’s name. When adding a new camera, the camera will be configured and a preview of the camera will appear. The preview could take up to 1 minute or longer to appear as some cameras are very slow to configure and set up.
The preview image appears so that you can aim the camera. It is also recommended to go ahead and name the camera and configure the settings now. You should choose a camera naming convention that will make the camera easy to recognize and will be scalable for a growing environment.
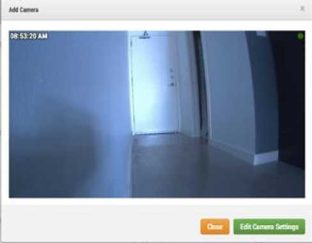
Figure 11 – New Camera Field of View
Page 15 of 92
rev 2.0
2021-07-01

WISeNËT SKY
Wisenet SKY Cloud VMS User Manual
A layout is a configurable screen that allows you to customize the display size and position of the camera preview video. Layouts remain the same across the web interface and the mobile devices. You can control which layouts which users get access to.
Creating a New Layout
Choose “Layouts” from the navigation menu on the left. Thcn select “New Layout” from the drop down menu at the top of the screen.
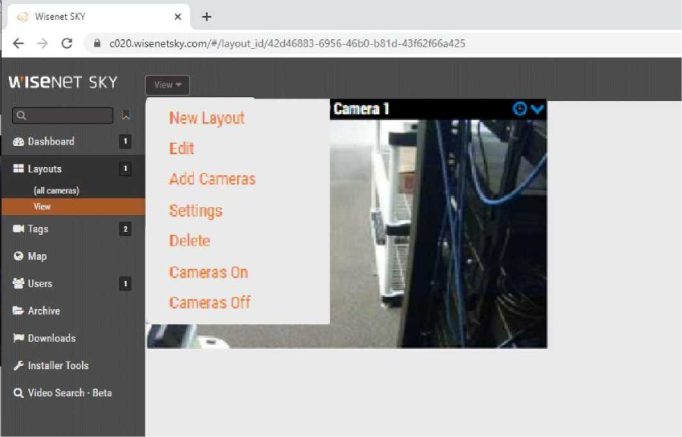
Figure 12 – Layout Dropdown Menu for New Camera
You will automatically be prompted to “Add Cameras” as shown in Figure 14 – All cameras appear in the Add Camera to Layout screen. You can filter the cameras that are displayed by typing in keywords based on the camera name or camera tags in the filter box
Page 16 of 92
rev 2.0
2021-07-01
WISeNET SKY
Wisenet SKY Cloud VMS User Manual
Show al camcrar
![]()
Figure 13 – Add Cameras
Layout Administration And Editing
To edit, administer, or add cameras to an existing layout choose the layout you want to update from the main menu tree and then activate the dropdown menu at the top of the screen.
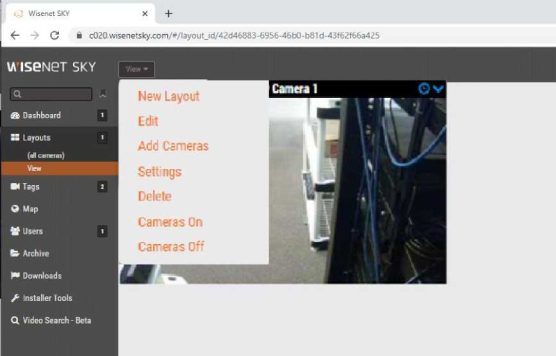
Figure 13 – Layout Menu
Page 17 of 92
rev 2.0
2021-07-01
WISeNET SKY
Wisenet SKY Cloud VMS User Manual
New Layout: Creates a new layout
Edit: You can adjust the size of each preview window and remove previews from your layout
Add Camera: You can add cameras to any layout by selecting Layouts on the main menu tree. Click the name of the current layout as shown in Figure 13 – Layout Menu in order to see the dropdown menu for layouts.
Settings: Using the Layout Menu, select “Settings.” A new dialog will appear letting you rename the layout, choose aspect ratios for the cameras, along with the max number of cameras per row and the option to show the camera name above each preview window.
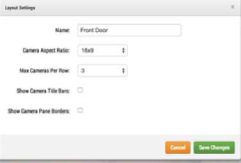
Figure 14 – Layout Settings
Delete: You may delete a layout by selecting the “Delete Layout” option from the Layout menu. You will be prompted to confirm this before the layout is deleted
Camera On: Turn on all cameras in that layout
Camera Off: Turn off all cameras in that layout
Dynamic Filtering enables you to find and watch cameras across many locations and display those cameras in once consolidated view. By typing the name, tag, location, or address will display filtered camera results immediately in any screen. You can then create a layout or save the filter for quick retrieval.
From any screen, enter text to filter results in real time.
Page 18 of 92
rev 2.0
2021-07-01
WISeNET SKY
Wisenet SKY Cloud VMS User Manual
^- -> C Ä c020.wi5enetsky.com/#/layout_id/42442b6a-45c9-4077-b1c4-49da8e7712c5
Enter Filter Text
V\ IS6N6T SKY
► Q
5th Floor Fneght Elevator
A Dashboard i
|
SS Layouts (all cameras) |
2 |
|
5th Root |
|
|
View |
|
|
W Tags |
2 |
|
Q Map |
|
|
^ Users |
1 |
|
b Archive |
|
|
)■ Downloads |
|
|
S’ Installer Tools |
|
Figure 15 – Dynamic Filter Text Entry
The name, tag, address, and location are used to filter. The results are displayed as text is entered and remain persistent until the text is cleared. Clearing the text can be done by pressing “Esc” on the keyboard, or by clicking the “x” which appears when text is entered.
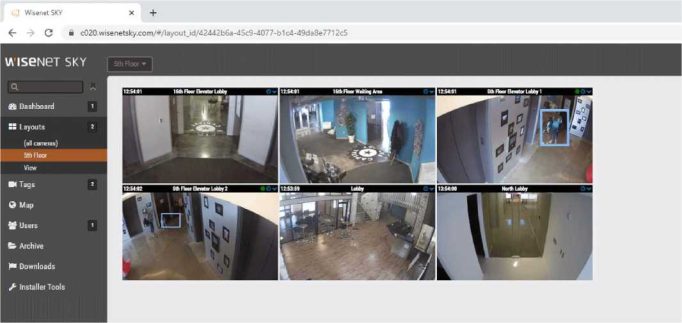
Figure 15 – Example Filter in Layouts
Page 19 of 92
rev 2.0
2021-07-01
WISeNET SKY
Wisenet SKY Cloud VMS User Manual
The results can be saved by clicking the plus button O to the right of the text entry bar.
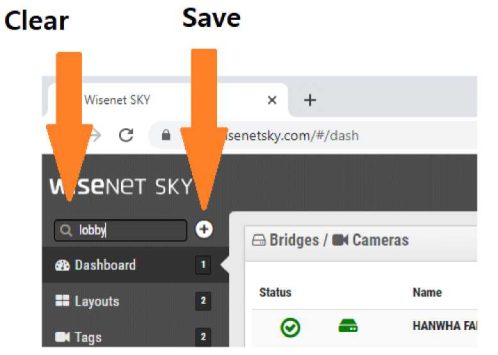
Figure 16 – Clear and Save
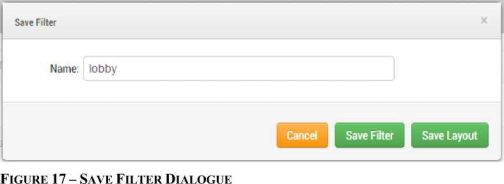
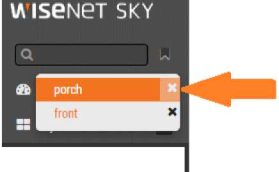
The text entered to perform the filter becomes the suggested name when you press the button to save. The options to save are as a filter or as a layout. This makes creating layouts very efficient. Saved filters are accessed by clicking the bookmark button to the right of the text entry.
Page 20 of 92
rev 2.0
2021-07-01
WISeNET SKY
Wisenet SKY Cloud VMS User Manual
Bookmark Button
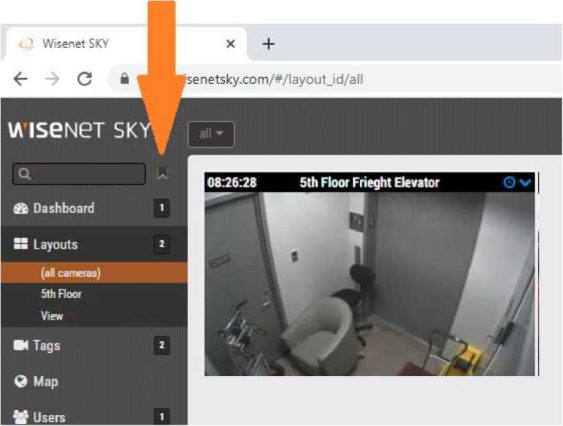
Figure 17 – Save Filter Button
Recalling a filter does not offer the option to save unless the filter text is changed.
Page 21 of 92
rev 2.0
2021-07-01
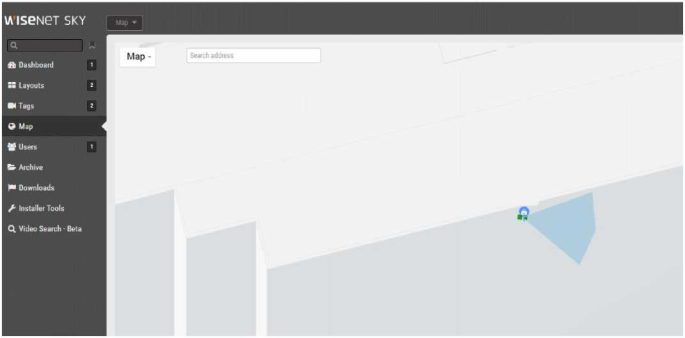
Figure 19 – Example of Zip Code Filter in Map View
Page 22 of 92
rev 2.0
2021-07-01
WISeNET SKY
Wisenet SKY Cloud VMS User Manual
There are a few differences between a saved filter and a layout. The main difference is that a layout is fixed. It will not change unless it is edited (by adding or removing cameras). When editing a layout, the order and size of the previews can be set. The saved filter is dynamic.
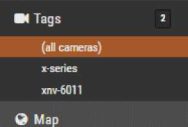
For example, if you have a filter that uses a zip code, recalling that filter will show the results of any new cameras that are added within that zip code. When viewing filter results in layouts or tags view, the order and size of the previews cannot be changed. They are shown in alphabetical order and sized evenly just as viewing tags. A filter can be deleted by clicking the “x” to the right of the filter name.
< ■ Wisenet SKY
<- -^ C ® cOZO.wi
& Archive
I* Downloads
Figure 20 – Example of Delete Filter
Leaving blank space between words treats the space as ‘or’ so that a text entry of ‘lobby parking‘ would show any cameras that had ‘lobby‘ or ‘parking‘ as part of any camera metadata.
lobby parking
Figure 21 – Example of an OR
Page 23 of 92
rev 2.0
2021-07-01
WISeNËT SKY
Wisenet SKY Cloud VMS User Manual
Putting words in quotes will use the space between as ‘and’ so that ‘“parking rear”‘ would only show cameras that had both “parking” and “rear” so that a camera with name or tag “rear parking” would be shown but a camera named “rear building” or “front parking” would not be seen.
![]()
Figure 22 – Example of an AND
Dashboard Update:
Cameras are grouped together by the bridge they are attached to. The bridge is shown first followed by the cameras underneath it. The bridge name can be used to quickly perform a filter to see the previews of all cameras on a bridge.

Figure 23 Filter Example – Dashboard Bridge / Cameras
Location
Set the location of a bridge by opening bridge settings and selecting the location tab. Information entered here is used by dynamic filtering. If cameras are not added to a map, they may still be filtered and viewed using location information from the bridge on the dashboard, and in layouts, tags and notifications views.
Page 24 of 92
rev 2.0
2021-07-01
WISeNET SKY
Wisenet SKY Cloud VMS User Manual
Bridge Settings # HANWHA FAE – Bradford
Bridge Location Metrics Local Display Notes

Cancel I Save Changes
Figure 24 – Bridge Settings / Location
You have the ability to configure common settings across all added cameras. Such settings include retention, resolution, bandwidth, bit rate, motion settings and alerts. Specific options will change based on the camera.
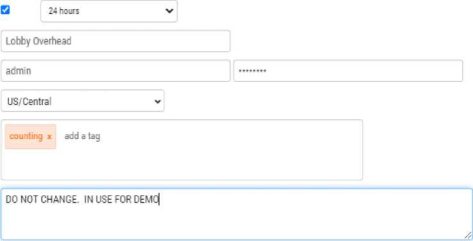
ON: If the checkbox is checked the camera will be on and record during the specified hours. If the checkbox is not check the camera will be off all the time and will not record anything ever.
24 Hours/Work Hours/Non-Work Hours/Custom Hours: If the ON checkbox is checked the camera will only operate and record during the selected hours. If 24 Hours is selected the camera will operate and record all the time. If Work Hours is specified the camera will only operate during work hours. The Work Hours can be changed in the Account Settings.
Name: The name of the camera. You can give it any name you would like. It will be shown in the Dashboard, Alerts, and in the Layout displays. We recommend descriptive long names.
Login: The username and password used to access the camera. For most cameras this is the same Username/Password as used to access the web interface. Not needed or shown for analog cameras. The password is not needed for cameras where the password is the default or a password is not needed for ONVIF access. If you have put your passwords into the Account->Camera settings (this list of
Page 25 of 92
rev 2.0
2021-07-01
WISeNËT SKY
Wisenet SKY Cloud VMS User Manual
passwords), you will not need to enter the passwords again here. This is used if you have a lot of cameras and you set the same password on them.
Time Zone: Set this to the time zone where the camera is located.
Tags: Tags are used to create groupings of cameras. You can have as many Tags as you want. Cameras with the same Tag will appear under the Cameras display. Tags are used to create easy groupings of your cameras.
Notes: Notes is an area for the installer or owner to record items about this camera. Sometimes used when the configuration of the camera is complex or other items. You can enter anything you want here to be reminded.
Information: Displays the make, model, firmware, and other information about the camera. Key item displayed is the LOCAL IP address that can be useful during the installation process.
Camera Settings // XNV-6011
Camera
Retention
Resolution
Analytics
Motion
Metrics
On:
Name:
Login:
Time Zone:
Tags:
Notes:
Audio Location
Information:
|
Manufacturer: |
Hanwha Techwin |
|
Model: |
XNV-6011 |
|
Firmware: |
2.10.02_20220117_R573 |
|
MAC Address: |
00:09:18:52:07:65 |
|
IP Address: |
192.168.10.183 . |
|
ESN: |
100a3ce7 |
|
Bridge: |
HANWHA FAE – Bradford (ESN: 100e405f) |
Delete Camera
![]()
Figure 25 – Camera Settings
Page 26 of 92
rev 2.0
2021-07-01
WISeNET SKY
Wisenet SKY Cloud VMS User Manual
Cloud Retention: Sets the number of days that recorded video will be kept in the cloud. Note that changing this value may affect billing.
Local Retention: On CMVR’s video can be kept locally. This will set how long the CMVR will attempt to keep video locally. If the CMVR runs out of disk space it will delete old video to make room for the new — even if it must delete video within the retention period.

Figure 26 – Camera Retention Settings
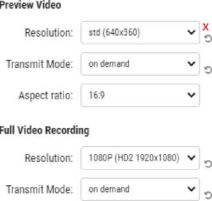
The Wisenet SKY Cloud VMS utilizes 2 streams of video. The first is Preview Video and the second is the Full Video. Normally the Preview video is recorded continuously and the Full Video is recorded only on motion (events).
Resolution: Sets the resolution of the preview video that will be recorded. We recommend CIF resolution.
Quality: Controls the amount of compression on the preview video. Low Quality will reduce the bandwidth the most.
Update: Sets the frames per second for the preview video. We recommend 1 frame per second.
Transmit Mode: Controls when the preview video is sent to the cloud data center. Always means that the Preview Video is immediately sent to the cloud. Event means the Preview Video is sent to the cloud when motion or other events occur. Background means that the Preview Video is only sent when Bandwidth is available on the schedule for the Bridge. On Demand means that the Preview Video is only sent to the cloud when someone is watching it. The recommended value is ALWAYS.
Max Bandwidth: Set the maximum bandwidth for the Bridge to use when sending the Preview Video to the cloud. The Bridge will not exceed this bandwidth for transmission. A low value will cause the previews to appear slow when viewing them in a layout. You should not set the sum of your Preview Video max bandwidths greater than 50% of your total available bandwidth.
Page 27 of 92
rev 2.0
2021-07-01
WISeNET SKY
Wisenet SKY Cloud VMS User Manual
Full Video Recording
Resolution: Resolution that will be used for full frame rate H.264 recording.
Quality: Controls the compression rate on the H.264 recording. We recommend Low or Medium.
Bit Rate: Also controls the compression rate of the video recording. The setting depends greatly on the camera. We recommend leaving this at its default value.
Transmit Mode: Controls when the Full Video is sent to the cloud data center. Always means that the Video is immediately sent to the cloud. This mode requires the largest upload bandwidth. We do not recommend it. Event means the Video is sent to the cloud when motion or other events occur. Once again, bandwidth must be available to use this mode. Background means that the Video is only sent when Bandwidth is available on the schedule for the Bridge. On Demand means that the Video is only sent to the cloud when someone is watching it or requesting it. The recommended value is Background.
Record When: Sets when the Full Video is recorded. Normally recording is only done when there is motion, but you can also select to do full recording all the time. If you set to Always, you will need at minimum double the amount of upload bandwidth. We recommend EVENT. Keep in mind the preview video is always recorded. The most efficient use of bandwidth is to use EVENT. This also helps to find video of interest more quickly.
Camera Settings //XNV-6011
Camera Retention Resolution Motion Analytics Audio Location Metrics
Video Stretching:
Quality:
default v x
Q
Quality:
Record When:

Estimated preview video for this camera (85kbps)
Update Rate: 1 s
Bit Rate: 1536 kb
Cancel I Save Changes
Figure 27 – Camera Resolution Settings
Page 28 of 92
rev 2.0
2021-07-01
WISeNET SKY
Wisenet SKY Cloud VMS User Manual
Camera Settings – Motion Detection
The Wisenet SKY Cloud VMS includes integrated motion detection system. This system can be adjusted in numerous ways and can have as many motion regions as your need.
Master Motion Sensitivity: This is the default level of motion sensitivity that is applied to the entire image. If you have created a region on the image the regions motions sensitivity can override the Master Motion Sensitivity for that region.
Master Motion Object Size: The motion detection system looks for objects moving through the image. The size selection can be small, medium or large. Large objects will be approximately 10% of the full image size. Small objects will take up about 1% of the full image.
Note: You can see the results of changes to these settings by clicking “apply.” Note that the red motion boxes that appear do not reflect object size. In order to see if the object size is triggering recording, look for the green circle that indicates “recording” in the upper right corner of the video.
Regions/Alerts: You can create an unlimited number of regions and alerts. Press the New Region button to create a new region.
Region Name: The name of the region you are going to edit or create.
Disable Motion: Checking this box will disable all motion detection in the region. This is used to block out trees or extraneous areas from causing unnecessary recording.
Region Sensitivity: The Master Sensitivity and the Master Object Size can be overridden for the region. The values specified for the region will be used instead of the Master values for any objects that are in the region.
Alert Enable: Check the box to turn on alerts for any motion in the region. Alerts can have a specified period of time when they are active. For example you could have motion alerts only when the office is closed or at night.
Alert When: This sets the time to trigger the alert for this region. The default is “24 hours” but choices are “Work hours,” “Non-Work hours,” and “custom.”
Re-arm: Sets the time when an alert will re-arm and be ready to trigger again.
Immediate: The alert is re-armed immediately. This creates the highest number of alerts.
After x minutes: The alert will not be re-armed for the number of minutes entered. For example, checking “After” and entering “15” will cause the alert to wait 15 minutes before another alert is triggered no matter whether motion is detected in the region or not.
After quiet for x minutes: The alert will not be re-armed until there is no motion detected in the region for the number of minutes entered. For example, checking “After quiet for” and entering “5” will cause the alert to re-arm only after five consecutive minutes without motion in the region. This helps to limit the number of alerts.
Max Per Hour: Will set the maximum number of alerts that can be triggered in an hour regardless of how many times motion is found in the region. This helps to limit the number of alerts.
Alert Who: This indicates the users of the system that should receive the alert for this region.
Page 29 of 92
rev 2.0
2021-07-01
WISeNET SKY
Wisenet SKY Cloud VMS User Manual
Alert Mode: The VMS has an alert mode. The mode is specified in the Account Settings. The Alerts will only be created when the corresponding Alert Mode is active. This is generally used for applications where you would like one set of alerts normally, but another set of alerts at a different time. For example you might want certain alerts active during normal business days and have a different mode of alerts for holidays.
Alert Level: the level of the alert can be specified here. An alert has a level. The users can specify that they only want to receive alerts that are HIGH, LOW or both. This allows some users of the system to limit the alerts that they receive.
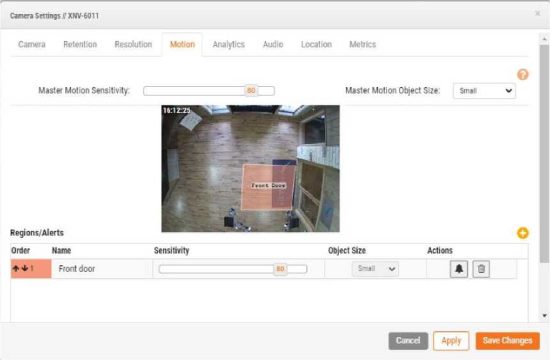
Figure 28 – Motion Detection Settings
There are analytics for counting, line crossing, intrusion and loitering. As with motion detection, analytics can be added to any camera including analog. Each analytic provides counts and graphs for detailed analysis. Alerts can be generated for line crossing, and intrusion.
Considerations for Analytics
Analytics use considerable resources on the bridge. At this time, only five cameras per bridge should have analytics enabled. Cameras should be capable of 16 frames per second for the MJPEG preview video which is used for Analytics. 16 frames per second is the most accurate. 12 fps is ok but 8 fps does not give adequate results.
Page 30 of 92
rev 2.0
2021-07-01
WISeNËT SKY
Wisenet SKY Cloud VMS User Manual
To enable Analytics, go to camera settings and choose the Analytics tab. Each analytic may be enabled separately and is billable per camera. A new tab will appear for each when clicking the checkbox.
Car*» J Semagt ? JCNV Ml I
Camera Retention
Cancel I Save Changes
Figure 29 – Enable Camera Analytic
Analytics – Counting
Object Sensitivity: By moving the slider to the left or right you can decrease or increase the sensitivity of object detection in the scene. The default sensitivity is 80 from a max sensitivity of 100.
Max Object Size: Set Max Object by clicking on the value or the edit button d and adjusting the outer box that appears in the preview area.
Min Object Size: Set Min Object by clicking on the value or
appears in the preview area.
the edit button z and adjusting the inner box that
Tip: You can deactivate the Max Min Object Size control by clicking on the edit button -‘
again.
Name: click on the name to edit.
Direction: click the arrow to adjust the direction in 90 degree increments or you can click the compass-point arrows in the preview window to select the direction.
Page 31 of 92
rev 2.0
2021-07-01
WISeNET SKY
Wisenet SKY Cloud VMS User Manual
Pencil: click to edit the line in the preview window.
Trash Can: click to delete the line.
Cancel: click to ignore any changes since the last changes were saved (or applied) and to exit the Camera Settings dialogue.
Camera Settings IIXNV-6011
Camera Retention Resolution Motion Analytics Audio Location Metrics
Enable Counting
Object Detection Settings Z
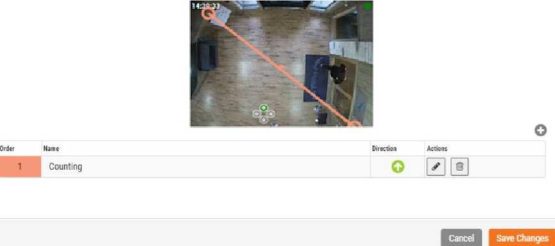
Figure 30 – Configure Count Analytics
Analytics – Line Crossing
Object Sensitivity: By moving the slider to the left or right you can decrease or increase the sensitivity of object detection in the scene. The default sensitivity is 80 from a max sensitivity of 100.
Max Object Size: Set Max Object by clicking on the value or the edit button < and adjusting the outer box that appears in the preview area.
Page 32 of 92
rev 2.0
2021-07-01
WISeNET SKY
Wisenet SKY Cloud VMS User Manual
Min Object Size: Set Min Object by clicking on the value or the edit button ” and adjusting the inner box that appears in the preview area.
Tip: You can deactivate the Max Min Object Size control by clicking on the edit button -‘ again.
Name: click on the name to edit.
Direction: click the arrow to adjust the direction in 90 degree increments or you can click the compass-point arrows in the preview window to select the direction.
Pencil: click to edit the line in the preview window.
Trash Can: click to delete the line.
Cancel: click to ignore any changes since the last changes were saved (or applied) and to exit the Camera Settings dialogue.
Alert Enable: Check the box to turn on alerts for any motion in the region. Alerts can have a specified period of time when they are active. For example you could have motion alerts only when the office is closed or at night.
Alert When: This sets the time to trigger the alert for this region. The default is “24 hours” but choices are “Work hours,” “Non-Work hours,” and “custom.”
Re-arm: Sets the time when an alert will re-arm and be ready to trigger again.
Immediate: The alert is re-armed immediately. This creates the highest number of alerts.
After x minutes: The alert will not be re-armed for the number of minutes entered. For example, checking “After” and entering “15” will cause the alert to wait 15 minutes before another alert is triggered no matter whether motion is detected in the region or not.
After quiet for x minutes: The alert will not be re-armed until there is no motion detected in the region for the number of minutes entered. For example, checking “After quiet for” and entering “5” will cause the alert to rearm only after five consecutive minutes without motion in the region. This helps to limit the number of alerts.
Max Per Hour: Will set the maximum number of alerts that can be triggered in an hour regardless of how many times motion is found in the region. This helps to limit the number of alerts.
Alert Who: This indicates the users of the system that should receive the alert for this region.
Alert Mode: The VMS has an alert mode. The mode is specified in the Account Settings. The Alerts will only be created when the corresponding Alert Mode is active. This is generally used for applications where you would like one set of alerts normally, but another set of alerts at a different time. For example you might want certain alerts active during normal business days and have a different mode of alerts for holidays.
Alert Level: the level of the alert can be specified here. An alert has a level. The users can specify that they only want to receive alerts that are HIGH, LOW or both. This allows some users of the system to limit the alerts that they receive.
Page 33 of 92
rev 2.0
2021-07-01
WISeNET SKY
Wisenet SKY Cloud VMS User Manual
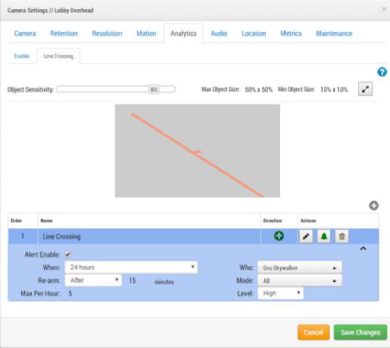
Figure 31 – Configure Line Crossing Analytics
Analytics – Intrusion Detection
Object Sensitivity: By moving the slider to the left or right you can decrease or increase the sensitivity of object detection in the scene. The default sensitivity is 80 from a max sensitivity of 100.
Max Object Size: Set Max Object by clicking on the value or the edit button ^1 and adjusting the outer box that appears in the preview area.
Min Object Size: Set Min Object by clicking on the value or the edit button < and adjusting the inner box that appears in the preview area.
Tip: You can deactivate the Max Min Object Size control by clicking on the edit button < again.
Name: click on the name to edit.
Direction: click the arrow to adjust the direction in 90 degree increments or you can click the compass-point arrows in the preview window to select the direction.
Pencil: click to edit the line in the preview window.
Trash Can: click to delete the line.
Cancel: click to ignore any changes since the last changes were saved (or applied) and to exit the Camera Settings dialogue.
Page 34 of 92
rev 2.0
2021-07-01
WISeNET SKY
Wisenet SKY Cloud VMS User Manual
Alert Enable: Check the box to turn on alerts for any motion in the region. Alerts can have a specified period of time when they are active. For example you could have motion alerts only when the office is closed or at night.
Alert When: This sets the time to trigger the alert for this region. The default is “24 hours” but choices are “Work hours,” “Non-Work hours,” and “custom.”
Re-arm: Sets the time when an alert will re-arm and be ready to trigger again.
Immediate: The alert is re-armed immediately. This creates the highest number of alerts.
After x minutes: The alert will not be re-armed for the number of minutes entered. For example, checking “After” and entering “15” will cause the alert to wait 15 minutes before another alert is triggered no matter whether motion is detected in the region or not.
After quiet for x minutes: The alert will not be re-armed until there is no motion detected in the region for the number of minutes entered. For example, checking “After quiet for” and entering “5” will cause the alert to rearm only after five consecutive minutes without motion in the region. This helps to limit the number of alerts.
Max Per Hour: Will set the maximum number of alerts that can be triggered in an hour regardless of how many times motion is found in the region. This helps to limit the number of alerts.
Alert Who: This indicates the users of the system that should receive the alert for this region.
Alert Mode: The VMS has an alert mode. The mode is specified in the Account Settings. The Alerts will only be created when the corresponding Alert Mode is active. This is generally used for applications where you would like one set of alerts normally, but another set of alerts at a different time. For example you might want certain alerts active during normal business days and have a different mode of alerts for holidays.
Alert Level: the level of the alert can be specified here. An alert has a level. The users can specify that they only want to receive alerts that are HIGH, LOW or both. This allows some users of the system to limit the alerts that they receive.
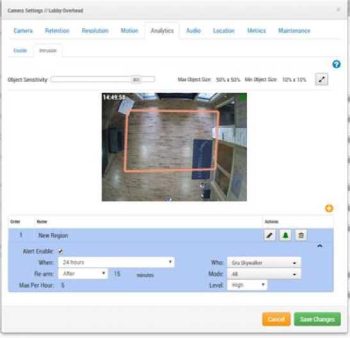
Figure 32 – Configure Intrusion Analytics
Page 35 of 92
rev 2.0
2021-07-01
WISeNET SKY
Wisenet SKY Cloud VMS User Manual
Analytics – Loitering Detection
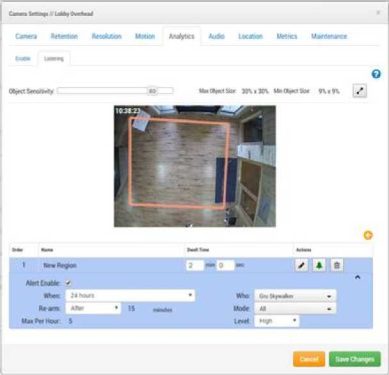
Figure 33 –ANALYTICS Loitering Configure and Alert Screen
Object Sensitivity – By moving the slider to the left or right you can decrease or increase the sensitivity of object detection in the scene. The default sensitivity is 80 from a max sensitivity of 100.
Max Object Size – Set Max Object by clicking on the value or the edit button -‘ and adjusting the outer box that appears in the preview area.
Min Object Size – Set Min Object by clicking on the value or the edit button -‘ and adjusting the inner box that appears in the preview area.
Tip: You can deactivate the Max Min Object Size control by clicking on the edit button -‘ again.
Name – click on the name to edit.
Dwell Time – The amount of time an object must be before the analytic is triggered.
Pencil -click to edit the line in the preview window.
Trash Can – click to delete the line.
Cancel – click to ignore any changes since the last changes were saved (or applied) and to exit the Camera Settings dialogue.
Page 36 of 92
rev 2.0
2021-07-01
WISeNET SKY
Wisenet SKY Cloud VMS User Manual
Alert Enable: Check the box to turn on alerts for any motion in the region. Alerts can have a specified period of time when they are active. For example you could have motion alerts only when the office is closed or at night.
Alert When: This sets the time to trigger the alert for this region. The default is “24 hours” but choices are “Work hours,” “Non-Work hours,” and “custom.”
Re-arm: Sets the time when an alert will re-arm and be ready to trigger again.
Immediate: The alert is re-armed immediately. This creates the highest number of alerts.
After x minutes: The alert will not be re-armed for the number of minutes entered. For example, checking “After” and entering “15” will cause the alert to wait 15 minutes before another alert is triggered no matter whether motion is detected in the region or not.
After quiet for x minutes: The alert will not be re-armed until there is no motion detected in the region for the number of minutes entered. For example, checking “After quiet for” and entering “5” will cause the alert to rearm only after five consecutive minutes without motion in the region. This helps to limit the number of alerts.
Max Per Hour: Will set the maximum number of alerts that can be triggered in an hour regardless of how many times motion is found in the region. This helps to limit the number of alerts.
Alert Who: This indicates the users of the system that should receive the alert for this region.
Alert Mode: The VMS has an alert mode. The mode is specified in the Account Settings. The Alerts will only be created when the corresponding Alert Mode is active. This is generally used for applications where you would like one set of alerts normally, but another set of alerts at a different time. For example you might want certain alerts active during normal business days and have a different mode of alerts for holidays.
Alert Level: the level of the alert can be specified here. An alert has a level. The users can specify that they only want to receive alerts that are HIGH, LOW or both. This allows some users of the system to limit the alerts that they receive.
Audio Enabled: Enables audio recording if the camera is capable.
Copy Audio To: Enables audio to be copied from one camera to other cameras attached to the same bridge. Select the cameras from the drop down list and Save Changes. The audio from this camera will be copied to the cameras selected during full video recording.
Page 37 of 92
rev 2.0
2021-07-01
WISeNET SKY
Wisenet SKY Cloud VMS User Manual
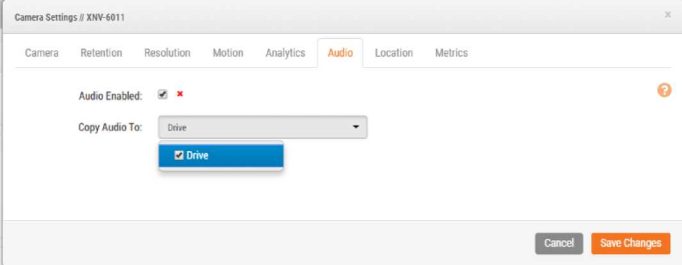
Figure 34 – Audio Recording Settings
The address and latitude longitude information is used when placing the camera on the map. You only need to enter this information if you are going to utilize the map. The data here can be edited graphically using the Map interface. It can also be entered using our Mobile application if you are located at the camera.
Street Address: Address where the camera is located
Latitude/Longitude: The location of the camera
Azimuth: The direction the camera is pointing
Range: The approximate distance the camera can “see”.
Floor: If in a building the floor the camera is located on. You may change floors for the camera on a map by changing the number here.
To delete a camera from the map, delete all entered text on this tab and save the changes.
Page 38 of 92
rev 2.0
2021-07-01
WISeNET SKY
Wisenet SKY Cloud VMS User Manual
Camera Settings I! XNV-6011
Camera Retention Resolution Motion Analytics Audio Location Metrics

Cancel I Save Changes
Figure 35 – Camera Location Information
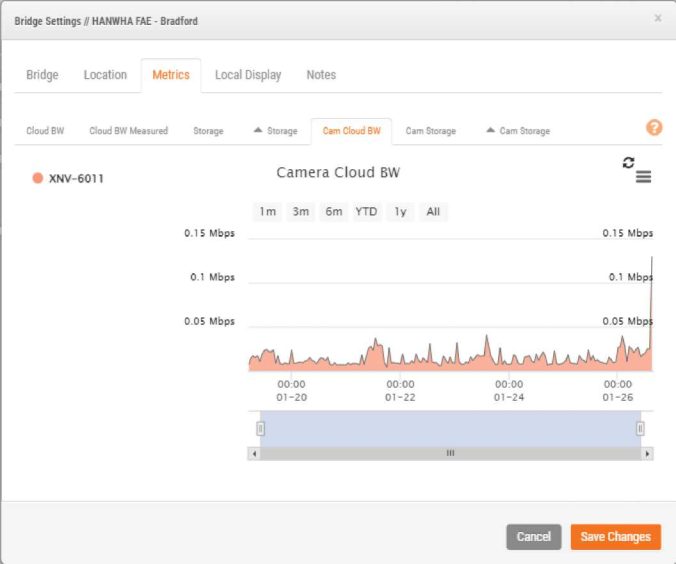
Cloud Bandwidth: A graph of the bandwidth used to transmit to the cloud data center for this camera.
Page 39 of 92
rev 2.0
2021-07-01
WISeNET SKY
Wisenet SKY Cloud VMS User Manual
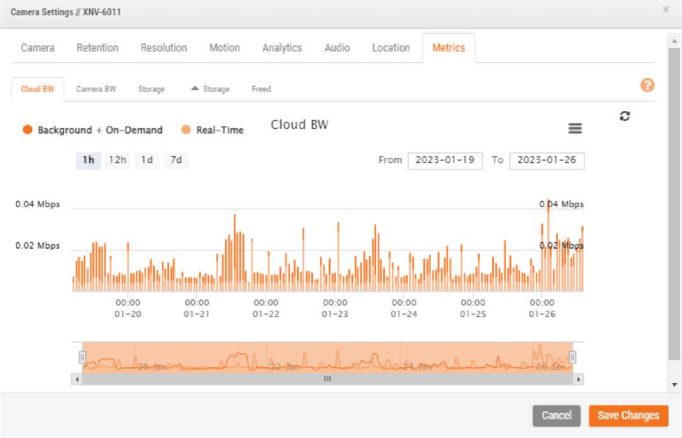
Figure 36 – Cloud Bandwidth Utilization
Page 40 of 92
rev 2.0
2021-07-01
WISeNET SKY
Wisenet SKY Cloud VMS User Manual
Camera Bandwidth: Bandwidth used to transmit data to the bridge
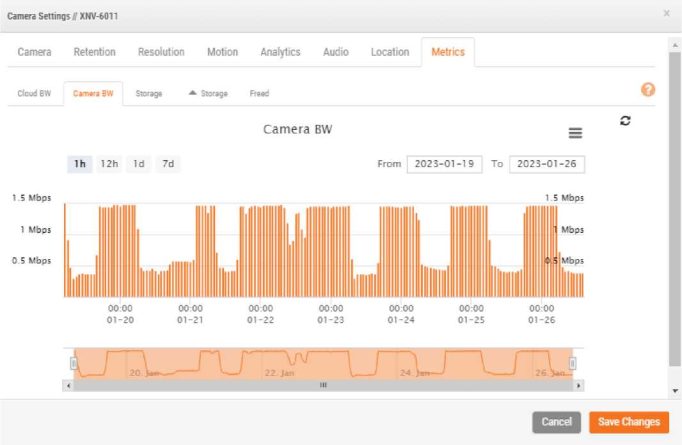
Figure 37 – Cloud Bandwidth Utilization
Page 41 of 92
rev 2.0
2021-07-01
WISeNËT SKY
Wisenet SKY Cloud VMS User Manual
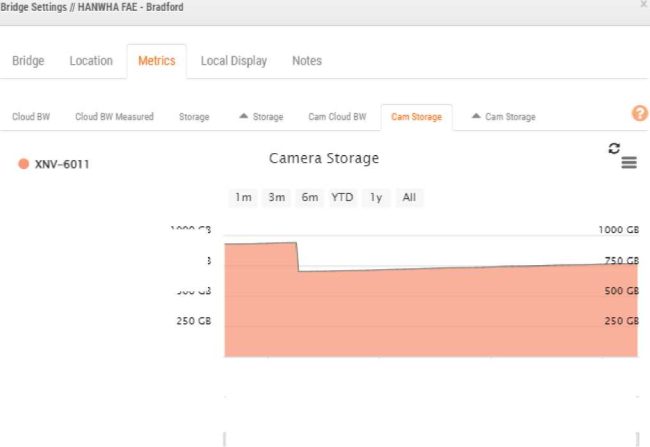
Data Storage: Total storage used on the bridge
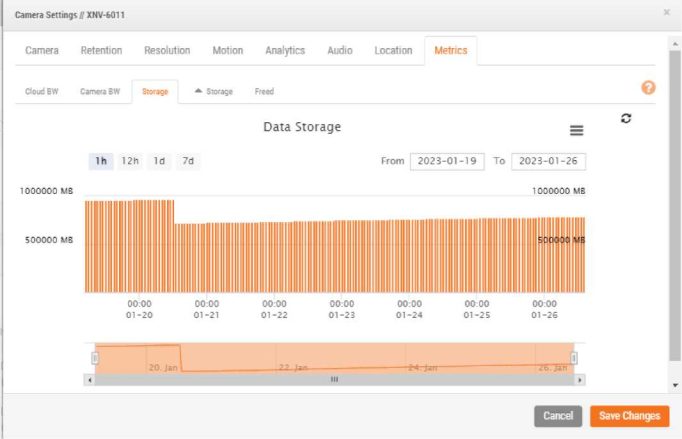
Figure 38 – Cloud Storage Utilization
Page 42 of 92
rev 2.0
2021-07-01
WISeNET SKY
Wisenet SKY Cloud VMS User Manual
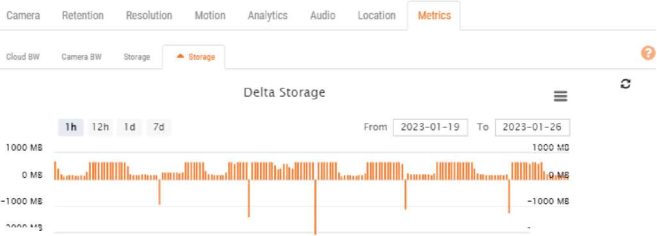
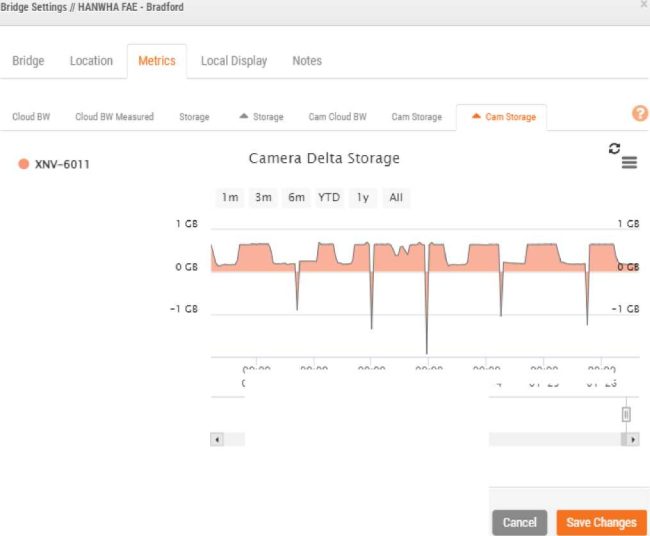
Delta Storage A graph of data stored and freed (also denotes purge within retention) from the bridge
Camera Settings # XNV-6011
1000 MB
-2000 MB
-2000 MB
00:00 00:00
01-20 01-21
00:00 00:00
01-22 01-23
00:00 00:00 00:00
01-24 01-25 01-26
![]()
Cancel I Save Changes
Figure 39 – Cloud Storage Delta
Page 43 of 92
rev 2.0
2021-07-01
WISeNET SKY
Wisenet SKY Cloud VMS User Manual
Camera Settings // CF1 Green Room (2MP)
Camera Retention Resolution Motion Analytics Audio Location Metrics Maintenance
This camera is on a supported switch and can be power cycled using the managed switch CF1 EEN 24 port PoE – 8th floor ■>rt1).
Power Cycle Camera
Cancel I Save Changes
Figure 40 – Maintenance
Similar to Camera Settings, you can access the Bridge Settings by clicking gear icon under actions for a bridge.
You may configure the name of the bridge, time zone and default bandwidth. The bridge name is a convenience feature to help identify the bridge. The time zone of a bridge will be the time zone used for the bridge and all cameras connected to the bridge.
The Default Transmit Bandwidth enables the user to decide how much bandwidth should be used to upload recorded video. The default setting is Auto. Auto will use 30% of available measured upload bandwidth. The camera transmit default setting of “background” will use the settings here for Default Transmit and Scheduled Transmit Bandwidth. The Scheduled Transmit Bandwidth allows for alternative settings based on a schedule.
Note: While viewing viewing live video
Page 44 of 92
rev 2.0
2021-07-01
WISeNET SKY
Wisenet SKY Cloud VMS User Manual
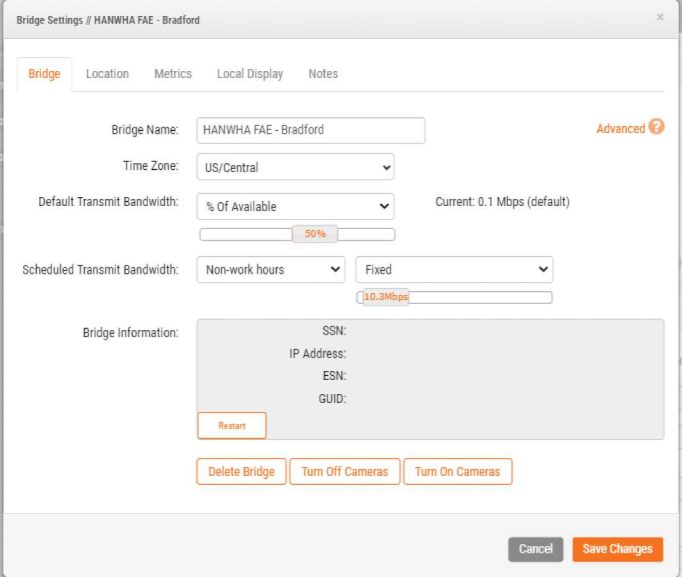
Figure 41 – Bridge Settings
Page 45 of 92
rev 2.0
2021-07-01
WISeNET SKY
Wisenet SKY Cloud VMS User Manual
If you provide location information, the bridge can set a location on the Map page to help you locate your cameras. The Bridge will lookup the Latitude and Longitude if you only provide the street address, city, state, and zip.
Bridge Settings H HANWHA FAE – Bradford
Bridge Location Metrics Local Display Notes

Cancel I Save Changes
Figure 42 – Bridge Location Information
Our bridge tracks and analyzes information locally. These graphs help the installer understand what is going on with the system and how it can be optimized.
Bridge Settings – Metrics – Bandwidth
This graph shows the average bandwidth used during the previous hours and days. This is a stacked graph that shows the total bandwidth along with what percentage is used for real-time vs. background. Real-time bandwidth is used by the preview images, live streaming videos and system meta-data.
Background bandwidth is used by uploading historic videos that have been saved locally to the bridge.
Page 46 of 92
rev 2.0
2021-07-01
WISeNËT SKY
Wisenet SKY Cloud VMS User Manual
Bridge SettingsH HANWHA FAE – Bradford
Bridge Location Metrics Local Display Notes
Cloud BW Cloud BW Measured Storage * Storage Cam Cloud BW Cam Storage A Cam Storage
• Background + On-Demand • Real-Time
Cloud BW
Ih 12h Id 7d
From 2023-01-19 To 2023-01-26


![]()
Figure 43 – Bridge Bandwidth Utilization
Bridge Settings – Metrics – Bandwidth Measured
This graph shows the average upload bandwidth speed between the bridge and our cloud. The data is collected as actual video is being sent to the cloud and it is a very good representation of the available bandwidth. Fluctuations in bandwidth are also shown and this information is help for diagnosing problems. The Bandwidth Measured is used to adjust the “Auto” setting of Background Transmit on the bridge.
Page 47 of 92
rev 2.0
2021-07-01
WISeNET SKY
Wisenet SKY Cloud VMS User Manual
Bridge Settings il HANWHA FAE – Bradford
Bridge Location Metrics Local Display Notes
Cloud BW Cloud BW Measured
Storage
Storage Cam Cloud BW Cam Storage
Cam Storage
![]()
Cloud BW Measured
![]()
4h 12h 1d 7d From 2023-01-19 To 2023-01-26
100 Mbps 100 Mbps


![]()
Figure 44 - Bridge Bandwidth Measurement
Bridge Settings – Metrics – Storage
This graph shows the total amount of data changed for a given hour. Values that are negative indicate that more video was uploaded than stored. After several days, a pattern should start to be established which shows a sustainable amount of data uploaded vs. recorded.
Page 48 of 92
rev 2.0
2021-07-01
WISeNET SKY
Wisenet SKY Cloud VMS User Manual
Bridge Settings ¡1 HANWHA FAE – Bradford
Bridge Location Metrics Local Display Notes
Cloud BW
Cloud BW Measured
Storage
Storage
Cam Cloud BW
Cam Storage
^ Cam Storage
![]()
• Delta Storage
Delta Storage
![]()
1 000 MB
0 MB
-1000 MB
-2000 MB
lh 12h 1d 7d
.mill lililí lllllllllnlliillllllllllllll
From
2023-01-19
To
2023-01-26
1000 MB
-1000 MB
-2000 MB

![]()
Figure 45 – Bridge Disk Input/output
Bridge Settings – Metrics – Disk Space
This shows the total available space on the attached storage. The useable data is limited to 80% of the total capacity in order to prevent fragmentation and allow additional headroom in the event of setting changes.
Page 49 of 92
rev 2.0
2021-07-01
WISeNËT SKY
Wisenet SKY Cloud VMS User Manual
Bridge Settings ii HANWHA FAE – Bradford
Bridge Location Metrics Local Display Notes
Cloud BW Cloud BW Measured Storage
Storage Cam Cloud BW Cam Storage
A Cam Storage
![]()
• Available 9 In Use
Disk Space
![]()
1000 GB
lh 12h Id 7d
From 2023-01-19 To 2023-01-26
500 GB
1000 GB


Cancel I Save Changes
Figure 46 – Bridge Disk Utilization
Page 50 of 92
rev 2.0
2021-07-01
WISeNET SKY
Wisenet SKY Cloud VMS User Manual
Page 51 of 92
rev 2.0
2021-07-01
WISeNET SKY
Wisenet SKY Cloud VMS User Manual
750 CB
1000 GB
500 GB
|
00:00 01 -20 |
00:00 01-22 |
00:00 01-24 |
00:00 01 -26 |
|
0 |
|
|
|
|
|
III |
|
|
![]()
Figure 47 – Camera Storage
Page 52 of 92
rev 2.0
2021-07-01
WISeNET SKY
Wisenet SKY Cloud VMS User Manual
Figure 48 – Camera Delta Storage
00:00
01-20
00:00
01-21
00:00
01-22
00:00
01-23
00:00
O’ -24
00:00
01-25
00:00
01-26
Bridge Settings – Local Display
If the bridge or CMVR supports local display, a “Local Display” tab will be available. There are two local display options, Local Display Via Browser and Local Display Via Monitor. Click the check box to “Enable” the display. Select the Layouts to be viewed and “Save Changes.” The HDMI or DVI/VGA output will be changed to display the live preview of cameras. A USB keyboard can be connected to the bridge and the up and down arrows will toggle the available layouts. Note: the live video depends on what the preview resolution and quality is set to per camera. The video is displayed at 4 frames per second.
Page 53 of 92
rev 2.0
2021-07-01
WISeNET SKY
Wisenet SKY Cloud VMS User Manual
If you need to do maintenance on a bridge set to external display, go to the bridge settings and uncheck “Enable” for Local Display and Save Changes. If the bridge is not connected to the cloud, connect a keyboard and press “q” to temporarily disable local display. When the bridge is back online, toggle the “Enable” setting or cycle power on the bridge to restore Local Display.
Bridge Settings H HANWHA FAE – Bradford
Bridge Location Metrics Local Display
Local Display via Browser: ^ *
Local Display via Monitor. z *
Layouts Available
Search
Hold The Door
Tomato
analytics
Notes
©
Layouts on Display
Search
(All Cameras)
Add At»
«Remove Ai
![]()
Figure 49 – Bridge Settings Local Display
If the bridge or CMVR has analog inputs, the “Analog” tab will be displayed. Use the “Available Inputs:” drop down to choose which of the inputs will appear under “Available Cameras” on the dashboard. This allows hiding the unused analog inputs so that they do not show, saving dashboard screen real estate.
Page 54 of 92
rev 2.0
2021-07-01
WISeNET SKY
Wisenet SKY Cloud VMS User Manual
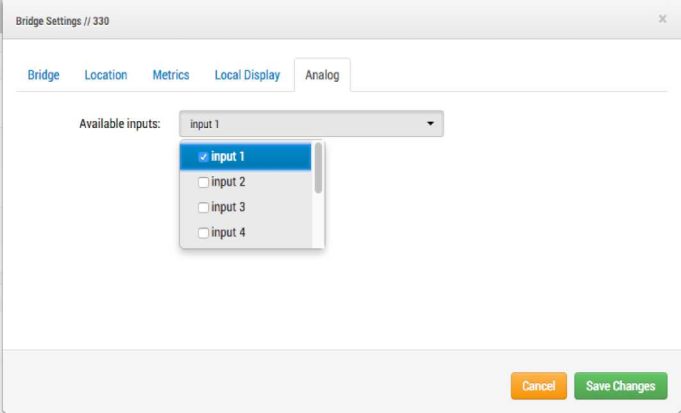
Figure 50 – Bridge Settings Analog
Figure 32 Dashboard examples of Bridge analog settings shows an example of checking “Available Inputs:” “input 1” and “input 2.” Only analog input 1 of this bridge has been added as a camera. Analog Camera Input 2 shows as available. Note that under “# of Cameras” the bridge shows “(7 available)” which are the 7 additional analog inputs. The number of inputs or cameras seen by the bridge that are not “added” will always show here even if the inputs have been hidden.
Page 55 of 92
rev 2.0
2021-07-01
WISeNËT SKY
Wisenet SKY Cloud VMS User Manual
K Available Cameras
|
Status |
Name |
Bridge |
Actions |
|
© |
Analog Camera Input 2 |
330 |
+ |
|
m Bridges |
|||
|
Status Name |
Serial Number |
It of Cameras |
Actions |
|
Q 330 |
EEN-BR330-09768 |
1 (7 available) |
0 © |
Figure 51 – Dashboard Examples of Bridge Analog Settings
User management appears for those with Admin or User Admin permissions.
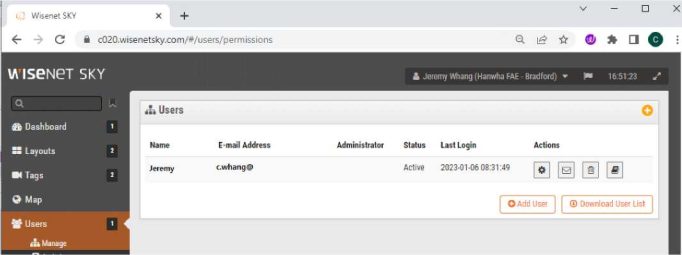
Figure 52 – User Management
Adding users requires a unique email address along with their first and last name. Once the user has been added, they will receive an email with a link. They need to click this link to validate their email address and choose a password. The email link is only valid for 72 hours and can be resent if needed.
Page 56 of 92
rev 2.0
2021-07-01
WISeNET SKY
Wisenet SKY Cloud VMS User Manual
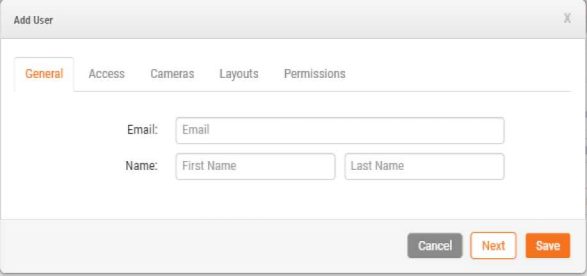
Figure 53 – Adding a user
You may remove users by clicking on the trashcan icon. You will be shown a dialog asking you to confirm this action. Once users are deleted their account cannot be recovered. They will need to be recreated as a new user if they needed further access.

Figure 54 – Deleting a user
User Settings – Access
User access can be controlled using this screen. A user can be disabled. This means he will no longer be able to log into the Wisenet SKY Cloud VMS. He will be blocked from logging in. You can also control the time period of the day that he can log in and the actions that the user can take when they are logged in.
Page 57 of 92
rev 2.0
2021-07-01
WISeNET SKY
Wisenet SKY Cloud VMS User Manual
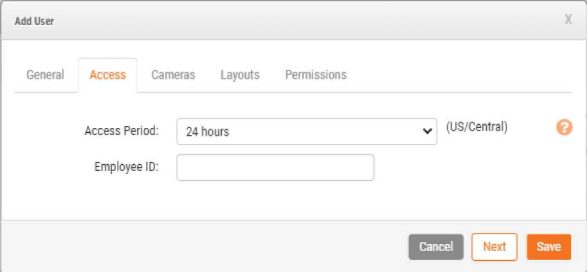
Figure 55 – User Access
User Actions
Page 58 of 92
rev 2.0
2021-07-01
WISeNET SKY
Wisenet SKY Cloud VMS User Manual
It is possible to restrict access to cameras on a user-by-user basis. You have may have some cameras that some users should not have access too. This is accomplished using the User Settings Camera Screen shown below. You can move cameras from the Access to the No Access side to change which cameras this user will have access too. Any cameras that are restricted from this user will simply not appear when he logs into the system.
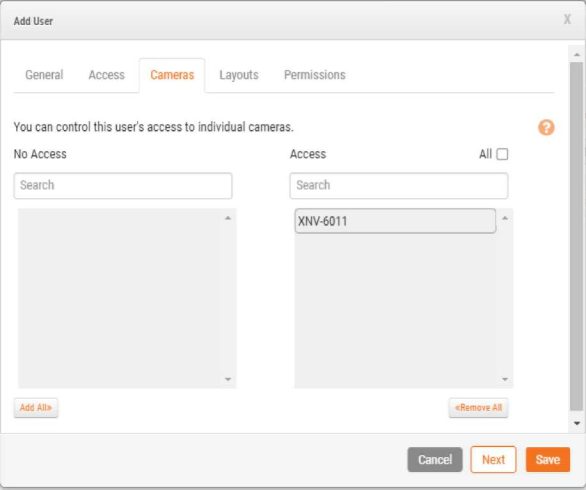
Figure 56 – Restricted Cameras
Page 59 of 92
rev 2.0
2021-07-01
WISeNËT SKY
Wisenet SKY Cloud VMS User Manual
In addition to restricting access on a camera-by-camera basis you can also restrict or grant access to cameras based on layouts. This screen allows you to indicate which layouts a user gets access too.
Add User
General Access Cameras Layouts Permissions
You can control this user’s access to layouts. Giving access to a layout automatically gives access to all Q cameras in the layout.
No Access Access All l~l

Add All> «Remove Al
Cancel IkBII Save
Figure 57 – Restricted Layouts
Cameras can be added to Google Maps so that they can be overlaid on the map at their physical location. The range of view of the camera can also be indicated on the map. Clicking a camera on the map brings up the preview video of the camera. Once the preview is visible, the same controls are available as viewing cameras from the Layouts or Cameras page.
Page 60 of 92
rev 2.0
2021-07-01
WISeNET SKY
Wisenet SKY Cloud VMS User Manual
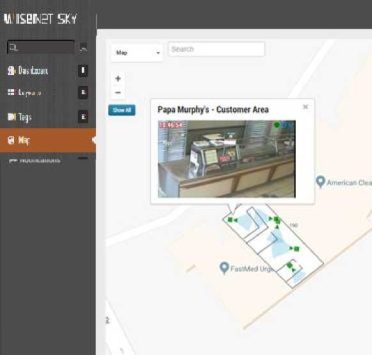
Figure 58- Map Example Camera Preview
Multiple floors can be setup with separate views, or viewed all at once. A drop down menu is in the
upper right corner of the map that allows selecting which floor or “All Floors
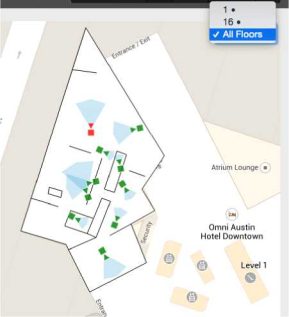
Figure 59 – Map Example Floors
Page 61 of 92
rev 2.0
2021-07-01
WISeNËT SKY
Wisenet SKY Cloud VMS User Manual
There are two ways to add cameras to the map. One is to add the address to a camera by going to camera settings and to the location tab.
Camera Settings IIXNV-6011
Camera Retention Resolution Motion Analytics Audio Location Metrics

Cancel I Save Changes
Figure 60 – Camera Settings Location
Entering a street address will add it to the map and automatically fill in a latitude and longitude. By default, the cameras are added to the 1st Floor. Changing the number in settings will move the floor a camera is on. Floors from -10 to 100 can be added to the map.
The easiest way to add cameras is to go to the Map and click the “Map” drop-down button at the top left and select “Edit.”
Page 62 of 92
rev 2.0
2021-07-01
WISeNET SKY
Wisenet SKY Cloud VMS User Manual
< ‘ Wisenet SKY X +
«- ^ C a cO2O. wisenets ky.com /#/ ca m era_m ap
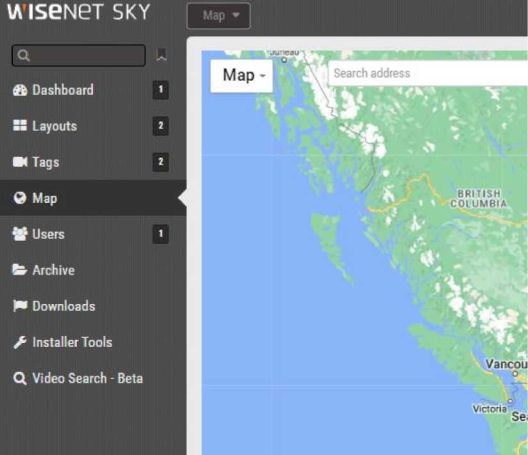
Figure 61- Map Edit
This will add a red outline to the map indicating you are in “edit” mode. A new set of buttons will appear at the top right of the map.

Figure 62 – Map Edit Settings
The next step is to enter the address of the location. This will zoom the map to the address location. Because this is an embedded Google Map, all the same functionality is available, such as pan and zoom using a mouse or touchpad.
Page 63 of 92
rev 2.0
2021-07-01
WISeNET SKY
Wisenet SKY Cloud VMS User Manual
Next, use the “-Add Camera-“ drop down, which will present a list of the available cameras. Select the camera and it will be added immediately to the map.
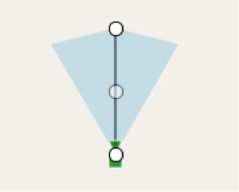
Figure 63 – Camera on Map
To move the camera, click and drag the circle directly on the camera. To change the direction and range of the camera, click and drag the circle farthest away from the camera.
Add additional cameras and floors and then click the green “Save” button. Your changes will be saved.
When cameras are added to the map, data is automatically populated in the camera settings “location” tab.
Camera Settings IIXNV-6011
Camera Retention Resolution Motion Analytics Audio Location Metrics

![]()
Figure 64 – Camera Settings Location filled in by Map placement
Additional changes can be made such as moving the camera between floors in the camera settings.
Page 64 of 92
rev 2.0
2021-07-01
WISeNËT SKY
Wisenet SKY Cloud VMS User Manual
To remove a camera from the map, delete the street address, latitude, and longitude, in the camera settings “location” tab.
The History Browser provides methods for you to review video recordings from your cameras. The top of the screen shows the current video image. This is normally a Preview video image. The lower part of the screen is a Timeline control with navigation buttons. To access the History Browser you can click on the clock icon © in the upper right hand corner of the preview view in Layouts.
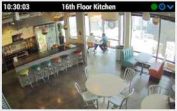
Figure 65 – Preview Tile Example
Or you can click on the clock button o in the Dashboard view.
![]()
Figure 66 – Dashboard Example
Timeline Control: The Timeline can be clicked and dragged left or right. The image displayed and the time will change to correspond to the pink cursor on the Timeline. The blue areas shown on the timeline indicate that the system has recorded Full Video during those periods. Blank areas indicate that only Preview video is available. You can drag and scroll on the time area to move over hours or minutes. You can also drag and scroll the date area located at the bottom of the Timeline Control area to scroll to a specific day to view.

Figure 67 – Timeline Example
Page 65 of 92
rev 2.0
2021-07-01
WISeNET SKY
Wisenet SKY Cloud VMS User Manual
The History browser allows you to drag the timeline and play Full Video segments. Full video is indicated by dark blue and motion by light blue.
Scrolling in the history browser is done by clicking in the middle of the timeline and holding down the left mouse button while moving it left and right.
Timeline Colors:
When System Notifications are enabled, additional colors are turned on in the history browser as shown here Timeline Colors. This is very helpful for troubleshooting the system.

Zooming the TimeLine: You can change the zoom level on the Timeline by selecting the 8Hr, 2Hr, 10Min, or 1Min buttons. This will change the amount of time shown in the Timeline.

Jumping to a specific time: You can jump to a precise time by clicking on the time display activate the Time Selector to set the time you want to display and then click the “Go To” button.
Page 66 of 92
rev 2.0
2021-07-01
WISeNET SKY
Wisenet SKY Cloud VMS User Manual
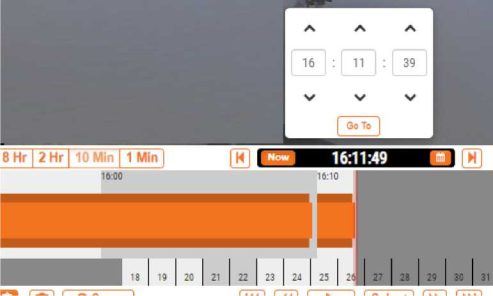
Figure 68 – Time Selector Example
Jumping to a specific date: You can jump to a specific date by clicking on the calendar button and
selecting the day you want to view.
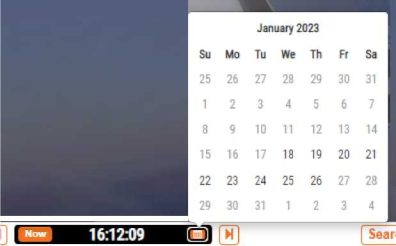
Figure 69 – Calendar Selector Example
Jump to current time and date: You can jump to to the current time by clicking on the Now Button
Now
It will continually update the timeline and keep the cursor at the latest image.
Page 67 of 92
rev 2.0
2021-07-01
WISeNET SKY
Wisenet SKY Cloud VMS User Manual
Zooming the video and Gallery View:
Zooming the Image: You can zoom in and out of a preview video or video segment by pressing the
magnifying glass. to zoom in and L J to zoom out.
Gallery View:
The gallery view is access by zooming out past the original image size. The gallery view shows a series of images in a 3×3, a 4×4 or a 5×5 view. Markers appear at the top of the timeline to represent the frames that appear in the gallery viewer.
Note: The gallery viewer may also be accessed by selecting it under the action menu from a live preview of a camera. This includes from the Map view.
Gallery Viewer Choose Display shows the drop menu allowing the viewing of frames to be based on time, key images, or videos. The time span between images depends on the current zoom level. 8 Hr. zoom will show 1 frame every 4 hours. 2 Hr. zoom will show 1 frame every hour. 10 Min zoom will show 1 frame every five minutes. 1 Min zoom will show 1 frame every 30 seconds. Choosing key images will show only the key images. Choosing videos will show the first key image in a recorded video segment. Click on a single image to center it and this will also refresh the other images around it.
Scrolling of the timeline will refresh the images. Double a click an image to bring it full screen and take the history browser to that point in time.
Page 68 of 92
rev 2.0
2021-07-01
WISeNET SKY
Wisenet SKY Cloud VMS User Manual
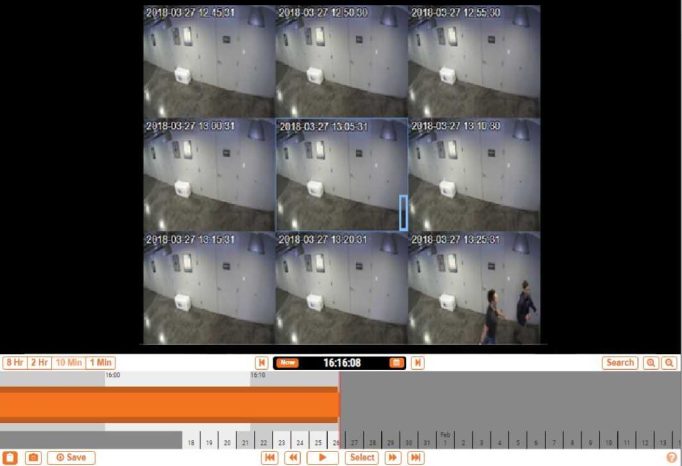
Figure 70 – Example of 3 x 3 Gallery View
Navigation Buttons: There are 6 navigation buttons.
The and
buttons will move the image one preview image forwards or backwards. The arrows
on a keyboard will also move one image forwards or backwards. Hold the button down to keep moving.
This will normally move the image 1 second forwards or backwards.
The
![]()
and
![]()
buttons will move the image from one Key Image to the next Key Image forwards or
backwards. When the system is recording full video (normally due to motion detection) it will select Key
Images in the video.
These Key Images are normally in the middle of the video and allow you to see an
important part of a motion event. For example if you are trying to watch a door, the Key Images will
typically give you an image of each person that walks through the door.
Page 69 of 92
rev 2.0
2021-07-01
WISeNET SKY
Wisenet SKY Cloud VMS User Manual
The
![]()
and
buttons will move the image from one video segment to the next. A video segment
can have more than one Key Image so this will typically move you faster through the timeline.
The play button
![]()
playback cursor is currently on.
will start or pause full resolution playback of video segment that the pink
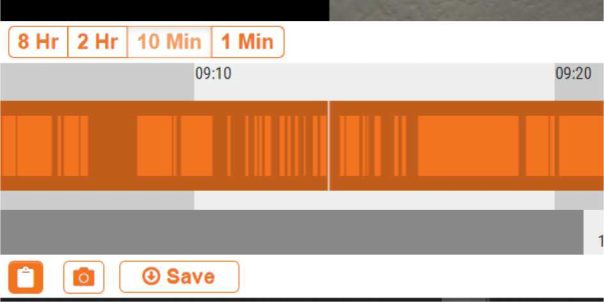
Figure 71 – History Browser Controls
Note: You can also play back a selected area on the timeline by Hold down the “shift” key on the keyboard and left mouse click at the start point and then at the end point to mark the area. It will appear highlighted in yellow. Then the play back will be limited to the selected area. Click anywhere in the history browser timeline to deselect the area.
History Browser – Downloading Video Clips
Wisenet SKY makes downloading your videos very easy. You can download the high-resolution version as it comes directly from the camera. We coalesce smaller clips that overlap together into a single clip for your convenience. In cases of high motion, it may be desirable to download only a part of the available video. For example, we have a busy room but we only want to download a section but we are only interested in the section where the person in shorts and a black hoodie is in the room.
After playing the video we see that he comes into the room at 03:33:47.682 PM and leaves the room at 03:37:18.424 PM. By holding the SHIFT key, we can click and drop a start pin. We can drop the ending
Page 70 of 92
rev 2.0
2021-07-01
WISeNET SKY
Wisenet SKY Cloud VMS User Manual
pin the same way. The area between them is highlighted (you can remove the highlighted area by clicking anywhere inside the highlighted area).

Figure 72 – Example of Timeline with Selection
Downloading a Video: Pressing the download button will download an MP4 version of the video. If there is no selected area the download screen will default to the current video segment under the cursor.
Start: Start time of the video download download
Stop: End time of the video to be downloaded
Type: Type of download Bundle or Time lapse (And speed of that time lapse
Description: Label for the downloaded footage
Time Stamp: Include time stamp information or not
Notes: Additional information about the download
Page 71 of 92
rev 2.0
2021-07-01
WISeNET SKY
Wisenet SKY Cloud VMS User Manual
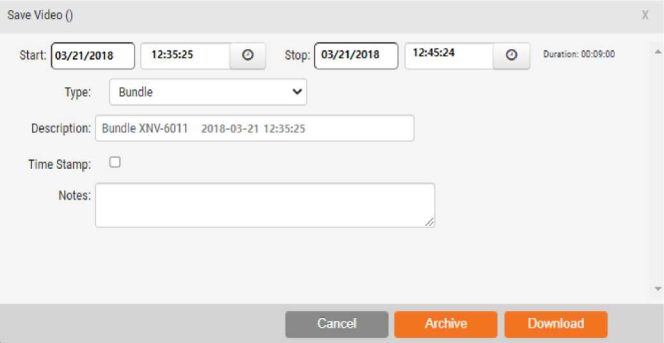
Figure 73 – Timeline Example
Not that this sometimes this process can take some time to create, process and download the video depending on size of the selected clip. The status of the
The Notifications page will show an entry for the video and will also indicate when the video is ready to download. The online notification indicator will also show in the upper right when the video is ready for download.

Figure 41 Online Notification Indicator
Figure 74 – Notifications Page
Press the cloud icon to download the prepared video.
Pencil will allow you to add notes to the downloaded file
Check mark: Wisenet SKY provides a checksum for any downloaded video to validate the video is not altered after it has been downloaded.
Page 72 of 92
rev 2.0
2021-07-01
WISeNET SKY
Wisenet SKY Cloud VMS User Manual
System Alerts and Notifications
System Alerts and Notifications can be sent to any user that is an ADMIN. Enabling system notifications is a two-step process. Your reseller must enable system notifications for your account, and you must also enable them as an admin user. Go to the user profile by clicking your name in the upper right corner when you are logged into the EEN system. Select “My Profile” and go to the “Notifications” tab.
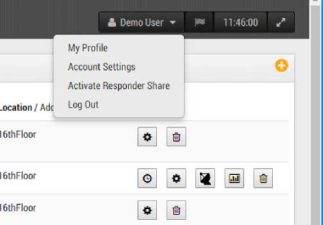
Figure 75 – User My Profile
Make sure and check “System” for “Notify on System Alerts” as shown in Figure 78 My Profile Notifications.
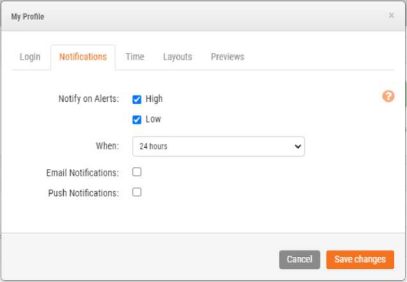
Figure 76 – My Profile Notifications
You may also select High and/or Low Alerts for motion alerts. Select “When” to receive and what method. You may choose online, email, or both. The Wisenet SKY system will send email alerts when cameras go offline and come back online.
Page 73 of 92
rev 2.0
2021-07-01
WISeNËT SKY
Wisenet SKY Cloud VMS User Manual
Motion Alerts and Regions of Interest
Often there is repetitive motion in a scene that you want to ignore. A great example of this is a TV or a swaying tree. Having constant motion makes it difficult to quickly find the item you are looking for. It is like adding more hay to the stack when you’re busy searching for a needle.
In this scene, there is a TV in view of the cameras that will appear as constant motion. As you can see from the blue streak across the timeline, it is difficult to find when people walked through the area. We want to mask out the TV from triggering motion.
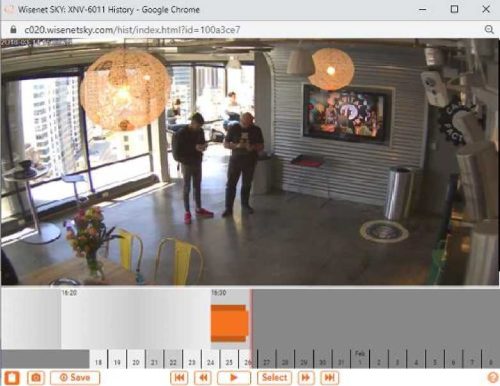
Figure 77 – Field of view without motion tuning
We can mask out a motion area by going to the Motion tab inside of Camera Settings.
Page 74 of 92
rev 2.0
2021-07-01
WISeNET SKY
Wisenet SKY Cloud VMS User Manual
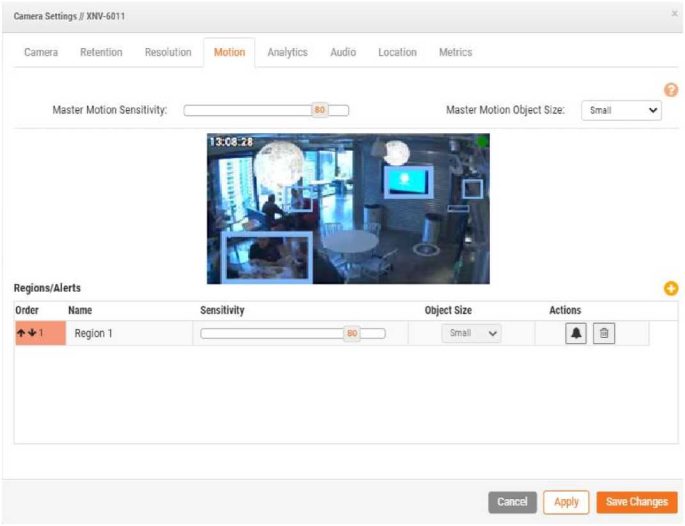
Figure 78 – Motion Detection Settings
The blue boxes show where motion is currently detected. As you can see, the TV is triggering motion. We can remove that by creating a new region by clicking on the yellow plus sign and dragging the box around the TV. We will name the region and enable the checkbox to Disable Motion. When finished, hit Apply. The motion tab should now have a named region over the TV in the preview image.
Figure 50 – Motion Detection exclusion zone settings
Page 75 of 92
rev 2.0
2021-07-01
WISeNET SKY
Wisenet SKY Cloud VMS User Manual
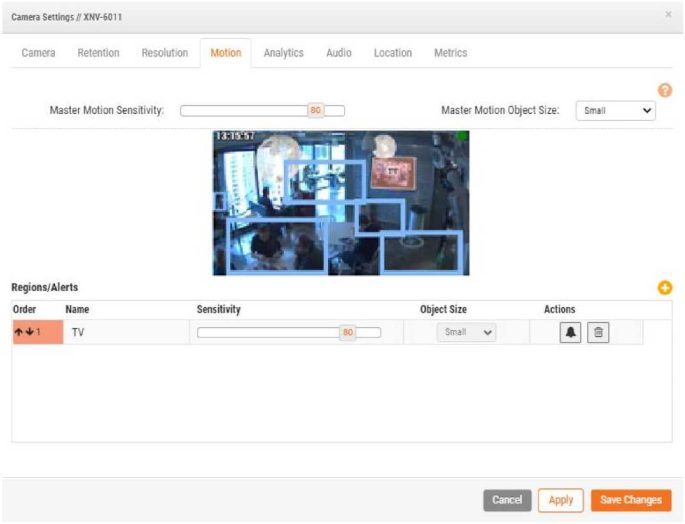
Figure 79 – Exclusion Zone in place
This is an example of the timeline with the TV masked out. It is significantly easier to find motion events.
Page 76 of 92
rev 2.0
2021-07-01
WISeNËT SKY
Wisenet SKY Cloud VMS User Manual
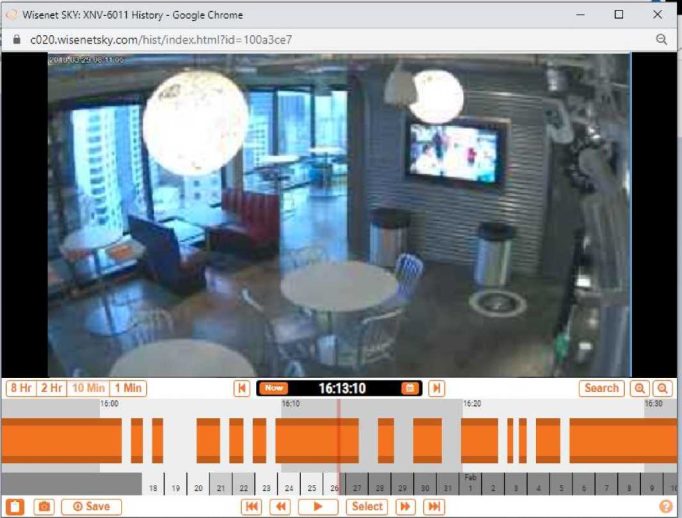
Figure 80 – History Browser tuned for Motion Detection
Page 77 of 92
rev 2.0
2021-07-01
WISeNET SKY
Wisenet SKY Cloud VMS User Manual
This example illustrates setting up email notifications on a door. In it, we are interested on getting an email notification whenever someone enters or leaves. The initial image is below.
< } WisenetSKY X +
^ -^ C i c020.wisenetsky.com/#/layout_id/42442b6a-45c9-4077-b1c4-49da8e7712c5
Q k
If Users i
& Archive
!■ Downloads
^ Installer Tools
Q Video Search – Beta
Figure 81 – Camera view
Page 78 of 92
rev 2.0
2021-07-01
WISeNET SKY
Wisenet SKY Cloud VMS User Manual
Here I have opened camera settings and gone to the ‘Motion’ tab. I have also created a new region and
placed it over the door and walkway to the door and named it “Entry-Exit.”
Camera Sellings II Entry Doors
Motion
Master Motion Sensitivity:
Audio Location
Camera Retention Resolution
Metrics
Master Motion Object Size: Large
Alert: 24 hours J
Re-arm: Immediate After: minutes
O After quiet for: 5 minutes
Max Per Hour: 10
Alert Who: Hans Kahler. Tim Duncan ^
Alen Mode: All ‘
Alert Level: High :
Entry-Exit
O
Disable Motion
□ Motion Override:
Sensitivity:
Object Size: Small
80 ]
Cancel Region
Save Region
Save Changes
Figure 82 Motion Settings
I have checked the alert checkbox. Here I am selecting the time range in which I would like this alert to be active.
Page 79 of 92
rev 2.0
2021-07-01
WISeNET SKY
Wisenet SKY Cloud VMS User Manual
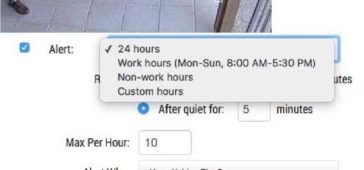
Figure 83 – Alert When
Here I am selecting which users I would like to be alerted.
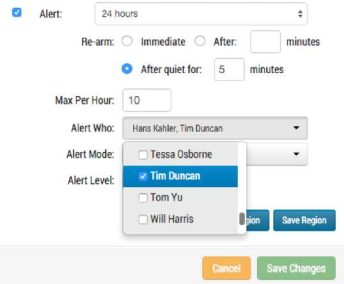
Figure 84 – Alert Who
Page 80 of 92
rev 2.0
2021-07-01
WISeNET SKY
Wisenet SKY Cloud VMS User Manual
Lastly, I am selecting if this should be considered a ‘High’ or ‘Low’ alert. Each user can choose in their profile if they would like to be notified on ‘Low’ and/or ‘High’ alerts.
Q Alert: 24 hours 4 I
Re-arm: O Immediate O After: minutes
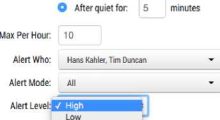
Cancel Region I Save Region
Figure 85 – Alert Level
After saving the region and pressing ‘Apply,’ the motion zone is highlighted on top of the preview image and the summary is listed.
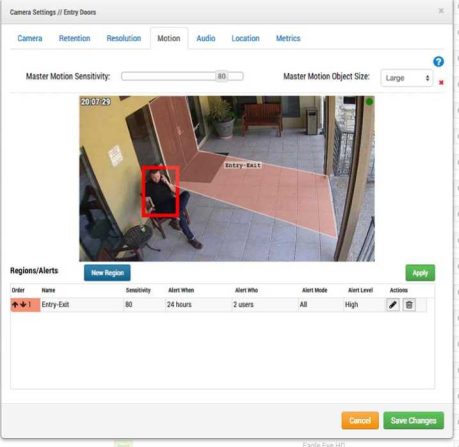
Figure 86 – Alert Summary
Page 81 of 92
rev 2.0
2021-07-01
WISeNET SKY
Wisenet SKY Cloud VMS User Manual
Finally, this is an example of the email that is sent to me.
Motion on camera “Entry Doon” in region “Entry-Exit” at 09:58 AM z\ v g x
9 59AM
detected motion on earner» “Entry Door»“ in region ‘Entry Exit’ at 09:58 AM.
Notification
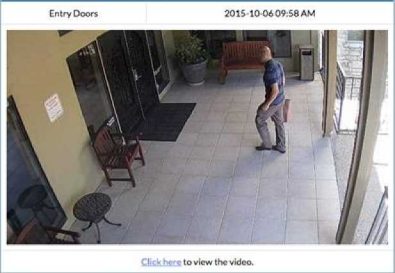
Alert Notification was sent to Tim Duncan. Mans Kahler
Alert Notification w» automatically generated based on your jet* ngy To in»« changes or d^wfee please r – c.
Think You.
Figure 87 – Email Alert Example
Notice that you can click the link in the email to be taken to that moment and begin playback in the history browser. If you are not logged in, you will be prompted to login. There is also a link that takes you to the notification settings for your user.
Page 82 of 92
rev 2.0
2021-07-01
WISeNET SKY
Wisenet SKY Cloud VMS User Manual
Balancing the amount of bandwidth available with the number of cameras and desired retention time with acceptable video quality is key to a successful application of the Wisenet SKY Cloud VMS. The goal is for a bridge to be able to upload all video from cameras to the Wisenet SKY Cloud Data Center within a day. Learning to use the metrics available under the bridge settings will help to set up and adjust the system in such a way to have a good user experience and happy customer. Here is an example of good metrics with plenty of bandwidth:
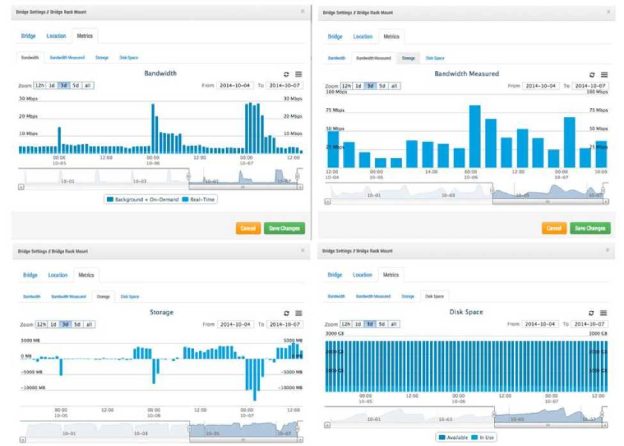
Figure 88 – Bandwidth Example 1
In the above example, the “Bandwidth” tab shows how much bandwidth the bridge is using over time. The “Bandwidth Measured” tab shows the available upload network bandwidth to the bridge also over time. Note the “storage” tab – it has both positive and negative. If there is enough bandwidth, there should be more negative than positive. Positive shows the buffering of video on the bridge. Negative shows the transmission of video to the cloud. The “Disk Space” tab shows very low amount of disk space being used — which is also good as the video that was buffered is already transmitted to the cloud.
Page 83 of 92
rev 2.0
2021-07-01
WISeNET SKY
Wisenet SKY Cloud VMS User Manual
Here is an example of a bridge that has low available bandwidth, but it has been set to be able to utilize enough bandwidth during night time hours to successfully transmit the video to the cloud:
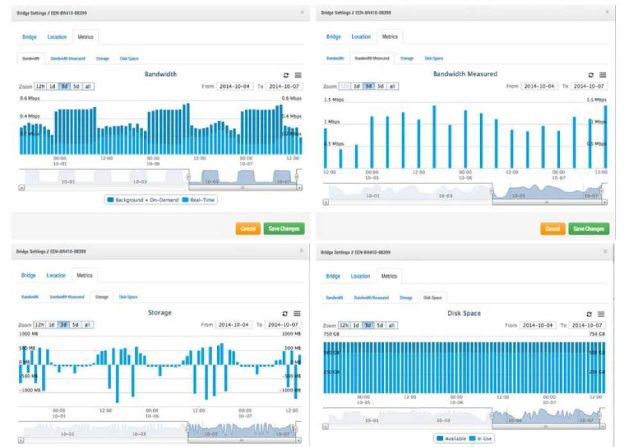
Figure 89 – Bandwidth Example 2
Notice that the cycle is predictable and repetitious.
In some cases, the bandwidth may change at a customer location. Here is an example of the bandwidth going down and the video storage building up over the last few days because there is more video being added to the bridge than can be transmitted. The only solution is to either give more Internet bandwidth, or adjust the video quality down. If it continues at this rate without intervention, then video will be purged and lost before it can be uploaded.
Page 84 of 92
rev 2.0
2021-07-01
WISeNET SKY
Wisenet SKY Cloud VMS User Manual

Figure 90 – Bandwidth Example 3
Notice the “Disk Space” tab where the disk space usage has increased slowly over the past few days. You can see that the bandwidth has been not been as high, so the video has slowly been building on the bridge and has not been fully transmitted to the cloud. This is a situation where something must be adjusted or video will be purged off the bridge before it is uploaded. In this situation, if the bandwidth is not available, or if the cameras cannot be adjusted to a lower quality, then a CMVR will be a better solution since the CMVR is designed to hold more video on premise.
We have provided many different tools to try and optimize bandwidth usage. If the system is installed for a business that keeps regular daily hours, then one such way is to set the business hours up via the user’s account settings:
A Tim Duncan ‘
My Profile
Account Settings
Log Out
Bridge /
Page 85 of 92
rev 2.0
2021-07-01
WISeNET SKY
Wisenet SKY Cloud VMS User Manual
Figure 91 – User Account Settings
Next go to the “Days” tab:
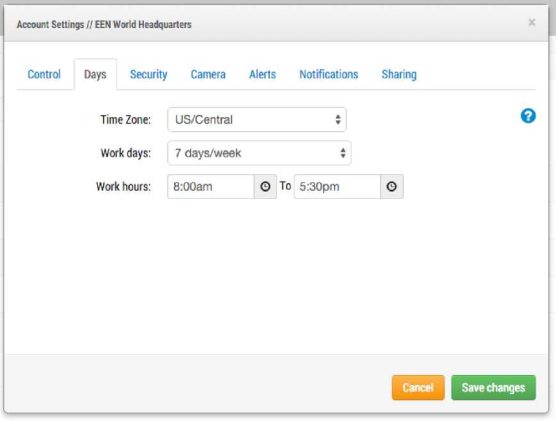
Figure 92 – Account Settings Days
Here you can set the “Work hours” of the business. In this example, it is set from 8:00am to 5:30pm. By doing this, you will be able to maximize the available bandwidth outside of business hours. To do this, go to the bridge settings and change the “Scheduled Transmit Bandwidth” to “Non-work hours” as shown in this example:
Page 86 of 92
rev 2.0
2021-07-01
WISeNET SKY
Wisenet SKY Cloud VMS User Manual
Bridge Settings // 210 Rack
Bridge Location Metrics Local Display
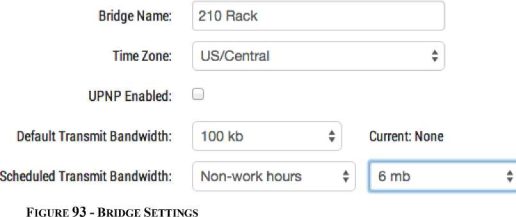
The bandwidth can also be adjusted to the maximum rate available based on the local Internet connection. So, in this example, during work hours, the maximum transmit rate is 100kb, but outside of work hours the transmit rate is 6mb. (6 Megabits).
Setting preview to very low resolution can also help with bandwidth. It is good to train the customer to view the low-resolution previews in order to decide what that would like to see of the high-resolution video. Our system is very unique in that we can have the preview stream set to “always” or “on demand.”
Always means that the preview images are always sent to the cloud. Thus the bandwidth must be available for each camera. If the cameras are set to 100k preview, and you have 4 cameras, then you would need 400K bandwidth to transmit just the preview images. Our suggestion is to have 400K of bandwidth per camera, so a 4-camera system that has 1600K of bandwidth up should work quite well. This of course depends on what we call the “duty cycle” of the camera.
The duty cycle is the percentage of time from 0% to 100% that motion triggers recording. So a camera with a duty cycle of 50% means that the high-resolution video is buffered on the bridge half of the time. There needs to be enough bandwidth available to transmit that video in the background, or outside of work hours within 2-3 days.
We have found that in very low bandwidth installations, it is good to allow the system to run for a few days to gather metrics and then adjust. It is also good to periodically check in on the status of customer systems from time to time. One good way to do this is using the installer tools to see the settings and duty cycle of the cameras installed. Note in the following example that you can see which cameras are the highest duty cycle (which means what percentage of time the camera is recording events).
Page 87 of 92
rev 2.0
2021-07-01
WISeNET SKY
Wisenet SKY Cloud VMS User Manual
/ Installer Diagnostic Tools
|
Status |
Name |
IP Address |
Duty Cycle |
Preview/Video Size |
Bandwidth Speed/Mode |
Cloud Retention |
|
|
© |
1st Floor Back Wall |
AXISAXISM3005 10.1.10.54 |
90% |
320×240 @ med quality 1280×720® med quality |
always (500kbps) background (1000kbps) |
14 |
a |
|
© |
1 st Floor Frig |
AXIS AXIS M3004 10.1.10.10 |
10% |
320×240 @ med quality 1280×720 ® med quality |
always (500kbps) background (1000kbps) |
14 |
« |
|
© |
1st Floor Front Door |
AXIS AXIS M3026 10.1.10.67 |
99% |
352×240 @ med quality 1280×720 ® med quality |
always (500kbps) background (1000kbps) |
14 |
a |
|
© |
1st Floor Grill Area |
AXIS AXIS M3005 10.1.10.53 |
98% |
320×240 ® med quality 1280×720 @ med quality |
always (500kbps) background (1000kbps) |
14 |
a |
|
© |
1st Floor Inside Back Door |
AXIS AXIS M3004 10.1.10.52 |
39% |
320×240 ® med quality 1280×720 @ med quality |
always (500kbps) background (1000 kbps) |
14 |
a |
|
© |
1st Floor Middle Area |
AXIS AXIS M3006 10.1.10.63 |
86% |
320×180 @ med quality 1280×720 @ med quality |
always (500kbps) background (1000kbps) |
14 |
a |
|
© |
1st Floor Middle Corner |
AXIS AXIS M3006 10.1.10.68 |
99% |
320×180 @ med quality 1280×720® med quality |
always (500kbps) background (1000kbps) |
14 |
a |
|
© |
1st Floor Over Register |
AXIS AXIS M3006 10.1.10.65 |
84% |
320×180® med quality 1280×720® med quality |
always (500kbps) background (1000kbps) |
14 |
« |
|
© |
1st Floor Sink Area |
AXIS AXIS M3006 10.1.10.18 |
75% |
320×180® low quality 1280×720 ® med quality |
always (500kbps) background (1000kbps) |
14 |
a |
|
© |
2nd Floor Back |
AXIS AXIS M3005 10.1.10.12 |
89% |
320×240 ® med quality 1280×720 @ med quality |
always (500kbps) background (1000kbps) |
14 |
a |
|
© |
2nd Floor Front |
AXIS AXIS M3005 10.1.10.47 |
70% |
320×240 ® med quality 1280×720 @ med quality |
always (500kbps) background (1000 kbps) |
14 |
a |
|
© |
2nd Floor Stairs |
AXIS AXIS M3024-L 10.1.10.60 |
44% |
352×240 ® low quality 1280×720 @ med quality |
always (500kbps) background (1000kbps) |
14 |
a |
|
© |
2nd Floor Storage |
AXIS AXIS M3006 10.1.10.17 |
2% |
320×180® low quality 1280×720® med quality |
always (500kbps) background (1000kbps) |
14 |
a |
|
© |
3rd Floor Stairs |
AXISAXISM3027 10.1.10.66 |
2% |
640×480 ® med quality 1280×960 ® med quality |
always (500kbps) background (1000kbps) |
14 |
a |
|
© |
3rd Floor Storage |
AXISAXISM3004 10.1.10.36 |
1% |
320×240 ® med quality 1280×720 ® med quality |
always (500kbps) background (1000kbps) |
14 |
a |
|
© |
BasementAislel |
AXISAXISM3004 10.1.10.55 |
4% |
320×240 ® med quality 1280×720® med quality |
always (500kbps) background (1000kbps) |
14 |
0 |
Figure 94 – Installer Diagnostic Tools
Out of 16 cameras, the average is 50% duty cycle overall. Most of the bridge installations we see fall into an average duty cycle of 40-50%. Outdoor cameras have significantly higher duty cycles. Higher duty cycles are no problem so long as there is adequate bandwidth. Otherwise, a CMVR is required.
Bandwidth Usage and Recommendations:
We recommend 100kbps per camera for our real-time preview stream. You can adjust the quality by raising or lowering the settings but those are safe averages. We load balance and pool requests so that multiple people watching the same live stream view it through our cloud and only a single live stream between the bridge and our cloud are required.
This allows us to get more cameras on the same bandwidth. In addition, full resolution video streams can be watched live or through our history browser. Our Bandwidth management gets the most out of available bandwidth.
Page 88 of 92
rev 2.0
2021-07-01
WISeNET SKY
Wisenet SKY Cloud VMS User Manual
We have a low-bandwidth customer who has successfully deployed 8 HD cameras on our system on a 1.5 Mbps connection. We use 0.8Mbps for our low-resolution preview video. The quality of the cameras is set to “low” and 500 kb for full video. The customer has the ability to watch a live (or historic) HD video stream of any camera. The preview stream and background upload slow down while the full HD streaming is taking place. Once they finish, the preview stream speeds back up. A lower duty cycle as well as lower quality and bit rate for full video make this possible for the customer.
We replaced a camera installation at a daycare center. They were providing low-resolution video to parents so they could check on their children. Using their previous system, they were only able to support ~20 simultaneous viewers. Using our platform, all 80+ parents can see the preview stream at the same time. The preview stream only uses 0.8Mbps to upload to our cloud and our cloud serves all the parents.
When talking about bandwidth we segment it into three groups; real-time bandwidth, background bandwidth, and on-demand bandwidth. Real-time bandwidth is what the bridge and cameras use to send and receive metadata and preview images. By default we set it to 50kpbs and recommend adjusting to 100kbps or until image updates are smooth.
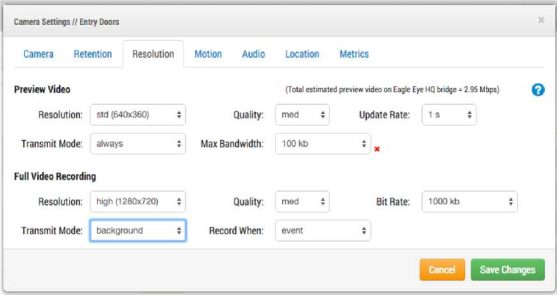
Figure 95 – Camera Settings Resolution
Background bandwidth is how we refer to background video uploading. When video is saved to the bridge it goes into a queue and is scheduled to be uploaded. The metadata travels ahead to the cloud. As bandwidth allows, the background video is sent up and removed from the bridge. The bridge allows for bandwidth limits to be scheduled so as to not interfere with other network traffic.
Page 89 of 92
rev 2.0
2021-07-01
WISeNET SKY
Wisenet SKY Cloud VMS User Manual
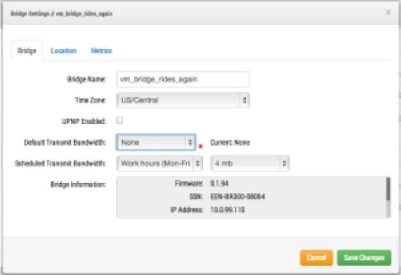
Figure 96 – Bridge Settings no default transmit
You can see that I have set the bridge to not use any background bandwidth during working hours and use 4mbps during non-work hours. Here is what that bridge metrics look like and they confirm those settings.
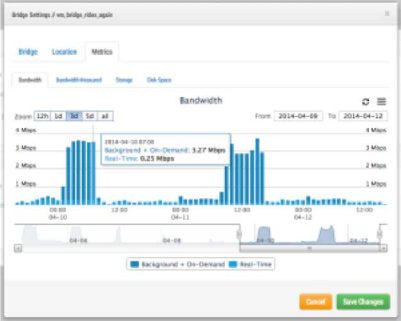
Figure 97 – Bridge Settings Metrics Bandwidth
On-demand bandwidth is the highest priority and will utilize all the bandwidth of real-time and background settings. When something is requested from the bridge that has not been uploaded yet, it will be immediately pulled from the bridge and sent to the client. This is the case for live video.
Our cloud will also transcode the video into other formats depending on the client’s request. Live streaming has a couple seconds latency. Video conversion adds additional latency for live viewing. Our goal is to keep live streaming within 2-3 seconds and live stream with video conversion within 8-10 seconds.
Page 90 of 92
rev 2.0
2021-07-01

