Dahua SmartPSS AC Complete User Guide, SmartPSS-AC is new platform software featuring lightweight, flexibility and specialization. It is designed for small and medium scenarios in solutions and can connect to various Dahua security products. Users can easily obtain the needed platform client that is used by corresponding solution.
Currently SmartPSS-AC has full function modules for attendance check and access solutions. It can connect to Dahua attendance check terminal, fingerprint/card/password access control devices, and access controller. It can meet the needs for attendance check of small and medium enterprises, such as making shift schedule, arranging staff shift, extracting attendance data, processing abnormality data, and exporting report.
In access solution, there are some new functions, such as scheduled extraction of attendance records at multiple time points, feedback function to improve user experience and more.
Features
- Connect to attendance terminal and access controller.
- Up to 64 channels access (64 channels of attendance terminal and access control).
- Make attendance check for up to 1000 people.
- Report real-time attendance data.
- Extract staff information from device.
- Extract attendance information from device.
- Send staff information from platform to device.
- Support maintenance functions, such as IP modification, initialization, time configuration and restart.
Instructions
- How to add an Access Controller to SmartPSS-AC
- How to create Time Templates and Holiday Schedules on SmartPSS-AC
- How to add Users with Pins, Cards, and Fingerprints on SmartPSS-AC
- How to Create a Permission Group on SmartPSS AC
- Up to 128 time templates to be configured.
Dahua SmartPSS AC Complete User Guide
Read Next : Dahua Password Reset Instructions
Technical Specifications
| Device | |
|---|---|
| Device Quantity | Max 64 (64 channels of attendance terminal and access control) |
| Channel Quantity | Max 64 (64 channels of attendance terminal and access control) |
| Attendance Check | |
| Personnel Quantity | Up to 1000 people |
| Records Quantity Supported for Export | Max 100,000 |
| Period | Max 32 |
| Shift | Max 32 |
| Holiday | Max 32 |
| Shifts for One Person | Max 32 |
| Access Control | |
| Personnel Quantity | Up to 1000 people |
| Time Template | Max 128 |
| Period of One Day | Max 4 |
| Holiday Plan | Max 16 |
| Anti-passback Group | Max 2 |
| First Card Unlock Record | Max 64 |
| Multi Card Unlock Record | Max 64 |
| Other Features | |
| Client Status | CPU status, storage status and alarm status |
| User Management | User role and authority |
| Log | Client log and device log |
| Operation System | |
| Minimum Configuration Requirement | CPU: Intel i3 Memory: 4gb HDD: 80gb |
| System Requirement | Windows 7, Windows 8, Windows 10 |
| Resolution | 1280×800 or higher |
Description
This article will show the steps on how to add an Access Controller to SMARTPSS-AC and change the Door Names easily identify the doors as we go through the configurations.
Important
Pre-requisites
Having an initialized Access Controller on the local network ready to go. Please Follow these instructions if not already done so:
Step by Step Instructions
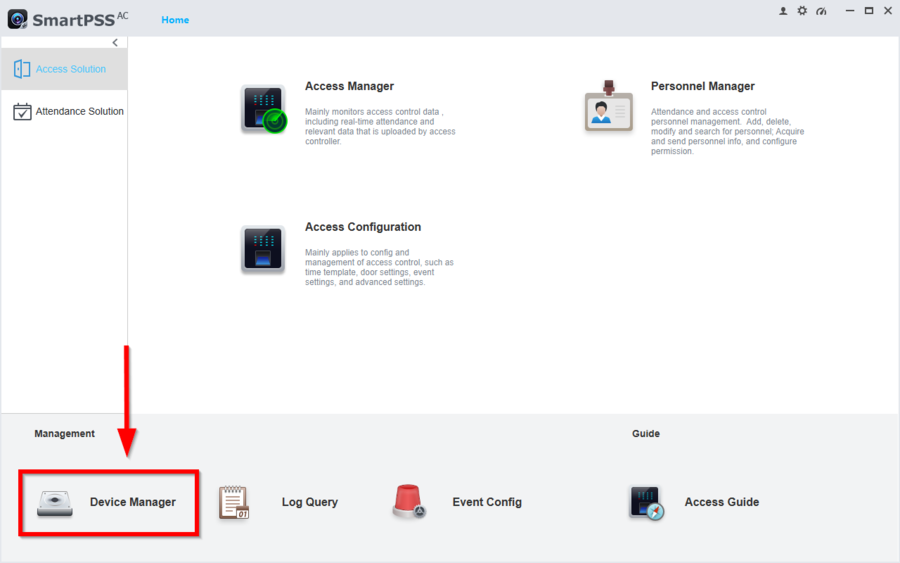
1. Open SmartPSS-AC and go to Device Manager
2. Click on Add
3. Enter the appropriate information of the access controller then click on add to finish adding the device.
4. You know it was successfull once you see the green status with Online.
5. At this point we recommend you go into the configuration of each door to rename them for an easier experience going forward.
Go back home and go to Access Configuration
6. On the left tabs click on Access Config -> then click on the door you want to rename -> then under the Door entry type the new name
Then click on Save
7. You should now see the Doors renamed
To continue with the setup please follow these next instructions How to create Time Templates and Holiday Schedules on SmartPSS-AC
Access Control/How to Create Time Templates Holidays on SmartPSSAC
Description
This article will show how to setup and create Time templates and Holiday schedules.
Time Templates are your normal everyday time schedules. These can be linked to your Permission Groups or Door Configuration Timezones.
Holiday Plans with override regular Time Templates on specific dates. These need to be linked with the Time Template creation.
Prerequisites
This article is a part of series of instructions. Please follow the Previous article before continuing with the configuration.
Step by Step Instructions
Time Template
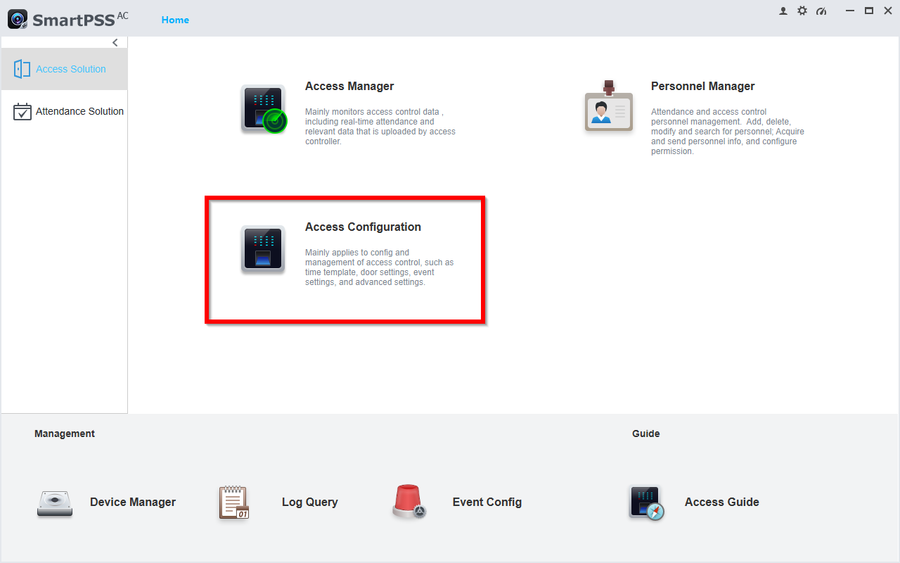
1. Go to Access Configuration
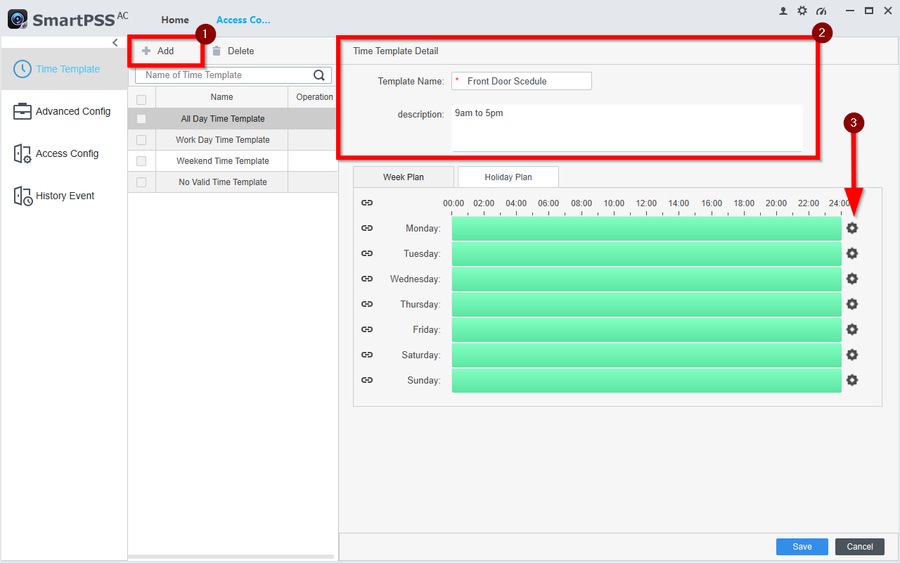
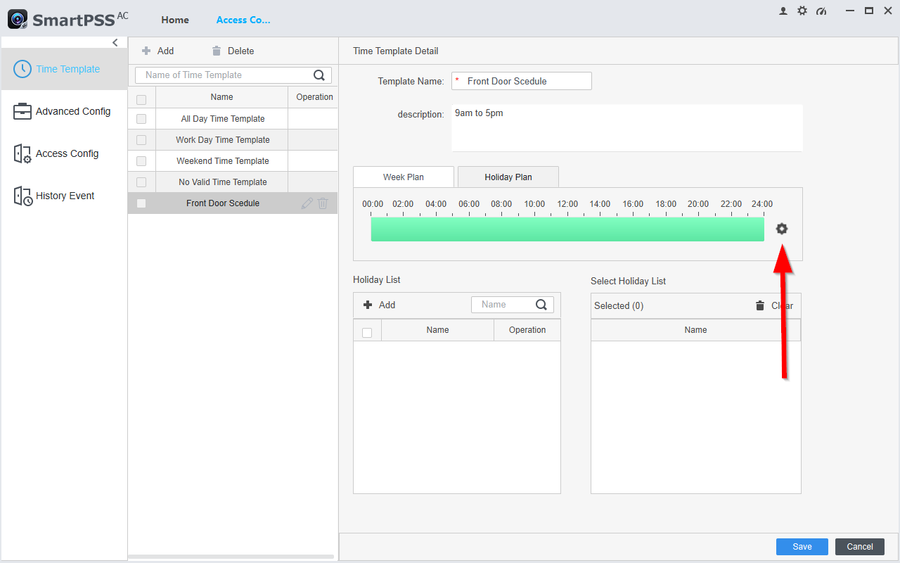
2. For these instructions we will create a 9am to 5pm Shift. Anything filled in with green is considered the Granted Access time. Greyed-out areas mean No Access
–Click on Add
–Give the Schedule a name and enter a description
–Click on the gear icon to edit the schedule
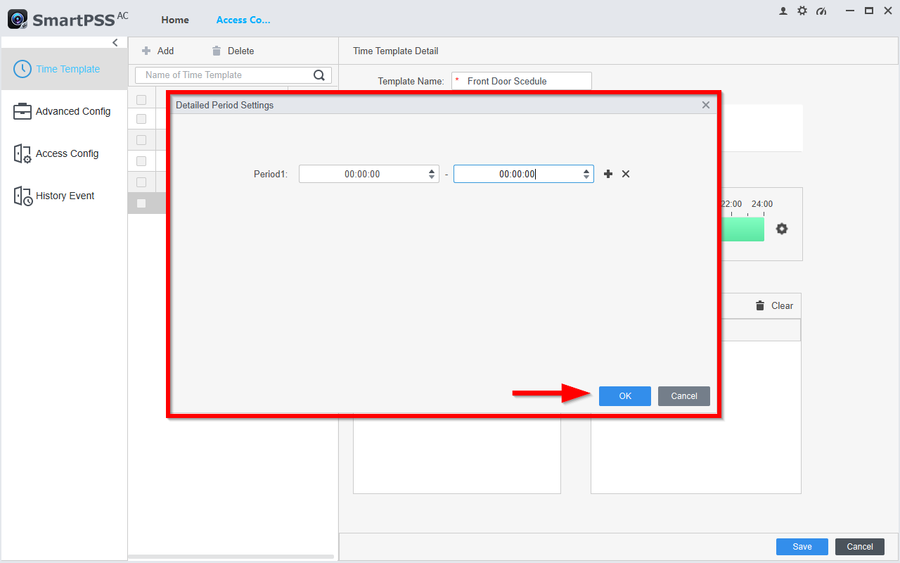
3. Now enter the time frame you want the doors to be active. You can also add multiple periods by clicking on +. You can also select the days you want the periods to take affect. For these instructions we will have a single period from 9am – 5pm ever single day of the week.
Holiday Plan
This section of the instructions will go over the Holiday Plan creation. Holidays will override the Week Plan we just created on specific days. In this example we will show a New Years Holiday plan with No Access during that date.
4. Go to Holiday Plan
5. Select the gear icon to modify the schedule
6. Edit the schedule you would like the Holiday plan to take. Then click on OK
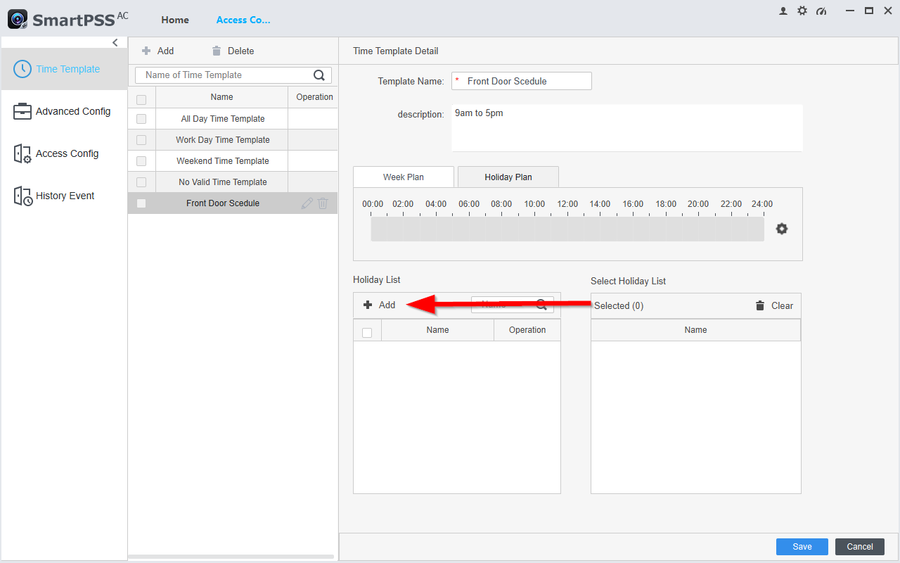
7. You can now see the schedule take affect on the timeline. Now go to Add under “Holiday List“
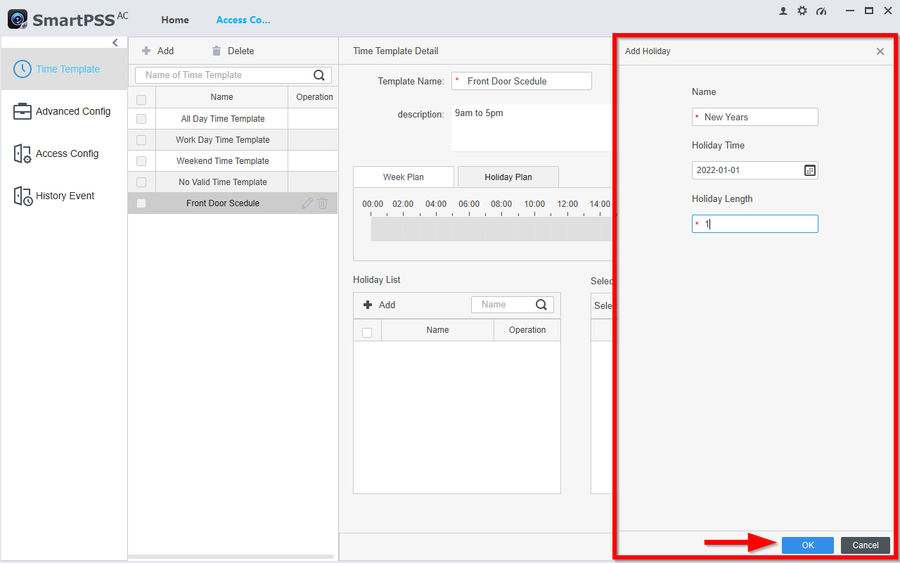
8. Here you will create the Holiday plan details
–Give the Holiday Plan a name
-Set the date you would like the Holiday Plan to take
-Set the amount of days the Holiday will take affect
Then click on OK to continue
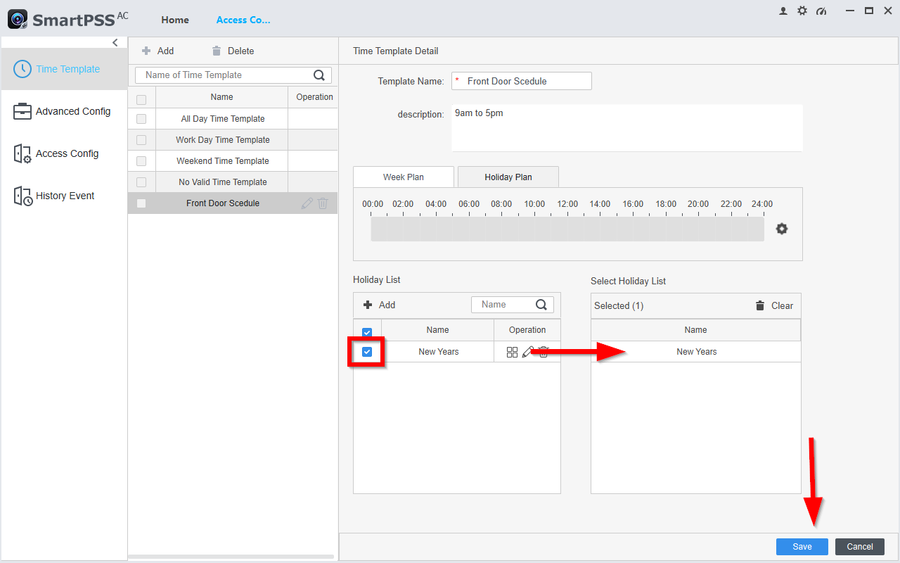
9. Make sure you check the Holiday we just created to link it to the Holiday Schedule. Then click on Save
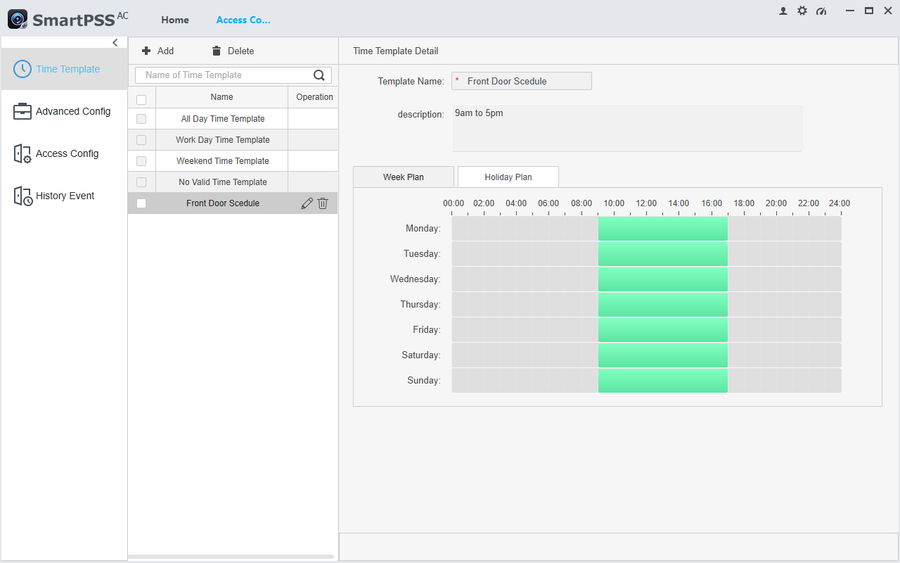
10. The Holiday is now in effect
To continue with the setup please follow these next instructions How to add Users with Pins, Cards, and Fingerprints on SmartPSS-AC
Access Control/How to Add Users With Pins Cards and Fingerprints to SMARTPSS AC
Description
This article will go over adding users with all three methods of authentication for doors on SmartPSS-AC.
Prerequisites
This article follows a series of instructions. If you have not followed our previous instruction please do so before continuing.
Step by Step Instructions
How to add a User
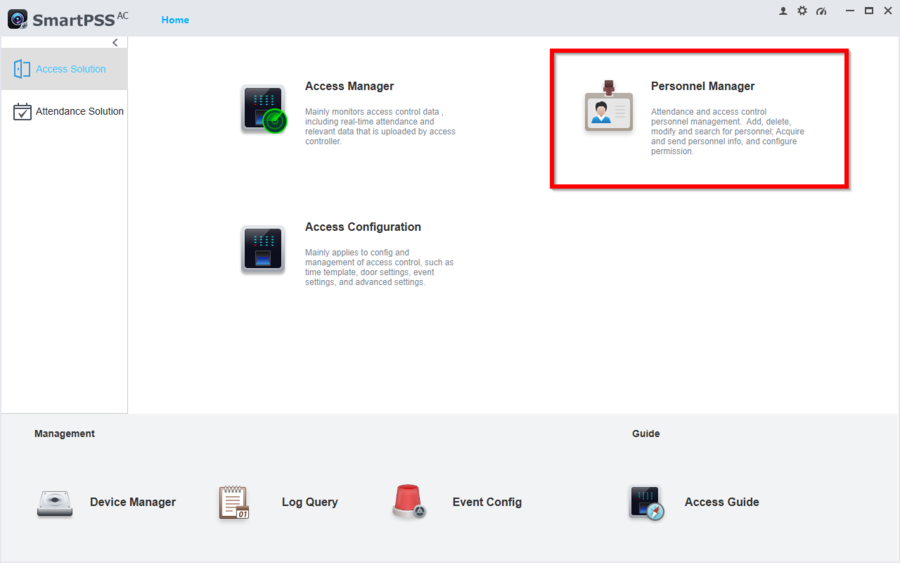
1. Go to Personnel Manager
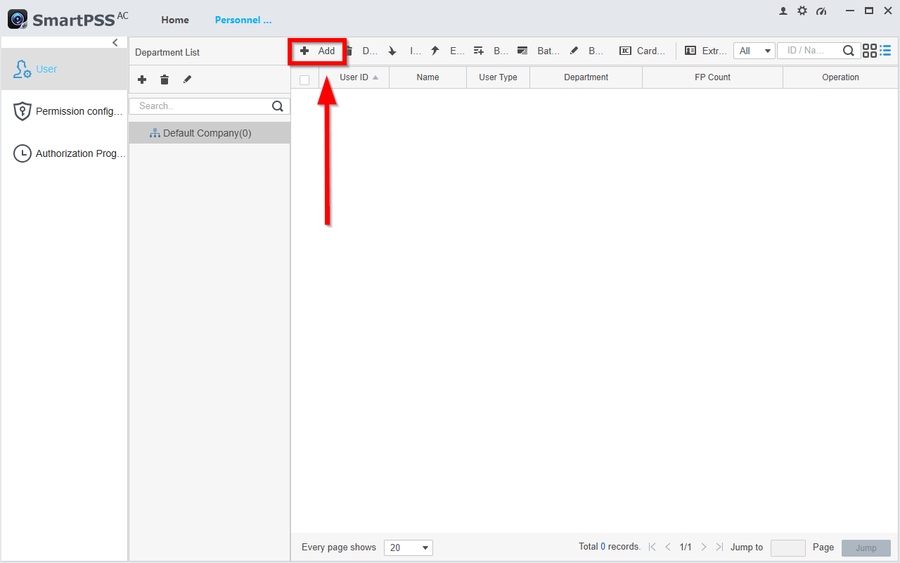
2. Click on Add
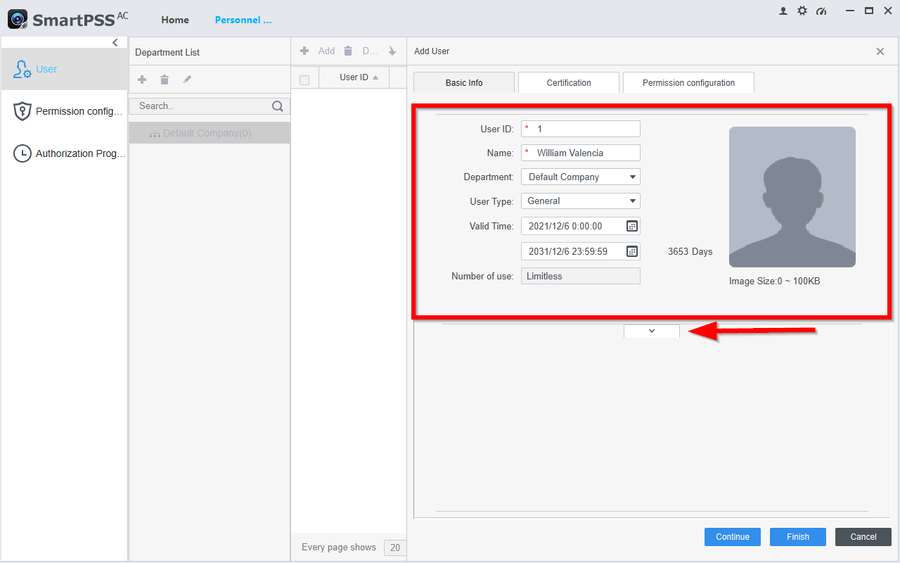
3. Assign the user a User ID and a Name. Click on the dropdown arrow to reveal more details.
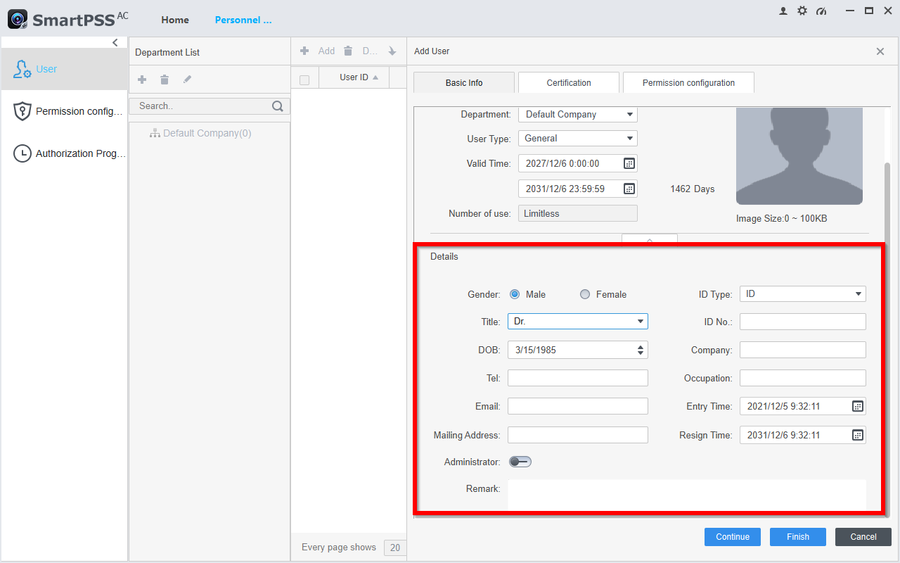
4. You can now further customize the user’s entry. Click Finish to complete adding the user.
How to assign PINs to Users
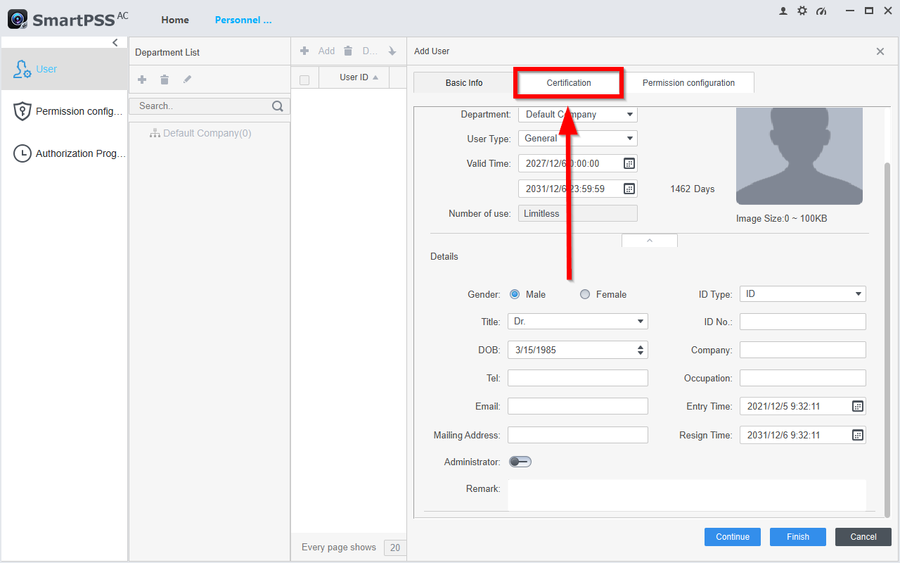
5. Go to Certification on the user.
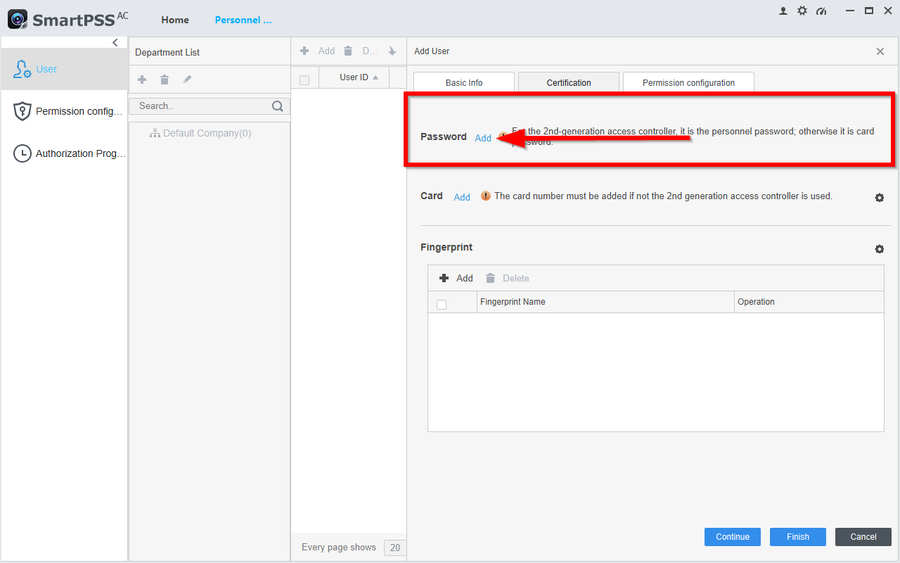
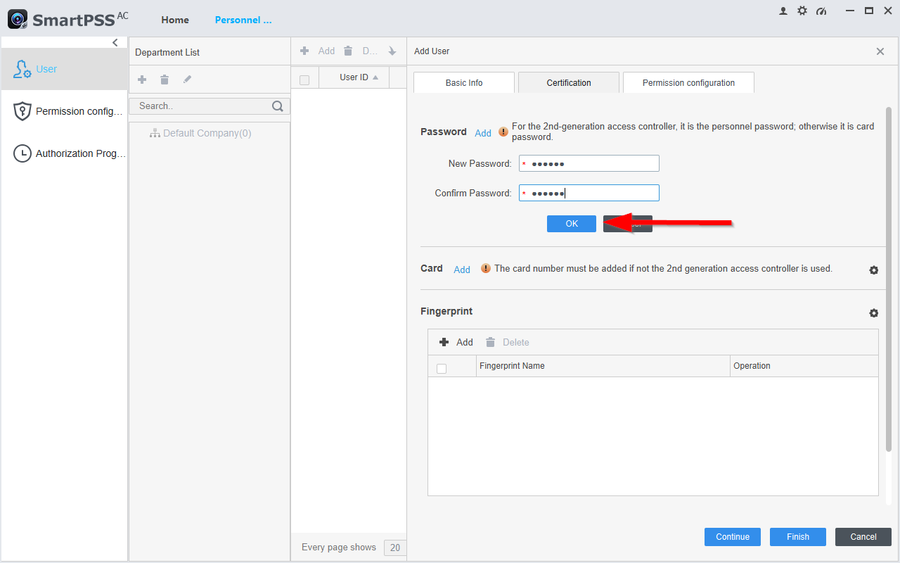
6. Click on Add to create a PIN
7. Enter at least a 6-digit password and confirm it. Then click on OK to save the entry. Then click on Finish to finalize the new PIN.
Note: to enter the PIN you will need to enter the UserID#6-digit# (i.e. 1#123456#)
How to assign Cards to Users
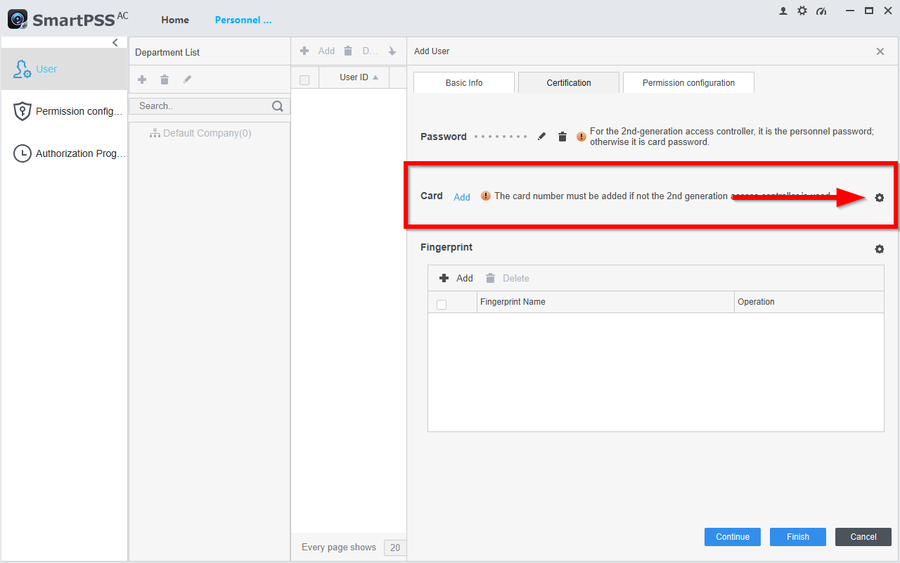
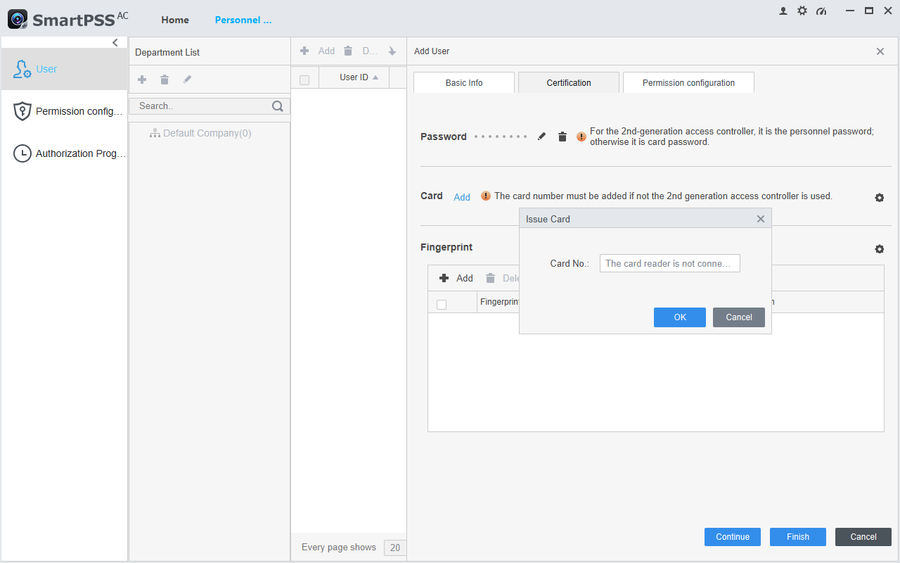
8. To add a card you first need to select the method. Click on the Gear Icon to select the method of adding the card.
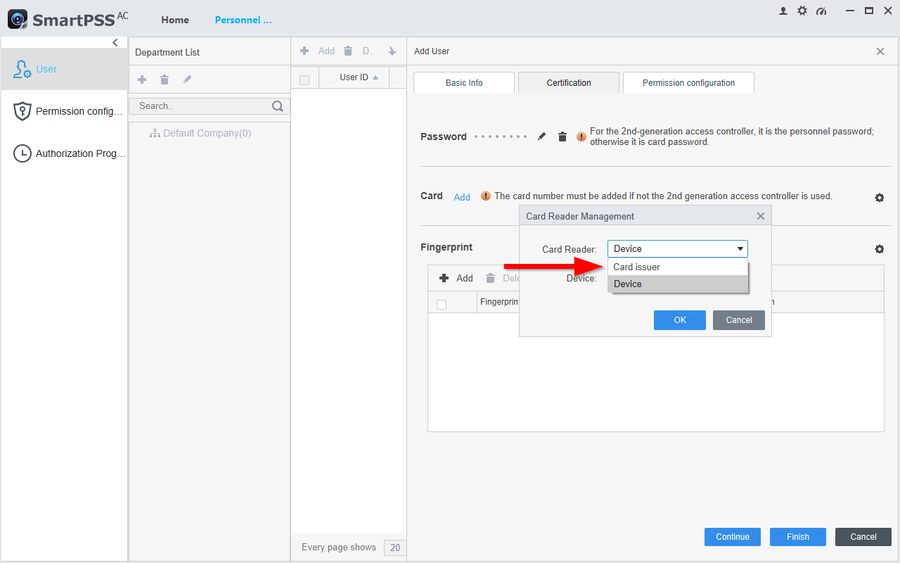
9. If you purchased the ASM100 then select Card Issuer
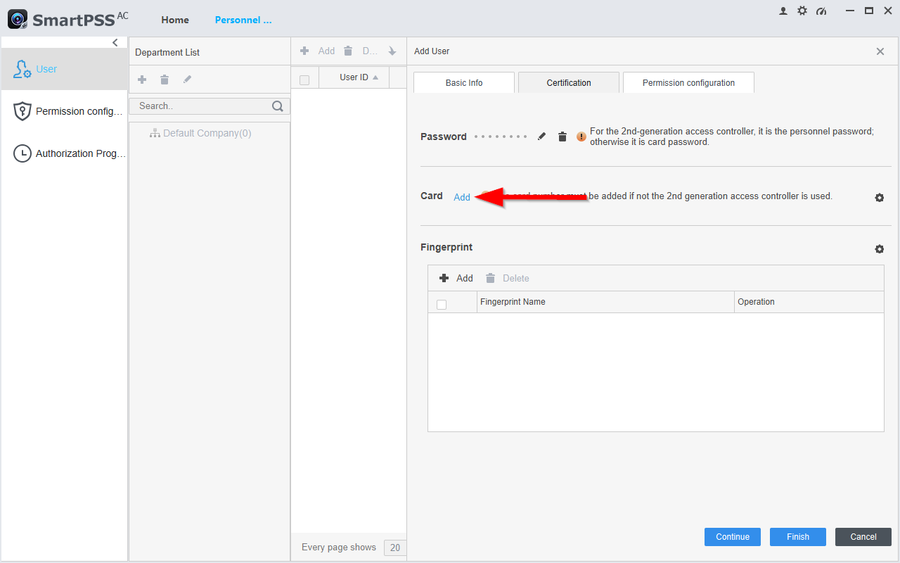
10. Then click on Add
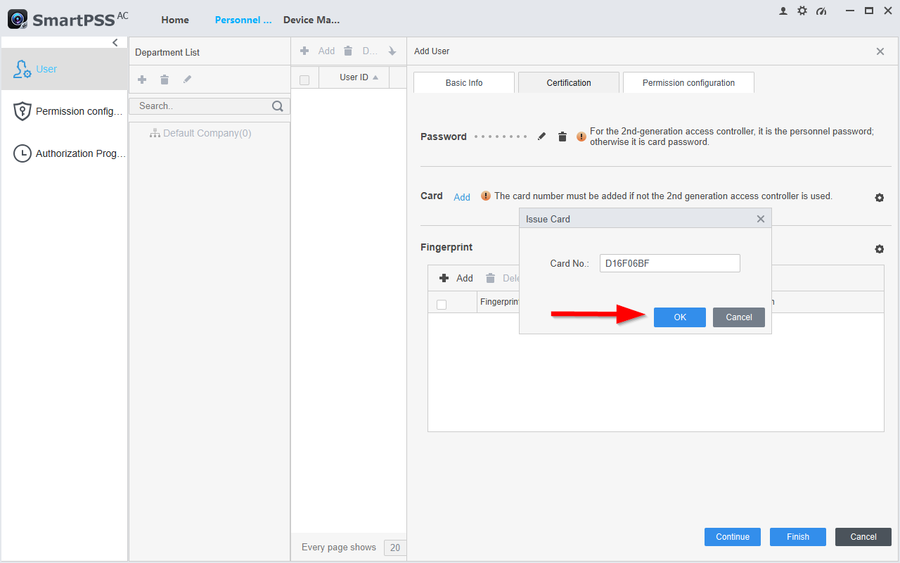
11. Scan the card on the ASM100 and the number will populate on the box entry. Click on OK to confirm.
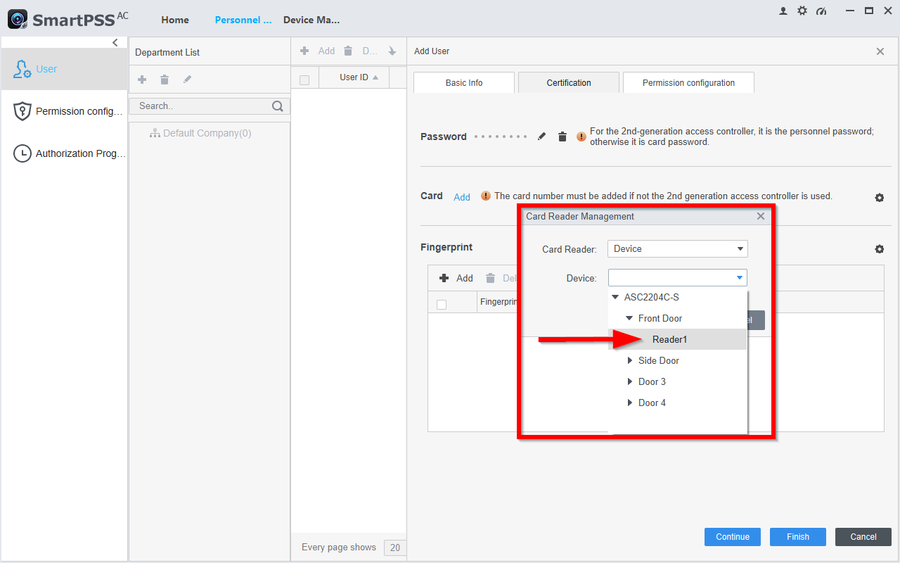
12. If you are using an existing Card Reader on the Access Controller then select the Door the reader is on. In this example I have the Card Reader on Door 1 which I renamed to Front Door.
13. Scan the card and the number should populate on the box entry. Click on OK to confirm.
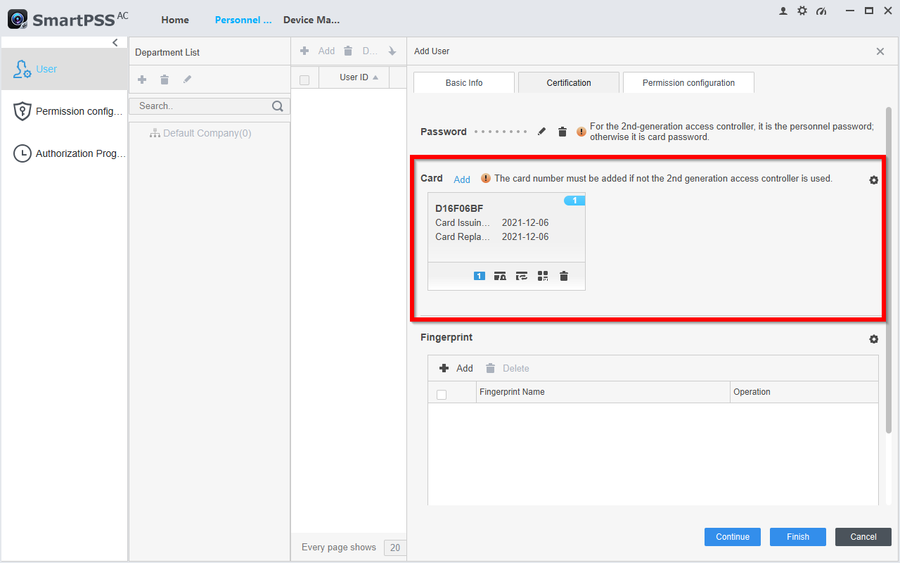
14. You will now see the Card entry if done correctly. Click on Finish to save any changes.
How to assign Fingerprints to Users
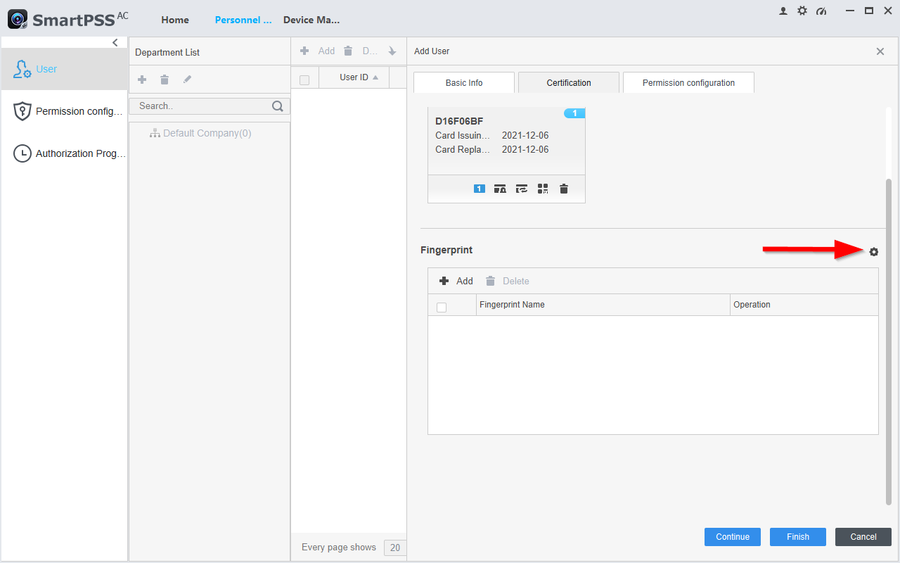
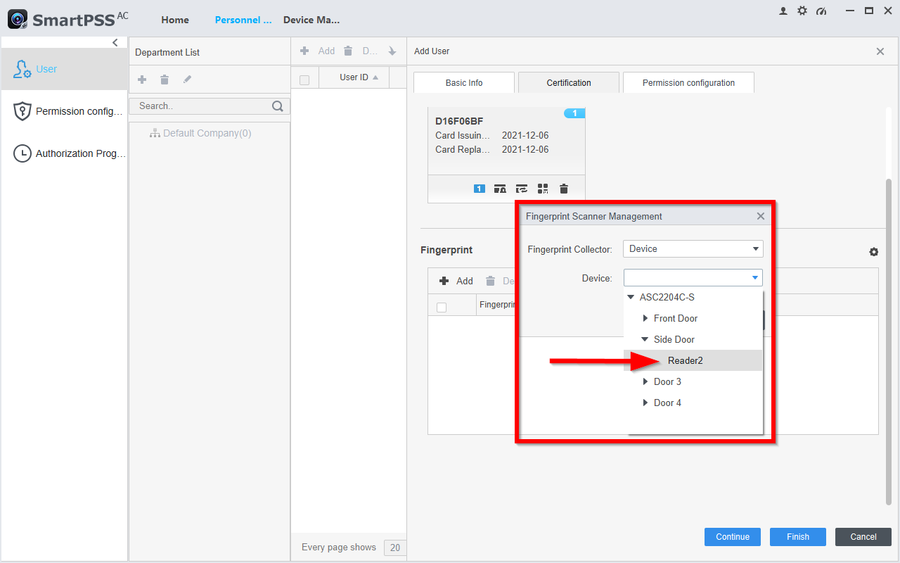
15. To add a Finger print you first need to select the method. Go to the gear Icon to select how you will be registering the fingerprint.
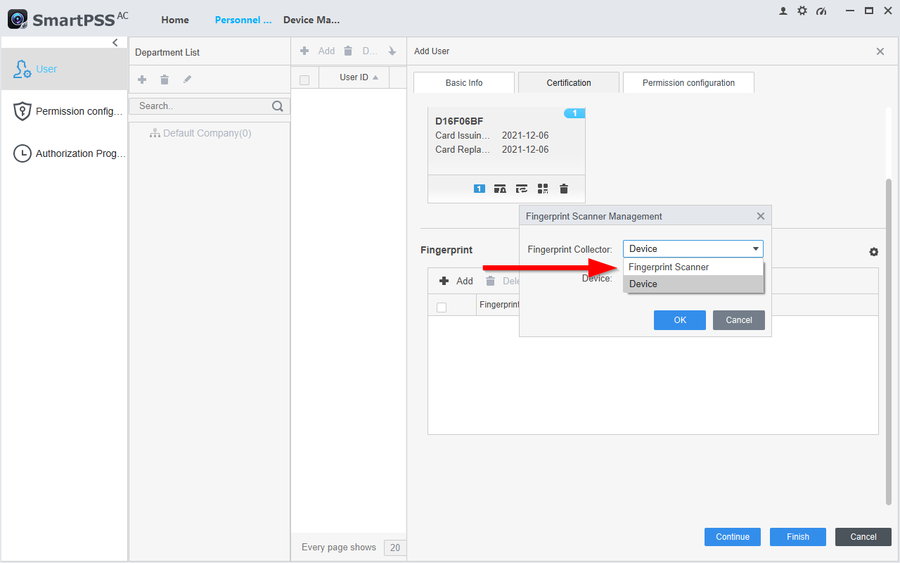
16. If you purchased our ASM202 select Fingerprint Scanner
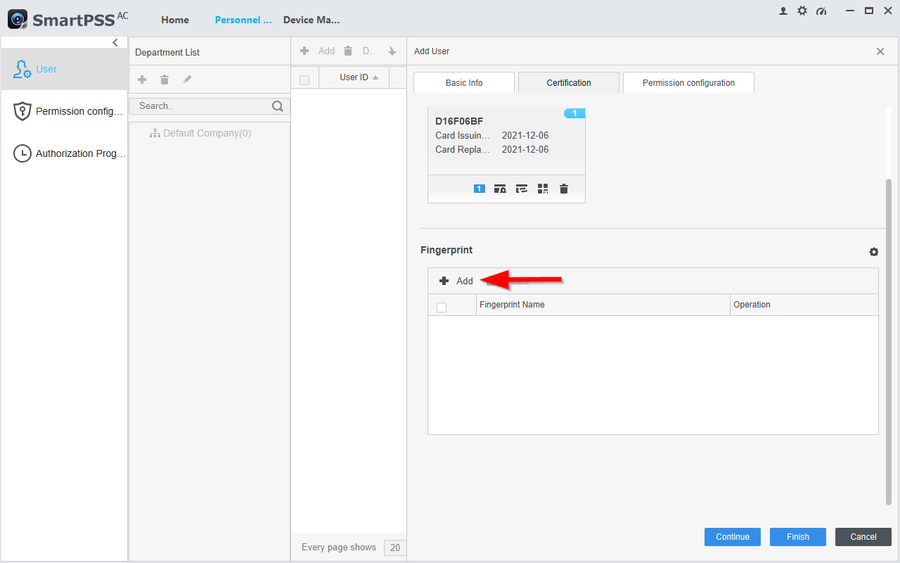
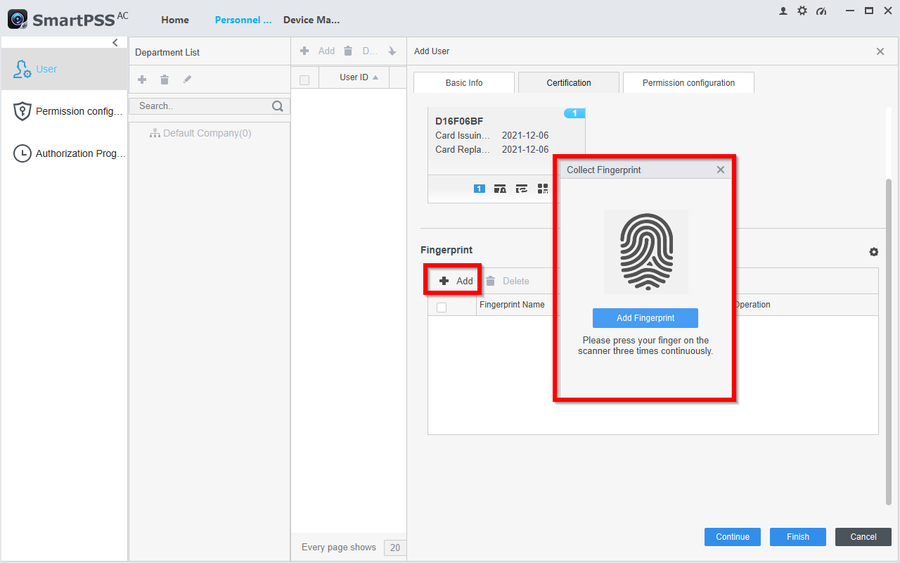
17. Then click on Add
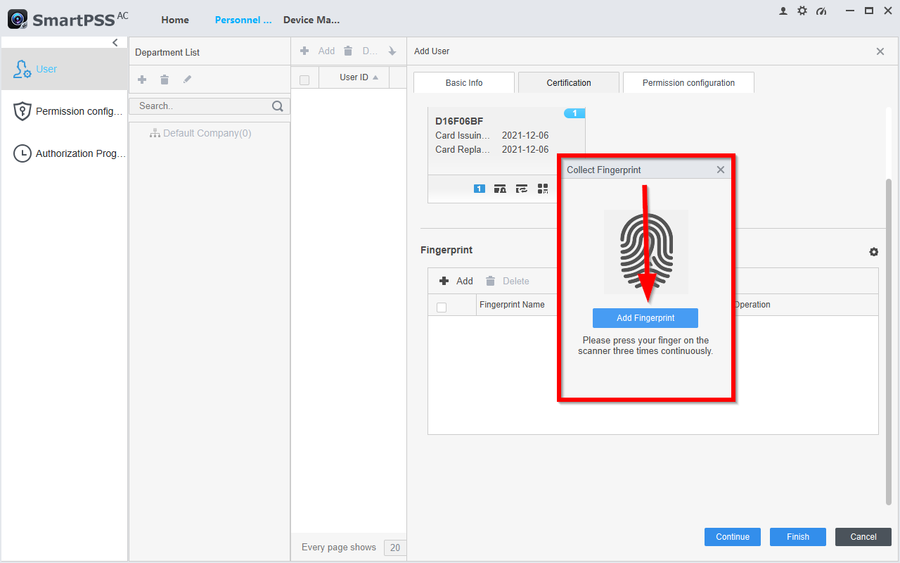
18. Select Add Fingerprint, then place your finger on the scanner. It will need to scan your finger a total of three times. Please wait for the beep after each scan.
19. In this article we will be using a Fingerprint reader on door 2 named Side Door.
20. Select Add Fingerprint, then place your finger on the scanner. It will need to scan your finger a total of three times. Please wait for the beep after each scan.
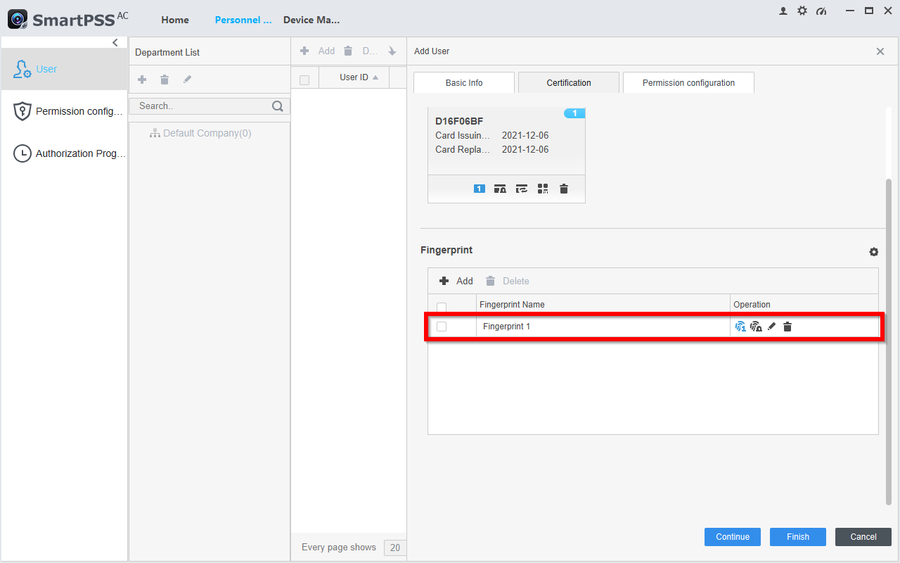
21. You will see the fingerprint entry if done successfully.
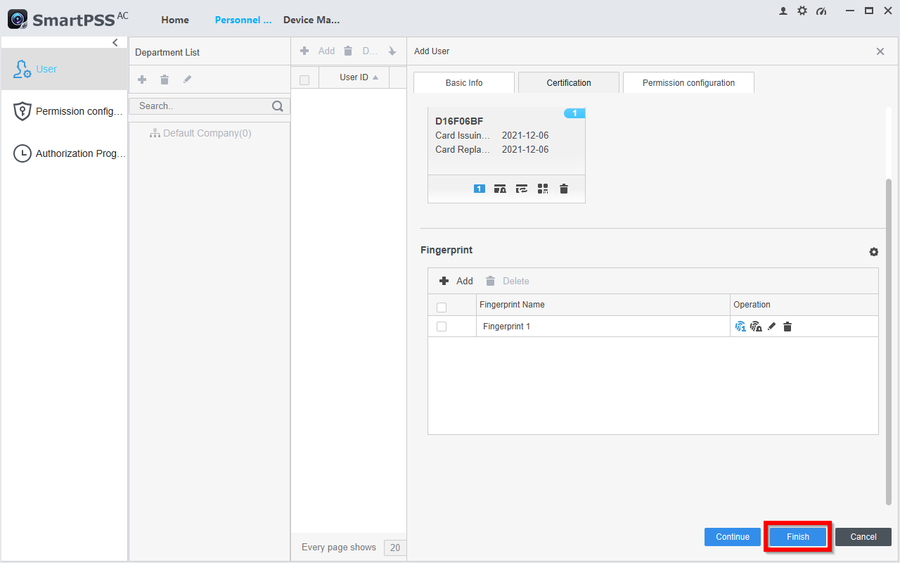
22. Click on Finish to save any changes.
To continue with the setup please follow these next instructions How to Create a Permission Group on SmartPSS AC
How to Create a Permission Group on SmartPSS AC
Namespaces
Page actions
Description
This article will go over how to create a permission group to SmartPSS-AC.
Creating a Permission Group will allow you to select one or several doors then be able to link users and time templates for those doors.
You can create multiple Permission Groups to fulfill specific entry permissions.
Prerequisite
This article follows a series of instructions. If you have not followed our previous instruction please do so before continuing.
Step by Step Instructions
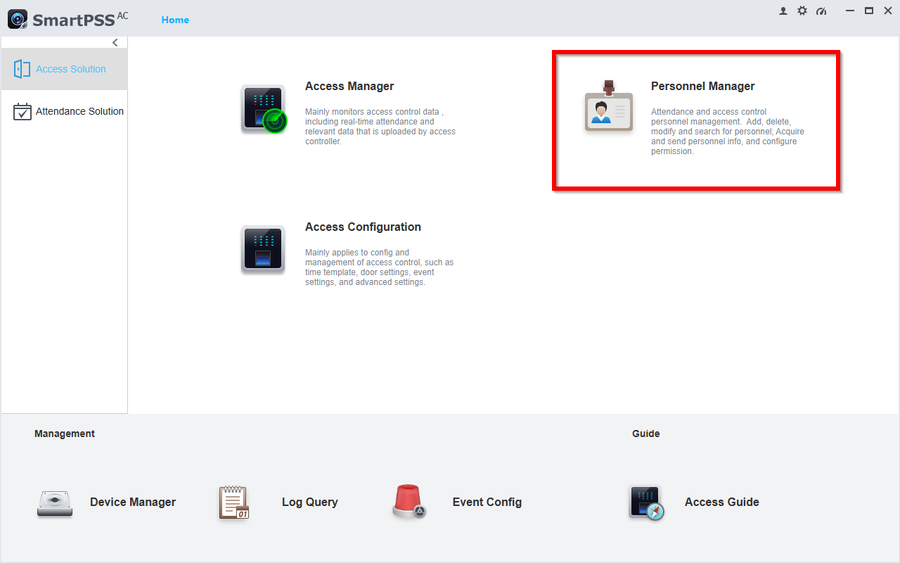
1. Open SmartPSS-AC and go to Personnel Manager
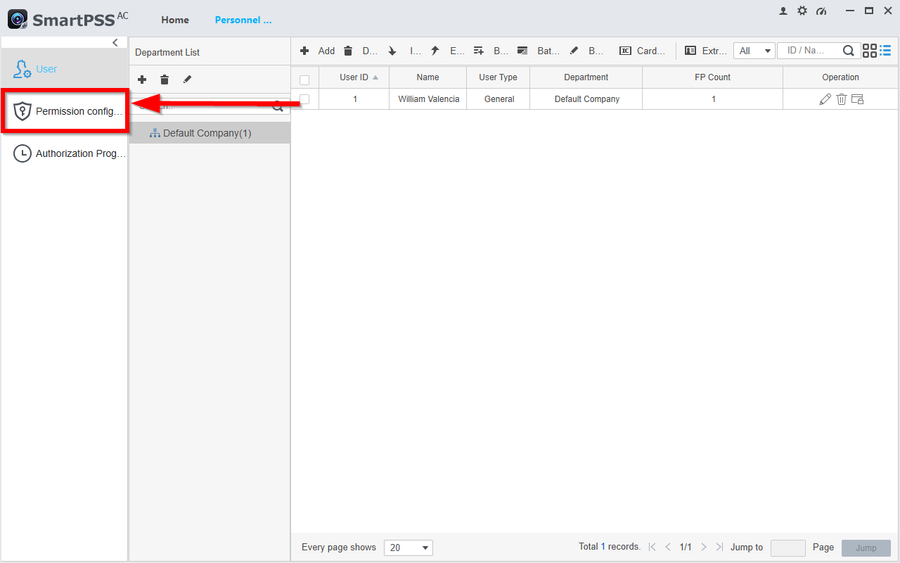
2. Click on the Permission Configuration tab on the left menus
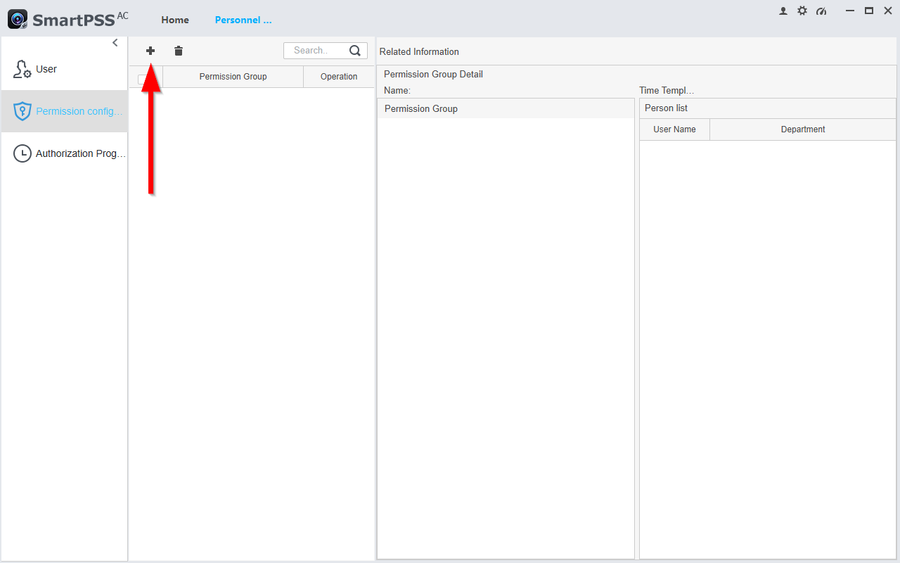
3. To start creating a Permission Group click on the + icon
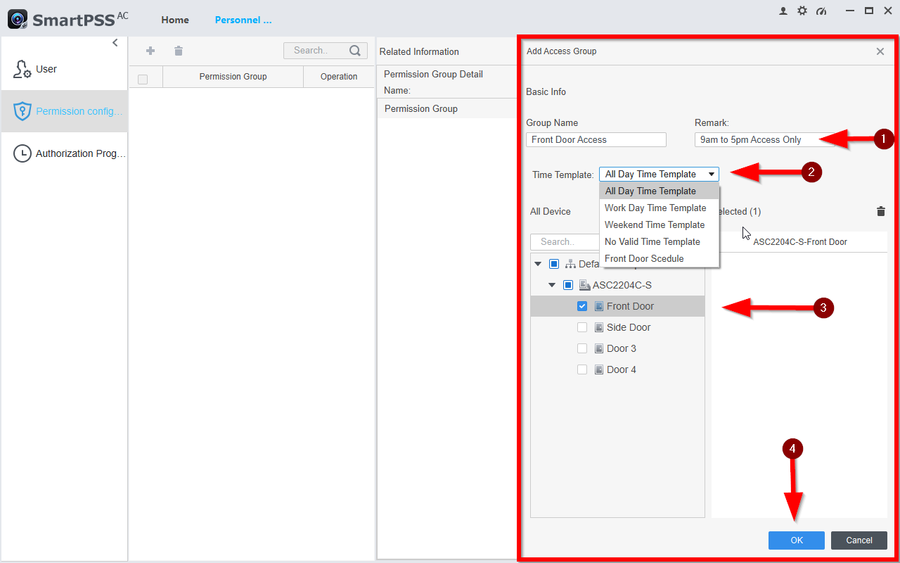
4. Follow these next following step
1. Give the door group a name and add a decryption or remark
2. Select the time template you created or select any of the pre-configured ones. In this tutorial we will be selecting the one we created “Front Door Schedule”
3. Select the Doors that will follow the time template
4. Click on OK to save it.
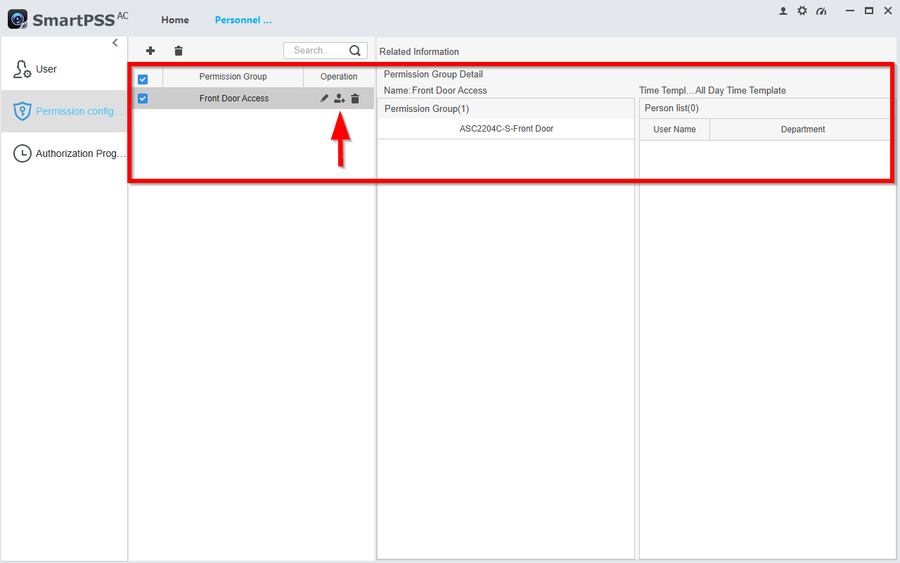
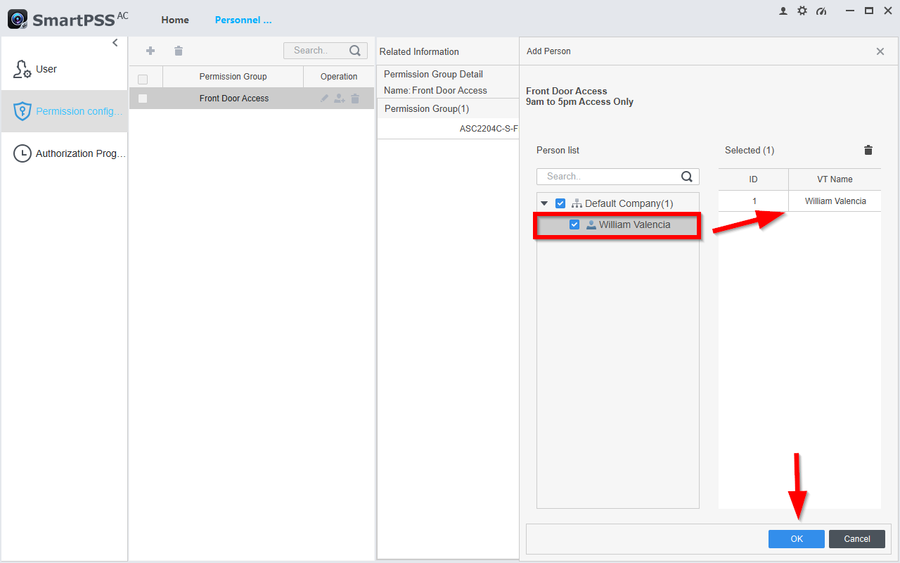
5. We now need to add users to the Permission Group to give them authorization to the linked Doors. Click on the “User” icon to start.
6. Select the users you want to give permission to the doors. Then click on OK to save the changes.
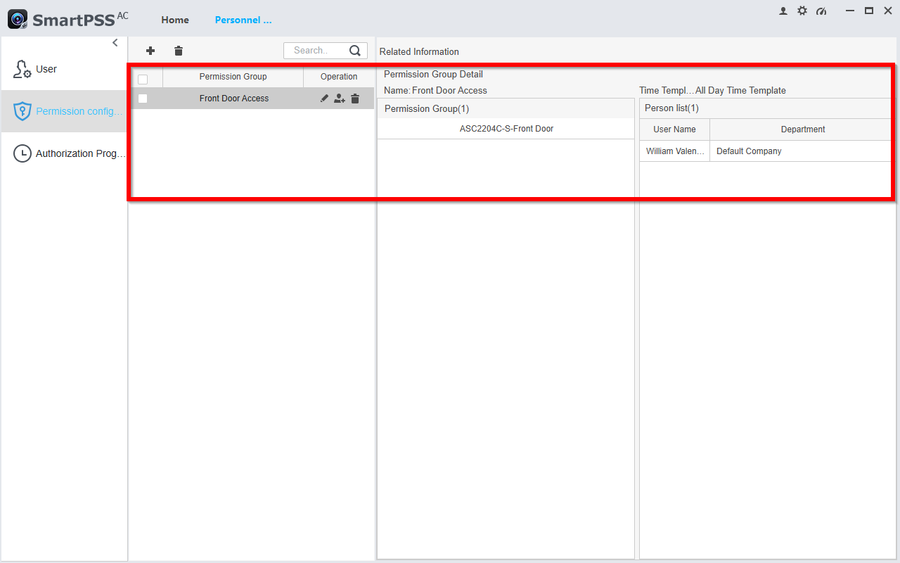
7. The Door group has now been created and you can verify to make sure the users and doors were saved correctly by checking on the permission group.
