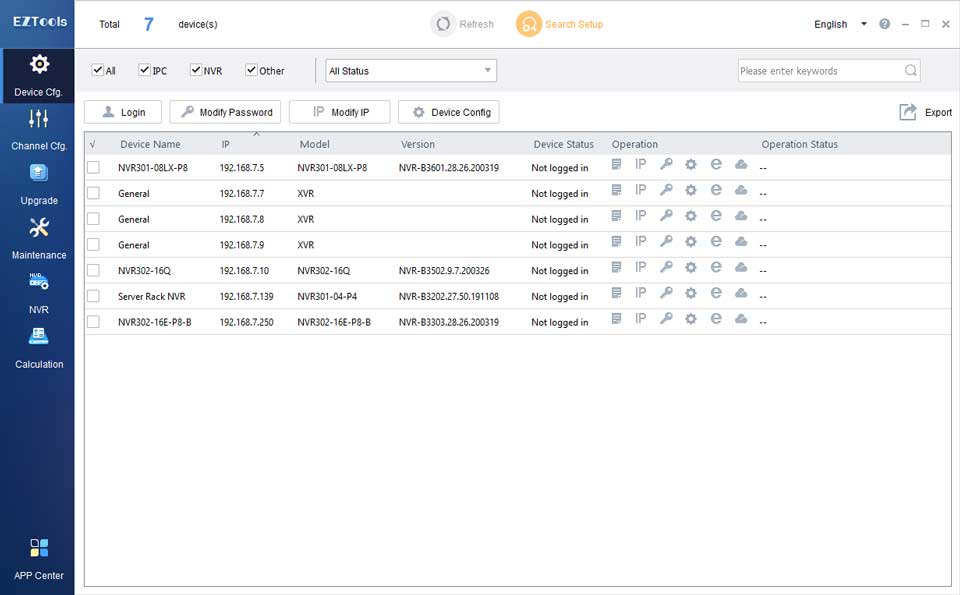
EZTools instruction manual, EZTools 2.0 is a tool kit for device management, channel management, device upgrade and maintenance, recording time and capacity calculation.
● Device Management: Search device; Change device password and IP; Configure device remotely including device name, time and network.
● Channel Management: Configure the image, encoding, OSD, and audio (for IPC only) settings.
● Batch upgrade: Upgrade devices using an upgrade file on the PC; Upgrade devices with Internet connection.
● Device Maintenance:Restore device to default settings; Import and export device configuration; export diagnosis info; Restart device.
● NVR Channel Management: Add or delete NVR channels.
● Capacity calculation: Calculate the allowed recording time based on the given disk space; Calculate the required disk space based on the given recording time.
System Requirements:
| Item | Requirements |
| Operating System | Microsoft Windows 7/ Windows 8/ Windows 10/ Windows 11 (32-bit or 64-bit). |
| CPU | Intel Pentium IV 3.0 GHz or higher. |
| Memory | 1 GB or higher. |
| Display Definition | 1280*720 or higher. |
This software is a tool used to manage and configure devices on a local area network (LAN) including IPC and NVR. Major functions include:
| Function | |
| Device Configuration | Configure the device name, system time, DST, network, DNS, port and UNP of an IPC or NVR. Besides, Change Device Password and Change Device IP Address are also included. |
| Channel Configuration | Configure channel settings including image, encoding, OSD, audio and motion detection. |
| Upgrade Device |
|
| Maintenance | Includes Configuration Import/Export, Export Diagnosis Info, Restart Device, and Restore Default Settings. |
| NVR Channel Management | Includes adding NVR channel and deleting NVR channel. |
| Calculation | Calculate recording time allowed or disks needed. |
| APP Center | Provides a portal through which users can download, install and upgrade other software. |
Before you start, make sure the computer on which this software runs and the devices to manage are connected by network.
Read Next :
Upgrade
Check for updates, download and install the latest version.
English
New Version
About
Name: EZTools 2.0
- You can choose to install immediately or later when the new version is downloaded. Clicking in the upper right corner will cancel the installation.
- Install Now: Close the software and start installation immediately.
- Install Later: The installation will start after the user closes the software.
Install
©
Download completed. Choosing Install Now will close the software automatically.
Install Now H Install Later
Functions
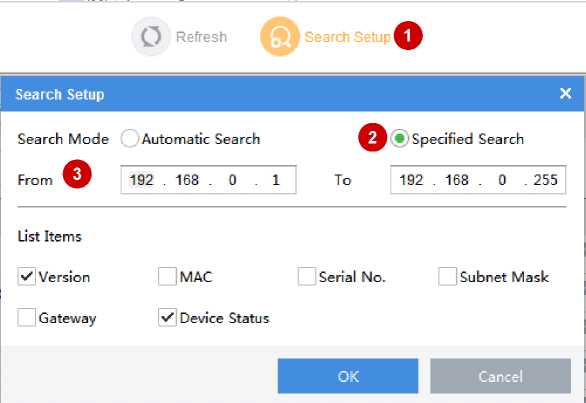
The software automatically searches for devices on the LAN where the PC resides and lists the discovered. To search a specified network, follow the steps as shown below:
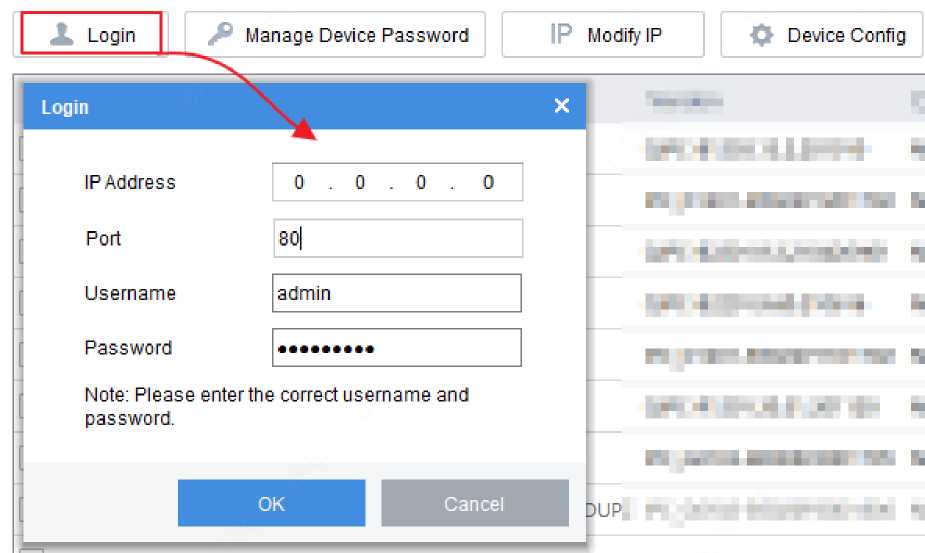
You need to log in to a device before you can manage, configure, upgrade, maintain or restart a device. Choose the following methods to log in to your device:
• Log in to device in the list: Select the device(s) in the list and then click the Login button on the top.
X Login^^ ft Manage Device Password IP Modify IP | | O Device Config | p Export
| V | Device Name | IP | Model | Version | Device Status | Operation | Operation Status | ||||
| IPC-E616-IR@DU-X… | 192.168.4.123 | IPC-E616-IR | QIPC-B1203.13.2.201010 | Not logged in | IP | 0 | e | A .. | |||
| IPC-B301-IR1@P-F36 | 192.168.4.178 | IPC-B301-IR1 | IPC_D1201-B5022P12D1702 | Not logged in | IP | o | e | A .. | |||
| TIC6831-IR@F50-4… | 192.168.4.164 | TIC6831-IR | QIPC- B2201.9.3.210426H01 | Not logged in | e | IP | o | e | A .. | ||
• Log in to device not in the list: Click Login, and then enter the IP, port, username and password
of the device you want to log in to.
The email address will be used to retrieve the password in case you forget it.
- Click Device Cfg. on the main menu.
- Select device(s), then click Manage Device Password > Verification Info on the top toolbar.
- Enter an email address, then click OK.
The default password is only intended for the first login. For security, please change the password when logged in. You can only change the admin’s password.
c
- For a single device: Click in the Operation column.
- For multiple devices: Select devices, then click Manage Device Password > Change Password on the top toolbar.
| V | Device Name | IP | Model | Version | Device Status | Operation | Operation Status |
| o | IPC3634ER3-DPZ28 | 192.168.4.102 | IPC3634ER3-DPZ28 | GIPC-B6102.26.36.200909 | Logged in | e ip /> o e a | Login succeeded |
| HIC6881-IR@X38-L. | 192.168,4.98 | HIC6881-IR | QIPC-B2201.8.0.201013 | Logged in | b ip > o e a | Login succeeded |
X Login S Manage Device Password IP Modify IP 0 Device Config
|~^ Export
- For a single device: Click IP in the Operation column.
- For multiple devices: Select the devices, and then click Modify IP on the top toolbar. Set the start IP in the IP Range box, and the software will automatically fill in other parameters according to the number of devices. Please make sure the username and password are correct.

Gateway
| IPC-B3O1-IR1@P-F36 192.168,! | ||
|---|---|---|
| TIC6831 -IR@F50-4… | 192.168> | |
| □ | TIC-S262-IR@PA-IR… | 192.168,; |
| □ | IPC-B3O1-IR1@P-F36 | 192.168,; |
| □ | HIC2821-H@A-WS-… | 192.168.; |
| □ | IPC-B312-IR@DP-I… | 192.168,; |
| □ | IPC2322EBR5-HDUPZ | 192.168J |
Device Name
ip Range
iDraucp.nwcDciA
I fiO
0 IPC-E616-IR@DU-X… 192.168,
| 255 | . 255 | . 255 . | 0 |
|---|---|---|---|
| 192 | . 168 | . 4 . | |
| IP(old) | IP(new) | Subnet Mask | Gateway | Username | Password | Operation Status |
|---|---|---|---|---|---|---|
| 192.168.4.123 | 192.168.4.123 | 255.255.255.8 | 192.1684.1 | admin | Not logged in | |
| 192.1684.178 | 192.168.4.124 | 255.255.255.0 | 192.1684.1 | admin | ••• «« | Not logged in |
| 192.1684.164 | 192.1684.125 | 255.255.255.0 | 192.1684.1 | admin | «•**«« | Not logged in |
Subnet Mask
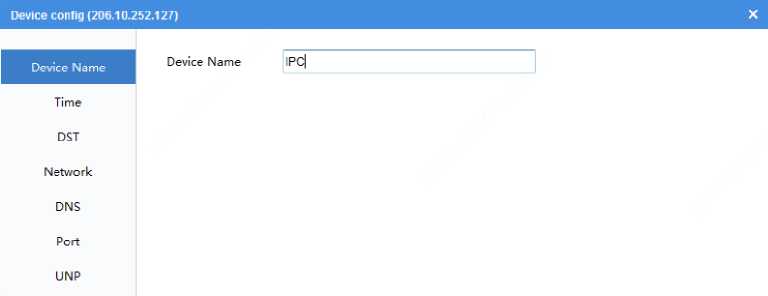
Configure the device name, system time, DST, network, DNS, port and UNP of an IPC or NVR.
NOTE!
You may select multiple devices to batch configure device system time, DST, DNS, port and UNP.
Device name and network settings cannot be configured in batches.
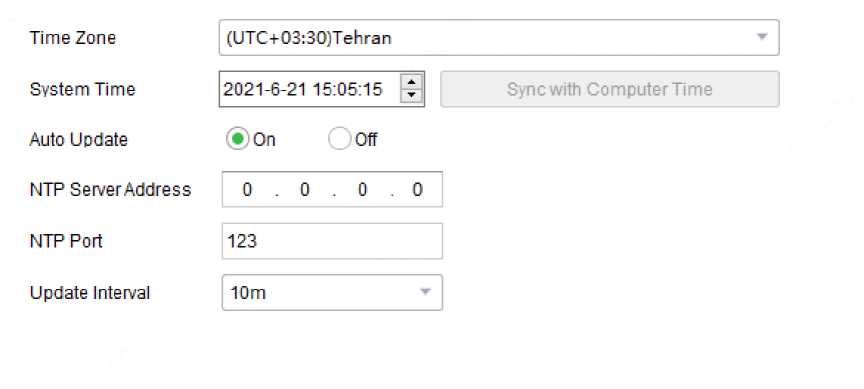
• Configure the time.
Synchronize the time of the computer or NTP server to the device.
- Turn off Auto Update: Click Sync with Computer Time to synchronize the computer’s time to the device.
- Turn on Auto Update: Set the NTP server address, NTP port and update interval, then the
device will synchronize time with the NTP server at set intervals.
• Configure Daylight Saving Time (DST).
DST On »Off
Start Time Feb ▼ First ▼ Mon 00 o’clock
End Time Mar Second Mon ▼ I 00 I o’clock
Bias 90 min
• Configure network settings.
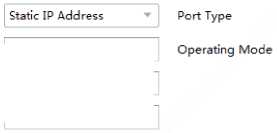

Gateway
IP Obtain Mode
Subnet Mask
IP Address
Copper Port
Auto-Negotiation
• Configure the DNS.
Preferred DNS Server 8.8.8. 8
Alternate DNS Server 0.8.4. 4
• Configure ports.
HTTPS Port 443
HTTP Port 80
![]() • Configure UNP. For a network with firewalls or NAT devices, you may use Universal Network Passport (UNP) to interconnect the network. To use this service, you need to configure on a UNP server first.
• Configure UNP. For a network with firewalls or NAT devices, you may use Universal Network Passport (UNP) to interconnect the network. To use this service, you need to configure on a UNP server first.
UNP Service
Off
0 . 0 . 0 . 0
(•Yes C No
Server Address
Authenticate
Username
Password
Configure channel settings including image, encoding, OSD, audio and motion detection. The parameters displayed may vary with device model.
NOTE!
You may select multiple IPCs of the same model and then click Channel Config on the top toolbar. NVR cannot be configured in batches.
3. Configure image, encoding, OSD, audio and motion detection as needed.
• Configure image settings, including image enhancement, scenes, exposure, smart illumination, and white balance.
NOTE!
- A double-click on the image will display it in full screen; another double-click will restore the image.
- Clicking Restore Default will restore all the default image settings. After restoration, click Get Parameters to obtain the default settings.
- To enable multiple scene schedules, select Multiple Scenes from the Mode drop-down list, select scenes and set the corresponding schedules, illumination ranges, and elevation ranges. Select the check box for the scenes that you have set, and then select the Enable Scene Schedule check box at the bottom to make the schedules effective. When conditions are met for a scene, the camera will switch to this scene; otherwise, the camera uses the default scene (shows ® in the Operation
column). You can click ™ to specify the default scene.
- You may copy image, encoding, OSD and motion detection configurations of an NVR channel and apply them to other channel(s) of the same NVR. See Copy NVR Channel Configurations for details.

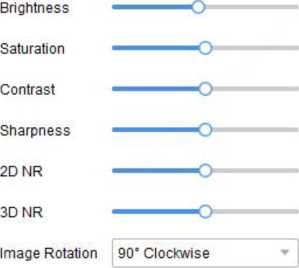
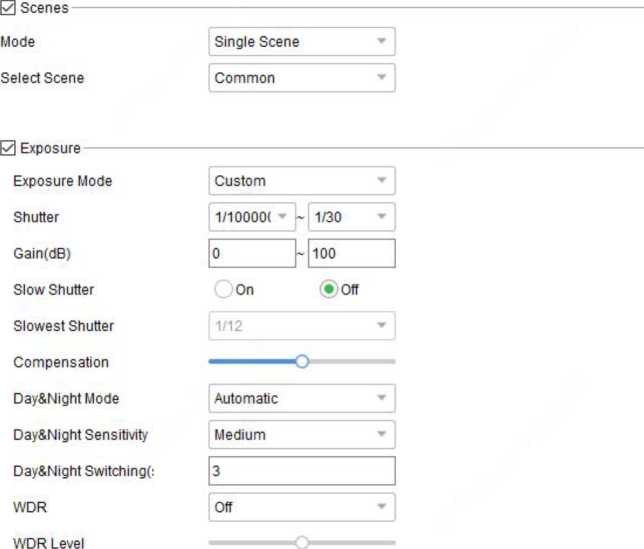
Image Enhancement
• Configure encoding parameters.
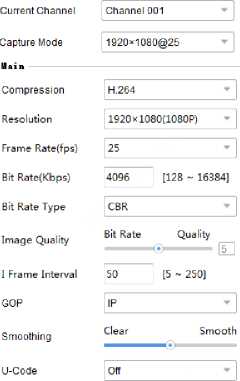
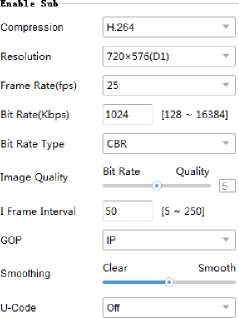
Copy To
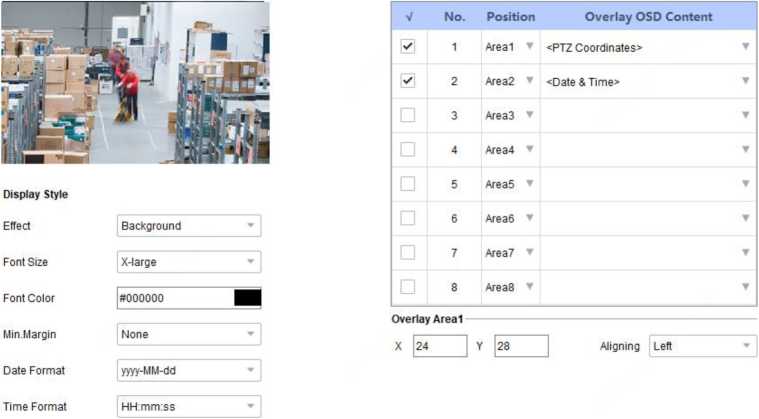
• Configure OSD.
1[1]1 Export L*J Import
NOTE!
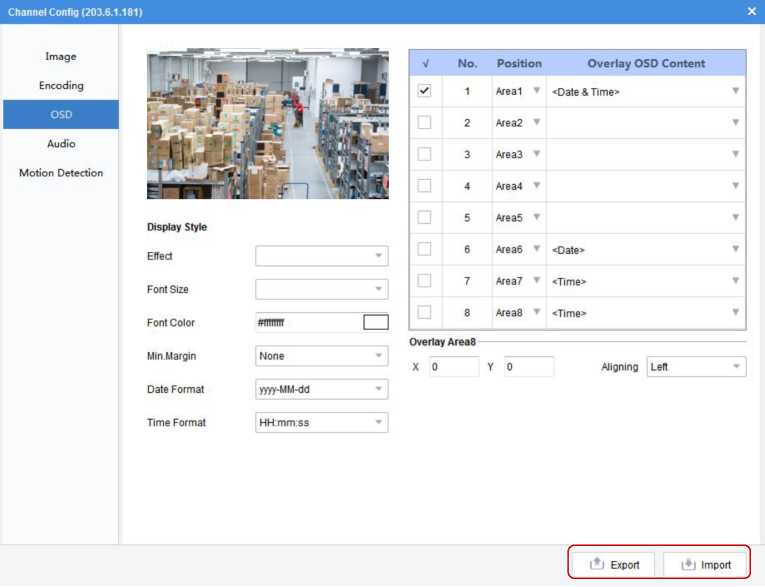
You can export and import OSD configurations of IPC channel(s). See Export and Import OSD Configurations of an IPC for details.

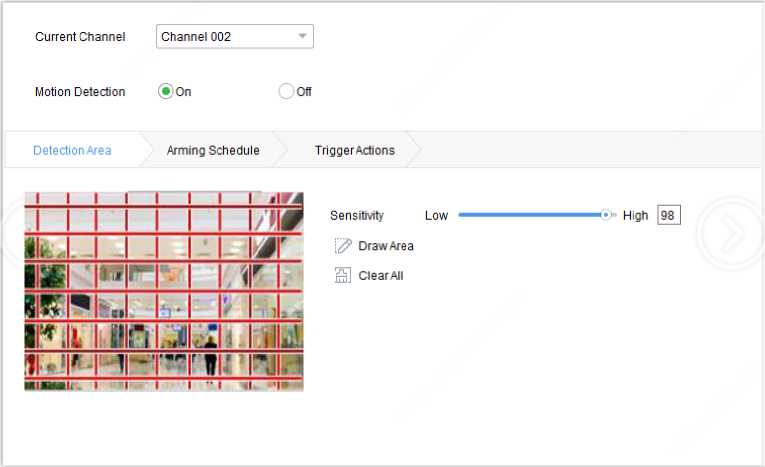
• Configure motion detection.
Motion detection detects object motion in the detection area during the set period. The motion detection settings may vary with device. The following takes NVR channel as an example:
| Item | Description |
| Detection Area | Click Draw Area to draw detection area in the left live view window. |
| Sensitivity | The higher the value, the easier a moving object will be detected. |
| Trigger Actions | Set the actions to trigger after a motion detection alarm occurs. |
| Arming Schedule | Set the start and end time during which motion detection takes effect.
0 Edit j O Reset 0 2 4 6 8 10 12 14 16 18 20 22 24 Mon Tu. Wed Thu Fri Sst Sur Holiday
|
View device information, including device name, model, IP, port, serial number, version info, etc.
g* NOTE!
Device info is also displayed for devices not logged in, but subnet mask and gateway will not be displayed.
Export information including name, IP, model, version, MAC address and serial number of device(s) to a CSV file.
- Click Device Cfg. or Channel Cfg. on the main menu.
- Select the device(s) in the list, and then click the Export button in the upper right corner.

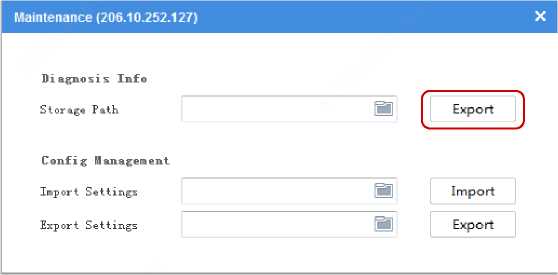
Diagnosis information includes logs and system configurations. You can export diagnosis info of device(s) to PC.
- Click Maintenance on the main menu.
- Click in the Operation column.
- Select the destination folder, and then click Export.
Configuration import allows you to import a configuration file from your computer to a device and change the current settings of the device.
Configuration export allows you to export current configurations of the device and save them as a file for backup.
- For a single device: Click ^in the Operation column.
- For multiple devices: Select the devices, and then click Maintenance on the top toolbar.

Restoring default settings includes restore defaults and restore factory defaults.
Restore defaults: Restore factory default settings except network, user and time settings.
Restore factory defaults: Restore all factory default settings.
- Click Maintenance on the main menu.
- Select the device(s).
- Click Restore on the top toolbar and then choose Restore Defaults or Restore Factory Defaults.

- For a single device: Click in the Operation column.
- For multiple devices: Select the devices, and then click Restart on the top toolbar.
| X | Login – Restart Restore | A Maintenan | |||||||||
| V | Device Name | IP Model | Version | Device Status | Operation | Operation Status | |||||
| 206.10.252,134 | 205.10.252.134 IPC2 | IPC_D | Logged in | IP | 0 | e | & | Login succeeded | |||
| o | 205.10.252,150 | 205.10.252.150 IPC2 | IPC_2 | Logged in | IP | o | e | & | Login succeeded | ||
| – | 205.10.252,151 | 205.10.252.151 IPC2 | IPC_2 | Logged in | IP | o | e | A | Login succeeded | ||
| 205.10.252,154 | 205.10.252.154 IPC2 | IPC_2 | Logged in | 5 | IP | 0 | e | A | Login succeeded | ||
Device upgrade includes local upgrade and online upgrade. Upgrade progress is displayed in real time during the upgrade.
Local upgrade: Upgrade device(s) using an upgrade file on your computer.
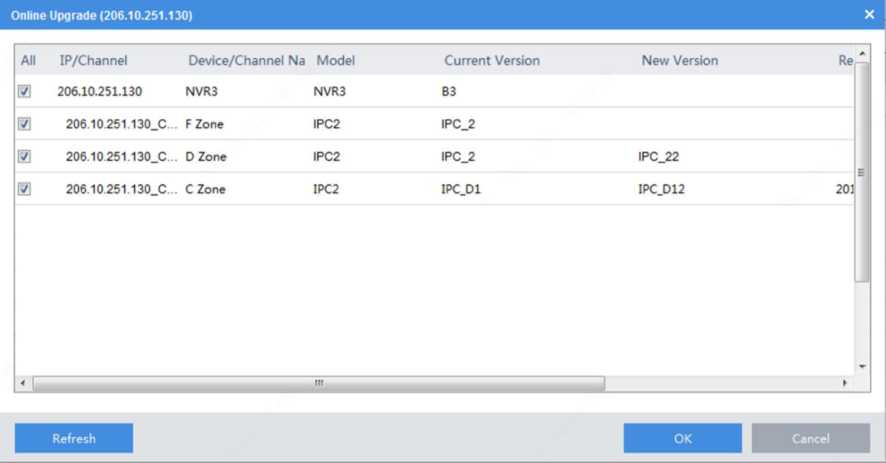
Online upgrade: With Internet connection, online upgrade will check the device firmware version, download upgrade files and upgrade the device. You need to log in first.
Local Upgrade Online Upgrade
| All | IP | Model | Version | Device Status | Upgrade Progress | Operation Status |
| 206.10.252.150 | IPC22 | 1PC.22O | Online | Logged in | ||
| 0 | 206.10.252.155 | IPC22 | IPC.220 | Online | Logged in | |
| 0 | 206.10.252.159 | IPC22 | IPC_22O | Online | Logged in | |
| 206,10.252.162 | IPC22 | IPC_220 | Online | Logged in | ||
| 206.10.252.166 | IPC32 | IPC.220 | Online | Logged in | ||
| 0 | 206.10.252.167 | IPC22 | IPC.220 | Online | Logged in |
Upgrade
NOTE!
- The upgrade version must be correct for the device. Otherwise, exceptions may occur.
- For an IPC, the upgrade package (ZIP file) must contain the complete upgrade files.
- For an NVR, the upgrade file is in .BIN format.
- You can upgrade NVR channels in batches.
- Please maintain a proper power supply during upgrade. The device will restart after the upgrade is completed.
Upgrade a device using a local upgrade version file
- Click Upgrade on the main menu.
- Under Local Upgrade, select the device(s) and then click Upgrade. A dialog box is displayed (take NVR as an example).
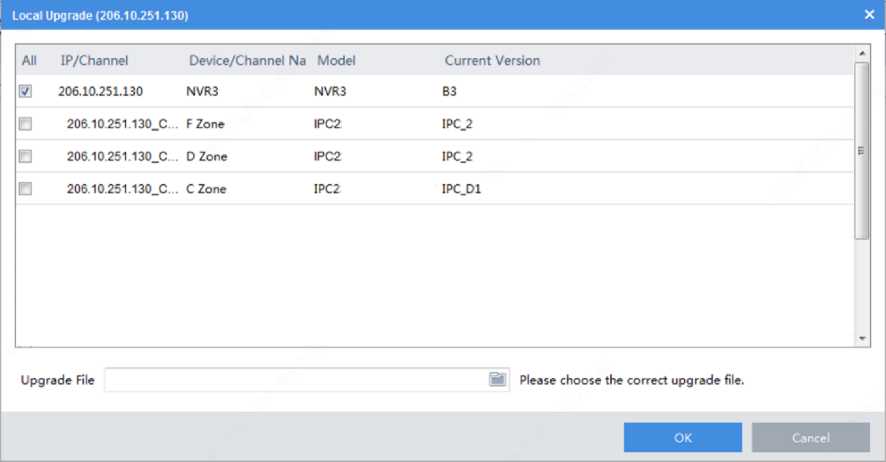
3. Select the upgrade version file. Click OK.
Online Upgrade
NVR channel management includes adding NVR channel and deleting NVR channel.
- Click NVR on the main menu.
- On the Online tab, select the IPC(s) to import, select the target NVR, and then click Import.
![]()
IPC: 7 online, 42 offline
~~j (41
Please enter keywords Q
S S ® IPC
p V^IPC 206.10.252.222
O EWIPC 206.10.3.55
H Sr IPC 206.10.3.77
13 Sr IPC 206.10.9.164
0 SrIPC 206.10.9.171
0 Refresh
Please enter keywords Q
Q 1 S NVR.206.10.9.216
D Sr2O6.1O.9.121_8O
D Sr 206.10.9.199.80
□ □ ff&NVR 206.10.9.80
D Sr206.10.9.199_80
D Sr 206.10.9.158 80
NOTE!
- In the IPC list, orange means the IPC has been added to an NVR.
- In the NVR list, blue means the newly added channel.
- To add an offline IPC, click the Offline tab (4 in the figure). The IPC’s username and password are required.
g NOTE!
- Use the Add button on the top if the IPC you want to add is not in the IPC list.
- To delete an IPC from the NVR list, place the mouse cursor on the IPC and click IUI
. To delete multiple
IPCs in batches, select the IPCs and then click Delete on the top.
Cloud Service
Enable or disable the cloud service and the Add Without Signup feature on the device; delete a cloud device from the current cloud account.
- Log in to the device.
- Click Device Cfg. or Maintenance on the main menu.
- Click in the Operation column. A dialog box is displayed.
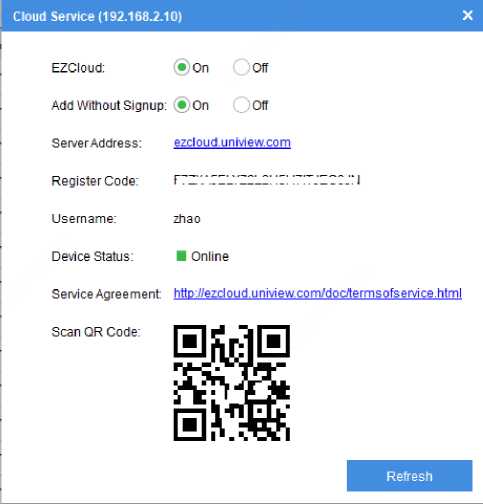
- Enable or disable the cloud service (EZCloud) as needed. When the cloud service is enabled, you can use the APP to scan the QR code below to add the device.
Note: Please click Refresh to update device status after you enable or disable the cloud service.
- Enable or disable the Add Without Signup feature, which, when enabled, allows you to add the device by scanning the QR code using the APP without signing up for a cloud account.
Note: The Add Without Signup feature requires the cloud service be enabled on the device and a strong password be set on the device.
Calculate recording time allowed or disks needed.
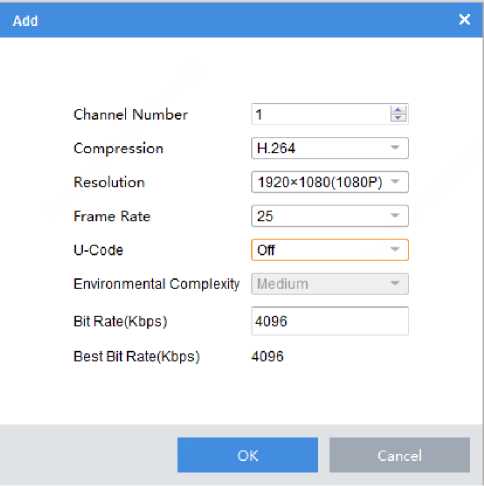
Note: You may also click Search to Add and select discovered devices for space calculation based on their actual video settings.
| T | 3tal 51 | device(s) | 0 Refresh W | ■ Search Setup | ||||
| + Add | 0 Edit | Ü Delete + S | earch to Adc | |||||
| V | Compression | Channels | Resolution | Frame Rate(fps) | Bit Rate(Kbps) | Total Bandwidth (Kbps) | ||
| * | H.264 | 10 | 1920xl080(1080P) | 25 | 4096 | 40960 | ||
| H.264 | 6 | 1280×720(720P) | 25 | 2048 | 12288 | |||
5. Select devices in the device list.
Calculate days in disk mode
Calculate how many days recordings can be saved based on the daily recording time (hours) and disk capacity available.
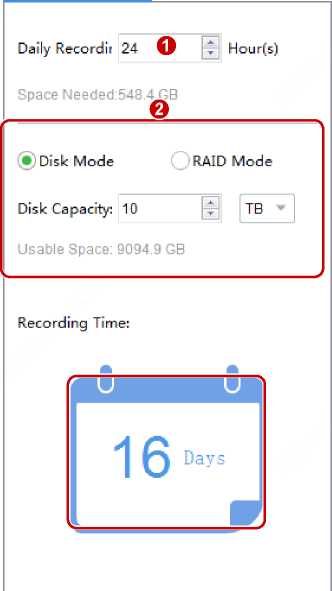
Calculate Days
Calculate Disks
Calculate days in RAID mode
Calculate how many days recordings can be saved based on the daily recording time (hours), configured RAID type (0/1/5/6), RAID disk capacity, and the number of disks available.
Calculate Days Calculate Disks
Daily Recordir 24 O |: Hou*)
Space Needed:548.4 GB
o
Disk Mode (S) RAID Mode
Disk Capacity: 10 C TB
RAID Type: RAID 5
RAID Disks: 5
Usable Space: 36379.7 GB
Recording Time:

Calculate disks in disk mode
Calculate how many disks are needed based on the daily recording time (hours), recording retention period (days), and disk capacity available.
Calculate Days Calculate Disks
—O =^-
Retention Tim 30 pl] Day(s)
Daily Recordir 24 pl] Hour(s)
Space Needed:16453.1 GB
• -J
°
(•) Disk Mode Q RAID Mode
Disk Capacity: 10 C TB ▼ I
Disks Needed

Usable Space: 18189.9 GB
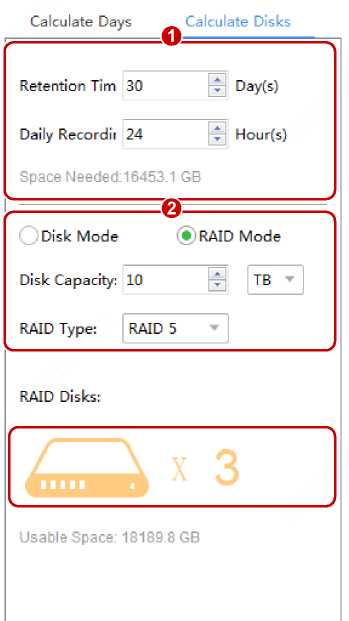
Calculate disks in RAID mode
Calculate how many RAID disks are needed based on the daily recording period (hours), recording retention period (days), RAID disk capacity available, and configured RAID type.
Select a device by selecting the check box in the first column of the list.
To select multiple devices:
- Select devices one by one.
- Click All to select all.
- Click to select devices while holding down <Ctrl>.
- Click to select devices while holding down <Shift>.
- Drag the mouse while holding down the left button.
Filter the list by entering a keyword contained in the IP, model, version, and name of the desired devices.
o
Click * to clear entered keywords.
In the device list, click a column title, for example, device name, IP, or status, to sort the listed devices in ascending or descending order.
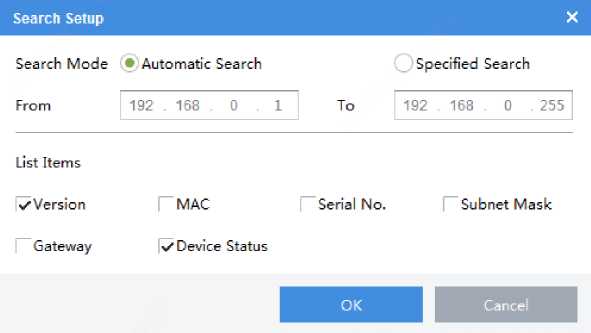
Click Search Setup on the top, then select titles to display on the device list.
Copy NVR Channel Configurations
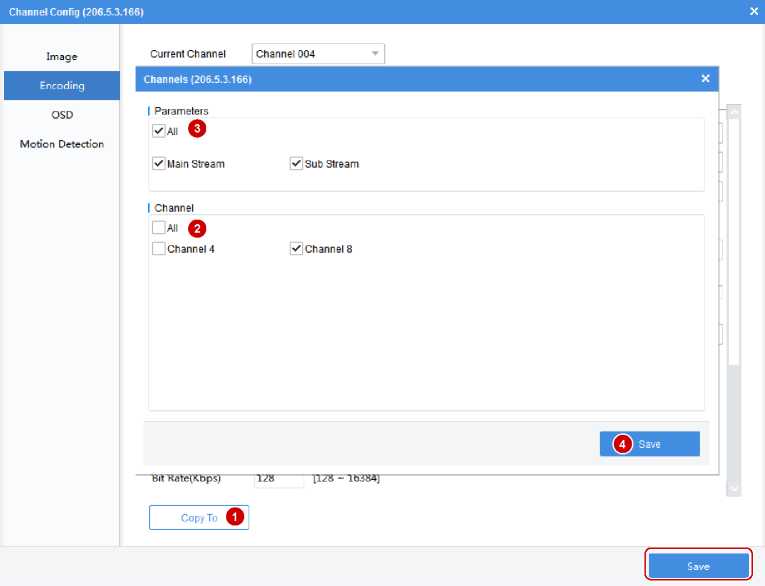
You can copy image, encoding, OSD and motion detection configurations of an NVR channel to other channels of the NVR.
NOTE!
This feature only supports NVR channels that are connected via Uniview private protocol.
- Image parameters: Include settings of image enhancement, exposure, smart illumination and white balance.
- Encoding parameters: Depending on the stream type that the device supports, you can choose to copy encoding parameters of the main and/or sub streams.
- OSD parameters: OSD style.
- Motion detection parameters: Detection area, arming schedule.
The following describes how to copy encoding configurations. Copying image, OSD and motion detection configurations are similar.
First, complete the configuration of the channel to copy from (e.g., Channel 001) and save the settings. And then follow the steps as illustrated:
Export and Import OSD Configurations of an IPC
You can export OSD configurations of an IPC to a CSV file for backup, and apply the same configurations to other IPCs by importing the CSV file. The OSD configurations include effect, font size, font color, minimum margin, date & time format, OSD area settings, types and OSD contents.
NOTE!
When importing a CSV file, make sure the IP addresses and serial numbers in the file match that of the target IPCs; otherwise, import will fail.
- Configure audio.
Currently this function is not available for NVR channels. ↑
