The Wyze app is your gateway to a smarter life and a safer home. Wyze, based out of Seattle, WA, makes smart tech at super-accessible prices, trusted and backed by a community of over 5 million users just like you.
Every smart product from Wyze has a home in the Wyze app. From Wyze Cams to Wyze Thermostat, if it’s connected, you can manage it in the Wyze app.
To get started with the Wyze app:
Additional Notes
Important: Update your Wyze app ASAP – 6/7/23
Update your Wyze app to 2.38 or newer to continue using your devices!
Here at Wyze, we take your security to heart and as technology advances, we need to ensure that our offerings are staying up with the times. In order to keep our commitment to protecting our users’ security, we wanted to inform you of some changes to the Wyze app.
As of 6/7/23, you will have 30 days before you will no longer be able to utilize your Wyze app if it is not updated beyond 2.38 for both Android and iOS devices.
Once this change goes into effect, any installed Wyze apps that are versions lower than 2.38 will not be available for use. Please note that the latest Wyze app requires a minimum OS version to operate – Android 7.0+ or iOS 14.0+.
If you are using Home Bridge or other third-party apps (aside from Google, Alexa, or IFTTT), we have developed a portal for you to generate an API key and provided steps to update your script. You can find more info on this here.
Once we make this change 30 days from 6/7/23, your automations will not work if you do not update the script.
Wyze App Setup Guide
Read More : Uniview NVR Remote Access
Frequently Asked Questions:
What happens if I don’t update my Wyze app?
If you are not on the 2.38+ Wyze app version when the change occurs, then the app will stop working after a one-month grace period. If your Wyze app is on version 2.38 or above, no action is required.
How do I know what app version I’m using?
To confirm the Wyze app is up to date:
What happens if I can’t update my Wyze app?
We suggest switching to a newer device as soon as you can.
How will this impact Two-Factor Authentication?
Two-Factor Authentication should function as normal after updating to the 2.38+ Wyze app. If your Wyze app is not updated to this version or above after this change takes effect, you will be unable to sign into your Wyze account unless you’ve updated your Wyze app.
What will happen to my Wyze Service?
Your Wyze Service (Cam Plus, Cam Protect, etc.) should be all set after updating your Wyze app to version 2.38 or above.
How will this impact shared users?
Shared users will also need to update their Wyze app if they’re not already on version 2.38 or above. Once they’ve updated their Wyze app they should be all set!
Creating an API Key
If you are using Home Bridge or other third-party apps (aside from Google, Alexa, or IFTTT), we have developed a portal for you to generate an API key.
To create an API key:
To delete an API key:
Notes:
Log in using your API key:
Endpoint: https://auth-prod.api.wyze.com/api/user/login
POST Request
POST /api/user/login HTTP/2
Host: auth-prod.api.wyze.com
Keyid: <insert-keyid-here>
Apikey: <insert-apikey-here>
Content-Type: application/json
Content-Length: 100
{
“email”:”<insert-email-here>”,
“password”: “md5(md5(md5(password)))”
}
Response
HTTP/2 200 OK
Content-Type: application/json
{
“access_token”:”lvtx.xxxxxx“,
“refresh_token”:”lvtx.yyyyyy“,
“user_id”:””,
“mfa_options”:null,
“mfa_details”:null,
“sms_session_id”:null,
“email_session_id”:null
}
To get a new access token:
Endpoint: https://api.wyzecam.com/app/user/refresh_token
POST Request
POST /app/user/refresh_token HTTP/1.1
Host: api.wyzecam.com
Content-Type: application/json
Content-Length: 100
{
“app_ver”:”wyze_developer_api”,
“app_version”:”wyze_developer_api”,
“phone_id”:”wyze_developer_api”,
“refresh_token”:””,
“sc”:”wyze_developer_api”,
“sv”:”wyze_developer_api”,
“ts”:4070908800000
}
Response
HTTP/2 200 OK
Content-Type: application/json
{
“ts”:””,
“code”:””,
“msg”:””,
“data“:
{
“access_token”:””,
“refresh_token”:””
}
}
Notes:
Snooze Notifications
Quickly turn off notifications for as long as you need to with the snooze notification feature!
To snooze notifications, open your Wyze app and tap the bell icon in the upper right-hand corner. You can snooze notifications for 30 minutes, for 1 hour, until tomorrow, or a custom time frame.
To turn notifications back on, simply tap the bell icon again. You should get a Push notifications turned ON pop-up message to confirm the change.
Note: These options are only available for Wyze app 2.43 and above. Not sure what app version you’re on? You can find this in your Wyze app by going to the Account tab > About. You can compare your app version to the latest app version listed on our Release Notes & Firmware page.
How do I opt-in to Two-Factor Authentication?
New Wyze accounts now have Two-Factor Authentication (2FA) enabled by default, for better security and to help provide you with more control over who can access your account. But if you’re already a Wyze user, you can opt-in to 2FA with just a few taps.
There are three methods available for Two-Factor Authentication:
To opt-in to Two-Factor Authentication:
Additional Notes:
2FA Updates and FAQs
On Thursday, September 1, 2022, we announced a new security update: Two-Factor Authentication will be enabled by default to sign in to the Wyze app. Related article: Two-Factor Authentication
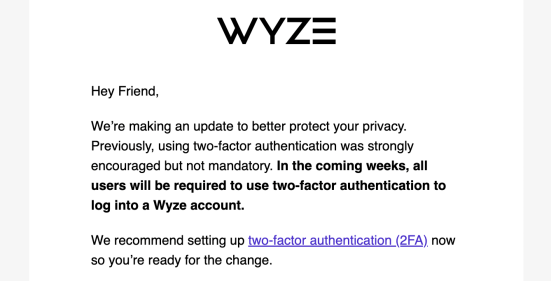
This update is a big change, but also a big plus for better security. Below are a few answers to the most popular questions we’ve received regarding this 2FA update.
2FA Frequently Asked Questions
What is Two-Factor Authentication (2FA)?
Two-factor authentication is a method of securing your account with a secondary authentication token. This secondary token is generated after you enter your email and password and is sent to your mobile phone either by SMS or 3rd party Authenticator app (Duo, Google Authenticator, etc.).
What do I have to do right now for 2FA?
Nothing at all! As long as you know and have access to the email address on your Wyze account, you’re all set and no further action is needed at this time.
How do I enable Two-Factor Authentication?
Follow the steps in this article to set up 2FA via SMS, email, or Authenticator app: Two Factor Authentication.
Is there an email option, not just SMS or app?
Yes! You can now set up email 2FA. You can see how here: Two-Factor Authentication
Is 2FA required, or can I opt-out?
Yes, you can opt out of 2FA, but it will be required to set up a new account. However, we strongly recommend enabling 2FA.
Will I have to go through 2FA every time I open the Wyze app?
Absolutely not. You will only have to go through 2FA when setting it up and whenever you fully sign out of the Wyze app, like by going to the Account tab and tapping Sign Out at the bottom. If you don’t sign out and attempt to sign back in, you will not have to repeat the 2FA process.
Want to just open the app to check your cameras and Wyze Services like usual? This hasn’t changed at all. No 2FA required if you aren’t logging into the app.
I live outside the US and cannot receive SMS. How do I enable 2FA?
No worries! You can set up 2FA with your Authenticator app instead, like Duo Security or Google Authenticator. Or, your email address will be used as usual with no action needed from you.
Can I use an Authenticator app instead of SMS?
Yes, you do not need to use SMS. Some popular (and free) Authenticator apps are Duo Security, Google Authenticator, Microsoft Authenticator, and LastPass.
Will setting up 2FA impact my 3rd-party accounts like Alexa or Google Home?
We’re investigating how this will impact 3rd-party accounts. At most, you’ll have to re-link your Wyze account to Alexa or Google Home once more.
I share my Wyze account with other people. How will this impact us? Will we all have to set up and go through 2FA when signing in?
What if I set up 2FA and lose my phone? Will I lose all access to my Wyze devices?
Not necessarily! When setting up 2FA, you have the option to add a Backup Number. You will also be able to use the email 2FA option to regain access to your account when you get a new phone.
Worst case scenario: However, if you only set up 2FA with an Authenticator app, haven’t saved any backup codes from that app, do not have a Backup Number added, and you have also lost access to your email address, you will lose access to your Wyze account and devices.
What if I don’t have access to or can’t remember my email address?
If you’ve lost access to the email address linked to your Wyze account, you will lose access to your Wyze account when this change fully rolls out. Even if you don’t set up 2FA with SMS or an Authenticator app, you will be required to use the default email 2FA verification method whenever you sign in to your account (not when simply opening the Wyze app).
Please recover your email address and regain access ASAP so you do not lose access to your Wyze account.
I want to change my email address. How will this impact 2FA?
Feel free to change your email address. 2FA hasn’t rolled out yet, and other verification methods like SMS and the Authenticator app will be optional. Just be aware than once you change your email address, you will be signed out of all devices. You must sign in to the app again and reach out to Wyze Support to restore access to any Wyze Services you’re subscribed to.
However, if you set up 2FA then change your email address, you will be signed out of all devices. You will have to sign in again using your 2FA verification method on all devices.
Tutorials for Using the Wyze App
Welcome to the Wyze app!
We’re so glad you got your hands on a new Wyze product, and we’re here to help you get started with the Wyze app. Our app is your personal command center that lets you view your devices, manage their settings, and enjoy all the cool features you get with your Wyze subscriptions. Your phone or tablet can, dare we say it, rule [your own personal] world!
>> Ahead of the game? If you don’t have the Wyze app yet, download it on iOS or Android.
To get started with the Wyze app:
Home (the Home Screen)
The Home screen is what you first see when you open the Wyze app.
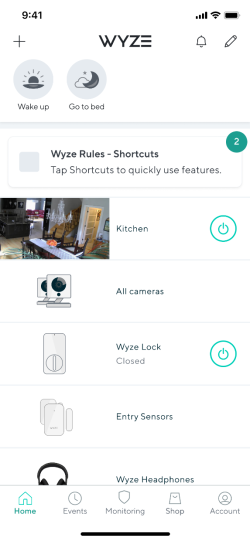
How to turn on Do Not Disturb for the Wyze app:
Tap the notification bell to turn on Do Not Disturb. No matter your other Notifications settings, you will not receive any notifications from the Wyze app.
Exception: Critical Alerts for Services like Wyze Home Monitoring will push through no matter your app settings.
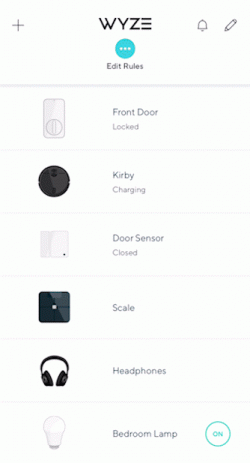
How to group your Wyze Cams together:
Tap on the + plus sign, then Add Device Group > Camera Group. Name it, then choose the cameras you want in the group before tapping Done.
A camera group lets you view all of your Live streams on the same page, and saves space on the Home tab. Want to view a single Live stream? Tap on it from within the group!
How to add a Device Trigger in the Wyze app:
Tap on the + plus sign, then Add Rule > Device Trigger > Device Trigger. Select the device, what will trigger the action, and the action. Then tap done.
Rules are what makes your Wyze ecosystem smart. Triggers are a type of Rule that make your devices work together. Have your porch light turn on when your camera senses motion, or your coffee pot turn on when your lamp turns on.
Here’s an example of a device trigger with a Wyze Sense Entry Sensor and a Wyze Bulb. When the door sensor opens (trigger), the hallway lamp turns on (action).
How to set the Detection Zone for your Wyze Cam:
Tap on your Wyze Cam > Settings gear > Event Recording > Detects motion. Then tap Detection Settings > Detection Zone > Detection Zone. Drag the box to set the area where motion will be detected. Your changes will save automatically.
Note: You must have Detects motion toggled on to set a Detection Zone.
How to set up Two-Factor Authentication (2FA):
From the Home tab, tap Account > Security > Two-Step Verification. Select how you want to verify during sign-in: Email, SMS, or Authenticator App. Follow along to copy and paste the verification code in the app, then save your settings.
Here’s how to set up 2FA with an Authenticator App (like Google Authenticator, DUO mobile).
App Discovery
Get the most out of your Wyze app using these helpful tips!
At the top of the Home tab of the Wyze app, you will automatically receive helpful tips to give you the best Wyze experience. These pop-ups cover a wide array of topics such as Two-Factor Authentication, how to utilize Rules, how to share your devices, and more!

To remove the current discover cards, simply swipe them away!
To adjust the frequency or disable your discover cards:
Using Preset Rules in the Wyze app
What are Preset Rules?
Preset Rules are some of our most-popular Rules, already set up in the Wyze app for you to use with just a few taps. Instead of manually creating a rule, select a Preset Rule and customize it before tapping Save.
Some Preset Rules are:
|
|
Type of Rule |
How it works |
Requires |
|
Turn on lights when a person is detected |
Device trigger |
If a camera detects a person, the lights turn on. |
Wyze camera, lighting and a plug, and Cam Plus / Protect subscription |
|
I’m home |
Shortcut |
Tap this shortcut to turn off your cameras when home. |
Any Wyze camera |
|
Turn lights off when I’m away |
Location trigger |
When you leave an area, the lights turn off. |
Wyze lighting or plugs, location enabled |
|
Turn alerts off at night |
Schedule |
App notifications turn off from sunset to sunrise. |
Any Wyze device |
🤫 There are hidden Preset Rules that display based on the Wyze devices you have. Get a new Wyze device? Keep an eye 👀 out for new Preset Rules to try out!
Where do I find Preset Rules?
Find Preset rules on the Create Rule screen (Home > + plus sign > Add Rule).
How do I use Preset Rules?
How do I edit or delete a Preset rule?
How to update your Wyze app.
Keep your Wyze app up to date to make sure you have the latest features from Wyze!
To update the Wyze app:
Android
iOS
To check your current Wyze app version:
Two-Factor Authentication
Wyze accounts now have Two-Factor Authentication (2FA) enabled by default, for better security and to help provide you with more control over who can access your account.
Related article: 2FA Updates and FAQs
What is Two-Factor Authentication (2FA)?
Two-factor authentication is a method of securing your account with a secondary authentication token. This secondary token is generated after you enter your email and password, and is a requirement to sign in as long as 2FA is enabled on your account.
We have three options available:
To enable SMS Two-Factor Authentication:
Note: Once you’ve successfully set up 2FA on your account, you’ll receive a 6-digit verification code every time you try to log into your account in the Wyze app. Enter this code into the prompt that appears on the sign-in screen. If the code doesn’t match, try logging in again to receive a replacement code. Each code is valid for up to 30 minutes if it is not used but will be refreshed immediately once it is successfully entered.
To use your Backup Number:
Tap Use Backup when prompted for the verification code. A text message with the code will be sent to your backup number.
To enable Authenticator App Two-Factor Authentication:
Before starting, be sure to download the authenticator app you prefer. A few popular ones are Google Authenticator and Duo Security.
Once the verification code has been copied to the Wyze app, you’ll be given a backup code that will let you back in if you’re unable to use the authenticator app. Save this in a location other than your phone to make sure it’s available should you ever need it.
Important: Once Two-Factor Authentication is enabled, the only way to modify it or turn it off is from within the Wyze app. For the purposes of security, Wyze and its employees are unable to make modifications to your Two-Factor Authentication settings on our end. This means that if you lose access to the phone number used for Two-Factor Authentication, you will need to create a new account.
To enable Email Two-Factor Authentication:
Changing Two-Factor Authentication Settings
Currently, for SMS authentication, once a number has been added it can’t be changed without completely disabling the Two-Factor Authentication option from your account’s settings. Once this is done, re-enabling 2FA will walk you through adding a new Primary Number and an optional Backup Number.
For the Authenticator App version of 2FA, there is no way to retrieve your Recovery Code from within the Wyze app if you lose it. That being the case, if you ever lose your Recovery Code while still logged into the Wyze app, we recommend disabling then re-enabling 2FA to generate a new Recovery Code.
Additional Notes:
Wyze’s implementation of SMS 2FA requires a phone number beginning with country code +1. At this time, this is limited to North American phone numbers from both the US and Canada.
If you decided not to add a Backup Number when first enabling SMS 2FA, you can add one at any time by tapping the Backup Number option under the Two-Factor Authentication settings.
Wyze App Account & Password
Your Wyze app account is your doorway to controlling your Wyze devices. Learn how to control and edit your account via the Wyze app below.
Before starting, download the Wyze app and enable Bluetooth on your mobile device.
To create a Wyze account:
To reset your Wyze account password:
Note: your Wyze account password must be a minimum of ten (10) characters long.
To edit your Wyze account details:
To delete your Wyze account:
Important: At Wyze, we value your security. We cannot make changes to your account on your behalf, nor update your settings or permissions for you. This includes updating your email address or phone number on your Wyze account if you lose access.
Wyze App Notifications
A Push Notification is a message that pops up on your phone. The Wyze app uses this to keep you in the know when an Event is triggered by your Wyze Cam or Wyze Sense.
With the Wyze app you can globally turn on/off notifications for all devices associated with your account. You can also set what triggers a notification per device.
Global Notifications
Follow these steps to turn on/off all notifications :
Note: Turning off notifications doesn’t turn off Event Recording. The Events will continue to be recorded and uploaded to the cloud.
Per-Device Notifications
You can set what triggers a notification for each of your Wyze devices. Example being you can set your Motion Sensor to send notifications when it detects motion and turn off notifications from motion detection with your Wyze Cam.
Follow these steps to change notification settings per-device:
Note: It’s important to keep in mind the global notifications setting will override any per-device notifications settings. E.g. if you have a device’s Send Notifications enabled but the global notifications disabled you will not receive a notification.
Using Rules in the Wyze app
What are Rules?
Rules let you automate your Wyze devices. With rules, you can do things like turn off multiple devices with a single tap in the app, set a specific time of day to record an event video, or even have your lights turn on when a door is opened.
There are 4 types of Rules:
To create a Rule:
To edit a Rule:
What are Shortcuts?
Shortcuts are actions controlled by tapping an icon from the Home screen of the Wyze app.
Example: Turn off all Wyze Bulbs with a single tap before going to bed.
To create a Shortcut:
To use a Shortcut:
What are Schedules?
Schedules let you set specific times when an action occurs.
Example: Turn on notifications from 7:00 AM to 4:00 PM, when you’re away from home.
To create a Schedule:
What are Device Triggers?
Device triggers allow one device to trigger an action in another device.
Example: When the Motion Sensor on the back porch detects motion, it turns on the lights.
To create a Device Trigger:
What are Location Triggers?
Location Triggers allow the device to trigger based on a certain location.
Example: When you enter your neighborhood, your Wyze Air Purifier will turn on.
To create a Location Trigger:
Shop and Order History
The Shop tab will allow you to purchase Wyze products directly through the in-app Wyze Shop and have all orders automatically connected to your Wyze account. Take the following steps to order products via the Shop.
The Early Access products will always appear at the top of the products list. This allows for purchasing an upcoming product pre-release to get it first before the official launch and offers a chance to discuss or ask questions about new products!
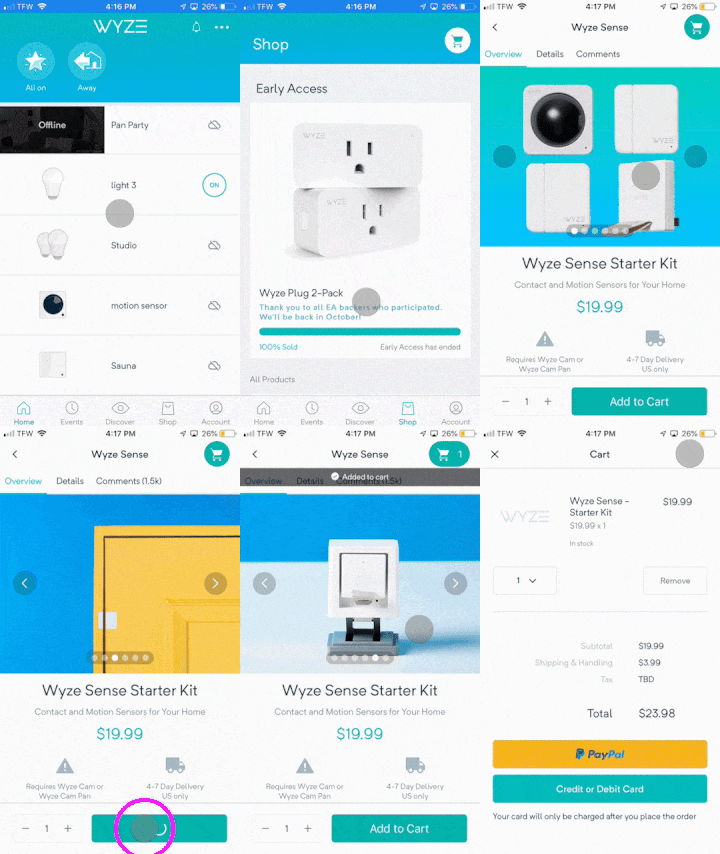
Order History
You can look up the history of past orders by navigating to the Account tab. Once there, tap on Order History to bring up your account’s orders placed through both the Wyze website and the Wyze Shop.
Note: Only orders connected to your Wyze account will show up here. If you checkout as a guest on the website or used a third party seller, you will not see that order under Order History.
How to Use Sharing
You can share access to your devices via the Wyze app. This way another user can control your Wyze Bulbs, see a camera’s Live Stream, or get notifications.
To start sharing follow these steps:
4.To share with a new user, tap the “+” Share with a new user button at the bottom of the page.
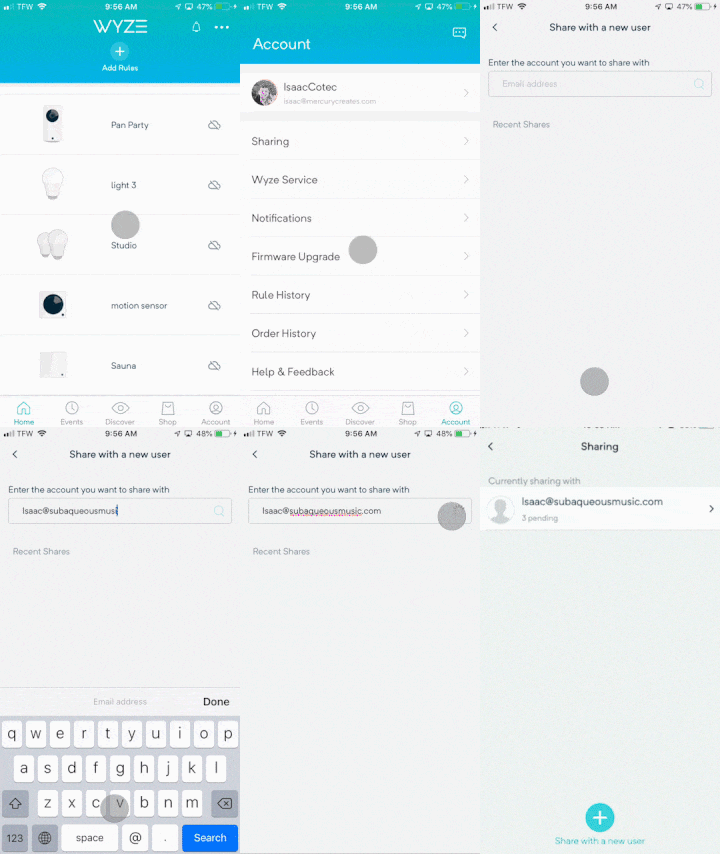
Note: You can also access individual device’s Share settings by following the steps below.
Stop Sharing
At any point, you can stop sharing a camera. To do this, tap the device in question in the Sharing menu in the Account tab. You will see a list of the users you have shared the camera with. Tap Cancel to remove a shared user from the camera.
Grouping Multiple Devices
Use the Wyze app to collect your Wyze devices into groups to view and manage them easily.
Frequently Asked Questions
To create a group of devices:
To view multiple devices in a group:
This will display all of the devices in that group. If you tap on a camera group, you will be able to view all of the live streams on the same screen.
To manage an individual device in a group:
Managing a camera group? Only one camera’s audio in a group can be playing at any given time.
To edit a group of devices:
To delete a group:
Additional Notes:
How to sort your Wyze devices
To sort your Wyze devices:


