UNV Viewing, Locking and Clipping Playback on your UNV NVR When an event occurs in the view of your cameras, viewing playback is an important part of having a security system. Locking clips allows you to clip them at a later date without the worry of the clip being overwritten.
Clipping playback allows you to save clips from your UNV system on a computer. This tutorial will guide you step-by-step through the process of accessing the playback menu and viewing footage on your UNV NVR.
UNV Viewing Playback and Clipping
Read Next :
Prerequisites
This tutorial assumes you have already completed the initial setup of your UNV NVR. If you have not done so, please CLICK HERE to view the tutorial on initialization of your UNV NVR.
Video Tutorial
Step 1
Starting from the Live View screen, open up the Playback menu by following the below steps:
Right Click Anywhere on Live View > Click “Playback” on the pop-up menu
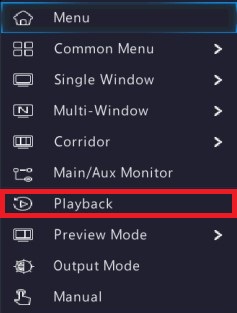
Please Note: You may be asked to sign in. If this is the case, please sign into the ‘admin’ account using your admin password or unlock pattern.
Part One: Viewing Playback
Step 2
You will be brought to the Playback Menu of your NVR.
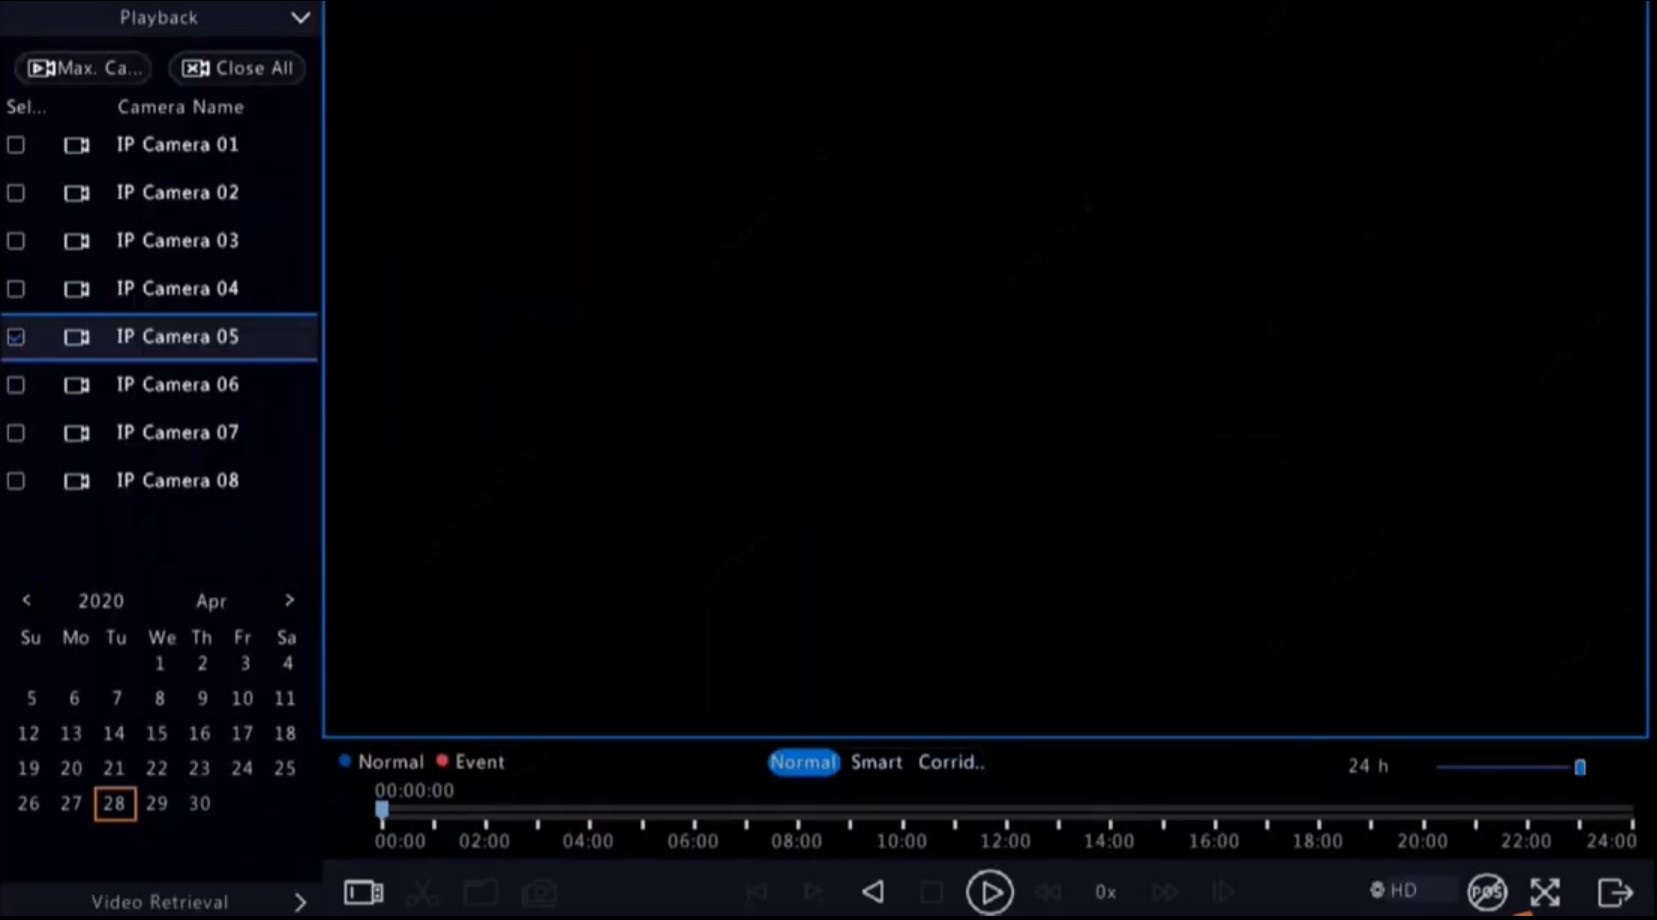
Step 3
Select the camera that you want to view playback from by selecting the camera in the “Camera Name” menu on the left-hand side of the screen.
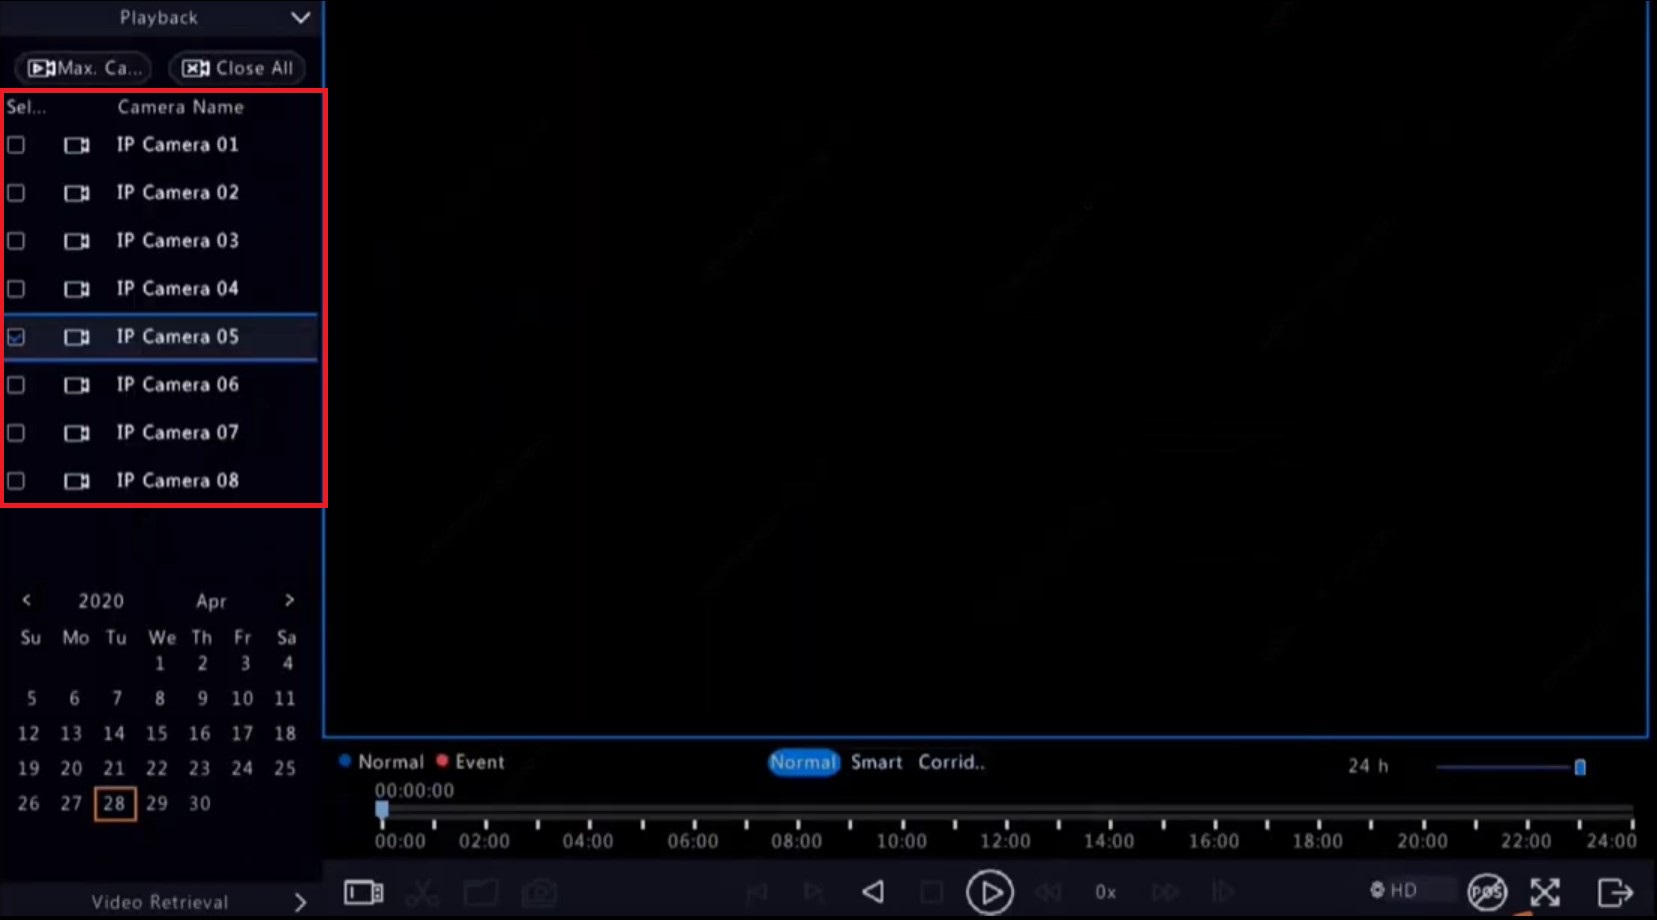
Step 4
After selecting the camera, you will now need to select the date you want to view. To do so, click on the date in the calendar at the bottom left of your screen.
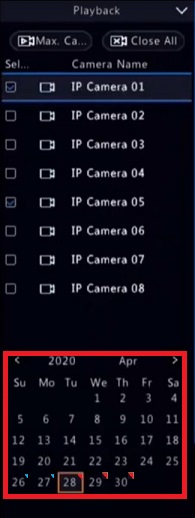
Please Note: Dates with a colored triangle are days that you have recording available. If you do not have a colored triangle next to the date, you do not have recording on that date.
- Blue Triangle: A blue triangle next to your date means that the recorder is set to record 24/7 continuously for this camera, but the camera did not catch any motion during the entire day. It could also mean that the camera is not set up to record motion.
- It is important to note that even if your camera is set up to record 24/7 continuously, if there was motion on that date and your camera caught it, the triangle will be red.
- Red Triangle: This means recording is present and motion occurred in view of the camera during the day of recording.
- It is important to note that even if your camera is set up to record 24/7 continuously, if there was motion on that date and your camera caught it, the triangle will be red.
Step 5
After selecting the date, video should start playing in the playback window.
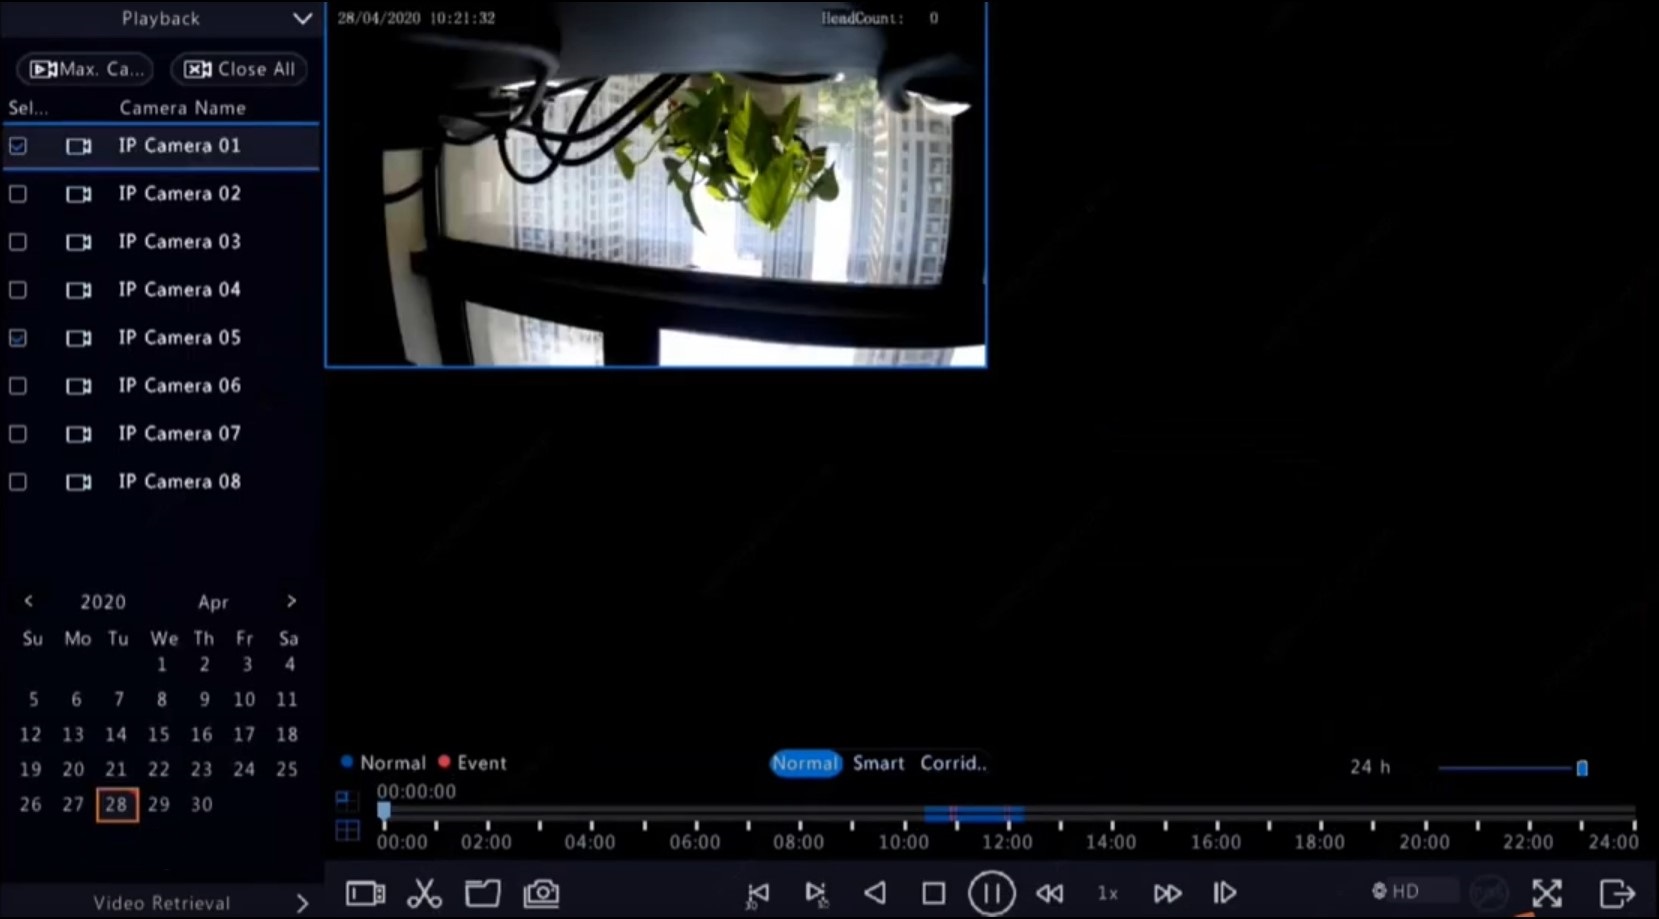
Please Note: If you want to make the image larger, double left click on the window where the playback is playing.
Step 6
Under the playback window, you will see a timeline going from 00:00 (12:00am) to 24:00 (11:59:59pm). This is where you can select the time you want to view your playback.
- For example, if the incident you’re viewing playback on is at 3:30pm, you will click the bar on 1530 to view playback at that time.

Please Note: Your timeline bar may vary in color. This is what it means:
- All Blue: An all blue bar means your cameras are set to record 24/7 continuously, and are either not seeing motion at all or are not set to record on motion.
- Fragmented Red Only: A fragmented red bar means your cameras are set to record on motion only. The areas that are not colored on the bar are times where there was no motion in view of the camera, so nothing was recorded.
- Blue with Fragmented Red: A blue and red bar means your cameras are set to record 24/7 continuously and are also set to record motion. This means the blue bar is where no motion took place and the red hashes are when motion occurred.
Part Two: Locking Clips on your UNV NVR
Step 1
After finding the incident you wish to lock, open the playback window to full screen by double left clicking on the image. You will now see a blue bar at the bottom of your playback window.
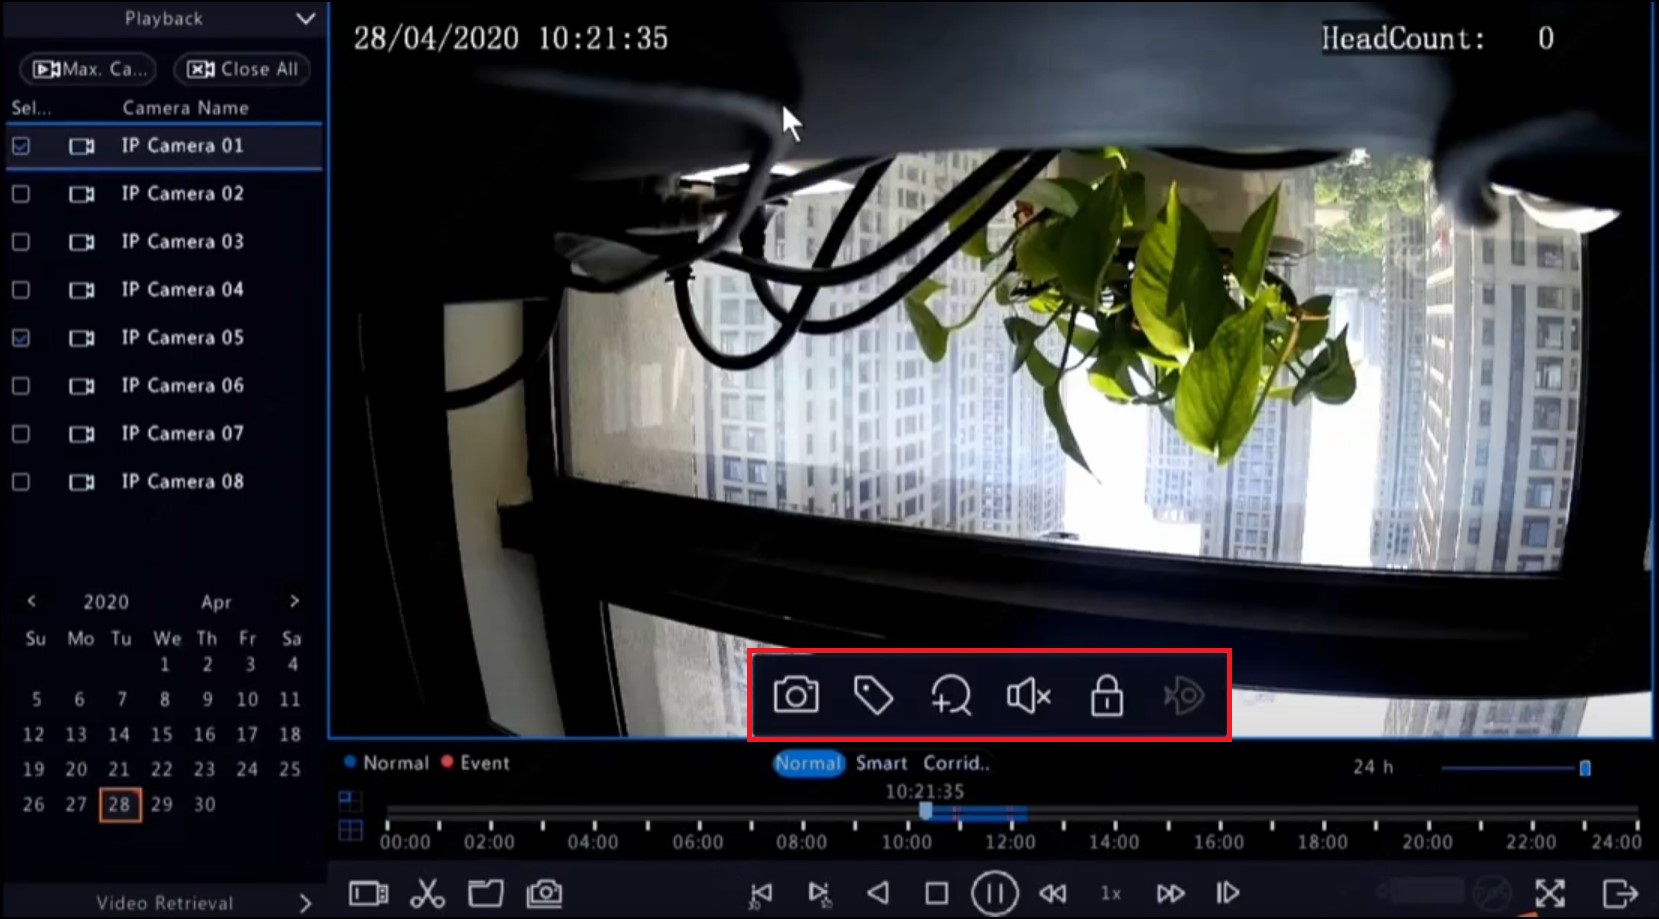
Step 2
Once you have found the clip you want, go to the very start of the clip and click on the icon that looks like a padlock. This is your Lock button.

Step 3
The File Management window should pop up. If it doesn’t automatically appear, click on the icon that looks like a file folder on the bottom left-hand side of your screen.
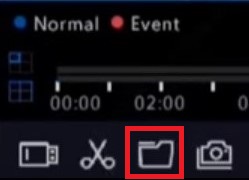
Step 4
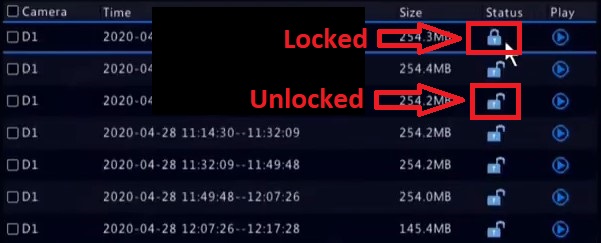
Once the File Management screen opens, you will see clips with time frames. The first clip should start at the time in which you clicked the Lock button. Under the status tab, you will see icons that look like either closed padlocks or open padlocks. This designates which clips are locked and which are not. Keep a close eye on the timestamps next to each clip to make sure you lock the full time in which the incident took place.
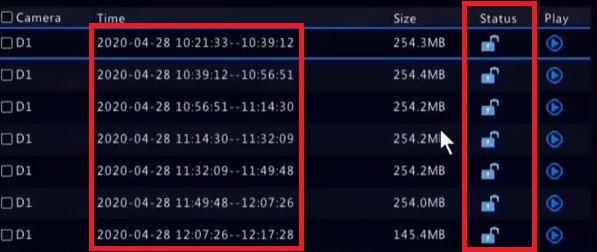
Please Note: The locking feature for your UNV NVR locks clips in increments of 254.4M in size. It is unable to lock single clips larger than this. If your incident is larger than that file size, make sure you lock the subsequent clip to make sure you save all the footage.
- For example: Your clip is from 12:00am to 1:00am. However, the first clip is from 12:00am to 12:30am and the second clip is from 12:30am to 1:00am. You need to lock BOTH clips in order to save all of the footage.
Saving and Exporting a Video Clip on your UNV NVR
Prerequisite: If you have not done so already, please plug a USB flash drive into your UNV NVR. You can use either the front or back USB ports. Your NVR should automatically recognize the USB flash drive and may open a pop-up File Management window. You can safely close this and continue on with the tutorial.
Step 1
After finding the beginning of the incident you wish to export, pause your playback by clicking the Pause button on the bottom of your screen.

Step 2
On the left-hand side of the bar, click the icon that looks like a pair of scissors. This is your Start/Stop Clip icon. This will define the start time for the clip.

Step 3
You do not have to watch through the entire clip to save it. Instead, click the end time on the time bar. Once you have found the end of the clip, click the Start/Stop Clip icon again. This will define the end time for the clip. If you have done this correctly, the time bar should turn a lighter shade of blue within the start and end times.

Step 4
Click the icon that looks like a folder. This is your File Management button and can be found on the bottom left-hand side of the screen directly to the right of the Start/Stop Clip icon.

Step 5
The File Management screen will open. You will see your clip in the menu.
- On the left-hand side of your clip, you will see a checkbox. Make sure that you click this checkbox on.
- On the bottom right-hand side of the menu, you will see a button that says “Backup”. Click this button to be taken to the next screen.
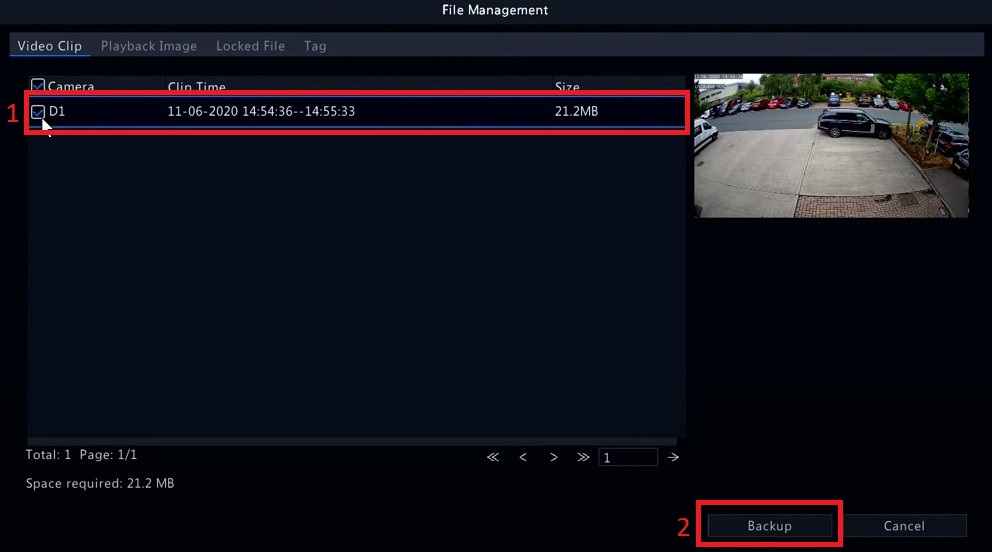
Please Note: If you are recording motion only, you may have multiple clips available to download. This is because:
- Motion Only: You are recording on motion only and each instance of motion is its own clip.
- File Size: You are clipping video that exceeds 254.4MB in size, so the NVR must separate the clips into multiple sections.
- Motion and Continuous: You are recording 24/7 continuously AND motion. This will give you a larger clip of the continuous recording as well as individual clips for each motion event.
There is nothing that can be done to change these limitations, however once clips are downloaded, you can use software to stitch them together if need be.
Step 6
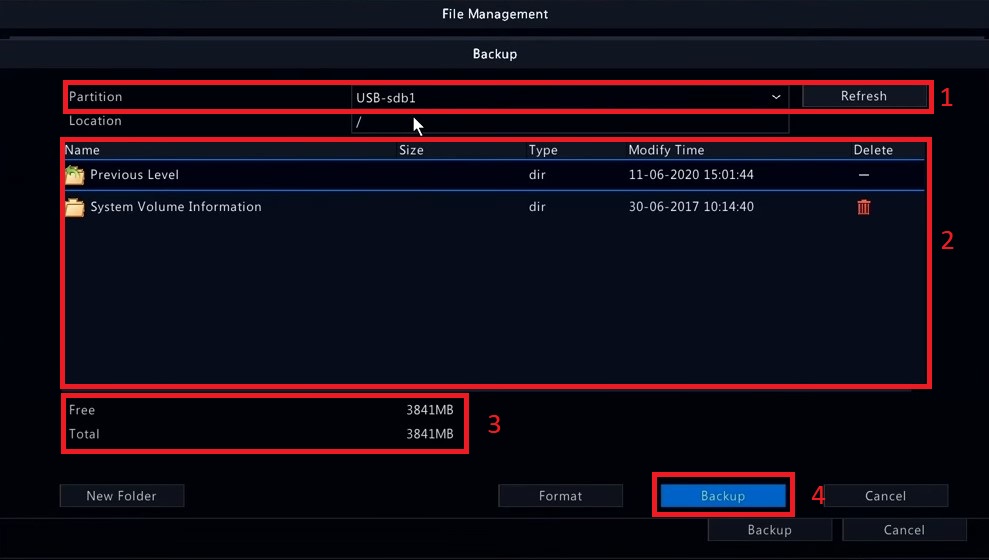
On the Backup menu, you will be allowed to select your USB flash drive. Typically, the NVR automatically detects and selects your flash drive. To verify this, look in the “Partition” Field at the top of your screen.
If your flash drive is completely empty, the box in the middle of the screen may be empty as well. However, if the USB has files already on it, you will see them in the middle box. This can be safely ignored.
On the bottom of the USB file box, you will see two fields: “Free” and “Total”. This is the free space and total space on your USB flash drive. There must be enough space for the clip(s) on your USB flash drive in order to back up your clip.
When you are ready to backup your clip, click the button on the bottom right that says “Backup”.
Step 7
An Export bar will automatically pop up on your screen. The gauge will fill as your files transfer to your USB flash drive. Once this reaches 100%, a box will pop up confirming that your backup was successful.


After receiving the system message stating that your backup is complete, you may unplug the USB Flash Drive from your NVR. Your clip is now saved to that flash drive and can be put onto a computer and viewed.
To view the software, we typically recommend one of two softwares:
EZPlayer: This is UNV’s proprietary software. It can be used to watch multiple clips at once and stitch clips together. CLICK HERE to be taken to the EZPlayer download page.
VLC Media Player: This 3rd party software is a good choice to view clips one at a time. It is user friendly and capable of playing almost every format of video. CLICK HERE to be taken to the VLC Media Player download page.
This completes the tutorial on Viewing, Locking and Clipping Playback from your UNV NVR
UNV Viewing Playback and Clipping
Viewing Playback and Clipping from the EZView Mobile App
Overview
Viewing playback and clipping footage from your phone is useful for quick incidents. This tutorial will guide you through the process of viewing and clipping playback from your phone.
Prerequisites
This tutorial assumes you have already installed EZView and added your NVR to your phone. If you have not done so, CLICK HERE to view our tutorial on installing and adding a device to EZView.
Step 1
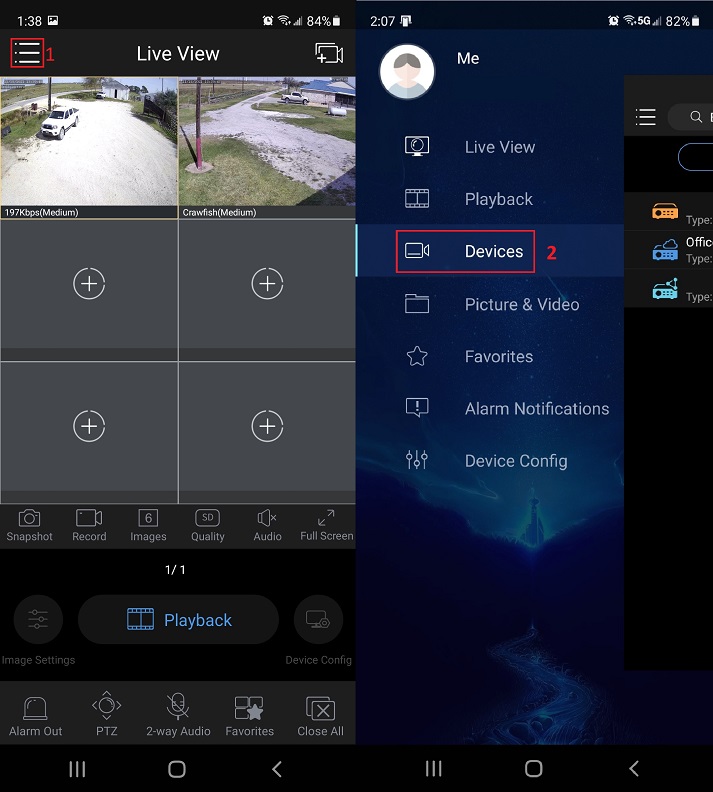
Open EZView. On the top left-hand side of the screen, click the three horizontal lines to open the main menu of the EZView application. Once the menu is open, click “Devices”.
Step 2
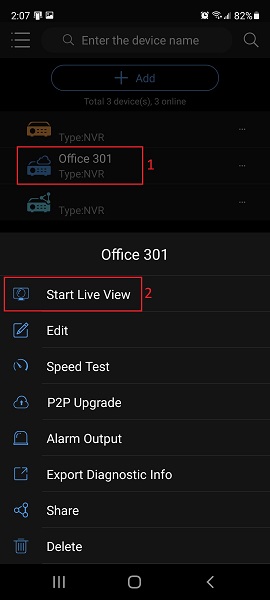
Select the device you wish to see by tapping on its name. This will open the device’s menu. Once this is open, click “Start Live View”.
Step 3
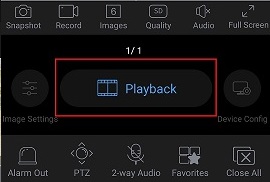
Once on the Live View screen, you should see all your cameras. Tap the camera you wish to do playback with and click “Playback” at the bottom of the screen.
Step 4
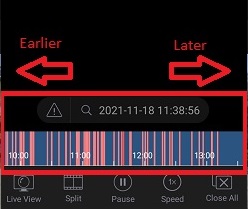
Your camera will begin playing back. Navigate to the time you wish to see by dragging your finger left or right along the playback bar. Once you have found the footage you wish to playback, continue to Step 5.
Step 5
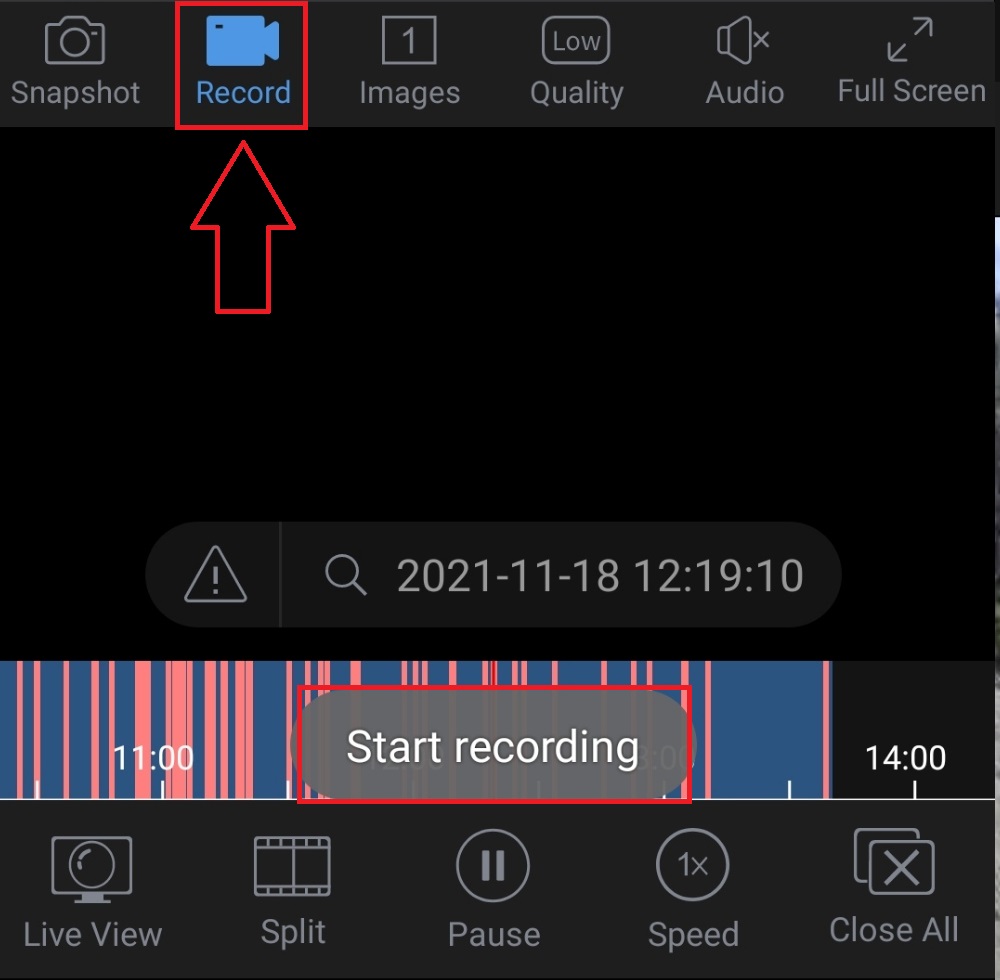
You should see an icon that looks like a video camera with the word “Record” under it. Click there to start the clip. You will see a banner that says “Start Recording” on your time bar.
Step 6
You may either drag the time bar to the end of the clip or watch through the clip until the end. Once you are satisfied with your clip, tap the Record icon again.
PLEASE NOTE: If you manually drag the bar to the end of the clip, the record icon will automatically turn off without the need to click it again.
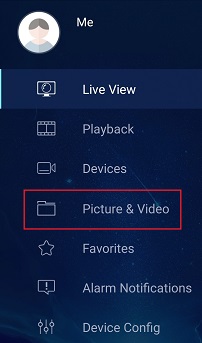
Once you have completed your clip, click on the horizontal lines on the top left-hand side and select “Picture & Video”.
Step 7
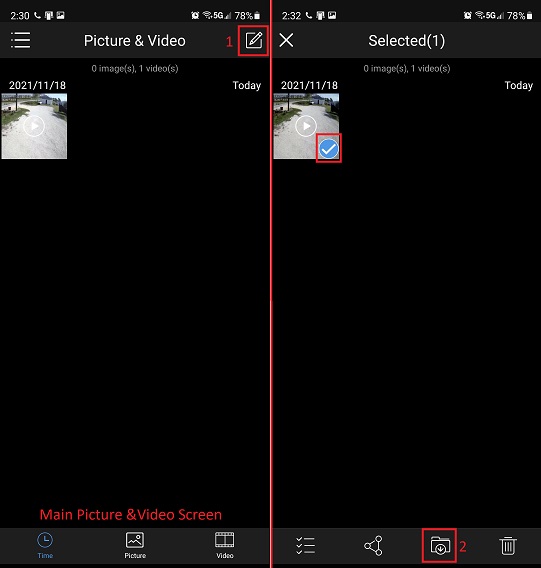
On the Picture & Video screen, you will see your clip. Tap the clip to view it. You may also export the clip by clicking on the icon on the top right-hand side of the screen, tapping the clip (You will see a blue checkmark appear on the clip itself) and selecting the “Export Clip” button.
This completes the tutorial on playback and clipping on your EZView mobile app
