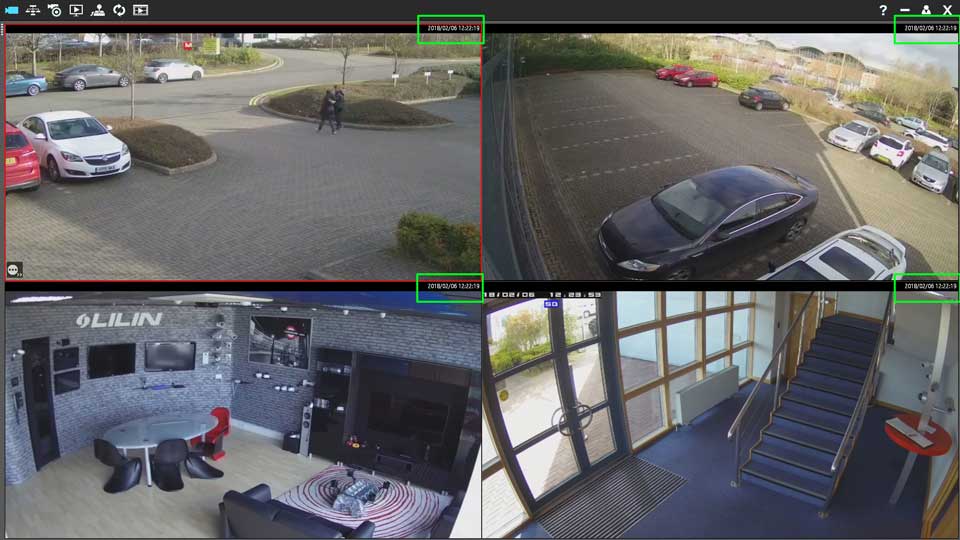
LILIN Client Installation and User Guide, Navigator Client is a Windows based application for managing cameras of LILIN Navigator Enterprise servers, NVRs, and DVRs. Major features such as remote live monitoring, remote video playback, remote video backup, remove device status report, PTZ control, and user authentication are supported in Navigator Client.
Client Software (View Manager) – Quick Start Guide – Installation, Adding Devices, Playback & Backup,Attached below is a quick start guide showing the basic functionality of the LILIN View Manager software.This guide covers adding a device, configuring a view for a recently added device, as well as playback and backup.
- LILIN Client Guide.pdf (4 MB)
Table of Contents
ToggleNavigator Client PC Specifications
Attached below is a document showing the minimum specifications for a Navigator Client PC.
How to setup LILIN P2P on an NVR for viewing on LILIN’s Client Software
Attached below is a document showing how to setup LILIN P2P on an NVR for viewing on LILIN’s Client software.
***Additional Note***
This process requires Navigator Enterprise software in order to function. For more information on Navigator enterprise contact your local LILIN representative.
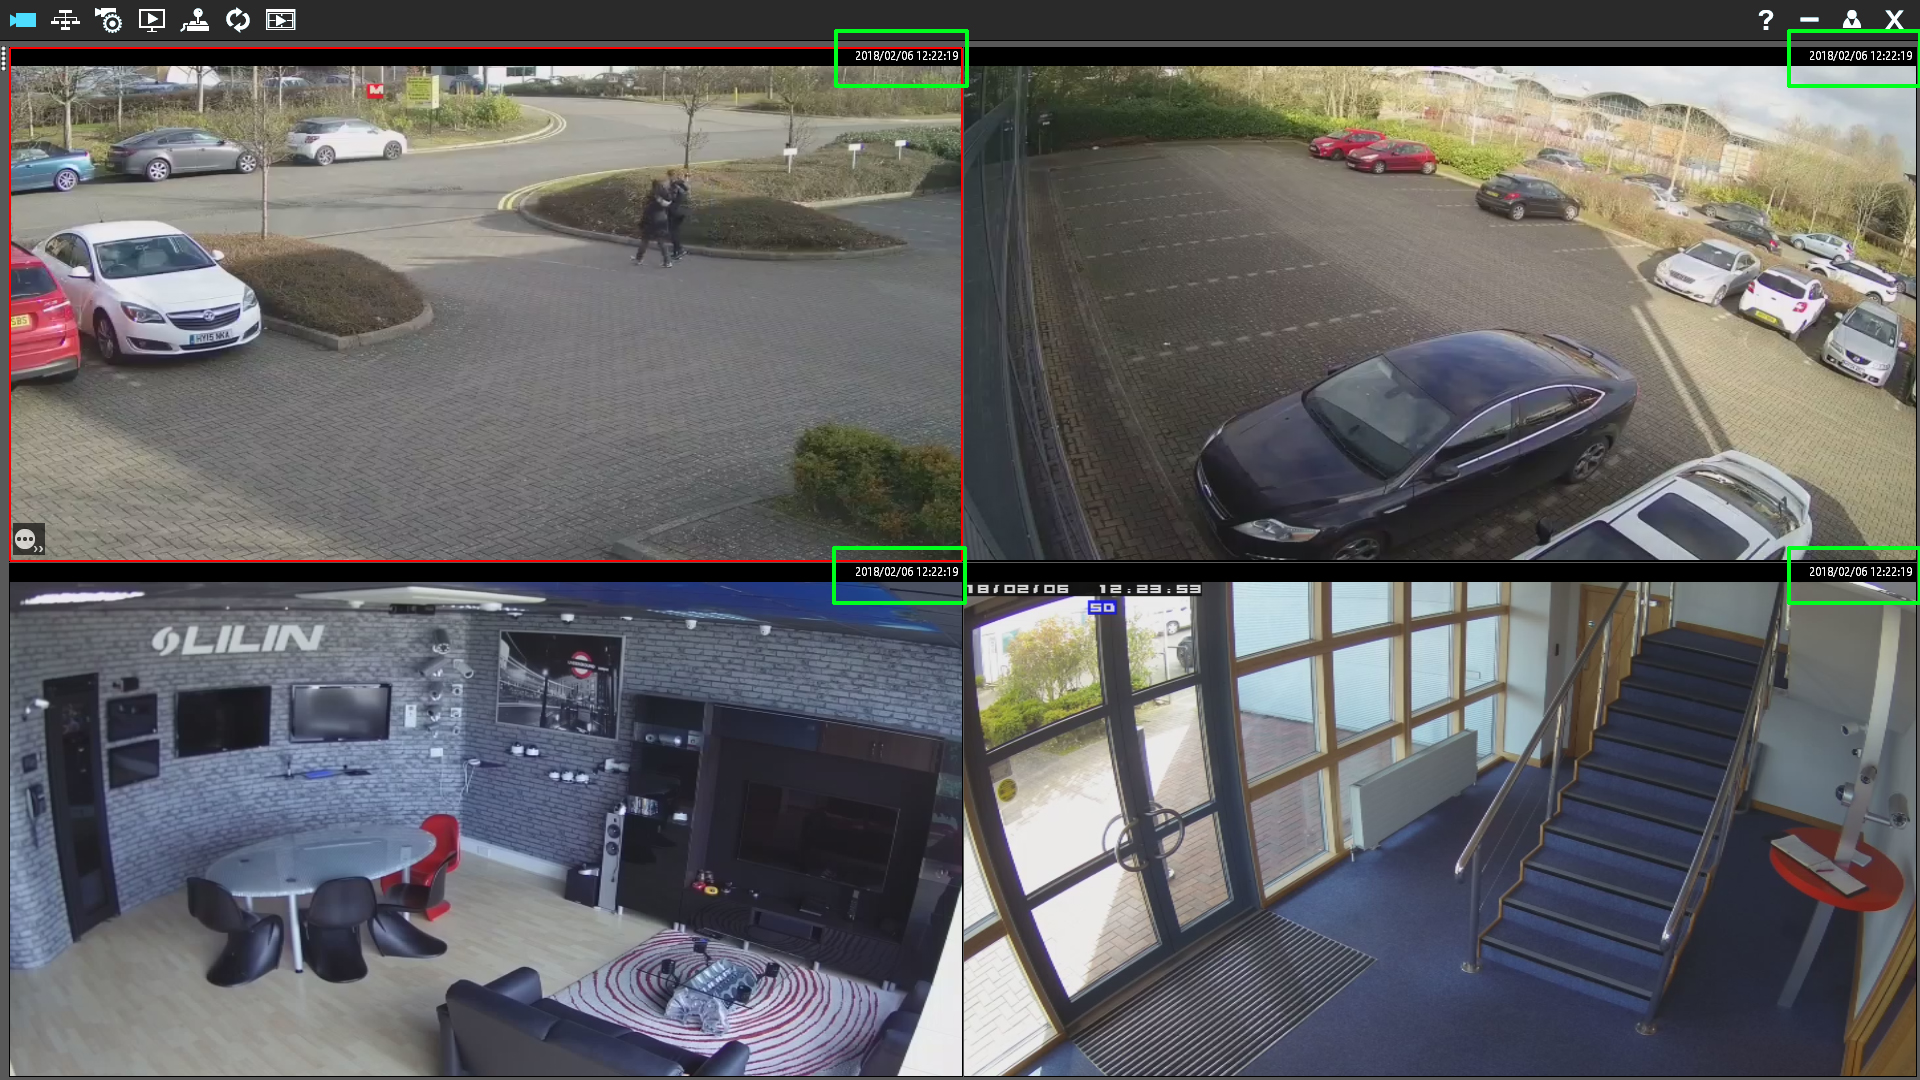
No Time and Date displayed on the Client Software
When the client is launched, by default the client will display the connected channel number information in the top right hand side of each channel.
To change the information display in this area simply press the ‘F2’ key from your keyboard.
Pressing ‘F2’ will cycle through the following information:
- Channel Number
- Time
- Resolution, Bit rate and Frame rate
- Time and Date
Read Next :
Copy a LILIN Client configuration to a different PC
If you need to install and configure the LILIN Client on multiple machines, it is recommended to configure the first client machine and then copy the configuration to any other machines requiring the client.
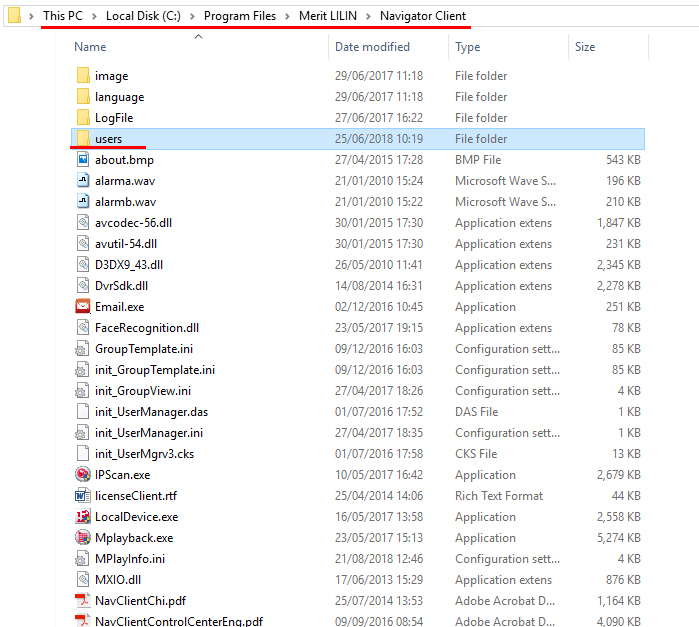
To copy the Client configuration, browse to the folder of the installed LILIN Client. As default its location will be:
C:\Program Files\Merit LILIN\Navigator Client
In the Navigator Client folder you will see a folder called ‘users’. Copy this folder on to USB or a network shared drive, you will need to restore this folder on any future client machines.
Next, install the client on any further machines. Ensure the client software is closed and then browse to C:\Program Files\Merit LILIN\Navigator Client and replace the ‘users’ folder.
Run the client and the configuration should match the original Client configuration.
Which ports do i use when adding the Navigator software to client software (View Manager)
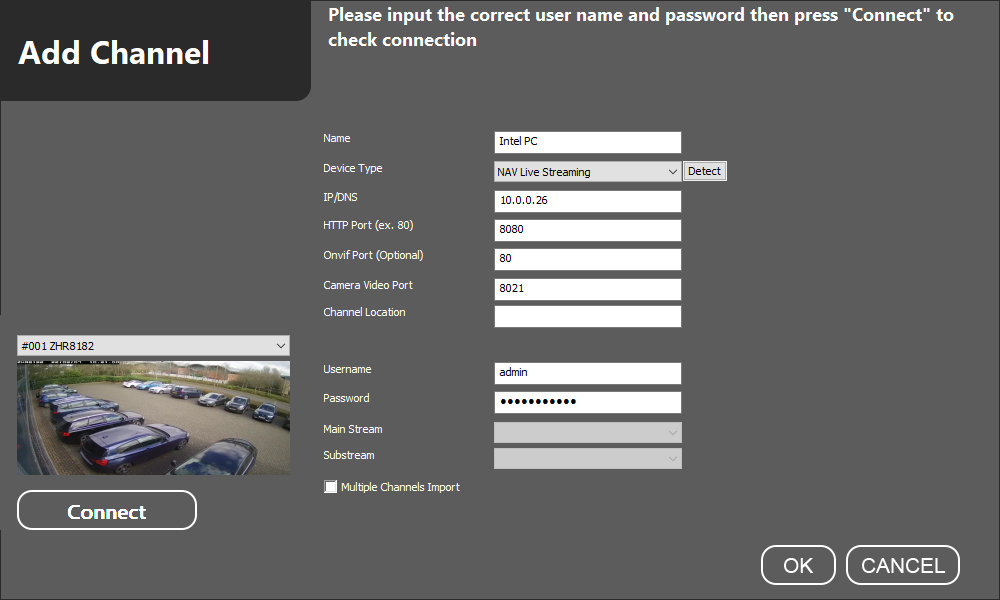
To add a Navigator server to the client software, please use the ports as shown below.
What is the Client Software default username and password
The default username and password for the LILIN View Manager software are:
Username: admin
Password: <Leave Blank>
This guide assumes that the LILIN Client software has already been installed on your computer and the icon is present on the desktop.
1) Click on the Client Software icon on the desktop and a login box will appear.
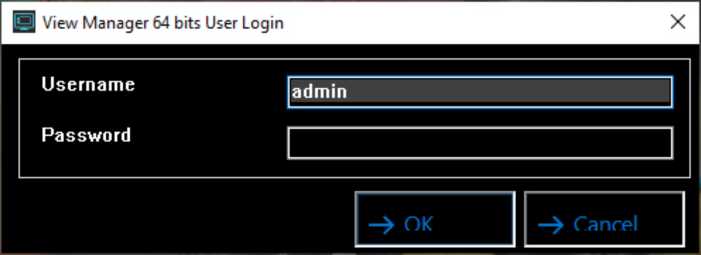
The details to enter the software are:
Username: admin
Password: (Leave Blank- there is no password)
Click ‘OK’ to enter the software.
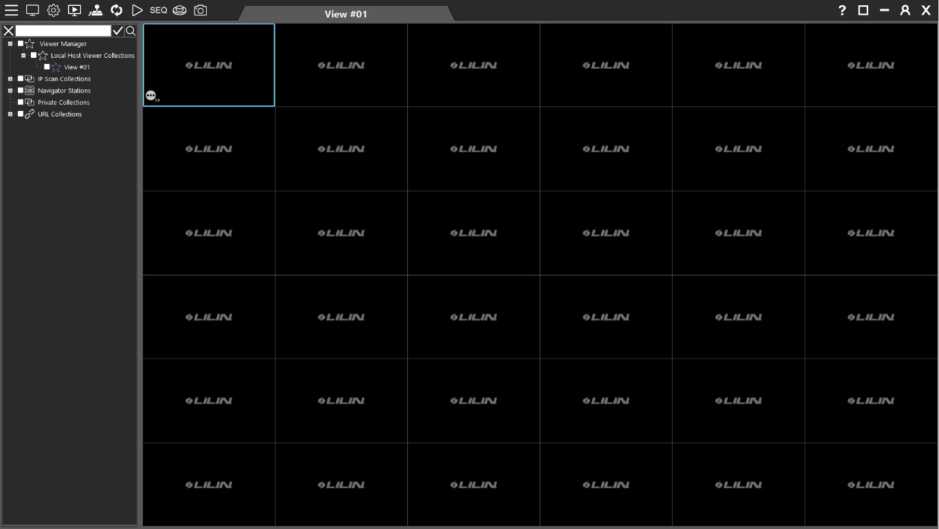
2) The software will load to its main screen.
- To add a device to the client, right click on ‘Private Collections’ in the left menu and a mini menu will appear, select ‘Add Group’.
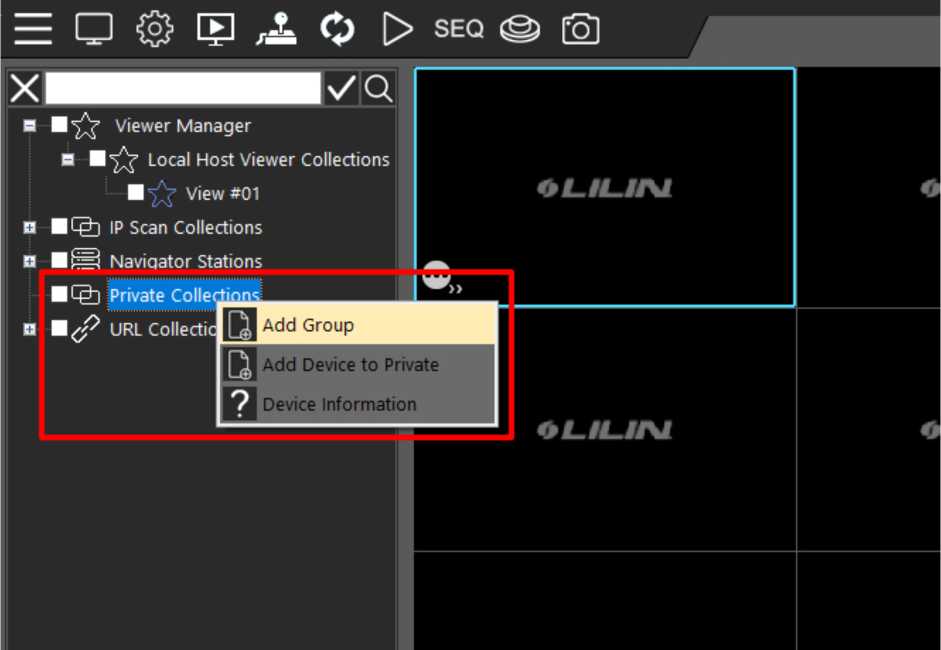
- A new window will appear, asking you to name the group. You can name this whatever you want.
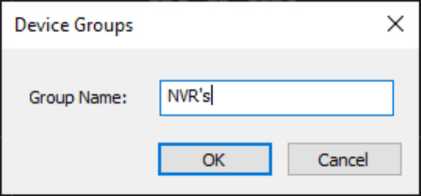
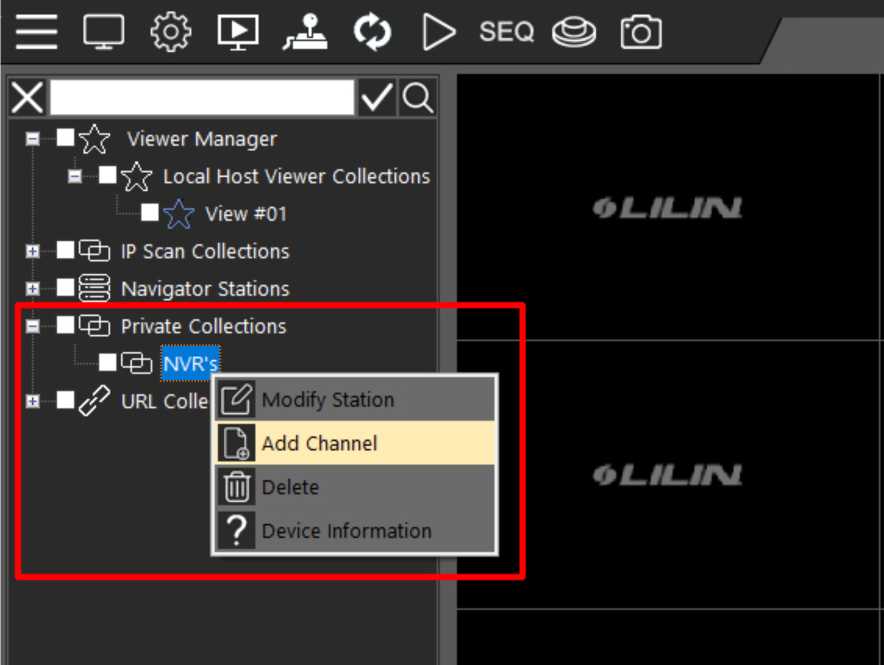
- This new group will now appear under the ‘Private Collections’ menu.
To add a device to this group, right click on the group name and select ‘Add Channel’.
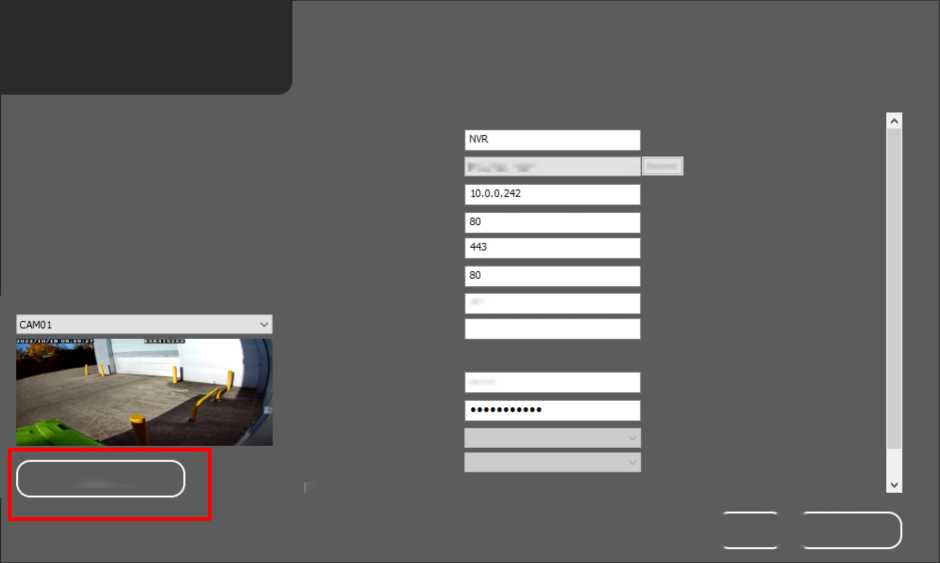
- A new window will appear. Here you will enter the details of the device you wish to add to the Client software. This can be an NVR, NAV server or a standalone camera.
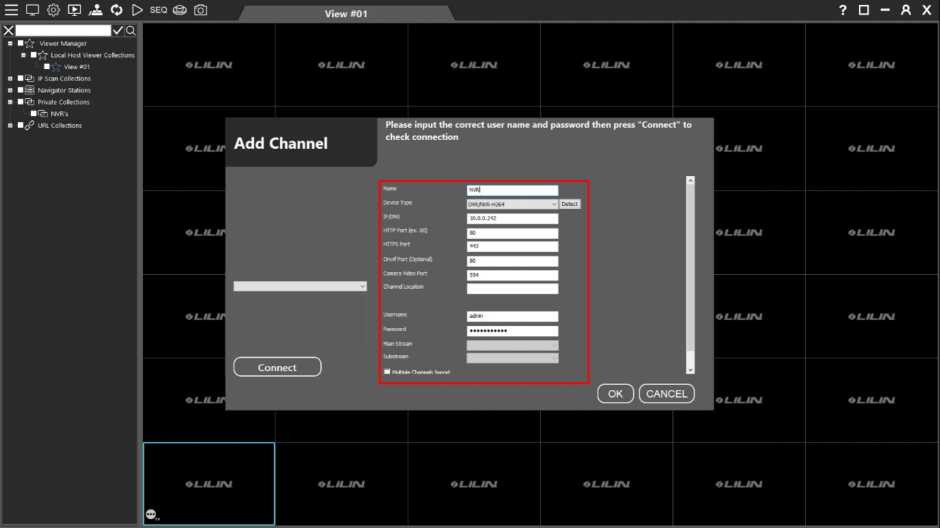
- In this new window please input the device details, select the correct device type, and add the correct username and password for this device.
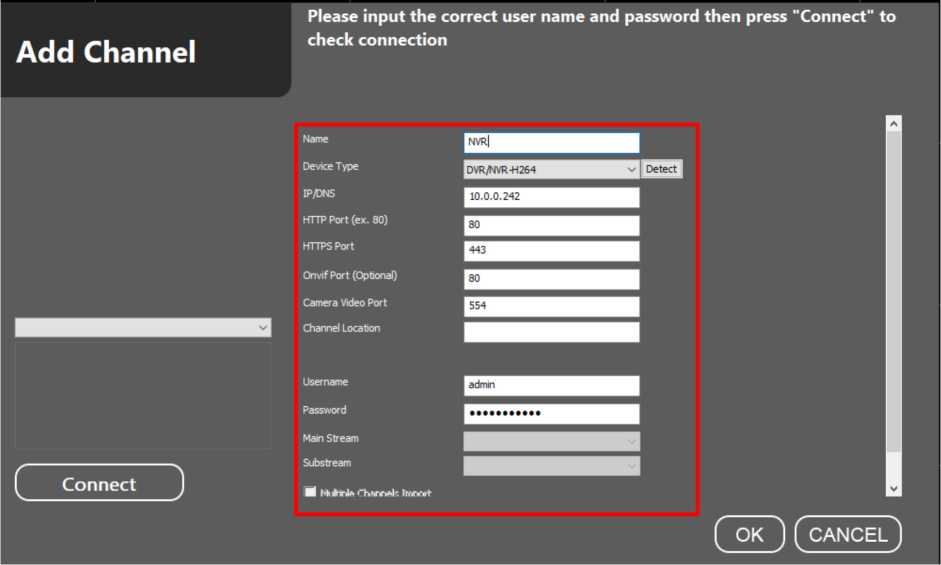
- Click ‘Connect‘ on the left-hand side to check the connection. If all of the device details have been entered correctly, the client will now connect to the device and show a preview of the first camera just above the connect button.
554
admin
DVR/NVR-H264
v Detect
Add Channel
Please input the correct user name and passvvord then press “Connect” to check connection
( OK )(CANCEL
Connect
Name
Device Type
IP/DNS
HTTP Port (ex. 80)
HTTPS Port
Onvif Port (Optional)
Camera Video Port
Channel Location
Username
Passvvord
Main Stream
Substream
M Multide Channels Imoort
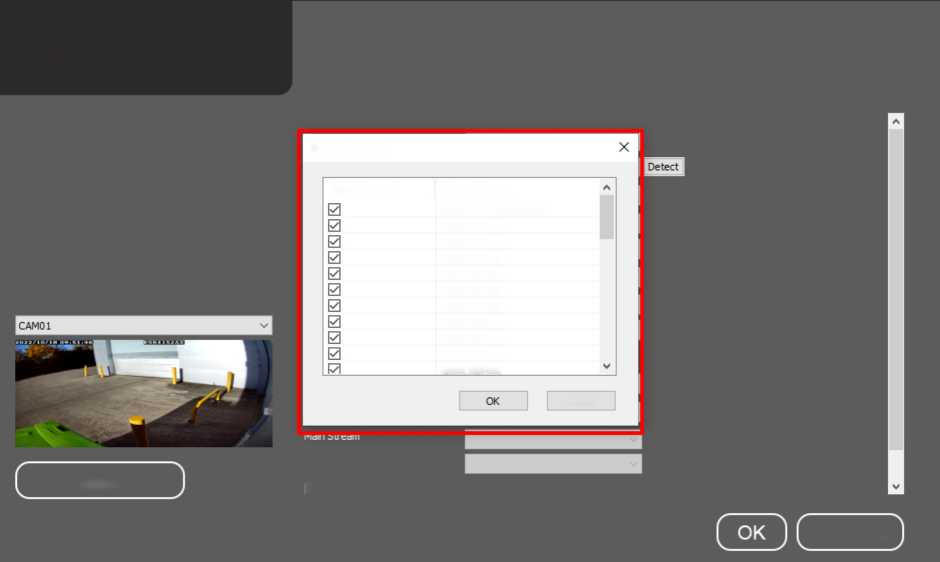
To import multiple cameras from a device (NVR, DHD, NAV) make sure the ‘Multi-Channel Import’ box is ticket at the bottom of the screen. This will open a new window asking you to select which channels you want to include on the import.
It is recommended that you tick the ‘Select All’ box.
Add Channel
Substream
Connect
a Multiole Channels ImDort
CANCEL
Please input the correct user name and password then press “Connect” to check connection
Select Channel
Select Channel
Channel Name
#002CAM02
#003 CAM03
#004CAM04
#OO5CAMO5
#006 CAM06
#007CAM07
#008 CAM08
#009 CAM09
»010 CAM 10
Cancel
Select Ali / Select None #001CAM01
- When you are happy with your selection, click ‘OK’ and your new devices should appear in your group under the ‘Private Collections’ menu that you created in step 4.
If you do not see devices appear, try clicking on a different option on the left side menu, which will refresh the tab.
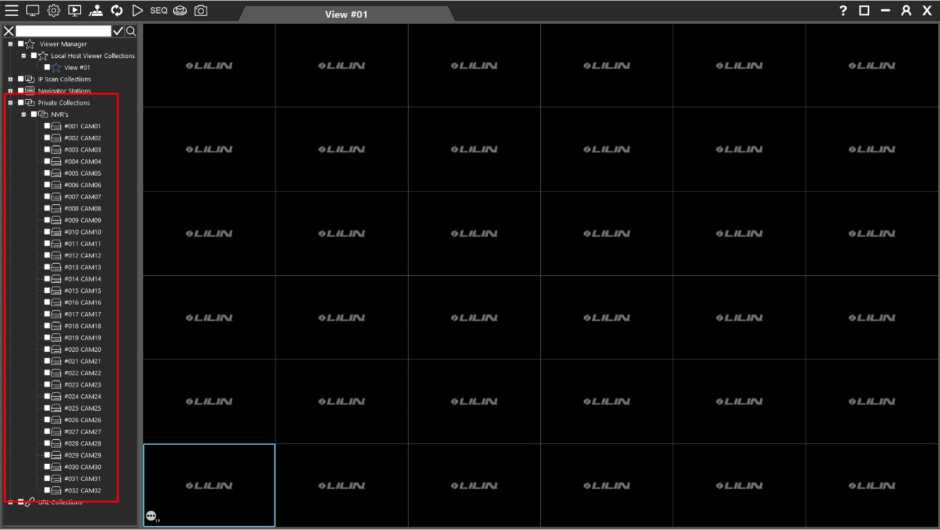
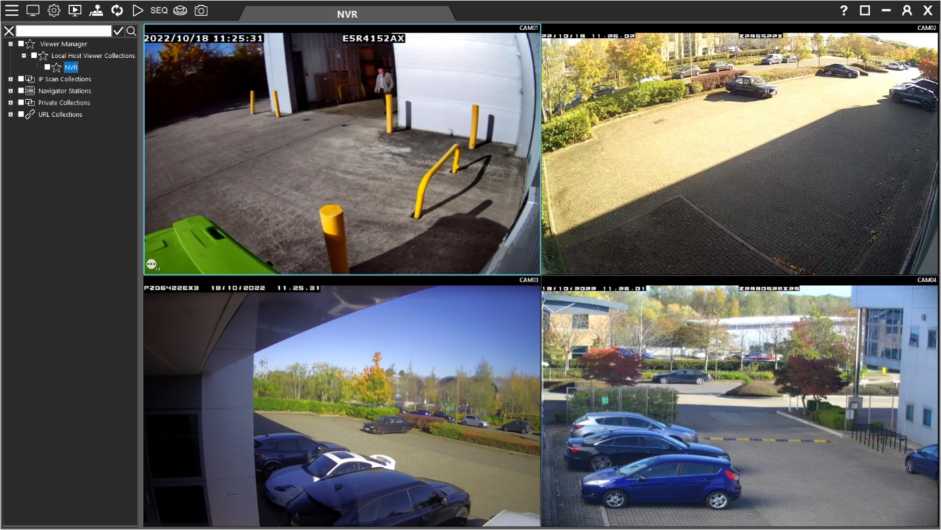
- The next stage is populating the view so that the cameras are visible. To do this, either tick individual devices, or to select all of the cameras tick the group name.
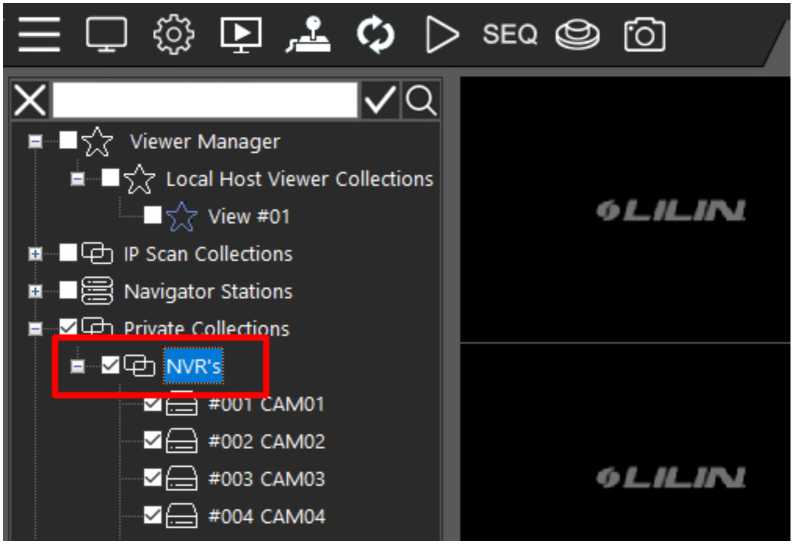
- Next, left click and drag the highlighted group (or camera) to the view window you would like the Client to start to add the device channels from. If you want to start from Channel 1, drag to the first box, if you would like to start from Channel 4, start from the fourth box etc.
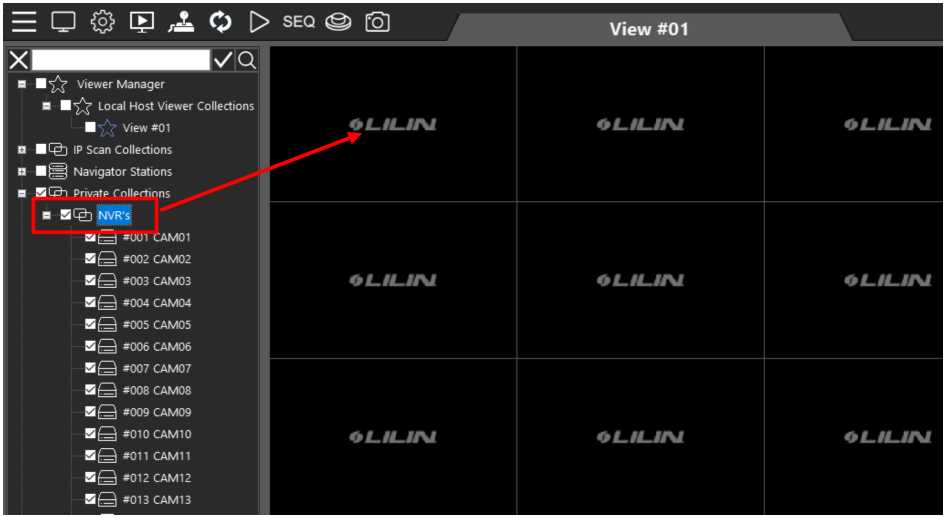
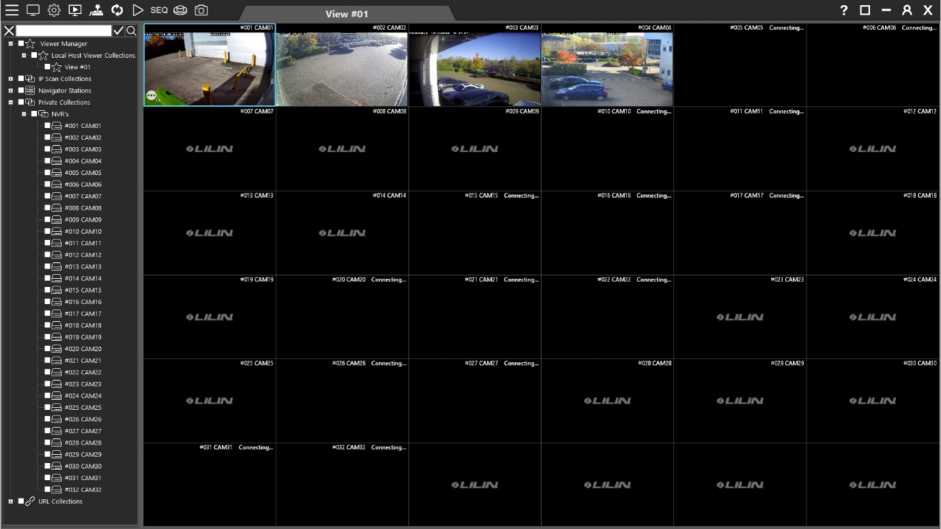
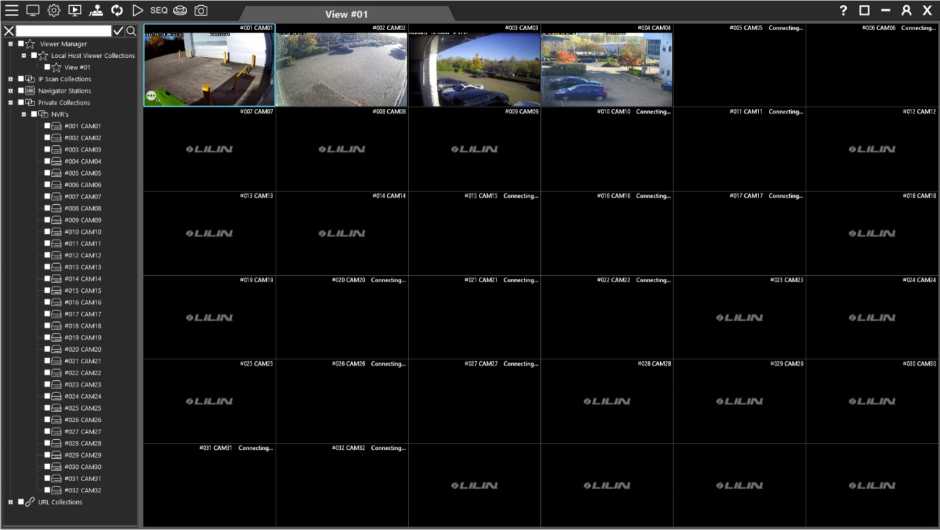
12) Your camera views should now appear in the windows.
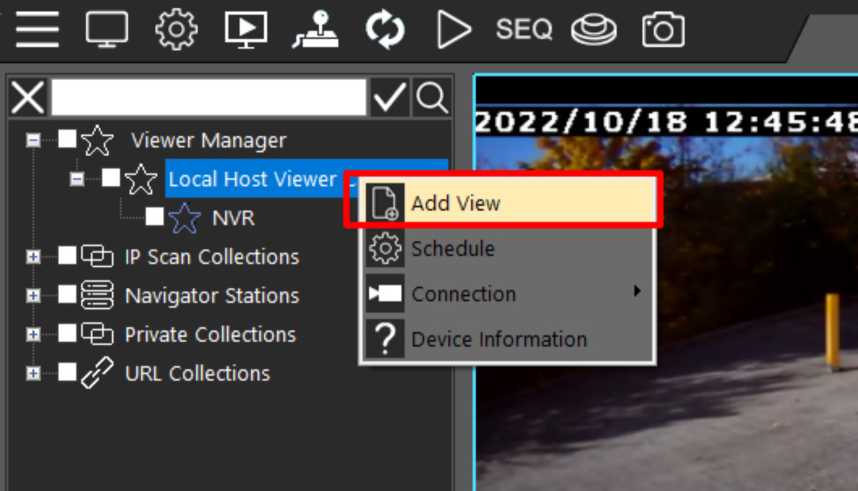
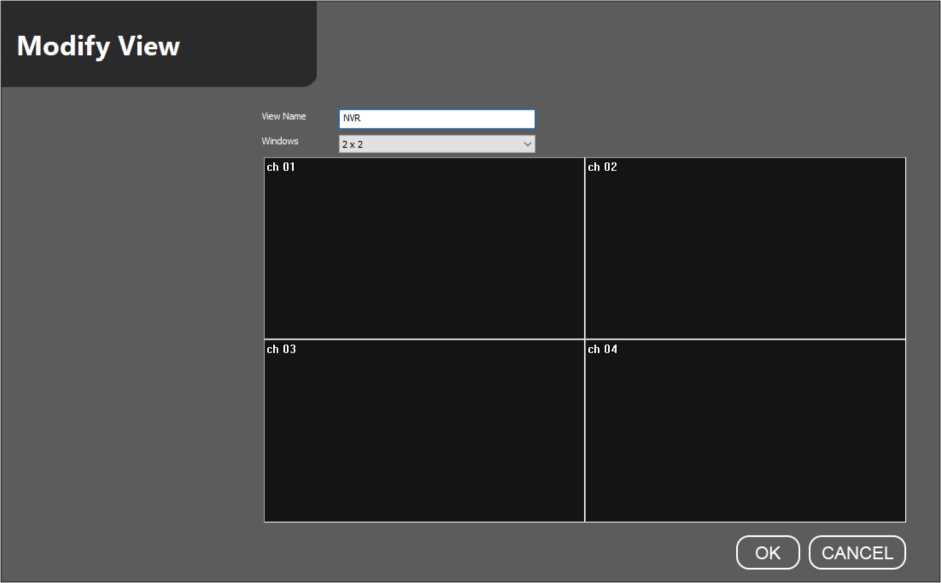
- To create a new view, in the upper left-hand side menu right click on ‘Local Host Viewer Collections’ and select ‘Add View’ from the mini menu that appears.
- A new window will appear. Enter a name for this view and select your chosen channel layout from the options that appear in the dropdown menu. These range from 1×1 (1 camera -full screen) to 12 x 12 (144 cameras).
Ali Cameras
6×6
| ch 01 | x 1 x2 x3
x 4 x5 |
ch 04 | ch 05 | ch 06 | |||
| ch 07 | x7 x8 x9 0x 1C 1×1 | ch 10 | ch 11 | ch 12 | |||
| . 12x E
ch 13 |
1 ** | I J | ch 16 | ch 17 | ch 18 | ||
| ch 19 | ch 20 | ch 21 | ch 22 | ch 23 | ch 24 | ||
| ch 25 | ch 26 | ch 27 | ch 28 | ch 29 | ch 30 | ||
| ch 31 | ch 32 | ch 33 | ch 34 | ch 35 | ch 36 | ||
( OK ) (CANCEL)
- Click on ‘OK’ when you are happy with how the layout appears. This will create a new view, which will be added to the Local Host Viewer Collections.
| View Name | ||
|---|---|---|
| Windows | ||
| ch 01 | ch 02 | ch 03 | ch 04 | ch 05 | ch 06 | ch 07 | ch 08 | ch 09 | ch 10 | ch 11 | ch 12 |
|---|---|---|---|---|---|---|---|---|---|---|---|
| ch 13 | ch 14 | ch 15 | ch 16 | ch 17 | ch 18 | ch 19 | ch 20 | ch 21 | ch 22 | ch 23 | ch 24 |
| ch 25 | ch 26 | ch 27 | ch 28 | ch 29 | ch 30 | ch 31 | ch 32 | ch 33 | ch 34 | ch 35 | ch 36 |
| ch 37 | ch 38 | ch 39 | ch 40 | ch 41 | ch 42 | ch 43 | ch 44 | ch 45 | ch 46 | ch 47 | ch 48 |
| ch 49 | ch 50 | ch 51 | ch 52 | ch 53 | ch 54 | ch 55 | ch 56 | ch 57 | ch 58 | ch 59 | ch 60 |
| ch 61 | ch 62 | ch 63 | ch 64 | ch 65 | ch 66 | ch 67 | ch 68 | ch 69 | ch 70 | ch 71 | ch 72 |
| ch 73 | ch 74 | ch 75 | ch 76 | ch 77 | ch 78 | ch 79 | ch 80 | ch 81 | ch 82 | ch 83 | ch 84 |
| ch 85 | ch 86 | ch 87 | ch 88 | ch 89 | ch 90 | ch 91 | ch 92 | ch 93 | ch 94 | ch 95 | ch 96 |
| ch 97 | ch 98 | ch 99 | ch 100 | ch 101 | ch 102 | ch 103 | ch 104 | ch 105 | ch 106 | ch 107 | ch 108 |
| ch 109 | ch 110 | ch 111 | ch 112 | ch 113 | ch 114 | ch 115 | ch 116 | ch 117 | ch 118 | ch 119 | ch 120 |
| ch 121 | ch 122 | ch 123 | ch 124 | ch 125 | ch 126 | ch 127 | ch 128 | ch 129 | ch 130 | ch 131 | ch 132 |
| ch 133 | ch 134 | ch 135 | ch 136 | ch 137 | ch 138 | ch 139 | ch 140 | ch 141 | ch 142 | ch 143 | ch 144 |
( OK ) (CANCEL)
- To populate cameras to your new view, find the device (NVR, DHD, NAV) or individual cameras under your ‘Private Collections’ menu. Tick the boxes next to the devices you want to populate.
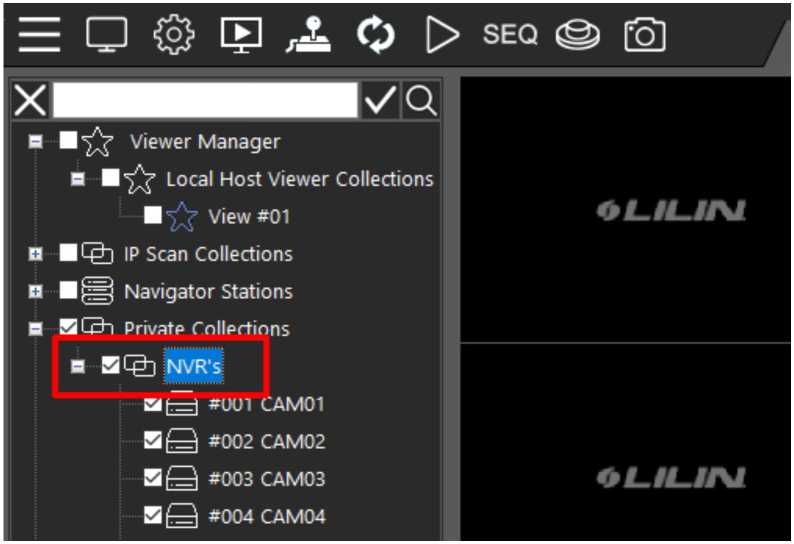
- Left click and drag the highlighted/ticked devices and to your new view window. If you want to start from Channel 1, drag to the first box, if you would like to start from Channel 4, start from the fourth box etc.
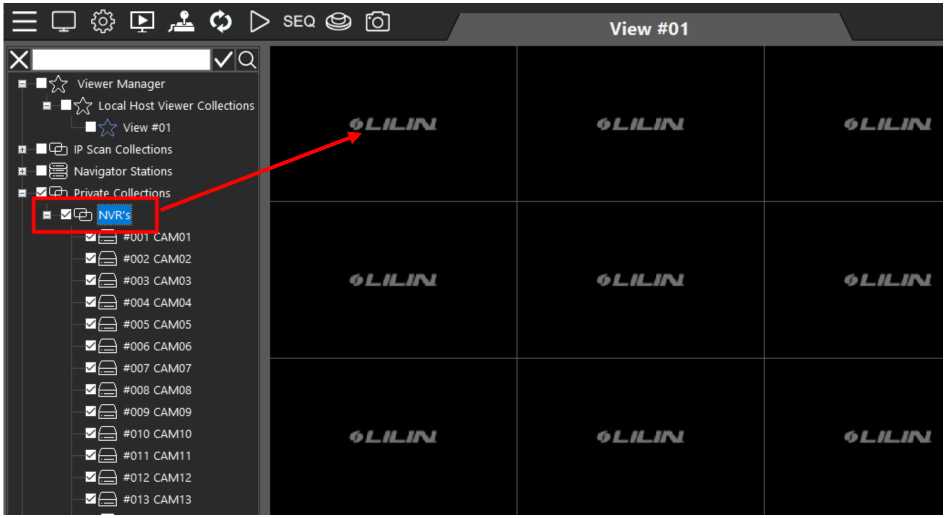
6) Your camera views should now appear in the windows.
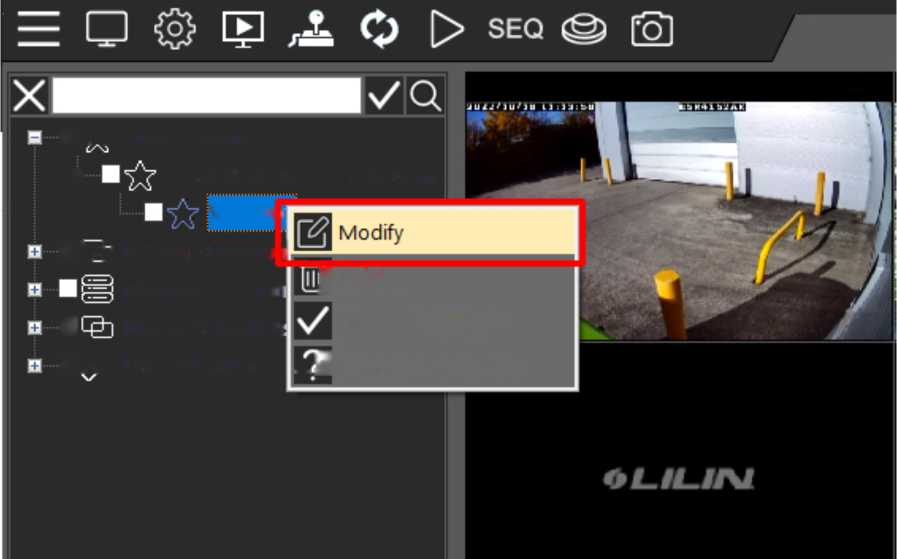
- To edit an existing view, right click on the view and select ‘Modify’ from the mini menu that appears.
View #ı1
J Delete
Channel Highlight _ J Device Information
CAM01
■ /y Vievver Manager
H Local Hoşt Vievver Collections
■ Lpjj İP Scan Collectio ı| Navigator Station
■ Private Collection:
■ /P URL Collections
- A new window will appear. Select the number of channels you would like the view to display from the dropdown list.
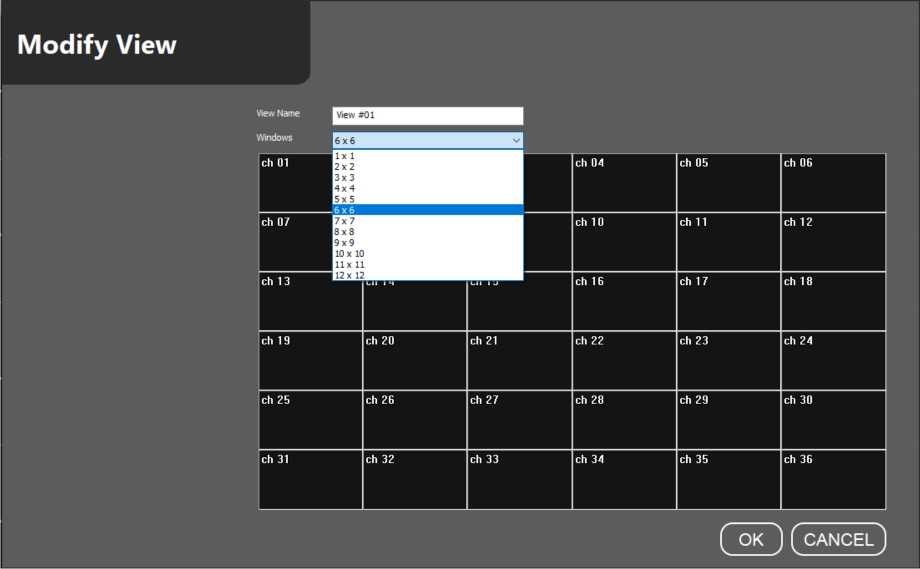
3) You can also rename the view if required.
4) Click ‘OK’ and this will save your changes. Your view should have changed; if it has not, try clicking on a different view and then back in to your edited view, to trigger a reload.
1) To access playback through Client, simply click the icon below, which can be found on the top menu bar. This will load the multi-channel playback feature.

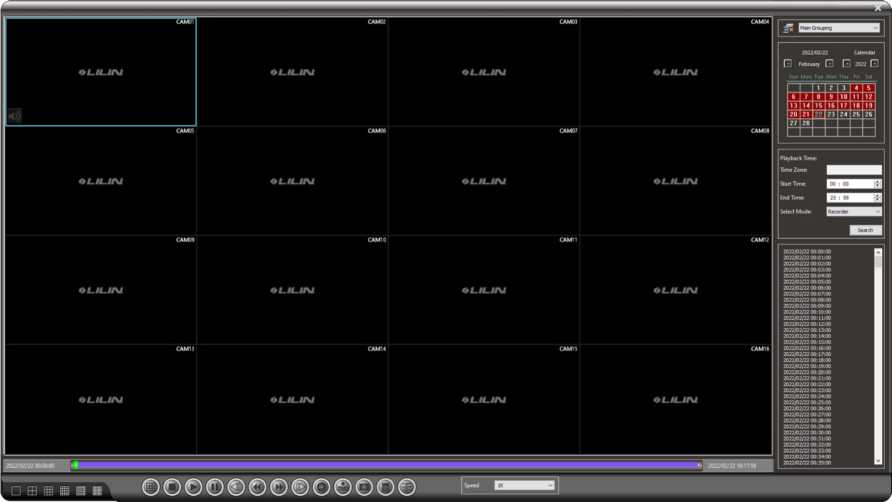
2) The Playback window will now be displayed.
On the right-hand side of the screen is a calendar and time search function.
Dates coloured in red on the calendar have recorded footage.
Click on the required date on the calendar and all available data for that date will populate the section below in 1-minute sections. You can refine these results by filtering for a specific time range.
You can see in the image to the right we have refined our search to a 5 minute period.
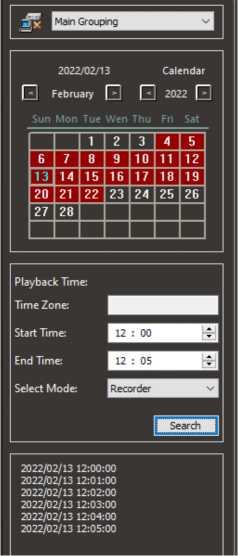 To play a video file, simply click on the minute you want to view and the video from all cameras at that time will play automatically. If you want to view one camera in full screen, simply double click on that channel.
- To backup video, ensure that you have filtered your search down to the correct date and times required, then click the ‘backup’ icon from the menu at the bottom of the screen.

- The backup menu will now open. This menu should load with your filtered date and times from the last step, but if these are incorrect you can adjust them here in the middle menu.
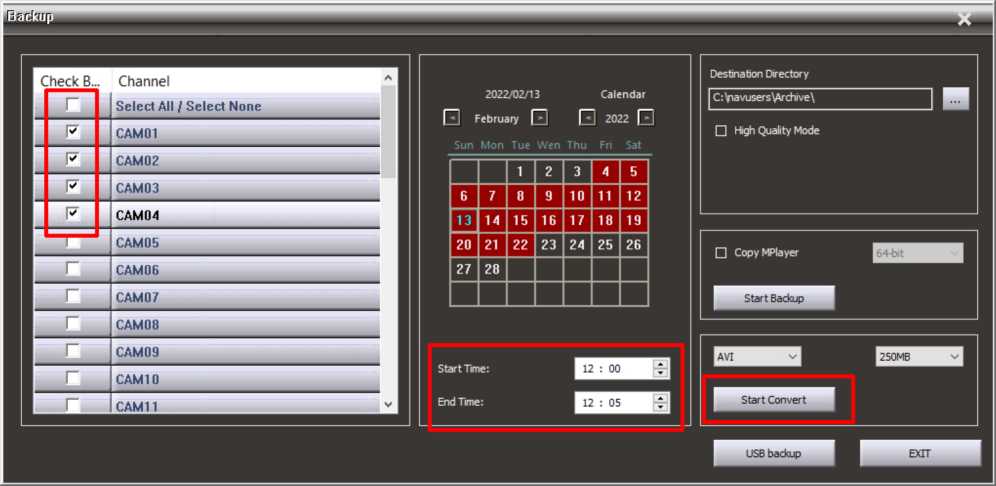
Select the cameras you want to include in your backup and click ‘Start Convert’ as shown above. This will create a .AVI file of the selected data.
