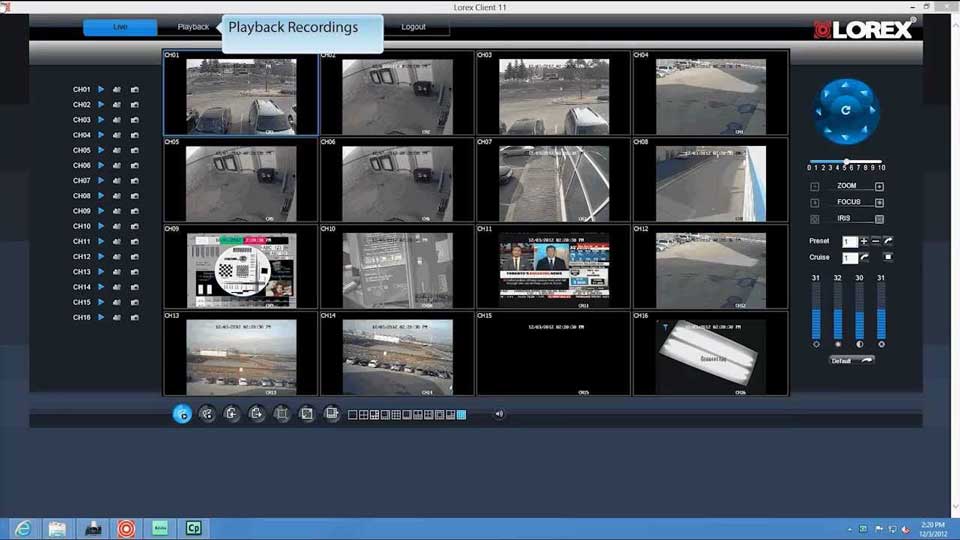
Lorex Desktop Software for Mac and PC The Lorex desktop software allows you to access and monitor your security system on a PC or Mac. We have two desktop software: Lorex Cloud Client and Lorex Client 13.
Alternatively, you can also access and monitor your security system using your mobile device. To access your security system on your mobile device, please download the compatible app.
Lorex Cloud Client
The Lorex Cloud Client allows you to access your security system on your Mac or PC.

What are the compatible recorders?
DVR
- DV Series
- LHV Series
- D241, D242, D251, D441 Series*
- D841, D861, D862, D863, D871, D881 Series*
NVR
- NR Series
- LNR Series
- N841, N842, N843, N844, N845, N846 Series*
- N861, N862, N863, N864 Series*
- N881, N882, N883 Series*
*Disclaimer: Basic functions work from Live View and Playback. SMD feature not supported.
How to download the Lorex Cloud Client software?
For PC users, please download the Lorex Client here.
For Mac users, please download the Lorex Client here.
Lorex Desktop Software for Mac and PC
Read Next :
Lorex Client 13
The Lorex Client 13 allows you to access your security system on your Mac or PC.

What are the compatible recorders?
- LHA
- LHB
- LNK
- LHWF
- LHO Series
- Wire-Free
How to download the Lorex Client 13?
For PC users, please download the Lorex Client 13 here.
For Mac users, please download the Lorex Client 13 here.
Popular Client Software and Mobile Apps
To receive automatic firmware upgrade for your recorder, it is essential to enable automatic update in your recorder’s settings. If this is not enabled, you will have to manually upgrade your system’s firmware. We highly recommend that you contact our Technical Support at 1-888-425-6739 to assist you in locating the correct firmware for your recorder.
Client Software for PC and Mac
We have three Client Softwares that support PC and Mac users: VMS Client, Lorex Client 13, and Lorex Cloud. Using a PC or Mac, you can access your security system by using any of the compatible software.
VMS Client
The VMS Client software is compatible with the following products:
Downloads
Lorex Client 13
The Lorex Client 13 software is compatible with the following products:
Downloads
Lorex Cloud
The Lorex Cloud Client software is compatible with the following products:
Downloads
- For PC users, download the Lorex Cloud Client here.
- For Mac users, download the Lorex Cloud Client here.
DH Thermal Software
The DH Thermal Software allows you to live view and playback your LTH02 Handheld Thermal Camera on a PC.
Download
- For PC only, download the DH Thermal Software here.
Mobile Apps
We have three mobile apps that allow you to remotely access your security system using an iOS or Android smartphone: Lorex Cloud, Lorex Home, and Lorex Cirrus.
Lorex Cloud
The following NVRs for Digital IP Systems are compatible with the Lorex Cloud app:
The following DVRs for Analog HD MPX Systems are compatible with the Lorex Cloud app:
Lorex Home
The following NVRs for Digital IP Systems are compatible with the Lorex Home app:
The following DVRs for Analog HD MPX Systems are compatible with the Lorex Home app:
The following Standalone Wi-Fi cameras are compatible with the Lorex Home app:
Lorex Cirrus
The following DVRs and NVRs for Wire-Free Systems are compatible with the Lorex Cirrus app:
LNK / LHA / LHB / L222 Series – How to manually upgrade the firmware of your recorder
NOTE: The instruction laid out in this article is applicable to the following recorders:
- LNK
- LHA
- LHB
- L222
You can upgrade the firmware of your recorder in two different ways:
- Automatically over a network, connected by an Ethernet cable (included). Click here for information on how to automatically upgrade firmware.
- Manually by downloading the firmware into your computer and uploading it using a USB flash drive onto your recorder.
IMPORTANT: It is recommended to use automatic upgrade unless directed by technical support to perform a manual upgrade. Technical support will provide you with a .bin file for manual firmware upgrade. Do not power off the DVR during a firmware upgrade.
Prerequisites:
- Ensure your DVR system is connected to a network using the included Ethernet cable.
- Save the .bin file in the root folder of a USB flash drive (not included), and connect the USB flash drive to a USB port on your DVR.
To manually upgrade the DVR firmware
For this procedure, you need (1) the latest firmware for your recorder, (2) a formatted and empty USB flash drive, (3) access to a computer with internet connection, and (4) a valid email address.
- To upgrade your recorder to the latest firmware, call our Technical Support at 1-888-425-6739 and request for your recorder’s latest firmware. When calling, make sure you have your recorder’s the correct model number and a valid email address at hand. We will send the firmware download link via email. NOTE: The download link will expire in a specified period of time.
- Next, format your empty USB flash drive using your recorder. IMPORTANT: We highly recommend that you format your USB flash drive using your recorder.
- Once you have successfully formatted your USB flash drive, remove it and insert it into your computer’s USB port and download the firmware we sent via email.
- Verify that you have the correct firmware, then remove the USB flash drive from your computer, and insert it back into one of the USB ports on your recorder.
- In the taskbar, click the Main Menu icon (
 ), and then click Advanced > Maintenance.
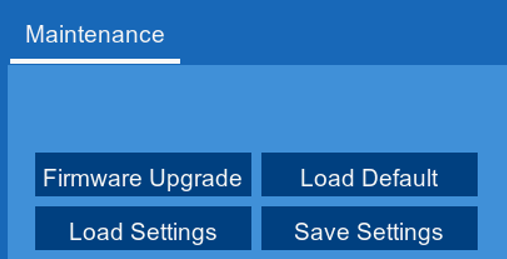
- In the Maintenance tab, click Firmware Upgrade.
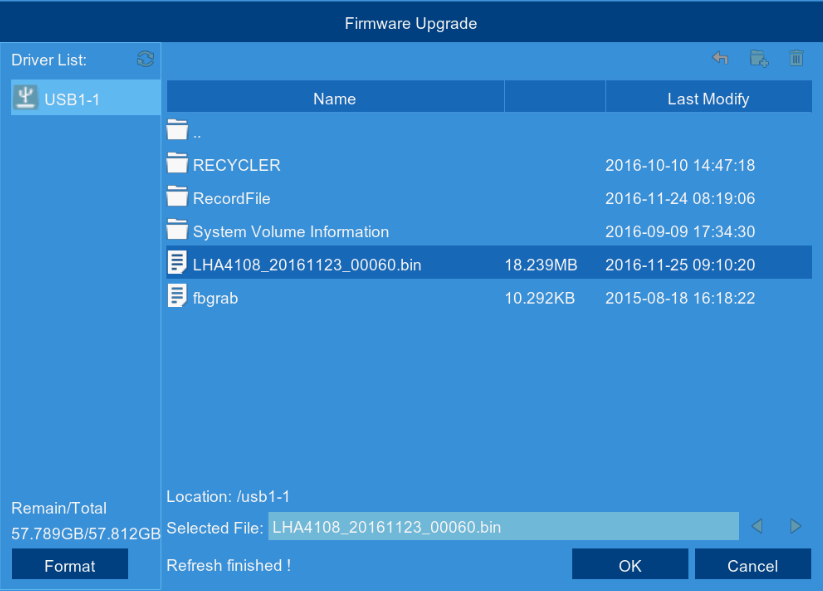
- Select the .bin file, and then click OK.
- Click OK on the confirmation window.
- Allow 5-10 minutes for the system to upgrade. The DVR will automatically restart when the firmware upgrade is complete.
How to upgrade the firmware of Lorex Smart Home Security Center
There are two ways of upgrading the firmware of your Lorex Smart Home Security Center (LSHSC): manually or via cloud.
Manual Upgrade
For this procedure, you need (1) the latest firmware for your LSHSC, (2) a formatted and empty USB flash drive, (3) access to a computer, and (4) a valid email address.
Step 1. To upgrade your recorder to the latest firmware, call our Technical Support at 1-888-425-6739 and request for your LSHSC ‘s latest firmware. When calling, make sure you have your valid email address at hand. We will send the firmware download link via email. NOTE: The download link will expire in a specified period of time.
Step 2. Next, format your empty USB flash drive to FAT 32.
Step 3. Using a computer, download the correct firmware to your formatted USB flash drive. Don’t unzip the file.
Step 4. Verify that you have the correct firmware, then remove the USB flash drive from your computer and insert it at the back USB port on your LSHSC.
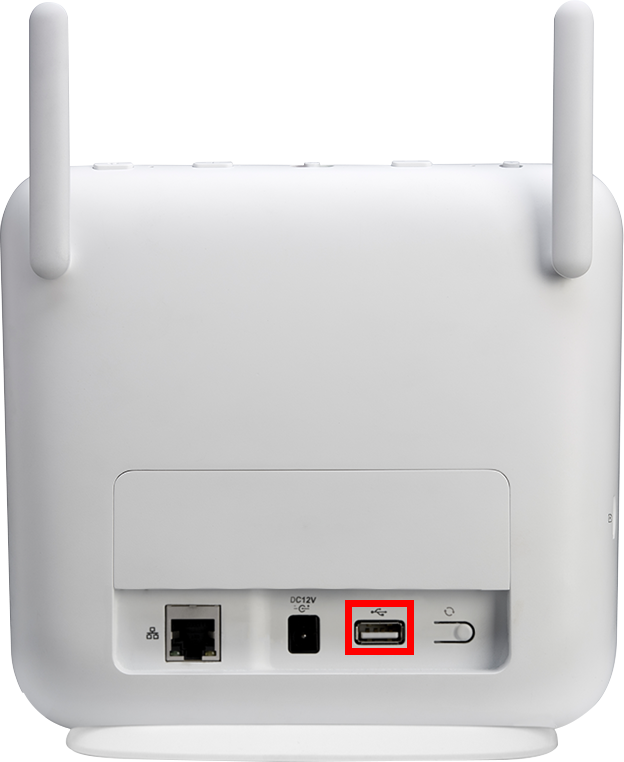
Step 5. Then watch out for pop up message on your LSHSC: “New firmware available.” Tap the Update button to the upgrade the firmware.
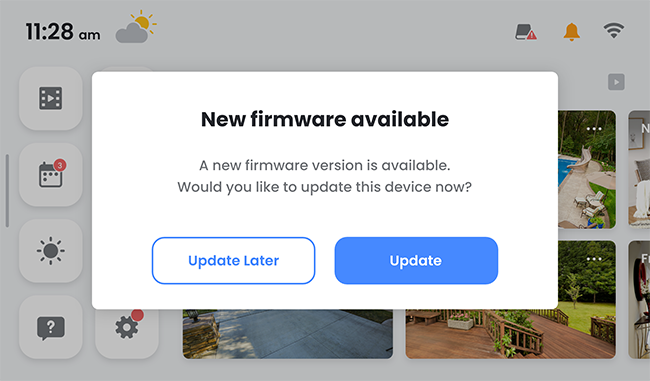
Step 6. Verify that the firmware has been successfully updated.
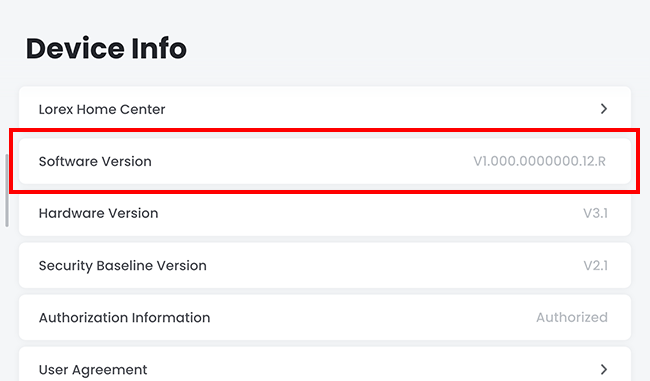
Congratulations! You have manually updated the firmware of your Lorex Smart Home Security Center.
Cloud Upgrade
For this procedure, your LSHSC must be connected to the internet during the upgrade.
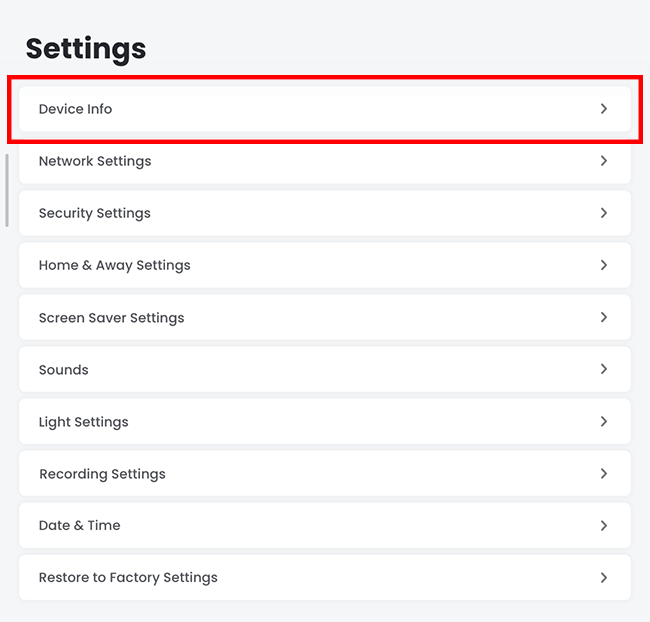
Step 1. Go to Home Screen > Device Settings > Device Info.
Step 2. Under Device Info, tap Software Version.
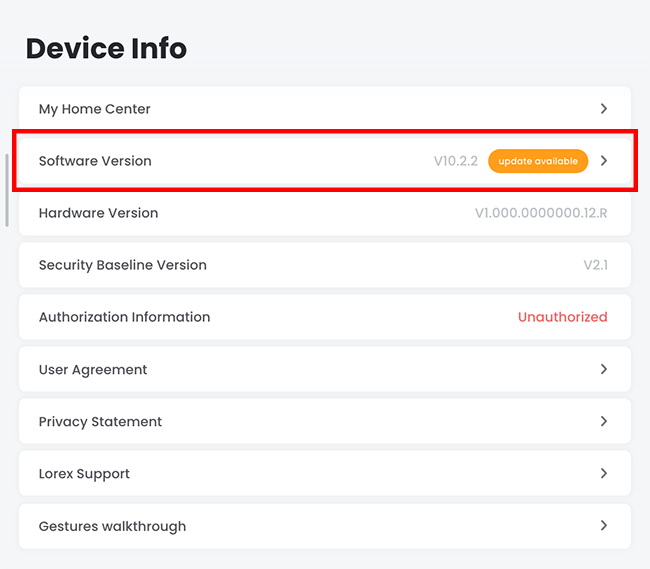
Step 3. Tap Update.

Step 4. Verify that the firmware has been successfully updated.

Congratulations! You have successfully updated the firmware of your Lorex Smart Home Security Center.
How to check your Lorex devices for firmware updates
In this article, we will walk you through the process of checking your Lorex devices for available firmware updates. If there is an available update for your device, we highly encourage you to update the firmware on your device. To do this, you must have access to the internet. To manually update the firmware, please check our guide here.
IMPORTANT: If you are unable to verify the status of your device’s firmware, please call our Technical Support at 1-888-425-6739.
Recorder
To check if you have the latest firmware on your recorder, please follow these steps:
Step 1. Go to Main Menu > Settings > System > Upgrade.
Step 2. In the Upgrade settings, click Check for Updates.
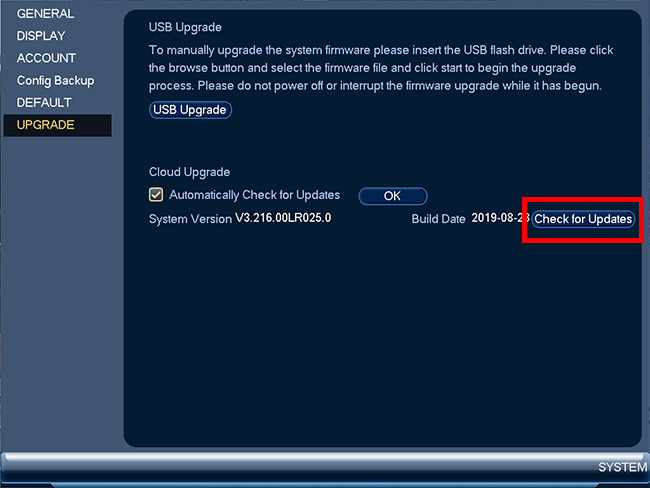
Step 3. If there is an available update for your recorder, please proceed with upgrading your firmware. If not, you will get a message that you have the latest firmware.
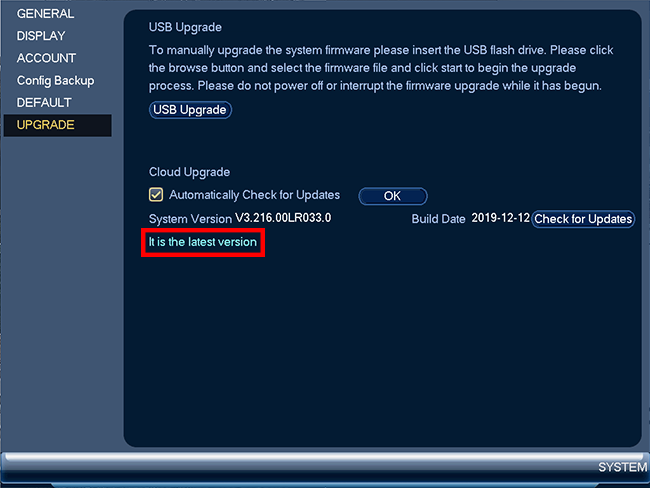
IMPORTANT: To receive automatic updates, make sure the box is checked next to Automatically Check for Updates, then click OK.
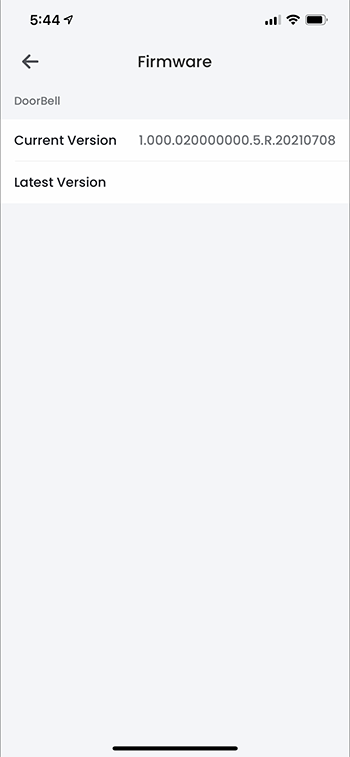
Lorex Home App
To check if you have the latest firmare on your Lorex Home app, please follow these steps:
Step 1. Launch the Lorex Home app.
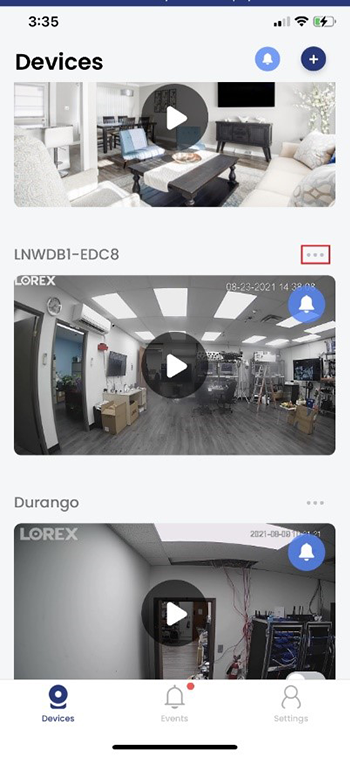
Step 2. Tap more or the three dots to go to Device Settings.
Step 3. Tap Firmware.
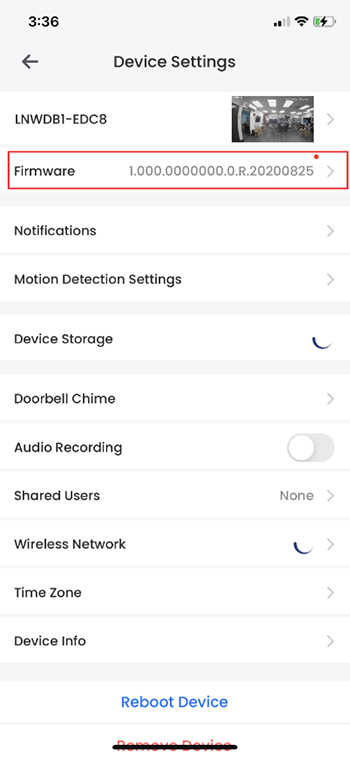
Step 4. If there is an available update, please proceed with upgrading your firmware. If there is no new firmware available, the Latest version will just be empty.
DVR / NVR – How to manually upgrade the firmware of your recorder
IMPORTANT: All Lorex firmware updates are free of charge.
There are two ways of upgrading the firmware of your recorder: USB Upgrade and Cloud Upgrade.
Part 1 – USB Upgrade
For this procedure, you need (1) the latest firmware for your recorder, (2) a formatted and empty USB flash drive, (3) access to a computer with internet connection, and (4) a valid email address.
Step 1. To upgrade your recorder to the latest firmware, call our Technical Support at 1-888-425-6739 and request for your recorder’s latest firmware. When calling, make sure you have your recorder’s the correct model number and a valid email address at hand. We will send the firmware download link via email. NOTE: The download link will expire in a specified period of time.
Step 2. Next, format your empty USB flash drive using your recorder. IMPORTANT: We highly recommend that you format your USB flash drive using your recorder. To format your USB flash drive using your recorder, please read the full instructions here.
Step 3. Once you have successfully formatted your USB flash drive, remove it and insert it into your computer’s USB port and download the firmware we sent via email.
Step 4. Verify that you have the correct firmware, then remove the USB flash drive from your computer, and insert it back into one of the USB ports on your recorder.
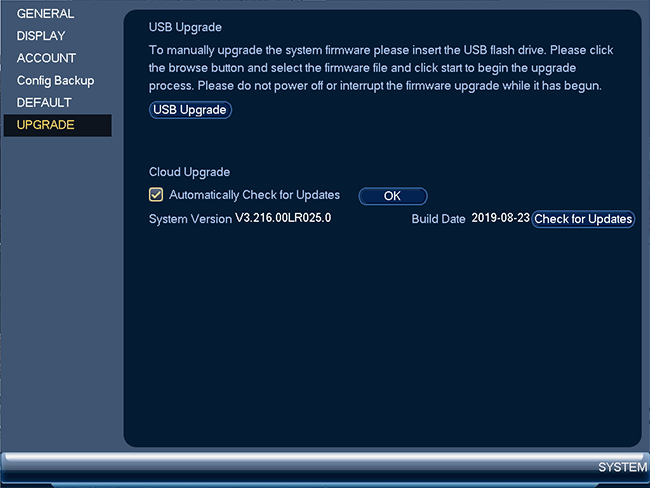
Step 5. On your recorder, go to Main Menu > Settings > System > Upgrade.
Step 6. In the Upgrade settings, click USB Upgrade.
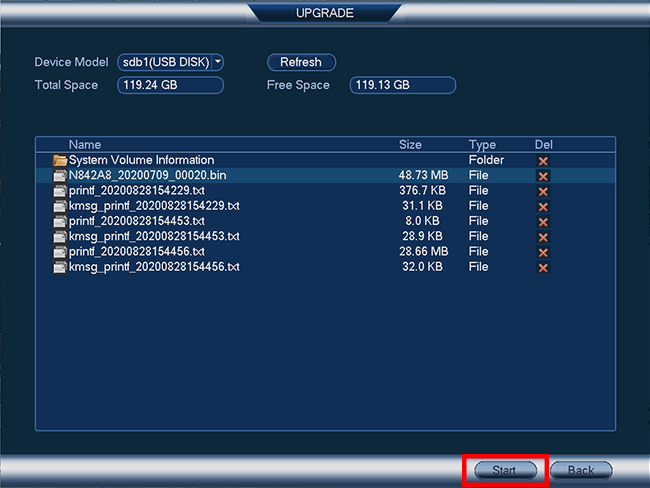
Step 7. In the popup window, select the firmware that you have previously downloaded for your recorder.
NOTE: Make sure to select the file with .bin extension. See image below.

Step 8. Then, at the bottom of the screen, click Start to begin the upgrade.
WARNING: Please DO NOT turn off the power during the firmware upgrade. Wait until the unit reboots and display the new live view.
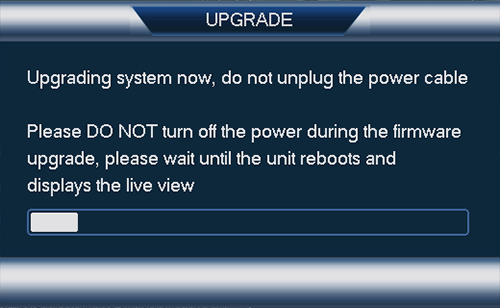
Congratulations! You have successfully updated the firmware of your recorder.
Part 2 – Cloud Upgrade
To upgrade your recorder’s firmware via Cloud Upgrade, it is necessary to connect the recorder to your network.
Step 1. Go to Main Menu > Settings > System > Upgrade.
Step 2. In the Upgrade settings, click Check for Updates.

Step 3. If there is an available update for your recorder, please proceed with upgrading your firmware. If not, you will get a message that you have the latest firmware.

IMPORTANT: To receive automatic updates, make sure the box is checked next to Automatically Check for Updates, then click OK.
DVR / NVR – How to format your USB flash drive on your recorder
To make sure you can transfer files to or from your recorder, it is essential that you first format your USB flash drive on the recorder before moving any file.
Step 1. Insert your USB flash drive into one of the USB ports on your recorder.
Step 2. On your recorder, go to Main Menu > Settings > System > Config Backup.
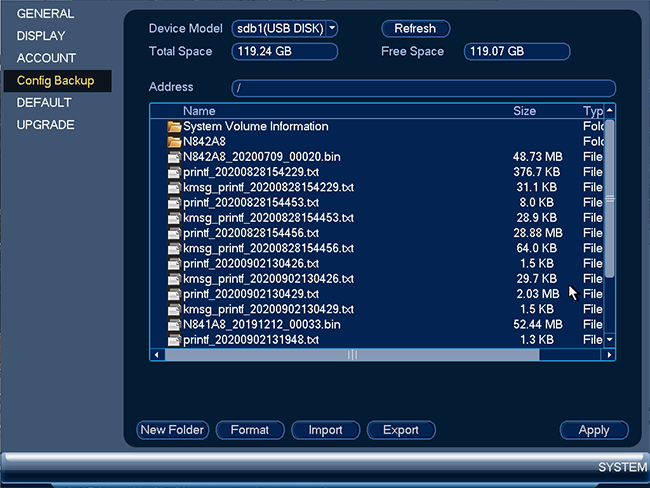
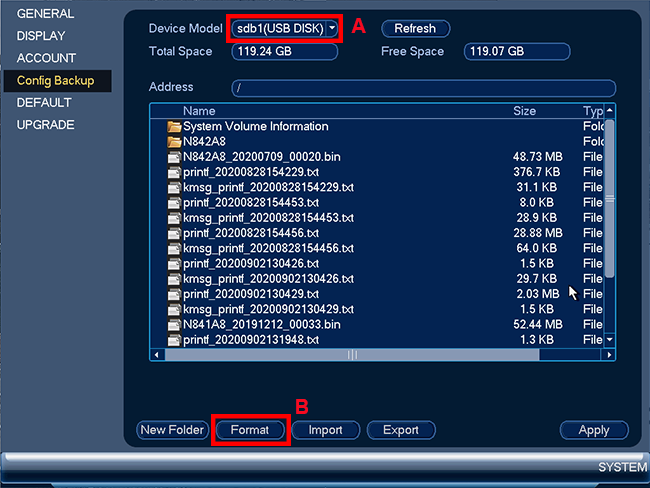
Step 3. At the top of the screen, select the USB flash drive (A) that you wish to format, then at the bottom of the screen, click Format (B) to open the popup window.
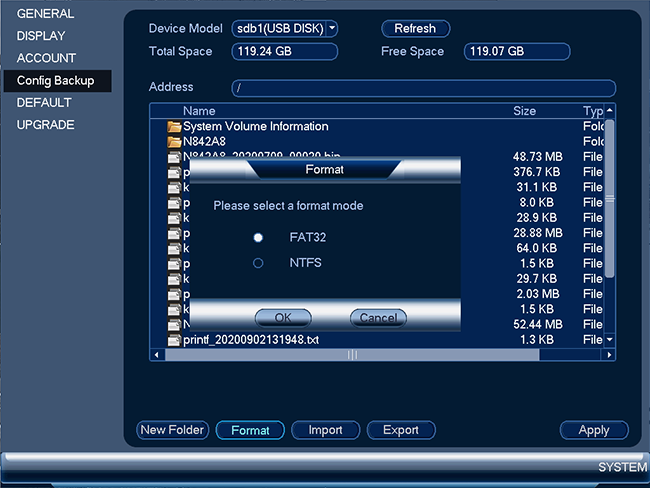
Step 4. In the popup window, select a format mode. In this procedure, I am selecting FAT32 as a format mode.
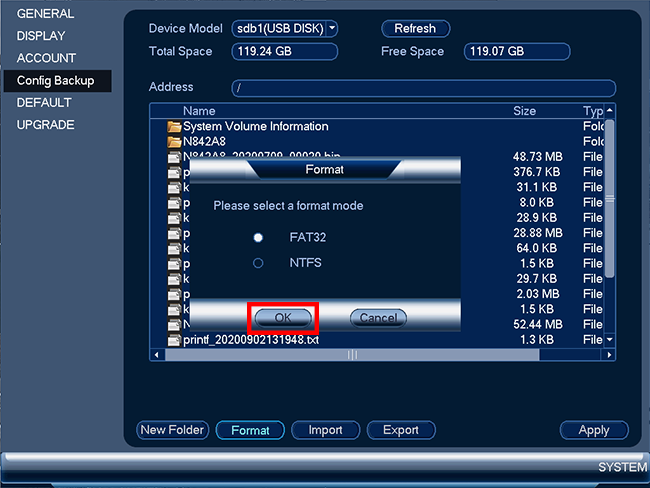
Step 5. Then, click OK to start the formatting.
Step 6. Once formatting is complete, click Yes to exit the popup window.
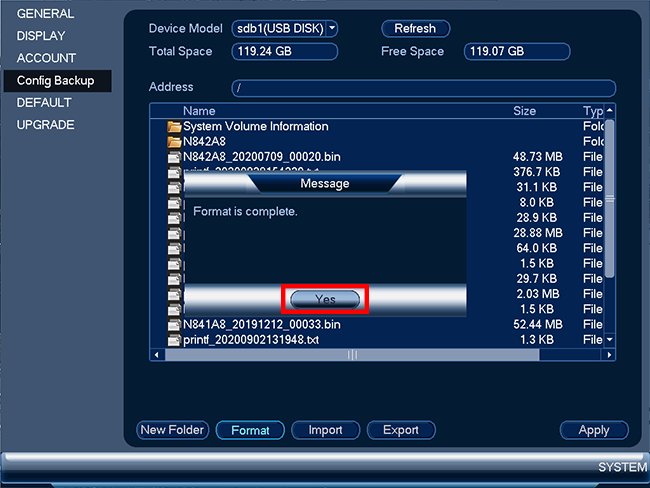
Congratulations! You have successfully formatted your USB flash drive. You are now ready to transfer files to or from your recorder.
