Hik-Partner Pro Portal Setup Guide, Hik-Partner Pro is a convergent, cloud-based security solution that helps manage services for your customers and expand your business by subscription offers. Read the following sections to learn more about Hik-Partner Pro.
Hik-Partner Pro is a convergent, cloud-based security solution that helps manage services for your customers and expand your business by subscription offers. You can monitor the system health status of your customers’ sites (even resolve problems) remotely, using a simple and reliable platform. Hik-Partner Pro solution enables you to customize security solutions for customers with fully-converged Hikvision devices, covering video, intrusion, access, intercom, and more.
Read the following sections to learn more about Hik-Partner Pro.
- Clients
- Relationship Among Hik-Partner Pro, Hik-Connect, HikCentral Connect, and HikCentral ReGuard
Clients
Hik-Partner Pro solution provides different ways/clients for service providers’ customers.
Table 1-1 Client Description
| Client | Description |
| Hik-Partner Pro Portal | Portal for service providers logging in to Hik-Partner Pro to manage the security business, such as permission and employees management, site management, device management, project registration, product selection, Hikvision product order management, solution search, and devices health monitoring. |
| Hik-Partner Pro Mobile Client | Mobile Client for service providers logging into Hik-Partner Pro to manage site, apply for site information management permission from end users, manage and configure the devices, submit RMAs (Return Material Authorization) requests, create quotations, etc. |
| Hik-Connect Mobile Client | Mobile Client for customers to manage their devices, accept the site handover from the service provider as the site owner, approve the Installer’s application for site information management permission, etc. |
| Hik-Connect Portal | Portal for customers to manage their employees’ access level and attendance after you set an attendance system for them via the Hik-Partner Pro Portal. |
| HikCentral Connect Portal | Portal for customers to manage resources, configure and use video management, on-board monitoring, alarm detection systems, etc. |
| Client | Description |
| HikCentral Connect Mobile Client | Mobile Client for customers to use video management, on-board monitoring, and alarm detection systems, such as live view, playback, driving monitoring, and track playback. |
| HikCentral ReGuard Web Client | Web Client for service providers to configure parameters for video alarm receiving center and manage work orders or statistics reports. |
| HikCentral ReGuard Control Client | Control Client for service providers to perform alarm monitoring, virtual guard, investigation and search, and so on. |
Relationship Among Hik-Partner Pro, Hik-Connect, HikCentral Connect, and HikCentral ReGuard
As the following diagram shows, Hik-Partner Pro provides certain value-added services related with Hik-Connect, HikCentral Connect, and HikCentral ReGuard. You can activate these value-added services to benefit yourselves or your customers (i.e., customers who use Hik-Connect, HikCentral Connect, and HikCentral ReGuard). For more information about the value-added services and how they relate to Hik-Connect,HikCentral Connect, and HikCentral ReGuard, see Value-Added Services and its sections.
Hik-Partner Pro Portal Setup Guide
Read More :
- How To Configure Hikvision iVMS-4200
- How to Add Device to Hik-ProConnect
- How to Reset Password Hikvision
CXlNote
The availability of the value-added services is determined by your country/region. Some value- added services are not supported in every country/region.
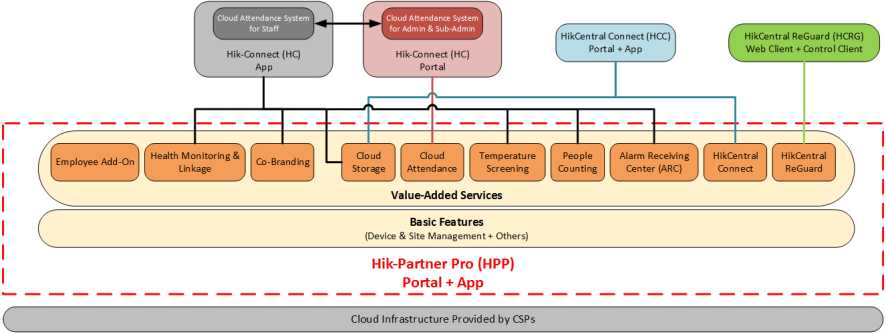
Figure 1-1 Relationship Diagram
This manual provides the service providers (i.e., Installer, System Integrator, Distributors, Resellers, OEM, and Alarm Receiving Centers(ARC)) with the essential information and instructions about how to use the Hik-Partner Pro Portal to manage the security business.
This manual describes how to manage the permission and employees of your company, add new or existing site for management, apply for site authorization and device permissions from your customers, manage and configure the devices belonging to the site, project registration, product selection, Hikvision product order management, solution search, and check the device health status for further maintenance, etc.
Here we introduce the entities (any physical or conceptual object) involved in Hik-Partner Pro.
Identity Related Entities
Service Provider
Those who provide services such as the design of security solutions, system/device installation, after-sales, and (or) device maintenance. There are several service provider types and the detailed descriptions are as follows.
Installer
Provides device installation and maintenance services for customers.
System Integrator
Integrates multiple systems to provide solutions for customers.
Distributor
Trades with Hikvision and supplies Hikvision devices to other businesses that sell to customers.
Reseller
Bulk purchases Hikvision devices from distributors and then sells the devices to installers.
Alarm Receiving Center (ARC)
Provides the alarm receiving and handling service for customers.
C®Note
If you are to apply for joining Hik-Partner Pro as ARC, selecting Alarm Receiving Center as the type of service provider is recommended when registering. For details, refer to Add Your Company to the ARC List .
OEM partners source products, parts or services from Hikvision and relabeling, rebranding or embedding them as a part to another product or system.
Maintenance Service Partner (MSP)
The MSP is a special type of security service providers. They offer technical support to installers who lack technical capabilities and skills. Usually, they collaborate with these installers to provide device management/maintenance services for end users. On Hik-Partner Pro, installers can share sites with their maintenance service partners to collaborate with them. For details, see Site Sharing .
C®Note
The MSP can select any of the service provider types when they registering an account for logging in to Hik-Partner Pro.
Remote Monitoring Center (RMC)
Provides the alarm receiving and handling services remotely based on the video monitoring via HikCentral ReGuard.
C® Note
The RMC can select any of the service provider types when they registering an account for logging in to Hik-Partner Pro.
End User
Those who have purchased Hikvision devices (e.g., network cameras, DVRs, alarm devices, video intercom devices, and access control devices) and want to manage the devices via an easy-to-use mobile client. End users are customers of the service provider, and they use Hik-Connect to manage devices.
Site Related Entities
Site
A site represents a physical location where device(s) are installed and through which the Installer/ Installer Admin can manage and configure devices.
Site Manager
When a site is assigned to an Installer, the Installer becomes the site manager of the site, and can manage and configure the devices of the site.
C® Note
Assigning site to Installer is not supported in countries and regions only with support for free functions. For details about free functions and these countries and regions, see Regions Only with Support for Free Functions .
Site Owner
When an installer transfers ownership of a site to an end user, the end user becomes the site owner who is the holder of the site. The installer can also apply for site authorization from the site owner to manage the site.
The following is recommended system for running the Portal.
Operating System
Microsoft Windows® 7/8.1/10 (32-bit and 64-bit).
CPU
Intel® CoreTM i5-4460 CPU @3.20GHz 3.20GHz and above.
RAM
8 GB and above (4 GB at least).
Graphics Card
NVIDIA® GeForce GT 730
Web Browser
Versions of Firefox (32-bit and 64-bit), Chrome (32-bit and 64-bit), and Edge (32-bit and 64-bit) released in the latest half year.
1.4 Function Availability for Different Countries/Regions
Hik-Partner Pro offers both free functions and value-added functions that cost certain fees. You can purchase certain services in the Service Market of Hik-Partner Pro to get access to the value-added functions. Currently, certain value-added functions are only available in certain countries and regions. And users in some countries and regions can only access the free functions.
‘Note
This document contains introductions of all Hik-Partner Pro functions, therefore some functions illustrated in this document may Not be supported in your country or region. And contents in some figures in this document may be different from the actual interface, if so, the latter shall prevail.
The following table shows the functions only available in certain countries and regions.
Note
For details about whether your country or region supports the functions contained in the services listed below, refer to the after sales or local distributor.
| Service | Function(s) Only Available in Certain Countries and Regions |
| Health Monitoring Service | Only linkage rule.
diNote Linkage rule is unavailable in the United States and Canada. |
| Cloud Storage Service | All functions contained in the service. |
| Temperature Screening Service | All functions contained in the service. |
| Cloud Attendance Service | All functions contained in the service. |
| Alarm Receiving Center (ARC) Service | All functions contained in the service. |
| Purchase Employee Account Add-On | All functions contained in the service. |
| HCC Services | All functions contained in the services. |
| HikCentral ReGuard Service | All functions contained in the services. |
The following two tables shows the free functions and the countries and regions only with support for the free functions.
Table 1-2 Free Functions
| Module | Function(s) |
| Account Management | |
| Site Management | |
| Device Management | • Add Device |
| Module | Function(s) |
| Support |
° View and Handle Case Records
C® Note This function is only available for accounts of authenticated channel partners.
o View RMA Request CH] Note This function is only available for accounts of authenticated channel partners. |
| Rebate |
|
Table 1-3 Countries and Regions Only With Support for Free Functions
| Continent | Country/Region |
| Africa | Angola, Benin, Botswana, Burkina Faso, Burundi, Cameroon, Cape Verde, Central African Republic, Chad, Comoros, Congo(Brazzaville), Congo(Kinshasa), Cote D’Ivoire, Djibouti, Equatorial Guinea, Eritrea, Ethiopia, Gabon, Gambia, Guinea, Guinea-Bissau, Liberia, Madagascar, Malawi, Mali, Mayotte, Mozambique, Namibia, Niger, Nigeria, Rwanda, Senegal, Seychelles, Sierra Leone, Somalia, Tanzania, Togo, Uganda, Zambia, Zimbabwe |
| Asia | Japan, Taiwan (China) |
There are two types of accounts: Installer Admin and Installer. Each company has only one Installer Admin but can have multiple Installers.
□S Note
For the countries and regions only with support for free functions, only the Installer Admin account is available and the Installer account is unavailable. For details about free functions and these countries and regions, see Regions Only with Support for Free Functions .
Installer Admin
The Installer Admin has full access to the functions in the system. Usually, the Installer Admin can be the manager of the installation company.
Installer
Installers are “sub-accounts” to the Installer Admin and are controlled by permissions for what they can do. For example, they can only manage the sites that are assigned to them. Usually, the Installers are the employees in the installation company.
The installation company should first register an Installer Admin account, and then invite the employees to register Installer accounts.
The flow chart of the whole process is shown as follows.

Figure 2-1 Flow Chart of Account Management
• Register an Installer Admin Account: You should first register an Installer Admin account before accessing any functions of Hik-Partner Pro. For details, refer to Register an Installer Admin Account .
□3 Note
After you register Installer Admin account, you need to complete your company information after logging in to the account. For details, see Manage Company Information .
- Set Role and Permission: Before adding an employee to the system, you can create different roles with different permissions for accessing system resources. For details, refer to Manage Role and Permission .
- Invite Employees: You can invite employees to register Installer accounts and assign different roles to employees to grant the permissions to her/him. For details, refer to Invite Employee .
- Accept Invitation and Register Installer Accounts: The employees can accept the invitation and register Installer accounts to manage sites and devices. For details, refer to Accept Invitation and Register Installer Account .
The installation company should first register an Installer Admin account before accessing any functions of Hik-Partner Pro.
Steps
OS Note
You can click Try Free Demo on the login page to see what Hik-Partner Pro can do for you, without registering any account. The data displayed in the demo is for demonstration only, and you cannot perform any operations.
- In the address bar of the web browser, enter https://www.hik-partner.com .
C® Note
For Russia, you can enter https://www.hik-partnerru.com in the address bar of the web browser.
The Login page of Hik-Partner Pro will show.
- On the Login page, click Register to register an account.
nS Note
- If your account has been registered, you can click Login to log in to Hik-Partner Pro. For details about login, refer to Login .
- Whether you will enter the process of registering the OneHikID account or Hik-ProConnect account is determined by your country/region.
- Select your identity and service provider type (installer, system integrator, distributor, reseller, alarm receiving center (ARC), or OEM).
Hl] Note
If you enter the process of registering the Hik-ProConnect account, you don’t need to select the service provider type. For details about the identities and service provider types, refer to Entities in Hik-Partner Pro .
- Register the OneHikID account or Hik-ProConnect account.
– Register the OneHikID account:
- Set your name (first name and last name), company name, email, verification code (for verifying the email address), and password.
CIS Note
We highly recommend you to create a strong password of your own choosing (using a minimum of 8 characters, including at least three kinds of following categories: upper case letters, lower case letters, numbers, and special characters) in order to increase the security of your product. And we recommend you change your password regularly, especially in the high security system, changing the password monthly or weekly can better protect your product.
- Click Register.
– Register the Hik-ProConnect account:
- Enter your email address and the CAPTCHA code.
- Click Get Verification Code to verify the account.
OS Note
- If you don’t enter the verification code within the required time, click Get Again to get the verification code again.
- If you fail to get the verification code, click Didn’t receive the verification code? for failure reasons.
- On the Complete Your Information page, enter or edit the required information such as your company name, address, phone number, and name. (For the process of registering the Hik- ProConnect account, you also need to set a password for your account on this page.)
OS Note
We highly recommend you to create a strong password of your own choosing (using a minimum of 8 characters, including at least three kinds of following categories: upper case letters, lower case letters, numbers, and special characters) in order to increase the security of your product. And we recommend you change your password regularly, especially in the high security system, changing the password monthly or weekly can better protect your product.
- Optional: Enter the invitation code if you are invited by your friend, so that your friend can earn some reward points.
- Optional: Check I would like to receive newsletters about new product introduction, service introduction, and questionnaires from Hikvision. I understand that at any time I can unsubscribe. to subscribe.
- If subscription succeeded, you will receive a confirmation email in a few minutes. You can unsubscribe by clicking the URL in the email if needed.
- After subscription, we will send emails about the latest product introduction, service introduction, questionnaires and special offers, to the email address which is used for your account registration.
- Check I agree to the Terms of Service and Privacy Policy if you accept the details in these agreements.
- Click Enter Hik-ProConnect to finish registration and log into Hik-Partner Pro.
What to do next
After registering an Installer Admin account and logging into Hik-Partner Pro with this account, you need to complete the information of your company. For details, refer to Manage Company Information .
After registering an Installer Admin account, you can manage and edit your company information.
Steps
OS Note
- When your company is not authenticated, the Installer Admin can manage and edit all the company information, and when your company authentication application is approved, the Installer Admin can submit the information change request and the information will be edited successfully after approval.
- You can link your Installer Admin account to a distributor via the Hik-Partner Pro Mobile Client to get support and help from the distributor. For details, see Hik-Partner Pro Mobile Client User Manual.
- If you have completed company merging and your account still exists in more than one company, or if the companies in which your account exists are all kept on Hik-Partner Pro, you can click Switch Company on the top right of the page to switch to another company for using. For details, refer to Become a Hik-Partner Pro User After Product Upgrade .
- Go to Company ^ Company Information or My Hik-Partner ^ Company Management ^ Company Information .
CS Note
If your company is an authenticated channel partner, the partner level will be displayed one the company logo.
- Enter the name of your company.
- Enter other information of your company, such as the address, GPS information, postal code, phone number, email, and user type.
C® Note
The country or region cannot be changed once you save the company information after registration.
- Edit the VAT number of your company, which will be used for qualification verification.
- Optional: If you want to upload the company logo, click + to upload the picture of your company logo, or click Edit to re-upload a picture to update the logo.
HO Note
- The picture should be in JPG, JPEG, or PNG format.
- Recommended picture size: Height = 200 px, 200 px < Width < 600 px.
- You are not allowed to enable the Co-Branding function if you have not set the company logo. For details about Co-Branding, see Co-Branding .
- Optional: Enter the website of your company.
- Optional: Enter or edit the description information, which will be displayed on Hik-Connect Mobile Client.
- Click Save to save the configurations.
OS Note
You can check the percentage of completed information after saving.
After you register an Installer Admin account, you can authenticate your account to purchase value-added services and use more features (besides the basic features) in Hik-Partner Pro.
One of the following ways for account authentication is supported, depending on the selected country or region when registering your account.
By Entering Authentication Code
For this way, you need to get the authentication code from the Hikvision or distributor first and then enter the authentication code to authenticate your account.
- Go to Company ^ Company Information or My Hik-Partner ^ Company Management ^ Company Information , and click Authenticate Now to enter account authentication page.
- (Optional) If you have no authentication code, click Get Authentication Code, and send the application email with the predefined content template, including your email address (the one which is used when registering your Installer Admin account) and company information, such as company ID, company name, and phone number, to Hikvision or distributor, and apply for one authentication code.
OS Note
- You can click £ to edit the information in the template. The edited contents will be updated in the company information.
- If the email server is not configured or the recipient’s address is not filled automatically, you can copy the content and send it to Hikvision or distributor by your own email box.
- After you get the authentication code, enter the authentication code on account authentication page and click OK to authenticate your account.
•
By Submitting Online Application
For this way, you need to fill and submit the online application information to authenticate your account directly. After your application is approved, your account will be authenticated.
Note
If your company is not authenticated and you have the permission to submit the authentication application, you may be prompted and guided to authenticate your company by submitting the application after login.
- Enter Company ^ Company Information or My Hik-Partner ^ Company Management ^
Company Information page, and click Authenticate Now to enter account authentication page.
- (Optional) Edit the company information, such as company name, address, and city if needed.
- Select your identity type from the drop-down list.
- Enter the VAT Number of your company.
- Click + to upload a picture (e.g., business card) as evidence.
- Enter the distributor if you have bought Hikvision products.
- Click Authenticate Now.
The application information will be sent.
CIS Note
- After your application is approved, you will be notified via push notification and email.
- If your country/region is in Australia (continent), you should also enter your security license number and contact name.
Before adding an employee to the system, you can create different roles with different permissions for accessing system resources and then assign roles to corresponding employees to grant the permissions to them. Or you can give a predefined role to an employee without creating one. An employee can have only one role.
Steps
OS Note
- For the countries or regions only with support for free functions, or for authenticated channel partners, managing role and permission is not supported. For details about free functions and these countries and regions, see Regions Only with Support for Free Functions .
- There are three predefined roles in the system: Administrator, Site Manager, and IT Manager.
The permissions of the three roles are as follows. The three roles cannot be deleted by anyone.
° Administrator: Setting company information, managing employees, checking operation logs of all the employees, and managing all the sites.
° Site Manager: Managing assigned sites, adding, configuring, and deleting devices, and enabling valued services for end users of assigned sites.
° IT Manager: Managing all the sites, assigning sites to other employees, enabling or editing valued service for all the end users, and viewing operation logs of all the employees.
- Click Company ^ Role and Permission or My Hik-Partner ^ Company Management ^ Role and Permission to display all the roles.
- Add a role.
- Click Add Role to open the Add Role panel.
- Enter the role name and select permission(s) for the role.
Manage All Sites
Managing all sites, including adding and editing site, assigning site to Site Manager, handing over sites, applying for site authorization, searching sites, managing devices in the site (adding, deleting, editing, upgrading), applying for device permission, and health monitoring. Up to 100 employees can be assigned with this permission.
Manage Assigned Site
Managing site(s) assigned to the employee, including editing site, handing over sites, applying for site information management permission, adding existing site, adding a new site, managing devices in the site (adding, deleting, editing, and upgrading), and deleting site.
US Note
You need to give an employee this permission before assigning the employee a site.
Manage Account and Role
Accessing Employee and Role and Permission page, adding and deleting accounts and roles. Employee and Role and Permission page will not show without this permission.
Manage Company Information
Accessing company information page and edit company information (e.g. name, logo, addresses, etc.). Company information page will not show without this permission.
Manage Service Package and Order
Viewing orders, purchasing service packages such as health monitoring packages and employee packages.
- Optional: Enter remarks of the role in the Description field.
- Click OK.
- Optional: Check added roles and click Delete to delete the selected role(s).
C0 Note
You cannot delete a role which has been assigned to an employee.
Installer Admin and Installer with the role permission for managing account and role can invite employees to manage resources in the system.
Steps
OS Note
For countries or regions only with support for free functions, or for authenticated channel partners, inviting employee is not supported. For details about these countries, see Regions Only with Support for Free Functions .
- Open the Add Employee pane.
- Click Company ^ Employee ^ Add Employee or My Hik-Partner ^ Company Management ^ Employee ^ Add Employee .
- On the Home page, click Company ^ Role and Permission or My Hik-Partner ^ Company Management ^ Role and Permission , and then click Add Employee in the Operation column.
- Enter the email of the to-be-invited employee.
- Select a role for the employee.
CIS Note
You can also create a new role. For details, refer to Manage Role and Permission .
The permissions of the role will be displayed.
- Click Add.
The invited employee will receive an email delivering a link in the entered email box. The employee needs to click the link to register an account, after which the employee’s information will be displayed in the employee list.
C® Note
If you invite the employee via your OneHikID account, and if the Hik-ProConnect account of the to-be-invited employee has not been upgraded to the OneHikID account, the to-be-invited employee needs to upgrade the account according to the instructions on the interface.
- Optional: Perform the following operations after adding employees.
| Enable/Disable
Employee |
Set the switch to on or off in the Enable column to enable or disable the employee account. |
Hl] Note
|
|
| Delete | Check one or more employees and click Delete to delete the selected |
| Employees | employee(s) if needed. |
‘Note
|
|
| View
Employee Details |
Click an employee to open the Employee Details pane to view the employee’s contact number, email address, role permissions, and so on. |
| Edit Role Assigned to Employee | Click an employee to open the Employee Details pane and click £ in the Role field to enter the Edit Role pane. Then you can click Add to add a new role or select another role for the employee. %
‘Note You cannot edit roles assigned to your own account and the Installer Admin account. |
| View Sites
Managed by Employee |
Click an employee to open the Employee Details pane or click the information in the Managed column to view the list of all sites managed by the employee. You can click a site to view the site details.
Hl® Note The above operation is supported only when the employee has site(s) to be managed. |
The Installer Admin, and Installer whose role contains permission of Manage Account and Role can invite other employees to register Installer accounts. The employees can accept the invitation and register Installer accounts to manage sites and devices.
Before You Start
Installer Admin and Installer whose role contains permission of Manage Account and Role should first invite the employee first. For details, refer to Invite Employee .
Steps
- After inviting the employee, the employee will receive an email from Hik-Partner Pro.
- Click the button or the link in the email.
- Click Register to open the Create Account page.
‘Note
If you have already registered a OneHikID account using your email address, you can log in with the account to join the company directly.
- Set the type, name, verification code (for verifying the email address), and password.
C® Note
We highly recommend you to create a strong password of your own choosing (using a minimum of 8 characters, including at least three kinds of following categories: upper case letters, lower case letters, numbers, and special characters) in order to increase the security of your product. And we recommend you change your password regularly, especially in the high security system, changing the password monthly or weekly can better protect your product.
- Check By clicking Register, I agree to Hikvision OneHikID’s Privacy Policy.
- Click Register.
Result
You can log into Hik-Partner Pro with this account and perform other operations such as site management and configuration.
After login, you can edit the basic information of the current account and change password if necessary.
Click the name at the upper-right corner and select Account Settings or click My Hik-Partner ^ Account Information ^ My Profile .
Set Basic Information
Set the basic information of the current account, including the name of the Installer, email address,
![]() phone number, etc.
phone number, etc.
Click
to set the profile of the current account.
![]()
Note
You can view your HIK ID on this page, but you cannot edit it.
Manage My QR Code
Hover over to show My QR Code, which your customers can scan to add you as the service provider and authorize you to manage devices.
If you have uploaded your company logo, your company logo will be displayed in the center of the QR code. Or you can click Add Your Company Logo to the QR Code to upload your company logo. Click to download the QR code.
Change Password
Change the password of the current account.
OS Note
If your account has been upgraded to OneHikID account, the page for changing the password of your OneHikID account will be displayed. You can follow the instructions to finish change the password.
‘Note
We highly recommend you to create a strong password of your own choosing (using a minimum of 8 characters, including at least three kinds of following categories: upper case letters, lower case letters, numbers, and special characters) in order to increase the security of your product. And we recommend you change your password regularly, especially in the high security system, changing the password monthly or weekly can better protect your product.
Change Account’s Bound Email
You can change the bound email address of the current account to another one if required.
- In the Basic Information page of the account settings, click .
OS Note
If the current bound account has been upgraded to OneHikID account, the page for editing OneHikID account information will be displayed. You can follow the instructions to change the email.
- Enter a new email address in the New Email field.
- Click Get Verification Code.
In the new email address, you will receive an email with a verification code.
- Enter the received verification code in the Verification Code field.
- Enter the password of the current account.
- Click Save.
Delete Installer Admin Account
For Installer Admin, if the account is no longer used, you can delete it in the Basic Information page of the account settings.
CIS Note
- Deleting Installer Admin account is irreversible. The company information and accounts CANNOT be restored once deleted. Back up the required data before deleting the account.
- If there are authorized site(s) or employee account(s) under the current account, you cannot delete it.
- If the current bound account has been upgraded to OneHikID account, the login page for OneHikID account will be displayed. You can follow the instructions to delete the account.
- In the Basic Information page of the account settings, click Delete Installer Admin Account.
- Enter the password of your Installer Admin account, and click Next.
- Click Delete Installer Admin Account to confirm deleting.
You can view the efficiency statistics of all employees, including the latest active time, added sites, added devices, handed-over sites, handed-over devices, and handled device exceptions. You can also perform operations such as exporting the efficiency statistics.
OS Note
This is supported only if you have permissions to manage the employees.
You can enter the Employee Efficiency Statistics page via the following methods:
- Go to Company ^ Employee Efficiency Statistics or My Hik-Partner ^ Company Management ^ Employee Efficiency Statistics .
- Click View All in the Employee Efficiency Overview section.

Figure 2-2 Employee Efficiency Statistics Page
You can perform the following operations if needed.
Table 2-1 Supported Operations
| Operation | Description |
| Search for Statistics | Enter the employee’s name, email address, or phone number in the search box to search for statistics. |
| Export Statistics | Click Export to export statistics in XLSX or CSV format. |
You can add, edit, and delete your shipping addresses, and set the default shipping address.
![]()
Note
The function is only supported in certain countries and regions.
Go to My Hik-Partner ^ Company Management ^ My Address .
You can view and manage all your added shipping addresses if any, or you can add new shipping addresses if you haven’t added any shipping address. Perform the following operations if needed.
Table 2-2 Supported Operations
| Operation | Description |
| Add New Shipping Address | Click New Address, fill in all required information (contact person, country/state, address, postal code, etc.), check Set this address as default if you are to set it as the default shipping address, and click Save. |
| Edit Shipping Address | Click z to edit the corresponding shipping address. |
| Delete Shipping Address | Click ® to delete the corresponding shipping address. |
| Set Default Shipping Address | Click Set as Default to set the corresponding shipping address as default. |
You can view and export the basic information about your partners.
‘Note
This function is only available to some users in some countries/regions. For details, please contact Hikvision.
Go to My Hik-Partner ^ Company Management ^ My Partner Network to enter the My Partner Network page.
You will be able to view the partner No., partner name, partner type, partner level, VAT No., address, website, etc.
You can also click Export to export the information.
You can have an overview of the status of all your projects and orders, and view the number of your DPPs/distributors.
C0 Note
This function is only available to some users in some countries/regions. For details, please contact Hikvision.
Go to My Hik-Partner ^ Dashboard to enter the Dashboard page.
You can view the number of your DPPs/distributors. Click to switch to My Partner Network to view details about your DPPs/distributors. Refer to View My Partner Network .
You can view the status of your projects, including draft, waiting for supporter, processing, approved, more information required, ineligible, closed won, closed lost, and closed canceled. Click View Details to switch to Project History for more details and operations. Refer to Project .
You can view the status of your orders, including in review, undelivered, fully delivered, and back order. Click View Details to switch to My Order for more details and operations. Refer to View My Orders .
After logging in by an Installer Admin account or Installer account, you can manage resources (including sites, devices, and roles, etc.) and perform health monitoring and so on.
Before You Start
Make sure you have registered an account. See Register an Installer Admin Account or Accept Invitation and Register Installer Account for details about registration.
Steps
- In the address bar of the web browser, enter https://www.hik-partner.com .
OS Note
For Russia, you can enter https://www.hik-partnerru.com in the address bar of the web browser.
The login page of Hik-Partner Pro will show.
- Select a country or region where the account locates and a language from the drop-down lists at the top of the page.
- Click Log In by OneHikID (Hik-ePartner) Account / Log In by OneHikID Account or Hik- ProConnect on the login page.
C® Note
- The display of “OneHikID” or “OneHikID (Hik-ePartner)” on the login page is determined by the country or region where you locate.
- The login method available is determined by the country and the region of your account. If you select OneHikID as the login method, and your Hik-ProConnect account has not been upgraded to the OneHikID account, you need to upgrade your account according to the instructions on the interface.
- If your Hik-ProConnect account has been upgraded to the OneHikID account, logging in to the platform by the Hik-ProConnect account is not supported.
- Enter the registered email and password.
nS Note
If you have registered for Hik-ePartner with a phone No., you can also enter the registered phone No. and password.
- Optional: Reset the password if you have forgotten the password.
- Click Forgot Password to enter the resetting password page.
- Click Get Verification Code.
You will receive a verification code sent by the Portal in your email box.
- Enter the received verification code in the Verification Code field.
- Enter the new password and confirm password.
Note
We highly recommend you to create a strong password of your own choosing (using a minimum of 8 characters, including at least three kinds of following categories: upper case letters, lower case letters, numbers, and special characters) in order to increase the security of your product. And we recommend you change your password regularly, especially in the high security system, changing the password monthly or weekly can better protect your product.
- Click OK.
By default, you will be required to log in by the new password.
- Click Sign In or Login.
C0 Note
If you have completed company merging and your account still exists in more than one company, or if the companies in which your account exists are all kept on Hik-Partner Pro, you need to select one company for login. You can also click Switch Company on the Company Information page to switch to another company. For details, refer to Become a Hik-Partner Pro User After Product Upgrade .
Hik-Partner Pro is upgraded from Hik-ProConnect, combining the features of Hik-ProConnect and another product named Hik-ePartner, so it provides services which are more diverse and more professional. If you have already registered for Hik-ProConnect and/or Hik-ePartner before the product upgrade, you can log in to Hik-Partner Pro using the existing account to become a Hik- Partner Pro user.
When you log in to Hik-Partner Pro for the first time using the existing account of Hik-ProConnect and/or Hik-ePartner, a window will pop up to notify you of the product upgrade.
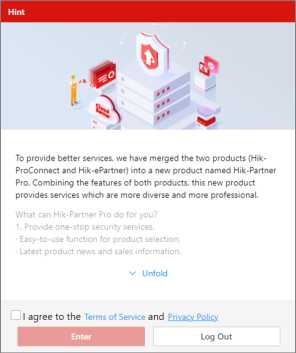
Figure 4-1 Product Upgrade
After you check I would like to receive newsletters about new product introduction, service introduction, and questionnaires from Hikvision. I understand that I can unsubscribe at any time. (which is optional) and I have read and agree to Terms of Service and Privacy Policy., and click Enter, you become a Hik-Partner Pro user and can continue to use Hik-Partner Pro.
C® Note
- In some countries/regions, the above-mentioned window will not pop up.
- If your existing account is an Admin account of Hik-ePartner, after you become a Hik-Partner Pro user, the employee account add-on will be given as a gift to you which can cover the existing employee accounts in your company and is valid for one year.
- In some countries/regions, the authenticated channel partners can complete the process of becoming a Hik-Partner Pro user offline.
Refer to the following sections for more details.
- Situations Where You Enter the Home Page Directly After You Click Enter
- Other Situations
- After First-Time Login
Situations Where You Enter the Home Page Directly After You Click Enter
- Your account only exists in Hik-ProConnect.
- Your account exists in both Hik-ProConnect and Hik-ePartner, and is the Installer Admin / Admin account in both companies on Hik-ProConnect and Hik-ePartner, which means the two companies can be merged into one company, and the data (devices, employees, etc.) of both companies can also be merged and not lost. Moreover, the information about the two companies are the same so that you don’t need to select the company information to be kept, or only one of the two companies is authenticated so that the information of the authenticated company will automatically be kept.
- Your account only exists in Hik-ePartner. And your account is the Admin account, or is an employee account but the Admin user has completed company merging.
Other Situations
- Your account exists in both Hik-ProConnect and Hik-ePartner, and is the Installer Admin / Admin account in both companies on Hik-ProConnect and Hik-ePartner, which means the two companies can be merged into one company, and the data (devices, employees, etc.) of both companies can also be merged and not lost. Moreover, the information about the two companies are the different, and both companies are authenticated / not authenticated. You have to select the company information you would like to keep after you click Enter.
- Your account exists in both Hik-ProConnect and Hik-ePartner. The Installer Admin / Admin accounts of the two companies are different, so company merging is not supported, which means both companies are kept for you on Hik-Partner Pro. You have to select one for login after you click Enter.
- Your account exists in both Hik-ProConnect and Hik-ePartner, and your account is an employee account in Hik-ePartner. You can log in to the company created on Hik-ePartner only after the Admin user completes merging companies. Or you can continue to log in to your company created on Hik-ProConnect for using.
- Your account only exists in Hik-ePartner and is an employee account. Moreover, the Admin user has not completed company merging. You can log in to use Hik-Partner Pro only after the Admin user completes merging companies.
- Your account exists in both Hik-ProConnect and Hik-ePartner. And your account exists in more than one company on Hik-ePartner. You have to select one from the companies on Hik-ePartner for company merging. You should also select the company information you would like to keep if needed.
After First-Time Login
If you have completed company merging and your account still exists in more than one company, or if the companies in which your account exists are all kept on Hik-Partner Pro, you need to select one company for login.
You can also click Switch Company on the Company Information page to switch to another company.
Chapter 5 Hik-Partner Pro Portal Overview
Hik-Partner Pro Portal is a B/S portal of Hik-Partner Pro platform. The service providers (e.g., installation company) can register an Installer Admin account on Hik-Partner Pro, then the Installer Admin can invite employees to register Installer accounts. Each company has only one Installer Admin but can have multiple Installers.
After registration, the Installer Admin and Installers can log into the Hik-Partner Pro via the web browser and the Home page of the Hik-Partner Pro Portal will show.
The Hik-Partner Pro Portal is divided into several main modules. You can access these modules via tabs at the top.
![]()
Note
If the country or region where you locate does not support the Solution, Explore, Project, and Order & Promotion module, the Portal layout of the current version is still the same as that of Hik- ProConnect in version 1.11.0. For details, refer to the corresponding user manual.
Table 5-1 Main Modules of Hik-Partner Pro Portal
| Module | Description |
| Home | On the Home page, you can view the banners showing the key features, functions, and important information of Hik-Partner Pro, check the number of added sites and devices, have an overview and get the introductions of the projects, value-added services, order & promotion, or explore modules, and quickly access some pages such as the site adding page, device adding page, and products page. Refer to Home Page for details. |
| Hik-ProConnect | The module provides entries for main functions including dashboard overview, batch configuration of devices, customer site and HikCentral Connect system management, health monitoring, notification center, service market, tools, and tutorial center. Refer to Hik-ProConnect Module for details. |
| Solution | The module provides all-around solutions for varied needs from Hik- Partner Pro users. These solutions are designed to provide comprehensive and end-to-end capabilities for diverse service providers, which can empower them to explore new business opportunities, optimize operations, and get a winning edge in the competition. |
| Module | Description |
You can perform the following operations in the Solution module.
DU Note This function is only available to some users in some countries/regions. For details, please contact Hikvision. |
|
| Explore | The module collects introductions, videos, pictures, and news about the latest Hikvision products and solutions. Service providers can easily keep up with the trend here, without having to find the latest news on other websites, and they can also forward the interested materials to their customers.
News You can get the latest news and information about Hikvision products and solutions, including videos, pictures, and articles, which are categorized by product type for easy searching and quick sharing with your customers. How To If you have troubles with product installation or software setup, you can view both documentation and videos in How To for guiding you through solving all kinds of problems you encounter when using Hikvision products and services. Notice You can view notices announced by the Hik-Partner Pro team to know some important information about the product, such as updates in the current version. |
| Module | Description |
| The Notice window will automatically pop up once you logged in to the Hik-Partner Pro Portal. If you check Do Not Show Again before closing the window, it will not pop up for your next time login.
Activity You can get the information about activities, such as lucky draws and promotions, initiated by the Hik-Partner Pro team and participate in them. Events You can view the upcoming and past events, such as training, seminar, exhibition, and roadshow, initiated by the Hik-Partner Pro team and participate in the upcoming events. DU Note
|
|
| Project | This module provides the support (e.g., trainings, consultations, and learning materials) and pricing for the authenticated channel partners who have new projects to help them better complete their projects.
For how to register a project, refer to Project . CE Note This function is only available to some users in some countries/regions. For details, please contact Hikvision. |
| Order & Promotion | This module supports viewing the information about hot products or a certain type of products. Authenticated channel partners can search for or filter the products, download the related documents, share the product information with others, compare parameters/specifications of products to learn about their similarities and differences, and submit orders to purchase products.
For details, refer to Order & Promotion . |
| Module | Description |
| C®Note
This function is only available to authenticated channel partners. For details, please contact Hikvision. |
|
| Incentive | This module provides a reward point system to reward your trust and support. You can complete specific tasks to get the reward points redeemable for lots of gifts in the Rewards Store.
For details, refer to Rewards Store . |
| Support | This module is available to you in many helpful formats. Wherever you are, whenever you need it, we have resources ready. Whether you are installing hardware or have questions about our services, our online support, documentation, and knowledgeable representatives are only a mouse-click away.
Tutorial Center You can view video tutorials and documents in the Tutorial Center to learn more product information and the proper ways to use our products. Chatbot If you have any question about Hik-Partner Pro, you can try finding the answer here. Case If you have any issues when using Hik-Partner Pro, you can get professional services from our technical support via Case. For details, refer to Case . Feedback If you encounter any problems while using the product or if you have any functional needs or suggestions, please feel free to contact us via Feedback. After opening the feedback window, you can select a type for your feedback and then enter your suggestions in the pop-up window and attach a picture if necessary. Enter an email address. After we receive your feedback, we will send an email to this address if we get an conclusion. Click Submit to submit your feedback to us. Contact Us |
| Module | Description |
| You can get the contacts (i.e., address, phone, and email) of our headquarter and the local office, and the email address of your sales representative.
RMA (Return Material Application) / Serial Number Inquiry The RMA is an arrangement in which you can ship an item back for an exchange or repair due to a product defect or malfunction. For the detailed process, refer to Return Materials Authorization . After you submit RMA requests, you can search for requests by the device serial No. to view the request status. CS Note This function is only available to some users in some countries/ regions. For details, please contact Hikvision. |
|
| My Hik-Partner | This module deals with all the management and administration aspects of a single installation company. It contains the following five parts: Company Management
Company Information View and manage the company information. See Manage Company Information for details. Employee Each company has only one Installer Admin but can have multiple Installers. The Installer Admin can invite the company’s employees to register Installer accounts and assign different permissions to employees according to actual needs. Installer whose role contains permission of Manage Account and Role can also invite other employees to be Installers by registering Installer accounts. See Invite Employee for details. Employee Efficiency Statistics Shows the efficiency statistics of all employees, including the latest active time, added sites, added devices, handed-over sites, handed-over devices, and handled device exceptions. See View Employee Efficiency Statistics for details. Role and Permission A role defines one employee’s rights to the functions in the system. After creating a role and specifying the role’s permission, |
| Module | Description |
| you can assign it to the employees according to actual needs. See Manage Role and Permission for details.
Operation Log View the operation logs of your accounts and sites in the current company. See Search Operation Log for details. Co-Branding Enable to display the company logo on the Hik-Connect Mobile Client for brand promotion to the end users. For details about how to get the co-branding service for free and enable the service, refer to Co-Branding . My Address Manage your shipping addresses for receiving items (e.g., gifts, repaired devices). See Manage My Shipping Address for details. DU Note This function is only available in certain countries/regions. For details, please contact Hikvision. Verify Gifts Distributors verify the gifts redeemed offline and export the records. My Partner Network You can view and export basic information about your partner. For details, refer to View My Partner Network . OXlNote This function is only available to some users in some countries/ regions. For details, please contact Hikvision. Account Information My Profile Edit your account information, including profile photo, name, email address, password, and phone number. Refer to Set Account Information for details. My Favorites / My Comments View your historical comments to news and how-to articles, and view the news, how-to articles, and solutions that are added to your Favorites. |
| Module | Description |
| My Order
View your order details, invoices, the balance of your e-wallet, financial reports, stock lists, price lists, and so on. For details, refer to View My Orders . OX] Note This function is only available to authenticated channel partners. For details, please contact Hikvision. Rebate For authenticated channel partners to view the rebates they earn from successfully promoting services of Hik-Partner Pro to their customers. See Rebate for details. CE Note This function is only available to some users in some countries/ regions. For details, please contact Hikvision. My Dashboard Have an overview of the status of all your projects and orders, and view the number of your DPPs/distributors. For details, refer to View Dashboard . ÜİİNote This function is only available to some users in some countries/ regions. For details, please contact Hikvision. |
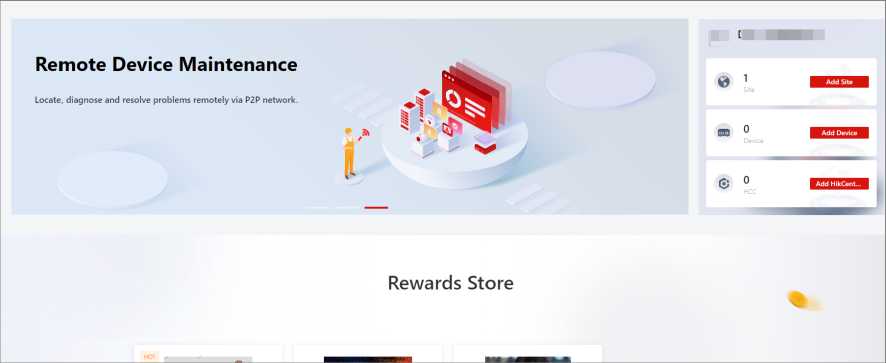
Figure 5-1 Home Page
Table 5-2 Home Page Description
| Name | Introduction |
| Banner | There are some banners, showing the key features, functions, and important information of Hik-Partner Pro. |
| Company, Site, Device, and HikCentral Connect Overview | You can view your company logo and name, the partner level (for authenticated channel partners), the total number of sites, devices, and HikCentral Connect systems managed by you.
Click Add Site to add a new site. For details, refer to Add New Site . Click Add Device to add a device. For details, refer to Add Device . Click Add HikCentral Connect to add a HikCentral Connect system. For details, refer to Create HCCSystems . iNote The HikCentral Connect service is only available in certain countries or regions. |
| Project Overview | Click Project Registration to view the features about the Project module.
You can click Register a New Projects to go to the Project page and create a project. For details, refer to Create a Project |
| Name | Introduction |
| CSNote
This function is only available to some users in some countries/ regions. For details, please contact Hikvision. |
|
| Value-Added Services Overview | Click Value-Added Services to view the value-added services you have purchased or obtained.
You can click More to enter the Service Market page to purchase more services. |
| Rewards Store Overview | You can view the available gifts for redeeming, and redeem your reward points for gifts.
Click View More to enter the Rewards Store page and perform more operations. For details, refer to Rewards Store . |
| Trending Products Overview | You can click / Q view the information about the hot products.
Click View More to enter the Order & Promotion module and perform more operations, such as submitting an order, comparing products, and so on. For details, refer to Order & Promotion . OXlNote This function is only available to authenticated channel partners. For details, please contact Hikvision. |
| Explore Overview | You can view the hot news and how-to articles to keep up yourself with the trend.
Click More to enter the news or how-to details page. |
| Solution Overview | You can switch to view some basic information about hot solutions.
Click More to enter the Solution page to search for and view more solutions. C@Note This function is only available to some users in some countries/ regions. For details, please contact Hikvision. |
-
-
- Hik-ProConnect Module
-
The Hik-ProConnect module is divided into several sections. You can access these sections via the navigation pane on the left.
Uil Note
You can click =■ or ~ to pin or unpin the navigation pane on the left of the page.
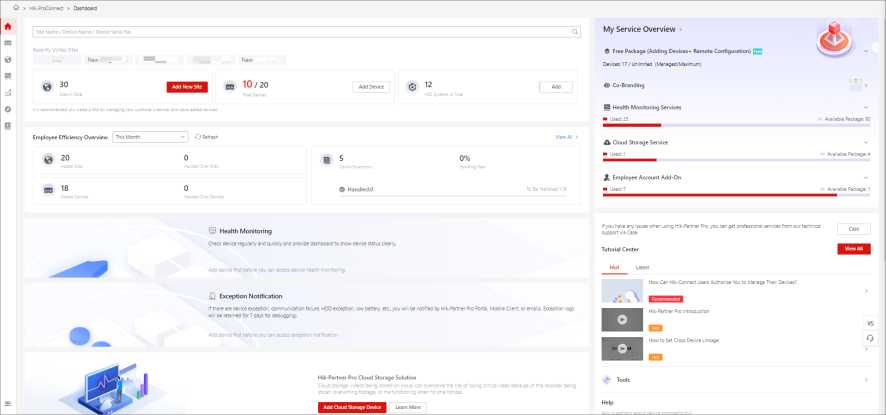
Figure 5-2 Hik-ProConnect Module
Table 5-3 Hik-ProConnect Module Description
| Name | Introduction |
| Dashboard | Global Search
Click the search box to show a search panel, select All, Site, or Device and enter a site name, device name, or device serial No. to search for sites or devices added to the Hik-ProConnect module. © AH © S’te ® Device | Site Name / Device Name / Device Serial No. Search History [nJ new site Recently Visited Sites Nt .. Figure 5-3 Global Search Panel The search results will be listed in two columns named by Site and Device. You can view the site information (including the site owner, phone number and address of the site owner, site type, and site manager) and the device information (including device name, device type, device serial No., online status, and health monitoring status). |
| Name | Introduction |
| You can also click a result item to enter the corresponding site or device details page.
The search history will be displayed on the search panel, and you can click a historical keyword to search again or clear the search history. The recently visited sites will also be displayed on the search panel and below the search box, and you can click a site name to enter the site details page. Number of Sites / Devices / HCC Systems Overview You can view the total number of sites / devices /HCC systems added to Hik-Partner Pro and the number of abnormal devices. You can also click Add New Site / Add Device / Add to enter the corresponding page to add sites / devices / HCC systems. For details, refer to Add New Site / Add Device / Create HCC Systems . CS Note The HikCentral Connect service is only available in certain countries or regions. Employee Efficiency Overview You can view the efficiency statistics of all employees, including the numbers of added sites and handed-over sites, the numbers of added devices and handed-over devices, the number of device exceptions, the exception handing rate, and the numbers of handled and to be handled exceptions. You can also filter statistics data by this month, this week, and today, or click Refresh to display the latest statistics data. If you want to view more data, click View All to enter the Employee Efficiency Statistics page. For details, refer to View Employee Efficiency Statistics . CS Note This is only supported only if you have permissions to manage the employees. Device Status Overview You can view the number of abnormal devices and total devices, including devices overall and each device type respectively. |
| Name | Introduction |
| diNote
You can click View All to enter the Health Status page to check the device health status details. For detailed instructions about Health Status, refer to View Status of Devices in All Sites and View Status of Devices in a Specific Site . Exception Notification Overview You can view the number of not handled and to be checked exceptions and numbers of top 5 types of the not handled exceptions. You can click a number on a chart to enter the Exception Center page and the exceptions will be filtered correspondingly. For example, if you click the number on the Not Handled chart, the exceptions will be filtered by the status of Not Handled on the Exception Center page. CHI Note
Cloud Storage Solution You can view the short introduction of cloud storage solution and click Learn More to view more details about the cloud storage. Click Add Cloud Storage Device to enter the Add Device page and you can add cloud storage device to the platform for further application. For how to add devices by different methods, refer to Add Device . More Value-Added Services You can set related service (such as cloud storage service and temperature screening) for devices after adding them to sites. Click Set on the upper right side, and select a site in the list to enter the site details page. My Service Overview |
| Name | Introduction |
| You can have an overview of your services and manage the services.
Free Package (Adding Devices + Remote Configuration)
Co-Branding Display the company logo when co-branding is enabled and the entrance for enabling the co-branding. Health Monitoring Service
Cloud Storage Service
Employee Account Add-On
Cloud Attendance Service |
| Name | Introduction |
Alarm Receiving Center (ARC) Service
C@Note This section will be displayed only if your country/region supports the ARC service, and your company type is ARC or there are companies added to the local ARC list. ‘jNote
Case The Case is a center for you to report any issues generated when using Hik-Partner Pro. And our technical support will receive your issues and help you resolve them as soon as possible. Tutorial Center You can view video tutorials and documents to learn more about Hik-Partner Pro and the proper ways of using the platform. Click a video to open a webpage and start playing the video. Click View All to view all the videos in Tutorial Center. Tools You can use some online tools to improve your work efficiency. Click Tools to view all the provided tools. |
| Name | Introduction |
| Help
View online documents including the Device Compatibility List, User Manual, Datasheet, and What’s New. Frequently Used Functions You can view the functions which you have used frequently. Click these icons to perform these functions quickly if needed. |
|
| Install & Configure | Provides four features for batch configuring devices.
|
| Site & HCC | Customer Site
A site represents a physical location where devices are installed and through which the Installer Admin/Installer can manage the devices. Site Map If sites are configured with the GPS information, they can be displayed on the map for viewing the site details, such as the site name, site owner, site location, and number of online/offline/ abnormal devices. HikCentral Connect A system created by installers via the Hik-Partner Pro Portal for providing a Video Security as a Service (VSaaS) solution for enterprise users. For details, refer to the user manuals of HikCentral Connect. ‘iNote HikCentral Connect is only available in the certain countries or regions. |
| Health Monitoring | There are three parts in the Health Monitoring module:
Health Status |
| Name | Introduction |
| The Installer can view the devices overall, normal, and abnormal status, locate the abnormal devices, and perform troubleshooting quickly.
Exception Center After setting the exception rules, when an exception occurs on the device, the device will push a notification to the Portal and you can view all the received notifications of exception in the Exception Center. Scheduled Report The platform can send the health check reports of encoding devices and AX PRO devices to target recipients regularly. Maintenance Quotation You can create quotation for providing the device maintenance service for your customers. Thus, you can standardize the service process, improve customer satisfaction, and expand your business. |
|
| Service |
|
| Tools | Hik-Partner Pro provides some online tools to improve your work efficiency. |
| Tutorial Center | View video tutorials and documents to learn more about Hik-Partner Pro and the proper way to use the platform. |
Get Co-Branding for Free
Click <•> on the top right of the Portal to get the co-branding for free. See Co-Branding for details.
dlNote
The display of the icon <*> on the top right is not supported in all countries/regions.
My Points
For the first time login in a day, you can click Check In to Earn Point on the top of the Portal to check in and the reward points will be credited to your account.
And then you can view your total points and click My Point on the top of the Portal to enter the Rewards Store page and perform more operations, such as completing tasks to earn points, viewing point history, and redeeming points for gifts. For details, refer to Rewards Store .
Notification Center
Shows all the history business notifications (including device management invitations, site sharing notifications, and notifications about device installation work orders), notifications of device/ channel exceptions, new features of the system messages, and the latest deals and offers. For more details about the notification center, refer to Notification Center .
Language
Click the language area in the top right corner of the Portal and select a language from the dropdown list as you required.
Help
Click □ in the top right corner of the Portal to show a drop-down list.
User Manual
Provides an entrance for viewing the user manual of the Hik-Partner Pro Portal online.
Wizard
View a wizard which guides you through the process of configurations and operations.
Click Next or Previous to go through the introductions in the wizard. You can click the image on the right to view the large image and check the details on the image if necessary.
Click Skip to close the wizard.
Questionnaire
Provides an entrance for joining the survey to help us provide a better experience and service for you.
C®Note
This icon is displayed only when a survey has been initiated.
Chatbot
Provides an entrance for asking questions and getting answers.
After-Sales Authorization Code
Provides an entrance for you to view the after-sales authorization code of your company. The after-sales authorization code is exclusive to the technical support staff for troubleshooting only. You can give your authorization code to the staff when it is necessary to log in to your account for troubleshooting. The staff can log in to your account via the authorization code to view or edit the information about the company (name, type, etc.), manage sites, remotely devices (AX PRO, etc.), perform health monitoring, etc.
You can click Extend to extend the validity period for the current authorization code or click Invalidate Authorization Code to invalidate the code right away.
US Note
One company can only have one valid after-sales authorization code. If the code is invalidated or your company has no authorization code, you can choose to generate one.
Profile Photo and Account Name
In the upper-right corner of the Portal, click the account name or profile photo to open the dropdown list.
Account Settings and Upgrade Account
Provides an entrance for editing the basic information of the account or deleting the Installer Admin account if it is no longer used. For details, refer to Set Account Information .
When you logged in by the Hik-ProConnect account, you can select Upgrade Account in the dropdown list and click Register or click Login to register an OneHikID account or log in by an existing OneHikID account.
Subscribe to Newsletters
Provides an entrance for subscribing to newsletters. You can also unsubscribe here at any time.
After the unsubscription you will not receive any newsletter emails (such as new product introduction, service introduction, and questionnaires) from us.
Link with Hik-Connect Account
Provides an entrance for linking your Hik-Partner Pro or OneHikID account with multiple Hik- Connect account, so the devices managed in the Hik-Connect account can be synchronized to Hik- Partner Pro account or OneHikID account automatically. For details, refer to Synchronize Devices with Hik-Connect Account .
My QR Code
Provides an entrance for downloading your QR code, so your customers can scan via the Hik- Connect Mobile Client to add you as the service provider and authorize you to manage devices.
You can also go to My Hik-Partner ^ Account Information ^ My Profile page to view your QR code.
C0 Note
This feature is only supported by accounts with the Manage Assigned Sites permission.
Verify Gifts
Provides an entrance for distributors to verify the gifts redeemed offline and export the records.
About
View the version of the current system, and read the agreements, including terms of service, privacy policy, and open source license. Or scan the QR code with your mobile phone to download the Hik-Partner Pro Mobile Client.
Switch Company
Provides an entrance for switching companies for login if you have completed company merging and your account still exists in more than one company, or if the companies in which your account exists are all kept on Hik-Partner Pro.
Log Out
Log out of the current account and return to the login page.
Floating Tool Bar
p Shopping Cart
Provides an entrance for entering your shopping cart to view the added products. For details, refer to Create an Order .
C®Note
This function is only available to authenticated channel partners. For details, please contact Hikvision.
, Order Upload
Provides an entrance for quickly submitting orders by uploading information (material code, quantity, etc.) of products with a predefined template. For details, refer to Create an Order .
C® Note
This function is only available to authenticated channel partners. For details, please contact Hikvision.
vs Product Compare
Provides an entrance for comparing multiple products with their same specifications hidden, so you can quickly choose products as needed. For details, refer to Compare Products .
C® Note
This function is only available to some users in some countries/regions. For details, please contact Hikvision.
Chatbot / Feedback / Customer Feedback
Provides entrances for asking questions and getting answers, submitting your own suggestions or suggestions from your customers.
I Questionnaire
Provides an entrance for joining the survey to help us provide a better experience and service for you.
Note
This icon is displayed only when a survey has been initiated.
A site can be regarded as an area or location with actual time zone and address, such as your customers’ home, office, etc. You can create a site on Hik-Partner Pro to manage devices on it. Moreover, after you complete installing and setting up devices on a site, you can hand over the site and devices to your customer.
Read the following two sections to learn more about the key features related to site management.
Real Sites and Sites on Hik-Partner Pro
The following diagram shows the relationship between the “real sites” and the “sites on Hik- Partner Pro”.
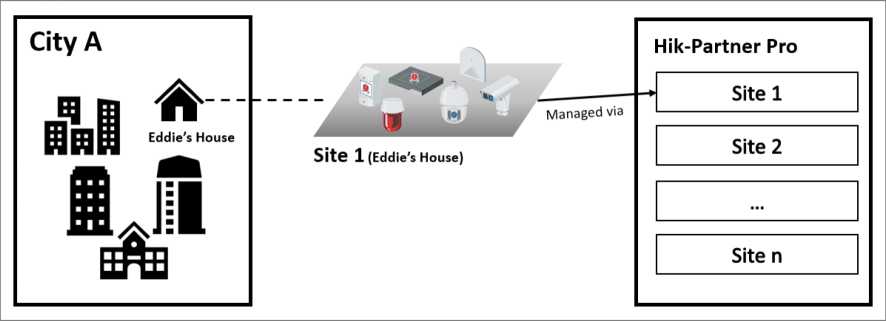
Figure 6-1 Manage Devices via “Site”
Typical Scenario of Handing Over Site
The following diagram shows a typical scenario related to device handover and authorization, as well as the overall process. For more information, see Hand Over Site .
In the diagram, HPP represents Hik-Partner Pro and HC represents Hik-Connect.
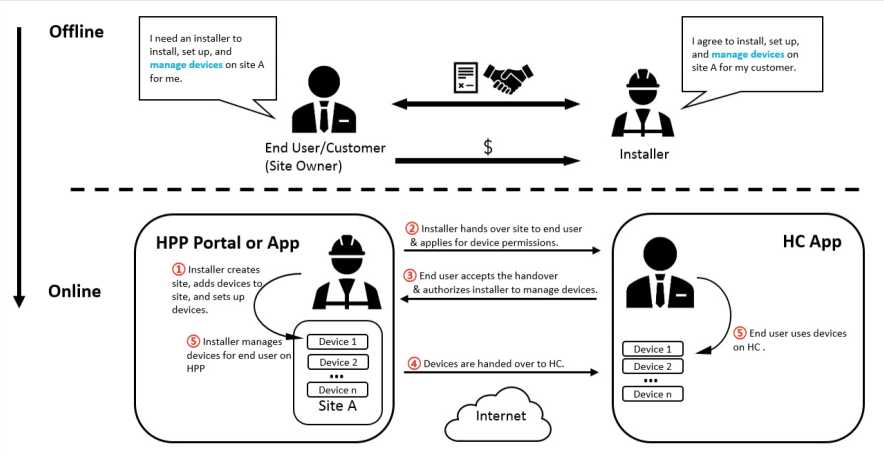
Figure 6-2 Scenario and Process
On the Site page, you can view the sites that are assigned to you (the Installer Admin as well as Installers with Manage All Sites permission can view all the sites of the company), and perform some operations for the sites, such as searching site, adding site, handing over site and assigning site.
Enter the Customer Site page.
- Click the Hik-Partner Pro tab. On the navigation pane, click Site & HCC ^ Customer Site (or Customer Site if HikCentral Connect is not available in your country or region).
- Click on the number of sites or click Add Site on the Home page to enter the Customer Site page. Click the search box on the top right of the Customer Site page and click Site with Offline Device to display sites with offline devices.
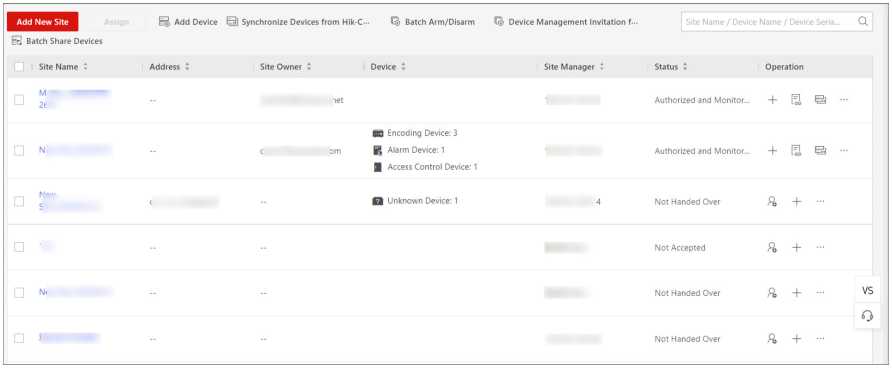
Figure 6-3 Site Page
There are different status for the sites in site list.
Not Handed Over
The site is newly added, and you have not handed over site to the customer.
Not Registered
The handover has been sent to customer who has not registered a Hik-Connect account.
Not Accepted
The handover has been sent but not be accepted by customer who has registered a Hik-Connect account.
Handed Over, Not Authorized
The site is handed over to the customer, but the site is not authorized to the Installer.
Authorized and Monitoring
The Installer gets the authorization of the site from the customer.
OS Note
According to site status, the Installer Admin and Installers with related permissions can perform the following operations in the table below.
Table 6-1 Supported Operations in Different Status
| Supported Operations | Not Handed Over | Not Accepted
Not Registered |
Handed Over, Not Authorized | Authorized and Monitoring |
| Search Site | V | V | V | V |
| Assign Site | V | V | V | V |
| Hand Over Site | V | V | x | x |
| Supported Operations | Not Handed Over | Not Accepted
Not Registered |
Handed Over, Not Authorized | Authorized and Monitoring |
| Manage Device | V | V | x | V |
| Edit Site | V | V | x | V |
| Delete Site | V | V | V | V |
| Apply for Authorization | x | x | V | x |
| Share Site | x | x | x | V |
Note
 See Add Device for details about how to add devices to the site.
- See Synchronize Devices with Hik-Connect Account for details about how to synchronize devices with Hik-Connect account.
When the end user wants the installation company to provide installing service or the installation company assigns the employee for device installation of specified end user, the Installer Admin or Installer with related permission needs to create a new site for managing these devices of end user.
Before You Start
Make sure you have the permission of adding a new site.
Steps
- Enter the Customer Site page.
- Click the Hik-Partner Pro tab. On the navigation pane, click Site & HCC ^ Customer Site (or Customer Site if HikCentral Connect is not available in your country or region).
- Click on the number of sites or click Add Site on the Home page to enter the Customer Site page.
- Click Add New Site ^ New Site .
dlNote
If an existing site of end user is not authorized to any installation company, you can select Existing Site to add the existing site. For more details, refer to Add Existing Site .
‘Note
- When setting the site address, you can click on the map to locate a place, or you can enter keywords in the search box to locate a place on the map.
- You should select the correct time zone where the devices locate and the time zone cannot be changed after the site is added.
- The Installer can select different configuration plans for the site and devices according to the selected scene.
- Optional: Check Sync Time & Time Zone to Device to synchronize the time and time zone of the site to the devices added to the site.
- Optional: Enter the end user information, such as contact number and maintenance records as the remark.
| OS Note |
The end user can view the remarks via Hik-Connect Mobile Client.
- Click OK to add a new site to the list.
- Optional: According to the site’s status and authorization, perform one of the following operations.
C® Note
For more details about supported operations in different site status, refer to Site Page Overview .
Search Site Enter keywords in search filed, and click Q to display the search results in the list.
| View Site Details
Edit Site |
Click the site name to view the site details, including managed devices, site information, and so on.
On the right side of the Site Details page, click to edit the site name, site address, city, state/province/region, remarks, and whether to check Sync Time & Time Zone to Device or not. |
| CS Note
When editing the site address, you can find and click the place on the map, or you can enter keywords in the search box to locate the place on the map. |
|
| Delete Site | Hover the cursor over on Operation column and click 0 to delete the site. |
| □S Note
If a site contains armed security control panel(s), it cannot be deleted. |
| Hand Over
Site |
For the site in the status of Not Handed Over, click on Operation column on Site page or click Hand Over on Site Details page to hand over the site to an end user.
CUNote For more details, refer to Hand Over Site . |
| Manage
Device |
For the site in the status of Not Handed Over, Not Registered, Not Accepted, or Authorized and Monitoring, you can click the corresponding icon on Operation column or enter Site Details page to manage the devices, such as adding device to the site, upgrading device, deleting devices, applying for live view or configuration permission, adding linkage rule, adding exception rule, etc. For more details, refer to Device Management . |
| If a security control panel is armed, it cannot be deleted unless being disarmed first. |
|---|
Note
When a site is not assigned to a company or if a site was previously assigned to a company but was later released and is now not associated with a company, you can add it by applying for site authorization from the site owner.
Steps
- Enter the Customer Site page.
- Click the Hik-Partner Pro tab. On the navigation pane, click Site & HCC ^ Customer Site (or Customer Site if HikCentral Connect is not available in your country or region).
- Click on the number of sites or click Add Site on the Home page to enter the Customer Site page.
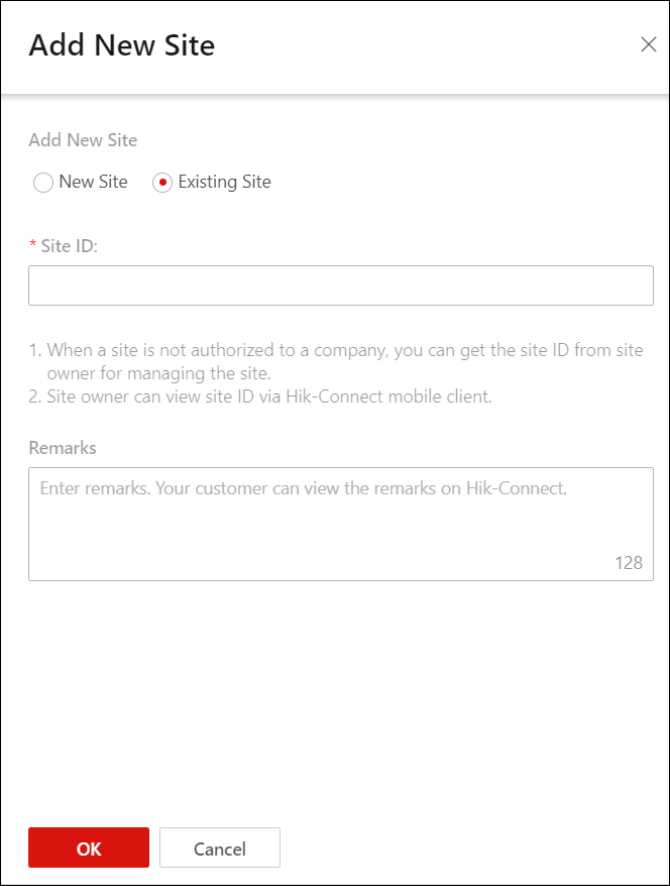
Figure 6-4 Add Existing Site
- Enter the site ID provided.
[ULI Note
- You can get the site ID form the site owner, who can view the site ID via Hik-Connect Mobile Client.
- Please inform your end users to download or update the Hik-Connect Mobile Client (V 4.15.0 or later). You can send the QR code or download link shown in the banner on the Home page to them.
- Optional: Enter the end user information, such as contact number and maintenance records as the remark.
Note
The end user can view the remarks via Hik-Connect Mobile Client.
- Click OK.
The site will be added in the site list and the site owner will receive an application. After the site owner approves the application, the site will be authorized to the Installer.
The Installer Admin or the Installers with assigning site permission can assign a site to the specified Installer as site manager responsible for configurations of the devices in the site.
Before You Start
Make sure you have the permission of assigning site.
Steps
- On the navigation pane, click Customer Site to enter Site page.
- Select one or multiple sites for assignment.
- Click Assign.
- Select one or multiple Installers as the site manager(s) of the selected site(s).
OS Note
No more than 100 site managers can be assigned to each site.
- Click OK.
The assigned site manager can enter site details and perform related operations, such as adding devices.
After the installation company completed the installation, the Installer needs to hand over the site to a customer. If required, the Installer can also apply for specified permissions for further device maintenance when handing over the site.
Before You Start
Make sure the site status is Not Handed Over and you have the permission of site management, such as managing all sites and assigned sites.
Steps
- On the navigation pane, click Customer Site to enter the Site page.
- Select a site to be handed over.
- Select a site and click in the Operation column.
- Click the site name to enter the Site Details page and click Hand Over Now.
You will enter the Hand Over Site page.
- Optional: Check Allow Me to Disable Hik-Connect Service.
‘Note
- If checked, after you hand over the site to your customer and your customer approves the request, you can disable the Hik-Connect service for devices that you rent to your customer without their authorization. If the Hik-Connect service is disabled, your customer will not be able to use these devices via the Hik-Connect Mobile Client for live view, playback, receiving alarms, etc. The tenant site scenario is a typical scenario to which this feature is applicable (see Typical Tenant Site Scenario for details).
- You can go to the Device tab to disable the Hik-Connect service for one device or all devices in this site by clicking or setting the Hik-Connect Service switch to off. You can also delete the devices from the your customer’s Hik-Connect account without her/his authorization.
- Optional: If you have checked Allow Me to Disable Hik-Connect Service in the previous step, check Grant Me Highest Configuration Permissions for Devices on Site to get the highest configuration permissions for devices on the current site which your customer cannot edit.
- Select Email or Phone Number as handover mode.
- Enter the site owner’s email address or phone number.
- Optional: Select permissions to apply for.
- S Note
- You can set the validity period for the permissions of configuration, live view, and playback, and select the device(s).
- If you have no permission for managing devices, or no devices are added to the site, you cannot select the permissions of configuration, live view, or playback when handing over the site.
- If the following permissions are selected, when the customer accepts the handover, the permissions will be authorized to the installer. The installer does not need to apply for authorization from the site owner again.
Site Information Management
The permission to manage the site information.
Configuration
The permission to configure selected devices on the site.
Live View
The permission to stream the live video from the selected devices on the site.
Playback
The permission to play back videos of the selected devices on the site.
- Optional: Check Apply for Activation of Cloud Attendance Service.
‘Note
- If the check-box is checked, after you handed over the site to your customer, he/she will be able to use the cloud attendance system provided by Hikvision or third-party manufactures.
- If the cloud attendance system provided by Hikvsion has been added to the site and activated, the check-box will appear on the Hand Over Site page.
- If the attendance service is provided by a third-party manufacturer, the check-box will be Allow ### System to Access or Allow Third-Party Attendance System to Access. ### here refers to the name of the third-party manufacturer.
- Optional: Check Apply for Site Authorization for Maintenance Service Partner to apply for site authorization for your maintenance service partner.
OU Note
For details, refer to Share a Site not Handed Over
- Enter the remarks, such as the reason of the handover, which your customer can view when he/she receives the handover via the Hik-Connect Mobile Client.
- Click OK to send the handover.
- Your customer will receive the handover email or message in email box or via short message with a download link of the Hik-Connect Mobile Client. Your customer can download or open the Hik-Connect Mobile Client via the link.
- If your customer has not registered a Hik-Connect account, he/she needs to register a Hik- Connect account first. After registering the account and accepting the handover via the Hik- Connect Mobile Client, the customer will become the site owner.
‘Note
Please inform your customers to download or update the Hik-Connect Mobile Client (V 4.15.0 or later). You can send the QR code or download link shown in the banner on the Home page to them.
- If there are maintenance requirements for the devices added in the Hik-Connect Mobile Client, but not added and managed in the site, after the customer accepts the handover and becomes the site owner, he/she can authorize the permissions about these devices to the Installer.
- Optional: Before your customer accepts the handover, click Hand Over Again to send handover again.
[2® Note
You can send the handover for at most five times in one day and the previous handover will be invalid if you send the new handover again.
In a typical tenant site scenario, you can help the property management company install and set up their security devices in their apartments, and help manage the devices so that the devices will be available for the tenants only during lease periods; as for the tenants, you can help them manage and configure the devices during lease periods.
To know more about the typical tenant site scenario, read the sections below:
Two Agreements Reached
Before you can hand over the devices in the apartment to the tenant via Hik-Partner Pro, the following two agreements have to be reached.

Figure 6-5 Agreement Reached Between the Property Management Company and Installer
Apartment A is available for rent. We have already installed some security devices in the apartment to guard the tenant and their property. During the lease period, you can use the HC App to use these devices for live view, playback, receiving alarms, etc.

Figure 6-6 Agreement Reached Between the Tenant and Property Management Company
Online Operations
After the two agreements are reached, you will operate on Hik-Partner Pro to hand over the devices to the tenant, of which the process is shown below:
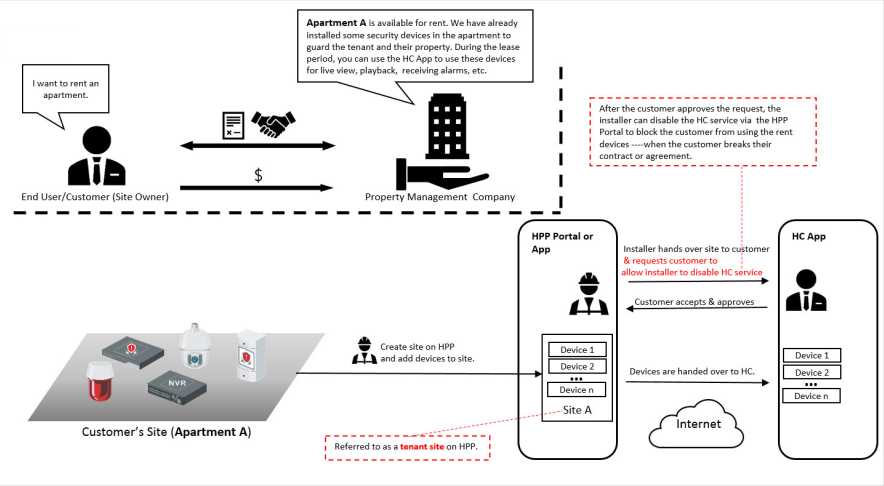
Figure 6-7 Hand Over Devices to the Tenant
- Create a site. Refer to Add New Site for more details.
- Add the devices to the site.
- Batch configure the devices. Refer to Batch Configure Devices on LAN or Batch Configure AX PRO for more details.
- Hand over the site to the tenant. Refer to Hand Over Site for more details.
Hl] Note
You should request the tenant to allow you to disable the Hik-Connect service, and if the tenant does not approve the request, the devices will not be handed over.
- The tenant accepts the handover on the Hik-Connect Mobile Client, which means the tenant also approves your request to allow you to disable the Hik-Connect service and approves your application for permissions (if any).
- The devices are handed over to the tenant’s Hik-Connect account.
When the Site (no permission selected when handing over site) has been handed over to Site Owner, and then there are maintenance requirements for the devices in the Site, the Installer needs to send an application to Site Owner for the authorization. After the authorization is approved, the Installer can get the permission to manage and configure the devices of the Site. Besides, the Site Owner can add a device on Hik-Connect Mobile Client and authorize it to the Installer for further management and configuration.
Steps
- On the navigation pane, click Customer Site to enter the Site page.
- Select a Site.
- Enter Apply for Authorization page.
- Select a Site and click on Operation column.
- Click the Site name to enter Site Details page and click Apply for Authorization.
- Enter the remarks and click OK to send the application.
The Site Owner will receive and handle the application via Hik-Connect Mobile Client. After the Site Owner approves the application, the Installer will have the authorization of the Site and perform some operations.
If there are maintenance requirements for the devices added in Hik-Connect Mobile Client, but not added and managed in the Site by the Installer yet, after consensus, the Site Owner can select the devices and authorize the permissions of the devices to the Installer.
CXlNote
- Please inform your end users to download or update the Hik-Connect Mobile Client (V 4.15.0 or later). You can send the QR code to them.
- For AX Pro, after adding an AX Pro to Hik-Partner Pro, the Installer and Installer Admin’s accounts will become the accounts of the AX Pro; these accounts will be deleted after the Installer deletes the AX Pro from Hik-Partner Pro. If you edit an Installer’s login password, the password for logging in to the AX Pro by this account will also change.
- After authorizing a Site with AX Pro to an Installer, the Installer and Installer Admin’s accounts will become the accounts of the AX Pro; besides, the account with the permission of managing all Sites will also become the account of the AX Pro.
- If an Installer hands over the Site with this AX Pro to an end user, the end user’s Hik-Connect account will also become an account of the AX Pro, while the Installer’s account will be deleted from the AX Pro. This is also applicable to an Installer Admin.
- For more details about operations on Hik-Connect Mobile Client, refer to the User Manual of Hik-Connect Mobile Client.
- Optional: Perform the following operations.
Apply for Device Click the Site name to enter Site Details page and apply for
Permission permissions.
Discard Authorization On the Site list page, click ^ & to discard authorization or the Site.
OU Note
For Sites with Allow Me to Disable Hik-Partner Pro Service function enabled when handing over to Installer, discarding authorization is not supported.
You can accept a device management invitation from your customer (i.e., a Hik-Connect user) to manage a device already added to a Hik-Connect account. In this way, the device, along with its configuration and operation permissions, can be shared with you to allow you to manage the device on Hik-Partner Pro. Compared with synchronizing the device in Hik-Connect with the device in Hik-Partner Pro, which requires your customer to share their Hik-Connect account name and password with you, this way is more privacy-friendly and easier to be accepted.
To know more about the device management invitation, read the sections below:
- Overall Process
- Introduction About the Device Management Invitation on Hik-Partner Pro
- The Email of Device Management Invitation
- The Notification of Device Management Invitation
- How Can Your Customer Invite You to Manage Their Device via Hik-Connect
Overall Process
If your customer (i.e., the Hik-Connect user) has already added one device to their Hik-Connect account, the customer can use the Hik-Connect Mobile Client to invite you to manage this device. Once the customer completes the invitation, an email containing the invitation information (e.g., the Hik-Connect user name and device name) and the button/link for accepting the invitation will be sent to you, and then you can accept the invitation.
Invitations for device management can also be accepted via Notification Center ^ Business Notification . Once you accept the invitation, the device will show on the specified site (namely, the site mentioned in the email or the notification) on Hik-Partner Pro.
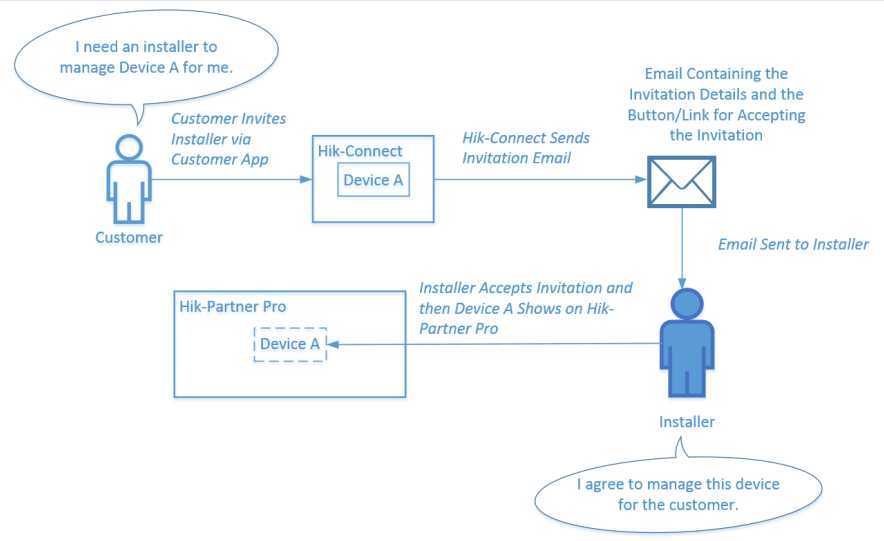
Figure 6-8 Overall Process Diagram
Introduction About the Device Management Invitation on Hik-Partner Pro
You can go to the site list page, and then click Device Management Invitation from Customer to open the window shown below. This shows how your customer uses the Hik-Connect Mobile Client to invite you to manage their device. It should be noted that you need to provide your Hik- ProConnect account (email address) to your customer first to let them specify you as the Installer who manages their device.
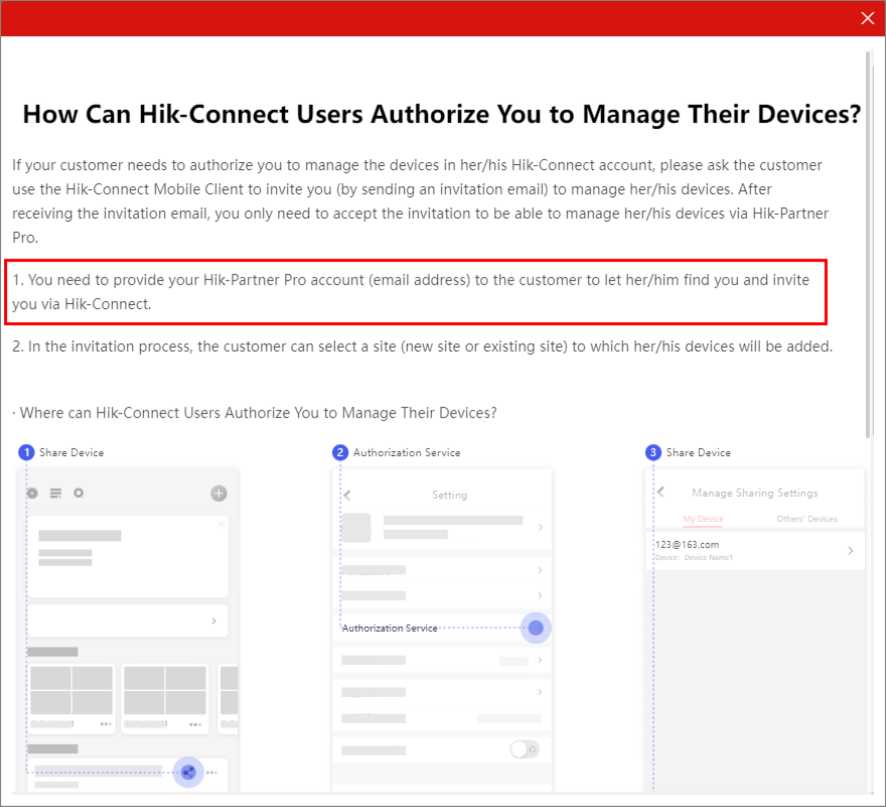
Figure 6-9 The Pop-Up Window
The Email of Device Management Invitation
The email shows the invitation details including device name, device serial No., name of the site where the device(s) is added, Hik-Connect user account, and the time of invitation. If you agree to manage the device(s) for your customer, you need to accept the invitation in three days, otherwise the invitation will be invalid.
The Notification of Device Management Invitation
The notification shows the invitation details including name of the site where the device(s) is added, device name, device serial No., and the Hik-Connect user account. If you agree to manage the device(s) for your customer, you need to accept the invitation in three days, otherwise the invitation will be invalid.
Device Management Invitation
My!
Devices)
DS-
Site Own
yzpr
- You should accept the invitation in 3 days if you agree to manage y our customer’s devices. Otherwise, the invitation will be invalid.
- If you do not agree, you need not to perform any operation. The in vitation will be invalid in 3 days automatically.
- If you agree, the site where the device is added will be displayed o n the Hik-Partner Pro Portal or Mobile Client, and you can view the device status and maintain the devices. Also, you can enter the site I ist page, and search for the site according to the site name or the us er s account name.
I Agree
Figure 6-10 Notification Example
How Can Your Customer Invite You to Manage Their Device via Hik-Connect
Refer to the following steps for details about how can your customer invite you to manage their device via the Hik-Connect Mobile Client.
- In the device list, tap «• of the device and the Share Device page will pop up. Or select More ^ Manage Sharing Settings ^ Share Device to show the Share Device page.
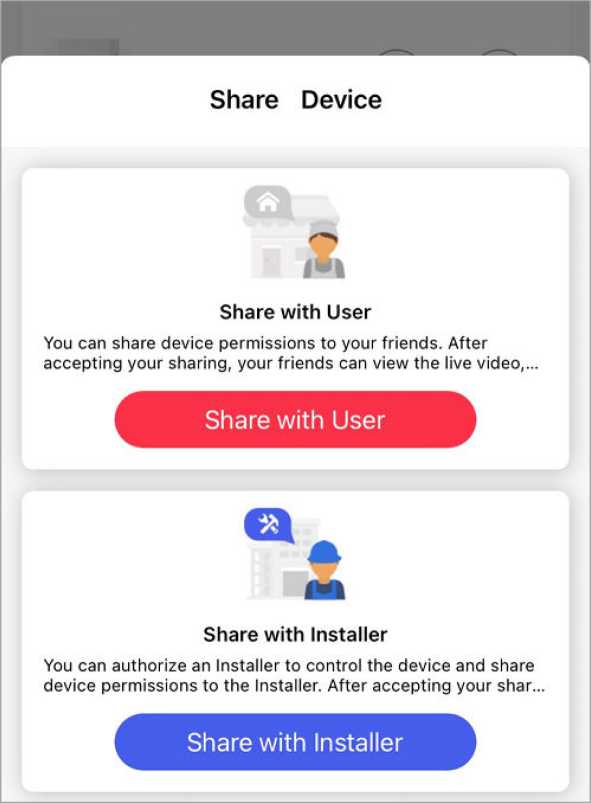
Figure 6-11 Share Device
LJilNote
If this page doesn’t show, it means the device cannot be managed by an installer and can only be shared with another Hik-Connect user.
Possible reasons: the device is shared from others; the device is already managed by an installer; the device is not enabled with the Hik-Connect service; or the Hik-Partner Pro service (installer service) is not available in your customer’s country or region.
- Tap Share with Installer.
- Tap New Installer and enter the installer’s account to share device permissions with a new installer; or select an existing installer.
OX Note
When entering a new installer’s account that has been linked with two or more companies, you should select a company to share device permissions with.
Figure 6-12 Select Installer
4. Select the Site where the device will be added and the device permissions to be granted to the installer.
\ Authorization
You can grant device authorization to the Installer. After authorization, your Installer will have the permissions that you select. You can deauthorize the device to revoke permissions from Installer at any time. If you have any questions, tap to get help.
Installer >
Site MySite ©
Permission
Live View ¿k
Validity Period: Permanent
Configuration
Validity Period: Permanent
Playback
Validity Period; Permanent
OK
Figure 6-13 Authorization
You can share sites with your maintenance service partners to allow them to cooperate with you in providing device management/maintenance services for your customers, especially in offering technical support. When sharing a site, you can determine the permissions for the MSP (maintenance service partner) to access devices on the site. After sharing a site, you can change the maintenance service partner’s permissions.
OS Note
If you change the maintenance service partner’s permissions, your customer will receive a notification about it on the Hik-Connect Mobile Client.
Read the following sections to learn the overall process and limitations of site sharing.
- Share a Site not Handed Over
- Share a Site that Has Been Handed Over
- Limitations
Share a Site not Handed Over
The diagram below shows the overall process of sharing a site not handed over to your customer. For detailed steps, see Share a Site not Handed Over .
In the diagram, HPP represents Hik-Partner Pro, HC represents Hik-Connect, and MSP represents maintenance service partner.
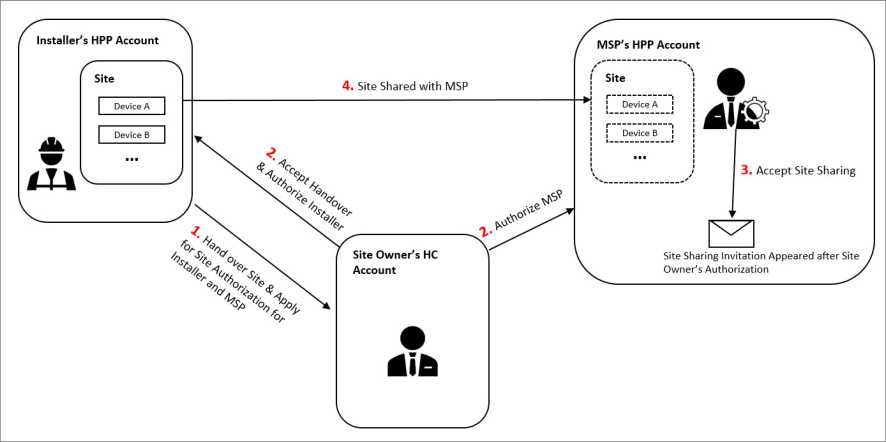
Figure 6-14 Overall Process
Share a Site that Has Been Handed Over
The diagram below shows the overall process of sharing a site that has been handed over to your customer. For detailed steps, see Share a Site that Has Been Handed Over .
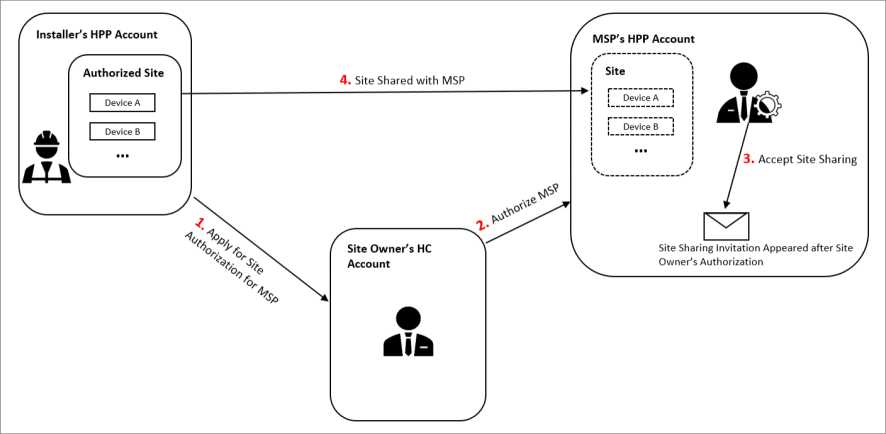
Figure 6-15 Overall Process
Limitations
- Site sharing is not supported in every country or region.
- You can only share a site with your maintenance service partner’s Installer Admin account.
- Your account and your maintenance service partner’s Installer Admin account need to be in the same country/region.
- You cannot share a site with any Installer of your company.
- .9.1 Share a Site not Handed Over
For a site that has not been handed over, you can apply for site authorization and select permissions for the maintenance service partner at the same time when you hand over the site, in order to share the site with your maintenance service partner for managing and maintaining the site together.
Before You Start
Make sure the site status is Not Handed Over and you have the permission to manage all sites or assigned sites.
Steps
OS Note
- The maintenance service partner’s Hik-Partner Pro account should be an Installer Admin account, of which the country/region should be the same as that of your account.
- You cannot share the site with the account of any employee in your company.
- Enter the Hand Over Site page. Refer to Hand Over Site for details.
- In the Site Sharing section, check Apply for Site Authorization for Maintenance Service Partner.
- Enter the maintenance service partner’s Hik-Partner Pro account.
CIS Note
If the account has been linked with two or more companies, you should select a company to share device permissions with.
- Select permissions for the maintenance service partner.
C® Note
- You can set the validity period for the permissions of configuration, live view, and playback, and select the device(s).
- If you have no permission to manage devices, or no devices are added to the site, you cannot select the permissions of configuration, live view, and playback when handing over the site.
- If the following permissions are selected, when your customer accepts the handover and the maintenance service partner accepts site sharing, the permissions will be authorized to the maintenance service partner.
Site Information Management
The permission to manage the site information.
Configuration
The permission to configure selected devices on the site.
Live View
The permission to stream the live video from the selected devices on the site.
Playback
The permission to play back videos of the selected devices on the site.
- Configure other settings on the Hand Over Site page. Refer to Hand Over Site for details.
- Click OK.
- Optional: After your customer accepts the handover and the maintenance service partner accepts the site sharing, perform the operations below.
You can view the status and email address of the Maintenance Service Partner on the site details page.
View Information
About the Maintenance
Service Partner
Cancel Site Sharing
You can cancel site sharing on the Site Sharing page.
You can change permissions for the maintenance service partner on the Site Sharing page.
Change Permissions for the Maintenance
Service Partner
DU Note
You can only change the permissions that have already been granted to the maintenance service partner by your customer, and your customer will receive a notification on the Hik-Connect Mobile Client if the permissions are changed.
6.9.2 Share a Site that Has Been Handed Over
After a site is handed over, you can share the site with your maintenance service partner for managing and maintaining the site together.
Before You Start
Make sure the site status is Authorized and Monitoring and you have the permission to manage all sites or assigned sites.
Steps
CUlNote
- The maintenance service partner’s Hik-Partner Pro account should be an Installer Admin account, of which the country/region should be the same as that of your account.
- You cannot share the site with the account of any employee in your company.
- On the navigation pane, click Customer Site to enter the Site page.
- Select a site for site sharing.
- Enter the Site Sharing page.
- Move the cursor to in the Operation column and click ■=< .
- Click the site name to enter the site details page and click Site Sharing.
- Enter the maintenance service partner’s Hik-Partner Pro account.
CE Note
If the account has been linked with two or more companies, you should select a company to share device permissions with.
il Note
- You can set the validity period for the permissions of configuration, live view, and playback, and select the device(s).
- If you have no permission to manage devices, or no devices are added to the site, you cannot select the permissions of configuration, live view, and playback when handing over the site.
- If the following permissions are selected, when your customer accepts the handover and the maintenance service partner accepts site sharing, the permissions will be authorized to the maintenance service partner.
Site Information Management
The permission to manage the site information.
Configuration
The permission to configure selected devices on the site.
Live View
The permission to stream the live video from the selected devices on the site.
Playback
The permission to play back videos of the selected devices on the site.
- Enter the remarks, such as the reason for site sharing.
- Click OK.
- Optional: After your customer accepts the application and the maintenance service partner accepts the site sharing, perform the operations below.
| View Information
About the Maintenance Service Partner |
You can view the status and email address of the Maintenance Service Partner on the site details page. |
| Cancel Site Sharing | You can cancel site sharing on the Site Sharing page. |
| Change Permissions for the Maintenance
Service Partner |
You can change permissions for the maintenance service partner on the Site Sharing page.
‘Note You can only change the permissions that have already been granted to the maintenance service partner by your customer, and your customer will receive a notification on the Hik-Connect Mobile Client if the permissions are changed. |
After the Installer Admin or Installer shares a site with the MSP (Maintenance Service Partner) on Hik-Partner Pro, the site owner will receive the device authorization application on the Hik-Connect Mobile Client. The site owner should agree to the authorization, so that the MSP can receive and handle the site sharing application on Hik-Partner Pro.
Before You Start
- Make sure the site owner has agreed to the device authorization on the Hik-Connect Mobile Client.
- Make sure the MPS has logged in to the Hik-Partner Pro.
- Make sure the country/region of the MSP’s account is the same as that of your account are the same.
Steps
- In the upper-right corner of the page, click Notification Center.
- Click the Business Notification tab.
All the business notifications (including the site sharing application) received by the MSP will be displayed.
- Click I Agree to accept the site sharing.
s Business Notification 0!o Exception Center 4 System Message 3 ■■ Deals and Offers ®>
Site Sharing Application 10, Dec, 2021 10:10:16
Figure 6-16 MSP Accepts Site Sharing in Notification Center
The MSP can manage and maintain devices on the shared site together with the installer.
6.9.4 Features Available for MSP on a Shared Site
After the MSP (Maintenance Service Partner) accepts the site sharing, the MSP can perform configurations and operations which the customer authorized on the shared site. The MSP can also release device permission or cancel the site sharing. If the MSP is authorized to manage the site, the MSP can directly applying to the customer for device permission.
OZlNote
The MSP who accepted the site sharing cannot share the site with another MSP.
Features Available for MSP with Permissions
Customer Site
Includes live view and playback, arming and disarming devices, device remote configuration, device upgrade, linkage rule configuration, DDNS configuration, resetting password, exception notification configuration, and deleting site.
‘Note
- The MSP can upgrade devices in the Customer Site module and the Health Monitoring module.
- If the MSP deletes the site, it indicates that the site authorization is discarded by the MSP, but the installer can still manage the sites and their devices.
Health Monitoring
Includes viewing the status of devices on the shared sites, device remote configuration, refreshing devices’ status, live view, playback, manually checking devices’ status, and exporting health check reports.
Exception Center
Includes receiving device exceptions and exporting exception records.
Send Report Regularly
Includes configuring report settings to send reports regularly.
My Service
Includes viewing the validity periods, expiration time and status of activated services for the site and their corresponding resources.
dlNote
The MSP cannot activate or transfer services on the shared site. Only the installer can do the above operations.
MSP Applies to Customer for Device Permissions
If the MSP is authorized to manage the site, the MSP can directly apply to the customer for device permission. The installer who shared the site will receive the notification after the MSP sends the application for device permission.
For how the MSP applies to the customer for device permission, refer to Apply for Device Permission .
MSP Releases Device Permissions
If the MSP does not need device permission, or the MSP finished the device configuration task earlier than the planned time, the MSP can release the permission.
For how the MSP releases device permission, refer to Release the Permission for Devices .
MSP Cancels Site Sharing
If the MSP does not need to manage or maintain the site, or the MSP finished the site management and maintenance tasks, the MSP can cancel the site sharing. After the site sharing is canceled, the site and devices on the site will be deleted from the MSP’s Hik-Partner Pro account.
If you have configured GPS information for the sites, you can view them on the map.
On the navigation pane, click Site & HCC ^ Site Map (or Site Map if HikCentral Connect is not available in your country or region) to enter the site map page.
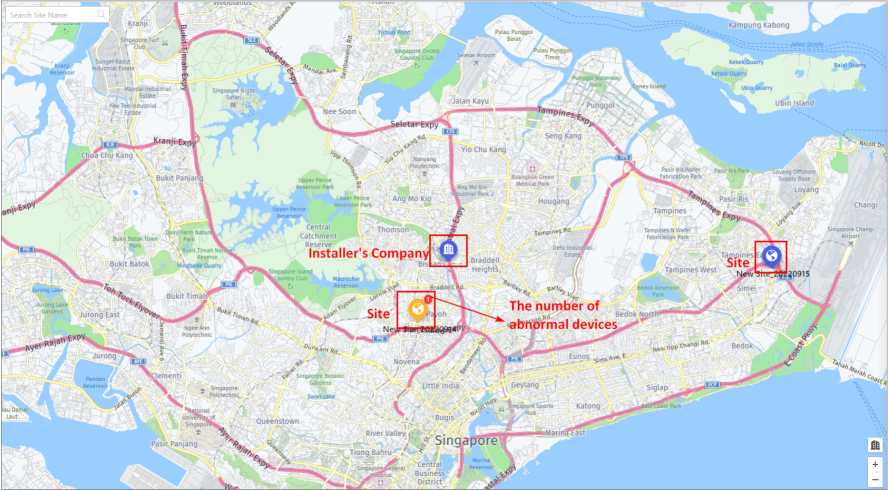
Figure 6-17 Site Map
![]()
Note
- Installer’s company is in the center of the map by default.
- ;’® : There are device(s) that have been activated the health monitoring service in this site.
- Q : There is no device that has been activated the health monitoring service in this site.
You can perform the followings on this page.
- You can view companies and sites whose GPS information have been configured on the map. For details about configuring GPS information for companies and sites, refer to Add New Site and Manage Company Information .
- You can click a site to view its information, including site name, site owner, site location, the number of online/offline/abnormal devices, etc. Also, you can click Site Details to enter site details page to view more information about the site. You can click Health Monitoring Details to enter the health status page and view the health status of all the devices added to this site.
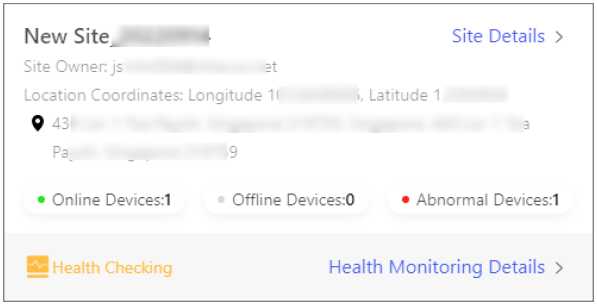
Figure 6-18 Site Information
• You can drag the map as needed. You can scroll the mouse or click / in the down-right corner to zoom in/out the map. Also, you can click a to view the company’s location on the map.
• You can enter keyword(s) in the search box in the upper-left corner to search for the site name.
Hik-Partner Pro supports multiple device types, including encoding device (e.g., solar camera), security control panel, video intercom device, access control device, doorbell. After adding them to the system, you can manage them and configure settings, including remotely configuring device parameters, configuring exception rule, linkage rule, people counting, temperature screening, etc.
OS Note
Some functions may not be available in specific countries and regions.
-
- Batch Configure Devices on LAN
You can batch configure online devices on the same Local Area Network (LAN) with the PC on which the Hik-Partner Pro Portal runs. The available configurations include batch device activation and device IP address assignment, batch linking channels to NVR/DVR, and batch setting parameters for devices via templates. These functions allow you to complete basic configurations for multiple devices with much less effort compared with configuring devices one by one.
‘Note
- For entering the device batch configuration page for the first time, a video tutorial about how to batch configure devices on LAN will pop up and automatically play in the down-left corner.
- The functionality is only available to certain models of cameras, NVRs, and DVRs.
- Before batch configuring devices, make sure you have connected them to the same LAN with the PC on which the Hik-Partner Pro Portal runs.
The flow chart for batch configuration of devices is shown below.
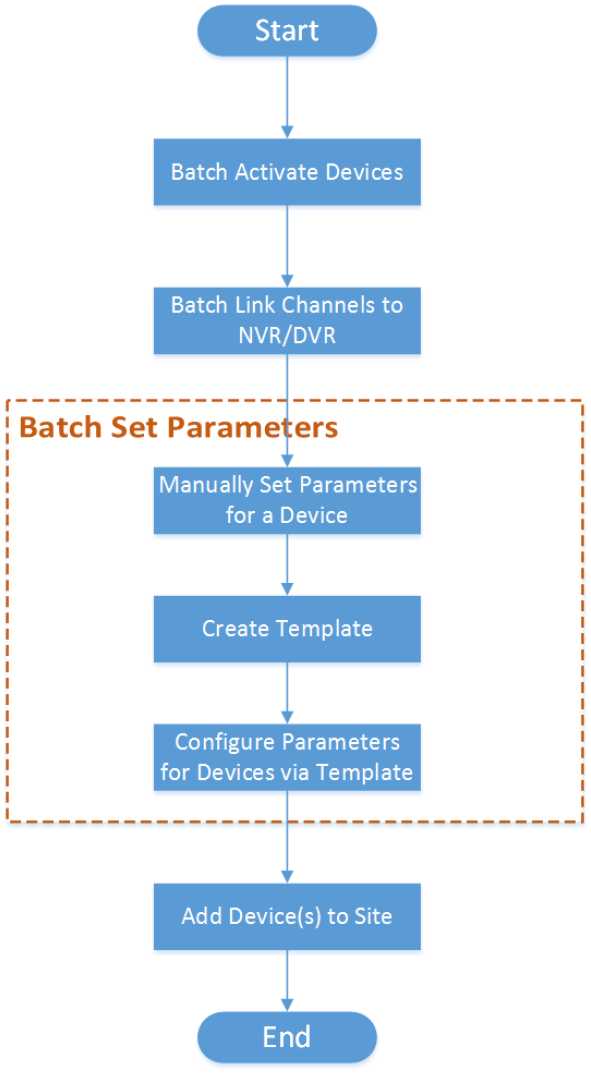
Figure 7-1 Flow Chart
Table 7-1 Flow Chart Description
| Step | Sub-step | Description |
| Batch Activate
Devices |
N/A | Batch activate online devices on the same Local Area Network (LAN) with the PC on which the Hik-Partner Pro Portal runs, and assign IP addresses for the activated devices. See Batch Activate Devices and Assign IP Addresses for Them for details. |
| Batch Link Channels to NVR/DVR | N/A | If the activated devices include NVR or DVR, link channels to NVR or DVR. See Batch Link Channels to NVR and DVR for details. |
| Batch Set Device Parameters | Manually Set Parameters for a Device | Select an activated device and set its parameters manually. See Create Template for Setting Parameters for details. |
| Create Template | Created a template based on the manually configured device. See Create Template for Setting Parameters for details. | |
| Configure Parameters for Devices via Template | Batch configure parameters for multiple devices via a selected template. See Batch Set Parameters for Devices via Template for details. | |
| Add Device(s) to Site | N/A | If required, add the activated and configured device(s) to a Site. See Add Detected Online Device for details. |
The Portal can detect available devices connected to the same network with the Portal, and then you can activate devices and assign IP address for them.
Before You Start
Make sure the devices you are going to use are correctly installed and connected to the network as specified by the manufacturers.
Steps
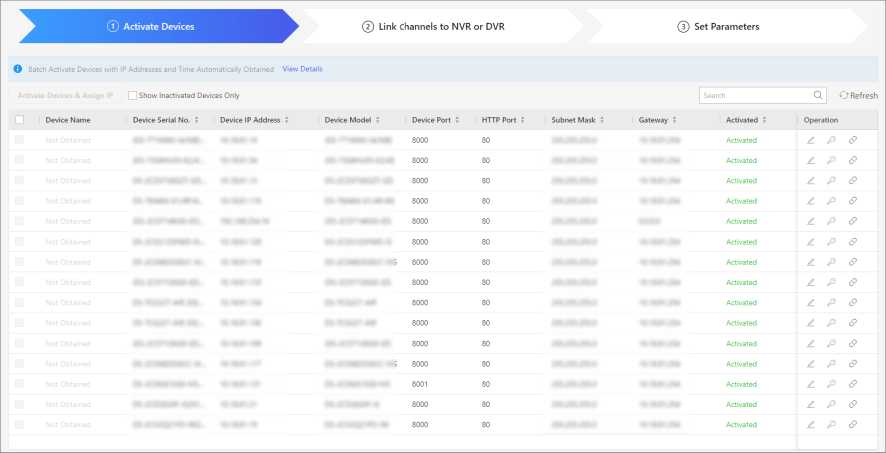
Figure 7-2 Batch Device Configuration
2. Select the detected online devices to be activated.
3. Click Activate Devices & Assign IP to open the Activate Devices & Assign IP window.
4. Enter the device admin password and confirm the password.
5. Click Activate Devices & Assign IP.
CIS Note
- The unactivated device and the activated device but not be assigned with IP address will be displayed as Not Obtained in the Device Name column.
- For the activated device and be assigned with IP address, if you hover the mouse on the IP address, Auto will be displayed to remind you the IP address is automatically assigned.
The devices are activated, and the device IP address are assigned by the Portal.
The time of the computer will be synchronized to the activated devices.
6. Optional: After the devices are activated, you can perform the following operations.
| Operation | Description |
| Edit Device Network Parameters | Click to edit the device network parameters, including IP address, device port, HTTP port, subnet mask, gateway, device admin password and then click OK. |
| Reset Device Admin Password | Click to reset the admin password of the device. |
| Unbind Device | Click and then enter the device password and verification code to unbind the device from its current account. After unbound, the device can be added to another account. |
What to do next
After activating the devices, you should batch add channels to NVR or DVR. For details, refer to Batch Link Channels to NVR and DVR .
If there are online NVR, DVR, and network camera on the same LAN, you can batch link the network camera to the NVR and DVR as channels. After linking, you can manage the linked channels according to your need.
Before You Start
Make sure you have activated the NVR, DVR, and network cameras. See Batch Activate Devices and Assign IP Addresses for Them for details.
Steps
OS Note
If there is no online NVR or DVR on the same LAN, skip this task.
- On the Link Channel page, select an NVR or DVR on the left.
C® Note
If you have not logged in to the device, enter the password to log in.
- Click Next.
Channels that have been linked will be displayed in the middle.
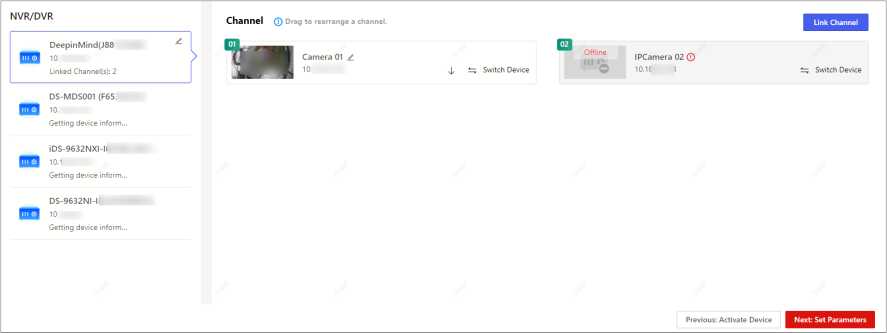
Figure 7-3 Channels on the Same LAN
‘Note
If a linked channel is offline, (p will be displayed beside the channel name. Hover the cursor on the icon to view the reason for being offline. You can click Set Parameters to change channel parameters to try again.
- Click Link Channel to open the Link Channel panel.
- Optional: Select a device and click to log in to the device and get device information.
- Click + to link the device.
- Optional: Perform the following operations.
| Edit NVR/DVR/Channel Name | Click to edit the NVR/DVR/channel name. |
| Sort Channels | Click ]’ or to sort the channels. |
| Replace Device | Click Replace Device to unlink this channel and link a new device. |
| Unlink Device | Click ~ to unlink channel. |
What to do next
Click Next to batch set parameters for devices. See Batch Set Parameters for Devices via Template for details.
Before batch configuring parameters for devices, you should create a template. After creating a template, you can batch apply it to devices.
Before You Start
Make sure you have activated devices and linked channels to NVR and DVR (if any). See Batch
Activate Devices and Assign IP Addresses for Them and Batch Link Channels to NVR and DVR for details.
Steps
- Click a device name or Set Parameters to enter the remote configuration page.
- On the remote configuration page, set parameters for the device.
- Click Save as Template on the top right.
- Set a template name and check the parameters you want to save in the template.
- Click Save to save the parameters as a template.
- Optional: Add a new template based on device with configured parameters.
- Click Manage Template ^ + .
- Enter template name.
- Select device type.
- In the template content field, select a device.
- Click Save.
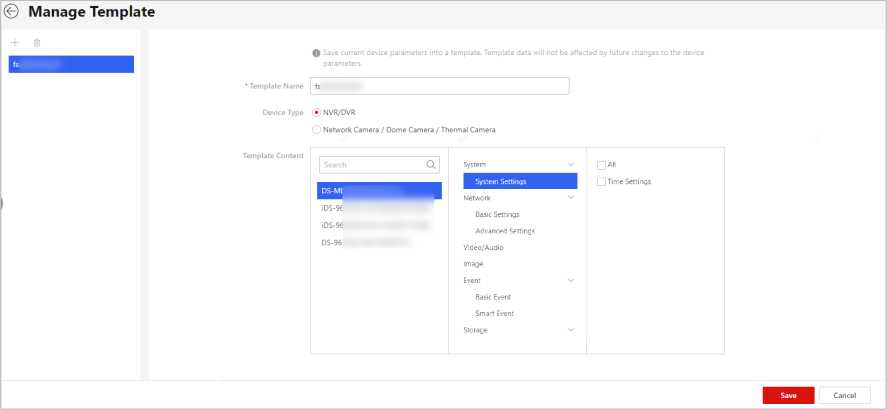
Figure 7-4 Add Template
To configure devices with high efficiency, you can batch apply parameters in an existing template to devices.
Before You Start
Make sure you have created at least one template for setting parameters. See Create Template for Setting Parameters for details.
Steps
- Check device(s) and click Set Parameters by Template.
dlNote
Before setting parameters for an NVR or DVR, you can tap Format to format the disk of the selected device. Batch formatting is not supported.
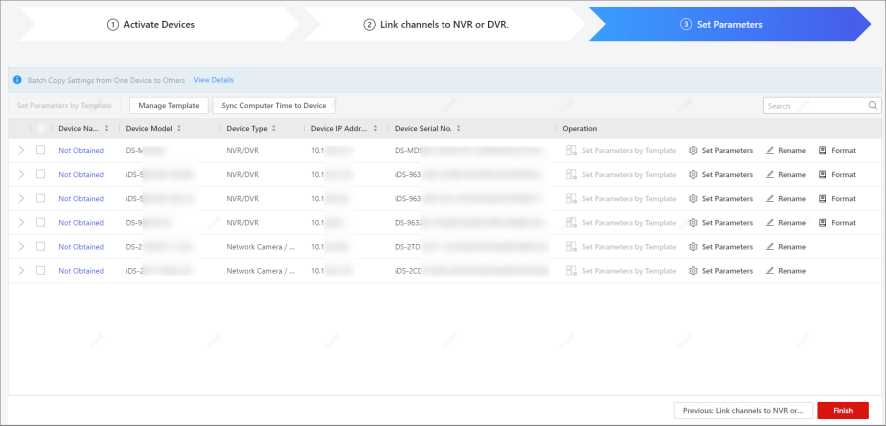
Figure 7-5 Set Parameters
3. Click Apply Parameters to apply the configured parameters to devices.
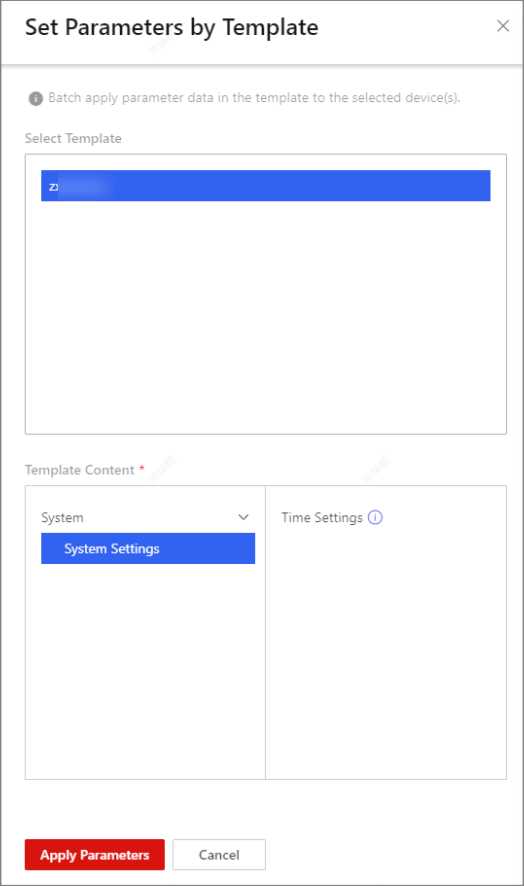 The application process and application results will be displayed.
Figure 7-6 Set Parameters by Template
4. Optional: Perform the following operations.
Add devices to Sites. See Add Device for details.
Add Device to Site
Manage Template
Edit NVR or Channel Name
Synchronize Computer Time to Device
Click Manage Template to add new template or delete template.
See Create Template for Setting Parameters for details.
Click Rename to edit name(s) of NVR or channels of NVR.
Check device(s) and click Synchronize Time to Device. And then check devices and click OK.
Hik-Partner Pro accesses devices by two modes: Hik-Connect (P2P) and Device IP Address/Domain Name. The former provides securer data communication (between Hik-Partner Pro and devices) and full access to features based on the Hik-Connect service, such as device handover and exception notification; the latter provides faster data communication but no access to the features based on Hik-Connect service.
The table below shows the device adding methods for the two access modes respectively.
Table 7-2 Device Adding Methods
| Access Mode | Device Adding Method |
| Hik-Connect (P2P) |
CSNote The last method in this table cell is for devices which do NOT support the Hik-Connect service. In this method, you can add them via the proxy of Hik-ProConnect Box to allow them to get full access to the features based on the Hik-Connect service. |
| Device IP Address/Domain Name | • Add Devices by IP Address or Domain Name |
After batch configuring devices, you can add the device(s) to the existing site or a new site.
Select one of the following ways to enter the Add Device page.
- After batch configuring device(s), click Add Device in the prompt box.
CXlNote
For details about batch configuring devices, refer to Batch Configure Devices on LAN
- On the Home page, click Add Device.
- On the navigation pane, click Site & HCC ^ Customer Site (or Customer Site if HikCentral Connect is not available in your region).
o Click Add Device on the top of the site list.
o Click — in the Operation column of the site list.
o Click the site name to enter the site details page, and then go to Device ^ Add Device . Select Scan for Devices on LAN, Enter Serial No., Enter IP Address / Domain, Batch Import, or Synchronize devices from the Hik-Connect as the adding method.
Select the device(s) to be added, and perform one of the following two ways to add the device(s) to the site.
- Select Existing Site and then click the site in the drop-down list.
- Select New Site and edit the following parameters to create a new site.
Site Name
The name of the site, which can describe the site location, function, etc.
Time Zone
Select the time zone in the drop-down list according to the location the site belongs to.
Scene
Select the scene of the site in the drop-down list according to the usage scene, such as house, department, villa, and store.
Site Address
Enter the site address, such as street and number, apartment suite, unit, building, floor, etc.
City
Enter the city of the site.
State/Province/Region
Enter the state, province or region of the site.
Sync Time & Time Zone to Device
After checked, the time and time zone will be synchronized to the device from the site.
Click Next and perform the operations according to the prompts on the page. For more details, refer to Add Device .
The Portal can detect available devices connected to the same network with the Portal, which makes the devices’ information about themselves (e.g., IP address) recognized by the Portal. Based on the information, you can add the devices quickly.
OS Note
- Make sure the devices you are going to use are correctly installed and connected to the network as specified by the manufacturers.
- You can add up to 15 detected online devices simultaneously.
On the navigation pane, click Site & HCC ^ Customer Site (or Customer Site if HikCentral Connect is not available in your region).
On the Add Device page, click Scan for Devices on LAN.
‘Note
For details about how to enter Add Device page, refer to Add Device(s) after Batch Configuring Them .
The device(s) connected to the same LAN with the Portal will be displayed on the device list. You can view information including device serial No., device IP address, activation status (activated or not), Hik-Connect status (connected to Hik-Connect service or not), etc.
Check the online device(s) to be added and click Next. Perform part or all of the following 4 steps based on the status of the selected devices before you can add them.
After you add an AX PRO device to Hik-Partner Pro, you will be able to log into the AX PRO by your Hik-Partner Pro account (i.e., Installer account or Installer Admin account) to configure and manage the device; if you delete the AX PRO device from Hik-Partner Pro, you can no longer log into the AX PRO device by your Hik-Partner Pro account.
After your customer authorizes a Site with AX PRO devices to you, you can log into these AX PRO devices by your Hik-Partner Pro account to configure and manage the device. In this case, if you are an Installer, the Installer Admin can also log into these AX PRO devices by her/his Hik-Partner Pro account; if you are the Installer Admin, your employees (i.e., Installers) have no permission to log into these devices by their Hik-Partner Pro accounts.
| Step | Description |
| Activate Device | If there are device(s) not activated, activate them. See Activate Device for details.
HZXlNote If a device is activated, the platform will automatically assign a fixed IP address for it. |
| Enter Device Password | Enter admin password of the device. See Enter Device Password for details. |
| Automatically Connect to Hik- Connect Service | Connect device(s) to the Hik-Connect service. See Connect to Hik-Connect Service for details. |
| Set Device Verification Code | If a device is connected to the Hik-Connect service successfully, the platform will automatically get device verification code from device.
If not, you need to set verification code for it. See Set Device Verification Code for details. |
Table 7-3 Step Description
•
- After you hand over a Site with AX PRO devices to your customer, your customer will be able to log into these devices by her/his Hik-Connect account, and you will no longer have the permission to log into these devices by your Hik-Partner Pro account.
- For the AX Hybrid Pro, after the device is added to the Hik-Partner Pro, its account and password which are configured on the Device Configuration page will be overwritten by those of the Hik- Partner Pro.
After adding devices to the Portal, you can perform the following operations if required.
Table 7-4 Available Operations after Adding Devices
| Operation | Description |
| Edit Device | Click the device name to edit it. Or move the cursor to the device and then click / to edit device name. |
| Configure Linkage Rule | Click [jj to configure linkage rule for the device.
CSNote For details, see Add Custom Linkage Rule . |
| Activate Health Monitoring Service | Click Activate Service on the adding result page.
Or hover the cursor onto S on the device card on the site details page, and then click Activate Service. CSNote
|
| Delete Device | Click ^ 0 to delete the device.
CS Note
|
| Upgrade Device Firmware | When device adding completes, the platform will start detecting whether the device firmware version is compatible. Some functions (including health monitoring, linkage rule, and remote |
| Operation | Description |
| configuration) are unavailable if the device is not compatible with the Hik-Partner Pro.
For devices incompatible with the Hik-Partner Pro, you need to upgrade them.
|
|
| Set Type for Unknown Device | If the Hik-Partner Pro cannot recognize a device’s type after you add it, you can manually set a device type for it. Click Set Device Type and select a device type from the drop-down list. You can edit it again after the selection. |
| Unbind Device from Its Current
Account |
If the adding result page shows that a device fails to be added and has been added to another account, you can click to unbind it. When the device is unbound, you can add it to your account. For details about unbinding device, see Unbind a Device from Its Current Account . |
Activate Device
If there are inactivated device(s) in the selected devices, create a device admin password for all the inactivated device(s) on the pop-up window to activated them.
LJilNote
We highly recommend you to create a strong password of your own choosing (using a minimum of 8 characters, including at least three kinds of following categories: upper case letters, lower case letters, numbers, and special characters) in order to increase the security of your product. And we recommend you change your password regularly, especially in the high security system, changing the password monthly or weekly can better protect your product.
Enter Device Password
For devices which are activated but not connected to the Hik-Connect service, you should enter its admin password on the pop-up window. The admin password is created when you activate the device.
If multiple devices share the same password, enable Batch Enter admin Password to enter the password for all the devices in a batch. If any devices’ passwords are incorrect, a notification will prompt showing these device(s) for you to enter the correct password(s).
‘Note
Before entering admin password, you should make sure that no repeated device IP address exists, or one of the devices with the same IP address will fail to be added. You can click £_ in the Operation column, and then edit the device IP address.
Connect to Hik-Connect Service
After entering device admin passwords, the platform will automatically start connecting the device(s) to the Hik-Connect service. Devices that are failed to be connected to the Hik-Connect service cannot be added.
‘Note
Make sure that no repeated device IP address exists and that the IP addresses of the to-be- connected devices are in the same network segment with the PC running Hik-Partner Pro, or connection exception will occur. You can click .£ in the Operation column, and then edit the device IP address.
Set Device Verification Code
- If a device is connected to the Hik-Connect service successfully, the platform will automatically get device verification code from device. If the platform failed to get the verification codes from any devices, you need to manually enter their verification codes.
If multiple devices share the same verification code, enable Batch Enter Verification Code and enter the verification code for all of them.
- If device(s) failed to be connected to the Hik-Connect service, you need to set a shared device verification code for multiple devices, or set verification codes for each device. After you complete device verification settings, the device(s) will be connected the Hik-Connect service.
C®Note
For EZVIZ devices, admin password is not required, and device verification code is required.
7.2.3 Add Device by Entering Serial No.
If a device is connected to Hik-Connect service, you can manually add it to a site by entering the device serial number and device verification code.
Before You Start
- Make sure the devices you are going to use are correctly installed and connected to the network as specified by the manufacturers.
- Make sure the device has been activated and connected to Hik-Connect service.
Steps
- On the navigation pane, click Customer Site ^ Site (or Customer Site if HikCentral Connect is not available in your region).
- Open the Add Device page.
OS Note
For details, refer to Add Device(s) after Batch Configuring Them .
- Select Enter Serial No. as the adding mode.
- Enter the device serial number and device verification code.
CIS Note
The device serial number and the default device verification code are usually on the device label. If no device verification code found, enter the verification code you created when enabling Hik- Connect service.
- Click Next.
CS Note
Hik-Partner Pro will start detecting whether the device firmware version is compatible with the Hik-Partner Pro. Some functions (including health monitoring, linkage, and remote configuration) cannot be used if the device is not compatible with the Hik-Partner Pro. Firmware version detection will not happen if a site is authorized. For devices incompatible with the Hik- Partner Pro, you need to upgrade them.
- Select Upgrade to Compatible Version on the Upgrade or Not column, and click Add and Upgrade.
- Enter device user name and password to add and upgrade the device.
- Check the device(s) to be added.
- Click Add.
US Note
- After you add an AX PRO device to Hik-Partner Pro, you will be able to log into the AX PRO device by your Hik-Partner Pro account (i.e., Installer account or Installer Admin account) to configure and manage the device; if you delete the AX PRO device from Hik-Partner Pro, you can no longer log into the AX PRO device by your Hik-Partner Pro account.
- After your customer authorizes a Site with AX PRO devices to you, you can log into these AX PRO devices by your Hik-Partner Pro account to configure and manage the device. In this case, if you are an Installer, the Installer Admin can also log into these AX PRO devices by her/his Hik-Partner Pro account; if you are the Installer Admin, your employees (i.e., Installers) have no permission to log into these devices by their Hik-Partner Pro accounts.
- After you hand over a Site with AX PRO devices to your customer, your customer will be able to log into these devices by her/his Hik-Connect account, and you will no longer have the permission to log into these devices by your Hik-Partner Pro account.
- For the AX Hybrid Pro, after the device is added to the Hik-Partner Pro, its account and password which are configured on the Device Configuration page will be overwritten by those of the Hik-Partner Pro.
- Optional: Perform the following operations after adding device(s).
| Edit Device
Name |
Click the device name to edit it.
Or move the cursor to the device and then click to edit it. |
| Delete Device | Click ^ 0 .
□S Note
|
| Upgrade Device | Refer to Upgrade Device . |
| Set Type for Unknown Device | If the Hik-Partner Pro cannot recognize a device’s type after you add it, you can manually set a device type for it. Click Set Device Type and select a device type from the drop-down list. You can edit it again after the selection. |
| View DDNS
Status |
Click a * « and hover the cursor on “§■ . See Configure DDNS for Devices for details about configuring device DDNS. |
| Activate Health Monitoring Service | Click Activate Service on the adding result page.
Or hover the cursor onto Fl on the device card on the site details page, and then click Activate Service. □3 Note
|
| Configure Cloud
Storage |
For the Hik-Partner Pro box, DVR that supports cloud storage, and NVR that supports cloud storage, you can click Cloud Storage Service to configure Cloud Storage settings. See Set Cloud Storage for Hik-Partner Pro Box , Set Cloud Storage for DVR , and How to enable cloud storage for an NVR that supports cloud storage? for details. |
7.2.4 Add Devices by IP Address or Domain Name
If you know the IP address or domain name of a device, you can add it to Hik-Partner Pro by specifying its IP address/domain name, user name, password, etc. Once a device is added in this way, Hik-Partner Pro will generate a QR code containing the device information. After completing device setup, you can share the QR code to your customer. And then your customer can scan the QR code via the Hik-Connect Mobile Client to add the device to her/his Hik-Connect account.
Before You Start
Make sure the devices you are going to use are correctly installed and connected to the network as specified by the manufacturers.
Steps
OS Note
- Devices added in this mode do NOT support the device handover process. If you need to hand over a device to your customer after completing the device setup work, please add it in one of following two methods: Add Detected Online Device or Add Device by Entering Serial No. .
- Only encoding devices mapped in WAN support this function.
- Ask your customers to download or update the Hik-Connect Mobile Client (V 4.15.0 or later). You can send the QR code or download link shown in the banner on the Home page to them.
- On the navigation pane, click Site & HCC ^ Customer Site (or Customer Site if HikCentral Connect is not available in your region).
- Open the Add Device page.
CS Note
For details, refer to Add Device(s) after Batch Configuring Them .
- Select Enter IP Address / Domain as the adding mode.
- Enter the device’s name, IP address/domain name, port number, user name, and password.
/t\ Caution
The password strength of the device can be automatically checked. We highly recommend you change the password of your own choosing (using a minimum of 8 characters, including at least three kinds of following categories: upper case letters, lower case letters, numbers, and special characters) in order to increase the security of your product. And we recommend you change your password regularly, especially in the high security system, changing the password monthly or weekly can better protect your product.
Proper configuration of all passwords and other security settings is the responsibility of the installer and/or end-user.
- Click Add.
A QR code containing the device information will be generated and displayed in the device card on the site details page.

| Figure 7-7 The QR Code of the Added Device |
6. Optional: Perform the following operations if you need.
| Encrypt Device
QR Code |
It is highly recommended that you encrypt the device QR code for security reasons.
|
| View and Edit
Device Information |
Click the device’s IP address or domain name to view the device basic information. If the device’s information changed, or a network exception occurs, you can edit its information accordingly.
Select a device, and click « * • ^ to edit the device’s name, IP address/domain name, port number, user name, and password. |
| Set Type for
Unknown Device |
If the Hik-Partner Pro cannot recognize a device’s type after you add it, you can manually set a device type for it. Click Set Device Type and select a device type from the drop-down list. You can edit it again after the selection. |
| Activate Health Monitoring Service | Hover the cursor onto Fl on the device card on the site details page, and then click Activate Service.
dlNote
|
| Delete Device | Click • * « ^ .
QU Note Deleting device (except devices added by IP/Domain) is not supported if the site is authorized to you. |
You can batch add multiple devices to the client by entering the device parameters in a predefined template.
Before You Start
Make sure the devices you are going to use are correctly installed and connected to the network as specified by the manufacturers.
Steps
OS Note
- The devices added in this mode cannot be handed over to your customer. If you need to hand over a device to your customer after completing the device setup work, please add it by Hik- Connect (P2P). For details, see Add Detected Online Device or Add Device by Entering Serial No. .
- Only encoding devices mapped in WAN support this function.
- On the navigation pane, click Site & HCC ^ Customer Site (or Customer Site if HikCentral Connect is not available in your region).
- Open the Add Device page.
CS Note
For details, refer to Add Device(s) after Batch Configuring Them .
- Select Batch Import as the adding mode.
- Click Download Template to save the predefined template (CSV file) in your PC.
- Open the downloaded template file and enter the required information of the devices to be added in the corresponding column.
- Click Upload Template to upload the edited template to Hik-Partner Pro.
- Optional: Perform the following operations after adding the devices.
‘Note
|
|
| View and Edit
Device Information |
Click the device’s IP address or domain name to view the device basic information. If the device’s information changed, or a network exception occurs, you can edit its information accordingly.
Select a device, and click [1] [2] * * ^ to edit the device’s name, IP address/ domain name, port number, user name, and password. |
| Set Type for Unknown Device | If the Hik-Partner Pro cannot recognize a device’s type after you add it, you can manually set a device type for it. Click Set Device Type and select a device type from the drop-down list. You can edit it again after the selection. |
| Delete Device | Click * * * ^ .
‘Note
|
- If an Installer hands over the site with this AX Pro to an end user, the end user’s Hik-Connect account will also become an account of the AX Pro, while the Installer’s account will be deleted from the AX Pro. This is also applicable to an Installer Admin.
- For the AX Hybrid Pro, after the device is added to the Hik-Partner Pro, its account and password which are configured on the Device Configuration page will be overwritten by those of the Hik-Partner Pro.
-
- Synchronize Devices with Hik-Connect Account
-
You can synchronize devices in your Hik-Connect account with devices in the Hik-Partner Pro account. After synchronization, the devices are still managed in your Hik-Connect account and you can continue to use Hik-Connect service.
In the following two cases, you need to synchronize devices in the Hik-Connect account with devices in the Hik-Partner Pro account.
- Case 1: Before using Hik-Partner Pro, you managed the devices for the customer by the Hik- Connect Mobile Client after the customer shares her/his devices to your Hik-Connect account.
- Case 2: Before using Hik-Partner Pro, you already have a Hik-Connect account and have added device(s) to it.
Under the above two circumstances, you can synchronize these devices (including the ones the customers shared to you, or the ones added in your Hik-Connect account) with the Hik-Partner Pro account for quick and convenient devices adding and better device management and maintenance.
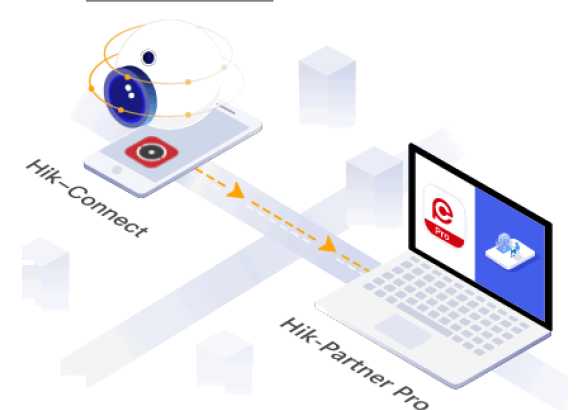
Figure 7-9 Synchronize Devices With Hik-Connect Account
- On the Customer Site page, click Synchronize Devices from Hik-Connect on the top of the site list.
- On the Add Device page, click Synchronize Devices from Hik-Connect.
- Click the user name in the upper-right corner, click Link with Hik-Connect Account in the dropdown menu, and click Link with Account.
Log into Hik-Connect
First, you need to log into Hik-Connect by entering your account or by scanning QR code. (Optional): Check Get Your Account and Device Information to allow Hik-Partner Pro to get these information.
Check Authorize Automatic Device Synchronization from Your Account to the Current Hik-Partner Pro Account to authorize automatic device synchronization. After authorization, devices newly added to Hik-Connect will be automatically synchronized to Hik-Partner Pro.
Select Device for Synchronization
Secondly, you need to select the devices for synchronization.
After login, the devices added to your Hik-Connect account, as well as the ones others shared to you, will be displayed in the device list.
You can filter the devices by selecting Show All Devices, Show My Devices Only (the devices added to your Hik-Connect account), or Show Others’ Devices Only (the devices shared to your Hik- Connect account from the customer) in the drop-down list.
Select the devices you want to synchronize with Hik-Partner Pro account, and click Next.
Configure Site for My Devices
Thirdly, you need to set the site information in Hik-Partner Pro for your devices to be synchronized. For the devices added in your Hik-Connect account (displayed in My Devices list), you can add them to different sites or to the same site according to your actual needs.
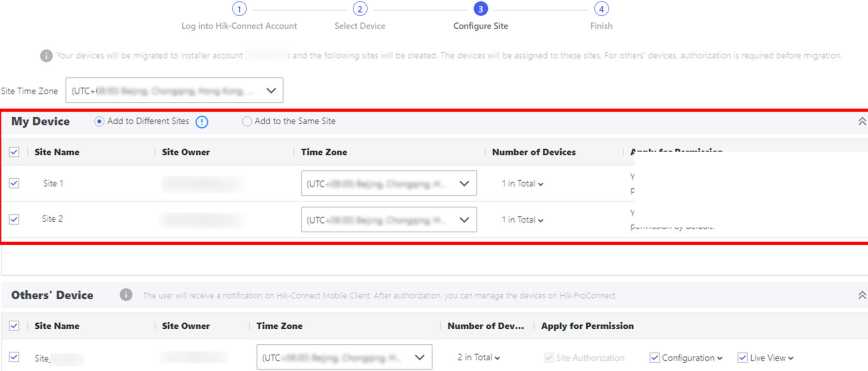
You have site authorization, configuration, and live view permission by default.
Figure 7-10 Configure Site for My Devices
Apply for Permission
You have site authorization, configuration, and live view permission by default.
Add to Different Sites
If your devices are shared to different customers, select this option and you can add them to different sites.
For the devices which have been shared to the customers, the system will automatically create sites by the user names of the customers, and then add the devices to these sites. If there already exists a site the site owner of which is the customer, the information of this site (site name and time zone) will be displayed and the corresponding devices will be added to this site automatically.
For the devices which are not shared to anyone, the system will automatically create a site named after your Hik-Connect account user name, and then assign them to this site.
You can hover over the site name and click to edit the site name.
Add to the Same Site
You can also add these devices to the same site. The system will automatically create a site named after your Hik-Connect account user name, and then add all these selected devices to this site.
You can hover over the site name and click to edit the site name.
By default, after synchronization, you will have site authorization permission of the automatically created site(s), and configuration as well as live view permission of the devices in My Devices list.
Configure Site and Permissions for Others’ Devices
Fourthly, you need to set the site information in Hik-Partner Pro and set the device permission for the devices shared to you.
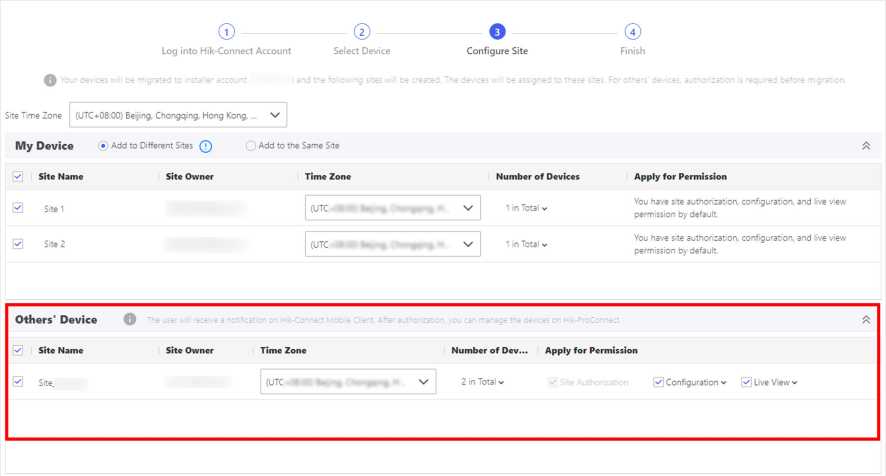
Figure 7-11 Configure Site and Permissions for Others’ Devices
For the devices shared to you by others, usually customers, (displayed in Others’ Devices list), they will be added to different sites. The system will automatically create sites named after the user names of the customers, and then add all these selected devices to this site. If there already exists a site the site Owner of which is the customer, the information of this site (site name and time zone) will be displayed and the corresponding devices will be added to this site automatically.
You can hover over the site name and click to edit the site name.
In the Apply for Permission list, you need to select the permissions that you want to apply from the customers for the devices. By default, you will have site authorization permission of the automatically created site(s). After synchronization, the customers will receive a notification on Hik-Connect Mobile Client. After authorization by the customers, you can manage the devices on Hik-Partner Pro.
Set Time Zone
Fifthly, you can set the time zone of the devices if needed.
You can set the time zone for each device, or you can select a time zone in the Set Time Zone dropdown list at the upper-left corner to set a time zone for the devices in a batch.
Start Synchronization
Finally, start device synchronization.
After setting the sites and device permissions, select the devices in the My Devices and Others’ Devices list, and click Synchronize to start synchronization.
For devices shared from the customers in Others’ Devices list, the system will send a request to the customers. After the customers approving the authorization request, the devices will be synchronized successfully.
Click Continue to select other devices for synchronization, or click Finish and View to view the devices synchronized after creating sites in the site list.
Some devices do not support the Hik-Connect service, and therefore they cannot be accessed by Hik-Partner Pro via Hik-Connect (P2P). If they are accessed via device IP address/domain name, some features (such as health monitoring, exception rule, and remote configuration) will be unavailable. To solve this issue, you can add these devices to Hik-Partner Pro via the proxy of Hik- Partner Pro Boxes. In this way, the originally unavailable features will be available.
Before You Start
Make sure that you have added Hik-Partner Pro Boxes to Hik-Partner Pro. For details, see Add Device by Entering Serial No. or Add Detected Online Device .
Steps
OS Note
- Currently only some encoding devices and access control devices can be proxied by Hik-Partner Pro Boxes. For detailed device models, see Hik-Partner Pro Device Compatibility List.
- The proxied devices do not support features including ARC service, cloud attendance service, temperature screening service, people counting service, and ISAPI alarm. For the proxied encoding device, in addition to the above-mentioned features, linkage rule is not supported as well.
- On the navigation pane, click Site & HCC ^ Customer Site (or Customer Site if HikCentral Connect is not available in your region).
- Click the name of a site with Hik-Partner Pro Boxes added.
You enter the site details page.
- Click a Hik-Partner Pro Box to show its details panel, and then select Proxied Device ^ Add ToBe-Proxied Device to enter the following page.
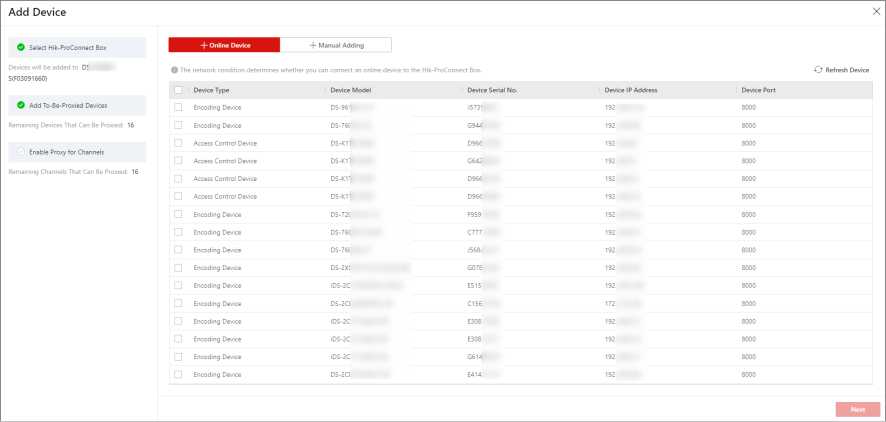
Figure 7-12 Add To-Be-Proxied Devices
- Add devices in one of the following two ways.
Table 7-5 Add Devices
| Way | Description |
| Online Device | Add devices on the same LAN with the Portal.
Or enter the device user name and password for each device.
|
| Manual Adding | Add a device manually.
In the Manual Adding window, select the target Site, and then enter the device IP address and device port No.
|
| Way | Description |
| OS Note
You can also add multiple devices first, and then click Batch Verification to set a user name and a password shared by all these devices. d. Click Next. |
The adding result page shows.
- If adding failures exist, you can view the failure reasons on the adding result page and do corresponding operations (e.g., entering password again if the failure is caused by incorrect password).
- Click Next.
- If there are encoding devices, enable proxy for channels of encoding devices before you can view live video and video footage of these channels.
- Click Enable Proxy in the Operation column.
- Select channels and then click OK.
- Click Complete.
- Optional: View the proxy information on the device details page of the Hik-Partner Pro Box.
You can use the Device Movement feature to move devices from one Site to another. By distributing devices to different Sites, you can manage both the Sites and devices more efficiently.
Steps
OS Note
• The feature is only supported by a device matches the following conditions:
- The original Site where the device belongs to needs to have been authorized to you.
- The device needs to be added by Hik-Connect (P2P). The devices added by IP address / domain name are not supported.
- The original Site and the target Site should belong to the same Site Owner.
• Once a device is moved from its original Site, you need to configure the device again because all the original device configurations will be invalid. In addition, device related configurations including the linkage rules, exception rules, ARC settings, network switch settings, people counting service, temperature screening service, cloud storage service, and cloud attendance service, etc., will be affected. You need to configure these related configurations again also.
- Go to Site & HCC ^ Customer Site (or Customer Site if HikCentral Connect is not available in your country or region).
- Click the name of an authorized Site to enter its details page.
- Click Move Device to open the Move Device pane.
- Click Select Device to Move, select device(s), and click Next.
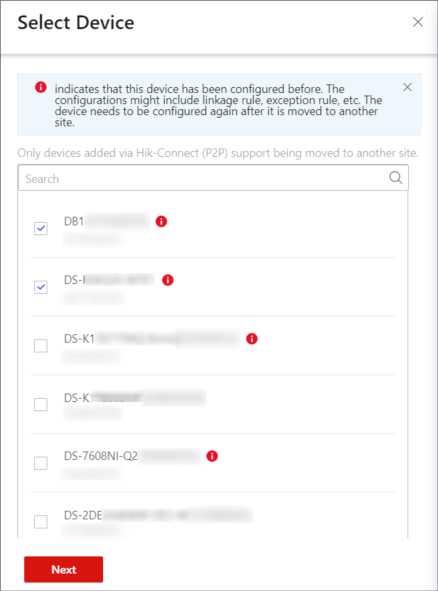
Figure 7-13 Select Device
- Select a Site.
Qi] Note
- New Site: If you select New Site, you need to create a name for the Site and set its time zone.
- Existing Site: If you select Existing Site, you need to select a Site that shares the same Site Owner with the current one.
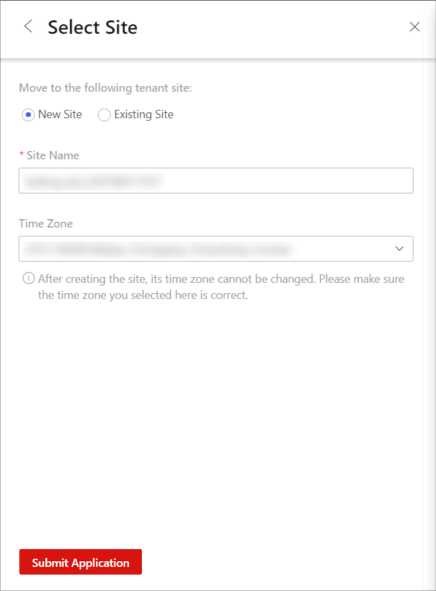
Figure 7-14 Select Site
- Click Submit Application.
The application will expire if not handled within 7 days.
- Optional: On the Move Device pane, click View Device Movement Record to enter the Device Movement Record page, and perform the following operation(s) if needed.
Apply Again
View Details
Move More
Click Apply Again to send an application for device movement again if the former one has been rejected or expired.
Click an application record to enter its details page to see the details.
Click an approved or sent application, and then click Move More to move more devices.
By handing over the site and applying for site authorization, you have already acquired some device permissions. You can still apply for additional device permissions afterward or release device permissions if needed.
After handing over a Site to the end user, and if you need to view the live view/recorded videos of devices added to the Site or configure the devices added to the Site, you can apply for the permission accordingly from the end user.
Steps
- Click the name of a Site to enter the site details page.
- On the Device tab, click Apply for Permission ^ Apply for Configuration Permission/Apply for Live View Permission/Apply for Playback Permission .
- Check device(s) you want to apply for permission, and click Apply.
- In the Validity Period drop-down list, select a validity period for the permission.
CXlNote
You can select Permanent, 1 Hour, 2 Hours, 4 Hours, or 8 Hours as the validity period.
- Optional: Enter the remarks for the permission.
- Click Apply to apply for the permission from end user.
If the end user approves your application, you will get corresponding permission(s).
If you do not need the permissions of configuration and live view for devices, or you finish the device configuration task earlier than the planned time, you can release the permissions manually.
Before You Start
Make sure the site of the devices has been handed over to you.
Steps
- Click a site in the site list to enter the site details page.
- Click a device to show the device details page.
- In the Permission section, select a permission, and click ^ OK to release the permission.
djNote
- After releasing, the permission will be unavailable for you. You need to apply for it again if needed.
- You do not have to release permission if the permission validity is Permanent.
You can set up a linkage rule to trigger certain device actions when the triggering event occurs. You can configure an exception rule to specify how, when, and where you want to receive exception notifications of a device or channel.
□3 Note
Make sure you have enabled the Notification functionality of the source device of the linkage/ exception rule. If the function is disabled, events detected by the device cannot be reported and thus the linkage/exception rule cannot be triggered.
A linkage (see the picture below for reference) refers to the process in which an event detected by resource A triggers actions of resource B, resource C, resource D, etc. You can add a rule using the predefined template or customize a rule to define such a linkage.
The rule contains five elements, including Source (resource A), Triggering Event (the event detected by resource A), Linked Resources (resource B, resource C, resource D… ), Linkage Actions (actions of resource B, resource C, resource D… ), and Linkage Schedule (the scheduled time during which the linkage is activated). The linkages can be used for purposes such as notifying security personnel, upgrading security level, and saving evidence, when specific events happen.
The picture below shows the process of the linkage.
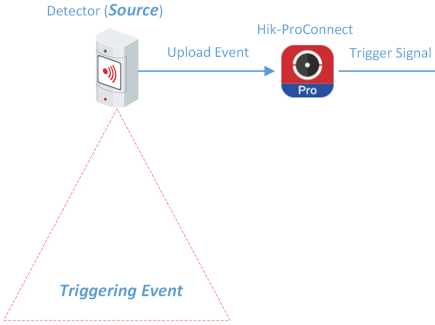
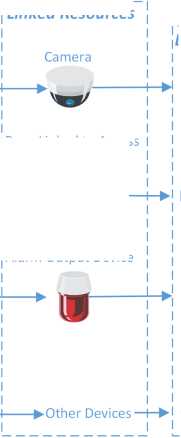

Figure 7-15 Linkage
Linked Resources
Linkage Actions
Recording
Remain Closed
Alarm Output
Other Actions…
Door Linked to Access Control Device
Alarm Output Device
Example
Sample Application
Assume that the end user is the manager of a jewelry store, and the store needs to upgrade security level during non-work hours. And the store has been installed with a PIR detector linked to a security control panel, a sounder linked to the security control panel, and several network cameras.
In this case, you can set a linkage rule for him/her to trigger alarm output and recording in the store when object(s) in motion are detected in the store during non-work hours. The following elements need to be defined in the linkage rule:
- Source: The PIR detector in the store.
- Triggering Event: Motion detection event.
- Linked Resources: The alarm output (the sounder in this case) and the network cameras in the store.
- Linkage Actions:
° For sounder: The sounder sends out audible alarm.
° For network cameras: The network cameras starts recording.
- Linkage Schedule: Non-work hours every day.
If the pre-defined templates cannot meet your needs, you can customize linkage rules as desired.
Steps
C® Note
- Make sure you have the permission for the configuration of the devices. Or you should apply for the permission first. For details about applying for the permission, see Apply for Device Permission .
- The Source and the Linked Resource cannot be the same resource.
- You cannot configure two totally same linkage rules. In other words, you cannot configure two rules with the same Source, Triggering Event, Linked Resource, and Linkage Action.
- If the Source or Linked Resource is an AX security control panel, when EN50131 Compliant mode is enabled on the device, make sure that you have done authentication by entering the device password, otherwise the configuration of linkage rule will fail.
- When the Source is a device added by IP/domain, the device added by Hik-Connect cannot be set as the Linked Resource for triggering capture.
- On the navigation pane, click Customer Site to enter the site list page.
- Open the Add Linkage Rule panel.
- Select a site and click ^ [jj in the Operation column.
- Click the name of a site to enter the site details page, and then click Linkage Rule ^ Add Linkage Rule .
- Click the name of a site to enter the site details page, and then select a device and click [jj .
- Set the required information.
Linkage Rule Name
Create a linkage rule name.
Trigger
Define the trigger for the linkage action.
Select Source
Select a resource as the Source.
Set Triggering Event
Select an event as the triggering event.
OS Note
Make sure that the triggering event has been configured on the selected device. For details about configuring event on device, see the user manual of the device.
Table 7-6 Available Triggering Events for Different Resource Types
| Resource | Triggering Event |
| Camera |
|
| Access Control Device | • Tampering Alarm |
| Door Linked to Access
Control Device |
OS Note Capture or Recording cannot be set as the linkage action for the triggering event Door Opened Normally.
|
| Door Station | • Calling |
| Area of Security Control Panel |
|
| Zone (Detector) Linked to Security Control Panel | • Alarm, such as Triggering Alarm, such as Instant Zone Alarm, 24-Hour Annunciating Zone Alarm, and Delayed Zone Alarm. |
| Doorbell |
|
Linkage
Click Add to select Linkage Action(s) and Linked Resource(s).
Note
- After selecting a Linkage Action, the resource(s) available to be set as Linked Resource(s) will appear.
- Up to 128 Linkage Actions or 10 Linked Resources can be selected.
Linkage Action
Select linkage action(s).
Table 7-7 Linkage Action Description
| Linked Resource | Linkage Action | Description |
| Camera (Channel) | Capture | The camera will capture a picture when the Triggering Event is detected. |
| Recording | The camera will record video footage when the Triggering Event is detected.
CH Note The recorded video footage starts from 5 s before the detection of the Triggering Event, and lasts 30 s. |
|
| Call Preset | Select a preset from the Preset drop-down list to specify it as the preset which will be called when the Triggering Event is detected.
A preset is a predefined image position which contains configuration parameters for pan, tilt, zoom, focus and other parameters. By calling a preset, the PTZ camera will move to the predefined image position. [dlNote Make sure you have configured presets for the PTZ camera. For details, see the user manual of the PTZ camera. |
|
| Call Patrol | Select a patrol from the Patrol drop-down list to specify it as the patrol which will be called when the Triggering Event is detected.
A patrol is a predefined PTZ movement path consisted of a series of key points (i.e., presets) that have their own designated sequence. By calling a patrol, the PTZ camera |
| Linked Resource | Linkage Action | Description |
| will travels to all the key points in set speed so as to provide a dynamic view.
0X1 Note Make sure you have configured patrols for the PTZ camera. For details, see the user manual of the PTZ camera. |
||
| Call Pattern | Select a pattern from the Pattern drop-down list tot specify it as the pattern which will be called when the Triggering Event is detected.
A pattern is a predefined PTZ movement path with a certain dwell-time configured for a certain position. By calling a pattern, the PTZ camera moves according the predefined path. nXlNote Make sure you have configured patterns for the PTZ camera. For details, see the user manual of the PTZ camera. |
|
| Arm | The camera will be armed and hence the events related to the camera will be uploaded to the Hik-Connect Mobile Client when the Triggering Event is detected. | |
| Disarm | The camera will be disarmed and hence the events related to the camera will not be uploaded to the Hik-Connect Mobile Client when the Triggering Event is detected. | |
| Enable
Privacy Mask |
Privacy mask will be displayed on the live images of the camera when the Triggering Event is detected.
diNote Make sure you have configured privacy mask for the camera. For details, see the user manual of the camera. |
|
| Disable
Privacy Mask |
Privacy mask will NOT be displayed on the live images of the camera when the Triggering Event is detected. | |
| Alarm Output | Alarm Output | The alarm output of the Linked Resource will be triggered when the Triggering Event is detected. |
| Linked Resource | Linkage Action | Description |
| Area of Security Control Panel | Stay Arm | The arming status of the area of the security control panel will switch to Stay when the Triggering Event is detected. |
| Away Arm | The arming status of the area of the security control panel will switch to Away when the Triggering Event is detected. | |
| Disarm | The area of the security control panel will be disarmed when the Triggering Event is detected. | |
| Door Linked to Access Control Device | Open Door | The door related to the access control device will be opened when the Triggering Event is detected. |
| Remain Open | The door related to the access control device will remain open when the Triggering Event is detected. | |
| Remain
Closed |
The door related to the access control device will remain closed when the Triggering Event is detected. | |
| Door Station | Open Door | The door linked to the door station will be automatically opened when the Triggering Event is detected. |
| Alarm Input | Arm Alarm Input | The alarm input will be armed and hence events related to it will be uploaded to the Hik-Connect Mobile Client when the Triggering Event is detected. |
| Disarm Alarm
Input |
The alarm input will be disarmed and hence events related to it will NOT be uploaded to the Hik-Connect Mobile Client when the Triggering Event is detected. |
Linked Resource
Select resource(s) as the trigger source of the Linkage Action.
CHjNote
For configuring Linkage Actions for a same Source, if its Linked Resources are cameras (i.e., channels), you can set at most four Linkage Actions. For example, if you have set capturing picture and recording (the two are considered as two Linkage Actions) as the Linkage Actions for camera 1, you can only set two more Linkage Actions, i.e., capturing picture and recording for camera 2, or capturing picture for channel 2 and recording for channel 3, or recording for channel 2 and capturing picture for channel 3.
![]()
Note
After selecting Linkage Action(s) and Linked Resource(s), you can check the check-box(es) and then click Delete to delete the selected Linked Action(s) and Linkage Resource(s).
Linkage Schedule
Define the scheduled time during which the linkage is activated.
All Days
The external linkage action is always activated from Monday to Sunday, 7 days x 24 hours.
Custom
Select date(s) within a week and then specify the start time and end time for each selected date.
C®Note
The date(s) marked blue is selected.
- Click OK
The linkage rule will appear on the Linkage Rule list.
- Optional: Perform the following operations if required after adding linkage rules.
Edit Linkage Rule Click ^ / to edit the linkage rule.
Delete Linkage Rule Click ^ 0 to delete the linkage rule.
Disable Linkage Rule Set to to disable the linkage rule.
What to do next
If you have enabled the linkage rule, make sure the Notification functionality of the Source is enabled. For details about enabling the functionality, see Enable Device to Send Notifications .
OZlNote
- If the Notification functionality of the Source is disabled, the Linkage Action will NOT be activated no matter the Triggering Event is detected by Source or not.
- Please notify the end user after handing over the site to him/her that notification of the Source should be kept enabled on the Hik-Connect Mobile Client, or the Linkage Action will NOT be activated no matter the Triggering Event is detected by Source or not. For details about enabling alarm notification for a specific device or channel, see the Hik-Connect Mobile Client User Manual.
- Please notify your end users to download or update the Hik-Connect Mobile Client (V 4.15.0 or later). You can send the QR code or download link shown in the banner on the Home page of Portal to them.
Add Linkage Rule Based on Pre-defined Template
You can use six pre-defined templates to add linkage rules, including Intrusion, Forced Entry Alarm, Back to Home/Office, Away, Visitor Calling, and Perimeter Zone Alarm. Each of the six templates is designed for a typical applications (see the table below) of linkage rule.
Before You Start
Make sure you have the permission for the configuration of the devices. If not, you need to apply for the permissions first. For details about applying for permission, see Apply for Device Permission .
Table 7-8 Template Description
| Template | Description |
| Intrusion | The Intrusion Template: Used for improving security level by triggering the linkage actions including capture, recording, and alarm output, when the intrusion event (people, vehicles, or other objects enter a predefined area) occurs. |
| Forced Entry Alarm | The Forced Entry Alarm Template: Used for improving security level by triggering the linkage actions including capture, recording, remaining door closed, alarm output, and calling preset when a door is opened abnormally. |
| Back to Home/Office | The Back to Home/Office Template: Used for lowering the security level and enabling privacy protection by triggering the linkage actions including disarming and enabling privacy mask, when you are back to home or office. |
| Away | The Away Template: Used for improving security level and canceling privacy protection by triggering the linkage actions including arming and disabling privacy mask when you leave your home or office. |
| Visitor Calling | The Visitor Calling Template: Used for improving security level by triggering the linkage actions including capture and recording when visitor(s) are calling from the door station. |
| Perimeter Zone Alarm | The Perimeter Zone Alarm Template: Used for improving security level by triggering the linkage actions including capture, recording, calling preset, alarm output, and remaining door closed, if people or other objects are detected in all accesses (including doors, windows, cellar doors, etc.) to a property. |
Steps
[2® Note
Due to the similarity of adding linkage rules based on different templates, here we only introduce how to add a linkage rule based on the Forced Entry Alarm template.
- On the navigation pane, click Site & HCC ^ Customer Site (or Customer Site if HikCentral Connect is not available in your country or region).
- Open the Add Linkage Rule panel.
Click the name of a site to enter the site details page and select the Linkage Rule tab, and then click Forced Entry Alarm template in the Linkage Template area.
Click ^ [ji in the Operation column, and then select the Forced Entry Alarm template from the left side of the Add Linkage Rule panel.
Click the name of a site to enter the site details page, click Add Linkage Rule and then select the Forced Entry Alarm template from the left side of the Add Linkage Rule panel.
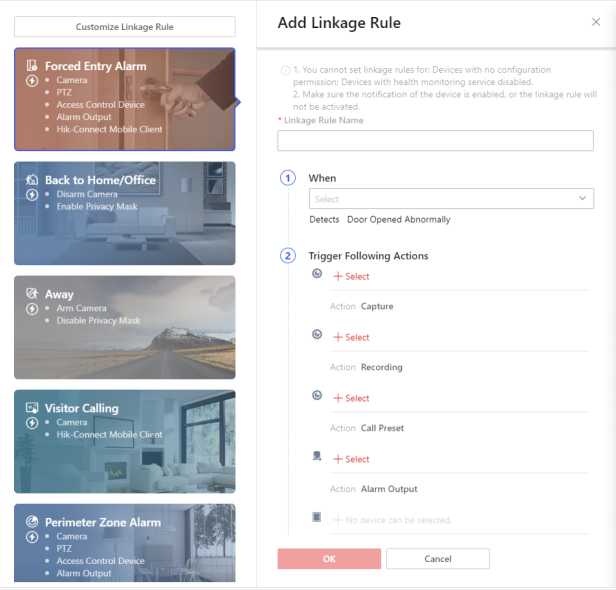
Figure 7-16 Add Linkage Rule by Template
- Set the required information.
Linkage Rule Name
Create a linkage rule name.
When
Select a resource as the Source for detecting line crossing event from the drop-down list.
Trigger the Following Actions
Click Select to select the Linked Resources used for triggering the linkage actions, and then click Add.
OS Note
- You can set only one linkage action.
- For details about the linkage actions, see Table 7-7 .
Linkage Schedule
Define the scheduled time during which the linkage is activated.
All Days
The linkage action is always activated from Monday to Sunday, 7 days x 24 hours.
Custom
Select date(s) within a week and then specify the start time and end time for each selected date.
C®Note
The date(s) marked blue is selected.
- Click OK
The added linkage rule will be displayed in the linkage rule list.
- Optional: Set <3 to to disable the linkage rule.
What to do next
If you have enabled the linkage rule, make sure the Notification functionality of the Source is enabled. For details, see Enable Device to Send Notifications .
OU Note
- If the Notification functionality of the Source is disabled, the Linkage Action will NOT be activated no matter the Triggering Event is detected by Source or not.
- Please notify the end user after handing over the site to him/her that notification of the Source should be kept enabled on the Hik-Connect Mobile Client, or the Linkage Action will NOT be activated no matter the Triggering Event is detected by Source or not. For details about enabling alarm notification for a specific device or channel, see the Hik-Connect Mobile Client User Manual.
- Please notify your end users to download or update the Hik-Connect Mobile Client (V 4.15.0 or later). You can send the QR code or download link shown in the banner on the Home page to them.
The following video shows that what is a linkage rule and how to set a linkage rule.
An exception rule is used to monitor the status of managed resources in real time. When the resource is exceptional, the resource will push a notification to the Hik-Partner Pro to notify the specified Installer(s) about this exception. Currently, the exceptions include two types: device exceptions and channel exceptions.
Before You Start
- Make sure you have the permission for configuration of the device. For applying configuration permission, refer to Apply for Device Permission .
- Make sure you have enabled the device to send notifications to the system (if the device supports). For details, refer to Enable Device to Send Notifications .
You can add a rule to define such a notification. The rule contains five elements, including Source (device A or channel A), Exception (the exception occurred on device A or channel A), Received by (the source pushes a notification to notify the recipient via certain ways), Recipient (who can receive the notification), as well as Schedule (when the recipient can receive the notification).
Steps
CS Note
This function is not supported by the solar camera.
- On the navigation pane, click Site & HCC ^ Customer Site (or Customer Site if HikCentral Connect is not available in your country or region).
- Click the name of a site to enter the site details page, and then click Exception.
The exception rules of all the devices added in this site are displayed by default.
- Optional: Click Unfold Channels to display all the channels of the device.
Example
For security control panels, all the zones and alarm outputs are displayed.
- Set the types of exceptions which can trigger the notification.
Move the cursor to the Exception field of the device or channel and click
| ( ■ ) | |
| Name
1 ( |
Exception Received by Recipient Schedule
All Exceptions |
| Site Manager All Days | |
| Camera 01 | All Exceptions |
Figure 7-17 Edit Exception
- Check the exception type(s) that you want to set exception rules for.
‘Note
- For Offline exception, you can set the threshold of offline duration. When the device or channel is offline for longer than this threshold, an offline exception will be triggered.
- The threshold of offline duration should be between 5 and 120 minutes.
- For network switch, you can set exception rules for the following: PoE Port Power Off, SFP Port Disconnected, RJ45 Port Disconnected, Port Blocked, Port Busy, and PoE Power Exceeds Limit.
- Click OK.
- Set where the notifications will be sent.
Move the cursor to the Received by field and click — .
- Check the receiving mode(s) according to actual needs.
Portal
When an exception is detected, the device will push an notification to the Portal in real time.
The Portal is checked by default and you cannot edit it.
□S Note
For checking the received notification in Portal, refer to Exception Center .
Hik-Partner Pro App
When an exception is detected, the device will push an notification to the Hik-Partner Pro Mobile Client in real time.
When an exception is detected, the device will push an notification to the Hik-Partner Pro, and the system will send an email with the exception details to the email address(es) of the recipient(s) in real time.
Hik-Connect App (Site Owner)
When an exception is detected, the device will push an notification to the Hik-Connect Mobile Client, used by your customer in real time.
CU Note
For alarm devices, this option is enabled by default and you cannot disabled it.
- Click OK.
- Set who will receive the notification.
Move the cursor to the Recipient field and click ‘ .
- Select Site Manager or Installer Admin. The recipient can receive the notification when the exception is detected in real time.
Note
- The Site Manager is checked by default and you cannot edit it.
- If you select Hik-Connect App (Site Owner) in the previous step, your customer will receive the exception notifications.
- Click OK.
- Set when the recipient can receive the notification.
Move the cursor to the Schedule field and click — .
- Select the schedule.
All Day
The recipient can always receive the notification from Monday to Sunday, 7 days x 24 hours.
Custom
Customize the days and time period on the selected days according to the actual needs.
- Click OK.
- Optional: Set or edit the exception rules of the devices in the site in a batch.
- Click Batch Edit.
- Check the devices or channels you want to set the exception rules.
Click — in the bottom to set/edit the exception types, receiving mode, recipient, and notification time.
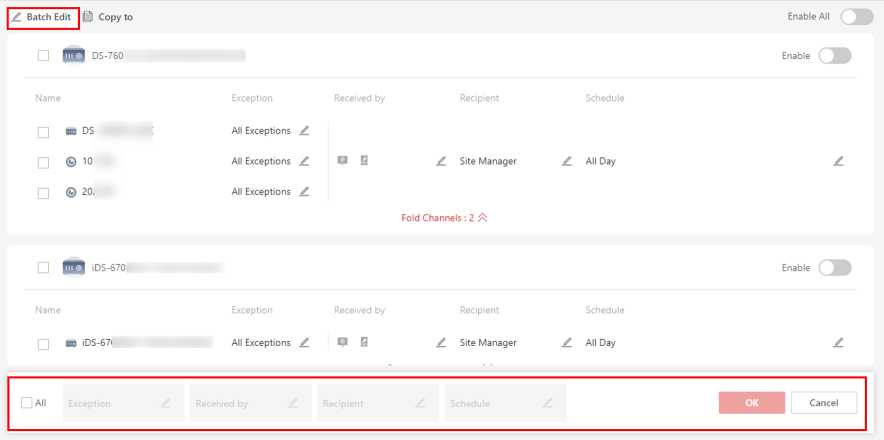
Figure 7-18 Batch Set/Edit Exception Rules
- Click OK to save the settings.
- Optional: After setting one rule, you can copy the rule settings to other devices or channels for quick settings.
- Click Copy to.
- In the Copy Exception Settings from field, select device(s) or channel(s) as the sources.
- In the To field, select the target resources of the same type as the selected sources.
- Click Copy to copy the rule settings of the sources to the target resources and back to the exception rule list. Or you can click Copy and Continue to copy the rule settings and continue to copy other settings.
- After setting the exception rule, you need to set the Enable switch in the upper-right corner of the rule to on to enable the device’s exception rule, or set the Enable All switch to on to enable the all the devices’ exception rules in the site.
After enabling the rule, it will be active and when an exception occurs, the device will push a notification according to the settings in the rule.
7.5.3 Enable Device to Send Notifications
After adding and enabling a linkage rule or exception rule, you should make sure the Notification functionality of the Source device is enabled so that the events detected by the device can be uploaded to the Hik-Partner Pro system and the Hik-Connect Mobile Client, which is the prerequisite to trigger the linkage actions and exception rules defined in the Source-device-related linkage rule(s) and exception rule(s) respectively.
Steps
C®Note
The device should support this functionality. If you have activated the health monitoring service for the device, the Notification function of the device is enabled by default. For details about activating the health monitoring service, refer to Activate the Health Monitoring Service for Devices .
- On the navigation pane, click Site & HCC ^ Customer Site (or Customer Site if HikCentral Connect is not available in your country or region).
- Click a site in the site list to enter the site details page.
- Select the Device tab.
- Click – ^ A to open the Notification Settings window.
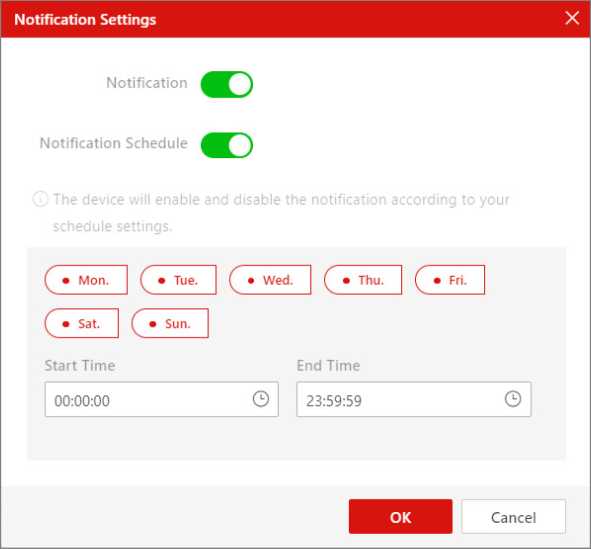
Figure 7-19 Notification Settings
- Set the parameters.
Notification
Make sure the functionality is enabled.
Notification Schedule
After enabling the Notification functionality, set a time schedule for uploading the events detected by the Source to the Hik-Partner Pro system and the Hik-Connect Mobile Client.
You can select date(s) and then set the start time and end time for each selected date.
- Click OK.
CU Note
- Please notify the end user after handing over the site to her/him that notification of the Source should be kept enabled on the Hik-Connect Mobile Client, or the Linkage Action will NOT be activated no matter the Triggering Event is detected by Source or not. For details about enabling alarm notification for a specific device or channel, see the Hik-Connect Mobile Client User Manual.
- Please notify your end users to download or update the Hik-Connect Mobile Client (V 4.15.0 or later). You can send the QR code or download link shown in the banner on the Home page to them.
You can reset the password of a device when you and the Site Owner both lost the password. Two methods of resetting device password are available: resetting password offsite (when you are not at the site) and resetting password onsite (when you are at the site).
OS Note
- Resetting password via the Hik-Partner Pro platform is not supported by every device type/ model. For example, AX PRO does not support this function.
- Make sure that the device is authorized by the Site Owner to you before resetting device password. For details, see Apply for Site Authorization from Site Owner.
On the navigation pane, click Site to enter Site page.
Select the device and click « * • ^ Reset Device admin Password . There are two methods to reset password.
- Reset Password Offsite: You needn’t go to the site where the device is located to reset the device password. This method can be used when you are not at the site.
CIS Note
Make sure that Hik-Connect (the Mobile Client for your customers) and the device are on the same LAN and that the version of Hik-Connect is V 4.15.0 or later.
Refer to the flow chart below for resetting the password offsite.
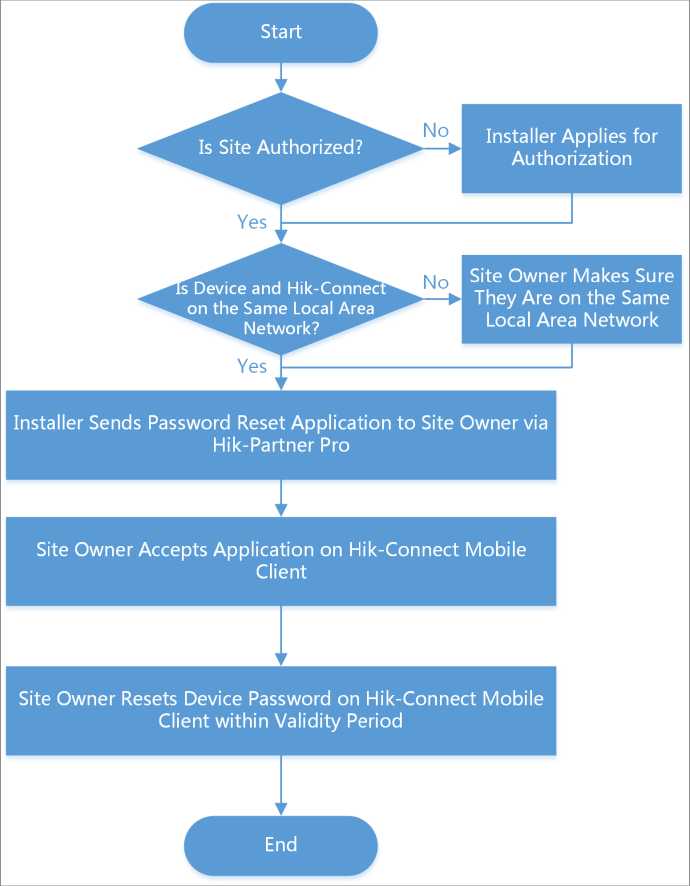
Figure 7-20 Flow Chart of Resetting Device Password Offsite
• Reset Password Onsite: You need to go to the site where the device is located. This method can be used when you are at the site.
OS Note
Make sure that Hik-Partner Pro (the Installer platform) and the device are on the same LAN.
Refer to the flow chart below for resetting the password onsite.
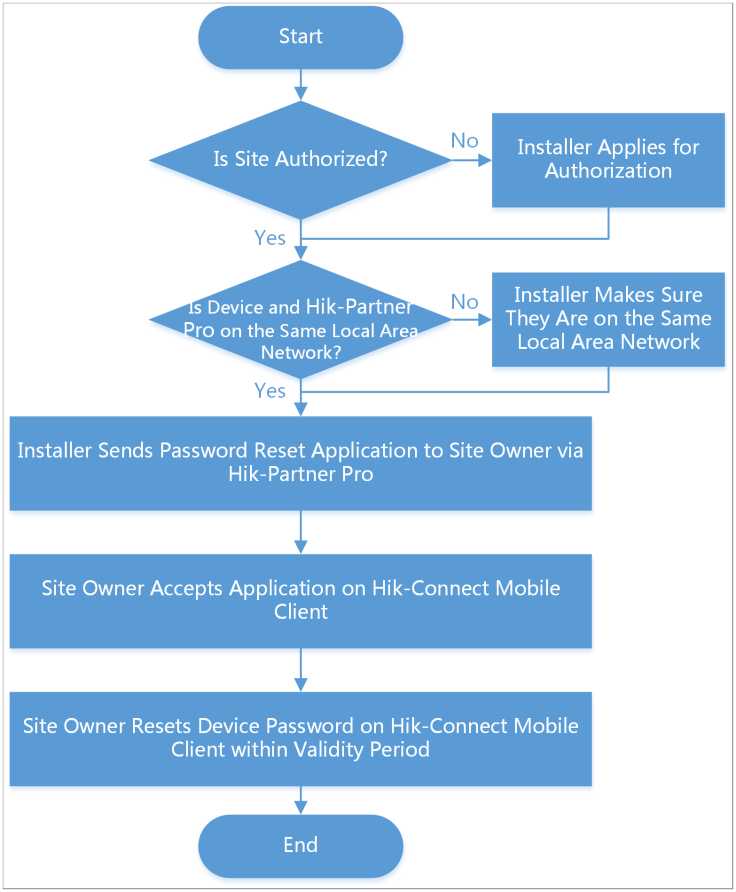
Figure 7-21 Flow Chart of Resetting Device Password Onsite
Remote Log Collection is for getting device logs. When this function is enabled, the technical support can collect device logs remotely for troubleshooting. You can set the validity period for collecting remote logs as needed, and this function will be automatically disabled when the validity period expires.
Before You Start
Make sure you have added the device which supports remote log collection to the site, and the site has not been handed over to the end user. If the site has been handed over to the end user, you should contact with the end user to enable the Remote Log Collection function on Hik-Connect.
Steps
- Enter the site list page.
- Click a site to enter the site details page.
The devices added in the current site are displayed.
- Find the device in the device list, and click Remote Log Collection; or click the device to enter its details page, and click Remote Log Collection.
![]()
• Online ©Activated
Device Serial No.: C
Device Type: Alarm Device
£°3 Remote Configuration Add Linkage Rule I Remote Log Collection
Figure 7-22 First Entry to Remote Log Collection
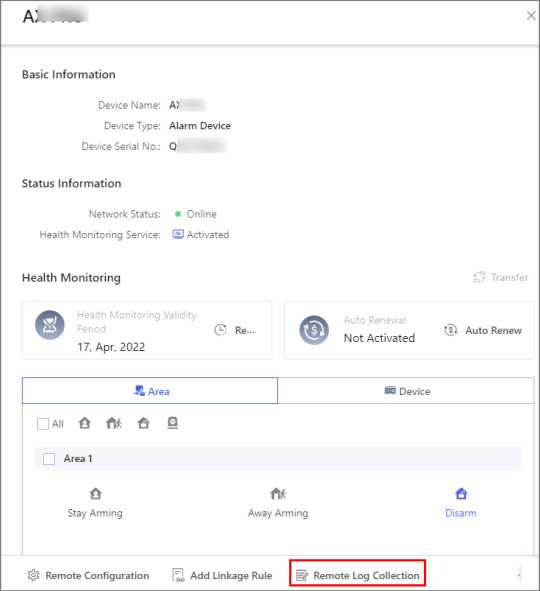
Figure 7-23 Second Entry to Remote Log Collection
The Remote Log Collection window pops up.
- Click Authorize.
- Select the validity period from the drop-down list.
Note
The function of remote log collection will be automatically disabled when the validity period expires.
- Click Enable to enable the function.
The Remote Log Collection icon turns from k to .
- Optional: Disable the function.
- Click Remote Log Collection.
- Click Deauthorize in the pop-up window.
7.8 Manage Security Control Panel
You can add and manage AX PRO, AX HUB, AX HYBRID, and AX HYBIRD PRO security control panels on Hik-Partner Pro.
C0 Note
- The following chapter introduces functionality supported by AX PRO / AX HYBIRD PRO security control panel (hereinafter referred to as “AX PRO / AX HYBIRD PRO device”), including batch arming/disarming and batch device configuration by template.
- AX HUB or AX HYBRID security control panel does not support the functionality introduced in the following chapter. AX HUB and AX HYBRID support generic device management, such as enabling ARC service, running health monitoring, setting rules for linkage or exception reporting, and configuring parameters remotely. For details, refer to Enable ARC Service for Devices , Health Monitoring , Linkage Rule and Exception Rule, and Remote Configuration respectively.
You can perform operations including arming/disarming area, clearing alarm, and bypassing zone.
Click Site & HCC ^ Customer Site or Customer Site to enter the site list page, and then click the name of a site to enter site details page.
Click the AX PRO or AX HYBIRD PRO device to open the operation panel. You can perform the following operations.
| Function | Operation |
| Away Arm Multiple Areas | Select the Area tab. Select areas and click . |
| Disarm Multiple Areas | Select the Area tab. Select areas and click ft . |
| Clear Alarms of Multiple Areas | Select the Area tab. Select areas and click □ .
C@Note This function is not supported by the AX HYBIRD PRO device. |
| Filter Peripheral Device by Area | Select the Device tab. Click v and select an area to only display the peripheral devices linked to the selected area, or select All to display all peripheral devices linked to all the areas.
CH] Note The AX HYBIRD PRO device only supports adding keyfobs as the peripheral device. |
| Bypass Zone | Select the Device tab. Select a zone (i.e., detector) and turn on the Bypass switch to bypass the zone.
JNote This function is not supported by the AX HYBIRD PRO device. |
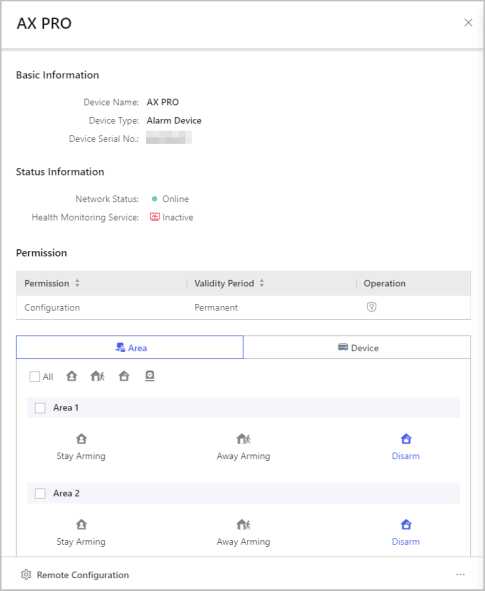
Figure 7-24 Operation Panel of AX PRO
You can remotely configure AX PRO and AX HYBIRD PRO device parameters, apply for PIN (required for upgrading firmware), and switch the language of the device.
Click Site & HCC ^ Customer Site or Customer Site to enter the site list page, and then click the name of a site to enter site details page.
Remotely Configure AX PRO / AX HYBIRD PRO
You can click @ Remote Configuration to enter the web page of the device to configure its parameters.
Note
For details about remote configuration, see the user manual of the device.
Apply for a PIN
You can click • * « ^ gj Apply for a PIN to get a PIN code for verification.
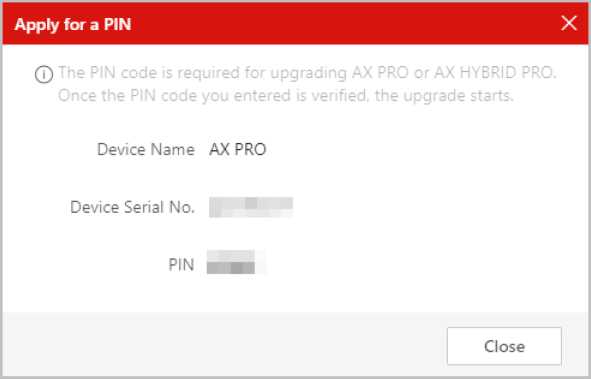
Figure 7-25 Apply for a PIN
Switch Language
You can click * * * ^ -l Language and set the device language. After you click OK, a pop-up window will ask you if you need to reset the names of the device and its areas. Click Reset to switch the device language and switch the names to the default names in the switched language; click Cancel to switch the device language only.
![]()
Note
A PIN code is required for switching language.
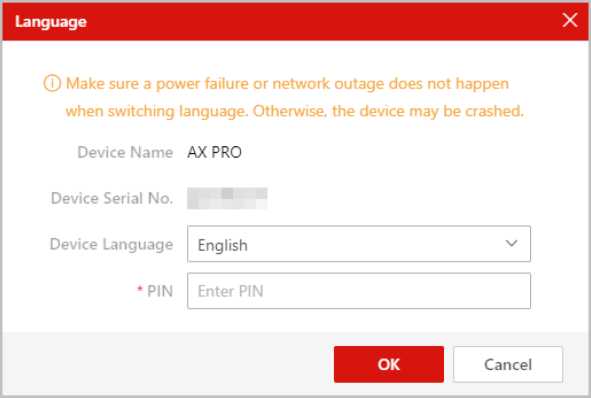
Figure 7-26 Language Window
You can batch configure parameters for the added AX PRO devices by creating templates. You can also batch upgrade the firmware of multiple AX PRO devices.
OS Note
- Only AX PRO devices (Version 1.1.0 and later) and AX HYBRID PRO devices are supported.
- The function is only supported in certain countries and regions.
You can create a template for batch configuring parameters of AX PRO devices.
- Go to Install & Config ^ Remote Batch Config ^ Manage Template to enter Manage Template page.
- Add a template.
- Click Add Template for adding a template for the first time.
- If not, click .
- Edit the template by configuring parameters as needed, and these configured parameters can be batch applied to AX PRO devices later. See the following for the detailed parameters explanations.
Arming Schedule
Enable auto Arm
Enable the function and set the arming start time. The area will be automatically armed according to the configured time.
Enable auto Disarm
Enable the function and set the disarming start time. The area will be automatically disarmed according to the configured time.
US Note
The auto arming time and the auto disarming time cannot be the same.
Late to Disarm
Enable the device to push a notification to the phone or tablet to remind the user to disarm the area when the area is still armed after a specific time point.
Weekend Exception
Enable the function and the area will not be armed or disarmed on the weekend.
Enable the function and set the holiday schedule. The area will not be armed or disarmed on the holiday.
OS Note
You can set up to 12 holiday groups.
Panel Alarm Duration
The time duration of the panel alarm.
Alarm Receiving Center
Protocol Type
Select ADM-CID, ISUP, SIA-DCS, *SIA-DCS, *ADM-CID, CSV-IP, FSK Module, RDC Module and IDS Module as the protocol type.
US Note
When selecting *SIA-DCS or *ADM-CID, you should configure the Encryption Arithmetic and Secret Key.
Address Type (Alarm Receiver Server)
Select IP or Domain Name as the address type, and enter the IP address or domain name of the alarm receiver server accordingly.
Port No. (Alarm Receiver Server)
Enter the port No., of the alarm receiver server.
Account Code
Enter the assigned account provided by the alarm receiving center.
Transmission Mode
Select TCP or UDP as the transmission mode from.
Impulse Counting Time
Set the timeout period waiting for the receiver to respond. Re-transmission will be arranged if the transceiver of receiving center is timed out.
Attempts
Set the maximum number that re-transmission will be tried.
Polling Rate
Enable the function and set the interval between 2 live polling.
Event Types Notification (Alarm Receiving Center)
Select which alarm receiving center to receive event notifications and the corresponding event types, including alarms and tampers, life safety alarms, maintenance and faults, zone alarm/lid opened, etc.
Notification by Email
Enable the function of sending video verification event and configure the related parameters including the sender’s name and email address, the SMTP server’s IP address and port No., and the receiver’s name and email address, etc.
Server Authentication
If enabled, you should enter the sender’s user name and password.
FTP Settings
Address Type
Select IP or Domain Name as the address type, and enter the IP address or domain name of the FTP server accordingly.
Port No.
Enter the port No. of the FTP server.
Protocol Type
Select FTP or SFTP as the protocol type.
User Name
Enter the user name of the FTP server.
Password
Enter the password of the FTP server.
Enable Anonymity
If enabled, you do not need to enter the user name and password of the FTP server.
OS Note
This function is only available when selecting FTP as the protocol type.
Directory Structure
The saving path of snapshots in the FTP server.
Batch Configure AX PRO by Template
You can batch configure parameters for AX PRO devices by the predefined template.
Steps
- Go to Install & Config ^ Remote Batch Config .
- Select multiple AX PRO devices to be configured.
- Click Set Parameters by Template.
A window of Set Parameters by Template pops up on the right side.
- Select a template from the list.
![]()
Note
- If you have not added a template, you should click Manage Template to enter Manage Template page and add a template for AX PRO devices. For details, refer to Create a Template .
- You can view the general template content on the lower side.
- Optional: Click Details to view the details of the template.
- Click Apply to start applying parameters to the devices.
What to do next
View the applying results. If applying failed, you can view the failure reasons.
You can batch upgrade the firmware of multiple AX PRO devices to ensure the proper functioning of these devices. If the firmware version of an AX PRO device is too old, some features might be unavailable.
Steps
- Go to Install & Config ^ Remote Batch Config to enter the page shown below.

Figure 7-27 Remote Batch Configuration
- Select AX PRO devices and then click Upgrade.
The Upgrade Device window will pop up.
- Click Apply for a PIN to get one.
The PIN code will be automatically entered.
- Click Update.
7.8.4 Batch Arm/Disarm AX PRO and AX HYBRID PRO
You can batch arm or disarm multiple AX PRO / AX HYBRID PRO devices on multiple sites by grouping the devices. For example, assume that your customer needs to have her office building cleaned in the period from 7:00 a.m. to 8:00 a.m. everyday, you can add all the AX PRO / AX HYBRID PRO devices in the building to a group and then disarm the group in the period everyday to avoid the nuisance of false alarms triggered by the cleaning.
Follow the steps to create a group of AX PRO / AX HYBRID PRO devices and then control the group.
Steps
OS Note
This function is only available in some countries/regions.
- Go to Install & Config ^ Batch Arm/Disarm .
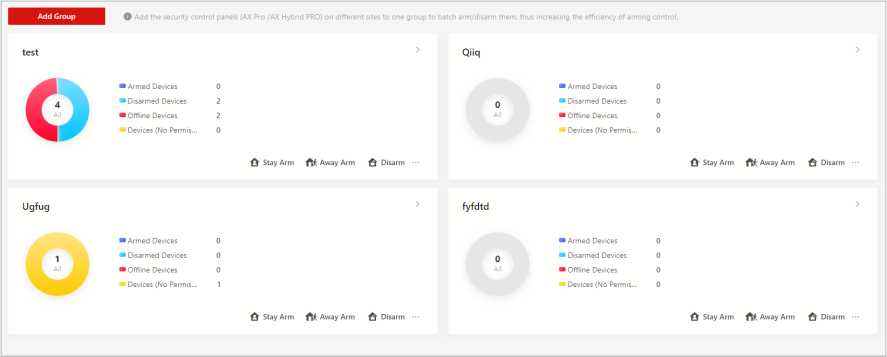
Figure 7-28 Batch Arm/Disarm Page
- Click Add Group.
- Create a name for the group.
- Add devices to the group.
- Click Add and select the devices in different Sites.
OS Note
- Only devices of which you have the Configuration permission can be added.
- Up to 500 devices can be added to one group.
- Click OK.
- Optional: Select devices and click Delete to remove them from the group.
- Click OK.
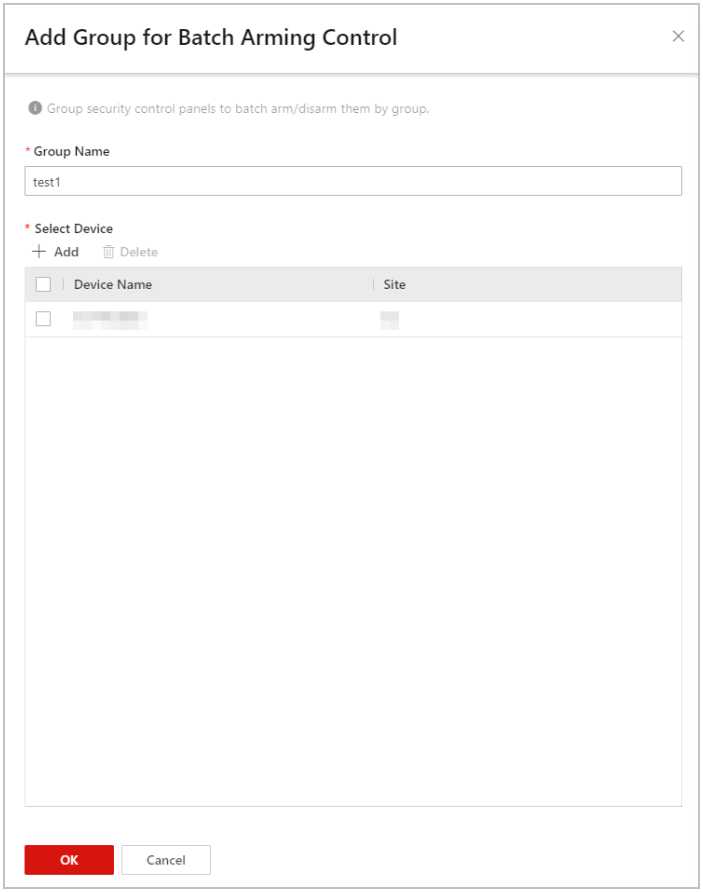
Figure 7-29 Add Group for Batch Arming Control
- Optional: Perform further operations.
View Group Click on the group to view its details, including devices in the group and their
Details arming/disarming status.
Arm/ Click Stay Arm or Away Arm to arm all devices in the group. Or click Disarm to Disarm disarm the group.
Group
□3 Note
•
If you leave the page after starting arming/disarming, you can click in the upper-right corner to go back. When the arming/disarming process is completed, a notice of result will pop up. Click Details to check full result.
• You will also be notified on the Mobile Client when the arming/disarming process is completed.
Batch Arm/Disarm
Stay arming Building B completed. Armed device…
Figure 7-30 Notice on the Mobile Client
Check Last Click Last Arming Control Record to check the last arming/disarming results. If Result there are devices that failed to be armed/disarmed, you can check the failure reasons and arm/disarm the failed ones again.
Edit Group Click a [3] [4] * ^ Edit to edit group name or edit devices in the group.
Delete Click * * * -> Delete to delete the group.
Group
You can view the live video and the recorded video footage of the added encoding device(s).
By viewing live view of managed cameras, you can check whether the camera is installed and located properly by capturing pictures, recording, PTZ control, etc.
Click Encoding Device on the top of the Site Detail page to show all the encoding devices of the site. Select an encoding device and click D to start live view. The live view will work for up to five minutes. When the live view ends, you can still start a new live view.
Hover the cursor on the live view window and click icons on the tool bar to start recording, conduct digital zoom and PTZ control, capture a picture, switch image quality, and turn on/off audio. Double-click the live view image to enter the full-screen mode, and double-click the image again to exit full-screen mode. the device verification code, ask the end user for it. For details about Image and Video Encryption, see Hik-Connect Mobile Client User Manual.
- Please inform your end users to download or update the Hik-Connect Mobile Client (V 4.15.0 or later). You can send the QR code or download link shown in the banner on the Home page to them.
- Make sure the device is online, otherwise the function cannot be used.
Video playback shows what happens when emergencies occur. If an end user approves your application for device playback permission, you will be able to play back the recorded video footage stored on the device.
dlNote
- Make sure your account has the permission for playback. Otherwise, you cannot enter the playback page. See Apply for Device Permission for details about applying device permission.
- This function needs to be supported by device.
- Make sure you have configured recording schedule for the device and there is video footage stored in the device.
On the Device tab page, select a device and click . to enter the playback page. You can select a date and time on the calendar to view the playback during a certain time range.
You can select channels from the drop-down list on the top right. Drag the time bar at the bottom to jump to different video footage. Hover the cursor on the time bar and zoom in the time bar to select a more accurate time. Hover the cursor on a playback window and click icons on the tool bar to capture a picture, clip video footage, perform digital zoom, download video footage, and turn on the audio.
For devices (including the added online devices) added by Hik-Connect Service without configuring DDNS, the playback will work for up to five minutes; for devices added by IP/Domain Name, and devices (including the added online devices) added by Hik-Connect Service with DDNS configured, the playback duration is not limited.
dJNote
Up to four playback windows are supported.
You can perform more operations for device management, including upgrading device firmware, unbinding device from its current account, configuring DDNS for devices added by Hik-Connect service, and remotely configure parameters for devices such as encoding devices and security control devices.
On the device list page, O will appear beside the name of a device if it is upgradable. You can upgrade the device to make it compatible with the Hik-Partner Pro.
Steps
OS Note
- The function is supported by devices such as security control panels (including AX PRO), doorbells, and certain models of network cameras, Hik-Partner Pro boxs, and DVRs/NVRs that support cloud storage.
- The system supports upgrading encoding device, some access control devices and video intercom devices connected to the same LAN with the PC where the platform runs.
- You can also upgrade devices in the Health Monitoring module. For details, see Health Monitoring .
- You can also upgrade devices when you add them. See Add Detected Online Device and Add Device by Entering Serial No. for details.
- Click a site name to enter the site details page.
- Hover over 0 , click Upgrade Device and then select upgradable device(s).
- Click Upgrade.
- Optional: If there are devices which have enabled EN50131 Compliant mode, enter the device passwords and click OK.
CIS Note
- Once started, the upgrade cannot be stopped. Make sure a power failure or network disconnection does not happen during the upgrade.
- You can enable EN50131 Compliant mode on device configuration page via the Web Client. See device user manual for details.
- For the device failed to be upgraded, you can click a to download the upgrade firmware package, and then upgrade the device on the remote configuration page of device or via other upgrade tools.
A window will pop up showing the upgrade progress. If there are devices failed to be upgraded, the causes will be displayed on the window.
-
-
- Batch Upgrade Devices on LAN
-
You can batch upgrade devices (security control panels, encoding devices, doorbells, etc.) on the same LAN to make the devices compatible with Hik-Partner Pro, if there are new firmware versions of the devices.
HS Note
A video tutorial about how to use search tool for important firmware update on Hik-Partner Pro Portal will pop up in the lower-right corner of the page.
- Select device(s) that need to be upgraded.
- Click Upgrade Online or Upgrade by Local File to upgrade the selected device(s).
When you add detected online device(s), if the adding result page shows that a device has been added to another account, you need to unbind it first before you can add it to your account. The device unbinding functionality is useful when you need to add a device to a new account but have no access to delete it from the old account (e.g., if you forgot the password of the old account).
OS Note
- For details about adding detected online device, see Add Detected Online Device .
- If you checked Allow Me to Disable Hik-Connect Service when handing over a Site to your customer, you cannot unbind the devices added to this Site. For details about Site handover, see Hand Over Site .
On the adding result page, click in the Operation column, and then enter the device password and click OK to unbind it from its current account. When the device is unbound, you can click in the Operation column to add the device to your account.
CS Note
If the device firmware does not support device unbinding, you are required to enter a CAPTCHA code after entering device password.
For devices with invalid or old firmware version, you can configure DDNS for them to make sure they can be managed by Hik-Partner Pro properly.
Steps
C® Note
Only encoding devices added by Hik-Connect (P2P) support this function.
- On the navigation pane, click Site to enter Site page.
- Select a device, and click < * * ^ ~ to open the DDNS Settings window.
- Switch Enable DDNS on to show the DDNS parameters.
‘Note
You can click How to set port? to learn the configuration.
- Select Port Mapping Mode.
Auto
In this mode, the service port and HTTP port are obtained automatically, and you cannot edit them after obtaining them.
Manual
You enter the service port and HTTP port manually.
- Enter the device’s domain name.
- Enter the user name and password.
Caution
The password strength of the device can be automatically checked. We highly recommend you change the password of your own choosing (using a minimum of 8 characters, including at least three kinds of following categories: upper case letters, lower case letters, numbers, and special characters) in order to increase the security of your product. And we recommend you change your password regularly, especially in the high security system, changing the password monthly or weekly can better protect your product.
Proper configuration of all passwords and other security settings is the responsibility of the installer and/or end-user.
You can perform device remote configuration if you need.
CSNote
Only site manager can perform the following operations and configurations of a site. See Assign Site to Installer for details about assigning site.
On the navigation pane, click Site to enter Site page. Click a site’s name to enter the site’s page.
And then click Device tab to show the site’s devices.
Click @ to open the remote configuration page of the device and set the device’s parameters.
dJNote
- Only doorbells, encoding devices, indoor stations, and security control panels support remote configuration.
- Make sure the device is online, otherwise the function cannot be used.
- For doorbells, you don’t need to enter the device user name and password before accessing the remote configuration page.
- For encoding devices, if you have already entered the device’s user name and password when adding it, you do not need to enter these information before remote configuration. For NVR and DVR, operations including rebooting, HDD formatting, and network settings are supported.
- For security control devices:
° If the security control device is in the same LAN with the Portal, you need to enter the user name and password before accessing the remote configuration page.
° If the AX Hub device and AX Hybrid device are not in the same LAN and EN50131 Compliant mode is enabled, you need to enter the devices’ admin passwords for verification first. After that, you can enter their remote configuration page after entering password of setter account.
- For encoding devices and security control devices, if the device is not in the same local area network with the Portal, some operations in the remote configuration (such as device account management, enabling Hik-Connect, and restoring device, etc.) are not available.
- See device user manual for details about remote configuration.
- If you have changed device parameters by other software or client (such as device page, Hik- Partner Pro Mobile Client, iVMS-4200, , HikCentral Professional, etc.), and the parameters on the Portal’s remote configuration page are not updated to the latest, you can click Clear Cache in the drop-down list on the top right of the remote configuration page to update the device parameters.
The Health Status module provides near-real-time information about the status of the devices added to the sites. If you have added network switches to a site, you can view the device status and link status in a visualized way via network topology. The status information, which is of importance for the maintenance of devices managed across the Hik-Partner Pro platform as a whole, helps you locate the source of exceptions and determine troubleshooting methods in time.
‘Note
- A video tutorial on how to check device health status will pop up in the lower-right corner of the page when you enter the Health Status module.
- For Installer, you can only view the status information of devices on the site assigned to you. For Installer Admin, you can view the status information of devices on all sites.
- When any exception occurs during health monitoring, the notification will appear in the
Exception Center under the Notification Center module. See details in Exception Center .
For Installer, you can view the status of each device type in all the sites which has been assigned to you. For Installer Admin, you can view the status of each device type in all the sites.
Click Health Monitoring ^ Health Status on the Navigation panel to enter the Health Monitoring page, and then select All Sites from the site list.
You can view the total number of devices and the number of abnormal devices of each device type.
Refer to the following table to get to the device description and operations.
Table 8-1 Links of Different Device Types
| Encoding Device | Refer to Encoding Device . |
| Access Control Device | Refer to Access Control Device . |
| Alarm Device | Refer to Alarm Device . |
| Video Intercom Device | Refer to Video Intercom Device . |
| Doorbell | Refer to Doorbell . |
| Hik-ProConnect Box | Refer to Hik-ProConnect Box . |
| Network Switch | Refer to Network Switch . |
Encoding Device
You can view the status including network status, the number of offline linked cameras, storage status, HDD usage, last inspected time, overwritten recording status, etc.
OS Note
For analog camera, you can view the status if video loss occurs.
Offline Cameras
The number on the left of the slash represents the number of offline/total cameras linked to the device.
Offline Duration
The column displays offline duration of devices in the format of “x Day(s) x Hour(s) x Minute(s)”. If the offline duration is less than one day, the duration will be displayed as “x Hour(s) x Minute(s) x Second(s)”. You can clickOffline Duration to sort devices by offline duration.
You can perform the following operations.
| Operation | Description |
| View Device Name and Version | Hover the cursor over the device name to view its device type and device version. |
| Remotely Configure Device | Click ¡§j in the Operation column to remotely configure the device parameters. For details, see the device user manual. |
| Inspect All Encoding Devices | Click Refresh to inspect all the encoding devices in all sites. |
| Inspect Selected Encoding Device | Click c in the Operation column to inspect the selected encoding device manually. |
| Display Abnormal Devices | Check Display Abnormal Devices Only to display the abnormal devices only. |
| Display Authorized Devices | Check Display Authorized Devices Only to display the devices of which configuration permission has been authorized to you. |
| View Camera Status | Click > to show the cameras linked to the device, and then you can view the online/offline status of each camera. |
| View HDD Information of DVR | Click > to show the HDD information of the DVR, including self-inspection evaluation result, overall evaluation result, running status, |
| Operation | Description |
| running time, HDD temperature, and S.M.A.R.T information. | |
| View Site Owner and Site Manager Information | Move the cursor to V in the Site column to view the information of the Site Owner and Site Manager, such as name and phone number. |
| Live View | Click Bi in the Operation column and then select camera(s) to view live video(s).
CH Note
|
| Apply for Permission or Reconfigure Device | 0 appearing beside the device name represents that you have no configuration permission for it, the IP address/domain set for the device is invalid, or DDNS is invalid. You can hover the cursor on the icon, and then apply for the permission from the end user, reconfigure its IP address/domain, or reconfigure DDNS respectively based on the prompts. |
| Operation | Description |
DjNote
|
Access Control Device
You can view the status including network status, door number, last inspected time, etc.
You can perform the following operations.
| Operation | Description |
| DjNote
For details about applying for configuration permission, see Apply for Device Permission . |
Alarm Device
You can view the status including network status, remaining battery power, ARC ID, number of abnormal peripheral devices, etc.
![]()
Note
Displaying peripheral device’s remaining power is not supported.
You can perform the following operations.
| Operation | Description |
| Display Authorized Devices | Check Display Authorized Devices Only to display the devices whose configuration permission has been authorized to you. |
| Upgrade Device | If 0 appears beside the device name, hover the cursor over the icon and then click Upgrade on the pop-up dialog to upgrade the device. For details, see Upgrade Device . |
| Authenticate or Apply for Permission | © appearing beside the device name represents that EN50131 Compliant mode has been enabled on the device, or that you have no configuration permission for it. For the former situation, you should hover the cursor over the icon and then click Authenticate on the pop-up dialog for authentication before you can view the device status; For the latter situation, you can apply for the permission from the end user.
OS Note For details about applying for configuration permission, see Apply for Device Permission . |
| View Zone and Peripheral Device Status | Click > to view the status of the zones and peripheral devices linked to the security control panel. |
| View Detailed Exceptions | You can hover the cursor over a specific zone to view its detailed exceptions. |
| View Site Owner and Site Manager Information | Move the cursor to V in the Site column to view the information of the site owner and site manager, such as name and phone number. |
| Inspect Alarm Device | Click o in the Operation column to inspect the selected alarm device manually. |
Video Intercom Device
You can view the status such as network status and last inspected time.
You can perform the following operations.
| Operation | Description |
| View Device Name and Version | Hover the cursor over the device name to view its device type and device version. |
| Inspect All Video Intercom Devices | Click Refresh to inspect all video intercom devices. |
| Inspect Selected Video Intercom Device | Click e in the Operation column to inspect the selected device manually. |
| Display Abnormal Devices | Check Display Abnormal Devices Only to display the abnormal devices only. |
| Display Authorized Devices | Check Display Authorized Devices Only to display the devices of which configuration permission has been authorized to you. |
| Apply for Permission or Reconfigure Device | © appearing beside the device name represents that you have no configuration permission for it. You can apply for the permission from the end user.
CENote For details about applying for configuration permission, see Apply for Device Permission . |
Doorbell
You can view the information including device model, network status, SD card status, last checked time, etc.
You can perform the following operations.
| Operation | Description |
| Display Authorized Devices | Check Display Authorized Devices Only to display the devices whose configuration permission has been authorized to you only. |
| Remotely Configure Device | Click $ in the Operation column to remotely configure parameters of the device. For details, see the user manual of the device. |
| Live View | Click Bi in the Operation column and then select camera(s) to view live video(s).
CH Note
|
| Upgrade Device | If © appears beside the device name, hover the cursor over the icon and then click Upgrade on the pop-up dialog to upgrade the device. For details, see Upgrade Device . |
| Apply for Permission | © appearing beside the device name represents that you have no configuration permission for it. You can apply for the permission from the end user.
CS Note For details about applying for configuration permission, see Apply for Device Permission . |
Hik-ProConnect Box
View information including network status of the box, number of offline channels (cameras) added to the box, and the latest time when the device was inspected.
You can perform the following operations:
| Operation | Description |
| View Device and Channel Information | Click to view the basic information (e.g., device serial number and device model) and the detailed list of online and offline channels. |
| Remotely Configure Device | Click $ in the Operation column to remotely configure parameters of the device. For details, see the user manual of the device. |
| Inspect Selected Device | Click e in the Operation column to inspect the selected device manually. |
Network Switch
View information including network status of the switch (online/offline), the number of online ports of the switch, and the latest time when the device was inspected.
You can also perform the following operations:
| Operation | Description |
| Inspect Selected Device | Click e in the Operation column to inspect the selected device manually. |
| Remotely Reboot Device | Click § in the Operation column to reboot the network switch remotely. |
| View Typology | Click 5 in the Operation column to view the topology of this switch. For details about topology, refer to Network Topology . |
| View Switch Details | Click > to view the detailed information of the switch, including the memory usage, CPU usage, POE power, peak POE power, working duration, port status (alarm, normal, not connected).
□S Note Working duration refers to the time from when the switch is turned on till the current moment. If the switch is turned off, its working duration will be recounted when turned on again. |
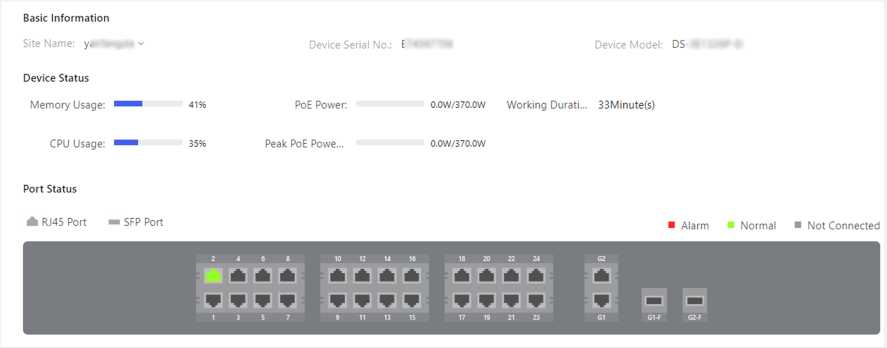
Figure 8-1 Switch Details
On the Switch Details page, You can perform the following operations:
| Operation | Description |
| View Enlarged Port Picture | Hover the cursor onto the switch picture to view the enlarged picture of the ports. |
| Clear Alarm | For port with alarm(s), click ^ Clear Alarm to clear the alarm(s) of this port. |
| Restart Port | For the abnormal port, click ^ Restart Port to restart this port. |
| Extend Port Transmission Range | Click ^ Enable Extend Mode/Disable Extend Mode to extend the transmission range of this port or not.
1’Note When enabled, the transmission range of the port will be extended from 200 to 300 m. Meanwhile, its bandwidth will be limited within 10 Mbps. |
You can view the status of devices in a specific site which has been assigned to you.
Steps
- Click Health Monitoring ^ Health Status on the Navigation panel to enter the Health Status page.
- Select a specific site from the site list.
The status of the devices in the site will be displayed.
- Optional: Perform the following operations.
| Filter Data | Check Display Abnormal Devices Only to display the abnormal device(s) only.
Check Display Authorized Devices Only to display the device(s) of which configuration permission has been authorized to you only. |
| Upgrade Device Firmware | If there are device(s) available for upgrade, a number in red will be displayed on Upgrade showing the number of upgradable device(s). You can click Upgrade, select the upgradable device(s), and then click Upgrade to upgrade them.
Select a device to view its basic information. If the device firmware is upgradable, you can click Upgrade in the Firmware Version field to upgrade it. □S Note For details, see Upgrade Device . |
| Diagnose Devices of the Site | Click Health Check to open the Health Check window, and click Check Now to diagnose the devices of the site.
When the checking completed, you can view the status of each device in the site. For AX PRO security control panel, NVR, and DVR, you can click View Report to export the diagnostics report as a PDF file to the local PC. |
| View Site Owner Information | Click Site Owner to view the Site Owner information, including name, email address, and phone number. |
| View Site Manager Information | Click Site Manager to view the Site Manager information, including name, email address and phone number. Up to 100 site managers can be displayed. |
| Inspect Devices in the Sites | Click Refresh to inspect all the devices in the site. |
| Remote
Configuration |
Select a device and then click Remote Configuration to remotely configure the parameters of the device.
El® Note
|
| Inspect a Single
Device |
Select a device and then click to inspect it. |
| Reconfigure IP/
Domain of Encoding Device |
Move the cursor to , and then click Edit IP/Domain to reconfigure the device’s IP/domain. For details about configuring IP/Domain, see Add Devices by IP Address or Domain Name . |
| Reconfigure DDNS | Move the cursor to © , and then click Configure DDNS to reconfigure the device’s DDNS. For details about configuring DDNS, see Configure DDNS for Devices . |
| View Encoding Device Details | You can view the network status, storage status, HDD usage, and overwritten recording status, etc.
You also click the encoding device to view its details, including basic information such as device type and serial No., and the network status of each camera linked to it. You can click □ and select linked cameras, and then click to view live videos. If the encoding device is a DVR, you can also view its HDD information, including self-inspection evaluation result, overall evaluation result, running status, running time, HDD temperature, and S.M.A.R.T information. For analog camera, you can view if video loss occurs. □J Note
|
| View Access
Control Device Details |
Click an access control device to view its details, including basic information such as device type and serial No., and the device status including network status and the number of its linked doors. |
| View Security Control Panel Details | Click a security control panel to view its details, including the basic information of the security control panel, and status of the zones, the linked peripheral devices, and the linked cameras.
The following list shows the description of each status icon.
|
|
|
| View Video
Intercom Device Details |
Click a video intercom device to view its basic information and its network status. |
| View Doorbell Details | Click a doorbell to view its basic information (including device model, device type, and device serial No.)
If the camera(s) are linked to the doorbell, you can also click a linked camera to view the live video. |
| View Hik- ProConnect Box Details | Click a Hik-ProConnect box to view its basic information and the channel(s) added to it.
You can also view the online status of the added channel(s). |
| View Network
Switch Details |
The network switches are displayed by card.
Click a switch to view its information, including the device model, device type, device serial No., the time of last inspection, network status, memory usage, CPU usage, PoE Power, peak PoE power in latest 70 days, working duration, port status (alarm, normal, not connected). □J Note Working duration refers to the time from when the switch is turned on till the current moment. If the switch is turned off, its working duration will be recounted when turned on again. Hover the cursor onto the picture of switch to view the enlarged picture of the switch. Click ‘E Topology at the top of the page to view the topology of this switch. For details about topology, refer to Network Topology . Click in the Operation column to inspect the device manually. For port with alarm(s), click ^ Clear Alarm to clear the alarm(s) of this port. For the abnormal port, click ^ Restart Port to restart this port. Click ^ Enable Extend Mode/Disable Extend Mode to extend the transmission range of this port or not. |
CE Note
When enabled, the transmission range of the port will be extended to 200 to 300 m. Meanwhile, its bandwidth will be limited within 10 Mbps.
You can set up schedules for the platform to generate and send device health check reports to the specified email addresses automatically, so that the recipients can get regular updates on the health status of important devices and compare the report of each period.
Before You Start
Make sure you have activated the Health Monitoring service.
Steps
- Go to Health Monitoring ^ Scheduled Report .
CIS Note
- All sites available for this feature are shown on the page automatically.
- The platform only supports automatically sending health check reports of encoding devices and AX PRO security control panels on authorized sites.
- Sites without the above-mentioned types of devices or sites that are not authorized to you will NOT be shown on the page.
- Enter the editing mode.
- To configure the report sending schedule for a single site, click Edit on the right side of a site.
- To configure the report sending schedule for multiple sites, click Batch Configure and then select the sites you want to configure.
- Configure the report sending settings.
Device
Select the device(s) to be health-checked and included in the report.
Send At
Specify the frequency, date, and time of sending the reports. You can set the frequency to Daily, Weekly, Monthly, Quarterly, Semiannually, or Annually.
Recipient Email Address
Add and edit the email addresses of the recipients.
CS Note
- You can check Site Owner’s Email to send a copy of the report to your customer.
- Up to 4 email addresses can be added.
Report Language
Choose a language for the report. The report is now available in 39 languages.
- Click OK.
- Enable the settings.
- To enable the settings for one site, switch on Enable for the site.
- To enable the settings for all sites, switch on Enable All in the upper-right corner.
The platform will generate and send reports according to the settings.
C® Note
If there are more than three site owners, only the first three can be displayed on the report while the others will be displayed as “…”.
If you have added network switch(es) to a site and connected devices to the network switch(es), you can view these devices’ network topology. Network topology displays the network links between devices and shows the link exceptions and abnormal devices, which helps you to locate exception source and troubleshoot faults in a visualized way.
‘Note
- Make sure you have the configuration permission of the network switch, otherwise network topology will be unavailable. For details about applying for the configuration permission, see Apply for Device Permission .
- If you have not activated the health monitoring service for the network switch, some topology functions (e.g., viewing device status on the topology) will be unavailable. For details about activating the heath monitoring service for devices, see Activate the Health Monitoring Service for Devices .
You can enter the network topology page in the following ways:
- On the navigation pane, click Site to enter the Site page, and then click the name of a site to enter the site details page, and then click View Topology.
□S Note
If you have NOT enabled the Health Monitoring service for the network switch, you can enter the network topology page in this way only.
- On the navigation pane, click Health Monitoring ^ Health Status , select All Sites from the site list, and then select Network Switch, and then click ?, in the Operation column in the network switch list.
- On the navigation pane, click Health Monitoring ^ Health Status , select a site from the site list to enter the site details page, and then click Topology.
Figure 8-2 Network Topology
The following table shows the descriptions of the available operations on network topology.
Table 8-2 Available Operations
| Operation | Description | |
| View Legend | Network Cable | You can click y next to More to view the legends.
= Optical Fiber ™ Normal ™ Busy ■ Blocked Disconnected |
| Device Type fcffj Network Switch
Security Control P |
fcvr? Virtual Network Switch Li-B Video Intercom Device Access Control Device FT Thermal Camera Speed Dome © N
inel Doorbell Hik-ProConnect Box Iffil DVR/NVR Unknown Device Type |
|
| Device Status
Xx-xxxxxxxxxxxx-xxxx XXX.XXX.XXX.KXX Normal |
TiMR
Xx-xxxxxxxxxxxx-xxxx Xx-xxxxxxxxxxxx-xxxx xxx.xxx.xxx.xxx xxx.xxx.xxx.xxx Abnormal Offline Devices not Under the Site Figure 8-3 Legend |
|
| Edit Root Node | When multiple network switches are added to a site, the platform will randomly select one of them as the root node by default for | |
îtwork Camera
More
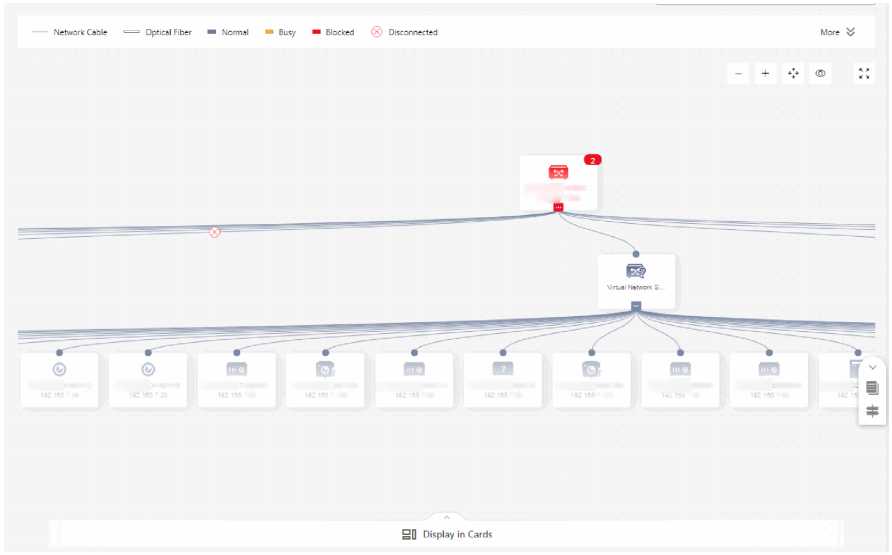
| Operation | Description | ||
| the network topology. If the randomly-selected network switch is not the real root node, you can hover the cursor over the current root node, and then click g to select a network switch as the root node. | |||
| £ll£& )
10 18m |
E
E84 |
||
| Figure 8-4 Edit Root Node | |||
| Refresh Topology | Click Refresh to refresh the topology structure.
□S Note The device status will not be refreshed. |
||
| Display in Cards | If you want to view more device status information of all the devices connected to the network switch(es), click Display in Cards to display device information in cards. | ||
| Move Network Topology | Drag the network topology to move it. | ||
| Zoom In/Out | You can click – / in the upper left corner to zoom in/out the topology. | ||
| Adjust Topology Size | You can click •> in the upper left corner to fit the topology size into the display window.
You can click : : in the upper left corner to display the topology in full-screen mode. |
||
| Display Thumbnail | If you have zoomed in the topology to a large scale, you can click æ to show the thumbnail which shows the current cursor location on the topology. | ||
| Search Devices in Topology | You can enter the keyword of a device to search for it on the topology. Once the device is found, the topology will pan and zoom automatically to display the found device. | ||
mjHj
| Operation | Description | ||
| View Link Information | You can view link information based on the legends shown in the figure below. | ||
| Netw | >rk Cable = Optical Fiber ■ Normal ■■ Busy ™ Blocked (X) Dis | connected | |
| Figure 8-5 Link Information Legend | |||
| View Link Details | You can hover the cursor over a specific link to view its details, such as the upstream, downstream, port name, and port status. | ||
| Apply for Configuration Permission | If you don’t have the permission to configure a device, a prompt will pop up asking you to apply for the permission first. You can click Apply for Permission to apply for it.
0@Note If you don’t have the permission, the position of the device in the network topology might be incorrect. |
||
| View Network Switch Details and Control It | You can click a network switch on the topology to view the information about the network switch, including basic information, device status, and port status.
You can also perform operations such as rebooting the network switch and restarting the port. For details, see Network Switch and View Status of Devices in a Specific Site . 03 Note You cannot view details of a virtual network switch. |
||
| View Another Device’s Details and Configure It | If an online device is connected to the network switch and added to the same site with the network switch, its device icon and device serial number will be displayed. And you can click the device to view its information including the basic information (e.g., device model) and device status (e.g., network status).
You can also click » to configure device parameters. |
||
| Operation | Description |
| CSNote
• If an unknown device (e.g., a PC) is connected to the network n • . 1 • , •III 1» 1 1 J™.«™™-™ Al ■ • • ■ switch, it will be displayed as —— . And you cannot view its information. • If an online device is connected to the network switch but is NOT added to the same site with the network switch, its serial number displayed will be a randomly-generated virtual serial number. And you cannot view its information. |
You can create a quotation for providing the device maintenance service for your customer. Thus, you can standardize the service process, improve customer satisfaction, and expand your business.
Before You Start
Make sure your company is authenticated. See Authenticate Account for details.
Steps
- Go to Health Monitoring ^ Maintenance Quotation .
- Click Create Quotation.
- Set the quotation information.
Quotation Details
Enter a name for the quotation, and if needed, edit the quotation No. which is generated automatically.
Customer Information
Set the customer information including the name, email, phone number, and address. Enter the information manually, or click Get from Site and then select a site from the drop-down list to automatically synchronize the customer (site owner) information.
Item
Click Add Item to set the quotation items. Add default items (remote maintenance, health check report, on-site maintenance (annual), on-site maintenance (additional), etc.) or custom items. After adding the items, set the device model, unit price, and quantity. The quotation tool will automatically add up the prices of all set items to calculate the total price.
Set Discount
If needed, enable Set Discount and enter the discount percentage to give your customer a discount.
Set VAT Rate
If needed, enable Set VAT Rate and enter the VAT rate to include the value-added tax.
Service Provider Information
The service provider information, including the name, email, phone number, address, and company logo, is automatically set according to your company information. Edit the information (except for the company logo) if needed.
- Optional: Click Preview/Export to see how the quotation will be presented and to export it as a PDF file.
- Click Save.
OS Note
You can create no more than 10 quotations if co-branding is enabled; otherwise, you can only create 3 quotations.
- Optional: Perform the following operations after creating the quotation.
Edit a Quotation On the quotation list, click Edit to edit a quotation.
Delete a Quotation On the quotation list, click ^ Delete .
Preview/Export a Quotation On the quotation list, click Preview/Export.
All operations information (including operator, operating time, site, operation target and result, etc.) of the employees (referring to Installer Admin and Installers) will be recorded so that you can search the operation log(s) of any employee to make sure what makes the sites wrong.
‘Note
This feature is not available to authenticated channel partner.
Click My Hik-Partner ^ Company Management ^ Operation Log to display the employee list and all the operation logs. You can search logs by employee, site, and time.
C0 Note
- Logs of all accounts are available for accounts with the permission for managing account and role. For accounts without permission for managing account and role, they can only view their own logs.
- Logs of all sites are available for accounts with the permission for managing all sites. For accounts without permission for managing all sites, they can only view the logs of assigned site.
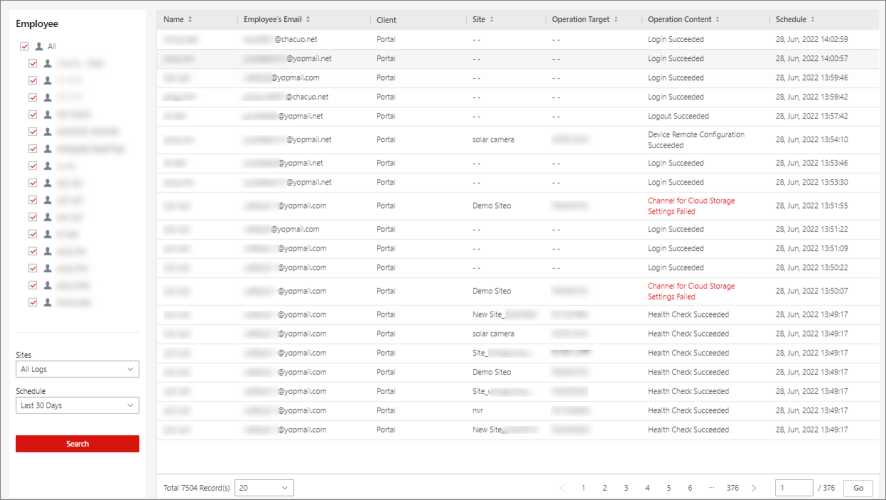
Figure 9-1 Search Operation Logs
The Notification Center module shows all the history business notifications (including device management invitations, site sharing notifications, and notifications about device installation work orders) and notifications of device/channel exceptions, which help you take reactions in time for the smooth running of the devices. The module also keeps you informed about the new features of the system messages and the latest deals and offers.
In the Business Notification module, you can receive the device management invitations from Hik- Connect users for device management on Hik-Partner Pro. You can also receive the notifications concerning site sharing with the Maintenance Service Partner (MSP).
Device Management Invitations
Besides receiving the device management invitation from Hik-Connect users through an email, you can also receive it in the Business Notification on Hik-Partner Pro. After accepting the invitation, you will be able to manage the device on Hik-Partner Pro.
For details about accepting the invitation, refer to Accept a Device Management Invitation from a Hik-Connect User .
Site Sharing Notifications
Both the Installer and the MSP can view the notifications concerning site sharing. For Installers, you can receive site sharing notifications involving the customers and/or the MSP. For example, when the MSP accepts or cancels the site sharing, the customer cancels the site sharing authorization to you and/or the MSP, or the customer modifies your and/or the MSP’s device management permissions.
For MSPs, you can receive site sharing notifications involving the Installer and/or the customers. For example, when the Installer accepts or cancels the site sharing, the Installer shares a site with you and modifies your device management permissions, the customer cancels the site sharing authorization to you and/or the Installer, or the customer modifies your and/or the Installer’s device management permissions.
For details about accepting site sharing, refer to Accept Site Sharing .
Notifications about Work Order for Device Installation
If ARC from HikCentral ReGuard assigns a work order for device installation to the Installer, the message will be displayed in Notification Center ^ Business Notification .
The message shows work order name, person who created it, and telephone number. You can handle the work on the Mobile Client.
Exception Center shows all the history notifications of device exceptions and channel exceptions.
OS Note
- For Installer Admin, you can view all the exceptions of the devices in all the added sites. For Installers, you can view the exceptions of the devices in the site which has been assigned to you.
- Device exception messages can be preserved for up to 90 days.
- You need to set the exception rule first. For details, refer to Add Exception Rule .
Go to the Notification Center page. Click Exception Center to enter the Exception Center page.
Filter the Exceptions
You can filter the exceptions according to your actual needs.
- Select a site in the site list to view the exceptions of the devices in this site. You can also select a device or a channel to view the exceptions occurred on the device or channel.
- Set the time period. The exceptions received during this time period will be displayed.
- Set the handling result from All Status, Not Handled, Solved, False Alarm, and To Be Checked.
- Select the exception types that you want to check. The exception types include alarm, exception, and operation.
You can switch on Auto-Update so that the latest exceptions received by the Portal will be displayed in the table in real time.
OS Note
The auto-update will be invalid when viewing history records (including records after page 1 and records received before today).
Handle an Exception
When you have solved an exception or you want to mark it for further examinations, you can select the handling result on Hik-Partner Pro. By handling the exceptions, you can better sort the exception list and avoid leaving some exceptions unattended. Your customer (the Site Owner) will also be informed of the handling result on Hik-Connect.
Follow the steps below to handle an exception.
1. Click Handle in the Operation column to show the Handle Exception pop-up window.
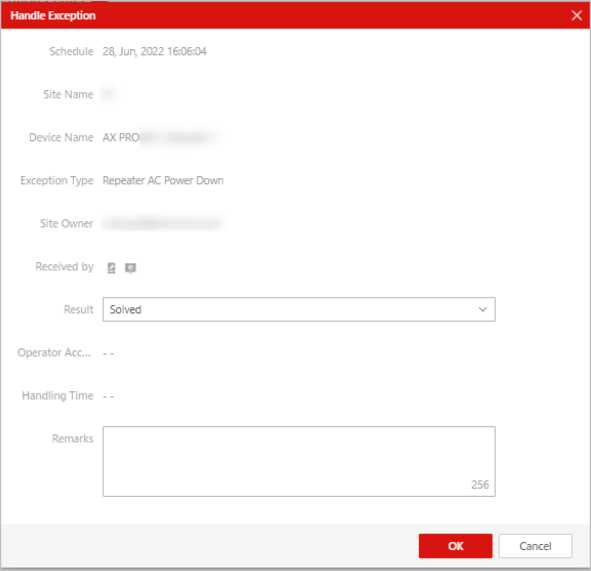
Figure 10-1 Handle Exception
2. Select a handling result in Result. You can select from Solved, To Be Checked, and False Alarm.
3. Click OK to save the changes.
Batch Handle Exceptions
If the handling results of several devices are the same, you can select multiple exception items and click Batch Handle to batch handle them.
Jump to Device Health Monitoring
Click : v| in the Operation column to jump to the device’s health monitoring page to troubleshoot the exceptions.
Export Exception Records
After filtering the exceptions, click Export and select the format of the file to export these exception records to your local PC.
OS Note
Currently, the supported formats of the exported file include CSV, Excel, and PDF.
Open in New Window
Click Open in New Window in the upper-right corner to open a new window of the browser to view the Exception Center. With this function, you can view the Exception Center and other pages at the same time.
The Notification Center supports displaying system messages to keep you informed of any system- related information, including the latest version of the system, newly added features, and successful company authentication. You can view basic information of the messages in the list, including the message type, title, time when it was generated, the read/unread status, and the content (in the form of texts or images).

Figure 10-2 System Messages
‘Note
- Authentication status includes authentication application submitted, failed, and succeeded only for the way of manual authentication. (Displaying status is not supported for the way of using authentication code.)
Only company administrations can receive the status change notifications.
- Supports receiving notifications about work order changes. The changes include when the work order is replied, when the request of closing the work order is initiated, when 7 days passed after the closing request was initiated, and when the work order is automatically closed because 14 days passed after the closing request was initiated.
The Notification Center supports displaying notifications of the latest deals and offers (e.g., complimentary service packages). You can view basic information of the notifications in the notification list, including the notification type, title, time when it was generated, the read/unread status, and the notification content (in the form of texts or images).
After you register your projects on Hik-Partner Pro, you can not only receive special pricing on essential components, but also receive technical support for your projects.
OS Note
The function is only available in certain countries and regions. For details about whether your country or region supports the function, refer to the after-sales or local distributor.
Projects can be created by distributors or system integrators/installers. A project contains project information, information about who creates the project, end user information, support information, product information, and project document.
Steps
OS Note
The function is only available in certain countries and regions. For details about whether your country or region supports the function, refer to the after-sales or local distributor.
- Click Project on the top of the page after login.
- Click New Project.
- Fill in the blanks.
- If you are a distributor, enter project information, system integrator / installer information, end user information, support information, and product selection. Then upload the project document if there is any.
- If you are a system integrator / installer, enter project information, distributor information, end user information, support type, support information, and product selection. Then upload the project document if there is any.
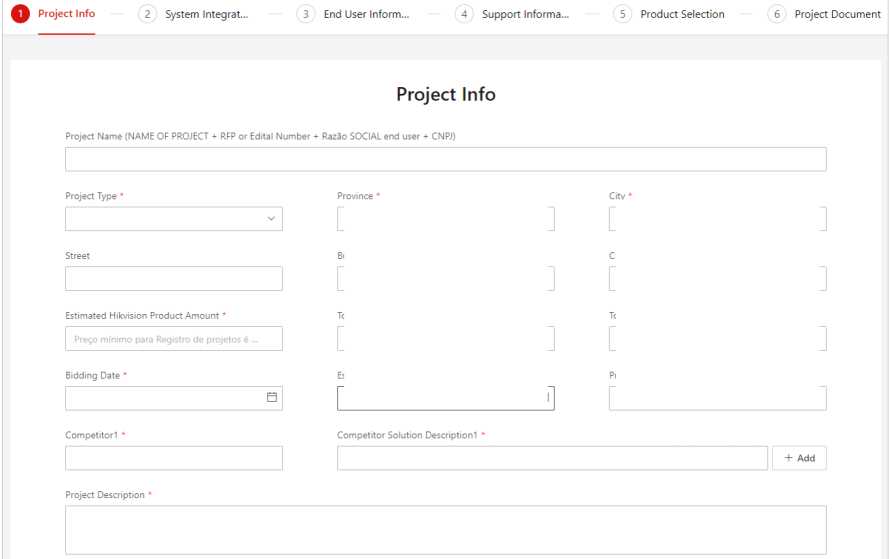
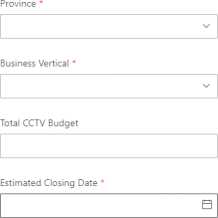
![]()
Figure 11-1 Add Project
Note
- For product selection, click Add ^ , select products and click Confirm.
- When you select products, you can click y<: to compare products. For details about comparing products, refer to Compare Products .
- Click Save & Submit.
The project will be displayed on the Project History page, and the Status will be Waiting for supporter.
What to do next
For further operations, refer to View Project History .
When you select products, you can add multiple products and compare them with their same specifications hidden. In this way, different specifications will be directly displayed and you can choose products as needed.
![]()
Note
Only products of the same category and subcategory can be compared.
Click Project ^ New Project , and in the Product Selection part, click to start compare products. You can also click at the right bottom, and add products to compare them.
To start to compare products, select at least two but no more than four products from the comparison list. On the comparison result page, fields that are different are highlighted with a background color. You can switch on Hide the Same on the top left to hide parts that are the same and focus only on the differences.
![]()


Product Comparison
Hide the same
External interface
| USB | 4 | 4 |
| VGA | 1 | 1 |
| Data | 4, 1000M Ethernet interface, exten… | — |
| Management | 1,100M Ethernet interface | — |
| COM | 1 | 1, for HyperTerminal or UPS |
| Data network interface | — | 4, 1000M Ethernet interface |
| MiniSAS interface | — | Supported |
| Controller Parameters | — | SAS Interface (Upper-level) |
| HDMI | — | 1 |
| Management network interface | — | 1, 100M Ethernet interface |
Figure 11-2 Compare Products
You can view all projects on the Project History page. You can check the information and perform further operations.
‘Note
The function is only available in certain countries and regions. For details about whether your country or region supports the function, refer to the after-sales or local distributor.
Click Project on the top of the page after login.
For Distributors
There are three tabs All, Project Supported by Hikvision, and Project Supported by Me.
All
All projects will be displayed under this tab. FW means the project is forwarded to you. S means the project is shared to you. For shared projects, you can only check the information but not quote.
Project Supported by Hikvision
It includes projects submitted by you and projects shared to you.
Project Supported by Me
It includes projects forwarded to you. You can click Go to Quote, enter distributor prices, and click Save&Send Quote to Customer to generate a quote and send it to the customer.
Project History
All Project Supported by Hikvision Project Supported by Me
Project Name Status y Registration Number H1K Project Number SI End User Project Suppo… 0 Hikvision Sales Operation
12 Draft EP-PRJ-ASIA-10012… Clone Details Edit
Figure 11-3 Project History for Distributors
For System Integrators / Installers
You can view all projects that you created. In the Operation column, you can click Quote and click the document in the Download column of the pop-up window to check the quote list.
Further Operations
| Operations | Description |
| Filter Projects by Status | Click Y in the Status column to filter projects by their status.
Here are some project status types. |
| Operations | Description |
|
|
| Close Project | Click Close Project and select among Close Won, Close Lost, and Closed Canceled.
|
| Copy Project | Click Copy to copy the project. |
| Edit Project | If the status turns to More Info Required or the project is only saved but not submitted, you can click Edit to edit the project. |
| View Details | Click Details to view the project details. |
If you have any issues related to hardware, software, device password reset, etc., you can get professional help from our technical support via Case. On the Case page, you can submit cases to report your issues to us and follow up on the cases you submitted.
‘Note
- This feature is only available for some countries and regions.
- This feature is available only if your company is authenticated.
- All employee accounts of an authenticated company have the permission to use this feature.
The methods to access Case are as follows:
- Click Support ^ Case .
- Click Case on the right side of the dashboard.
The Case page will be opened in a new tab page.
Enter different information for submitting Hardware Product Case, Software Product Case, Hik- Partner Pro Case, and Dedicated Customer Service Case.
Submit different types of cases as needed.
[2® Note
- Hardware Product Case, Software Product Case, and Hik-Partner Pro Case are only available to some countries and regions.
- For device password reset, please submit cases on the Hik-Partner Pro Mobile Client.
- Some installers can submit Dedicated Customer Service Case for focused troubleshooting from technical support.
-
- Submit Hardware Product Case
-
You can submit hardware product cases for issues related to operations, configurations, or faults.
Steps
- Go to the Case page.
CSNote
For how to enter the Case page, refer to Case .
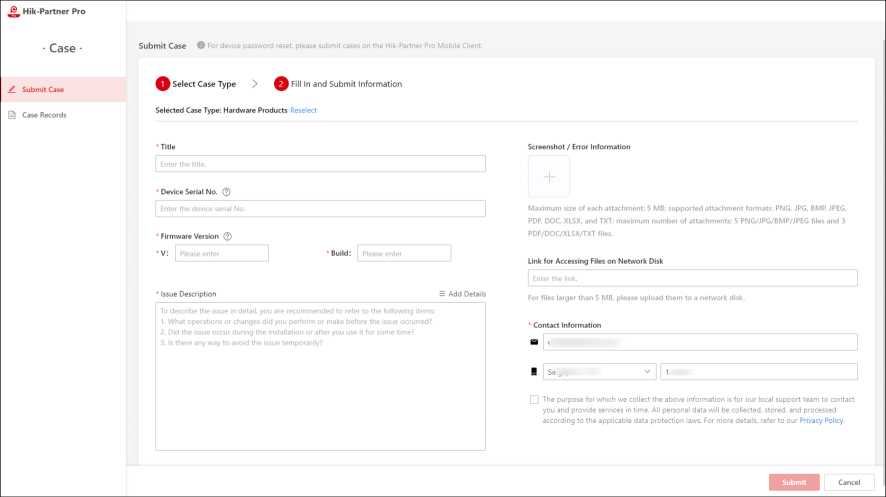
Figure 12-1 Submit Hardware Product Case
Title
Enter the title of your case.
‘Note
The maximum length of the title is 100 characters.
Device Serial No.
Enter the device serial No. You can click to see where to find the serial No.
Firmware Version
Enter the version number and build number. You can click to see where to find the firmware version.
Issue Description
Describe your issue according to the suggestions in the blank.
E2@Note
The length of issue description should vary from 20 to 2000 characters.
You can also click Add Details to add issue details (software name, software version, network type, etc.) to your description as needed.
Screenshot / Error Information
Click + to upload screenshots or error information.
Note
- You can upload attachments in PNG, JPG, BMP, JPEG, PDF, DOC, XLSX, and TXT format.
- No more than 5 PNG/JPG/BMP/JPEG files and 3 PDF/DOC/XLSX/TXT files are allowed.
- The maximum size of each attachment is 5 MB.
Link for Accessing Files on Network Disk
For files larger than 5 MB, please upload them to a network disk.
Contact Information
This field is filled with your account information by default. You can edit it as needed.
- Check the statement in the end.
- Click Submit to submit the case.
C0 Note
The case you submitted will be displayed on the Case Records page. For more operations such as relying to the case and closing the case, refer to View and Handle Case Records .
-
-
- Submit Software Product Case
-
You can submit software product cases for issues related to Hik-Connect and iVMS-4200.
Steps
- Go to the Case page.
C® Note
For how to enter the Case page, refer to Case .
- Select Submit Case ^ Software Products , and select Hik-Connect/iVMS-4200 as the software name.
- Fill in the fields as required.
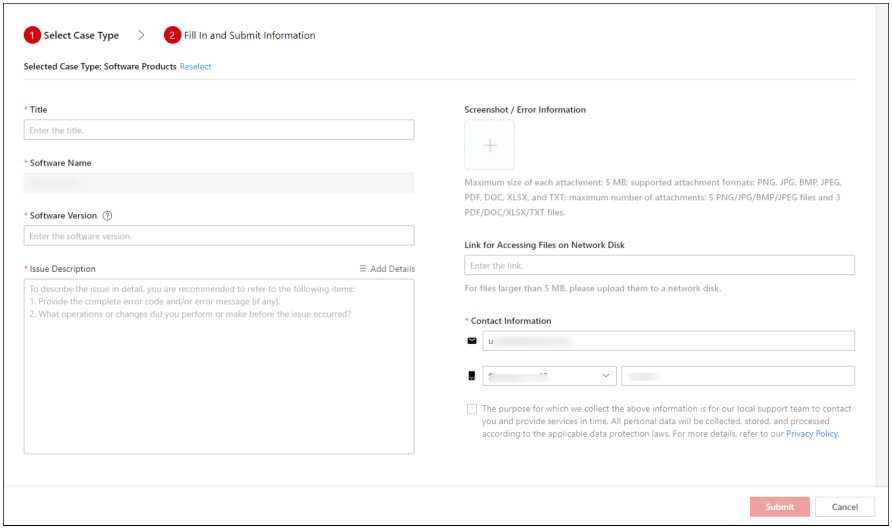
Figure 12-2 Submit Software Product Case
Title
Enter the title of your case.
The maximum length of the title is 100 characters.
Software Name
The software name is predefined and cannot be edited.
Software Version
Enter the software version. You can click to see where to find the software version.
Issue Description
Describe your issue according to the suggestions in the blank.
The length of issue description should vary from 20 to 2000 characters.
You can also click Add Details to add issue details to your description as needed.
How did it occur?
The maximum length is 500 characters.
Phone/PC Operating System and Version
The maximum length is 72 characters.
Information About the Related Hikvision Devices
The maximum length is 500 characters.
Screenshot / Error Information
Click + to upload screenshots or error information.
You can upload attachments in PNG, JPG, BMP, JPEG, PDF, DOC, XLSX, and TXT format. No more than 5 PNG/JPG/BMP/JPEG files and 3 PDF/DOC/XLSX/TXT files are allowed. The maximum size of each attachment is 5 MB.
Link for Accessing Files on Network Disk
For files larger than 5 MB, please upload them to a network disk.
Contact Information
This field is filled with your account information by default. You can edit it as needed.
- Check the statement in the end.
- Click Submit to submit the case.
The case you submitted will be displayed on the Case Records page. For more operations such as relying to the case and closing the case, refer to View and Handle Case Records .
You can submit Hik-Partner Pro cases for issues related to Hik-Partner Pro.
Steps
- Go to the Case page.
dJNote
For how to enter the Case page, refer to Case .
- Select Submit Case ^ Hik-Partner Pro , and select an issue type from the supported ones.
- Fill in the fields as required.
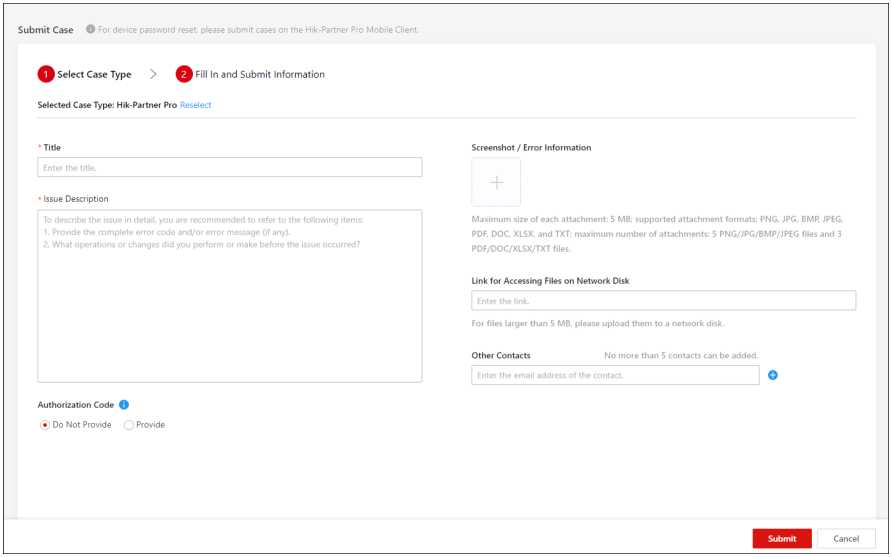
Figure 12-3 Submit Hik-Partner Pro Case
Title
Enter the title of your case.
C® Note
The maximum length of the title is 100 characters.
Issue Description
Describe your issue according to the suggestions in the blank.
OS Note
The length of issue description should vary from 20 to 2000 characters.
Authorization Code
The after-sales authorization code is exclusive to Hikvision’s technicians for troubleshooting only. You can give your authorization code to the technicians when it is necessary for them to log in to your account for troubleshooting.
US Note
This field is not available for the following issue types: Code Scanning and Reward Point Market, Solution and Project, and Others.
Screenshot / Error Information
Click + to upload screenshots or error information.
OS Note
You can upload attachments in PNG, JPG, BMP, JPEG, PDF, DOC, XLSX, and TXT format.
No more than 5 PNG/JPG/BMP/JPEG files and 3 PDF/DOC/XLSX/TXT files are allowed.
The maximum size of each attachment is 5 MB.
Link for Accessing Files on Network Disk
For files larger than 5 MB, please upload them to a network disk.
Other Contacts
Enter the email address of other contacts.
C® Note
No more than 5 contacts can be added.
- Click Submit to submit the case.
nS Note
The case you submitted will be displayed on the Case Records page. For more operations such as relying to the case and closing the case, refer to View and Handle Case Records .
You can report the issues found when using Hik-Partner Pro to us by submitting dedicated customer service cases. We will respond to your case and provide support according to your case severity and language. Submitting dedicated customer service cases is only available for some installers, for focused troubleshooting from technical support.
Steps
HE Note
If you have more function-related requirements or improvement suggestions, you can give your feedback. For details, refer to Hik-Partner Pro Portal Overview .
- Go to the Case page.
HE Note
For how to enter the Case page, refer to Case .
- Click Submit Case on the left.
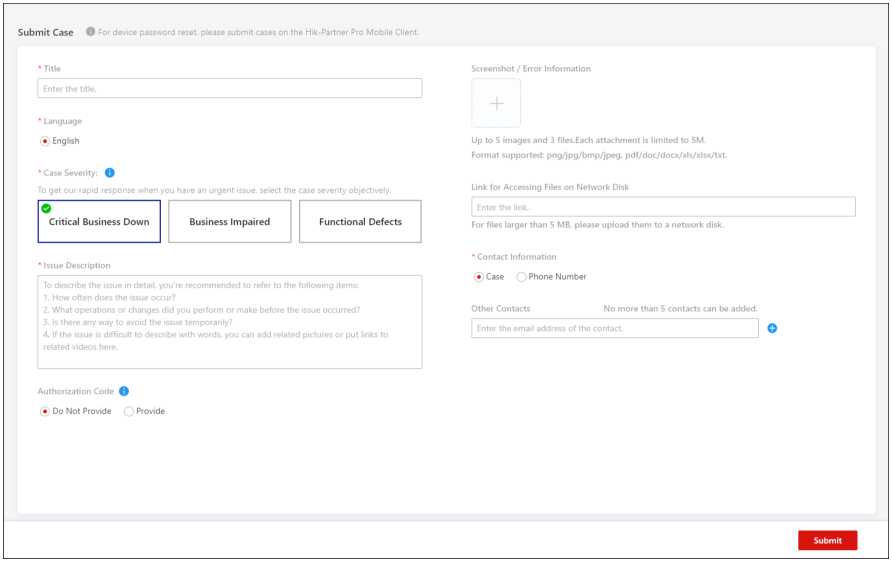
Figure 12-4 Submit Dedicated Customer Service Case
- Enter a title for your case.
- Select the language.
The language options vary according to the country/region of your account.
- Select the case severity.
Critical Business Down
Main functions which are critical to your business, such as logging in to the platform, creating sites, adding devices, receiving alarms, and handing over sites, are unavailable.
Business Impaired
Main functions work properly, but there are other function-related issues such as batch LAN configuration not working, probabilistic failure of remote configuration, and connection failure of some devices.
Functional Defects
There are some functional defects which do not affect your business or only affect your business slightly, such as wrong words on the page and high response latency.
To get our rapid response when you have an urgent issue, select the case severity objectively.
- Enter the issue description.
Note
You’re recommended to refer to the items listed on the page to describe the issue in detail. If the issue is difficult to describe with words, you can put links to related videos in the issue description and attach pictures below.
- Set whether to provide the authorization code for the technical support staff for troubleshooting.
C® Note
For details about the authorization code, refer to Hik-Partner Pro Portal Overview .
- Optional: Click to upload screenshots or error information.
OS Note
You can upload attachments in PNG, JPG, BMP, JPEG, PDF, DOC, DOCX, XLS, XLSX, and TXT format.
No more than 5 PNG/JPG/BMP/JPEG files and 3 PDF/DOC/XLSX/TXT files are allowed.
The maximum size of each attachment is 5 MB.
- Optional: Enter the link for accessing files on network disk.
OS Note
For files larger than 5 MB, please upload them to a network disk.
- Select Case or Phone Number as Contact Information.
OS Note
If you select the latter, select the country/region code and enter the contact number.
- Optional: Enter the email addresses of other contacts.
nS Note
No more than 5 contacts can be added.
- Click Submit.
nS Note
The case you submitted will be displayed on the Case Records page. For more operations such as relying to the case and closing the case, refer to View and Handle Case Records .
12.2 View and Handle Case Records
You can view cases you submitted on the Case Records page, view replies to a case, reply to a case, and close a case.
Go to the Case page and click Case Records on the left.
Note
For how to enter the Case page, refer to Case .
Table 12-1 Available Operations on Case Records Page
| Operation | Description |
| View All Submitted Cases | You can view cases you submitted on the Case Records page, including the case ID, created time, case title, case type, and case status. |
| View Case Details | Click a case to enter the Case Details page to view the case creator, issue description, replies from technical support, request from the technical support for closing the case, case status updates, and so on.
CSNote You will be notified via emails and push notifications on the Mobile Client if there are new replies or updates of case status. |
| Reply to Case | Click a case to enter the Case Details page. Click Reply on the bottom right corner, enter the reply content, and add attachments in the Reply section. Click Confirm to submit your reply to the current case. |
| Close Case | Click a case to enter the Case Details page, and click Close Case on the bottom right corner to close the case after your issue is solved. You can rate our services and give your comment when closing the case.
□S Note The case will be closed automatically if you do not reply within 14 days. |
Return material authorization (RMA) is an arrangement in which you can ship an item back for an exchange or repair due to a product defect or malfunction. The process is firstly Installers can initiate RMA applications, and distributors can repair the defected products after receiving applications. Finally the products will be returned after they are repaired and debugged.
OS Note
The function is only available in certain countries and regions. For details about whether your country or region supports the function, refer to the after-sales or local distributor.
You can register an RMA request for exchanging or repairing goods. After registration, you can check real-time status of the requests.
The function is only available in certain countries and regions. For details about whether your country or region supports the function, refer to the after-sales or local distributor.
Steps
- Go to Support ^ RMA .
- Click Add to add products.
- You can input the serial number of the products of interest, click Add, and enter fault description and reference. Click Add Attachment to add attachments if there are any.
- You can click Download Template, enter information of multiple products, and click Upload Serial List to batch upload products.
OS Note
It should be a Hikvision product sold in the current country or region.
- After all products are added, click Next to select shipping information.
- Select shipping information.
- For countries and regions that support cross-distributor repair, if the distributor is identified according to the serial number, the distributor will be automatically selected. If not identified, you need to click Change Shipping Address to choose a distributor by yourself. After choosing a distributor, the distributor and product information will show up in the list.
By default, the selected repair station is the nearest one. You can also select among all stations of all distributors in the country.
- For countries and regions that do not support cross-distributor repair, the system will identify the distributor according to the serial number. The default choice is the nearest location of the distributor. If the distributor can not be identified according to the serial number, then the product can not be added.
Whether your application is submitted successfully or not is displayed.
- You can perform the following operations.
Operation Description
Download Document Click RMA number to download document.
Back to Menu Click Back to Menu to check details and track status.
Create More Click Create More to add more applications.
After an RMA application is submitted, you can view its status and perform further operations.
Go to Support ^ RMA , and the successfully submitted applications are displayed in the list.
You can perform the operations as needed.
| Operation | Description |
| Search for RMA Applications | You can search for an application by its Reference Number, RMA Number, Date, Application Number, and Serial Number. |
| Filter by Status | Click v , and select among Saved, Unreceived, In Repair, Waiting For Customer Response, Ready for Shipment, and Completed. |
| View Details | Click Detail to view application details. |
| Download Document | Click Download Document to download the application file. |
The Order & Promotion module supports viewing information of regular products, hot products, and promotional products that are discounted or are put on clearance. You can search for and select products to place an order or submit your product order by uploading a predefined template.
OS Note
The module is only available to authenticated channel partners.
You can search for products and view detailed product information, including the product picture, description, stock availability, and other related parameters.
Under the B2B tab of the Order & Promotion module, you can view information of hot products and the products you have recently viewed. You can also view information of the regular products or promotional products (e.g., discount products, clearance products, etc.) by selecting the corresponding tabs under the navigation bar. You can filter the products by product category and search for specific products by product name or model.
Click a product to view its detailed information, including the product picture, description, stock availability, and other related parameters. If needed, you can add a product to Favorites by hovering over it and clicking .
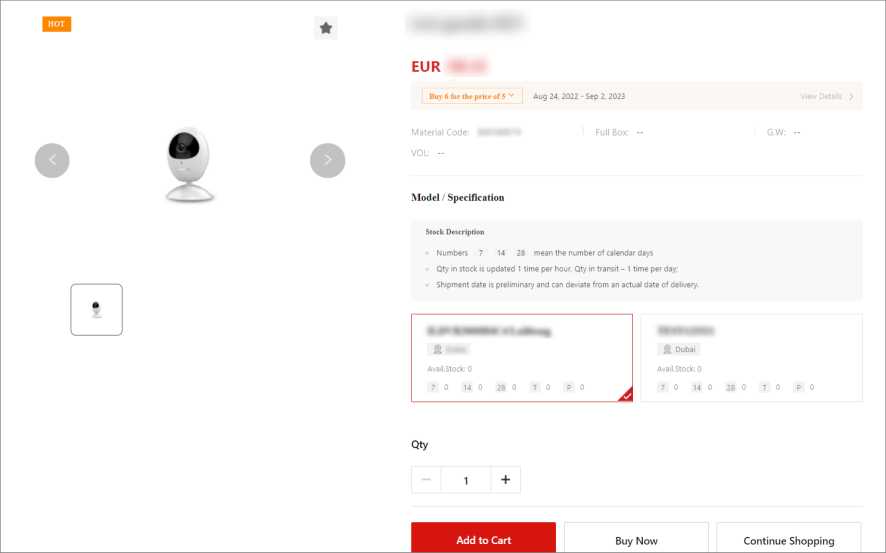
Figure 14-1 Product Information Details
![]()
Note
You can find the products you have added to Favorites later in My Hik-Partner ^ Account Information ^ My Favorite ^ B2B Product .
You can place an order by adding products to the shopping cart, selecting the products you need for checkout, and entering the required shipping information.
Steps
OU Note
Besides adding products to the shopping cart, you can also submit an order by uploading information (material code, quantity, etc.) of products with a predefined template via Order Upload.
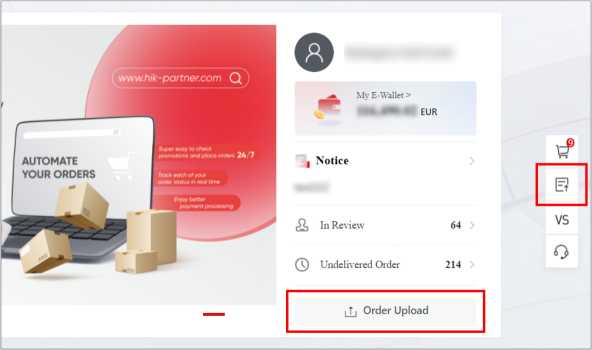
Figure 14-2 Ways for Accessing Order Upload
- View or search for the products to be ordered.
C® Note
For details, refer to View and Search for Products .
- Hover over a product of interest, set the quantity to be ordered, and click Add to Cart. Repeat this step to add multiple products to your shopping cart as needed.
- Click J1 on the right to go to your shopping cart.
- Select the products to be ordered, adjust the quantity for each product if needed, and click Next.
- On the Check Order Information page, enter your shipping/billing address, select a preferred shipping method, and confirm the order details (quantity to be ordered, total cost, etc.).
OS Note
- You can also set a preferred future date of delivery and upload a project register form if needed.
- If you have entered a shipping/billing address before, check whether the address information displayed on the page is correct.
- Click Submit.
You can track the status of the submitted order via My Hik-Partner ^ Order ^ My Order . For details, refer to View My Orders .
After submitting an order, you can track the status of your order, perform operations such as canceling or reordering as needed, and view related information such as invoices and transaction records.
The following order related information can be accessed via My Hik-Partner ^ Order .
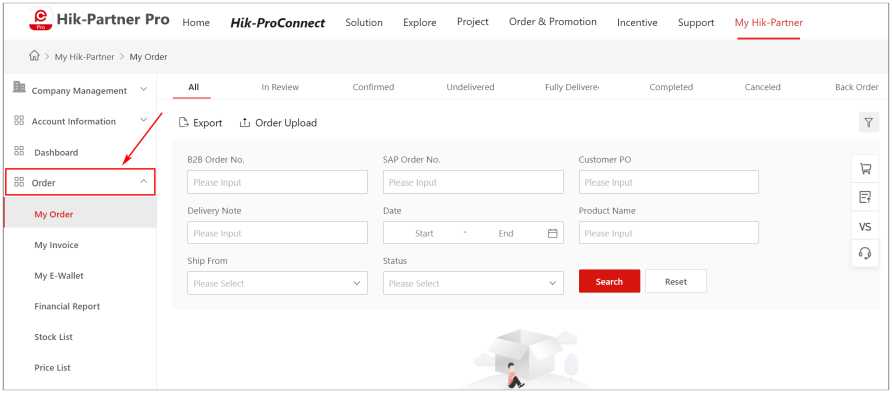
Figure 14-3 Order Related Information of Your Company
My Order Page
On the My Order page, you can view your orders by different status (e.g., In Review, Confirmed, Fully Delivered, Completed, etc.) and click an order to view the order details, including the products selected, total cost, and shipping related information.
![]()
Note
The My Order page can also be accessed via the In Review and Undelivered Order tabs displayed on the B2B page of the Order & Promotion module.
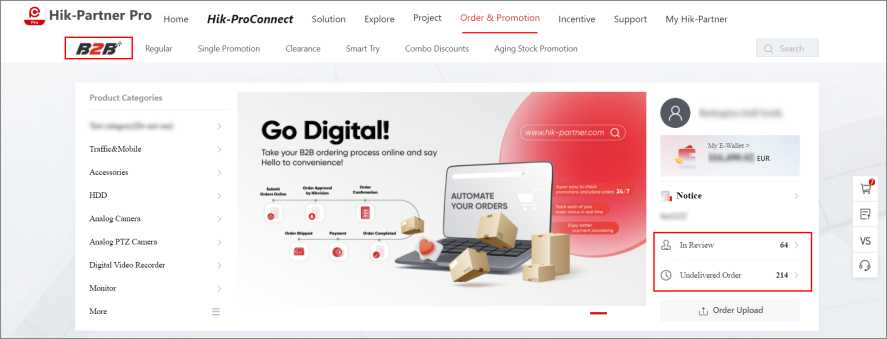
Figure 14-4 Another Way for Accessing the My Order Page
If needed, you can click Export to export the list of orders to your local PC, click Order Upload to submit an order using a predefined template, click — next to an order No. to copy the order No., or click to reorder the same products of an order. To cancel ordering a product, click an order to enter the order details page, and click Cancel next to the product.
OS Note
The ordering of products that are fully delivered or the stock clearance / combo discount products are not allowed to be canceled.
My Invoice Page
On the My Invoice page, you can search for and view invoices of your past orders and export the list of invoices if needed.
My E-Wallet Page
On the My E-Wallet page, you can view your E-Wallet balance and transaction records, and search for specific records as needed.
OS Note
You can also click the E-Wallet balance displayed on the B2B page of the Order & Promotion module to access your E-Wallet.
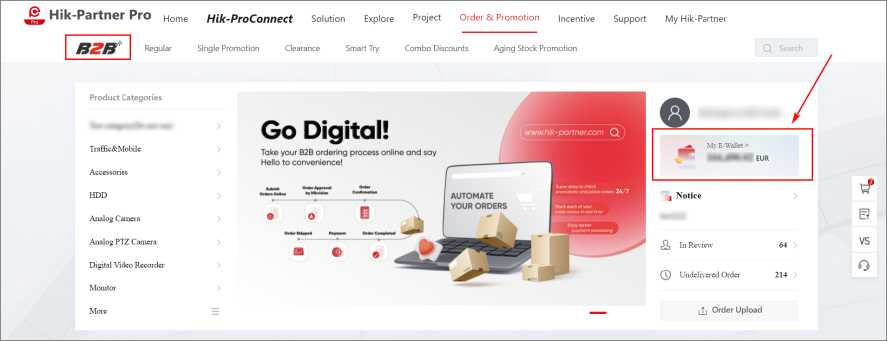
Figure 14-5 Another Way for Accessing the My E-Wallet Page
Financial Report Page
On the Financial Report page, you can view details of your credit status, account payable balance, and basic information of the invoices.
Stock List Page
On the Stock List page, you can view and search for stock related information of your products and export the full stock list or specific search results to the local PC as needed.
Price List Page
On the Price List page, you can view and search for price related information of all products and export the full price list or specific search results to the local PC as needed.
Hik-Partner Pro provides multiple value-added services for you to better serve your customers, including the health monitoring service, cloud attendance service, cloud storage service, people counting service, temperature screening service, alarm receiving center service, HikCentral Connect service, co-branding service, and employee account add-on.
OS Note
- Most of value-added services are only available in certain countries and regions. For more information, refer to the after sales or local distributor.
- Only the cloud storage service is supported by the solar camera.
Hik-Partner Pro offers a free package containing a series of basic features such as viewing device online status once you complete account registration. In some cases, for the capacity and functionality limitation of the free package, these basic features are insufficient for you to satisfy higher level needs of your customers (i.e., end users), such as their need for the maintenance of a large number of devices.
Compared with the free package, the health monitoring package not only allows you to add more devices to Hik-Partner Pro, but also monitor the health status of your customers’ devices and configure other value-added features. You can access the health monitoring service by purchasing health monitoring packages in the Service Market.
The following table shows the differences between the free package and the health monitoring package.
OS Note
For the countries and regions where the health monitoring service is currently free, the details of the health monitoring package might be different from the information displayed in the table below. Refer to the distributors or after-sales in these countries and regions for details.
Table 15-1 Differences Between Free Package and Health Monitoring Package
| Functionality | Free Package | Health Monitoring Package |
| Live View/Playback/ Downloading Video | ||
| Device Firmware Remote Upgrade | ||
| Health Monitoring | Not Supported | Supported |
| Exception Rule | Not Supported | Supported |
| Linkage Rule | Not Supported | Supported |
| Employee Management | Not Supported | Employees Accounts: 4
‘iNote You can get 4 employee accounts for free only when purchasing the health monitoring service for the first time. |
| Role/Permission Management | Not Supported | Supported |
| Searching Operation Logs of Employees | Not Supported | Supported |
You can purchase the health monitoring service packages online in the Service Market in Hik- Partner Pro or purchase a service key from the local distributor offline first, and then activate the health monitoring service packages by the service key in the Service Market.
Steps
OXlNote
Purchasing the service by service key is only supported in some countries and regions. Contact the local distributor for details.
- Go to the Service Market page.
- In the Health Monitoring Package area, click Online Purchase to enter the Purchase Health Monitoring Package page.
‘Note
If your country or region supports service key and you have purchased a service key from the distributor, you can also click Activate by Service Key to purchase the service.
- Select service packages and set the number of service packages that you want to purchase.
All-Type Device Monthly Package
An All-Type Device Monthly Package can be used to activate the service for a device of nearly any type. And the activated service lasts one month.
“All-Type Device” here means that the service package is applicable to nearly all device types, including DVR, NVR, network cameras, PTZ cameras, access control devices, alarm devices, video intercom devices, doorbells, Hik-Partner Pro Boxes, thermal devices, and network switches.
“Monthly” here means that the service term is one month. The service term starts when you activate the service.
All-Type Device Monthly Package * 20
20 All-Type Device Monthly Packages sold as a batch. Set the number of batches to purchase.
All-Type Device Monthly Package * 100
100 All-Type Device Monthly Packages sold as a batch. Set the number of batches to purchase.
All-Type Device Annual Package
An All-Type Device Annual Package can be used to activate the service for a device of nearly any type. And the activated service lasts one year.
“All-Type Device” here means that the service package is applicable to nearly all device types, including DVR, NVR, network cameras, PTZ cameras, access control devices, alarm devices, video intercom devices, doorbells, Hik-Partner Pro Boxes, thermal devices, and network switches.
“Annual” here means that the service term is one year. The service term starts when you activate the service.
All-Type Device Annual Package * 20
20 All-Type Device Annual Packages sold as a batch. Set the number of batches to purchase.
All-Type Device Annual Package * 100
100 All-Type Device Annual Package sold as a batch. Set the number of batches to purchase.
Network Camera Monthly Package
A Network Camera Monthly Package can be used to activate the service for a network camera. And the activated service lasts one month.
“Network Camera” here means that the service package is only applicable to network cameras.
“Monthly” here means that the service term is one month. The service term starts when you activate the service.
Network Camera Monthly Package * 20
20 Network Camera Monthly Packages sold as a batch. Set the number of batches to purchase.
Network Camera Monthly Package * 100
100 Network Camera Monthly Packages sold as a batch. Set the number of batches to purchase.
Network Camera Annual Package
A Network Camera Annual Package can be used to activate the service for a network camera. And the activated service lasts one year.
“Network Camera” here means that the service package is only applicable to network cameras.
“Annual” here means that the service term is one year. The service term starts when you activate the service.
Network Camera Annal Package * 20
20 Network Camera Annual Packages sold as a batch. Set the number of batches to purchase.
Network Camera Annual Package * 100
100 Network Camera Annual Packages sold as a batch. Set the number of batches to purchase.
- Enter your VAT number.
OS Note
The VAT number entered here will be displayed in the payment receipt.
- Select Credit/Debit Cards as the payment method.
- Click Checkout to enter the payment page and finish the payment.
- Optional: Go to Service ^ Service Market ^ My Service ^ Health Monitoring Service to view your health monitoring packages and manage them.
CS Note
For details, see Manage Your Health Monitoring Service .
After purchasing health monitoring packages, you can use them to activate the health monitoring service for specific devices. Once the service is activated, features such as device health monitoring and device exception notifications will be available for these devices.
Before You Start
Make sure you have purchased health monitoring packages. For details, see Purchase Health
Steps
OS Note
If the firmware version of a device is obsolete, or its device type cannot be recognized by Hik- Partner Pro, activating health monitoring service for the device is not supported
- Enter the Activate Health Monitoring Service page in one of the following ways.
- Choice 1: Go to Service ^ My Service ^ All Services , and then click Activate Health Monitoring Service.
- Choice 2: Go to Service ^ My Service ^ Health Monitoring Service , and then click Activate Health Monitoring Service.
- Choice 3: Go to the site details page, and then hover the cursor onto n on the device card, and then click Activate Service on the pop-up dialog.
- Choice 4: Go to the site details page, and then click a device to show the device details panel, and then hover the cursor onto Fl on the panel and click Activate Service
- Choice 5: Click Activate Service on the adding result page after adding detected online devices or adding a device by Hik-Connect (P2P). See Add Detected Online Device or Add Device by Entering Serial No. for details.
The Activate Health Monitoring Service page will be displayed as one of the following two figures show.
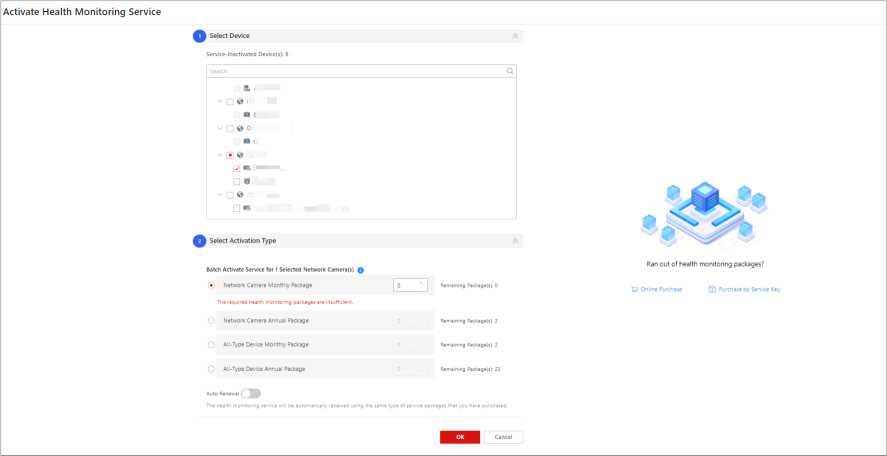
Figure 15-1 Select Devices to Activate Health Monitoring Service
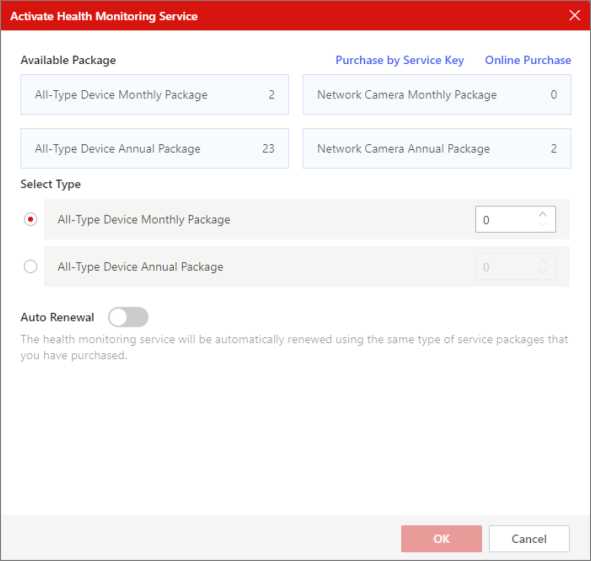
Figure 15-2 Activate Health Monitoring Service for One Selected Device
- Select devices.
C® Note
Skip this step if you enter the Activate Health Monitoring Service page as Figure 15-2 shows.
- Select the activation type.
CS Note
- The number you set represents the number of months/years that the service lasts for each selected device.
- If service packages are insufficient, you can click Online Purchase or Activate by Service Key to purchase more. For details, see Purchase Health Monitoring Service .
Use All Device Package Only
When enabled, you can only select All Device Packages (All Device Monthly Package and All Device Annual Package) for network cameras to activate the service for them.
Auto Renewal
When enabled, if the service for a device expires, the service will be automatically renewed using the same service package in previous activation. For example, assume that you activated a 1-month health monitoring service for a NVR using an All Device Monthly Package on 5/14/2021, the 1-month service will be automatically renewed using another All Device Monthly Package on 6/14/2021.
- Click OK.
After the health monitoring service is activated for devices, the notifications of all exceptions will be enabled by default.
- Optional: Go to the site details page, and then click a device with the service activated to show the device details panel, and then perform the following operations if needed.
| Renew the Service | Click Renew to renew the service for the device. |
| Transfer the Service | Click Transfer to open the Transfer Health Monitoring Service window, and then select a device to transfer the remaining service time from the current device to the selected device. |
| Enable Auto Renewing the Service | Click Auto Renewal to Open the Auto Renew window, switch on Auto Renewal, and then select a type of service packages for auto renewal. |
-
-
- Manage Your Health Monitoring Service
-
In My Service, you can manage your health monitoring service. The available features for the management include viewing remaining service packages, service activation, service renewal, service transfer, service auto renewal, and so on.
Go to Service ^ My Service ^ Health Monitoring Service to enter the health monitoring service page (as the figure below shows).
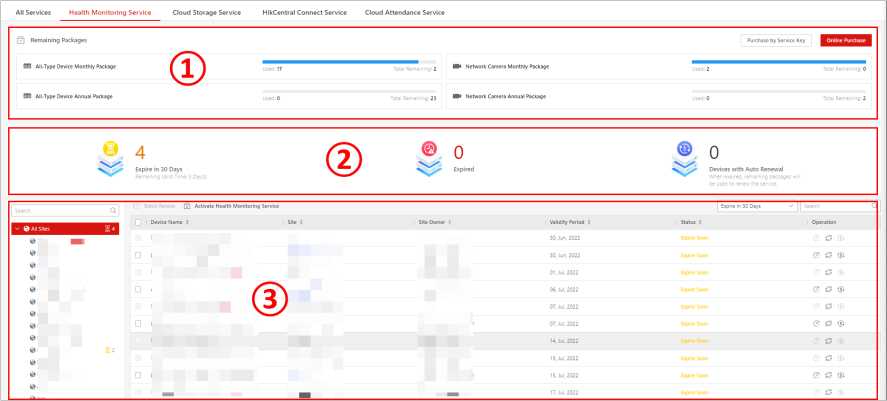
Figure 15-3 Manage Your Health Monitoring Service
On the page, the following features are available.
Table 15-2 Available Features
| Area No. | Feature | Description |
| 1 | View Remaining Packages & Purchase More | View used number and remaining number of each type of heath monitoring packages.
Click Activate by Service Key or Online Purchase to purchase more packages. For details, see Purchase Health Monitoring Service . |
| 2 | View Expiration and Auto Renewal Information |
You can click Expires in 30 Days to view these devices in the device list below.
You can click Expired to view these devices in the device list below.
You can click Devices with Auto Renewal to view these devices. |
| 3 | Filter Devices or Search by Keywords | Select a Site from the site list on the left, and then select a filter type (All, Expire in 30 Days, or Expired) from the drop-down list to filter devices.
Or enter key words to search for matched devices. |
| 3 | Activate Service | Click Activate Health Monitoring Service to activate the heath monitoring service for specific devices. For details, see Activate the Health Monitoring Service for Devices . |
| 3 | Batch Renew Service for Devices | Select devices and then click Batch Renew to renew the service for the selected devices.
The process of renewing the service is similar to that of activating the service. See Activate the Health Monitoring Service for Devices for details. |
| 3 | Renew Service for a Device | Click O in the Operation column to renew service for a device.
The process of renewing the service is similar to that of activating the service. See Activate the Health Monitoring Service for Devices for details. |
| Area No. | Feature | Description |
| 3 | Transfer Service | Click £ in the Operation column to transfer the remaining service time from the current device to another. |
| 3 | Enable Service Auto Renewal | Click (si in the Operation column to open the Auto Renew window, switch on Auto Renewal, and then select a type of service packages for auto renewing the health monitoring service. |
15.2 Purchase Employee Account Add-On
Hik-Partner Pro offers only one Installer Admin account for your company to manage resources in the system. Although sometimes, several employee accounts will be given as gifts to you in some activities, it may still not meet your requirements. So if you want to invite more employees to join Hik-Partner Pro to work collaboratively for providing better service for your customers, you can purchase the employee account add-on online in the Service Market in Hik-Partner Pro or purchase a service key from the local distributor offline first, and then activate the employee account add-on by the service key in the Service Market.
Steps
OU Note
Activating the service by service key is only supported in some countries and regions. Contact the local distributor for details.
- Go to the Service Market page.
- In the Employee Account Add-On area, click Online Purchase to enter the Purchase Employee Account Add-On page.
d@Note
If your country or region supports service key and you have purchased a service key from the distributor, you can also click Activate by Service Key to purchase the service.
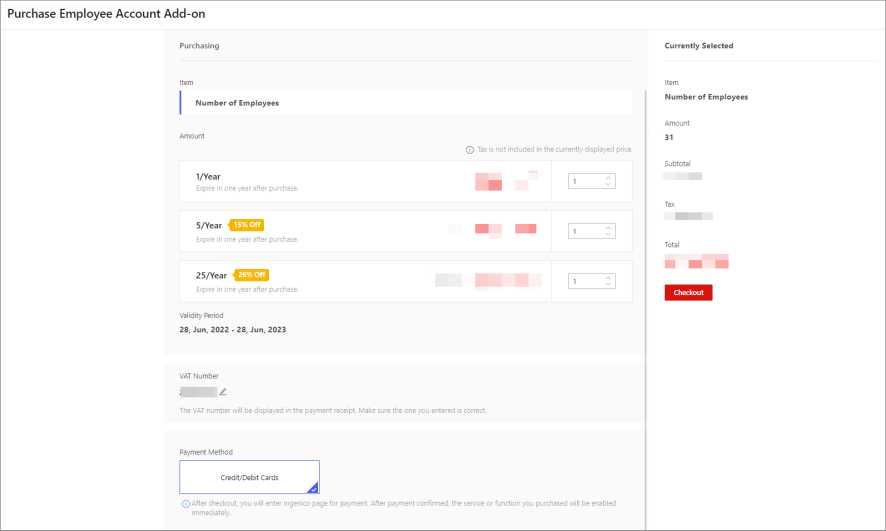
Figure 15-4 Purchase Employee Account Add-On
3. Select type(s) of add-on and set the number of employee accounts that you want to purchase.
C® Note
An 1/Year, 5/Year, or 25/Year add-on can be used to invite 1, 5, or 25 employee accounts which will expire after one year.
- Enter your VAT number.
CS Note
The VAT number entered here will be displayed in the payment receipt.
- Select Credit/Debit Cards as the payment method.
- Check your purchasing information and click Checkout to enter the payment page and finish the purchase.
15.3 Cloud Attendance Service
The cloud attendance service provides a cloud-based and all-in-one solution for access control and attendance management in various businesses. You can create cloud attendance systems for your customers, so that your customers, such as managers of small organizations or human resource director, can configure the system on the Hik-Connect portal ( http://www.hik-connect.com ) and use it to manage the attendance of the employees.
Employees of your customers can check in or check out via the devices configured in the cloud attendance system. With the Hik-Connect Mobile Client V4.13.0 or later, the employees can control doors and check attendance records on their mobile phones.
‘Note
The cloud attendance service is only supported in some countries and regions currently. You might fail to find related functionality due to its unavailability in your country or region. If you need related functionality, please feel free to contact the local distributor or our branch office.
The flow chart below shows the recommended process for setting cloud attendance service.
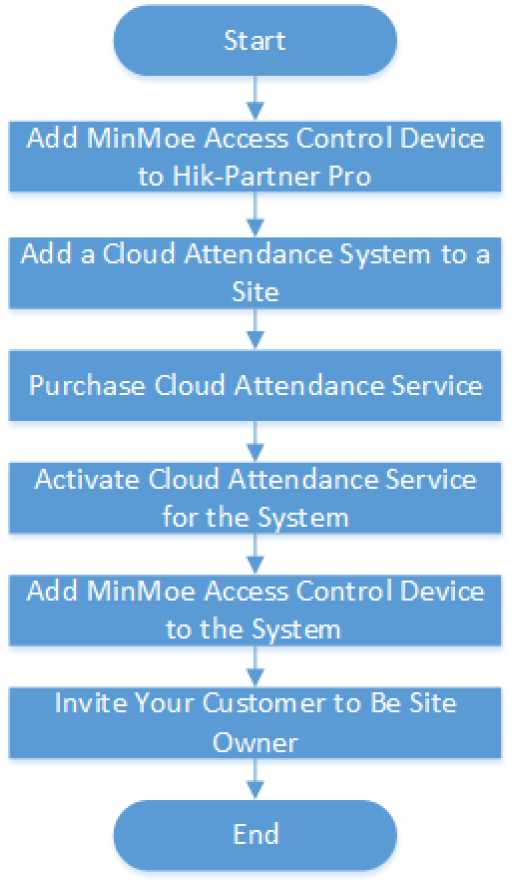
Figure 15-5 Flow Chart
The table below shows the description of each step and the link to corresponding section.
Table 15-3 Flow Chart Description
| Step | Description |
| Add MinMoe Access Control Devices to Hik-Partner Pro | Add MinMoe access control devices to site(s) which are owned by the same customer. For details about adding devices to Hik- Partner Pro, see Add Device and its sections. |
| Add a Cloud Attendance System to a Site | Add a cloud attendance system to a specific site. The cloud attendance system is used for grouping and managing MinMoe |
| Step | Description |
| access control devices. For details about adding the system, see Add Cloud Attendance System . | |
| Purchase Cloud Attendance Service | See Purchase Cloud Attendance Service for details. |
| Activate Cloud Attendance Service | Activate the cloud attendance service for the system. For details, see Add Cloud Attendance System |
| Add Cloud Attendance Devices to the System | Add MinMoe access control devices to the system. For details, see Add Cloud Attendance System . |
| Hand Over Site to Your Customer | After completing the required configurations, hand over the site to your customer and so they will be the site owner. For details, see Hand Over Site .
DjNote When your customer accept the site handover and approving activating the cloud attendance service on the Hik-Connect Mobile Client (V 4.15.0 or later), they will be able to set access levels and attendance rules for their employees via the Hik- Connect Portal ( http://www.hik-connect.com ), and their employees will be able to use the Hik-Connect Mobile Client to check their attendance records. |
You can purchase the cloud attendance service packages online in the Service Market in Hik- Partner Pro or purchase a service key from the local distributor offline first, and then activate the cloud attendance service packages by the service key in the Service Market.
Steps
[2® Note
Activating the service by service key is only supported in some countries and regions. Contact the local distributor for details.
- In the left navigation, click Service ^ Service Market to enter the Service Market page.
- In the Cloud Attendance area, click Online Purchase to enter the Purchase Cloud Attendance Package page.
Note
If your country or region supports service key and you have purchased a service key from the distributor, you can also click Activate by Service Key to purchase the service.
- Select the service packages (purchase by month or by year), and set the number of service packages that you want to purchase.
Cloud Attendance Package (Monthly)
The service term is one month. The service term starts when you activate the service.
12 * Cloud Attendance Package (Monthly)
12 Cloud Attendance Packages sold as a batch.
C0 Note
The price of the package changes when you purchase different numbers of packages.
- Click to enter the VAT number, and click to confirm.
C® Note
The VAT number will be displayed in the payment receipt.
- Select Credit/Debit Cards as the payment method.
- Click Checkout to enter the payment page and finish the payment.
- Optional: Go to Service ^ Service Market ^ My Service ^ Cloud Attendance Service to view your cloud attendance packages and manage them.
US Note
For details, see Manage Your Cloud Attendance Service .
15.3.3 Add Cloud Attendance System
You can add a cloud attendance system for a site to set up the basic attendance management environment for the Site Owner.
Steps
- Go to the Customer Site page.
- Select the site where you want to add the cloud attendance system.
- Select the Cloud Attendance tab.
- Click Add Cloud Attendance System.
- Create a name for the system.
- Click OK.
US Note
The service is inactivated.
- Activate the cloud attendance service for the site.
- Click Free Trial.
- Click Confirm in the pop-up window.
![]()
Note
You can view the trial capacity of the service (25 persons) and the expiry date.
- Optional: If you need to expand and renew the service, click Expand & Renew.
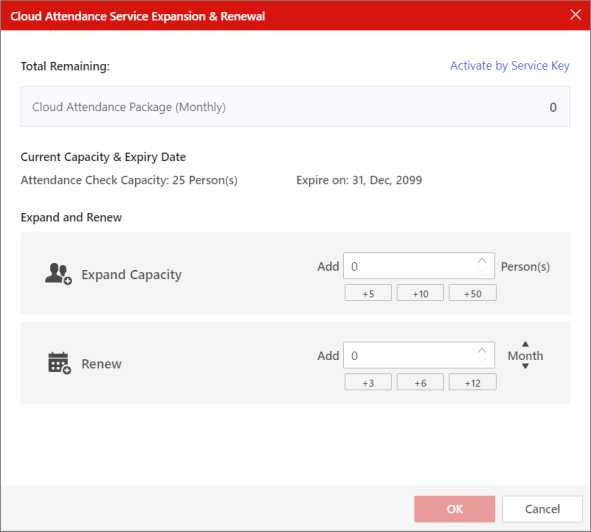
Figure 15-6 Cloud Attendance Service Expansion & Renewal
1) Set the number of person(s) to be added.
2) Set the month(s) to be renewed.
CE Note
You can view the number of cloud attendance service packages needed after the service is expanded and renewed.
- Optional: If service packages are insufficient, you can click Online Purchase or Activate by Service Key in the upper-right corner to purchase more.
C® Note
For details, refer to Purchase Cloud Attendance Service .
- Click OK.
- Click Add Device or Edit to add access control devices to the cloud attendance system or edit the devices.
- To add the devices in the current site to the system, click Add, select the devices, and click OK.
- To add the devices in the other sites that belong to the same Site Owner, click Add Other Sites’ Devices, select the devices, and click OK.
il Note
Make sure to switch on Cloud Attendance for the devices.
What to do next
Hand over the site to the Site Owner and inform the Site Owner to accept the cloud attendance service permission application. See details in Hand Over Site .
15.3.4 Manage Your Cloud Attendance Service
In My Service, you can manage your cloud attendance service. The available features for the management include viewing remaining service packages, service activation, service renewal, and so on.
Go to Service ^ My Service ^ Cloud Attendance Service to enter the cloud attendance service page (as the figure below shows).
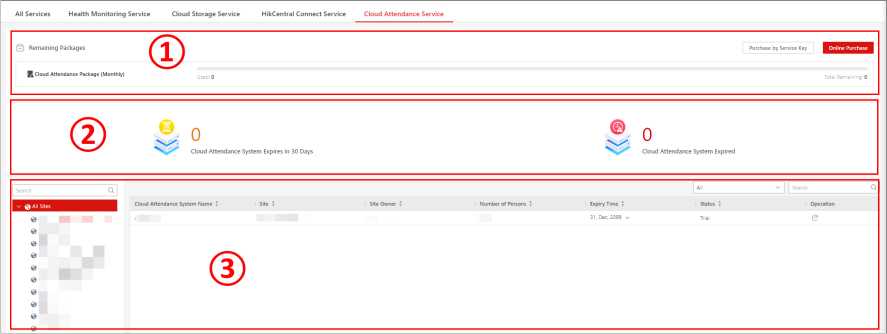
Figure 15-7 Manage Your Cloud Attendance Service
On the page, the following features are available.
Table 15-4 Available Features
| Area No. | Feature | Description |
| 1 | View Remaining Packages & Purchase More |
|
| 2 | View Expiration Information | • Cloud Attendance System Expires in 30 Days: The number of cloud attendance systems that expire in 30 days. |
| Area No. | Feature | Description |
| You can click Cloud Attendance System Expires in 30 Days to view these cloud attendance systems in the list below.
• Cloud Attendance System Expired: The number of cloud attendance systems that expired. You can click Cloud Attendance System Expired to view these cloud attendance systems in the list below. |
||
| 3 | Filter Cloud Attendance Systems or Search by Keywords |
|
| 4 | Renew Service | Click O in the Operation column to renew the service.
See Add Cloud Attendance System for details. |
Hik-Partner Pro offers cloud storage solution for the event-related video footage, which refers to the video footage recorded when a pre-defined event is detected by the channel of an encoding device.
After you add a cloud storage device to the platform and complete cloud storage settings, the device will function as the transmission medium by uploading the event-related video footage from its linked channels to the cloud. The uploaded video footage will be retained for 7 days, 30 days, 90 days, 180 days, or 365 days on the cloud, basing on the types of the cloud storage service packages purchased from the service market.
The flow charts below shows the recommended procedures for using cloud storage service by Hik- Partner Pro box, DVR that supports cloud storage, NVR that supports cloud storage, and solar camera.
Note
If your DVR/NVR does not support cloud storage, you should use a Hik-Partner Pro box to help the DVR/NVR upload footage to the cloud, and the flow chart is the same as that for the Hik-Partner Pro box.
Flow Chart for Hik-Partner Pro Box
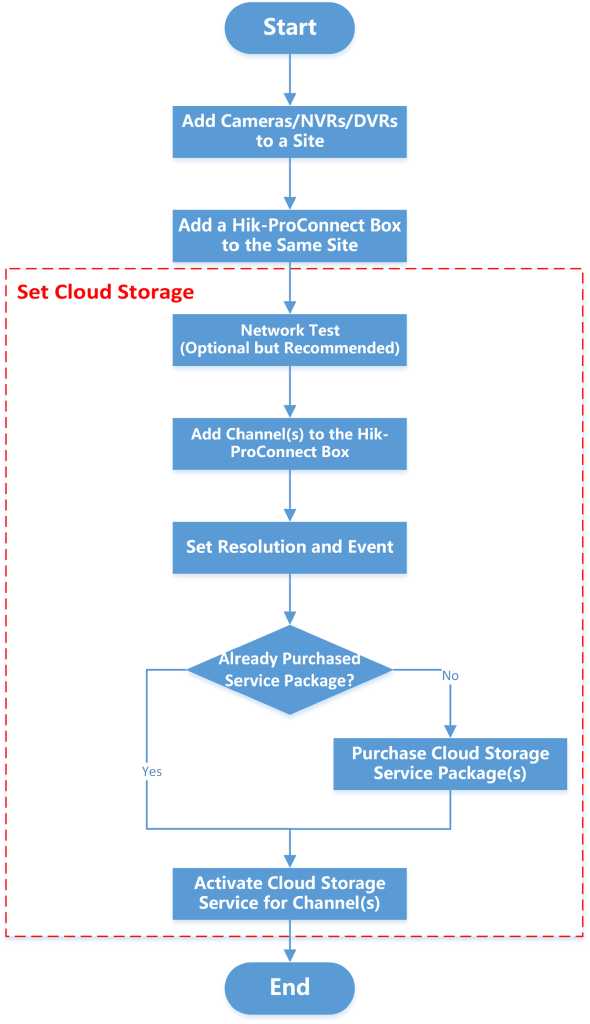
The following table shows the description for each procedure of the flow chart.
Table 15-5 Flow Chart Description
| Procedure | Description |
| Add Cameras/NVRs/DVRs to a Site | Add cameras, NVRs, or DVRs to a site. For details, see Add Device . |
| Add a Hik-Partner Pro Box to the Same Site | Add a Hik-Partner Pro box to the same site by Hik-Connect (P2P).
For details, see Add Device by Entering Serial No. , Batch Add Devices , and Add Detected Online Device . QU Note For the Hik-Partner Pro box added by IP/Domain name, cloud storage service is not supported. |
| Set Cloud Storage | Set cloud storage for the Hik-Partner Pro. See Set Cloud Storage for Hik-Partner Pro Box for details.
The following list shows the descriptions of the sub-procedures.
ΠNote You can also activate service packages by service key. Consult the distributor to get the service key.
|
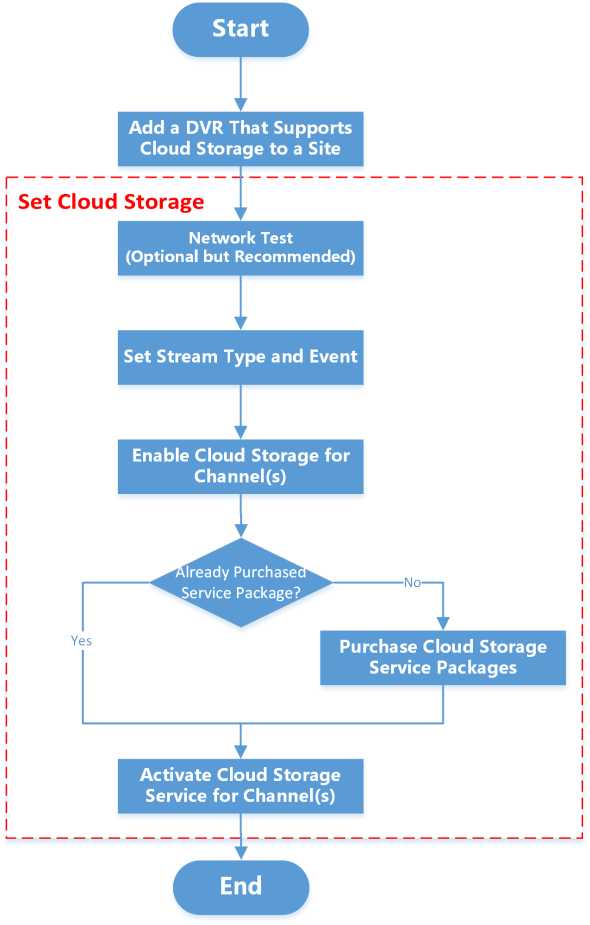
Figure 15-8 Flow Chart for DVR That Supports Cloud Storage
The following table shows the description for each procedure of the flow chart.
Table 15-6 Flow Chart Description
| Procedure | Description |
| Add a DVR That Supports Cloud Storage to a Site | Add a DVR that supports cloud storage to a site by Hik-Connect (P2P). For details, see Add Device by Entering Serial No. , Batch Add Devices , and Add Detected Online Device . |
| Procedure | Description |
| OS Note
If the DVR that supports cloud storage is added by IP/Domain Name, cloud storage service is not supported. |
|
| Set Cloud Storage | Set cloud storage for the DVR that supports cloud storage. For details, see Set Cloud Storage for DVR .
The following list shows the descriptions of the sub-procedures.
CS Note You can also activate service packages by service key. Consult the distributor to get the service key.
|
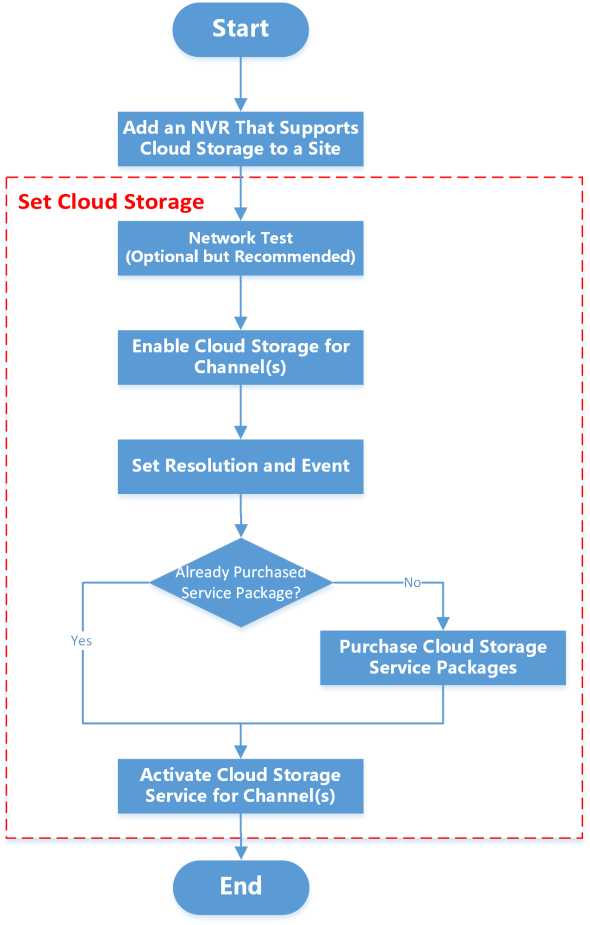
Figure 15-9 Flow Chart for NVR That Supports Cloud Storage
The following table shows the description for each procedure of the flow chart.
Table 15-7 Flow Chart Description
| Procedure | Description |
| Add an NVR That Supports Cloud Storage to a Site | Add an NVR that supports cloud storage to a site by Hik-Connect (P2P). For details, see Add
Device by Entering Serial No. , Batch Add Devices , and Add Detected Online Device . |
| Procedure | Description |
| OS Note
If the NVR that supports cloud storage is added by IP/Domain Name, cloud storage service is not supported. |
|
| Set Cloud Storage | Set cloud storage for the NVR that supports cloud storage. For details, see How to enable cloud storage for an NVR that supports cloud storage? .
The following list shows the descriptions of the sub-procedures.
CS Note ° If Smart H.264+ / H.265+ encoding is enabled for the channel with cloud storage enabled, the quality of the footage on cloud will be affected. The platform will notify you to disable Smart H.264+ / H. 265+ encoding. ° If stream encryption is not enabled for an encoding device linked to an NVR that supports cloud storage, you cannot enable cloud storage for the channels of the encoding device.
|
| Procedure | Description |
| OS Note
You can also activate service packages by service key. Consult the distributor to get the service key. • Activate Cloud Storage Service for Channel(s): Activate cloud storage service for specific channel(s) using the purchased cloud storage service package(s) or service key. See Activate or Renew Service for a Channel for details. |
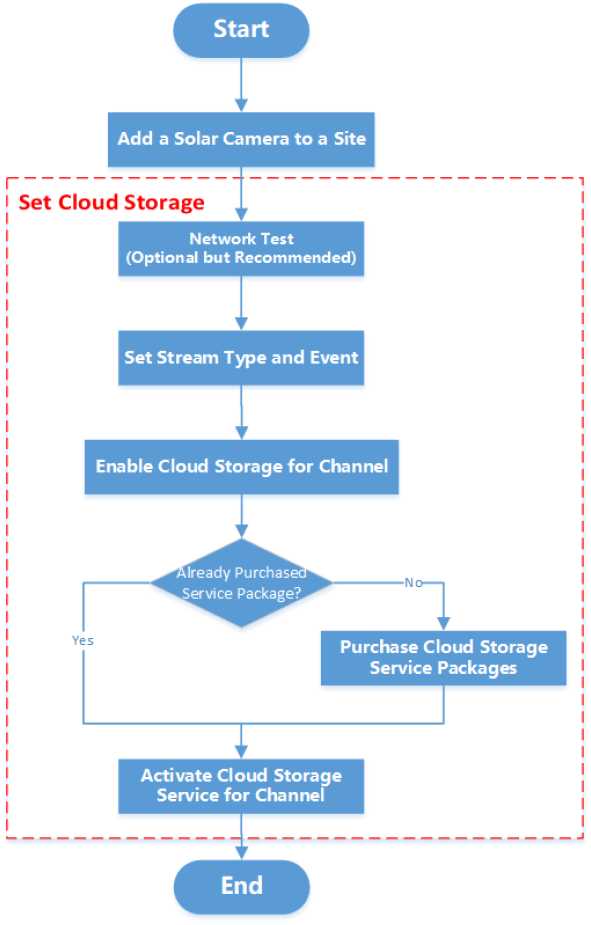
Figure 15-10 Flow Chart for Solar Camera
The following table shows the description for each procedure of the flow chart.
Table 15-8 Flow Chart Description
| Procedure | Description |
| Add a Solar Camera to a Site | Add a solar camera to a site by Hik-Connect (P2P). For details, see Add Device by Entering Serial No. , Batch Add Devices , and Add Detected Online Device . |
| Procedure | Description |
| OS Note
If the solar camera is added by IP address / domain name, cloud storage service is not supported. |
|
| Set Cloud Storage | Set cloud storage for the solar camera. For details, see Set Cloud Storage for Solar Camera .
The following list shows the descriptions of the sub-procedures.
CS Note Currently only motion detection is supported.
HS Note You can also activate service packages by service key. Consult the distributor to get the service key.
|
-
-
- Purchase Cloud Storage Service
-
There are seven types of cloud storage service packages, namely, 7-Day Monthly Package, 7-Day Annual Package, 30-Day Monthly Package, 30-Day Annual Package, 90-Day Annual Package, 180- Day Annual Package, and 365-Day Annual Package. You should purchase the cloud storage service from the service market before using it.
Before You Start
The cloud storage service is available for purchase only if your company is authenticated.
Steps
- Go to the Service Market page.
- Click Cloud Storage under Value-Added Services.
- In the Cloud Storage area, click Online Purchase to enter the purchasing page.
You can view the seven types of cloud storage service packages and their corresponding prices.
- Click /x or manually enter a number to define the number of the packages to be purchased.
CHjNote
- You can purchase one or more packages at a time. The validity period of the service is one year after purchase, and thus you should activate the service within the validity period.
- The number before “Day” (e.g. 7-Day, 30-Day, 90-Day, etc.) refers to the retention period of the event-related video footage on the cloud. Monthly and Annual refer to how long the service will last after activation.
Example
For example, if you select 7-Day Monthly Package, the video footage can be saved on the cloud storage for 7 days, and it will be covered by new video footage from the 8th day. After activation, the service will last for a month.
The selected service package(s) will be displayed on the right side of the page.
- Click to enter the VAT number, and click to confirm.
OU Note
The VAT number entered here will be displayed in the payment receipt.
- Select Credit/Debit Cards as the payment method.
- Click Checkout to enter the payment page and finish the payment.
- Optional: Click Service ^ My Service ^ Cloud Storage Service to view the service package(s) you have purchased.
When you complete adding a Hik-Partner Pro box to a site, the result page will show the entry for setting cloud storage. You can skip the settings, but it is recommended that you click the entry to start the settings, including network test (optional), adding channels, channel resolution settings, event settings, and activating cloud storage service. When you complete all these settings, the Hik- Partner Pro box will be able to upload event-related video footage from its linked channels to the cloud.
Steps
d@Note
If you skip the cloud storage settings when completing adding the Hik-Partner Pro box, you can click the device in the device list to open its settings panel to set cloud storage for it later.
- Add a Hik-Partner Pro box to a site by Hik-Connect (P2P).
OS Note
- For details about adding the Hik-Partner Pro box, see Add Device by Entering Serial No. , Batch Add Devices , or Add Detected Online Device .
- If you add the Hik-Partner Pro box by IP/Domain name, its cloud storage functionality will be unavailable.
When you complete adding the device, the entry for setting cloud storage will be displayed on the adding result page.
- Click Cloud Storage Settings to start setting cloud storage parameters.
You will enter the Network Test page.
- Optional: Click Start to test the network performance if the network bandwidth is limited, and then click Add Channel when test completes.
CIS Note
- For details about network test, see Network Test .
- You can click Skip to skip the step.
The Add Channel window will pop up.
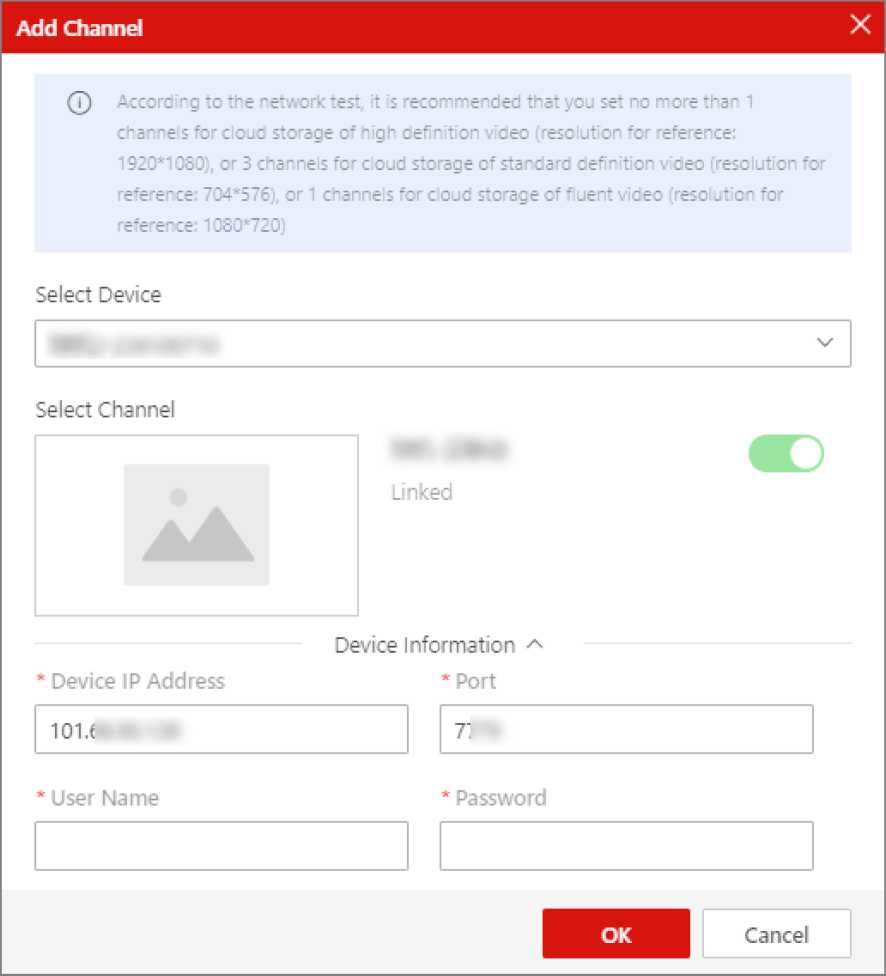
Figure 15-11 Add Channel Window
4. Add channel(s) to Hik-Partner Pro box to enable cloud storage functionality for them.
1) Select a device (e.g., NVR and network camera) from the drop-down list on the Add Channel window.
The channels of the device will be displayed. And you can click Device Information to view or edit the device information, including device IP address, port No., device user name, and password.
Mil Note
The IP addresses of the devices and the Hik-Partner Pro box should be on the same LAN.
- Turn on the switch(es) to add specific channel(s) to the Hik-Partner Pro box so as to enable their cloud storage functionality.
- Enter the information of the device to which the channel belongs, including IP address, port No., user name, and password.
- Click OK.
You will enter the Cloud Storage Settings page, which displays the channel(s) already added to the Hik-Partner Pro box.
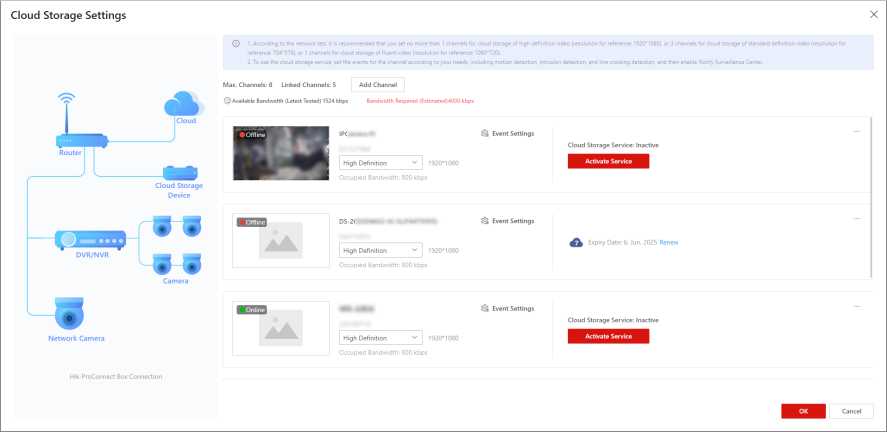
Figure 15-12 Cloud Storage Settings Page
5. Set resolution of the footage to be uploaded to the cloud.
– Select Standard Definition or High Definition from the drop-down list according to the recommended resolution displayed on the Cloud Storage Settings page (if you have done network test).
CilNote
Make sure the number of standard definition channel(s) or high definition channel(s) is no more than the recommended upper-limit displayed on the Add Channel window (if you have tested your network).
– Click Z , and then select a resolution (1080P, 720P, 4CIF, or CIF) from the drop-down list in the pop-up window, and then set the bit rate according to the recommendation shown on the pop-up window.
- Click Event Settings to set the event(s) that will trigger video recording action of the channel.
‘Note
The events that support such a trigger include motion detection, intrusion, and line crossing. For the settings of different events are similar, here we only briefly introduce how to set motion detection. For details about settings of other events, see the user manual of the channel (camera).
Enable Motion Detection
Turn on the switch to enable motion detection.
Area Settings
Tap Draw Area to draw an area on the image, and then drag the slider to set the sensitivity of motion detection.
Objects in motion will be detected within the drawn area.
Arming Schedule
Define the time period during which motion detection is activated.
Linkage Method
Make sure Notify Surveillance Center is checked, otherwise the channel will not record event-related video footage even if the event is detected.
- Optional: Edit or delete a specific channel.
Edit a Channel Click • * • ^ to edit the settings of the channel.
Delete a Channel Click « * * ^ ® to delete the channel.
- Click Activate to activate cloud storage service for the channel.
C® Note
For details about how to activate the service, see Activate or Renew Service for a Channel .
The event related video footage of the channel will be uploaded to the cloud.
- Optional: Click * * * ^ to switch channel to use the activated service.
- Click Finish.
15.4.4 Set Cloud Storage for NVR
You can enable and set up cloud storage for an NVR and its linked channels. When you complete the settings, the NVR will be able to upload event-related footage of its linked channels to the cloud.
Do I need a Hik-Partner Pro Box to enable cloud storage function for an NVR?
- If your NVR supports cloud storage, there is no need for a Hik-Partner Pro Box.
This feature requires device capability. Refer to the Hik-Partner Pro Compatibility List for a complete list of supported models.
See the next section for instructions.
- If your NVR does not support cloud storage, you can use a Hik-Partner Pro Box to help the NVR upload footage to the cloud.
See details in Set Cloud Storage for Hik-Partner Pro Box .
How to enable cloud storage for an NVR that supports cloud storage?
Select the NVR’s site, and then select the Cloud Storage tab. Click Enable Cloud Storage Service to
set up cloud storage for the NVR and its channels.
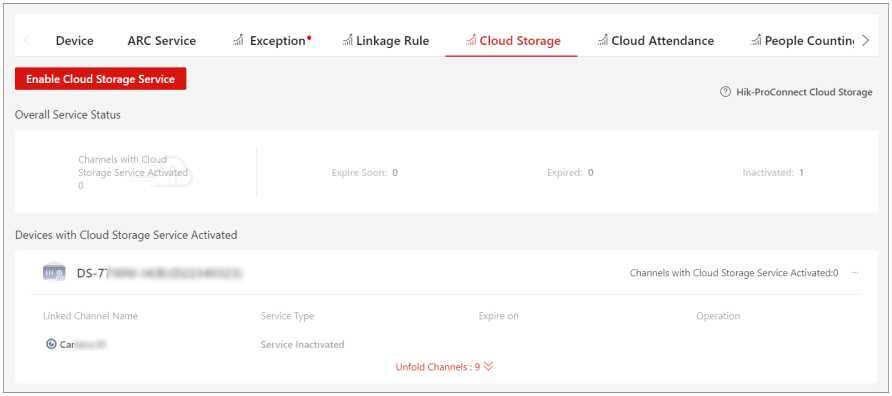
Figure 15-13 Cloud Storage
When setting up the cloud storage, you need to read and follow the recommendations for the resolution, bit rate, and number of the channels at the top of the page.
(T) 1, Based on the cunent network condition, it is recommended that you set no more than 7 cloud storage channel(s) with the resolution of 1920’1080, or set no more than 9 cloud storage channel(s) with the resolution of 1280’720, or set no more than 15 cloud storage channels) with the resolution of 704’576
- To use the cloud storage service, set the events for the channel according to your needs, including motion detection, intrusion detection, and line crossing detection, and then enable Notify Surveillance Center.
- After enabling uploading video to cloud storage, the device will not support H.264+, H.265+, or network camera connection (except those accessed by disabling analog channels). The resolution cannot be 8 MP,

![]()
Max. Channels: 2 Cloud Storage Enabled: 1
Available Bandwidth (Latest Tested) 7888 kbps Bandwidth Required (Estimated)256 kbps
Cloud Storage Service: Not Enabled
Figure 15-14 Cloud Storage Settings
The steps are similar to those of setting up cloud storage for a Hik-Partner Pro Box. You can refer to Set Cloud Storage for Hik-Partner Pro Box for information on the video resolution, event settings, and service activation.
Note
- If Smart H.264+ / H.265+ encoding is enabled for the channel with cloud storage enabled, the quality of the footage on cloud will be affected. The platform will notify you to disable Smart H. 264+ / H.265+ encoding.
- If stream encryption is not enabled for an encoding device linked to an NVR that supports cloud storage, you cannot enable cloud storage for the channels of the encoding device.
15.4.5 Set Cloud Storage for DVR
When you complete adding a DVR that supports cloud storage to a site, the result page will show the entry for setting cloud storage. You can skip the settings, but it is recommended that you click the entry to start the settings, including network test (optional), event settings, stream type settings, enabling cloud storage for the channels of the DVR that supports cloud storage, and activating cloud storage service for the channels. When you complete all these settings, the DVR that supports cloud storage will be able to upload event-related video footage from its linked channels to the cloud.
Steps
dlNote
- If your DVR does not support cloud storage, you can use a Hik-Partner Pro box to help the DVR upload footage to the cloud. See details in Set Cloud Storage for Hik-Partner Pro Box .
- If you skip the cloud storage settings when completing adding the DVR that supports cloud storage, you can click the device in the device list to open its settings panel to set cloud storage for it later.
- Add a DVR that supports cloud storage to a site by Hik-Connect (P2P).
CHjNote
- For details about adding a DVR that supports cloud storage, see Add Device by Entering Serial No. , Batch Add Devices , or Add Detected Online Device .
- If you add the DVR that supports cloud storage by IP/Domain name, its cloud storage functionality will be unavailable.
When you completes adding the device, the entry for setting cloud storage will be displayed on the adding result page.
- Click Cloud Storage Settings to start setting cloud storage parameters.
You enter the Network Test page.
- Optional: Click Start to test the network performance if the network bandwidth is limited, and then click Next when the test completes.
‘Note
- For details about network test, see Network Test .
- You can click Skip to skip the step.
You enter the Cloud Storage Settings page, on which all the channels of the DVR that supports cloud storage are displayed.
- Select Main Stream or Sub Stream from the drop-down list as the stream type for the channel. dlNote
The video definition of main stream and sub stream are displayed below the drop-down list. Make sure the number of standard definition channel(s) or high definition channel(s) is no more than the recommended upper-limit displayed on the Add Channel window (if you have tested your network).
- Click Event Settings to set the events that will trigger video recording action of the channel.
US Note
The events that support such a trigger include motion detection, intrusion, and line crossing. For the settings of different events are similar, here we only briefly introduce how to set motion detection. For details about settings of other events, see the user manual of the channel (camera).
Enable Motion Detection
Turn on the switch to enable motion detection.
Area Settings
Tap Draw Area to draw an area on the image, and then drag the slider to set the sensitivity of motion detection.
Objects in motion will be detected within the drawn area.
Arming Schedule
Define the time period during which motion detection is activated.
Linkage Method
Make sure Notify Surveillance Center is checked, otherwise the channel will not record video footage even if the event is detected.
- Turn on Cloud Storage to enable cloud storage functionality for the channel.
C® Note
If it is the first time you enable cloud storage for a channel of the DVR that supports cloud storage, the DVR will be automatically rebooted. Please wait patiently until it completes rebooting and then open its settings panel to complete the steps below.
- Click Activate to activate cloud storage service for the channel.
‘Note
For details about how to activate the service, see Activate or Renew Service for a Channel .
The DVR that supports cloud storage will automatically reboot. After that, the event related video footage of the channel will be uploaded to the cloud.
C® Note
When cloud storage service is activated for the channel, you cannot turn off Cloud Storage for the channel by default.
- Click Finish.
- Optional: Click the DVR that supports cloud storage in the device list to open its settings panel, and then click Edit to edit the settings of its channels.
CS Note
If you turn off Cloud Storage for all of its channels, the DVR that supports cloud storage will automatically reboot itself.
15.4.6 Set Cloud Storage for Solar Camera
You can enable and set up cloud storage for a solar camera when adding the solar camera to a site. When you complete the settings, the solar camera will be able to upload event-related footage of its channel to the cloud.
Steps
CS Note
- If you skip the cloud storage settings when adding a solar camera, you can go to the site to which the solar camera is added to set cloud storage for it later.
- For a complete list of supported solar camera models, refer to the Hik-Partner Pro Compatibility List.
- Add a solar camera to a site by Hik-Connect (P2P).
C® Note
- For details about adding solar cameras, see Add Device by Entering Serial No. , Batch Add Devices , or Add Detected Online Device .
- If the solar camera is added by IP address / domain name, its cloud storage functionality will be unavailable.
When you complete adding the solar camera, the entry for setting cloud storage will be displayed on the adding result page.
A pop-up window indicating the time remaining for waking up the solar camera will appear before entering the Cloud Storage Settings page, on which the channel of the solar camera is displayed.
- Optional: On the Network Test page, click Start to test the network performance if the network bandwidth is limited, and then click Next when the test completes.
OS Note
- For details about network test, see Network Test .
- You can click Skip to skip the step.
- Select Main Stream or Sub-Stream from the drop-down list as the stream type for the channel.
CS Note
The video definition of main stream and sub-stream are displayed next to the drop-down list.
- Click Event Settings to set the event that will trigger the video recording action of the channel.
US Note
Currently only motion detection is supported by solar cameras.
Enable Motion Detection
Turn on the switch to enable motion detection.
Area Settings
Tap Draw Area to draw an area on the image, and then drag the slider to set the sensitivity of motion detection.
Objects in motion will be detected within the drawn area.
Arming Schedule
Define the time period during which motion detection is activated.
Linkage Method
Make sure Notify Surveillance Center is checked, otherwise the channel will not record video footage even if the event is detected.
- Switch on Cloud Storage to enable cloud storage for the channel.
- Click Activate Service to activate cloud storage service for the channel.
CS Note
- For details about how to activate the service, see Activate or Renew Service for a Channel .
- After the cloud storage service is activated for the channel, you will not be able to disable cloud storage for the channel.
- Click Finish.
The event-related video footage of the channel will be uploaded to the cloud.
When your network bandwidth is limited, you can only enable cloud storage for a limited number of channels, otherwise video loss may occur. To avoid such a risk, you can perform network test. Based on your network conditions, the result of network test shows the maximum number of channel(s) with cloud storage enabled and the recommended resolution setting for each channel, helping you to set cloud storage in the way that utilize the limited network bandwidth to the largest extent.
OS Note
It takes about one minute to test the network.
You can click the cloud storage device in the device list to open the device settings panel, and then click ^ Start to start network test.
On the cloud storage service page for a site, you can view the service status of channels of the cloud storage device(s) added to the site. If cloud storage service is not activated for a certain channel, you need to activate the service before using the feature. If the service activated for a channel is about to expire or has already expired, you can renew the service for the channel.
Before You Start
Make sure you have added cloud storage device(s) to the site. For details, refer to Add Device .
Steps
US Note
For a device which doesn’t support the Hik-Connect service, you need to add it to Hik-Partner Pro via the proxy of a Hik-Partner Pro Box first, and then activate the cloud storage service for channels of the device. See Add Devices Without Support for the Hik-Connect Service for details about how to add this type of devices.
- Go to the Customer Site page.
- Click a site to enter the site details page.
- Select the Cloud Storage tab.
- Open the Activate / Renew Cloud Storage Service window.
- If cloud storage service is not enabled for any of the channels of the cloud storage device, click Enable Cloud Storage Service first, select an online device from the list, enable Cloud Storage for a device channel, and click Activate Service.
- If a cloud storage device has at least one channel with cloud storage service enabled, its linked channels and their service status will be displayed on the page. In the Operation column of a channel, click Activate Service to activate the service for the channel, or click Renew Service to renew the service for the channel.
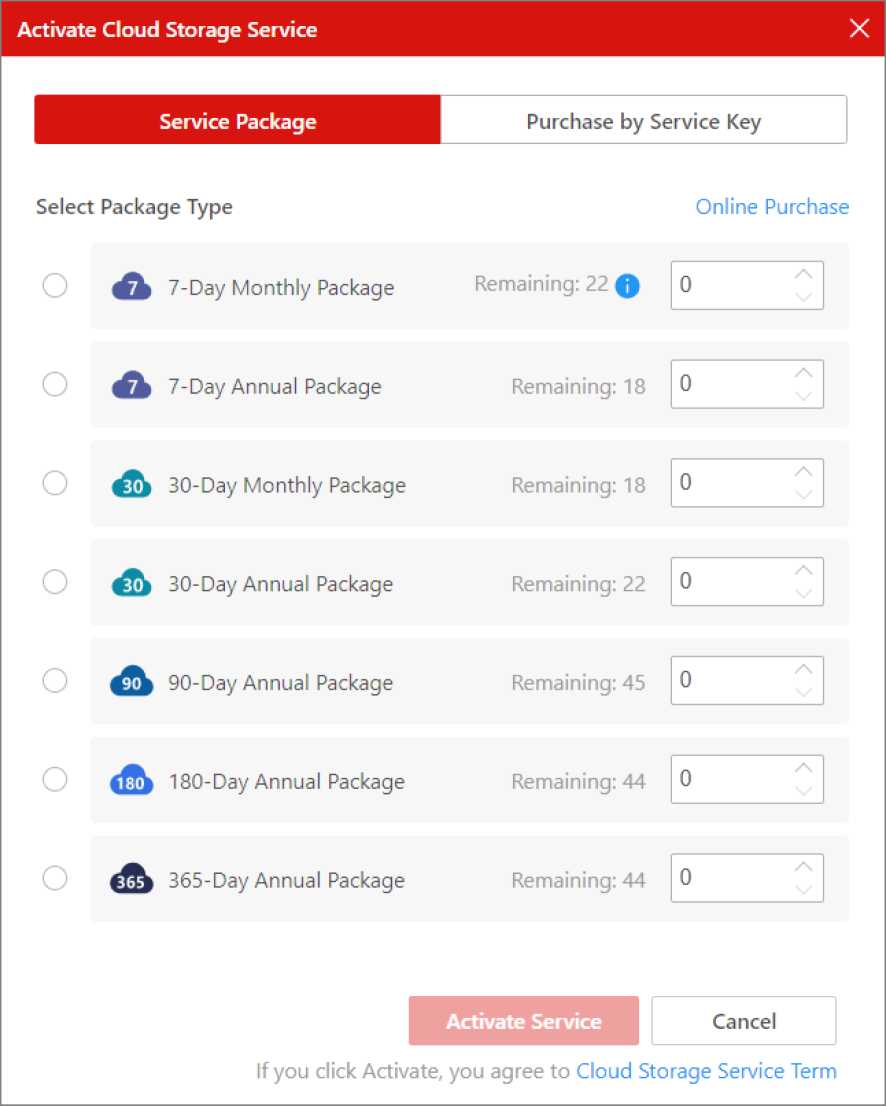
Figure 15-15 Activate Cloud Storage Service Window
‘Note
You can view the available packages which you have purchased. You can also click Online Purchase to purchase more packages if needed. For details, refer to Purchase Cloud Storage Service .
- Activate or renew the cloud storage service for the channel.
- Click Service Package, select a package type, and click /x (or manually enter a number) to set the number of package(s) to be used.
- Click Activate by Service Key, and enter the 16-character service key.
C® Note
You can consult the distributor to get the service key.
- Finish activating or renewing the cloud storage service.
- For activating cloud storage service, click Activate Service.
- For renewing cloud storage service, click Renew.
After activating or renewing the service, you can view the package type and expiry date of the service activated for each channel.
15.4.9 View Cloud Storage Details
You can view details of the cloud storage service, including the number of used and remaining service packages and the details (such as the expiry date and status) of service activated for channels of the cloud storage devices. You can also perform operations such as renewing the service for further use.
You can enter the cloud storage details page via the following two methods:
- Click the Hik-ProConnect tab. On the navigation pane, select Service ^ My Service ^ Cloud Storage Service .
- Click the Hik-ProConnect tab. On the navigation pane, select Service ^ My Service ^ All Services , find the cloud storage service block, and click Details.
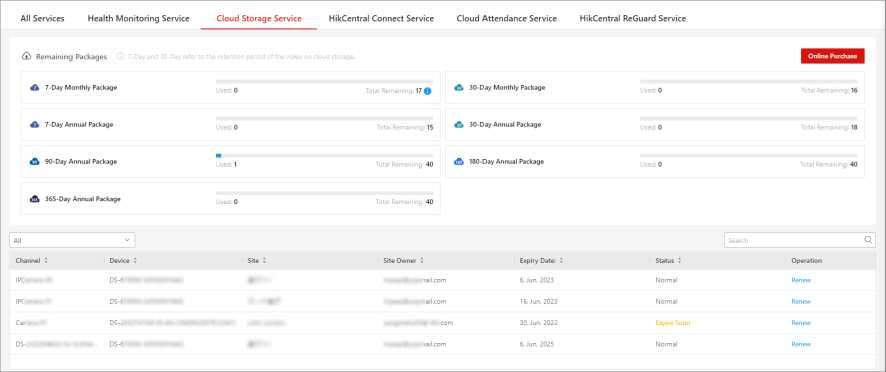
Figure 15-16 Cloud Storage Service Details Page
On the cloud storage details page, you can have an overall view of the cloud storage service packages that you have purchased and used, view the status of the service activated for different channels, and perform the following operations if needed.
- Filter: Click to filter the channels of cloud storage devices according to the service status (expire soon or expired).
- Search: Enter a keyword (name of device, site, or site owner) in the search box to search for and view the service status of specific channels.
- Purchase Cloud Storage Service Package: Click Online Purchase on the upper right corner of the page to purchase more cloud storage service packages as needed. For details, refer to Purchase Cloud Storage Service .
- Renew Cloud Storage Service: For the service that will expire soon, click Renew to renew the cloud storage service. For details, refer to Activate or Renew Service for a Channel .
HCC services refer to the enterprise-user services offered by the HikCentral Connect (HCC) system, which provides a Video Security as a Service (VSaaS) solution for enterprise users. An HCC system includes three subsystems, namely the Video Management System (VMS), on-board monitoring system, and alarm detection system, offering video management service, on-board monitoring service, and alarm detection service respectively.
See the following sections for more information about HCC services.
- Relationship Between Hik-Partner Pro and HCC
- Introduction to the Services of HCC
- HCC System User Types
- Clients for Accessing HCC
Relationship Between Hik-Partner Pro and HCC
HCC systems can be created on Hik-Partner Pro by installers like you and handed over to an enterprise user of HCC. To hand over a system, an email containing a super user account and an initial password will be sent to your customer for logging in to the HCC system. If there are devices added to the HCC system, the devices will be handed over together with the system. Refer to Create HCC Systems and Hand Over an HCC System and Devices for details.
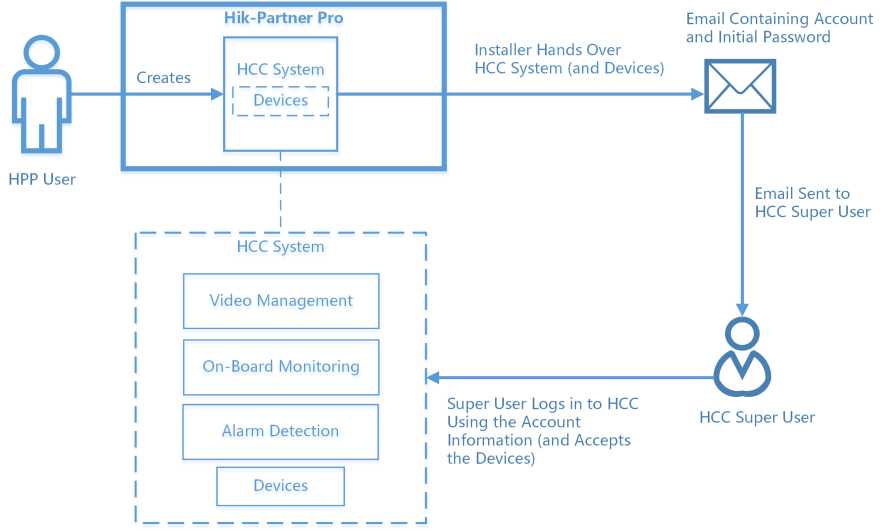
Figure 15-17 How an HCC System Is Created on Hik-Partner Pro and Handed Over
HCC systems can also be created by the self-registered HCC users themselves and added to Hik- Partner Pro for installers like you to purchase/activate value-added services for them. To complete the account linking process, HCC super users will need to give their account information (i.e., email address of the system owner) to you, who can then send an account linking request to them using the information. Refer to Link with HCC Account for details.
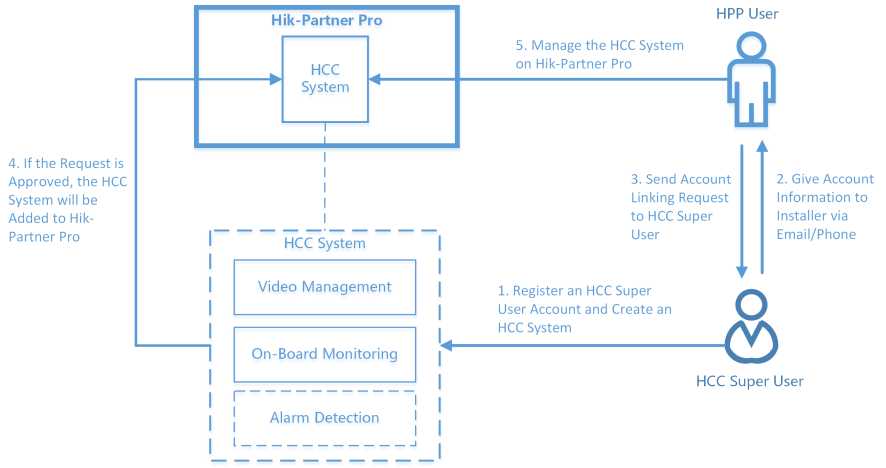
Figure 15-18 How an HCC System Is Created and Added to Hik-Partner Pro
Introduction to the Services of HCC
Table 15-9 Services of HCC
| Service | Description |
|
|
| Alarm Detection Service | The alarm detection service provides features such as real-time monitoring of partition (area) status and resource arming controls. Your customers can enjoy the following perks:
|
HCC System User Types
Table 15-10 User Types
| User Type | Description |
| Super User | The enterprise user who accepts a ready-to-use HCC system handed over from installers like you or self-registers an HCC account and plays the role of the initial administrator of HCC. The super user has full access to the resources and features of HCC. |
| Normal User | All other users of HCC except the super user. |
Clients for Accessing HCC
Table 15-11 Portal and Mobile Client
| Client | Description |
| monitoring features, and alarm detection features are available on the Portal. | |
| Mobile Client | Mobile Client for the super user and normal users to log in to HCC to use the video management features, on-board monitoring features, and alarm detection features such as live view, playback, driving monitoring, track playback, and arming control of security control partitions (areas) or zones. |
In the service market, you can either purchase HCC service packages online or activate the services by entering service keys purchased from local distributors offline.
Before You Start
Make sure that the HCC service is available in your country/region.
Steps
Note
Activating the service by service key is only supported in some countries and regions. Contact a local distributor for details.
- Go to Hik-ProConnect ^ Service ^ Service Market .
- In the Value-Added Services area, click HikCentral Connect Service.
- Click Online Purchase.
C® Note
If your country/region supports activating by service key and you have purchased a service key from a distributor, you can also click Activate by Service Key to activate the service.
- Set the number of the service packages to be purchased.
C® Note
- Each type of services (video management, on-board monitoring, and alarm detection) is offered in both monthly and annual packages.
- You can also purchase cloud storage service packages along with the video management service packages for enabling cloud storage service for your video management channels. To do so, check the checkbox displayed under each type of video management service packages and set the number of each type of packages according to your needs.
- The number set for each type of service packages and the total price (tax included) will be displayed on the right under Currently Selected for you to confirm before checkout.
- Enter your VAT number.
il Note
The VAT number entered here will be displayed on the payment receipt.
- Select Credit/Debit Cards as the payment method.
- Click Checkout to enter the payment page and complete your payment.
- Optional: Go to Hik-ProConnect ^ Service ^ Service Market ^ My Service ^ HikCentral Connect Service to view your HCC service packages and manage them.
CH] Note
For more details, refer to Manage Your HCCServices .
In My Service, you can manage your HCC services including the video management service, onboard monitoring service, and alarm detection service.
diNote
Make sure that the HCC service is available in your country/region.
You can go to the HikCentral Connect service details page by clicking Hik-ProConnect ^ Service ^ My Service ^ HikCentral Connect Service .
On the HikCentral Connect service details page, you can view the number of services that have expired and are about to expire within 30 days. You can also click All Systems or a specific system to view the following information: the number of resources (e.g., channels, vehicles, zones) added for each service, the service expiry time, and the service status (normal, expire soon, expired, trial, free, inactivated).
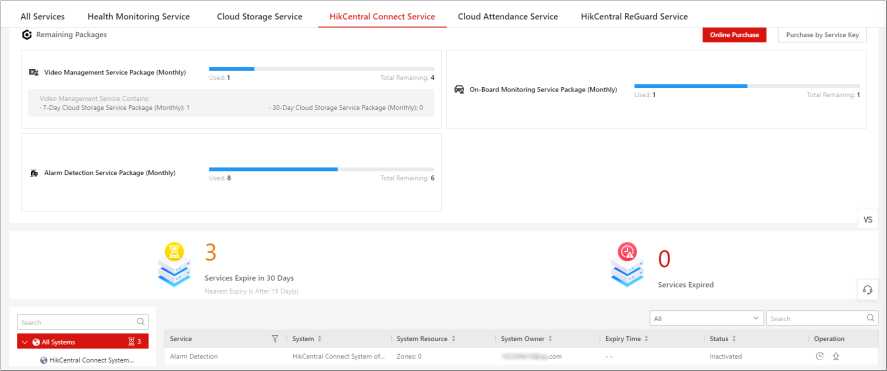
Figure 15-19 HikCentral Connect Services
On the Hik-Partner Pro Portal, you can create HCC systems which contain the video management service, on-board monitoring service, and alarm detection service. After you hand an HCC system over to a customer, the customer becomes the system owner and can log in to HCC with the given account and use the above-mentioned services to manage devices and perform monitoring tasks. You can still monitor the HCC system on the Hik-Partner Pro Portal, including the capacity and the status of the services activated for the system.
Before You Start
Make sure that the HCC service is available in your country/region.
Steps
C0Note
HCC systems can also be created by the self-registered HCC users themselves. To add their selfcreated HCC systems to Hik-Partner Pro and offer them value-added services, you need to link with their self-registered accounts. Refer to Link with HCCAccount for more details.
- Go to Hik-ProConnect ^ Site & HCC ^ HikCentral Connect .
- Click Create HikCentral Connect System to open the Create HikCentral Connect System pane.
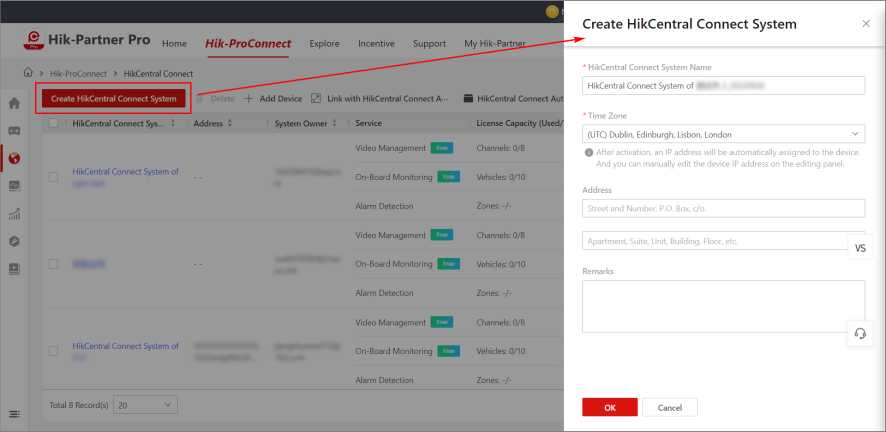
Figure 15-20 Create HikCentral Connect System
- Create a name for the HCC system.
- Select a time zone for the HCC system.
- Optional: Enter the address of your customer.
- Optional: Enter the remarks.
- Click OK.
- Optional: Perform the following operations as needed.
| View System Details | Click the name of an HCC system to view its details, including the validity period of the video management service, on-board monitoring service, and alarm detection service, whether the system has been handed over, etc. |
| Hand Over
System |
Click in the Operation column to hand over a system, or click the name of an HCC system to enter its details page and click Hand Over on the right. Refer to Hand Over an HCC System and Devices for details. |
| Delete
System(s) |
Select system(s), and click Delete to delete the selected system(s). |
You can add devices to an HCC system before handing it over to a customer.
□S Note
- Make sure that the HCC service is available in your country/region.
- The systems created by HCC users themselves and added to Hik-Partner Pro via account linking do not support the device adding.
You can add devices to an HCC system via one of the three following ways:
- Add Devices on HCC System List Page
- Add Devices on HCC System Details Page
- Add Devices After You Finish On-Site Config
After entering the Add Device page, refer to the hints displayed on the right of the page or the step descriptions in Add Detected Online Device and Add Device by Entering Serial No. respectively for details about adding devices. You can create a new HCC system or select an existing HCC system (not handed over) for adding devices to.
Refer to Device Status and Further Operations for more details about the status of added devices and what operations you can further perform.
Add Devices on HCC System List Page
Go to Hik-ProConnect ^ Site & HCC ^ HikCentral Connect and click Add Device at the top.

Figure 15-21 Add Devices on HCC System List Page
Add Devices on HCC System Details Page
Go to Hik-ProConnect ^ Site & HCC ^ HikCentral Connect and click the name of an HCC system to enter its details page. If there are no devices added to the system, you can click Add Device below the descriptions of each service.
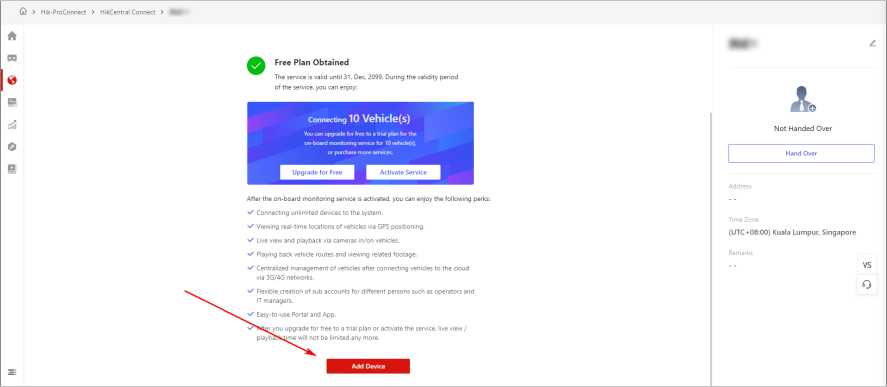
Figure 15-22 Add Devices on HCC System Details Page (First Time Adding)
If you have added devices to the system before and want to add more, click Add Device next to Hand Over Now to add more devices before handing these over.
![]()
Devices to Be Handed Over (4)
DS-‘
Device Serial No, •
Device Type: DVR/NVR
DS-
Device Serial No,
Device Type: DVR/NVR
îgî Remote Configuration EM Live View *►} Playback
îgî Remote Configuration EM Live View Playback
![]()
Device Serial No,
Device Type: Network Camera
DS-
Remote Configuration El Live View Playback
Device Serial No,
Device Type: DVR/NVR
£gî Remote Configuration EM Live View **)• Playback
Figure 15-23 Add Devices on HCC System Details Page (Add More)
Add Devices After You Finish On-Site Config
After batch configuring devices via On-Site Config (refer to Batch Configure Devices on LAN for details), click Add Device on the prompt window to enter the Add Device page.
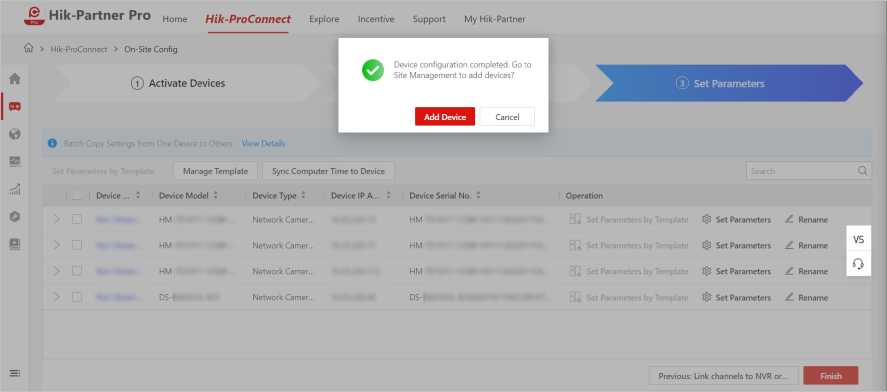
Figure 15-24 Prompt Window After Finishing On-Site Config
Device Status and Further Operations
After the devices are added via one of the above ways, you can click Hand Over Now to hand over the devices right away to a customer along with the HCC system, or click Continue Adding Devices to add more. The added devices will be displayed on the details page of the HCC system below the service plan details.
Devices to Be Handed Over (4)
Hand Over Now
+ Add Device
DS-
DS-•
Device Serial No,
Device Type: DVR/NVR
Sgî Remote Configuration El Live View Playback
Device Serial No, •
Device Type: DVR/NVR
Remote Configuration E Live View Playback
DS-
Device Serial No,
Device Type: Network Camera
Remote Configuration El Live View Playback
DS-
Device Serial No,
Device Type: DVR/NVR
Remote Configuration E Live View Playback
Figure 15-25 Device List of an HCC System
If the system is not handed over to a customer, the devices will be in the “to be handed over” status, and you can perform operations such as remote device configuration, deleting devices, and editing the device names.
Once you have initiated a handover attempt, the status of the devices will be changed to “to be accepted”. For devices to be accepted, you can only view the device list and cannot perform any other operations.
The devices handed over successfully (i.e., accepted by your customer on HCC) will not be displayed on Hik-Partner Pro anymore. Those failed to be handed over will be shown on the page for you to check and notify your customer of the (partial) handover failure.
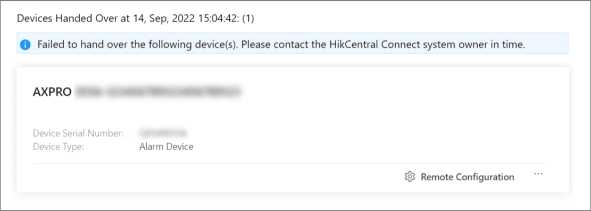
Figure 15-26 Device(s) Failed to Be Handed Over
You can link with the self-registered users of HCC, or HCC users whose systems are created by other Hik-Partner Pro users, to add their HCC systems to your Hik-Partner Pro and offer value-added services for them.
Note
Make sure that the HCC service is available in your country/region.
The self-registered HCC users can create an HCC system on their own and start using the video management service and/or on-boarding monitoring service of HCC on free service plans. However, if they want to use the alarm detection service, upgrade the free service plans to trial plans, or enjoy the service features without limitations, they need to link with installers like you to purchase/activate the services for them.
To complete the linking process, you can go to Hik-ProConnect ^ Site & HCC ^ HikCentral Connect , click Link with HikCentral Connect Account at the top, and enter the account information (i.e., email address) given by the self-registered users for you to send them the account linking request.
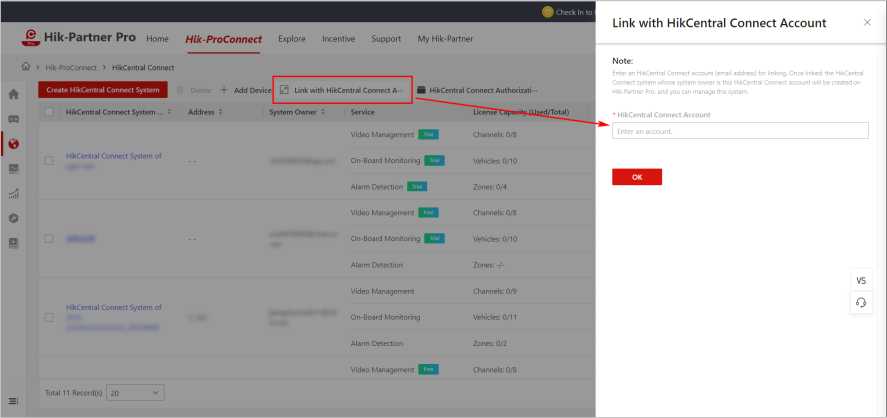
Figure 15-27 Link with HikCentral Connect Account
After a linking request is approved, the HCC system whose system owner is this HCC account will be added to your HikCentral Connect system management page for you to manage, such as performing service plan upgrades and service activations.
CH] Note
- An HCC account can only be linked with one installer at a time. If your customer has already linked with another installer, you can still send a linking request. After the request is approved, you can start managing your customer’s HCC system and the services already activated by the previous installer will not take up your service package inventory.
- For linking with an HCC account (system) created by another installer, once your customer approves your linking request, the HCC system is deleted from the other installer’s Hik-Partner Pro account and added to yours.
After you create an HCC system, you can hand it over to a customer together with the devices added to it. As a result, the customer becomes the system owner and is able to use the services of HCC (i.e., video management, on-board monitoring, and alarm detection service) to manage the corresponding devices and perform monitoring tasks. You can still monitor the HCC system on Hik- Partner Pro after the system handover.
Before You Start
Make sure that the HCC service is available in your country/region.
Steps
The systems added to Hik-Partner Pro via account linking do not support device adding and handover.
- Go to Hik-ProConnect ^ Site & HCC ^ HikCentral Connect .
- Choose from the followings to start the handover process.
- Click _i in the Operation column of a system to be handed over.
- Click the name of an HCC system to enter its details page. On the page, click Hand Over on the system details pane, or click Hand Over Now next to Devices to Be Handed Over (if there are devices added to the system).
- Click Hand Over Now on the success page after you add devices to an HCC system. For details about adding devices to an HCC system, refer to Add Devices to an HCCSystem .
A window may pop up to remind you that you will not be able to add devices to the system after handing it over to your customer.
Figure 15-28 Device Adding Reminder for System Handover
3. Optional: On the pop-up window, click OK to go to the device adding page to add devices, or click Cancel to proceed with the handover process.
4. On the Hand Over System pane, enter the email address, first name, and last name of your customer.
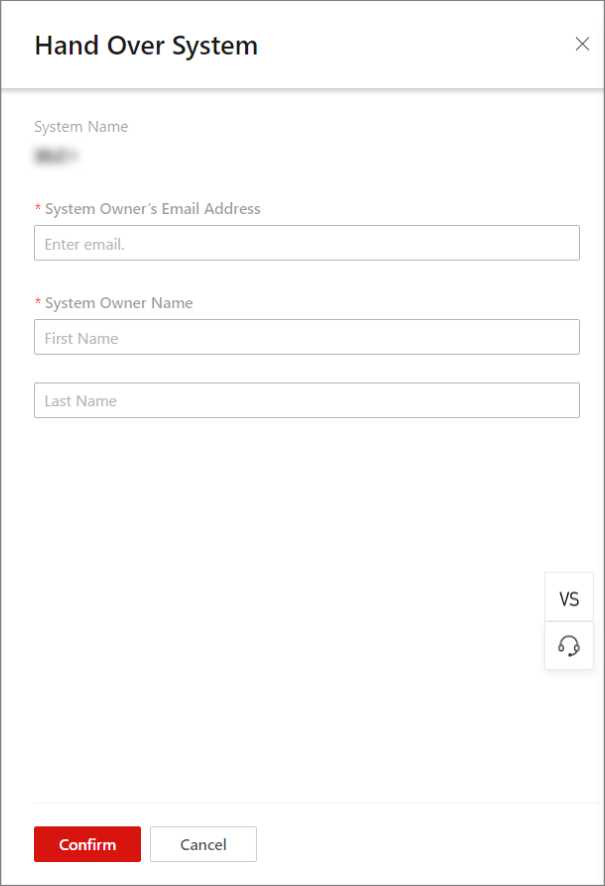
Figure 15-29 Hand Over System
- Click Confirm.
The status of the system and the devices added to it (if any) will be changed to “to be accepted”. An email will be sent to your customer to provide them the account information. After successfully logging in to their system, your customer will receive another email notifying them of the device handover attempt.
- Optional: Contact the customer to log in to the HCC system and accept the devices.
You can access your customers’ HCC systems using the authorization code created by them on HCC to provide them maintenance services within a set period of time.
03 Note
Make sure that the HCC service is available in your country/region.
If your customer needs maintenance services from you, they can create an authorization code on HCC for you to access their HCC system directly without the need to log in using their account name and password.
To do so, you can go to Hik-ProConnect ^ Site & HCC ^ HikCentral Connect , click HikCentral Connect Authorization Code at the top, and enter the authorization code given to you by your customer. To access their HCC system, confirm that the system information (system name and account information) displayed after you enter the code is correct and click Access HikCentral Connect.
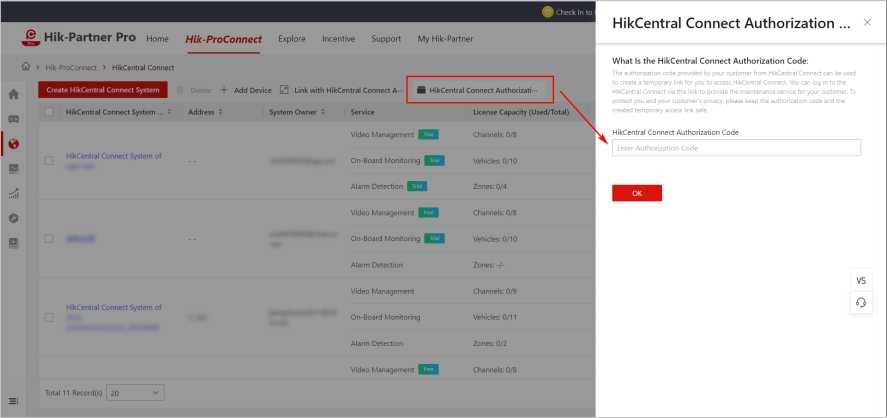
Figure 15-30 Enter HikCentral Connect Authorization Code
Hik-Partner Pro offers people counting service to help your customers to resolve issues related to people flow control. After adding people counting cameras to specific Sites managed via this platform and activating this service for your customers, you can integrate people counting capabilities to of these cameras with the platform so as to monitor in real time the people densities of specific areas in these Sites. These cameras will count people entering, exiting, or passing by the areas, and analyze whether people densities of these areas reach the upper-limits.
This is useful for certain commercial and health protection scenarios, such as limiting the customer traffic of a shopping mall during the promotion period.
C® Note
People density here refers to the amount of people staying within a limited area at the same time.
The flow chart below shows the recommended process for setting people counting service.
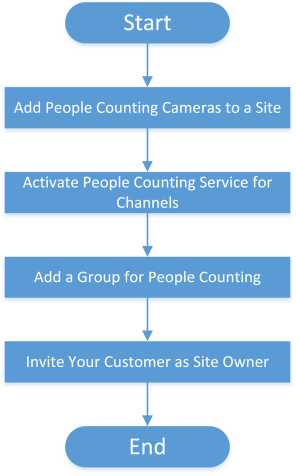
Figure 15-31 Flow Chart
The table below shows the description of each step and the link to corresponding section.
Table 15-12 Flow Chart Description
| Step | Description |
| Add People Counting Cameras to a Site | Add people counting cameras (i.e., the cameras with people counting capability) to a specific Site. For details about adding devices, see Add Device and its sections. |
| Activate People Counting
Service for Channels |
Activate people counting service for specific channels of the added people counting cameras. For details, see Activate People |
| Step | Description |
| Add a Group for People Counting | Add a group to define people counting rules, such as calculation mode and maximum allowed people in the area. For details, see Add a Group for People Counting . |
| Hand Over Site to Your Customer | After complete the required configurations, hand over the site to your customer, so they will be the site owner. For details, see Hand Over Site .
Œ] Note When your customer accept the site handover on the Hik- Connect Mobile Client, he/she will be able to access the people counting functionality of the people counting cameras via the Mobile Client. |
If the end user needs to use people counting related functionality on Hik-Connect, you should activate people counting service for channels of the people counting cameras first.
Before You Start
- Make sure you have added people counting cameras to the target site. For details, see Add
- Make sure you have the permission for device configuration. Or you should apply for the permissions first. For details, see Apply for Device Permission .
Steps
- Go to the Customer Site page.
- Click a site to enter its site details page, and the select People Counting tab.
The people counting cameras will be displayed in the Device area.
- Click > to open the device panel.
The channel(s) of the device will be displayed on the panel.
- Click Activate to open the Activate People Counting Service window.
- Enter the user name and password of the admin account of the device.
- Click OK to activate people counting service for the channel.
15.6.3 Add a Group for People Counting
A people counting group refers to a group of people counting cameras mounted in a certain region.
A people counting group defines two elements, namely, the boarder of the region (i.e., the cameras added to the group) and the maximum amount of people allowed to stay in the region.
The cameras added to the group will detect the entering and exiting persons and at the same time calculate related data. In this way, the platform will be able to determine if the amount of persons staying in the region has reached the maximum allowed value, and meanwhile send related data to the Hik-Connect Mobile Client, which will display in real time the number of persons staying in the region and the remaining quota for entering the region.
This allows the end users to use Hik- Connect to remotely monitor the people density of the region and take corresponding measures in time. The function is useful in various scenarios in which people flow of a certain region requires to be limited. For example, assume that your customer is the manager of a supermarket, when a contact-transmission disease outbreaks, you can set the people counting cameras at the entrance and exit of the supermarket as a people counting group and enable it, thus allowing your customer to respond timely based on the data on Hik-Connect so as to lower the risk of infection for the customers in the supermarket.
Before You Start
- Make sure you have configuration permission for the people counting cameras. Or you should apply for the permissions first. For details about applying for permission, see Apply for Device Permission
- Make sure you have enabled people counting service for channels. For details, see Activate People Counting Service for Channels .
- Make sure people counting settings (e.g., entering direction) has been configured on the camera. For details, see the user manual of the camera.
Steps
CXlNote
See Hik-Connect Mobile Client User Manual for details about how to view related people counting data on the Hik-Connect Mobile Client.
- Go to the Customer Site page.
- Click a site to enter its site details page, and the select People Counting tab.
- Click Add Group to open the Add Group panel.
- Set the required information.
Group Name
Create a name for the people counting group.
For example, if you need to count the customer flow in the first floor of a shopping mall, you can name the group as “1st Floor”.
Select Channel
Click Add and then select channel(s) to add the selected one(s) to the group.
Note
- Only the channel(s) that have been enabled the people counting service can be selected.
- Up to 16 channels can be added to one people counting group.
- You can add a channel to up to 16 people counting groups.
Calculation Mode
Set the calculation mode for each selected channel.
Standard
Count the amount of the people entered detected by the camera as the amount of people entering the region and count exited as exiting the region. Select this mode when the direction of entering configured on the camera is the same with the actual entering direction.
□S Note
See the picture below for reference, in which the blue arrows represent the actual entering and exiting direction of the people, while the red arrows represent the entering direction configured on the camera.
Reverse
Count the amount of people entered detected by the camera as the amount of people exiting the region and count exited as entering the region. Select this mode when the direction of entering configured on the camera is opposite to the actual calculation direction.
‘Note
See the picture below for reference, in which the blue arrows represent the actual entering and exiting direction of the people, while the red arrows represent the entering direction configured on the camera.
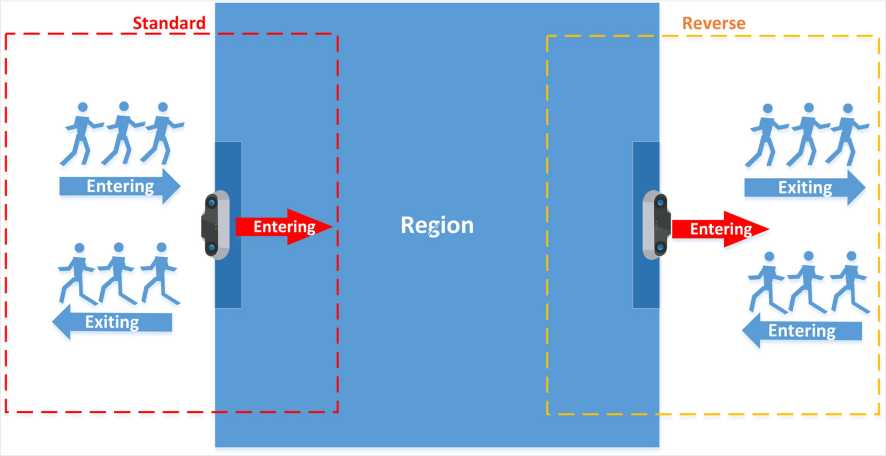
Figure 15-32 Calculation Mode
Max. People Allowed
Define the maximum amount of people (range: 1 to 100,000) allowed to stay in a specific region at the same time.
Push Alarm to Hik-Connect If Max. People Reached
After enabled, an alarm notification will be pushed to the Hik-Connect Mobile Client if Max. People Allowed is reached.
C® Note
Please notify the end user that he/she should keep the Notification functionality of the Hik- Connect Mobile Client enabled, or he/she will not receive this alarm notification on the Mobile Client. For details about enabling the Notification functionality on Hik-Connect, see Hik-Connect Mobile Client User Manual.
- Click OK.
The people counting group will be displayed on the People Counting tab and it is enabled by default. And the end user will be able to view corresponding people counting data on Hik- Connect Mobile Client.
0® Note
You can add up to 16 people counting groups to a site.
- Optional: Perform the following operations if required.
Edit Group Hover the cursor onto • • • and then click to edit the group.
Delete Group Hover the cursor onto • • • and then click © to delete the group.
| ‘Note
If you delete a people counting group, the corresponding people counting functionality will also be deleted. |
|
| Disable a
Specific Group |
Set ^2) to CW to disable the group.
‘•Note If you disable the group, the people counting related functionality on the Hik-Connect Mobile Client will be unavailable. |
| Batch Enable/
Disable Groups |
Click Enable All or Disable All to enable or disable all groups respectively.
CSjNote If you disable the group, the people counting related functionality on the Hik-Connect Mobile Client will be unavailable. |
15.7 Temperature Screening Service
Temperature Screening service provides contact-less skin-surface temperature measurement and facial mask detection in real time. You can activate this service for your customers, such as the manager of a retail store or the administrator of a school campus, so that they can view the screening results on their mobile phone via Hik-Connect Mobile Client.
‘Note
The service is only available in some countries and regions.
The flow chart below shows the recommended process for setting temperature screening service.
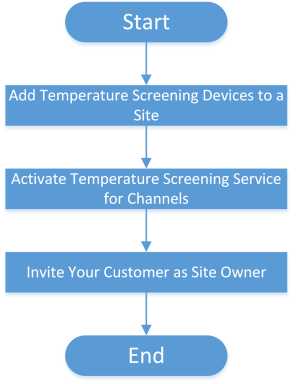
Figure 15-33 Flow Chart
The table below shows the description of each step and the link to corresponding section.
Table 15-13 Flow Chart Description
| Step | Description |
| Add Temperature Screening Devices to a Site | Add temperature screening devices (i.e., the devices with temperature screening capability) to a specific Site. For details about adding devices, see Add Device and its sections. |
| Activate Temperature
Screening Service to Channels |
Activate temperature screening service to specific channels of the added temperature screening devices. For details, see Activate Temperature Screening Service for Channels . |
| Hand Over Site to Your Customer | After complete the required configurations, hand over the site to your customer, so they will be the site owner. For details, see Hand Over Site .
C@Note When your customer accept the site handover on the Hik- Connect Mobile Client, he/she will be able to access the temperature screening functionality of the temperature screening devices via the Mobile Client. |
If you have added devices that support temperature screening to the platform, you need to activate temperature screening service for the channels of these devices and then set temperature screening parameters for each channel. After that, the temperature screening functionality of these devices will be available and the Site Owner will be able to view the skin-surface temperature of the persons appeared in the live view of the channels on the Hik-Connect Mobile Client.
Optimally, you can also enable the channels to push abnormal temperature alarm to Hik- Connect, upload captured pictures of the person whose temperature is abnormal to Hik-Connect, detect if the persons wear masks, and upload the no-mask alarm to Hik-Connect.
Before You Start
Make sure you have added devices that support temperature screening to the target Site.
Steps
OS Note
Temperature screening related functionality are not available in some countries and regions.
- Go to the Customer Site page.
- Click a Site to enter its site details page, and then select Temperature Screening tab.
Only the devices that support temperature screening will be displayed.
- Click > to open the channel panel.
The channel(s) of the device will be displayed.
- Click Activate to open the Activate Temperature Screening Service window.
- Enter the user name and password of the admin account of the device.
- Click OK to activate temperature screening service for the channel.
- Set temperature screening parameters.
- Click Settings to set the temperature screening parameters.
Temperature Threshold
For the channel of a temperature screening camera, set a temperature as the threshold for triggering abnormal temperature alarm if the detected skin-surface temperature is higher than the threshold.
For the channel of a face recognition terminal, define a temperature range as the range of normal skin-surface temperatures. An abnormal temperature alarm will be triggered if the detected skin-surface temperature is NOT within the range.
Mask Detection
After enabled, the temperature screening device will detect if the persons wear masks.
Store Temperature Screening Information
After enabled, the temperature screening information will be uploaded to the Hik-Partner Pro platform.
If disabled, the platform and the Hik-Connect Mobile Client will be unable to receive temperature screening information from temperature screening devices, including abnormal temperature alarm, normal temperature records, no-mask alarm, as well as the captured face pictures of the persons with abnormal skin-surface temperature.
Push Alarm to Hik-Connect If Abnormal Temp. Detected
After enabled, abnormal temperature alarms will be pushed to the Hik-Connect Mobile Client if abnormal skin-surface temperatures are detected.
OS Note
Please notify the end user that he/she should keep the Notification functionality of the Hik-Connect Mobile Client enabled, or he/she will not receive this alarm notification on the Mobile Client. For details about enabling the Notification functionality on Hik- Connect, see Hik-Connect Mobile Client User Manual.
Save Normal Temperature Records
Save normal temperature records on the Hik-Partner Pro platform.
Upload Captured Pictures
After enabled, the temperature screening device will capture the face picture of the person whose skin-surface temperature is abnormal and upload the captured picture to the platform.
C® Note
If disabled, the end user will be unable to view the captured picture on the Hik-Connect Mobile Client.
Push Alarm to Hik-Connect If Wearing No Mask Detected
After enabled, if a person who wears no mask is detected, an alarm about it will be pushed to the Hik-Connect Mobile Client.
nS Note
Please notify the end user that he/she should keep the Notification functionality of the Hik-Connect Mobile Client enabled, or he/she will not receive this alarm notification on the Mobile Client. For details about enabling the Notification functionality on Hik- Connect, see Hik-Connect Mobile Client User Manual.
- Click OK
- Optional: Perform the following operations if required.
| Disable Temperature Screening Functionality of a Specific Device
Disable Temperature Screening |
Set ^3 to CW to disable the temperature screening functionality of the device.
US Note If disabled, the end user will NOT be able to use the temperature screening functionality of the device on the Hik-Connect Mobile Client. Click Disable All to disable all temperature screening functionality of all devices. |
Functionality of All
Devices
Note
If disabled, the end user will NOT be able to use the temperature screening functionality of these devices on the Hik-Connect Mobile Client.
Alarm Receiving Centers (ARC) is a facility that receives and responds to alarms from systems of companies, schools, factories, etc., for the security purpose. It is made up of a specially trained team who can react quickly when an alarm occurs. Hik-Partner Pro offers multiple ARCs, which can provide 24/7 remote alarm receiving service for customers.
If your company is a professional ARC, you can add your company to the Alarm Receiving Center (ARC) list. After that, all the other Hik-Partner Pro users can be your potential customers. They can select your company as the ARC for their customers. This can promote the brand awareness of your company and provide great possibility for your company to expand business.
The diagram below shows the overall process of how an installer can enable the ARC service for the installer’s customer.
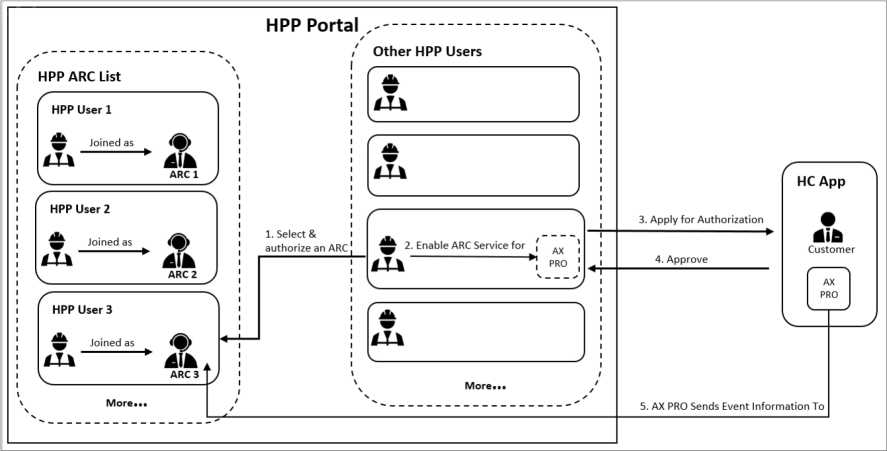
Figure 15-34 Overall Process of Enabling ARC Service
In the diagram:
- HPC represents Hik-Partner Pro and HC represents Hik-Connect.
- “Joined as” indicates that a Hik-Partner Pro user has been authenticated as a user who runs/ manages a professional ARC. Once authenticated, this ARC will be listed in the ARC list of Hik- Partner Pro. For details about how to apply for “joining as ARC”, see Add Your Company to the ARC List .
- For more information about the five procedures (marked with red digits in the diagram), see Enable ARC Service for Devices .
- AX PRO represents the AX PRO security control panel. Here we take this device as a example.
OS Note
ARC service is only supported by the devices added by Hik-Connect (P2P). The supported device types include the camera and NVR manufactured by Hikvision, and AX PRO/Hub/Hybrid security control panel.
You can add your company to the Alarm Receiving Center (ARC) list to enable your company to provide alarm receiving services to other Hik-Partner Pro users. After adding your company to the ARC list, all the Hik-Partner Pro users can view the company information and determine whether to connect the encoding devices and/or alarm devices managed by them to the ARC of your company. This can greatly increase brand awareness of your company and bring more customers to you.
Before You Start
- Make sure the type of your company is ARC. For details, refer to Manage Company
Information . If the type of your company is not ARC, you will be reminded of changing the type to ARC first on the page of joining as ARC.
- Make sure you have the permission for managing company information. If you do not have the permission, contact the Installer Admin.
Steps
- Find the entry ofjoining as ARC.
CS Note
There are three entries.
- Go to the Customer Site page, select a site from the list, select the ARC Service tab, and then click Join as ARC in the upper-right corner.

Figure 15-35 The First Entry
– Go to the Customer Site page, select a site from the list, select the ARC Service tab, click Select ARC to open the Select ARC for Authorization panel, and then click Join as ARC.
Select ARC for Authorization

J your company is an Alarm Receiving Center (ARC}, you can apply for providing alarm monitoring services for other users. After the application is approved, your company information will be displayed on the ARC list in the ARC Service module of Hik-Partner Pro. All Hik-Partner Pro users can view the information and determine whether to connect the encoding devices and/or alarm devices managed by them to the ARC of your company Join as ARC
Figure 15-36 The Second Entry
- Click Company ^ Company Information to enter the company information page, click Apply Now in the Add Your Company to ARC List area.

Figure 15-37 The Third Entry
You will enter the introduction page of applying for ARC and can read the detailed steps about how to apply for ARC.
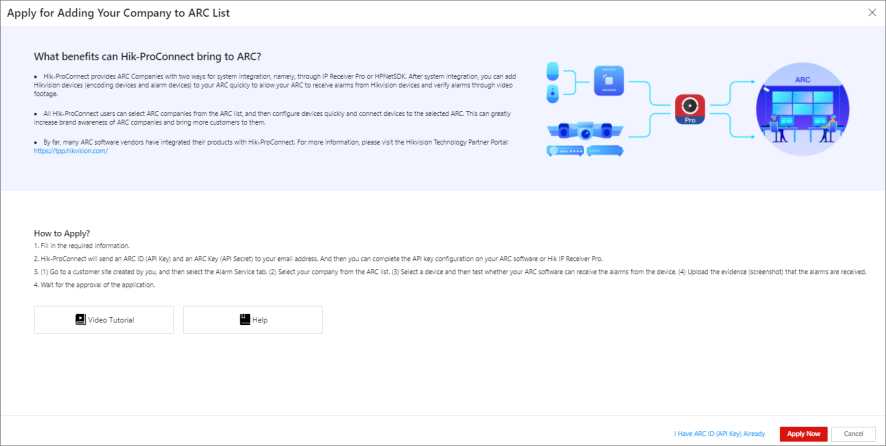
Figure 15-38 The Introduction Page of Applying for ARC
- If your company has not been authenticated, click Company Authentication ^ Authenticate Now to authenticate your company.
![]()
Note
For details, refer to Authenticate Account.
- If your company has been authenticated, click Apply Now to enter the following page.
Apply for Adding Your Company to ARC List
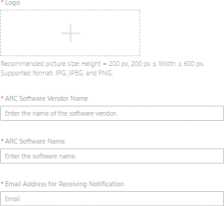
Complete Required Information ô
• Company Name
Receive the ARC ID (API Key) and ARC Key (API Secret) and
I Email
‘ Country/Region
configurations.
located.
3 Connect a device to
‘ Service Available For
upload the evidence that your ARC
applying results, to the email aadress.
alarms from the
application quickly, if incorrect information is entered, your application
the application.
‘ State/Province/Region
Phone Number
Figure 15-39 Fill In Information
- Enter or edit the required company information such as the email address.
- Read Agreement on Joining as ARC carefully and check Agree to Agreement on Joining as ARC in the down-right corner.
- Click Submit Application.
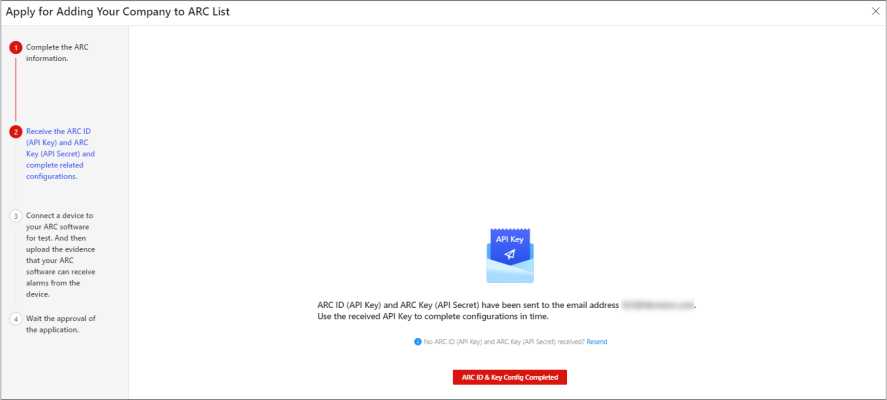
Figure 15-40 ARC ID & Key Sent
‘Note
You will receive an email containing the ARC ID (API Key) and ARC Key (API Secret). If receiving failed, you can click Resend to resend the ARC ID and ARC Key to your email address. Then, you can complete the ARC ID and ARC Key configuration on your ARC software (software used by your company for receiving alarms) or Hik IP Receiver Pro. If you have any questions about the ARC ID and ARC Key configuration, refer to Agreement on Joining as ARC and find the email for getting help.
- Click ARC ID & Key Config Completed to enter the next page.
- Authorize a device, and then upload the evidence (up to 2 pictures) that your ARC software can receive alarms from the device.
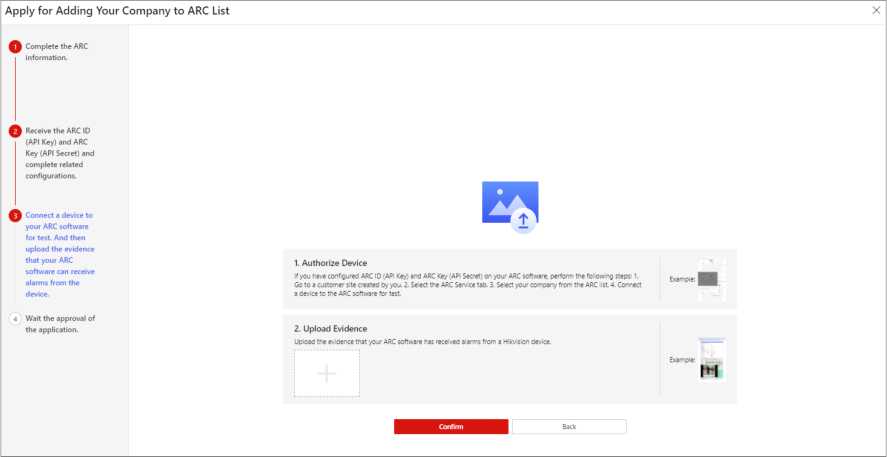
Figure 15-41 Authorize Device & Upload Evidence
C® Note
You can click the pictures on the right side to view the examples. Also, you can refer to Enable ARC Service for Devices for details about authorizing devices.
- Click Confirm to enter the application approval page.
□S Note
Wait for the approval of your application. If the application is approved, your company information (e.g., brand logo) will be displayed on the ARC list. If the approval failed (e.g., you have entered the wrong company information), you should click Edit ARC Info to edit your ARC information.
15.8.2 Enable ARC Service for Devices
You can authorize a site to an ARC, and then enable the ARC service for devices on the site to allow the staff of the ARC to receive events from the devices, respond to the events, and send out emergency dispatches (if needed) around the clock.
Steps
CU Note
- ARC service is only supported by the devices added by Hik-Connect (P2P). The supported device types include camera (except solar camera) and NVR manufactured by Hikvision, and AX PRO/Hub/Hybrid security control panel.
- The ARC service is not available in all countries or regions.
- Enter the Site list page.
- Go to Site & HCC ^ Customer Site .
- Go to Customer Site (if HikCentral Connect is not available in your country or region).
- Select a Site to enter the site details page, and then select ARC Service.
- Click Select ARC to display the Select ARC for Authorization pane.
OS Note
On the pane, you can view the details of each ARC, including the company name, logo, country/ region, location, contacts, and official website.
- Optional: Click the official website of the ARC to view more information about it.
- Select an ARC, and click Authorize.
The device(s) available for enabling the ARC service will be displayed, and an email will be sent to the ARC’s Email Address for Receiving Notification to notify them, with the user account, device serial No., device model, and your company information.
HE Note
The ARC service is only supported by Hikvision encoding devices and AX security control panel (including AX PRO, AX Hub, and AX Hybrid) added by Hik-Connect (P2P).
- Switch on to enable the ARC service for a specific device.
The events detected by the device and the device exceptions will be sent to the ARC.
- Optional: If you have enabled the ARC service for an AX device in the previous step and the device is accessed to the ARC via Hik IP Receiver Pro, click the device in the device list to open the configuration pane, and then set the way to connect the device to Hik IP Receiver Pro.
HO Note
- Hik IP Receiver Pro functions as the medium for transmitting alarms and alarm-related videos from the device to the ARC.
- You need to acquire Configuration permission before you can configure the device.
- You might need to verify the Installer account of the device to modify this parameter.
- If the device is armed, disarm it first.
Ways to Connect to Hik IP Receiver Pro
Connect Directly or by Hik-Partner Pro Server
When the two types of connection are both available, direct connection will be used in priority, i.e., the device will be connected to Hik IP Receiver Pro directly. When direct connection is abnormal, the device will be connected to Hik IP Receiver Pro by Hik-Partner Pro server. If direct connection is restored, the way will automatically switch back to direct connection.
Such a mechanism ensures the stability of data transmission from the device to the ARC.
Connect by Hik-Partner Pro Server
The device will be connected to Hik IP Receiver Pro byHik-Partner Pro server constantly.
OS Note
The stability of data transmission is lower if compared with Connect Directly or by Hik- ProConnect Server.
- Optional: Click Deauthorize to deauthorize the ARC.
OS Note
- After you deauthorize the ARC, the ARC service for all devices on the Site will be automatically disabled.
- Once you deauthorize the ARC, an email will be sent to the ARC’s Email Address for Receiving Notification to notify them, with the user account, device serial No., device model, and your company information.
15.9 HikCentral ReGuard Service
HikCentral ReGuard (hereinafter referred to as HCRG) services are the value-added services offered by the HCRG. HCRG provides a security management solution that helps its users (i.e., service providers) with alarm receiving and handling.
CS Note
- The HCRG services are not supported in some countries/regions. For details about the supported countries/regions, contact the local distributors or after-sales.
- HCRG-related features are only supported on the Hik-Partner Pro Portal.
- The HCRG user (usually the Remote Monitoring Center, or RMC, who provides the alarm receiving and handling services) registers and becomes a Hik-Partner Pro user to purchase HCRG services and generate an HCRG key on Hik-Partner Pro.
- The HCRG user logs in to HCRG to activate the HCRG services by using the key.
- After activation, the HCRG user can create work orders on HCRG, and assign the work orders to an installation company on Hik-Partner Pro by entering the Installer Admin account of the company.
EH] Note
All installers with the Manage Assigned Site permission in the company will receive the work order notifications, and those who are to handle the work orders will go to the sites to install the devices according to the address and customer information on the work orders.
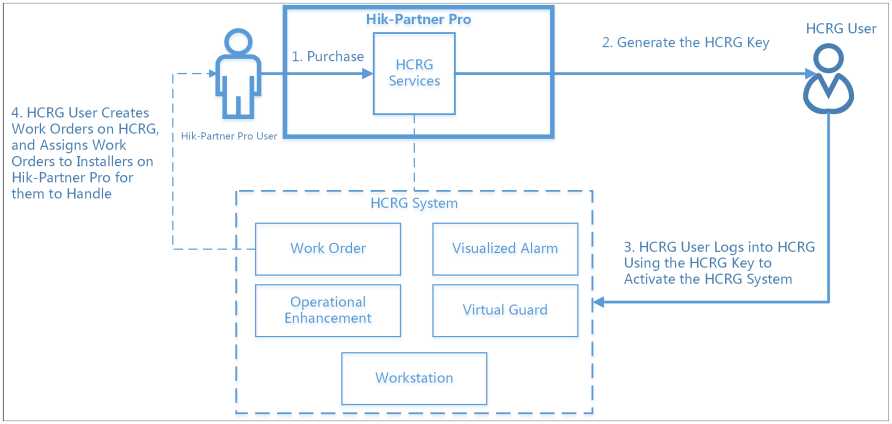
Figure 15-42 How HCRG Services Are Used
In the service market, you can purchase HCRG services by entering service keys purchased from local distributors offline.
Before You Start
Make sure you have completed account authentication before you can purchase HCRG services.
For details, see Authenticate Account.
Steps
■Note
Online purchase is currently not supported.
- Go to the service purchase page.
– Go to Hik-ProConnect ^ Service ^ Service Market ^ HikCentral ReGuard Service .

Figure 15-43 HCRG Services in Service Market
– Go to Hik-ProConnect ^ Service ^ My Service ^ HikCentral ReGuard Service .
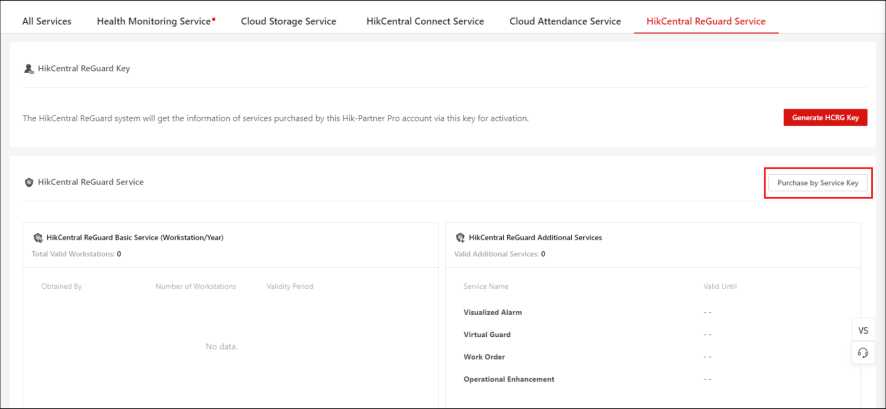
Figure 15-44 The Second Entry
- Click Purchase by Service Key.
- Enter the service key purchased from local distributors offline.
- Click OK.
What to do next
Generate an HCRG key for activating the HCRG system. See details in Generate HikCentral ReGuard Key .
15.9.2 Generate HikCentral ReGuard Key
After HCRG services are purchased by service key, you can generate an HCRG key for activating the HCRG system. The generated key will be sent to the email address of the Installer Admin and is also displayed in My Service. HCRG users can log in to HCRG with the key to activate the HCRG system.
Before You Start
Make sure you have purchased HCRG services by service key. See details in Purchase HikCentral
Steps
- Go to Hik-ProConnect ^ Service ^ My Service ^ HikCentral ReGuard Service .

Figure 15-45 HikCentral ReGuard Service
- Click Generate HCRG Key.
The generated HCRG key is displayed and automatically sent to the email address of the Installer Admin. You can click © / to hide/display the generated HCRG key.
What to do next
- Log in to HCRG with the key to activate the HCRG system. See details in HikCentral ReGuard Web Client User Manual.
- Manage HikCentral ReGuard services. See details in Manage HikCentral ReGuard Services .
15.9.3 Manage HikCentral ReGuard Services
After purchasing and activating HCRG services, you can monitor the real-time status of HCRG services on Hik-Partner Pro, including the total number of valid workstations, the number of valid additional services, the number of services expiring within 30 days, and the number of expired services.
Go to Hik-ProConnect ^ Service ^ My Service ^ HikCentral ReGuard Service .
Days, Expired, or Not Expired), you can filter the service information.
This feature helps improve the visibility of your brand, products, and services. It allows your customers to view some basic information of your company via Hik-Connect Mobile Client. You can purchase and enable this service as needed.
C® Note
You can get the co-branding service for free after purchasing the annual type of health monitoring packages (including All Device Annual Package and Network Camera Annual Package) for the first time. For details about how to purchase health monitoring packages, see Purchase Health Monitoring Service .
In the service market, you can either purchase co-branding service packages online or activate them by entering service keys purchased from local distributors offline.
C® Note
- Make sure you get your company authenticated. For details, see Authenticate Account.
- Purchasing co-branding services online is supported only in some countries/areas. Contact a local distributor for details.
Go to Service ^ Service Market ^ Company Management . In the Co-Branding area, purchase the service packages online or activate the services by service keys.

Figure 15-46 Company Management
| Online Purchase |
|
| Activate by Service Key |
|
If you enable the co-branding service, your customers (i.e., the end user) will be able to view your company information, such as company logo, address, and phone number, on the Hik-Connect Mobile Client.
LT Note
- You can get the co-branding service for free after authenticating your account and adding 3
devices via P2P. See details in Authenticate Account and Add Device by Entering Serial No. .

Figure 15-47 Entrance for Getting Free Co-Branding
- A window with notification about getting the co-branding service for free will pop up when your co-branding service expires in 2 months.
- You can choose to or not to upload your company logo. If no company logo is uploaded, your company name, instead of your company logo, will be displayed on the Hik-Connect Mobile Client.
Go to Company Management ^ Co-Branding . Switch on Service Status, and then hover the cursor onto the Logo area to show the Edit button. And finally click Edit to upload your company logo. After you edit the logo, the latest logo will be updated to the Company Information page.
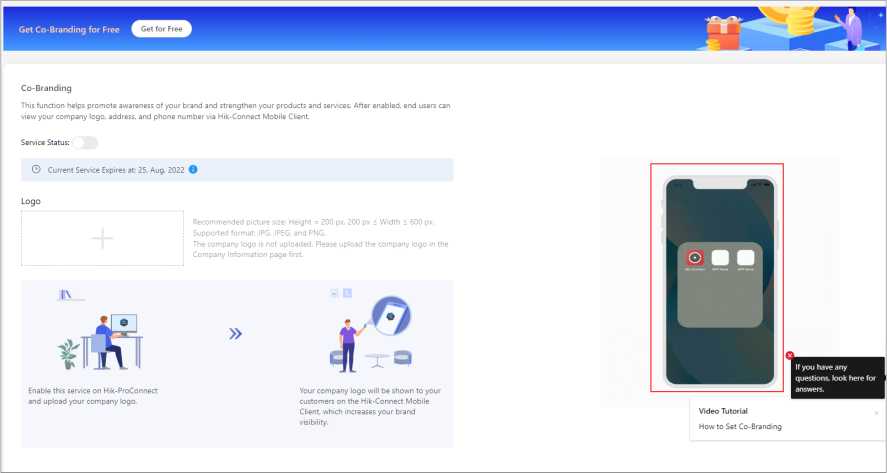
Figure 15-48 How Your Company Logo Will Be Shown to Your Customers
C®Note
- To ensure the co-branding service works on the Hik-Connect Mobile Client, please ask your customers to update the Mobile Client to the required version (V 4.15.0 or later if the company logo is uploaded and V 4.26.0 or later if the company logo is not uploaded). You can send the QR code or download link shown in the banner on the Home page to them for downloading the Mobile Client.
- If all the devices of your customer are managed by the same installation company, the installation company’s logo will be displayed on the login page and About page of your customer’s Hik-Connect Mobile Client.
- If your customer’s devices are managed by different installation companies, your customer can go to the device details page on the Hik-Connect Mobile Client to view the companies’ logo and details.
Hik-Partner Pro provides tools, such as disk calculator and NVR channel calculator, to help you improve your work efficiency.
On the Hik-Partner Pro page, click Tools on the left pane to enter your tools page.
Batch Configuration
The tool is used to batch configure devices on LAN.
See Batch Configure Devices on LAN for details.
Batch Upgrade
The tool is used to detect whether the firmware of devices on LAN need to be upgraded and batch upgrade the firmware of the devices.
See Batch Upgrade Devices on LAN for details.
Search for Important Firmware Update
The tool is used to check whether the firmware of your device needs to be updated and download the relevant firmware package for the update.
Disk Calculator
The tool is used to calculate the recording time and recording space by setting related parameters.
NVR Channel Calculator
The tool is used to calculate the number of network cameras that can be connected to the NVR by setting the related parameters.
Focal Length Calculator
The tool is used to calculate focal length and object distance by setting related parameters such as sensor size. You can view the recommended data by the tool.
Bandwidth Calculator
The tool is used to calculate the required bandwidth of a network camera or NVR by setting parameters such as channel number and resolution.
Maintenance Quotation
The tool is used to create quotations for after-sales maintenance, which can help installers standardize the service process, improve customer satisfaction, and expand business.
See Create a Maintenance Quotation for details.
Hik-Partner Pro provides a reward point system to reward your trust and support. By completing specific tasks (e.g., check-in), you can get the reward points redeemable for lots of gifts (e.g., certain value-added services) in the Rewards Store.
CH] Note
- The reward point system is only supported in some countries/regions.
- For some countries/regions, the reward points are available only when you have your company authenticated. For details about company authentication, see Authenticate Account.
Enter the Rewards Store page.
- Click Check In to Earn Points/My Points in the upper-right corner to enter the Rewards Store.
- Click Incentive ^ Rewards Store to enter the Rewards Store.

Figure 17-1 How to Enter the Rewards Store Page
For the Installer Admin and Installers, the information displayed on the Rewards Store page varies. The Installer Admin can view more information and perform more operations. See the table below for details.
Table 17-1 Available Information/Operations for the Installer Admin / Installers
| Information/Operation | Installer Admin | Installer |
| Tier Information | V | V |
| Add Device to Earn More Points | V | V |
| View the Task List and Do Tasks
□3 Note The task types include inviting friends (by sharing the OR code, invitation code, or invitation link), answering questions, browsing/liking news and how-to articles, inviting staff members, scanning SN codes, and adding devices. |
V | V
Installers can perform some of the tasks available for Installer Admin. |
| Redeem Points for Gifts | V | x |
| View My Gifts | V | x |
| Lucky Draw | V
Only supported in some countries/regions. |
x |
îl Note
- Distributors can go to My Hik-Partner ^ Gifts Verify to verify the gifts redeemed offline and export the records.
- After user upgrading, if your original account and Hik-ePartner account are merged to one OneHikID account, the points in the two accounts will add up.
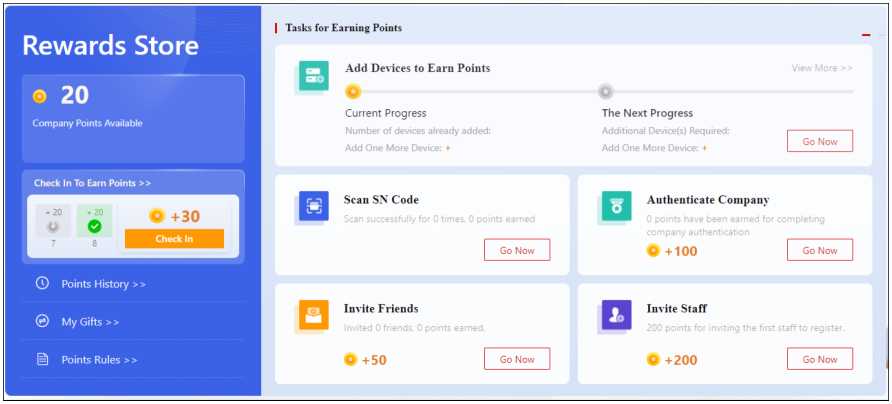
Figure 17-2 Rewards Store Page for Installer Admin
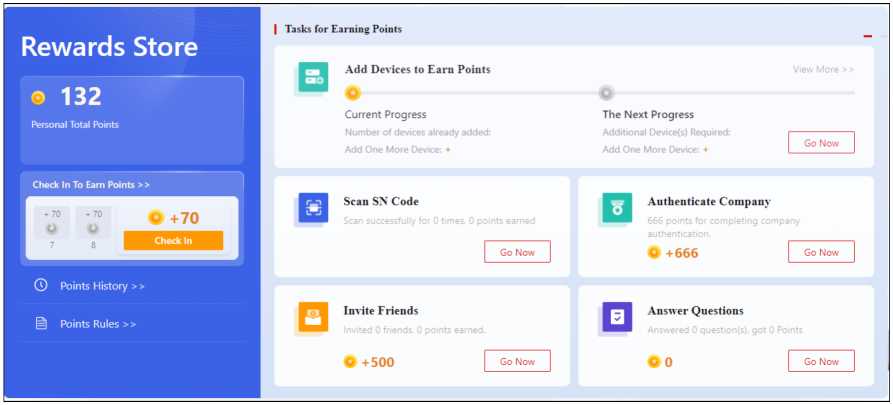
Figure 17-3 Rewards Store Page for Installers
For authenticated channel partners, they can view the rebates they earn from successfully promoting services (i.e., health monitoring service and cloud storage service) of Hik-Partner Pro to their customers, including installers and secondary distributors. Here we will introduce the process and the calculation method of earning rebates.
OS Note
This function is only available to some users in some countries/regions. For details, please contact Hikvision.
-
- Generate Authentication Code
For some countries or regions, authenticated channel partners can generate authentication codes for installers and secondary distributors to complete the company authentications on Hik-Partner Pro, and then they can have chances to earn rebates.
C® Note
Contact the local Hikvision branch for details about whether the country or region supports generating authentication codes on Hik-Partner Pro.
Go to My Hik-Partner ^ Rebate ^ Authentication Code .

Figure 18-1 Generate Authentication Code
Generate an Authentication Code
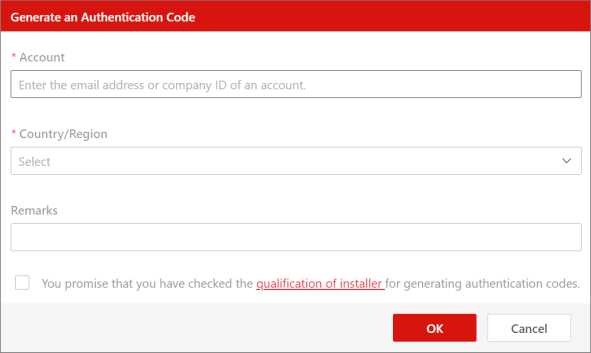
Figure 18-2 Generate an Authentication Code
- Click Generate to open the Generate an Authentication Code window.
- Enter the information about account (email address or company ID) and select the country/ region of the installer or secondary distributor for whom you generate the authentication code.
- Check You promise that you have checked the qualification of installer for generating authentication codes. and click OK.
The generated authentication code will be displayed on the Authentication Code page.
Batch Generate Authentication Codes
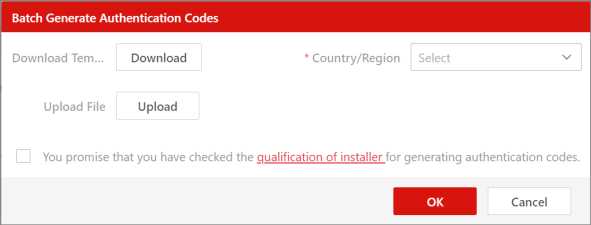
Figure 18-3 Batch Generate Authentication Codes
- Click Batch Generate to open the Batch Generate Authentication Codes window.
- Click Download to download the template and fill in the information about accounts of the installer or secondary distributor for whom you generate authentication codes.
- Click Upload to upload the filled-in template file.
- Select the country/region for the accounts you uploaded.
OXlNote
You can only batch generate authentication codes for accounts in the same country or region each time.
- Check You promise that you have checked the qualification of installer for generating authentication codes. and click OK.
The generated authentication codes will be listed on the Authentication Code page.
Export Authentication Codes
Click Export Authentication Codes to export the generated authentication codes and send to the installer or secondary distributor.
You can also check Show Unused Authentication Codes Only to export the authentication codes that are not used.
18.2 The Process of Earning Rebates
The process of earning rebates varies basing on whether the country or region supports generating the authentication codes.
Process for Countries and Regions Which Support Generating Authentication Codes
dlNote
Contact the local Hikvision branch for details about whether the country or region supports generating authentication codes on Hik-Partner Pro.
- The authenticated channel partner introduces and promotes services to an installer or secondary distributor when selling Hikvision devices.
- The authenticated channel partner goes to My Hik-Partner ^ Rebate ^ Authentication Code on the Hik-Partner Pro Portal and generates an authentication code for the installer or secondary distributor.
CWNote
For details about generating authentication codes, refer to Generate Authentication Code .
- The installer or secondary distributor authenticates their company by entering authentication codes.
CH] Note
For details about how to authenticate the company, refer to Authenticate Account.
- The installer or secondary distributor activates services for devices via Hik-Partner Pro after their company authentication is completed.
HS Note
For details about how to activate services for devices, refer to Activate the Health Monitoring Service for Devices and Activate or Renew Service for a Channel .
- Hik-Partner Pro calculates monthly rebate amount based on resources with service(s) activated in the last month for the authenticated channel partner.
LU Note
If a service has been activated for a resource before, the resource will NOT be included in statistics. The authenticated channel partner can go to My Hik-Partner ^ Rebate ^ Rebate Settings to view the calculation rules. And for more details, refer to The Way to Calculate Rebate Amount .
- The authenticated channel partner gets the rebate amount in the form of a credit note.
CIS Note
The authenticated channel partner can go to My Hik-Partner ^ Rebate ^ Rebate Details to view the information about the rebates they earned. See View Rebate Details for details.
Process for Other Counties and Regions
- The authenticated channel partner introduces and promotes services to an installer or secondary distributor when selling Hikvision devices.
- The installer or secondary distributor activates services for devices via Hik-Partner Pro.
HS Note
For details about how to activate services for devices, refer to Activate the Health Monitoring Service for Devices and Activate or Renew Service for a Channel .
- Hik-Partner Pro calculates monthly rebate amount based on resources with service(s) activated in the last month for the authenticated channel partner.
US Note
If a service has been activated for a resource before, the resource will NOT be included in statistics. The authenticated channel partner can go to My Hik-Partner ^ Rebate ^ Rebate Settings to view the calculation rules. Refer to The Way to Calculate Rebate Amount for details.
- The authenticated channel partner gets the rebate amount in the form of a credit note.
US Note
The authenticated channel partner can go to My Hik-Partner ^ Rebate ^ Rebate Details to view the information about the rebates they earned. See View Rebate Details for details.
18.3 The Way to Calculate Rebate Amount
Here we introduce the four elements that determine the rebate amount, and the formula for calculating the rebate amount.
Go to My Hik-Partner ^ Rebate ^ Rebate Settings to view the calculation rules.
Elements that Determine the Rebate Amount
Four elements determine the earned rebate amount, including:
- Number of Resources Contributed to Rebates
- Unit Price
- Rebate Rate
- Calculation Type
Table 18-1 Element Description
| Element | Description |
| Number of Resources
Contributed to Rebates |
The number of resources which have contributed to rebates.
To be a resource contributed to rebates, 1) it should belong to an authenticated channel partner; 2) it should have been added to Hik-Partner Pro and the health monitoring service or cloud storage service should have been activated for it. OXlNote
|
| Unit Price |
CH] Note For example, assume that a customer spent 288 US dollars to purchase a 7-Day Annual Package (a type of cloud storage service package; the “7-Day” means the videos uploaded to the cloud will be retained for 7 days; the “Annual” means the service lasts for 12 months) and activated it for two channels, the unit price in this case would be the result of 288/2/12, that is, 12 dollars. |
| Element | Description |
| Rebate Rate | Fixed rebate rate or tiered rebate rate, depending on the marketing strategy for the country or region.
For the tiered rebate rate, the authenticated channel partner can get a higher rebate rate when the number of resources with service activated reaches a certain threshold. |
| Calculation Type | One of two calculation types is used for calculating the rebate amount, that is, Combined or Separated, depending on the marketing strategy for the country or region.
° For calculating the rebate amount related to the health monitoring service, the rebate rate(s) for different device types are the same, be it fixed or tiered rebate rate. ° For calculating the rebate amount related to the cloud storage service, the rebate rate for different types of service packages are the same, be it fixed or tiered rebate rate.
° For calculating rebate amount related to the health monitoring service, the rebate rate for network cameras and other device types can be different. Other device types include the NVR/DVR, security control device, access control device, video intercom device, etc. ° For calculating rebates related to the cloud storage service, the rebate rate for different types of service packages can be different. |
Formula for Calculating the Rebate Amount
The formula for calculating rebate amount is shown below:
Number of New Resources Contributed to Rebates in Current Month x Unit Price x Rebate Rate = Rebate Amount for Current Month
LUilNote
The platform will calculate the rebate amount of the previous month on the 1st day (fixed) of each month.
Example
Calculate the Rebate Amount of the Current Month
Assume that in the current month:
- Customer A purchased a 7-day annual package (price: 288 US dollars) and activated it for 8 channels linked to a Hik-ProConnect box; Customer B purchased a 30-day annual package (price: 600 US dollars) and activated it for 4 channels linked to a Hik-ProConnect box.
- The Calculation Type used in the country or region is Separated.
- Tiered rebate rate is used for calculation in the country or region:
- First Tier: a rebate rate of 10% for the first 4 channels activated with the 7-day annual package; a rebate rate of 20% for the first 2 channels activated with the 30-day annual package.
- Second Tier: a rebate rate of 30% for all other channels activated with the 7-day annual package; a rebate rate of 40% for all other channels activated with 30-day annual package. In this case, for the 7-day annual package, the unit price would be: (288/12)/8 = 3 US dollars; For 30-day annual package, (600/12)/4 = 12.5 US dollars, so we can calculate the rebate amount as: 4 x 3 x 10% +4 x 3 x 30% + 2 x 12.5 x 20% + 2 x 12.5 x 40% = 19.8 US dollars.
After authenticated channel partners promote the health monitoring service or cloud storage service to their customers (i.e., installers and secondary distributors), if customers activate two services for devices added to Hik-Partner Pro or channels linked to a Hik-ProConnect box, authenticated channel partners will earn a certain rebate amount and they can view the details of their rebates.
‘Note
You can view the rebates of the current month after the calculation day of the next month. For example, if the calculation day of the month is set to 15th, you can view the rebates of July on 16th, August.
Go to My Hik-Partner ^ Rebate ^ Rebate Details ^ Health Monitoring Related/Cloud Storage Related .

Figure 18-4 Rebate Details
Select By Month or By Quarter from the drop-down list on the top left, select a corresponding period, and click Search to search for rebate related data.
Authenticated channel partners can filter their bills of sale to check the information related to the devices sold to customers (i.e., installers or secondary distributors). The information includes the device serial No., device model, purchaser name, and purchaser type. By setting the purchaser type to Secondary Distributor, authenticated channel partners can transfer rebates related to specific devices to the secondary distributors.
Go to My Hik-Partner ^ Rebate ^ Bill of Sale .

Figure 18-5 Bill of Sale Page
LUJNote
If the bill of sale is uploaded before the calculation day, the related rebates will be credited to the amount of the previous month. If the bill of sale is uploaded on or after the calculation day, the related rebates will be credited to the current month.
Filter Bills of Sale
- Enter a device serial No. or purchaser name to filter.
- Set one of the following conditions to filter.
Display All
All bills of sale will be displayed.
Display Secondary Distributor Only
Only the devices purchased by secondary distributors will be displayed.
Display Installer Only
Only the devices purchased by installers will be displayed.
Export Bills of Sale
Click Export Bill of Sale and select Export All Bills of Sale or Export Filtered Bills of Sale to export the data as needed.
Transfer Ownership of Future Rebates
If the purchaser of specific devices is a secondary distributor, the authenticated channel partner can transfer the ownership of future rebates related to these devices to the secondary distributor. Once the ownership is transferred, the previously calculated rebates are still owned by the Authenticated channel partner, the secondary distributor starts owning rebates related to these devices from the next month.
The authenticated channel partner can transfer the ownership in the following three methods.
Transfer Ownership of Future Rebates Related to a Device to a Secondary Distributor
- On the Bill of Sale page, select a device and click £_ in the Operation column.
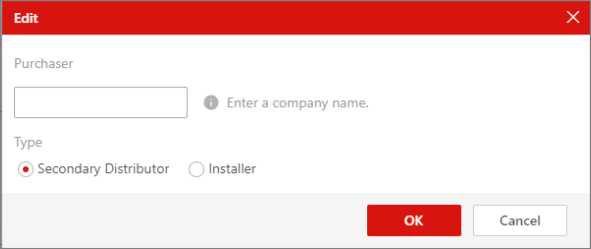
Figure 18-6 Transfer Rebates
- Enter the purchaser name.
- Select Secondary Distributor as the purchaser type.
- Click OK.
Batch Transfer Ownership of Future Rebates Related to Multiple Devices to a Secondary Distributor
- On the Bill of Sale page, select all devices and click Edit.
- Enter the purchaser name.
- Select Secondary Distributor as the purchaser type.
- Click OK.
Transfer Ownership of Future Rebates Related to Multiple Devices to Multiple Secondary Distributors
- On the Bill of Sale page, click Upload Bill of Sale.

Figure 18-7 Upload Bill of Sale
- Click Download Template and fill the required information (e.g., fill Secondary Distributor in the Purchaser Type column) in the template.
- Click on the Upload Bill of Sale window to upload the filled-in template file.
- Click OK.
- LUJNote• It is highly recommended to encrypt the device QR code for security reasons.
• Please inform your end users to download or update the Hik-Connect Mobile Client (V 4.15.0 or later). You can send the QR code or download link shown in the banner on the Home page to them.
• For AX Pro, after adding an AX Pro to Hik-Partner Pro, the Installer and Installer Admin’s accounts will become the accounts of the AX Pro; these accounts will be deleted after the Installer deletes the AX Pro from Hik-Partner Pro. If you edit an Installer’s login password, the password for logging in to the AX Pro by this account will also change. ↑
- After authorizing a site with AX Pro to an Installer, the Installer and Installer Admin’s accounts will become the accounts of the AX Pro; besides, the account with the permission of managing all sites will also become the account of the AX Pro. ↑
- □S Note• Up to 16 live view windows are supported. ↑
- If Image and Video Encryption has been enabled for the device on the Hik-Connect mobile client, you are required to enter the device verification code before starting live view. If you don’t know ↑
