Night Owl X CMS Installation Setup, If you are the admin of the system and wish to allow someone else to remotely view the cameras from their Smart Device, you will need to create a second set of login credentials for them to use. Please follow the steps below:
Night Owl X CMS / X HD Troubleshooting
Click from the list below to navigate to that section of this guide for more information.
- App Password Issues
- Device Login Issues
- Adding Additional Users for Remote Viewing
- P2P Connection Issues
- Playback / Connection Issues
- CMS Initial Setup
- CMS Crash / Black Screen Issues
NOTE: If you are still experiencing an issue after troubleshooting, please click on Contact Us from your product’s support page to reach our Technical Support Team via Live Chat or Phone.
![]()
Read Next :
- TRENDnetView EVO Administration Guide
- Ajax PRO Desktop User manual
- Danale Wireless Camera Installation Guide
1. App Password Issues
NOTE: If you are receiving a “Username or Password is incorrect!” error message, ensure you have confirmed your email address.
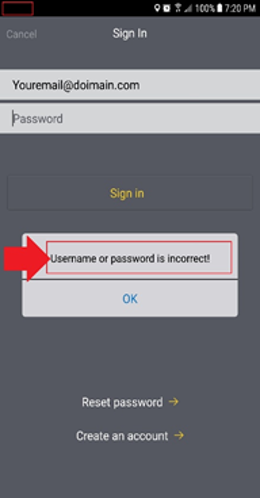
- To perform an app password reset, follow the steps below:
- Tap Reset password within the app.
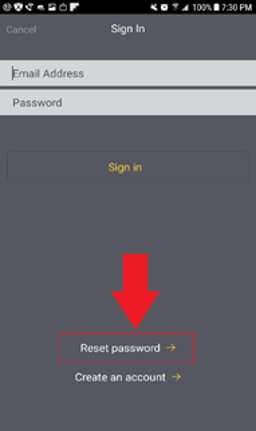
- Enter the email address associated with your account and tap Send reset.
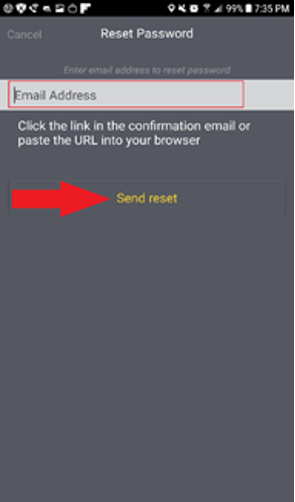
- You will be emailed a temporary reset code. Open your email from a web browser and retrieve the code.
- Return to the app and enter the reset code into the password field. Then tap Sign in.
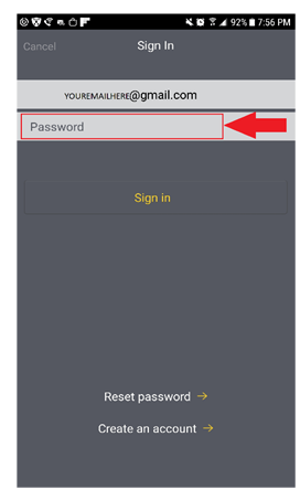
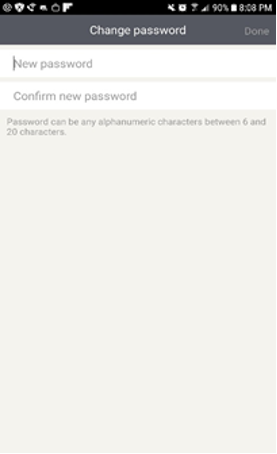
- After you have entered the 6 character code, you will be prompted to create a new password. Once you have completed this section. You have successfully reset your app password.
- Tap Reset password within the app.
![]()
2. Device Login Issues
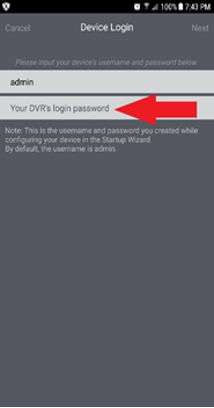
To remotely view your system, you will need to add it to the Night Owl X App (smartphones) or Night Owl X HD App (tablets). When doing so, you will be asked to enter the username and password for the system. This is the password you created during the Startup Wizard, when you initially setup the recorder. If you do not remember your password, click on Forgot Password on your recorder’s login screen from a TV / Monitor.
NOTE: This is not the password you created in the app. The password you enter here will be the password for your recorder (DVR/NVR), which should be stored in your Quick Setup Guide. DO NOT enter the password for the app, as this will produce an error message.
![]()
3. Adding Additional Users for Remote Viewing
If you are the admin of the system and wish to allow someone else to remotely view the cameras from their Smart Device, you will need to create a second set of login credentials for them to use. Please follow the steps below:
- Log in to your recorder from a TV / Monitor using your admin credentials. The username should always be “admin” when creating a secondary account.
- Click anywhere on the screen to make the menu taskbar appear at the bottom of the screen.
- Select the Main Menu icon on the left of the taskbar.
- Navigate to the System or Configuration
- On the left side of the screen click the Users
- Click on Add or Add User.
- Left-click on Edit at the bottom of the screen.
- Edit the second username and then create a username and password for this additional user.
- Lastly, select which permissions you would like this user to have.
- Once complete, share these login credentials with the second user so they can add the system to the Night Owl X / X HD App on their Smart Device to begin viewing.
![]()
4. P2P Connection Issues
If the app is not connecting, the QR Code or Owl Scan isn’t working, the P2P doesn’t match the P2P in the recorder firmware or the QR Code is missing, follow the steps below.
NOTE: The P2P ID for your recorder should be on the support sticker on the top or bottom of your recorder.
- Ensure that your recorder is properly connected to your router with the Ethernet cable included in your package.
- Make sure you have installed the correct application for your system and mobile device.
- Connect to your local Wi-Fi network, on your Smart Device, and launch the application.
- Locate the P2P ID for your system.NOTE: If the P2P QR Code is damaged or missing, please proceed to step g.
- Open the Night Owl X / X HD App and use Owl Scan to scan the QR Code on your recorder.
- Once you have scanned the QR Code, ensure the P2P ID matches what is on the support sticker on your recorder.
- If the sticker is damaged or missing from your recorder, please:
- Log in to your recorder from a TV / Monitor.
- Access the Main Menu by left or right-clicking anywhere on the screen to make the menu icons appear.
- From within the Main Menu, click on Configuration / System.
- Next, click on Network / System Info.NOTE: The System Info tab will display the QR Code and P2P ID for your recorder.
- Within the app, you should now be able to see your recorder and cameras.
![]()
5. Playback / Connection Issues
If you are experiencing playback or connection issues, such as slow video / freezing or connection failure, follow the steps below.
- First, ensure you are using the right mobile app for your recorder. You can visit your product’s Series page at support.nightowlsp.com and/or doublecheck your Quick Setup Guide to verify you are using the right app.
- Make sure your recorder and your Smart Device are both properly connected to the Internet.NOTE: Please make sure your Smart Device is connected to the same local network (router) as the recorder. If you are not sure if your recorder is properly connected to the Internet or you don’t know how to check it, please click DVR / NVR Troubleshooting.
- Ensure your Smart Device meets the minimum requirements listed below:
- The coverage in your area must support 3G, 4G, or 4G LTE.
- Your Smart Device must support 3G, 4G, or 4G LTE.
- Your Smart Device must have the latest version of the Night Owl X / X HD App downloaded from the App Store or Google Play Store. (Make sure you have enough free space to keep the app up to date)
- The SIM card must be inserted properly in your Smart Device (if applicable).
- Ensure that your Smart Device is running the latest software.
- Reboot your Smart Device.
- Remove and reinsert the battery. If the device doesn’t have a removable battery, press and hold the power button and volume down button for up to 15 seconds until the device resets.
- Turn the device back on and reopen the Night Owl X / X HD App.
- Uninstall and reinstall the Night Owl X / X HD App and check if the issue still happens.
NOTE: Uninstalling and reinstalling the application may remove any saved recordings within the application.
- Check your Internet speeds. Make sure the network where the recorder is connected meets the minimum requirements.
- Use a computer with PC /MAC OS
- Open a website browser and type www.speedtest.net
- Right-clicking on Begin Test
- See the download/upload speedsNOTE: We recommend a minimum of 2 Mbps dedicated upload speed for your recorder. Consider that your Internet connection is shared between all the devices you have in your home. So, you will need more than 3 Mbps of upload speed to have your device properly connected.
- For push notification issues, please ensure that push alerts are enabled in the recorder and in the Night Owl X / X HD App for the channel in question. For more information on how to do this, refer to your product’s manual on our support site.
- TIPS: Situations where signal strength can be affected.
- Poor coverage due to building materials or destructive interference.
- Free apps and free games are filled with advertisements that eat your bandwidth and can contribute to poor coverage.
- Your mobile carrier / ISP does not have coverage in the area where you want to connect to the recorder.
![]()
6. CMS Initial Setup
-
- Download the Night Owl X CMS software.
- Install and launch the Night Owl X CMS software.
- Once you have launched the Night Owl X CMS software, you will have the option to create an account or to sign in with a pre-existing account. If you are creating a new account, click Create an account.NOTE: If you have already created and confirmed your account via the Night Owl X or X HD app, you can log in using your email and password that was created during the setup of your account.
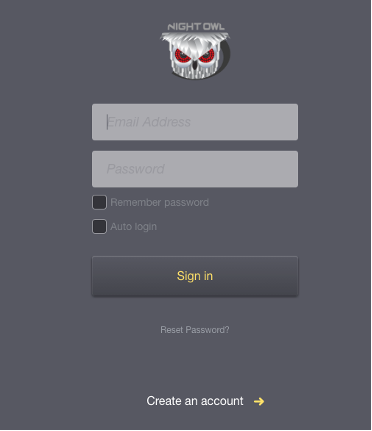
- On the next screen, you will be prompted to enter your Email Address, Password, and Confirm Password.
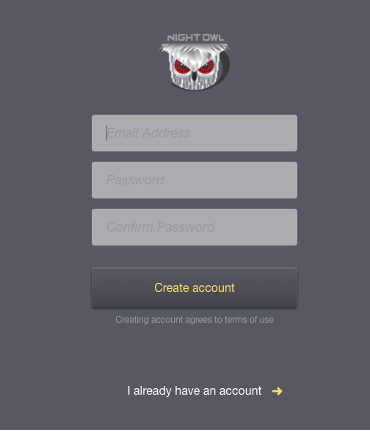
- After filling in all the values, click Create Account. A confirmation email will be sent to the email address that was entered for your account.
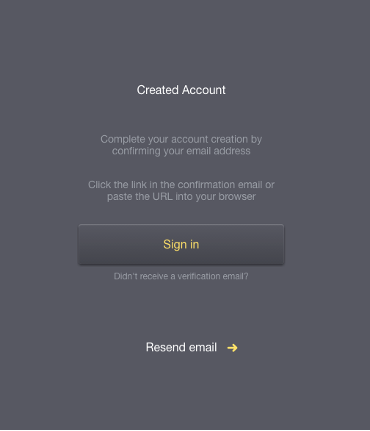
- Please click Confirm Email in the confirmation email to complete the account setup.
- After you have confirmed your email, click the Sign in tab in the Night Owl X CMS software.
- Click on the Device Manager tab at the top of the screen.

- If you can see a UID number and an IP address, this means that your device was recognized by the Local Network. Here you will enter the same credentials on the User Name and Password These should be the same credentials created during the initial setup of your recorder.

- After you have filled in those values, click on the add tab to add your device to the Night Owl X CMS software. Your recorder should now appear in the top right corner of the screen in a thumbnail image.

![]()
7. CMS Crash / Black Screen Issues
If you are using the Night Owl X CMS (Control Management Software) and it is crashing or showing a black screen, try the steps below:
- Make sure you are using the correct CMS software for your recorder.
- For black screen issues using a Windows PC:
- Find the Night Owl X CMS icon located on your PC.
- Right-click on the software icon and then left-click Run as administrator.
- This will give the CMS more priority to perform better and will correct the black screen in most cases.
- Please be sure that your PC/MAC complies with the following specifications:
- PC Operating System: Windows® 7, Windows® 8/8.1 and Windows® 10 or above.
- MAC Operating System: MAC OS X® 10.9 and above.
- As a last resort, try restarting the CMS software.
Night Owl Protect App, CMS and Recorder Videos
Click on any of the topics below to go to a video
IMPORTANT: These videos pertain to products that use the Night Owl Protect App, including the following series: TA5, DP2, DP8, VDP2, WNIP2, BWNIP2, DB-WNIP2, BTD2, BTD8, BTN8, BTWN8, FTD4, and FWIP4.
Night Owl Protect App/CMS Videos
- How to Create A Night Owl Protect Account Using the App
- Night Owl Protect Account Login Options
- Adding a Recorder to the Night Owl Protect App
- Password Reset Using the Night Owl Protect App
- Changing Your Password Using the Night Owl Protect Website
- Changing Your Night Owl Protect Password Using the App
- Playback Recordings Using the Night Owl Protect App
- Night Owl Protect Download, Save and Share Events
Night Owl Protect Wired DVR/NVR Videos
- Hardware Setup and Bluetooth® Configuration for Bluetooth® Enabled DVRs
- Hardware Setup and Bluetooth® Configuration for Bluetooth® Enabled NVRs
- Hardware Setup for Wired DVRs without Bluetooth®
- Live View For Wired Recorders Using Night Owl Protect
- Local Playback for Wired Recorders Using Night Owl Protect
- Night Owl Protect Wired Recorders: Backup Recordings
Night Owl Protect Wi-Fi NVR Videos
- Hardware Setup and Bluetooth® Configuration for Bluetooth® Enabled Wi-Fi NVRs
- Wi-Fi NVR System (WNIP2 Series) – Basic Hardware Setup
- Hardware Setup for Wire Free Smart Security System (BWNIP2 Series)
- How to Recharge the Batteries for your Wire Free Cameras (BWNIP2 Series)
- Pairing an Add on Wi-Fi IP Camera to the WNIP2 Series Wi-Fi NVR
- Night Owl Protect Wi-Fi Recorders: Adding and Removing Devices
- Night Owl Protect Wi-Fi Recorders: Live View Tutorial
- Night Owl protect Wi-Fi Recorders: Playback Recordings Locally
- Night Owl Protect Wi-Fi Recorders: Backing Up Recordings
Night Owl Protect Standalone Wi-Fi IP Camera Videos
- Adding a Standalone Wi-Fi Camera to the Night Owl Protect App
- Formatting Your MicroSD Card for WNIP2 Series Standalone Cameras
Night Owl Protect Smart Doorbell Videos
- WNIP2 Series HD Smart Doorbell Hardware Setup and Pairing to a Wi-Fi NVR
- WNIP2 Series HD Smart Doorbell Hardware Setup and Pairing to a Router
Night Owl Protect App/CMS Videos
How to Create A Night Owl Protect Account Using the App
Night Owl Protect Account Login Options
Adding a Recorder to the Night Owl Protect App
(Click here to learn how to create a Night Owl Protect account)
Password Reset Using the Night Owl Protect App
Changing Your Password Using the Night Owl Protect Website
Changing Your Night Owl Protect Password Using the App
Playback Recordings Using the Night Owl Protect App
Nightowl Protect Download, Save and Share Events
(Click here to learn how to create a Night Owl Protect account)
Night Owl Protect Wired DVR/NVR Videos
Hardware Setup and Bluetooth® Configuration for Bluetooth® Enabled DVRs
Hardware Setup and Bluetooth® Configuration for Bluetooth® Enabled NVRs
Hardware Setup for Wired DVRs without Bluetooth®
Live View For Wired Recorders Using Night Owl Protect
Local Playback for Wired Recorders Using Night Owl Protect
Night Owl Protect Wired Recorders: Backup Recordings
Night Owl Protect Wi-Fi NVR Videos
Hardware Setup and Bluetooth® Configuration for Bluetooth® Enabled Wi-Fi NVRs
Wi-Fi NVR System (WNIP2 Series) – Basic Hardware Setup
Hardware Setup for Wire Free Smart Security System (BWNIP2 Series)
How to Recharge the Batteries for your Wire Free Cameras (BWNIP2 Series)
Pairing an Add On Wi-Fi IP Camera to the WNIP2 Series Wi-Fi NVR
Adding a Standalone Wi-Fi Camera to the Night Owl Protect App
(Click here to learn how to create a Night Owl Protect account)
(Click here to learn how to pair your standalone wi-fi camera to your Wireless NVR)
Formatting Your MicroSD Card for WNIP2 Series Standalone Cameras
(Click here to learn how to create a Night Owl Protect account)
Night Owl Protect Wi-Fi Recorders: Adding and Removing Devices
Night Owl Protect Wi-Fi Recorders: Live View Tutorial
Night Owl Protect Wi-Fi Recorders: Playback Recordings Locally
Night Owl Protect Wi-Fi Recorders: Backing Up Recordings
Night Owl Protect Smart Doorbell Videos
WNIP2 Series HD Smart Doorbell Hardware Setup and Pairing to Wi-Fi NVR
WNIP2 Series HD Smart Doorbell Hardware Setup and Pairing to a Router
Night Owl Protect Troubleshooting
Click from the list below to navigate to that section of this guide for more information!
1. Accessing your Product Manual
2. Watch our Helpful Night Owl Protect Videos
3. Login Issues on your Recorder
4. Username Issues
5. Password Reset
6. How To Share Access via the App
NOTE: Images may vary slightly. This troubleshooting guide was accurate at the time it was created, but new software updates may not be reflected. However, the steps will be the same!
1. Accessing your Product Manual
Your product manual has detailed information on all of your product’s features and capabilities. It includes images of each menu within your recorder’s firmware and easy step-by-step information on making adjustments to your settings. To access it:
a. Visit Support.NightOwlSP.com
b. Enter your Series located on the product’s support sticker.
NOTE: For recorder’s, the support sticker is usually located on top in the left-hand corner.
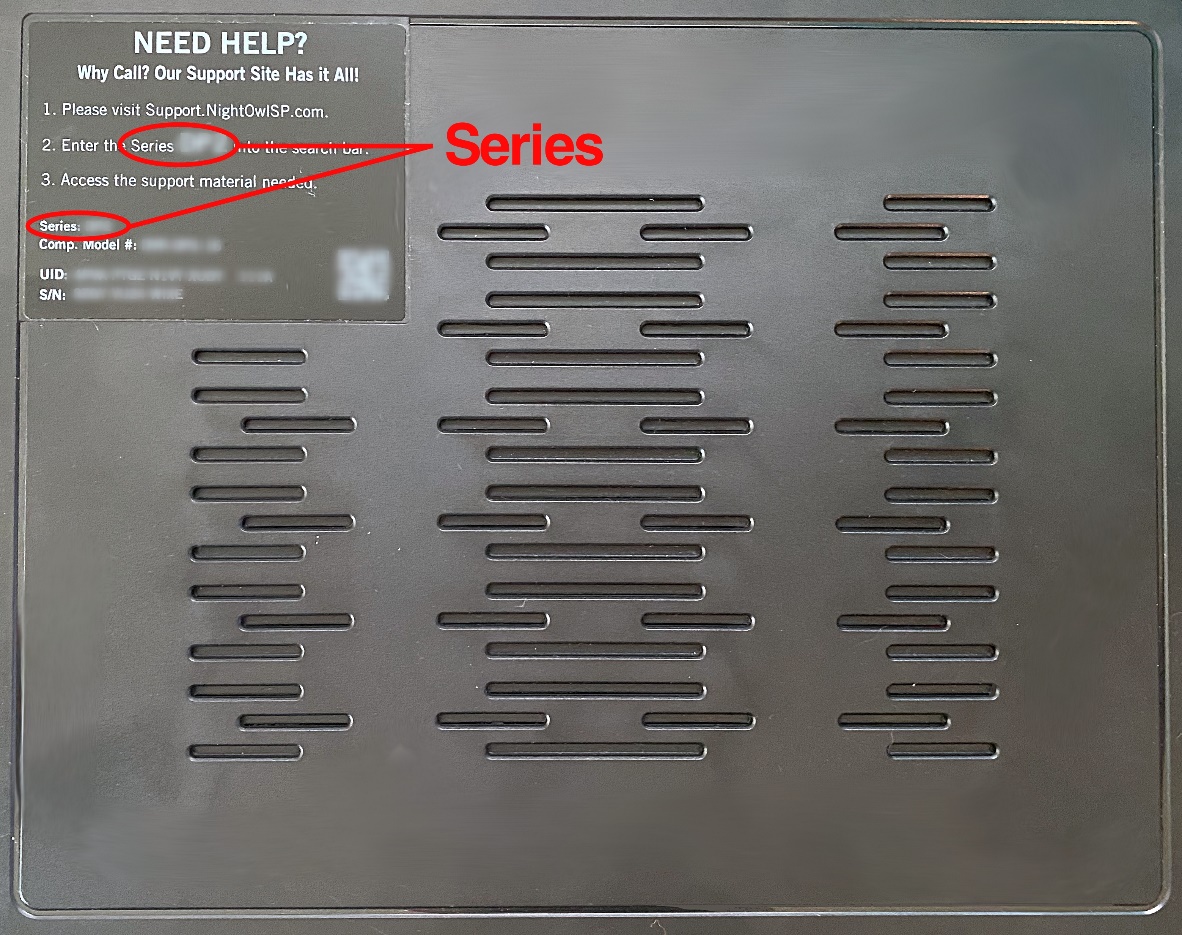
c. Under Helpful Resources, click on “Manual.” This will download a full copy of your manual to your PC or Mac.

2. Watch our Helpful Night Owl Protect Videos
For Night Owl Protect, we offer a large number of short, yet informative, how to videos to assist you with setup and troubleshooting. You can watch the video from the convenience of your Smart Device, PC or Mac and pause it while you perform the easy to follow how to steps!
a. Click on the image below to watch the videos.
3. Login Issues on your Recorder
 |
For enhanced privacy and security, we recommend using your Night Owl Protect username to log in to your recorder. |
The following options can be used to login to your Night Owl Protect recorder:
Option #1: Username
a. Type your username.
b. Enter your password.
c. Tap “Login.”
Option #2: Email Address
NOTE: Your email address MUST be verified in your Night Owl Protect account, or you will be unable to use it to access the Night Owl Protect account from your Smart Device.
a. Follow the steps below to verify your email address using the Night Owl Protect app:
1. Log in to your Night Owl Protect mobile app.
2. Tap “Account” on the bottom right of the Devices screen.
3. Tap on your “Name/Email.”
4. Tap “Verify” next to your email address to receive an email with a secure code.
5. Retrieve the code from the email and return to the app.
6. Enter the code into the blank field to verify your email address.
b. Follow the steps below to verify your email address using the Night Owl Protect website:
1. Go to https://www.no-protect.com/
2. Log in to your Night Owl Protect account with your username and password.
3. Click your “Username” in the upper right corner of the window.
4. Click “Manage my account.”
5. Click “Verify” next to your email address to receive an email with a secure code.
6. Retrieve the code from the email and return to the website.
7. Enter the code into the blank field to verify your email address.
Option #3:Mobile Phone Number
NOTE: Your mobile phone number was verified when you created your Night Owl Protect account.
Follow the steps below to use your mobile phone number to log in to your account:
a. If it is not pre-populated, you MUST enter +1 into the field.
NOTE: The + is found by clicking 123 on the on-screen keyboard that appears when logging into the recorder.
b. Next, enter the area code followed by the phone number (no spaces or dashes).
c. Example: +15551234567
d. Enter your password and click “Login.”
4. Username Issues
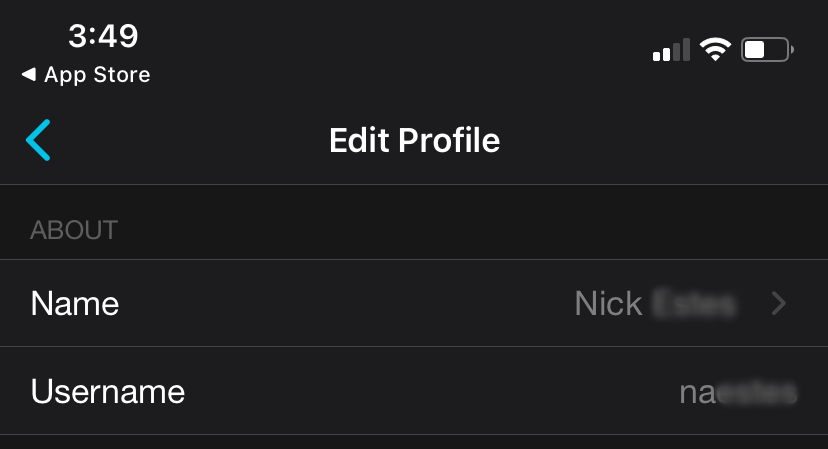
For added security benefits, we recommend using your username to login to your Night Owl recorder. If you have forgotten your username, you can find it by signing into the mobile app with your pin, face id, email or phone number.
a. Log in to your Night Owl Protect mobile app.
b. Tap on “Account” on the bottom right of the Devices screen.

c. Tap on your “Name/Email.”
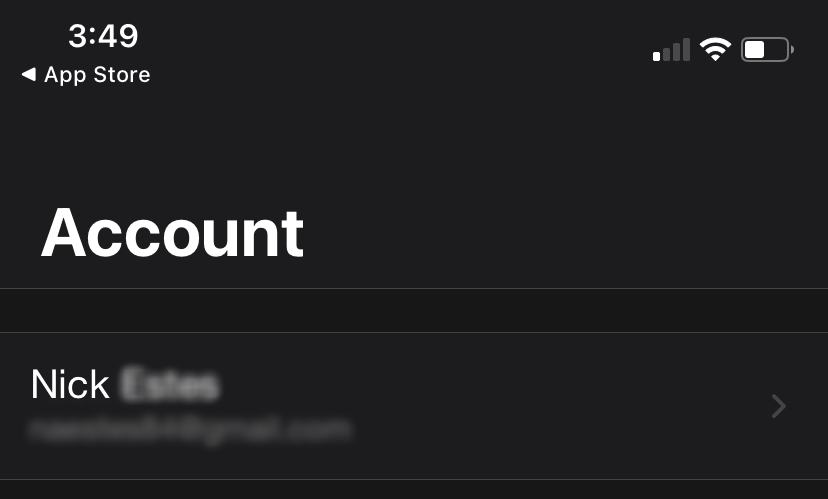
d. Your username is found in the Username field.
5. Password Reset
Single Sign-On lets you securely access multiple Night Owl devices with one set of login credentials. The password is the same for your recorder and the mobile app, so you can quickly reset it without having to call Technical Support.
My DVR/NVR is connected to the Internet.
a. Using the Mobile App
If you forgot your password and are logged into the DVR/NVR with your Night Owl Protect account credentials, go to the mobile Night Owl Protect app to reset the password.
1. Tap “Forgot my password” on the Night Owl Protect app login page.
2. After resetting, log into your DVR/NVR with the new password.
3. Be sure to keep your DVR/NVR powered on and connected to the Internet so that it can receive the new password once you change it.
b. Not Using the Mobile App
If you are not using the mobile Night Owl Protect app you can also reset your DVR / NVR password.
1. Visit https://www.no-protect.com/
2. Click “Get Started.”
3. On the next page select “Forgot Password.”
4. Enter your Night Owl Protect username and a new password will be sent to your registered email address.
My DVR/NVR is not connected to the Internet or it hasn’t been logged into using my Night Owl Protect account credentials.
a. Click “Forgot password” in the DVR/NVR Login screen.
b. A reset code is required for password resets. To receive a code log into your Night Owl Protect account, or if you don’t have an account, you can create one by clicking here .
c. Once registered, click on the device’s panel.
d. Click the “Reset Code” button on the right side of the panel.
e. Enter the date that is currently displaying on the device’s Live View.
f. Click “Ok” to receive a Reset Code.
g. Return to the DVR /NVR and enter the code.
h. Once verified, you can create a new password.
6. How to Share Access via the App
Want to share access to your system with a family member, friend or co-worker? You can easily do so using the Night Owl Protect App.
 |
To share access to your Night Owl Protect device, the guest MUST have their own Night Owl Protect account. Please ensure they have downloaded the app onto their Smart Device, setup their account and verified their email before proceeding. |
a. To Share Access to your Night Owl Protect Device:
1. Log in to the Night Owl Protect app on your mobile device.
2. From the Devices page, tap on the device you want to share access to.
3. Under Sharing, tap on “Members” (Android) or “Shared Users” (iOS).
4. If you have not already done so, you may be asked to verify your email address before sharing access. To do so:
- Tap “Verify Now.”
- Tap on your “Email” under Email Address.
- Tap on “Verify My Email.”
- Tap “OK.”
- A secure code will be sent to your email. Go to your email and retrieve the code then return to the app.
- Enter the secure code and then tap “Verify My Email.”
- Your email address has now been confirmed and you’ll see “Verified” next to your email.
5. Tap on “Get Started” if prompted.
6. Tap on “Add Member” (Android) or “Add a Person” (iOS).
NOTE: Before you proceed, the person you are sharing access with must have downloaded the Night Owl Protect App to their Smart Device, setup their account and verified their email. If they have not, please have them do so before continuing.
7. Enter the name of the person you are sharing access with in the Name field.
8. Tap on the device you want to share (Android) or “Next” (iOS).
9. Enter the email address of the person you are sharing access with in the Email field.
10. Enter a personal message (optional).
11. Tap the “✓” (Android) or “Send” (iOS) in the top right corner of the screen.
12. An email invite will be sent to the guest and you will see them added as a member. At this time the guest will see the shared recorder on the devices page of their Night Owl Protect mobile app and can access it.
NOTE: The person must have the app on their Smart Device, setup their account and verified their email. If there is any issue gaining access, ensure they have done so. As a last resort, use the steps below to delete them and then perform steps 1 through 12 again.
b. To Delete a Shared Access Member:
1. Log in to the Night Owl Protect app on your mobile device.
2. On the Devices page, tap on the device you would like to remove a guest from.
3. Tap on “Members” (Android) or “Shared Users” (iOS) under Sharing.
4. Tap on the person you want to delete.
5. Tap on “Remove User From This Device” (Android) or “Remove” (iOS).
6. You will be asked if you are sure. Tap “OK” (Android) or “Confirm” (iOS) to confirm.
7. The member will now be removed and will no longer have access to your Night Owl Protect device.
