Eye4 camera and APP user guide, Hello, in this article, we will provide an advanced installation and usage guide for the eye4 camera and its application. You can learn step by step about adding a camera, watching the recording and other functions.
APPdownload
1. For iPhone, please go to APP Store, for android phone, please open the Google Play or other APP market, to searchfor ” Eye4″ APP and download.
2. Scan the QR code below to download.
Register
1. ForAndroid/iOSAPP,clickon”Register”,createausername andpassword,thenclick”submit”tofifinishregister.
2. Alsosupportthirdpartyaccountslogin(noneedtoregister).
Connectcamerastothenetwork
Please connect your phone to the WiFi network first.
Note: The camera does not support mobile hot spotsor public WiFi.
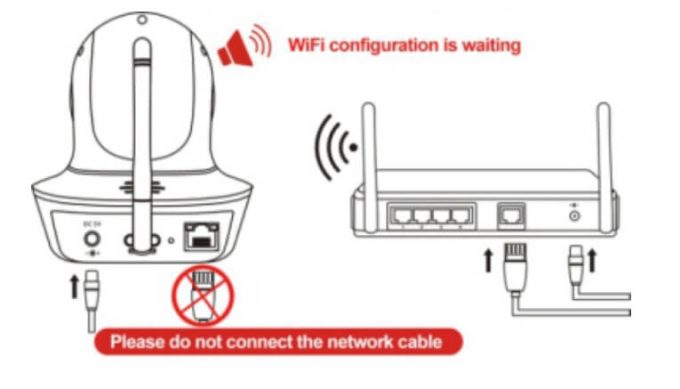
Please power on the camera, wait about 30s until the reboot of the camera is finished, then the camera will issue voice promp for WiFi configuration( If the camera doesn’t issue the voice prompt, please reset the camera.
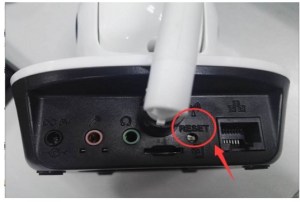
Reset method: Locate the RESET hole next to the network cable port on the back of the camera, and press and hold the button in the hole for about 10 seconds to restore the factory Settings. After successful reset, there will be a prompt “Reset completed, will reset the device”).
Scan QR Code
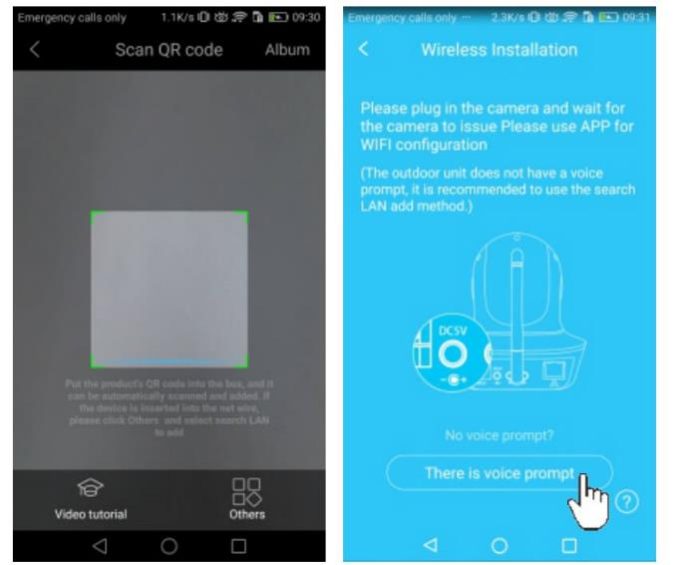
1. Enter the APP, click the “+” icon on the top right corner of the homepage, to scan the QR code on the camera’s body;
2. Once the camera says “Please use APP for WiFi configuration” for the first time, please click on the “Heard voice prompt” button, then put in the password of the WiFi network that the mobile phone currently connecting to, click ‘OK’ to go to next step.
Note: Please ensure that there is no space or any special characters in the WiFi password, and the password is entered correctly, otherwise the camera will not be able to connect.
3. Click the ‘Send’ button on the APP, to send configuration signal to the camera.
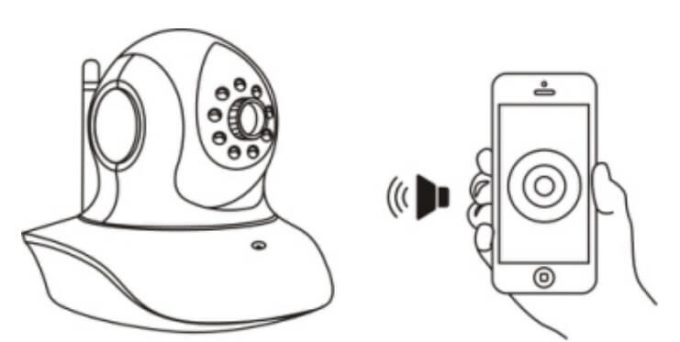
Note: Place the phone close to the camera, and adjust the phone volume to the maximum.
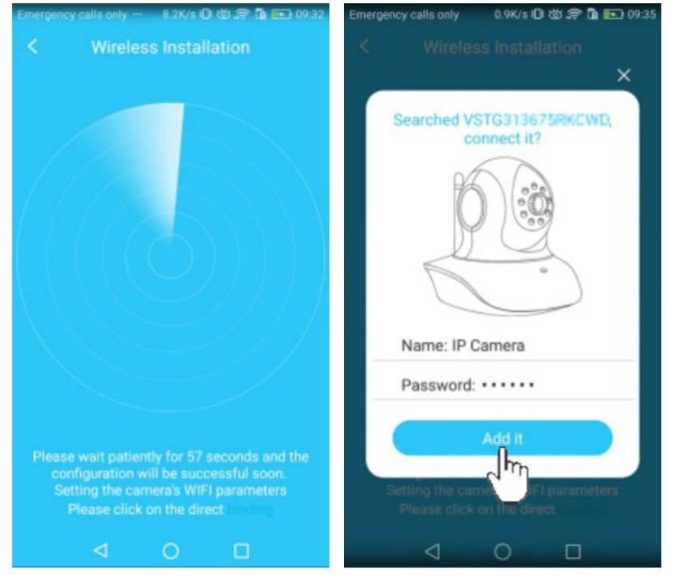
4. About 30 seconds after the camera prompts “wireless configuration succeed” , the binding window will pop up, click “Add it” to complete the connection.
Note: During this process, if it prompt that WiFi is configured successfully but the binding page does not pop up, please click the “binding” in the lower section of the searching page, to add the camera.
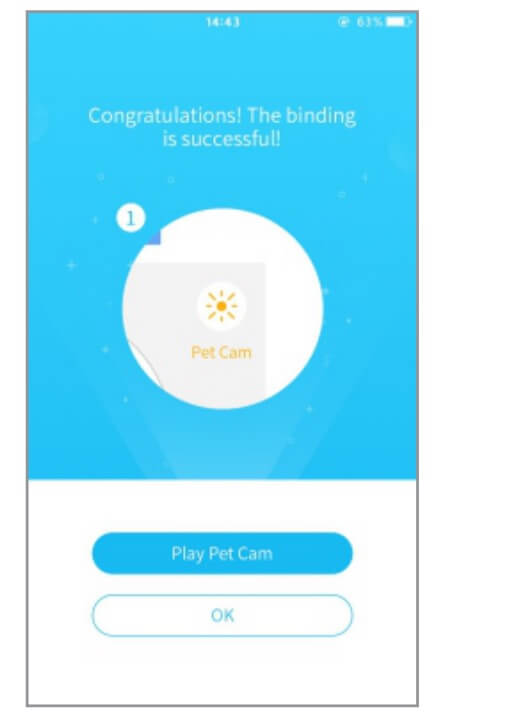
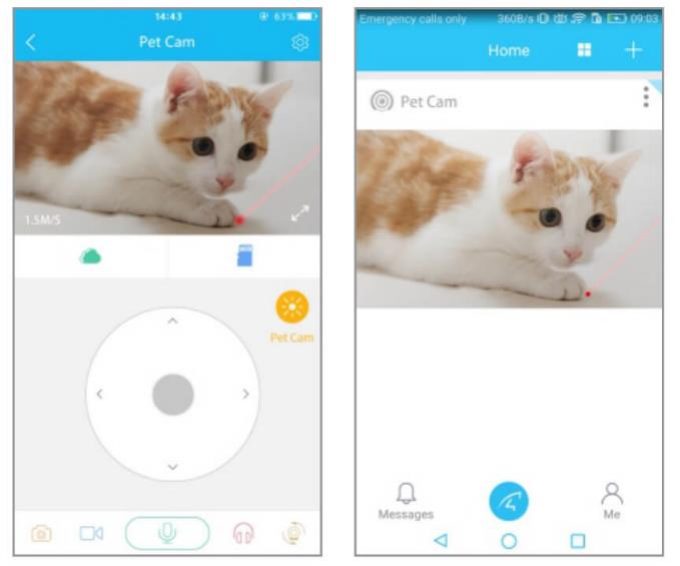
5. This device is a pet camera. After successfully bound, you can choose the mode of “Play Pet Cam” or click “OK” to jump to the home page of the APP.
Note: Each time you enter the real-time video page, the “Pet Cam” function will be automatically opened. When you leave this page, this function will be automatically closed. Drag the cradle head to control the “Pet Cam”.
How does the‘ Pet Cam’ button work?
After the‘ Pet Cam’ is opened, the head of the camera will emit a red laser beam. You can tap the PT icon or slide the camera’s picture to move the beam and play with your pet.
To enable this function from the home page of the APP, click the play button in the camera screen to enter the real-time video screen, and the “Pet Cam” function will automatically open.
Note: Laser irradiation is harmful to human eyes, so do not irradiate the laser head directly to human eyes. Also, keep children away from beams of light for safety reasons
Other ways of adding
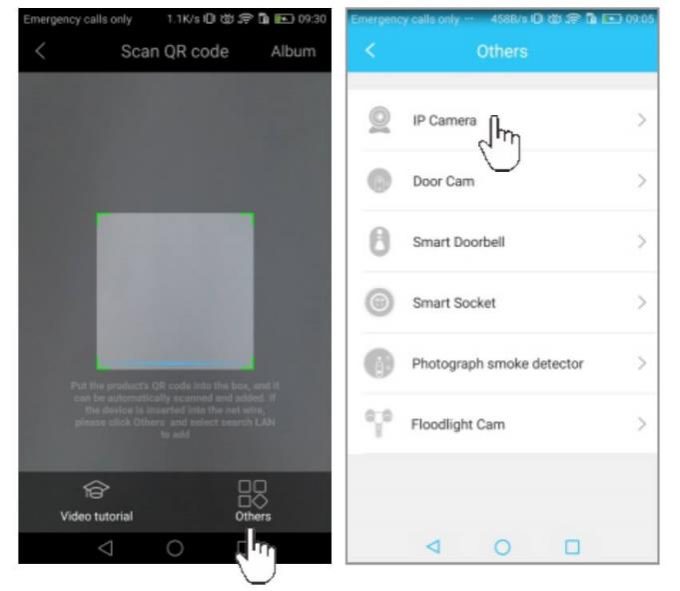
If no QR code can be found on the body of the camera, or it fai led to connect the camera by scanning Q R code, please choose the ‘Others ‘ method to connect the camera.
Method One : Wireless Installation
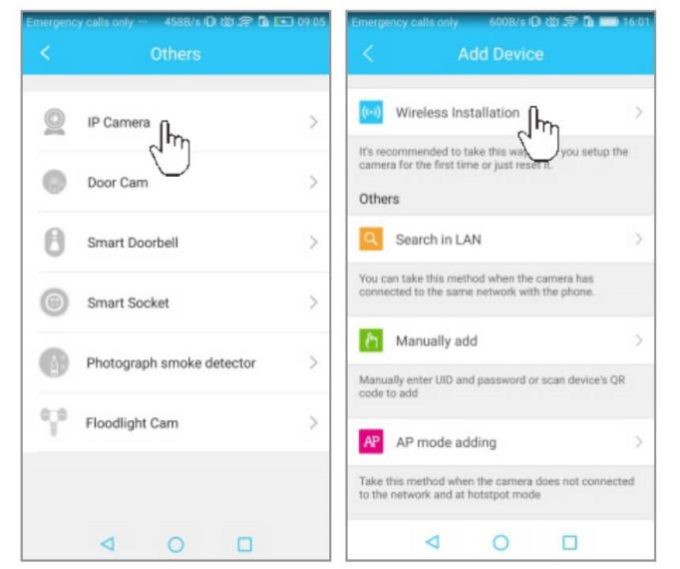
1. Enter the APP, click the “+” icon on the top right corner of the homepage, tap ‘Others’→IP Camera.
2. Choose ‘Wireless Installation’, please refer to the ‘Wireless configuration add instructions‘ on the APP and the APP’s voice prompt to finish the setting.
Note: Please refer to the ②③④ steps in the chapter ‘Scan QR code’ to finish the’Wireless Installation’ settings.
If the wireless configuration fails, please refer to one of the following methods to connect the camera.
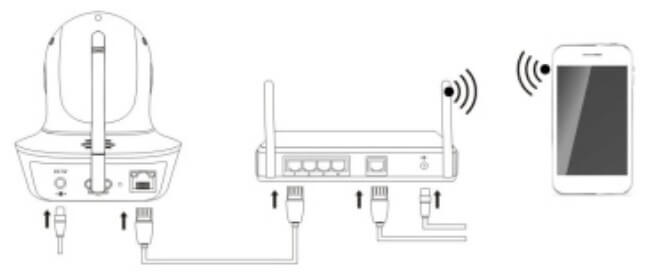
Please power on the camera, and use a network cable to connect the camera to one of the LAN ports on the router.
Please make sure the phone and camera are under the same router.
Please connect the network cable
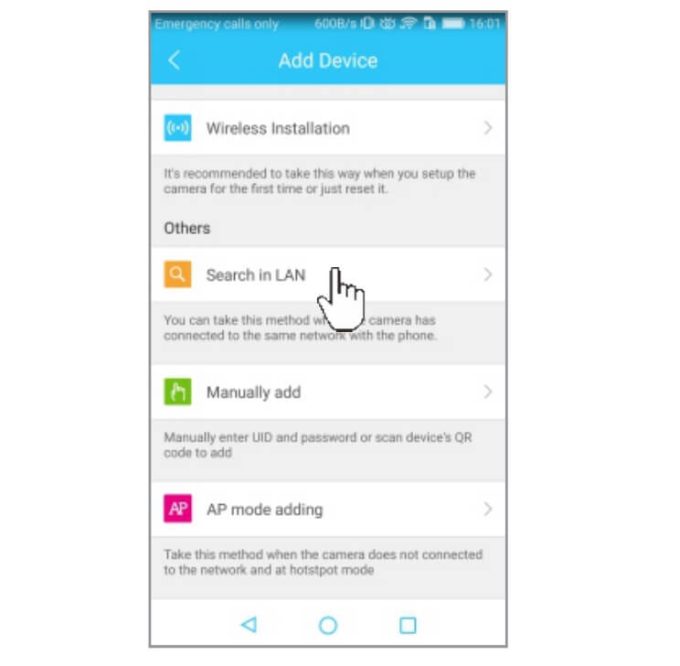
Method Two: Search in LAN
1. Login the APP, click the “+” icon on the top right corner of the homepage, tap ‘Others’ →IP Camera.
Click on “Search in LAN”, you can find all the available cameras in the same router with the smartphone(. Note:Cameras that has been added successfully in this account will not be searched again).
2. The binding page will pop up after about 30 seconds. If the search times out, please try again or return to the Add Device page and select Manually add.
Method Three: Manually add
After select “Manually add”, please input camera’s UID ( 15 characters, can be found on the label stick to the camera’s body), or scan the QR code on the camera’s bottom sticker, the UID will be auto filled in, then put in the camera’s password to connect the camera.
Note: After the camera has been added by Search in LAN or Manually Add, if you want to make the camera work in WiFi mode, please follow the steps below:
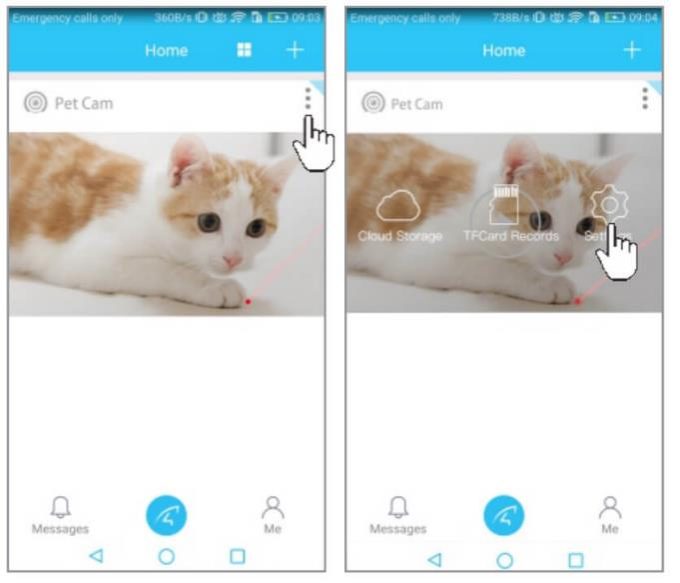
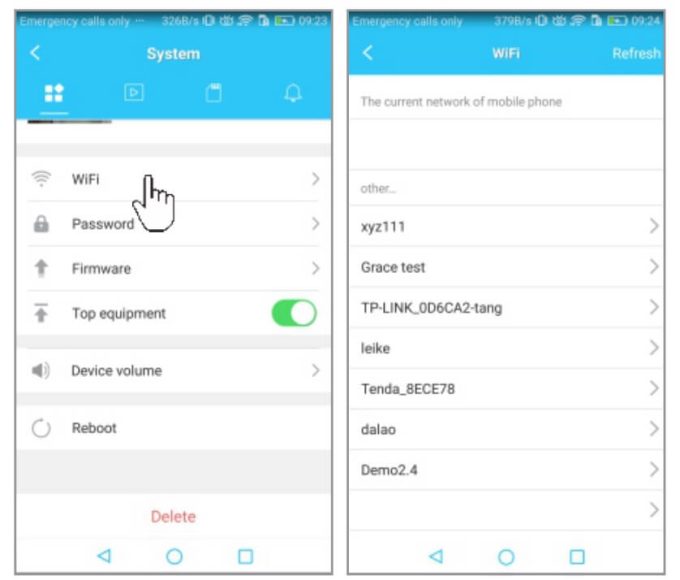
1. In the home page of the APP, click the”![]() “on the top right corner of the camera →choose “Settings →WiFi”, select the WiFi that the smartphone / tablet connecting to, then input WiFi password, click on “done”.
“on the top right corner of the camera →choose “Settings →WiFi”, select the WiFi that the smartphone / tablet connecting to, then input WiFi password, click on “done”.
2. Wait until the APP/Camera prompt’ please remove the network cable, camera will restart ’ , remove the network cable(Keep the camera powered on).
Unplug the network cable,camera will reboot automatically…
Note: If setup failed, please refer to network cable connection method or change a router to setup again.
Cloud Storage
The camera supports cloud storage function( Only for regions where cloud storage has been enabled ). After the cloud storage function is activated, once the camera detects moving objects, it will record video to cloud server, for users’ checking at any time.
How to activate the cloud storage service?
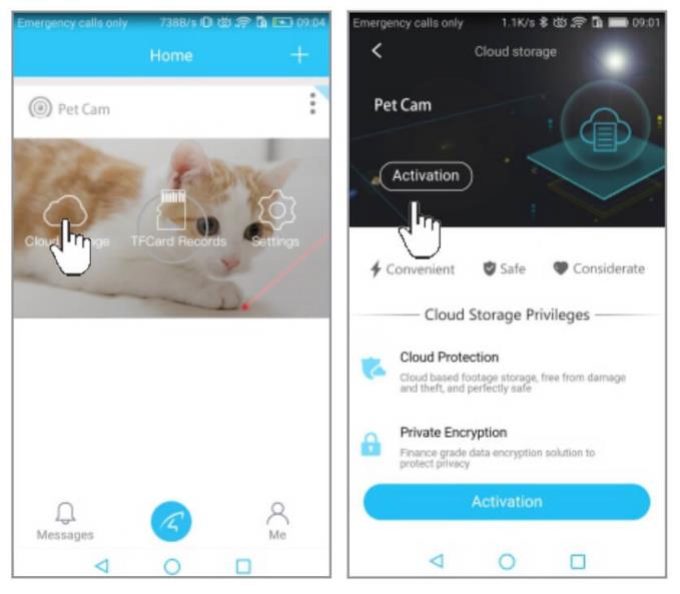
Click the ![]() on the top right corner of the camera, select “cloud storage“. Click “activation” to open the cloud storage service.
on the top right corner of the camera, select “cloud storage“. Click “activation” to open the cloud storage service.
How to view cloud storage video?
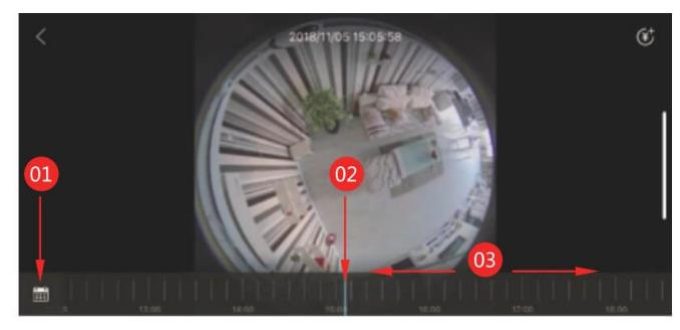
Click the![]() on the top right corner of the camera, select ” cloud storage‘ ,drag the timeline at the bottom of the screen to view
on the top right corner of the camera, select ” cloud storage‘ ,drag the timeline at the bottom of the screen to view
cloud storage videos.
Note: The blue parts means there are videos recorded. Click it to watch videos.
The grey parts are the time periods that no videos are recorded. Slide the time bar to choose the time period;
Click the ![]() at the bottom left to select the date.
at the bottom left to select the date.
1. Click to choose the date
2. The blue parts means there are videos being recorded
3. Drag the time bar to choose time period
How to renew the cloud service
It requires to renew the cloud service when it is expired.
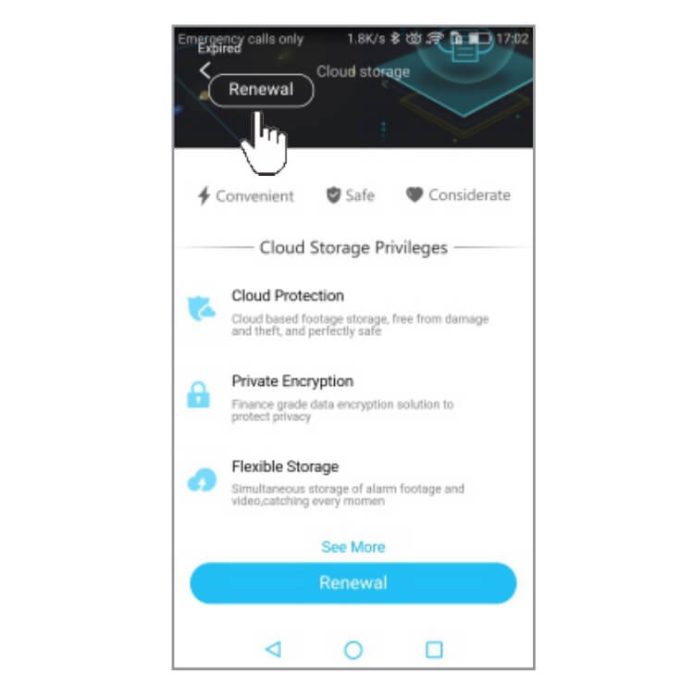
Click the icon![]() in the upper right corner of the cloud storage interface, to open the renewal interface.
in the upper right corner of the cloud storage interface, to open the renewal interface.
Click the “Renewal” option at the top left corner or the bottom of the interface to bring up the service package details. You can choose the package according to your needs.
Note: there are two types of “video preservation (circulation)” : 7 days and 30 days.
The 7-day cycle means that the video can be saved for 7 days, and the 30-day cycle means that the video can be saved for 30 days. After that, the video will be covered in order. 1 month, 6 months and 12 months of service pack is optional.
For more information about cloud storage, click “See more” on the renew interface.
Note: Due to the different market conditions and national policies, the price of cloud storage may be vary in different regions, the amount is subject to the actual amount on the app.
Online Support
If you have any questions or difficulties in using the product, or suggestions for our products, please contact us in the following ways:
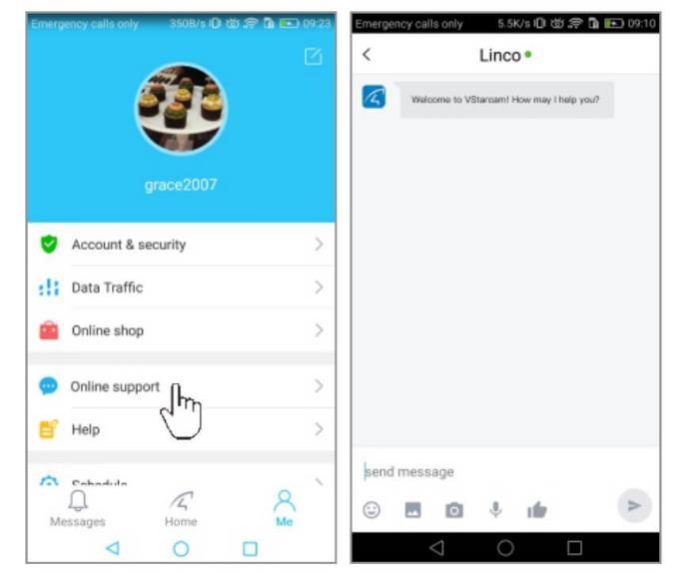
Click on “Me” in the bottom right of the APP, and click on ‘Online support’, to enjoy the high-quality online consulting ser vices provided by our company.
FAQ
How to reset the camera to factory default setting?
Hold the reset button for about 10 seconds to reset camera.
Camera’ S default password: 888888 (To improve the security, it is highly recommended that you modify the password of the camera).
Any tips for WiFi connection?
camera support only 2.4G frequency signal, and 802.11b/g/n WiFi network.
1. The WiFi password should be less than 16 digits, and can not contain special characters, such as @ $! etc. , suggestyou to make a password that contains only letters and number.
2. Please upgrade the APP to the latest version.
No vision at night time?
1. Check ifthe IR functionis enabled ornot;
2. Check if the lR LEDis onor not;
3. Reset the camera back to factory setting;
4.Upgrade the camera to the latest firmware.
What to do if camera’s picture is blurred?
1. Login the camera’s web interface, adjust the picture quality to HD mode;
2. Clean the camera lens with a cotton swab.
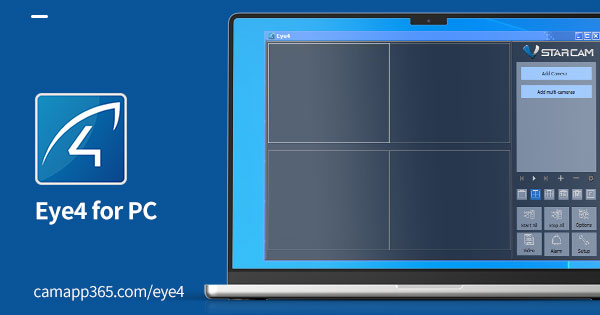
Eye4 For Pc
Real-time picture viewing, snapshot, recording, reminding, setup ect.
Support Windows and MAC OS computers.
Eye4 Camera Finder
Used to search IP-Cameras located in LAN, Camera settings.
Eye4 Video Player
used to play video files in TF card windows.
Eye4 Plug for IE
IE browser plug-in, you can access Eye4 camera through IE browser
FAQ
Account login failed, appear “ unknown error”
Generally speaking, this kind of problem is related to the compatibility between the APP and the phone or computer. The solution are as follows:
1. APP for PC client: Please uninstall the APP(completely remove it from your computer’s local disk, desktop and control panel→program), then download and install a new one and then login APP again.
Note:Please don’t use the default path when download and install the eye4 software, choose a different disk to place it.
2. APP for Smart Phone: Please uninstall the APP, then download and install a new one. please check whether the APP is blocked by any security software, such as Security steward, 360 anti-virus software etc.
3. This problem can also be caused by the server, so if the above two methods don’t work, then please wait for the sever to be repaired and try again later. Thanks!
Camera cannot connect after the password of the WiFi changed
If the camera cannot connect after the WiFi password being changed, solution are as follows:
Step 1. To reset the camera to factory default settings. You can do that by referring to the guide below:
Cameras that can pan/tilt:
Please reset it as the following way:
Please power on the camera, use a pin or pencil to hold the ‘reset’ button for 10~~30 seconds, then the camera will say ‘reset completed, device will reboot!’, then there would be a clicking sound, all the IR LEDs will be on for a while and then off, then the camera start to do self-checking(pan/tilt), after the pan/tilt finished, the reset finished.
Outdoor camera:
Please reset it as the following way:
Please power on the camera, use a pin or pencil to hold the ‘reset’ button for 10~~30 seconds, then you will hear a clicking sound from the camera, all the IR LEDs will be on for a while and then off, and you will hear another clicking sound, that means the reset has been finished and it’s rebooting.
Step 2. Re-configure the “ wireless settings ” on the camera
Camera displayed offline after replaced the Router
After replaced the router, the camera will display offline. The reasons is that the camera is connected to the previous WiFi network, can’t switch to new WiFi network automatically. We need to setup the new WiFi to the camera. The steps are as follows:
Step 1. To reset the camera to factory settings by referring to the reset guide.
Step 2. After that, please re-configure the camera’s wireless according to the new WiFi network
Note: Before configure the camera to the new WiFi router, we need to reset the camera to factory default.
.
Camera reboot automatically from time to time
The problem of camera reboot automatically from time to time is generally caused by network or firmware problem, not caused by hardware.
The solutions are as follows:
Method 1. Network factors
Please check whether there is IP address conflict. Please download IP Camera Finder from the webpage (http://www.eye4.so/download/), then open the Finder, to see if the IP address is overlapped in camera list. If the IP address conflicted with other cameras, please modify the IP to a different static IP.
Method 2. Upgrade camera’s firmware to the latest version
If the above methods does not work, it probably caused by hardware problems, please contact the direct dealer for maintenance.
Can camera realize remote wireless connection?
In PC client, the camera can realize remote wireless connection. You can refer to chapter 8 in the [IP Camera PC Client Function Detailed Instructions](page 9 to 10) to setup the WiFi. However, in Phone APP, we cannot setup WiFi connection remotely.
Can connect and view in LAN, but can not in WAN
The cause of the problem:
Generally speaking, the cause is that camera can not access the Internet (Camera cannot connect to internet), Please check whether the wireless router which the camera connected to is working properly. Make sure that you can access the internet when connected to the WiFi of the router.
Suggestions:
If the router is working fine, then please check the following information:
1. Check LAN connection. If you can view the camera in PC client, Phone APP and Web client, that means the LAN connection is fine. If you can’t view the camera in LAN, then we can’t view it in WAN.
2. If the camera can be viewed in LAN, please switch to mobile network, check whether the camera can be viewed normally.
3. If the camera cannot be viewed in mobile network, then please change a router to test again.
4. If the camera still can’t go online remotely after changing router, then it must be a problem of the camera’s PNP penetration. It is recommended that take the camera to other network environment to have a try, for example, your friend’s network.
5. If can view the camera normally in other network environment, that means there is a problem with the local penetration of the camera. Then we can not use the UID to access. In this case, please contact the dealer for help.
Note:
1. Please make sure the camera get the latest firmware and the APP is the latest one. If not, please update the firmware and APP to the latest version
2. Generally speaking, the issue that the camera can be connected and viewed in LAN, but can not in WAN is cause by software or server, instead of hardware problem, no need to return to factory for repair.
Can not get real-time video
If the camera is online and can Listen, Audio, PTZ control, but can’t display the real-time video, then it must be cause by hardware problems. The solutions are as follows:
1. Reset it to factory default settings, re-configure it and try again.
2. Upgrade the camera to latest firmware.
3. Run the camera in other client, such as PC client, Phone client, Web client, if all operations failed, then it must be hardware problem.
4. If none of the above methods work, then please contact the dealer for replacement or maintenance.
Can SD card automatically record after inserted
After inserted the SD card, the camera will automatically start loop recording, and will automatically overwrite the old recording files when full, do not need to do extra settings of recording.
If you want to cancel the recording, please select the “24 hours video” , check to remove, if you need to set the recording time, please use the Web client settings, more details, please refer to [IP camera Web client function instructions]
How to remotely download video files saved in SD card
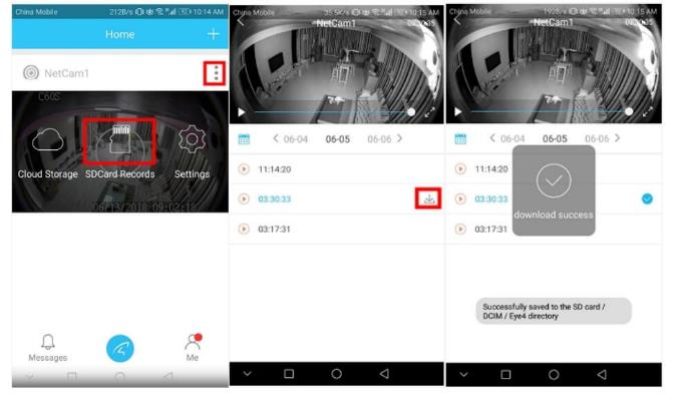
If you want to download SD card video files to your phone local storage, please take the following steps.
Step1: open APP home page–>SD card records–>click download icon
Path to save recording:
Android phone: local storage–> DCIM–>Eye directory iOS phone: in local system album;
Cannot read SD card or check SD card’s memory size
The solutions are as follows:
1. Check whether it is inserted in the opposite direction.
2. After inserted, click “format SD card” (format it even if you cannot check SD card’s memory size), reboot camera and refresh it.
3. If the above steps do not work, please change a SD card,(please use genuine SD card), For example, Kingston SD Card, Class 4 and 10 is preferred.
Notes:
1. If the above methods does not work, you can check the TF card slot on the camera and the SD card. If it proved to be hardware problems, please contact the dealer for replacement.
2. Besides, please make sure the camera’s firmware and the APP is in the latest version. If not, please update to the latest one.
Forget the Camera Password
Please reset the camera to factory default settings, the default password of the camera is 888888.
How to reset:
Power on camera, then find out the camera “ reset “ hole, use a pin or pencil to keep pressing the button for about 15 seconds until camera reboot, then the camera will be reset successfully.
Forget App Account and Password
If you forgot the password, click “ forget your password “ in Eye4 APP in PC or Phone, enter the email account bound the account, then you will get a verification mail, please follow the system prompts to change the password.
How long does the SD card record?
The following data is based on the test of video duration calculation of 64G TF card. The results will be different in different scenarios. For example, recording for static and dynamic picture are not the same. If you set different parameters, the results may different. The data is calculated on the camera’s default stream settings, just for your reference.
1. It can record 16 days when C38 is in 720P mode.
2. It can record 18 days when C7815WIP is in 720P mode.
3. It can record 14 days when C37A is in 960P mode.
4. It can record 10 days when C50S is in 1080P mode.
5. It can record 8 days when C38S is in 1080P mode.
Note: You can choose high-bit stream or low stream image, they take different amount of capacity. Please refer to the specific settings [IP Camera Web Client Function Instructions] SD card record settings
IP camera screen blurred , color cast
If your camera’s screen blurred or it’s color cast, please follow the guide below:
1. Please reboot camera a few times, or restore cameras to factory default settings, after that, it will be back to normal.
2. If the problem occur again and again, then it probably cause by camera’s sensor problem, please contact dealer or sale man for maintenance or replacement
Lens screen blurred, the screen is not clear or color cast
If you got such kind of problem, please try the following ways:
1. For Pan & tilt Cameras. Please turn the lens slowly until the picture turned clear.
2. Make sure the inner and outer surface of the lens’ are clean, if not, please clean them with a soft cloth.
3. If there is color cast, please login the PC or Web client, to adjust the contrast, brightness, saturation. [You can also try to restore it to factory setting or reboot camera a few times, to see if it works. If the issue happen again and again, then it must be hardware problem.]
Note: If the above ways do not work, it must be something wrong with the sensor in lens board, please contact the direct dealer or salesmen for warranty.
What is the wireless distance between Camera and Router
The distance depends on the wireless signal strength of the router.
1. At present, VStarcam IP cameras support 2.4G frequency bandwidth wireless router, don’t support 5G frequency bandwidth.
2. It is recommended to keep the distance within 10 meters.
Note: If the wireless signal of the router is weak, please connect the camera to the router with a network cable. Otherwise, It will make the camera offline.
