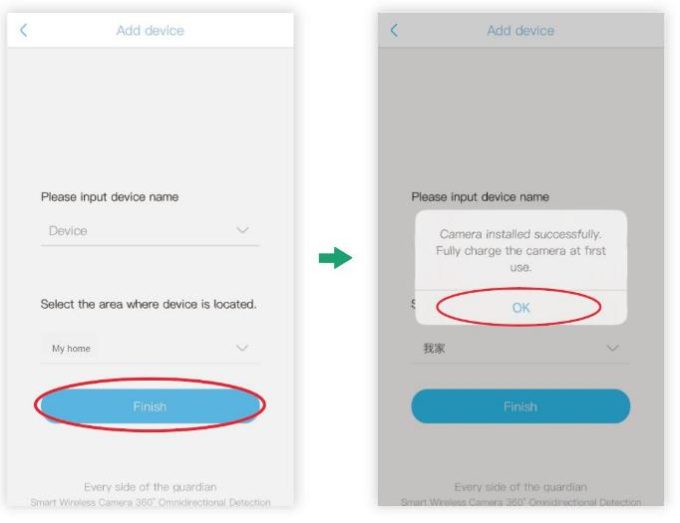
Soliom Pro, with the use of smart camera products, you can always know the real-time video of the house, courtyard, balcony, etc., and also can quickly browse to the video during the automatic monitoring of the camera, and use the application to easily monitor multiple products at the same time or Family use together.
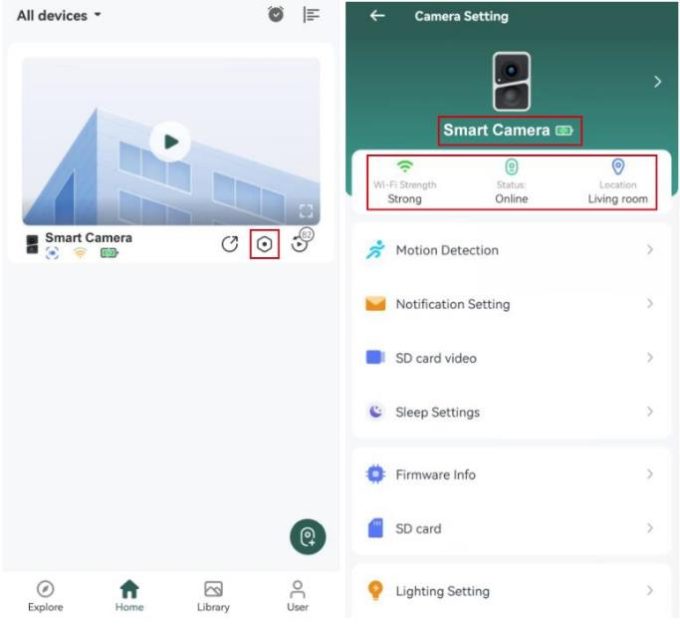
1.View Feeder Camera Status
① Battery Charging Status
You can check the camera’s power status and charge the camera in time.
② WiFi Signal Strength
Please make sure your camera has a full bar of WiFi strength to ensure a smooth live view speed.
(A WiFi extender is recommended to install beside the camera if needed)
2.Motion Detection Settings
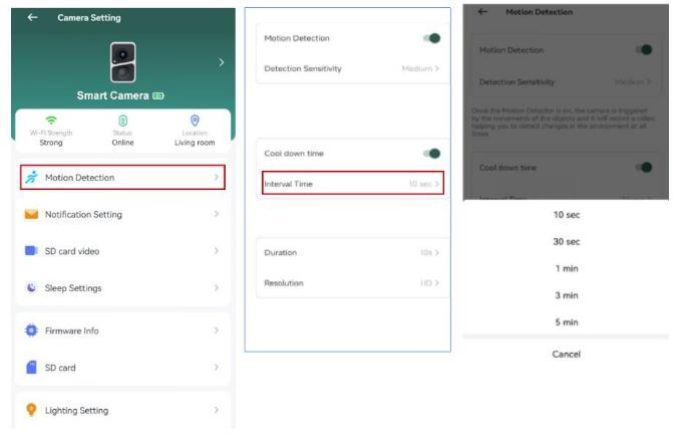
① You can set the detection sensitivity as High, Medium and Low. It is recommended to set the PIR Detection to High so that you could capture as more as a motion-triggered from the beginning part of the event.
② You can turn on/off the Cool down time.(You can set the cool down time to reduce the trigger frequency and set the interval time as 10s, 30s, 1min, 3min, 5min as you want)
③ You can set the video record time as auto,10,15, and 20 seconds. Auto:The recording time will be different from 5 seconds to 3 minutes according to the motion activated time length.But when you choose Auto,the battery will consume more power. It is suggested to be default as 10 seconds to optimize the battery power saving.
How to Use Soliom Pro
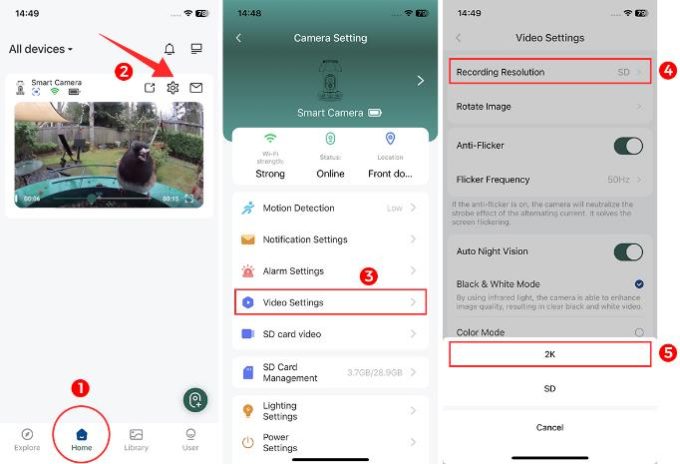
④ Setting to enhance the video quality. How to enhance video quality using the settings?
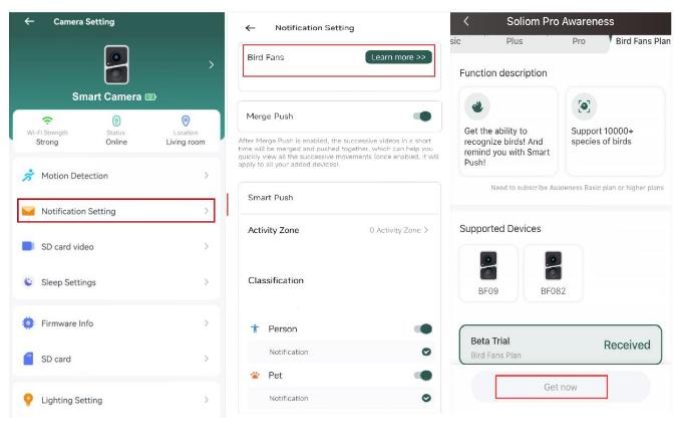
3. Bird Fans Plan Setting (Cloud storage plan paid service)
You can start the “Bird Fans” program. Note that this feature requires at least a paid basic cloud service plan.
We offer a free one month Beta Trial for all new users, please click “Get now” to claim it.
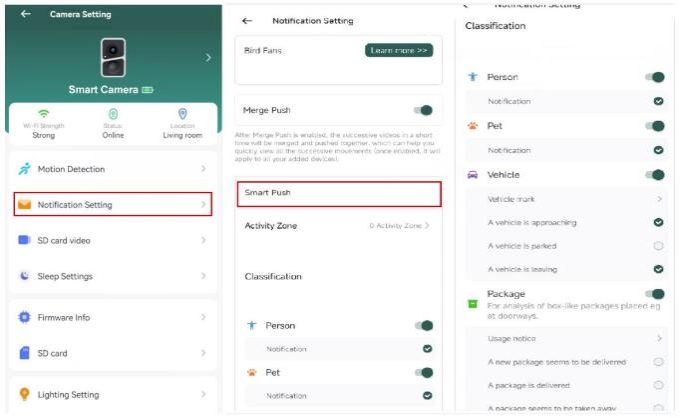
4. Notification Settings (Cloud Storage Plan Paid Service)
Smart Push: Select one or more AI objects, and you will receive notifications for the following events: “Something was detected.” Redundant information is filtered out to ensure notification effectiveness.
Activity Zone: Set up the area you want to monitor closely.
Note
Activity Zone, Smart Push and Bird fans plan features require at least the basic paid cloud service plan.
5. Sleep Settings (Sleep and Arm Time)
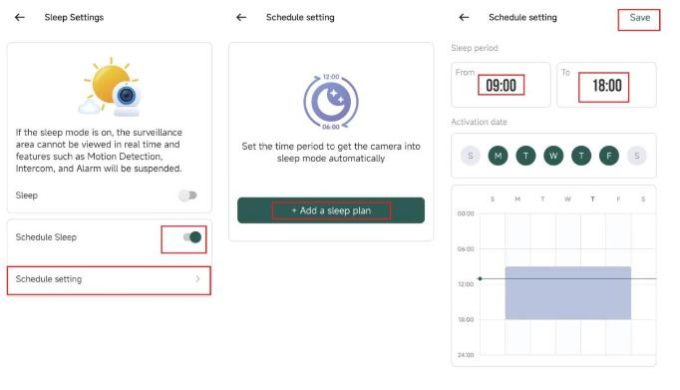
① If the sleep mode is on, the surveillance area cannot be viewed in real time and features such as Motion Detection. intercom, and Alarm will be suspended.
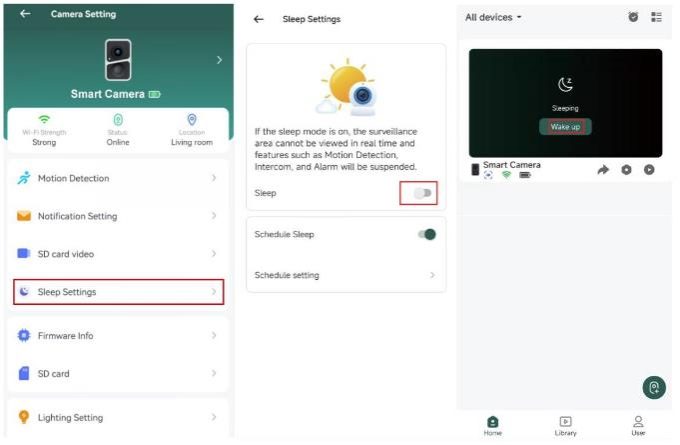
② Schedule Setting
(1) This is the time schedule function that you want the camera to work.
(2) You can select a day and then scroll the time to have a specific time frame.
(3) If you set a time from the Schedule Setting, the camera will only trigger motion and send out notifications at the time frame you set.
Note
1. The defaulted arming is set to 00:00 to 24:00 every day 7/24.
2. When you want to set your own arming time, please make sure to switch off the defaulted arming time first or edit the defaulted arming time.
3. You can set eight arming time frames per day at most.
4. Start time cannot be later than the end time, you have to set the arming time frame from 00:00 to 24:00 clockwise direction, do not across 24 hours.
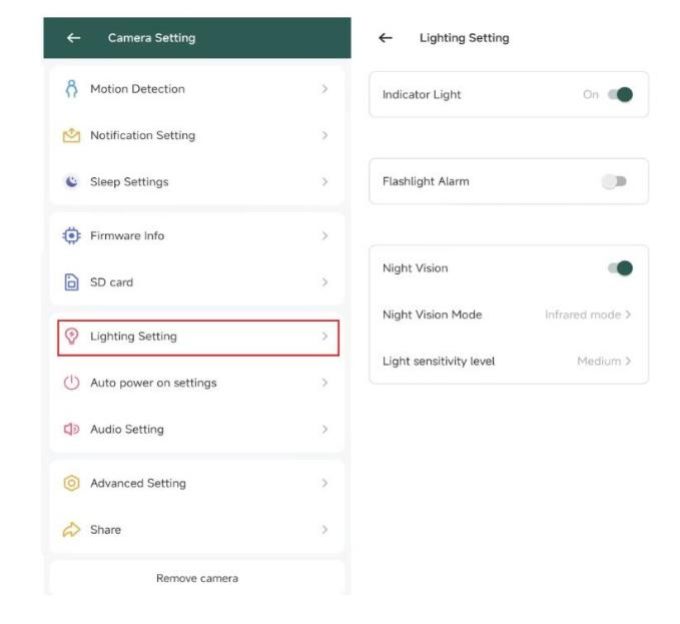
6. Lighting Setting (Indicator Light or Night Vision)
①. Flashlight Alarm: If you want the squirrels to be scared away. You can use this function.
②. Night Vision: You can turn on the night vision function at night, select Infrared mode for Night Vision Mode.
③. You can set the night vision sensitivity as High, Medium and Low.
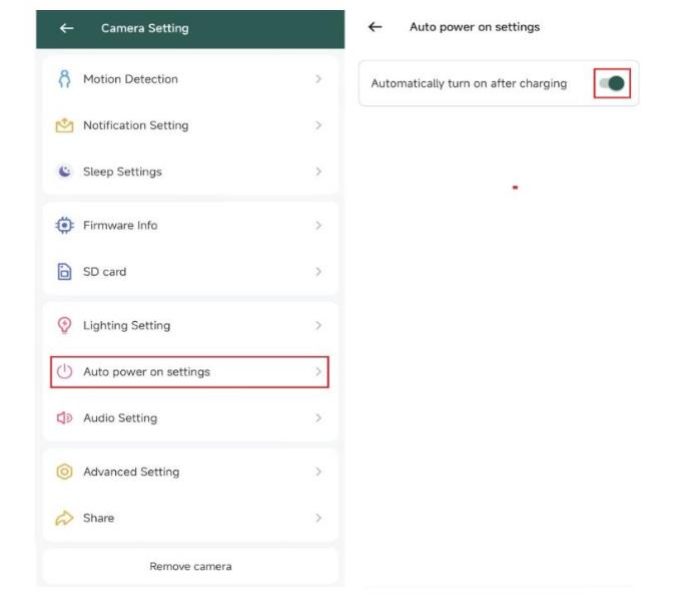
7. Auto power on settings
Automatically turn on after charging
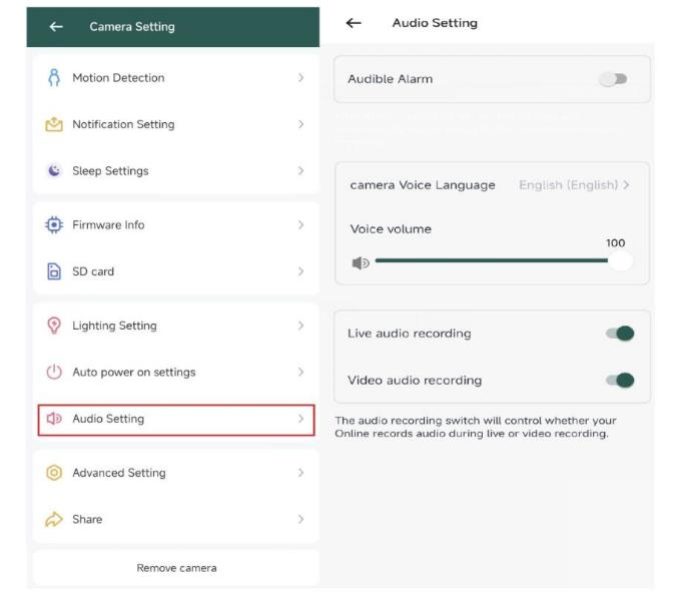
8. Audio Setting
① Audible Alarm
When motion is detected,the camera will Automatically sound an alert. (This function is not recommended for indoor use)
② Camera Voice Language
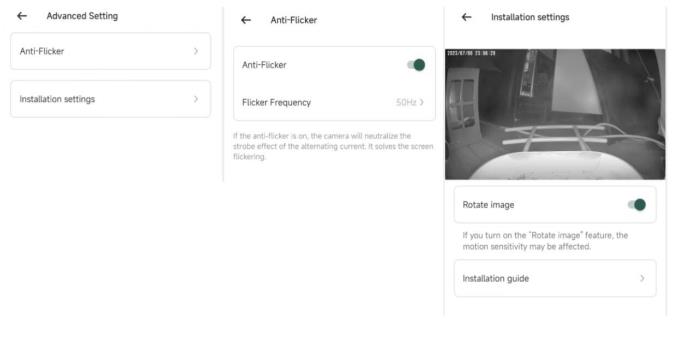
9. Advanced Setting
① Anti-Flicker: 50Hz is defaulted for the United States’ user.
② Installation setting: Rotate image or not according to the install place and check the Installation guide.
10. Other settings
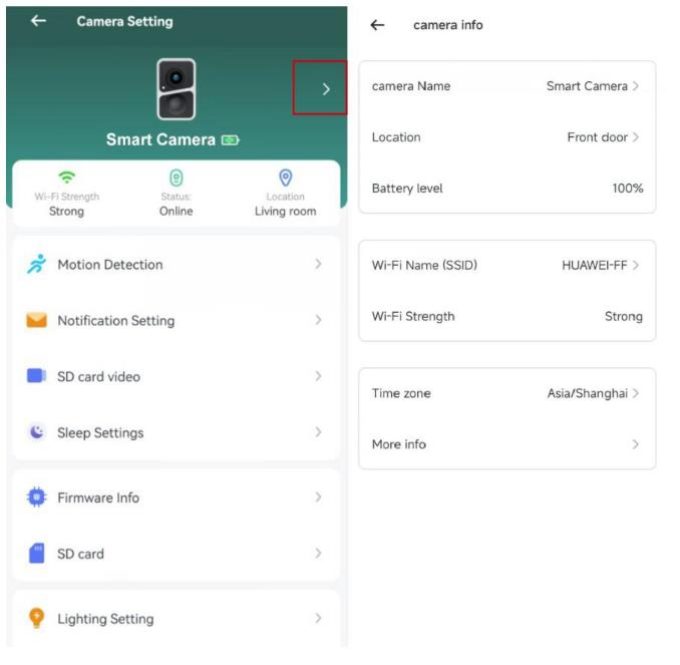
① Camera Name
You can set a desired name for your camera.
② WiFi Name(SSID)
Modify the WiFi name or change another WiFi.
③ Time Zone
Please choose the correct time zone base on your city.
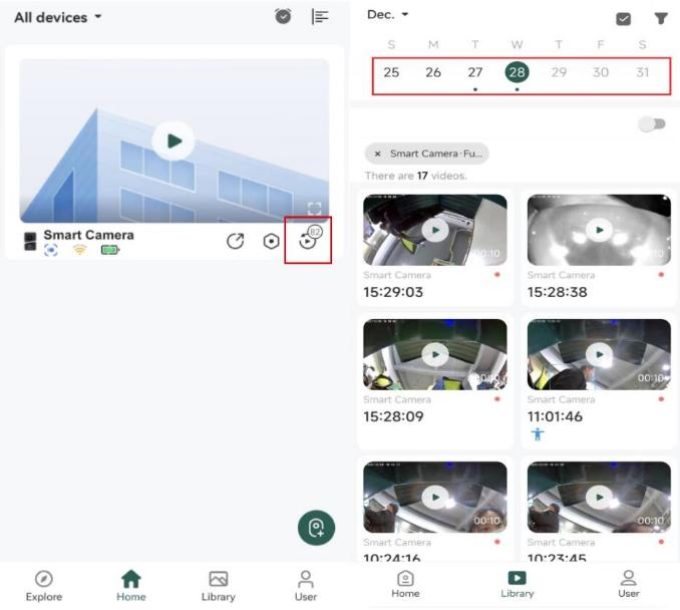
11. View Detection Video on the Cloud
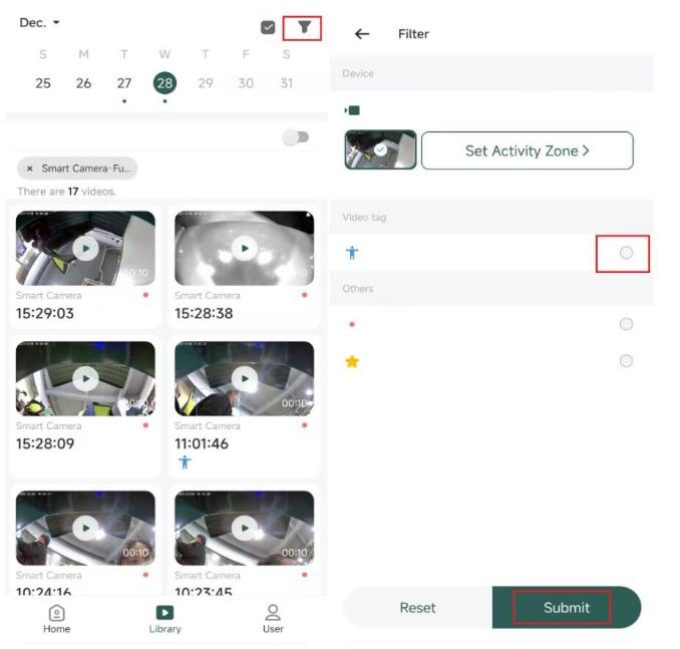
Click or to check the video clips by date.
Filter Videos: You can choose the tag to filter the videos and click the“Submit”.
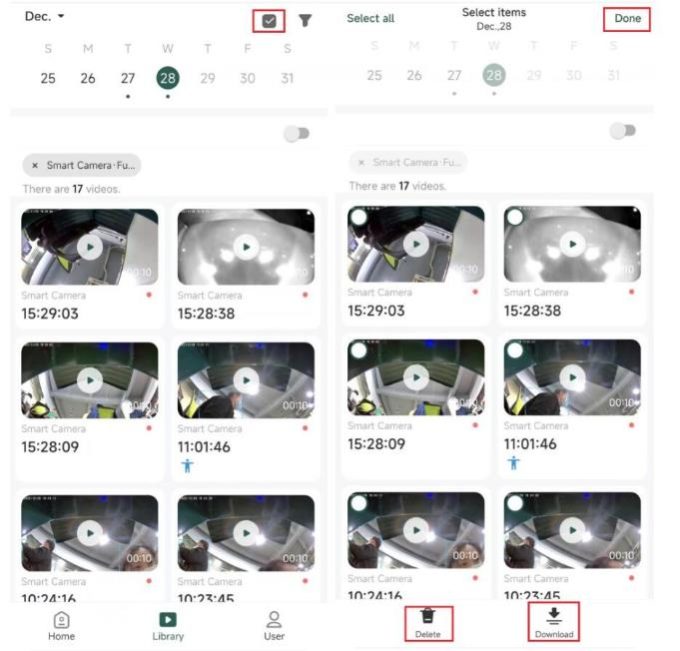
Delete or Download Videos:Click and choose videos that you want to delete or download, then click “Done”.
You can only check the motion triggered videos from the App, you can not share,delete or download the videos from the card.
You can take out the card to view all your videos from a computer.
Frequently Asked Questions
Q1: Why doesn’t the Wi-Fi name appear when I connect to Wi-Fi?
A1: You need to turn on the location permission” for the app in the system settings and change it to “allow when using”.
Q2:Will the camera show red lights when night vision is activated?
A2:The built-in infrared lamp beads make the camera only show some dim red lights when night vision is activated,but the image quality is still clear under no light environment.
Q3:What are the requirements for Wi-Fi?
A3:Please use a 2.4GHz wireless network.The device does not support the 5GHz wireless network.Meanwhile,please set the Wi-Fi authentication method to wpa2-psk or other lower level of the security method. A password is required.
Q4:How far should the camera be placed from the router?
A4:After testing,the Wi-Fi connection distance can normally reach up to 50 meters in the open area. However, the actual situation depends on the strength of Wi-Fi and its surrounding environment, walls or other obstructions may weaken the signal, so we suggest put the camera within 16 feet from the router.
Q5:What is the maximum length of recording time?
A5:You can choose the recording time in the app.The camera record for a fixed time or auto”mode,when depending on whether there is a person, the maximum length of a video is 20 seconds.
Q6:What should I do when the device is malfunctioning?
A6:Long press the power button to restart the camera.
Soliom User Manual Download for All Cameras
More Tips for Using Soliom +
More tips for your reference:
1. How to change the defaulted motion detection time length from 10 seconds to other time length?
Go to live view mode and find “Device setting” gear icon- go to “No delay” – change the time as you want.
P.S.: When you set the No delay time, the spotlight will turn on with the same time length when motion was triggered at night.
|
No Delay |
Micro sd video length |
Cloud video length |
|
15s |
15s |
10s |
|
30s |
30s |
20s |
|
60s |
60s |
30s |
|
Full-time Recording |
Full-time Recording |
No |
2. When you share your camera to family members, please let them to register a Soliom+ account using their email first and then start to share according to the user manual. The shared users cannot change administrator’s password, the shared users are only limited to the defined permission configurations.
3. Install Micro SD card only when the camera powered off, Camera doesn’t support plug &play.
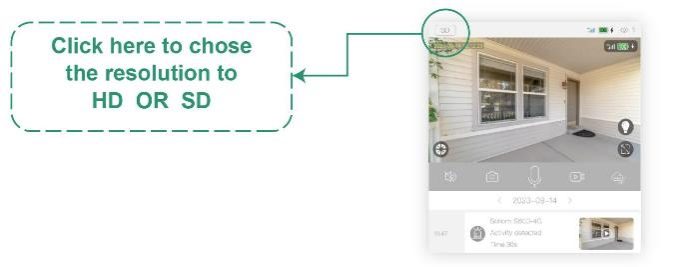
4. The camera is defaulted as SD for a smooth transmission, you can click it to change to HD for high resolution every time when you live view the camera. Or you can go to “Me settings” and go to “Common settings” to change the resolution to HD as default.
5. When you live view from app and found green video, you can log out the app and then log in to refresh the frame rate, the camera vide format is H.265+, sometimes low internet transmission will cause a short froze of frame rate.
When your download video on the phone and replay found green video, that means your phone has a lower version built-in video player that not compatible with H.265+ video format. We suggest you to download a video compressor and convertor or change other players such as: Oplayer
How to Pair the 4G Cellular Camera with Soliom+ APP?
Here are 2 methods for pairing 4G Security Camera:
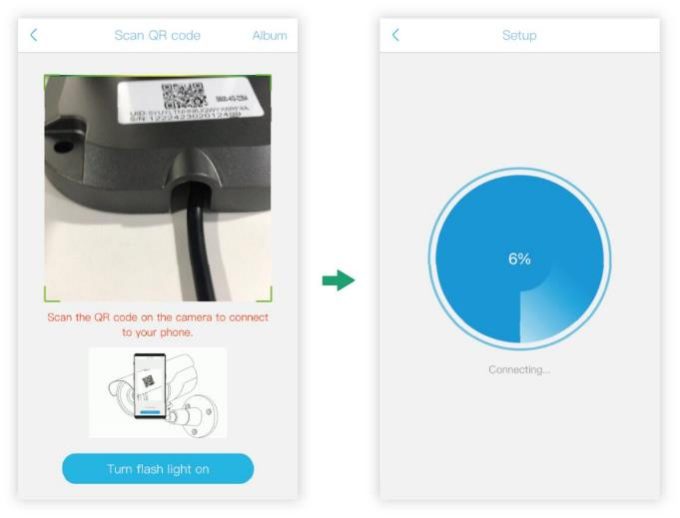
Method 1: QR code scanning connection
Please insert the SIM card into the camera “SIM” port correctly. The sides of the chip face down.
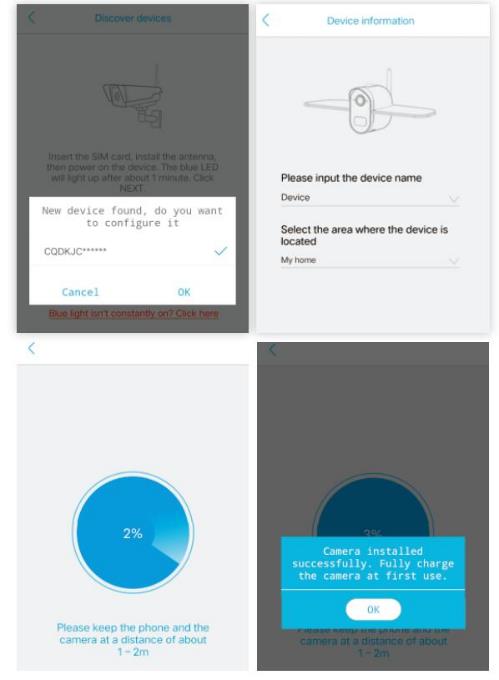
When inserting the SIM card correctly. (Please flip the sim card when needed). The camera will show a steady blue light. Then use the cell phone APP to scan the camera body QR code.
Method 2: Bluetooth connection:
① Before connecting, please make sure that Bluetooth is turned on.
② When the camera indicator light stays blue, put the phone near the camera and click “Add a device”. When the app displays the message: “New device found. Do you want to configure it?”, please click “OK” for successful connection.
③ If the connection fails, please try below the Method 1
How to use Soliom Pro camera,
Soliom Pro setup guide,
Soliom Pro installation instructions,
Soliom Pro user manual,
Soliom Pro wireless camera setup,
How to connect Soliom Pro to Wi-Fi,
Soliom Pro features and settings,
Troubleshooting Soliom Pro camera,
Soliom Pro app setup,
Best practices for using Soliom Pro,
Soliom Pro video quality settings,
Soliom Pro night vision setup,
How to access Soliom Pro recordings,
Soliom Pro motion detection setup,
Soliom Pro battery optimization tips,
How to update Soliom Pro firmware,
Soliom Pro outdoor camera guide,
How to reset Soliom Pro camera,
Soliom Pro home security camera tutorial,
Using Soliom Pro cloud storage
