TP-Link VIGI VMS Ultimate Guide, VIGI VMS, or VIGI Video Management Server, is a network and database-based video management server system that integrates network and video surveillance solutions. It is an all-in-one system primarily used for centralized management of VIGI devices in medium and large security monitoring networks.
Hi Everyone,
We’re excited to announce the official launch of VIGI VMS here! Welcome to try VIGI VMS, which will help to better use and manage your VIGI devices.
We will welcome all suggestions or problem reports related to VIGI VMS.
What is VMS
VIGI VMS, or VIGI Video Management Server, is a network and database-based video management server system that integrates network and video surveillance solutions. It is an all-in-one system primarily used for centralized management of VIGI devices in medium and large security monitoring networks.
The Software of VMS System
VIGI VMS comprises two components, VIGI VMS Service Manager and VIGI VMS PC Client.
VIGI VMS Service Manager:
A server which needs to install in a Windows PC, it is used to manage VIGI devices and push the streams.
VIGI VMS Service Manager provides a web portal and supports features such as Live View, Playback, User Management, Site Management, Device Management, Event Search, Rules setting, Log Management and System Backup & Restore.
VIGI VMS PC Client:
A Windows PC client that supports live view, playback, AI monitoring, evidence collection, real-time event monitoring, and view capture.
The Type of VIGI VMS
Currently, VIGI VMS includes Local VMS and Cloud VMS.
Local VMS:
It typically operates within the same network as monitoring devices, communicating through the network to centrally manage VIGI devices in the system.
Cloud Access is also supported by local VMS, but it is currently disabled in the system. We will enable it in the near future and you will be able to manage your local devices remotely as well.
Cloud VMS:
It is built on the TP-Link Cloud server, and are commonly used in distributed networks to add devices in different countries and regions, completing the unified management of the headquarters.
Key Benefits of VMS
Monitoring Center
System Dashboard
Virtual Map
AI Monitoring
Evidence Archive
The difference between VIGI VMS and VIGI Security Manager
| Items | VIGI Security Manager | VIGI Local VMS |
| Scenarios | Small security monitoring networks;
Remotely Management via TP-Link Cloud. |
Medium/Large security monitoring networks;
Locally centralized management. |
| Site | 1 | Multiple sites. |
| Device Number | Limited, less than 256 | Unlimited, 256 cameras for a free license |
| Account | 1 main account.
A device can be shared to up to guest accounts |
1 admin account.
Up to 50 accounts for the system with different permissions for different sites |
| Features | Centralized Management
Live View Playback |
Centralized Management
Live View Playback Monitoring Center System Dashboard Virtual Map AI Monitoring Evidence Archive |
Typical Topology
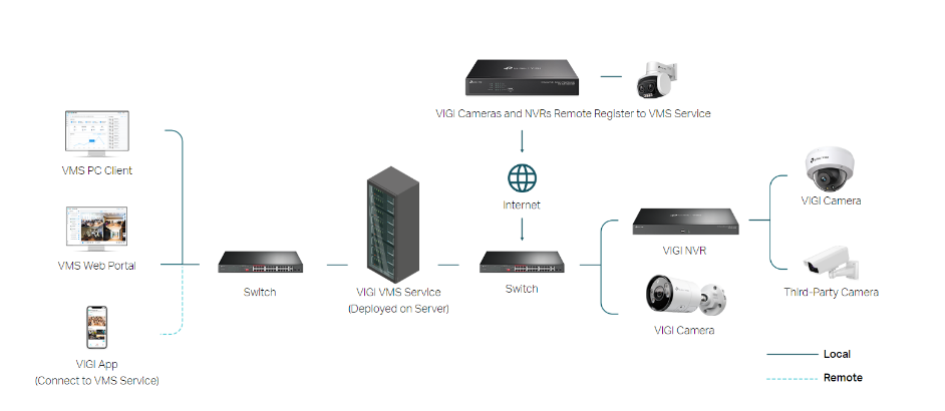
A complete VIGI VMS topology should include the VIGI VMS server, VIGI NVR, cameras, and network communication devices such as switches, routers, APs, and wireless bridges if a wireless connection is used.
A third party camera could be managed by VIGI VMS via a VIGI NVR.
Hardware Requirements
| Items | Minimum hardware requirements
for VMS server & PC client |
Recommended hardware requirement | ||
| for VMS Server | for PC Client&Web Portal(video streaming) | |||
| Operating System | Windows Server 2008, 32 bits/64 bits | |||
| Windows 7/10/11, 32 bits/64 bits | ||||
| CPU | i5-9400(6C/6T 2.9GHz) | i5-9400(6C/6T 2.9GHz) | i5-13600k/i5-14600k(14C/20T 3.5 GHz) | |
| Memory | 16GB and above, 8 GB available for VMS | 16GB and above, 8 GB available for VMS | 16GB and above, 10 GB available for VMS | |
| Network Bandwidth | 100Mbps and above | 1000Mbps and above | ||
| System Disk | 100GB free for VMS | |||
| Browser Version | Microsoft Edge 106 and above, Google Chrome 107 and above, Firefox 106 and above | |||
.
| . |
Note:
Related Information
Download Link: Download the latest VIGI VMS.
Learn more about VIGI VMS: VIGI VMS | VIGI Video Management System | TP-Link
Compatible Device List: Devices Supported by VIGI VMS (tp-link.com)
Notes:
Please make sure the VIGI device has been upgraded to the latest firmware before using VMS.
TP-Link VIGI VMS Ultimate Guide
Frequently Asked Questions
Q1: How many VIGI Cameras can the VIGI VMS manage?
A: Currently, the free version of VMS can support the management of up to 256 channels.
For expansion needs, please contact us for customization.
Q2: How many account can I create?
A: One super admin account and 50 user account.
Q3: Can I access the VMS Web Portal on a non-Windows system?
A: Yes, VIGI VMS provides a Web portal that work on browsers without limiting the type of system.
However, it should be noted that for advanced video playback through the web portal, a special web plugin needs to be installed, which can only be installed under windows.
Q4: What are the browser software version requirements for Web Portal?
A: Google, edge and Firefox are recommended. Best to use the latest browser release.
Q5: Do I need a discrete graphics card for the host running VMS Server?
A: Video playback requires a graphics card for decoding.
Generally, the performance of integrated graphics on Intel processors from the 10th generation onwards is good enough for video playback. Installing a discrete graphics card will help improve video decoding performance, and NVIDIA GeForce graphics cards are recommended.
Q6: Could VIGI VMS work with cloud service at the same time?
A: No. After the VIGI device is connected to the VIGI VMS system, it is automatically dropped from the TP-Link cloud. At this time, it is not possible to use VIGI APP or VIGI Security Manager to manage the device remotely.
Q7: Can VIGI VMS manage third-party ONVIF devices?
A: No, VIGI VMS is designed for VIGI Solution, it cannot manage third-party devices directly.
However, it is possible to add third-party cameras to the VIGI NVR first, and then indirectly manage the third-party cameras by managing the NVR through the VMS.
.
How to set the dark mode for VIGI VMS web portal
Apply to VIGI VMS version 1.5.14 and above
VIGI VMS web portal currently support two color mode, light mode and dark mode.
The default is light color mode.
Follow the steps to configure the dark mode.
1. Log in to the web portal
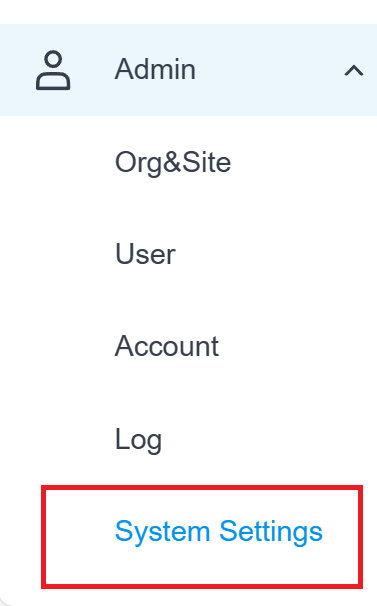
2. Move the mouse to the function bar on the left of the page and click admin–>system settings.
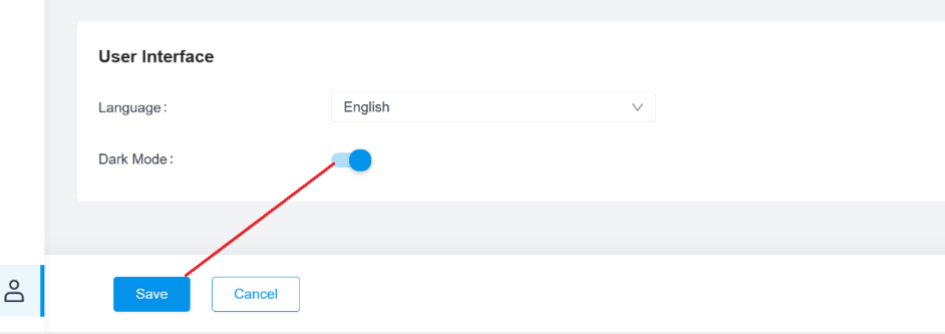
3. Slide to the bottom of the page, find the User Interface. Enable the Dark Mode and click Save.
.
How to set up org, site and account on the VIGI VMS
.
To manage VIGI devices using VIGI VMS, it is necessary to set up Org, Site, account, and user to divide permissions. This article provides instructions on how to set them up.
Org Setting
In Organization Details, you can edit and view organization information and organization administrators.
To configure the name, region, and time zone of the organization, log in to the VMS web management interface, navigate to the Admin menu, select Org & Site, and click the ‘Edit’ button.
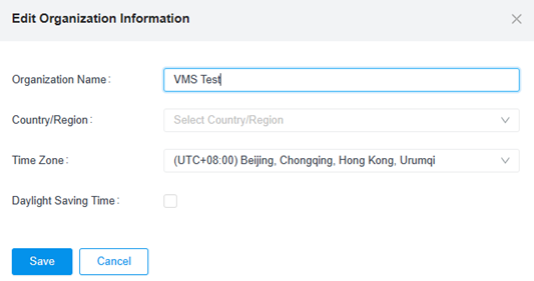
Click the ‘Add Manager’ button to add the administrator of the organization. The administrator account has the highest privileges and can manage all aspects of the VMS.

Site Setting
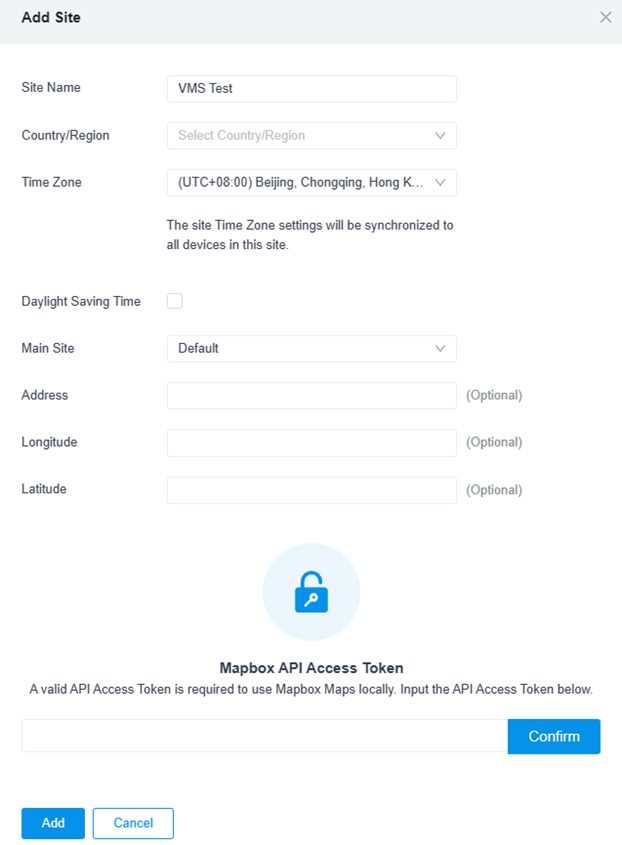
A site is a sub-site of an organization, typically used in distributed networks to represent a specific location.
Site details are shown on the top half of the Site page, where you can view site details, edit the site, and delete the site.
You can edit the name, region, time zone, address and other information of the corresponding site by clicking the ‘Add Site’ button.
User Account
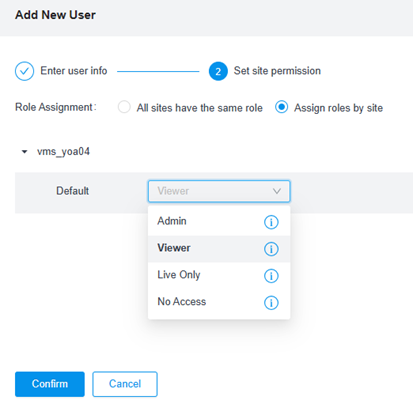
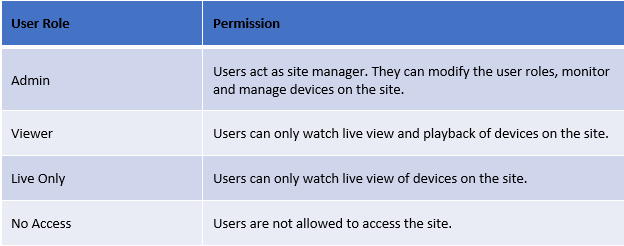
Different accounts can be set for various sites, with users being granted specific permissions for each use. Permissions for each user and site are listed in the table below.

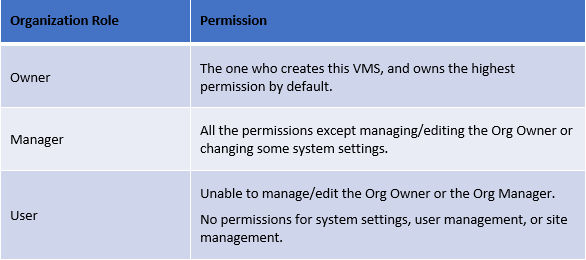
Different accounts can have varying permissions for different sites, including Admin, Viewer, Live-Only, and No Access.
Refer to the table below for a list of their respective permissions.
How can I create an evidence on VIGI VMS PC Client
The VIGI VMS PC Client includes an Evidence Collection feature that enables users to efficiently save video clips as evidence while viewing playback or event footage. This feature allows for easy access to all saved evidence in a unified manner. This article provides instructions on how to create and display evidence.
1. Connect VIGI devices to VIGI VMS, you can refer to the FAQ – How to add VIGI devices to VIGI VMS.
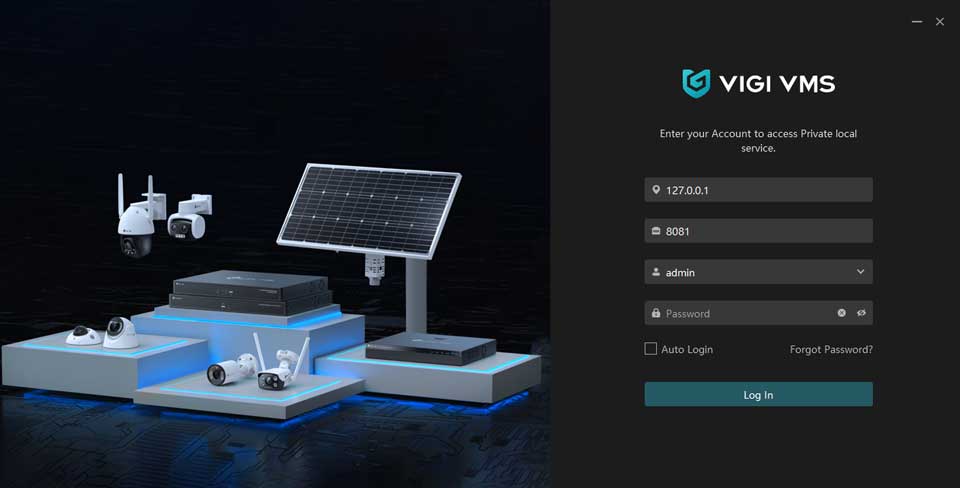
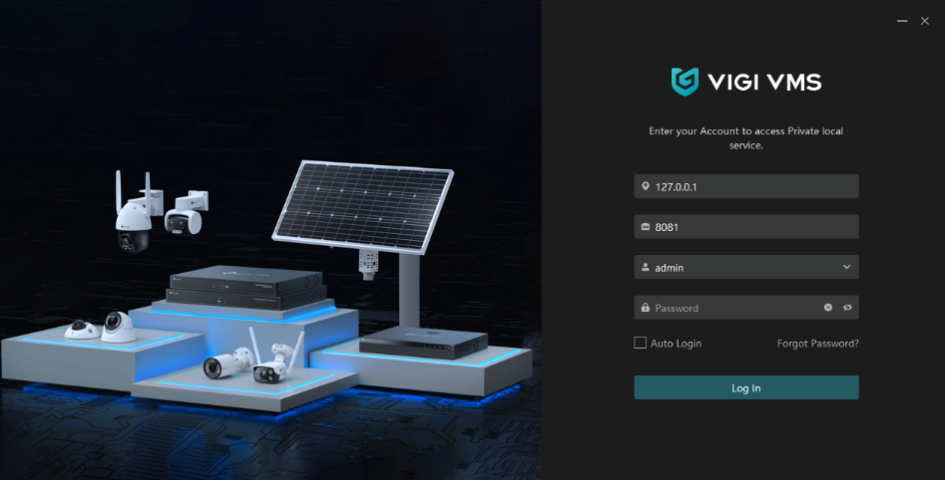
2. Run the VIGI VMS PC Client and use the IP address of the server along with the corresponding management port (default port is 8081) to log in.
3. Navigate to the Playback interface, select the relevant camera, locate the corresponding event, and click the “Record” button to start recording.
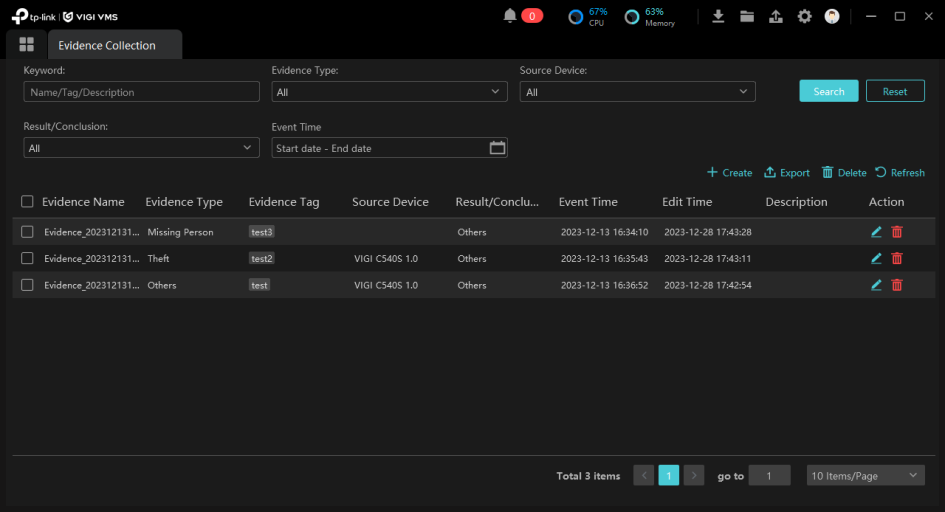
4. Go to the Evidence Collection interface, click “Create”, select and upload the recorded video clip.
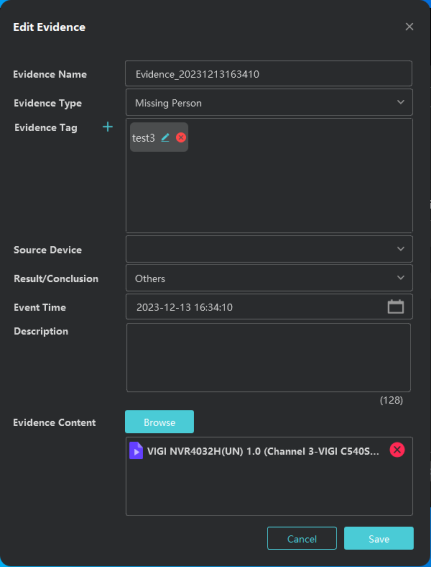
5. Set the type and custom tag for the video clip, then select Save.
6. Search and export related events based on evidence type, time, tag, and other relevant information.
How to add VIGI devices to VIGI VMS
VIGI VMS can discover and add VIGI devices in three ways: Auto Add, Manually Add, and Remotely Add. From this article, you can learn how to add VIGI devices to VIGI VMS via different methods.
Auto Add
Auto Add is used in topologies where the VIGI device and the VIGI VMS are located on the same network. VIGI VMS broadcast and scan VIGI devices on the same network using the TP-Link private protocol and perform association to add them.
1. Connect the VIGI device to the network and ensure it can communicate with the VIGI VMS.
2. Log in to the VIGI VMS web management interface and navigate to the Device menu. Click the “Add” button to add the device.

3. Click on the “+” button next to the device you want to add.
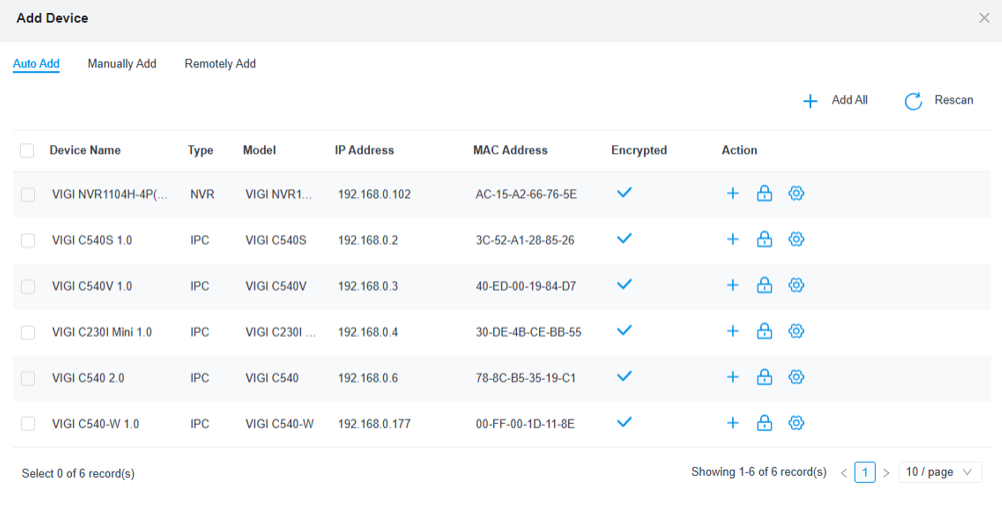
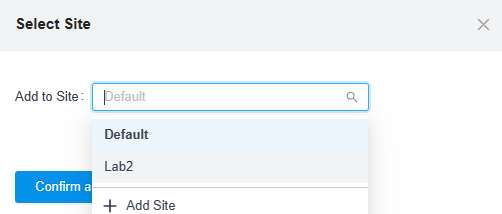
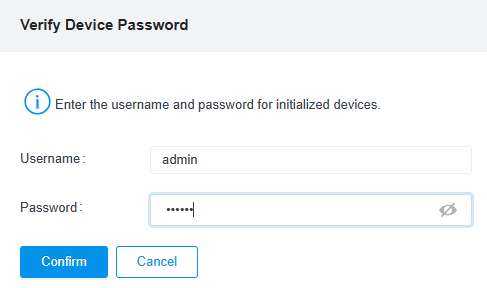
4. Select the corresponding Site. Enter the device’s username and password.
5. If the device has been added successfully, it will be displayed in the Device List. To view the Device List, return to it.

Manually Add
Manually Add is frequently used to add VIGI cameras with a specific IP address or located within a specific IP range.
Customer specifies the relevant IP address, and the VIGI VMS initiates association with the VIGI device at the specific address, including single IP address addition and multiple IP address addition.
1. The steps for preparation are identical to the Auto Add steps.
2. If Single mode is selected, enter the specific IP address. If Multiple mode is selected, enter the corresponding IP address range.
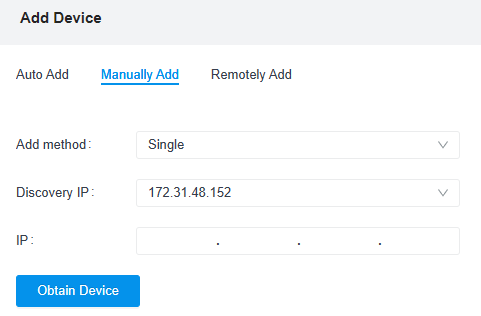
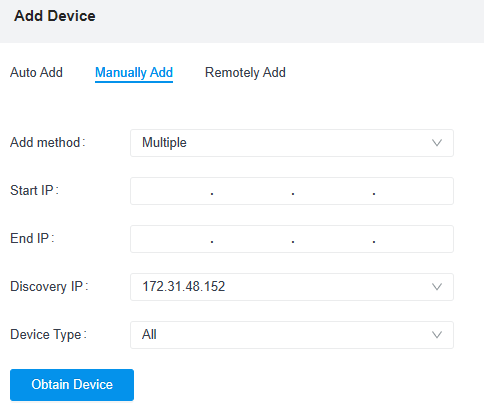
3. Click on “Obtain Device” to retrieve device information.
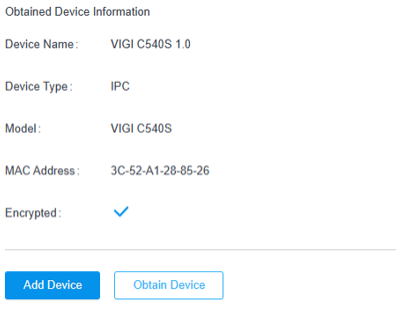
4. Check the device information and click on the “Add Device” button. Then, select the site and enter the username and password for verification.
Remotely Add
Remotely Add is typically used when the VIGI VMS and VIGI devices are not on the same network and need to connect via the Internet. In this case, adding the device is highly dependent on the network. If NAT exists at the front-end of the VIGI VMS, port forwarding on the routes at the front-end of the server is usually necessary.
1. log in to the web management interface of the VIGI device o, go to the “Platform Access” section in the Network Configuration item.
2. Enable ‘Access to VIGI VMS’ and fill in the IP address and connection port of VIGI VMS (default is 10123).
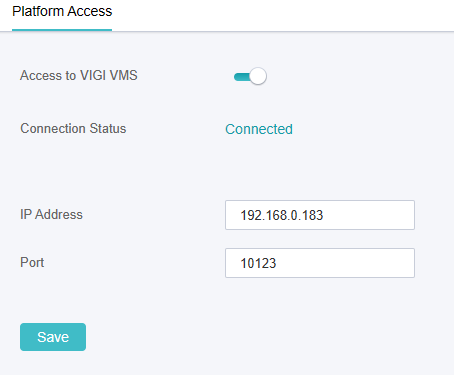
3. log in to the VMS web management interface, navigate to the Device menu, and select “Remotely Add”.

4. Select the corresponding VIGI device, choose the site, and enter the username and password for verification.
.
Frequently asked questions of VIGI VMS
Q1: How many VIGI Cameras can the VIGI VMS manage?
A: Currently, the free version of VMS can support the management of up to 256 channels.
For expansion needs, please contact us for customization.
Q2: How many account can I create?
A: One super admin account and 50 user account.
Q3: What are the supported operating system for VIGI VMS system?
A: As of now, VIGI VMS (including VMS Service Manager and VMS PC Client) can only work on Windows: Windows 7, Windows 10, Windows11, Windows Server 2008.
Q4: Can I access the VMS Web Portal on a non-Windows system?
A: Yes, VIGI VMS provides a Web portal that work on browsers without limiting the type of system.
However, it should be noted that for advanced video playback through the web portal, a special web plugin needs to be installed, which can only be installed under windows.
Q5: What are the browser software version requirements for Web Portal?
A: Google, edge and Firefox are recommended. Best to use the latest browser release
Q6: Do I need a discrete graphics card for the host running VMS Server?
A: Video playback requires a graphics card for decoding.
Generally, the performance of integrated graphics on Intel processors from the 10th generation onwards is good enough for video playback. Installing a discrete graphics card will help improve video decoding performance, and NVIDIA GeForce graphics cards are recommended.
Q7: Could VIGI VMS work with cloud service at the same time?
A: No. After the VIGI device is connected to the VIGI VMS system, it is automatically dropped from the TP-Link cloud. At this time, it is not possible to use VIGI APP or VIGI Security Manager to manage the device remotely.
Q8: Can VIGI VMS manage third-party ONVIF devices?
A: No, VIGI VMS is designed for VIGI Solution, it cannot manage third-party devices directly.
However, it is possible to add third-party cameras to the VIGI NVR first, and then indirectly manage the third-party cameras by managing the NVR through the VMS.
Which ports do VMS use?
VMS will use designated TCP and UDP ports to send and receive data over a network.
These ports are limited to a range of 1 to 65535. Port collisions can occur when a program attempts to use a port that is already occupied by another program on the host.
From this article, you can learn which ports VMS uses, and how to modify the default ports.
1. An overview of the default ports
The default ports used by the VMS are listed in the table below.
| Ports | TCP/UDP | When the port is required |
| 5001 | UDP | When VIGI VMS actively discover VIGI devices via private protocol. |
| 8081 | TCP | When customer access the VIGI VMS web service via https. |
| 8082 | TCP | When VIGI devices report events to VIGI VMS. |
| 8091 | TCP | When customers watch live views or playback, VIGI VMS manages VIGI devices through this port. |
| 10123 | TCP | When VIGI devices connect to the VIGI VMS, establish the remote control terminal session between VIGI VMS and VIGI devices. |
| 10556 | TCP | When customer watch live view or playback from the VIGI VMS. |
| 13134 | TCP | VIGI VMS coordinates multiple services through this port simultaneously. |
| 27017 | TCP | VIGI VMS accesses the MongoDB database through this port. |
2. Examples of VMS using ports
This section explains how VMS uses ports, using the example of how it discovers and adds VIGI devices.
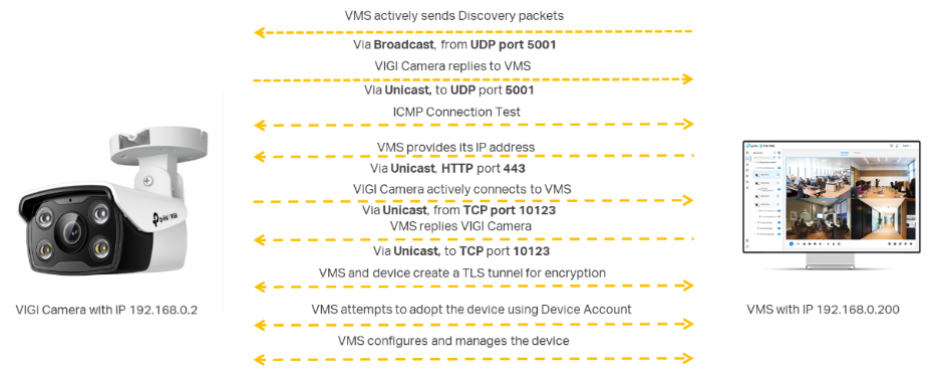
Firstly, VMS broadcasts discovery packets on the subnet via UDP port 5001.
Secondly, VIGI devices listen to the port and receive the discovery message, then reply to the VMS via the same port.
Thirdly, VIGI devices connect to VMS via TCP port 10123.
Finally, VMS and VIGI devices create a TLS tunnel and adopt VIGI devices with device account.
3. Port Forwarding Settings
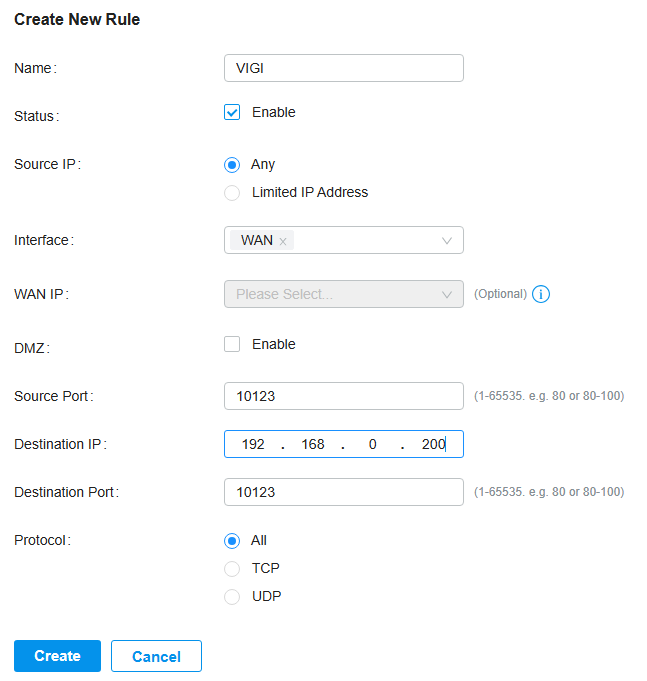
If a router is performing NAT (Network Address Translation) between the VMS and the VIGI devices, the VIGI devices cannot connect directly to the VMS. In this case, Port Forwarding rules must be created to enable proper communication between the VMS and the VIGI devices.
The source and destination ports of the Port Forwarding rules should be the same as the VMS ports mentioned above. For example, if the device connect port is being used, the settings should be as shown below.
4. How to change the ports used by VMS
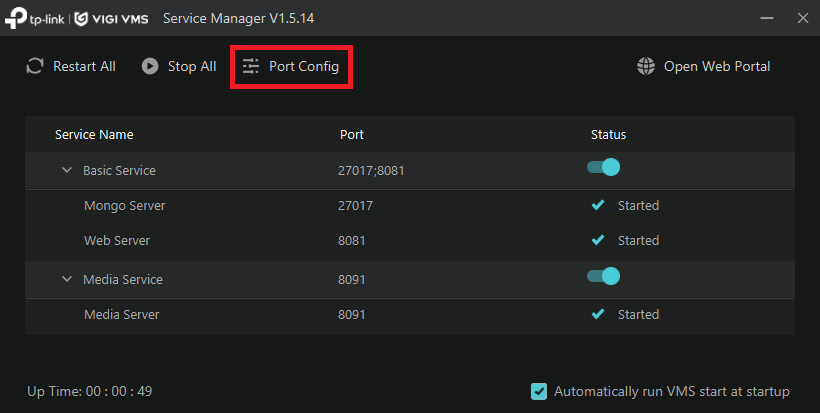
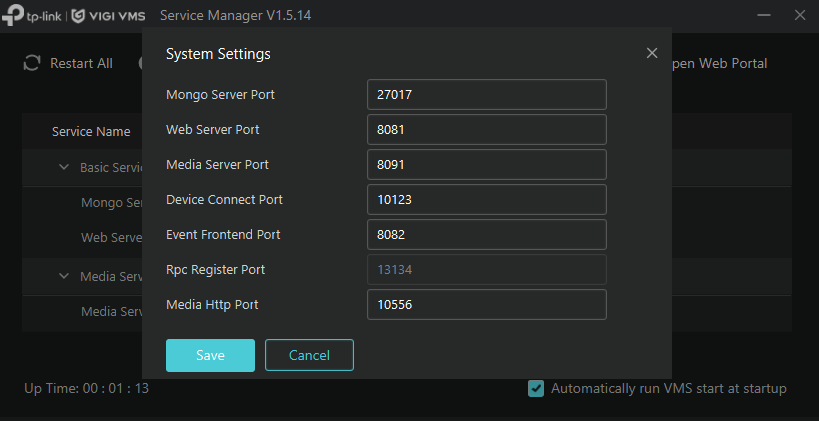
The VMS server ports can be changed by accessing the ‘Port Config’ option on the setup page.
5. Q & A
Q: How can I change the RCP Register Port?
A: The RCP Register Port is enabled when the VMS is running, if you want to change this port, please stop the VMS service and then change this port.
Q: What should I do if “Port is occupied” is displayed when VMS is enabled?
A: The VMS default ports have been used by another service on the server, please refer to section 4 to change the VMS default ports or stop the services that have been using the default ports.
Q: If my VMS is behind NAT, which ports do I need to forward to public?
A: You will need to set port forward rules on port 8081, port 8082, port 10123 and port 10556.
.
How to install VMS PC client only (without VMS Service Manager)
Apply to VIGI VMS V1.5.14 and above.
VIGI VMS (Video Management System) includes two applications:
VIGI VMS Service Manager:
The core service of VIGI VMS, providing functions such as user management, device management, alarm management, virtual map, etc.
In a surveillance system, the VMS Service Manager is usually deployed on only one host/server.
Other clients can access the VMS Service Manager via a web portal or PC client.
VIGI VMS PC Client:
Mainly used for video management, must work with VMS Service Manager.
In a surveillance system, VIGI VMS PC Client can be deployed on multiple hosts to realize multi-user video management.
Install VIGI VMS Client
Preparations:
1. The PC client needs to work with and in conjunction with the VMS Service Manager.
Firstly, ensure that a VMS Service Manager has been deployed in the network.
2. Find a Windows PC on which VIGI VMS PC client have not been installed.
Step1:
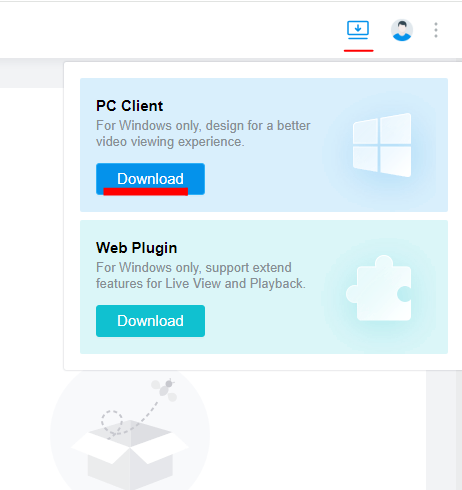
Access the Web Portal of VMS Service Manager from the computer on which the VMS PC Client needs to be installed.
Download the PC Client installation package in the upper right corner of the page.
Note:
This installation package can be saved and shared with other devices that need to install VIGI VMS PC Client.
Step2:
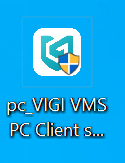
Double-click to run the installer
Step3:
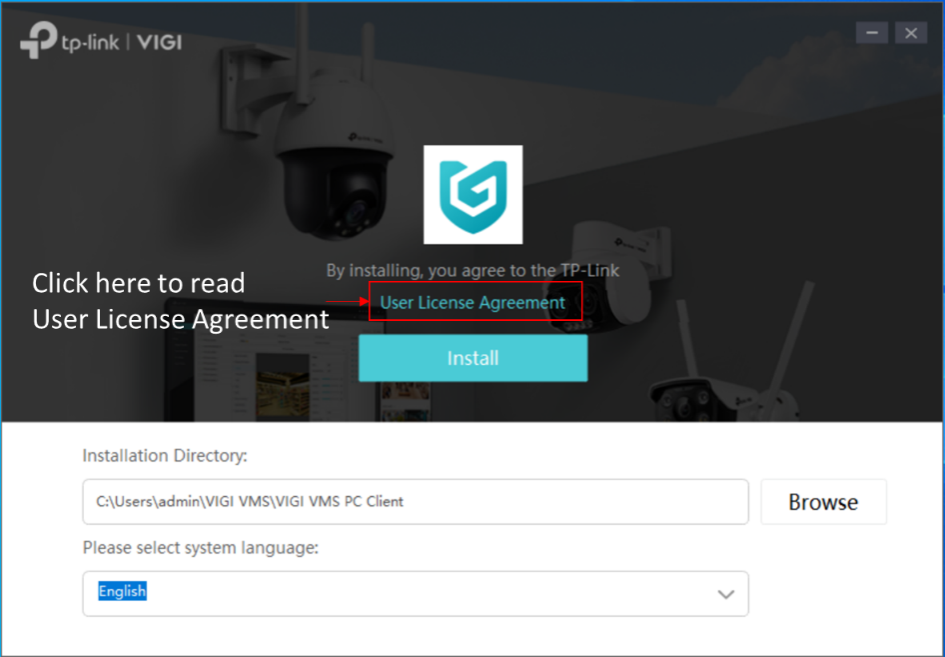
Read the User License Agreement and select the installation directory and software language.
Step4:
When installation is complete, only the VIGI VMS PC Client is successfully installed.
Please note:
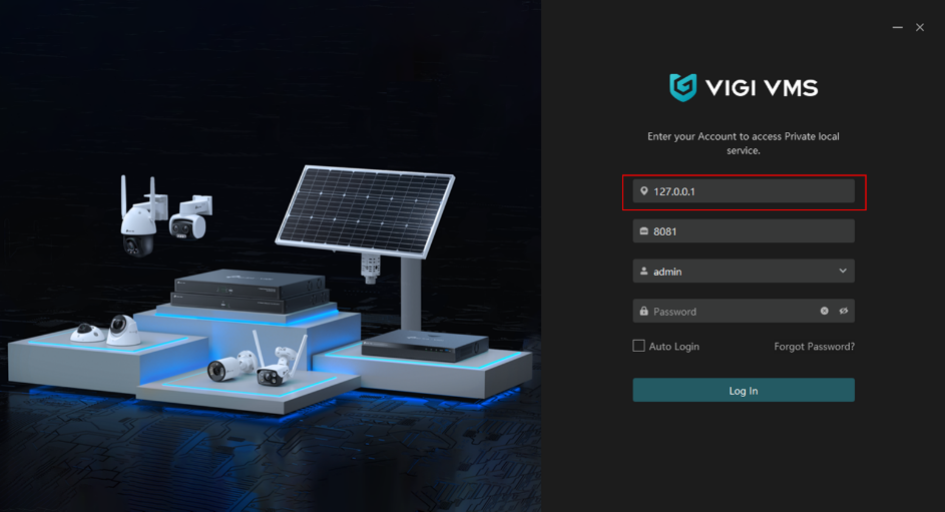
Since VMS Server Manager and PC Client are not installed on the same computer at this point, the Server Address is no longer 127.0.0.1, but the IP address of the host or server where VMS Service Manager is deployed.
.
