Guard Viewer Security System User Guide v1, Guard Viewer is a mobile surveillance client app. With this app you can access surveillance products(Network Cameras,Network Speed Domes,NVRs) through network and view live or recorded video, receive alarms and manage cloud devices using your mobile phone.
.
1.Download the mobile APP (Guard Viewer) and Sign up
for an Account
Download the mobile APP and Sign up for an Account
1. Download and install the app.
Please scan the QR code to download the free APP “Guard Viewer”
You also can visit the Apple Store or the Google Play Store to download the Guard Viewer app for iOS or Android devices. Alter installation, tap the icon to launch the app.
2.Register an account and login
For first time use, please create a new account and add the following steps:
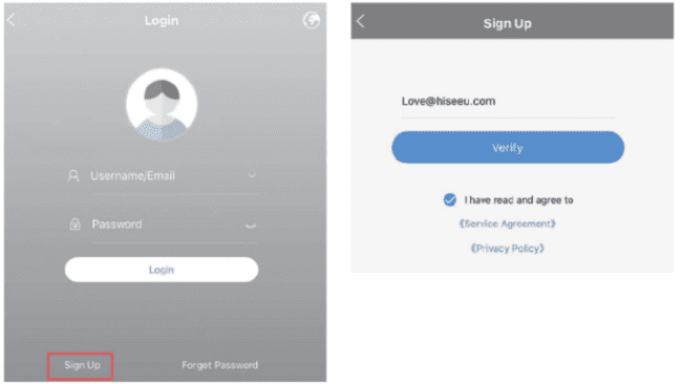
Please tap Sign up and follow the on-screen prompt to register an account by email.
2.Add Device to APP(Guard Viewer)
Guard Viewer Security System User Guide v1
Further support, plz email us at email love@hiseeu.com
Or contact us at +1 917 688 2228
Add Device to APP(Guard Viewer)
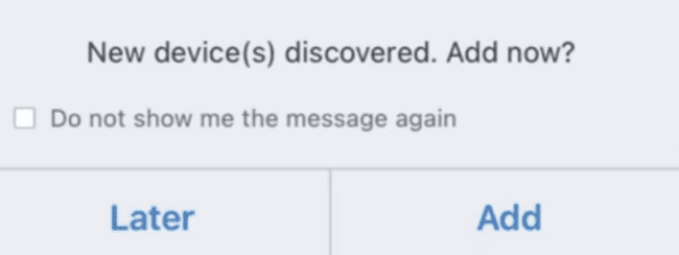
Auto add is not suggested. Please tap on “Later” if you see this message box.
In this situation, it will Auto Search to discover the NVR device connected to the local network. But once your mobile phone disconnects with LAN WiFi, you will not be able to view it anymore.
Please Add devices in this way
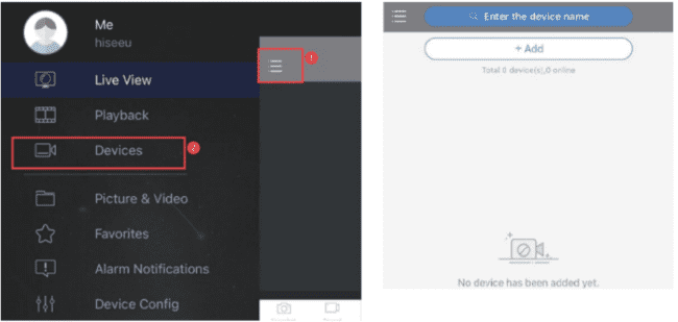
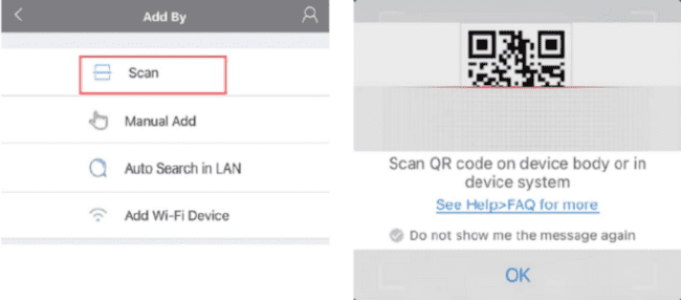
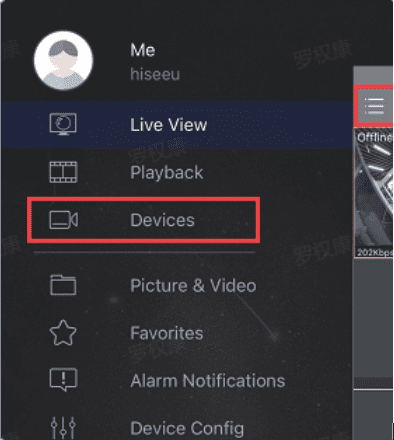
1. Please Tap on “ Menu” icon> Tap on “Devices”> “Add” ,
2. Tap on “Scan”> “OK ” to scan the NVR QR code
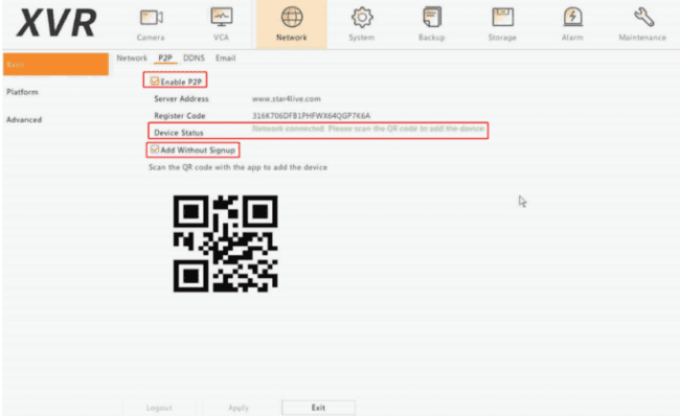
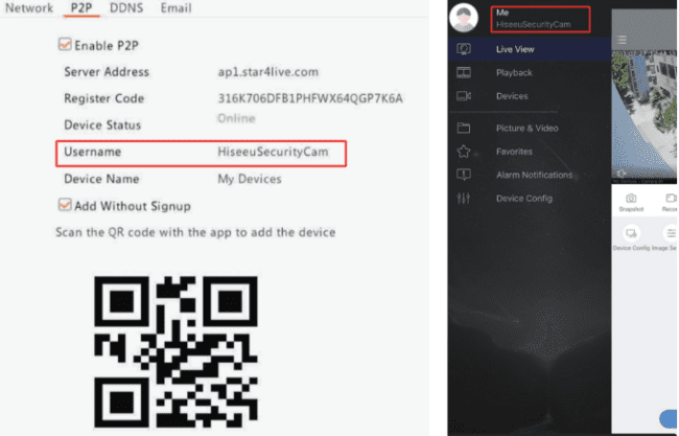
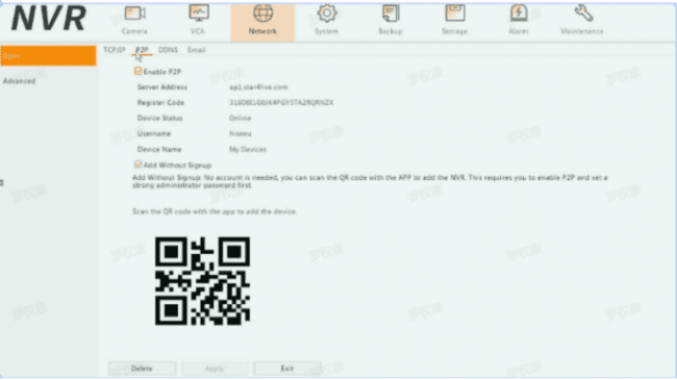
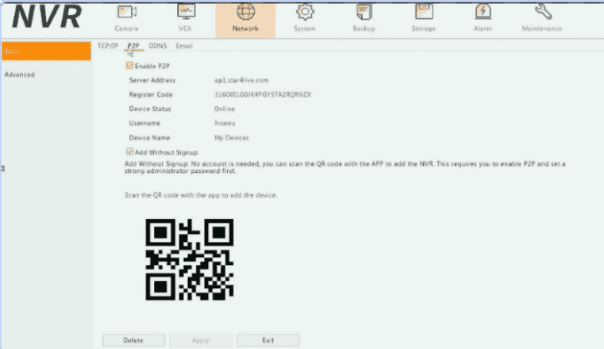
3.Navigate to “Menu– Network> Basic> P2P”
• If the Device Status is “Network connected…” , means device is online and ready for remote view
• If the Device Status is “Offline” , please check the network connection first, if the problem remains, please feel free to contact us at Love@Hiseeu.com
After you add the device successful, the “Device status” will be “Online”, and your APP account username will display here. • You can check your APP user name by navigate to “Me”
• If the username doesn’t belong to you, please click on “Delete” and add it again.
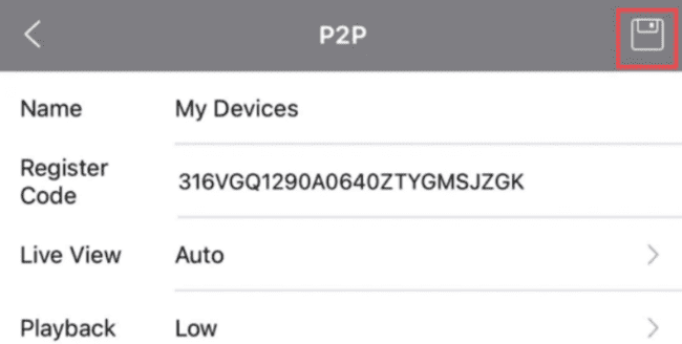
4. add NVR by scanning device QR code and click on “save”
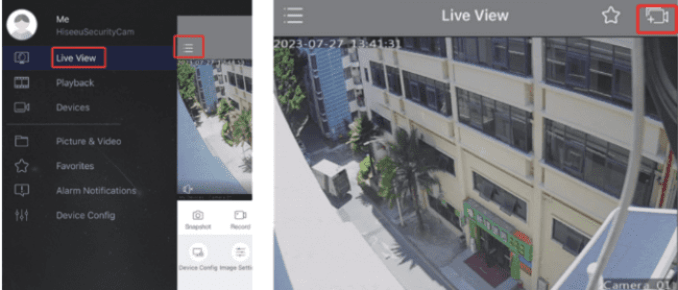
5. Please Tap on “Menu ” icon, Tap on “Live View” “Add”
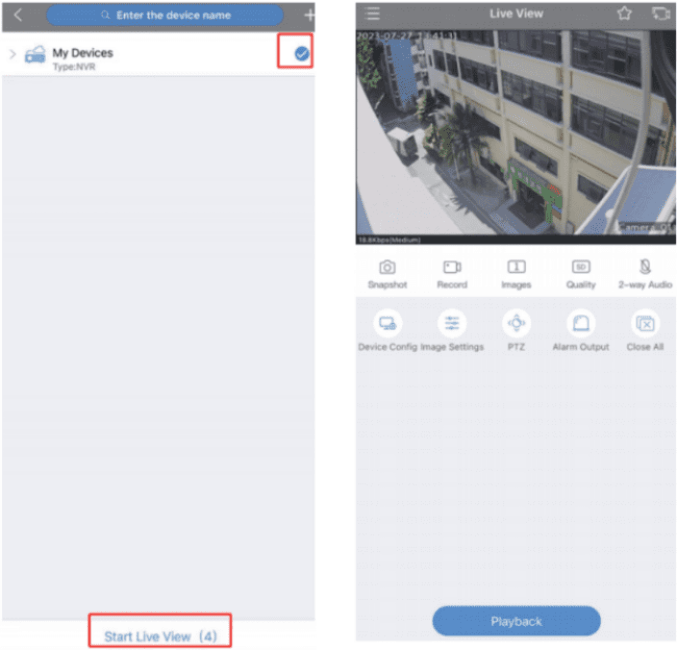
6. Select the device and tap on “Start Live View ”
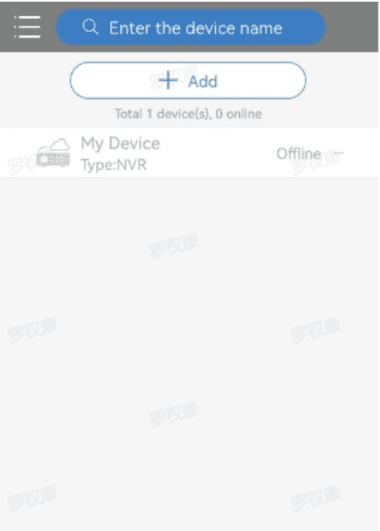
3.Device shows “Offline” (system kit to app)
Device shows “Offline” (system kit to app)
1. If the device shows offline on the mobile phone app, we need to make sure the NVR is connected to the network perfectly or not
2. Go to your monitor that is connected to NVR, and check out the network status first navigate to this path first: “Menu–Network–Basic–P2P”, also check whether the device status is online or not,
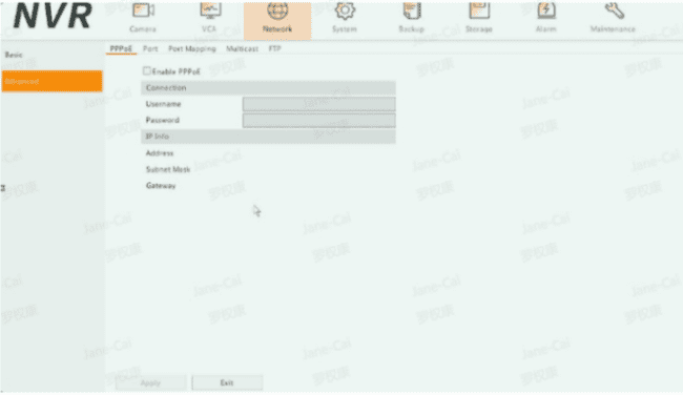
3. Also go to “Menu–Network–Advanced”,to disable the “PPPoE”
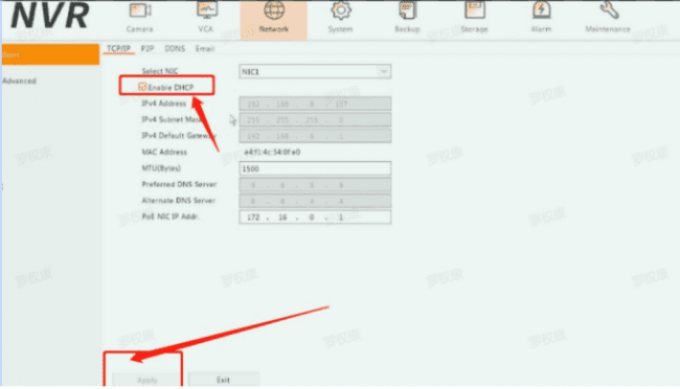
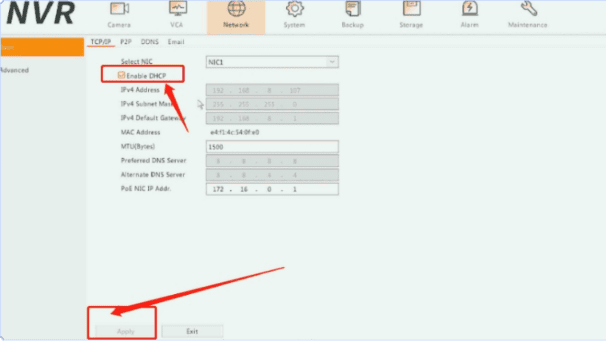
4. if it shows: network disconnected, plz enable the DHCP in this path ” Menu–Network–Basic-TCP/IP ” and click “Apply”. After that, go back to “P2P” and check if the device status is online or not
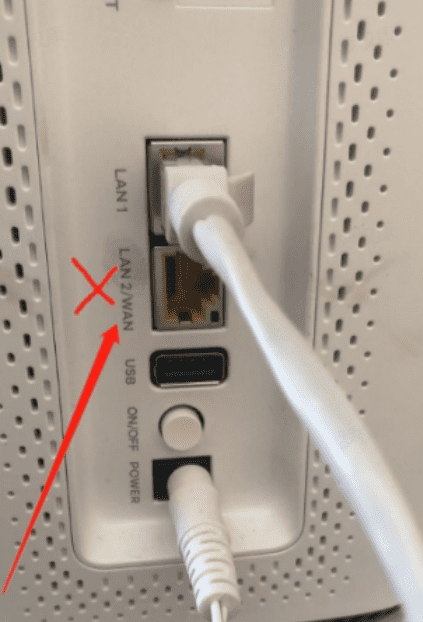
5. if you connect the network cable to the lan port or the lan/wan port of the router
We need to connect it to the lan port of the router,plz take a photo of yours for us to check.
.
If the P2P show connect the network ,but the app also show the offline,please delect the device on your APP and re-add it again.
4.Enable push alerts on APP
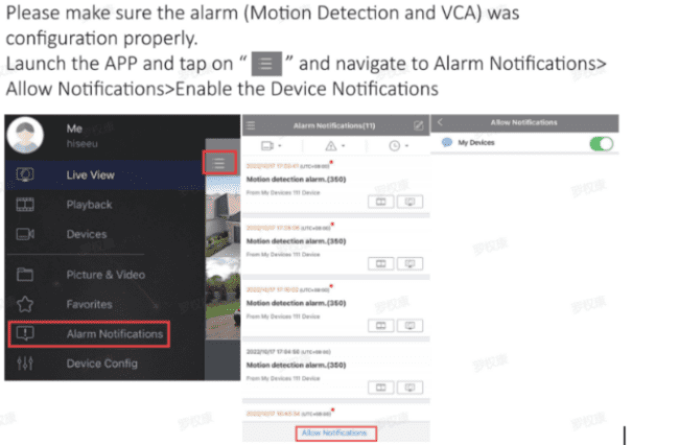
Enable push alerts on APP
5.Why I can’t remote view when the network is outside?
Why I can’t remote view when the network is outside?
.
Cause: Customer doesn’t follow the instructions on the user manual and add the device in a local adding way, so we suggest them to delete the device first, and re-add the device again like this FAQ
https://www.hiseeu.com/a/help/article/53969
6.APP Share Device
APP Share Device
One device is linked to one user only. The NVR system can only be controlled by one authorized account, which can share the device with others to prevent attack or hacking.
There are 2 ways to share the device with others. For the admin user, please follow the instructions to share the device:
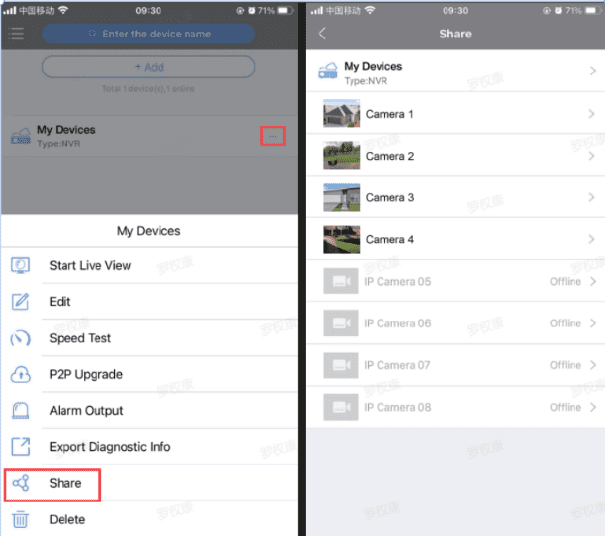
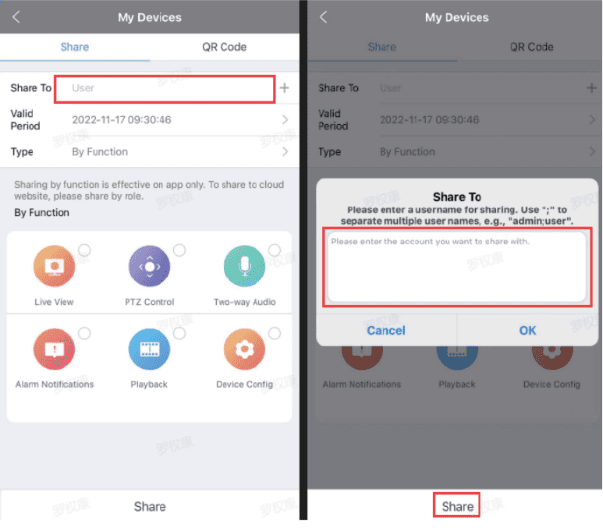
1.Type in “Menu Icon ” and navigate to “Devices”
2. Tape on “… ” > “Share”, You can select a single channel to share or select the entire NVR system to share
3.Share the device by typing in the user name you want to share and selecting the function as needed.
• The other user needs to register a Guard Viewer APP account and provide the user name for sharing.
• After that, when this user login the APP will find the device by navigating to “Devices”.
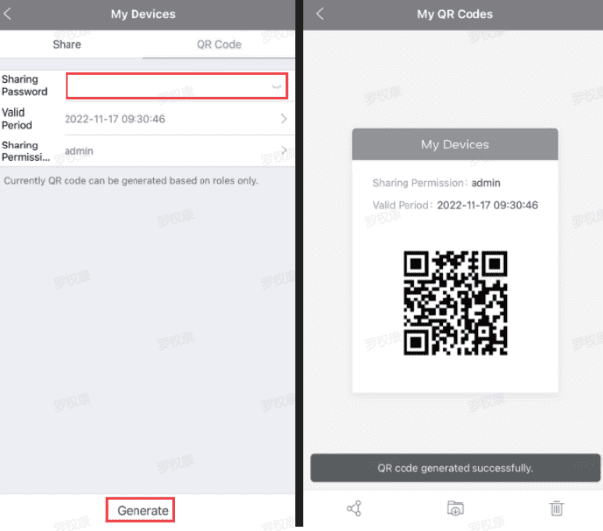
4.Share the device by generating a QR code
• Create a sharing password and set the valid period
• Click “Generate”, your APP will generate a QR code
• Other users can use the APP to add the device by scanning the QR code you sent
7.Add Device on Guard Station PC Client Software
Add Device on Guard Station PC Client Software
Add device to “Guard Station” Download link: https://www.dropbox.com/sh/jeftu4sqwy4y1u8/AAD4PkyEJxg6j4H1n20PxBkZa?dl=0
Please sign up for the mobile APP(Guard Viewer) account and add the device first.
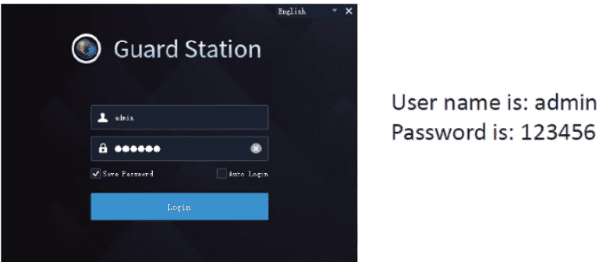
Download and run “Guard Station” on the PC
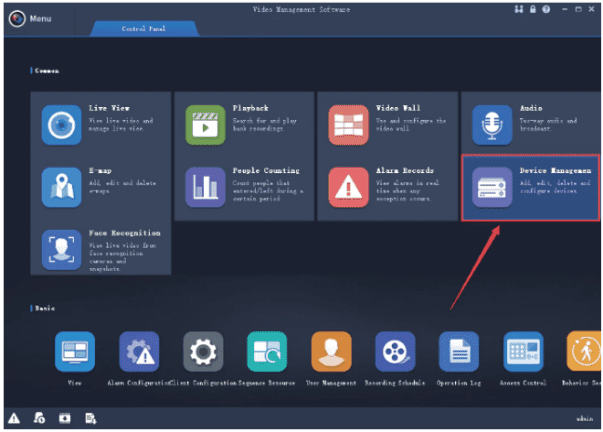
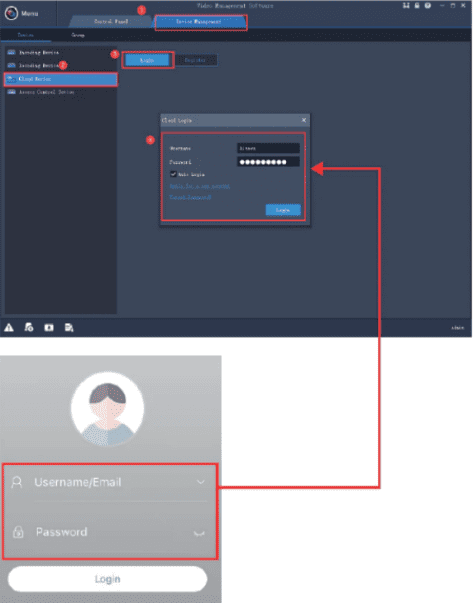
1) Please Navigate to “Device Management“> “Cloud Device”> Click on “Login”
2) Login with your APP account and password.
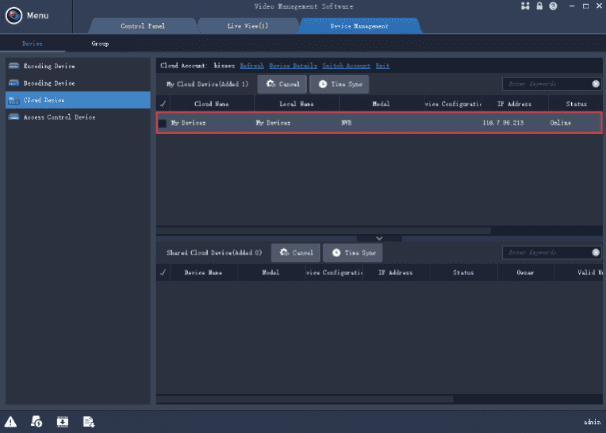
3) After Login, the device you added to the APP will list here
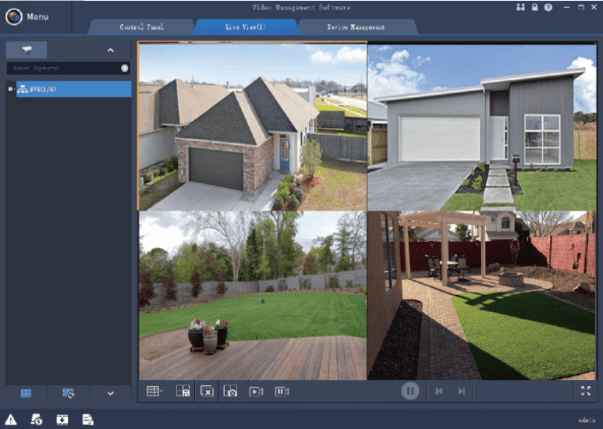
Please click on “Control Panel”> “Live View”> Double-Click Camera to load the live view video
8.Guard Station shows “offline”
Guard Station shows “offline”
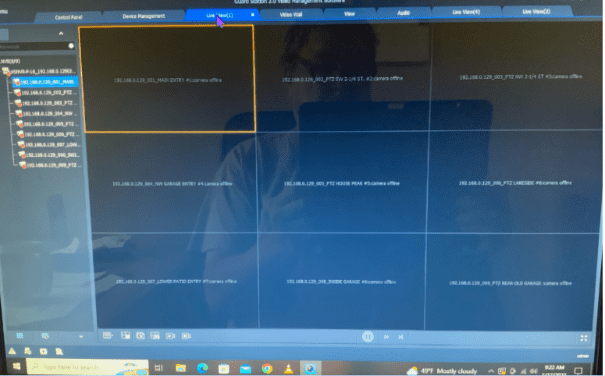
plz check local NVR is connected to network perfectly or not,If your NVR hasn’t connected to the network yet, it will show “offline” in your PC Client “Guard Station”
Plz go to your NVR that is connected to Monitor,
Check out the network status, first navigate to this path first : “Menu–Network–Basic–P2P” ,and check the device status is online or not,
if it shows: network disconnected, plz enable the DHCP in this path ” Menu–Network–Basic-TCP/IP ” and click “Apply” , After that, go back to “P2P” and check if the device status is online or not
9.Not Recording? HDD not working?
Not Recording? HDD not working?
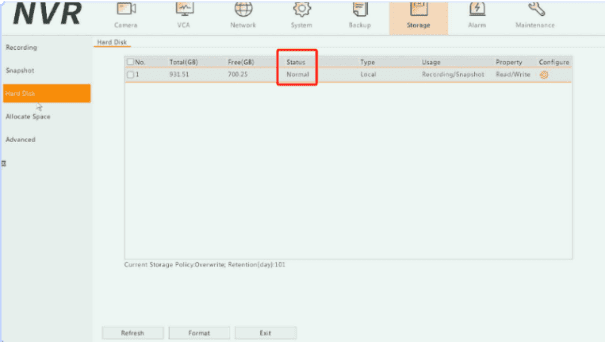
Right-click the mouse from “Menu–Storage–Hard Disk”
If there is no hard drive information or Status shows Abnormal, the hard drive is having an issue
10.AHD5 Modify the Camera model
AHD5 Modify the Camera model
(Please notice that AHD5 cameras only the TVI camera model have the audio function,the AHD5 cameras we sell seperately is the AHD model so it should modify the TVI model to have the audio function)
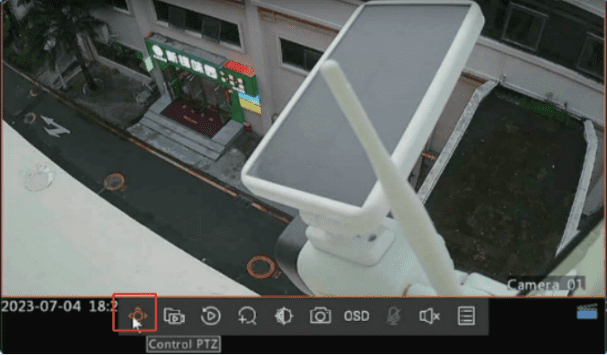
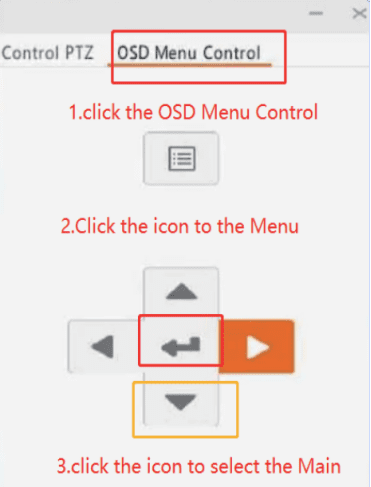
1. Click the OSD Menu Control , then click the arrows to the Menu t hen click the icon to select the “VIDEO SETTING ”
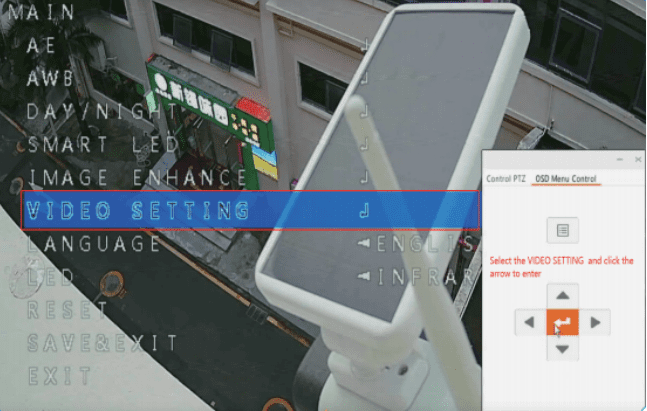
2.Select the VDEO SETTING and click the arrow to enter.
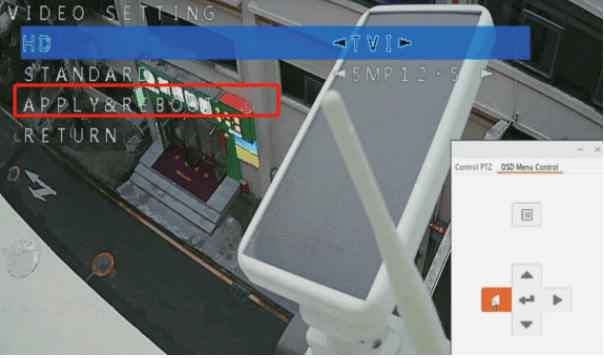
3.Then Select the “TVI ” on the HD, then click the “APPLY&REBOOT “and then click the “RETURN “and the “EXlT” back to the Version
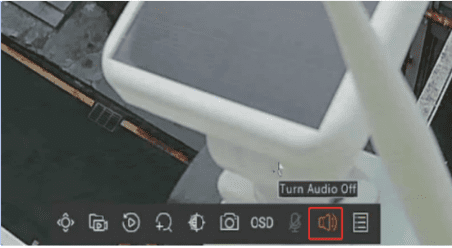
4.Finally Turn Audio On
11.Forget DVR Password
Forget DVR Password
If you forget your current password, please follow the instructions to reset it.
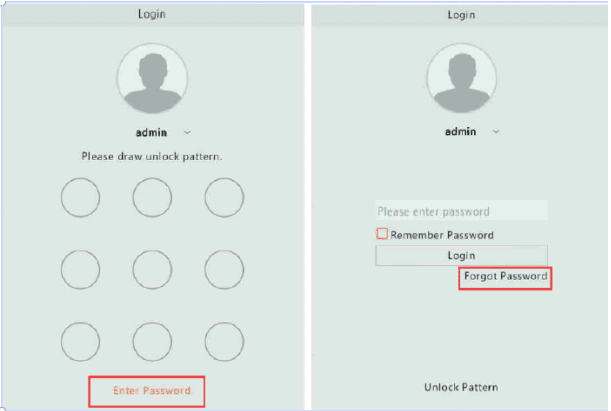
1. In the system login interface, please click on “Enter Password” > “Forgot Password”
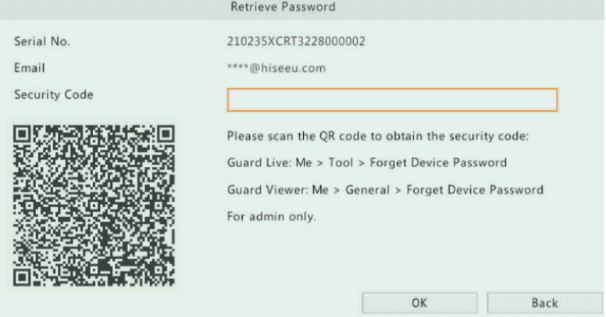
2. If you filled in your email address as a reserved email when you set up the system, you can reset the device password via the APP(Guard Viewer)
In NVR interface, tap forgot password.
1. Scan the above QR code by APP “ME–General–Forget Device Password” , and the security code will be sent to your email address.
2. If you haven’t set up an email before, or have any difficulties resetting the password, please take a screenshot of this interface(Serial No. please also make the code is as clear as you can ), and email us at love@hiseeu.com , since we need the serial number to produce a new password by using an internal tool
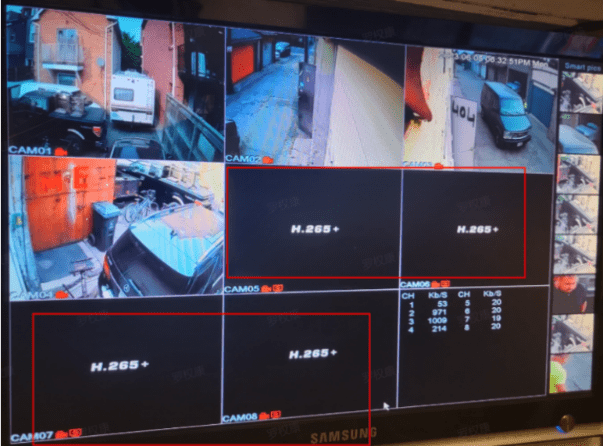
12.One or two cameras are not working
One or two cameras are not wokring
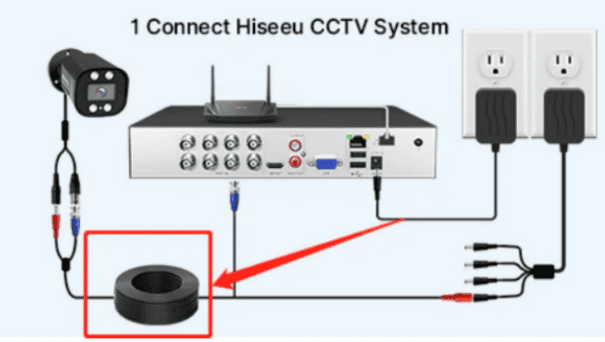
(1) BNC Cable connected to Camera is broken
Step: Use another BNC cable to connect the camera to have a try
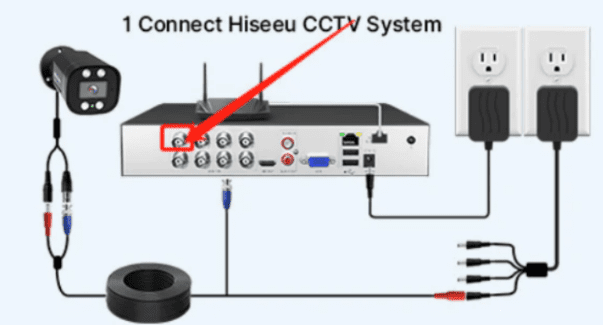
(2) The port of the DVR box is broken
Step: After changing the BNC cable, and still there is no camera image, plz insert the camera into another port of the DVR to have a try
(3) Camera is broken after troubleshooting with the steps (1)-(2)
13.Four cameras or above are not working
Four cameras or above are not working
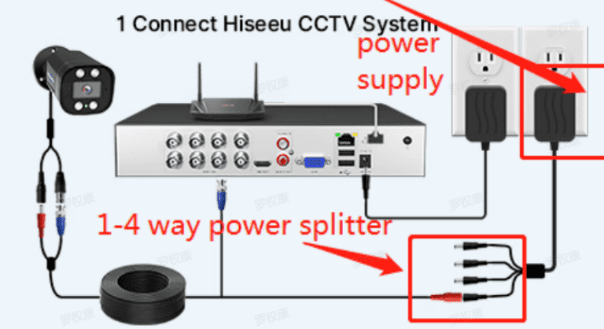
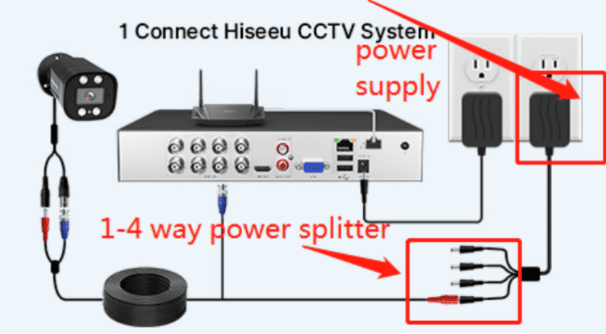
Four cameras or above not working is an abnormal situation. It’s not only a camera issue, which could be related to a power supply or power splitter connected to four cameras
If the power supply or power splitter connected to four cameras is broken, which can’t provide power supply to cameras
Step:
(1)Change to another 12V 2A Power Supply to connect to four cameras to have a try. We wanna make sure if this is related to the power adapter
(2) Change another 1-4 way power splitter to connect four cameras to have a try. We wanna make sure if this is related to the power adapter
( If you do not have another power adapter/splitter, plz use the other power adapter connected to the four normal cameras)
After making sure the power supply or power splitter is doing fine, but still no camera image, which means the DVR box is having issue
4.Eight Cameras are not working
Eight Cameras are not working
Please check your camera connection is correct , if the connection is correct ,
i t’s mostly possible the DVR box is having issue, and need a new DVR box replacement
Further support, plz email us at email love@hiseeu.com
Or contact us at +1 917 688 2228
15.How to record the event only?
How to record the event only ?
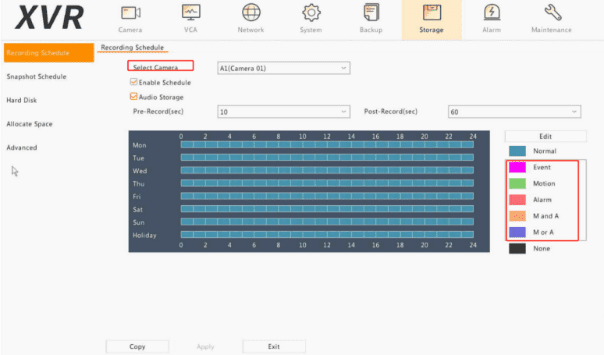
Please click the mouse to the Menu then click the “ Storage ” and then click the “ Recording Schedule ”,“ Select Camera ” then click the “ enable Schedule ” click the “ Audio Storage ” then select the color of record type and fill in the corresponding time and date.
.
