GV-Cloud VMS User Manual v1, GV-Cloud VMS is a cloud-based video surveillance and data center solution. Thousands of on-site cameras, alarm devices, motion triggers and AI events can be efficiently monitored from a single cloud-powered platform. With GV-Cloud VMS, you can effortlessly access live streams, review playbacks, and query events from anywhere using a web browser.
GV-Cloud VMS is suitable for businesses of all sizes. The cloud solution is easily scalable to meet the increasing need for more cameras and storage capacity. User and camera permissions can be grouped to align with the structure of a corporation. Overall, the cloud solution streamlines video surveillance while increasing infrastructure flexibility and scalability.
GV-Cloud VMS is a cloud-based video surveillance and data center solution. Thousands of on-site cameras, alarm devices, motion triggers and AI events can be efficiently monitored from a single cloud-powered platform. With GV-Cloud VMS, you can effortlessly access live streams, review playbacks, and query events from anywhere using a web browser.
![]() GV-Cloud VMS is suitable for businesses of all sizes. The cloud solution is easily scalable to meet the increasing need for more cameras and storage capacity. User and camera permissions can be grouped to align with the structure of a corporation. Overall, the cloud solution can streamline video surveillance while increasing infrastructure flexibility and scalability.
GV-Cloud VMS is suitable for businesses of all sizes. The cloud solution is easily scalable to meet the increasing need for more cameras and storage capacity. User and camera permissions can be grouped to align with the structure of a corporation. Overall, the cloud solution can streamline video surveillance while increasing infrastructure flexibility and scalability.
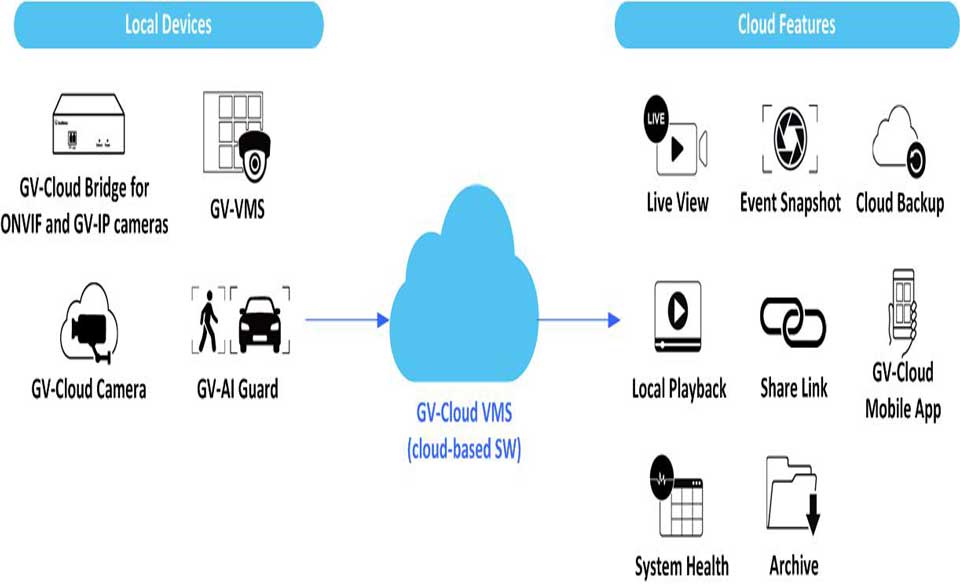
Local Devices
Cloud Features
ONVIF and GV-IP cameras
GV-VMS
Live View
Event Snapshot
Cloud Backup
GV-Cloud Camera
GV-AI Guard
GV-Cloud VMS (cloud-based SW)
Local Playback
System Health
Share Link
Archive
Mobile App
The following browsers are compatible with GV-Cloud VMS.
Note: The WS player is not supported by Safari.
GV-Cloud VMS has the following types of licenses. For details, please contact our sales representatives.
|
Plan |
Basic |
Standard |
Premium |
|
|
Price |
Free |
Licensing by channel |
Licensing by channel |
|
|
Details |
Log only – 30 Days |
Event Snapshot – 30 Days |
Cloud Backup – 3 / 7 / 15 / 30 Days |
|
|
Features |
Live View |
V |
V |
V |
|
Local Playback |
V |
V |
V |
|
|
System Health |
V |
V |
V |
|
|
Event Snapshot |
– |
V |
V |
|
|
Share Link |
– |
V |
V |
|
|
Archive |
– |
– |
V |
|
|
Cloud Backup |
– |
– |
By resolution: SD / 720p / 2 MP / 4 MP |
|
|
Note: 1.The Standard and Premium plans are priced based on the required number of camera channels.
2.The SD resolution is 640 x 480 or below.
3.System Health is the storage, I/O, and camera status of the host.
4.You will receive e-mail reminders 15 days before your license expires. Renew your license to continue receiving event snapshots and cloud backup. The archived recordings will not be limited to a 30-day retention period unless you manually remove them.
5.If you remove an existing host with event snapshots and cloud backup, its data will be removed from GV-Cloud VMS.
6.GV-VMS / GV-Cloud Bridge / GV-Cloud Camera (GV-GDR4900 / GEB4900 / GEBD4911) hosts have the following limits when uploading events onto GV-Cloud:
Up to 2 events are supported for each channel per minute.
Up to 7,680 events are supported for 64 channels per hour.
Up to 184,320 events are supported for 64 channels per day.
|
||||
Chapter 2 Getting Started
To get started, you must acquire a GV-Cloud VMS license and a series number from GeoVision.
IMPORTANT: Keep your account ID number, which is required each time you log into GV- Cloud.
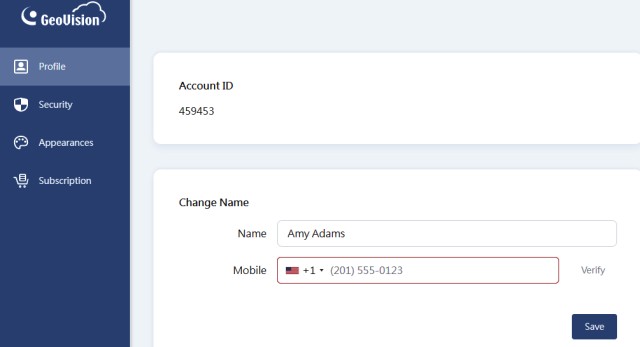
Note: The mobile phone number can be used for the two-factor authentication if needed. See 5.3 Two-Factor Authentication.
For first-time users, you need to add a license to start the services.
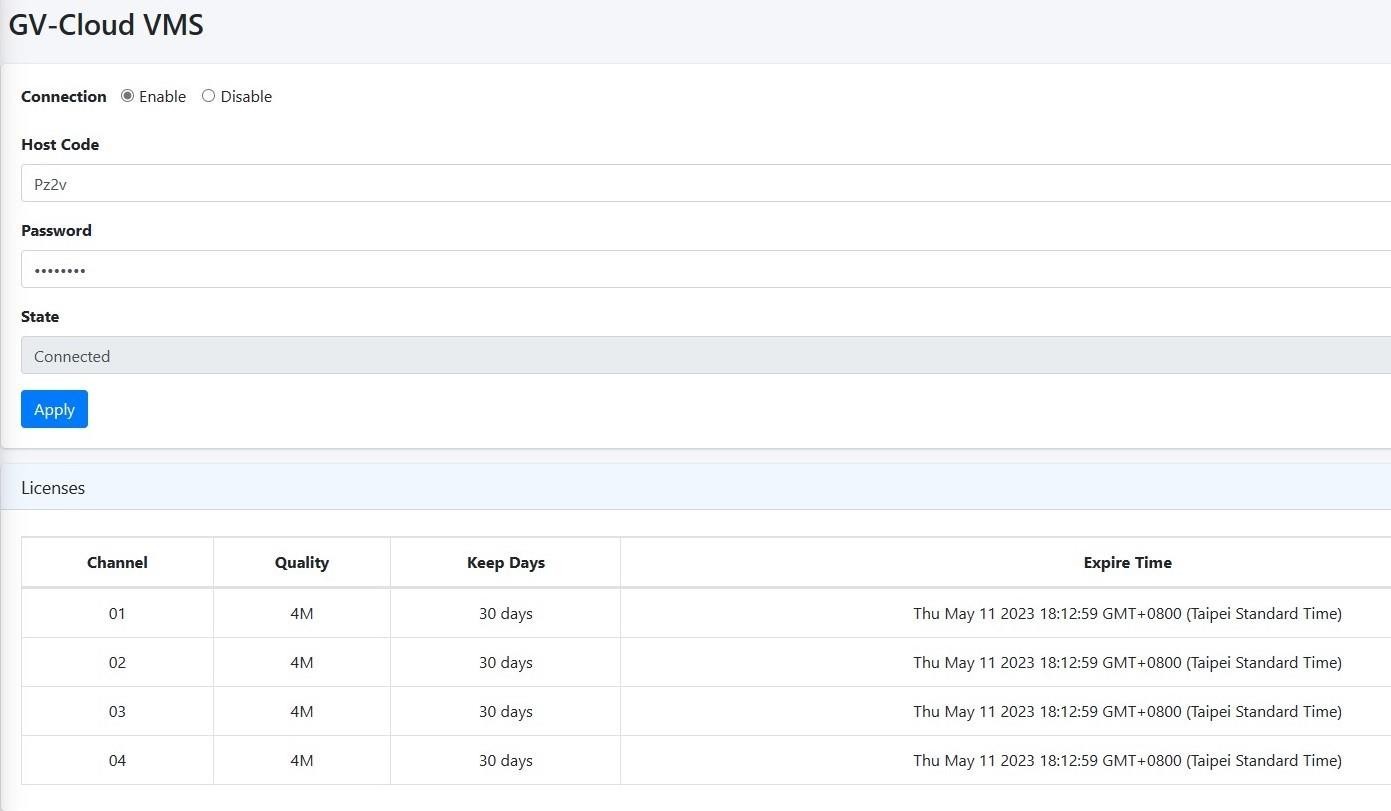
You must create a Host for each GV-VMS, GV-AI Guard, or GV-Cloud Bridge that you want to connect to. To create a host on GV-Cloud VMS, follow the steps below.
The message “Host has been added” will be displayed. Keep the Host Code and Password
for configuring the connection to GV-Cloud on the host.
Note: To reset the password, select a host in the Hosts list, and click the Edit Info icon next to the Info tab. See [Info], 4.1 Hosts.
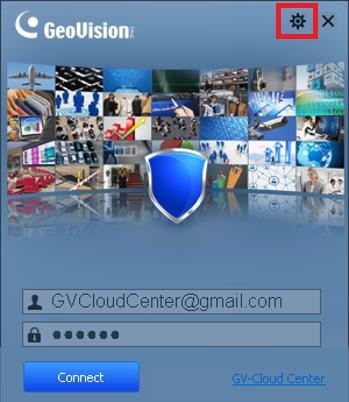
Follow the steps below to connect GV-VMS or GV-AI Guard to GV-Cloud VMS for cloud central monitoring.
Note: The support for GV-AI Guard is coming soon.
In GV-VMS / GV-AI Guard:
In GV-Cloud VMS:
When the GV-Cloud VMS connection is established, the host will be displayed, with a yellow icon ![]() or a green icon
or a green icon ![]() , on the GV-Cloud VMS Home page.
, on the GV-Cloud VMS Home page.
Without a license, you can view live streaming from the host.
By adding a license, you can receive snapshots or back up video to GV-Cloud VMS. For details, see 2.2 Adding Licenses.
Note:
WebCam Server and Mobile Service are enabled alongside Connect to GV-Cloud.
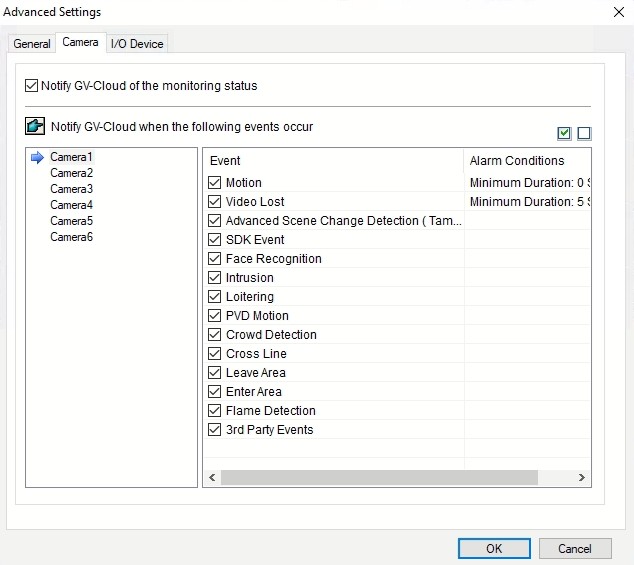
To specify which events should be sent to GV-Cloud VMS, click the Configure button ![]() on the Connect to GV-Cloud dialog box. Three types of settings are available: General, Camera, and I/O Device.
on the Connect to GV-Cloud dialog box. Three types of settings are available: General, Camera, and I/O Device.
[General]
Figure 2-6
[Startup]
[Connection Broken]
[Notify GV-Cloud when the following events occur] Select which events to notify GV- Cloud VMS about. Click Modify to adjust the threshold for sending notifications when the free storage space or keep days falls below the threshold.
[Temp Folder] The path to store logs and recordings to be sent to GV-Cloud VMS.
[Camera]
[Notify GV-Cloud of the monitoring status] Notify GV-Cloud VMS whenever camera monitoring is enabled or disabled.
[Notify GV-Cloud when the following events occur] Select a camera from the list, and then select the type of event or data to be sent to GV-Cloud VMS. By double-clicking the following two fields, you can specify the alarm conditions for specific events.
Tip: To apply the same settings to all cameras in the list, click the Apply All button ![]() .
.
[I/O Device]
Figure 2-8
[Notify GV-Cloud of the monitoring status] Notify GV-Cloud VMS whenever I/O monitoring is enabled or disabled.
[Input] Select an Input device from the list.
[Output] Select an output device the list.
You can connect up to four ONVIF cameras, through GV-Cloud Bridge, to GV-Cloud VMS for cloud central monitoring.
In GV-Cloud Bridge:
In GV-Cloud VMS:
When the GV-Cloud VMS connection is established, the host will be displayed, with a yellow icon ![]() or a green icon
or a green icon ![]() . on the GV-Cloud VMS Home page.
. on the GV-Cloud VMS Home page.
Without a license, you can view live streaming from the host.
By adding a license, you can receive snapshots or back up video to GV-Cloud VMS. For details, see 2.2 Adding Licenses.
Note:
Chapter 3 Home Page
1
5
6
2
3
4
|
4 |
Cloud Account |
Logout: Log out the GV-Cloud account.
Account Settings: This option allows you to change the GV-Cloud account’s profile (Profile), password (Security), language setting / UI theme / time format (Appearances), as well as check and add subscriptions (Subscription).
|
|
5 |
Event Monitor |
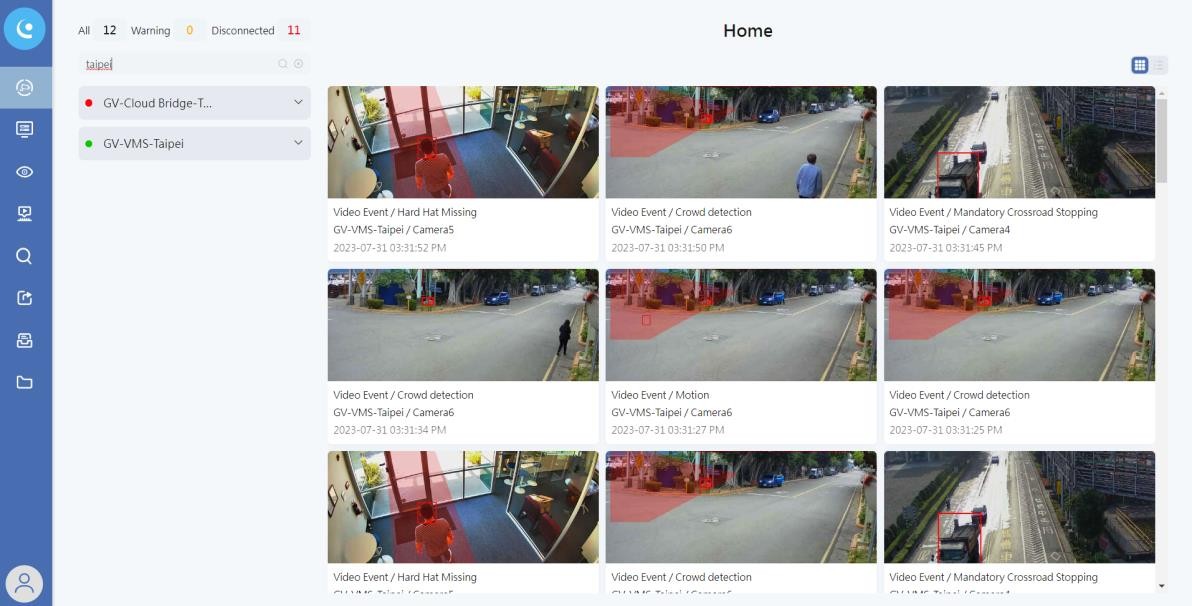
Display coming motion and AI events. Use the Filter above the Host List to display the events of specific hosts.
|
|
6 |
View Display |
Display motion and AI events in Photo View or List View. |
3.1 Video Window
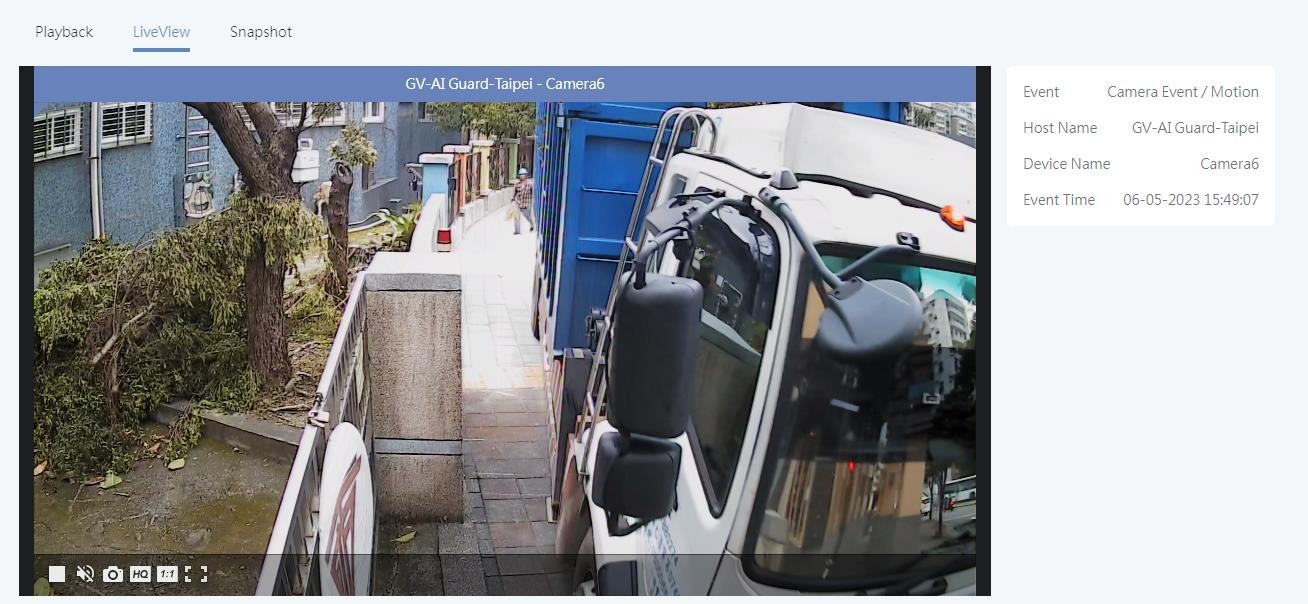
By clicking an event snapshot on the Home page, you can access the event playback, live view or snapshot, depending on the licenses you purchased.
1
2
3
4
6 7
5
|
No. |
Name |
Function |
|
1 |
Playback |
Play video from a host directly. Right-click the image and select States to view the video information: codec, resolution, audio, bitrate, and frame rate. |
|
2 |
Cloud Playback |
Play the video saved to GV-Cloud. Right-click the image and select States to view the video information: codec, resolution, audio, bitrate, and frame rate. |
|
3 |
Live View |
Stream live video from the camera. Right-click the image and select States to see the video information: codec, resolution, audio, bitrate, and frame rate, and the number of connected clients. |
|
4 |
Snapshot |
View the snapshot taken when the event occurs. |
|
5 |
Control Panel (for Playback) |
Click the Real-Time and Frame-by-Frame icons shown below to switch modes:
|
|
6 |
Control Panel (for Live View) |
: Play / Pause live view
|
|
7 |
Archive |
To archive a cloud-based recording, click the Archive button. To view a list of archived recordings created, select Archives in the left menu. See 4.6 Archives. Note: If you skip the note for an archive, you cannot add a note to the archive later. |
|
8 |
Share Link |
To share a recording/snapshot, click the Share Link button and specify an expiration time, a note, and a password (optional) to access the recording/snapshot. The link will be emailed to the specified address(es). You can also view the recording/snapshot by simply copying the Share Link. To view a list of shared links created, select Share Links in the left menu. See 4.5 Share Links. Note: If you skip the note for a shared link, you cannot add a note to the share link later. |
Note: When you click Playback and no video is displayed, the video clip may not have been created yet. The maximum length of a video clip created in GV-Cloud Bridge is 30 seconds, while the default length of a video clip created in GV-VMS / GV-AI Guard is 5 minutes, you may have to wait until the specified length has elapsed after an event begins to view the video playback.
Chapter 4 Cloud VMS Settings
The Hosts page allows you to create host accounts and view the status of the host’s cameras, I/O devices, and storage. Click a created host in the list to access the following functions.
[Info]
![]() This page allows you to edit the information of a host. Click next to Info to start editing. You can also reset the host’s login password from this page.
This page allows you to edit the information of a host. Click next to Info to start editing. You can also reset the host’s login password from this page.
[Cameras]
You can view the camera’s connection, monitoring status, applied license plan, plan expiration date, camera resolution, and monitoring type on the Cameras page.
Note: When the camera’s resolution does not match the applied license plan, the following 2 icons will appear:
[Modules]
The Modules page displays which inputs and outputs on the host are being triggered.
[Storage]
On the Storages page, you can view the host’s storage information such as the recycle threshold, Keep Day, storage path, and remaining storage space.
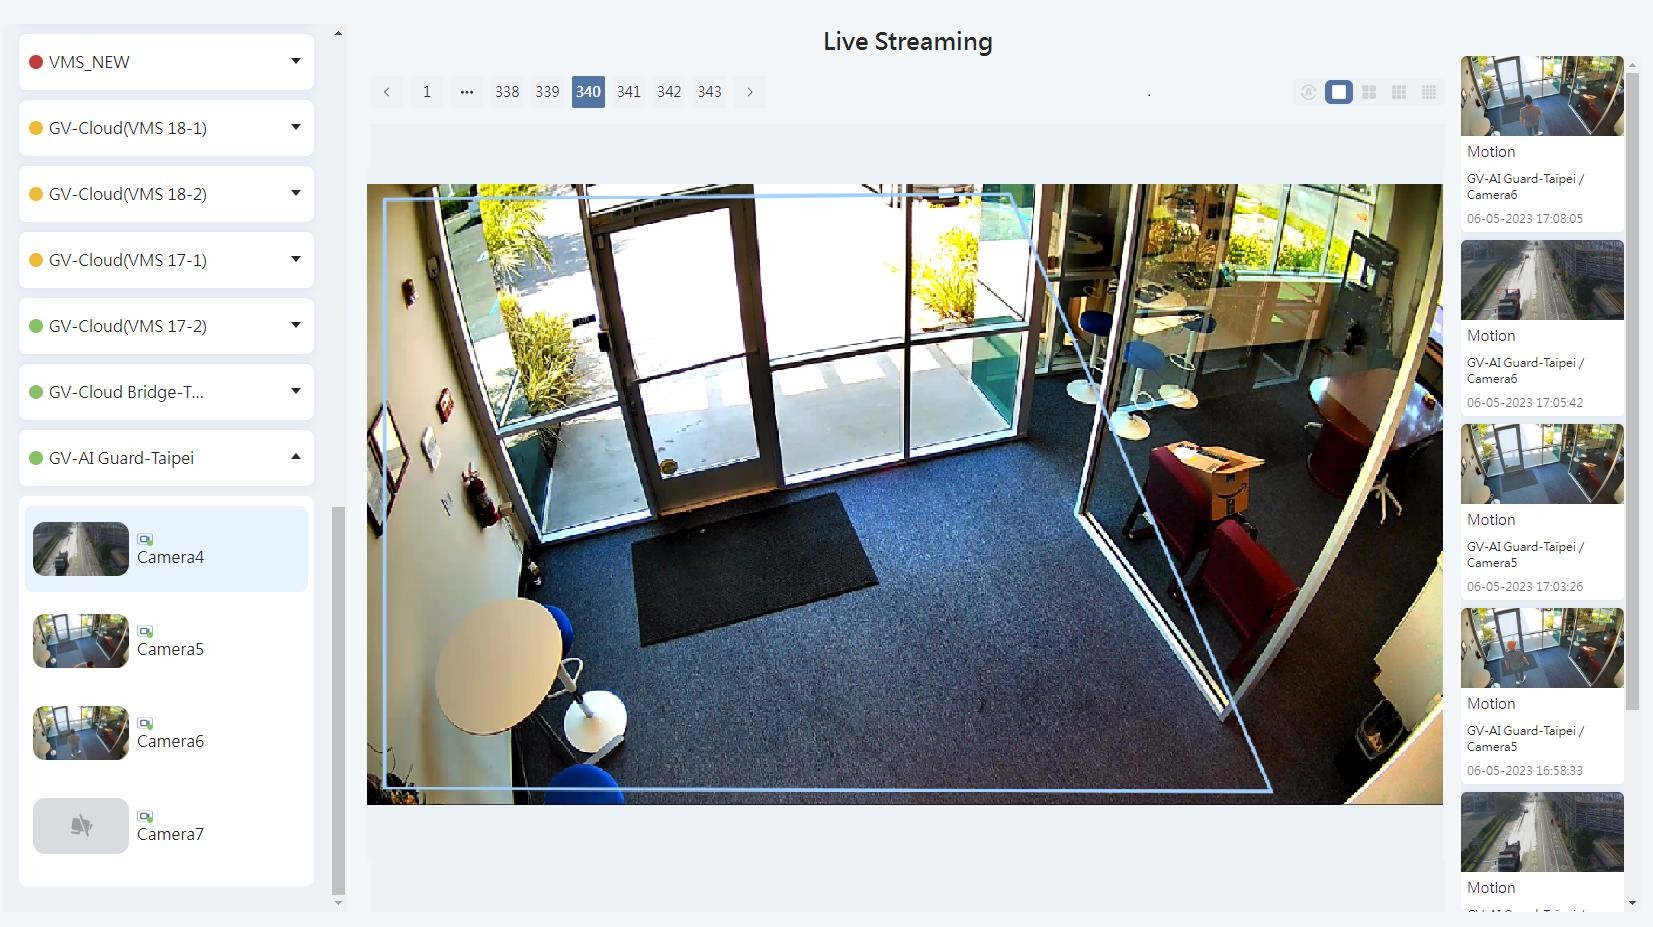
On the Live Streaming page, you can access the camera’s live view.
Host List
Page
Screen Division
Event Snapshot
Frame Rate
When motion or AI events occur, snapshots of them will appear on the left side of the Live Streaming window. By clicking an event, you can view the live view or play it back. For details, see 3.1 Video Window.
Note:
on the capabilities of your computer.
You can play back events directly from a host (Local Streaming), or from GV-Cloud (Cloud Streaming).
Date
Local Streaming / Cloud Streaming
Event Marks
Play
Note:
on the capabilities of your computer.
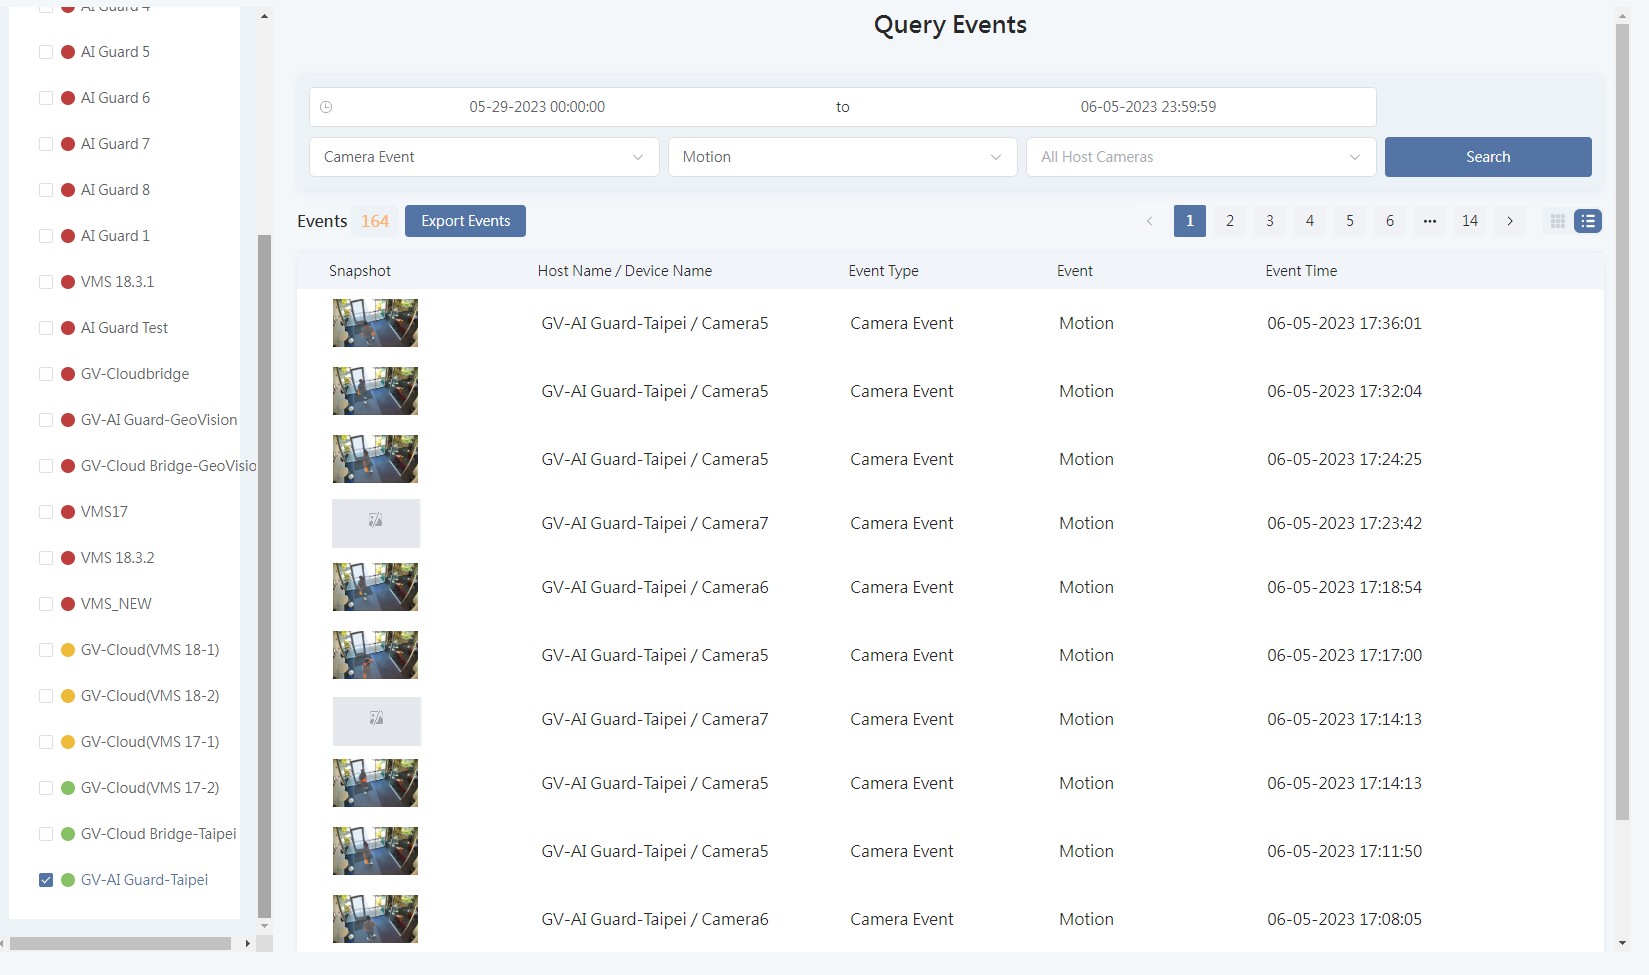
On the Query Events page, you can search for events by category, including I/O Event, System Abnormal, Camera Event, I/O Alert, System Status, Connection, Access Control, Storage, and AI Event.
By clicking an event snapshot, you can view the live view or play it back. For details, see 3.1 Video Window.
Note: The event query can display up to 10,000 results.
On the Shared Links page, you can see a list of shared links you created through the video window. To create a shared link, see No. 8 in 3.1 Video Window.
Note: The note for a shared recording is editable. However, once a note is deleted, it cannot be added back to the recording.
On the Archives page, you can see a list of archived recordings you created through the video window. To archive a recording, see No. 7 in 3.1 Video Window.
Double-click an archived recording to play it back.
Note:
When an event occurs, you can be alerted via push notifications on your mobile device.
On the Groups page, you can specify which account users have access to which hosts by creating groups. A group named “default” has been created with access to all hosts.
To create a group:
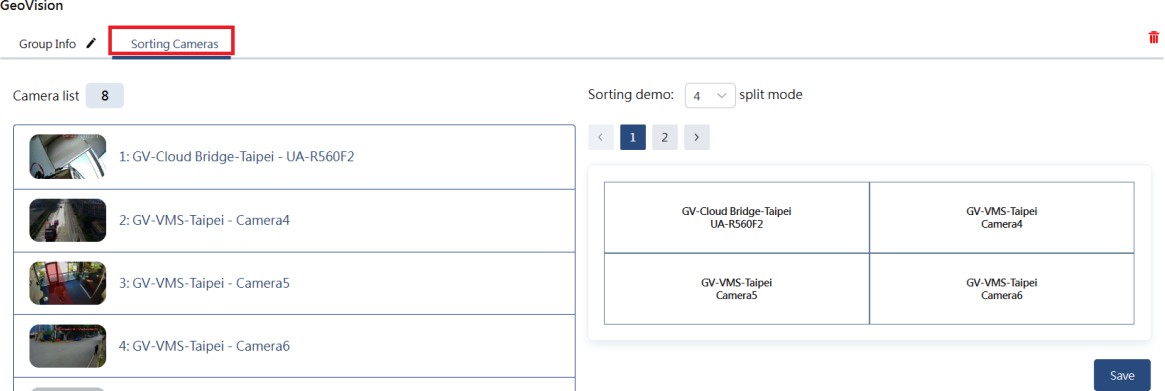
To sort cameras:
After assigning hosts and users to a group, you can configure how camera channels from the hosts are arranged across different screen divisions.
IMPORTANT: The default group has been created to allow all users to access all hosts. Therefore, to specify an account user to view only limited hosts, remove the user from the default group.
Chapter 5 Account Management
You can add account users to monitor different hosts on GV-Cloud VMS. GV-Cloud VMS supports two types of account users:
To add an account user:
After clicking the activation link to confirm the e-mail account, the account user will receive another e-mail confirming the success of GV-Cloud registration, along with a temporary login password.
The account user can now log into GV-Cloud using the registered e-mail address and the temporary login password. To change the login password, click the Account icon at the bottom of the left menu and select Account Setting.
To assign host permissions:
See 4.7 Groups for details on how to specify which account users have monitoring access to which hosts. Only the hosts assigned to the account user will be displayed when the user logs in.
To change a non-master user to a master user, follow the steps below:
By default, GV-Cloud accounts log in using their e-mail and password. 2-Factor Authentication (2FA) adds an extra layer of security to your account by requiring you to retrieve a code via SMS or e-mail in order to login.
To enable 2FA on the GV-Cloud account:
Note: If multiple users are created under the same GV-Cloud account, each user must log in to configure their own two-factor authentication.
Chapter 6 Audit Log
Audit logs are records of events and changes made by your GV-Cloud accounts that provide a complete record of account activities. Therefore, audit logs are a valuable resource for administrators investigating suspicious network activities and diagnosing problems.
You can conduct a log search by specifying a time range, service, and user behavior. The Audit Log will return the following information:
Note: The Audit Log can store 60-day data, and overwrite it with new data on a daily basis.
Chapter 7 E-Map
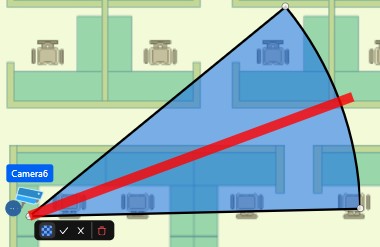
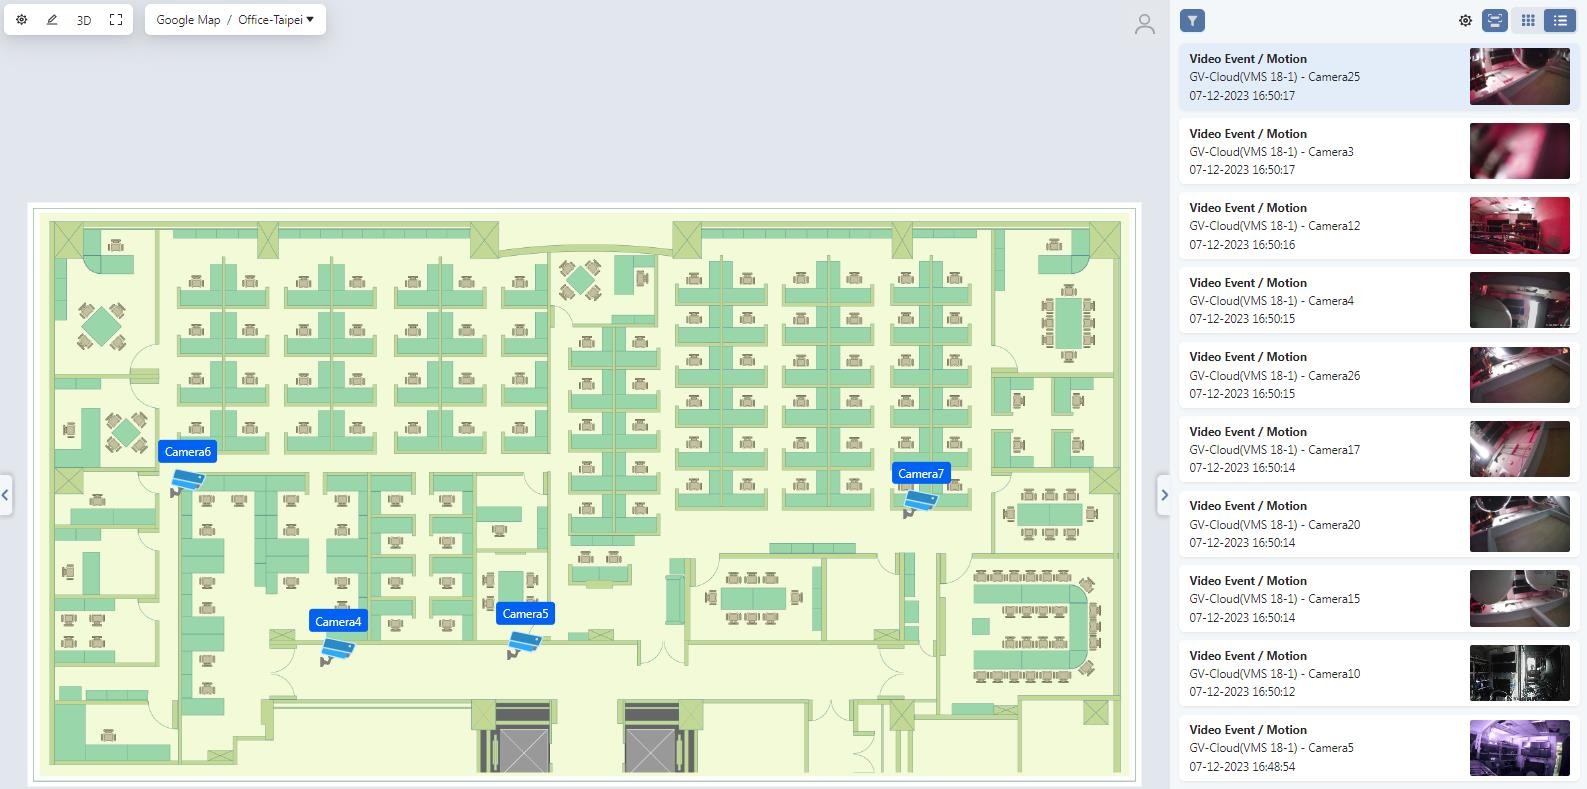
You can place the icons of connected cameras on Google Maps or on a map you uploaded to GV-Cloud. The map will help you quickly pinpoint the location of an event or the devices you have installed.
Tip: By clicking the 3D button, the created map can be displayed in 3D view, which you can zoom in and out of a map with the mouse wheel, and rotate it as desired.
You can enable the Event List on the right side of the map to display real-time events, and select which events should appear on the list. When an event occurs, the corresponding map with a flashing icon of a triggered camera will also pop up on the screen.
Appendix
Basic Network Settings
In most cases, no network configuration is required to access the GV-Cloud services. Only when your firewall or ISP restricts outbound connections do you need to open the following default ports for remote connections.
|
Service |
Connection Port |
|
Live Stream |
80, 3443, 56000 |
|
Playback |
3443, 5552 |
|
Data Transmission |
443, 56000 |
|
WS Player |
9100 |
The GV-Cloud services also use the IP addresses listed below. If outbound connections are restricted, add the three IP addresses to the whitelist of your network for remote access.
*.gvaicloud.com
*.ccrelay.mygvcloud.com relay.vsm.mygvcloud.com,
