Hikvision How to & FAQ, Hikvision is committed to serving various industries through its cutting-edge technologies of machine perception, artificial intelligence, and big data, leading the future of AIoT: through comprehensive machine perception technologies, we aim to help people better connect with the world around them; with a wealth of intelligent products, we strive to identify and satisfy diverse demands by delivering intelligence at your fingertips; through innovative AIoT applications, we are dedicated to empowering every individual to enjoy a better future by building an intelligent world that is more convenient, efficient and secure.
Featuring an extensive and highly skilled R&D workforce, Hikvision manufactures a full suite of comprehensive products and solutions for a broad range of vertical markets. In addition to the security industry, Hikvision extends its reach to smart home tech, industrial automation, and automotive electronics industries to achieve its long-term vision.
Password Reset
This page will guide you in resetting passwords on your Hikvision devices.
For end users:
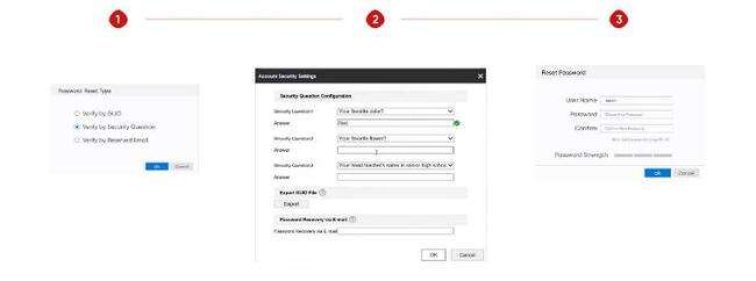
We highly recommend “4 Ways of Self-service Password Reset” (you can see the Tutorial video here). Please note that not all Hikvision devices support all these methods. Go to the “Forget Password” page to check the various methods supported by your product.
For installers:
You can easily reset a password using the Hik-Partner Pro mobile app.
Check out the tutorials below to discover the quickest way to reset a password. If you have any questions during the process, please contact Hikvision (Find the contact of Hikvision technical support team) or see Troubleshooting Tips of Password Reset Failed Issue here.
Note: Also try the Password Hints function to help you recall your original password. This function is only available for NVRs (76Q-series, K-series, K-series with AcuSense) with firmware V4.75.000 and later. Learn more here.
Self-service password reset
Via account verification
Prerequisite:
The device has been added to the Hik-Connect or Hik-Partner Pro account.
Prerequisite:
A reserved email address has been set up by the user.
Prerequisite:
Security questions have been set by the user.
Prerequisite:
The GUID file has been exported and saved by the user.
Password reset via XML file
Prerequisite:
The Hikvision devices can be detected on the same LAN.
Hikvision How to & FAQ
Also Read : Hikvision How-To Tutorials Part1
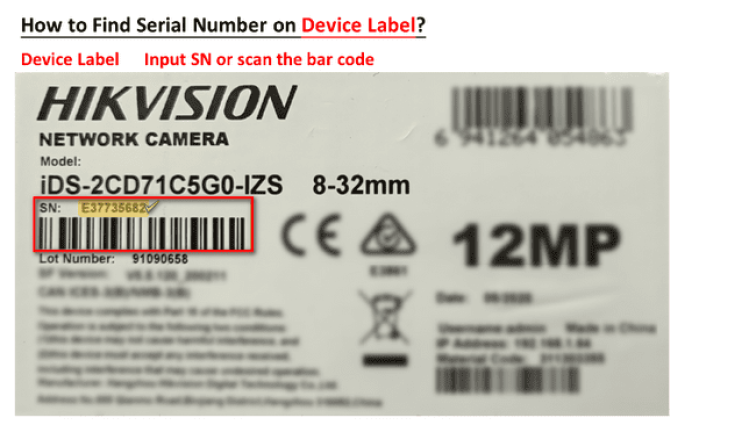
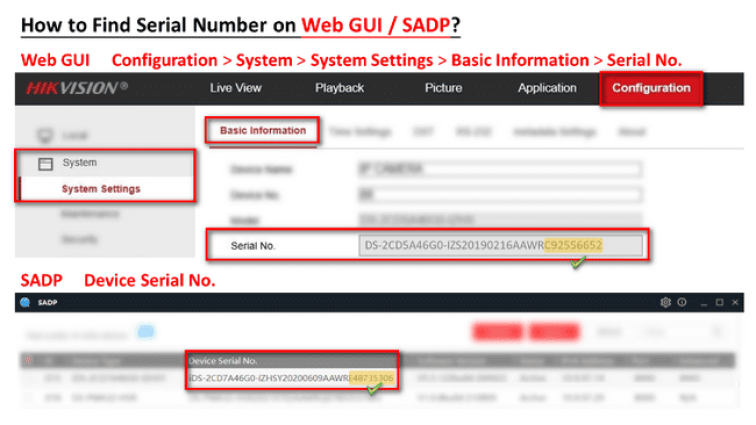
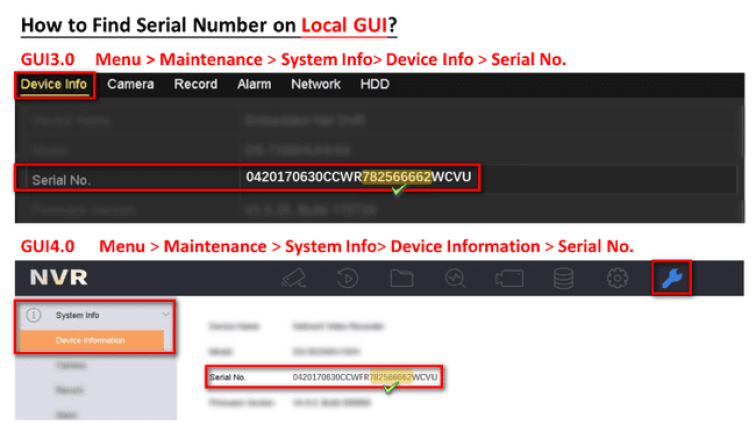
How to Check Device Serial Number
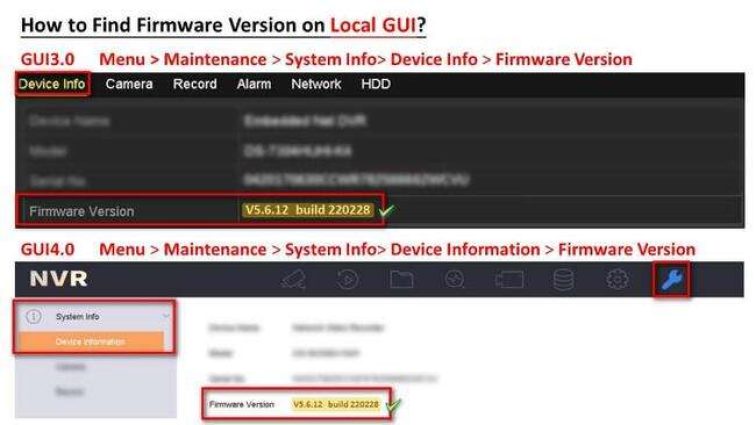
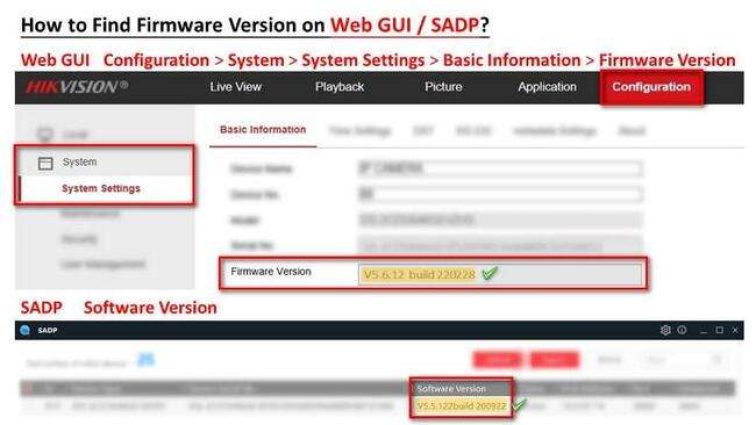
How to Find Device Firmware Version
How to add IPC with POE function to NVR
Description
POE cameras could be added into NVR which supports POE function with both Manual mode and Plug-and-Play mode. When applying the Plug-and-Play mode, please kindly make sure the password of the camera is the same with the NVR, or you could set the password of the camera to 12345.
Note: Plug-and-Play mode could only be applied when the camera is added directly to the POE port of a NVR.
999
How to Enable Hik-Connect Service in Device
Summary
Hik-Connect is a new service introduced by Hikvision which integrates the dynamic domain name service along with alarm push notification service. It provides an easy way for devices to connect to the Internet.
This manual is a guide for users to show them how to enable Hik-Connect service in device.
Discretion
User interface may not be identical to the instructions shown below depending on the product, firmware version. However, the information and settings required to setup Hik-Connect services are similar across all supporting products.
Preparation
Users need to upgrade device to proper firmware that supports Hik-Connect Service.
999
How to Unbind Device from Hik-Connect Account
Description
One device can be added only by one Hik-Connect account, if the device was added by other account, you cannot add it again. You can follow steps below to unbind your device or check the video which can help you.
Youtube video link
How to Unbind Device via Hik-Connect APP
How to unbind device via SADP tool
999
How to Solve Hik-Connect Offline Issue
Description
When our customer adds a device to the Hik-Connect account and the APP returns device is offline, we can follow steps below to solve the problem or locate the causes.
999
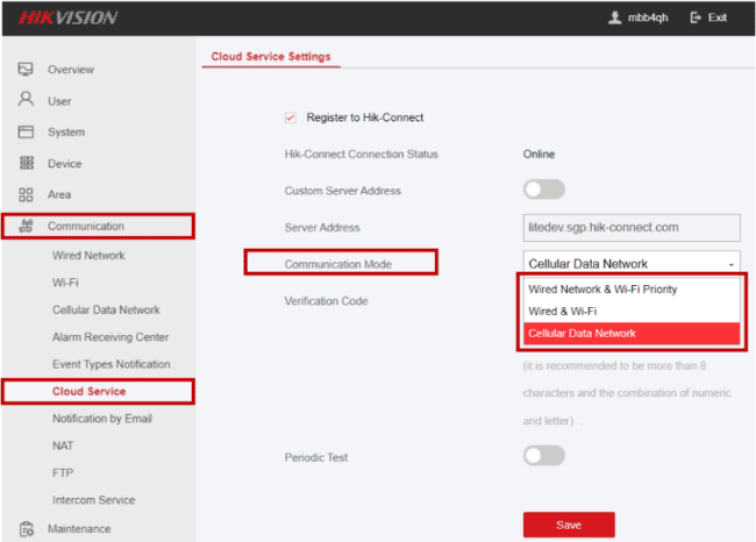
How to Configure Communication Mode of AX PRO
There are three types of Communication Mode via Communication > Cloud Service > Communication Mode:
Wired Network & Wi-Fi Priority
It means that Wired Network, Wi-Fi Network, Cellular Data are all supported, AX Pro will choose best network status and change connecting ways when network is not stable. It is recommended to use this mode when your device is with complex network environment, since it can help you select better way automatically.
Wired & Wi-Fi
It means that only Wired Network and Wi-Fi Network are supported, AX Pro can only connect with wired or Wi-Fi. It is recommended to use this mode when you want to save cellular data or do not want to use cellular at all.
Cellular Data Network
It means that AX Pro only use cellular data network to connect. This mode is usually used in poor network environment, like wired and Wi-Fi network are hardly connected. Besides, it can help you save network detecting time.
Tips
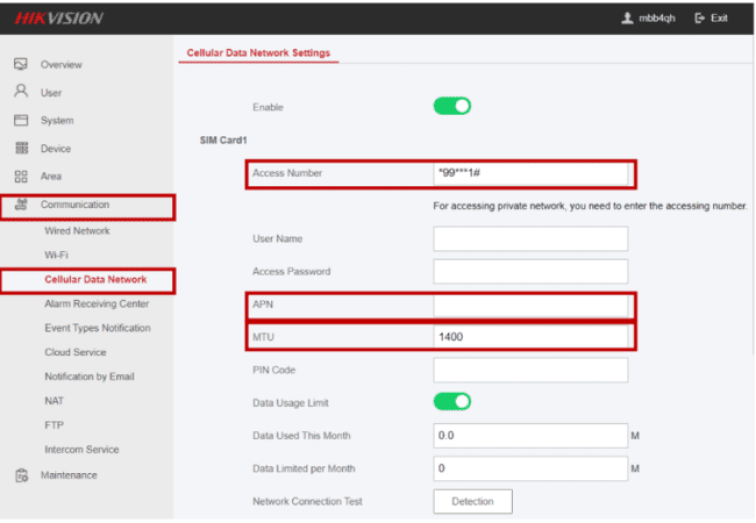
When you set Communication Mode as Cellular Data Network, the followings can help you use cellular data successfully:
1. Keep MTU as default 1400, Access number as default *99***1#
2. Test SIM in mobile, make sure that your SIM card can call, send message and connect to the internet
3. The AX PRO default dialing includes most SIM card APN but not all. If the network is not connected, you need to search the SIM card’s APN by Google or ask your mobile operator then set up the SIM card APN manually and then restart it.
999
How to Download Multiple Recordings
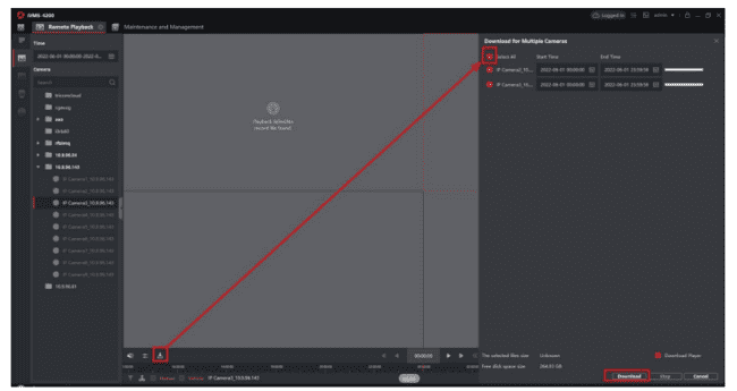
Hikvision device support download/export multiple recording at the same time. This file will introduce three methods of multiple download recordings: local GUI, web page and iVMS-4200 software.
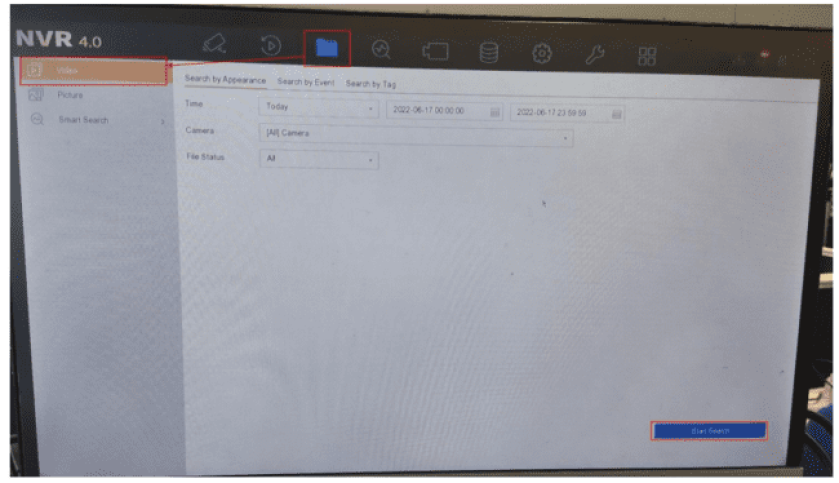
Method 1: local GUI
On local GUI, we need turn to the button of File > Video. In this page, we could select search condition, time and camera channel which you want to download. After select, click “Start Search”.
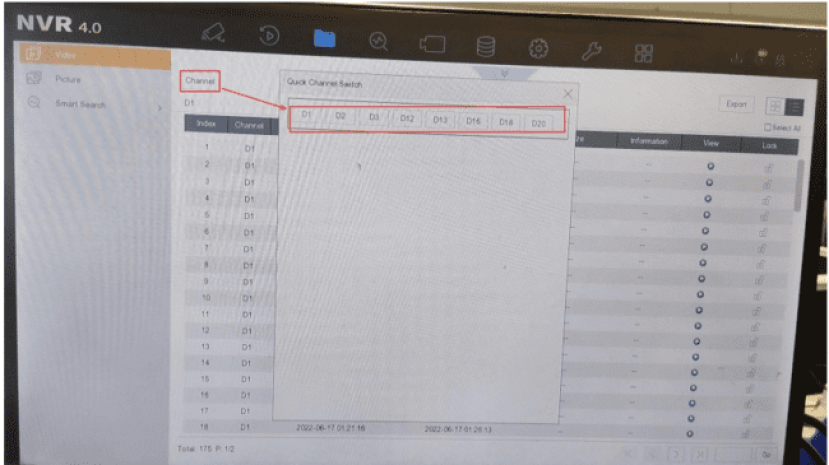
After search, it will show all the recordings of the channel 1 default, and if we want to check other cameras recording, we need to select the Channel to switch to other channel.
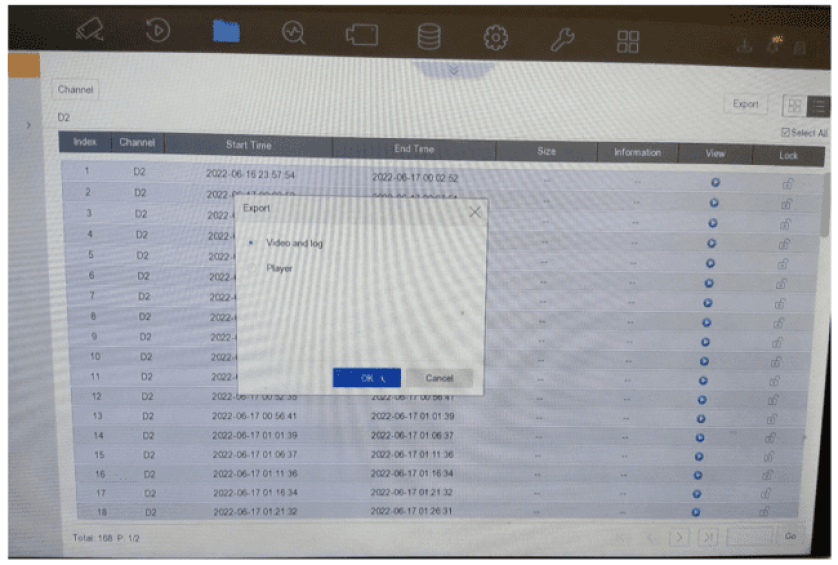
Then we could select the recordings and Export.
Method 2: Web page
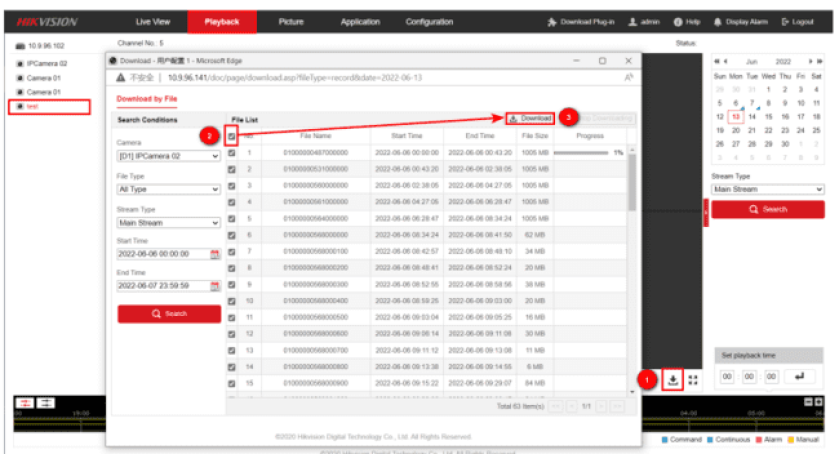
Web page Log in the device via IP address on IE browser, turn to Playback page, select the camera which you want to check, click the download button in the lower right corner. It will pop up the download configuration page, in this page, we could select the camera/ type/ time, after search we could select the recording files and download.
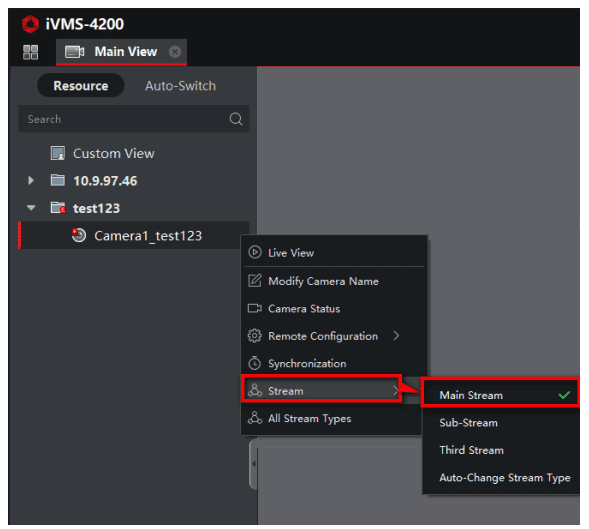
Method 3: iVMS-4200 software
999
How to Solve DVR Live View Noise Issue of Hik-Connect
If there is noise of DVR in Hik-Connect when remote live view or sliding channel (switch to next screen), you can try the following methods to solve the problem.
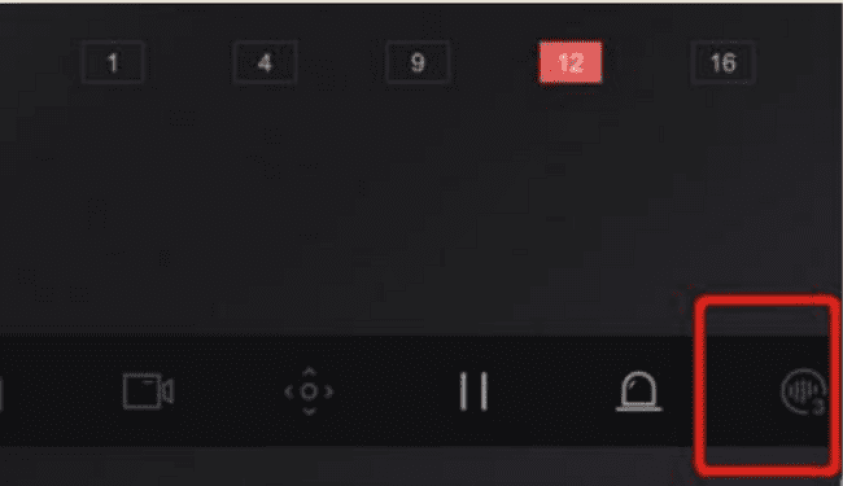
1. If you connect a coaxial audio camera to DVR, please turn on Noise Reduction function in Hik-Connect to solve it.
2. If it’s not a coaxial audio camera, please change to coaxial audio camera then connect to DVR.
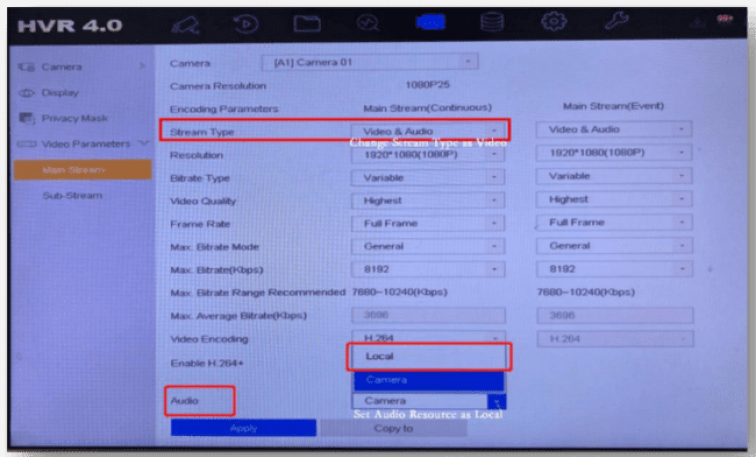
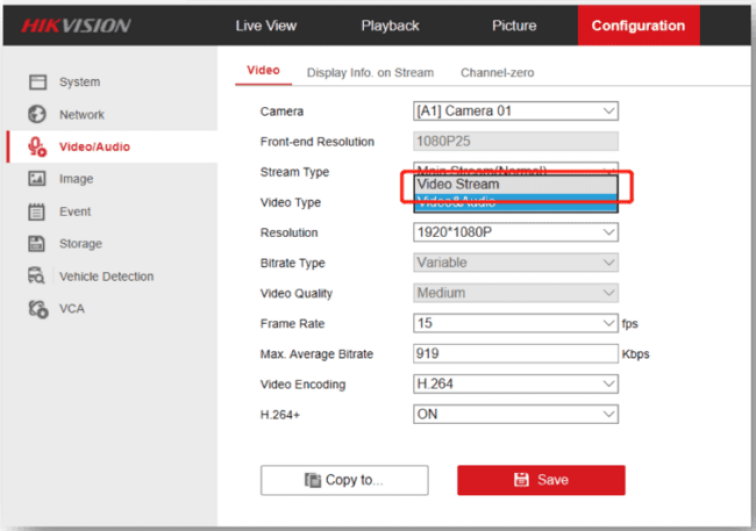
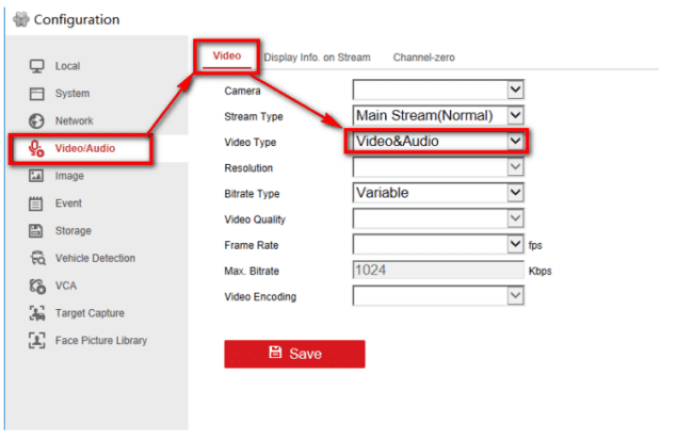
3. If you don’t want to change camera, please change camera Stream Type from video & audio to video and set DVR audio resource as local to solve the problem.
999
How to Solve IP Camera No Link Issue on PoE NVR
IP cameras could be added into PoE NVR with both Manual mode and Plug- and- Play mode.
When applying the Plug- and- Play mode, please kindly make sure it is Hikvision brand camera, and the password of the camera is the same as the NVR. For “No Link” issue, please enter NVR.
Menu – Camera – IP Camera, click Status icon of camera to check the error message first.
Scenario 1:
The user name or the password is wrong.
Solution :
If the IP camera has hard reset button, please turn off the camera (cut off the power). Then keep holding the button for more than 30 seconds. Meanwhile, power on the camera while holding the button. The device would be back to the inactive status. PoE NVR will automatically active and connect the camera.
If the IP camera doesn’t have hard reset button, please use SADP tool to reset camera password first. You can operate according to below steps:
1. Download and install the latest SADP tool on your computer. You can download from below link: https://www.hikvision.com/en/support/tools/hitools/TS20200826033/
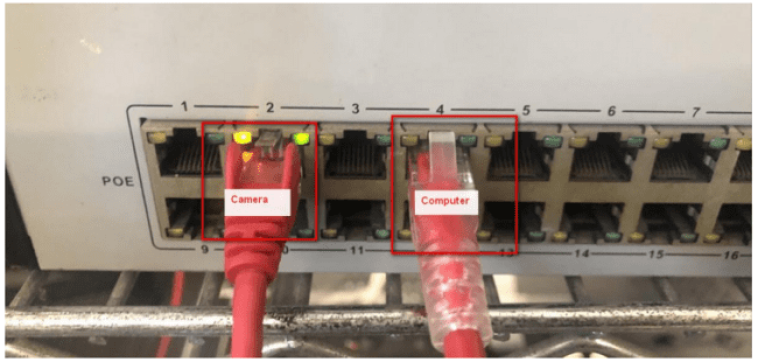
2. Connect your computer to one of PoE ports of NVR with network cable.
3. Running SADP tool to search camera.
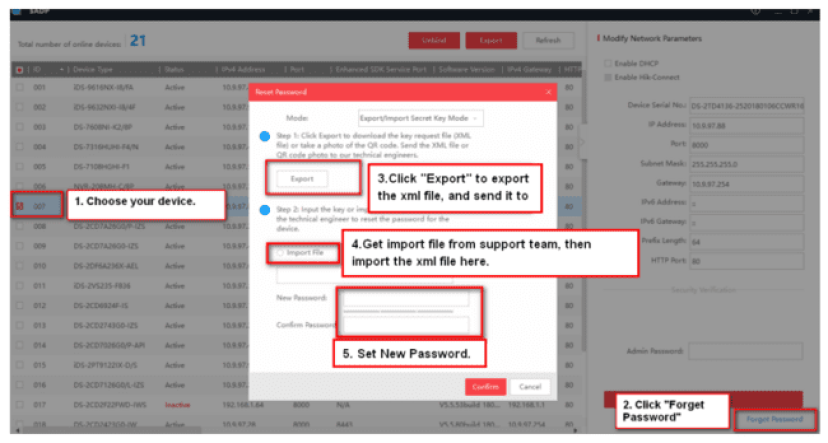
4. Select the device, and click the “forgot password” button.
5. If it has an export button, you can click it to export a device’s xml file and send it to our regional support team to reset password.
6. Get import file from support team, then import file to reset device password.
(Note: Please set the new password of camera to the same as NVR’s.)
7. PoE NVR will automatically connect the cameras with same password.
Scenario 2:
Network is Unreachable
Solution:
If the camera is connected to NVR PoE port.
1. Please download and install the latest SADP tool on your computer. You can download from below link: https://www.hikvision.com/en/support/tools/hitools/TS20200826033/
2. Connect your computer to one of PoE ports of NVR with network cable .
3. Running SADP tool to search camera, check device IP address.
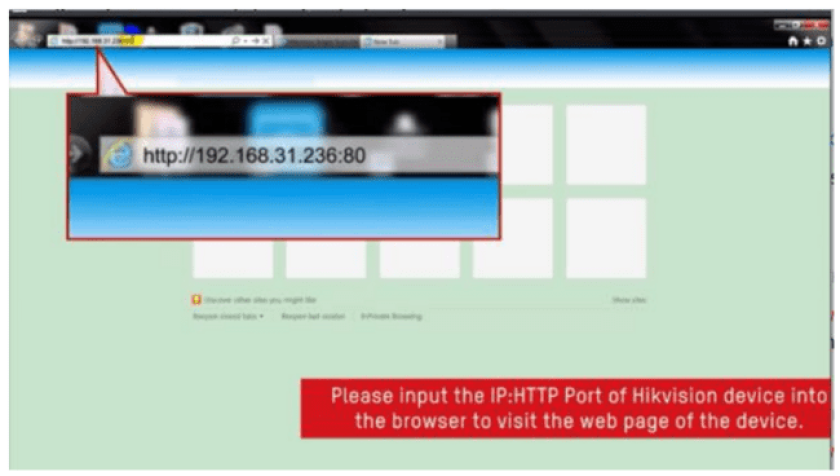
4. Please access camera via web browser as following picture.
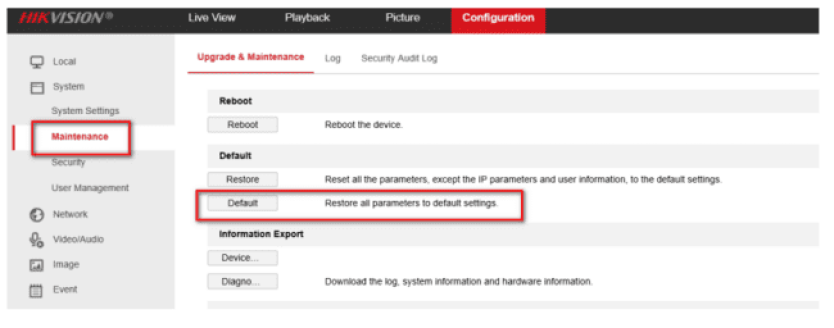
5. Go to Configuration – Maintenance – Default, default camera to factory settings, PoE NVR will automatically active and connect camera.
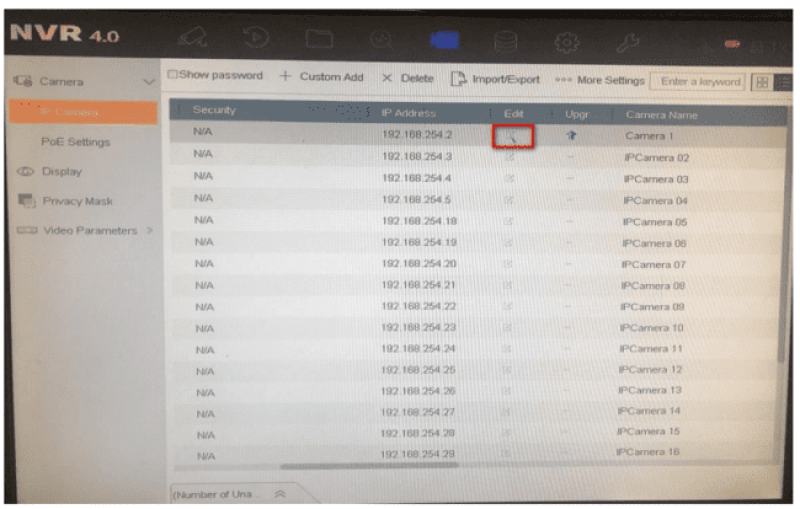
If the camera is connected to the PoE switch, please connect switch to NVR LAN port. The IP address of the camera must be in the same network segment as the IPv4 address of NVR. Then enter NVR Menu- Camera- IP Camera, select camera and click Edit icon.
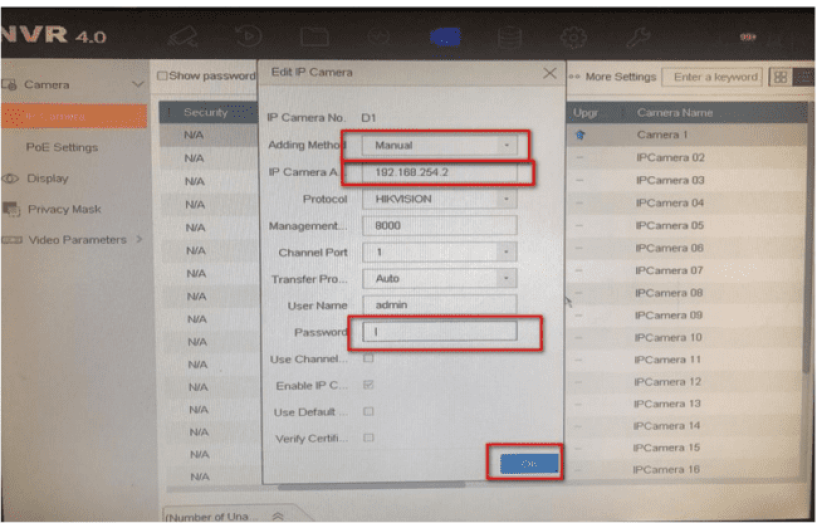
Select Adding mode to Manual, enter camera IP address and correct password, then click OK to add camera.
Scenario 3:
IP camera does not exist
Solution:
“IP camera does not exist” means NVR does not detect the camera input.
Please check whether the camera is properly connected to the POE port of the NVR. You can try to change a shorter cable, change a PoE port or connect a external power supply to IP camera to test.
999
How to Solve Live View Error on iVMS-4200
This document displays how to solve common Live View Error on iVMS-4200. In order to get high performance, please kindly download and install the latest version of iVMS-4200 via the link: https://www.hikvision.com/en/support/download/software/ivms4200-series/
Case 1: HCNetSDK.dll[2]
Case 2: Playctrl.dll[2]
Case 3: HCNetSDK.dll[5]
Case 4: HCNetSDK.dll[91]
999
One Picture to Solve 6 Errors about Unbind
If the bound account can not login and you can not access the device via local GUI, you could try to unbind device from Hik-Connect App or SADP tool.
How to Unbind Device via Hik Connect APP
How to Unbind Device via SADP tool
When you unbind the device and meet errors, hope this picture could help you to solve it.
Scenario 1:
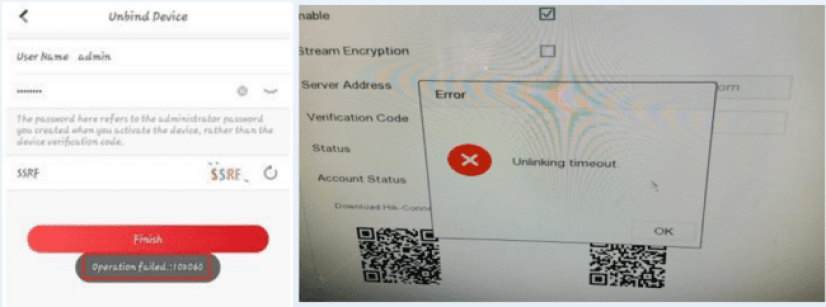
“102060” “102075” or “Unbinding failed. Not support by the device.” on App/SADP or “unlinking timeout” on local GUI
Solution:
1. We recommend you login the previous account to delete the device, then add it to the new account.
2. If the previous account can not login, you could choose third party DDNS name to get remote live view. Please refer this guide: How to Use Third Party DDNS Services V3.0.pdf (hikvision.com)
3. If necessary, please kindly connect the local support team for better solve this issue.
Scenario 2:
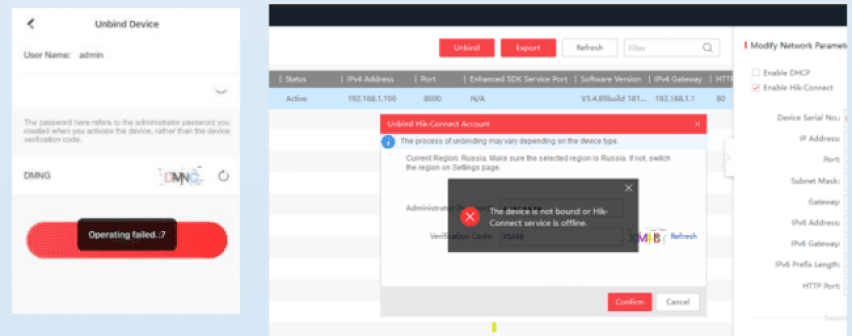
“Operation Failed 7” or “Error code: 99 Network Connection Failed” or “Hik-Connect service is offline”
Solution:
1. Enable Hik-Connect function in device and make device Hik-Connect status is online.
2. If device Hik-Connect status goes online and offline frequently, change to a stable network or upgrade firmware then try again.
3. If the problem persists, contact support to confirm connection status.
Scenario 3:
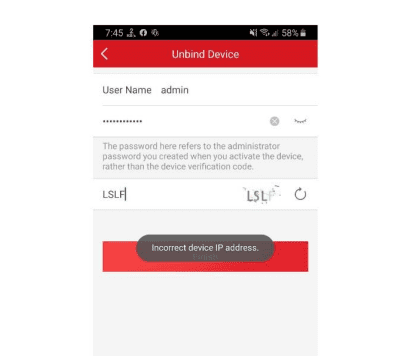
“Incorrect Device IP Address”
Solution:
1. Make sure your mobile/computer connect to the same LAN as device connect to.
2. Connect device and mobile/computer to primary routing network in topological map.
3. Enable UPNP function of the router, try to upgrade device firmware and reboot the device.
Scenario 4:
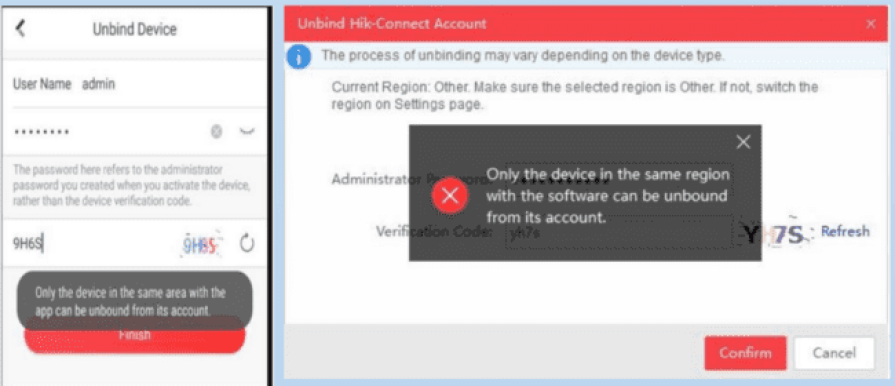
Only the device in the same area with the app can be unbound from its account.
Solution:
Please confirm the area which the bound account belongs first.
1. Via App: Use new account with the same registered area information to unbind.
2. Via SADP: Make sure the geographic location of the device is the same as the area to which the bound account belongs.
3. If you don’t know the area information of the bound account, please contact support team help you confirm or assign registered area information.
Scenario 5:
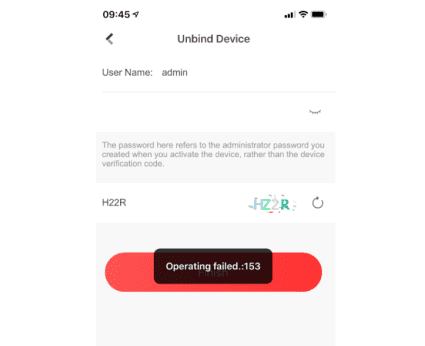
Operating failed: 153
This error caused by inputting wrong password too many times and the user was locked.
Solution:
1. Reboot the device.
2. Modify the LAN IP of the PC or mobile phone and try again.
Scenario 6:
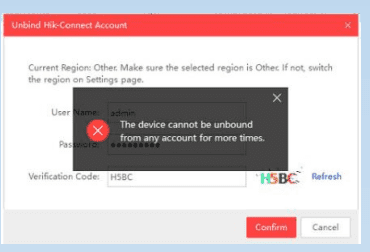
The device cannot unbound from any account for more times.
Solution:
1. This error means the device have been unbound too many times during one day, and you could try to unbind after 24h.
999
Two Steps to Solve No Result of VCA Playback Search
If do VCA search on playback page of Hikvision device and there is no event result, please do the following 2 steps.
Notes: Before searching playback video, make sure you have configured recording schedule on Hikvision device.
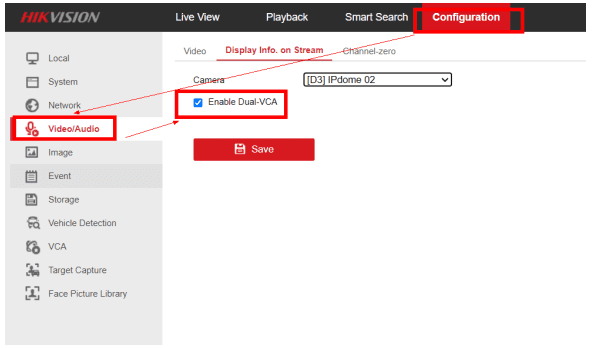
Step 1: Enable Dual-VCA on Web
(a) Login to web page of device as the below picture.
(a) Login to iVMS-4200 and click Setting button – Basic settings
(b) Go to Configuration –Video/Audio– Display Info. on Stream to tick the checkbox of Enable Dual-VCA then Save.
Notes: After above settings, do VCA search via web browser of the camera. If the device is DVR/NVR/HVR, except for configuration on web, we also need to do step 2.
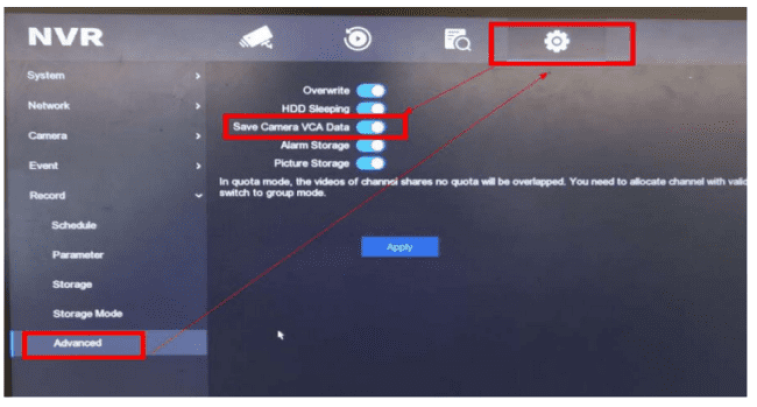
Step 2:
If the device is DVR/NVR/HVR, login local GUI, click Configuration Button – Advanced – enable Save Camera VCA Data.
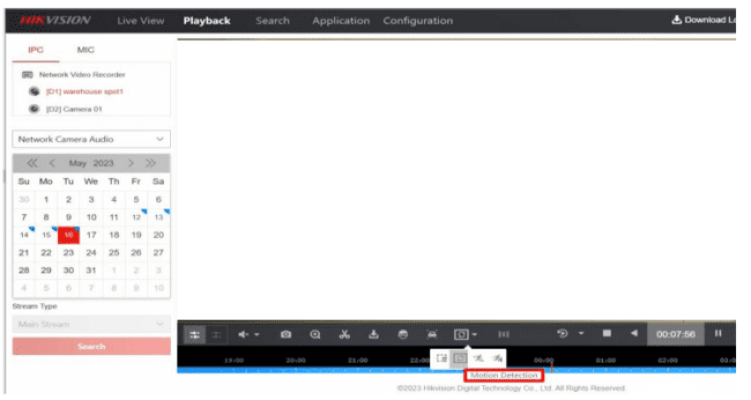
After above settings, search VCA playback as below:
(a) via web browser
(b) via local GUI on DVR/NVR/HVR
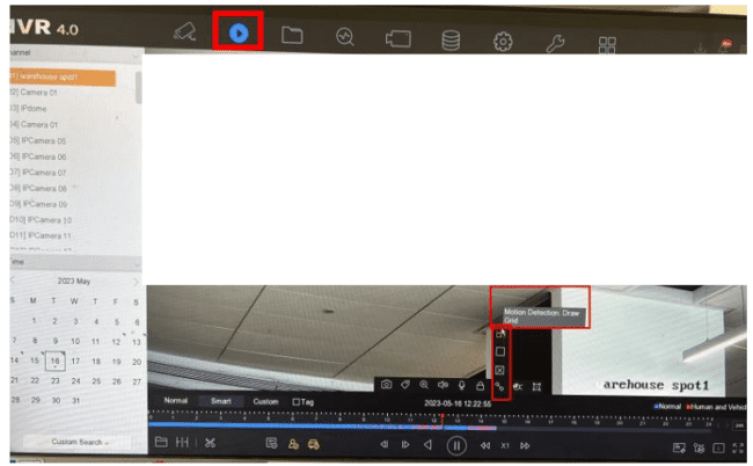
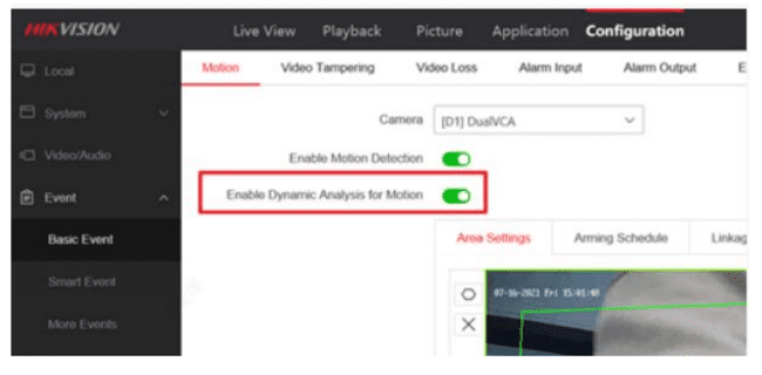
Notes: If search motion detection VCA playback, Enable Dynamic Analysis for Motion is necessary.
999
What Can We do If NVR Cannot View via Chrome
It is recommended to download ivms-4200 on your computer instead of viewing via Chrome browser.
If you want to use Chrome browser to view, download Plug-In first, install it and restart the browser, then you can view via Chrome.
If ‘Download Plug-In’ does not show, it usually means that your NVR does not support live view via Chrome, in this situation, there are mainly 5 ways to solve the issue:
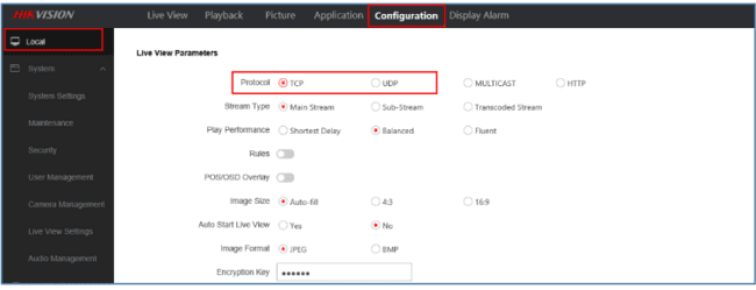
1. Turn to Configuration > Local > Live View Parameters > Protocol. Switch protocol from TCP to UDP, or switch from UDP to TCP, save and view in chrome.
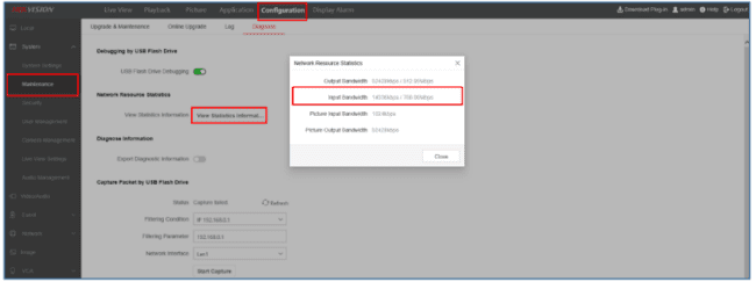
2 & 3. Some devices support to check network resource statistics. Turn to Configuration > Maintenance > Network Resource Statistics. If the previous value of Input Bandwidth is almost equals to the latter value, please reduce bitrate.
For those device which cannot check Network Resource Statistics, you can reduce bitrate and resolution directly for a try.
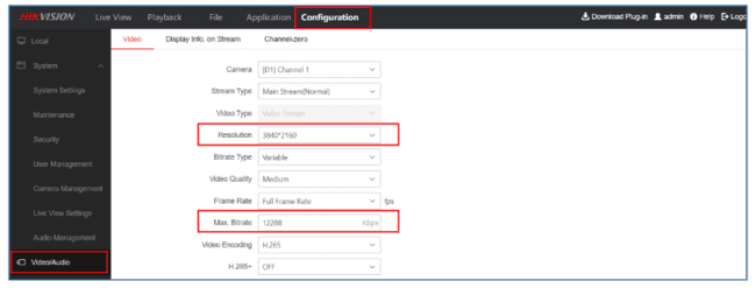
Turn to Configuration > Video/Audio > Video
Reduce Resolution and Max. Bitrate, save and view in Chrome. The reference value are as follows:
Resolution —Max. Bitrate
1080P(2MP) — 4096 kbps
720P(1MP) — 2048 kbps
704*528(4CIF) —- 1024 kbps
528*384 (2CIF) —- 512Kbps
Please set your NVR Video Encoding type as your camera supports, which means if your camera only support H.264 please switch NVR Video Encoding to H.264.
4. If your NVR supports multiple video output interfaces, it is recommended that 1 camera only set 1 output interface. Although the other interfaces you configured and didn’t use, NVR is decoding which will occupy the encoding ability and may cause the issue.
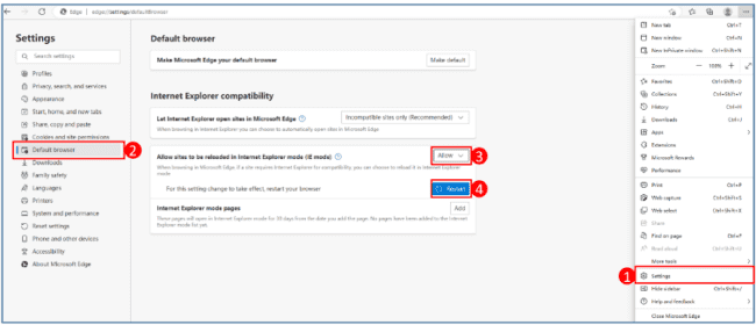
5. Open Microsoft Edge on Windows 10.
Turn to Setting > Default browser > Internet Explorer compatibility Under the “Internet Explorer compatibility” section, turn on the “Allow sites to be reloaded in Internet Explorer mode” toggle switch.
Click the Restart button, then you can view via Edge browser.
If you have done all the above, the issue is still not solved, contact local support and provide the following information:
999
