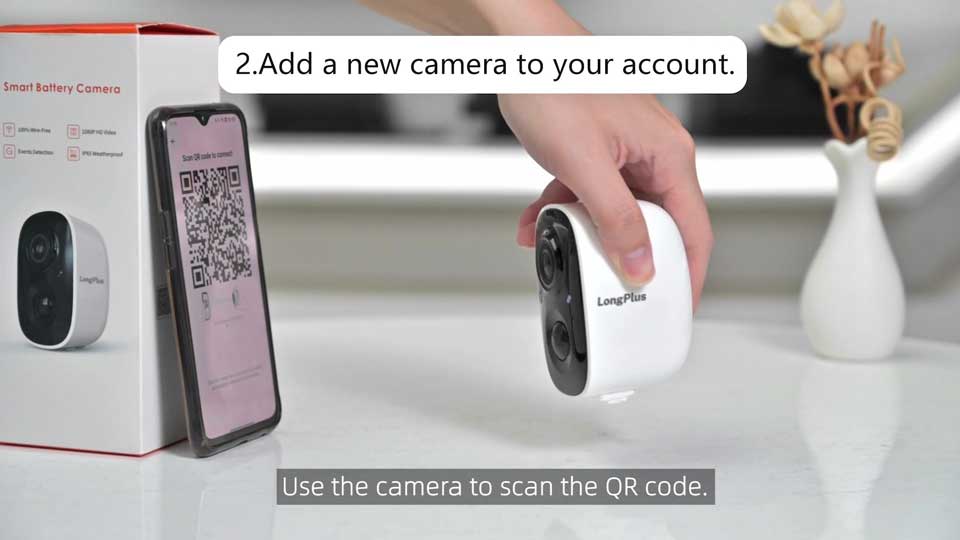
LongPlus Apps FAQ, The LongPlus client is an easy to use P2P network camera video monitoring professional mobile phone client software, connected by a sequence number, the only global P2P network and network cameras installed in the home or office, view real-time video images, and image capture, video. The scene situation users can learn in the shortest possible time home or office. P2P network camera of the software production and the company in the network of cooperation to normal use.
App Download
Simply download the Vichome app from the Apple Store (iOS devices) or Google Play (Android devices) and have full control over all security products. This means that you can monitor your home or property whenever you like.
As a powerful helper, our app will help you stay connected to your home or business when you’re not there and help keep you safe when you are.
NOTES🚩: Vicohome APP is a mobile application and we currently do not provide PC version or iPad version of the APP.
We greatly appreciate your support and welcome to stay tuned for more.
How do download LongPlus App on a PC?
🟠 LongPlus APP is a mobile application. Unfortunately, we currently do not provide PC version and iPad version of the APP. We are developing the web version for use and we greatly appreciate your support and welcome to stay tuned for more.
What is the default language of LongPlus App?
🟠 The default language when LongPlus Home APP is installed follows the system language of your phone, and can be modified manually after installation.
How many LongPlus security cameras can connect to one account?
🟠 One account is capable of 50 cameras maximum. However, we recommend having no more than 12 cameras connected to a single Wi-Fi network to ensure the best connection.
What are the differences between all subscriptions?
🟠 If you have No Plan, you can enjoy 3-day + no more than 0.5 GB cloud storage of recorded videos for free. But you cannot use intelligent features, such as AI Analysis, intelligent notifications, and activity zones. Once you register a LongPlus account, you get the 3-day + no more than 0.5 GB cloud storage of recorded videos automatically.
|
LongPlus Plan |
Basic |
Advanced |
Professional |
|
|
Package privileges |
Privileges |
Unlock intelligent features, such as AI Analysis, intelligent notifications, and activity zones |
||
|
Cyclic storage |
15 days |
30 days |
60 days |
|
|
Cloud storage |
2GB |
4GB |
8GB |
|
|
Monthly package |
$2.99 |
$4.49 |
$7.99 |
|
|
Season package |
$7.99 |
$12.49 |
$22.99 |
|
|
Annual package |
$30.99 |
$48.49 |
$89.99 |
|
Will there be a reminder when the camera battery is low?
🟠 You will receive a notification from the APP when the camera’s battery is below 10%.
Why can’t I receive a verification code when I register the app?
🟠 It is possible to enter the spam mailbox, please check the spam mailbox
🟠 Please check if you have entered the correct email address
If the camera is stolen, can I still view previous records?
🟠 Yes, you can view historical cloud recordings in LongPlus APP, and all cloud recordings that have not been overwritten can be viewed
How can I remove too many reminder messages from the app?
🟠 Mark all APP message pages as read
🟠 Turn off APP message push
🟠 Unconnected the device, uninstall the APP and reinstall the connection
LongPlus Apps FAQ
Read Also : How to Use Camius View app
How to adjust the video time?
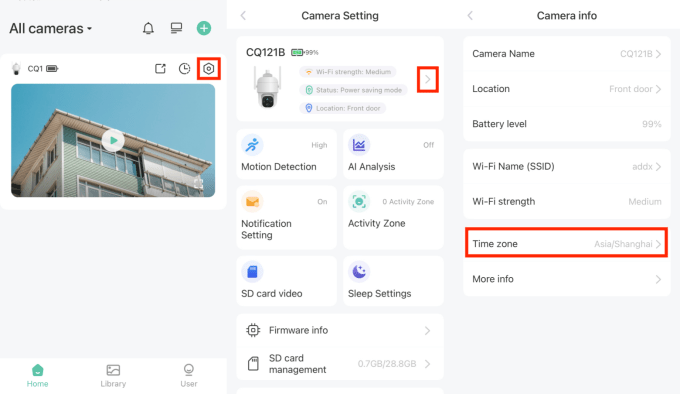
The time in the upper left corner of the video (live video, cloud video, and microSD video) is decided on the time zone where the camera is located.
Usually, the time zone of the camera is the same as the time zone of the phone. If the current time is not what you want, you can adjust it by changing the time zone for the camera.
How to change time zone: tap the camera “setting” icon > tap the “>” extension icon > tap “More info” > tap “Time Zone”.
* If you want to change the time from military time (24-hour) to regular Time (12-hour), we are working on it, stay tuned!
* Currently LongPlus does not support the 12-hour system for mobile phone systems, and there will be abnormal recording problems
How to enable motion detection?
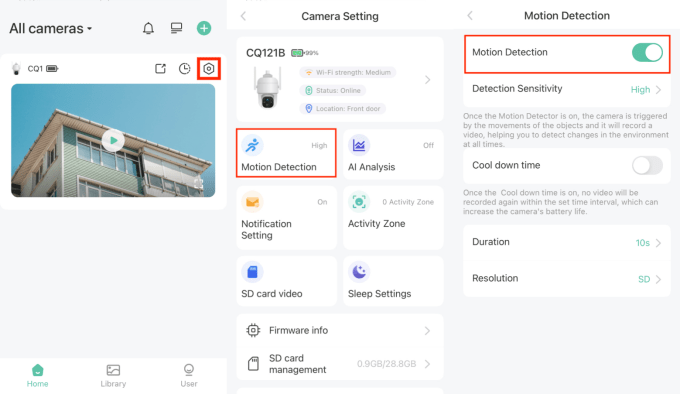
After the motion detection feature is enabled, any movements in the camera’s field of view will activate the camera. Next, the camera will record videos of the movements and notify you of the movements (of course, to receive notifications, you also need to enable “Notification” under the “Notification Setting” page.)
To enable the motion detection feature, please tap the camera “setting” icon > tap “Motion Detection” > enable “Motion Detection”.
How to set the motion detection duration?
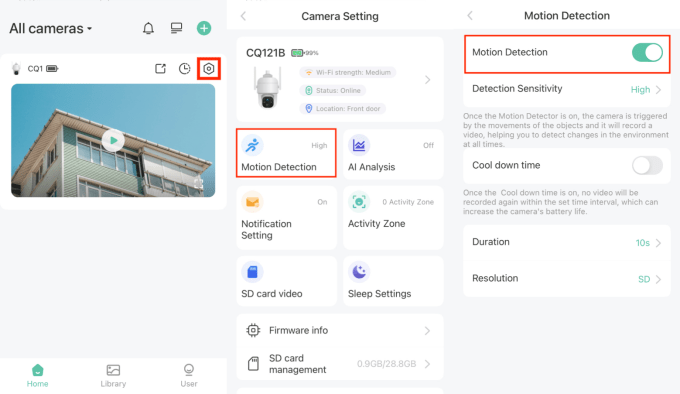
Please tap the camera “setting” icon > tap “Motion Detection” > tap “Duration” and select the duration you want.
How to enable night vision?
After “Night Vision” is enabled, the camera will be able to “see” clearly in the dark. Particularly, it will offer high-quality nighttime images.
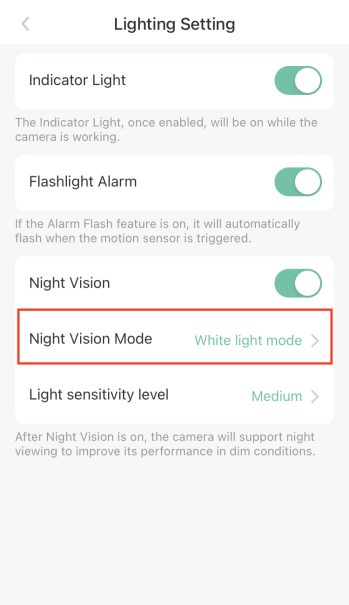
To enable “Night Vision”, please tap the camera “setting” icon > tap “Lighting Setting” > enable “Night Vision”.
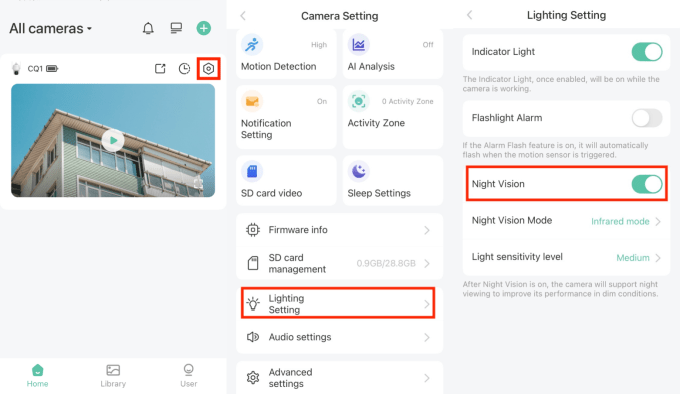
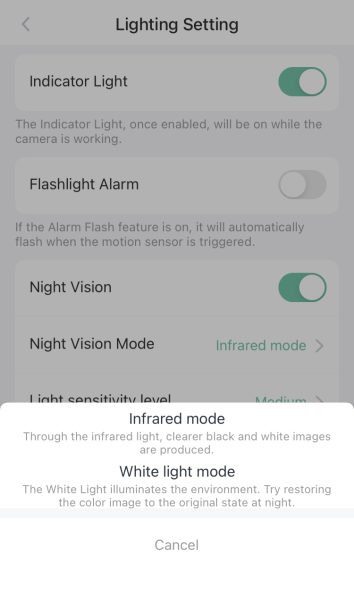
There are two night vision modes, infrared mode and white light mode. The difference between the two modes is in the color rendering of the picture. In infrared mode, the picture is in black and white and is clearer while in white light mode, the color of the picture will be restored to the greatest extent.
How to adjust the sensitivity of night vision?
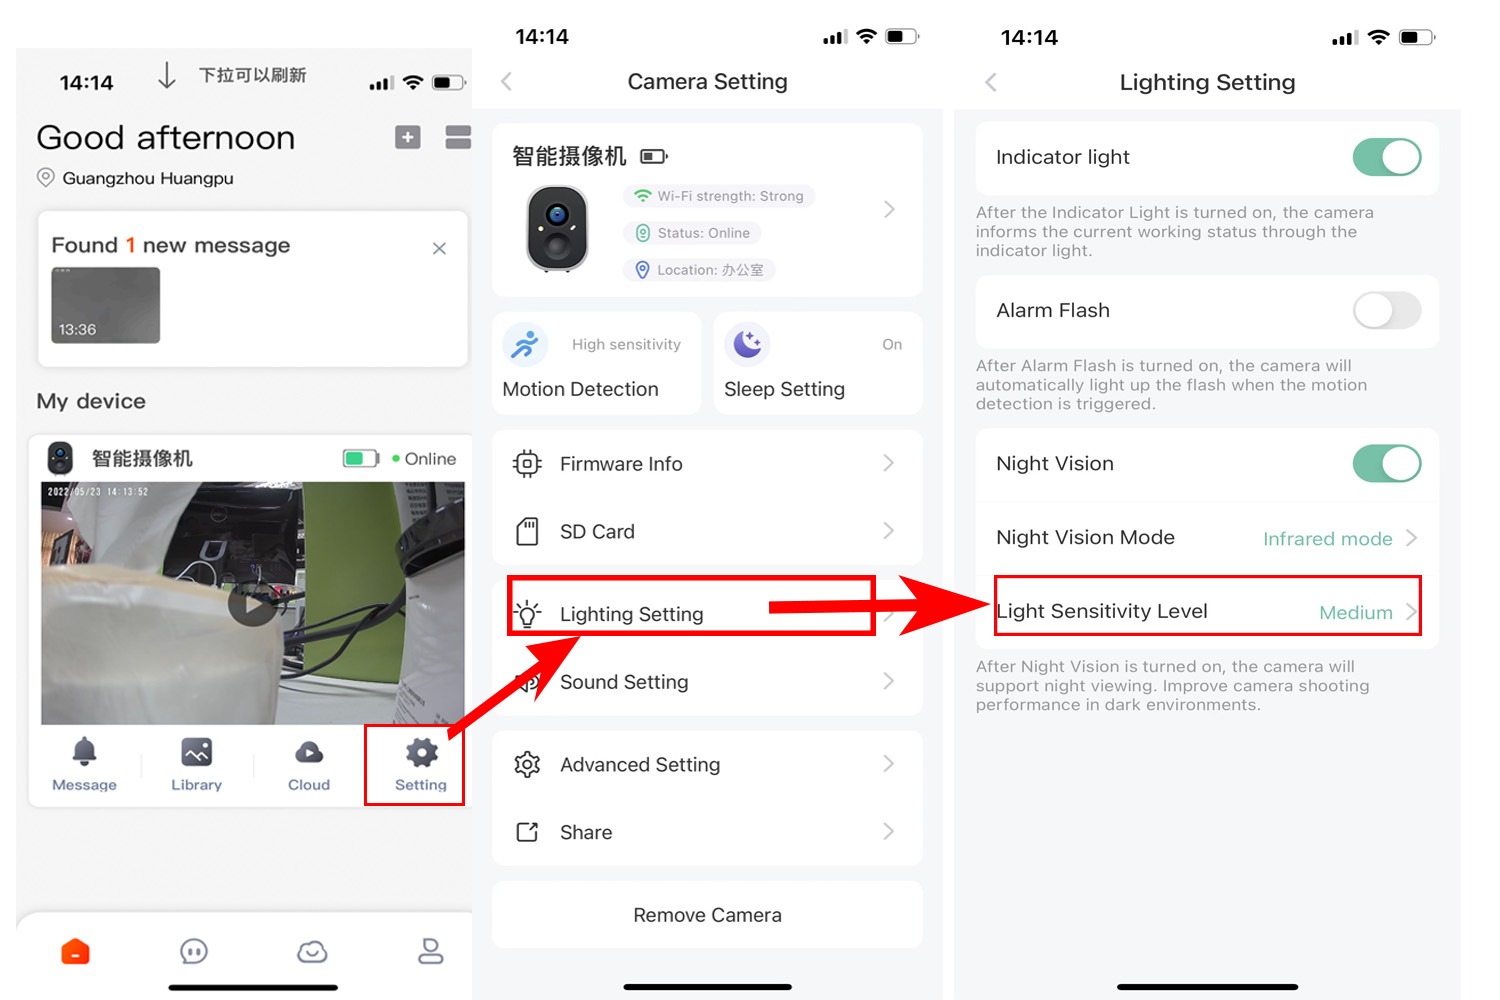
The sensitivity of night vision is actually the sensitivity of the ambient light sensor. The ambient light sensor senses the brightness of the light available around your camera. When it senses that the light is darker than the threshold, the camera will enter the night vision mode. By adjusting the sensitivity, you can control how easily the camera enters the night vision mode. The higher the sensitivity, the easier the camera enters the night vision mode.
To adjust the sensitivity, please tap the camera “setting” icon > tap “Lighting Setting” > tap “Light sensitivity level”.
How to turn on the white light/spotlight?
Important: Most battery cameras have a white light/spotlight. However, for a few battery cameras, they don’t have a white light/spotlight. Neither do the plug-in cameras.
You can tap the camera “setting” icon > tap “Lighting Setting” > enable “Flashlight Alarm”. After that, the white light/spotlight will be flashing for a while once the camera is triggered by any movements. Of course, if there is no “Flashlight Alarm” option under the “Lighting Setting” page, that means that your camera does not support a white light/spotlight.
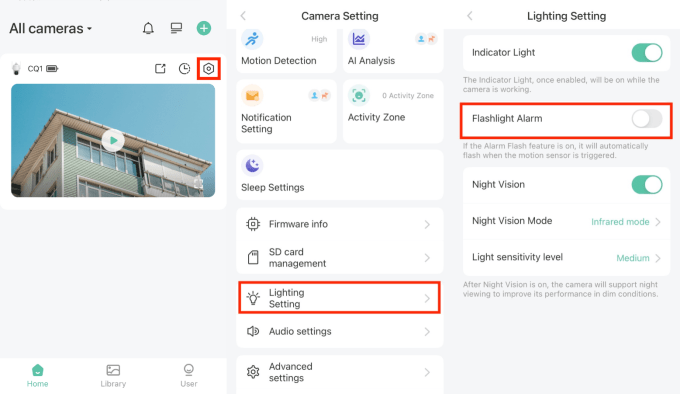
However, if you want the camera’s white light/spotlight to be on constantly in the dark or at night, you can turn off “Flashlight Alarm” and set “Night Vision Mode” as “White light mode” instead.
How to use AI recognition feature?
This is a paid feature, and you need to purchase the Awareness service to use it.
After you purchase the Awareness service, the AI recognition feature is enabled, and the cloud system can be able to recognize people, pets, vehicles, and packages in the video and analyze their actions to send you smart notifications.
These videos will be encrypted and analyzed by an AI algorithm in the cloud server (AWS), and then according to your selection (person/pet/vehicle/package) to decide whether to send you a notification or not.
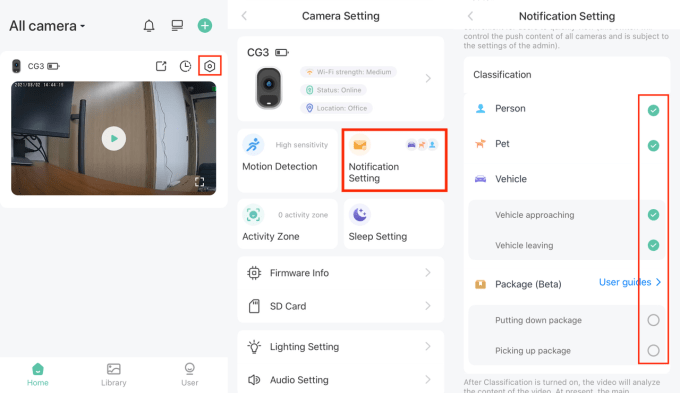
The introduction of AI recognition feature
The AI analysis result comes from encrypted AI algorithm analysis. Once you turn on the classification feature, the camera will analyze the video and you will be notified only when the camera recognizes a person, pet, vehicle, or package. The smart notifications depend on which classification(s) you select.
You can quickly filter out all videos of dropped-off/picked-up/delivered packages by only selecting the corresponding tag.
How to filter out videos with tags?
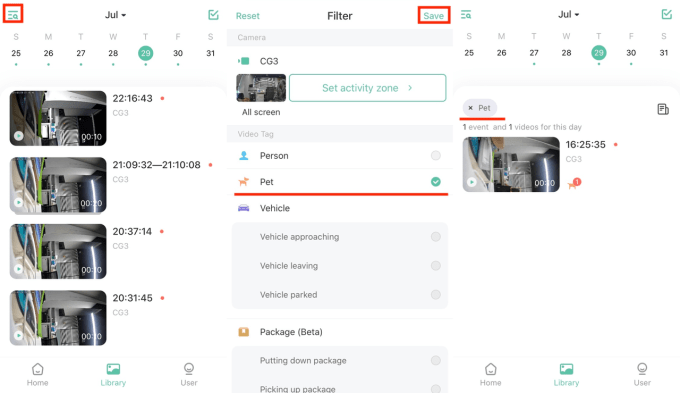
Tap Library tab-> Tap the “search” icon on the top left->select any tag you want to see->tap Save on the top right. Then you will be able to see all recordings made with the tag you select.
Note:
1. Currently, once you purchase the Awareness service, it will apply to all the added cameras.
2. This AI recognition will reduce push disturbances and will help you quickly know the movements.
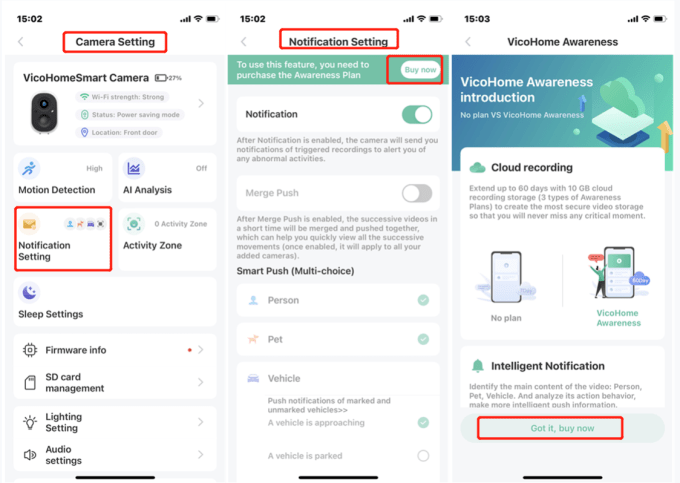
If you want to try the AI recognition feature, please click “No plan” in “User“.
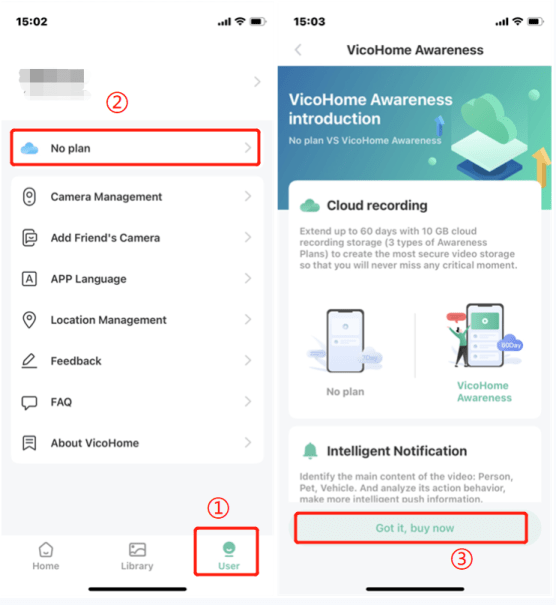
Or you can open Camera Setting to click Notification Setting to tap Buy now.
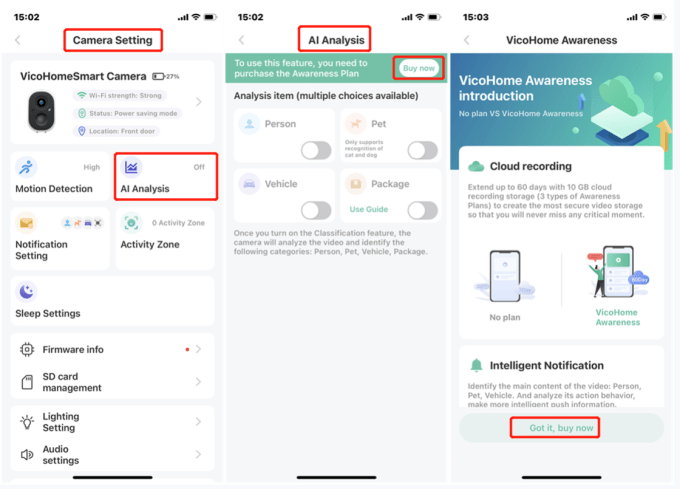
Also, you can open Camera Setting to click AI Analysis to tap Buy now.
If you have any questions, please send us feedback for further assistance.
How to set up the Activity Zone?
This is a paid feature, and you need to purchase the Cloud service to use it.
🟠 Activity Zone is a cloud-based feature that encrypted analyzes the motions and interactions in the set zone using an AWS computing server. It is a feature combined with intelligent push.
🟠 How to set up the activity zone?
You can tap the camera “setting” icon->tap Activity Zone to add/edit/delete activity zones. To add an activity zone, tap + plus icon on the top right. To edit/delete an activity zone, tap the “setting” icon.
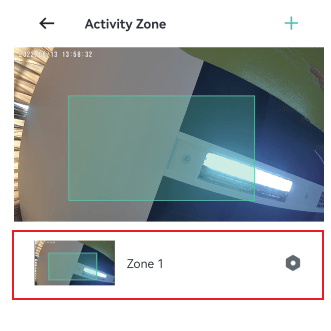
🗒️Notes:
🟠 What will happen if I set the Activity Zone?
What is a package detection feature?
This is a paid feature, and you need to purchase the Awareness service to use it.
Package detection is a technology based on the continuous evolution of algorithms and massive data. When the camera watches the package being picked up or put down, it will notify you of a push message. You can check the status of the package in the push message in the notification bar. The detected package is highlighted by a bounding box in your notification.
How to make Package Detection work?
1.Camera position and distance.
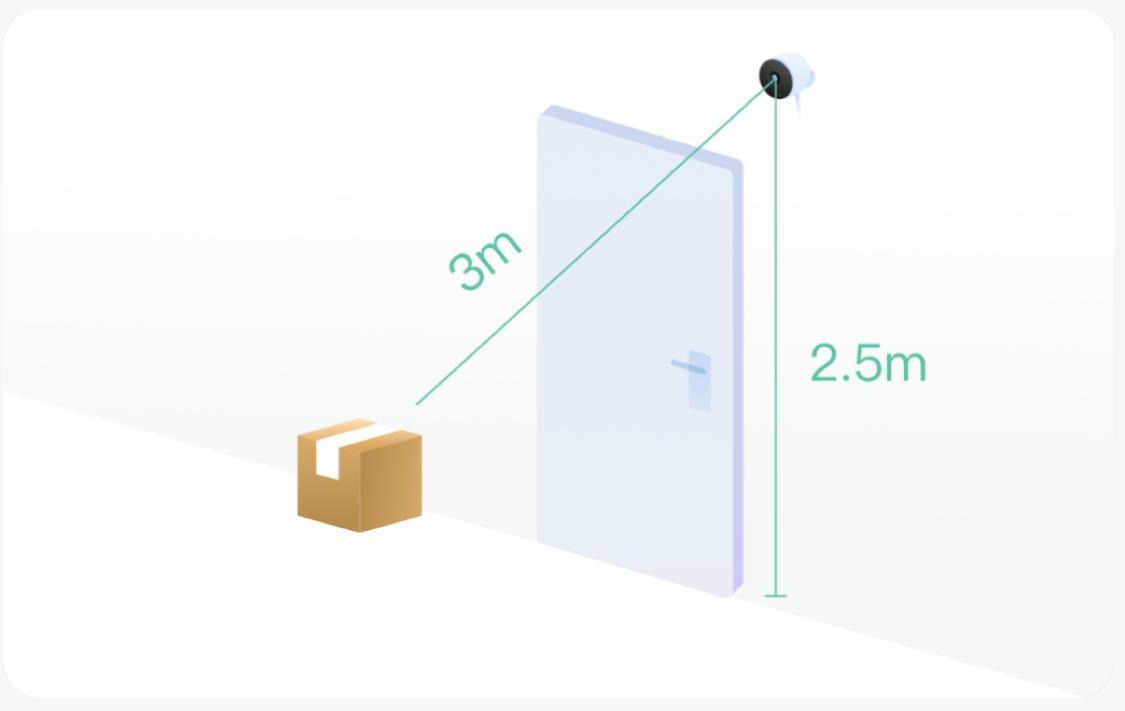
It is recommended to place your camera at a height of about 8 feet( 2.5 meters) and tilt it so that you can see the area where the package is located.
At the same time, the distance between the camera and the package should not exceed 10 feet (3 meters).
After removing the camera for charging or changing the location of the camera, remember to reconfirm whether the package position is accurate.
2.Camera view.
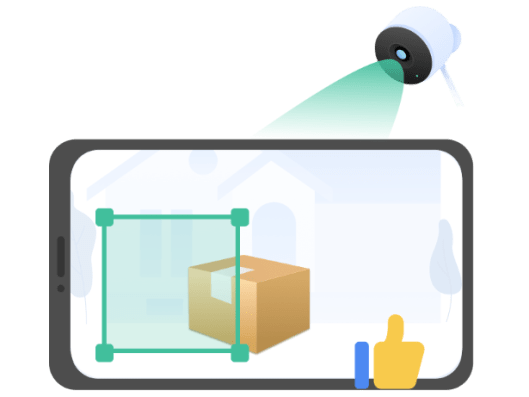
Please make sure that the package is visible in camera view and that it is not blocked by other objects.
At night or in the case of insufficient light, the detection capability is decreased. Please mainly refer to the detection results during the day or under sufficient light conditions.
3.Select package.
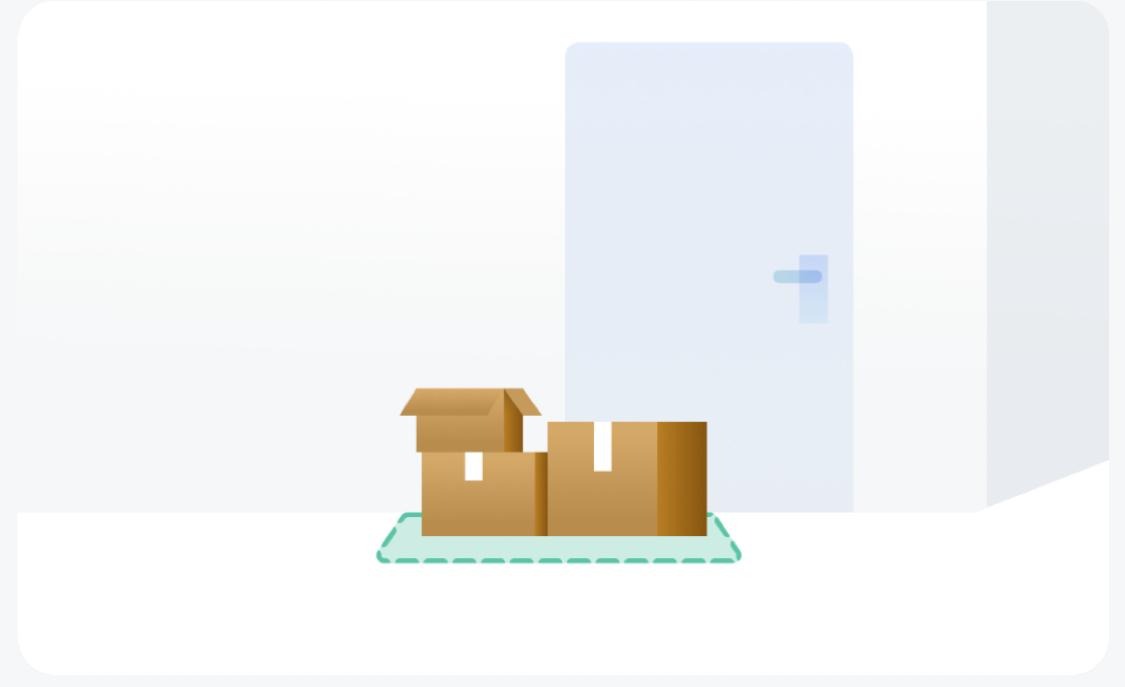
Please don’t forget to select the package in the Notification Settings/ Smart Push.
At the same time, frame the area where the package may appear on the video screen in conjunction with the location of the package on the ground to improve the recognition accuracy of the package.
Tips: The minimum detection size of a package is 8x10x1in (20x25x2.5). It may be difficult to detect a package that is less than the minimum size.
Why sometimes a package cannot be detected?
Package detection is a technology based on the continuous evolution of algorithms and massive data. Sometimes, the detection rate is low. Please check the following reasons:
If you have any questions, please send us feedback for further assistance.
Can the device volume be adjusted?
🟠 Yes, you can tap the camera “setting” icon->tap Sound Setting to enable the siren of the camera, set the voice language and volume for the camera.
How to view the app version?
🟠 To view the app version, please open the app > tap “User” > tap “About us”.
🟠 BTW, if you want to update the app or check whether there is a new version available, you can open the “Google Play” app or the “App Store” app > search for “LongPlus”
Why are notifications delayed?
🟠 There are three steps to receive a motion event notification on your phone.
Usually, all three steps will be completed within a few seconds. However, in some cases, a delay may occur at step 1 or 3.
There may be tens of seconds delay at Step 1. In most cases, this is due to a poor or unstable network connection. Please check and ensure that the Wi-Fi network connection is good and the camera is installed in a place with a strong Wi-Fi signal. Please also select 720p resolution (SD) for video recording to reduce streaming bandwidth.
There may be minutes or even tens of minutes delay at Step 3. Many external factors might cause this delay, such as Apple/Google’s notification server, the phone’s poor or unstable network connection, etc. Most of the time, it can return to normal after a while.
🗒️ Note: For some brands of Android phones, to fix the delay, you must add our App to the battery-saving whitelist in your phone’s Settings. It’s because the battery management of these Android phones will kill all background running apps, causing the apps to fail to receive the notifications from Google(Android) notification server in time.
How to add our App to the battery-saving whitelist: Go to your phone’s Settings > Apps > Our App > Battery > Battery optimization > Don’t optimize.
Why can’t I receive notifications?
🟠 The failure to receive notifications may be caused by the following reasons, please check one by one:
(1) The LongPlus app is not granted “Notifications” permission. When the “Notifications” permission is not allowed, your phone isn’t able to receive any notifications from LongPlus app. Please open the Settings app on your phone > find/search for “LongPlus” > tap “Notifications” and enable it.
(2) The “Motion Detection” feature is not enabled. When “Motion Detection” is disabled, the camera isn’t able to be triggered by any movements, let alone notifications. Please open LongPlus app > tap the camera “setting” icon > tap “Motion Detection” > enable “Motion Detection”.
(3) The “Notification” feature is not enabled. When “Notification” is disabled, the camera is only able to record videos of the movements but isn’t able to send notifications to your phone. Please open LongPlus app > tap the camera “user” icon > tap “Message” > enable “Notification”.
(4) The camera’s Wi-Fi connection or your phone’s network connection is poor or unstable. Please check and ensure that both your camera’s Wi-Fi connection and your phone’s network connection are good for receiving notifications.
Why are notifications delayed after purchasing a plan?
🟠 When you have no plan, there are three steps to receive a motion event notification on your phone.
However, when you purchase a plan, there will be one more step between Step 1 and Step 3. That is: The motion event is been analyzed by the AI algorithms in the cloud to decide whether to send the notification or not. For example, if you select “Person” under the “Notification Setting” page in the app and the camera recognizes a person in the motion event after analysis, it will decide to send the notification, and vice versa. That’s exactly why you may feel a little longer to receive a notification after paying.
How to cancel automatic renewal?
🟠 For iOS users, to cancel the automatic renewal, please manually turn off the automatic renewal in iTunes/Apple ID settings at least 24 hours before the expiration time of your subscription. You can cancel it in iCloud payments, Setting – iTunes Store & App Store – Apple ID – View Apple ID – Account – Subscription, find our App, and close.
🟠 For android users, to cancel the automatic renewal, please manually turn off the automatic renewal in Google Play Store settings at least 24 hours before the expiration time of your subscription. You can cancel it in Play Store payments, Mine – Subscription, find our App, and close.
🗒️ Note: If you cancel within 24 hours before your service expires, you will still be charged for the next subscription period. The subscription service will end at the end of the next subscription period.
Remember the password when logging in
🟠 Please click the Remember Password button below your account password.
When you check the 「Remember password」 option, we will encrypt and store this information locally on your phone. After you check this option, you don’t have to enter the password again when you log in next time. Please be assured that the information will not be passed on. You can also choose not to check this option, we will not record locally, and you need to enter the password again when you log in next time.
Remember Wi-Fi name and password after successful connection
🟠 When you select the “Remember Wi-Fi name and password after successful connection” option, we will encrypt and store this information locally on your phone, and will not transmit it to the outside. You can delete this information at any time.
How to reset the password?
🟠 Currently, there are two ways to support password resetting.
(1) If you remember the current password, please click your account avatar in the “User” Section > tap “Change password” and follow the instructions on the page to reset your password.
(2) If you have forgotten your current password, please click “Forgot your password?” in the login page, then you need to enter the e-mail/phone of your account to accept the verification code. After entering the correct verification code, you can reset your password.
🗒️ Note: The password must contain at least one uppercase letter, one lowercase letter, and one number, and the minimum length of the password must be 8 characters.
Why is a log-in prompt message indicating no account has been registered, although the account has been registered?
🟠 The following reasons may lead to the error prompt. Please check them one by one:
(1) Please confirm whether to select the corresponding country.
(2) Please make sure the account and password you entered are correct.
(3) Spelling error. Please ensure your account and password are spelled correctly. A misspelling may result in an account that doesn’t exist.
Why is the connection unsuccessful after scanning?
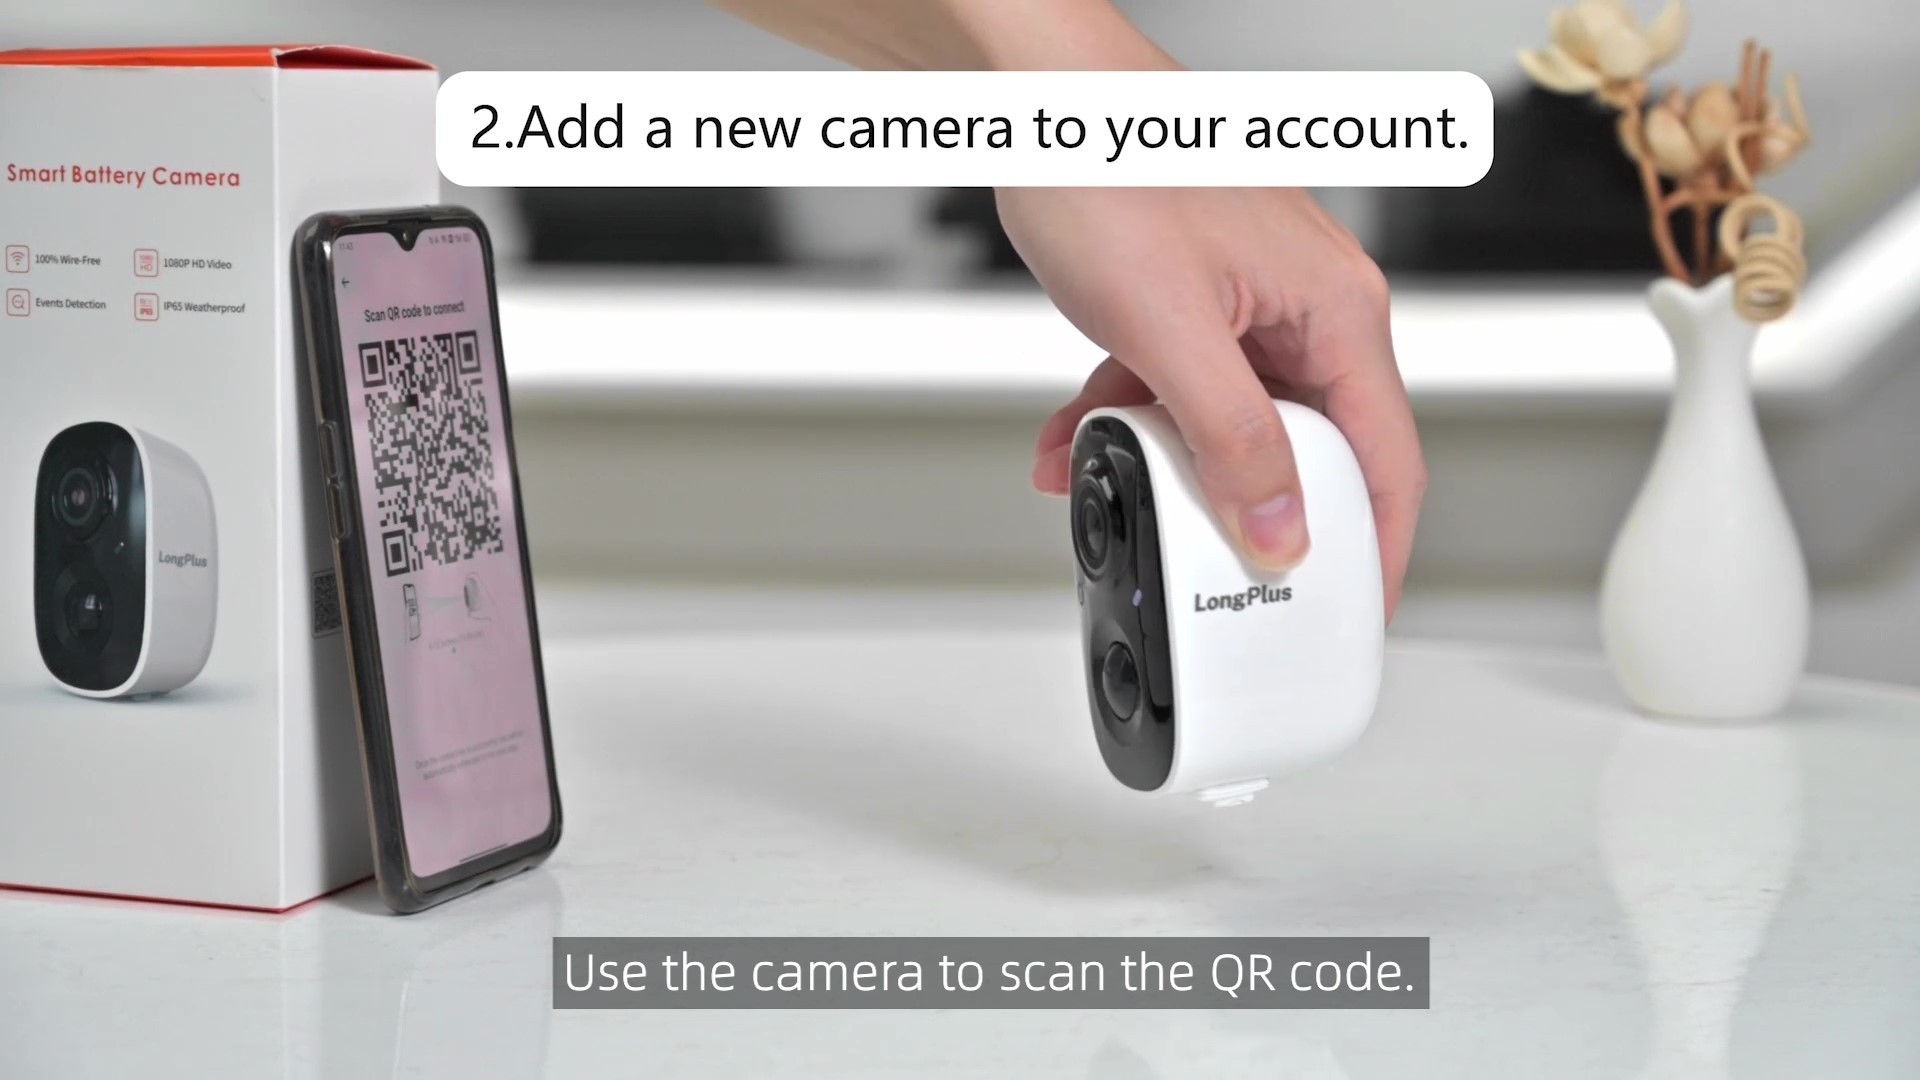
If the camera cannot scan the QR code generated by the app, the reasons may be as follows. Please check them one by one.
🟠 Camera is not in scan mode (continuous “ding dong ding dong” sound)
🟠 The camera lens is dirty. Please peel off the plastic protective film first. If your camera’s lens is dirty, clean it. Please avoid leaving fingerprints on the camera lens.
🟠 The camera cannot find the focus of the QR code
🟠 Make sure the phone and camera are aligned, then slowly move the camera back and forth to the QR code on the phone to find focus.
🟠 The distance between the camera and the phone should be 6-12 inches (15-30 cm).
🟠 Please do not scan the QR code in a backlit or dark environment.
If the problem persists, please submit feedback on the app for further technical assistance.
What should I do if the camera reports an error after scanning the QR code?
🟠 The camera reports a “Wi-Fi SSID not found” error
The camera only supports 2.4GHz Wi-Fi. Please make sure to connect the camera to 2.4GHz Wi-Fi.
Please make sure the Wi-Fi signal is present and working. You can try to connect Wi-Fi to your phone, if you can get online normally, it means Wi-Fi is working properly.
This error may be caused by the camera being too far away from the Wi-Fi router. Please place the camera near the Wi-Fi router or as close as possible to the Wi-Fi router.
It is recommended that the Wi-Fi SSID (name) does not contain special characters or is too long. If the Wi-Fi SSID (name) contains special characters or is too long, try simplifying the Wi-Fi SSID and try again.
🟠 The camera reports a “Wi-Fi password error” error
Please double check the password you have entered and make sure it is correct. Note special characters such as spaces.
It is recommended that the Wi-Fi password not contain special characters or be too long. If the Wi-Fi password contains special characters or is too long, try simplifying the password and try again.
🟠 The camera reports a “Cloud service connection failed” error
If the camera reports a “cloud service connection failed” error, it means the camera cannot establish a connection with the cloud server.
Please make sure your Wi-Fi router is connected to an available network. You can try to connect Wi-Fi to your phone, if you can get online normally, it means Wi-Fi is working properly.
If yes, but the problem persists, restart the Wi-Fi router and try again.
If the problem persists after restarting the Wi-Fi router, it is likely that the Wi-Fi router is subject to some restrictions. In this case, you can try the following:
Unrestrict the Wi-Fi router: enter the administrator address of the router in the browser address bar (usually the administrator address will be written on the main body of the router) > enter the administrator password to enter the management site > click LAN > click DHCP Servers > Under “DNS and WINS Server Settings” set Server 1 to 8.8.8.8 and Server 2 to 8.8.4.4.
If possible, reset and reconfigure your Wi-Fi router Or try connecting the camera to another Wi-Fi.
🟠 The camera reports an “authentication error” error
This error may be caused by an unsupported authentication method for the router.
Please set the authentication method of the router to WPA-PSK or WPA2-PSK. Please note that the camera only supports the AES encryption algorithm, not the TKIP encryption algorithm.
The error can also be caused by special authentication methods like SMS/Web authentication being enabled.
Please disable any special authentication methods such as SMS/Web authentication.
If possible, try connecting the camera to another Wi-Fi.
🟠 The camera reports a “timed out retrieving IP” error
The error may be caused by the router’s DHCP server not being enabled.
Please enter the administrator address of the router in the browser address bar (usually the administrator address will be written on the main body of the router) > enter the administrator password to enter the management site > click LAN > click DHCP server to make sure the DHCP server is enabled And the IP pool address is set correctly.
The error may also be due to too many devices connected to the router, so the camera cannot obtain an IP address from the router.
Please try restarting the router and try connecting the camera again.
If possible, try connecting the camera to another Wi-Fi.
If the camera does not report anything, or if you are still unable to connect to the camera after trying the listed solutions, please submit feedback on the app for further technical assistance.
Why can’t I find the QR code on the camera body?
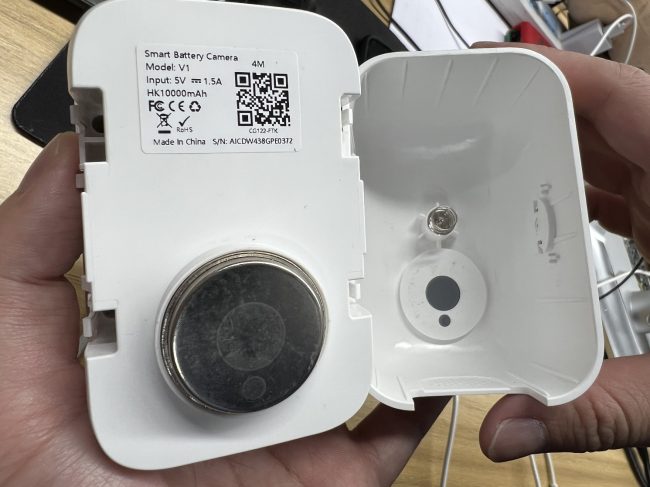
🟠 The QR code on the camera body includes the model number and serial number of the camera. It’s usually affixed to the camera’s sticker.
🟠 You can find it behind the camera.
🟠 With some (special) models, you may need to remove the camera’s case to access it.
For other models, there is no QR code on the camera body. In this case, you can directly submit feedback for further technical support.
Why do images/pictures look blurry?
The following factors may cause blurred images/pictures. Please check them one by one.
To get a clearer live image, you can click the “Full Screen” icon in the bottom right corner of the live window > click “SD” and change it to “HD”.
To get a clearer playback/recording image, you can click the camera “Settings” icon > click Motion Detection > click “Resolution” > choose “HD”.
Note that HD will use more network data (bandwidth) and will consume more battery power.
