How to Use Motion Detection in ACTi Cameras Motion Detection (MD) is a common video analytics function that is supported by most of the IP cameras in the market with the purpose of detecting moving objects (people, vehicles) in the view of the camera and taking necessary actions.
How to Use Motion Detection in ACTi Cameras
Motion Detection (MD) is a common video analytics function that is supported by most of the IP cameras in the market with the purpose of detecting moving objects (people, vehicles) in the view of the camera and taking necessary actions.
The motion detection system inside the IP camera is able to analyze the video frames and decide whether there has been any motion in the user defined region that has exceeded the allowed limit of speed and size. Whenever motion occurs and triggers alarm, the camera can either execute several responses to the alarm directly or notify the video management system (NVR, CMS) in the control site and let the control site respond to the events.
Motion detection system is one of the many advantages of IP cameras over analog cameras. The analog camera is just the “eye” and cannot analyze motion on the video. All the motion analysis has to be done on DVR side, creating the following risks – the failure of DVR would disable the motion detection capability for all channels of the same site while in case of IP system each camera is independent from NVR – they can detect motion and handle the responses directly and instantly regardless of the status of NVR.
Furthermore, since every IP camera has its own “brain” to analyze video stream, there will never be computing power limitation issues and consequently false or missed motion detection alarms that may occur in case of DVR based motion detection systems.
This article introduces the motion detection system of ACTi cameras, including the configuration advice and the management of motion triggered events.
How to Configure Motion Detection
Configuring motion detection system inside the camera is very easy – use Internet Explorer browser (version 6.0 or newer) and access the camera’s web interface by typing the IP address of the camera to the browser’s address bar.
How to Use Motion Detection in ACTi Cameras
Read Next :
Upon successful connection you will be asked for the user name and password (default: Admin/123456). When you log in, you may notice that the user interface of ACM-series cameras looks different from TCM-series cameras. This article uses the user interface of the ACM-series camera for explaining the motion detection system. You can find the same motion detection settings in TCM-series cameras as well.
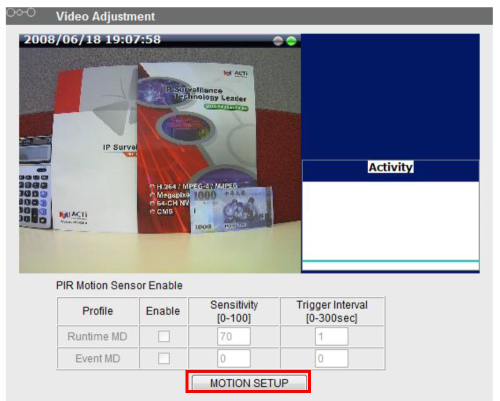
Find the item Video Adjustment in the menu of the ACM-series camera. A popular cube camera ACM-4201 is used in this article to demonstrate all the functions of the motion detection system.
» Video Setting
» Video Adjustment
» OSD/Privacy Mask
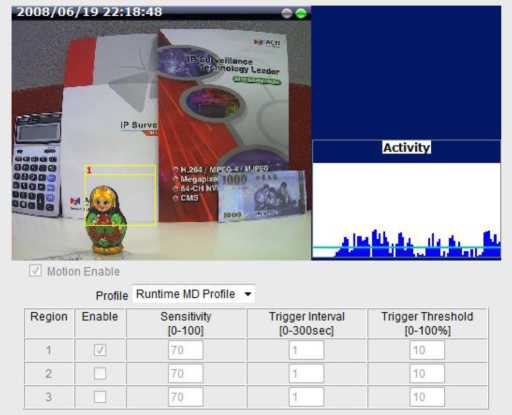
Once you have entered the video adjustment page, you will see live video together with motion activity panel. There is no activity shown in that panel because the motion detection system has not been enabled yet. Press “Motion Setup”.
![]()
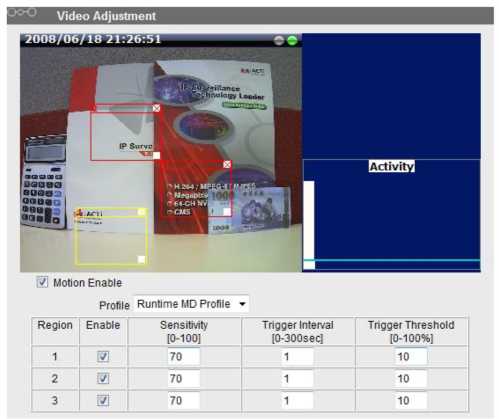
After that, enable the motion detection system by checking “Motion Enable”.
There are three independently configurable motion detection regions in ACTi cameras. Each motion detection region has 6 configuration parameters:
- Enabled or disabled
- Location of the reg ion
- Size of the region
- Sensitivity
- Trigger threshold
- Trigger interval
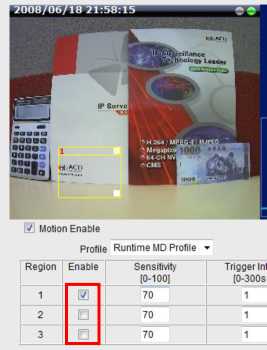
Each of the 3 motion detection regions can be enabled or disabled individually. Look at the example: Only the region 1 is enabled while 2 and 3 are disabled. The disabled regions disappear from the video display.
Note that the number of the motion detection region is written in the upper left corner of the region.
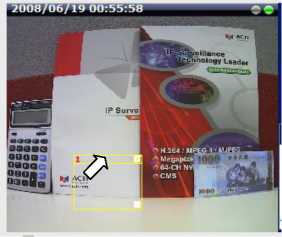
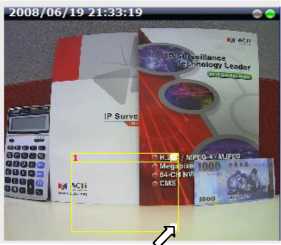
You can move the motion detection region anywhere on the field of view by dragging the top of the motion detection rectangle as shown on the image. The motion detection regions may even be overlapping if you like.
By dragging the lower right corner of the motion detection region you can change the size of the region. The maximum size of the region can even be as big as the whole screen.
Sensitivity is the parameter that helps us to distinguish actual moving targets (people, vehicles) from the slightly moving background, such as leaves of the trees waving in the wind. In order to avoid false alarms, we might want the camera be able to ignore small motion.
The higher is the sensitivity level of the camera the smaller shift of the object is needed to trigger the alarm. For example, if the object within motion detection region has moved for about 1-3 pixels during two video frames, then such small motion will be discarded by camera if the sensitivity is low, and will still trigger an alarm if the sensitivity is high. In other words, you can think of sensitivity level as a reversed speed limit – the smaller is the sensitivity, the faster are the objects allowed to move without being detected.
The biggest challenge of motion detection configuration is to find the settings that do not produce false alarms and at the same time do not miss any actual intrusions. The rule of thumb is: the sensitivity should be as high as possible while not producing false alarms. The default sensitivity level of ACTi cameras is 70 (on a scale of 0-100) and it is a good setting for most standard cases.
Trigger threshold
Look at the moving object entering the area of motion detection: although moving quite slowly, it caused motion activity – several pixel regions reported a motion that was faster than allowed “speed limit” of sensitivity (70).
The blue graph on the right side of the image shows how many percent of pixels within the motion detection region were considered as “currently in motion”. The activity panel itself is a timeline – for each moment of time you can see the height of the blue bars.
You may notice that at certain moment the tallest bars in the activity graph reached about 25% (a quarter of the total height in activity panel) – it means, 25% of this motion detection area were filled with moving pixels at that moment. By visual observation you can also see that the object standing inside the motion detection region indeed covers about 25% of its size.
What if the object is really small but moves rather fast (gets triggered by the current sensitivity level)? For example, we want to detect people but not the cat walking in the room. Although both people and cat may move with the speed that will trigger motion, they have different size of triggered pixels.
For example, a human passing by the motion detection region will trigger 25% of pixels in that region while the cat would trigger only 2%. Since we want to have a real alarm in case of human or vehicle passing by while ignoring birds, cats, butterflies, mice, etc, we need a filter that can define how many percent of triggered pixels will be considered as a real alarm.
This parameter is called trigger threshold. The default value of trigger threshold is 10%. It means, only the objects that are bigger than 10% of the motion detection region size and move faster than allowed by sensitivity level (70) will produce actual alarm.
How to choose the most optimal trigger threshold level? The rule of thumb, keep the trigger threshold as small as possible while not causing false alarms by the moving objects that are not humans or vehicles.
You can have different sensitivity level and trigger threshold level for each motion detection region.
In order to understand all of the above even better, please refer to the table below containing four possible combinations of settings using sensitivity level and trigger threshold percentage.
The objects listed in each cell will trigger an alarm under given settings:
| Low threshold (0-5%) | High threshold (5-100%) | |
| Low sensitivity (0-65) | Big and fast «Mg
Small and fast |
Big and fast «Ms |
| High sensitivity (65-100) | Big and fast «Ms
Big and slow Small and fast Small and slow |
Big and fast «Ms
Big and slow |
ACTi camera’s default sensitivity is 70 and threshold is 10%. By these default values, only the rabbit and the turtle would trigger an alarm while the butterfly and the snail would be ignored by the motion detection system.
Important: Please remember that changing the size of the motion detection region has an impact on the threshold – the bigger is the size of the motion detection region the smaller should be the threshold value if you want the same object size to trigger motion.
For example, if you increase the motion detection region to twice the previous size, please remember to reduce the threshold to half its original value (from 10% to 5%). On the other hand, changing the location of the motion detection region has no impact on threshold.
The last configuration item is the trigger interval. It is the time period from the beginning of the triggered event during which the all motion activities are ignored by the camera. This is designed to avoid needless repetitive reporting of the same intrusion.
Trigger interval 20 seconds would mean that when the even happens, camera will take certain one-time actionsand ignore the continuing activity in the motion detection region for 20 seconds. When 20 seconds are over, the camera will produce a new alarm if there are still action in the motion detection region, and take actions again.
There is one more item on the Motion Detection configuration page which was not explained above – the Profile of Motion Detection. Think of them as Profile 1 (Runtime MD Profile) and Profile 2 (Event MD Profile).
It means that you can configure two independent groups of Motion Detection regions with at most 3 regions in each group. Normally, the Profile 1 (Runtime MD Profile) is used as an active profile of the camera. However, in some cases it is possible to let the camera switch to Profile 2 by using the Event Handler system of the camera.
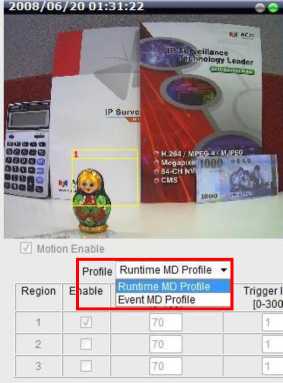
For example, you might want to have different motion detection regions and parameters for day and night time. Then the two profiles become really handy. In such case, remember to configure the motion detection regions for both profiles before moving on to configure the event response system.
How to Manage Motion Detection Events by Firmware
In order to make the motion detection system meaningful, you also need a system that can handle the motion triggered events and take necessary actions, such as start recording video, send video or snapshots to FTP server or e-mail, send notification e-mails, play alarm sound, change camera’s settings, command other IP devices, activate alarm devices through digital output of the camera and much more.
If your camera’s motion detection regions have been fully configured then you can set up the event response system. You can do it either by using the Event Handler that is part of the camera’s firmware or use a software in remote PC instead.
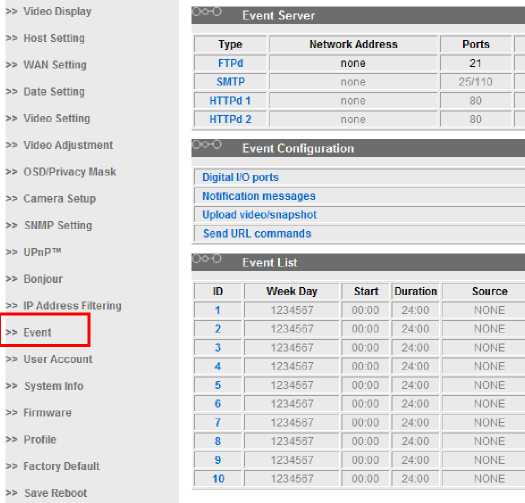
This chapter introduces the use of Event Handler. You can find the Event Handler under the item “Event” in the firmware menu.
The benefits of using Event Handler is the convenience – you do not need any other software at all. The camera can handle everything by itself.
When motion is detected by the camera, the Event Handler can be configured to take following actions without needing any additional software:
- Send video or snapshots to FTP server
- Send snapshots or text to e-mail
- Save video or snapshots to camera’s MicroSD card (if camera has local storage)
- Activate external devices through digital output of the camera (siren, door locks, etc)
- Go to PTZ preset point or tour (if the camera has PTZ function)
- Command other IP cameras (change their settings or PTZ position)
- Send URL command to any PC based web server
- Change the day and night mode
One of these possible responses is explained below. Please note that the Event Handler functionality range is actually even wider than that – in addition to accepting motion detection events, it also accepts events by Passive Infrared Sensor and events by external devices through digital input (smoke detector, glass break detector, window or door magnet, etc).
It even allows users to create scheduled events – for example you might want the camera to send snapshots to FTP in a specific time of the day regardless of the activity in the camera site.
The switch from day to night can also be used as a trigger for Event Handler and one of the possible responses to that could be the change of motion detection profile (different motion detection regions, sensitivity and threshold for night time surveillance).
However, this article focuses only on motion detection as the trigger of the events and on several possible responses to the events. For more detailed information about Event Handler please refer to the Event Handler Guide in ACTi Knowledge Base.
Send Video or Snapshots to FTP Server
Before you create the event response rule, please make sure that the Motion Detection system has already been configured and the FTP server is installed and running properly. If you do not have FTP server installed yet and you need some advice then please read the Appendix 1: How to Install FTP Server for detailed instructions.
Now, it is time to configure the event response in Event Handler of the firmware. There are 3 parts to configure here:
uploadable content and destination)
Let’s begin with the first one – configuring the
FTP account related settings.
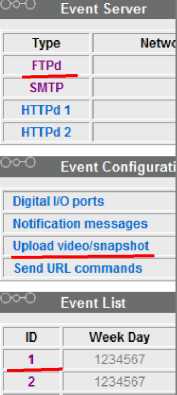
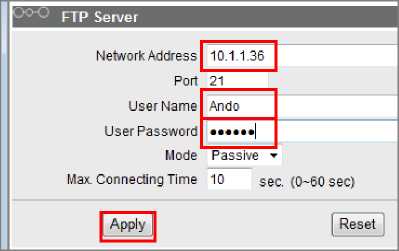
Type the IP address of the FTP server together with user name and password. For the other settings, you can keep them as they are. (port 21, passive mode, max connection time = 10).
» Video Display
» Host Setting
» WAN Setting
» Date Setting
» Video Setting
» Video Adjustment
» OSD/Privacy Mask
» SNMP Setting
» UPnP™
» Bonjour
» IP Address Filtering
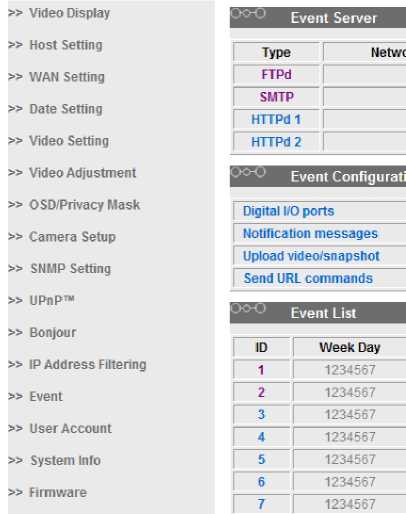
» Event
The 2nd step is to define the uploadable content.
Remember to check “Enable Video/Snapshot 1”.
If you would like to test the video streaming to FTP first, then click on the radio button named “Video”, and select Upload image to “FTP Server”.
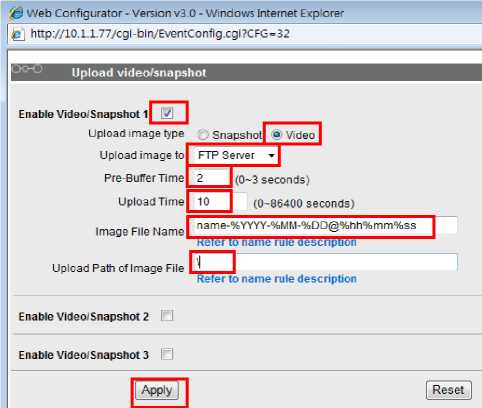
The video from 2 seconds (Pre-Buffer time) before the event is triggered will be recorded until 10 seconds (Upload time) after the event is triggered.
You may use following naming convention to auto-assign file names to captured video clips.
name-%YYYY-%MM-%DD@%hh%mm%ss
This way, every file name will be different since they will carry a different date and time code. You may simply copy this line into the textbox of Image File Name section for your convenience. Of course, you can rename the part “name” into something else if you like. For more naming options, you may click on the hyperlink “Refer to name rule description”.
If you want the video to be stored in root folder of the FTP account, then mark Upload path of the image file simply with “\”. To store it in another folder, use
 something like “\Camera-1\”. You may also use the variables in folder name. So
“\Camera-1%MM%DD\” would create a separate folder everyday to store images.
The last step of Event Handler setup is to create the rule that would define the period of time during which the Motion Detection is “on duty” and what should be the response when Motion Detection is triggered during “on duty” period.
Click on the rule ID 1 to define it.
| 9 | ■ ■ | www.acti.com |
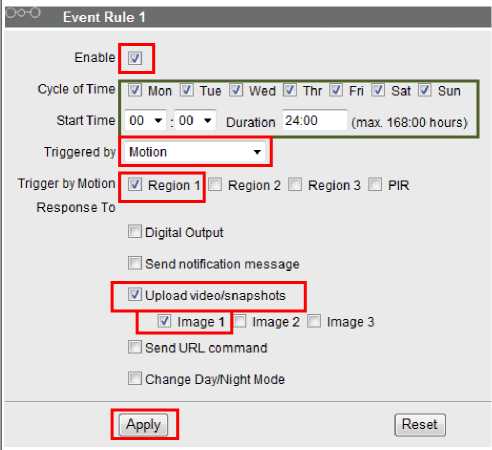
Setting up the rule is very simple – since we want the Motion Detection (MD) be “on duty” for 24 hours a day and 7 days a week, therefore you do not need to change the default settings for
Cycle of Time and Start Time. Keep them as they are. Just remember to “Enable” the rule itself!!
Choose “Motion” as the trigger type and specify it by checking “Region 1”.
Finally, check the “Upload
video/snapshots” and pick “Image 1” that you defined earlier.
 The whole system is now ready!!
The Motion Detector of the camera is now 24 hours on duty to detect any human motion and ready to stream video to FTP server when motion occurs.
Let’s go and try it out! After walking across the room within the view of the camera, MD will detect your motion and couple of seconds later you will be able to find the RAW video file in
The last thing you might wonder is how to do the playback of those RAW files.
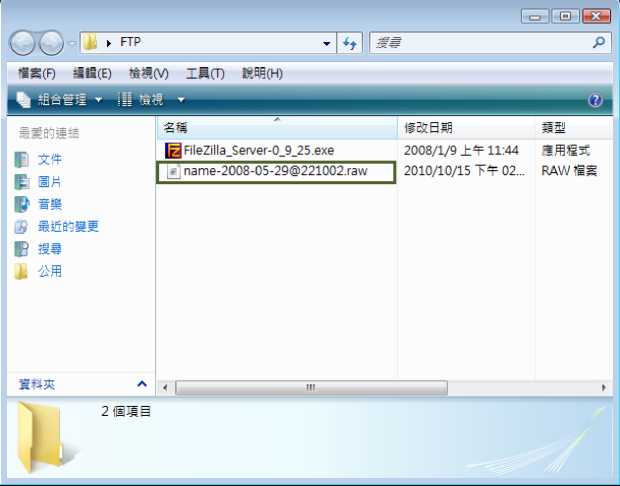
You may use either Archive Player from the ACTi Utility Suite or ActivePlayer from NVR (both free softwares).
If you do not have the Archive Player yet, you may download it from here: http://www.acti.com/product/detail/Application Software/ACTi Utility Suite
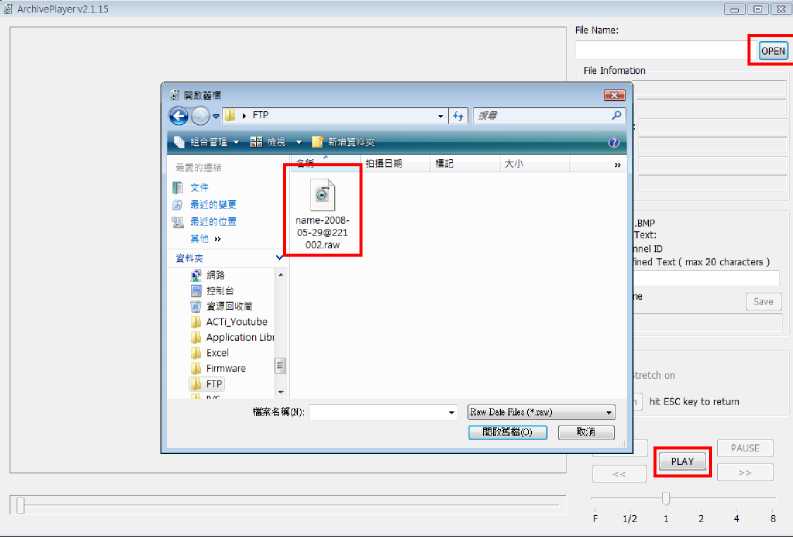
Run the Archive Player and press “Open” to select the video clip for playback.
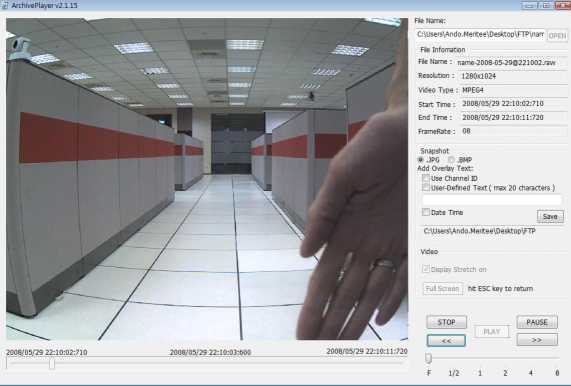
When you have found the video clip in FTP folder, you can start the playback by pressing “Play” button.
It works! You are able to see the video clip of the hand that was detected and triggered by the motion detection system.
As you see, the Event Handler can help you do basic video surveillance even when you do not have NVR installed.
If you want the camera to send snapshots to FTP server instead of video stream, then you can do it with one little change in “Upload video/snapshot”
panel – Switch the radio button from Video to Snapshot.
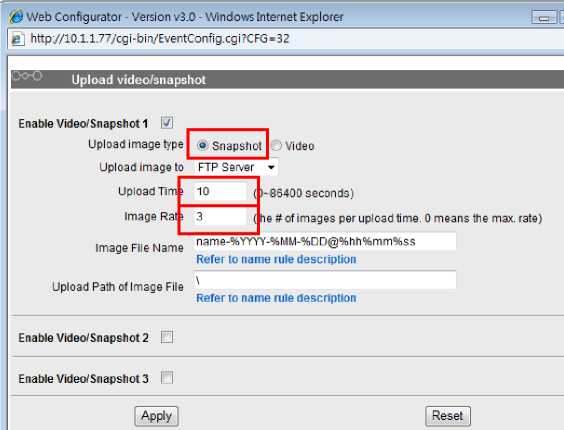
Based on the given settings, the camera will prepare 3 snapshots evenly within 10 seconds (the first image will approximately be captured on the 1st second of the event, the 2nd image on the 5th second and the 3rd image on the 9th or 10th second).
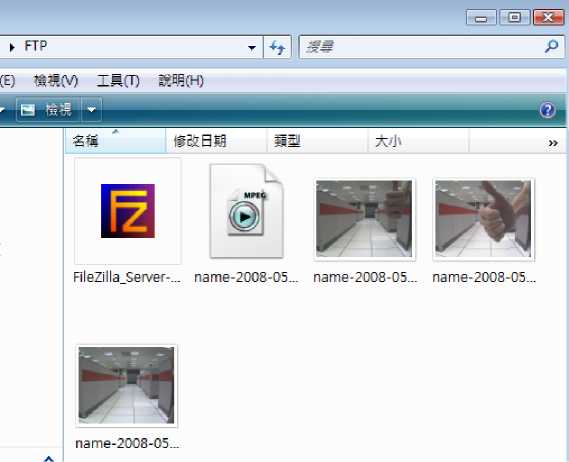
Now go to the camera, wave your hand to trigger MD event, and then go to FTP server’s folder to look for snapshots.
You can find the snapshots there!
One more thing:
If you want to manage your FTP files conveniently from another PC, then you may consider downloading the FileZilla Client program from http://filezilla-project.org/
Alternatively, you may simply use an existing web browser instead, just like when we were testing if the FTP server was working properly or not.
How to Manage Motion Detection Events by ACTi NVR
The events of the camera can also be handled by ACTi NVR. Since camera is continuously notifying NVR about the ongoing events together with the video stream, it is also possible to use NVR to manage those events instead of camera’s Event Handler if you like.
If you have already configured the motion detection system using camera’s firmware then you can skip this part in NVR. However, it is good to know that you can configure motion detection system through NVR user interface without logging in to camera’s firmware.
Configure Camera’s Motion Detection via NVR Interface
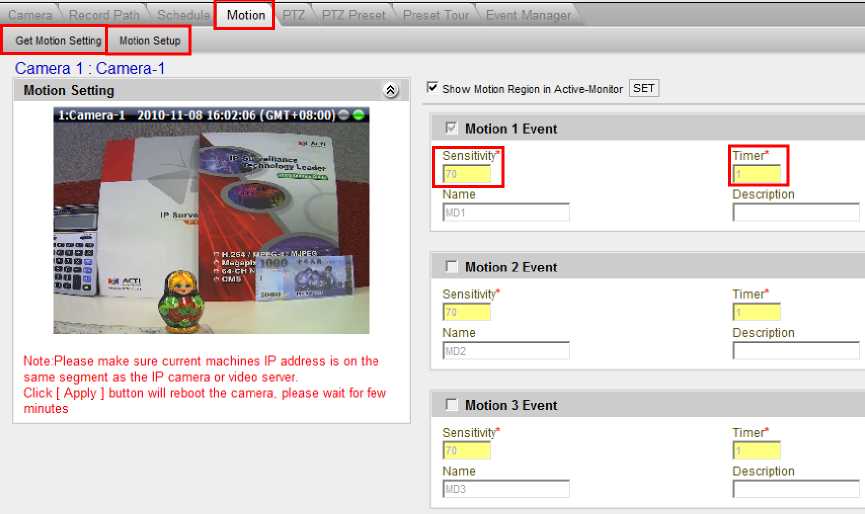
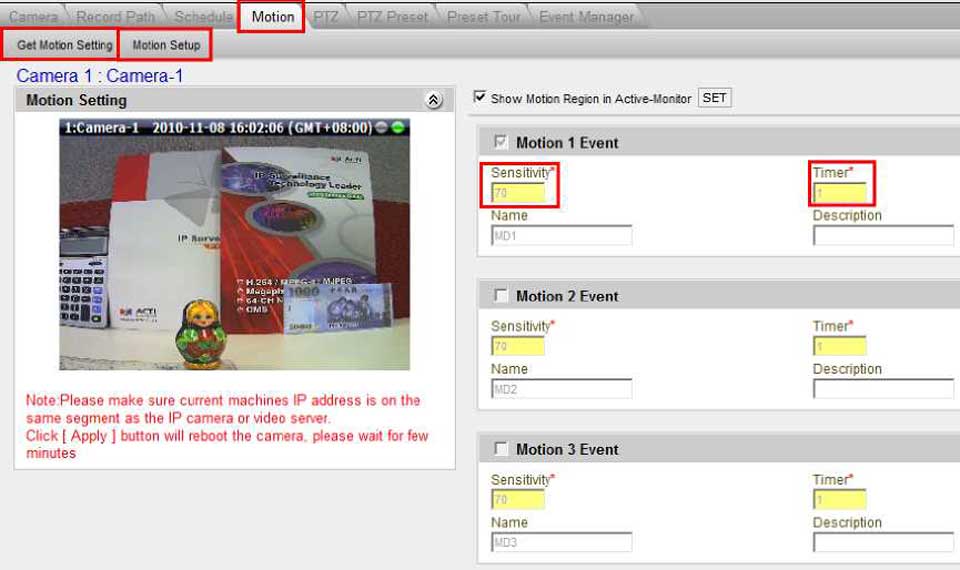
If you would prefer to use NVR to configure the motion detection system then follow the steps as shown below. Open Motion tab of the camera’s page in NVR and click Get Motion Setting followed by Motion Setup. After that you will be able to edit the fields of Motion Event.
Check the Motion 1 Event checkbox and adjust the sensitivity and timer settings. The word “timer” in NVR corresponds to the word “trigger interval” in camera’s firmware. Please note that the trigger threshold setup is not available in NVR, therefore the default value of 10% will be used automatically in case of NVR-based motion detection system setup. If you want to use threshold level other than 10%, then please use firmware of the camera instead.
The settings will be saved in both camera and NVR when Apply is pressed.
Event Manager Configuration in NVR
Once you have configured the motion detection as the event trigger either by camera’s firmware or NVR, you can decide the appropriate event responses. In this example, the event responses will be to activate digital output of the cube camera (turns on the light or opens/closes the door, etc) and notify the guard by playing audio file through the speakers of the NVR workstation PC.
Open the Event Manager tab and
click on MD1 and the action panel will
expand below it. Check the Action checkbox and start activating the event responses.
Check Trigger DO checkbox and set the timer value – for example 5 seconds. After that, select the Play Audio File and define the path to the wav-file in your PC. When setting up
Audio File, you must login from a
workstation installed on the same PC as
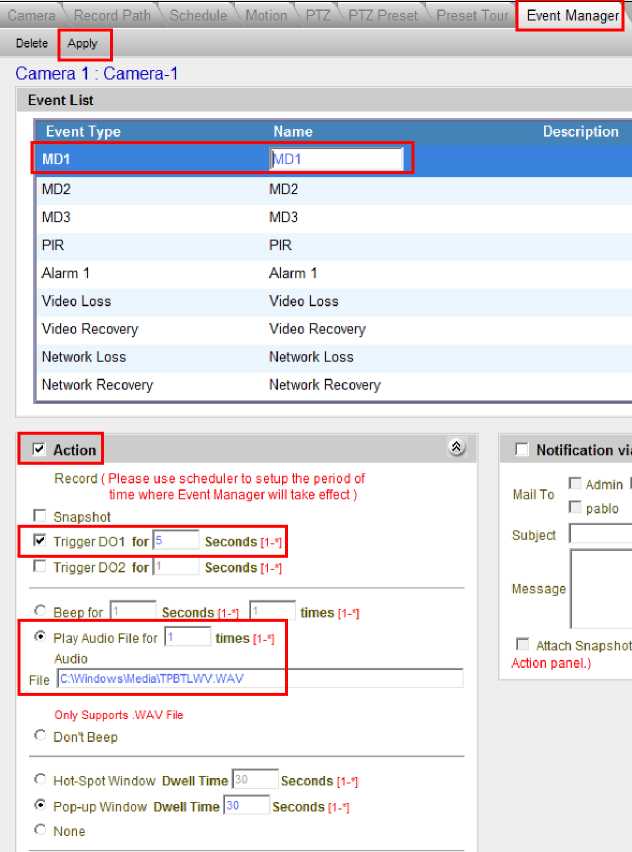 Server.
The settings will be saved when Apply is pressed.
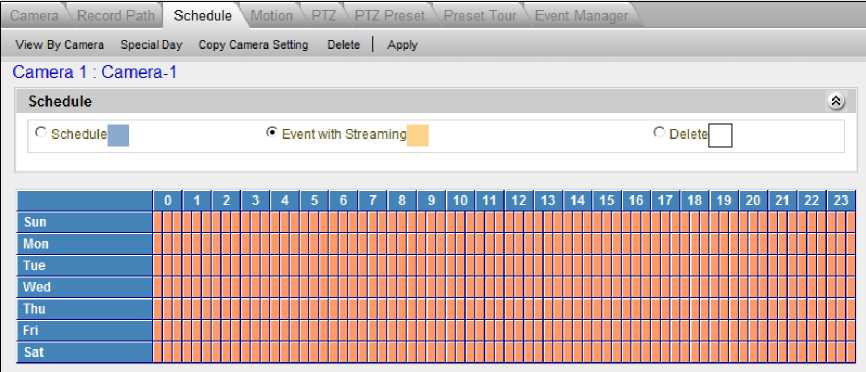
The last step is the easiest – just define the time range when you want the NVR to handle the events and record videos. Please note that you need to have either “Schedule” or “Event with Streaming” scheduling mode to make the alarm system work via NVR.
If you choose the normal “Schedule” mode then the NVR listens to the incoming events during all this time and keeps recording continuously regardless of the exact timing of the events during the given time period. In the “Event with Streaming” mode NVR also listens to incoming events during the time you defined (marked with orange color on the image below), however, it records videos only whenevents happen.
The image below shows how to set a schedule using “Event with Streaming” mode that is active 24 hours a day, 7 days a week:
The settings will be saved when Apply is pressed.
After these steps, close ActiveSetup and open ActiveMonitor – the motion detection solution is fully configured and ready to work! When human movement triggers motion detection region 1, there will be audio sound from the speakers of the PC that hosts the ActiveMonitor of NVR and the command to activate digital output will be sent from NVR to the camera automatically.

Appendix 1: How to Install FTP Server
If you do not have any FTP servers installed yet and you have never installed one before then the following example may be very helpful in learning about FTP server installation.
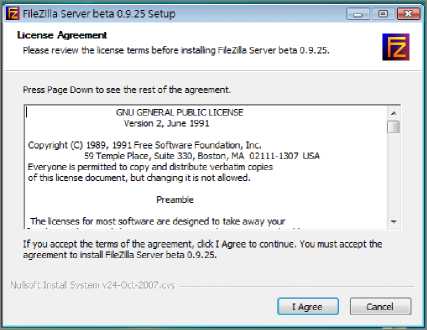
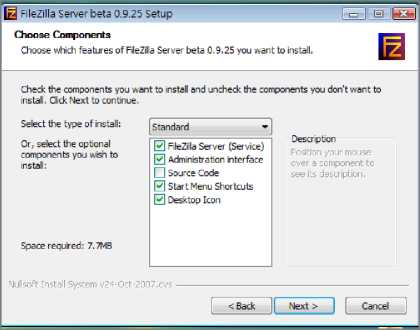
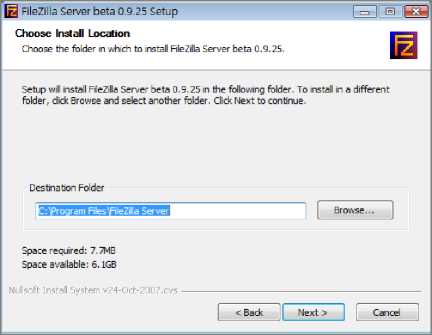
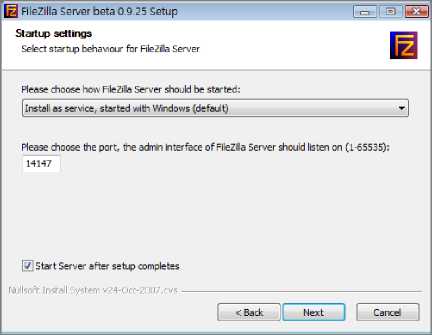
First of all, you may visit http://filezilla-project.org/ and download FileZilla Server setup file from there. Once you have downloaded it, execute the file in your computer – it will launch the Setup of the FileZilla Server.
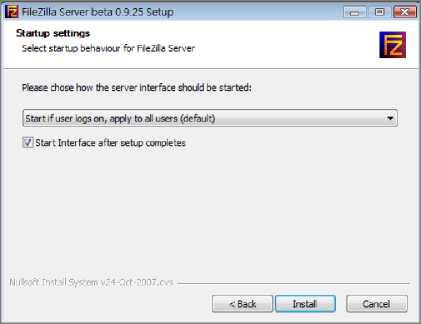
After reading and agreeing the License Agreement, simply use NEXT button all the way till the end of the set up process without changing any settings
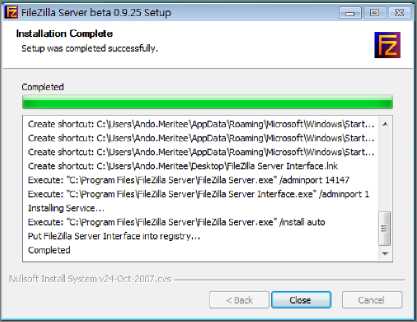
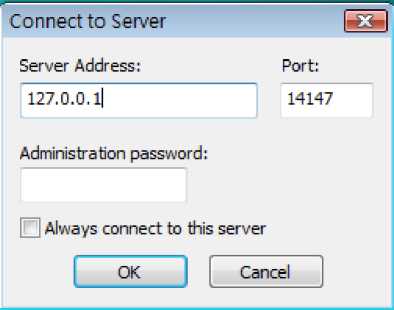
This window pops up right after the end of the installation. The purpose of this window is to allow you to define how the FTP administrator would access the system part of the FTP server. Since it is your own PC anyway, just leave everything as it is – no need for password here. Just press OK.
After that, you will be redirected to the FTP server administrator’s page. In this page, you can create accounts and their permissions to certain folders of this PC.
Click on the icon to add a new user.
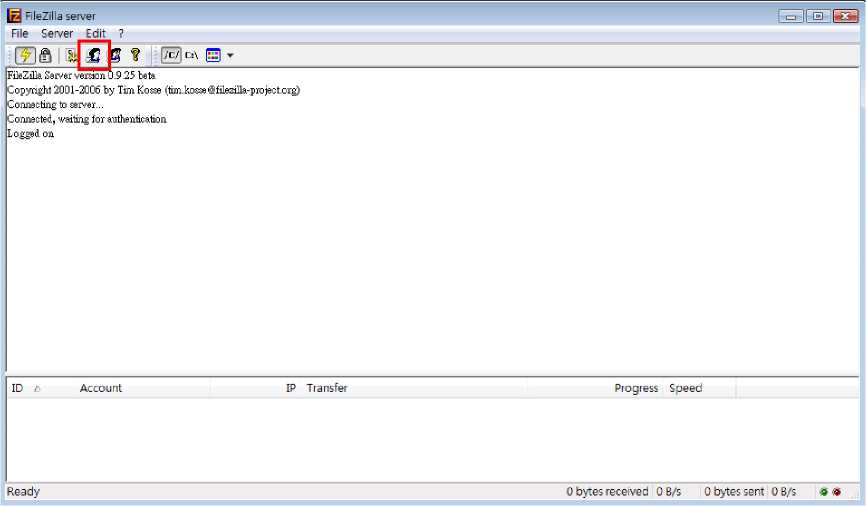
Click on the “Add” button below Users area and type the name of a new user and press “OK”.
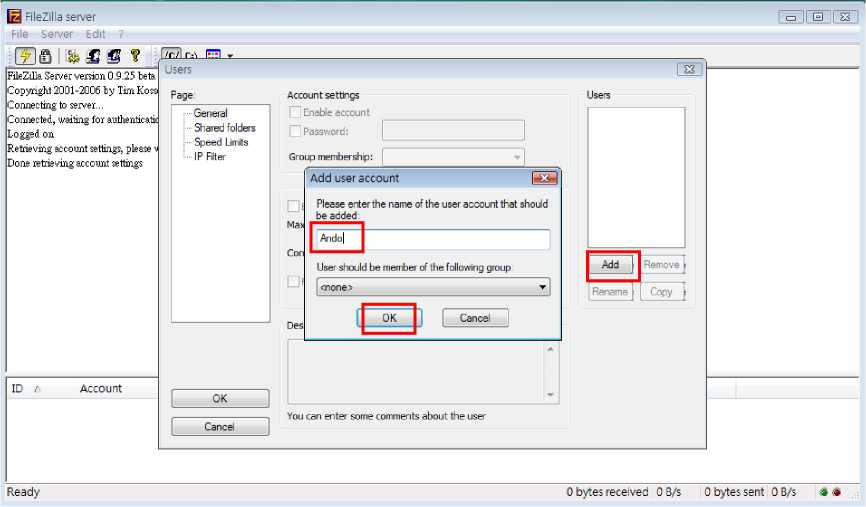
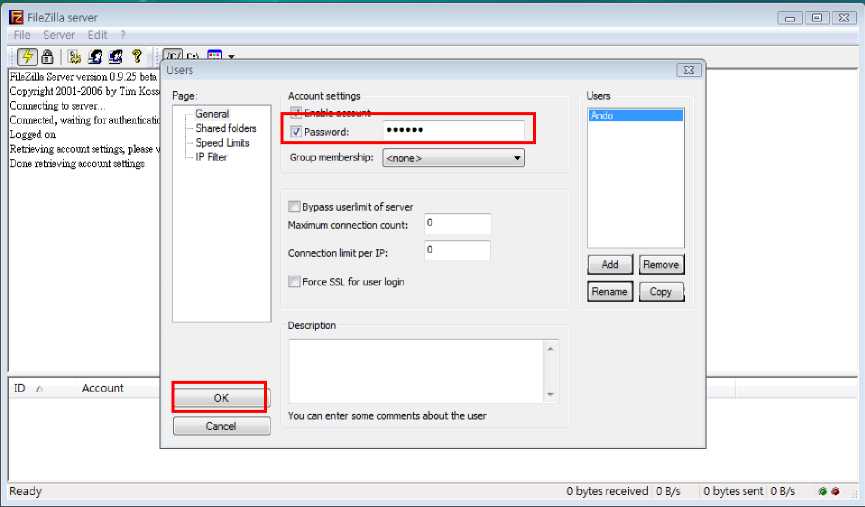
After pressing “OK”, the name will be added to Users list. Now you can add a password for the user by checking the Password area and typing any password you like.
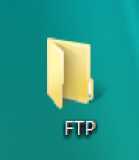
The next step would be to assign permissions to access certain folders of given PC for that new user. You could, for example, first create a new folder to your Desktop, named FTP.
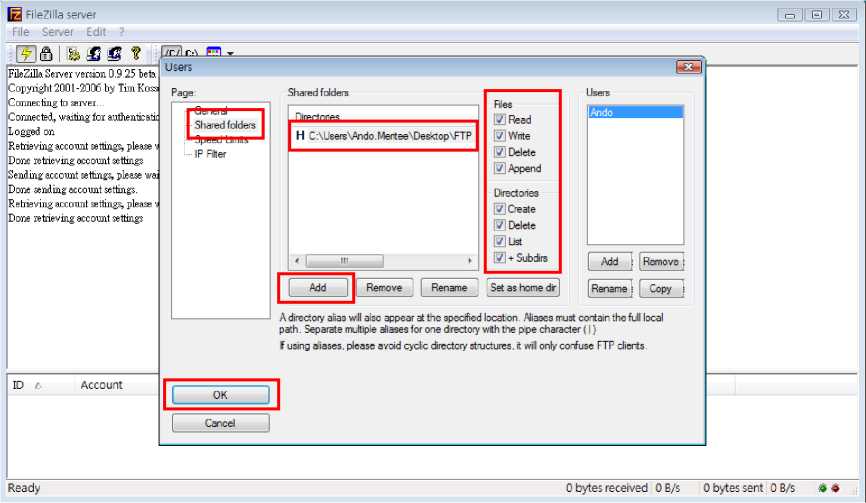 created.
Now, click on “Shared folders” and press “Add”, to show the path to the new FTP folder you just
When you see the new path appearing in window named Directories, then please remember to give the full permissions for the user to work with the files and subfolders within the FTP folder.
When done, press “OK”.
The FTP Server has now been fully configured. How to test if the FTP server and the user account actually work over the network?
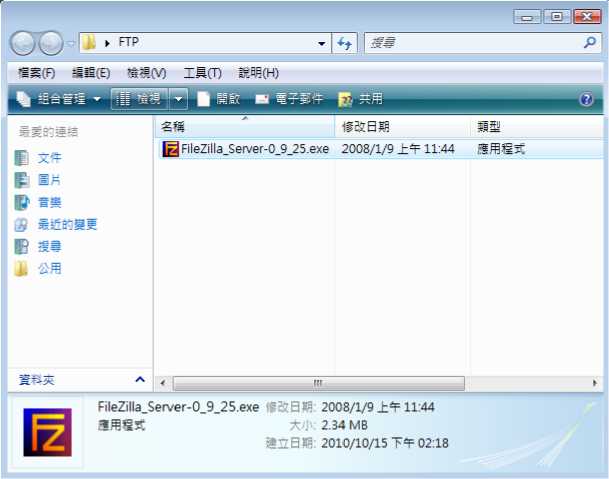
For testing, copy one sample file into your FTP folder – for example, the installation file of the FileZilla server itself. Then use another PC in your network to access this FTP server. In this example, the local IP address of FTP server PC is 10.1.1.36
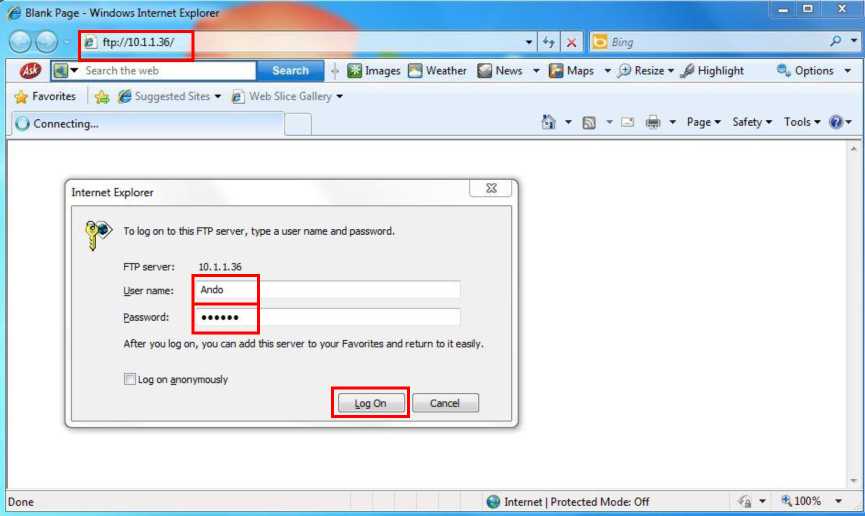
From another PC with the IP address 10.1.1.24 the testing connection to FTP server can be done simply by using any web browser, typing the following into address bar:
After that you will be prompted to type user name and password.
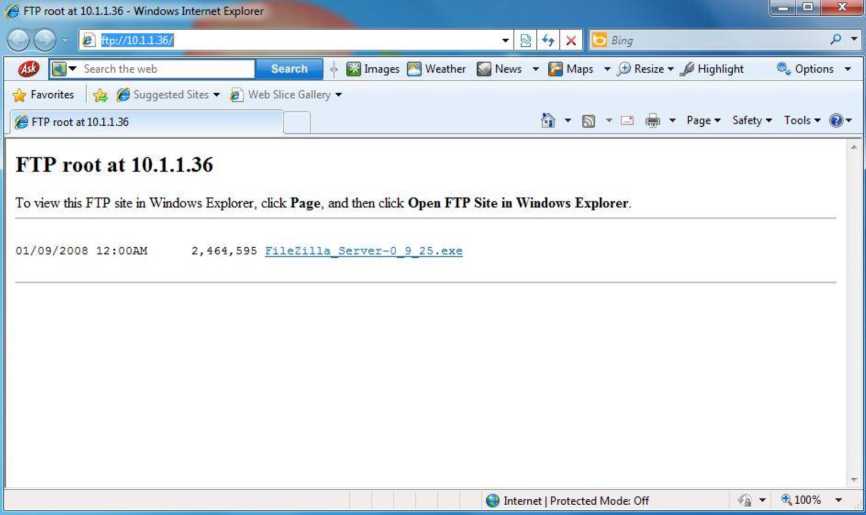
Upon successful login, you will see the contents of the folder that the user has permissions for.
The FTP server part has been fully configured and validated. You may now use this FTP account information in the configuration page of Event Handler of the camera or in NVR Event Manager.
Appending 2: Questions and Answers
Q: Under which settings is the motion detection system available in the camera?
A: The table below illustrates the availability of motion detection system depending on the chosen compression type and the GOP length. GOP length shows after how many P-frames the next I-frame occurs. GOP=1 would mean that there are no P-frames at all and every frame is an I-frame. For more information about GOP please refer to ACTi Knowledge Base at: http://www.acti.com/KB/detail.asp7KB ID=KB20091209001
| Compression | GOP length | Motion Detection Available | |
| Platform A | Platform T | ||
| MJPEG | – | Yes | No |
| MPEG-4 | 1 | No | No |
| Anything but 1 | Yes | Yes | |
| H.264 | 1 | – | No |
| Anything but 1 | – | Yes | |
Q: Why the NVR sometimes does not respond to motion activity shortly after one motion event has already occurred?
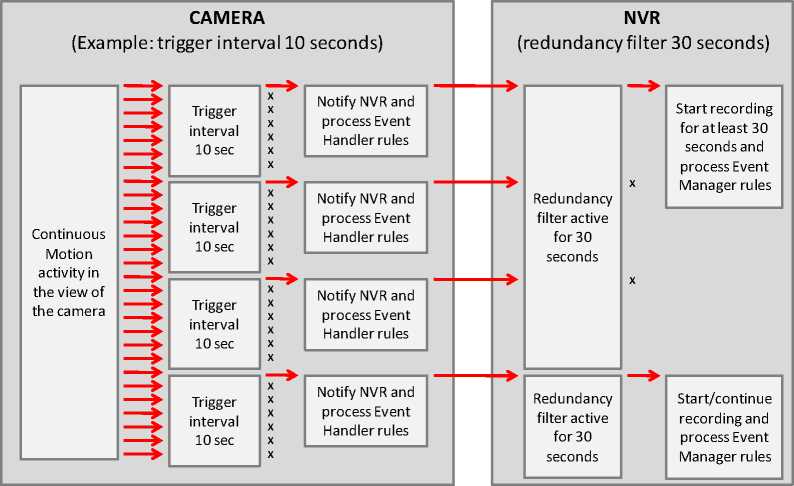
A: In addition to trigger interval setting of the camera that defines the period of time during which the camera does not send out redundant alarm notices, there is also a similar built-in redundancy filter on the NVR side – when the NVR receives an event from the camera, it will ignore redundant events from the same camera for following 30 seconds and only then it will be ready to accept new events again.
So, let’s say the camera’s own trigger interval is 10 seconds and there is a constant motion in front of the camera. In such case, the event will be first triggered in the camera, including notifying NVR and taking actions through Event Handler, followed by the 10 second pause before camera will respond to possible events again. When the 10th second passes, camera will have an alarm again if there is still a motion in front of the camera, and the camera will notify NVR and process Event Handler again.
However, in this case, NVR will ignore this event purposely in order to avoid redundant alarms of the same intrusion incident. Since NVR event based recording system records at least 30 seconds of video clip, therefore there is always the video evidence of the whole period during which NVR ignored redundant alarm messages.
The following chart illustrates how the filters act in both camera and NVR side.
Time
Motion event notice
Notice cancellation by filter

Thanks for great info I was looking for this information for my mission.